
Cassie Stephens's Blog, page 28
October 12, 2019
Sketchbooks in the Art Room!
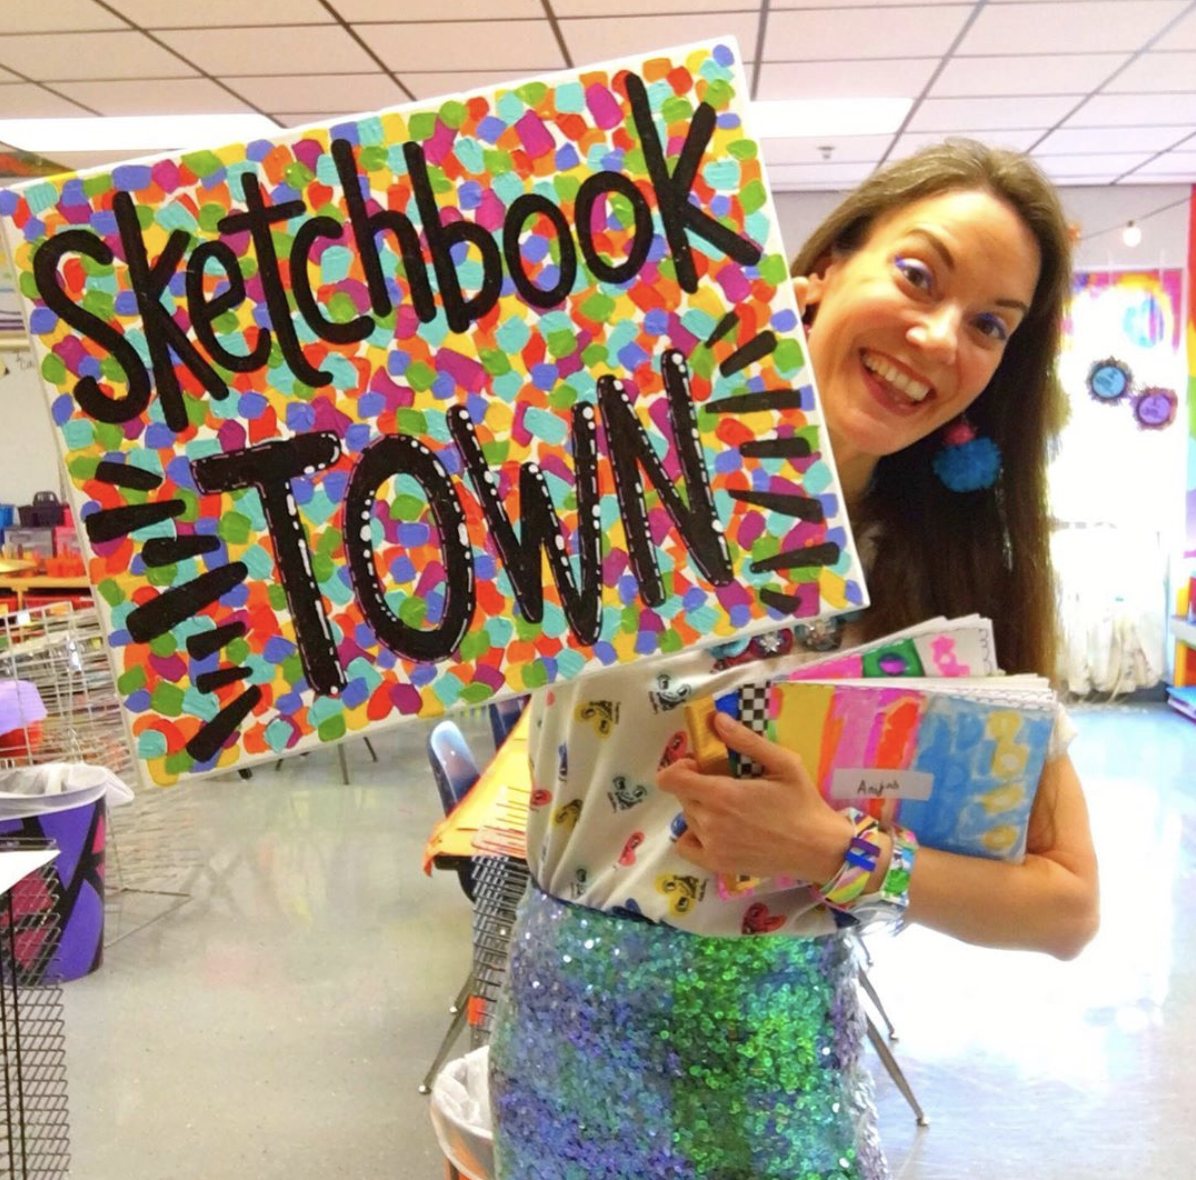 Here we go, trying sketchbooks once again in the art room! This time around, I'm calling it Sketchbook Town. If you'd like a tour, then here you go:
 My face says it all, don't you think?!
 To kick off sketchbooks, we created our covers! We used 18" X 6" pieces of drawing paper, paint sticks and these decoder sheets. More information (and a download of those sheets!) can be found here.
 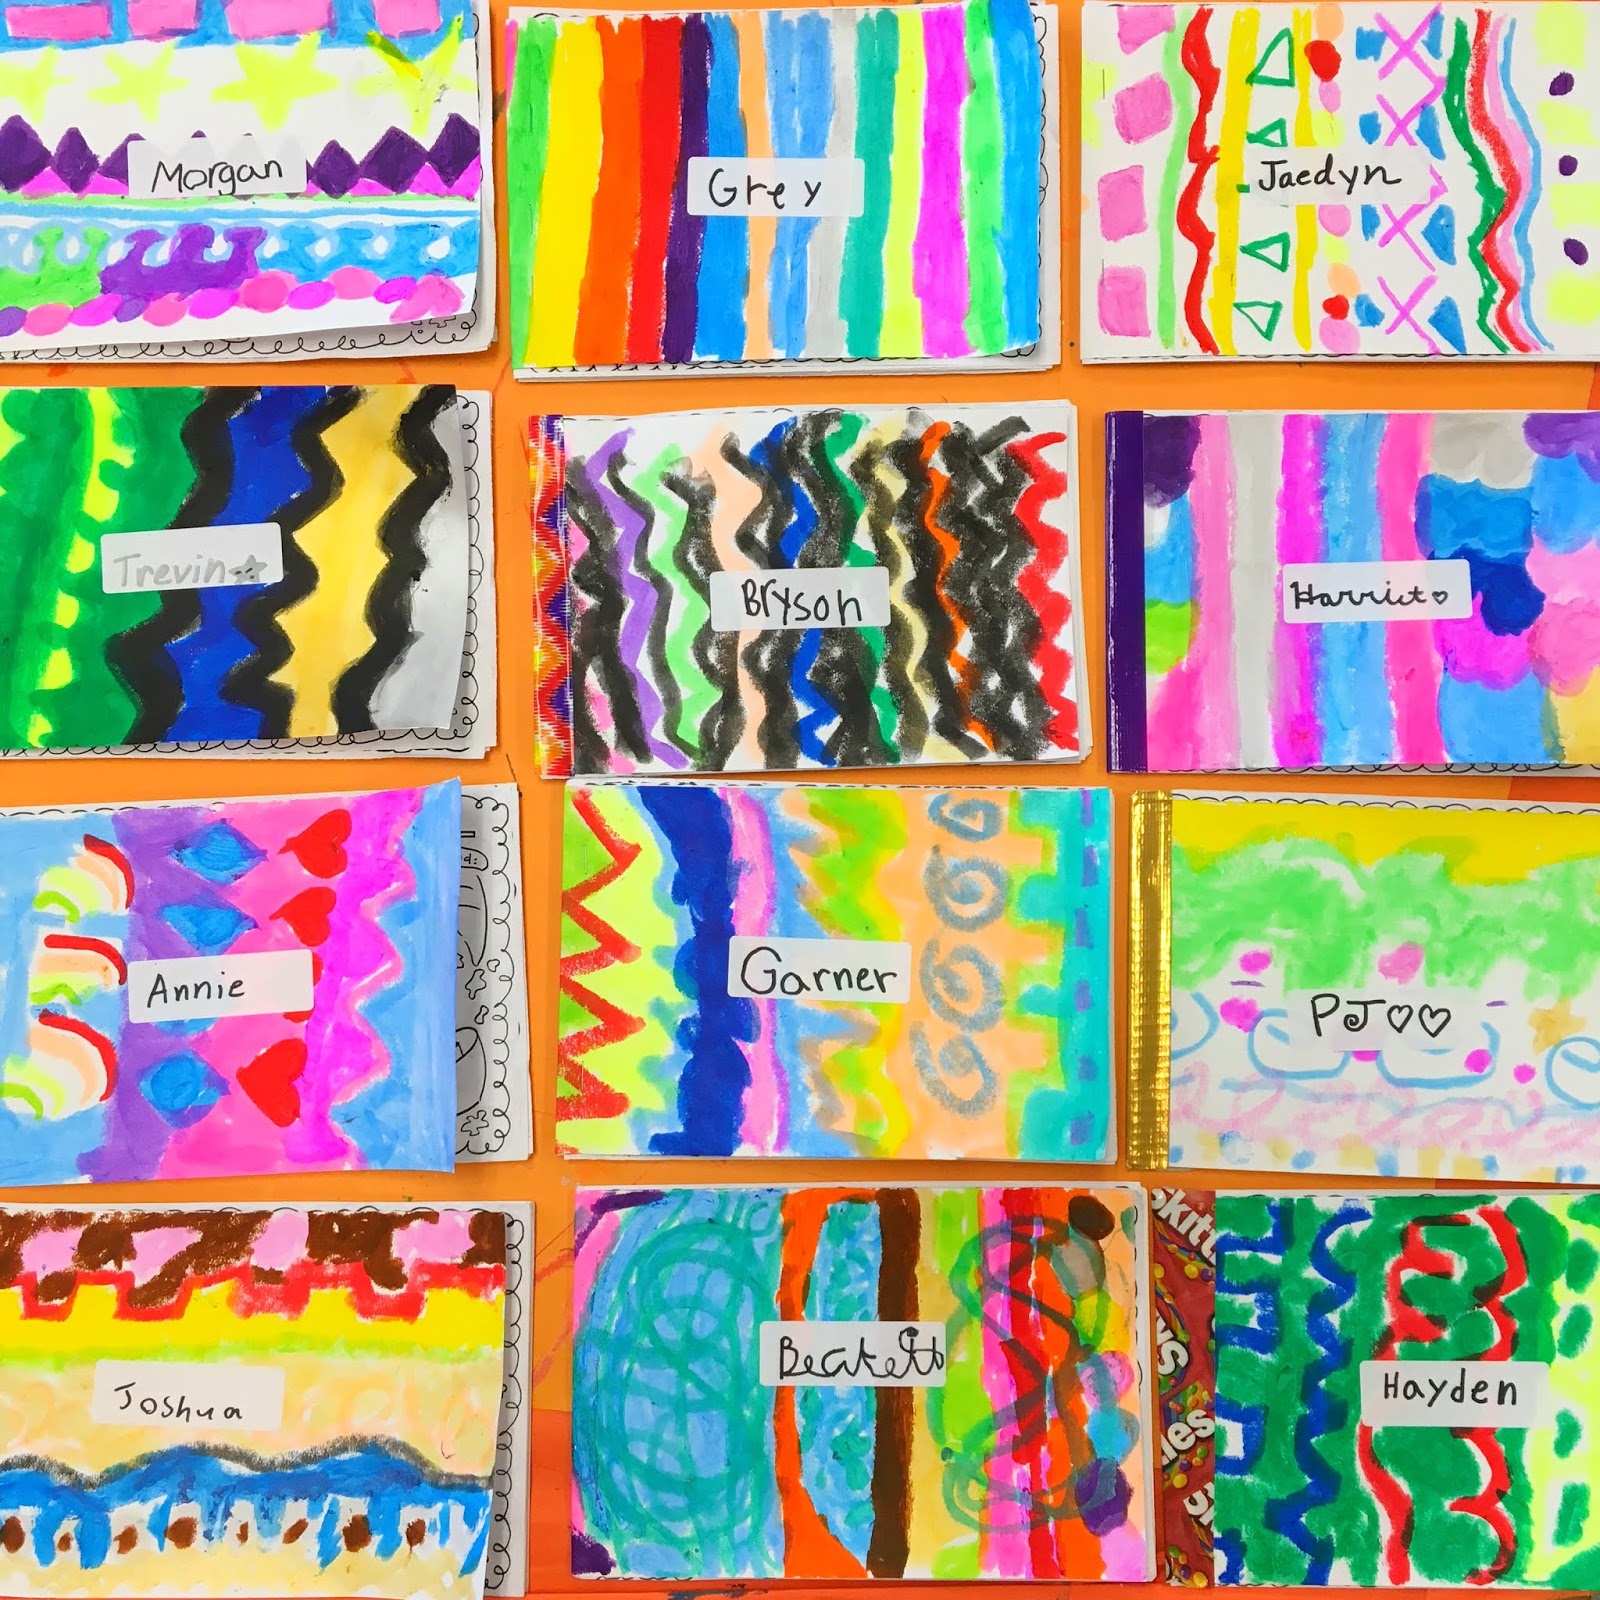 Inside each sketchbook are six handouts that I created for my students. I'll be sharing these soon. My students are loving them! Also included are 10 sheets of 6" X 9" pieces of drawing paper.
 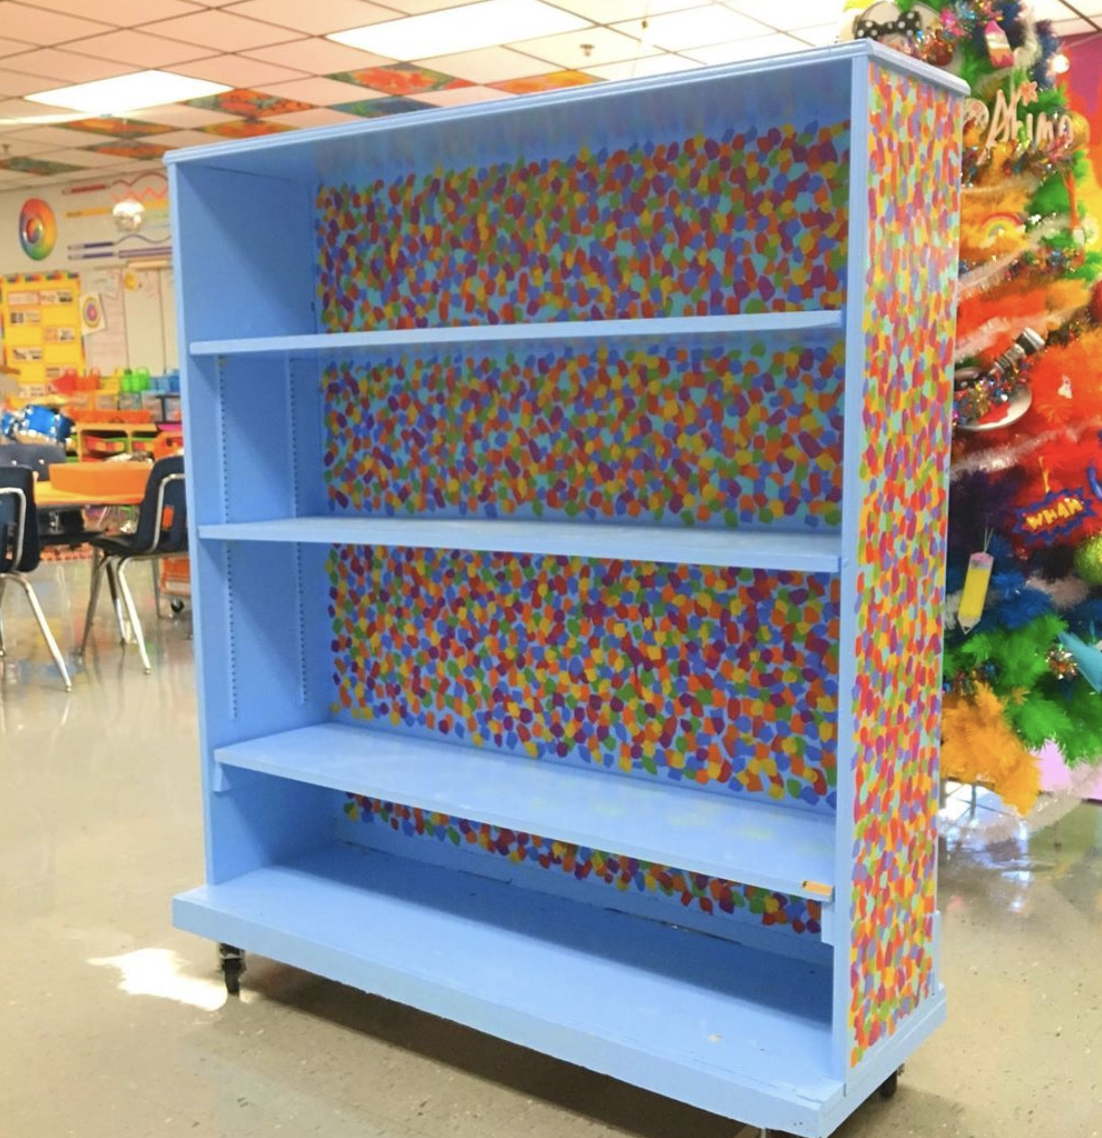 In the past, the problem with sketchbooks was storage and accessibility. Where would I store them? How would I make them easy to access? How will the kids know when they can sketch? AND what will they do in their sketchbooks.
 SO MANY QUESTIONS! Let's start with storage. I began by painting this abandoned cabinet I found in an unused classroom. More on how I painted that right here.
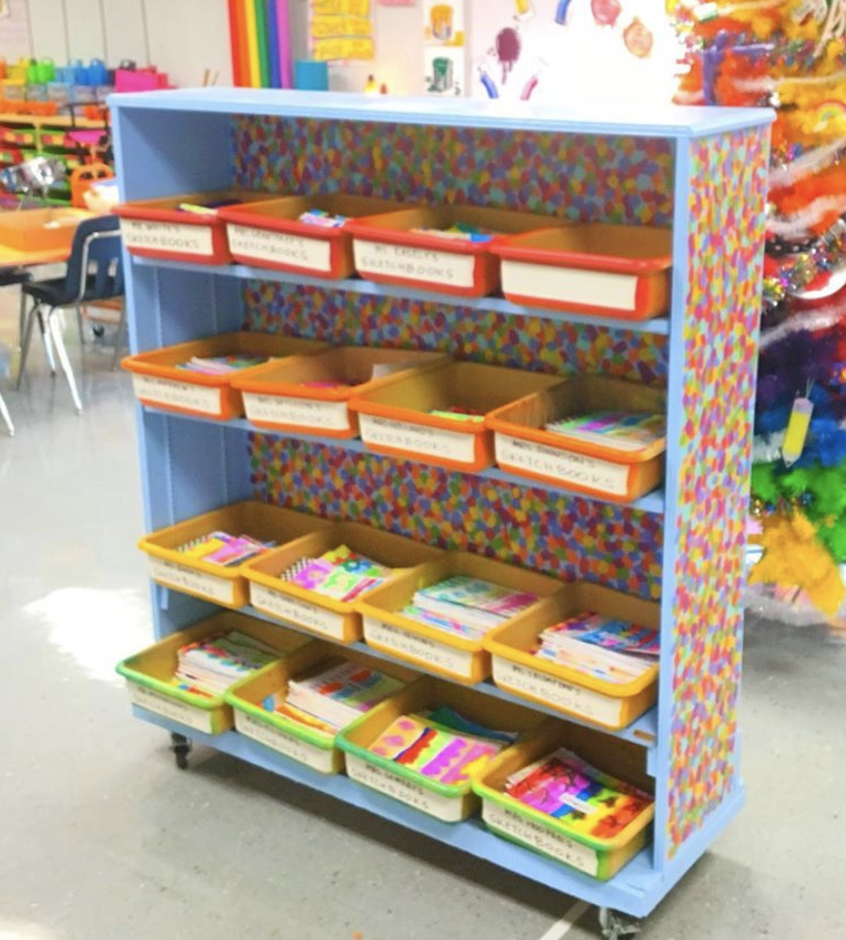 The cabinet only came with four shelves but I'm thinking of having more made as this seems like a whole lot of wasted space. But, for the time being, each shelf holds a different grade level. Now, I do work in a small school with just 4 classes of each grade (with only 3 of fourth grade!). That means sketchbooks for me are a little more doable. However, the whole 30 minute art class does make it kind of tricky. All that to say, we all got our struggles, right? Here's my solution to one of em: storage.
 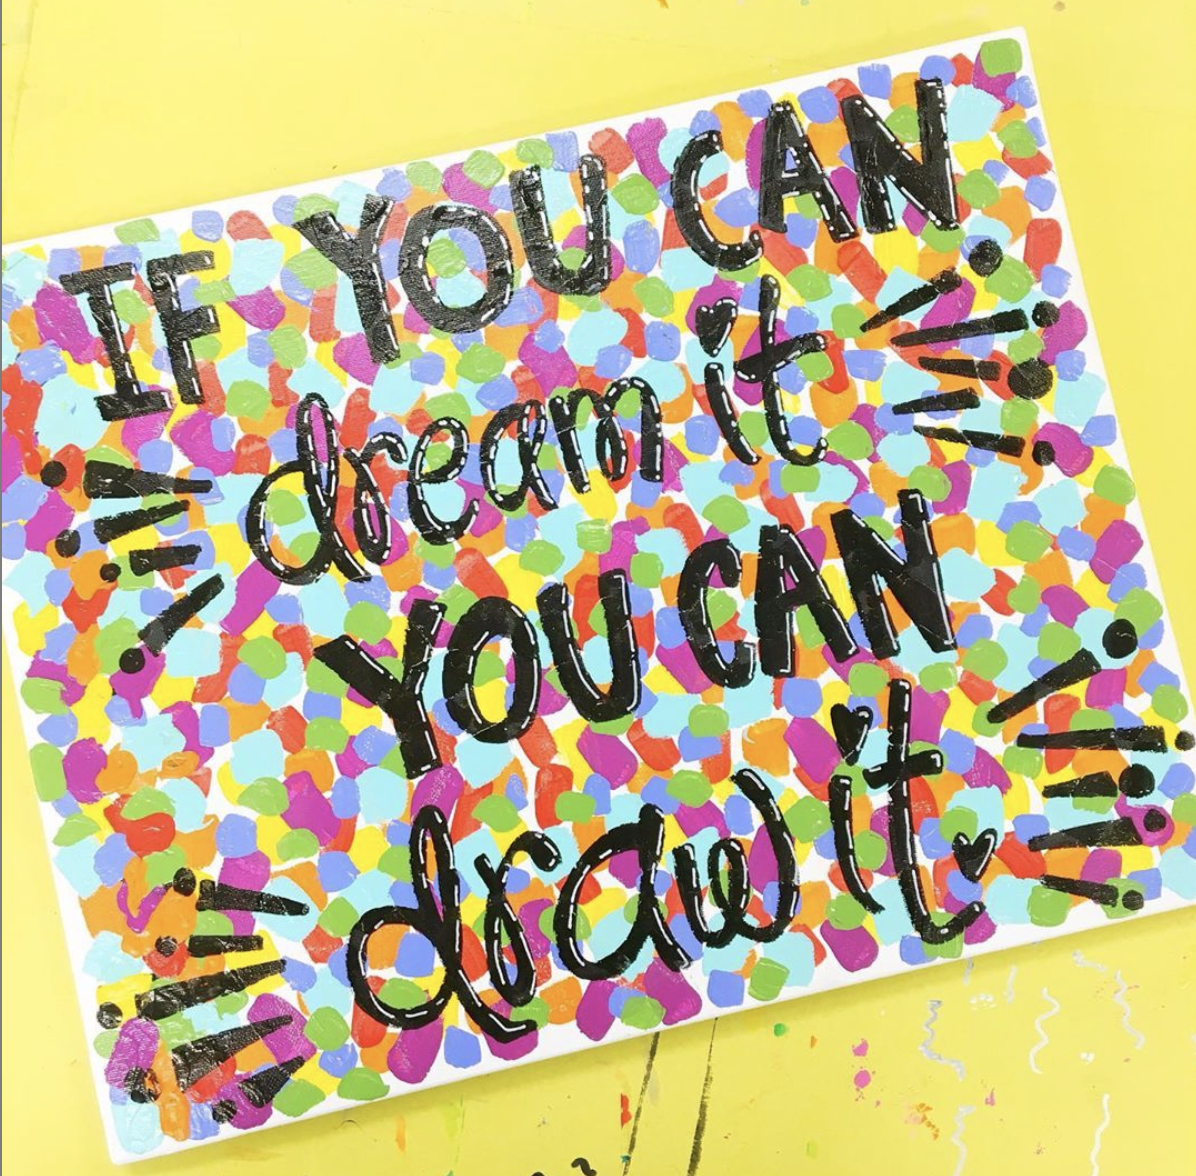 Fun fact: if I find a blank surface, I'll paint on it. Usually after a long day at school. While Netflixing. Back to Sketchbook Town!
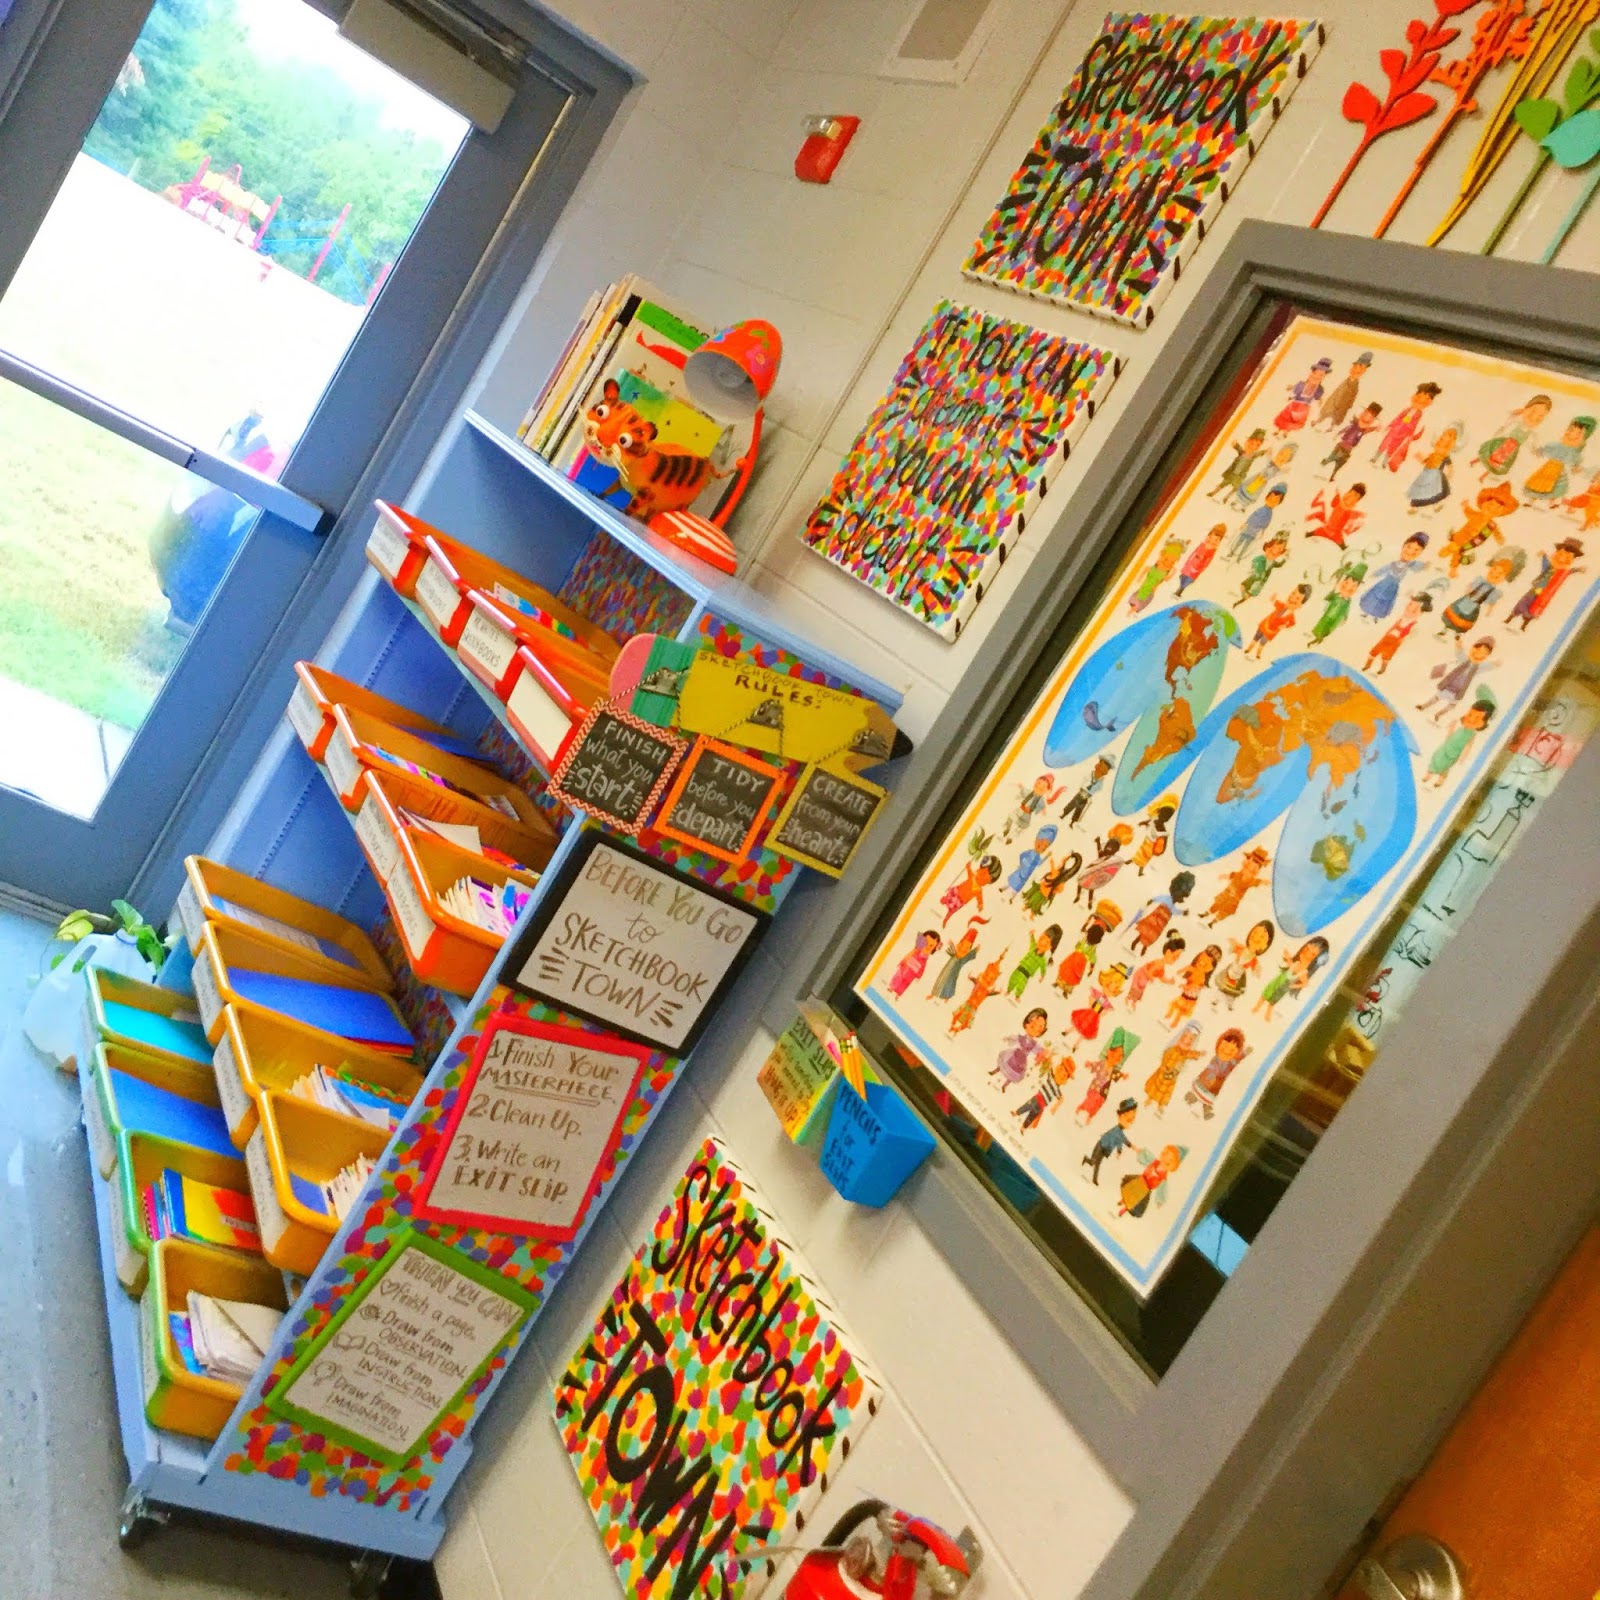 I decided to place the cabinet in a rather strange place: right next to the door that leads outside. It works here because it is close to all of our sketching supplies (which I'll get to in a minute). Here you can see the set up.
 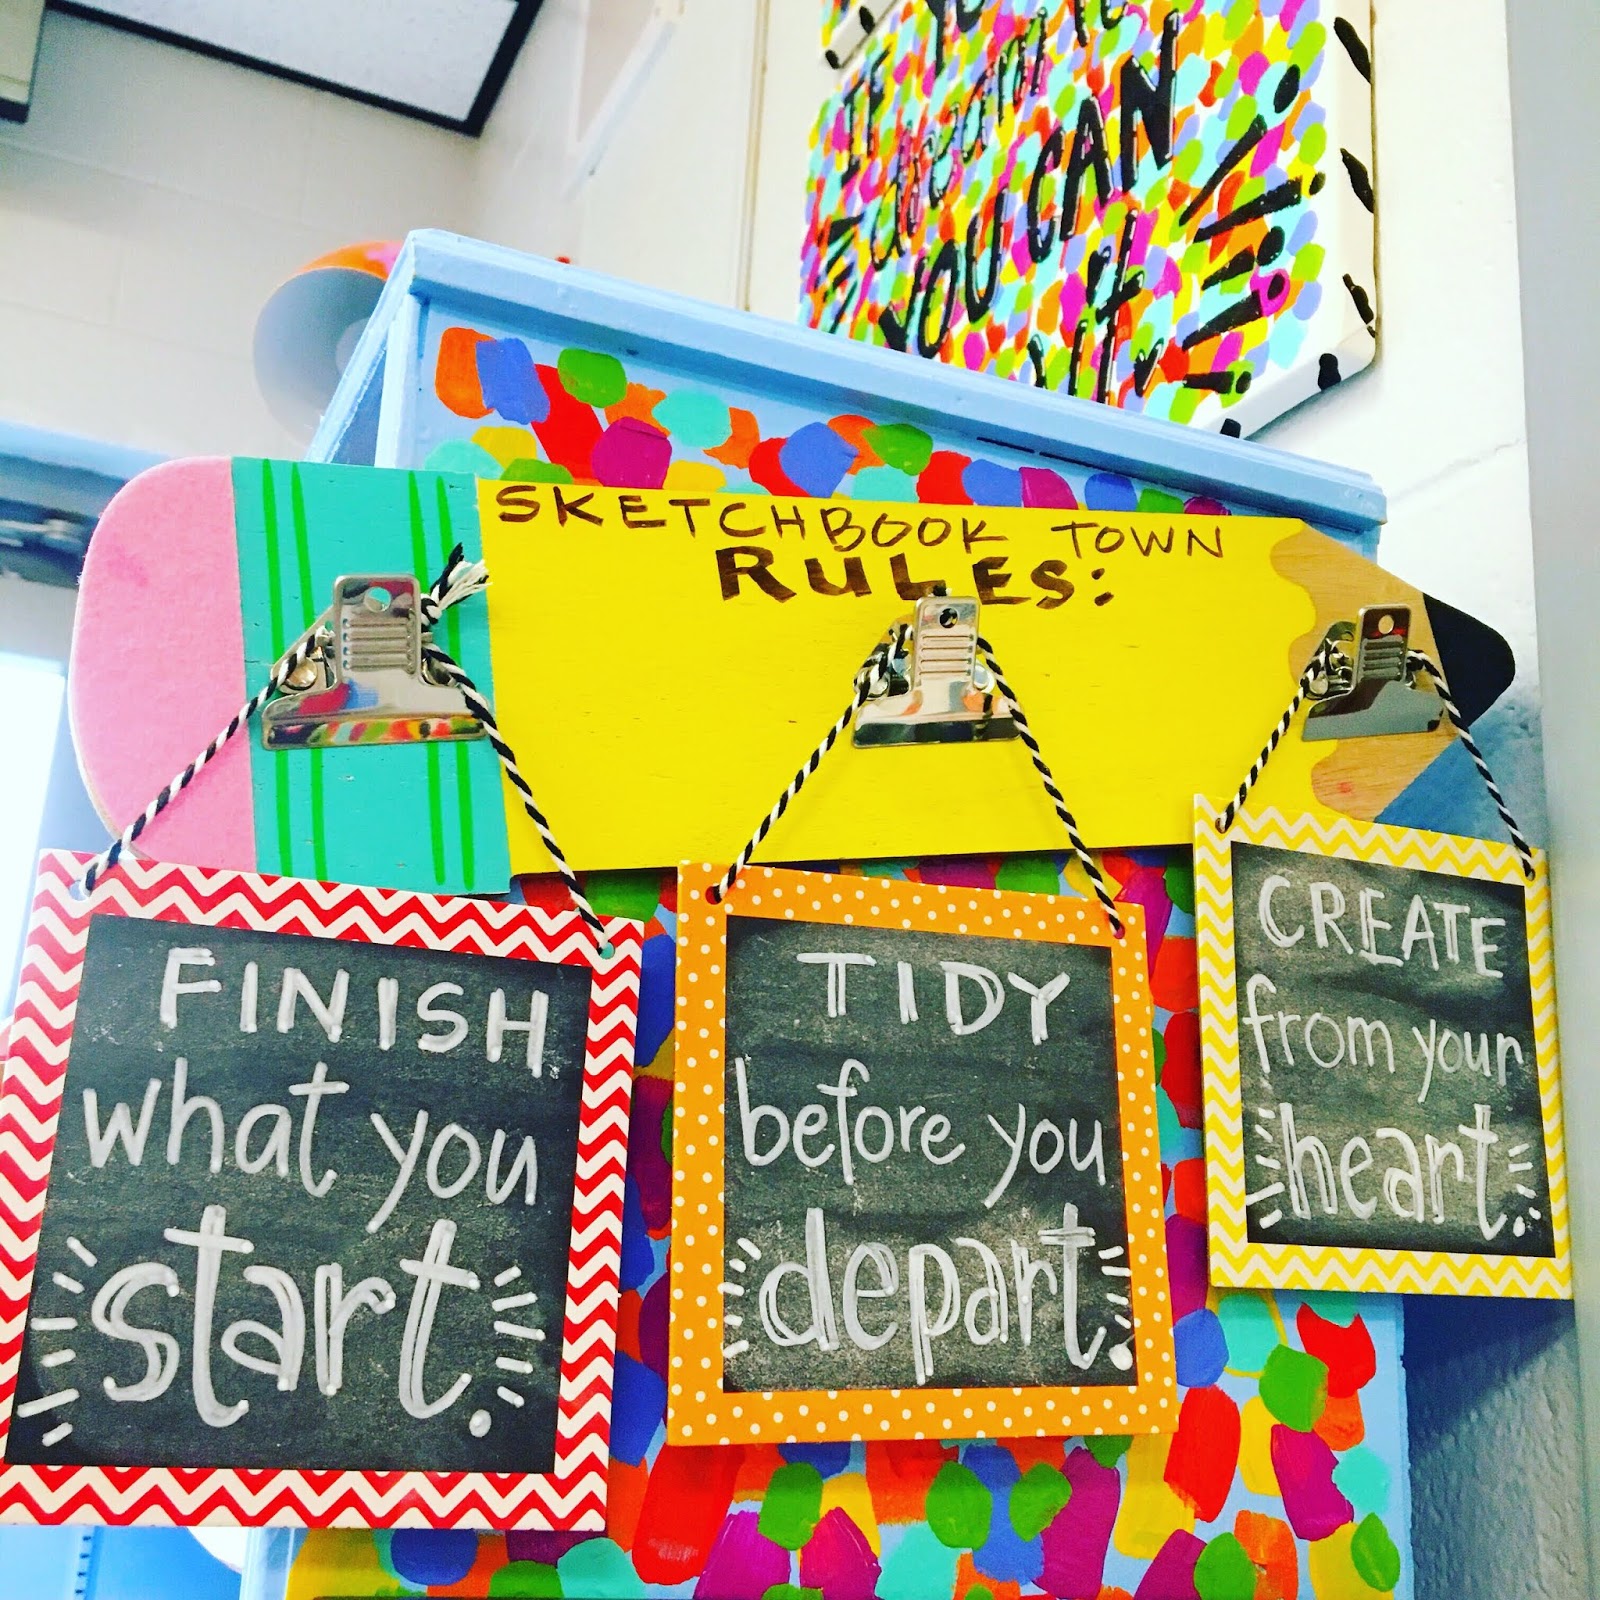 This week, I came up with three rules for sketchbook down. We've had a bit of a "soft opening" over the last month. This has helped me see what issues we'll have in Sketchbook Town...and these were some of them. Finishing too quickly and leaving my S.T. a bit of a mess. NO MORE, artists. No.More.
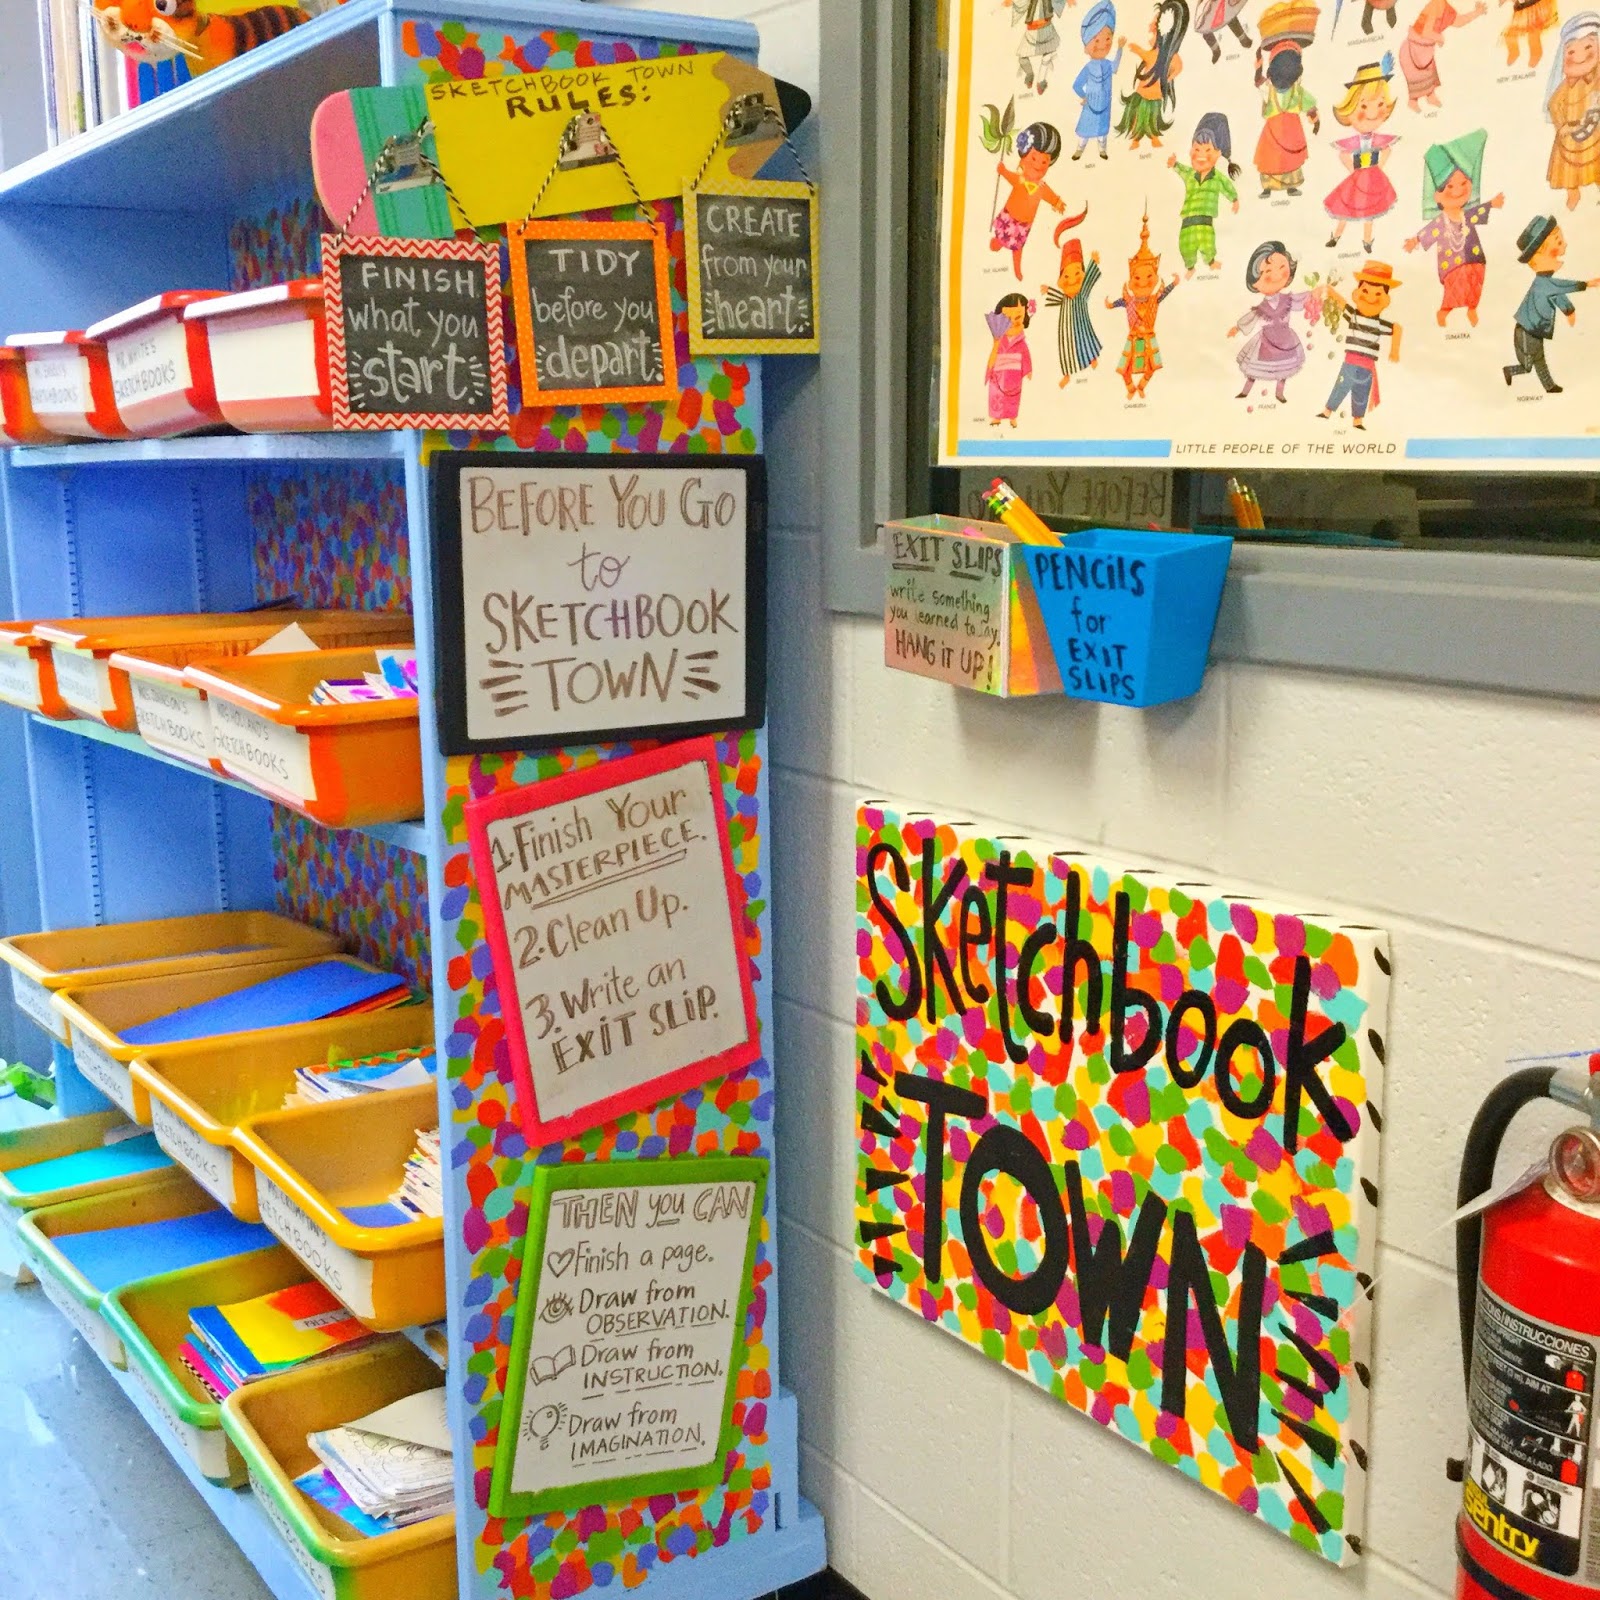 To insure that my artists are ready for S.T., they gotta follow those steps: finish their work, clean their area and write an exit slip (more about that in my video). Then they are free to draw from observation, instruction or imagination!
 I'm hoping to expand this area of options but for now, I'm happy with it. If you'd like to see more, be sure and check out the video.
 Welcome to Sketchbook Town!


October 10, 2019
Simple Embroidery for Day of the Dead
 Last Friday, I hosted a Halloween craft night and it was a whole lot of fun. We created super simple embroidery and needle felted decorations. My theme for mine was Day of the Dead but, since I was hosting a bunch of art teachers, I decided to just share the basics and leave the options and creativity up to them. Here's what they came up with:
 So fun, right?! After sharing these images on my Instagram, I got a lot of questions about embroidery and needle felting basics. This project is all about the basics so I thought I'd create a little easy-peasy tutorial for you and the crafty folks in your life. I do believe children as young as 7 years old could handle this craft with you by their side. Here you go:
If you are not familiar with Day of the Dead and would like to read more, you might want to start here.
 Supplies needed:
* Embroidery hoop (ours were about 6" wide)
* Fabric (scraps work great for the background!)
* Embroidery floss
* Embroidery or chenille needle
* Craft store felt in a variety of colors
Optional:
* Wool Roving
* Needle felting tool
* Needle felting cushion
 Instead of needle felting, you could always just glue on flowers, jewels or Halloween decor! The fun part on craft night was having a ton of supplies on hand for everyone and just seeing what all they could dream up!
 I like to keep my Calaveras (skulls) in the hoops and then hang them that way. I have a Halloween Tree (yes, I'm that person) and they look so cute on there.
 I hope that tutorial helps. Have a wonderful time creating!
If you like this, you might want to grab MY BOOK, right here!
October 7, 2019
In the Art Room: Teaching Line (and more!) to Kindergarten
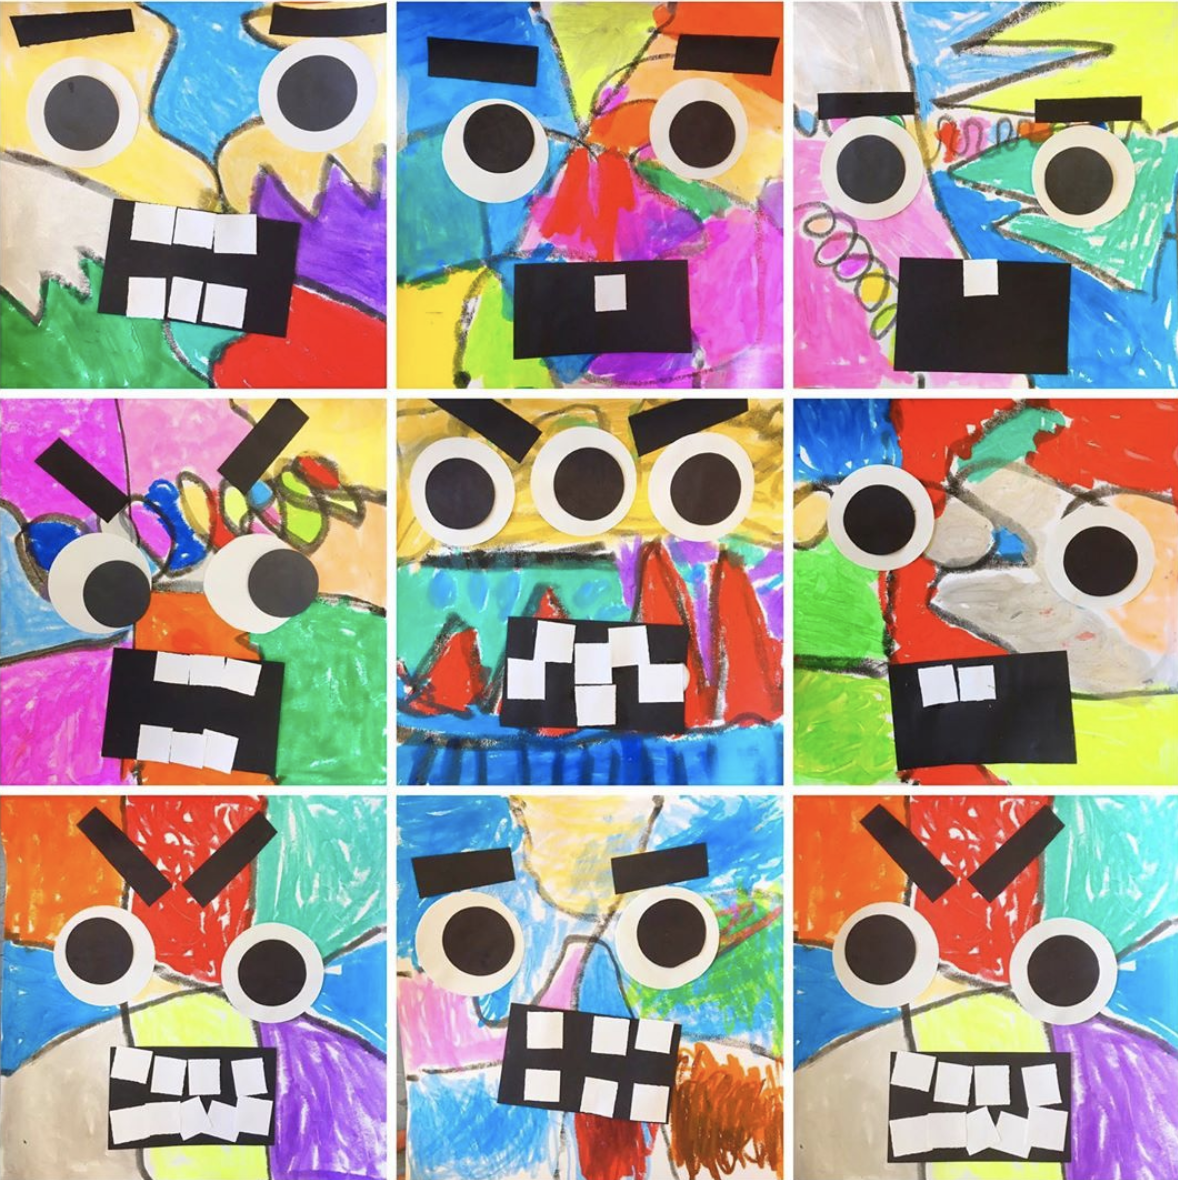 Hey, y'all! I've been sharing a lot about my kindergarten friends here lately as I feel as though that it a weakness of mine...and just might be a weakness of yours. While I LOVE teaching kindergarten, I find that I often drop the ball when it comes to teaching them my routines. I know they have a shorter attention span and I love to get them creating when they come to art. It's my weakness and it's something I'm working on...because when I don't, I tend to make those same faces as shown above.
 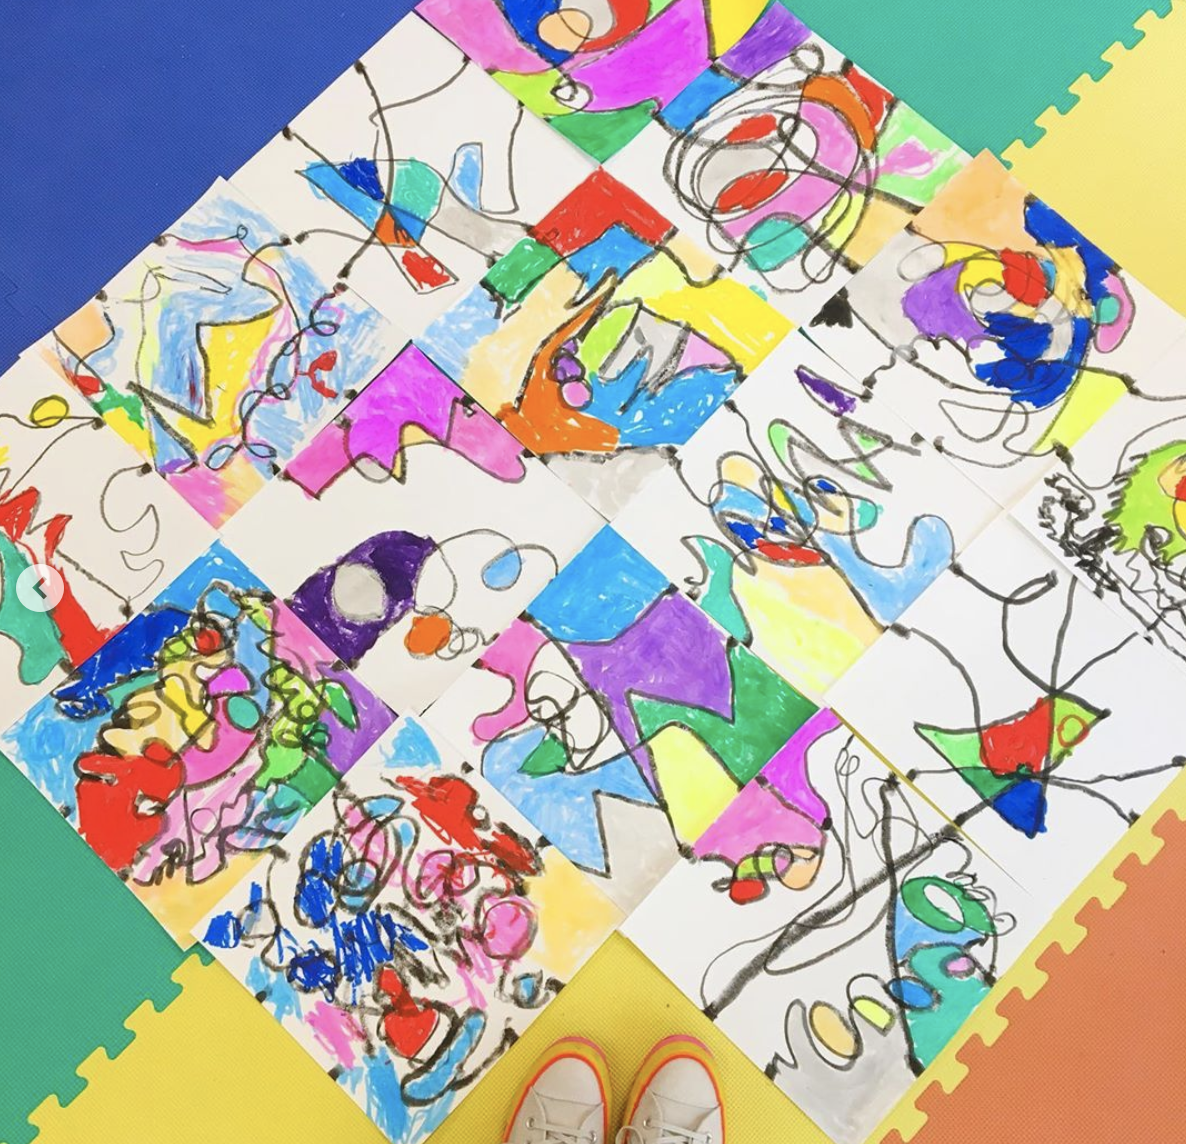 One of the most popular posts on this blog was the one I wrote on my Kindergarten Line Unit. It has a ton of lessons, poems and info if you have not checked it out. And while I still do many of the lessons from that unit, I decided to change it up a bit this year with a little Line Game for my kindergarten's first line study. Here's how it worked:
  Before the kids arrived, I cut paper into 12" squares. Then I added two black dots on each side of the paper (you can kinda see them now, right?). Then, working with the person seated next to them, they were to pick a start dot and their neighbor was to pick their end dot. Then they had to take their line for a walk from one line to another. When all the dots had lines, they had to go on a shape hunt. Lines make shapes! They had to find those shapes and color them in. We used paint sticks to fill in the shapes.
 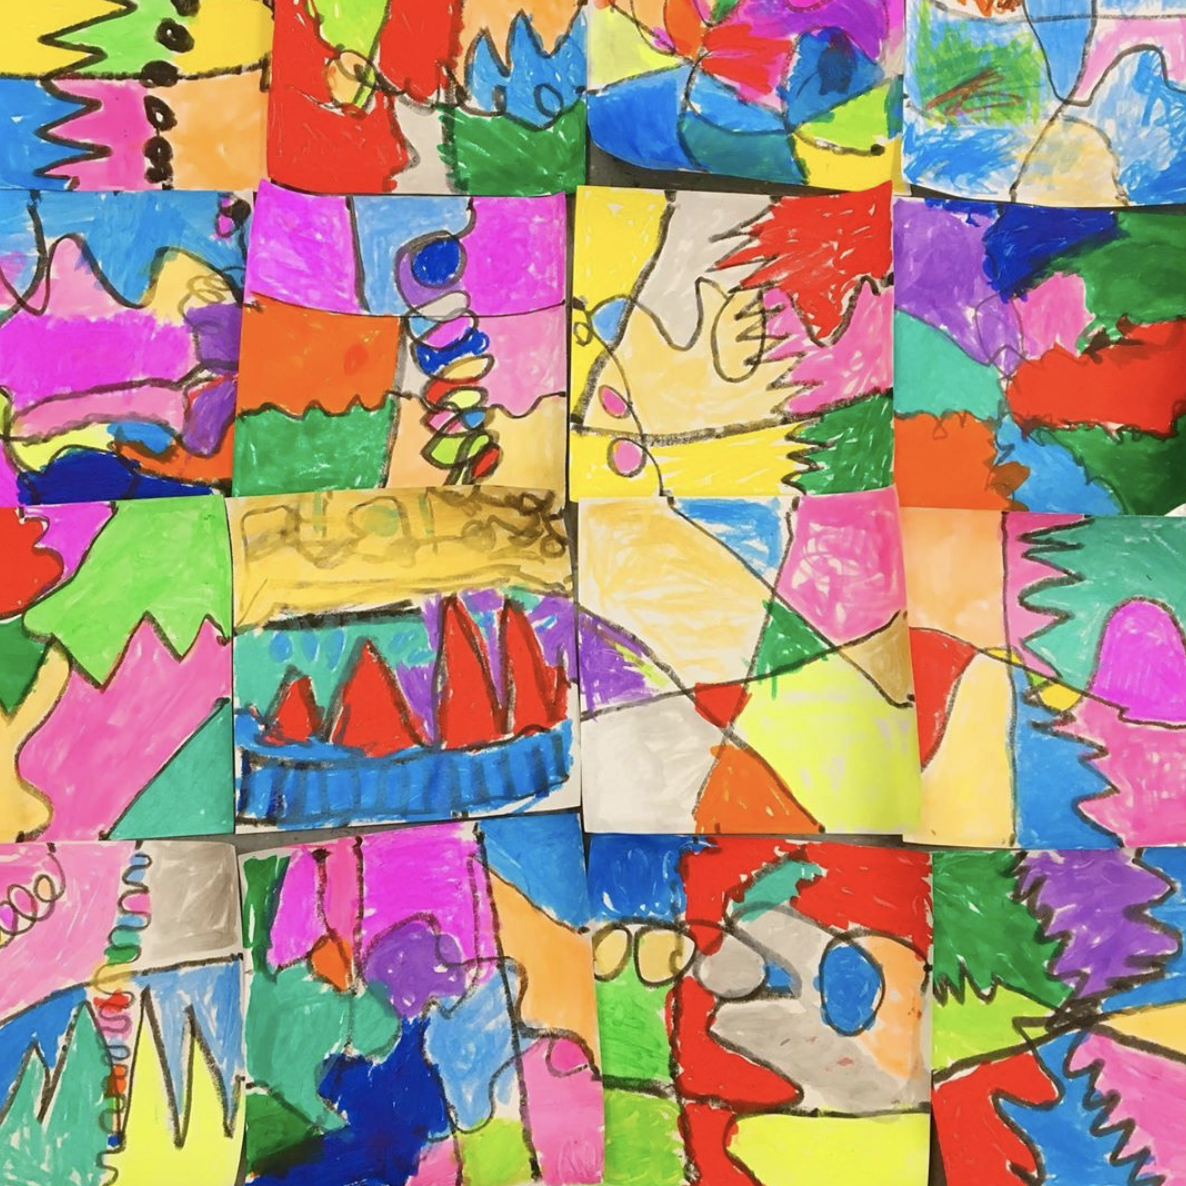 I loved their final results. One the third 30 minute art class, we learned about collage and created the shape monsters you saw at the start of this blog post. They LOVED that! Here's a little video from one of those art classes:
And if you'd like to see more videos like this or hear my podcast episodes about my dear kindergarten friends, you can hop over here.
October 6, 2019
In the Art Room: Favorite Fall Art Lessons!
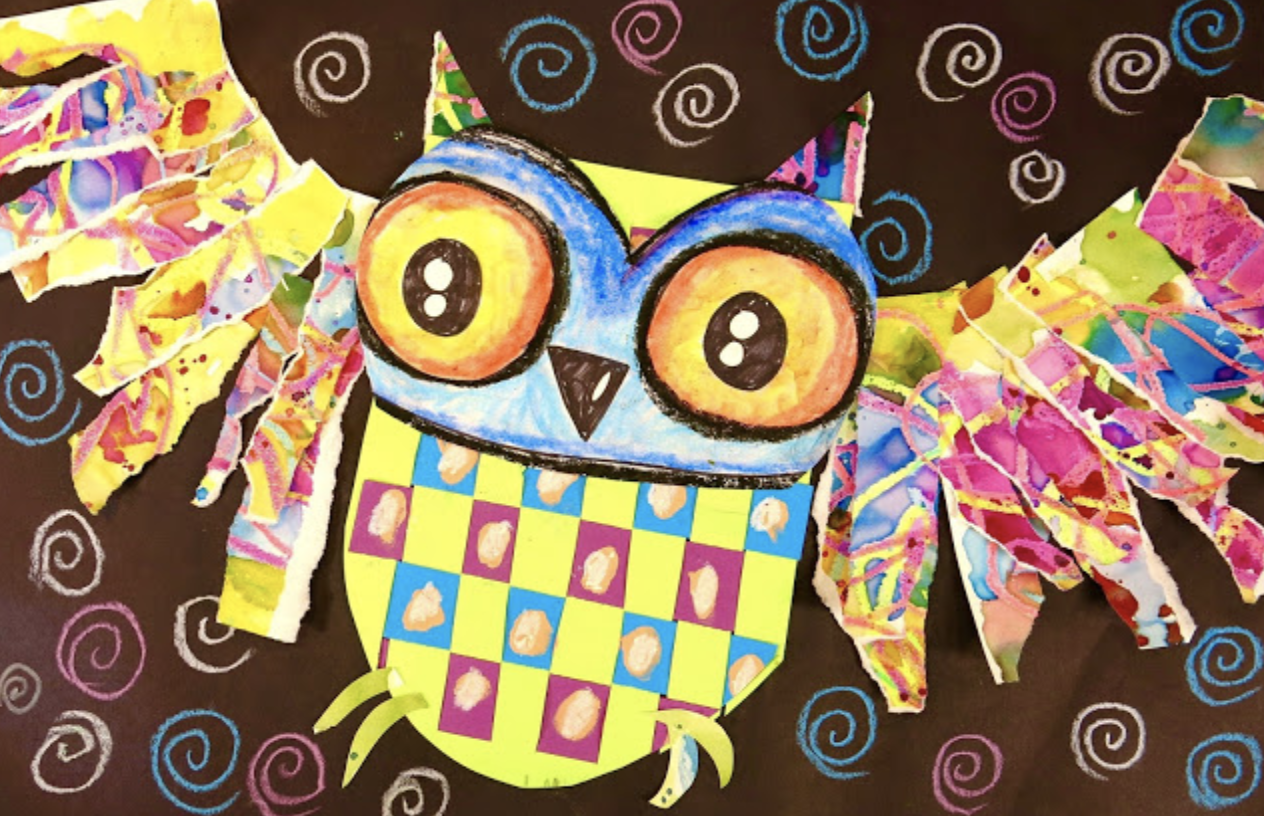 Hey, y'all! It's finally fall-ish feeling around here and I thought it would be the perfect time to share with you some of my very favorite fall art lessons! If you follow the links, most of these lessons include videos for you to use in your art makin' world. To kick it off, here is a fave fall lesson of mine: First Grade Woven Owls!
 I love this weaving lesson so stickin' much! You can find all the details both in my fibers book or right here in my blog post!
 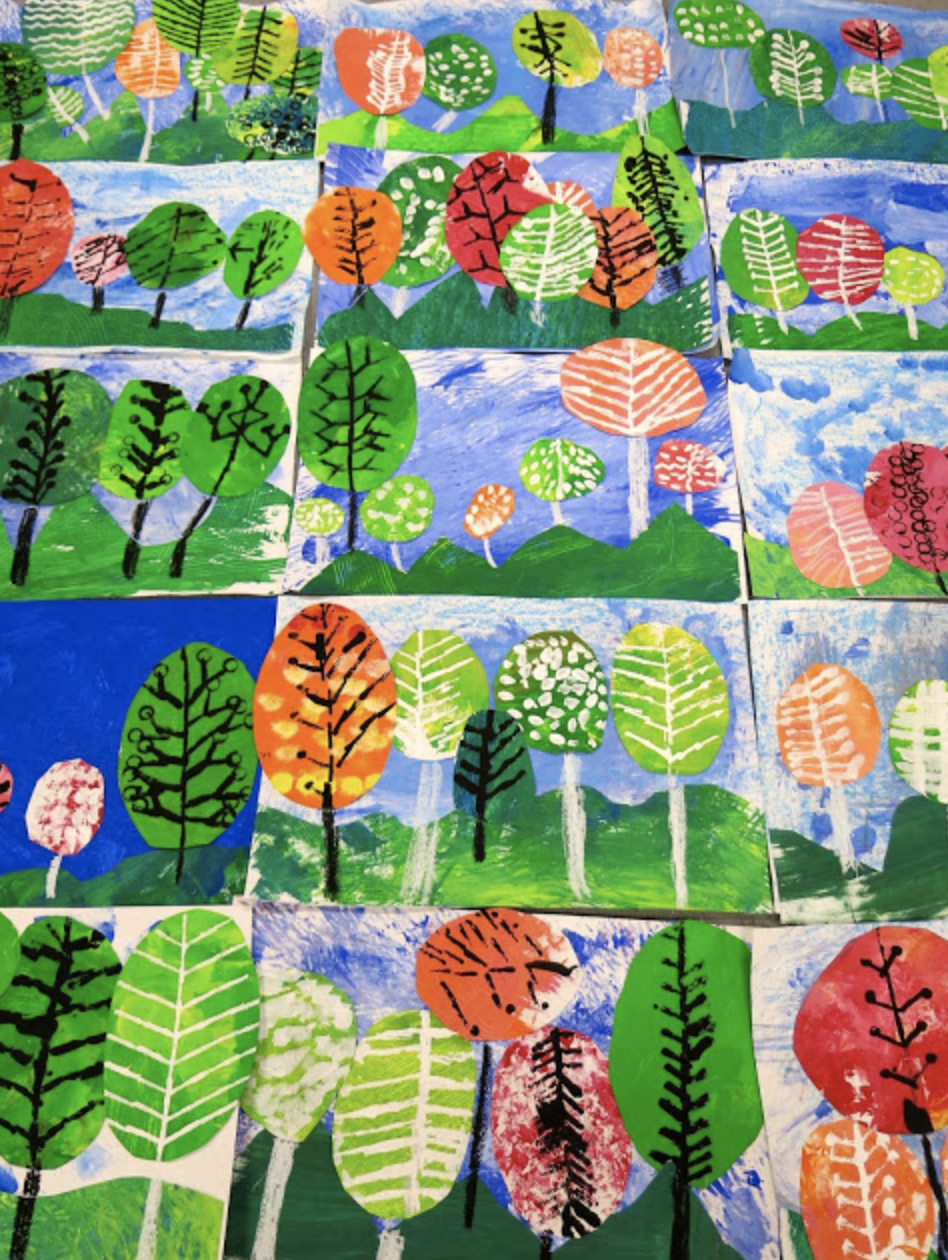 Here's another fun fall lesson that I did with my first graders but would be awesome with older grades too. This one involved learning about a contemporary artist, painting, collaging and printing. So much! Details here.
 If you are looking to create something a little spooky with your kids, I KNOW they will love this van Gogh inspired haunted mansion lesson.
  Marker prints are my favorite! So easy, such little mess and so stinkin' pretty! You can find out all the details on this lesson right here.
  If you need a beautiful fall landscape lesson in your life, then here you go!
 All of my students loved creating these Loud Mouth Monsters last year! It rated pretty high on the fave project list. You can find out more and see a video here.
 Of course giving thanks and showing gratitude is always perfect this time of year (and all times of the year, right?!). Here are my three favorite gratitude lessons!
 Another fun fall printing lesson can be found here. Instead of creating the printing pans, you can always use Gelli-Plates!
 This lesson I have done with my students as young as first grade! They love it and the results are always stunning. More details here.
I hope these fall lessons leave you feeling inspired. Happy Fall, y'all!
September 30, 2019
In the Art Room: Sketchbook Decoder Sheets
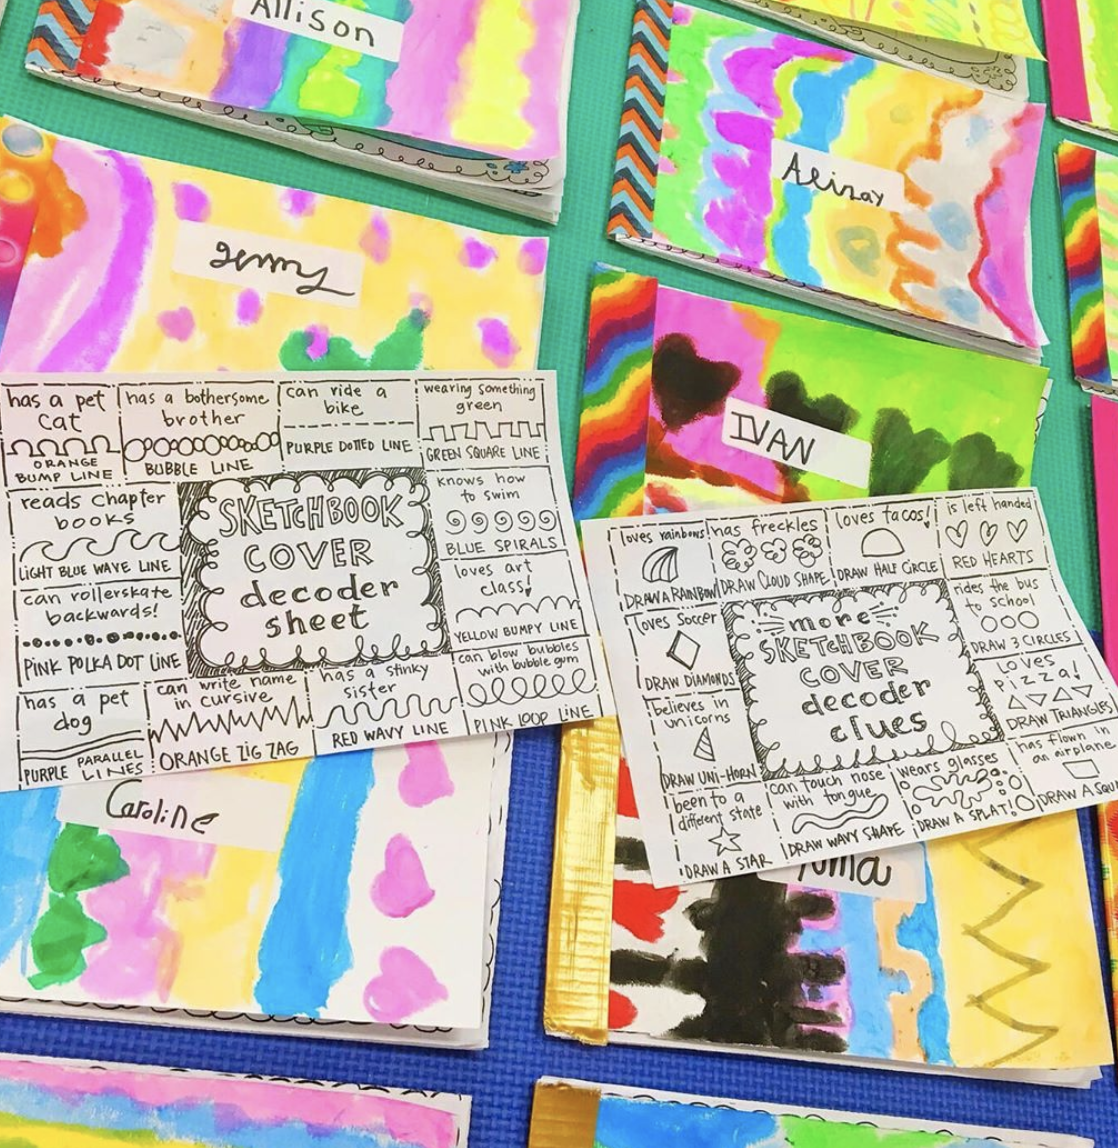
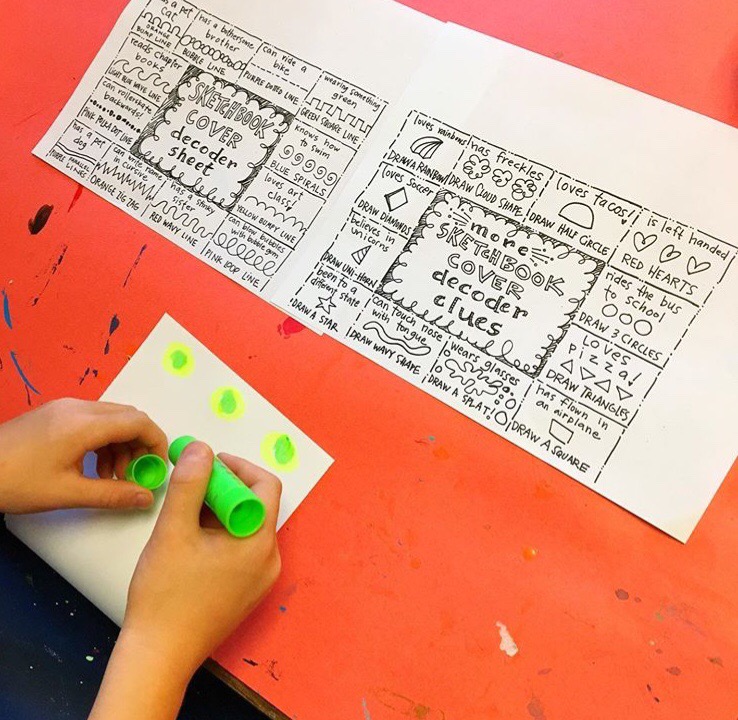
 Hey, y'all! I'm trying, once again, to give sketchbooks a go in my art room. It's always been tricky for me with 30 minute art classes and I've tried doing sketchbooks a BAH-ZILLION different ways. Here's hoping this works. MORE sketchbook details to come (I even created insert pages, y'all...I'm crazy) but until then, I thought I'd share with you a previous post on how I have done sketchbooks in the past . AND I wanted to share with you this free PDF on how they created these sketchbook covers!
 Now if these decoder sheets look familiar it is because this is the same idea I used for our Getting to Know You Sculptures!
For our sketchbook covers we used 6" X 18" paper and paint sticks. But really, this would be a great activity for sub plans, the start of abstract painting or simply Getting to Know You works of art!
 Here is one Sketchbook Cover Decoder Sheet.
And here is the other titled MORE Sketchbook Cover Decoder Sheet.
The reason for the smaller format of the sketchbook decoder sheet is that these were later added to their sketchbooks when assembled!
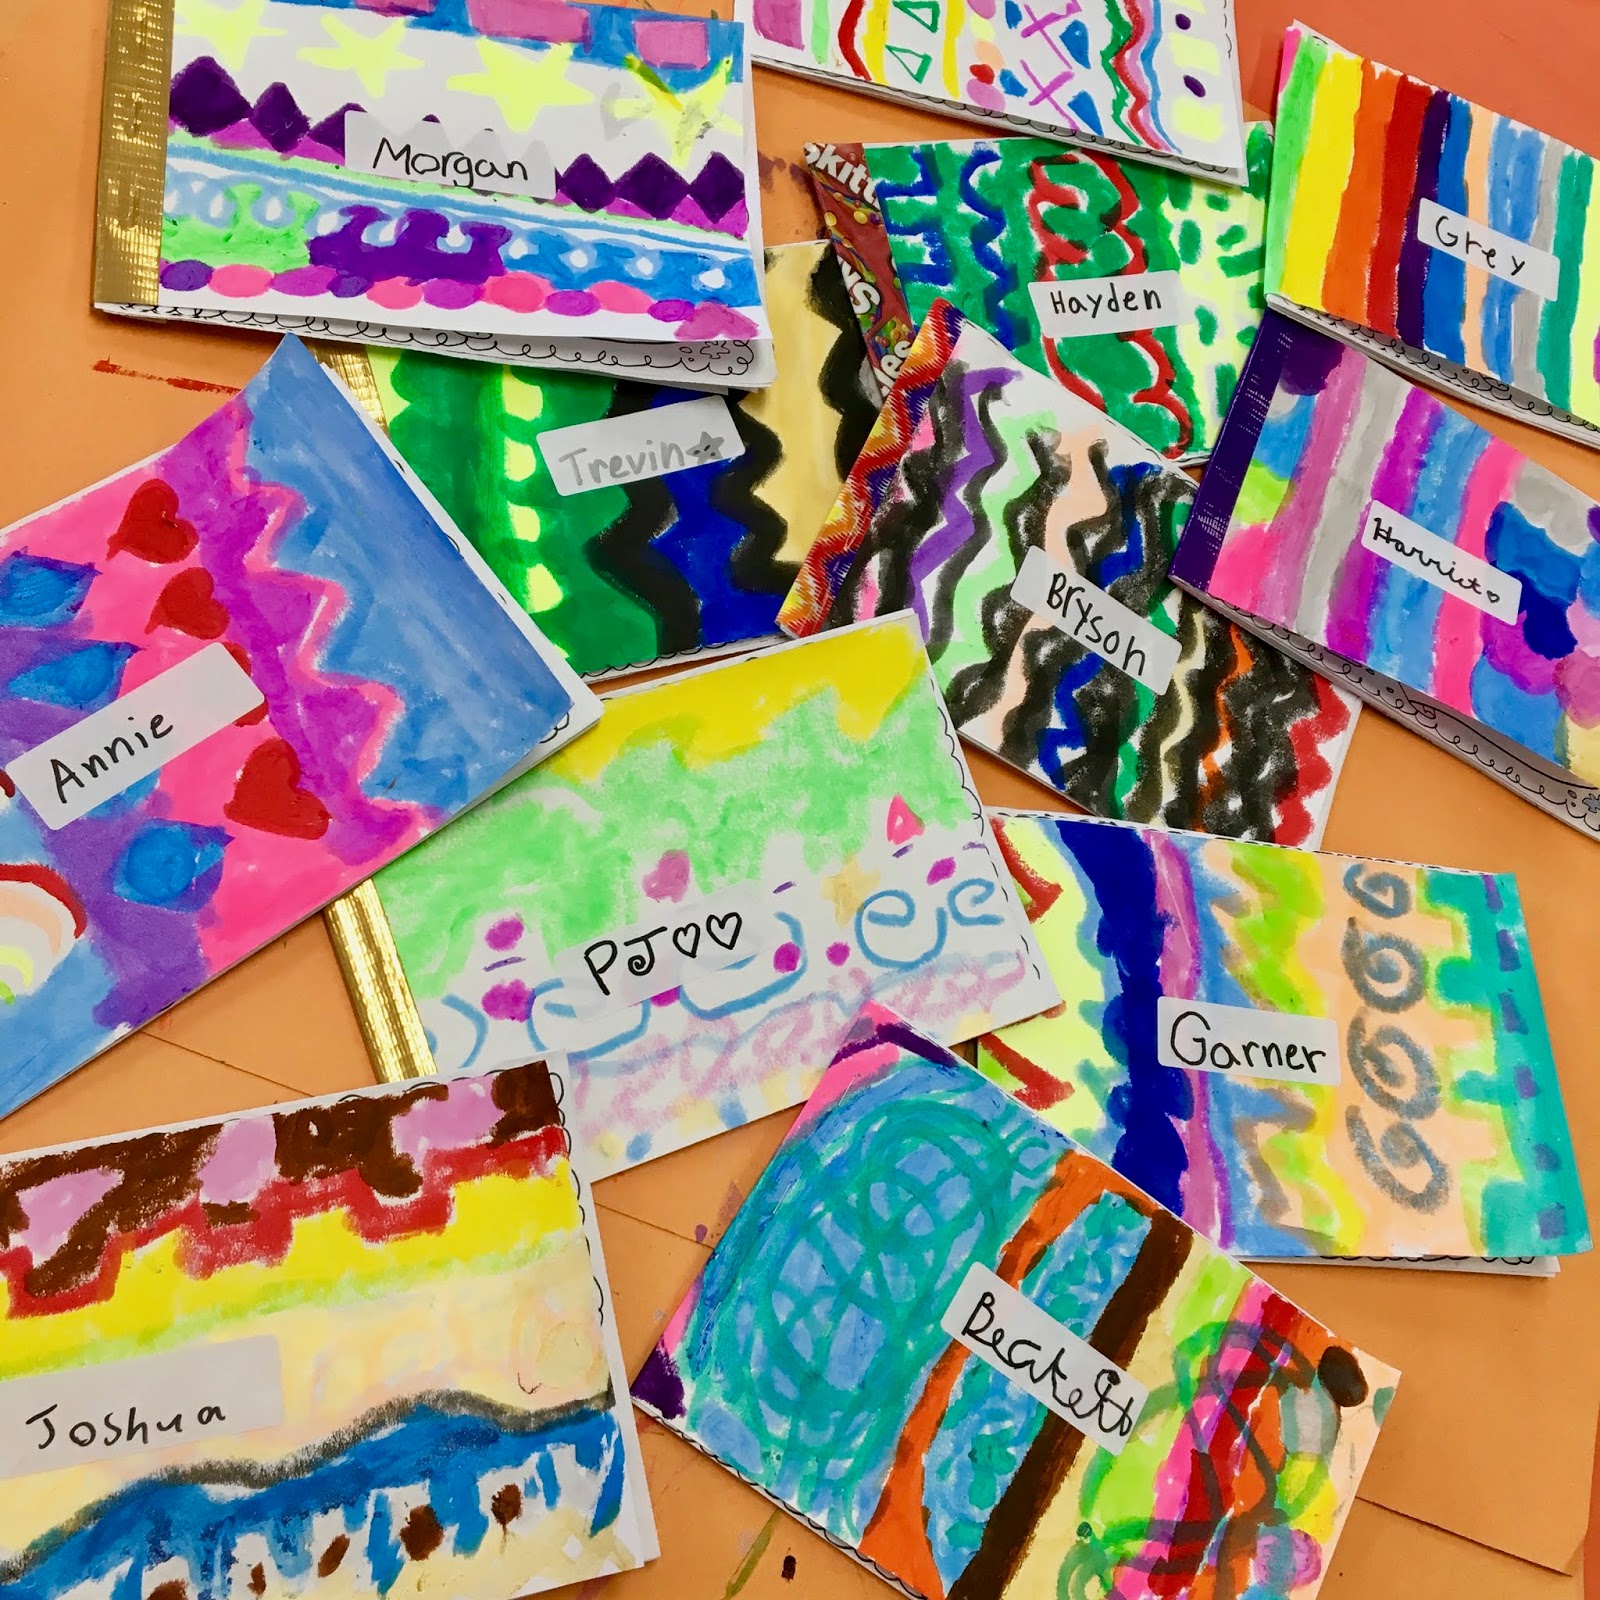
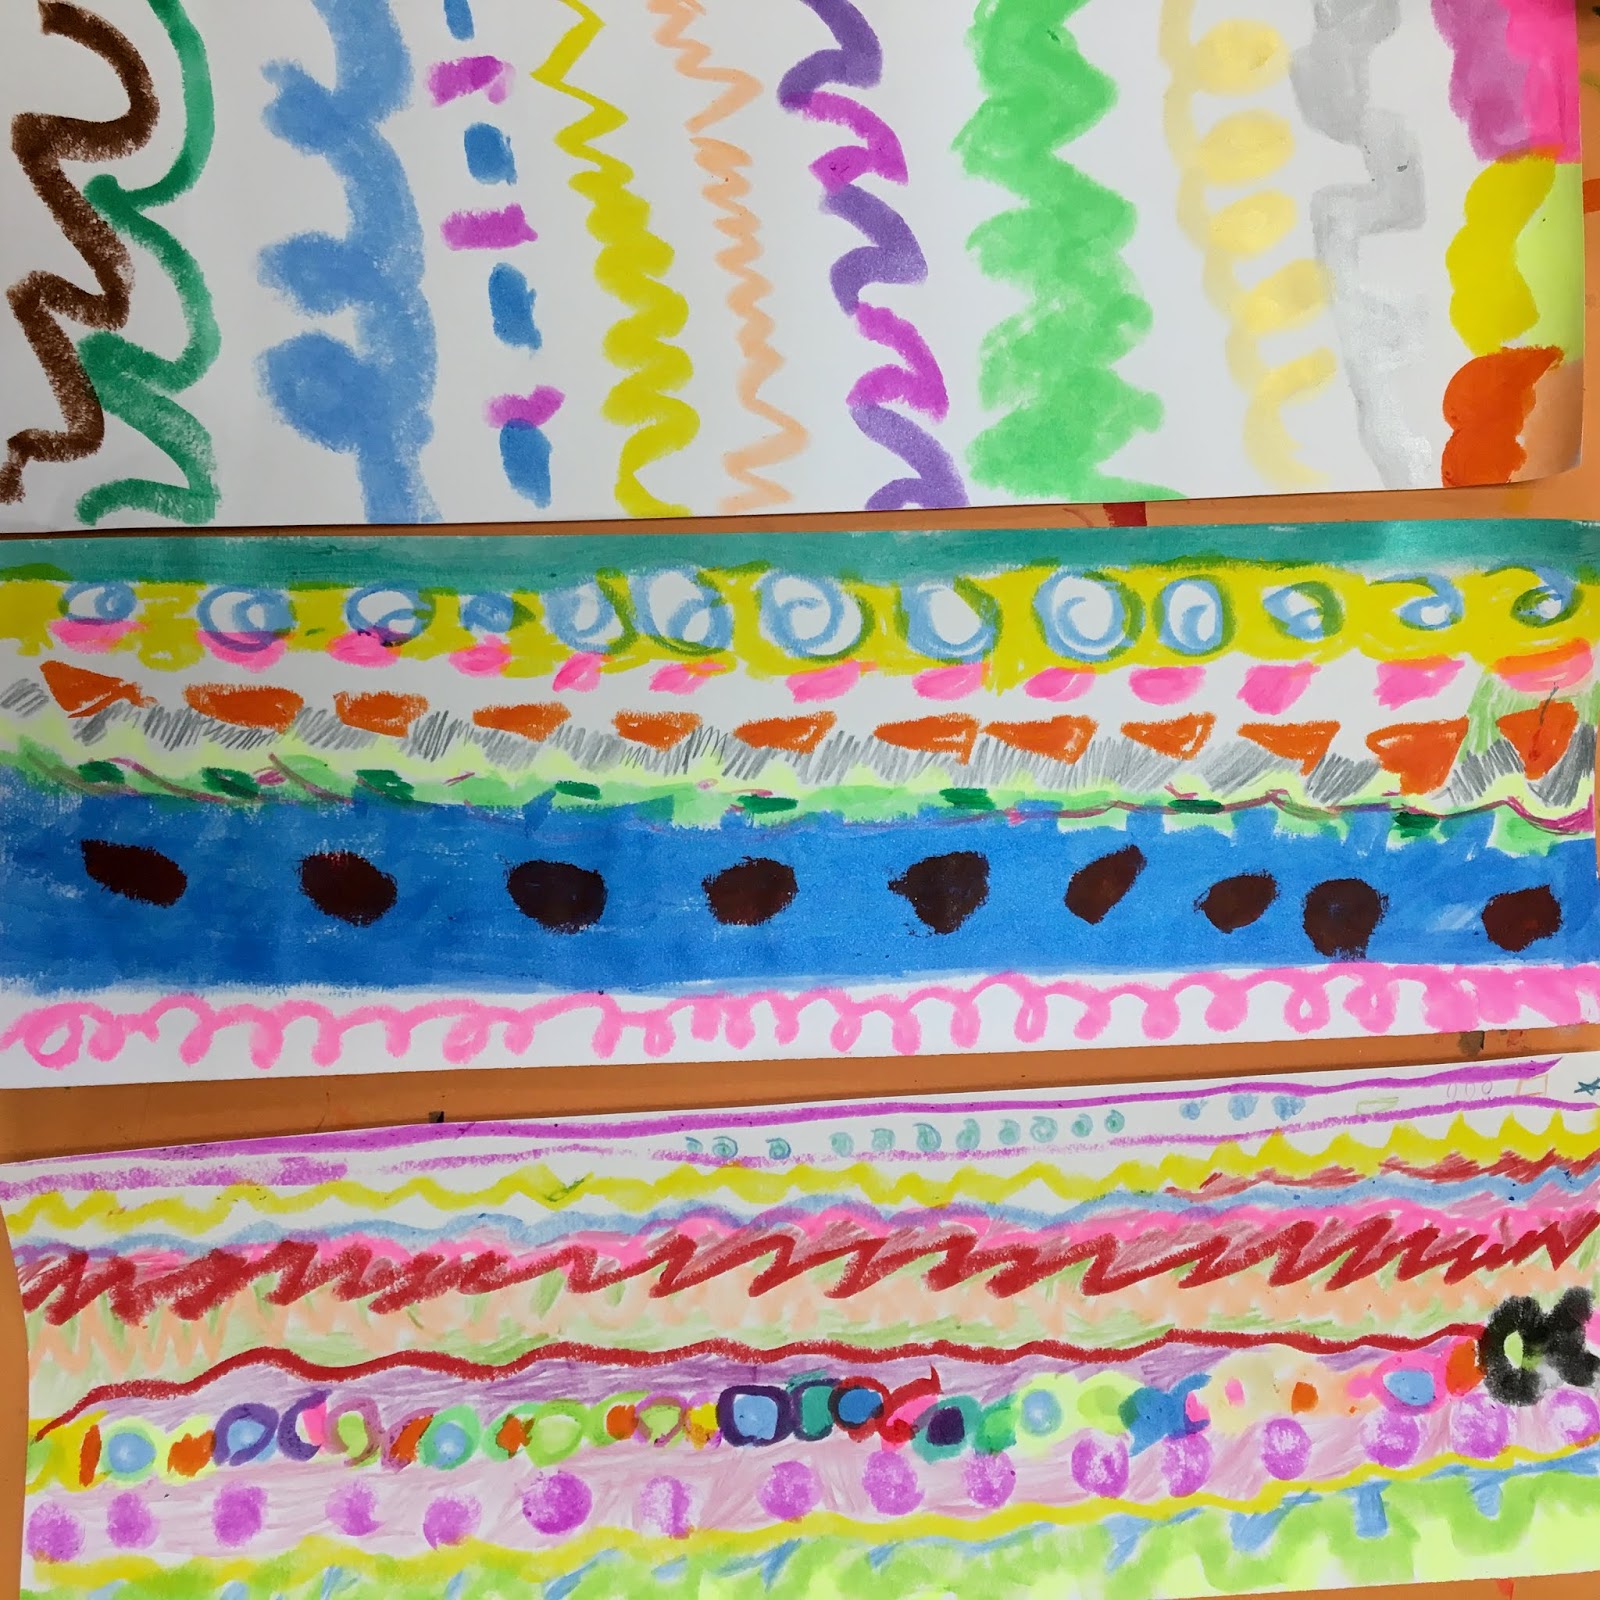 The kids loved creating these and I loved how colorful and creative they were. These could be done with just about any art medium too!
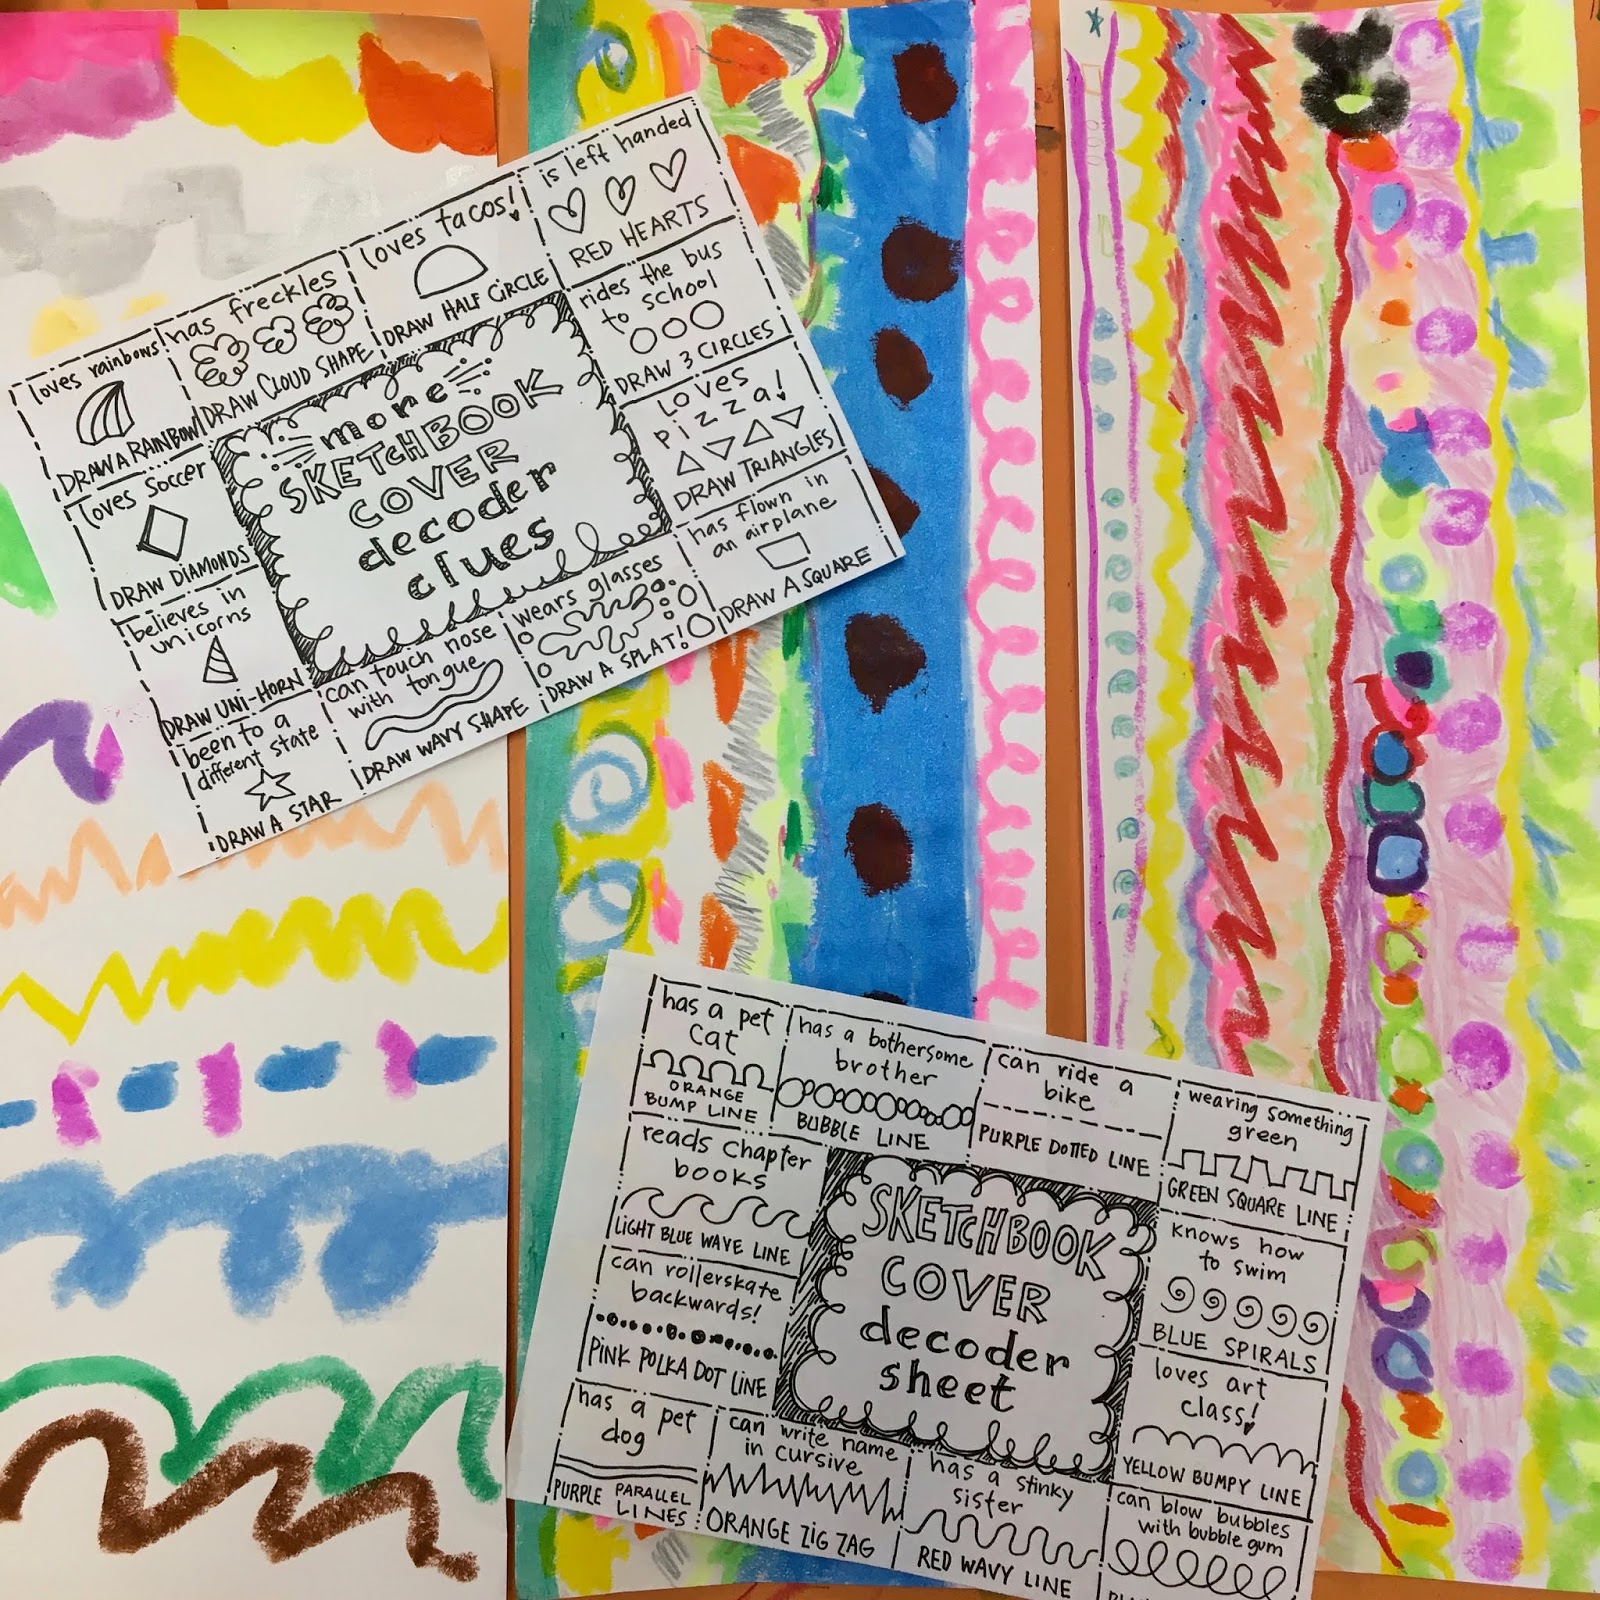 You'll have to keep me posted if you give these sheets a dry with your students! A fun line and shape review as well!
September 29, 2019
In the Art Room: Tiny Gallery of Gratitude
 Recently, I shared that my students in fourth grade are working on creating their own Tiny Art Show. Because I was going to be out of school for a couple of days visiting the art teachers in Vermont, I needed a lesson to keep my students engaged. I created this Tiny Gallery of Gratitude sheet for my third and fourth grade students. I hope they enjoyed it (I'll find out tomorrow!) but fingers crossed they did. If you think your student would like it too, here's a link to the FREE PDF.
 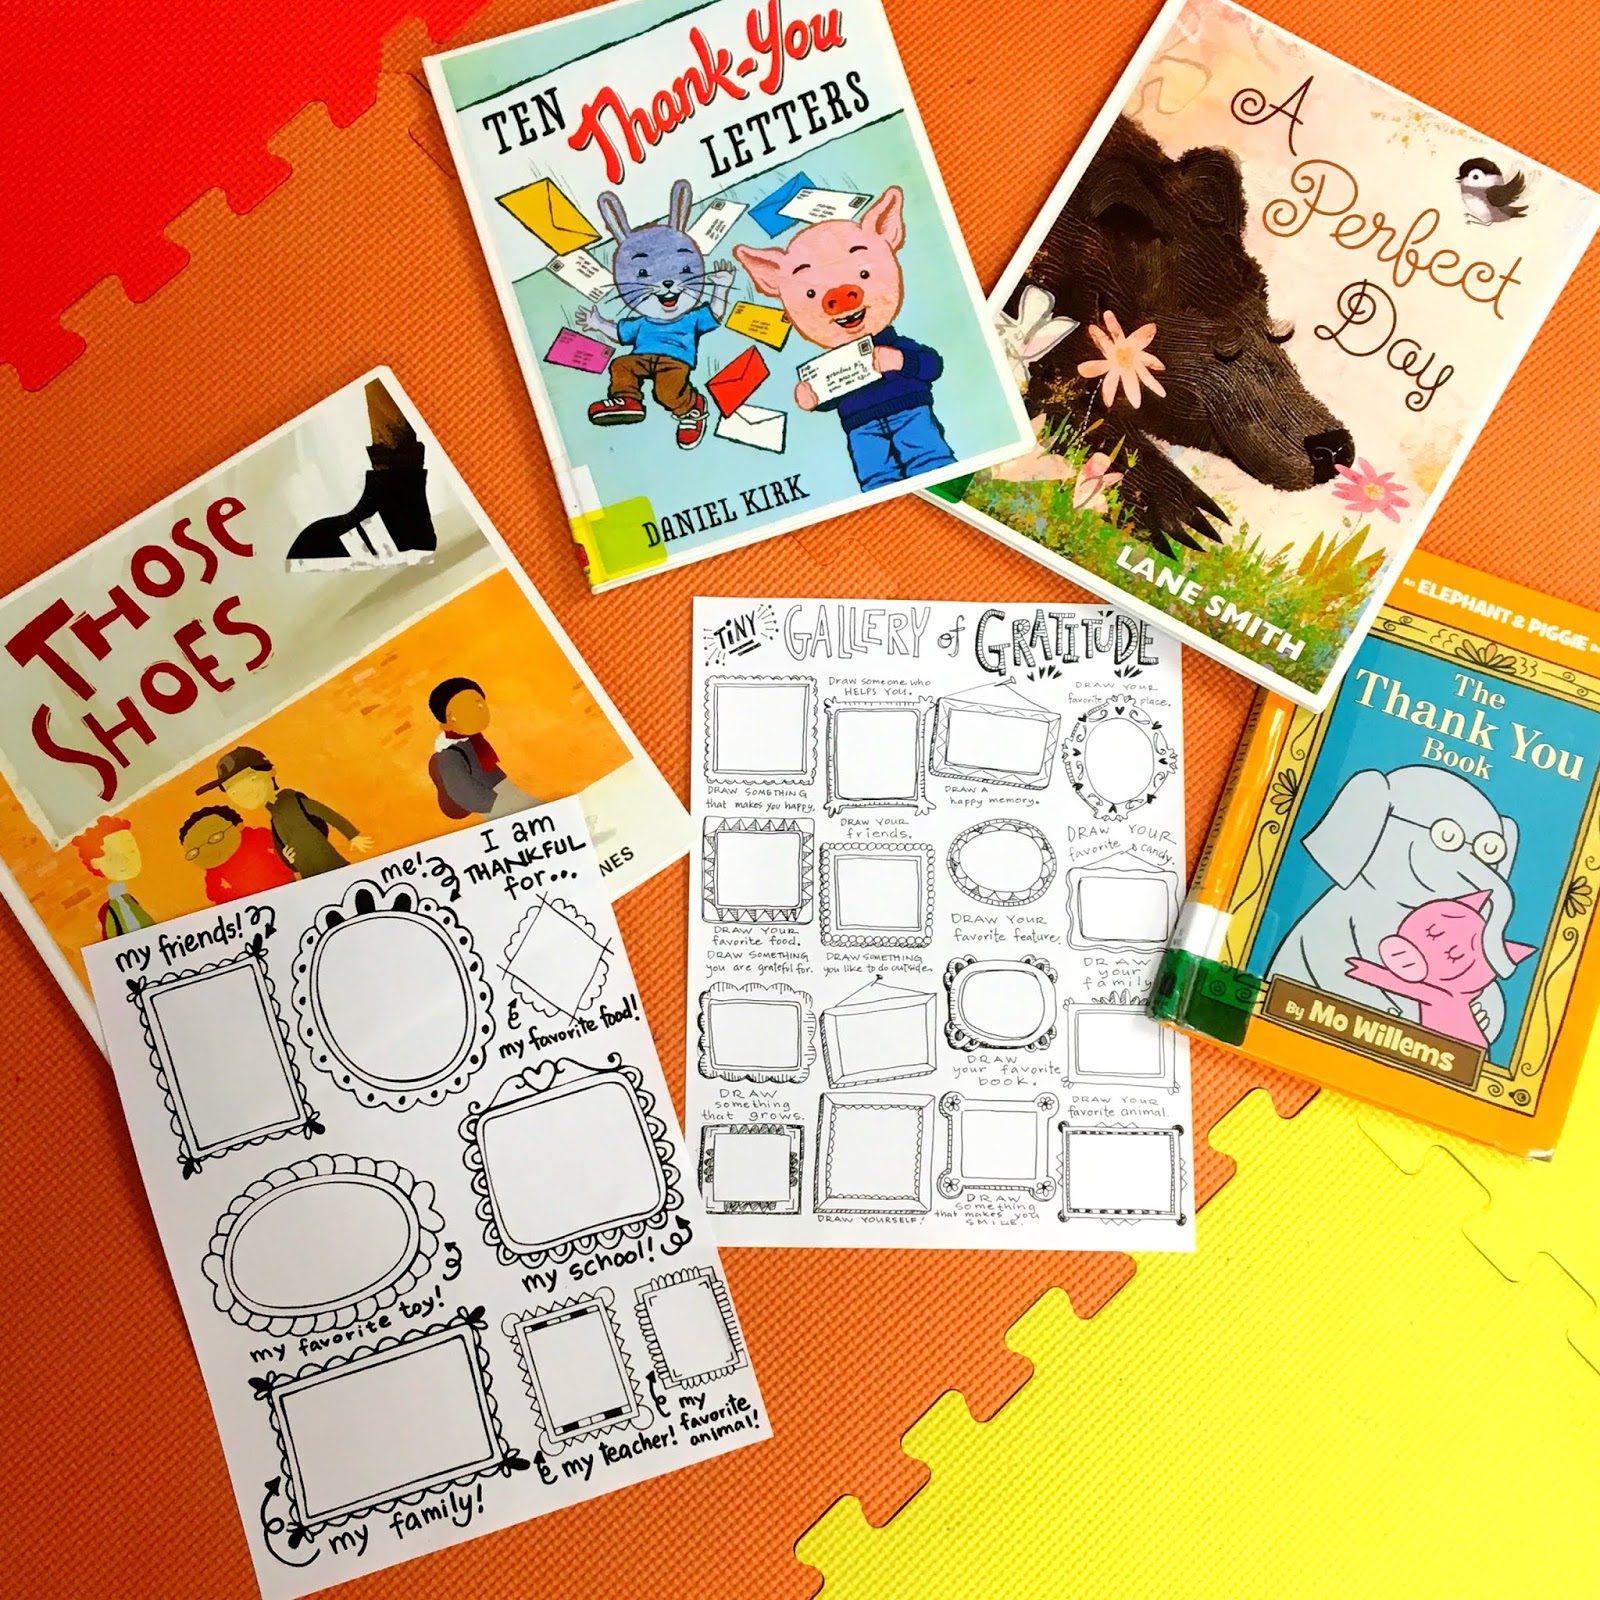 I gathered these books for my sub to start the lesson with. They are all wonderful books to introduce the idea of gratitude. Because my sub would be with my students for a couple of days, I asked that she read a book at the start of each class...but I let her decide which ones to read.
  Here is the sheet I created for my kindergarten through second grade students. (link works, just click on bold sentence!)
As for supplies, I set out pencils, erasers and color pencils for my students to use. I asked that the sub save the work so that we could return to this drawing as a sketch for early finishers. I also want to see what they drew!
If you are interested in other projects that show gratitude, here you go:
 This Gallery of Gratitude lesson was a HUGE hit with the entire school with all creative hands on deck. I cannot recommend doing this lesson enough!
 I recently did an updated version of the Gallery of Gratitude and I love it even more! We used modeling clay and did a bit of writing out the faculty and/or staff member we were grateful for. Lesson here and here.
  Helping my students understand what gratitude is and how to show it is very important to me. Do you have lessons that you love that help spread gratitude? I'd love to hear about them!
September 28, 2019
In the Art Room: Clean Up Routines!
 Is your art teacherin' clean up time a real pain in the, well, you know? I've tried EVERY clean up trick under the sun and I've finally found what works. There's a whole lot of bells, whistles and moving parts when it comes to my routine...some may work for you, some may not. But that's the trick. Finding what works and sticking with it. In my podcast episode this week, I am sharing an audio clip of my kids cleaning up from the alarms I set...
 (And there are a lot of alarms I set because each day of my schedule is different AND each of my classes is 30 minutes in length) to the Clean Up Drums and Gong, to the Table Caller and the super easy reward system I use to encourage a quick, quiet and amazing clean up. I'll also be sharing a whole lot of alternatives to what I use as I don't assume most of y'all have a drum set or a gong. I hope you will take a listen AND I hope you'll share what clean up routines work for you. Here's the episode:
September 25, 2019
In the Art Room: The Gallery Game!
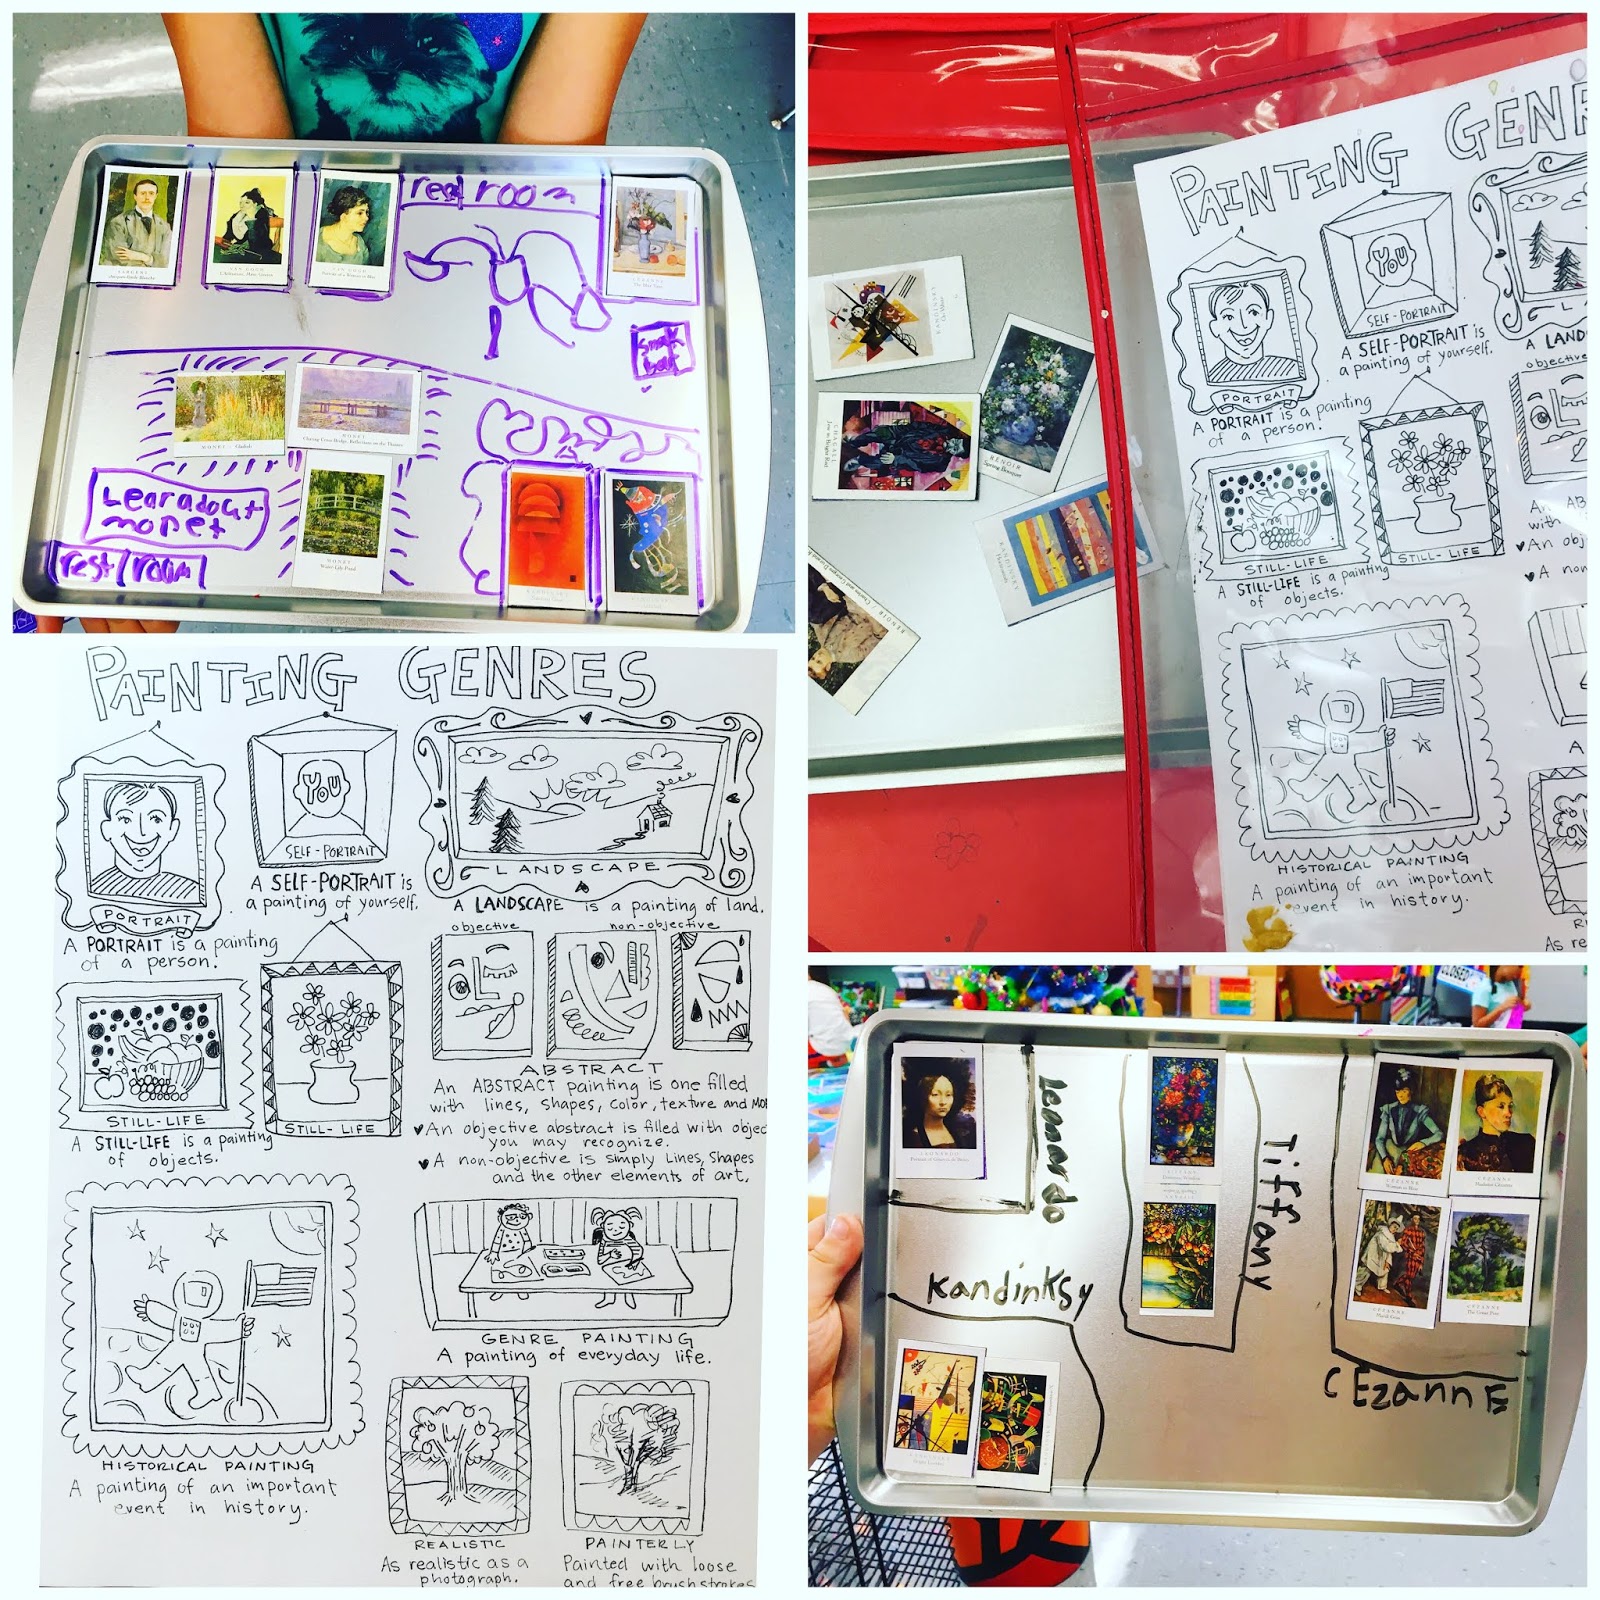 UPDATE! Here is the Painting Genres PDF.
AND here's the Tiny Art Museum PDF.
Lately, I've been inspired by two amazing art teachers: McKay Lanker Bayer who is the art teacher behind Tiny Art Show (see more on her Instagram @tinyartshow) and Emily Compton who is an elementary art teacher who recently shared how she uses games for assessment. I was struck by McKay's Tiny Art show concept and have been wanting to do this with my students. What I love about McKay's art show is that it's not just little works of art but it's also about how to curate an art showing. And I totally fell in love with Emily's super simple assessment ideas.
I have many weaknesses as a teacher but one of the two that I want to work on this school year are assessment, teamwork (for the kids, I gave up on being a team player myself) and including more art in lessons. This Gallery Game I came up with seemed to do all of those things. Plus the works of art are so tiny that it ties in perfectly to the Tiny Art Show we'll soon be creating!Hopefully this video will help you out!
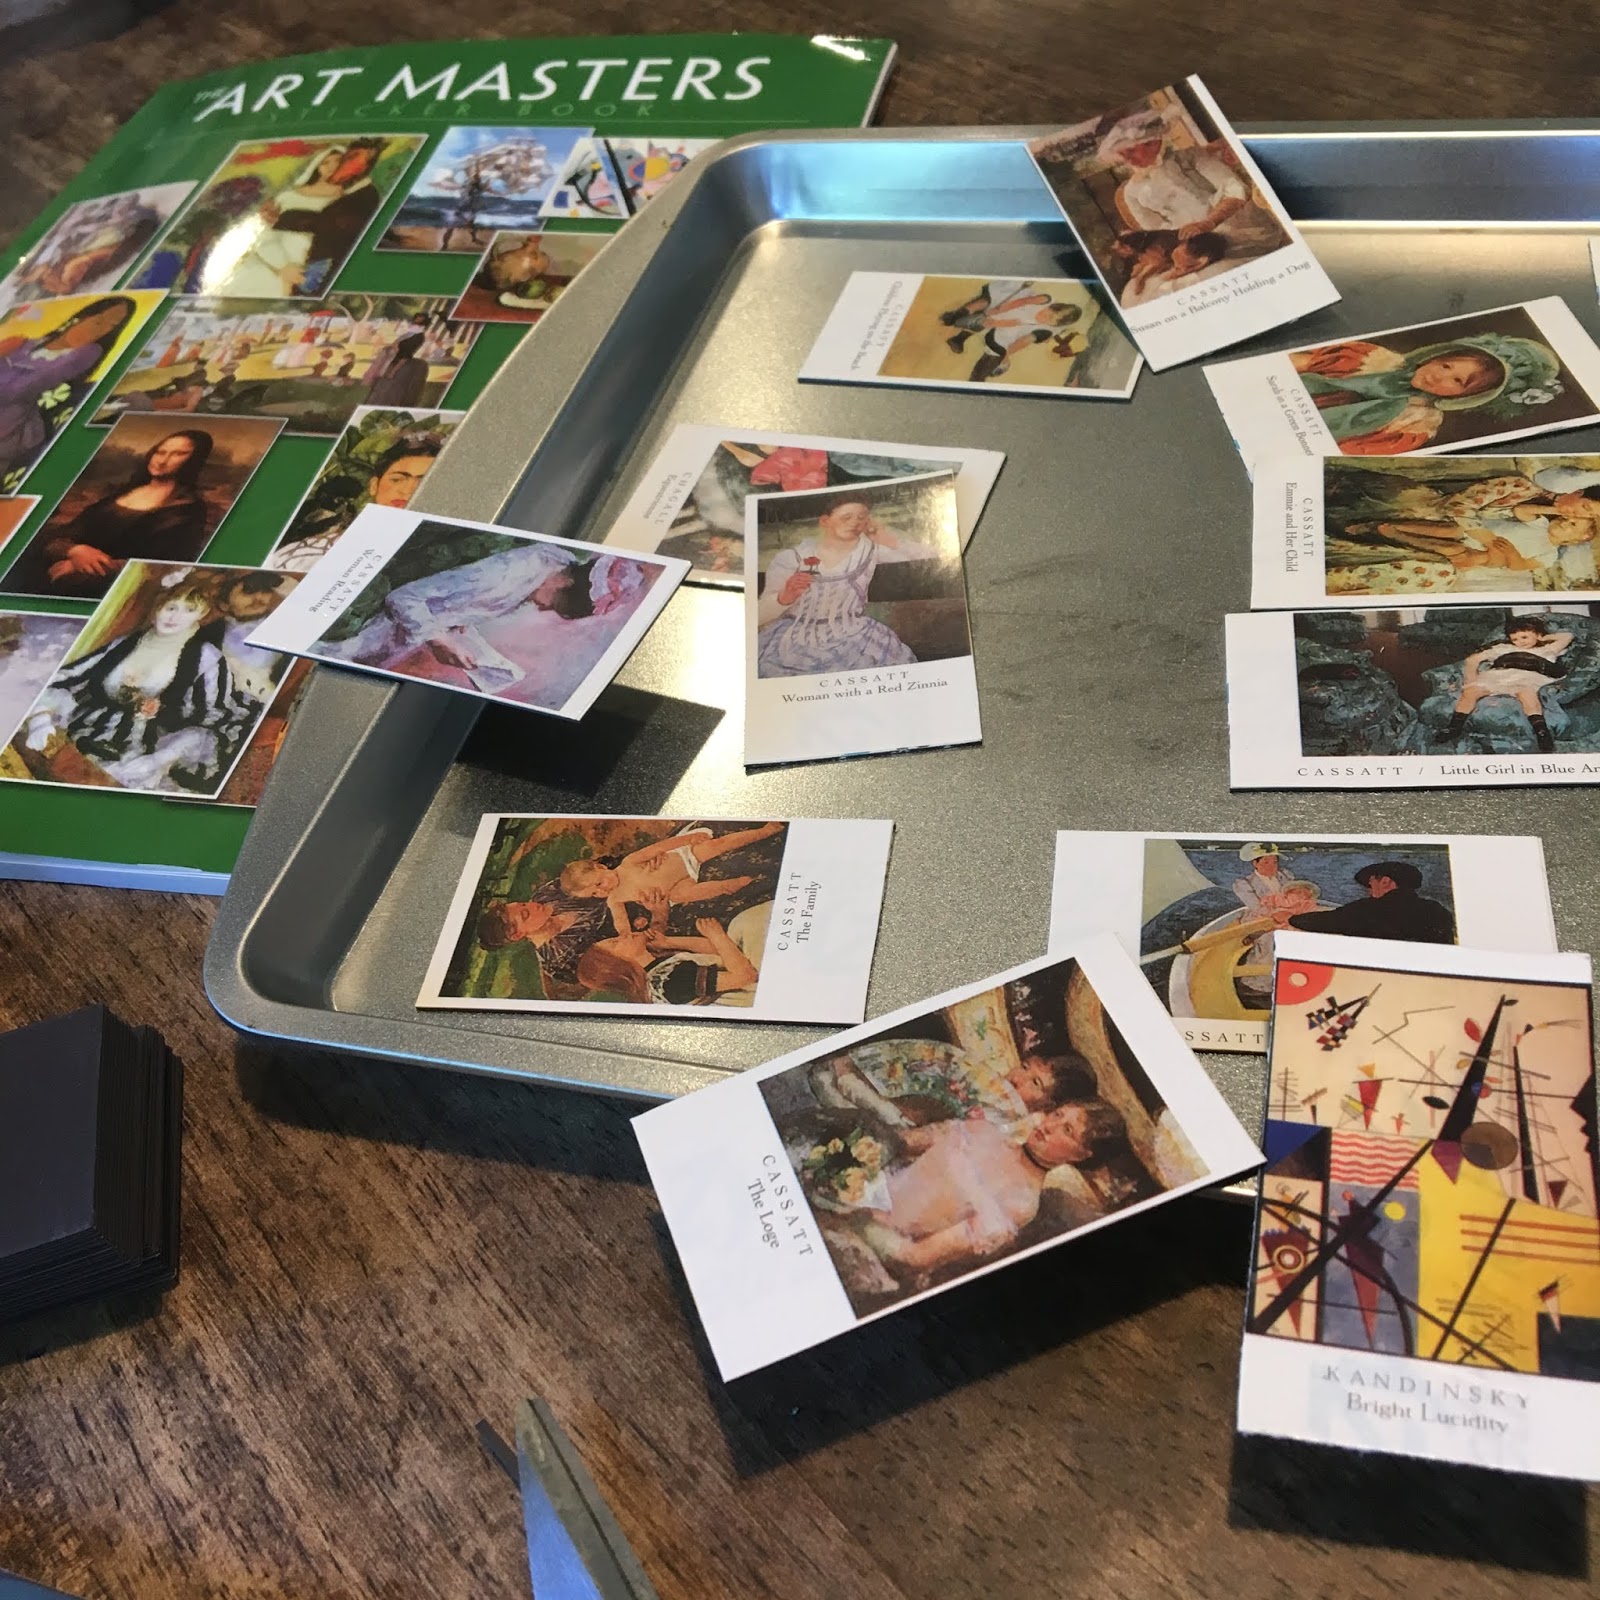 To create the game, I used this artist sticker book from Dover Publications. I added the stickers to magnets and scored the cookie sheets at The Dollar Tree. I created two games per table so that kids could pair up and work together. They were to sort the artwork according to THIS Painting Genre sheet. They were to then create a museum, curated anyway they liked. Most choose to categorize the work by genre but others did by artist or color.
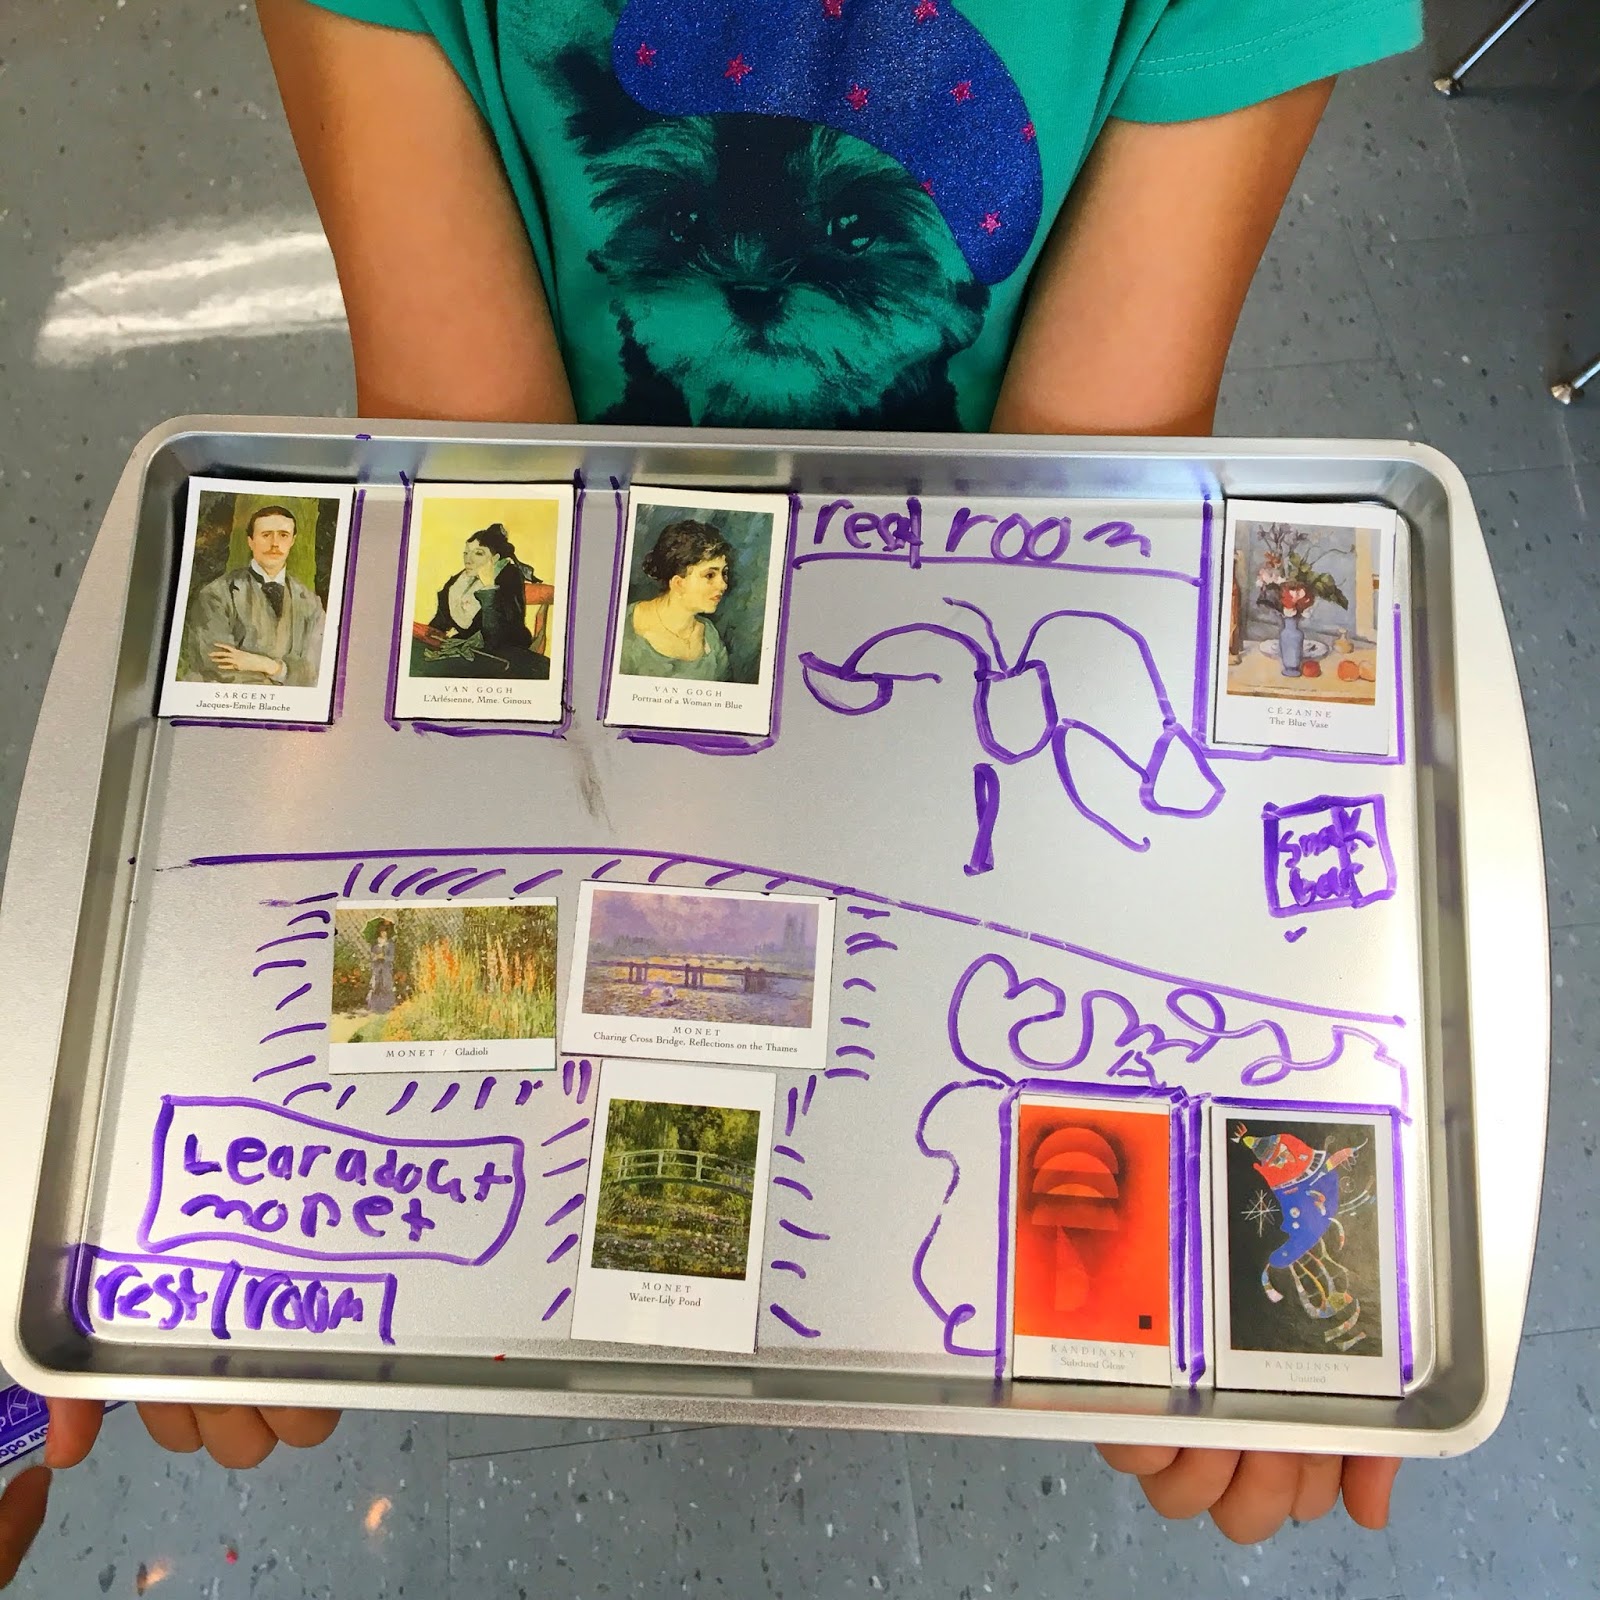 From there, they drew on their cookie sheet, using both sides of the sheet if necessary. Inside a sheet protector, they could name their museum, the sections and draw a map! It was a lot of work for them in 30 minutes but they had a blast AND they learned so much!
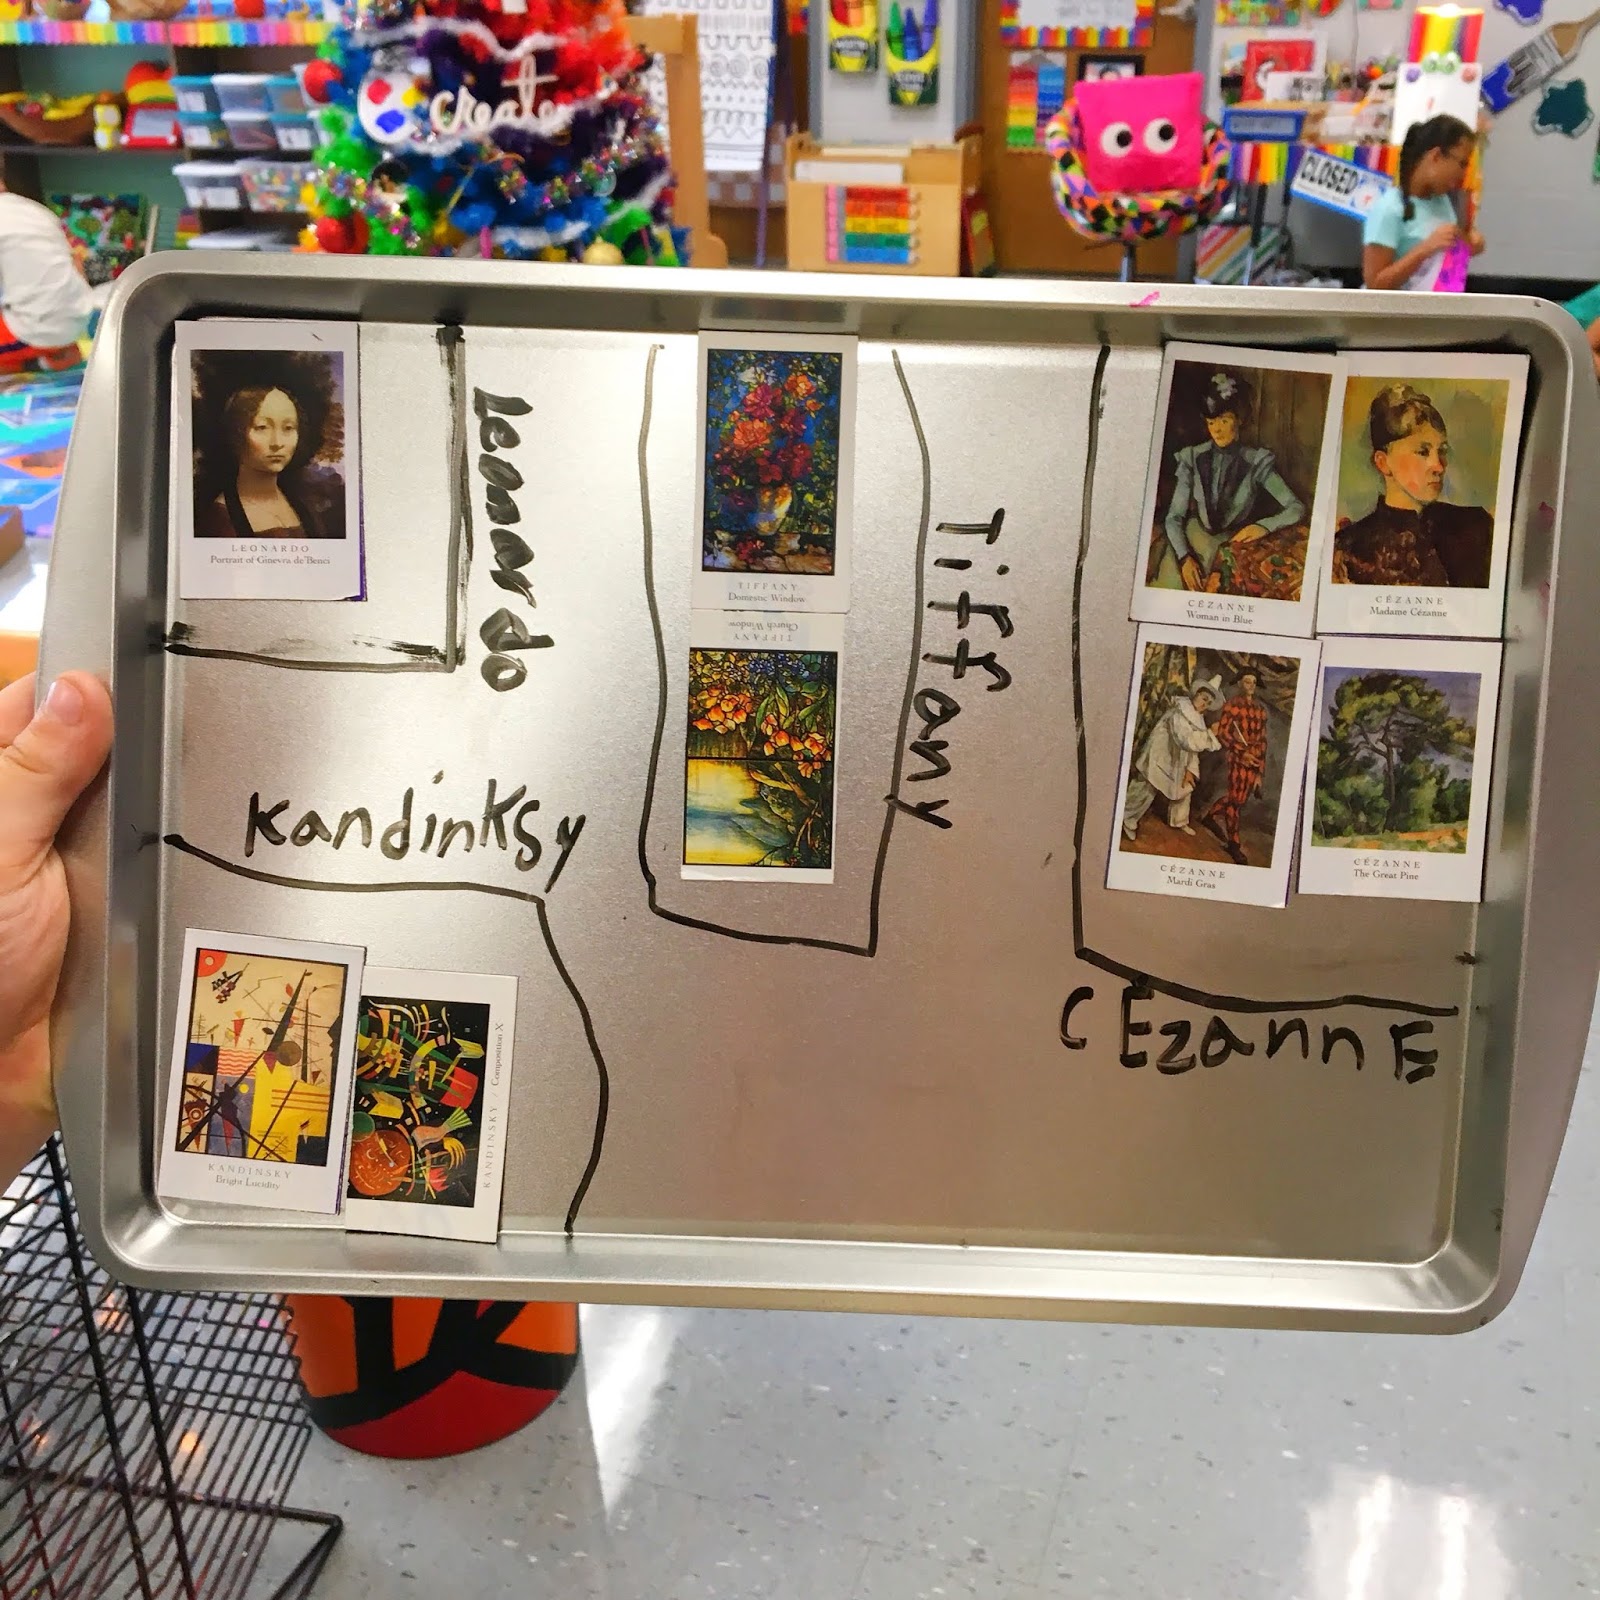
September 22, 2019
In the Art Room: Tips for Both Hosting a Student Teacher AND Being a Student Teacher!
 It's a new school year...which means that some of y'all are going to be student teachers and others might be considering taking a student teacher on. No matter which boat you find yourself in, I've got a podcast episode for you! I've hosted a grand total of three art teachers in my art room (with only one becoming an art teacher and that's the amazing Rebecca Tenpenny) so my track record isn't great. But I have learned some things having had my feet in both set of shoes so I thought I'd share them.
 If you find yourself in the "about to be a student teacher" camp, you should definitely take a listen. This is the time you are going to be learning SO STINKIN' MUCH so you'll want to make the most of it. Take a listen here:
 And if you are thinking of hosting a student teacher, I can share with you what I've learned from those experiences. Here's more:
If you are interested in reading more about that mural Rebecca is working on, you can travel back in time to this blog post for more.
I also did an interview with her a while back! You can read about that here.
September 16, 2019
DIY: Super Simple Way to Paint Furniture!
 Last week I got a wild hair and decided that I needed to paint not one piece of furniture for my art room but three. And the process was so stinkin' easy, I thought I'd share it with you. Here you go:
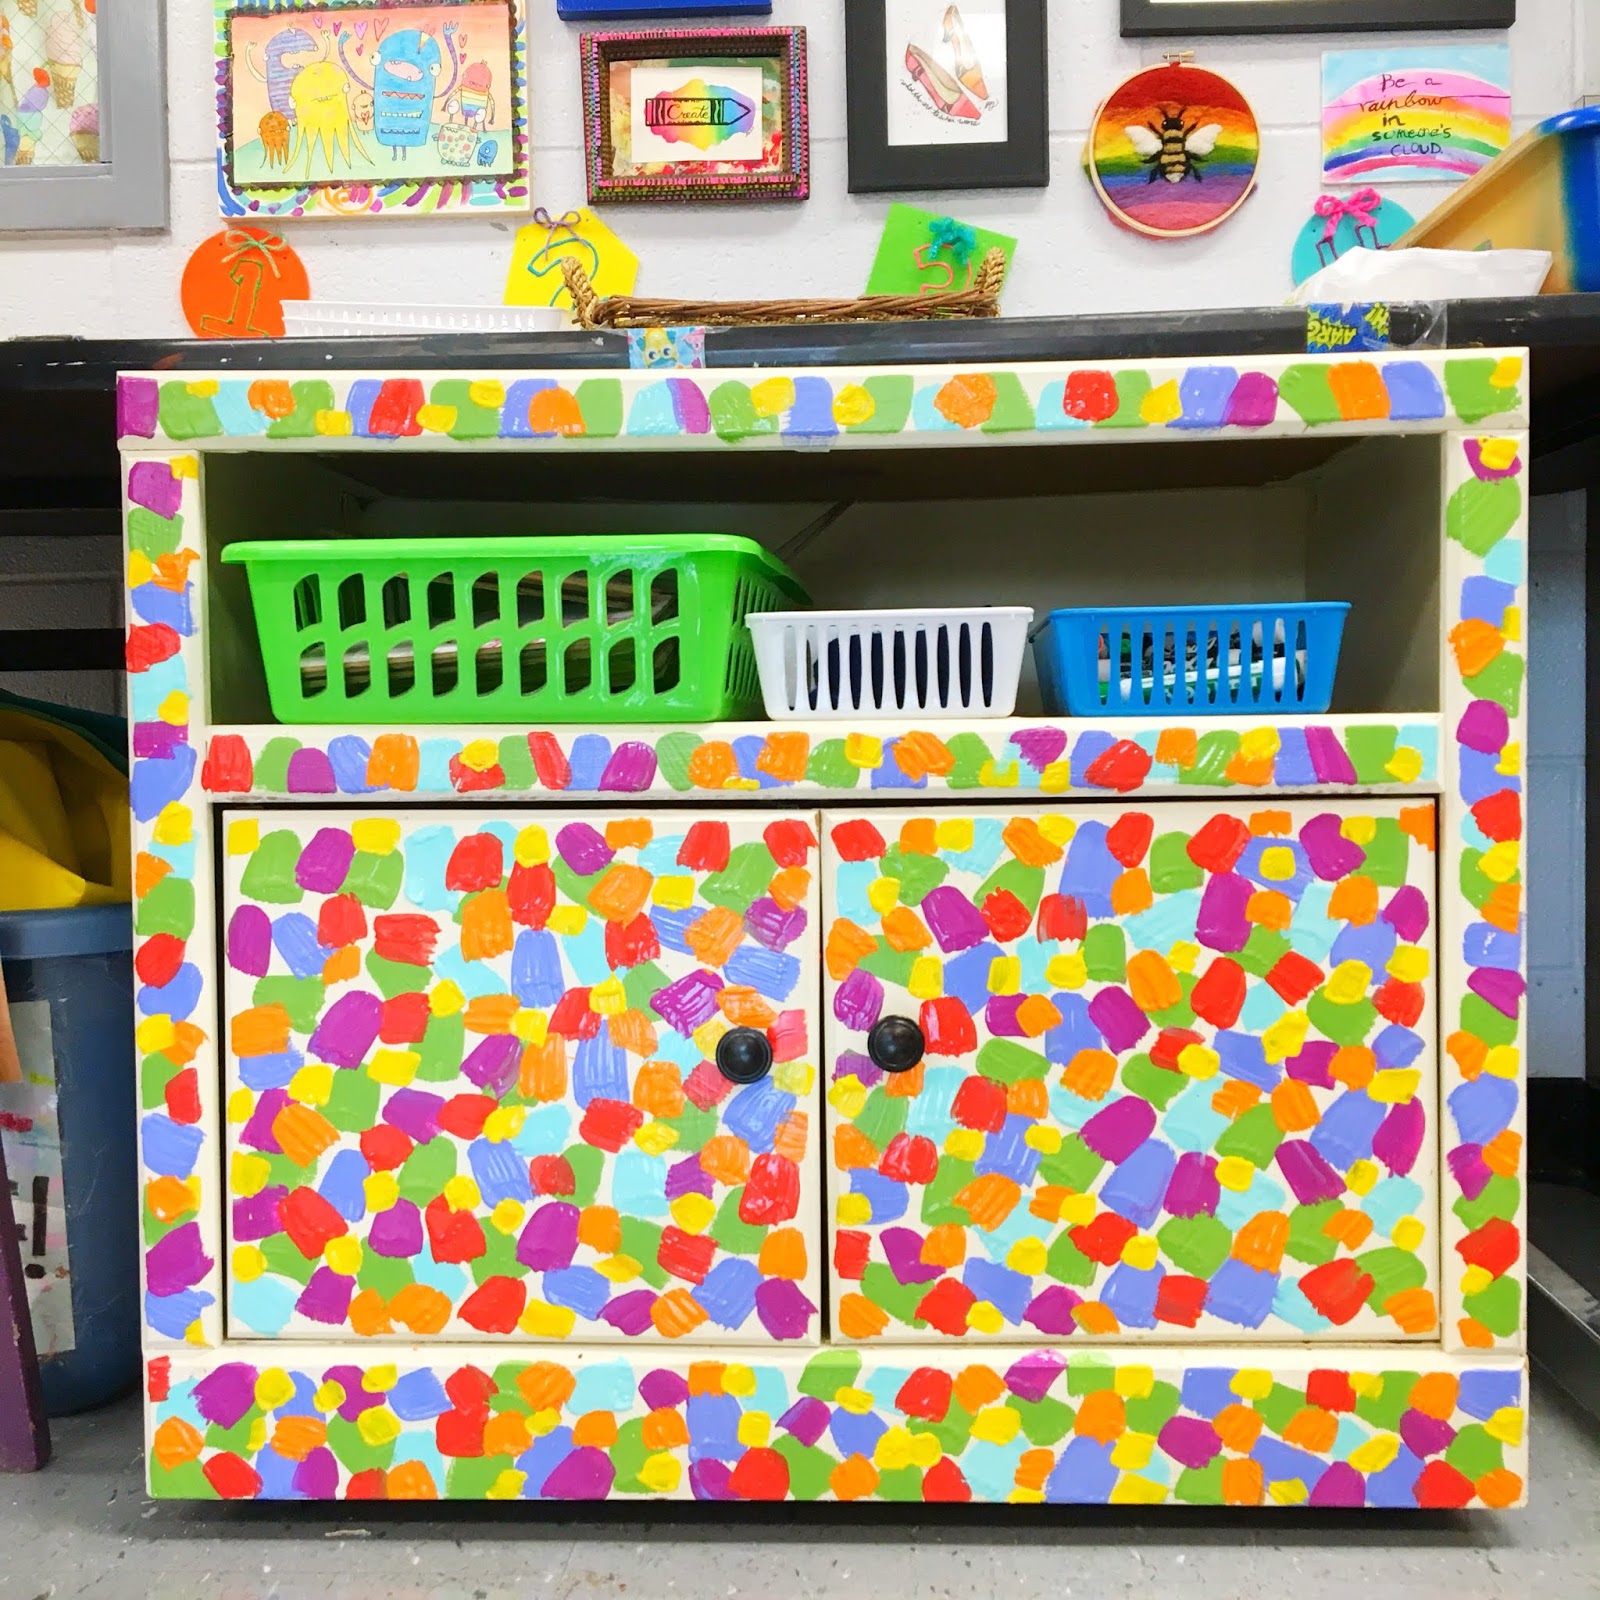
A while back, I created a couple of murals for my art room and I didn't end up using all of the paint. I kept the paint and I'm so glad I did (I mean, what else was I gonna do with it?! I'm an art teacher AND a hoarder, HELLOOO!). Now I can make sure that, despite all of the different crazy patterns, everything kinda-sorta goes together because the colors tie it all. Says me.
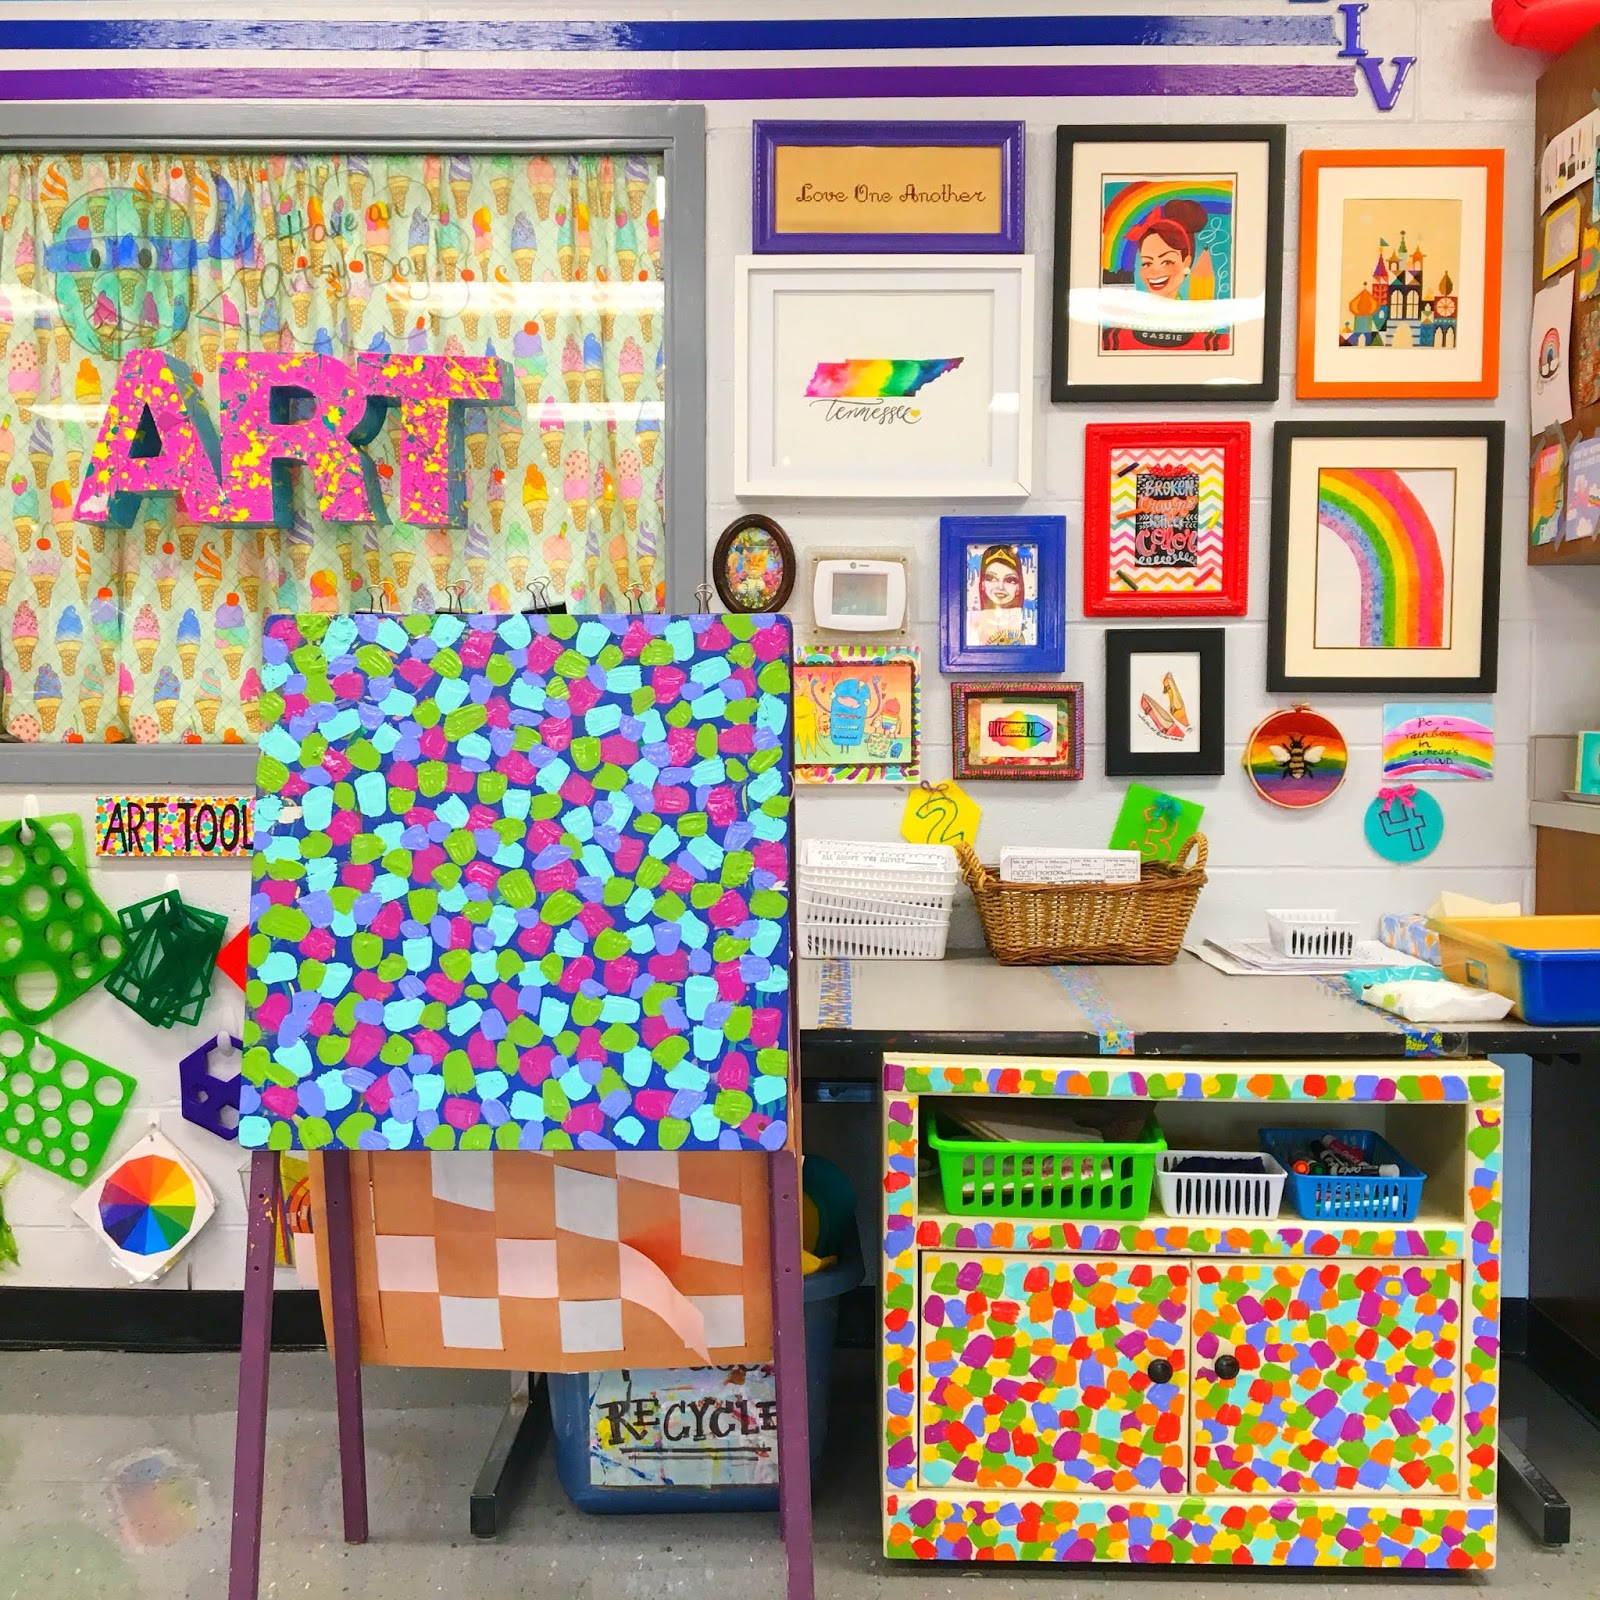 All this madness actually started with a cabinet that I'm now calling Sketchbook Town (see below). But then on Friday afternoon, I just couldn't stop! I repainted my easel that had become sad and ugly with just blobs of the cold colors. Thinking I'll paint the reverse with the warm colors. That cabinet was a score from the teacher's lounge. The space below that table was just begging for something to fill it AND this little cabinet does the trick. It currently holds my dry erase boards, markers and erasers as we use those everyday...but they were taking up too much space on the table above. We call that The Store and it's the supply-gathering area. I try to keep it clear but I also have a terrible habit of cluttering it up. So getting those dry erase supplies outta the way will (hopefully) help.
  So all this painting mayhem started when I decided I wanted to create Sketchbook Town. I'll be filling you in on this later (so much to share!! I'm excited). But here is a sneak peak. Oh yeah, I also painted three paintings in this dotted style. I think I actually caught Dot Day fever, y'all!
  Here's my sketchbook cabinet. If you are wondering where all this furniture came from, lemme just tell you, in your school there is ALWAYS furniture that folks are wanting to part with. Ours is kept in a spare classroom or sometimes it's dropped in the teacher's lounge. Also...if you need furniture, be sure and stop by that local thrift store. You never know what thrift you are gonna score.
  These are the murals I painted in my art room a couple years ago. You can read more about this mural here...
 And the mural that started it all! You can read about that one here.
Okay...I seriously had a million things to do last week...but sometimes, you just need to slap some paint on stuff. Trust me. Carve out some time and do it. You won't regret it.
Cassie Stephens's Blog

- Cassie Stephens's profile
- 34 followers
Cassie Stephens isn't a Goodreads Author
(yet),
but they
do have a blog,
so here are some recent posts imported from
their feed.

