
David Allen Wizardgold's Blog: Good and Geeky, page 6
January 11, 2020
Safest Messenger App – Threema
Threema creates and keeps the keys for the encryption on device. They can’t be passed to another device which means if you have multiple devices you need to have a workaround to see messages on all devices at the same time. It isn’t difficult to set this up. You’ll need to work with multiple IDs. Even if you have three devices, for example my wife has two iPads and iPhone. Each of these devices have a different Threema ID. You have your first ID which is connected to an email address and/or a telephone number. Or not, you can go completely anonymous if you wish. Your contacts will have to find you with the ID code from Threema rather than your email address or phone number.
On your second device you create a second ID.
Don’t link this new ID with your email address or your phone number. Give it a nickname which includes your name and the name of the device. Your contacts will recognise the name and you will recognise the name of the device.
Still on the second device, perhaps your iPad, scan the QR code on the iPhone where your first ID is residing. You can save that contact as “My iPhone”.
Then use your iPhone to scan the QR code for the second ID on your iPad and save the contact as “My iPad”.
Still on your iPhone create a group with the contact “My iPad” included as well as the contact you are connecting with.
When your contact sends a message to the group chat it will go to both your iPhone and iPad.
Your group chats are end-to-end encrypted in the same way as our single chats. This will work just fine and you shouldn’t have any difficulties. The only problem could come if someone does a data backup and their group chat could be different from everybody else’s. If this happens the group administrator can do a synchronisation to set things right again.
Other cool things with Threema
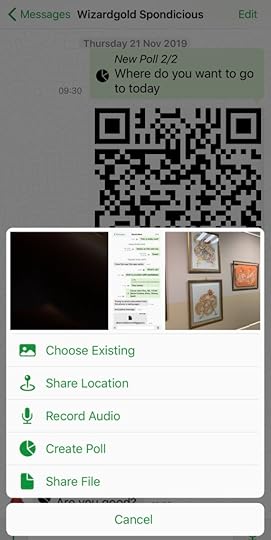
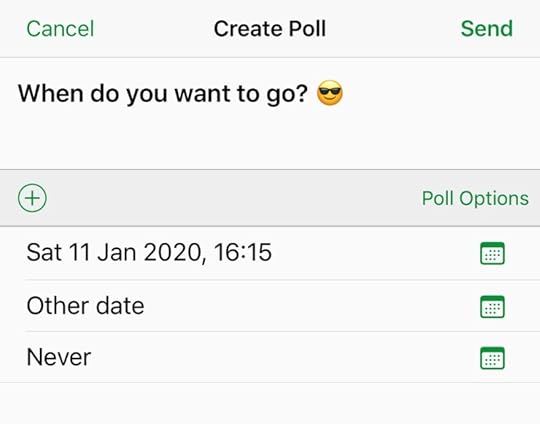
If you need to ask a question of several people rather than doing a back-and-forth between everybody when it use a poll. Just set up your question and the possible answers. All the recipients can vote. When all the votes are in you can close the poll and see the results. Everyone who voted can see who voted for what. There is also a ‘Agree or Disagree’ feature, which is basically a thumbs up or thumbs down.
Fantastic Encryption Features
The encryption features are completely and fully end to end. There’s no way a man in the middle can successfully hack you. It is not possible for any messages whether they be single chats, group messages or files to be sent unencrypted. You can’t accidentally send something without encryption. The key pair generation is kept completely within the device and the private key is kept secure. It’s also technically impossible for Threema to decrypt any user’s messages.
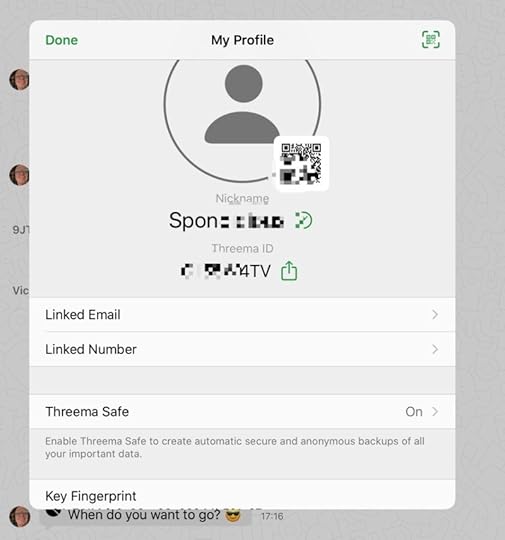
The man in the middle attack is prevented by verification of identities – Threema ID. I can scan a contact’s QR Code when we are face-to-face in the same room. Or I could ask my friend to send me a picture of the QR Code by other means. That could even be by snail mail or any other trusted means of communication. If someone was going to try and pretend to be my contact I can test identity using verification in Threema.
The Threema ID identification code which is eight letters long I can use to add someone to my contacts.
Get the Settings Right in Threema
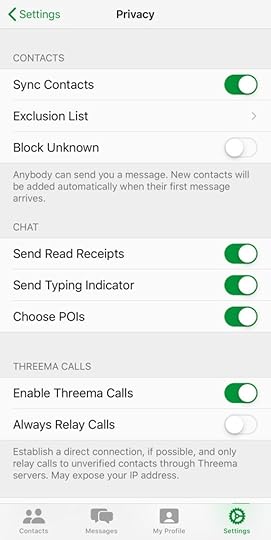
If you don’t want to send the indicator you are typing, you can switch that off.
Easy to block unknown people so you stop spam in its tracks.
Exclude people if you need to. Good having control over who can send you messages.
Do you want to let people know the message they sent to you has been read? If not, turn off the read receipts.
In the settings decide if you want to allow audio calls.
Buy the Book
One way of staying safe is to avoid using email. Sending email is the equivalent of putting your private data onto a postcard. The postcard (email) can be read easily as it passes through the postal system. Your information is naked and without protection. There are illicit sniffer applications which look at email as it goes through servers. Similar to the Google email system which looks to see what adverts it should put in front of you. That’s why you get a free service from Google. You are the product being sold to the advertisers.
Buy the Book
Test Threema by sending me a message
In the Book you will find my Threema ID and QR Code
Ask me whatever about security and privacy and I’ll do my best to answer the questions. Try out message apps, OpenPGP or other encryption techniques,
The post Safest Messenger App – Threema appeared first on Good and Geeky Books.


January 10, 2020
How To Move Files With OnionShare
In the book ‘Stop Using Email’ I recommend a couple of ways of sharing files securely. One of those is Firefox Send, another one is to use Tresorit. Or you could encrypt the files before you send them by email, if you are still using email. You can also move files across the Internet using secure end-to-end encryption in message apps Signal, Threema, Wire are three good examples of this type of application. These applications rely upon the use of a server. However, there is a way you can securely and anonymously share your files without a separate server or third party file sharing service.
Install OnionShare
If you go to the OnionShare website you can download the application for your operating system. There are versions for Mac OS, Windows and various flavours of Linux. The application is easy to install and get working. How to use Onionshare When you are ready to send files, you drag-and-drop files or folders into the application. Or you can use the buttons Add Files or Add Folder to put your files into Onion Share. When you are ready, click on the big green button ‘Start sharing’. Just give it a moment and you will get a link for your recipient to use in the Tor Browser. Each time you setup a share you get a unique new link. The files are hosted on your own computer.
How to use Onionshare
When you are ready to send files, you drag-and-drop files or folders into the application. Or you can use the buttons Add Files or Add Folder to put your files into Onion Share. When you are ready, click on the big green button ‘Start sharing’. Just give it a moment and you will get a link for your recipient to use in the Tor Browser. Each time you setup a share you get a unique new link. The files are hosted on your own computer.
Or Receive FilesYou Trust the other person to send safe files
Previous
Next
Use The Tor Browser
The people who make the Tor browser and OnionShare care deeply about security and privacy. By cutting out the server in the middle you are adding another layer of security. You can still encrypt the files and folders before you send them. If you are going from Mac to Mac I recommend using Encrypto. Going to other platforms it’s probably better to use OpenPGP.
There’s a Tor browser for Windows, Mac and Linux desktop platforms and also one for Android. It’s a pity there isn’t one for the iOS platform. By using the Tor browser you can guard against tracking, surveillance and censorship. It’s well worth having this browser as part of your arsenal of defences to use on the Internet.
Onion Share Settings
For the most part you can leave the settings as they are. If you have a file which is meant to be downloaded many times you will want to change to Public Mode. If someone ties to guess the random ‘Slug’ part of the link too many times OnionShare thinks it’s an attack. It will shut down the service for that share. (The slug is a random, very difficult to guess set of letters and numbers)
There are settings to use for auto-start and auto-stop. If you wanted to have the file only available for a specific time period . Such as between 15:00 and 17:30. Useful for a deadmans switch. So a leak of a file could occur if anything happens to you. If you are not there to turn it off, the file goes to the recipient. Like being in a spy movie, how cool is that?
There is setting which only allows the files to be downloaded once.
Receive Files with Onion Share
Normally when we are talking about sharing files we are looking at it from the point of the person sharing. With OnionShare we can set it up to give a link to someone to use in the Tor browser for them to send us files. You give someone the link and it gives them a direct line to send a file to your computer. You need to have complete trust in the person sending you the files. You wouldn’t want to give this URL/link to someone who could send you a malicious file. Same as when sending files, it is direct to your computer without being stored in any servers along the way.
Another way to set up something similar would be to use FlowCrypt. Using FlowCrypt you have a webpage you can send somebody to, into which they submit text and or files. You have the end to end encryption provided by OpenPGP. You are in control of the Private/secret key. So you could say it’s just as secure as using Onion Share.
Buy the Book
One way of staying safe is to avoid using email. Sending email is the equivalent of putting your private data onto a postcard. The postcard (email) can be read easily as it passes through the postal system. Your information is naked and without protection. There are illicit sniffer applications which look at email as it goes through servers. Similar to the Google email system which looks to see what adverts it should put in front of you. That’s why you get a free service from Google. You are the product being sold to the advertisers.
Buy the Book
The post How To Move Files With OnionShare appeared first on Good and Geeky Books.
December 14, 2019
Swiping for Typing
Really love the swipe keyboard we have now since iOS 13. It’s so much faster typing this way than tapping on the keyboard. Not quite as fast as dictation on my Mac, but impressive all the same. I’ve pulled into a nearby town to test the public electric car charging facility. I’m enjoying the heated seat and cabin heating of my Nissan Leaf. I’m writing in comfort using the free electric while staying warm in a cool winters day. Doing a little people watching in between sentences. The locals happily going about their daily business.
I could break out the iPad to type on. I could reduce the keyboard down to the small size and swipe. It’s just been working out so well with the iPhone though. If I needed to send the text off to the website now or if I needed to work with graphics or video I’d use my iPad. One of the great things of owning a larger size iPhone I suppose.
Or Should I Use Voice Control
I was tempted to write with Voice Control dictation. It’s pretty good in terms of overall accuracy. By writing using swiping on the iPhone I was able to have music in the background. Seemed like a good plan to stick with the keyboard. Normally I work in silence but having Blue Öyster Cult playing has been an extra perk. Actually, it’s great to get out of the house instead of going stir crazy inside. All I need for a perfect working environment is proper tea making facilities. I do have a cup I can plug in to the 12 volt socket, but it takes a while to get the water boiling. Sipping tea would make dictation even more difficult and I could scald bits of me not meant to get so warm.
I used to use the Swype keyboard app, but now it’s gone in favour of the swipe enabled keyboard from Apple. I can hit the microphone key to dictate if I need to. Couldn’t do that with the Swype keyboard, I’d have to swap back to the standard one.
Like Those People Who Write In The Tea Shop
It’s quieter and more private to sit in the car than the coffee shop. Still people walking past me in the street perhaps, depends on the location of the charger. My favourite benefit is the warmth in my lower back region with the car seat heating. Also I’m not denying a seat to someone who needs to sit down with their beverage. It’s terrible looking for a seat with tea in one hand and cake in the other and everyone looking like they are there for the rest of the day. Some of them don’t even buy a second cup of tea or coffee. So I’m being a nice person by choosing to sit car to write using my iPhone. I’ve nearly hit 1000 words while here.

Other Keyboards
I tried the G-Board keyboard recently. I heard it mentioned on a podcast. Someone liked using it for whatever weird reason. I spent five minutes it and that was enough. Deleted it right away. All I need is the Standard Apple keyboard and one for emojiis. I also have the keyboard from the App Copied. Never think of using it though. I just looked at it and the ‘Recently Copied’ selection of clipboard entries was not recent at all. I had better clean house and delete that too.
The post Swiping for Typing appeared first on Good and Geeky Books.
December 12, 2019
Dragon Dictate vs Voice Control Dictation
Last night I did a test of Voice Control dictation. I’m now comparing it by doing this dictation using DragonDictate. The difference is kinda small and yet also kind of big. Voice Control dictation is fairly good in terms of accuracy, but not very good in terms of control. If I need to make some corrections in the text as I’m writing it’s much easier to do that with DragonDictate. Mostly Voice Control is pretty good to the point of being impressive. It’s just not good enough for me to keep my fingers away from the keyboard. With DragonDictate I can dictate from the other side of the room if needed. My preferred sitting position is to have my feet on the desk and leaned back in my office chair. I can do this with DragonDictate, not so much with Voice Control. I still managed 600 words in a short amount of time.
One of the differences is being able to see the correction window in DragonDictate. Occasionally DragonDictate gets something wrong and I’m able to use the correct window to choose the right set of words. Most times the correct set of words will be there to choose from. This is not the case with Voice Control. When you see an incorrect word with Voice Control you might choose to say “edit [that word]” and you will get a numbered list of choices. You just say the number you want and the word is replaced. Quite often though, the replacement words are of no use whatsoever. These words don’t take into consideration either what it was you actually said or the context of the sentence. Sometimes it seems the replacement words are completely random. A better way to make the replacement is to say “select [that word]” and to say the word again. Sometimes it will put the correct word in there and sometimes it won’t. I give it one chance and then I will type the word in. If it doesn’t do it on the first time, it’s certainly not going to do it on the second or third time!
Speed Of Dictation – Writing
The small difference there is in terms of trust of the accuracy of the dictation engine makes a big difference in how fast you can work. I noticed when dictating into Voice Control it was taking me much longer to create 600 words that it would by using DragonDictate. Not only was it taking longer I also felt a certain amount of frustration. Voice Control dictation is not ready for the big time yet. I can see how it could be very useful to somebody who is unable to use keyboard and needs it as an accessibility feature. It’s not good enough for a writer who wants the ideas out of his or her head and onto the page. Where I might make more use of Voice Control dictation for now is going to be on iOS. The results I get from it are better than using Siri dictation. DragonDictate is not available for me to use on iOS. You have to either live in America or the UK to get access to Dragon Anywhere. Even if it was available here in Spain I might not use it because it seems quite expensive at $15 per month.
Dictation Possibilities For The Future
Next year there will be another update to the Mac operating system, probably. Every time this comes around there’s the possibility of the connection between the operating system and DragonDictate breaking. I will most certainly want to have the latest operating system, but what will I do for dictation? I might want to have the operating system that has just become available, but I might decide to stay with Mac OS Catalina. It depends upon the new things becoming available in the new operating system. Would it be worth having a new OS and abandoning the use of DragonDictate. Or if the update is worth having and worth me spending the amount of money necessary to keep on using DragonDictate.
The only option available will be to get software to run a virtual machine. That will most likely be Parallels. I will also need to buy a new version of DragonDictate, I’ll need the one that works with Windows and I probably won’t get an upgrade price. The only way to get it a little cheaper will be to buy an older version of DragonDictate. Older versions are sometimes available via Amazon.
The advantage of the Windows version of DragonDictate is how it works as a transcription dictation software. This means I could record my audio while doing something else. I can do this with the Mac version, but the Windows version does a much better job of it. I prefer to be in front of the iMac and see the words come up on the screen in front of me as I’m speaking. It just seems to work better for the thinking processes of getting the words out of my head and onto the page. So transcription features don’t make a lot of difference to me, but they could for you.

My Probable Future for Dictation Mac and iOS
I expect an expensive month to be in my future when I have to buy Parallels and a Windows version of Dragon dictation. It could be in one years time or it could be further away, who knows? I’d like to be optimistic regards improvements to voice control dictation on the Mac and iOS. It’s not a good idea to get your hopes up though. Even though voice control has entered at a high level, the necessary improvements it needs could be slow coming. I’m not willing to give up using dictation for my writing process. Dictation is so much faster and much more comfortable than using a keyboard. Maybe I will make the job sooner rather than later to working with a Windows version of Dragon dictation if at some point I have the money available. Perhaps I should just think about putting some money aside in a small piggy bank to soften the blow.
The post Dragon Dictate vs Voice Control Dictation appeared first on Good and Geeky Books.
December 10, 2019
Using Telegram Secure Message App
Working with Telegram Secure Messages
When you have a group of people it’s nice to have somewhere to chat all together. There are a number of applications you could use to do this. I have used WhatsApp with a group in the past. I had to leave the group and stop using it because I was getting annoyed with all the noisy bleeping. A couple of members of the group were posting silly stuff frequently and it made me grumpy. A niece was re-posting pictures of unicorns or something like that. WhatsApp is great for general use but it can be abused.
So for my choir group I looked at other secure messaging applications. I decided that Telegram would be the most suitable. I’ve been testing it with a couple of the more tech minded members of the group. I’m pleased with the test and the responses from the testers. This morning however, I was trying to add a person to the group and failing miserably. He says he has installed the application and created an account. I have sent him a link to directly join the group chat. I’ve tested the link on my own iPhone and it works. I sent him a link to directly connect with me. I have a username within Telegram which means I can use this type of link. None of this seems to have worked. I don’t know what he is doing or what he isn’t doing and so I’m a little bit disappointed.
Update: Later in the day he appeared in the chat. I still don’t know what the hold up was.
Within the application it’s possible to add members to the group. The person you want to add has to be in your list of contacts. So I go to invite friends. I find my friend’s name in there, select it and then tap on Share Telegram. The screen goes a little bit darker and a Cancel button appears. Nothing happens however long I wait. Kind of frustrating and it might be the app or it could be something else. Who nows, it should be easier than this.
https://goodandgeeky.com/wp-content/uploads/2019/12/Sharing-a-file-with-Telegram.mp4

What do I like about Telegram?
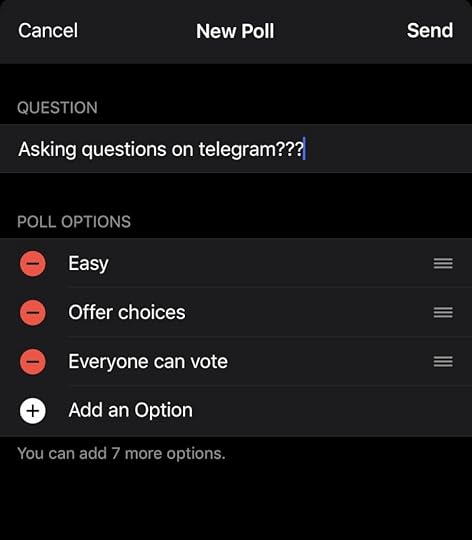
First of all it has a pleasant and useful interface. It’s easy to use for sending messages on a one-to-one basis. It also does a good job of being therefore a group chat. Within a group you have extra facilities such as creating a poll. Ask your question and have as many as 10 different options. You can send photos, videos, files and your location. The location can be a current location as a one-time share or a live location for up to 8 hours.
Today I created a small video on my iPad showing how to share files. I recorded it and edited it on my iPad. In the video also showed how it is possible to download the shared files. The shared media is divided up into Media: photos and videos, Docs: such as PDFs and word Documents, Links: Internet URLs and Audio: whatever sort of audio files. Until now the files have been shared through Dropbox. I have seen one or two people struggle with this method of file sharing. Mostly due to versioning issues. Changes were made to choir files and no one knew to get rid of the old one and use the new. The wrong lyrics were sung.
Setting up a Poll
in Telegram
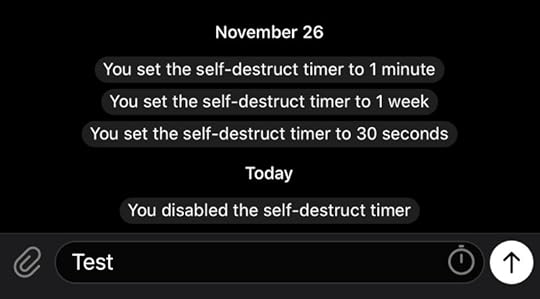
Secret Chats and Self Destructing Messages
The post Using Telegram Secure Message App appeared first on Good and Geeky Books.
December 9, 2019
Technology is great when it works
This morning I’ve been delving into tech goodness. The leader of our choir asked me to take some scanned pages and put into a PDF. I decided the best way to do this would be to use the application Pages. I considered using PDF Pen Pro and it would have worked, but I think Pages was easier.
The first problem with the completion of this task was that the scanned documents were of low resolution. Not only that, there was a lot of white space around the edges which needed to be cropped. This effectively made the resolution even poorer. I put the image onto an A4 page and dragged out one corner to make it fit. It looks quite blurry after that.
Methods to Crop 16 images
The first method to try was to open up the image in Preview. Select the area I wanted to keep, press Command K to crop, Command S to save and finish with the command W to close. This is not too tedious a method to do for one or two images, but I had 16 of these files to work with.
I thought about doing this with Keyboard Maestro on my Mac. I had a quick look to see what actions were available. But I wasn’t able to quickly work out how to start the automation. As I was looking I remembered there were crop tools within the Shortcuts app on iOS. I made the files available on iOS and opened up Shortcuts.
In Shortcuts it was extremely easy. I tested it with one file to start with. I started with the action called **Get File**. I then got it to show the document picker and to select multiple.

The next action was to crop the image. I wanted the cropping to be anchored from the top left corner. I was able to select it from a list. I then inserted the width and the height of the crop. I had this information from the first image I cropped manually.
The action to finish off was to save the documents after cropping. I didn’t want it to ask me where to save each time so I left that unchecked. The destination path has to be within the shortcuts folder. I could have added a sub-folder, but it wasn’t necessary.
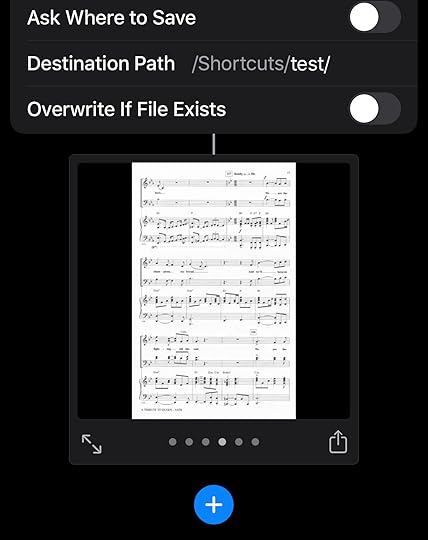
All I had to do then was to click on the run icon in the bottom right-hand corner. The job was so quick I didn’t even get a chance to take a breath. It was without a doubt, definitely worth spending the time to set up the automation.
Making the PDF in Pages
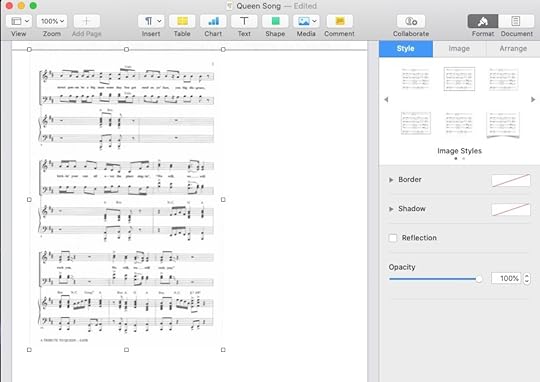
I just had to drag and drop the cropped images onto each new page in Pages. Grab the bottom right corner of the image and extend until it fitted the page. As I said, the image was blurry, but there wasn’t anything I could do about that. I asked my friend to try and get better quality scanned images. He needs to be scanning them at least at 300 dpi.
When I scan anything these days I use the Scanner Pro application on my iPhone. It is able to find the edges of the document being scanned. It will correct for any parallax introduced due to the position of the camera when taking the photo. You can scan more than one page and at the end of it you have a PDF document ready to go. This is my go to application for working in a paperless fashion.
The post Technology is great when it works appeared first on Good and Geeky Books.
December 1, 2019
Easy Encryption for Technophobes
It's really not that difficult
How to encrypt your communications
I’ve been trying out a few different options to use encryption. It’s not that I’m paranoid but, they are all out to get us. Seriously though, emails are completely insecure and they should be encrypted. The internet can be a bit of a wild west and there are bad people using it. Let’s not make it easy for them.

Canary Mail
The Canary Mail application looks pretty on iOS as well as on the Mac. If you are using the easy (for novices set up) on iOS it works fine. If you are a more advanced user and you want to use PGP keys you will run into difficulties. If you want to bring in a public key from somebody, you can’t. If you want to send your public key from Canary Mail, you can’t. It is all very disappointing. Well, you can do those things but you need a Mac too. Can’t be done just with iDevices.

Best iOS encryption applications
iPGMail
iPGMail works okay even though the interface is not pretty. iPGMail uses Pretty Good Privacy PGP/GPG so you need to know how to use key pairs. You use someone elses public key to send them an encrypted message. Only they can decrypt with the Private key they possess. It is more of an add-on you use with another email application. It uses the Apple Mail app to send the emails out. When encrypted mails come in to Apple Mail you have to select the encrypted text message. Open up the iPGMail application which automatically offers the option to import. You then have to put in the password for the private key and it will be decrypted. It is decrypted to a text file in the local file storage area of the application.
ProtonMail

Protonmail is a far better option to use. When an email comes in which has been encrypted using your public key, it will be automatically decrypted in the app. The way it works is much more seamless and for that reason I recommend it. If you send messages to non-Protonmail users you can still encrypt a message by giving it a password. Protonmail also sends the public key out with the email, so the recipient can add to their keychain and encrypt a reply. I have sent an email to a Gmail address which didn’t have encryption setup. I used a password so it could be encrypted. When the email arrived there is a link in it which takes the receiver to Protonmail to insert the password. Next I setup Flowcrypt for that email. I imported the public key from the Protonmail message. Then it was easy to send an encrypted email back. Flowcrypt only works in the Chrome browser for now (iOS Beta is still unusable).
No Setup - PrivateBin

One possibility is to use Privatebin.net. You just have to go to the website and paste in your text to be encrypted. Choose your settings for the encryption. These are easy settings. How long the message will last for. Burn the message after reading or is it an open discussion. Set the password. Set the basic formatting as plaintext, source code or markdown. I like using markdown.
After you’ve clicked on send – you’re given a private URL which you can use as normal or take it as a QR code. The person who receives this information can scan the QR code or paste in the URL. They enter the password if one has been required to see the message.
PrivateBin is a minimalist, open source paste bin where the server has zero knowledge of pasted data. Data is encrypted/decrypted in the browser using 256 bits AES.You don’t have any control over the keys used to encrypt or decrypt. So it’s necessary to trust this service. I’d say this probably okay and worth using if you don’t want to set up PGP – Pretty Good Privacy. Use it for the odd message here and there if you need to.
Paranoia Text Encryption
I found this one in the iOS App Store and at first I didn’t think much of it. After trying it out on my iPad and iPhone and then finding out there’s a web version and desktop versions of the application too, I’m a little more impressed. It’s simple to use.
Set a password.Write or paste a text into the unencrypted text area (green bordered).Press the Encrypt button.An encrypted text will appear in the encrypted text area (red bordered).You can then copy the encrypted text and use it however or wherever you want.Decryption works similarly. There is a choice of encryption methods and if you’re planning to send it to someone using the online version you’ll need to use the AES encryption. The application on iOS will automatically detect which encryption code has been used.I like this option for encrypting and decrypting text. It’s fast and easy-to-use. The application has one other trick up its sleeve. Steganography, which is a cryptographic technique which hides your message in a digital image. The image which includes your message looks like any other version of that same image. You do have to be careful with regards the service used for transmitting the image. Some of them compress the image before sending it and this destroys the message. It’s best to test steganography with your preferred means of transmission before relying upon it. If any bad actors did get to see your message with the image, they were just think you are sending your friend had a nice picture.
What are you waiting for?
Go and Encrypt Something
My Preferences For Encryption
Mac Encryption
On the Mac when I’m sending emails encrypted I prefer to use Thunderbird email client from Mozilla. It’s an accomplished, fully featured email client with all the bells and whistles. Using the Enigmail plug-in makes it work with GPG Tools seamlessly.
To encrypt files on the Mac, I’ll use GPG Tools through the Services menu. This is whether I’m encrypting files just for myself or to send to somebody else. Obviously, I need the public key belonging to the other person.
I also have FlowCrypt set up in Gmail in the Chrome browser. Works with PGP keys and is really good.
If I don’t need to encrypt a file, but I want to have it protected while being sent through the system then I would use Firefox Send. It’s simple to use for the centre and also for the recipient.
I also have an application available called Encrypto. It’s easy to drag-and-drop a file into the application, give it a password and send to my recipient. I would send the password using a secure messaging service. You can also use the telephone to pass on the password. Or just give a hint to the recipient. Encrypto is just for Mac to Mac communications.
iOS Encryption
For sending and receiving emails with PGP I’m using Canary Mail – mostly. If I have a struggle with the key management in this application I will then go to iPGMail.
On iOS I’m still working out which method is the best for text encryption. I really like the look of Paranoia Text Encryption because I can use it as an app. Recipients of the encrypted text can either use an app or can use the web version. It doesn’t matter what platform they are on.
If I want to encrypt something with Pretty Good Privacy – PGP/GPG and it’s not for email then I’ll probably use iPGMail. I can encrypt files with it as well as text.
The post Easy Encryption for Technophobes appeared first on Good and Geeky Books.
November 15, 2019
Shortcuts and NFC tags
The first NFC tag support came from the application Launch Centre Pro. This was before NFC was properly launched systemwide on iOS. These are pretty little NFC tags with a picture of rocket on the front. At the time and they only worked with Launch Centre Pro which could be configured to run shortcuts. Since iOS 13 came out we can now read NFC tags directly into Shortcuts.
Getting started with Shortcuts
The first problem to solve with NFC stickers is to decide what shortcuts to run from an NFC tag. My first one I set up with Launch Centre Pro ran a shortcut called Drivetime in my car. This opened up the applications Leaf Spy Pro and Waze followed by podcast audio and a short spoken message. This perfectly set up my driving experience in my electric car. However, I no longer use this NFC tag. This is due to the inclusion of another trigger in shortcuts iOS 13. I can trigger the same set of actions just by connecting to Apple Carplay.
[image error]
Next Steps with Shortcuts
So I bought another 10 NFC sticker tags and a bunch of NFC keyring type tags. For two or three weeks I didn’t really do anything with them. I needed to sit down and have a think which shortcuts would be best used with NFC triggers. I got busy with other things and the NFC thing wasn’t urgent.
This morning I finally set up a number of NFC triggers. I found out it was possible to set a television watching scene with NFC. Not only can I set the lights just as I want them, I can also turn on the television and set the Apple television to the desired application. I can choose whether I want Netflix, Amazon prime video or YouTube. I could even set it to one of the games. There is an action within the Shortcuts application to connect to the remote for the Apple TV. It activates the Apple TV and switches to the required application. I have set up three NFC tags, one to open up Netflix, another to open up Amazon Prime Video and another one for YouTube. I should also set up another one to go into Apple TV plus. With the lighting I turn everything off except the corner lamp which I set to 60% brightness. The room goes into cinema mode. The television is turned on using a HomeKit plug socket. I used to control that using an Amazon echo Wi-Fi plug socket. I found I have a couple more options by keeping it within the Apple universe. The NFC tags are stuck to the coffee table in front of the sofa. I can easily touch the phone to the tags without having to move. Another option I’m looking into to assist my laziness is to get an Apple HomePod. I can use my voice to get things happening without having to pick up my iPhone.
It’s not perfect yet
[image error]
When I was trying to set up these shortcuts I ran into a problem. I was choosing an action to ‘set’ HomeKit properties. For the life of me I couldn’t work out why the shortcut wasn’t working. Instead of choosing set I should have gone with run. I had to look into a previous shortcut which was working to find out where I had gone wrong. It was a good job I had a previous shortcut in which I’ve chosen the correct action.
I can use these NFC tags myself, but my wife who is using an older iPhone isn’t able to. This isn’t going to change in the near future. We will have to wait until I buy my next iPhone and that might not be until next year or even the year after.
Other NFC triggered shortcuts
I have put an NFC tag at the front door. It is actually stuck to the front door just above the handle. It is a white door and a white tag. You would hardly notice its presence. I have set it up so that it runs a HomeKit scene. Basically, all it does is switch off all the lights and appliances in the house. I can’t use it when my wife is still inside. It is just for when I leave the house and I’m the last one to leave. There is another automation trigger available based on who is the last person to leave the house. The advantage of using the NFC tag is that the shortcut also gives a message reminding me to lock the door. When I’m leaving the house via the garage is when the last person leaving trigger comes into play. I could get short cuts to say something else to me instead.
[image error]
Applications donating shortcuts actions
It took a while to set up the shortcut for leaving the house. I wanted it to use a particular Home scene called I’m leaving. When I was looking for the shortcuts action for this scene it wasn’t available. I had to go into the Home application and use the scene manually a couple of times. Only then did the Home application donate the action to shortcuts. Up until then it was only showing me the shortcut actions I was using to set up the NFC tags for the television. Hopefully in the future Shortcuts will have better integration with other Apple applications. It really should do already!
Other NFC options
I drive an electric vehicle, a Nissan Leaf. Occasionally I need to top up the battery away from home. To do this I often need to use an RFID card to activate the charging point. I have quite a few of these RFID cards. An RFID card is basically an NFC tag. So I have set it up so I can scan an RFID card and use it to start an application on my iPhone. An application I use regularly is PlugShare. This tells me where the charging points are. I can check in to a charging point using the PlugShare app to let other PlugShare users now it is being used. I can submit how long I expect to be using the charger for. I have the RFID card in my hand and it is easily done to tap my phone onto the card and open up the PlugShare application.
Another type of RFID card is a debit or credit card. You could scan your bankcard and use it to open the banking application on your phone.
Using the rest of my NFC tags
I have one of the key ring type tags on my keyring. These are available in different colours. The white one I have on there at present is set up to run the shortcut for the car. I’ll have to have a think about setting up other shortcuts suitable for connecting to these keyring tags.
Shortcuts is great for automation
Shortcuts keeps getting better. Not only do the team at Apple keep making improvements there are other side applications you can use to add extra functionality. One of these is called Toolbox Pro. It’s highly likely that the Apple team will add some of the functionality found in Toolbox Pro to the Shortcuts app. There is also the application Scriptable and Data Jar from the same application developer. If you know what you’re doing with some basic programming in Javascript the sky is the limit with what you can do with Shortcuts.
Sitting In My car being Good and Geeky
I started this article watching it in Drafts using Dragon dictation on my Mac. It’s a bit of a cold day here on the Costa Brava and I had to go out in my car to the post office. I collected a package containing amongst other things another Hue lightbulb and a motion sensor. For my next track I went to the nearest charging point for the car. It is free to use with an RF ID card. It’s next to a supermarket if I need to go in and collect some bits and pieces. It is also quite a good place to stop and get some work done while plugged in. My car has a heater in the seats to keep me warm.
So I am comfortable sitting in the passenger seat with my iPad and I am editing the document using both the keyboard and also Voice Control. Voice Control is remarkably accurate for dictation, it also has editing commands to use with the voice. It’s amazing the amount of work you can get done talking to your iPad in your car.
The post Shortcuts and NFC tags appeared first on Good and Geeky Books.
October 4, 2019
Always Learning Something New
This morning I learned you can have a subject line in the Messages application. This is similar to the way you have a subject line in an email. I tried it and it stands out from the actual message underneath. I didn’t know it was possible, but I learned it from a tweet. We should all try and learn something new each day.
Clips Video Creator
While listening to a podcast this morning I learned it’s possible to add a voice-over in the Clips app. If you’re bringing in video already recorded with audio you can talk over the audio you already have there. It seems the audio doesn’t play while you are recording the video into the clips app. So you could be talking over some speech you already have in there. Maybe it would be better just to use this with video without any sound already.
Clips isn’t a real and proper video editor. It’s only there for doing the throwaway type of video you push onto Instagram or onto Facebook. I do have this application on my iPhone and I have tried using it once. I wasn’t terribly impressed and I think there are better ways of making video. You’d only really want to use this if you want to make use of the special features, such as stickers or the fancy filters. You can also have your audio captioned. It converts your speech to text and you may need to edit it to get the words just right.


Previous
Next
You can make your video look quite different and even make it look like a bit of a cartoon. Probably the worst part of the app is that it only films in square mode. You can only use it with your device in portrait mode and it’s probably best used on an iPhone rather than an iPad. All in all Clips is kind of a weird application, but a little bit fun to use.
Sample Video From Clips
The post Always Learning Something New appeared first on Good and Geeky Books.
September 11, 2019
Catalina Voice Control
First of all I tried Voice Control dictation into Drafts. This is where I normally work with DragonDictate. Nothing happened. None of the words I spoke got turned into text. I decided to give Voice Control dictation a go in Textedit. I was slightly surprised when it did actually start to work. It only works with short pieces of speech and it was unable to complete a full sentence. This would make it extremely frustrating to work with. All of your thoughts will be truncated as you try to get the ideas out of your head and onto the page.
[image error]
On too many occasions Voice Control dictation missed out either whole sentences or parts of a sentence. It would then be necessary to go back to where the text was supposed to be and dictate the words a second time. This is extremely annoying when trying to dictate. It works worse than when using Siri dictation or the enhanced Siri dictation in Mojave or on iOS.
Where the dictation did work with Voice Control I have to say I was impressed with the accuracy. It didn’t seem to have any problems with my accent or how I spoke. This may be due to the fact it’s using a UK dictionary. This wasn’t the case when I tried out the Voice Control accessibility feature on iOS. The only dictionary available was the US English. I like to have a full stop at the end of the sentence and not a period.
Continuous Improvements?
I’d like to think that this is just the first iteration of Voice Control with improvements to come. There will be upgrades coming once Catalina is formally introduced to the world. I would expect continuous enhancements after that. Hopefully there will be artificial intelligence or machine learning helping to improve the way the dictation works. For the moment though, there is no way I would give up Dragon Dictate in favour of using Mac OS Catalina Voice Control.
Not Fit For Purpose
The Voice Control feature has been packaged as an accessibility feature. It is for people who have a need to dictate because they can’t properly use a keyboard. This feature is going to have to get better quickly or even the people this has been designed for are going to get really annoyed. It just isn’t good enough as it stands right now.
The post Catalina Voice Control appeared first on Good and Geeky Books.
Good and Geeky

- David Allen Wizardgold's profile
- 3 followers

