
David Allen Wizardgold's Blog: Good and Geeky, page 4
February 27, 2021
What’s New With Good & Geeky
Using Alfred on the Mac
Whenever I press Command plus the space bar on the keyboard instead of getting spotlight I get access to Alfred. With the pro version of Alfred you get more than just a spotlight replacement. So I can do fancy things like, getting a list of the previous X number of clipboard contents. I can scroll through and paste whatever I want from the list. It gives me search facilities and will bring up items that are in the Contacts app. Or it will give me an opportunity to search inside Google, Wikipedia or Amazon using whatever I typed in as the starting point. This morning I added a workflow to Alfred which is activated by me typing in CLF followed by the first letters of a folder on looking for. It specifically brings up any folders containing the letters or words typed in. I have another workflow which will find emoji icons for me. I only have to start typing in the word emoji followed by whatever is on looking for. I can also get that started by using a hotkey. I’ve got it set up so that it will start using Control, Option, Shift Command plus the letter E. That might seem like a difficult combination but I have that set of keys set up to the caps lock. I only need to press caps lock plus the letter E. It is possible to make your own workflows in Alfred. It’s often easier to have a look in the directory of workflows you can find on the forum and download them already made.
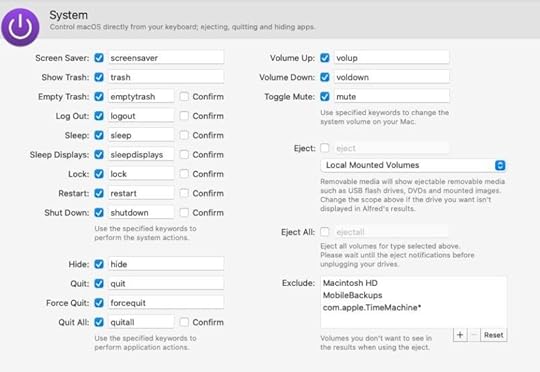
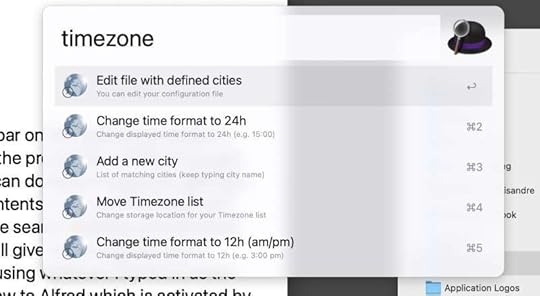
A useful workflow I downloaded gives me time zones. The coding within the workflow allows me to manage the cities in the list. I can easily add cities and remove cities. Change between 24-hour clock or 12 hour clock. I have a hotkey which immediately brings up the list of cities and their time zone information. Or if I type in the word time zone I get the options to manage the workflow. Alfred also does file search, web search, snippets, dictionary definitions, connects to music mini player. Alfred is also a great way to get to system commands like when you want your computer to go to sleep.
 I Bought a New iPhone
 I was planning to keep the iPhone 10 for three years. I came into a little bit of money and brought it forward by six months. It’s also a good idea to do it on the two years because I pass my phone onto my wife. In terms of battery usage and longevity it has to last for four years if I work on a two-year cycle for my own phone. Stretching out my phone change time period to 3 years will make the phone less useful for my wife. That’s my excuse and I’m sticking to it!
I use my phone as my ultimate portable computer. So having the latest and greatest for two years is sensible for me. My wife doesn’t have the same technological requirements for her phone as I do. The only benefits you’ll get from having the iPhone 10 will be the longer battery life than she gets with the iPhone 7.
To move my data from the old phone to the new phone I used iMazing. It wasn’t totally straightforward because of me using the beta version of the operating system on the old iPhone. I had to register the new phone in the beta program with Apple. Download the updated operating system and install it. Then I was able to get the job done. There was some time delay between starting the upgrade process and getting it finished. During this period I missed a few of the messages sent to me in the Messages app.
There’s not really a huge difference between phones that are two years old compared to a new one. I don’t even really notice any sort of speed bump even though the processor is quicker in the new phone. The camera is improved, but I haven’t a chance to make any proper comparisons yet. In any case I’m still glad to have the newer version of the phone.
After my phone is updated I then have to update my wife’s phone. I did a better job of doing that because of lessons learned with the first one. I should make my own set of notes to remind me next time the order of things in the process. Like doing the unpairing of the watch before doing the reset of the phone.
Choosing the Application for Dealing with Email During the last month I’ve been using MailMate. Before that I was using Thunderbird and I’ve also been dabbling with Spark. The reason for using Spark is that I use it on iOS. I like it and it looks pretty. Spark does the job apart from dealing with PGP encryption. It’s for that reason I was using Thunderbird. Then Thunderbird changed the way it did PGP. Instead of using the Enigmail extension it did its own encryption. I haven’t been too impressed with the new way of doing it. I came across MailMate and so far I’m happy with it. It does a better job of PGP encryption. When I’m searching for things it does a better job of finding stuff. I’m quite tempted to pay the money at the end of the trial period. This is despite my desire to move away from using email as much as possible. I’ve written a book ‘Stop Using Email’ in which I enthuse about end-to-end encryption in the secure messaging applications. It’s much better to use Signal, Wire, Telegram, Threema or Session. I even set up the more technically difficult application Element. I can’t see me being able to persuade many people to use that one to communicate with me. I would like to get rid of WhatsApp due to the latest privacy concerns with Facebook. It’s difficult because too many of my family contacts use it and are not showing any signs of changing to something more secure. There’s quite a lot of inertia and unwillingness to change. Most people don’t really seem to care if their stuff is private or not. The shouting only starts to happen when they get hacked. I sometimes want to pull my hair out when talking to my mother about passwords.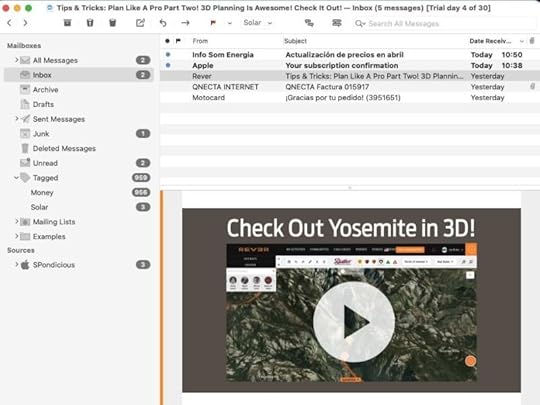 Motorcycle Technology
 When I’m riding my motorbike an NC750 X I’d like to listen to music or podcasts when on a long trip. So I bought a communications device for the crash helmet. This connects to my phone by Bluetooth and I can just about listen to music while riding. Due to the wind noise it can be a little bit faint when I’m riding at higher speeds. It’s also useful to have this communications device to have instructions from Waze relayed to me by the speakers inside the helmet. I do have a handlebar mount for my phone so I can see the map in front of me. As you can imagine when riding a motorbike it’s really useful to have warnings of speed cameras up ahead.
The best use for the communications system is that it comes as a pair. My wife has the same system installed in her crash helmet. When we are riding close enough together we can send messages to each other verbally. This usually is me reminding her to turn off her indicator lights. She is learning how to pass the motorcycle test at the moment and I can give some instructions over the air as we are riding.
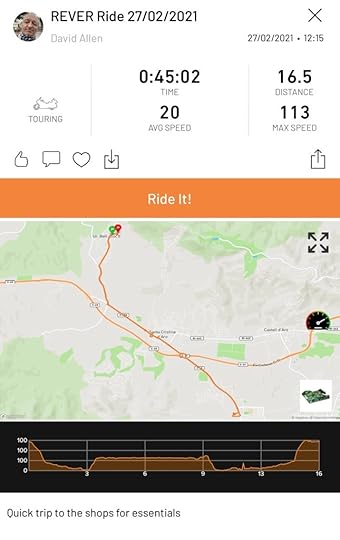
Riser or ReverI started with an application called Riser and I’ve just downloaded another one similar called Rever. These are apps to keep track of your motorcycle journeys. It would be good to take the recorded info and put into a spreadsheet. Would be great to see how long in kilometres all the journeys are. One day I will buy and electric motorbike and I need to see what I need in terms of range. Could buy a bike based on actual range needed rather than what I think I need.
I signed up for a month of Pro membership with Rever. I like the maps and you also have a planning mode on the web site. Set the app to give you the twisty roads to ensure maximum motorcycling fun. Both of these apps look great and it’s hard to chose which one will be the long term winner. Rever has a 3D mapping view which is cool and there is a rewind tool in Riser.
 Rever
Rever 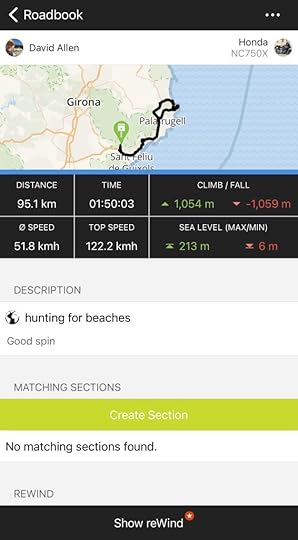 Using Riser Mac and iOS How-To Videos For quite a lot of years I’ve been making how-to videos showing people how to get things done with applications on iOS and the Mac. During the last week I’ve been making videos explaining how to work with Affinity Photo and Affinity Designer. There’s a Facebook group for these applications and people ask questions. I’ve been able to add to my catalogue of how-to videos on YouTube in my Wizardgold channel. I’m always looking for subject matter for these videos. If there’s anything you’d like me to cover, why not send me an email asking for a tutorial.
 The post What’s New With Good & Geeky appeared first on Good and Geeky Books.


January 25, 2021
Stream Deck Automation
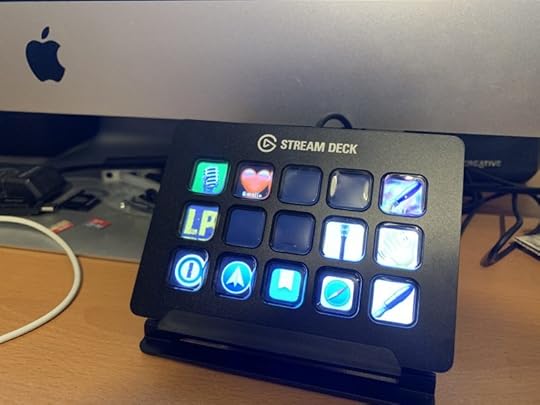
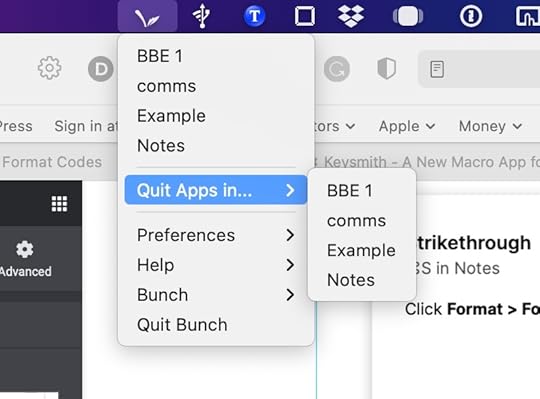
A Stream Deck is one of those devices I’ve wanted for quite some time, but never got round to it. It’s a set of buttons which sit on your desk allowing you to get things done faster, easier and more productively. It’s fully configurable with LCD screens per key. I love having a visual representation of an icon I’ve designed myself to show me which button to press. I have a picture of a microphone to run the macro to set up Drafts ready for me to dictate. Instead of having to remember keyboard shortcuts you can just press a button on this device and hey presto. You can get these with 6 keys, 15 keys and 32 keys. I decided to get the one with 15 keys because I’m heavily into automation and I didn’t think six keys was going to be enough. You can also have folder keys to let you drill down to another level of keys.
Installation and First StepsInstallation was easy. I just plugged it into a USB port on the back of my iMac and downloaded the software from the Elgato website. When you first start this up it only has one key enabled which is a link to the Elgato website to get help and information about how to use this device.
As you may have guessed from the name of the device it is for when you’re streaming video or audio and you want to quickly control what’s happening on the screen. If you’re live streaming on Twitch or on YouTube and you want something to happen with your microphone, your camera, your desktop or something within the chat connected to the stream, press the button and it’s done. Set a button to show a lower third graphic on your video stream to make yourself look entirely professional. Concentrate on the game or the content of your video. Have things can happen in the background so your viewers don’t get distracted by seeing weird stuff happening on your screen during your live stream. I don’t generally do any live streaming, but it’s nice to know I have all of this available to me. I’m more interested in the productivity angle.
 Enhancing Productivity with a Stream Deck
 I’m still getting to grips with the Stream Deck and so far all the videos I’ve seen are all about how to do the streaming. I have seen it’s easy to set up a button which will take you directly to a website. It is supposedly possible to set off a Keyboard Maestro macro off by pressing a key. Well, it is, but only by using a hot key combination in KM. There’s a way to activate a key on the Stream Deck from KM, but that’s looking at the device from the other end of the workflow.
Why Use a Stream Deck?I have so many keyboard shortcut combinations in so many apps it’s hard to remember them all. By using this device I can see the automations I have set up as brightly coloured buttons on my desk. For example I have keyboard shortcuts in Drafts to run actions. I often use the action to send text to Day One journals. The words go to the main journal if it’s a general posting. I’ve a journal for motorcycling and another for cultural comments of my life experience. I have assigned buttons for each of these. I don’t have to open the sidebar with the actions on display and double click on the action. Now it’s done with just one click. I have a button which runs a Keyboard Maestro to set Drafts up for dictation. Just the text entry window in view and the drafts and action lists pushed out of the way. In fact I have set up a profile which displays itself automatically when Drafts activates. Buttons to run my most used actions will take the top ten spaces and the five on the bottom row will be for opening other apps. Or…. I will use a button to open up the Default Profile which has the buttons for the applications.
The Story so FarI’ve decided to try and put as many macros onto the buttons as possible. These are automations connected to keyboard shortcuts. I had a keyboard shortcut in KeySmith to run my ‘Ready for Dictation’ macro. I found it worked better making the same macro in Keyboard Maestro. It could have been a problem with overlapping key combinations because at one point it worked and later it didn’t. Mostly I have not run into many problems like this. This morning I wanted to set up Drafts to run an action from a Stream Deck Button. My first attempt didn’t work. I changed the keyboard shortcut for the action and then it worked. my reason to put this on a button is because it saves time. The action is in a group of actions I don’t normally see on the screen. By using a button I save myself a few clicks not having to navigate to the social network group of actions in Drafts. I could just remember the keyboard shortcut to do this task. That’s probably not going to happen though. I have too many shortcuts to remember and this is a perfect use for the Stream Deck device.
Thinking About How I Use the ComputerWhen you’ve been using a system for some time you will have organised, reorganised how you do things. You will have created keyboard shortcuts in various applications and also systemwide to help you get things done. During that time your needs will have also changed. There will be keyboard shortcuts you once used daily or multiple times per day you now no longer need. They are still sitting there on the system taking up space. It’s quite possible for me to create a new keyboard shortcut and for it to not work due to a conflict. Something else will happen or nothing will happen and I’m left scratching my head. I have a number of automation tools like KeySmith, Keyboard Maestro as well as application-specific keyboard combinations. On top of that you have to consider the keyboard combinations you can set up from within the keyboard settings in the system preferences. Sometimes it could be a good idea to start from scratch and make a plan. You could have a specific keyboard combination like Command with Option plus a letter to do certain types of task. It would help to remember these productivity keyboard combinations.
I could reorganise some of the actions I have within Drafts. I could make sure the ones I use most frequently are in the action group I tend to keep the front. I would necessarily need to use the Stream Deck because it would be just as easy to do a double click directly on the action. At least it’s easy to find out which actions are most used by looking in the action log. It seems I mostly use Drafts for writing posts in my journal app of choice Day One, at least that’s the case during the last month. When I’m in writing mode I do the writing for blogging and for the books in Drafts. From there I move it into Ulysses for the editing and publishing. It’s good to have a copy of your first draft as a backup. Just in case anything happens.
Using Stream Deck for opening applications. We already have a number of ways of opening applications on the Mac. Most times I open or switch to an application by using the keyboard shortcut command-spacebar. This opens up Alfred and I can find the application just by typing the first couple of letters of the application name. Then there is the dock on which I have placed my favourite applications. I could even use Launchpad to see all of my applications available on my iMac. I have just set up a keyboard shortcut to get out that quickly, although there is no guarantee of me remembering the shortcuts. I would need to put a Post-it note at the bottom of the screen and use it multiple times to get it into my muscle memory. At least now I could make a button on the Stream Deck so I don’t have to remember the secret handshake to get into Launchpad. Now I have this button to press I might actually start using Launchpad more often.
Creating Buttons on Stream DeckWhen you first open up the application to configure your Stream Deck your first job should be to tidy up the list of available actions. On the right-hand side of the screen you’ll see a list which includes many things you don’t need or want. There’s a button in the top right which looks like a list of three things. Click on that and get rid of any superfluous actions. For example I got rid of the actions for the OBS streaming.
Then you might click on the button in the bottom right corner to get more actions. This will bring up another window where you can choose to install actions to work with Apple Mail, Philips Hue Lights, PowerPoint (if you’re that way inclined) and other specific applications. It works with a wide variety of streaming applications such as Wire Cast and Ecamm Live. There are a few actions designed to give you information on the buttons such as a Bitcoin price ticker, a world clock, stocks and there’s one for displaying the current CPU usage.
Previous Next Solving A Problem With The Stream DeckWhenever I dictate into the application Drafts using Markdown I create a level 2 header with two hashtags. I dictate this into the document using the words “Header two.”. For some strange reason at the beginning of a document it will add an extra space in front of the two characters for the header. I have created a fix for this little problem using Keyboard Maestro and when I type xx it runs a macro to delete those two X characters, go to the beginning of the line, delete the space and then return to the end of the line ready for the next part of the dictation. It works well and doesn’t give any trouble but I thought it like to also have a button on the Stream Deck to do the same job. This allowed me to try out the function on the Stream Deck stringing multiple actions one after the other. With the set of three hotkey actions the job was done. So now if my keys are at the keyboard I can use the Keyboard Maestro macro activated by the typing of xx or I can press the button on the Stream Deck. It’s nice to have multiple ways of doing this. Sometimes your fingers on the keyboard, sometimes the fingers are closer to the Stream Deck and I also have another way of triggering it with Keyboard Maestro. If I press the F9 key it brings me to a conflict palette which allows me to press another letter key on the keyboard to activate the macro. I can also assess all of these methods of doing the job after a month or two. Maybe I use all of these equally and keep them all. Maybe I delete one of them because it’s not being used. It’s also possible that I only use one of them because it’s the only one that’s attached itself to my muscle memory. I don’t really need to delete any of these possibilities unless I need the shortcut or the button to use for something else.
It Doesn’t Always WorkWhen I was taking the draft document to put onto the WordPress blog post I wanted to automate the process. In WordPress I’m using a system called Elementor which is a great way to drag and drop elements to make great looking blog posts. I have to work on it per element, so per header, per paragraph and so on. This is so I can arrange the blog post and set it up just the way I want. What I was looking for was to have a button on the Stream Deck to copy a line or to copy a paragraph in the Drafts application. Then I would go to the creation of the blog post in Safari and have another button which would paste without formatting. I can never seem to remember the keyboard shortcut for paste without formatting. To do this properly it has to select what’s already there and paste over the top.
I created a button in the Stream Deck which used a combination of keyboard shortcuts. I needed an action which moved the cursor to the end of the line. Then another keyboard shortcut to select the whole line. Finishing off with a keyboard shortcut to copy selection to the clipboard. That seemed to work fine.
Moving to WordPress. I needed another button which would paste the clipboard contents over the top of the placeholder text in the element. So I have my cursor within the placeholder text. I have to move the cursor to the end and then select all of the text. I can do this using the right keyboard shortcuts. Finishing off the automation with a paste of the clipboard contents.
This all more or less works. The problem is, I have to click a second time on the actual text otherwise I only have the element selected. If I don’t do that the automation tries to select all of the other elements rather than just the text I need to be selected. So sometimes it works and sometimes it doesn’t. When this happens it starts to feel frustrating and more of an annoyance than a good automation.
The I found the keyboard shortcuts I used which were fine in the main interface of Drafts, didn’t work in the Preview view. Instead of getting a whole paragraph I got an odd selection from the middle of the sentence where the cursor was to the same position in the line below.
Now I am finding the selection of a paragraph to be easier by triple tapping on the magic trackpad anywhere within the paragraph. I have the PopClip application which gives me the copy command right on the cursor and it is so easy to use.
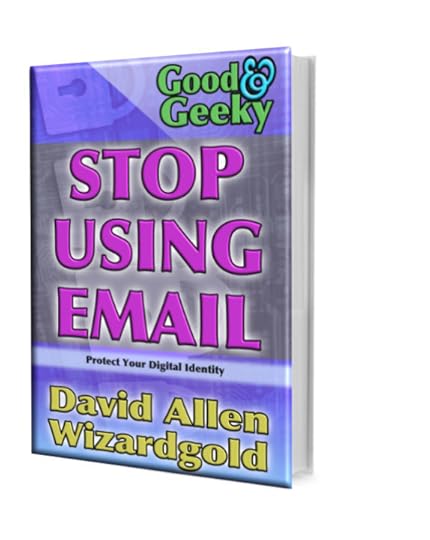 Buy The Book One way of staying safe is to avoid using email. Sending email is the equivalent of putting your private data onto a postcard. The postcard (email) can be read easily as it passes through the postal system. Your information is naked and without protection. There are illicit sniffer applications which look at email as it goes through servers. Similar to the Google email system which looks to see what adverts it should put in front of you. That’s why you get a free service from Google. You are the product being sold to the advertisers. Buy The Book
 The post Stream Deck Automation appeared first on Good and Geeky Books.
December 15, 2020
How To Protect Your Email Account
There are many things you sign into online where you have to provide an email address. These places are then able to manage your account with you via that email address. We are talking about accounts where money is involved. We are also talking about accounts where personal and private data is held. So it makes sense to have a well protected email account. If someone can get into your email account then they can also get into wherever else you have signed into using that email address.
So you do need to use email to have an online presence and you can’t give it up completely. I would recommend though, giving up using email for your person to person communications. Use a message service with end-to-end encryption enabled as default. Email is completely insecure. It was designed that way and this so embedded into using the Internet it’s almost impossible to make it secure.
Step One - Switch to Messages App
STOP USING EMAIL AS MUCH AS POSSIBLE
Session – Like Signal but with anonymitySignal – recommended by Edward SnowdenTelegram – Make sure the message is encrypted (It’s not the default)WhatsApp – Do you want to trust Facebook??Threema – Good but you have to pay for it. (not expensive)
Step Two - Use a Better Protected Email Service
You could get yourself an email address where end-to-end encryption is included. It will only ever be included when sending messages to people using the same service for added encryption functionality. If your email address is with Tutanova or Protonmail and you send email to other people using the same service you will have end-to-end encryption and be protected. Send to non Protonmail people from your Protonmail account and encrypt with a password. Possible to swap encrypted emails to friends with PGP in Protonmail.
Protonmail is Good

I can recommend using Protonmail because it is set up in such a way to give it good protection from the off. Two factor authentication is included as default for login. It’s a good start to your personal online security. You only have to persuade other people to use the same service to get full protection. You might have success with friends getting them to change their email service from Google or Hotmail. That’s never going to be the case with businesses. You would think that big business would prefer to have their sensitive data protected. It’s mostly the case that they don’t realise how exposed they are. For non Protonmail users you can send encrypted emails which can be decrypted with a password. You only have to give the password to your contact by secure means. Send it via an end to end encryption message service or read it out over the phone.
Or There is Flowcrypt
If you have FlowCrypt enabled via an extension in the Chrome browser you can send encrypted emails to other people using the same service. Or you could set up PGP encryption on your computer and communicate with someone else using PGP encryption. It is possible therefore to have secure communications with email, but it is not the default. The examples mentioned have various levels of complexity, ease-of-use. Much of whether it’s going to work and not depends upon the security considerations used by your contacts.
Question – Do you want Google reading your emails so they know what adverts to send you?Step 3 - Use Good Passwords
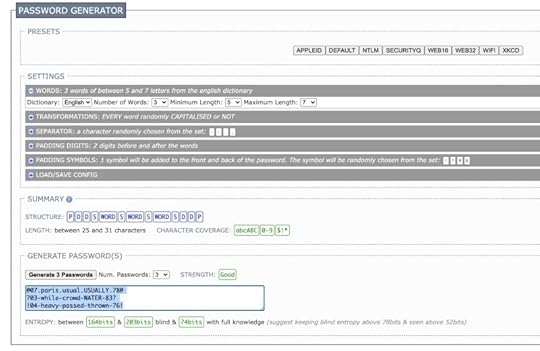
Don’t use a single password in multiple places. Especially don’t do that if your password is your date of birth or your mothers maiden name.Use a good password in every separate account.Use a tool to create good passwords. 1Password does this. Or use xkpasswd.net to make new passwords.Use a password manager to help you look after them. I like 1Password for this, there are others.Don’t write your passwords on a piece of paper unless you store it in a locked safe.Don’t write them in plain text in a Word document.Use one of these long, but memorable passwords from xkpasswrd to get into your password manager. Entropy – long passwords, is your friend. Give yourself a password easy to remember, but hard for a computer to guess. 44 bits of entropy means it would take 550 years to guess at 1000 guesses per second.
Step 4 - Add 2FA To Any Accounts Offering it.
Protect your account with 2-Step Verification With 2-Step Verification (also known as two-factor authentication), you add an extra layer of security to your account in case your password is stolen. After you set up 2-Step Verification, you’ll sign in to your account in two steps using:
Something you know, like your passwordSomething you have, like your phoneThe post How To Protect Your Email Account appeared first on Good and Geeky Books.
December 11, 2020
KeySmith Mac Automation Tool
I’m quite impressed with KeySmith automation on the Mac. You can record a macro to do any number of things on your computer and it will play it back for you. Open applications and click on buttons. Automatically type in text and run AppleScript commands. It’s easy to use compared to Keyboard Maestro and has enough tools for most people. My recommendation would be to use it in conjunction with other applications such as Keyboard Maestro, Better Touch Tool and Alfred to expand your automation options. Start an automation from KeySmith with a keyboard shortcut and use keyboard shortcuts from other applications such as Moom, Alfred or Better Touch to keep things moving. It isn’t quite a Shortcuts for Mac, but it’s going in that direction.
KeySmith Automation Tutorial
Getting Started with KeySmith Automation
There’s a webpage with examples which you can bring into the application by clicking on a link in the Safari webpage. Most of these examples are fairly simple with only one or two actions. There are some which merely open up an application. If you already have something like Alfred it might seem a little pointless. Although, you do save a couple of keystrokes. You could have a shortcut where you press both command keys and a number to open up a specific application. This would work quicker than using the command spacebar keyboard shortcut with Alfred, typing in a couple of letters to start a search for an application followed by pressing Enter or command + a number. A small time-saving when you’re only opening just one application. You could make it more useful if you regularly work with two or three applications at the same time. Use KeySmith to open as many applications as you want with just one keyboard shortcut. You can follow that with a global keyboard shortcut in the macro to activate Moom to organise the Desktop.
Thanks a Bunch - KeySmith Alternative
Bunch is another app (from Brett Terpstra) which is even better for opening multiple apps. It also runs AppleScript commands. Easy to edit the files to make all the magic happen. Thumbs up from Good and Geeky!
Worth getting and using alongside KeySmith.
GET BUNCH
Making KeySmith Macros From Scratch
1. Click on the button to start a new macro.
2. Click the button to record – open up your applications, click whatever buttons you need to click, keep going until you have everything done.
3. To test your new KeySmith macro you’ll need to close down the applications you’ve just opened up with your recording.
4. Use the keyboard shortcut if you’ve already assigned one, if not click on the button – Run.
5. Most times this will work fine and if it doesn’t you’ll see notifications to tell you where it has failed. There are occasions when you might need to insert an action to wait a second or two. I found it sometimes necessary to change it from clicking on an element within an app. Change from an element such as text entry and to use an action which clicks on screen as a specific pixel point. I don’t know why this would’ve worked better, but it did. I also found recording keyboard shortcuts worked better than some clicks.
6. Run it a few times to test it. I made one and it worked great. To make sure it worked the subsequent times I had to add an action at the end to close the app I was working with. For now we have to go to the right side of the screen to get the ‘More’ drop down menu. There are six choices including the option to delete the action.
Limited in Scope
I would like to have IF actions to add logic to the macro. Could do with a way to add ‘Open App’ when adding actions manually. I’d like to see these actions as drag and drop options from a side panel.
A Drafts Example
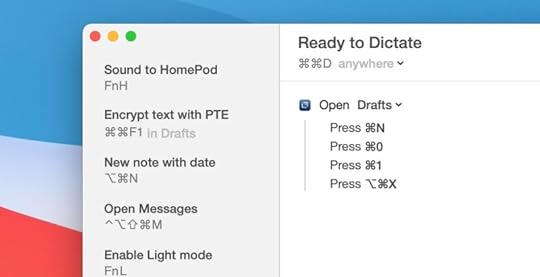
I dictate into drafts and I made a Keysmith macro which works globally to open Drafts and start a new draft. It then does a couple of key combinations to clear the screen ready for receiving text. I finish off with another keyboard shortcut which turns on the dictation and turns off the TextExpander for while I am dictating.
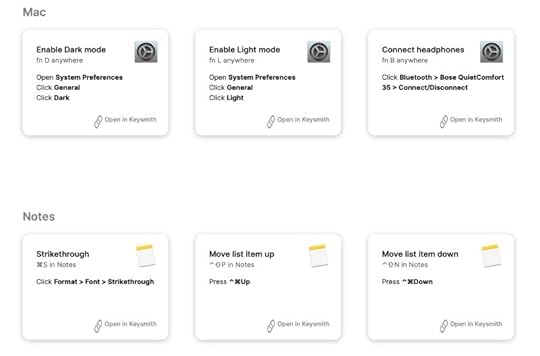
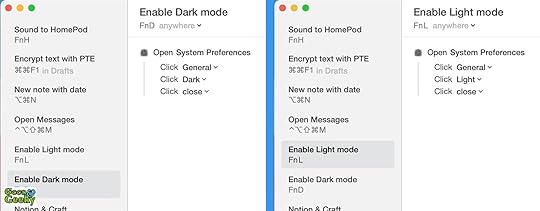
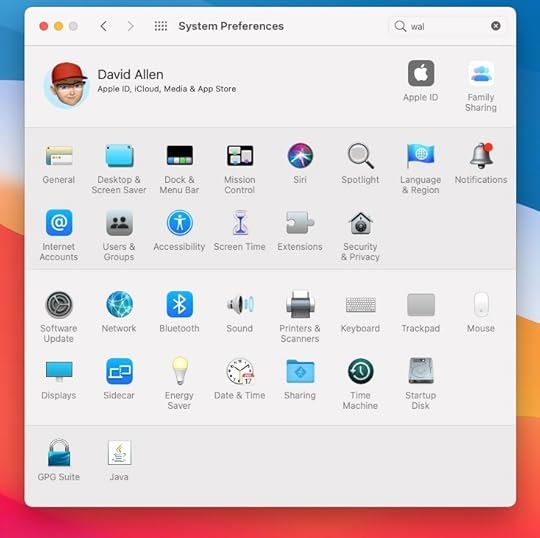
System Preferences - Dark and Light Modes
Two separate macros – one to turn on light mode and the other to turn on dark mode. Much faster than manually opening System preferences and going to the right tab to get it done. You could set other system setting at the same time to have things just right for your productivity environment on your Mac.
Sound to HomePod
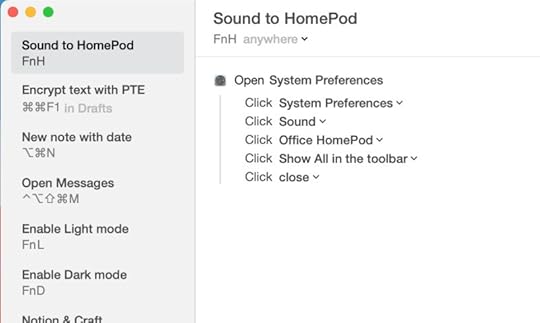
This one changes to sound output from the speakers I have connected to the Mac to the HomePod. It works a treat and is so much faster to get the job done.
I find it works better to get the sound going to the Homepod by using KeySmith.
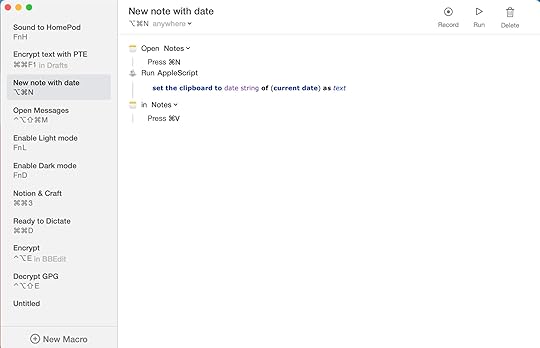
Notes App as a Journal
I like to use DayOne as my journal app. If you don’t want to pay a subscription and want something with fewer features but does the job, use this macro. It will open Notes and get the current date to paste to the top of the note. you could also add other text as a template if that suited you.
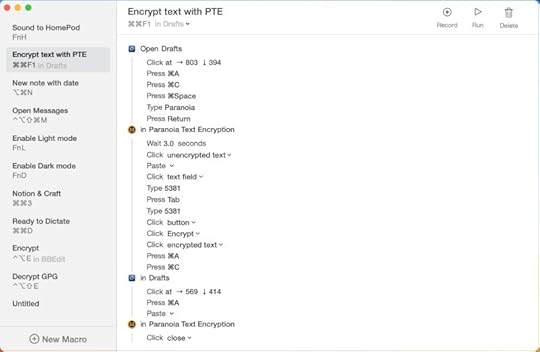
Encrypt Text in an App with Paranoia Text Encryption App
This is a more complicated macro which I ran through first without recording before doing it again for real. It starts in Drafts where I do most of my writing. I set it to:
1. Select all the text
2. Copy to clipboard
3. Open Paranoia Text Encryption
4. Paste the clipboard text in the right place
5. Fill in the password in two places
6. Click the button to encrypt the pasted text
7. Make selection of the encrypted text and put it on the clipboard
8. Go back into Drafts and select everything
9. Paste the encrypted text over the top
10. Go back to Paranoia Text Encryption and close the application
11. To finish off with a flourish I run an AppleScript to say “It’s Encrypted.”
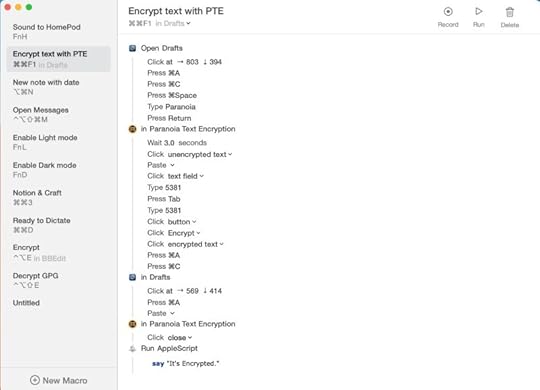
I did have to add a wait for three seconds to give Paranoia Text Encryption to open up properly. This is to make sure the KeySmith application has somewhere on which to click and paste the text ready for encryption. When I first did it I didn’t have the Paranoia Text Encryption application closing at the end. The next time I ran the KeySmith macro it didn’t work because there was already text in there from the previous time. By closing the application it puts it into a virgin state ready for the next time I need it.
I now have a macro which I can run by pressing the two command keys and F1 and it works perfectly every time. It would be nice to have an ‘ask for input’ action so I could choose the password I require for the encryption. This would involve having variables available in KeySmith. So this is another thing I would like to see added to the application at a later stage. or I will have to have one KeySmith macro which opens up the app and does everything to the point of password required, then another to follow finishing off the KeySmith automation.
The post KeySmith Mac Automation Tool appeared first on Good and Geeky Books.
December 10, 2020
Key Pairs Fun with GPG Encryption
I have been helping somebody with encryption and decryption using PGP. Sometimes I fail to understand why they can’t get the notion of a public and private key pair. This person has a fingerprint and ID of a key and was able to add the key but was asking me what the email address could possibly be. If it is not contained within the key pair then there’s no way to get it, apart from asking the person who made it.
The morning has not been totally wasted by going through this exercise of encryption. I have found out that I don’t like Thunderbird and the new way it does encryption. It was much better when it used to the plug-in Enigmail. The new way works, but you have fewer options and get less information about how the encryption is taking place. With Enigmail it was possible to specify the keys you were using to encrypt, decrypt or to sign. This doesn’t seem to be the case with the new Thunderbird encryption using GPG.
I prefer using the application Spark for my email. I will keep Thunderbird on the system but I’m going to use Spark as my go to email client. It’s nicer to use and has a better interface. Now I have the application KeySmith I can use a script/macro set of actions to encrypt and decrypt any text I have copied and pasted into BBEdit. It isn’t as convenient as using Thunderbird, but I’m not sending that many encrypted emails.
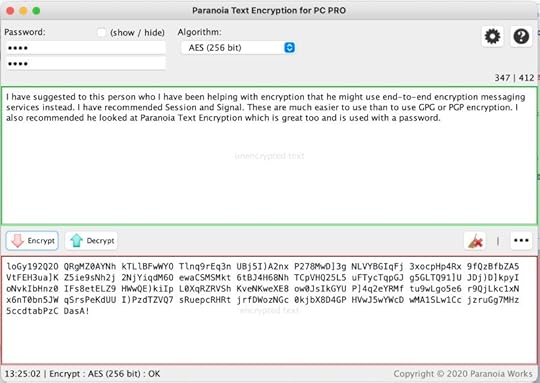
I have suggested to this person who I have been helping with encryption that he might use end-to-end encryption messaging services instead. I have recommended Session and Signal. These are much easier to use than to use GPG or PGP encryption. I also recommended he looked at Paranoia Text Encryption which is great too and is used with a password.
The post Key Pairs Fun with GPG Encryption appeared first on Good and Geeky Books.
November 25, 2020
Craft Note App – Make a Wiki
One of the good things about using Craft is that it’s available on iOS devices as well as being on the Mac. I like being able to work on the same file whatever device am using at the time. This gives it an advantage over the application Obsidian. (Obsidian will have an iOS app at some point in time) I don’t need to do any special computer kung fu to get data from one platform to the other when using Craft.
Making Links in Craft
It’s really easy to make links from one page to another. You type in a couple of open square brackets or an ampersand, followed by the first letter or couple of letters of the page you want to link to. Press enter and you have a link between the two pages. The backlink is created at the same time. It’s also possible to create a link to an item on the same page. Of course, if you want to make a link to a new page, you can do that too. Go and fill in the data of the new page whenever you are ready. If you change the title of a page then the link changes to reflect that change. Select a word to get a context sensitive menu. Apart from the styling options you have ways to link from that word. Either link to a web site with a URL or to something else in your Craft documents. Basically, Craft is fantastic for creating wiki documents.

Functional and Pretty Too
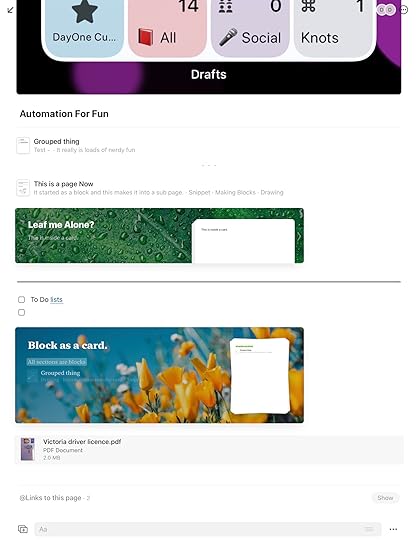
The documents created are visually attractive. Set blocks within the document to be titles or body text, bold, italics, strikethrough or code, as well as use colours and four basic fonts. You have all the types of list you could need. The page can show a cover image which makes it easier to identify the page in front of you. When you are possibly jumping from one page to another it is super to have visual clues to help. Great for visual learners to have pictures and colours. Within the document you can include to-do items, ordered and unordered lists. It’s also possible to indent the blocks. You can even add a cover image either from pictures you have on your system or from UnSplash. All of these ways of making a page personalised in its looks helps those of us who are visual learners. There are other ways to make blocks of text stand out. Give it a declaration of focus or block, or both. It makes the whole block stand out more. Focus puts a vertical line to the left of the text. While block gives the text a coloured background to make it more prominent. Or you can turn the block of text into a card or a page. The pages option lets you open the block as a page and fill it with more stuff. The cards can be given styles to really make them stand out. Put groups, pages, cards and whatever else inside these page or card blocks.
(Mac) Double click on a card to get inside it. With pages you have a small arrow inside a circle to the right of the block to go in and add more content.
(iOS) Tap on either, to go directly into the page, card or group. Or tap and hold then move the item to open in split view or slide over as a separate instance.
Add images to your notes with drag and drop. It will take the new Apple format of .HEIC and .JPG but does not do .PNG. I use a shortcut in the shortcuts app to convert and resize images.
What About the Cost of Craft
The app is free up to 1000 blocks. Seems like a lot but it could very quickly get to the limit and you will have to decide if you want to pay a subscription to continue. $3.75 a month if you pay annually or $4.99 a month when paying monthly. I already have too many things I pay for by subscription. Drafts and Ulysses is what I have for dealing with text and I pay annually. I wouldn’t want to replace either of those with Craft, however lovely Craft is. Craft can do things other note taking apps can’t do and that might just make you stump up the money. I have to admit I’m tempted. Another option for making linked documents would be to us mind-mapping software like iThoughts. You get a better overall view of a structure of links. It is more for an overview / outline rather than the rich document possible with Craft.
Craft Page with Cover Image and Links to Other Pages
The post Craft Note App – Make a Wiki appeared first on Good and Geeky Books.
November 20, 2020
Cross-Linking in Drafts for a Wiki
First in a series of posts to see which is the best option.
I seem to have a bit of a thing with note taking applications. My go-to application for getting text into my system is Drafts. Recently, a couple of updates ago Drafts gave us the option to create links between our drafts within the application. I downloaded a set of actions allowing linking one document to another. It kind of works, but it feels like an afterthought and could be a lot better. It doesn’t automatically create links back to the document you was linking from. There are other apps which do, do that. If you’re a student then you might have more of a need to deal with the data in a wiki style. When you’re making notes on a subject and you need to create a side note that’s more than just a comment creating wiki pages is the way to go. Let’s see what can be done inside Drafts.
Cross-Linking In Drafts
I downloaded this set of seven cross-linking actions from the Drafts and most of them work. Here is the list of the actions for cross-linking. (insert picture of these cross-linking draft actions)

Insert Link To Draft – If the title of the draft you’re linking to has the ## for a header two, the link is not recognised. it does work if the header a #, a header one in markdown.
Back Links – Doesn’t seem to do anything. Never gives up any back links. Might as well delete this action.
Open Last Draft – This will take you back to the previous draft. (handy because the previous action is broken)
New Linked Draft – Gives you an opportunity to make a new document and give it a name and tags.
Insert Workspace Link – Sometimes you don’t want to link to a document but to a workspace.
Setup Project – Sets up a page with a title of Table of Contents. Ready for you to add links pages/drafts of your project.
Autocomplete Cross-Link – If you know the title of the draft you want to link to you start typing two open square brackets and a couple of characters and it will search your drafts. Tap on Insert link and the link is made.
Good and Geeky Verdict on Cross-Linking with Drafts
If you’re all in with Drafts and you need to make this work, You’ll be okay. It isn’t pretty and isn’t particularly intuitive. Maybe you only need this type of cross linking once in a while. Why bother getting a new application and learning how to make it work, when you can do this in Drafts. There are other applications more suited to creating a wiki. Other applications to give you better looking notes. You’ll be able to have notes with images and WYSIWYG formatting. This important to us people who re visual learners. I respond to pages where the information is pretty as well as useful. Easier to commit to my memory. My preference is to keep Drafts as the application to start with text. Drafts is the application to capture your ideas in the form of words and decide later where you want to use them. Drafts is a brilliant application which is great for automation. I recommend you use one of these other applications if you really need to create a wiki.
Craft
Notion
Obsidian
The post Cross-Linking in Drafts for a Wiki appeared first on Good and Geeky Books.
October 20, 2020
Release Date for Big Sur Apple Operating System
I have been holding off doing a change to big Sur on my iMac after trying it briefly about a month ago. The try I did previously was on an external disk to easily make it temporary. This time I’ve gone the full hog and installed it on my internal hard drive (SSD). When I tried it before everything was working okay and didn’t give me any problems at all. Apart from one small thing. I use the Firefox application for a specific purpose. It’s the Spanish version and is an old version. I use this to check up on my Spanish nationality request. In order to use this I need to use a certificate to prove my identity on this computer. On my previous trial of Big Sur that stop working. For that reason I went back to using Catalina. I decided to give another try because there have been more beta releases and I was wondering if it was because the disc was external which gave the digital certificate a problem. The certificate might think it was being fooled or dodged around and therefore stop working. The Spanish Firefox is still not working, but I do have a backup disk I could boot into to go back on a temporary basis.
Big Sur First Impressions
The main thing about big Sur is that it’s a complete new look. It has a much cleaner interface. It looks nice and for some people that’s enough of a reason to change to the new and shiny version of an operating system. I prefer to see enhancements in productivity and ease-of-use. So far I haven’t seen many big changes. I do like the addition of the Notification Centre which comes into the screen when I swipe two fingers right to left on the far side of the trackpad. You get your notifications in there and you have a few widgets. Over time there may be more widgets added by Apple and also by third-party developers. After getting used to using widgets on my iPhone and iPad it’s cool to have them available also on the Mac. I like to see my computing platform as a collection of places and devices I can use. Anything, working on, on the iPad I’d like to be able to continue seamlessly on any other device. This is one of the reasons I like using Drafts because I have it available on all my devices. Any text on working on is available on whichever device I pick up or look at.
DragonDictate for Mac on Big Sur
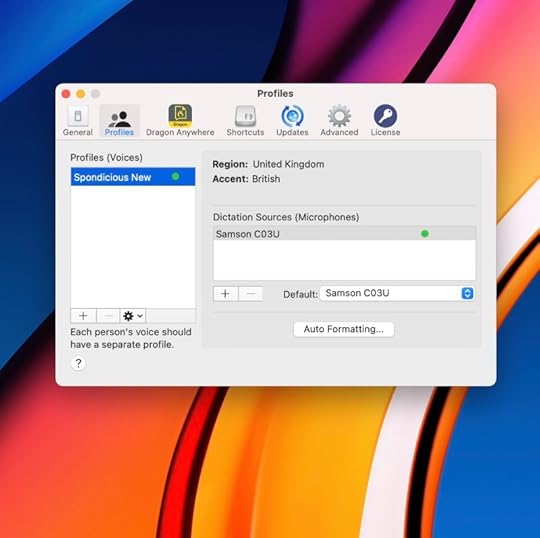
Most of the writing I do is with dictation. DragonDictate for Mac has been discontinued by Nuance. The dictation provided by Apple doesn’t yet match up to what I have available from DragonDictate. For this reason DragonDictate has to work just as well as it ever did when I install a new operating system. I’m pleased to report DragonDictate version 6 is still doing the business for me on Big Sur. Occasionally I give the voice-over dictation from Apple a try to see if it has improved. It’s about time I tried it again. My only other option would be to use a virtual machine with Windows on it and to use the Windows version of Dragon dictation. I really don’t want to do that mostly due to the cost of it, but also because I don’t want to run Windows. It would annoy me greatly!
What Apple Says about Big Sur
New Features – At the top of their preview page the highlights are a big update to Safari, with new features in maps and messages. Of course there also highlighting the added transparency regards privacy.Streamlined Apps – full height sidebars and refreshed toolbars as part of a new cleaner looking at design. This does make better use of the space in applications like Photos and Messages. I like the look of it, makes everything appear more open and fresh.Improvements to Safari – There’s the customisable start page which I don’t tend to see very often. Now I can decide what will be there in front of me when I do see it. I do like the way with the tabs if you hover the pointer over the tab bar it shows you a thumbnail version of webpage in the tab. This could be useful if you have a lot of tabs open and make it easier to choose the correct webpage in Safari tabs. One of the biggest improvements is translation. This has been a long time coming. It’s of obvious interest to me because of me living in Spain. Until now We’ve had to use Google Chrome to get this facility. Chrome is known to be a bit of a battery and memory hog, so if we have a reason to keep with Safari, all the better.Improvements in Messages – you can pin conversations to the top of your list. This will give you good access to your most important conversations. This is also multi-device because it synchronises across to iOS devices. There is also the in-line replies which starts a thread under the original reply. This should make it easier to keep track of all the replies. Then there are the group photos which could be handy for newsgroups a lot. Within group messaging you can also give a mention to somebody. This is handy when you’re using customisation of an active group. Make it so that only the notifications for messages when you are mentioned show up. Within the messages out there are also improvements to the Memoji’s and message effects.
Stability of Big Sur In Beta
I really haven’t had any problems with running this beta software. I got impatient waiting for it to be pushed out for use by the general public. While you should always be careful of installing Beta software, especially when it’s an operating system I can’t fully complain about Big Sur. I haven’t experienced any crashes of the system. Apart from the small problem with Firefox, everything is working as it should be. I think we must be very close to the release of the Big Sur operating system to the general populace.
The post Release Date for Big Sur Apple Operating System appeared first on Good and Geeky Books.
July 11, 2020
What’s on the Home Screen of My iPhone
What you have on the home screen of your device says a lot about how you use it. Obviously you’re going to put the most used applications on the front page. What you have on your homepage is also going to be variable according to the time of the year. At least, that is the case for me. During the time of year when I’m working I change a few things to have the apps I need more for work. Sometimes you just put applications onto the front page because you want to be reminded about them. You have recently downloaded them and need to build in a muscle memory. It’s quite easy to put new applications on your device and forget you have them there. A couple of months later you’re looking at applications on the last page of your device and wonder what that app is supposed to do.
Making the Best Use of the Space Available
You’d think having 28 slots available for applications would be enough. I suspect for many people it is plenty. It really depends upon what you do with your device. The more geeky you are, the more likely you are to use a larger selection of applications to do a wider variety of tasks. My interests include recording audio, controlling the home kit devices, they couple of social network applications, listening to music and podcasts and journalling. This is on top of the must have applications like 1Password, Safari, messaging applications and email, access to files and photos. Another well used application is AnyList which gets used any time I need to do some grocery shopping. There is the basic text input which is used for various workflows and for that are used Drafts. Sometimes the only way is to have groups of applications and even have more than one page within the group. This is the case with my productivity group of applications. I also have a group of applications for automation due to my heavy interest in all the stuff I can do with shortcuts and similar applications. One of the way of cramming more stuff in is to use a shortcut to give access to parts of applications. So I have a shortcut which will give me access to a number of camera apps. I choose the camera application based on whatever it is I want to do.
Starting at the Bottom And Working Upwards
The menu row at the bottom which persists as you scroll through the screens is where you put your most important applications. These are the apps you use constantly throughout your day. It could just be application which you use one time daily, but every single day. Here is my menu row on my iPhone.
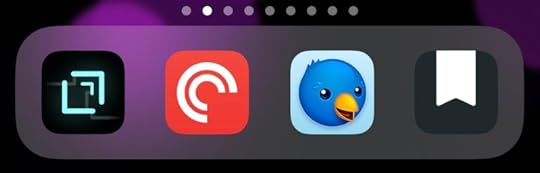
Application Number One – Drafts
So much of what we do with our devices is collection of text. That text to go to various places, to social networks, emails, notes, reminders, collection of ideas. Within that you can further subdivide such as with emails for specific persons, same with specific messages. Notes go to a variety of topic areas. There are actions in Drafts send the text to where it needs to go. It doesn’t have to all go into one big data bucket. Actions are programable automations in the Drafts app. Drafts is without a doubt the best text collection, plain notes depository available on Mac and iOS. Anything I put into this application synchronises across the platforms. It doesn’t matter where I start any note in Drafts. I can continue and finish it where ever I have the app installed.

I might have a small but vital idea I need to record at some point during the day. It’s easy to use Drafts to record that idea for posterity. I either type it in or use the Siri dictation. There is also the extended Siri dictation which lets you talk for longer. If it’s a small note and I need to record it quickly can even do it with my Apple Watch. The multiple input methods increases the versatility of the application.
It’s All about the Automation
Drafts is just plain text, it doesn’t have the versatility of the Apple Notes application. Most of the time I don’t need to draw a diagram or to write with handwriting, or add images. All I need to do is to turn an idea into words, computer editable text. I still have Apple Notes sitting there waiting for me to use, if I need to. It’s possible to add an image in Drafts through markdown. You need the image uploaded to the Internet already and to know the URL for it. When you convert the markdown within the application it will show you the document with the image included.
The best thing about Drafts is the automation. Using actions in Drafts makes the app incredibly versatile. Many times we unload an idea out of our brains into our computer and not know for sure how we want to use it. In Drafts you put everything in the app and decide later how to use it. I have actions to send text to Twitter, to other notes apps and to my journal. There are actions allowing Drafts to become a GTD application or send the tasks to your favourite organiser / list application. I can also publish direct to a blog from Drafts. I’d do that for a quick post maybe, but usually I prefer to use the action to copy the whole text to clipboard and open up the WordPress backend.
It isn’t just about passing text through to other apps. There are great actions available to process your text. Remove all blank lines, split draft at cursor, remove duplicate lines. Add the date in a predefined format.
I have actions which are like templates for my journalling. I have four different Dayone actions. Depending on the content, the draft will be sent either to the main journal or to my journal about movies and TV series watched. The other journal is about learning to code in Swift. I wanted to keep track of what lessons I had completed.
Application Number Two – Pocket Casts
Although there is a podcast listening app from Apple I prefer to use the application Pocket Casts. The Apple application is usable but basic. Pocket Casts is an app I use every single day. I like to listen to podcasts about science, the news, Apple news and one or two drama podcasts. Here are a few of the podcasts I listen to.
* True Spies
* Outlook (personal stories from the BBC.)
* The Maccast
* Mac Power Users
* Fully Charged Podcast
* The Infinite Monkey Cage
* Automators
* iPad Pros
* Friday Night Comedy
* Adapt
* Borrasca (Drama)
* Full Disclosure with James O’Brien
* People Fixing the World (BBC)
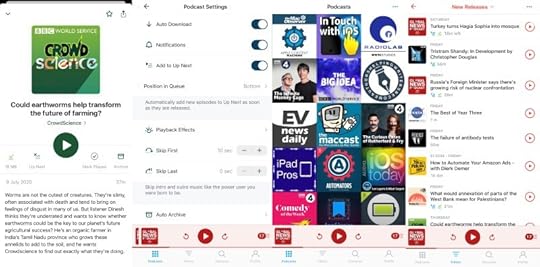
Feature Packed App
With Pocket Casts you can have it trim silence. It tells you how much time you saved. Since I’ve been using this feature in the application I’ve saved more than 10 days of listening using that feature. It’s also possible to change the speed of the playback. There are one or two podcast it’s worth listening to at 1.5 times speed. You get the information and you get it quicker. There is a sleep timer. I like being able to set the podcast to cut the first number of seconds from the podcast. This is useful to cut out all of the intro which you don’t need to listen to every time you listen to the podcast. It will auto download podcasts if you tell it to. It’s a good idea to set a limit to the number of podcast episodes downloads. You can set it to notify you and also if you want the episode added to the Up Next filter. You can make other filters to have collections of a specific type of podcast. I have a filter for drama podcasts and another for science-based podcasts. I have tried other podcast applications, but this is my preferred way to listen to podcasts.
Application Number Three – Twitterific
There are a variety of applications you use with Twitter and Twitterific is the one I have settled upon. In the past I’ve tried out a few different ones and there are not huge differences between them. I paid for a version of Twitterific a while back. They now are trying to persuade me to either pay with a subscription per month or a large amount for a lifetime single payment. The software bugs me from time to time with that request, but I always ignore it. Twitterific does what it’s supposed to do and earns a place on the home screen in permanent view due to how much I use it. There’s not much else to say about the application except it does what it supposed to do.
[image error]
Application Number Four – Day One
As mentioned previously I most often make text entries using the Drafts application. I also share photos from the photos app into Day One. I like the way the application gives me the option to change the date of the entry based on the date within the photo. Adding audio to the journal entry is easy too. I often forget it is there because I’m so used to adding text entries. Then when I do use the audio I forget I’m actually recording audio rather than dictating. I have to stop myself from being silly and dictating the punctuation. It could be a better option to record the audio in another application and make minor edits easily. There aren’t any audio editing facilities within Day One, but for short clips of audio it’s not really a big problem.
[image error]
The post What’s on the Home Screen of My iPhone appeared first on Good and Geeky Books.
June 29, 2020
Thoughts on Big Sur and iOS 14
There doesn’t seem to be any big changes with the way the system works in Big Sur. It mostly seemed to be lipstick and toenail polish on top of something already quite beautiful. The design changes seem to be heading towards similarity with iOS design. I think this is a good plan because I like to think of my Apple devices as a whole system rather than separate operating systems. It’s good to work on one of my devices and to continue on whichever other one I want to, without too much visual change.
[image error]
Maybe in a couple of years time there will be a touch screen Mac. After spending some time with iOS it is quite likely sometimes to want to touch your Mac screen to do something. It just seems so familiar to want to touch the screen to operate it. There’s very little chance I will update my iMac to a newer model for some years yet. The one I have is three years old and has plenty of life left in it. Absolutely no reason to want to change it. Same thing with my iOS devices that were working great and there’s nothing compelling in any of the new devices. Everything has got so good that Apple can only make incremental changes. No need to get new hardware. There are a couple of features in the new Apple Watch, but that also doesn’t really need updating. This is all good because I don’t want to spend any money on computer hardware at the moment. I’d rather save the money and spend it a motorcycle.
Email is Still Insecure
One of things about upgrading the Mac is the question of whether Dragon Dictate will continue working. At the moment I think it’s likely that Dragon will continue to work with Big Sur. This is based on how it seems the new operating system is mostly a new paint job. I did hear that in the Apple Mail app many of the plug-ins have stopped working. This makes no difference to me because I prefer to use Thunderbird. I did get a notice yesterday from Thunderbird to delay any updates to the software. The Enigmail plug-in will stop working on the next version, number 78. They say they are going to build in GPG support directly into the application. Not many people use encryption with email anyway so it’s not going to make much difference. It would have been nice if Apple could have done something about email security and privacy. They should build in end-to-end encryption into the mail app. Apple goes on and on about privacy and security and how is looking after us and then ignores the total insecurity of email. This is why I try to conduct personal communications using secure messaging apps rather than using email.
All the Little Things
The toolbar at the top and the Control Centre for Mac. Apple have made the toolbar translucent which so far seems to make things unreadable occasionally in the beta versions. It seems reasonable to make the toolbar less intrusive, because you want the operating system to get out of the way of your doing work. Some developers might need to work on the icons I use for the toolbar to make sure they still stand out well enough to be read. There is the control centre newly added to the toolbar. Quick access to basic computer controls, such as Wi-Fi, Bluetooth and AirDrop. Gives you access to the brightness of the display and the level of audio. For the audio still more likely to hold down function key and use one of the function keys to rise although the volume of audio from the system. Because it’s an iMac I very rarely have to mess around with the Wi-Fi settings. In fact most of the settings on there are of no interest to me.
Welcome Changes to Safari
The most useful change for me will be the addition of translation. This gives me one more reason to use Safari rather unused Chrome. Chrome always seems to be a memory hog so for that I would prefer to use Safari. There are also the privacy and security issues by using Google software. No reason for them to know everything you’re doing or what are interested in. If Safari can be made more useful by third parties adding extensions I could ditch Chrome altogether.
[image error]From Apple.com
Also on the privacy end of things, there are reports in Safari to let you know how you are being tracked while surfing. You can see which websites are tracking you and whether you are blocking any data.
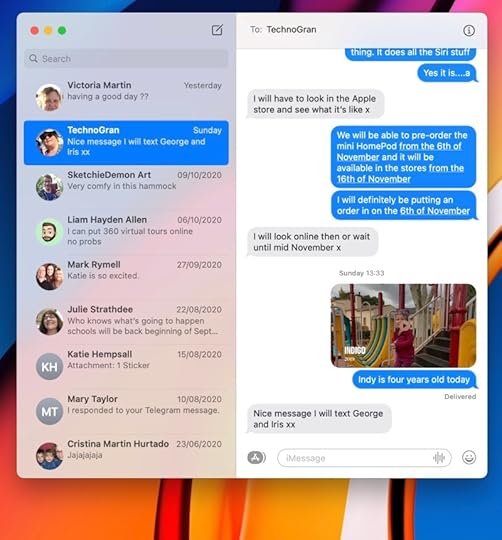
Messages App Improvements
It looks like there are improvements to how groups work. So you can do in line messages. It says it’s easier to keep track of all the replies because it starts a new thread automatically. I don’t do any group messaging on Messages App. Sometimes I think it would be nice if Apple could have made Messages available on other platforms. We all have friends who use other operating systems. It will be useful to pin the conversations with our favourite people at the top of the app. The Mentions feature could also be useful in a group chat. It would save you going out of the group to make an individual chat just for that one person. It depends on how your brain works. Maybe it’s best to separate these things to keep it clear in your head who you are talking to and who is seeing the message.
There are other improvements such as Memoji and the message effects. I’ve seen messaging effects in other messaging applications, maybe it was already possible in the messages app on iOS. Now it’s also available in the Mac Messages app.
The post Thoughts on Big Sur and iOS 14 appeared first on Good and Geeky Books.
Good and Geeky

- David Allen Wizardgold's profile
- 3 followers

