
David Allen Wizardgold's Blog: Good and Geeky, page 3
September 10, 2021
Filming Video And Using a Gimbal
Yesterday I put in an order for a DJI gimbal, the previous day they announced the new OM5. I’ve been watching a number of videos showing how to get the best use of a gimbal with various creative gimbal moves. It looks like I’ll be able to make more interesting and creative videos by getting better movement. The videos I made of the motorbike on our last trip to the Dam at Susqueda could be improved by better use of B roll clips. If we go to France in October I’d like to be able to really spend some time making some videos and make the trip more interesting. I’d like to spend some time really thinking about the shots I take and how to put them together. I’ll do what I can with the video clips in the iPad see how the look compared to what I can do with the Mac and Final Cut Pro.
However, the order I did with DJI directly rather than going through Amazon didn’t go smoothly. I paid through PayPal and it got the address wrong. It left out the street name and number and the courier is going to find that difficult. Hopefully the courier will be able to find me and if not maybe I can contact them to give them better information so they can get to the house. According to the notification it should arrive here from China on Tuesday. I did get onto their help section and they wasn’t able to sort the address out for me which was a pain in the bottom. When I spoke to the help section today there was still unable to help by contacting the courier to do anything with a stop and return, so maybe it will all work out right in the end. I just find it annoying to have this sort of annoyance and nuisance when all I want to do is to put in an order and have it arrive at my house without any problems.
 Gimbal Moves to Try
I’ll have two make a list of the various gimbal moves I want to try. There is the push through or push forward where you are moving forward with the gimbal and camera changing the angle as you go maybe. The idea is to have some movement in the foreground as you move forward and then finish off with a reveal of the actual subject of the clip. This looks like it worked particular well if using the low-slung mode and getting the camera close to the ground to start with. The push through ways where your moving the camera in between objects to reveal the view on the other side.
Another movies to slide from me the right to left or left to right from behind an object in the foreground to reveal the subject in the background. It makes it a lot more interesting to have this sort of shot after a opening shot like the push forward with a wide-angle lens used as an establishing shot.
One thing to remember is to get the focus and exposure locked. So the exposure doesn’t change based upon the amount of light going into the camera as you move from behind some foreground object into seeing what’s in the background. So I can focus on the background and have it out to focus on the foreground object in order to do the reveal. This would help as well with the transition from one clip to another where the blurred foreground object is the place where the cut is going to be. Cutting from one blurred portion to another blurred portion may be doing a speed ramp to get an extra bit of movement as the video changes from one to another.
I Have Found This Channel UsefulTelling a StoryAll good stories have a beginning, middle and end and this is the case with videos. The establishing shot or shots is the beginning of the story. Then there could be a mixture of standard and close-up shots to follow and then finishing off with may be the opposite of the push forward with a pull backwards.
With the DJI Osmo 5 there are some tricks you can employ such as the spinning camera shot. This is sometimes called the Inception Shot as popularised by the film. Spinning out of one clip and then spinning in from another clip which is another transition I want to try.
It’s also possible to do the dolly zoom with the zooming taking care of by the software. The camera operator only has to keep the subject in the same place within the frame while walking forwards or walking backwards.
I’ll want to try to do some hyper lapse shots and perhaps some timelapse as well. Then find a way to slot these into the finished movie. I think I’m going to have a lot of fun trying out all these different shots and getting creative.
The post Filming Video And Using a Gimbal appeared first on Good and Geeky Books.


August 11, 2021
Even Tech Heads Can Struggle With Geeky
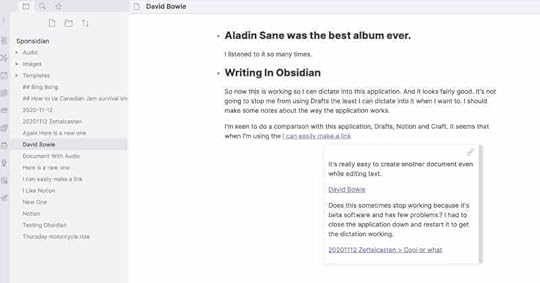
I am fascinated with the various note-taking applications and I can’t resist looking at something new. I revel in the technical details and getting things to work in a geeky way. There are times though, when I feel I’ve met my match. Over the last couple of days I’ve been trying out Obsidian again. I’ve been using it on the iMac on and off for some time now and it’s now available for iOS devices. I immediately thought ‘oh great, another app where I can have all my data (notes) in one place. I have spent a few hours trying to get the vaults (this is where you have your data stored within Obsidian) to synchronise across platforms and I’m ready to give up on the project.
 Paid For Synchronisation
 The easy way to do the synchronisation across platforms is to use the paid for synchronisation service from Obsidian. It’s supposed to be possible to get the synchronisation work across iCloud, but for the life of me I can’t work out how to do that. After a lot of head scratching trying to find out where the data was being saved on my iOS device so I could open the vault in Obsidian on my Mac, I still haven’t done it. There’s supposed to be a folder in iCloud Drive called Obsidian with the folder for the vault contained within that. The Obsidian folder is missing in action. These files have to be somewhere, but looking through the Files application either on my iPhone or iPad, I just can’t see them.
What About Git and Git Hub?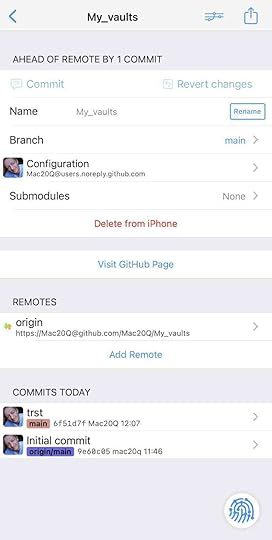
My next area of curiosity was with using Git Hub and Working Copy on my iOS devices. Some say it’s possible to synchronise your Obsidian data using git. I have to say I find the terminology within Git Hub quite confusing. When I learning something I need diagrams because I am a visual learner. I have seen nothing yet, which explains how Git Hub works in this way. I have connected a vault containing files to git hub and I’ve seen changes I’ve made in files manifest themselves through this service. Despite this lower level of success I still feel totally confused.
Tech Heads Versus Mere Mortals
In my confusion and my brains and unwillingness to comprehend what I’ve seen in video tutorials and in help files I’m left wondering if I’m just a mere mortal after all. To achieve synchronisation of data in between applications on different platforms, or between the same application on different platforms, there are easier ways. The obvious answer to this is to use application which already does it for you, such as using Drafts or Ulysses or Notes or Craft. There are plenty of options available, each with their pros and cons when comparing to using Obsidian. Craft also does wiki style links between notes and does it in a prettier way. Drafts will do the same, but again not as pretty or as efficient as in Craft. Ulysses is more for the long form text and for creating E-Books, but it does the synchronisation really well. There is also Scrivener which has a synchronisation across platforms feature. It doesn’t do it via iCloud and requires manual interaction and for that I don’t particularly like it. It’s for that reason I gravitate more towards using Ulysses for the long form writing.
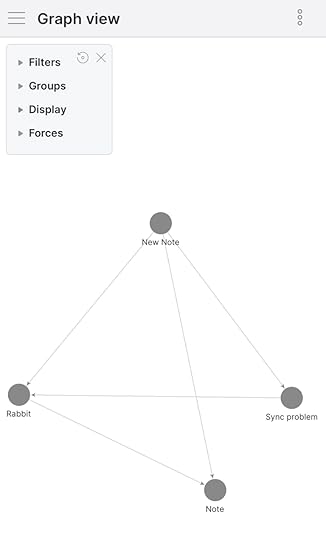
The Good and Geeky WayThe Good and Geeky philosophy as far as I’m concerned, is the encouragement of mere mortals to use computer hardware and software to make lives easier. In the way that it works at the moment, Obsidian doesn’t really fit within working concept. I’m sure that if you’re willing to spend the time setting it up it could be just the thing you’re looking for. It’s a really good way of using a note-taking application and being able to make connections between those notes. If you’re working on a project which is quite complicated having those connections could easily highlight something you wouldn’t otherwise find. It’s especially good with its graph view where you see the actual connections in between the files in a visual way. Like I said, I’m a visual learner so this feature is particularly appealing to me. It’s for this reason I will probably continue to persevere setting up Obsidian, so it works for me. I may even opt for the paid version of the synchronisation if I think it’s going to be worth it. I will not stop using Drafts as my primary input software for text collection. So it would be really cool if I could have some sort of integration in between Drafts and Obsidian.
If or when I find the solution to setting this up in a simple enough way to convert mere mortals into good and geeky gods I’ll make a video about it. What’s needed is a step-by-step guide to getting started with Obsidian suitable for muggles to follow. The videos I found so far for setting up Obsidian have been too technical, to the point of relying upon using the Terminal and using scripts in Keyboard Maestro to make the synchronisation happen. Watch this space!
The post Even Tech Heads Can Struggle With Geeky appeared first on Good and Geeky Books.
August 7, 2021
Getting Myself Sorted 3
I’ve been planning to make a lot more YouTube videos, but I often find that life gets in the way. It could just be that I’m a procrastinator extraordinaire and highly skilled in putting things off until tomorrow. In the past I’ve tried using Omnifocus, but I found it was a little too complicated. If you have a complicated life then maybe it will be just the thing for you. I tried using Reminders or just putting things into the Calendar app. This works for me up to a point, but it never really clicked with me. It’s kind of annoying have to rely on two applications to do your Get Things Done mojo going. In a podcast I was listening to last month I heard of an application called Sorted. Out of curiosity I decided to have a look. What this application does is to combine tasks and events into one application.
What I Like About Sorted 3So having the calendar events and tasks all in one application give me everything in one view is spot on. I still add events in the calendar, but they’ll find themselves also displayed in Sorted. Then there are the tasks to organise. I found it’s easy to set up a new task and I’ve also added some automation into the mix. I’ve created a shortcut which will act as a template to create a new task for me. Same thing with Drafts I have templates for repeating tasks making it super quick and easy to organise myself. When I’m ready to start on a new video project I can quickly add the set of tasks required to complete the project from Drafts. I’m ready to then start ticking things off as I get them done and be completely mega productive.
In shortcuts I tried setting up all of the tasks in one shortcut. For some reason or other this didn’t really work very well. I think the probable cause was the use of the iOS 15 beta software. I’ve just updated the latest public beta on the iPhone and iPad and I’ll have to give this another try. It could have been fixed, fingers crossed.
What I have found to be totally successful is the use of the X callback URL’s which can be used from either within shortcuts or from within Drafts. In the Drafts app I downloaded a set of actions for Sorted 3. These actions were created by someone called KJ Miller. Most of the actions I left as they were and a couple of them I fiddled with to personalise for me. I took one of them and created an action which makes a new task with today’s date and all the other information I need within that task. I put the task on a specific list and I also created tags along with a duration for the task.
Hyper Scheduling and Tasks with a Duration
The Sorted application is all about hyper scheduling. Sometimes this way of organising your day is called time blocking. It does this Hyper scheduling in a sort of Pomodoro style. This is where the auto scheduling really shines. This is the best feature within the application by a long way. It’s fantastic where you can select a number of tasks you plan to do for the day and to auto schedule them. It’s got the Pomodoro feature of a built in break in between each task. This is where you have finished what you wanted to do with a task and take a break. Set whichever amount of time suits for you. I leave it set for 15 minutes. It’s OK to completely ignore these breaks and go straight to the next task. Sometimes you get into a bit of a flow with your work and want to continue. Or maybe you overrun with a task. Either go back to the auto schedule for the remaining tasks and redo it or leave it in case you get back onto schedule by doing the next task faster. The hyper scheduling is extremely flexible yet at the same time gives a definite structure to what you need to get done. It was this auto scheduling feature which tipped the balance for me to purchase the Pro version of Sorted 3. I’m a little disappointed the pro version for the Mac is an extra payment and is more than the cost of the iOS version. So for the moment I’ll work with it just as an iOS and decide at a later date if I need it on the Mac as well.
In the first YouTube tutorial video I covered the basics of the application and in the second one I dived in a little deeper. There is the third video in the works covering the use of the X callback URL scheme in Sorted 3 and I plan to make a fourth video which will go over making a shortcut in the Shortcuts app.
Sorted 3 For Getting Things DoneI can highly recommend this as a GTD application for use with iOS and with the Mac. If you have both versions paid for, you get the synchronisation across platforms. I do like applications which work everywhere for me. Initially you might think that the application is quite simple. To a large extent this is part of its attraction for me. Yet at the same time it has that auto scheduling feature which lifts it up into the realm of ‘excellent application’ worthy of paying for the pro version. I have the application on the front screen on my iPhone. I’ve also placed it in the dock on the iPad so it’s always available front and centre ready to go.
There are a couple of improvements I’d like to see. I would particularly like to see more parameters added to the X callback URL scheme. It will also be excellent to have a way to create the checklists within the notes of the task by using markdown. It seems the developers are actively developing and improving the application and I’m following the discussions about it in the Slack channel.
The post Getting Myself Sorted 3 appeared first on Good and Geeky Books.
July 31, 2021
Why You Should Not Install Beta Operating Systems
I decided to go with the Mac OS Monterey beta version of the operating system because there were a few things I want to try. Mainly I was interested in the application Shortcuts which just arrived since WWDC and is in Monterey. With the first beta I put on there, everything was working fine. I didn’t really get around to trying out the Shortcuts application much. It seems quite strange to have it on the Mac instead of on iOS. I need to get my head around it and see what can be done with it.

With the second version of the beta operating system there was a big change in my way of working due to the application Drafts crashing as soon as I tried to open it. This is my text capture application which I use all the time. It’s particularly good because I can have all my text snippets all in one place. Everything synchronises across to all my devices. I had to wait for two weeks for the next beta to arrive. I couldn’t wait to get my sticky fingers on it and upgrade. That’s where the problems started.
I started the install of the new beta operating system in the evening before going to bed. I was expecting to get up in the morning and find everything was all sorted out ready to go. Instead I saw a screen showing it had stopped completely. I left it for the rest of the day and still nothing happened. This was just before going away on a trip to the mountains so I had to leave it alone. When I got back I would need to do some recovery work to get it up and running again.
How to Recover from a Botched Operating System InstallI did a search to find out what I needed in terms of special keystroke combinations to do the recovery. It’s quite simple, all you need is Command R. You press that while the computer is starting up and wait until you see the Apple symbol on the screen. On the first try, nothing was happening as it was spending ages scanning the disks. So I performed unbelievable yoga contortions to get to the back of the computer and disconnected all of the external disks. I’m pretty sure I have too many disks connected. On the other hand, you can never have too much backup and storage space. I think I have to change some of them from physical magnetic discs to SSD’s. This is possible now that the price of SSD’s have dropped. I could quite easily get a couple of 2 TB disks.
As soon as I had disconnected the disks I got the dialogue box to show a few options. The one I was interested in was the option to reinstall the latest beta software, macOS Monterey. The first information dialogue told me I would have to wait 2 ½ hours for the install to complete. Five minutes later it told me it would take four hours. No problem, I don’t care how long it takes just a long as the job is done right. In the end it did only take about 2 ½ hours. I was able to get the computer working again and reconnect all of the hard drives and we’re back in business!
macOS Monterey Back in Business AgainI’m happy to see that the application Drafts is once more fully functioning. All of my data is fully available and most importantly, DragonDictate is still working properly. I’ll have another year of using the best dictation system for the Mac. It’s still a huge shame that Nuance have discontinued development of the software for the Mac. The possible replacement of it with Voice Control found in the accessibility settings of the Mac is not quite up to the same level of dictation as we get with DragonDictate. We have to keep our fingers crossed Apple will continue improving the dictation service. Otherwise I would have to install a virtual machine on the computer and run Windows and the Windows version of DragonDictate. That would be extremely annoying and would cost money. I’m fairly sure that the DragonDictate I have now is not going to work on the new Apple Silicon Macs. This Intel iMac is still working great and it’s not really necessary to make any upgrades for a good few years.
The post Why You Should Not Install Beta Operating Systems appeared first on Good and Geeky Books.
May 21, 2021
Text Buddy Mac App
This is another utility application I recently found which does wild and wonderful things with text. It is for manipulating text with 128 mostly useful commands and not for writing code or markdown. You can either open the application and paste the text into it and press command T to bring up the list of possibilities. Or in whichever application you are editing your text activate text body from the services menu. This takes you straight into the list of commands. There are a lot of commands unfortunately you have the possibility to search for what you want to do. There are simple things like removing blank lines or transforming to title case. There are web programming things like stripping HTML code or converting markdown to HTML.

There have been a number of times when I’ve been given some text which needed to be cleaned up one way or another. Perhaps there were odd characters or numbers and spaces at the beginning of each line. There’s a command in Text Buddy which will remove these unwanted characters from every single line. Some people are know to put two spaces in after a full stop, or you have got text with multiple space characters within. Use Text Buddy to remove the consecutive white spaces. Or perhaps there have been weird line breaks in text you’ve copied from some place or other and these can be removed just as easily. Just as easily you could add line numbers to your block of text or have all sentences start with a capital letter. You never know when you might want to add line numbers using Roman numerals. Another command let you keep lines with something specific contained within. Many of the features included you won’t know you need until you get that strange block of text in desperate need of a clean up.
Encryption Service in Text BuddyI do like encryption and Text Buddy provides encryption facilities. Choose Encrypt with Password and the text is encrypted with AES encryption. This is for your own purposes on your computer and not for sending an encrypted message to someone else. I suspect it might decrypt a message sent by another Text Buddy user if you have the password for it.

After the encryption command

There are thing you can do with numbers, like adding all the numbers together. Format numbers as currency or spell the numbers as text. Other numbers possibilities only a mathematician could love are available.
OCR and Transcription in Text BuddyAccording to the documentation Text Buddy can transcribe from audio and video files. I have not got that to work yet. It says you have to go to the System Preferences and turn on Voice control in accessibility. I might have to reboot to get it to work. I’ll try later.
The OCR works well. Drag a file in and it finds the text in an image. I dropped in an image of a recipe and it did the job almost perfectly. Just a couple of the numbers were converted incorrectly. Not bad considering it was white text on a black background. There’s a slider which affects how the text is presented. Push it to the left and all the text starts left justified on the page. I did another command to finish off to remove blank lines. I do have another application for OCR called Owl OCR which did a better and quicker job with the same image.

 OCR – Get text from an image.Text Buddy Interface
The application has a simple interface and can show the line numbers on the left hand side. There is a slide over panel on the right which gives you information about the text in the working area. Then you have a couple of icons at the top to give you extra functionality. The first one allows you to manually move lines towards the beginning or towards the end of the document. This is handier than doing the copy and pasting. I also have this sort of functionality in Drafts, but not just for line but also for paragraphs of text. The next icon is to detect any links within the text and make them clickable. If you make any mistakes when converting your text or transforming it apart from using command said to go back one step at a time there is a history button. This gives you a list of the commands you have used recently along with a button to restore back to that point in time. The next button is useful if you’re working full screen and you need to keep the Text Buddy application on top.
When you’re working in the Text Buddy application at the bottom of the panel giving you information about the block of text there are your options of what to do with the text. You can copy it to the clipboard, replace the text selected or all of it if you haven’t anything selected. The other two possibilities are to either prepend or append to the text which at times can be useful.
Text Buddy in the Services Context Menu Get to this with a right click or two finger tap on the trackpad.
If you use the Text Buddy application from the services menu – Process with Text Buddy – you get a pop-up window of the list of commands to choose from. Choose whichever one you want and the processed text is put onto the clipboard. You can then either pasted over the top of your selection in whichever application you’re using all paste it wherever you want it to be.
Good and Geeky Verdict on Text BuddyIt’s an amazing application which does wild and wonderful useful things with your text. It’s worth getting if you often have to process text to make it look and work right. There have been many occasions when I’ve got a lump of text which had things in it which needed to be removed either on a character, line or paragraph basis. I have a similar application which does things to text on iOS. The list of commands available are extensive and with plenty of variety. I’m impressed with the application and all it can do.
The post Text Buddy Mac App appeared first on Good and Geeky Books.
May 20, 2021
Great Mac Utilities
You’d think that with a 27 inch iMac I’d have plenty of space up on the menu bar. The trouble is, I have so many applications which want to put an icon up there, I’ve run out of space. Sometimes I just get a bit blind to all of the icons and can’t remember which one is supposed to be for which. Some of them are quite similar. The icon for KeySmith is just the same as the one for Hotkey which is a new app I downloaded today. I don’t know if I’ll keep it, but I’ll give it a try and see what it does. It can be a bit of a problem when you have so many utilities on a computer doing all sorts of amazingly useful things. The difficulty is it can be hard to remember which applications do what. Sometimes I find myself doing something manually which I could easily get done quicker if I’d only remembered the shortcut key or the exact app to do it better. I was half tempted to get the latest Bartender app. I had it before and it got lost in upgraded computers over the years. Wouldn’t too expensive at the upgrade price. Just not that sure about how much I need it.
 A Full looking menu bar.Hook it all Together
Something like Hook is amazingly powerful for the features you get to connect all of your documents, text, webpages and everything else together. It’s just a case of remembering to use it. Obviously if you’re into studying then is going to be something where you are creating projects and needing to link things together. So you have more opportunities to use Hook.

It’s a fairly good interface although I think I can improve it by making keyboard shortcuts to fit on top. I could use KeySmith to create a shortcut which then runs the keyboard shortcuts to do specific jobs with Hook. Instead of having to activate Hook and then use another keyboard shortcut to either collect the link or to paste the link I could do it with one keyboard shortcut. Maybe I could even find a way to use Better Touch Tool instead of a keyboard shortcut to get things started.
Keysmith Macro for Hook This activates Hook and grabs the link. The other Hook connects it to another item.Sharpening the Axe
It’s all about spending the time working out what you do and how you do it, so it can be streamlined. I obviously need to spend more time at my Mac doing my stuff and thinking about it. Sometimes I’m spending more time using iOS on the iPhone and the iPad. This is because I’m sitting down on the sofa rather than being in front of my iMac on the desk. I like to think of the Apple ecosystem as one complete system. It’s all one big place for me to go and do whatever I need to do. I love it when I can start something on one device and complete it on any other device. This is why I’m so fond of Drafts as my text editor of choice. There are some things it doesn’t do I can find in BBEdit, but Drafts gets updated and improved regularly. I could even send the developer a request for some functionality which he could consider adding to benefit all users. Sometimes what I need could be added by myself using the actions and learning a little bit of JavaScript. It’s possible I could find someone who already knows how to do JavaScript has already created something which I could re-purpose for my own uses. I understand some scripting and programming concepts, but if it’s not something I do every day I forget and then I have to relearn. I still get a bit of a buzz when I learn something new on my Apple eco system which saves me time and brain energy. There’s a certain type of nerdy satisfaction to be had being a pro computer user.
The post Great Mac Utilities appeared first on Good and Geeky Books.
May 1, 2021
Hook For Productivity
This morning I’ve been looking at the application Hook to get more understanding about how to use it. It works pretty good when using it with Drafts, but I can see a little bit of a problem when using it with Craft. I’ll spend a bit more time working it out and then make a video showing how I can use it. It’s an amazing tool for use with various projects where you need to link files together. This can be done to a certain extent by using tags. I could put the same tag on all the files for a project, then search for the tag to get everything I need. This would mean I could have files spread all across the computer and still get my hands on what I want. Where Hook is better is being able to connect individual emails and webpages to the project. Hook works well with Drafts and I can see that would be the good starting point for a project. Link everything within the project to one draft. It makes a lot of sense when you’ve got all sorts of different types of data.
 What Can you Link ?Web Pages – Various browsersPDF Documents – Apps like PDF Pen Pro and SkimEmailsText documentsMind Map – Tried it with iThoughts and it worked fine.Files of any sort in Finder – audio or video includedEbook Readers – Tried with Books app and it worked fine.Diagramming Apps like OmniGraffleTask Mangers – Not Reminders, OmniFocus, TaskPaper, Agenda and Things.OutlinersUtilities – Trickster, PathFinder, ForkliftInformation Managers like Evernote, Devonthink and CraftLots of Note taking appsJournal App – Day One – Using Keyboard MaestroSo How Useful Is Hook
When you’re working on a project it’s possible that you want to bring in information from various sources. You might have information in emails, PDFs, various image files and text sources. You could probably get away with moving all that information into one folder on your Mac. If this is a temporary project you could have a folder on your desktop so it would be easy to remember where you need to save everything. You could copy and paste from an email into a separate document to save in this folder. It would be difficult to have just about everything all in one place, double-click on whatever item when you need to open it up and see it.
Tagging files is a solution to linking all this information together. The advantage of using Hook would be the possibility of deep linking. Instead of linking to a file you linked to a pertinent place within the file. You would still have to export out of some applications like email to get to the right information. I use MailMate for my email and I can tag the relevant email to make it easier to find. That tagging system doesn’t link in with the Apple tagging system. So it would be necessary to copy and paste the email into a separate file or app to get the full linking.
Another way to work on a project would be to use something like Craft. Do the copy and pasting to get everything into a project folder within the application. This would be better than using a folder in Finder as all the information would be more visible. You can do whatever linking you need to do from one snippet of data to any others. Craft has extremely good deep linking facilities and it might be all you would need.
On my Mac I like to have types of documents saved in specific places. I use the application Hazel to send files of certain types to specific folders as they arrive in places like the downloads folder or on the desktop. It’s a good way to keep everything neat and tidy! I wouldn’t be keen on having a folder where I’d have to move things at the beginning of a project and then relocates everything when the project was finished.
Advantages of Using HookAutomate with StreamDeckThere are many more options of linking by using Hook. The links are robust so if a file is moved or has the name changed the link will still work. Using keyboard shortcuts to access Hook makes the process seamless. I also have a Hook button on my Stream Deck. Then I have a profile in stream deck which presents itself whenever I am hooking. This profile gives me access to the keyboard shortcuts to complete the hooking process.
 Activate Hook from StreamDeck
 Streamdeck Hook ProfileDeep linking
It’s good when you can link to a specific place within a document and not just to the overall documents. If you’re working in a large PDF it would be a nuisance to have to do a search to get to the exact point in the document you need.
Project Hub – Links to EverythingInstead of taking the contents of an email to put somewhere else, use Hook to link it to where ever is your hub for the project. That could be in another app like Craft, Drafts, TextEdit or in a To Do app like Agenda or Omnifocus. I would go for Craft myself because I can add images and go beyond text alone. Also there is the Wiki style linking to further organise in Crafts. Still possible to link in the organisational aspects of a get things done application.
The post Hook For Productivity appeared first on Good and Geeky Books.
April 26, 2021
How to Use Craft for Your Journal
First of all I should say I am a happy user of Day One journalling software. This is the best journalling software available for the Mac and iOS. I have been using it now for more than nine years and so I know what’s required of an application for good journalling. There are features within the application which mean I would be unlikely to change to using Craft. However, there could come a time when I need to reduce the number of subscriptions I pay per month. I saw on the Craft forum someone was asking how to use it for journalling. So I thought it would be interesting to see how it could be done.
Craft is excellent software and would make a great platform for your journalling activities. This is because you have the ability to create good looking text based journal posts and also include images as much as you would like to. It’s possible to include a sketch directly within the application if you’re using it on the iPad. It doesn’t have audio recording built-in, but you can record audio in another application and drag it and drop it into a Craft document. Then there is the organisational facilities you need.
Organising Your Journal in CraftThe organisational features within Craft give you a number of options and I’ll show you in the video a couple of ways to arrange your daily journal posts.
One way is to use folders and subfolders. Have a folder for the year inside a journal folder. Then put subfolders inside each year for each month. Within the subfolder for the month you have a couple of ways of creating your journal.
It could be done by having one document for the whole of the month, although if you did you wouldn’t need the subfolders per month. Within the document whether it is per month or per day you can have multiple posts. I often write more than one journal entry during any particular day.
There are a couple of ways of creating these posts within a document. The way you’ll do it will depend upon how you want your journal to look. You will want to decide how accessible the content is in Craft.
Creating Journal Entries
Let’s first have a look at this example I’ve created in Craft. I have a folder called Journal. If you are using Craft only for journalling then you won’t need to have this initial folder. I use Craft for many purposes so I’ll be using a separate folder to separate all the various subject matter I include. Inside of the journal folder I have two folders. One for the year 2020 and the other for the year 2021. Let’s look first at how I’ve set up 2021.
Within the 2021 folder I’ve got four folders for four months of the year. April through to July and I’ve given each of these folders a number at the front so they sort properly. In the left sidebar you can sort those manually, but within the main window of the folder you can have them sought automatically. This is why I put the numbers at the beginning of each of the month titles.
Notice in the sidebar I’ve used emoji icons for each of the year folders. I’ve used the generic icons included in Craft for the months. It’s easy to change these folder titles after the initial setup if you wish to. (Here is how you change the icon for the month of June.)
If we have a look in the folder for the month of April you can see I have six documents. The documents are titled using the ISO naming convention for the date. I prefer it this way because it allows for better sorting based on the name of the document within the folder. There is also an extra document which started with three zeros (For proper sorting), the name of the month and the year.
This could be the single document you use for the month of journalling. Within it you have content contained within, but is not its own document within Craft. There are two examples of this for the date 22nd of April and 25th of April. You make these sub- documents by clicking on the add content button.
Or have links which go to separate Craft documents. Create one of these documents by inserting the date after an ampersand. A window will pop up and you can click on Create or press enter. If you’ve already made to the document you use this method to link to it from the document you’re working in.
Remember that this new document will be created within the inbox. This document will be better stored within the correct folder so you’ll need to move it manually afterwards. Even when you are moving the document within your system the link you made in the initial document will still work.
Whether you create the document as a sub documents within another one or as a separate craft document, you have the same options for the content of the entry.
Add a cover image to make it look pretty at the top. Use a photograph of your own to show something about your day. Or you can grab one of the stock photos just because you wanted to look good. I quite like having a cover image because it looks better when you’re using one of the tiled views in Craft.
Then add the blocks of text, images, titles and headers to create your journal post. If you’re doing this on the iPad you can also insert a sketch or diagram. Add snippets of code or maths formulas if that’s what takes your fancy. Format it so it looks nice and hey presto.
Each paragraph you add is a block and because of this you can work in a free-flowing manner. Dump your ideas into the document and arrange it to make sense of it afterwards. You also have keyboard shortcuts to move things around, group or un-group. Change a block which is a paragraph into a title by using the keyboard shortcut of Control – 2. Or change the style in the style panel on the right side for the complete block. Another way to adjust the style of the block is to use the / key to access another menu. All the same style adjustments available including the focus and block decorations, colours and fonts.
If you have some words selected in the block you can do the usual bold or italicise type of formatting in the same panel.
Change the look of your post by selecting one or more blocks and converting them to either a page or a card. Decide for yourself your system for building your journal entry so that it’s as functional and / or as pretty as you want it to be.
Another option for your journal organisation could be to have one Craft document to contain whatever. That could be everything, all posts for the year or posts for the month. It really depends upon your level of journalling. If you are a professional you would probably go for splitting it up with at least a folder per month. If you don’t create that much journal data you could go for a document per month. Within that you could have the sub documents contained inside.
In this folder for 2020 I went for a menu document with links to separate craft documents per month. Then within each of those month documents I could have links to the separate documents or to the pages contained within pages.
There’s lots of different ways you can do this so you can choose whichever one works best for you. You just need to consider
Privacy Considerations Using Craft for Your JournalIf you’re using this on one device you will have the protection of passwords and bio controlled access such as fingerprints and face recognition. If you are using synchronisation so the data is the same on multiple devices such as your iPad, iPhone and on the Mac, you might consider extra measures. Journals are meant to be private and personal. You don’t want every man and his dog reading your sensitive data. I don’t think the data within Craft is held on the servers at Craft, but I don’t know. In any case, you should consider using encryption within your journal. At least encrypt the most sensitive parts of the data.
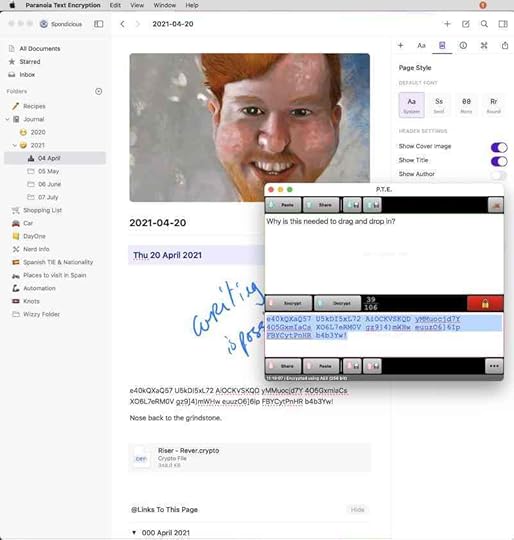
There are a couple of ways to do this and be protected. To encrypt text I recommend the use of the application Paranoia Text Encryption which is available for the Mac and also for iOS devices. You put your text into the application set a password and choose which version of encryption you want to use. Make a copy of the encrypted text in PTE and paste over the original data within Craft.
The other option would be to encrypt documents which you would include in your journal document. This can be any sort of document, images or text based documents. On the Mac I recommend the application called Encrypto. Drag-and-drop a document, multiple documents or a folder into Encrypto, give your password and save the file. Then drag that encrypted documents into Craft.
With both of these options and using passwords remember to use a password suitable for the level of protection you require. If you want a long password that’s okay, but put it into something like 1Password to keep it safe.
 Buy a Book About Journalling
The post How to Use Craft for Your Journal appeared first on Good and Geeky Books.
April 15, 2021
Motorcycle Trip Tracking Apps Riser versus Rever
I’m a Good And Geeky motorcyclist! It’s only natural for me to want to collect the data from my motorcycle rides. I downloaded a couple of applications which I like for tracking my fun on a motorbike. Riser and Rever are both excellent applications which have a free version and a paid version. So far I’ve only used Riser free version and I paid for a month subscription to Rever. It was only €3.50 approximately for the month with Rever. I did it mainly because I wanted to find out what the 3D movie maps were like. This is where your ride is replayed in 3D on a map and you can make it into a movie. Riser has a pro feature called reWind and you have an interactive 3D map. I’ve been looking for a video showing what this looks like on YouTube but haven’t found anything yet. To be honest, it’s quite difficult to choose between these two applications. There are differences, but they mostly have the same features. Up until five minutes ago I was edging towards Riser being my preferred application. This was due to the automatic stopping and starting of tracking while on a journey. You don’t want the time counted while you are eating as part of your riding time. I just found a setting in the Rever application which also allows this automatic pause.
3D Map Video of the Ride in Rever (PRO)Free Versus ProBoth of these applications have very good facilities available in the free versions. I suspect that for many people it will be sufficient to only use the free app. In both applications you get a record of your rides with lots of lovely information. With Rever you also get a graph which shows the elevation along the ride. Also with Rever you get two views showing your rides, a tile view and a list view. The tile view gives you a map along with the basic information such as how long the ride was and how many kilometres or miles you rode. Whichever way you start, list or tiles, by tapping on the ride you get more information. One cool feature in the Riser application is that you can hide your start and finish. This is for when you are starting from home and you are sharing the ride within the application or elsewhere. You might not necessarily want people to know where you live.
What You Get in Each AppRISERREVERCost of Pro/Premium€59.99 / €29.99 Half price offer€39.99 / €21.49 OfferTitle DescriptionDate of RideDistanceDuration of RIdeTime Started RideTop Speed Possibility to hide when sharing.Average SpeedClimb / FallSea Level max/MinTotal AscentMax AltitudeVisual Showing elevationTemperatureIcons to mark basic weather state. – PROMapsOffline Maps with PRO accountA variety of map styles in the free version and more available in the PRO version. Points of interest, weather overlay and Offline maps with PRO.reWind / 3D ViewreWind – – PRO3D View – PROLink to Share Ride or share an image from the map view of the ride.More that 1 bikeGarage – List of bikes you ownGarage and lists of bike gear possible.PhotosCan be added one at a time.Can be added one at a time.Commute booleanSurface TypeCommentsMark a ride a Favourite
Ride route again Upload GPX data – PROChallenges Geographically limited.Navigation / Route Planning – A to B – Super Curvy road – PRO – A to B and also with way points if required. More than 3 is a PRO feature.Round Trip SuggestionDiscovery – Rides and sections marked as good by yourself or other rideUse previous rides and new ride.Turn by turn navigationPack Ride – Limited to 30 minutes unless PROUsing Your Motorcycling Tracking Application
DescriptionDate of RideDistanceDuration of RIdeTime Started RideTop Speed Possibility to hide when sharing.Average SpeedClimb / FallSea Level max/MinTotal AscentMax AltitudeVisual Showing elevationTemperatureIcons to mark basic weather state. – PROMapsOffline Maps with PRO accountA variety of map styles in the free version and more available in the PRO version. Points of interest, weather overlay and Offline maps with PRO.reWind / 3D ViewreWind – – PRO3D View – PROLink to Share Ride or share an image from the map view of the ride.More that 1 bikeGarage – List of bikes you ownGarage and lists of bike gear possible.PhotosCan be added one at a time.Can be added one at a time.Commute booleanSurface TypeCommentsMark a ride a Favourite
Ride route again Upload GPX data – PROChallenges Geographically limited.Navigation / Route Planning – A to B – Super Curvy road – PRO – A to B and also with way points if required. More than 3 is a PRO feature.Round Trip SuggestionDiscovery – Rides and sections marked as good by yourself or other rideUse previous rides and new ride.Turn by turn navigationPack Ride – Limited to 30 minutes unless PROUsing Your Motorcycling Tracking ApplicationHow easy are these applications to use? I have set up a shortcut on my iOS iPhone to automatically start these specialised motorcycle tracking applications. At the moment this does both applications Riser and Rever. Eventually I will choose just one of these applications and get rid of the rest. I have also just downloaded Calimoto to do some testing. If I don’t set up something to automatically start the application it’s quite likely I will forget. I have the habit of using Waze due to using in the car and enjoying the notifications I get about where the speed cameras are. The shortcut asks me if I am on the bike instead of the car. If the answer is the default ‘Yes’ it will start the GPS tracking app.
Tracking Your Ride with RiserWhen you have the application if the map is not showing you tap on the middle button in the menu at the bottom of the screen. It says Go! and has a little picture of a house. Then all you need to do is to press the button to START TRIP. The map then changes to indicate the distance, time and climb at the top of the map screen. In the centre at the bottom there is a circle with six black dots inside. Tap on this button to get to another menu.

The one thing I really liked about this application right from the start is the auto pause. It will also auto resume if it has paused. There’s a button from the menu allowing you to manually click resume.
One of the buttons is for navigation. The starting point is your current location and you can add where you want to go to in the search field available. If you are a free user you only get the choice of curvy roads. Premium users also get the opportunity to choose a super curvy road. If you click on the settings button in the top right corner you can set some options. There are only two choices in the route options – Avoid Motorways and Don’t Have Time? If you need to get to your destination the quickest way possible, you just have to say you don’t have time and the route will change accordingly. There are times when we don’t have the enough time to have some fun on the way. In the free version I’m only given a single route to choose from once I’ve set the parameters. It may be that premium users get extra options.

My usual test for a mapping application routing is to get to a campsite in the French Pyrenees I use from time to time. I already know which routes are the best for whatever reasons. It’s interesting to see what the application gives me. If I don’t have time it will send me along the motorway. If I want to avoid the motorway it sends me along a completely different route. I’m quite happy with the decisions made by the application. In the iOS application you don’t get any options to add waypoints. So you would need to organise your journey in stages. It would be nice to specify stopping points on your journey.
If you don’t know where you want to go to you can tap the button in the top right-hand corner of the map, above the settings button, to get a round-trip from your location. When I clicked that button at home it gives me a trip of 81.5 km which would take me one hour and 40 minutes. You can go into the settings and change the maximum duration. I change the duration to 2 ½ hours and it gave me a trip of 206.5 km that would take me nearly 4 hours. Some strange things going on with the mathematics within the application.
What Else Might You Do in the Application?FeedIn the menu at the bottom the first icon to the left is the feed. This gives you a scrolling screen showing your rides and rides of people you are connected to. It also shows connections to the journal/blog from the application.
GetawaysHere there are two screens, the one entitled browse shows you getaways organised publicly in your current location. The other screen available is My Getaways. This will show you the getaways you are participating in and getaways you create yourself. I could create a getaway by pressing the plus icon in the top right-hand corner which brings up a screen giving a choice of – Short Spin, Daytrip and Journey. When you click on any of these you select a riding style – Cruising, Dynamic or Sporty.

The next thing is to choose the meeting point. You tap on the map and move it around until you get the exact position you want on the screen.
Pick a start time and end time. Give the getaway a title and a description then you can give the getaway a photograph if you wish.
Finish off the process by inviting friends you are connected to via the application. Or you can choose the visibility of the getaway within the application. Anyone, Friends or Private. If it’s private then only you will see it. So this could be a good way to meet motorcyclists in the area near where you live. Organise a group trip out for the weekend or whenever.
RoadbookYou have two screens available here, one is called Trips which shows you tiles for each of your trips. Each tile shows the date, the title, distance and duration of the trip. You can tap on the tile to go to the details of the trip.
At the top of the details you’ll see a map which you can tap on to go fullscreen. Further down you create a section, or there could be matching sections. Maybe another rider has ridden that road and created a section. A section is part of the trip which you have noted as being particularly good. Usually this is going to be a curvy, twisty road. I created a section in a recent trip, when I clicked on the section it opened up another screen in which told me that five bikers have ridden it nine times.
Then you have the button to Show reWind which is only available to premium members. Underneath reWind is the option to link to the trip and to share it. There is a toggle to enable the secret link. Tap on the blue bar across the screen to share the trip. The URL takes whoever clicks on it to a webpage showing the details of the trip. Obviously it always gives the opportunity for viewers to find out about the Riser app. I use this URL in a shortcut in the Shortcuts application in iOS. Even though the data is nicely presented within the Riser application I like to move the data into my own database. For this I use AirTable which allows me to see the data in a variety of ways. This is also good as a backup. If anything was to happen with the Riser application I wouldn’t lose all of the accumulated information. It isn’t difficult to set up the shortcut to send the info to Airtable. I found videos on YouTube showing how to do this with the API. I made a change to the original to ask me which bike I’m riding to get that into Airtable also. I want to make another change to ask me the reading off the odometer at the end of the trip to add to the data.
More…In this area you get quite a few options to play with. Setting up your profile is the first on the list. Get in and add whatever you want to share and see cumulative totals from your ride data. The distance you’ve logged, time riding, climb, number of trips and rank. I’ve got two gold stars whatever that means… Woo Hoo. Tap on Garage to add your bike or bikes. You will also get into your list of Riser friends through here too.

There is a social element to riding motorbikes and included in the app. There are lists of groups you can create and belong to. Challenges to take part in. I added my name to the April 2021 500km challenge. I can see I am ranked 34 in the list and there are 179 participants. I’ve already ridden 622km this month. It’s all a bit of fun to add a gaming element to the riding if you are slightly competitive.
Using Rever Tracking AppThe first thing I notice is the more detailed maps in Rever. There are contours to show the lay of the land which would be useful if you’re riding off-road often. The tracking does not auto pause by default so you should set that in the settings before you do anything else. When you are ready to just hit the Record button when in the Track mode. Use the Create Ride option at the top of the screen if you want directions with the option to use twisty roads if you want.
 Connect with Friends
I like the option of a QR code you can show to a friend who also has Rever. Handy if they are standing next to you so you can link up easily. Or you send a url link by whatever method to connect with your mates.
Planning a RouteThere is a good route planning section. Set where you want to go to and add waypoints to refine the route as necessary. If you want twisty roads you have to be premium in the app. Set Avoid highways, Tolls and Ferries if you want. Load a route you have already recorded to ride it again and get directions. Premium users can import GPX data and download rides from the Discover section of the app. There is a button in the Discover section – Ride It, so maybe you don’t need to download the ride. Choose from various types of rides – Paved, mixed surface, Off-road Areas and more.

There are a lot of things to like about Rever and if it had the API or allowed me to scape the data from the url which shares the ride I would choose it. It’s good to have the data saved elsewhere, so if I wanted to swap apps at any time, I could. Just press the big orange button in the Track section to start the process at the beginning of a ride. the collected data is similar to Riser with the addition of a graphic to show the change of altitude during the ride. Add photos from the ride and link a YouTube video to show how it went. Same as in Riser there is a place to insert ride notes and comments.
There are challenges to take part in, in the Rever app although all of them are geographically restricted. I will not be riding in New Zealand or South Africa anytime soon.
Which App do I Choose?I have recorded more trips using Riser than I have with Rever. It’s better to choose one application and stick with it. On the other hand, there are features within Rever which I like, along with a cheaper cost of entry to the premium or pro version. it looks like I’m going to be using both of them. I’ll use Riser because I can get the information I need out of it for AirTable. This will give me an independent set of date not chained to one specific app.
I’ll also use Rever because it only cost me €12.25 to get one year of pro subscription. There was a 30% offer I took advantage of on their web site. I like the 3D replay of rides and the prettier maps with more options. Although the day after subscribing I have no rides on display in the app. When I access the account in the browser, there are rides in the list. Something weird is going on with their server. Another reason to use Riser combined with AirTable to have more control of the data.
Use Rever to Ride Route againWith the Rever website you get a map with all your rides overlaid on top of each other. Of course you can look at each one individually to see the route on the map by itself. You’ll get all the same info as you get in the app on your phone. See the basic data and add comments, likes and favourite the ride. Premium members can download the GPX data file to use in other mapping applications. Or use yourself to do a re-run of a previous ride. An easier way to follow a previously ridden route if to select the route in the app, hit the icon which is a circle with three dots inside. Tap on the menu item Ride It! Choose Follow Route Line or Get Directions. Do the route in reverse if you wish.
The post Motorcycle Trip Tracking Apps Riser versus Rever appeared first on Good and Geeky Books.
March 19, 2021
Affinity Designer Tutorials
Here are a series of video tutorials you can use to learn how to do things in Affinity Designer. Designer is an amazing application which benefits from not being a subscription service. Many people are changing from Adobe products to using other software because of the need to pay for Adobe on a monthly basis. Affinity Designer by Serif is a highly accomplished vector design application. There are some things it doesn’t do compared to what’s possible with Adobe Illustrator. For the most part and for most people Affinity Designer will do the job, and do it elegantly. In the past in my pre-Mac days I used to use CorelDraw on a daily basis for my sign writing business. It was fantastic software and was perfect for what I used it for. It took me a long time to find similar software to use on the Mac. Affinity Designer certainly fills my needs for vector artwork creation.
Answering Affinity Designer QuestionsThere’s a Facebook channel for Affinity Designer and people are often asking how to do things in the software. I quite like to make a video to answer these questions. Sometimes I have to learn how to do the task myself first of all. I quite like learning how to do something new and to pass the information on. Even though for some of the things there are already tutorial videos covering some of these processes already. I’m often able to put my own spin on it and to show things that got missed in other videos. I’ve made a video showing you how to place vector art inside text. There is a tutorial showing how to remove the background from a photo whilst using Affinity Designer. You can find out how to use the Affinity Designer vector crop tool and also how to do something simple like making a trapezoid shape. Have a look at the video in which I detail how to put text on a curve.
Making a Copy Of A Design In Affinity DesignerI took the bitmap of the design someone wanted to copy. I put it on to the working area in Affinity Designer. I sized it up to make it fit the working space. It’s a good idea to lock the reference layer so when you’re putting things on top you don’t accidentally move your it. The first thing I did was to place a rectangle to be the background for the design. I can start putting things on top using the Affinity Designer tools.
The centre part of the design are three letters which have been altered to make into a logo. The easiest way to do this was to trace the straight edges of the letters using the pen tool. I had snapping working for me making it easy to have the new nodes line up. If I hadn’t done that I would have used guides. After getting the nodes for the letters in mostly the right places I was able to go to the node editing tool and fine tune the shapes.In the design there is a shape which goes around the centre part of the logo and is broken up by text at the top and the bottom of it. It was simple to create this shape by making two rectangles and using the internal rectangle to cut out the inside of the shape. This made a frame and I placed two more rectangles on top to remove the area by using Subtract, where the text was going to go.
I show one way of putting a bitmap pattern or texture into a design. This is to do it on a per shape basis. With this design it was easier to to put the single copy of each of the backgrounds behind the main shape. I then used the Boolean tools to do a cookie cutter allowing these backgrounds to show through. It was necessary then to mask certain areas of the uppermost bitmap pattern allowing the lower pattern to be shown in the right places.The main logo letters also included an outline. I added a copy of the letter A on top, made the fill empty and added an outline in white. Where I had used the method of making the background mask with the rest of the letters I would have had to make copies of those before using the Boolean tools. Failing that, I could have also just use the pen tool to recreate the shapes. Sometimes it’s necessary to do some planning beforehand to work out the best way of doing the job or to find workarounds. I could have made a copy of the cookie cutter shape and deleted what I didn’t need to do the job.
The marble effect in the background of the main letters was easy to apply. I didn’t have anything quite so similar to the gold coloured background for the letter E and the word ‘ELITE’. This was just for a tutorial so didn’t really matter too much. If it was a job for yourself then you would have spent more time looking for the right background or pattern. The text was similar to the font Arial Black and for many people it would have been good enough. For a professional job you would identify the proper font for the job.
Affinity Designer Versus IllustratorI did try using Illustrator for a short while, a few years ago. I didn’t like it in comparison to CorelDraw and is seemed to be more difficult to do some of the things I found easy to do in my previously preferred vector design software. This hasn’t been the case with my use of Affinity Designer. Most of the things I want to do with the illustrations I’d like to produce, can be done easily using this software. The one main thing missing, is the vector warp tool. Hopefully we’ll get the ability to warp the vector shapes we create and keep them as vector shapes. If you have Affinity Photo it’s possible to warp your design, but you have to turn those parts of the design into raster, bitmap artwork. If you need to make text into warped shapes you can do it on a shape by shape, letter by letter basis. Whether you would do this or not depends upon the complexity and amount of text you need to work with.
Affinity Designer is highly accomplished software and it gets the Good and Geeky recommendation and a huge thumbs up.
The post Affinity Designer Tutorials appeared first on Good and Geeky Books.
Good and Geeky

- David Allen Wizardgold's profile
- 3 followers

