
David Allen Wizardgold's Blog: Good and Geeky, page 13
March 24, 2017
Shopping List App – Reminders or Anylist?
It’s a really good and geeky thing to use your mobile computers for your shopping list. It is much more useful though than writing lists of what you need to get on pieces of paper. What I needed was a shopping list app.
Reminders as a shopping list app
I have been using the application Reminders and lately, it’s been annoying me just a little bit. I leave completed items on the list so I can choose them again. This saves me from retyping the shopping list each time I do it. The trouble is, the list is not in alphabetical order. It can be difficult to scroll through and find just the item I want. I have on many occasions retyped something in that is already on the list just because I didn’t see it was there.
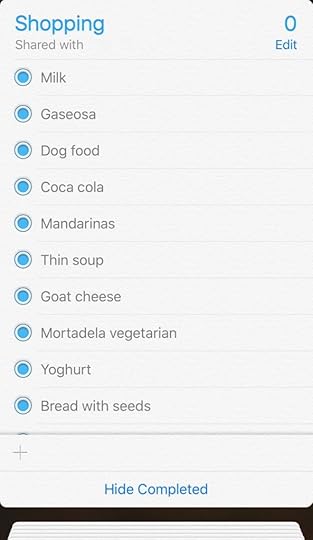
I was going to need a new application to use for the shopping list. After searching through the App Store the app which kept coming to the top of the list was Anylist.
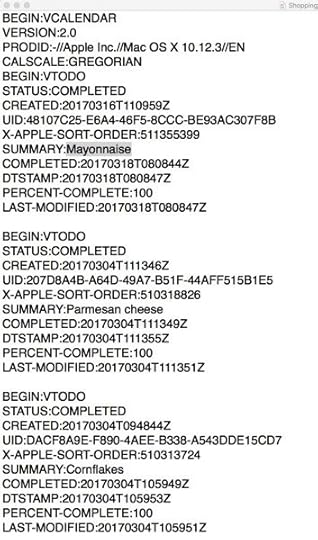
The next thing to do was to get the list I had in reminders into Anylist the shopping list app. It’s not possible to export out of reminders on iOS but it is possible to delete from the Mac version of the application. I did the export and the file came out in the ICS format. When I looked into the file using a text editor it was full of extra rubbish I didn’t need.
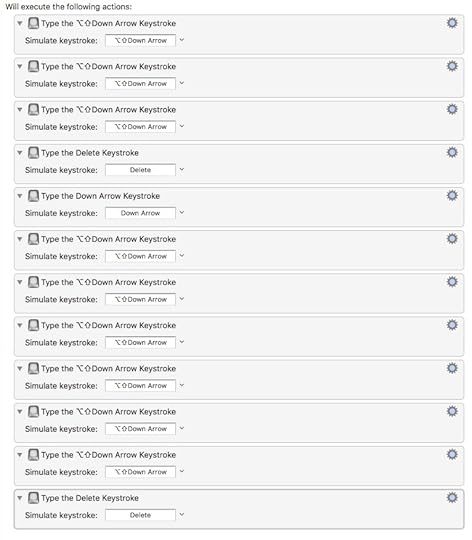
I like the idea of using automation which is what computers are excellent at, to get the file sorted out. First of all, I used Keyboard Maestro to create a macro which from a given starting point selected lines of text, deleted the text, moved the cursor down two lines, selected another few lines of text and deleted those too. All I needed to do then was to use a find and replace to get rid of some extraneous text on the same line as the item of the list. Then I was finished with the job. (The macro did one item at a time so I had to press the Keyboard shortcut for each item.)
Easier with Editorial and TextTool on iOS
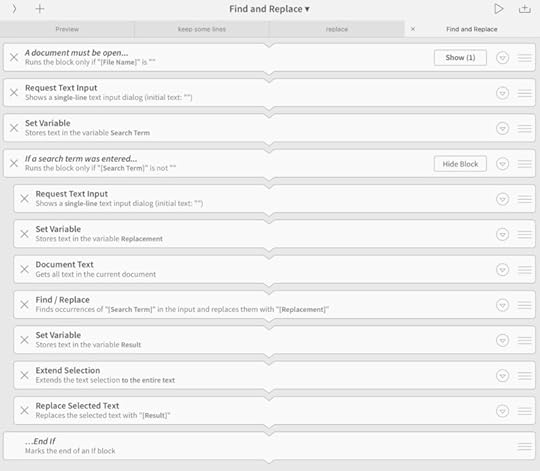
Even though it wasn’t possible to get the text exported out of Reminders on iOS I wanted to find out if it was possible to do the job I did with keyboard Maestro on the Mac, on iOS. I was pleased to find out that using a macro in Editorial did a quicker and easier job of getting rid of the lines I didn’t want. Then I used an application called TextTool to do the find and replace. I have since found workflow available in Editorial to do the find and replace.
Keeping the Lines with the text I wanted

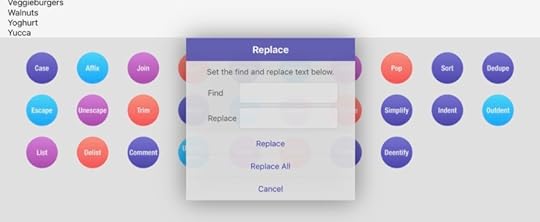
Find and replace in Editorial
Find and Replace in TextTool
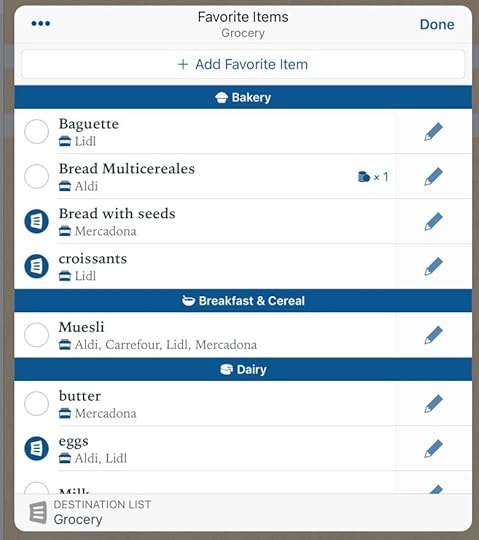
I was delighted to find in the shopping list app Anylist there is a way to import a list of items into your shopping list. This is available in the iOS version of Anylist. Once the list is available in the application you can then start to categorise items such as produce, dairy, bakery et cetera. I can also add information such as the price of the item and assign the item to one or more shops.
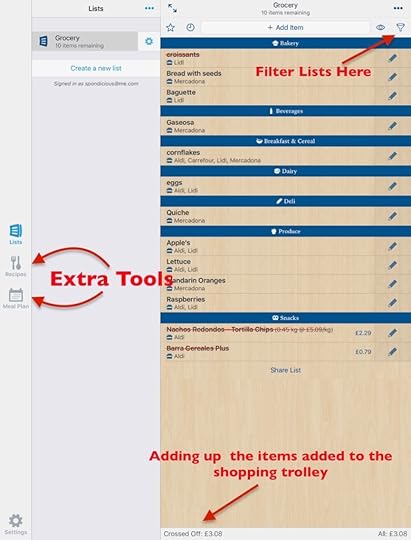
Using AnyList shopping list app
When I’m going out shopping I can quickly set up a filter when I’m in a specific shop to show items for that shop. It’s also good to see the items separated out into categories making it easier to find items on the list in various parts of the supermarket. If I have the prices set up I can see prices from other shops. I can also have a running total of how much is being spent in the store as I cross things off when I put them into the shopping basket. Anylist is a cool shopping list app and much better than using Reminders.
Adding to the shopping list from Favourites
Using the Anylist shopping list app
The post Shopping List App – Reminders or Anylist? appeared first on Good and Geeky Books.


March 17, 2017
Dragon Anywhere Problems
I’ve just managed to buy a subscription for the Dragon Anywhere product. It starts with a seven day trial version and then after that it works out at €12 per month. For my next trick I’ll have to get the application onto the iPhone. This is a bit difficult because it’s not available in the Spanish App Store. I have to get into an English/UK account I have, if I want to get the latest version of the Dragon Anywhere application. I do have a version of Dragon Anywhere in iTunes because I was able to download it previously. It’s just that I’m not sure if it is completely up-to-date or not. (Probably not…) I’m installing it on the iPhone as I write this, so I have my fingers crossed. It’s taking a very long time to do a backup of the iPhone. Back ups work much faster when I’m using the application iMazing. For now iTunes has to do a backup as part of the synchronisation to get the application I want copied across to the phone. The start of the Dragon Anywhere problems
 Doing a dance with the iTunes Store’s
I did have an Apple ID previously, which was set up with the English/UK iTunes. For some reason or other I can’t get into it. The password isn’t working and when I go to retrieve the password it’s not letting me do that either. Apple seemed to be blocking me out of my account on the UK iTunes Store. I’ve just set up another UK iTunes account which has gone okay so far. I’ll try to log into that either in iTunes on the Mac, on the iPhone itself or maybe give it a try on the iPad.
Full of optimism for the trial of Dragon Anywhere
For the next seven days while it’s free I will do my best to use the hell out of the Dragon Anywhere service. I don’t really want to pay €12 per month, but then again you never know it might be the best thing since sliced bread and worth paying for. I really won’t know until I give it a proper try. If I can get past the Dragon Anywhere problems
Hitting my head on a brick wall – Dragon Anywhere problems
Bashing my skull on a concrete wall would be less annoying than trying to set up Dragon Anywhere. I was able to download the application to my iPad and to my iPhone, but it would let me use the login which I used for the purchase of the seven day trial from Nuance. I’m not sure if it’s a problem to do with where the Nuance account is registered. It might not let me in because I am living in Spain. I also saw that there were problems on the Nuance website. I tried looking at the online receipt for the access to Dragon Anywhere and I just got an error message. I also looked in PayPal which is what I was using to register for the service and possibly pay for it if I go past the seven days of trial. I didn’t see an entry in my PayPal account which is a little bit weird to say the least. I did get confirmation earlier from Nuance to say everything was okay and I just needed to download the app and start using it. What on earth is going on Nuance how come so many Dragon Anywhere problems to deal with? I was looking forward to using dictation from Dragon on my iPhone and at the moment I feel like giving up. I have beaten into submission by a whole lot of messing around.
The post Dragon Anywhere Problems appeared first on Good and Geeky Books.
March 10, 2017
Secure sensitive data with encryption – Wikileaks and Online Privacy
With the latest announcements from WikiLeaks with information they somehow got from the CIA regards how they hack your devices, should we be worried? Can governments, whether our own or foreign see what we are saying in supposedly private messaging apps? Is our data safe when we’re using apps like WhatsApp and Signal? Do we need to do anything to make ourselves more secure and secure sensitive data? If these applications are insecure in the way the CIA are able to use them what does that mean for our data privacy in general? If software has a back door put in there for governments to use is that also a vulnerability which thieves and criminals could make use of?
The security of data in messaging apps
We should be safe when using messaging apps like Apple’s Messages, WhatsApp, Signal, Keybase or Telegram which say they have end to end encryption. We certainly are safe using these applications in terms of the man in the middle attack. It’s not possible for a nefarious person of whatever flavour to read the messages as they travel down the Internets tubes from one user to another. Unfortunately, there are still vectors of attack which work along the same lines as someone looking over your shoulder while you are using your computer. If for example you are sitting in front of your computer using Messages to send delicate information to a friend, somebody standing behind you could see what os on the screen. Same as if when the message arrives at the destination and the computer at the other end is insecure there’s a vulnerability there too. How do we protect ourselves from people looking over our shoulders, how do we secure our computers and keep their data safe?

The first thing to do is to make sure you use a good password to access your computer. The quality of the password you use, the unbreakability and security of it depends upon a number of variables. If your computer is in a securely locked room in a secure building containing data not particularly sought-after by anyone then you might only need a short, quick password. If you use your computer in a school or within an office and there are plenty of people wandering around it’s a different matter altogether. You’ll want to make sure that your computer goes to sleep in a secure mode when you move away from the computer. If you think you’re not going to remember to do this every time you walk away then change the settings. Make your computer go to sleep automatically inside of one minute if it’s not being used. Have a password which has enough entropy to be secure. This means you want our password which is long. It is possible to make passwords which even though they’re long they are still easy to remember.
Good computer security
The good thing about our iPhone and the new MacBook Pro is that they are protected by biometric security in the form of fingerprints. It’s not possible for a bad person to access your computer without your thumb or finger print. In time all computers will be protected in this way and to gain access we will have to use a fingerprint or an eye scan. It’s possible to set up a system where a computer will go in to secure mode whenever you move more than a certain distance away from it. This can be set up with your Apple Watch or phone and using Bluetooth it will know if you have gone more than one or two metres away from your computer. You can also set things up so that when you return it will unlock as soon as you are within the right distance from machine again. If somebody takes the watch off your wrist and goes to your computer then it shouldn’t unlock your computer. For secure sensitive dataYou will also have a password on your watch to prevent it from unlocking your computer.
Use two factor authentication to Secure sensitive data
 Use two factor authentication on your main accounts. So for accounts like email, Apple ID iCloud, Facebook, Twitter and those sorts of places you enter a time sensitive code to get in. I can get the code from another device such as from my Apple Watch, my iPhone, or my iPad. The way it works is that you still use your normal password (something you know) and then you’ll be required to enter another code which only lasts for 30 seconds from the other device. (Something you have). So even if somebody had your password to get into one of your protected accounts such as your Gmail account, they still wouldn’t be able to get in. An advantage of 2FA is that you can use public computers to access these accounts. Even if those public computers are compromised no one else will be able to access your data within those accounts. Still might not be a good idea to enter a load of sensitive data in case of a keylogger. More and more services are offering two factor authentication to help beef up your data security.
It is still possible to stay safe
Secure messaging apps with end-to-end encryption are a good idea and still safe to use. Just make sure your device is as secure as it can be.
Despite some of the sensationalism around the reporting of WikiLeaks revelations you’ll still be safe if you take basic precautions.
Use two factor authentication and an application like Authy or Google two Factor Authenticator to secure sensitive data.
Change the passwords on your most important accounts regularly, every six months is good. If you’ve used a public computer you should change your passwords at the earliest opportunity. Even if you have been using two factor authentication; Just to be safe!
Encryption of data on the computer
 There are possibilities to encrypt the whole of your disk on your desktop computers. It’s more necessary to do something like this when you are using a laptop computer you travel with. Or if the computer is in a public area such as an office where it could be tampered with or stolen. With this protection in place if the computer is stolen the thief wouldn’t be able to take out the hard disk and have any way of accessing the data.
Use Pretty Good Privacy encryption to secure sensitive data
If you don’t want to encrypt the whole of the disk then you could just encrypt specific files. Use PGP or GPG to secure sensitive data, encrypt files and folders. Make sure you have good passwords and keep them safe in a password manager such as 1Password and have a good password to protect your passwords vault.
The post Secure sensitive data with encryption – Wikileaks and Online Privacy appeared first on Good and Geeky Books.
March 9, 2017
Enough Apple Rumours to Sink a Ship
I like to keep ahead of what’s happening in the Apple news. Mainly I want to know if there are going to be new computers available especially when I’m getting to the stage where I need to upgrade the iMac computer I have on my desktop. I also write about things to do with Apple on the blog so another reason to keep up to date. For the blog I come at it in terms of what you can do with the technology and how it can help our daily lives. I am getting thoroughly fed up with these supposed news sites for Apple because of all the rubbish they talk. Rather than talk about something useful the podcast hosts always discuss whatever Apple rumours are flying around at the time. The rumours are completely baseless and the podcasts have made no attempt to verify any of the information or to cite their sources. These people are pretending to be journalists which is fair enough if you want to have fun talking about this stuff. I for one am just completely bored with listening to the same stuff over and over again.

You know nothing Jon Snow…
Unless you work at Apple in the management it’s unlikely you have real data about what’s coming next from our favourite computer company. So I have to wonder why any of these people give credence to any of the rumours that circulate 365 days of the year. The only time we get a break from the stories is maybe for one or two days after an actual announcement. The podcast hosts will talk about things that have actually happened – briefly. Technology you can go into a shop and buy to make use of in your good and geeky life. It really does only take one or two days before they are at it again. I think the iPhone 7 was only out for about a week and they were already discussing rumours for the next iPhone.
The Mac Cast – Worth listening to.
 It’s for this reason I only listen to one Apple based podcast that discusses news and that is the Mac Cast. It was this podcast by Adam Christenson I was listening to when I first was finding out about Apple computers. The information from this podcast helped me decide which Apple computer to buy when I switched from Windows to the Mac. He does cover some of the rumours and does say the same things over and over again sometimes, but at least part of a podcast is about tips and tricks and getting the best from your computer.
Apple Fan Boy Premium rate phone line
I sometimes wonder if there should be a service for these dedicated Apple fan boys where you can pay to have conversations about what has or hasn’t been done by Apple. Like I said, it’s mostly chat about what Apple hasn’t done yet.
For how long did they talk about an Apple TV product?
At the moment all the Apple rumours are centring around whether Apple will change the lightning port to a USB 3 on the iPhone. The other concerns fan boys are having is about whether Apple will ever update the Mac Pro with its trashcan design. There was a lot of talk about whether there was going to be an Apple car. Just as there was a lot of talk a couple of years ago about Apple making a television. The podcasters have given up on those for now. The number of hours dedicated in these podcasts to daft discussions about nothing must really mount up. It really does get very boring and I know there are more interesting things to talk about.
Using computers is more interesting than news about them
 I think it’s more interesting to talk about how you can use the hardware and software to do things better. There are so many things we can do to use computers to make our lives better. There’s a huge amount of stuff we can talk about with regards home automation and indeed life automation. Which is the best software to use to keep our data safe? How can we use encryption to prevent nefarious parties from prying into our business? It’s nice to discuss how we can use software to keep a record of our lives as easily as possible. For this I like the application Day One. There are all sorts of interests and avenues of computer use such as writing, photography, video and making audio and the software you use to do these things that could be talked about on podcasts. It would just be so much more interesting than the incessant repetition of baseless Apple rumours.
The post Enough Apple Rumours to Sink a Ship appeared first on Good and Geeky Books.
March 2, 2017
Keybase Secure Messaging app for macOS
There are already lots of secure messaging applications to use for end to end encryption of messaging. Applications such as WhatsApp or Messages from Apple are easy to use and you don’t have to think about the encryption side of things. Wire is another secure messaging app. Then there is Telegram which also encrypts all data to provide security. So I had to wonder why there was any reason to sign up for another application doing the same sort of thing. At the moment there is a disadvantage of using Keybase as your main messaging application because it’s only available on desktop computers. According to the information on the website for the application there are mobile applications coming soon. So I set up Keybase to get a feel for what it can do and see what it’s like in real time use. Keybase claims it’s faster and that may be the case but I’ve never been worried about the speed of other applications used so far. It has built-in encrypted chat, but then so do the other applications already mentioned. Keybase gives you built-in encrypted file sharing and I can already do that with using the GPG Tools. I just have to use the services menu in Finder to encrypt a file with the public key of my recipient. I then send it as a mail attachment, or by whatever the means I deem suitable. Keybase gives us cryptographic commands in the command line. For most people that’s not really going to be much of an advantage. Most users don’t use the command line and have no idea how to even open up Terminal. It is also true to say normal users would be scared of using command lines and the Terminal. The Keybase application does have one big advantage that would be that it doesn’t take the word of the app for granted and it checks every identity proof. When you are conversing with somebody you really want to know that the person at the other end is who they say they are. The checking of identity and proving it cryptographically is where Keybase really shines as a secure messaging app.
Like a block chain – Proofs and revocations
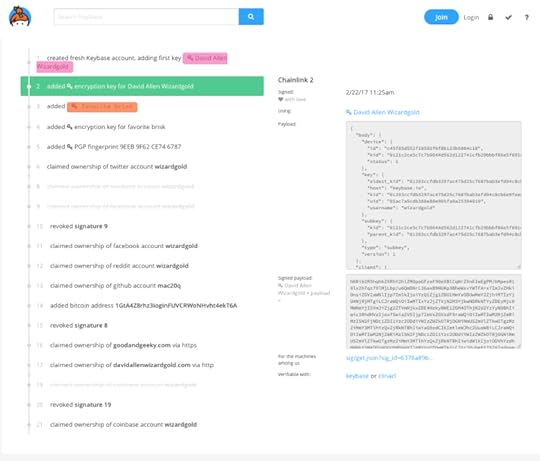
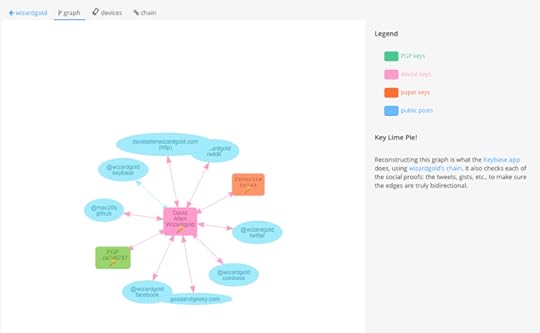
When you set up your Keybase identity, the thing to do is to connect it to your other proven online profiles. You connect it to your Twitter account by posting a tweet which is then verified by Keybase. Do the same with Facebook, Reddit, Coinbase, your websites and with a bitcoin address. All of this is put into a block chain record of what you have done with your Keybase account. Starting off with creating a fresh Keybase account and adding your first key, then adding what they call a paper key, followed by a PGP fingerprint and then maybe claiming ownership of your Twitter account. In the Keybase web application you can see the chain which checks all of these social proofs, gists and you can even see a visual graph of how all of this fits together. This is all public information so someone can see you are who you say you are. This block chain file is tamperproof and if somebody tried to mess with it it would be seen. So you would know if somebody was trying to pretend to be you. Keybase shows you if someones identity has been compromised. Other people would know if they should be wary of a message sent appearing to be from you because they’d be able to see if someone had interfered with your identity. This is in comparison to the other end to end encrypted messaging services where you just put your trust in the system. You have to just believe that the message you have received from somebody is from that person. You need to believe the encryption put in place is unbreakable. You’ve no way of checking or proving somebody’s identity as you can with Keybase.
Who needs this level of security?
For most of us we just need to send an encrypted text message once in awhile. We know the person we are in contact with or we know enough about the person so we can be sure who we are talking to. Using the sort of system as provided by Keybase will be more for a group of people coming together for the first time. Maybe in a business situation where there is sensitive information which need to be kept private. It could be something like a group of lawyers working together on a case requiring this sort of security solution. We are living in an information world and data has value. You could have scientists working on a project and they want to keep information out of the hands of people who could damage the project. There are all sorts of reasons why we should encrypt our communications.
Get the PGP Cheatsheet – Click Me
For instance, when Joe wants to establish a connection to an identity on Twitter, he would sign a statement of the first form, and then post that statement both on Twitter and Keybase. Outside observers can then reassure themselves that the accounts Joe on Keybase and MrJoe on Twitter are controlled by the same person. This person is usually the intended keyholder, but of course could be an attacker who broke into both accounts.
Keybase is not just for messaging
You can use Keybase secure messaging app to send encrypted files. Just put the file into the proper folder for the connection between you and your contact. Your contact will have protected access to that file.
What it is like to use?
You make keys for yourself, for the computer devices you use and for the connections you make. They suggest making 2 paper keys and I still have not really worked out why you need the ‘Paper Keys’?? The more things you connect to the Keybase identity, the more you prove who you are. Here is my Sig Chain to show you what I have done so far.
If you can find a friend willing to use Keybase it is easy for sending chat messages. Use like any other secure messaging app after you have set it up. Confirming my ownership of Twitter and Facebook accounts was easy. I made a post/tweet and Keybase was able to verify. Coinbase was a little more tricky but I worked it out in the end.
Verifying myself: I am a20q on Keybase.io. qUQ8q2j_m2AVAu0IYPBgMUaKFZQNgoKq5Adx / https://t.co/E48PVQuUq9
— David Allen (@A20Q) February 25, 2017
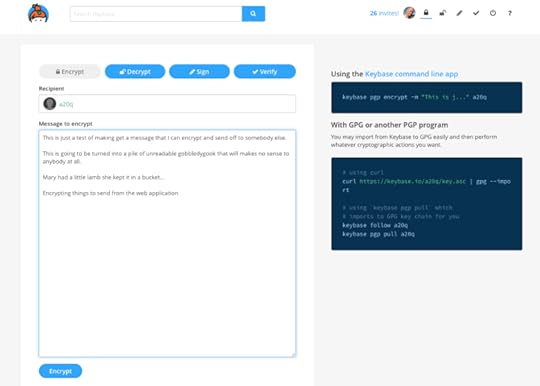
It’s possible to have a private key put onto Keybase and then you can use it to sign encryptions or to decrypt on the web page. Otherwise you need to use the command line to do some tasks. The command line is easy and you can do some tasks either that way or in the secure messaging app on your desktop computer.
Attach files and send them in the chat window or click on the Folders icon in the left panel and then click on Open Folder. all you have to do then is to drop files in the folder and they are dispatched to the recipient after being encrypted.
There’s documentation on the website and for most users it will just cause brain ache. Explanations of DDOS plus other attacks and what Keybase is doing to make everything secure.
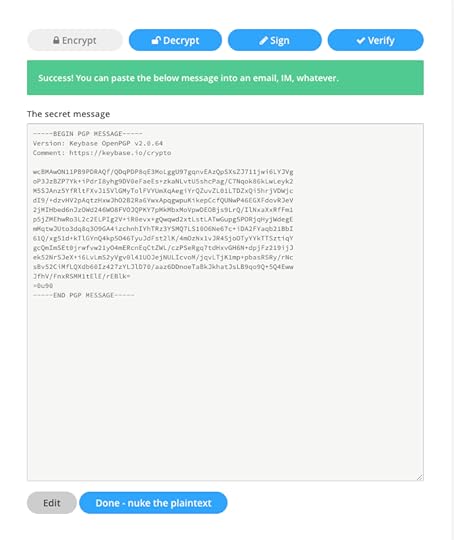
Keybase really needs the mobile version to round out the service and make it properly useful. An easy way to encrypt on iOS would be nice. Otherwise you might use the web application of this secure messaging app.
Now the message is encrypted.
Fill out the form below to get access to more Encryption information
Keybase and PGP
I am a long-term user of the Pretty Good Privacy PGP in the form of GPG and it’s not at all difficult for me to send encrypted emails or receive encrypted emails. It’s also easy to encrypt any file whether it be an image file or a document of any sort using GPG. I fully understand how some people do find it difficult to understand the concept of the public and private key pair. I have tutored a number of people in a practical way how to send and receive encrypted messages. I have found it takes a while for people to get used to the idea that to send an encrypted email to a friend you need to have that friends public key. For that friend to send you an encrypted email he or she needs to have your public key. The public key is exactly that, public – so they can be used by whoever needs to send the owner of it an encrypted email. The private key on the other hand is to be kept a secret and not allowed out into the wild. It is this private key which you used to decrypt a message encrypted by its public twin key.
On whatever system, you go to GPG tools and use it to store your public and private keys. In the same tool you store the public keys of any of your friends to whom you wish to send encrypted emails or encrypted files. The easiest way to send these encrypted emails is by using a plug-in for whichever email client you use. I have plug-ins which work with Apple Mail, a plug-in which works with Thunderbird or Postbox and the plug-in which works with my favourite email client at the moment, Airmail 3.
Another way to encrypt or decrypt text is to use services from GPG Tools which you have set up to use from your services menu. Select a portion of text, right click on it and from the services choose to encrypt. You only have to follow the instructions in the following windows to choose the public key you going to use. You’ll be presented with a pile of undecipherable gobbledygook which you can send as an email or text message to the recipient.
Another way to encrypt something ready to send would be to save the text as a file. It could easily be a markdown, text, rich text format, Word document or whatever type of file. In the finder you select the file, do the right click and choose the GPG service to encrypt the file. Follow the steps and you’ll have an encrypted file you can send as an attachment in an email or by whatever other method you want.
The web of trust for your encryption
In general use of encryption key pairs between a couple of friends on the Internet to send encrypted messages it’s easy to trust the way it works in the basic form. When the first message comes from my friend with whom I’ve been chatting on Twitter, Facebook, email or by whatever means and I know the message I’ve just got actually comes from that person. We were just talking about it, or as we are talking about it, the message arrives and I know it can only be from my friend. I am 100% sure that the encrypted message is from who I expect it to be from.
If you are in contact with a lot of people using encryption for business purposes you may need to take more care. It isn’t impossible for someone to steal your friends private key and to start sending messages to you. This third person may have nefarious intentions. In this sort of situation you need to take extra precautions. One of the traditional ways of doing this with Pretty Good Privacy PGP would be a face-to-face meeting of the people using the encryption. You would take whatever precautions necessary at the time to confirm the identity of the person giving you the public key and you would sign it with your own private key. This key could also be signed by other people at the meeting and the more signatures the better.
Buy the Book

The post Keybase Secure Messaging app for macOS appeared first on Good and Geeky Books.
February 8, 2017
The Good and Geeky Week
During this last week I have continued learning how to code in JavaScript. I have to admit on a couple of occasions with the lessons I’m working on at freeCodeCamp, I have struggled mentally. It’s been a bit of a job to get my head around the flow of the code. I’ve had to go over a couple of the lessons more than once until I got an understanding of how it worked. The way I learn best is in a visual way and sometimes text on a screen isn’t enough for me. I need to have something more diagrammatic. This makes me think how it would be great if there was a more normal person style of programming available. I know there are some languages available for kids learning how to code where they are dropping blocks of code like Lego into a coding area. Sometimes it’s hard enough to keep up with the ‘thinking like a programmer’ without having to learn the arcane invented code language. I’m sure there must be a good reason why the inventors of code have done it like they have. It certainly seems to be made for coders rather than someone with a good idea wanting to create their own application in order to do something computationally.
Automating the Mac or iOS
This there is a certain amount of programming involved if you want to automate certain processes on your computers. It can be quite useful to understand code in applications such as Keyboard Maestro. Although there is the possibility to record a set of actions. Those recorded actions are turned into what is essentially a small program or application you can run in order to get things done auto magically. Sometimes these small automations are called macros. It’s well worth thinking about things you do repeatedly over and over and finding out if you can do it by creating a macro. I’ve been trying an application called Quadro which runs on my iOS devices and connects to my Mac. One thing I’ve liked about Quadro is the ability to string together a number of actions across a range of Mac applications to get things done.
Something I would do quite often would be to take text from TextEdit and move it into Ulysses. I created a macro in Quadro which at the press of a single button, will select all of the text, copy to clipboard, open up Ulysses, create a new file and paste the text. It’s kind of cool to do it with one single tap on the iPad screen. Something which would have taken a number of keyboard shortcut key combinations is shortened time wise considerably. If I change from one application to another on the Mac the screen changes on the iPad. You want these buttons directly available to you and Quadro makes that happen. It also works when I change from one palette of buttons on the iPad screen it will change to the correct application on the Mac. There are a couple of quick change buttons at the bottom of the screen on the iPad application as another way of moving between Mac applications.

What to do if the keyboard pops up in Quadro
It all works very well and only on certain occasions is its annoying. I really don’t need to have the keyboard of the iPad popping up as I don’t intend to do any typing on the device. Sometimes it appears on the screen ready for me to use the big buttons. I can move the cursor or use the iPad on-screen keyboard. I could perhaps use a physical keyboard connected to the iPad as a way of inputting text to the iPad. My preference for writing text is to use dictation. It’s possible to turn off the auto recall of the keyboard in the app settings for Quadro. Well, that’s sorted that problem out!
Better Touch Tool and the Magic Trackpad
There is a decent range of gestures you can use on the trackpad available as standard in Mac OS. A two finger swipe from the right-hand side of the trackpad will bring in the notifications/today panel. I sometimes have that come in by accident if I’m working in some applications. So for a short period while using those applications I will turn that gesture off. It is handy though to have quick access to the Today panel if you want to send a quick tweet or a quick Facebook post. I have it set up so I can also see what I have in reminders, countdown timers, calendar and the get things done application OmniFocus. I don’t use the panel that often but it’s kind of nice that it’s there. Better Touch Tool extends the range of gestures you can make with your fingers on a trackpad. A simple one I use is a triangle swipe from the top right corner which will do the assigned shortcut of Control – D. This simple shortcut code is connected to Keyboard Maestro which toggles the microphone on or off as well as toggling TextExpander on or off. I like to have it when the microphone is on for dictation with Dragon for Mac, TextExpander is off. I don’t have a huge number of these gestures in Better Text Tool because if you have too many it becomes hard to remember all of them.
Alexa vs Siri
My biggest challenge with using these two options for home automation is that my wife keeps turning off at the wall switches, the Philips Hue Lights. As soon as they are turned off at the wall I can’t control them anymore either with Siri or with Alexa. My preferred home automation is when things happen automatically. Triggered by events such as doors being either opened or closed. I have one automation which will turn on one of my lights when I am returning home. Location based triggers are cool and easy to setup. I have an automation which will turn on a light when the garage door opens up after it’s dark. This allows me to easily see that the garage door has opened from where I’m sitting in my car and waiting for the gate to open.
The software for automations in HomeKit and also for Alexa need to improve and get more complicated. I can set it so a light only comes on at night time after it has been triggered by a door sensor for example. There are other occasions where that trigger would happen but I don’t need the automation to take place. The software to control these auto magic home automation tricks needs to allow for more conditions to be set. It needs to take into account who is in the house. For example, I can’t set up an automation to turn off all of the lights in the house when I leave because my wife could be in the house. That sort of home automation is only going to annoy her and end up being a big fail. I could sometimes do with a condition for the automation where the light is turned on for a specific amount of time after a trigger has been triggered.
 I had home kit Elgato Eve Energy plug sockets for the television but I’ve changed it for TPLink sockets which work with the Amazon Echo. It’s preferable in the way it works with the voice control. I don’t have to do a Hey Siri to my watch or iPhone I can turn things on just by speaking clearly from the living room, kitchen, office. It’s just easier! When I ask Siri for the weather she just tells me what the temperatures are going to be for the day. When I ask Alexa for the weather I get much more detail. Alexa gives me better daily information with the daily briefing. I get the basics of what’s happening as well as she will play me a podcast of some BBC News. No such information from Siri. It’s still early days for this type of voice only automation, so we’ll just have to be patient.
Website Testing
I’ve also been busy this week with a site called UTest. This is a site where you can sign ever as a tester. There are tests available to take part in and you can earn money doing so. My son has taken part in the number of tests and unwell earning some decent sums of money. So I thought I would give it a go. This week I was invited to take part in a test. This test is for testing of new testers. You get to learn the ropes of how to report issues/bugs on a website. It is called a sandbox test and I’m not sure if it’s possible to earn money during this test and get paid, or it is just to get a rating. If you do well with the test you do get invites to other tests where money can be earned. This sandbox test is still ongoing at present and I’ll find out more in a couple of days.
Good and Geeky Books
Despite being busy with the website testing I jumped back into the good and geeky books business. I have received a small amount of money from Amazon and Apple for books sold. This encouraged me to take the steps in finishing off the steps necessary to publish ‘Good and Geeky iPad Artist’. This book has been available for some time on the Apple iBookstore and I should have put it on Amazon much sooner. I’m also encouraged to get started with the next Good and Geeky book. I think the next book should be about using dictation on the Mac. I already have a free book available and it would make sense to do a fuller more in-depth version. As you know my dictate just about everything rather than using a keyboard. It only makes sense to use the knowledge I have to produce a Good and Geeky book.

The post The Good and Geeky Week appeared first on Good and Geeky Books.
February 1, 2017
iOS Dictation – Transcription Options
I find typing to be incredibly slow compared with dictation. It’s not that I am a slow typist, it’s just that dictation really is much faster. If you have good software like the Nuance Dragon dictation software you’ll be able to easily write thousands of words per day. The big benefit is that at the end of the day you won’t have sore wrists due to bashing the keys on your keyboard. It does take a little bit of getting used to, to talk to the computer instead of using a keyboard. You’ll find there is a transition period where the software has to become used to your voice and for you to become used to speaking instead of typing. I have noticed in a Facebook DragonDictate group that some people find it difficult to get past this introductory phase of becoming a dictator. It seems that many people are still thinking about how the text looks on the screen. Why on earth do you need to worry about whether there are indents at the beginning of your paragraphs? Why do you need to worry about the size of the text on the screen? Surely you’ll have set up your software to have a readable text size in the software preferences. If you look past the little niggles that can happen as you learn to use speech to text software you’ll find dictation has many advantages. You’ll then be wondering how you can continue using dictation on your mobile devices. You’ll be pleased to know there are a number of options allowing you to dictate your words on your iPhone or iPad. Let’s have a look at our iOS dictation – transcription options.
Speech to text options on iOS
Use the built-in Siri dictation.
Use the free Nuance DragonDictate software.
Use audio software to record your voice and then use transcription services in Dragon on your Mac or PC.
Using the application called ‘Just Press Record’ which has transcription contained within.
Pay for the Nuance Dragon Anywhere monthly service. This will connect up with your dragon dictation software on your desktop computer.
Using the built-in Siri dictation in iOS.
I am always using this system level speech to text facility in iOS. Whether I’m writing emails, sending text messages to my wife or to my extended family, or writing a longer piece using the Ulysses application I will nearly always use Siri dictation. I find it works better when you have a faster Internet connection. Not only does the converted text come back to you faster, but it seems to be more accurate as well. I have had sessions where I’ve written between 700 and a thousand words in just a few minutes using Siri dictation.
The best way to do it is to speak two or three sentences and then check the converted text. If there are small mistakes that don’t change the meaning of what was said I may or may not fix the mistakes. I fully expect to do an editing of the text before I actually use it. When writing a longer piece it’s better to keep in the flow of the ideas coming of what you want to say. Creativity will be stifled if you have to stop and start continually. If there is a word or two that are completely wrong and change the meaning of sentence I will make changes. This is to help me remember exactly what I wanted to say. With iOS it’s quite easy to select a word, get rid of it and put in the correct word. I do have to remember I don’t have all of the Dragon dictation facilities with Siri dictation. I sometimes forget and try telling the Siri dictation to scratch a word. Overall, the Siri dictation works incredibly well and the small annoyances don’t get in my way of writing using dictation on iOS.
Using Nuance dictation software for iOS
Once again, looking at iOS dictation – transcription options I’m testing of using this Dragon Dictation software from Nuance. Is not up-to-date and there is a message to say it should be receiving attention from the developers. When you press the button to start recording you get a visual on the screen to show it’s recording, but you don’t get to see the words arriving on the screen as you do with Siri dictation.
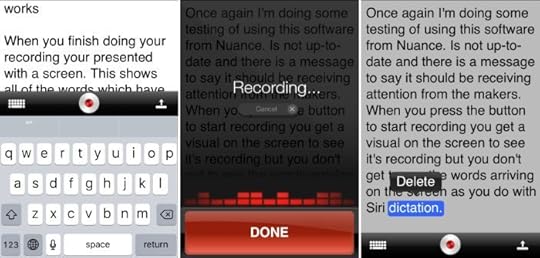
When you finish doing your recording you’re presented with a screen. This shows all of the words which have been converted into editable text. This first screen lets you delete words singularly. Tap on the word and then you’ll get a pop down or pop-up which will delete that word. It is also possible to go into the editing mode by bringing up the keyboard. When you’re editing the words in this way you’ll be doing it in the same way as if you were editing words after a Siri dictation. One of the good things about using this application is that you can talk for longer. It will still time out and you have to make sure you’re looking at the screen to see what is going on. If you have your eyes closed, as I sometimes do when dictating, the software might stop listening. You’ll then have the pleasure of talking to yourself. They do say that talking to yourself is the first sign of madness.
The previous two paragraphs were dictated using the Nuance iOS application. It seems that the application is being abandoned by Nuance because they want you to pay for the monthly subscription service. I don’t think there’s much advantage in using this software rather than using Siri dictation. It isn’t any more accurate or efficient than using the built-in Siri facilities of iOS.
Recording your voice and using transcription
Some people prefer to use transcription and some people prefer seeing the words come up on the screen as they are being spoken. I prefer dictating directly into whichever software. There are times when transcription is going to be a better option. This could be if you’re driving, walking or running or in any other situation when you’re unable view the screen as you talk.
The Importance of a Good Microphone
You’ll need to arrange a good setup for your microphone. The placement of the microphone will also make a difference in the quality of the dictation. If you have the microphone set close to your face (the sound source) you can still get good dictation even if the environment is not totally quiet. Basically what you want is a good signal to noise ratio. If the recording signal, your voice is clear compared to any background noise then you’ll still likely to have successful transcription sessions. I have tried a number of Bluetooth microphones and none of them were any good for me at all. These were the microphones at the cheaper end of the scale. There are Bluetooth microphones which probably will do a good job, but I didn’t want to spend any more money on microphones. I already have a number of good quality wired microphones. It’s a good idea to have a microphone which is unidirectional so that it picks up less of the wider noise landscape. I find a clip-on microphone is a good idea. These microphones work best if you have a small windshield cover for them if you’re outside and in a windy environment. It’s best if you can clip them on in such a way as they are not rubbing against your clothes and also creating noise in that way. A good option is to use a headset microphone. When you have the microphone on a boom so it is positioned right in front of your mouth you just can’t go wrong. A headset microphone is also good for keeping the microphone at a single specified distance from your mouth. If you’re constantly changing the position of your microphone the overall efficiency of the dictation will be compromised. Having a good microphone is important whether you are dictating directly into software or if you’re going to go for transcription. The microphones available on the iPad and the iPhone are decent microphones, just make sure you hold your mouth close to it. The wired ear pods you get with Apple products can also work out fairly good.
Using ‘Just Press Record ‘ For Transcription
One way to use this application is to just make a recording of your voice and to bring it into the DragonDictate on your Mac. DragonDictate has excellent transcription facilities. If you’re worried about the accuracy of the speech to text conversion you can also listen to the recording and compare it to the words produced by the software. If you have your microphone setup well and you are speaking clearly you will get a good quality transcription of your voice. Good enough that you’ll be able to understand what it was you said and be able to edit text ready to use. Don’t think of editing the text as an extra step because of dictation. Whether you are typing or dictating text it needs to be edited before it is published.
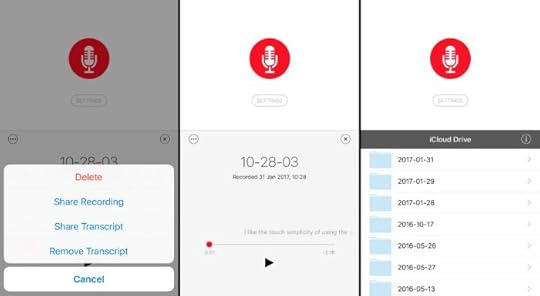
The application ‘Just Press Record‘ is simplicity itself to use. After opening the application you are presented with a screen with a button. Press that button to start recording. You can record for as long as you like and just press the button again to finish off your recording. When you finish recording you have two options available. One option is to send the recorded audio to transcribe in DragonDictate on your Mac. The other option is to use the built-in transcription service of the application. In my tests the results are mixed. One recording I made was as good as using DragonDictate. In another recording I made, the results were nowhere near as good. If you’re going to use this as a quick way to get your ideas out of your head and onto the digital page I would think it is a good option. The transcription is quick enough and is more or less real-time. Five minutes of audio could take about five minutes to be transcribed. Transcription in DragonDictate on the desktop computer will be faster.
After you have made your recording and done the transcription you can press the play button at the bottom of the screen. The audio will play and the transcribed text will scroll across the screen. You can see how well the transcription has worked right in the application. I was actually quite surprised at how well the application did with the transcription. The next thing to do is to make use of the transcription text. On the left-hand side of the screen is a circle with three dots on it. Tap on this button to get access to four options. If the transcription is terrible you can tell it to remove the transcript. Otherwise, you can share the transcript to other applications able to accept text. It’s also possible to share the recording or delete it. If you want to share the recording you get the share menu. From there you can use AirDrop or use other applications to transfer the file to where you want it. I like using the application Transmit or the application Sync to send the file to my Mac. I can also use Dropbox or iTunes file sharing. Send it to another audio application such as Twisted Wave (my favourite iOS audio editor) to edit the audio. You might want to chop out sections, use filters to clean up the audio, or increase the volume of the audio before you send it to wherever you want to work with it.
Using Dragon Anywhere
I haven’t been able to use this software because it’s not yet available in Spain. so it’s not iOS Dictation – Transcription Options I’ll be able to use. It’s only available in the US and in the UK. I did try to download it and use a trial of the software using my UK iCloud account, but I had no success at all. There was no way around it. The $15 a month is too expensive for my needs. I would rather record the audio using either ‘Just Press Record’ or ‘Twisted Wave’ and use the DragonDictate on the Mac. I think I’ve paid enough for the software already. The advantages of using Dragon Anywhere is that you can use the dictation profiles from your desktop software. If you’ve spent a lot of time training your Dragon to understand you this can be invaluable. The desktop software does learn to understand your accent and the words you use so it improves as you go. Accuracy with Dragon Anywhere should be better if you’re using in conjunction with DragonDictate.
Download the Book – ePub
What are the best options or workflows for using dictation software on iOS
If you’re just doing a little bit of text entry through dictation then the first port of call will be using Siri dictation (Probably with Drafts app). For a longer piece of work, I would also continue using Siri dictation if my Internet connection was fast enough. The next in line would be to use the free Dragon Dictation application as I find it works quite well for me and my voice. Transcription is worth considering for those times when you can’t view the screen while talking to your mobile computer. There are some people who would still go for transcription first before using the options that I prefer to have at the front of the queue. There are a number of variables such as the microphone, environment, whether it is noisy or quiet, Internet connection and whether you intend to write a lot of words or not. Whichever way you go about it there will be a dictation option that’s going to work. There’s not going to be too many occasions where you’ll have to drop down to the slower way of working, either typing on the glass screen of the mobile device or using an external keyboard.
One of the best iOS Dictation – Transcription Options – Dictate into Drafts
I really love using the application Drafts for collecting short notes. There is now an extra button on the Drafts extra keyboard toolbar. It has a picture of an old-fashioned microphone on it. Press the button and you go to a new screen dedicated to dictation. You get a slightly longer time to speak to the application to have your speech converted into editable text. When you’ve finished dictating tap on the Insert Button. The converted text will go into a new draft document where you can do further editing. Drafts is a fabulous application due to the inbuilt automation options. If you go to the button in the top right-hand corner you’ll get access to automations for sending your text to wherever you want it to go to. Drafts is also an excellent application for markdown editing. In the extra toolbar on the keyboard, you get quick access to markdown syntax.Drafts app is one of the best iOS Dictation – Transcription Options.

Dictation on the Mac with Dragon Dictate
It’s an older version but works pretty much the same now I’m using version 6
The post iOS Dictation – Transcription Options appeared first on Good and Geeky Books.
January 9, 2017
First Look – eBook Creator Software Kotobee
I’ve been trying out a new application which is for creating electronic books. The application eBook Creator Software Kotobee and it would be a competitor to Ulysses, Scrivener and iBooks author. It has the advantage of, like Scrivener, you are able to export out to the Kindle format. The application also gives you a proprietary format which can be accessed from a native application on Android, iOS and even on Windows phones. Kotobee will also export out to a web format. You upload the folder containing your book to a Web server and hey presto you have a book which can be viewed online. It looks quite interesting and I’m still in the process of playing with it and testing to see what can be done.
eBook Creator Software Kotobee
The interface for eBook Creator Software Kotobee is fairly basic in terms of being a word processor. You get a WYSIWYG view of the work you are doing. It’s easy to make the headers and add pictures to the text. It supports flow around the text even in the format style which is re-flowable. I exported out to the Kindle format and the images I put into the text didn’t show up on the Kindle app on my iPad. I looked at the same file in my Kindle app on the Mac and I have pictures exactly where they were supposed to be. I also exported out to the EPUB format and the pictures came across okay into the iBooks reader application. It’s still early days for testing this application and I have yet to work out how the pricing of it works. There is a free option which is what I’ve been using. The exports I’ve made so far have worked okay without any restrictions. I see that to export to an encrypted version of EPUB it’s necessary to upgrade to a paid version. This is fair enough as software developers do have to eat as well. The Good and Geeky brand books I’ve created for sale on Amazon previously have all been compiled and exported out of Scrivener. This has given me a good well formatted book and all for a reasonable price for the Scrivener software.
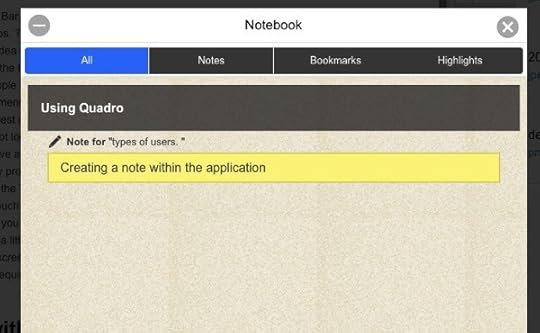
One of the formats I tried to export out to from eBook Creator Software Kotobee, PDF didn’t work because it required having Java installed. I will not install Java on my computer and there are other ways of getting PDFs. If you want to export out as a web app it will export out as a HTML 5 application. It’s possible to send books out as an application for Windows, Macintosh or as a Chrome app. Each time you want to export to a different format it seems to want to download a plug-in to do it. This is probably a good idea saving you from downloading parts of the application you’re never going to need. I did a test of exporting out to a Mac application. It put an icon onto my desktop and when the application was opened it gave me the same sort of view as I experienced when opening up the book in a web browser. You get one or two options for the way the book works within the application. It’s possible to select text and add notes or highlight text. There is a view of all of these notes in one place which would be handy if you were creating textbooks.
Creating the book as an iOS application
This is something I’m going to have to try and hopefully I won’t need to have a paid Apple developer’s account to be able to use it. There is a tutorial to help you set up because you need to have a certificate file and a provisioning profile. You do need to upgrade eBook Creator Software Kotobee or buy credits in order to create applications. And this starts off with a $100 one user – lifetime access to the application. This might only allow you to export one application because there is another premium version which requires the payment of $300 which states you can export five mobile apps. There is a mobile app pricing allowing the export of one mobile app and that costs $30. There is a free trial so I might give that a go.
Interactive components and facilities for education
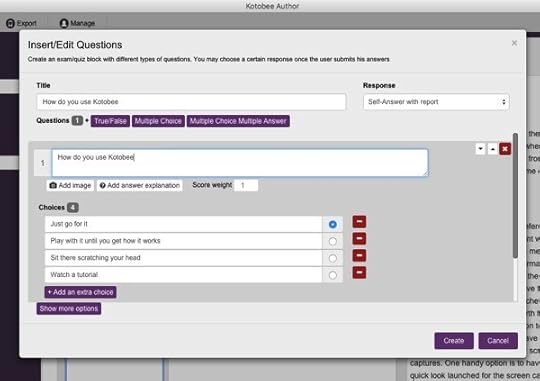
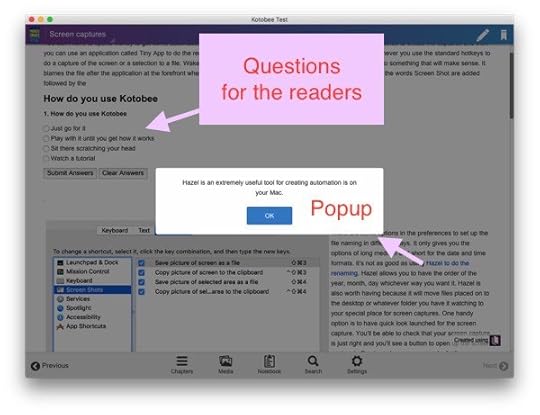
The books are compatible with iBooks widgets. This means you can add video, audio, galleries and 3D widgets. As with iBooks Author you can add customised HTML 5 widgets, limited to your html5 coding prowess. With all of that you’ll be able to create a better academic experience for learning from these electronic books. You can add responsive quizzes and exams in the form of multichoice questions. The answers to these questions can be self-reported to the student or emailed to the instructor.
First impressions of eBook Creator Software Kotobee
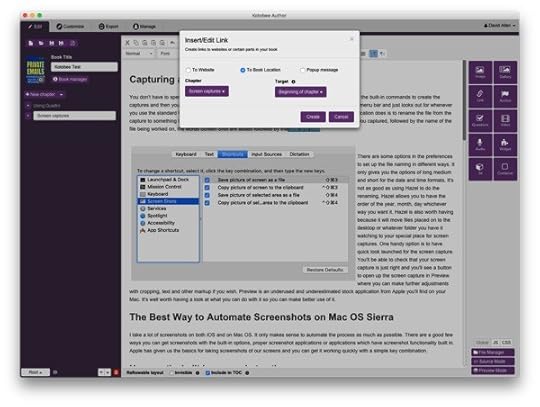
In the edit mode for Kotobee you have your word processor. On the left side you have a panel where you can put in the book title and arrange your chapters. This is where you will also insert the cover for the book. In the main TextEdit area you have a set of icons at the top of the screen for formatting your text. Over to the right there’s the panel where you can choose images, links, audio, 3D, widgets and so on. When you insert or edit links it’s possible to link to external websites, to a location within the book or for a pop-up message. A good way of getting the information into the application will be to bring in as HTML text. I would likely be writing in Ulysses or another markdown editor allowing me to export out to HTML. Change to the source code view to paste in HTML formatted text. This would save having to go through each of the sections of text to set up the headers and things like lists. There are also views for JavaScript and CSS so there’s no reason why you can’t create some incredibly good looking and intelligent e-books using eBook Creator Software Kotobee.
The post First Look – eBook Creator Software Kotobee appeared first on Good and Geeky Books.
December 28, 2016
Using a Fully Featured Email App on the Mac
I’ve been looking for an application to use for my email and provide integrated encryption. I was using the Apple mail application which was great except it didn’t do the GPG after the update to macOS Sierra. I was using Postbox for a while, but it’s not reliable. Too many bugs! Then I moved on to using the application called Spark. Spark doesn’t do encryption at all and now I have found Airmail 3 which looks just as good as Spark but does GPG encryption with a plug-in. I also tried Thunderbird which was okay but pretty ugly. So now I have AirMail 3 working I’m quite happy because I don’t have to do the encryption manually. There are lots of settings and customisation possible with Airmail 3. Fingers crossed it will pass the test of time in the stability department.
The post Using a Fully Featured Email App on the Mac appeared first on Good and Geeky Books.
December 21, 2016
Apple – It Just Works – Kind of…
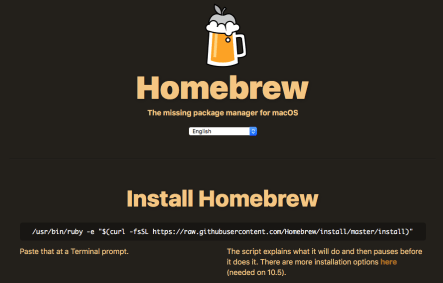
One of the big things about using an Apple computer, whether it be an iMac or your iPad or iPhone is that it just works. You don’t need to do any messing around with arcane settings of any sort, you plug things in and they work. For the most part this is still true. There are occasions though where you can get just as confused, annoyed and frustrated as when using other systems. It never gets as bad as when you are doing specialised things using the terminal. Delving into the Linux underpinnings of the Mac operating system using the terminal can give you weird and not so wonderful consequences. If you are going to do some copy and pasting of terminal commands from whatever website to install and configure you should really make sure it’s a reliable source. The other thing which can mess things up with your Apple computer system is when you have to fiddle around with your Apple ID or IDs. I have been in Terminal setting up HomeBrew and installing software on my iMac as well as doing things with the Apple iDs over the last couple of days.
Apple iMac computer problems this morning
I plugged in my iPhone and I wanted to do a backup using the application iMazing and it didn’t work. There was an upgrade for the application which I let run. I tried it again and it still didn’t work. At the same time there was also a problem with iTunes not seeing my iPhone. I’d say the problem was the same for both applications – whatever that was. I didn’t want to do a restart of the computer because of the noisy start-up tone. It was too early in the morning and my wife was still in bed. I didn’t want to be too loud. It would be handy to have one of those recently announced new MacBook Pros, which has a quiet start-up. Later this morning I was able to do the restart of the computer and the backup using iMazing seems to be working. I was also able to open up iTunes and see the iPhone 7+ in the sidebar. However, it wasn’t showing me the applications installed. So what was the problem causing this little difficulty? Who knows??
I have an Amazon Dot on the way to me in the post from the UK. I had to order it from Amazon to my mother’s address using my Amazon UK account. The Amazon Dot is not yet available in Spain. Reading an article this morning telling me about an application called iDevices which works in the same way as the Apple Home application. The article suggested I could use the iDevices application in conjunction with the Amazon Echo or Dot. So I went through the whole rigmarole of getting my hands on the Amazon Echo application for my iPhone. It was a nuisance because I had to sign out of my Apple ID for Spain & into the Apple ID for the UK. I have a suspicion that this is how I got problems into the workingsl of my Apple devices. Now that I’ve got the application from the UK store and changed the Apple ID sign in back to my normal Apple ID it seems to working properly again.
I decided to try and download the Amazon echo application through iTunes on the Mac when maybe it would have been better to get it directly on the iPhone. The idea was that if I did it through iTunes I would be able to install first on the iPhone. Then afterwards I’d be able to push the application out to my iPad. With all of the messing around, it did in the end work out better to download the application onto the iOS device.
Using two factor authentication could have been a factor
It’s good to use two factor authentication for all of your important web services. So you should use this two factor authentication on your main email, your iCloud account, Dropbox account, Facebook, Google account, and Twitter accounts. When you login to your account for the first time on a device you have to first put in your password and then verify using a physical device. The way that Apple does it is to send a code to a device you have set up as being a known and trusted device, such as your iPad or iPhone. You can also have it set up to send you an SMS message to your phone. With some of the services the way to do it, is to use an application like Authy or Google Authenticator. This will give you a time sensitive password which will get you into your account. I prefer to use the application Authy. It is also possible to use 1Password to supply you with these temporary (2FA) secondary passwords.
I was thinking that maybe the problem was due to me using my iPhone with SMS as the two factor authentication for my UK Apple ID account. I’m wondering if it didn’t like me using the same phone number with two different Apple IDs. Whatever was causing the problem is not a concern any more now that I’ve put everything back to rights and I still have the applications I needed to download from the UK App Store.
iDevices and Apple Home Application
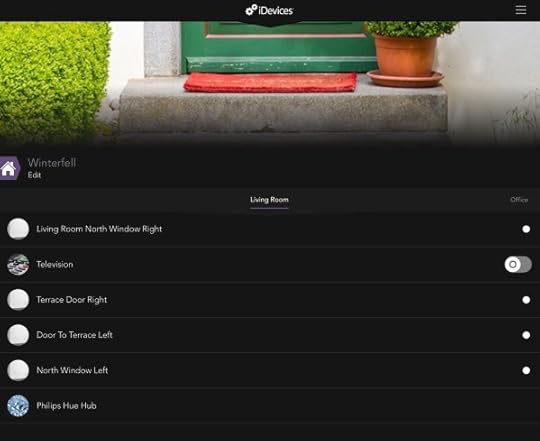
iDevices pulls in the setup from the Home application for all of the HomeKit accessories you have set up. You can see your zones, rooms and products. Also view your scenes and schedules and create new ones if you wish. For instance you might want to set up a schedule to turn a light on at a certain time on one or more days of the week. Any schedules you create in iDevices will propagate into the Home application. The iDevices application doesn’t see all my Elgato Eve HomeKit accessories. It doesn’t let me set up schedules with a trigger based upon a door opening or a motion sensor. It doesn’t seem to work using the location-based triggers either. Still early days with home automation, but we will get the stage when it just works.

I’m going Dotty
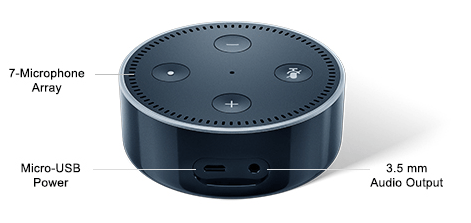
I’m still waiting for the Echo Dot to arrive so I can’t finish off the setup. You have to sign into your Amazon account to link the products. Then you have to add the iDevices skill through the Amazon Alexa application (this is why I had to download the app). When you’ve done that, you can use Alexa to control your home automation electronics. I’m going to be interested to see how well it works. When I have got all of this setup I’ll do some testing first. Then I’ll make a video to show you how I’m using the Amazon Echo Dot to control HomeKit devices. I won’t have to think about opening up Siri to do the job and it should be easier with Amazon Echo Dot always listening with its far field microphones. My iPhone 7+ does respond to the command of “Hey Siri” followed by the command such as “Turn on the office light “. I do need to be close to my iPhone for this to work. With my testing using “Hey Siri” I found the likelihood of it working when more than 50 cm away from the phone was quite slim. I do have to wonder if Apple will come up with a competitor to the devices from Google, Amazon and there may be one coming from Microsoft also. Perhaps they will be too late when we all have set ourselves up with things like the Google Home or the Amazon Echo/Dot. Can we still say “It just works”?
The post Apple – It Just Works – Kind of… appeared first on Good and Geeky Books.
Good and Geeky

- David Allen Wizardgold's profile
- 3 followers

