
David Allen Wizardgold's Blog: Good and Geeky, page 5
June 9, 2020
Protect Your Data While Protesting
It’s even more important to have good security if you’re taking part in protests for Black Lives Matter. I have seen a load of videos where the police are brutal in the US. They have forgotten there are the to Protect and serve the people. They are just happy donning the good old riot gear and bashing people’s heads with their batons. No one can fight back because they also have guns which they are also likely to use.
I think they are making a huge mistake and will have a more difficult job policing in the future with their present attitude. Attacking people exercising their right to protest peacefully is not on and protesters have to up their game. This can start by protecting the data on the mobile phones, in case they get arrested. The police will take your phone off you and get inside looking for information to incriminate you and anyone else connected. So first off – Turn on the biometric entry to your device. Don’t use fingerprint or face recognition technology to unlock your phone. Then have a good password which they can’t get past. I recommend a long password made up of words with a special character in between if you can.
Let’s look at the methods of communication available… starting with email
If you’ve been following my website good and geeky.com you’ll know I’m committed to communication by secure, private and possibly anonymous means. I don’t approve of using email for communications unless it is encrypted. Sometimes you can’t get around it with some email communications, but you can let that only happen with emails without any personal and private data contained within. So somebody send you an email and it’s not encrypted, what do you do? How can you keep your communications private?
There are a number of options and depends upon the contents of the email and with whom you are communicating as to what you do to remedy the situation. If the email sent to you is safe and does not contain any personal information you could reply with unencrypted email if you needed to get the email replied too quickly. If you need to reply with some personal information then it’s going to be a good idea to encourage the recipient to start using encryption. Again we have options with how we do that.
Encrypt the reply using something like the Paranoia Text Encryption And give the recipient the password by secure means. So you would phone them up and tell them the password, let’s assume that you know their voice and you are confident their phone number is correct. PTE is good because there is a web version and the contact doesn’t have to install any software.Encrypt the reply using an application like Encrypto. Encrypto encrypts documents, so create your reply in whichever application and then encrypt the end result. Send the document in the reply email. Your contact will have to install Encrypto.Reply to your contact with a messaging service which has end to end encryption. Session, Signal, What’sApp, Threema, Telegram, Wire, Dust, Wickr Me and Confide. You can put whatever you like into any of these messaging services and know that it is not going to be disclosing its contents to a man in the middle attack as it passes through the Internet.Belt and braces – If you’re really paranoid you could double up on the encryption you use. You could encrypt text using paranoia text encryption before putting it into either a document you encrypt with Encrypto, or an email encrypted using PGP/GPG, or sending via an application using end-to-end encryption. Most the time that would be over-the-top, perhaps you might do this with extra sensitive information.If you’re using Gmail then you can make use of FlowCrypt. This is a plug-in you can use to add PGP encryption to your Gmail account. If you have FlowCrypt set up you can use a webpage for people to send you encrypted emails to that account. If that contact is also using Gmail you can also encourage them to set up a FlowCrypt account. This would make things nice and easy.
One of the problems with using email and the fact that it is so insecure is when you send encrypted emails to somebody and they reply with the body of your email unencrypted within the text. What is the point of that? If somebody did that to me I would be very annoyed. It is ridiculous to send something encrypted and for it to still end up going through the Internet unprotected. The person receiving the encrypted email would certainly know that it was encrypted so it would be just stupidity or ignorance with them replying in that way. If you needed to continue communicating with that person you would have to work out a different way of sending information. It’s probably less likely to happen if you put the sensitive information inside and encrypted documents as an attachment. When they click on reply and include the body of the email within the reply, attached documents will probably not be included. In any case, the document will still be encrypted. It would take work by the contact to select, copy and paste the information to put back into the reply.
You may have to resort to telling the person off and insisting they follow some basic privacy rules. Maybe all that is needed days a little chat. Maybe you’ll need to change to a different method of communication. Tell that contact you will only communicate with them using end to end messaging services.
You have to wonder why it is that people still persist using email. Is it a lack of knowledge and ignorance of how email is so insecure? Maybe the majority of people still don’t recognise that there are dangers in communicating online. There are many people who would say I don’t have anything worth stealing in my information. These people don’t realise there is software gathering much of this information and putting it together. Perhaps in one email finding out what your date of birth is, and in another email finding out where you live or the name of your dog, all the street in which you grow up. Once there are enough data points they could access your email account and then use that to attack everything else. There’s good reason why when you are giving answers to security questions you should basically put in a hard to guess password rather than the actual information. Store it all in your password manager, I use 1password.
By the way, your most important accounts such as an email account or your Apple account should be protected using two factor authentication. That way if somebody gets your password they’re still not going to be up to get in. The first factor is your password and the second factor is something you have for something you store elsewhere. I use the one-time password application Authy and I also use 1Password to give me those 30 seconds time sensitive digits to gain access to my account. I’m well protected!
Choose a good end to end encrypted messaging service
When I first started looking at these messaging services I didn’t find one which was absolutely perfect. There are a number of things to consider. Does the service encrypt end to end by default. Does it offer verification so you know who it is you are talking to? Can you have disappearing messages so you can choose for a message to automatically vanish after a number of seconds or stick around for as long as a week? Can you sign up for the messaging service anonymously, so you don’t have to give your phone number or your email address? Can you communicate safely within groups? Could your data divulged to law enforcement if the messaging service company was given a legal request? Is the meta data protected within your message? Then there are questions such as how easy is it to use the messaging service. It is easy to add and delete contacts? Can you send audio, photos, documents all make secure encrypted phone calls? An important one is is the application free and if so, why is it free? If the application is something which has to be paid for it could be difficult to persuade your contacts to use. Even if the application is free you might still have contacts who are unwilling to download and install software on their device.
My process in choosing my preferred end to end encrypted messaging service
I use the Messages app which is part of the Apple universe. This is end to end encrypted and has the benefits of connecting well to all the other Apple applications and devices. There is no extra cost to using it and overall I trust Apple and their privacy policy. The two things against it would be that it is only for Apple users and I do have friends who use Android devices. The other downside would be the backup system. If your backups to iCloud are not encrypted, Apple could have to legally give over information if required to by a government organisation. If you don’t back up to iCloud, this is not an issue.
WhatsApp is a popular encryption service with end-to-end encryption. I don’t mind using this with friends who are users of WhatsApp. I don’t think it’s necessary to persuade them to change to something more secure. By more secure, I mean an application which is not owned by Facebook. Facebook has enough black marks against them for how they have used, abused and leaked customers information. For this reason I wouldn’t fully trust WhatsApp.
The next one on the list was Telegram. This is a fairly good secure messaging service. The two things I have against it is the fact you need a telephone number to sign up and the full end to end encryption is not the default. What you get as default is for the most part okay, but I really can’t understand why they don’t give the full package as the default method of communications. I’ve read all their information about the app on the website and I think I can trust their system well enough. I’m happy enough to use Telegram with any of my contacts who are Telegram users. It’s still not a perfect one because of the lack of anonymity. it even has disappearing messages when in stealth mode.
Signal is the application recommended by Edward Snowden and he should know what he’s talking about. It has disappearing messages which can be set to last between five seconds and one week. You can verify your contacts by scanning a QR code if you are verifying in person. There is also a set of numbers you can compare and you might do that across another network where you have already verified the contact is who they say they are. It’s a good application and I would recommend it except for the need to connect it to a phone number. It is possible to get around the phone number requirement by using a burner phone. That’s just too much messing about though if you can find a messaging service without that requirement.
Wire, Keybase Wickr me, Dust, Confide are all other secure messaging applications I’ve looked at, but not really got into. Keybase is good but seems a little bit complicated. Wire is okay and each of them have their pluses and minuses. Depending upon your requirements any of these could – suit your secure messaging need.
[image error]
The application which was my favourite until recently was Threema. This application ticked most of the boxes and was as close as perfect for my use. One of the things against it is that it is a paid for application. It is inexpensive and in my opinion well worth the cost to buy. However, there are some people who will not spend money on applications unless they really have to and have their arm twisted behind their back. The application doesn’t have disappearing messages, but apart from that gives a good answer to all of the security, privacy and anonymity questions. The other thing it doesn’t do is synchronise between devices. So if someone sends your message to your iPhone you don’t get to see it on your iPad as well. There isn’t a desktop application, but you can use it via the web by scanning a QR code with your Threema app on your device. Threema is a top app for security and you can get around the identity per device by using a group hack.
I think I have now found the perfect secure messaging app – Session.
[image error]
It is based on the Signal Protocol. It is open source so it can be verified by anyone who knows what to look for. It is anonymous – No phone number or email needed to get an ID on Session. It also strips out meta data. It will not reveal your location because the IP address is removed as it passes through the onion router. It does three hops. Just looked at my app and I can see the messages I send will go through nodes in Germany and France before going to the recipient. No single node ever knows both the origin and destination of the message.
All messages are encrypted and can only be decrypted by the private key stored locally on your device. No messages are stored in a blockchain and will be deleted everywhere after a fixed amount of time. The time depends on the ‘Time to Live’ set in the disappearing messages settings.
Attachments are also end to end encrypted. The Loki server can never see whats in the attachments sent.
Same with photos, the meta data is removed. No details about the camera, no location. Nothing…. Just the image. If you set the disappearing messages to 1 minute or less it is also unlikely anyone can do a screenshot to grab it and send on to elsewhere.
You can link devices with Session – Up to two devices. I have it set so the two iOS devices are connected and the Mac has a different ID. That works fine for me. The iOS ID is the one I will generally use and the Mac ID will be infrequent and more as a back up ID.
How do I connect with someone on Session.
Send the ID by a secure channel to my contact. That could be by voice over a phone call or by for example WhatsApp or other app with end to end encryption. Let’s assume I have already verified the contact in that app. The Session ID is a long – 60 characters alpha numeric code. – Or the contact can send you their Session IDIf you are there in person Get your contact to show you the QR Code for their ID. When you start a new session you get two options. One is for the sharing of ID and the other is all about QR Codes. Show your code or scan their code. That’s all you need to do to get started with sending text, audio, photos and documents. 10mb limit on the documents.
The post Protect Your Data While Protesting appeared first on Good and Geeky Books.


June 1, 2020
Tech Safety For Protestors
I’m a huge fan of privacy and security and with all things going on in the world I can see anonymity is another worthwhile goal. I like WhatsApp for the end to end encryption, but as it is owned by Facebook I wouldn’t give it my full trust. In my search for the best end-to-end encrypted messaging apps I found Threema. Threema’s excellent and ticks most of the boxes. The only two things against it is the fact that it’s a paid for application and the lack of self-destructing messages. I didn’t mind paying for it, the problem only shows itself when you have to persuade your contacts to also pay for the application. All of the security questions you would ask you get the best answers with Threema. I feel fairly sure that the application will get exploding messages at some point in time.
Signal is the application which gets most of the accolades and praise. It is highly commended by actual spies like Edward Snowden. As far as I’m concerned, for security and privacy it is one of the best. The only problem is having to attach a phone number to your account. There are ways around this, like getting someone else to buy you a burner phone, use it once to register the account with Signal. Dump the phone after that to make sure there’s no way can be connected to you. With Threema you don’t need an email address or phone number to set up your account and you get full anonymity straight out of the box. What about if you could have something based upon the Signal privacy and security technology, but with anonymity? That’s now possible with this new application called Session.
Setting Up With Session
As a user it’s a simple application and easy to set up. As you go through the process you don’t have to give an email address or phone number. You can call yourself whatever you like. It doesn’t have to be a real name, a nickname will do. You get a session ID which is a long alphanumeric set of characters. You also get a recovery phrase which is a set of 13 words. With this you can restore or migrate your session ID to a new device. I have got this saved in a safe place in case I need to do a recovery. You can connect another device to the same account. This means you can use the same Session ID on those two accounts. At the moment it is limited to just two. It’ll be good when this is extended to more devices so I can use the same account on my iPad and also on my desktop computer. I suppose the thing is with the same Session account on more devices the less secure it is.
Settings
Settings inside a Message
My Session ID
A disappearing Message
Send a GIF
Non Text Messages Options
Scan this and send me a Message
A Voice Message + Options
Making Use of Session for Security and Privacy
It’s really easy to start using your Session account on your device. You give your session ID to your friend/contact so you can begin making contact. Share the session ID either with a QR code or with the alphanumeric ID. You could send the ID code to your contacts by whatever means. I suggest by using a different messaging app with end-to-end encryption. The connection between you and your friend is verified and both of you know exactly who you are talking to. If you are doing this in person, one of you will show the other a QR code and you are in business. You are ready for secure and private and anonymous messaging.
Closed or Open Groups
There is also the option of closed or open group chats. Open groups can be joined by anyone and don’t provide the full privacy protection. There is a round icon with a + symbol in the middle of it at the bottom of the screen. This is where you choose your open group or closed group messaging or a person to person session. The screen which pops up for the closed group looks almost the same as the screen you get when you’re starting a new closed group session. In a closed group chat you can have up to 10 people participating.
Not Just Text
Apart from sending text you can send photos directly from the camera or from the photo library. There’s also an option to send a GIF. Type in a search term and you get a choice from the Giphy service. If you want to send a document you can choose from the photo library or to browse in the Files application.
Send Voice messages in Session. It doesn’t do video or phone calls yet. There are other apps which cover that requirement. It is good to see an app doing the basics the best possible way. Security – Privacy – Anonymity the core of the app is well taken care of by Session.
Disappearing Messages
There are situations when disappearing messages are vital for your safety. Imagine you have been arrested and they take your phone. What if they force you to unlock your device. They could use your face or fingerprint biometrics without your consent to unlock. Best to turn off biometrics before you go on that protest. You can’t be forced to give the password in your memory. In any case with Session it’s possible to set it so messages delete after a set amount of time. From 1 minute to 1 week, and settings in between. If you are in a group organising where to be and protesting (peacefully of course) you don’t want to give away vital information. The message disappears from both devices involved in the conversation. Even if arrested, Move along – Nothing to see here. The timer starts after the message has been seen at the receivers end. On your own device the timer starts as soon as you hit send. The officers might know you had messages which went ‘Poof’ and exploded into the void. There is a message on the screen stating the setting for the TTL – Time-To-Live. There will be no messages there though. In the iOS version you see a small icon on the message which shows a countdown. On the Mac version it counts down in 5 second intervals before it wobbles and vanishes.
Find out more at the Loki Foundation.
Benefits of Using Session
No Phone numbers or other identification to set up
Doesn’t collect data so it can’t leak anything
Open Source software means anyone can check and verify the code.
It will sync across devices, which Threema can’t do.
Uses Onion routing network to not leave a footprint.
De-centralised servers. Harder to shut down.
Run by the Loki Foundation – Believes – Privacy is a fundamental right.
The post Tech Safety For Protestors appeared first on Good and Geeky Books.
May 25, 2020
What’s Blocking Privacy and Security?
The Nuts and Bolts of Taking Security Seriously
So you’ve been to the website of the Electronic Frontier Foundation – EFF and you seen what you need to do. You’re going to quit using email as much as possible and choose a messaging service instead. A messaging service with end to end encryption. You will probably need more than one message service, depends on what your contacts are using. What sort of problems are you going to run into trying to implement good privacy and security practices? Where are the difficulties in setting this up? Is the technology and the software awkward to use? Or is the problem more about persuading other people to join the privacy and security club?
It's Getting Easier To Be Secure Online
There’s a plethora of secure messaging apps with end-to-end encryption. You could almost say there’s too much choice. So many apps to choose with various pros and cons, how do you know which one to work with? You research everything and eventually come to a conclusion which app is right for you. Go for something which automatically encrypts end to end as a default, every single message. Use an application which allows for ephemeral or exploding messages, so it covers its tracks automatically as you use it. It’s good to have an application which has forward secrecy. This is a system which keeps messages private even if the phone is lost or bashed with a hammer. Secret communications are not left lying around for someone to access either on the device or on a server somewhere. You’ve also managed to find a secure service which is based in a safe jurisdiction. It’s unlikely the government of the jurisdiction containing the servers will be able to launch a man in the middle attack on your data. The service doesn’t keep any of the cryptographic keys to your messages so there are no backdoors left open. Open source software is being used and has been checked by the security community. It isn’t a locked and hidden proprietary software which could have any sort of nefarious problems contained within. You’ve ensured your data is kept safe by not using any cloud backup services which could be unencrypted. Basically you are happy with your choice and you are ready to put it all into practice. What’s it really like when it comes down to the nitty-gritty?

The Big Problem Is Getting Other People to Realise There Is a Problem
The vast majority of people using the Internet have absolutely no idea how unsafe email is. Your average user doesn’t know anything about encryption. They have no idea sending emails is the equivalent of writing personal details on a postcard to send through an open postal system. The postal worker picks up the postcard and can read it when it’s being collected. As it is going through the system any of the people routing the postcard can read the plain text, even if you have bad handwriting. When the postcard goes to the other end the postman can entertain himself by reading the personal details before he puts it into the letterbox. Sending an email is the digital equivalent of that insecure process. Unless you learn to use encryption. It also means teaching other people, your recipients, to use encryption too.
What Can You Do to Really Make It Work?
1. Insist your email recipients also use encryption.
2. Stop using email and use a secure messaging service instead.
3. Put contents of email into a separate document and encrypt before attaching.
How Does It Work in Practice?
You want to send an encrypted email to a friend. Your friend doesn’t have any encryption installed and is unwilling or unable to do so. It could be just technically too much for them or they just don’t not care at all. There are two options to consider. The first option is to not send an email to the person and use a secure message app instead. The second option would be to send an email, but encrypt it using a password. Encrypt just the text of the email or encrypt a document and attach to the email – More or less the same thing. You then send the password by other means. You could speak on the telephone and say the password. Or you could use secure means such as a direct message through whatever messaging app you know will get to your friend.
How does this work in practice and how does it fall down? You can’t use the secure messaging app with end-to-end encryption if your friend doesn’t have any on their computers. There are free ones available, but some people seem to have some sort of aversion to downloading new software. For us geeks it’s hard to believe, but there are technophobes and Luddites out there. They’re not all burning down 5G masts because they think it’s a corona virus conspiracy, but there might be some reticence in trying something new. This is especially a case amongst the silver surfers.
Live Test of A New Encryption Session
I recently conducted a test sending an encrypted message to a Twitter friend who is fairly geeky. She actually works helping out older people get the most out of their technology. She doesn’t have any encryption setup and it was a test to send her a question using a Keybase Saltpack Encrypted Message. I sent it with an email – I pasted the encrypted text into the email.
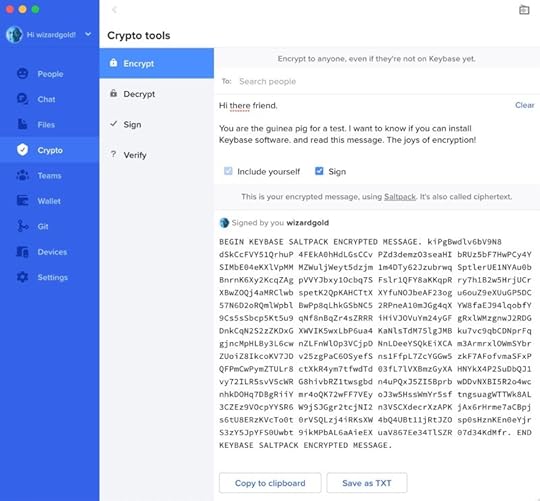
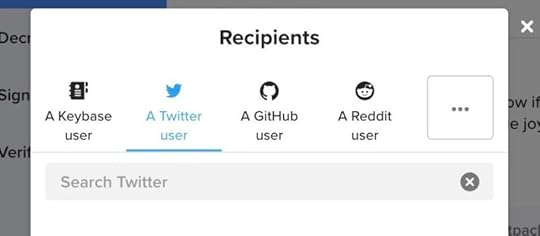
The invite has to go to a Keybase user, a Twitter user, or someone with an account at Github or Reddit. It would be better if it could be to a specific email address. Then when that person signs up to Keybase they would get access to the encrypted messge. Might also work more smoothly if there’s a link to Keybase for signing up.
Sending the Encrypted text by Email
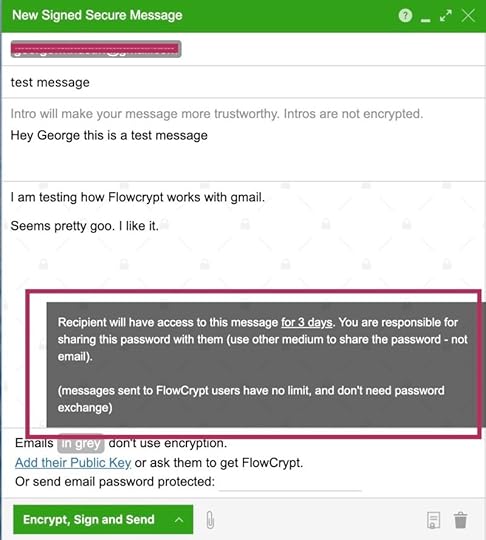
At the bottom of my email is a signature with a link to a Flowcrypt page to reply securely back to me. She used that link to send an encrypted email reply. She didn’t install Keybase and that was partly due to not wanting to install software she hadn’t heard of and her time constraints. Fair dues she wanted to research Keybase and know more about it. Despite some back and forth messages using Flowcrypt and Twitter she hasn’t installed Keybase. Might never do so and I don’t want to push it. I wanted to give an invite and see what happened.
FlowCrypt is an extension you add to a Gmail account which works in the Chrome browser. There’s also an iOS app which is not brilliant because it’s not quite at a release level. I’ve been testing it out and it does work. Within FlowCrypt there’s an opportunity to encrypt email using a password. (For people without Flowcrypt.)

What's Best? Encrypted Emails or Secure Messages?
I replied to her Flowcrypt email in Flowcrypt. I sent the Flowcrypt message password to her as a Twitter DM. Some would say it will be more secure to send the password via a messaging app which uses end to end encryption. For the messaging and encryption of this test that wasn’t necessary. Usually I would recommend always follow best practices. The gap made by using two separate services worked fine for security in this instance.
That was the sending of the reply email to my friend taken care of and it worked. She used the password I gave her and was able to read what I’d sent. I was pleased to get a reply which was also encrypted. This is where the email encryption can fall down. Some people hit reply and the email you sent encrypted is included in the reply – In Plain Text. So all the good work is undone! What was the point of it all when the reply exposes all the sensitive data. For that reason it can be best to not use email in the first place. Go straight to the end to end encryption with a Messages app like Signal, Threema, WhatsApp, Telegram or others.
The good thing about Flowcrypt is you can guide people to a web page which will send you an encrypted email. It works well. This is the link to my Flowcrypt page. https://flowcrypt.com/me/wizardgold . I put this in the signature at the bottom of emails I send out, to encourage people to reply using that link. To a large extent it’s all about training people to use encryption one person at a time.
If you have someone who does the reply and sends back the data unencrypted, maybe the answer is to encrypt a document. It’s less likely they will go to the trouble of copying the data from a separate document to put back into the reply. Not totally foolproof, but it’s something.
My friend turned out to be mostly good with the encryption thing. I gave an option to reply with encryption and she took it. She hasn’t set up her own GPG / PGP encryption setup. This could have been to get a Flowcrypt account set up for herself. She wasn’t using a gmail account for her email, so maybe it wouldn’t suit her. I didn’t really expect her to install GPG Tools and use Thunderbird as her email client. Apple Mail can do GPG also but it costs money to use it. I would have to teach her all about the PGP Key Pair system and a lot of people struggle with the concept. That’s all taken care of in Flowcrypt.
Keybase for Encryption
The email I sent was about the Keybase app. Keybase is great for encryption, but not so good with anonymity. To verify yourself you put in loads of connections to yourself. You could get around that to hack anonymity, but it would take too much effort.
The effort to see if someone would sign up with Keybase in order to read an encrypted message didn’t work. In a real world situation it is not refined to be foolproof easy. The test was saved by the Flowcrypt solution.
Long Term Connections
If you want you communications to always be encrypted you will have to only use the secure service. Otherwise your friend will forget and send you something unencrypted by email. When they send something like that, reply with encryption in a safe messaging app. Or ignore anything coming in by email. Basically don’t allow emails with any personal data to go out unsecured. You have to take charge of the process. Insist on using the best end to end encryption messaging service. It might take a while for it to sink in with some people.
Really what it all comes down to is to make it as easy as possible for your contact to only use encrypted communications.
ENCRYPT EVERYTHING
The post What’s Blocking Privacy and Security? appeared first on Good and Geeky Books.
April 8, 2020
Affinity Designer Text Manipulation
Sometimes when you’re working on a design you need text to be manipulated to change the overall shape of it. Let’s change the shape where there’s a word and you want to have a wavy line at the top of the text or the bottom of the text. One possible way of doing this would be to change the text objects to editable shapes. Then you could use the node editing tools to alter the shapes of the letters one by one. Doing it this way you’d need to have some sort of guide to get the wavy shape you’re looking for. By doing it this way you’re still working with vector design objects. Staying vector could be important if the design is to be used at various sizes. When you’re using vector you don’t get the jagged, pixelated edges you find with rasterised, bitmap objects.
In the past when I was an expert with CorelDraw it was possible to take a piece of artistic text and manipulate it. This was the envelope tool and it gave you a way to use nodes and control points to change the shape of the whole object. There are applications where it’s possible to do this on the Mac – Inkscape is one. Unfortunately it’s not the case yet with Affinity Designer. Although, you can add a mesh warp to an object in Affinity Photo. It won’t be a vector though.
Affinity Designer Facebook Group
In the Facebook group for Affinity Designer a member (Jet Jet) was asking if anyone knew of a way to do this sort of text design. Initially when I opened up Affinity Designer I expected to find the mesh warp took over on the left hand side with the other tools. For a couple of minutes I thought I must be looking at the wrong editing persona. After some searching around and looking in the help files I discovered it’s only available in Affinity Photo. The good thing about the Affinity products is that they are made to work with each other. If you are working on something in Affinity Photo you can send it to Affinity Designer, or the other way around. When you have done what you need to do in the other application, you send it back. All of the changes you made will be there available for you back where you started. I haven’t use these facilities very often. It took me a while to realise it was necessary to use the command in the file menu of the apps to make this work. Once I had got past this little hold up, it was all plain sailing.

Convert Text To Editable Shapes
In the video I made to demonstrate how to do this editing I started in Affinity Designer. I created the text required for the job and added a wavy line to use as a guide. Before sending the text to Affinity Photo I converted it from text into editable curves. This means you can’t edit it as text any more. You can use the node editing tool to manipulate it as a shape on your page. Rather than do this manually I sent the design to Affinity Photo.
If you plan to work on each of the letters individually you need to un-group them. The un-grouping can be done in Affinity Designer, before you send to Affinity Photo or afterwards. When there are not too many letters in the word you might get away with manipulating the shape as a whole. When you’re working on a word with more letters you’ll get less distortion by doing one letter at a time. Watch the video to see how the job was done and see the difference between the two editing methods. If you do use one warp mesh for the whole set of letters, add more nodes to help keep the shapes.
Using the Cookie-Cutter Method
With certain types of design and font types you could get away with chopping off parts you don’t want. Create the shape to make the cookie-cutter and use the subtract tool. What you are left with will still be a vector shape. This could be better for you in the long run depending on how you want to use the design.
Step one is to create your text. Convert this text to curves. Ungroup these shapes which was text. Then select all of the separate items and make it into a compound object. Create your cookie-cutter if you haven’t done so already. Position the cookie-cutter to the right position to alter the text. Use the subtract tool. The cookie-cutter will be deleted and leave only the text minus what was cut from it.
Another way to do this would be to get the cookie-cutter onto the clipboard. Do each of the letters one at a time. Each subtract operation will delete the cookie-cutter. Use Command V to paste the cookie-cutter back in again and repeat for each item.
Buy The Book
One way of staying safe is to avoid using email. Sending email is the equivalent of putting your private data onto a postcard. The postcard (email) can be read easily as it passes through the postal system. Your information is naked and without protection. There are illicit sniffer applications which look at email as it goes through servers. Similar to the Google email system which looks to see what adverts it should put in front of you. That’s why you get a free service from Google. You are the product being sold to the advertisers.
Buy The Book
The post Affinity Designer Text Manipulation appeared first on Good and Geeky Books.
March 30, 2020
Learning to Code with Swift
I was listening to a podcast the other day and the guy on there was talking about his application and how he got to learn to code for iOS. This was Alex Hay who is the guy responsible for Toolbox Pro. I found it amazing to find out he hasn’t been coding for very long. He mentioned a site he used for learning how to code with Swift. I did try learning Objective-C coding before Swift was announced. That was a good few years ago! Objective-C was kind of difficult and I couldn’t get my head around it. The promise of Swift is that it’s much easier to understand and to learn. And I’m finding out that is truly the case. Although I have other work to do I couldn’t help myself, but to click on the link to find out more about learning Swift. Many of us have plenty of time at the moment due to being locked down in the house. The Covid 19 virus for all its other faults could turn us into coding geniuses.
Hacking with Swift
The test might ask you to verify if the code is correct. It also could ask for you to mark which statements about the topic are correct. There are one or two where you have to move lines of text around to create code that works. The tests are helpful in getting you to read code and follow it. I get caught out sometimes by not noticing a line has set a constant when I know it should be a variable.
What's the Point of It All?
I have been enjoying the coding possibilities of the Shortcuts app. It’s limited in how far you can take it though. At the moment I’m wondering if I might be able to learn enough Swift to make an application. I’d like to make an app which could replace one of the more complicated Shortcuts. With it being its own application, it would be more reliable and probably would work faster. I’ll have to do is see how far I can take my knowledge of Swift. Aside from that, I don’t expect to become a professional Swift coding expert. It is mostly just for fun and a way to keep my brain in trim.
Running Xcode
I find with some of the tests it is good to write the code out and correct it to make it work. It’s practice in writing the code and seeing how Xcode works. It can confirm to you that you got the right answer.
There are daily challenges aside from the learning. Some I can’t do because I haven’t got far enough in the learning side of the app. You get points in these challenges completed added to your total. Makes it a game and help you feel like you are winning.
The post Learning to Code with Swift appeared first on Good and Geeky Books.
February 17, 2020
How to Track Movies, TV Shows and Books
Which apps could do the best job of keeping our ratings and reviews of books, films and TV series we consume?DraftsSofaDay OneShortcutsAirTableRemindersNotesGoodreads
Ratings and Reviews
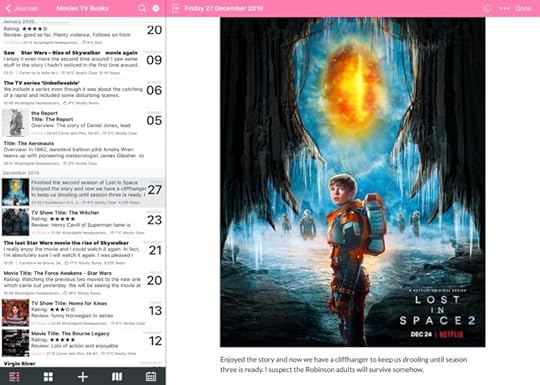
It’s good to keep an eye on the movies you want to see. When we have watched the movie it’s a fantastic to keep a record of the experience. The same goes for any TV series we’ve seen on Netflix or Amazon Prime or whatever other network. You might even be doing it old school and watching movies on terrestrial TV over the air. Then there are books to read. Did you enjoy the book, the movie or the TV series? Why not give it a rating out of five. One star for the movie which was a complete waste of your time. Five stars for the movies which had you on the edge of your seat. Get out the inner critic and write a review. Comment on the acting, the special effects and story. Keep a record of whether the book was a proper page turner or was it a bit of a struggle? Did you fall asleep while watching the latest episode of the TV series? Or was the story so good you ended up binge watching, going to bed far later than you intended. It is not enough for me to take it in and then say nothing. I want to think about what I’ve experienced and have something to say about it.
Taming the Onslaught of Culture
It’s good to keep an eye on the movies you want to see. When we have watched the movie it’s a fantastic to keep a record of the experience. The same goes for any TV series we’ve seen on Netflix or Amazon Prime or whatever other network. You might even be doing it old school and watching movies on terrestrial TV over the air. Then there are books to read. Did you enjoy the book, the movie or the TV series? Why not give it a rating out of five. One star for the movie which was a complete waste of your time. Five stars for the movies which had you on the edge of your seat. Get out the inner critic and write a review. Comment on the acting, the special effects and story. Keep a record of whether the book was a proper page turner or was it a bit of a struggle? Did you fall asleep while watching the latest episode of the TV series? Or was the story so good you ended up binge watching, going to bed far later than you intended. It is not enough for me to take it in and then say nothing. I want to think about what I’ve experienced and have something to say about it.
How Many Apps Do We need?
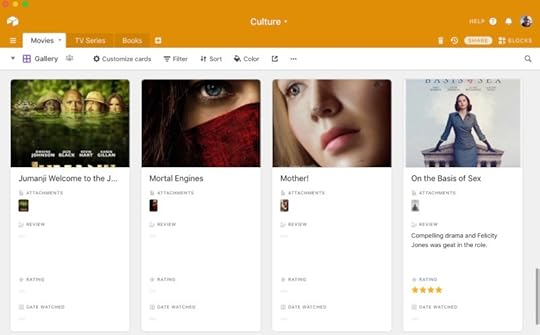
You don’t have to use just one application to keep records of your culture consumption. All the possible applications have their pros and cons. When you’re setting this up you need to think about the accessibility of the information and how you want to use it later. In the Sofa application you can search for the movie in an online database. It’s good to get the image to go with the movie along with the release date and an overview of the story. With Sofa you get the runtime of the movie too. It’s nice and easy to use. In comparison, a set of shortcuts I found for tracking movies is not so user friendly. Sofa is more about what to watch out for. You don’t get a chance to leave a review or a rating. Maybe this is something we’ll find in a later version of the application. So for the moment you need to have something else to satisfy your desire to critique. I’m a big fan of the application Day One for all of my journalling needs. This is a great application to store reviews, ratings and notes in a chronological order.
Keep it Simple With Text and Emojis
If it’s enough for you to keep your documentation in simple text form, I would highly recommend the application Drafts. Write about your reading, viewing or listening experience in a free-form manner. Whenever you open the application it presents you with a clear page ready for you to write. Add tags so the drafts get sorted and easily found when you need them. Have a workspace to keep all of your cultural activities in one place. Or you can separate them into books, music, films or whatever. Drafts has search functionality with tags and basic word searches so you can find what you want later. You can keep all of this record keeping just within Drafts, although it will be prettier if you use Day One also. With templates in both Day One and Drafts it is simple to dive in and log the information quickly. I like to put emojis into templates and menus as it makes menus more functional and prettier.
Let's Try Out The Apps
Drafts
Step 1 – Download the Action from the Action Directory. New Draft with Template Use the one made by the developer of the app. Look for AgileTortoise. Install in whichever action group suits you best. You don’t need to fiddle with any settings in the action, but I like to set the new draft to archive itself when the action is run.
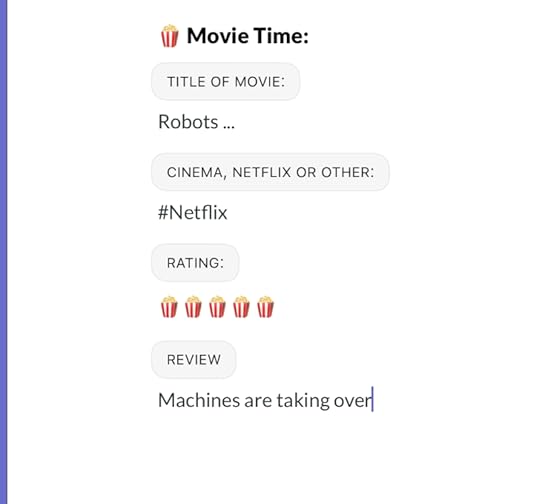
Step 2 – Create some templates. Put in the boilerplate text which has to be present in each draft containing your film review or book review. Make sure the template has the tag – template. The action will be looking for that tag to supply you with choices on the menu. Add a tag for Movie or Book if you want. This tag will carry through to the draft being created by the action.
Step 3 – Tap on the action New Draft with Template and choose the template off the menu. As you can see It looks better when you use emojis in the title of the template.
Step 4 – Fill in the form you’ve created in the template. This is a new draft and the template is still in the templates workspace ready for you to use unchanged as a template again.
Optional Step – Send the completed new draft containing your thoughts and feelings about the movie/book/TV Episode you’ve just watched, to Day One the journaling app. Or maybe to AirTable.
VISIT DIRECTORYGet the ActionADD TO GROUPBasic GroupScript in The ActionPossible to EditEDIT ACTIONMake Templates with a TagRUNNING ACTIONChoose your TemplateFILL IN TEMPLATEUse TextExpander Where Possible
Previous
Next
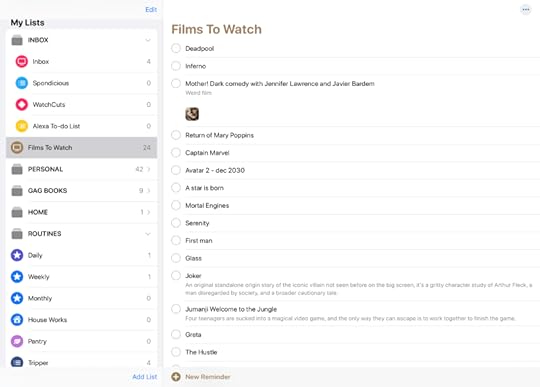
Reminders
A great place to save your list of the movies/books/TV series/video-games you want to get through. It’s easy because Reminders is built into the system and it’s just a tap or a click on any of your devices to mark a movie as done. Another plus is how you can easily send items to a list using the Shortcuts app. The main limitation of Reminders is it’s only providing a partial solution to the whole process. It’s great if you want a checklist of movies to see and you check them off as you watch them. There’s just no mechanism to add your rating and a date for when you’ve completed the task. Although, there is a notes field where you could add some of this data, it’s not suitable for the job. It doesn’t accept TextExpander snippets so you would have to enter everything manually. There’s a place to add an image, but it is not viewed best until you tap on it and it fills the screen. Reminders works best in combination with other apps.
Agenda
There are lots of apps for creating general lists. Agenda is another possibility. It’s a note taking app with a slant towards dates, but you can make lists with checkboxes inside notes. You could start with a Category of Entertainment. Fill it with Projects like – Films to Watch and Books to Read. Inside the project have a note for each movie with the details. Use the name of the movie as the title for the note. Have a checkbox to mark if it has been seen then write your review and rating in the rest of the note. Add an image of the movie poster to make it look good too.
Instead of a checkbox to mark if the film has been watched, make another project in the same category called Movies Seen. Drag the note from the list of Films to Watch into the Movies Seen list. And/Or… Use tags. when you add a word with a hashtag in front, it becomes a tag in Agenda. Later you could search for the tag #Watched to get your list of movies you’ve seen. Another plus point is the search can be saved into the sidebar. That works like a smart folder in Finder.

Agenda doesn’t do templates nor TextExpander on iOS. However, we do have Shortcuts. Have your template set up in Drafts and use the share action. Share to the shortcut you’ve setup to push the draft contents to Agenda. I have it set so the Shortcut prompts me to dictate the title of the movie and this sets the title of the note. The shortcut sends the text of the draft directly into the project where it’s supposed to go. So for me this goes to Films to Watch. When I get it in there I can add the poster image for the movie if I wish. I’ve found the best way to get posters is through IMDB using a screen capture.
Day One - The Journalling App
Day One is an application which I use every single day. For that reason it would be a good place for me to keep a record of movies I’ve watched. As it is date based you get a date attached to your review automatically. You probably write your review just after or during watching the movie, so the date is going to be good. Possible to change the date to when you actually saw the movie if necessary. It’s my habit to write something in Day One every day and it’s easy to extend the habit to reviews of books, films, TV series and music. I have a couple of ways of getting the information into the application.
– Direct entry into Day One with a template.
– Write first in Drafts and send using an action to Day One.
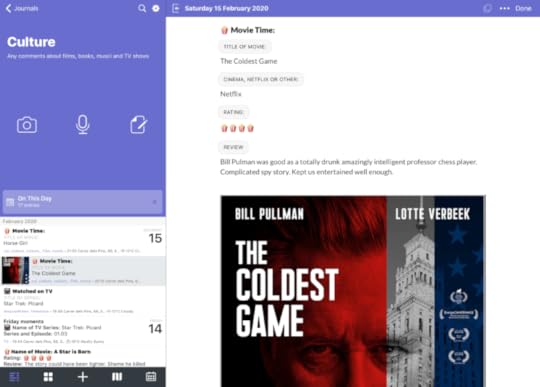
I am a fan of writing in Drafts first because it gives me a built in backup of anything I write. When I send my writing somewhere else the original still resides in Drafts. It could be in the inbox or the archive folders and it could even be in the trash folder. The main thing is that it’s there and I can always go back and find it if I need to. Using Drafts does make it into a two-stage process using two different applications, but I think that’s a price worth paying. The good news is the markdown syntax is supported in both applications. Your headers and paragraphs as well as bold and italics will also work in Day One. The only thing extra you’ll need to do is to add the image for the movie poster or a picture from the television series or the book cover.
I would recommend having both means of entering data into Day One setup and ready to use. If you are already in the Day One application then why not hit the plus button and choose a template. You can set up your own templates easily. I like to have the title for the entry starting with a level 2 header. Then you can add sections. In my templates for recording my thoughts of episodes of a TV series, the title for each of these is What Did I Watch? Followed by five sections – Title, Series, Episode, Rating, Review. When you’re filling in the data on the new journal entry you can use the Next button to jump through to each of the sections. In the advanced settings you specify which journal the entry will be sent to. Also add tags to enhance searches later.
Using Templates in Day One
This is a good and quick way to enter the data to record movies seen, TV series watched, books read and so on. I’d like if I could change the formatting of the section titles, but it’s not possible. The section title is formatted with the text in all caps inside a rounded grey rectangle. I tried to format the sections using HTML headers, but that didn’t work. You could still use it, but then you’d have to manually move between each part of the data entry. TextExpander works in Day One and I use that to add the rating for the book, TV series or whatever. I add the five popcorn boxes if I really liked the culture I’d consumed.
Day one isn’t really suitable for keeping a list of movies you’d like to see. Although there is a checklist function in the app. So a good combination would be to use Reminders or Sofa application for a list of what you want to watch or read.
Using the Sofa App For Culture Tracking
Sometimes the best app is one which was made to do one thing and to do that one thing well. The application Sofa is going in that direction. The best thing about the application is that it searches online databases to bring you information on the movie or TV series. It does the same for books, podcasts and music albums. The application is a work in progress at the moment, but is usable for making a good set of lists. It’s possible to export your data out, but only as one big lump of data. You can either have it as a .CSV file to put into a spreadsheet. Or you can export it out as markdown so you can put into Drafts or Day One. Whichever way you go, you only get a basic list of the titles in each section. Plus you get the list of titles completed.
Previous
Next
It’s good to use this application for the useful information it drags in. Even though there are limits with what you can do with the information. To get the poster, release date, runtime and overview you need to do a screen capture. It could work out okay using that image in Day One or in Airtable. I have tried the export to comma separated values and opened it up in Numbers okay. It was the exact same information as the export to markdown. The application has crashed a couple of times in the short time I’ve been trying it out. Apart from that it was working fine. I think it’s worth persevering with Sofa and hopefully we will see improvements over time. Use Sofa for your list of things to do and combine that with Day One or Agenda for the reviews.
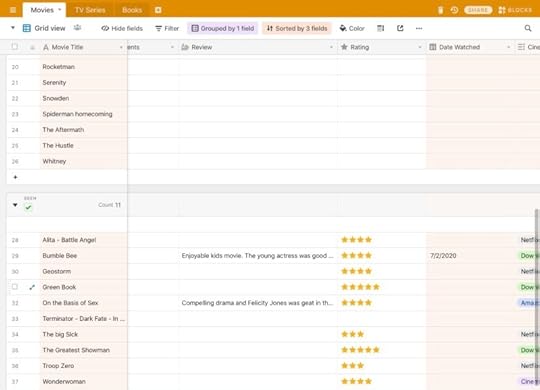
Recording Culture Consumption in Airtable
Airtable is a database app and therefore should be a perfect place to keep the data. There are certainly advantages to doing it this way. The main disadvantage would be if you use it extensively you could run into the limits of the free version of Airtable. The maximum number of records for free you can have in the application is 1,200. If you go over that, you’re looking at paying $10 a month. There are perfectly serviceable ways to do this for free and I really don’t want to spend any more money on subscriptions. So what are the advantages of using Airtable?
Customisable fields. One field type is specific to ratings. There’s a date-based field. To record where you watched the movie you can use a multiple selection field. Add movie posters as an attachment. It’s simple to add a checkbox to mark a movie as seen.
Various ways of viewing the data. Create a form for an intuitive way to enter the data. The gallery view is a great way to get an overview of all the movies you plan to see, especially if you’ve added images.
Have one database of all the movies and then group them by if they have been seen. Put it all in there, books, TV and video games too.
Filters are useful. Create a filter so you’re only showing movies with a rating of three stars or above. See the movies you’ve watched this year. Lots of filter possibilities to play with.
Sorting. Perhaps you want to see all the movies sorted by date when you watched them. Or sort by Netflix, Amazon and so on.
It might seem like it takes more time to set up using Airtable to record your viewing and reading. Once you’ve it done though, it does become a lot easier and quicker. Setting up the database in the first place doesn’t take any longer than creating the boilerplate text you would use in TextExpander. Or the time taken creating a template in Day One.
There are a number of ways you can add data to your movies, TV series, books database. There are Airtable applications for the Mac and also for iOS. Access Airtable through a web browser if you want. There’s an API which can be accessed through the Shortcuts application. It’s really easy to set up questions you ask one after the other in dialog boxes and have the information sent to the database.
Airtable is amazing and gives you a huge number of possibilities to enter, sort and view the data. For that reason it has to be high on the list of solutions to record your ratings and reviews of movies. You can give it a try for free and see how you like it. It’s quite likely you’ll love it and want to continue using it. If you are prolific in your consumption of movies, TV series and books you could hit that limit of 1,200 records. At that moment you’ll have to decide whether to continue using it and start paying. On the other hand, you could move all the data to another system. It wouldn’t be too difficult to export out of Airtable if you had to. You might find it annoying having to change from a system you really liked. It could be difficult to find something which worked as well as Airtable. The list of movies to watch could be in the same list as movies seen. Get it all done in one application.
Using the Apple Notes Application
The advantages of using Notes is the fact it’s an Apple application you can use across all of the system. Add data into Notes easily from whichever device you’re using. The data can be added using actions in Drafts or Shortcuts created specifically for the purpose of recording your reviews. Have one note which will be your ‘movies to watch’ list. Have a checklist within this note. The app does a nice trick where when you check off the item as done, it gets moved to the bottom of the list.
The way to set up in Notes would be to have folders and maybe subfolders. The main folder could be called culture with subfolders of movies, books, podcasts, video games and TV series. Then in each of the folders, for example movies, you have a note for each movie. Insert the title of the movie at the top and format it as the title of the note. Next you could add the image for the poster of the movie. Followed by the rating and the review.
A disadvantage of using Notes by itself is that you can’t use TextExpander on iOS. There is the system wide text replacement you can set up in the settings for the iOS device. If I type in R5 it expands to – Rating: ★★★★★. I’m not able to get it to enter a date for me in the way that I can get a date automatically expanded out of TextExpander.
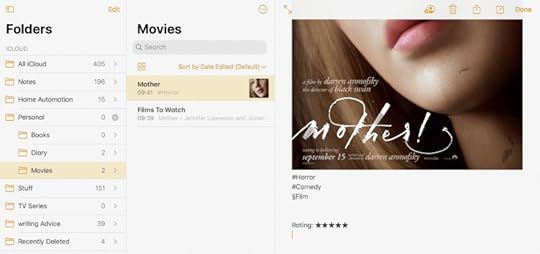
Notes doesn’t have a proper tagging system. It’s for this reason I would prefer to use Agenda which allows the use of tags. It’s possible to create your own tags within Notes. You use the hashtag # or another symbol such as a § immediately followed by the word you want as the tag. §movie or #movie. When you do a search in Notes this will work a little bit like tagging. It’s not perfect or as good as having a system with tags built in. As a workaround it’s fairly useful.
Goodreads an Application Specific to Books
There’s the Goodreads application on iOS and you can also enter the data through a webpage for Goodreads. You basically have a list for all the books you want to read and another list for books you have read. You can create bookshelves which is a way to sort books. I have a bookshelf called ‘Couldn’t Finish Book’, as some books are that bad. I try to persevere with a book and learn from the bad writing or rubbish story if I can. Sometimes though you have to say, “Enough is enough.”
I like the reading challenges in Goodreads. I usually set myself the challenge of reading 30 books in a year. Most times I beat that challenge by a good amount. There are suggestions from other Goodreads users and communities to join. I’m in the group for time travel books. I love a good time travel story. They give recommendations of which books to read.
As you read the book you can add reviews or leave it until you’ve finished. I leave the rating when I have completed reading the book. It is cool to update the progress though the book sometimes. Look at the book page for your reading progress and you get to see what you thought about it as you progressed.
This is a good way to keep track of your books and you won’t really need anything else. The only problem is it is not under your control. It has been around for some time and will probably stick around, but you never know. One day the person in charge of the site could stop doing it for whatever reason and you’ll lose all your data. On the plus side it’s good to get suggestions for books to read from other Good reads users. Some reviews you have to take with a pinch of salt. There are books with mostly five star reviews with a one star review thrown in by a reader. You just can’t please everybody all the time.

My Workflow for Saving The Data
Adding to the Movies to be Watched List
Go to Sofa app or IMDB to get the movie info and screen capture the poster.
Add the movie to the list in Reminders if it is a Movie to be Watched.
Adding a Rating and Review of the Movie or TV Series.
A:-
If in Drafts use a template to make the entry I will make in Day One.
Send the draft to Day One using an action.
Add a picture to the entry if I want to.
B:-
If already in Day One the use the template there.
Add an image as necessary.
With both of the options I add the rating Rating: ★★★★★ or 
January 31, 2020
iOS Update 13.3.1 – Terrible!
It's been a terrible update so far for iOS 13.3.1
I like to upgrade to the latest OS as soon as possible. Usually there are updates which are worth having. You always have the latest security when you go for the OS updates when they happen. Sometimes the behaviour of how things work also change. With this latest update to iOS I’m no very happy so far. The way the Watch and the iPhone are talking to each other has been less than ideal.
Annoying Notifications
My watch and my iPhone are having too close a connection with regards notifications. When I’m listening to a podcast or some music and a notification comes in from the watch the audio stops. This also stops some of my shortcuts from running. So when I leave the house to go walk the dog, I start a walking workout on my watch. If I’m already listening to some music or a podcast this audio will stop. Instead I get the audio coming from the watch for the countdown to start the walking workout. I really don’t need to hear that on my AirPods. The shortcut I have which runs whenever a workout begins isn’t working either. Before the OS update the shortcut would run and give me an option to listen to the music or podcast while walking. Now I’m not getting the shortcut displayed on the phone.
The way I expect it to work is, if I’m listening to something, that audio should continue. If any notification comes into the AirPods then it should be on top of whatever audio I’m listening to. My shortcut should run and I should get the option to tap on a podcast if I want to continue with listening to it. Or I can tap on music and it will change to music.
I have notifications which come in to let me know the camera at the house is changed from streaming to streaming plus allow recording. I’m going to have to turn off this notification because it something else which stops my audio from continuing. If a notification comes in from the watch and the phone about the activity rings, that also stops the audio from playing. I get a notification to say I walked 1 km and again the audio stops. It is so annoying having to constantly take out my phone and restart the music.
AirPods not working properly either
When I double tap on the right AirPod it should resume audio playing. Since the update this is not happening. When I double tap on the left AirPod I should be able to do a Siri command. This is also a little bit broken. Sometimes it works and sometimes it doesn’t.
How can Apple Get Such Simple Stuff so Wrong?
Sometimes I wonder if the Apple engineers talk to each other and actually use the products. Do they actually test how all this works together before they send the update out to the general public. Why do they have to leave it so rough and expect us users to have to tell them where they’ve gone wrong? Quite simply, it’s just not good enough Apple.
It might seem these problems I’ve experienced are only little things but when it happens many times per day it gets very annoying quickly. You expect an update to give you things which are improved. You don’t expect an update to make things worse for you.
Now, all we can hope for is that Apple will come up with some updates as soon as possible. We’ll have to keep our fingers crossed!
The post iOS Update 13.3.1 – Terrible! appeared first on Good and Geeky Books.
January 24, 2020
What is the Best Dictation App for iOS?
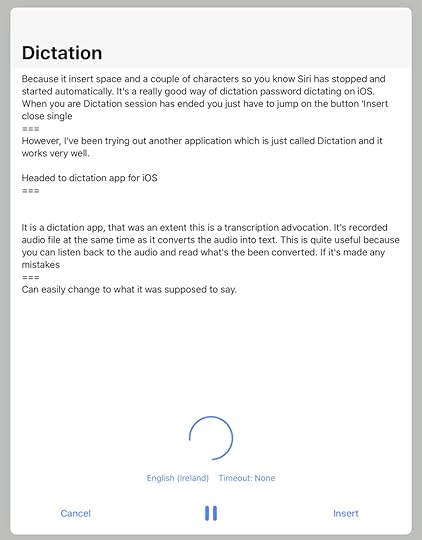
Until now the best dictation app for iOS has been Drafts. This is because it extends the capabilities of the Siri dictation. With Siri dictation you only get about 45 seconds of speaking time before it stops and you have to manually restart it. When dictating into Drafts you can keep going for as long as you want. The restart is done automatically. There is the possibility of losing a word during the changeover process from one Siri instance to the next. You do see where the breaks are because it inserts a space and a couple of characters so you know Siri has stopped and started automatically. It’s an excellent way of dictating on iOS. When your dictation session has ended you just have to tap on the button ‘Insert’ and it’s pasted into your document. However, I’ve been trying out another application which is just called Dictation and it works fairly well. Let’s have a look at the app by Blueshift.
The Best Transcription app for iOS
It’s a dictation app, but to a certain extent it’s more of a transcription application. It records an audio file at the same time as it converts the audio into text. This is useful because you can listen back to the audio and read what’s been converted. If it’s made any mistakes you can easily change them to what it was supposed to say.
Getting Started with the Dictation App for iOS
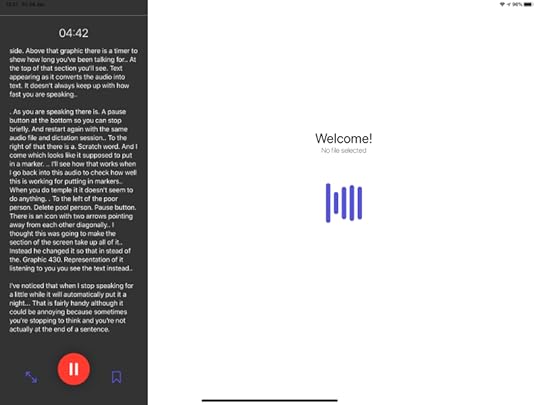
As with all applications on iOS it’s an easy install. When you open up the application you get a screen with a red button you press to start the process of dictation. There’s a graphic to show its listening to what you’re saying. On the left-hand side above that graphic there’s a timer to show how long you’ve been talking for. At the top of that section you’ll see text appearing as it converts the audio into text. It doesn’t always keep up with how fast you are speaking. It’s just to show it’s working. To the left of the pause button there’s an icon with two arrows pointing away from each other diagonally. I thought this was going to make the section of the screen take up all the iPad screen. Instead it changed so instead of the graphic for the representation of it listening to you, you see the text converted so far. You can go back to seeing the waveform representation of your voice being listening to by tapping again on that icon with the two diagonal arrows pointing away from each other at the bottom of the screen.
As you are dictating there’s a pause button so you can stop briefly and restart again with the same audio file and dictation session. To the right of that there’s an icon which looks like it’s supposed to put in a marker. When you tap on this dictation app for iOS, it doesn’t seem to do anything. However, It does actually add the markers to the audio and text.
Automatic Punctuation
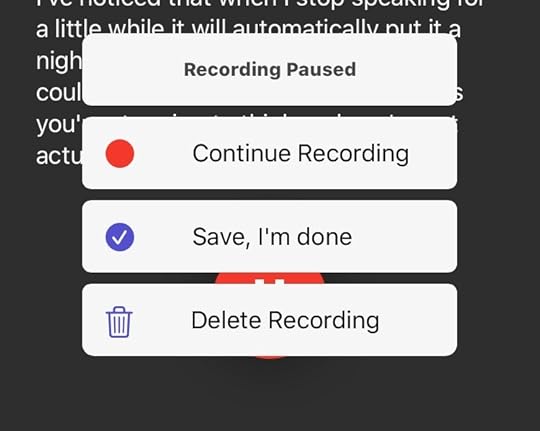
I noticed when I stop speaking for a little while it will automatically put in a full stop/period That’s fairly handy although it could be annoying because sometimes you are stopping to think and you’re not actually at the end of a sentence.
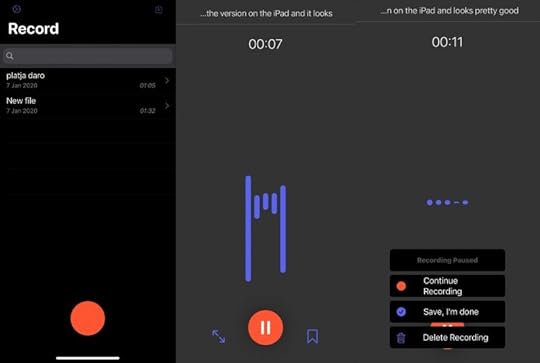
I just got an automatic set of menu items because I stopped recording to take a screenshot. That’s fairly handy meaning you can go off to whatever other application and come back to your dictation and start your recording again. Having it do an automatic pause is useful. When you’re finished you click on the pause button. This opens up that menu again and have the options of continuing your recording or clicking on ‘Save, I’m done’ or you may delete the recording.
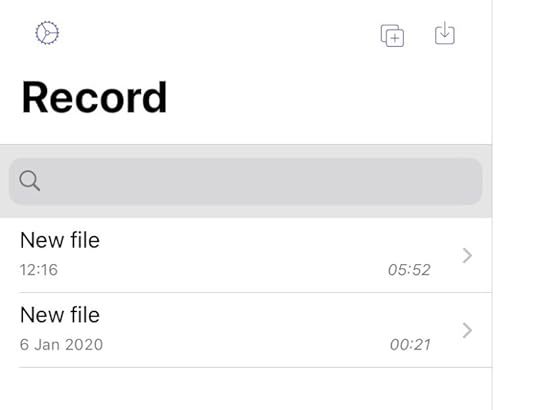
Saving Your Work
When you click on ‘Save I’m Done’, Dictation App saves your recording with the name – New File. Tap on this and a dialog window comes up for you to rename the file. Tap on the file you just renamed and it will open up a working area to the right side of the application. At the top of the screen there’s a waveform representation of the audio. Underneath that you have a set of controls. The first one is an image of a turtle which plays the audio slowly. There are two buttons for going back 15 seconds or forward 15 seconds. There’s a play button and a button for seeing a list of markers. To remove these markers you place the cursor after the marker in the text and press the delete button on your keyboard.
The representation of the audio and the text you see in the text editing area are linked. If you tap on a word in the text area, the cursor in the audio area moves to that spot on the audio. This also works the other way around in this dictation app for iOS. Tap on a section in the audio timeline and the text below is highlighted.
How Good Is This Dictation On iOS App To Use
It’s a different dictation experience to using DragonDictate. With Dragon Dictation you can use commands to edit your text as you are speaking. With this dictation application for iOS you don’t get the option to edit words by deleting them and replacing them with others during the dictation. You do get to add punctuation by saying the name of the punctuation item. Mostly when I’m dictating I speak in complete sentences, but sometimes I don’t. There are times when in the middle of a sentence I might stop to think about the words coming next. If you do this in this dictation app it will think you are at the end of a sentence and will add a full stop. It seems the best way to work with this application is to not think about it too much about the speaking part. Try your best to get your verbal flow going to get your ideas out of your head and into the audio/text. Wait until the editing stage to do the corrections.
With any writing there’s the actual writing part followed by the editing part. Same as when you use the keyboard. So you don’t need to look at the time needed to edit the text converted from audio as being an extra step in the process. Dictation is so much faster than actually using a keyboard and a really good way to efficiently get ideas and thoughts out of your brain and onto the page.
Something which would be nice would be the automatic deletion of long silences. When you are editing the text it does it in real time. So if we record for five minutes, it’s going to take five minutes to listen and edit. Although, you can shorten this by reading through your text and just listening to the audio where you think it’s got it wrong. Sometimes I can’t remember the actual words I spoke at the time. It’s great being able to hear verbatim exactly what it was I said. In the editing process I can choose whether I want to use my actual words or come up with something better.
Best practice for editing in the iOS dictation app
I think it’s too time-consuming to start at the beginning and listen to all of it as you read through the text. It’s possible to read the converted words quicker than the software will play the audio of you speaking. I like to read the words out aloud and make the basic corrections so the sentences make sense. Only listen to the audio of the dictation when you need to compare the audio with the words in the document.
I like the way I can zoom into the audio and also pan to where I want it to be. You just pinch out or pinch in to do your zoom. If you tap on the icon in the top right-hand corner, a circle with three dots in the middle, you get more options.
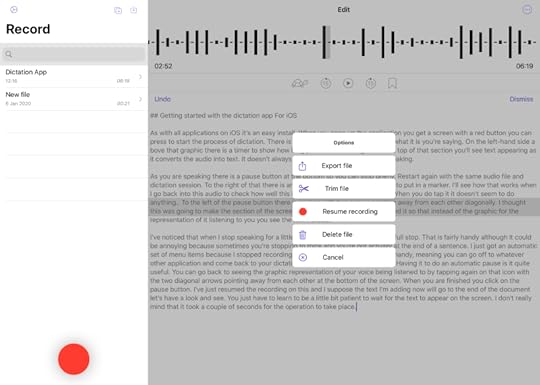
Export file
Trim file
Resume recording
Delete file
Cancel
When you resume the recording the audio goes to the end of the previous audio. I only added a short sentence, but it seemed to take a few seconds before it actually updated the screen to show the added text. In my second test of this it actually took more than 10 seconds for the text to appear. I don’t mind that it took this time to do the job, what’s important is the dictation app for iOS did it correctly. It’s not an option you’re going to need to use very often. I’d say it’s probably better to start a new recording.
What Can You Do in the Settings?
There are four versions of English you can choose from. This is useful for me seeing as I speak with a British English accent. There are three versions of Spanish and two versions of Chinese. You can also use the application in Italian, and Brazilian Portuguese, Russian or Turkish.
There is an export setting to include timestamps in the transcript. This could be useful in some circumstances.
You may set up a recording shortcut for Siri. I will test how this works for use in shortcuts later.
In the editor settings you can choose how far you want to jump back or jump forward. You only have the choice of either 3 seconds, 15 seconds or 30 seconds. There is also the option of showing the waveform when editing. It isn’t a highly detailed waveform, but it is useful to see it there.
In the import settings you can toggle the option to import without transcribing. I suppose if you do this you can do the transcription later if you need to.
Good and Geeky Review of iOS Dictation App
The accuracy of the speech to text engine is fairly good. Obviously it’s not as good as using DragonDictate. That’s no surprise considering DragonDictate is the professional dictation software. After all, there is a huge difference in price. It’s $6.99 for the iOS version of Dictation by Blue Shift and $16.99 for the Mac version. The conversion of speech into text is done on device. The audio isn’t sent to a server for conversion. You have unlimited minutes for the transcription. Most transcription services you have to pay per minute of audio. It is a well thought out application which does what it sets out to do. It’s there to take the grunt work out of converting audio into text. For general dictation work on iOS I absolutely love this application. You pay a one-off price to use for live transcription/dictation. It’s nice there are no monthly fees to pay. Well worth the cost of the application. On the Mac I will be sticking with DragonDictate. Although it’s something I could consider using if a future Mac operating system update kills DragonDictate. Is this dictation app for iOS the best available? I think it could be.
Buy the Book
Dictation is three to four times faster than writing with a keyboard. In this book I go over all the things you should consider when you start with dictation. The best apps to use and how to get into the mind set of talking to your computer instead of pounding your fingers on a keyboard.
Nuance doesn’t support Mac dictation anymore with Dragon Dictate. You can still use the last version they made V6 with the latest Mac OS. I use it with Catalina and it works just as well as it used to.
I might do what some people do with running a virtual computer on my Mac with Windows. In that I will have the Windows version of Dragon Dictation. I don’t need to do that for now because it’s working fine. Maybe a project for the future. Or maybe the new accessibility dictation will improve.
Buy the Book
The post What is the Best Dictation App for iOS? appeared first on Good and Geeky Books.
January 22, 2020
Easy Text Encryption Everywhere
In the previous good and geeky article about encryption we encrypted the files or the folders using Encrypto. In this one we’re going to look at an application called Paranoia Text Encryption – PTE. The information you want to send doesn’t need to be in a specific format requiring it to be inside a file. It isn’t a group of files either, it only needs to be the text. You could create a document which is a text document and encrypt that file with Encrypto. Using Paranoia Text Encryption instead offers a couple of advantages.
PTE Paranoia Available Everywhere
There is an old saying which goes “Just because you are paranoid it doesn’t mean they’re not out to get you!” So even if you are paranoid you should still be encrypting text in emails. You should also consider encrypting text when you send within messaging apps not offering end-end encryption. Email as an Internet service is highly insecure. Some messaging services are less secure than others. These insecurities are the reasons so many people get hacked. Do you really want to be one of those people to have their digital identity stolen? There are bad people doing bad things on the Internet. It’s time to take the matter into our own hands and encrypt our communications. Paranoid Text Encryption applications and its service available via a browser are useful tools. You can use on a Mac, on a Windows machine, Linux, on an Android device, as an iOS app or in whatever browser. Your friend doesn’t even have to install any software for this to work.
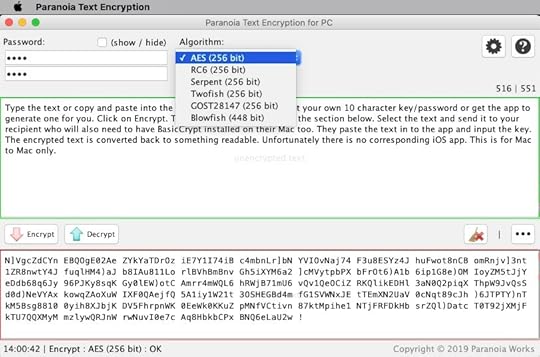
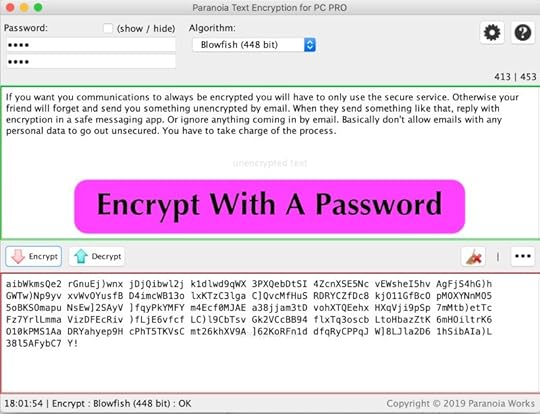
Paranoia Text Encryption Is Easy-To-Use
1. Open the app on whatever computer or device.
2. Paste the text to be encrypted into the app.
3. Enter the session password.(Use a good one)
4. Use the default algorithm or choose one of the others available.
5. Click or tap on the Encrypt button and your text is presented in the window below encrypted and unreadable.
6. Click and drag the cursor across the text to select it. Or use the keyboard combination of Command A to select, then copy it to the clipboard. On iOS you can use the share button to send the text to the clipboard.
7. Paste the contents of the clipboard into your messaging app or email client to send to your recipient. On iOS in the share menu you also get the option to share to the Mail app and to the Messages app.
8. Send the password to your recipient by secure means. Such as with a telephone call or using a messaging service with end-to-end encryption.
Steps For The Recipient Of The Encrypted Text
1. You select and copy the encrypted text.
2. Open the application Paranoia Text Encryption and enter the password you received from your friend.
3. Paste the copied text into the application. On the Mac this is the lower portion with the red border around it. On iOS you just click on the paste button.
4. Click or tap on the button to decrypt.
The decrypted text of the message will appear in the application for you to read. This process is easy and fast as well as being secure and private.
Send Your Message Using Steganography
On the Mac and also on iOS this application has another trick. Steganography is where the text of your message is hidden within an image. You send a picture to your friend with the text hidden within the file. It’s impossible to discern or read the text by looking at the picture. No one would have any idea the picture contains a secret message. When the application makes the Steganogram it does change the file name slightly. It adds .f5 at the end of the filename and most people wouldn’t notice that. Even if they did, it wouldn’t matter if they didn’t have the password. You can change the file name to whatever you like and the Steganogram will still function.
The steganography works really well and the only thing you need to consider is the means of transport through the Internet. There are some messaging services which compress images before sending them. If the images get compressed then the secret message is lost. The best thing to do is to test with your messaging app to see if it works or not.
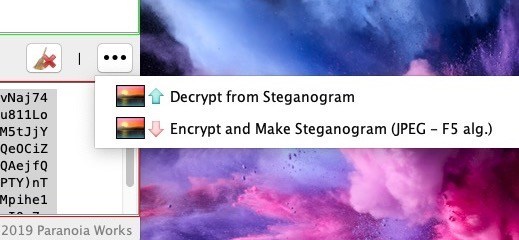
Decrypt this with PTE - Password is the same as used in the video
dlAqKL5xMa 0Eu38KLApB MUVRPK51)w 2FT5URtixM gp)ZD7nG1U YtA8DHz0t1 oxRMPNZ1Zn eNzIcIR]ix kLy4SvZmmI cr2tdvbJ7H Uuo))daqIb Mrs9Fru6ok u4bDVEbUbA bR3g6SQIC4 18HqRYA]6J 3JyRxHwZGu M8LF46biH4 XndAidzN1u pcE1O92d)q )lUtLgt849 tWO3vveWVO 4eRhnlePrA GZ14w5bwwn doshVh0bLs 3YImdKuabG CE4uowz4Ov zoRmohSX)] VegLB25ccp GwqRS6272R b1DBE6f6dp E0]HSV88BP vjQxOlWMC2 LUSkuvdQdM SNZlVixe0X 8Mh5m3WX7m 7VE2wivlRB RUIlvhRG2p hO9F]Z]jxl 3hY6T)5KWN Wko57hq4OB KJtSdJNQBr x12abqXhRc LcK1fLGpVf 7Pl2DEztZV z8iSCgtgKX 76iluFF5LR uvNpEMWvlT XIgnHzIT1W RDmh7tmqDC mO7ZljfPgy 5FI]RGKUXu cLKmY7TGSN P6]hrz6)sU IIzthrtc]S Nhiehysd)q Iw1jyoWrP5 1nv0It5TM1 iIjmfUEsT0 gkpsiBDVhc BGZFvneYKa 8YDr8cyzC7 rp5kpk1Pn7 YbNSaX]kgo 2a6tzyFuHD Yx4Qip)ndC oXO5MCQssa e6I6Rsojlm v7lCqx2qeO MssT7Nov1j AJDOLitBxn NYy3myHyKK GeQ8Yagx6j wpmrcrA!
Buy the Book
One way of staying safe is to avoid using email. Sending email is the equivalent of putting your private data onto a postcard. The postcard (email) can be read easily as it passes through the postal system. Your information is naked and without protection. There are illicit sniffer applications which look at email as it goes through servers. Similar to the Google email system which looks to see what adverts it should put in front of you. That’s why you get a free service from Google. You are the product being sold to the advertisers.
Buy the Book
The post Easy Text Encryption Everywhere appeared first on Good and Geeky Books.
January 19, 2020
Easiest Way to Encrypt Files Or Folders – Mac and Windows
Encrypto is a delightfully small and easy-to-use application. It makes it so easy to encrypt files or folders on the Mac. Whatever files you encrypt, you can decrypt for yourself on your Mac. Or send the encrypted documents to other Mac users or even to Windows users to decrypt whatever you’ve sent them using Encrypto. It would be lovely if there were versions of this application for other platforms. I’d love to see this on iOS, Android and Linux distributions. It is quite a limitation, because not everybody uses a Mac or a Windows computer. The biggest thing Encrypto has going for it is that it is the easiest way to encrypt files or folders on your Mac.
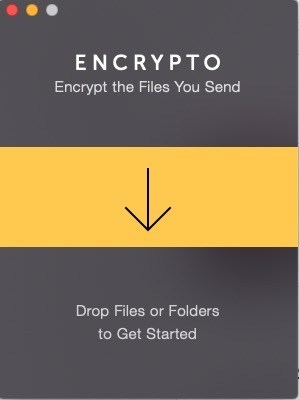
How to Use Encrypto
On your Mac you get the application from the Mac App Store. For Windows users you can get it from the developer’s website at Macpaw. It’s an easy install!
Open the application and it doesn’t take a lot of space on your screen. I find the easiest way to start using it to drag and drop files or folders onto the application. If you put the mouse over the + in the middle of the application window, it opens up a file choosing Finder window. That’s your two ways of getting files into the application.
Your next job is to give the encrypted file a password. Make sure you use a good password. Store your password in your password manager. I prefer to use 1Password for this job. It gives me good, long, difficult to guess passwords as well as storing them securely. Each time you make a new password for a file or a folder encryption make sure you keep the password safe. If you lose the password you lose access to the file. It’s also possible to give yourself a hint (optionally) for the password. My hint would be to tell me to look in 1Password.
If this is a one-off file movement to your friend and you only need the protection for while it is flying through the Internet you could choose something fairly simple. For example you could send a message to your friend telling him the password is his wife’s name, his date of birth, or the name of the bar where you both got drunk that time.
If it’s going to be a more regular event of sending files in this way to the same person, then choose a better password. Whatever the password is, make sure you send the password by secure means. Make a phone call and read the password verbally. Use a secure Messenger service such as Threema, Telegram (in a secure chat), Signal or Wire. There are others you could also choose from. Just make sure it has end-to-end encryption (by default preferably).
Top Tip
Securely delete the original file after you’ve encrypted it. Otherwise there’s not much point in using encryption. Unless you consider the computer you’re using completely secure and you’re using Encrypto for a file you are sending to somebody else. Maybe use the app Incinerator to secure delete the file.
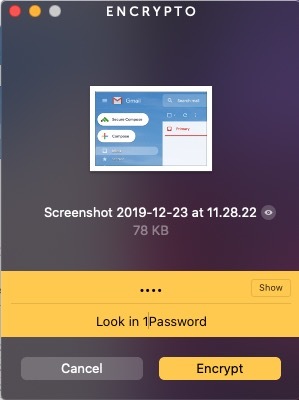
Encrypt the File
So you have the file dropped into the application and you’ve given it a password. All you need to do now is to click on the button Encrypt. You get a nice little animation to show the process of the file or folder encryption. The encryption used is AES 256 encryption. You now have three methods to use the encrypted file.
Drag and drop directly from the Encrypto app to where you want it. You can drag it into a Finder window. You can also drag directly into an email message. I tested this with Thunderbird email client and it worked perfectly.Click on the button Save As… The file will be saved to wherever you decide.The other button available is Share File. Click on this and you’ll see a few options available. Share it to the Messages application or to Airdrop. I can also send it to Day One, my journalling application or to Yoink. It all depends upon what applications you have on your computer and how you have set up the sharing extensions.Whichever way you decide of those three, your files are completely secure. Send it by email, Messages, USB stick or put into Dropbox. So even by sending through insecure means such as email, you are protected.
Double up the Protection
It’s perfectly reasonable to go for the belt and braces approach. Send your encrypted file by encrypted means. Use a messenger app which is endowed with end to end encryption. My favourite of these applications is Threema. It’s available on all platforms and is inexpensive. Other messaging services such as Telegram, Signal, Wire, Dust, Keybase, Confide, Wickr Me or even WhatsApp have end-to-end encryption. Whichever one you use really depends upon whatever your friend is using. It’s a good idea however to persuade your friend to you something which is secure. Avoid using Facebook Messenger which is insecure. You could still use it providing you have used Encrypto in the first place. Decide for yourself whether one layer of encryption is enough.
Buy the Book
One way of staying safe is to avoid using email. Sending email is the equivalent of putting your private data onto a postcard. The postcard (email) can be read easily as it passes through the postal system. Your information is naked and without protection. There are illicit sniffer applications which look at email as it goes through servers. Similar to the Google email system which looks to see what adverts it should put in front of you. That’s why you get a free service from Google. You are the product being sold to the advertisers.
Buy the Book
The post Easiest Way to Encrypt Files Or Folders – Mac and Windows appeared first on Good and Geeky Books.
Good and Geeky

- David Allen Wizardgold's profile
- 3 followers

