Stephanie Pedersen's Blog, page 9
March 25, 2016
Imagine This….
You wake up in the morning feeling vibrant, refreshed, and ready for the day! You jump out of bed, stretch and enjoy a quick, easy, delicious breakfast. As you head out the door, you catch a glimpse of yourself in the mirror. You have a healthy, vibrant glow, and you can’t help but smile. You walk out the door feeling lighter, you walk taller!
What if eating healthy was easy and came naturally for you? What would it be like not to worry about food, give into cravings, or beat yourself up because you just ate something you “shouldn’t have”?
I’m going to show you how to make this vision a reality.
I have been asked to share my expertise on this complimentary online event, “Own Your Power: How to get your best body and create the life of your dreams.” I am thrilled to invite you to join me!


March 20, 2016
Hello Gorgeous!
How is March treating you? I hope well!
I know it is still a bit grey and nippy where many of you live. It certainly is here in NYC. But I am craving the sunshine and soft delicious warmth that come with spring. So today, in the spirit of vernal make-believe, I offer up a fresh-tasting treat, one that you can enjoy while you wait for those first days of the new season.
This recipe features that springtime favorite, strawberries. In addition to tasting great, strawberries contain large amounts of the nutrients your body needs to look and feel its best.
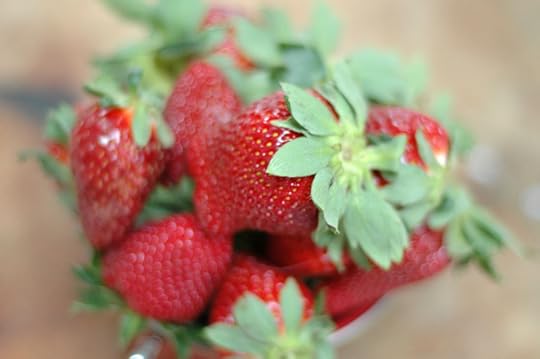 Get this: One cup of strawberries contain 113% of your body’s daily requirement for vitamin C, 28% of its need for manganese and 13% for fiber. Plus these tasty jewels are loaded with a wide range of phytonutrients, those plant chemicals that work to strengthen our immune system, ward off cancer and fight off free radicals so we look and feel young.
Strawberries also play well with other ingredients. Here, the berries team up with coconut (great for the immune system and brain health) and my favorite superseed, Chia. (Did you know that I co-wrote the book Chia: The Complete Guide to the Ultimate Superfood? I learned so much about how to love this protein-packed, omega 3-rich superfood.)
Chia helps soothe joint and muscle pains, fills you up so you don’t overeat, gives you steady energy, improves the look of your hair and skin, helps heal cardiovascular conditions and more. Plus, it is easy to incorporate into a wide range of delicious foods. Like this delicious pudding!
Strawberry Chia Pudding is a little something that I like to make in the evening after washing up the nighttime dishes. I spoon it into six individual ramekins, cover the ramekins, and stash them the fridge to firm up for the next day. Sometimes the pudding becomes breakfast, sometimes it is part of an eat-at-home lunch and sometimes—if it lasts that long—it even doubles as an afterschool snack. Enjoy!
Strawberry Chia Pudding
Makes 6 smallish servings
16 ounces fresh strawberries, hulled
1 1/2 cups (about one can) coconut milk
2 tablespoons to 1/4 cup honey, coconut nectar or other natural sweetener
Dash salt
1 teaspoon vanilla extract
3/4 teaspoon finely grated lemon, lime or orange zest
1/2 cup whole chia seeds
Place the strawberries, coconut milk, sweetener, salt, vanilla, and zest in a blender and blend until smooth. Taste and adjust sweetener.
Place the chia seeds in a large mixing bowl. Add berry and, using a whisk or a fork, whisk thoroughly.
Let stand for 10 minutes and whisk again.
Cover and refrigerate for at least 4 hours or overnight. The longer the pudding sits, the thicker the pudding will become. If the consistency is too thick for you, whisk in a bit of coconut milk or water.
Enjoy!
Much love,

P.S. As some of you may know, I am currently hard at work on my next cookbook! (Hint: It’s all about a special family of veggies.) But what you may not know is the berry book I was working on during the summer and fall is just about ready to hit the bookstores! I am excited to share that my Berries: The Complete Guide to Cooking with Power-Packed Berries (Sterling Publishing), comes out April 19. In fact, this recipe comes from the book! You’ve been so good about asking how you can help. Reviews are a great help! (In fact, I’ll be sending out a review request in a couple weeks.) So are your ideas. Have a great idea for a book party or some book publicity ideas? Send me an email! I’d love to hear them! xoxoxo
March 13, 2016
Hello Gorgeous!
I have so much to share with you and only this space, so I am going to quickly choose one thing: A fabulous recipe! All else will have to wait until next week.
So are you ready for a yummy, superfood recipe that is fast, deeply nutritious and easy? (It’s also just exotic enough to make any meal feel like an occasion.)
I learned this recipe from the National Dried Plum association. A dried plum, in case you aren’t aware, is a prune wrapped in a sexy new name. No matter what you call them, however, dried plums are not only delicious (so sweet, so chewy, so almost-chocolately), they are packed with high amounts of antioxidants, phytonutrients, vitamins, minerals and fiber—all of which boost the immune and digestive systems, help ward off cancer, and create great-looking skin.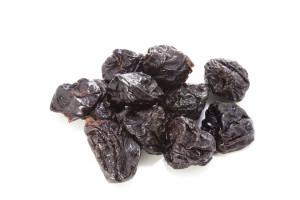
In this recipe, dried plums team up with other superfood ingredients, including kale and coconut. If you don’t have dried plums, use raisins or dried unsweetened cherries or apricots. If you don’t have kale, try chard or collards. And so on.
Enjoy!
Sauteed Kale with Dried Plums and Coconut
Makes 4 servings
Fresh kale sautéed with cumin, mustard seed, chili flakes, ginger and California dried plums, garnished with toasted coconut
1 bunch smooth or curly kale (about 8 ounces)
1 tablespoon coconut oil
1 teaspoon brown or yellow mustard seeds
1 teaspoon cumin seeds
1/2 cup diced California pitted dried plums
1 teaspoon grated fresh ginger
Pinch red pepper flakes (optional)
Salt
1/4 cup toasted unsweetened flaked coconut
. Remove stems from kale and discard. Cut or tear kale into bite-size pieces; wash and drain (do not dry in a salad spinner; there should be some moisture clinging to the leaves).
In a large skillet, heat coconut oil over medium heat. Add mustard seeds; when they start to pop, add cumin seeds and toss for a few seconds. Add dried plums, ginger and pepper flakes; after ginger sizzles for a few seconds, add kale.
. Cover skillet and cook 3-4 minutes or until kale wilts but is still bright green. Season with salt and mix well.
Transfer to a serving bowl and sprinkle with coconut.
March 6, 2016
FROZEN FOOD: HOW IT CAN WORK FOR YOU
FROZEN FOOD: HOW IT CAN WORK FOR YOU
(Let’s make it easy for you!)
Happy Frozen Food Month! Yep, March is the month we celebrate that ultimate convenience: Frozen Food.
If you’re scratching your head, wondering why a nutritionist would celebrate a month dedicated to not-fresh food, let’s address the elephant in the room: It’s true, frozen food does have a bad reputation—and really with good reason. Often, what you find in the frozen food aisle is heavily processed frankenfood entrees with all kinds of factory-made ingredients.
But…. frozen can be healthy. And convenient. And wonderful. Which is why I am celebrating.
 The secret to making frozen food work for you is to stick to frozen plain veggies (no weird butter or cheese sauces), frozen fruits, frozen grains and frozen legumes. Even frozen hormone and antibiotic-free poultry, red meats and seafood. In fact, I’ve got a weird factoid for you: Because frozen food is picked and immediately put in the deep freeze, it doesn’t sit around languishing on a truck and in the produce department, drying up and losing precious nutrients with every post-harvest hour it sits around waiting for someone to take it home and eat it. So frozen produce will often have 50 to 200% MORE nutrients than the fruits and veggies you find in your neighborhood grocer’s produce department.
Plus, frozen food is convenient. You can stock up and have what you need. You can open a bag or box and use just what you need. There is nothing left rotting in the fridge. And so on.
Lastly, frozen food can be cheaper than the unfrozen stuff. Weird, but true.
Some tips when shopping for frozen food:
Go for pure food. No chemicals, no preservatives (frozen food does not need chemical preservatives), no colorants, no flavorings. None. Just spinach. Or green beans. Or cooked millet. Or trout fillets. Or bison meat. Or blueberries. Or whatever.
If you can afford organic, wonderful. There are some great organic frozen brands. If money is an issue, head to Whole Foods and check out their 365 Brand. Or check out Trader Joe’s frozen organic offerings. These two stores have some of the best organic frozen prices around.
If you cannot afford organic, don’t sweat it. Buy what you can buy.
Get the frozen food home quickly and into your freezer. You don’t want to let the food thaw, then refreeze, thaw and refreeze. If it happens, don’t sweat it. Just pop it into the freezer. But try not to let it happen.
Make sure your freezer is cold enough. That would be 0° F or -17 C (or colder).
Use the item within three months. To help you do this, get a Sharpie marker or food marker and mark the purchase date on the package. If the package has a “Use By Date”, circle that so it’s easy to see.
Place frozen items in a second freezer-safe bag or place them in a freezer-proof glass or other container to help preserve their freshness. Freezer burn happens when food dehydrates due to exposure to cold air. It literally is the protein and fiber in food being burned by extreme cold. Double protecting items increases their shelf life.
Check your freezer every two weeks to make sure the items that are approaching expiration are used.
Be adventurous! Frozen mango chunks, a new kind of fish, veggie burgers, heritage beans, a quinoa-millet-red rice blend—there are some awesome, exotic, whole food frozen offerings out there. Have fun!
February 27, 2016
MILLET, QUINOA AND SPELT. OH MY!
Grain—good for you or bad for you? Nourishing, energy-giving, fiber-rich world staple or fattening, bloat-causing, diabetes-creating villain of America’s obesity crisis?
Both.
Crazy, right? But grains can be your body’s best friend or worst nightmare depending on one thing: Whether they are whole or refined.
MAKE YOUR GRAINS WHOLE
The difference between whole grains and refined grains is pretty simple. Whole grains still have their nutrient-dense bran, germ and endosperm. Think black rice. Quinoa. Millet. The grains our early ancestors ate.
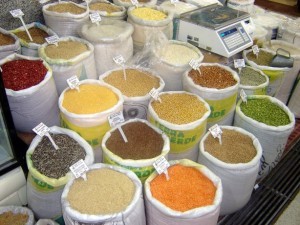 They are some of the best sources of nutritional support around, containing high levels of dietary fiber, protein and B vitamins. And because the body absorbs their goodness slowly and steadily, whole grains provide long-lasting energy.
Refined grains, on the other hand, have been stripped of their healthiest parts so only the simple carbohydrate remains. Think white rice, polished barley, white flour—and any product made with it.
Here’s the bad part: Refined grain products cause blood sugar levels to rise then plummet, increasing the amount of insulin in the blood, which can set you up for wicket carb and sugar cravings, as well as weight gain.
Good reasons to go whole, don’t you think?
To make the switch even more delicious, here’s an easy millet recipe. Try it! And feel free to share your own favorite whole grain recipes.
Millet with Sunflower Seeds
Makes 4 servings
This high-protein, high-fiber dish makes a great foil for sautéed veggies and protein. I love to include a half-cup of Millet with Sunflower Seeds as an accompaniment to sautéed veggies and protein (it goes fantastically with beans, poultry, red meat, seafood and all veggies.)
1 cup millet
1/2 cup sunflower seeds
3 cups water
Pinch of sea salt
1. Rinse and drain millet.
2. Dry toast sunflower seeds in a dry skillet over medium heat until they smell nutty; approximately 4 minutes.
3. Bring water to boil in a small pot. Add millet and sunflower seeds.
4. Cover and simmer for 30 minutes.
5. When done, fluff and let sit for 10 minutes. Mix, serve and enjoy.
6. Note: If millet is too dry for you, add more water when cooking.
Looking for easy, delicious ways to enjoy whole grains every, day? There are some great cookbooks out there to help you. One I like: The Grain Brain Cookbook: More Than 150 Life-Changing Gluten-Free Recipes to Transform Your Health, by David Perlmutter.
WHAT DO YOU WANT TO LEARN MORE ABOUT?

Have something you want me to write about? Want to learn more about a specific food or health topic? Looking for recipes for a special occasion? Take my one-question survey and let me know what you want me to share with you! The survey, which is anonymous, is here. Thank you! I cannot wait to give you what you want! xoxo
February 18, 2016
Hello Gorgeous,
I am in a great mood. February is in full swing, I just completed a terrific 21-Day Cleanse with some fabulous people, and I am ready to dive into a bunch of fun projects, including publicizing my latest book (on Berries, due out in April), writing my next book (on Roots), updating my website and a few surprise items that I will be ready to share soon!
In the meantime, I am doing the same thing you probably are: Trying to have as much fun as possible with my crazy, full life.
How lucky are we, having such busy lives?
 The thing about busy lives, however, is that the more our lives contain, the less time we have available for “being healthy.” Which is exactly why I adore this recipe: It takes no time at all (less than 15 minutes of active work) and it’s healthy, thanks to large amounts of protein, fiber and antioxidants. Plus, it’s easy to make, uses ingredients that are easy to find, and is outrageously delicious.
Chickpea Soup
Makes 6 servings
I love protein-rich soups. And I love chickpeas. Which is why I adore this soup! I originally found the recipe in Bon Apetit, but modified it by taking out a few cleanse-bad ingredients. Note: Make sure your broth is a flavorable one—if yours is lacking, you can make it stronger by reducing it. Simply simmer broth it until it boils down not quite by half.
3 15-ounce cans chickpeas, rinsed
3 tablespoons extra virgin olive oil
2 large onions, coarsely chopped
4 garlic cloves, chopped
¼ teaspoon dried thyme
4 1/2 cups strong vegetable or chicken broth
Salt and pepper to taste
Optional garnish: Chopped roasted veggies, sunflower seeds, chopped nuts or minced fresh herbs
Drain chickpeas.
Heat oil in a large heavy pot over medium heat. Add onions, garlic, and thyme; cook, stirring occasionally, until onions are soft, 10-15 minutes. Add chickpeas and broth.
Bring to a rapid simmer. Reduce heat, cover, and simmer until chickpeas are very soft, 1 1/2-2 hours for dried chickpeas, or about 30 minutes for canned.
Working in batches, purée chickpea mixture in a blender or with an immersion blender, adding water by 1/2-cupfuls if needed, until smooth. Season with salt and pepper and garnish as desired.
Enjoy!
Much love,
P.S. Have something you want me to write about? Want to learn more about a specific food or health topic? Looking for recipes for a special occasion? Take my one-question survey and let me know what you want me to share with you! The survey, which is anonymous, is here. Thank you! I cannot wait to give you what you want! xoxo
February 7, 2016
A BETTER GAME-DAY DIP
 Superfood 7 Layer Dip
Makes 10 to 12 servings
When I was in college, 7-Layer Dip was all the rage. It’s delicious, it’s addictive and it could be healthy—if you go without the fatty ground beef, shredded cheddar and sour cream. This outrageously delicious version is not only missing those artery-clogging ingredients, it is loaded with antioxidant-heavy and nutrient-rich spices, herbs and superfoods, so game-watchers will have no idea that they are getting healthier simply by snacking! Note: The ingredient list and the instructions are on the long side, but this is very easy. Give it a try!
1 (15-ounce) can refried beans
2 tablespoons hot sauce
Extra-virgin olive oil, avocado oil or coconut oil
4 scallions, roughly chopped
1 (16 to 18 ounce) jar green chili or tomatillo salsa
2 tablespoons chopped cilantro, a palm full, chopped
1 (15-ounce) can black beans
2 teaspoons ground cumin
1 (16 to 18 ounce) jar chipotle salsa
1 16-ounce (or two 8-ounce) containers hummus (try a flavored hummus if you’d like)
1 lime, zested and juiced
2 ripe avocados
2 cloves garlic, finely chopped
1 lemon, juiced
1 jalapeno, seeded and finely chopped
Salt
1 cup diced tomatoes (can be canned)
Organic tortilla and/or lentil chips, buy 2 sacks in 2 different colors/varieties
Baby veggies and/or veggie strips
Heat refried beans in small nonstick pan over medium heat and season with hot sauce. Transfer the beans to a small, deep casserole dish. Scrape pan clean with rubber spatula and return to heat.
Add a little oil to the pan and raise heat to high. Add the scallions and sear them, 2 to 3 minutes. Add green salsa to scallions and heat through. Add cilantro, remove salsa from heat, and layer on top of the beans.
Return the same pan to the stove, lower heat to medium and add black beans, heat through and season with cumin, layer on top of the green salsa.
Top the black beans with a layer of chipotle salsa. Mix hummus with the lime zest and juice and spread on top of the chipotle salsa.
Combine the meat of 2 ripe avocados with garlic, lemon juice, jalapeno and salt to form a chunky guacamole. Top the salsa with guacamole. Garnish the dip with the final layer of diced tomatoes.
Much love,
January 27, 2016
MOVE OVER SOUR CREAM, THERE’S A NEW TOPPER IN TOWN!
 You’re trying not to eat dairy and soy, but you want something creamy to top a potato or an enchilada or to dress up sautéed veggies or to just enjoy as-is with a spoon—what do you choose?
It’s a good question! One I can answer from experience: At the moment, I am in week one of my 21-Day New Year’s Cleanse and my detoxers are looking around for creamy things to dress up their meals. Below are two of the recipes I offer. Based on high-protein sunflower seeds, Sunflower Seed Crème and Sunflower Seed Sauce are terrific kitchen staples. I like to make a batch of one or the other on a Friday, when I tend to do a lot of my big batch cooking for the weekend—a time when my sons and husband are home and we typically have a house filled with friends. Both recipes are easy-peasy, fast and use ingredients that you may already have on hand. Feel free to try both of these with pepitas (green hulled pumpkin seeds) if you’d like.
Sunflower Seed Crème
Makes a little over a cup
1 cup rawsunflower seeds
1 cup water
4 tablespoons lemon juice
1 garlic clove
Optional: 3/4 teaspoon herb or spice of your choice
3/4 teaspoon salt
1. Place ingredients in blender or food processor and whiz until completely smooth.
2. If consistancy is thick, add a bit more water (or lemon juice if more zing is needed).
3, Adjust seasoning, to taste.
4. Great for baked potatoes, as a dip, as a sandwhich spread and in place of mayo or sour cream. You can even puree in up to a cup of chopped cooked veggies (use whatever is in the fridge), avocado or beans.
5. Store in a covered container in the fridge for up to five days.
Sunflower Seed Crème Sauce
Makes 4 to 6 servings
This creamy sauce is a great stand in for a classic béchamel or cheese sauce or cream gravy. Try it with mashed potato, over cooked veggies or grains, drizzled over fish or poultry or meat, or any other way that you would like.
1 cup raw sunflower seeds
2 cups water
4-5 tablespoons soy sauce or tamari
1 tablepsoon paprika powder
1 teaspoon curry powder
Optional: About 3 tablespoons coconut or olive or another oil
Optional: 1 onion
Optional: 3 cloves of garlic
1. Place sunflower seeds, water soy sauce, paprika, and curry powder in a blender or food processor. Process for a couple of minutes until completely smooth.
2. Optional: Heat optional oil in a pan. Add thinly sliced onions. Cook for a couple of minutes. Add chopped garlic and cook for 30 seconds. Add the blended sauce, stir and let it simmer for a couple of minutes. Return to the blender and process again until smooth.
3. Store in a covered container in the fridge for up to five days.
January 22, 2016
COME ON IN! WE’RE GOING TO HAVE A GREAT TIME!

Yay!
The 21-Day New Year’s Cleanse starts tomorrow (woohoo!!!!) with one simple assignment: Download the shopping list and upcoming schedule then take a look. Pretty simple, right?
Why don’t you join us?
We’d love to have you along for the ride!
Go here to read more.
Use code 2016 for a $20 discount.
Much love,
P.S. Have questions? Email me here.
P.P.S. You have got to try this addictive Walnut-Apricot Spread! It takes minutes to make and is rich in protein, fiber, vitamin A, omega 3 fatty acids and phytonutrients. Plus, it is out-of-this-world delicious. The recipe is here!