
Ruth Soukup's Blog, page 104
August 21, 2014
Thrifty Thursday {Week 74}

Happy Thursday! I hope you are all having a great week! This morning I sent my girls off for their first day of school, which meant the first day of kindergarten for my little one. While there is a tiny part of me that is sad my baby is not really a baby anymore, I have to admit that I am looking forward to getting back into more of a regular routine now that school has begun! Has school started for you already? How do you get back into the school-year groove? I’d love to see your tips!
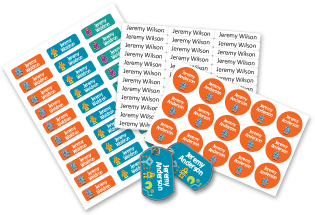
Also, if you haven’t already, be sure to enter to win one of three sets of personalized labels from Label Land! These ultra-durable labels stick–and–stay on everything, and are perfect for make sure your kids’ stuff stays put! Just scroll down to the bottom of this post to enter!
Here are the most clicked links from last week:
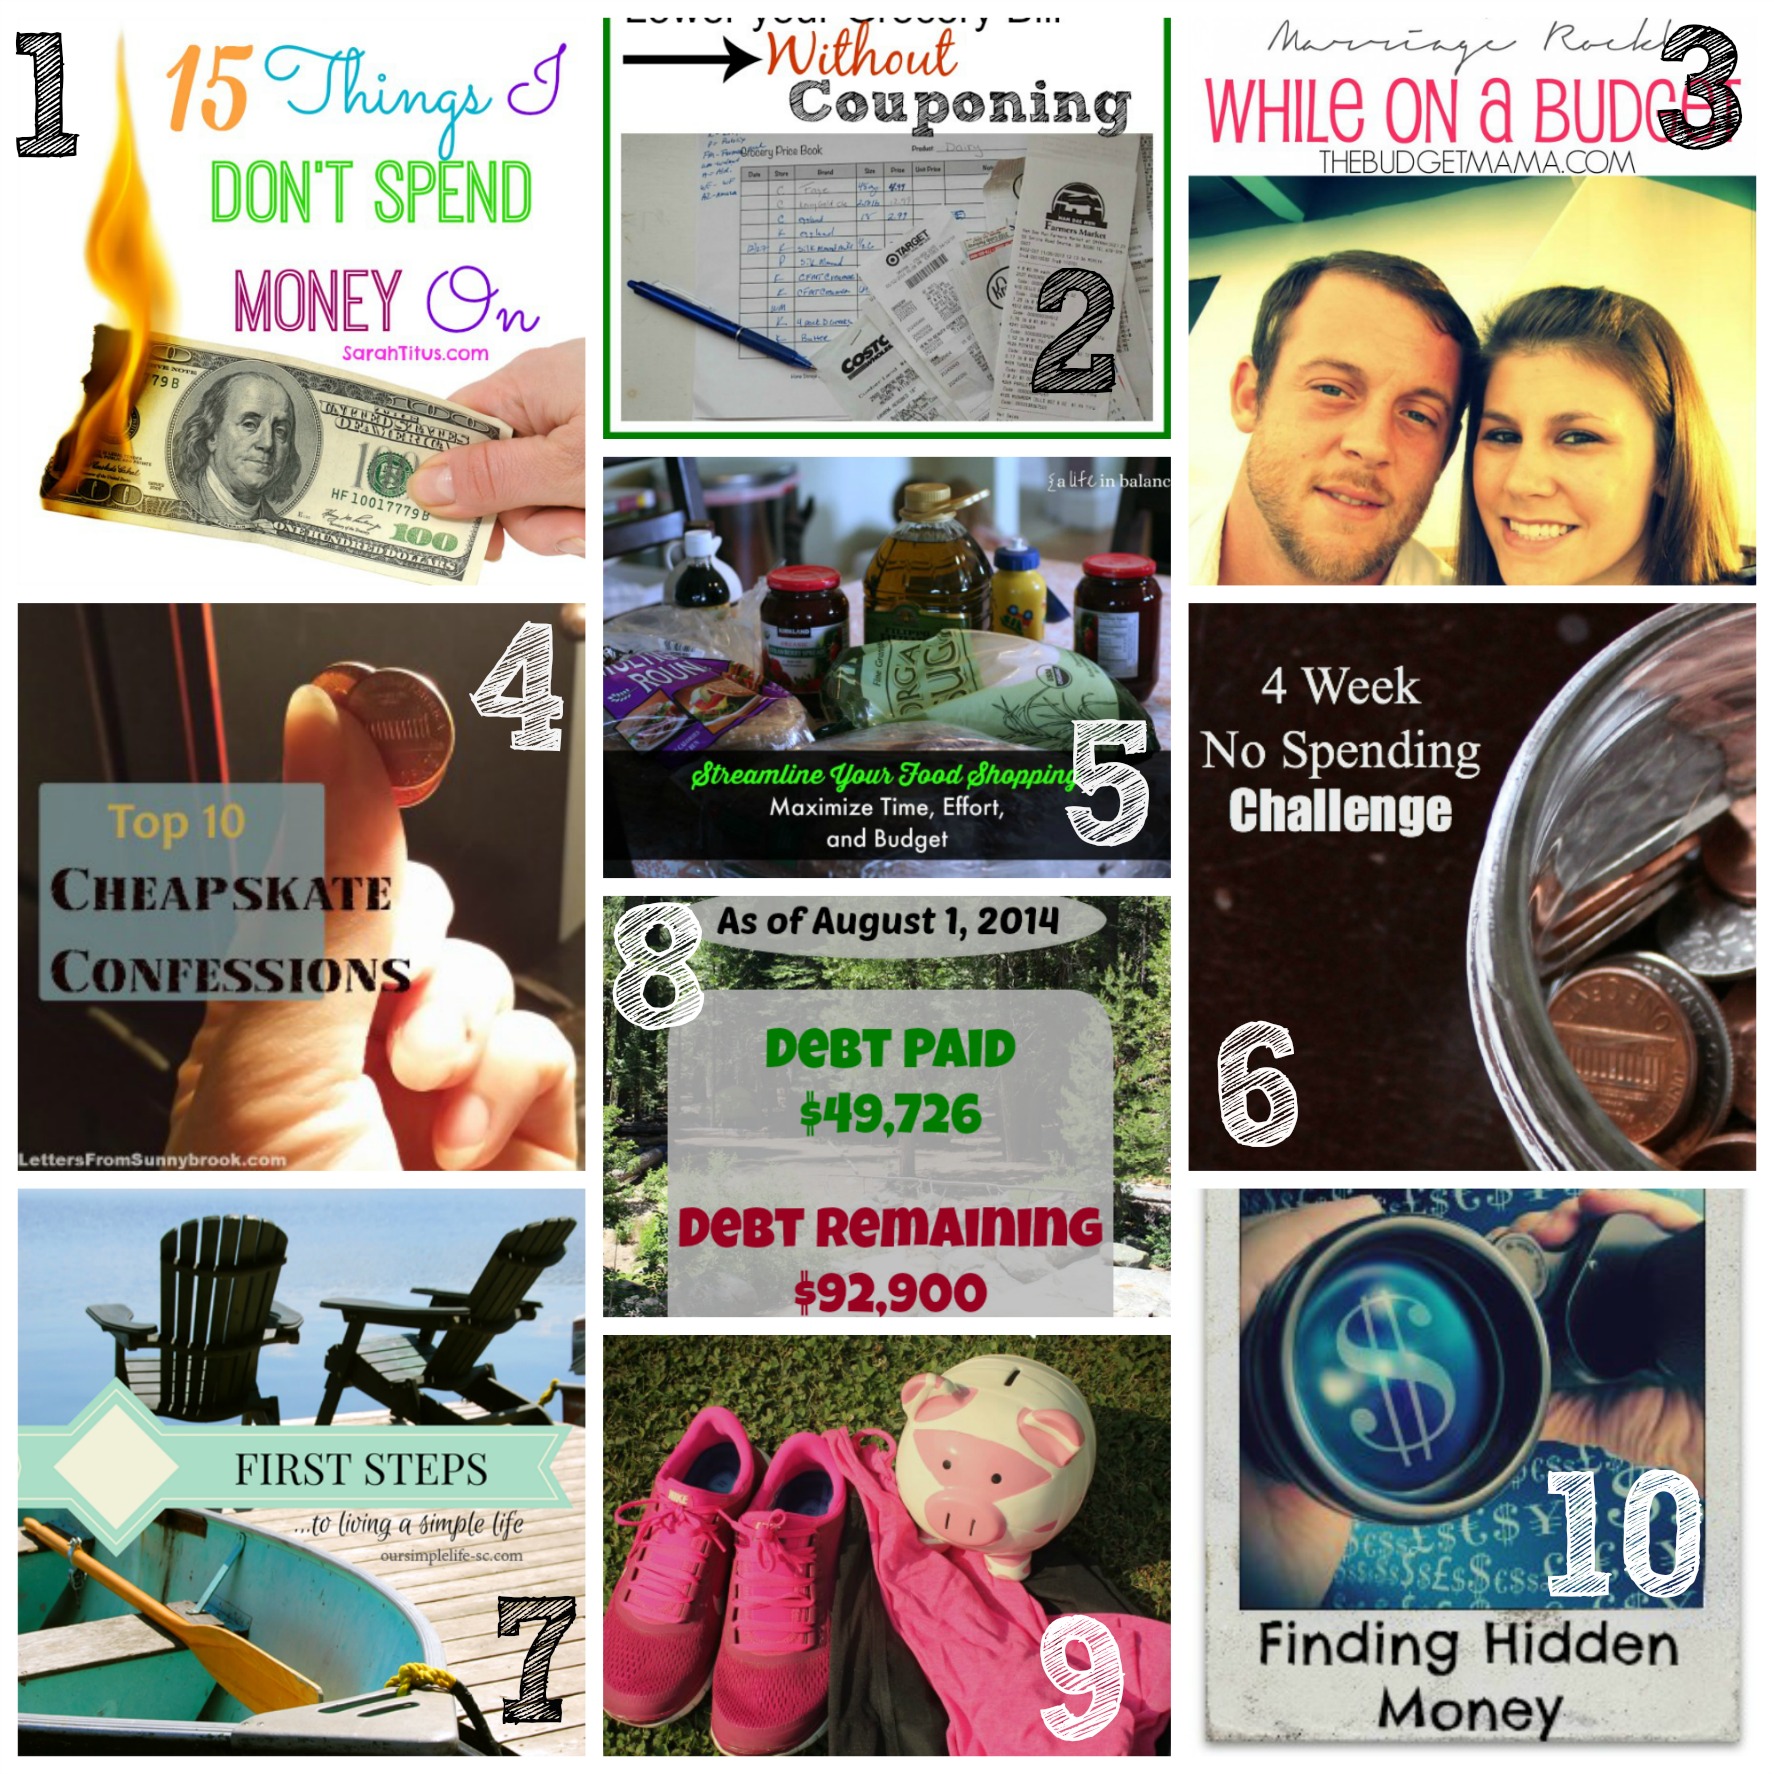
1. Sarah Titus { 15 Things I Don’t Spend Money On }
2. A Cultivated Nest { Lower Your Grocery Bill Without Coupons }
3. The Budget Mama { The Husband Project While on a Budget }
4. Letters From Sunnybrook { Top 10 Cheapskate Confessions }
5. A Life in Balance {Streamline Your Food Shopping: Maximize Time, Effort and Budget}
6. Practical Stewardship { No Spending Challenge- Shop Out of the Pantry and Freezer Month }
7. Our Simple Life { The First Steps to Living a Simple Life }
8. Six Figures Under{ Debt Repayment Progress Report- July 2014 }
9. Snail Pace Transformations { 10 Ways Thrifty People Save on Workout Clothes }
10. My Mothermode { Finding Hidden Money }
Never linked up before? Here’s how:
Scroll down, find the little blue “Add your Link” Button and click on that.
Follow the instructions on the next page – add a great image of your project and an interesting title. Make sure you link to the direct page of your budget friendly post – not the main page of your blog!
Try to visit at least a few other blogs at the party. Be sure to leave a comment to let them know you stopped by!
Please link back to this post somehow. There are badges available here; a simple text link is just fine too.
 Feel free to tweet about Thrifty Thursday so others can join the fun, and don’t forget to check back here Sunday morning to see which posts have been featured this week at Weekend Wandering!
If this is your first time here I also invite you to check out my blogging guide, How to Blog for Profit (Without Selling Your Soul). It is a fantastic resource if you are interested in building your blog, getting more traffic, or learning how to monetize, and the expanded 2nd edition is now available in paperback! Or, if you have read the book and are still looking to take your blog to the next level, I encourage you to check out Elite Blog Academy.
An InLinkz Link-up
Pin It
The post Thrifty Thursday {Week 74} appeared first on Living Well Spending Less®.


August 20, 2014
Herb Roasted Chicken Breast

The price of meat just keeps going up. This often means that in order to keep our meal plans budget friendly, we have to be more creative about using less expensive cuts of meat. Of course we still want whatever we make to taste amazing! This simple herb roasted chicken breast recipe is a perfect fit–easy, delicious, freezer-friendly, and made with bone-in chicken breasts or thighs, which tend to be much cheaper than their boneless counterparts.
To make it as part of a freezer cooking day, just split the marinade & chicken into multiple bags, then throw it right into the freezer–no cooking required! Making it ahead of time is not necessary, though, as it is equally delicious just marinated at room temperature. And don’t let the simplicity of the recipe fool you–this is another moist & flavorful meal that your family will absolutely go crazy for!
Here is what you need:

1 cup olive oil
3 tablespoons dried onion
4 cloves garlic crushed
2 teaspoons dried thyme
1 teaspoon dried rosemary, crushed
1/2 teaspoon oregano
2 cups chicken broth
1 1/2 teaspoon season salt
1 teaspoon ground black pepper
1/3 cup fresh parsley, chopped
8 bone-in chicken breasts or thighs
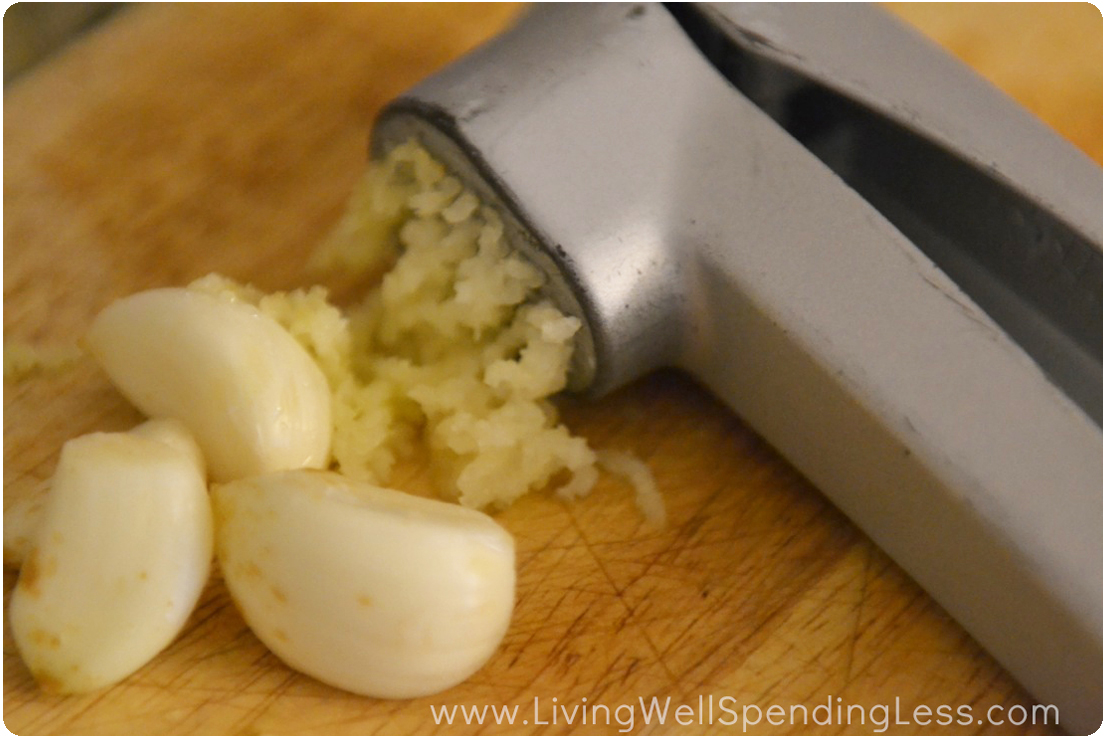
Step 1: Crush garlic.
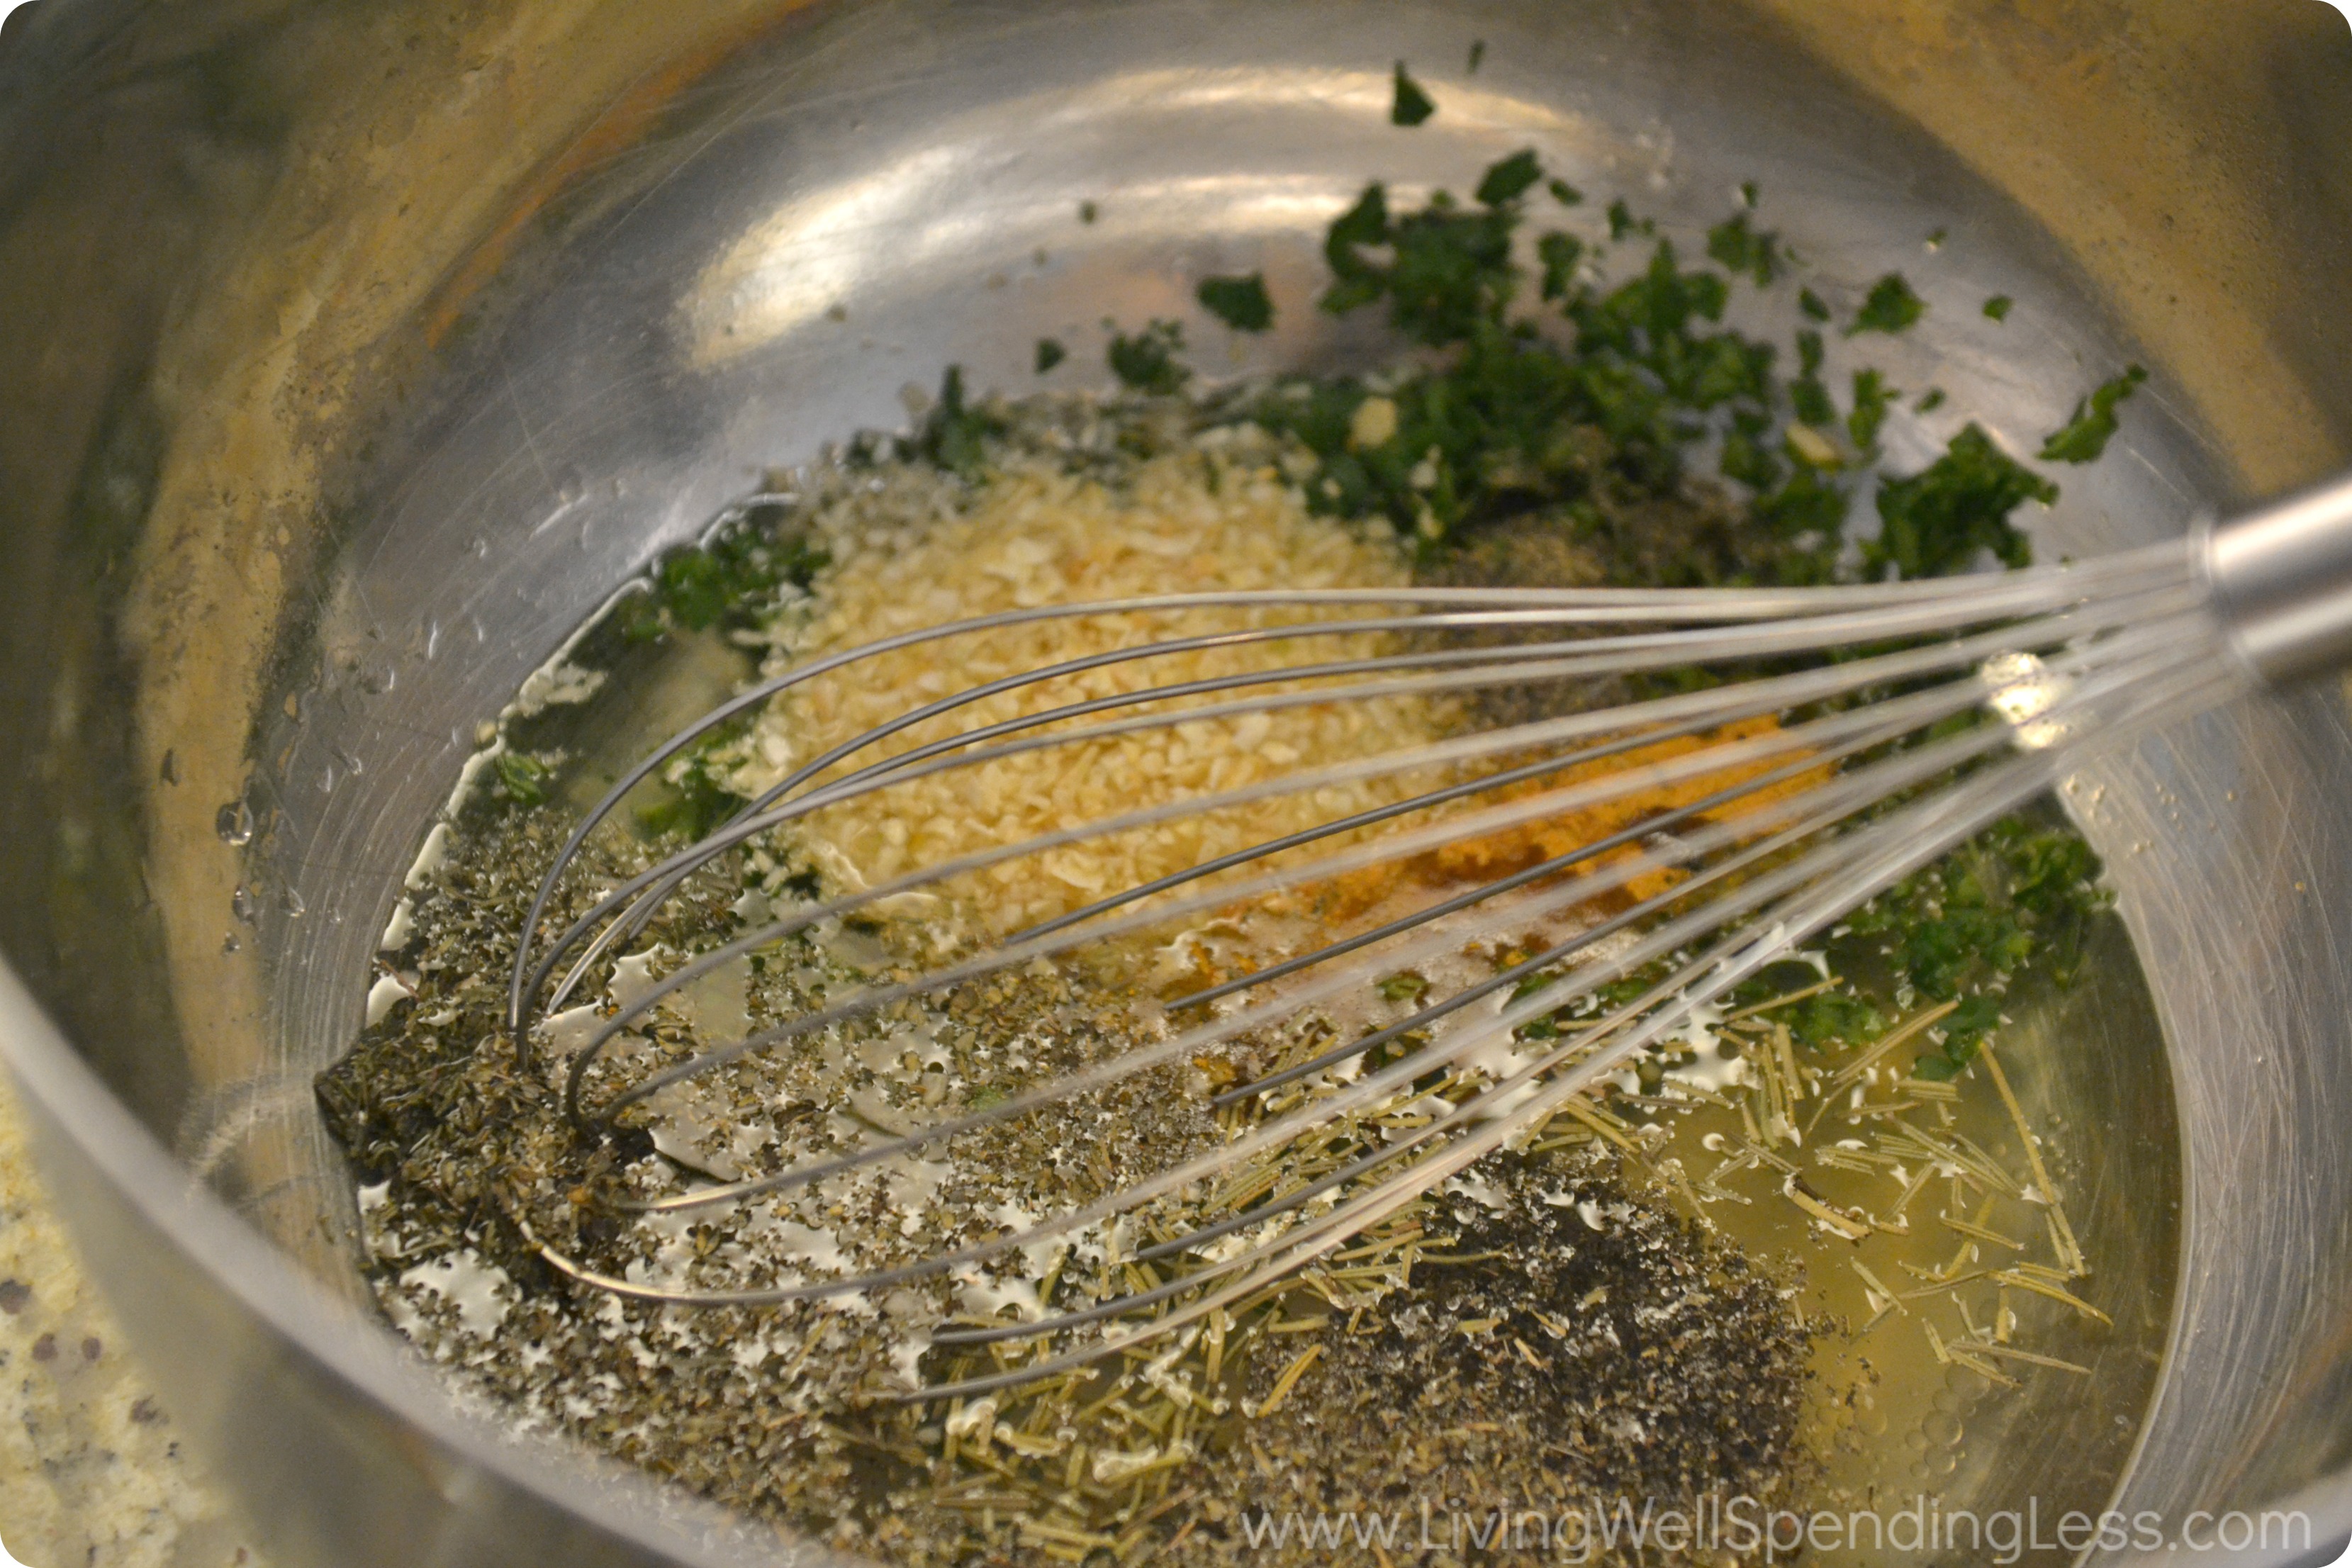
Step 2: In a medium size bowl, prepare the basting sauce by combining olive oil, broth, onion, garlic, thyme, rosemary, sage, oregano, salt, pepper & parsley.
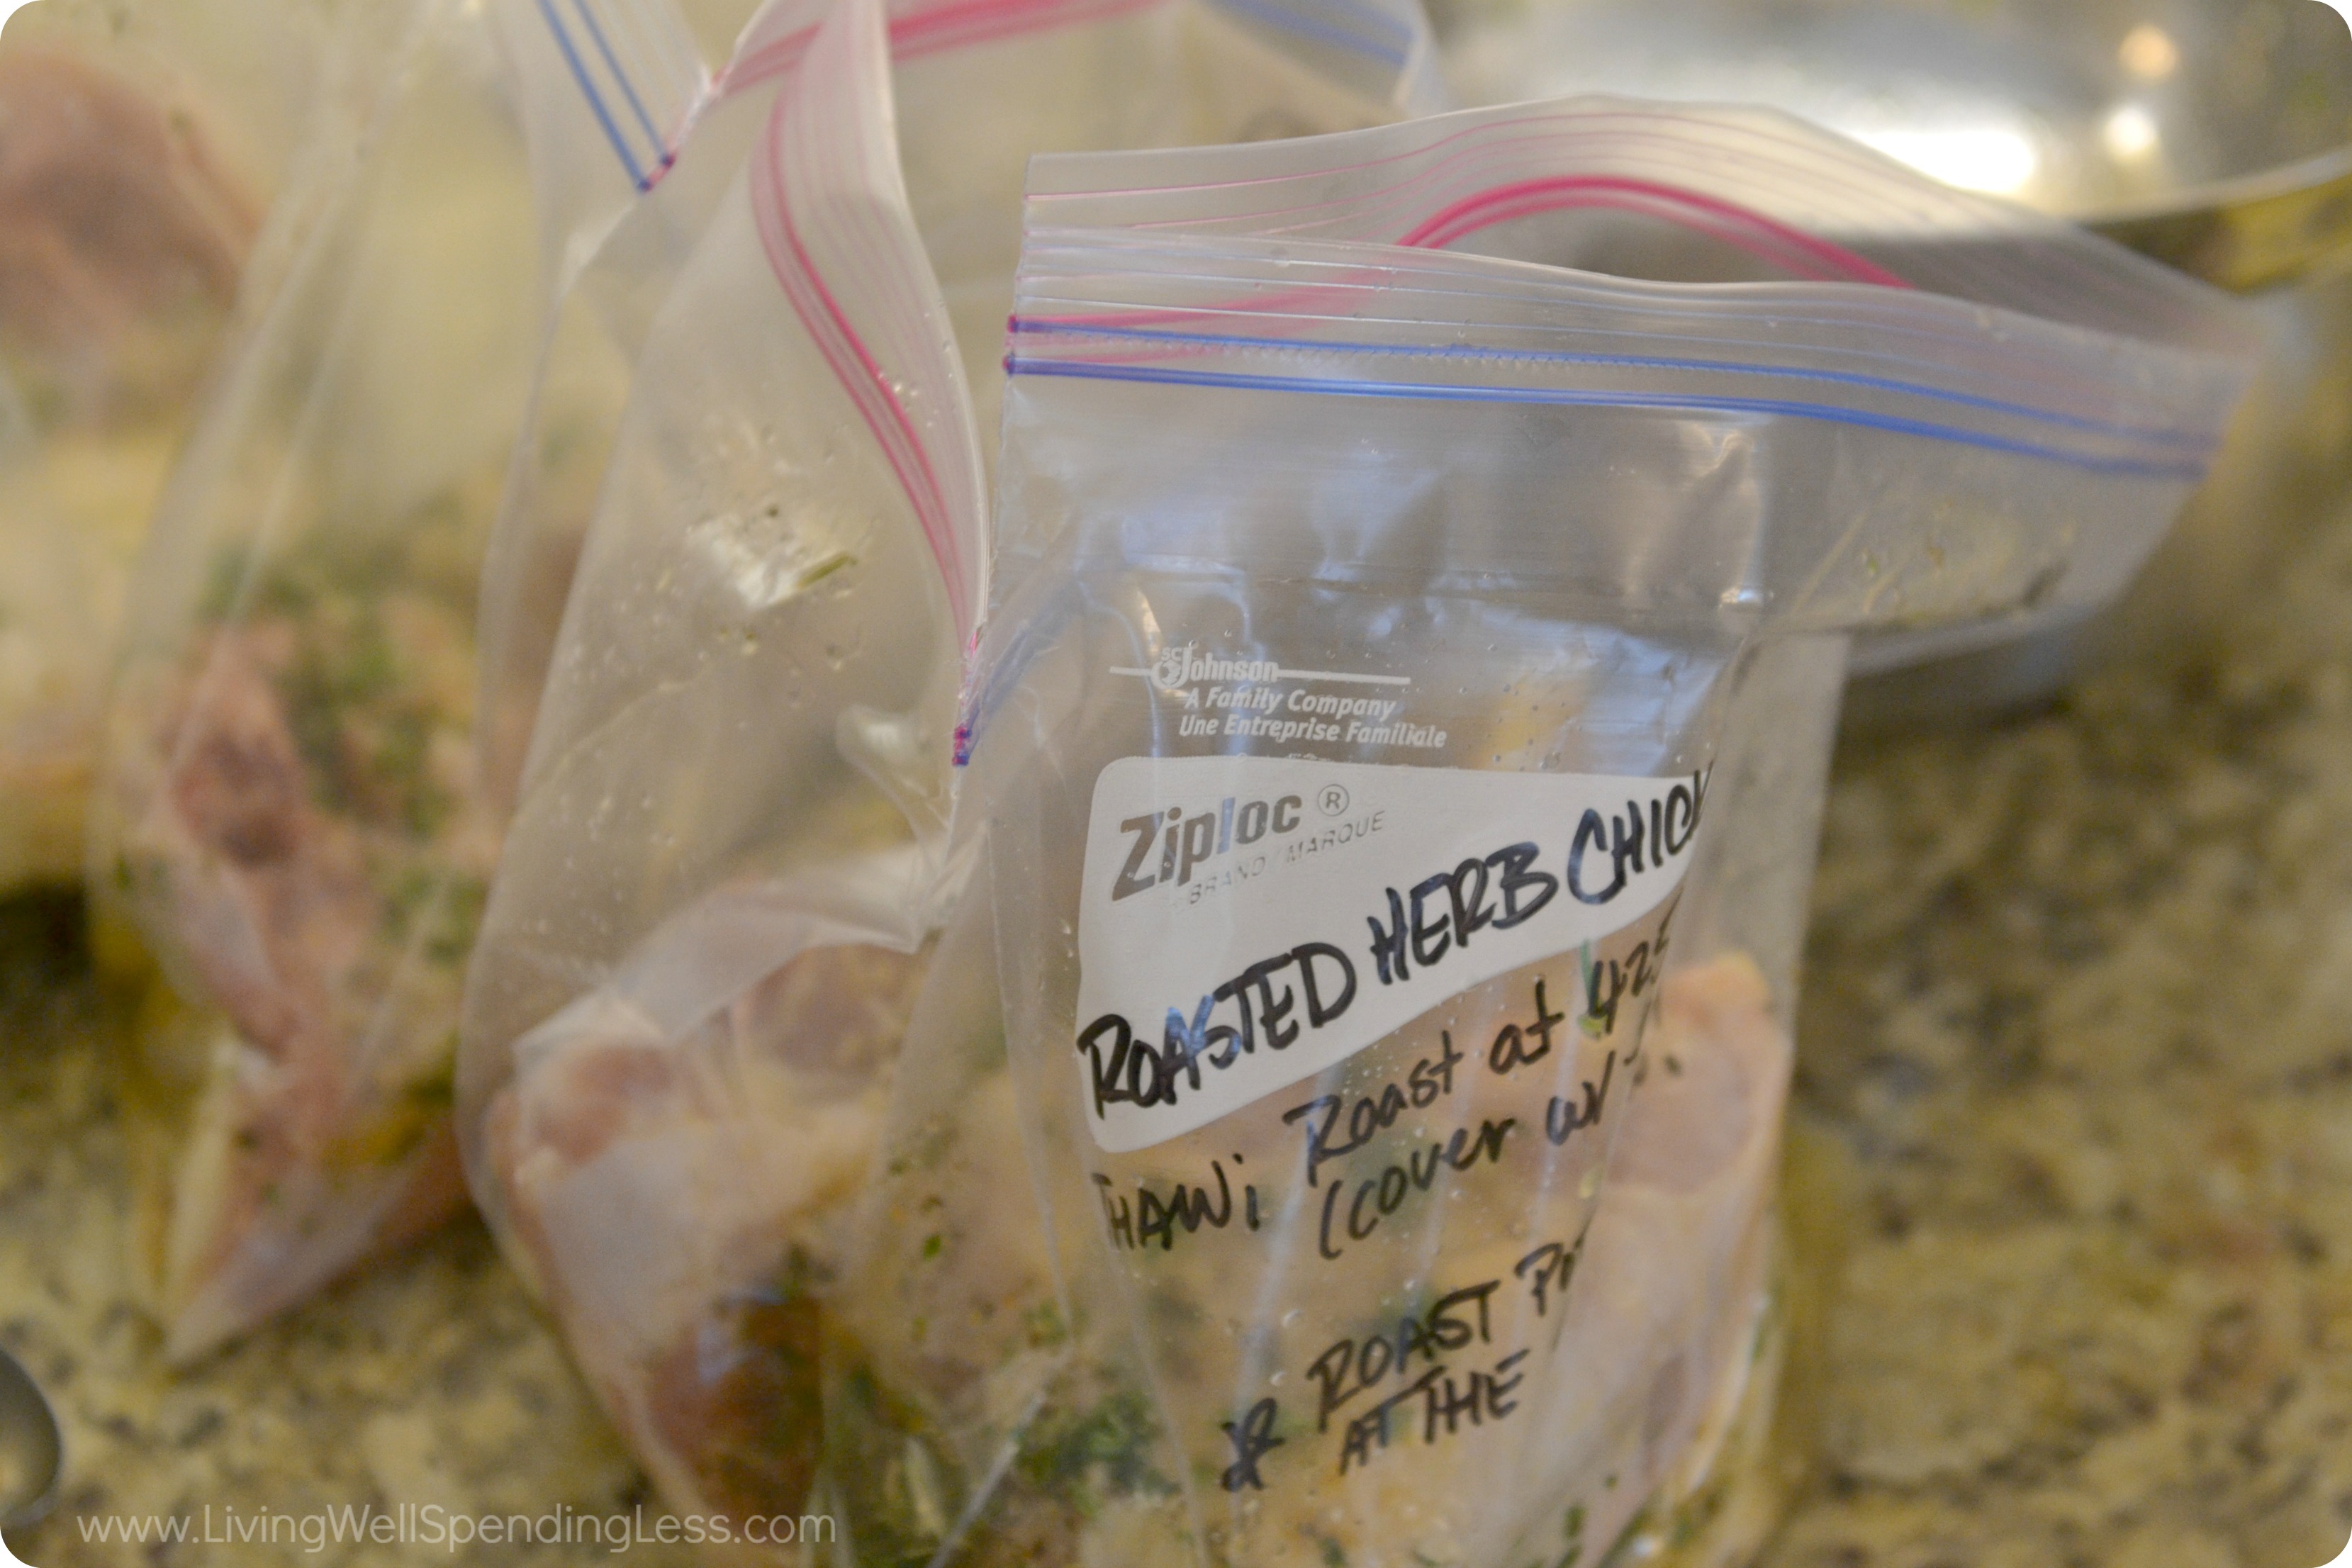
Step 3: Be sure to label bags first then divide mixture into the 2 bags. Then add chicken to bags with basting sauce, massage basting sauce around chicken then freeze.
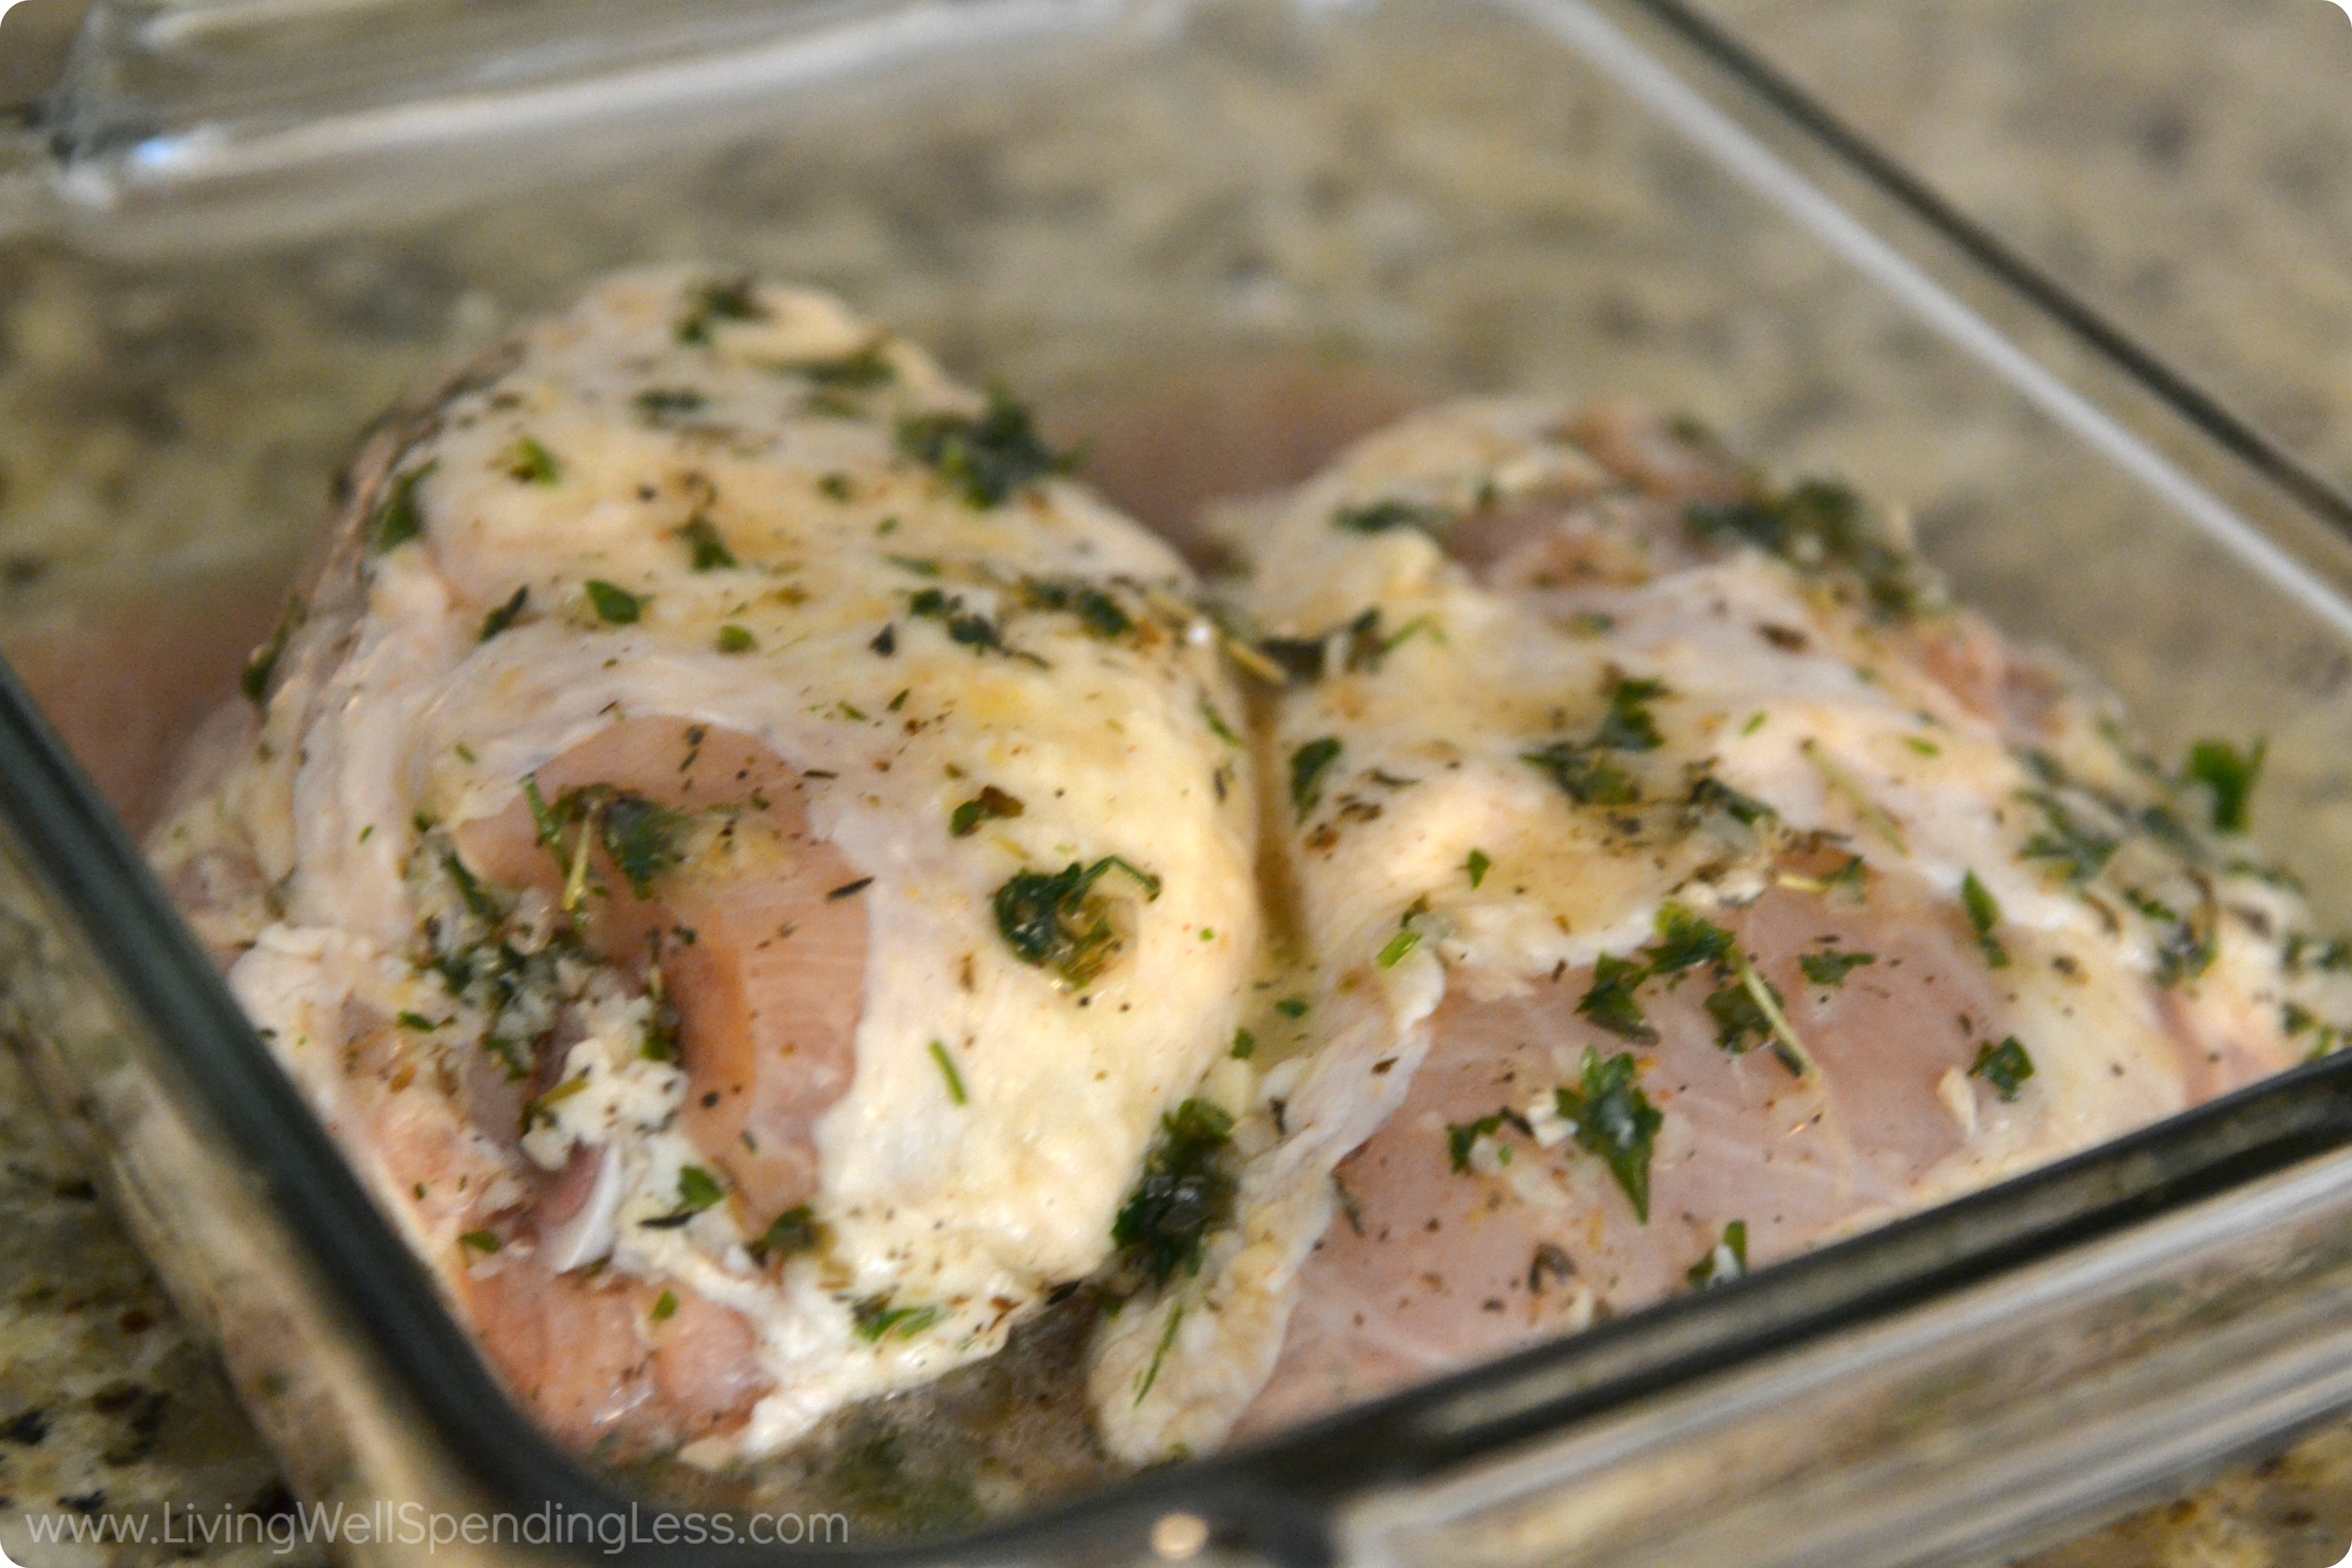
Step 5: Thaw chicken and cook in shallow baking dish. Cover with tinfoil.
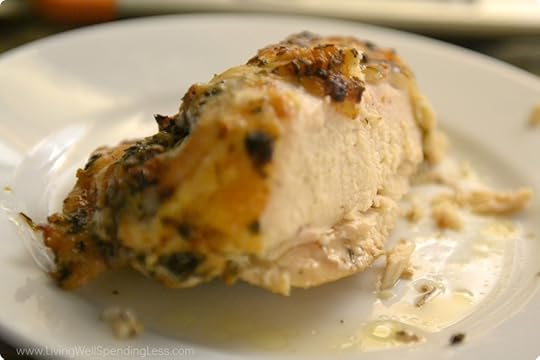
Step 6: Roast at 425 degrees F, if desired baste occasionally with pan drippings, cook for about 45-60 minutes, until meat is fully cooked. Once cooked,plate on a warm platter and spoon pan juices over top.
Tip: To make a complete meal, roast potatoes at the same time you are roasting the chicken. Toss potatoes in olive oil, salt, pepper, oregano and parsley.Roast uncovered on baking sheet.

Print This!
Recipe: Herb Roasted Chicken Breast
Summary: This super flavorful chicken recipe is sure to be a new family favorite!
Ingredients
1 cup olive oil
3 tablespoons dried onion
4 cloves of garlic crushed
2 teaspoons dried thyme
1 teaspoon dried rosemary,crushed
1/2 teaspoon ground sage
1 1/2 teaspoons oregano
2 cups chicken broth
1 1/2 teaspoon season salt
1 teaspoon ground black pepper
1/3 cup fresh parsley, chopped
8 bone-in chicken breasts or thighs, with or without skin
Instructions
Crush garlic.
In a medium size bowl, prepare the basting sauce by combining olive oil, broth, onion, garlic, thyme, rosemary, sage, oregano, salt, pepper & parsley.
Be sure to label bags first then divide mixture into the 2 bags. Then add chicken to bags with basting sauce, massage basting sauce around chicken then freeze
Thaw chicken and cook in shallow baking dish. Cover with tinfoil.
Roast at 425 degrees F, if desired baste occasionally with pan drippings, cook for about 35-45 minutes. Once cooked,plate on a warm platter and spoon pan juices over top.
Tip: Roast potatoes at the same time. Toss potatoes in olive oil, salt, pepper, oregano and parsley.Roast uncovered on baking sheet.
Preparation time: 5-7 minutes
Cooking time: 35-45 minute(s)
Number of servings (yield): 8
* * *
What are your favorite freezer recipes?
Pin It
The post Herb Roasted Chicken Breast appeared first on Living Well Spending Less®.
August 18, 2014
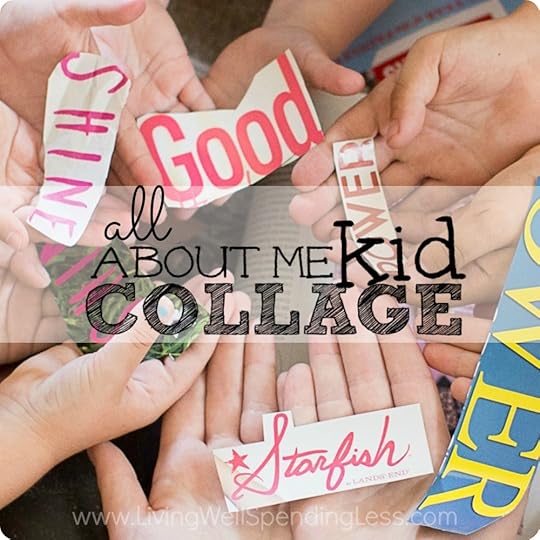
All About Me Kid Collage

This is the last Week of our 12-week Summer Fun with Kids series here at LWSL! Today we are welcoming Michelle & Kira from Sunshine and Hurricanes, who are sharing a mixed-media all about me collage. For more summer fun, check out the overview page.
***
Hey Friends! This is Michelle & Kira from Sunshine and Hurricanes and we’re so excited to share these fun and easy “All About Me” collages. How often do your kids create art that they adore, but that you would rather not hang up all over the house? These mixed-media collages are a great way to solve that dilemma! Your kids will be so proud of their creations because it’s all about them, and you’ll love this project because it’s a great piece of art.

Here is what you need:
9 x 12 Canvases
Assortment of Acrylic Paints
Paint Brushes
A Stack of Old Magazines
Scissors
Mod Podge

Step 1: Have your little artist brain storm ideas about what they would like to paint on their canvas. We used 9×12 canvases but any size would work. Provide pencils, a variety of paints colors and different size brushes.

Step 2: Then have your little artist paint their canvas. Encouraging them to use a multitude of colors or several shades of the same color to help add depth to their paintings. Then set painting aside to dry.

Step 3: It is now time to break out the magazines and scissors. Encourage your little artists to look for positive and descriptive words that they can relate to or that display their likes. You could even have older artists cut out individual letters to spell their names or other words.

Step 4: Once everyone has chosen their words/letters. They can place them where ever they think they would fit best in their original design.

Step 5: It’s time to break out the Mod Podge. Use clean brushes to apply a thin layer of Mod Podge to the canvas and then paint over the word/letter.

Step 6: Then let the canvases dry for a couple of hours. While waiting, find the perfect spot to hang their master piece once dry.

These fun mixed media collages would be a great home school art activity, a first week of school activity or a great rainy day project! Looking for more tips? We have information about How to Save BIG on Craft Supplies or looking for ways to inexpensively Organize Your Kids Keepsakes and Artwork? Check out these posts for some really great ideas!

***** GIVEAWAY *****
And now it is time for another great giveaway! To get you ready for back-to-school, today we are giving away 3 sets of Label Land School/Camp Labels to three lucky winners! These labels are so durable and come in a variety of colors and styles. The School/Camp label set is a $42 value and includes 40 iron-on labels, 30 stick on labels, 14 shoe labels, and 2 bag tags. To be entered to win, simply follow the instructions in the box below.
Sunshine and Hurricanes creators Kira Lewis and Michelle
Myers both live in sunny SWFL and have six kids between them ranging in age from 3 to 12. There they share about the importance of friendship and community where they hope others will find resources for creating fun and purpose in daily life as well as support to get through the inevitable storms.

* * *
Are you ready for your kids to go back to school? Why or why not?
Pin It
The post All About Me Kid Collage appeared first on Living Well Spending Less®.
August 17, 2014
Weekend Wandering


Happy Sunday! I hope you are all having a fabulous weekend! We kicked ours off with a bang on Friday evening with a Lego Friends themed party for my daughter Maggie’s 8th birthday. It was all very last minute–we literally planned it in about 3 days–but it all came together beautifully, and she was as happy as can be! (Check out my Instagram feed for photos!)
As always, I loved checking out all the awesome posts you had to share this week! Here are a few I especially loved:
* * *
First of all, my kids love any food that comes in cupcake form? How adorable are these Mini Shepard’s Pies from Cincy Shopper?

Next, these Hawaiian Pork Sliders with Slaw & Island Sauce from A Mother’s Shadow look SO full of flavor!

Now on to some sweeter dishes… These Rocky Road Blondies with Cream Cheese Glaze from This Silly Girl’s Life would be a perfect lunchbox treat!

This next recipe is totally speaking my love language! The Savvy Saving Couple helps you create your very own Starbucks Iced Caramel Snickers Frappuccino at home. YUM!

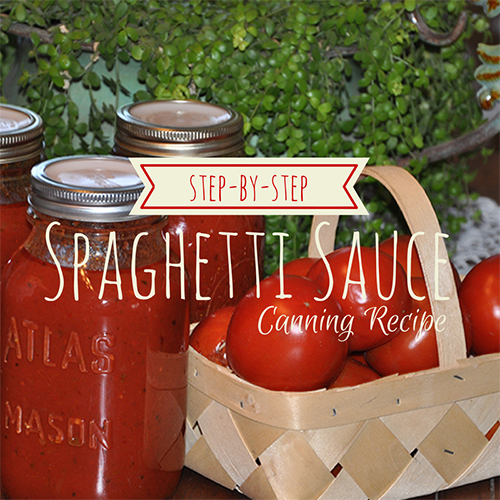
Got an abundance of tomatoes in your garden this year? Learn the family secret to canning your own Spaghetti Sauce from Our Simple Life. Easy to follow step-by-step directions along with instructional photos.
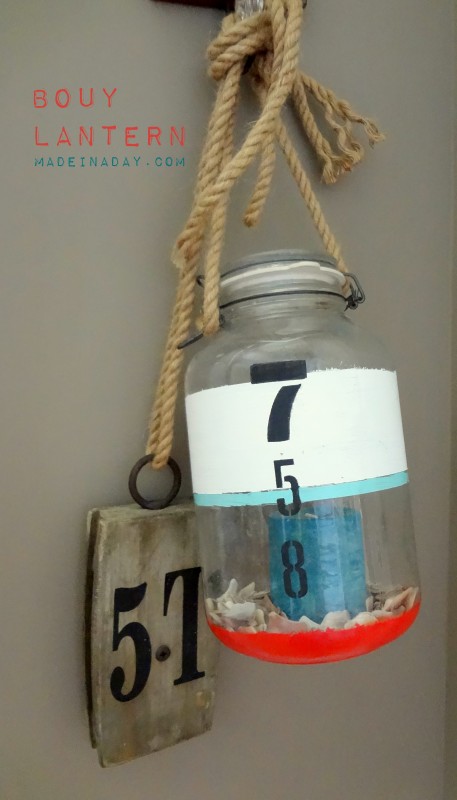
Moving on to some DIY……I absolutely love nautical accents for the home. This DIY Buoy Lantern from Made in a Day is super cute!
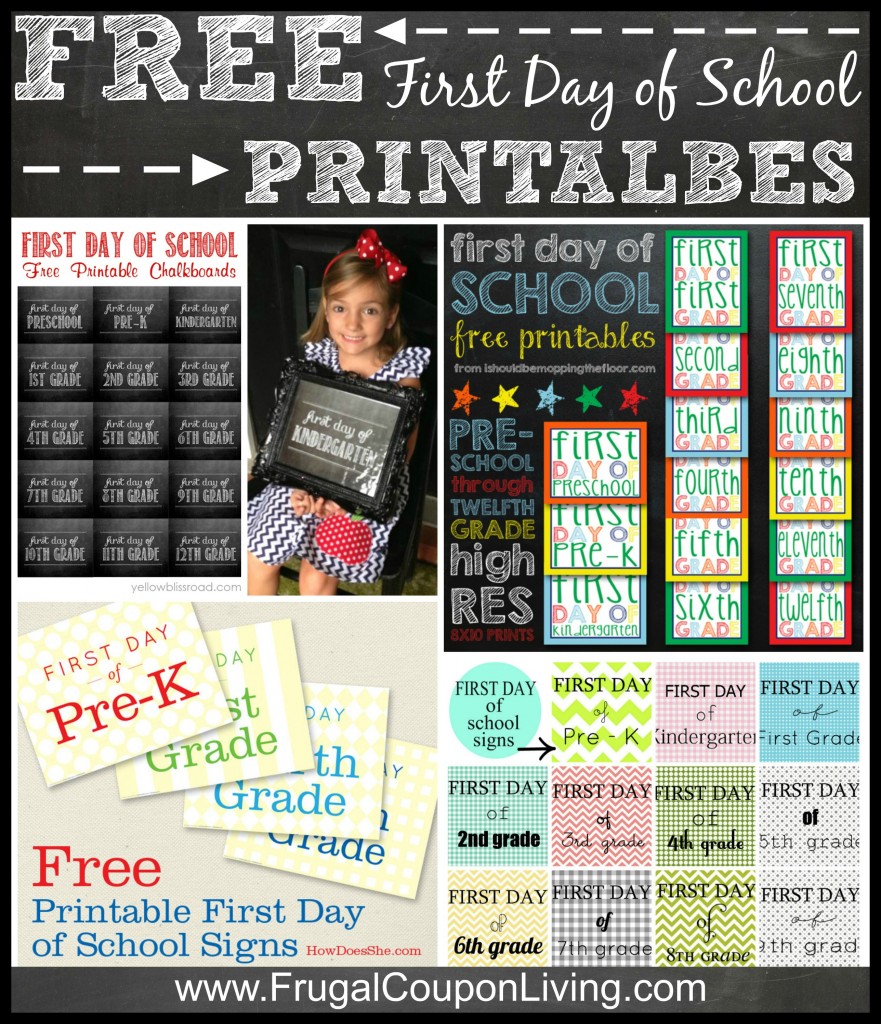
These free First Day of School Printables from Frugal Coupon Living are available in 4 different styles. Can you guess which style I plan to print? 
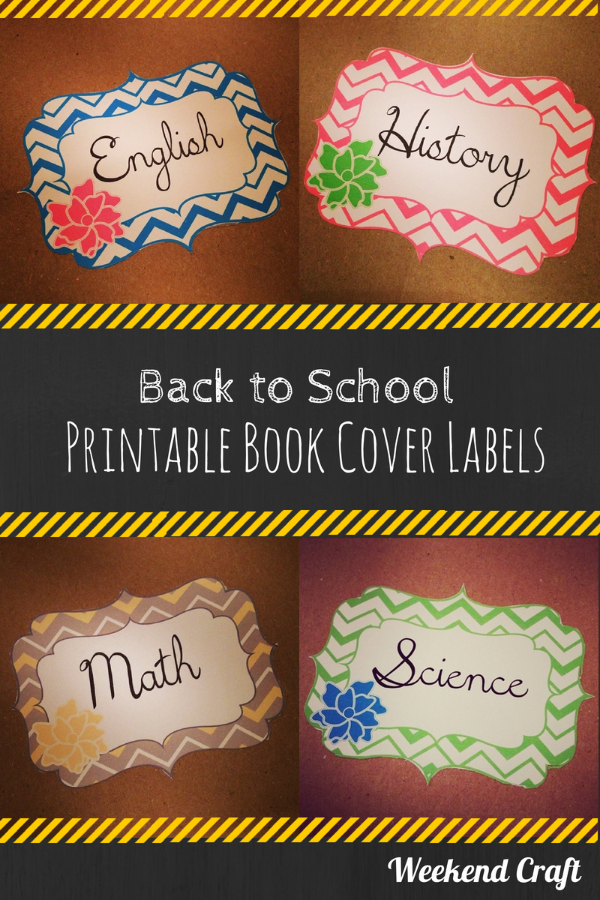
Weekend Craft has Printable Book Cover Labels to give those books some style. So adorable!
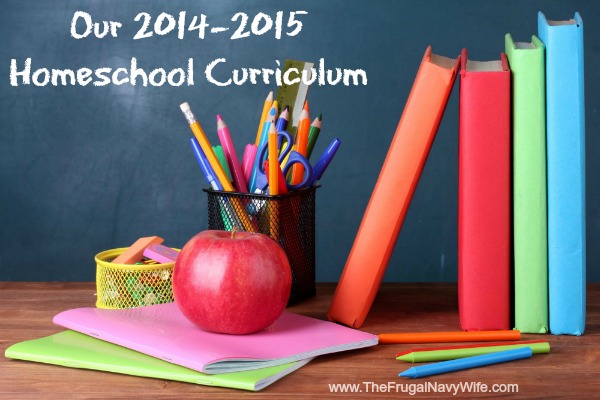
Starting a new homeschool adventure & still not quite sure what to teach? The Frugal Navy Wife is sharing her 2014-2015 Homeschool Curriculum including age appropriate lessons and great plans for virtual field trips!
Looking to save money during the next several months? Four Hats and Frugal has 3 Frugal Must Do’s for Back to School savings!

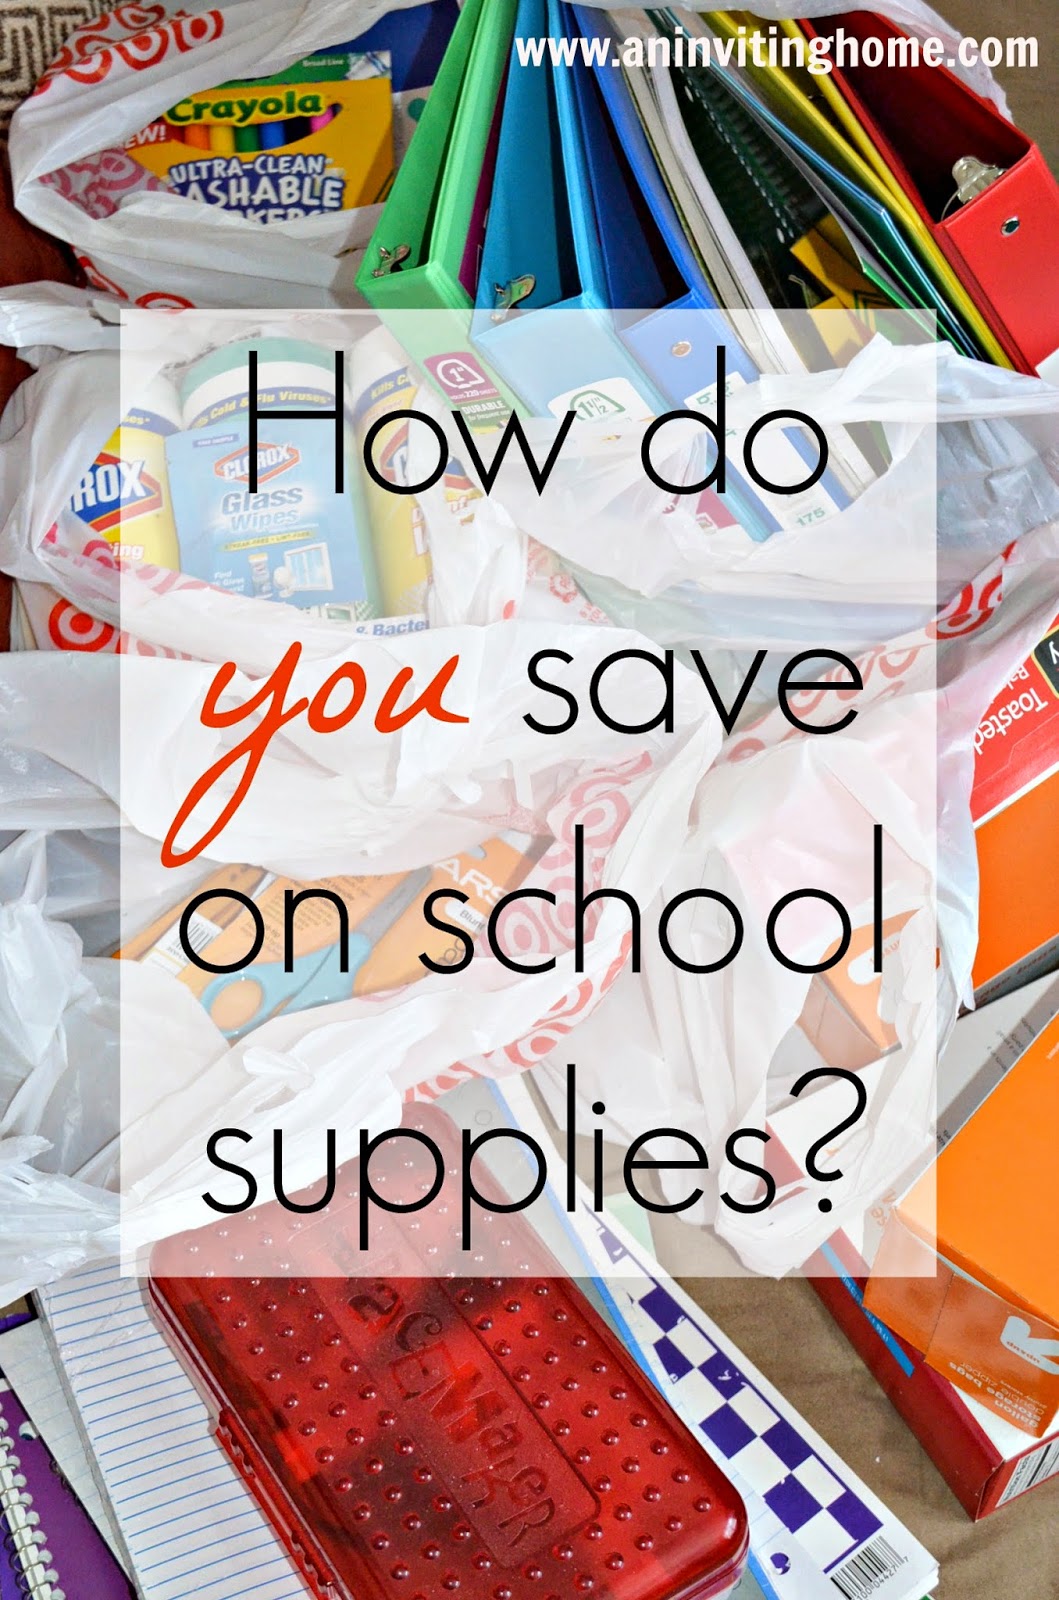
Sarah from An Inviting Home is looking for your advice on Budgeting for Back to School Supplies.
Decorating a home can also be costly! But Little Bits of Granola has 5 Easy and Budget Friendly Ways to Give a Room a Facelift (without painting). Tip number one is so clever!

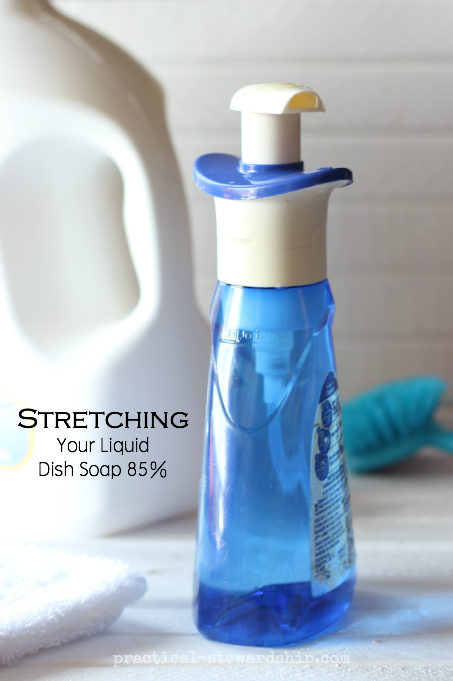
Practical Stewardship has tips for Stretching Your Liquid Dish Soap by 85%. In turn saving you money!
Finally, a new school year can bring lots of emotions for both kids and parents. Why I’m Not Excited School is Starting from Sunshine and Hurricanes tells the story of one mom’s back to school blues.

* * *
What did you love this week?
Pin It
The post Weekend Wandering appeared first on Living Well Spending Less®.
August 15, 2014
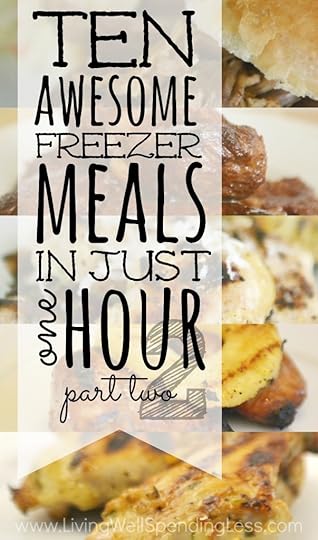
10 Freezer Meals in One Hour 2


A few months ago I shared my first 10 Freezer Meals in One Hour plan, which included 5 great recipes that could be prepared together in about sixty minutes to make TEN separate meals. It was a huge hit, not only with my own family, but with many of your families as well!
At this point I am pretty much hooked on easy recipes that taste great and don’t take a lot of time, effort, or expensive ingredients to throw together, and that can be made and frozen ahead of time to save time on hectic weeknights. My goal is to spend less time in the kitchen, not more, but I still want to be able to provide tasty meals that my family loves!
I am excited to share this no-bake version of 10 Meals in an Hour, which includes five awesome warm weather recipes that are cooked either on the grill or in the crockpot—no oven required! (Of course, if you would rather use the oven than the grill, that is always an option—you can generally just bake your chicken covered at 400 degrees for 25 minutes to get the same results!)

In order to make the cut this time, each recipe had to meet ALL of the following criteria:
Deemed delicious by both my kids and husband
No pre-cooking required
Freezer friendly
Easy to cook
Uses budget-friendly ingredients and pantry staples
No oven required on cooking day
In this one post you will find everything you need to prep 10 awesome freezer meals in about an hour of hands-on time (not including grocery shopping.)
Once again, in just one quick Saturday morning session you could have almost two weeks worth of absolutely delicious, family-friendly meals all ready to go!
Before you begin, you will need to gather your tools & supplies and also make sure that you have all your groceries on hand. I find it is easiest to go grocery shopping the day before I do my cooking. To save time unloading, only put away the items that need to be refrigerated. Finally, make sure your kitchen counters are cleared of clutter and sanitized and empty your dishwasher and sink of any dishes. (Check out this post for more tips on freezer cooking like a pro!)
Here are the five recipes we will be making:
Coconut Lime Chicken
Easy Slow-Cooked Ribs
Easy Honey Dijon Chicken
Easy Freezer Pulled Pork
Hawaiian Chicken

Here are the supplies you will need:
10 gallon size zipper freezer bags
labels or permanent marker
large mixing bowl
cutting board
sharp knife
garlic press
can opener
dry measuring cups
liquid measuring cups
dry measuring spoons
liquid measuring spoons
12 inch frying pan
stand or hand mixer
Here are the ingredients you will need:
Produce
12 cloves garlic
4 limes
Fresh parsley (optional)
2 sweet onions
Fresh pineapple (optional)
Bread
Hamburger Buns or Rolls (not needed until time to serve)
Pantry Staples
Honey
Olive oil
Seasoned salt
Salt
Black pepper
Cayenne pepper
Ground ginger
Ketchup
Worcestershire sauce
Cider vinegar
Garlic powder
Ground mustard
Barbecue sauce
Teriyaki sauce
Soy sauce
Brown sugar
Pineapple Rings (optional)
Canned/Dry Goods
Dijon mustard
1 can coconut milk
Liquid smoke (optional)
2 cans root beer
1 cup pineapple juice
Meat
10-12 pounds boneless, skinless chicken thighs or breasts
4 pounds pork ribs
2-2-3lb pork shoulders (butts)

Be sure to print the following pages before getting started:
Printable labels (designed to work with Avery 8163 shipping labels)
Printable Shopping List
Printable Prep & Prepare Instructions
Be sure to also print the following recipes:
Coconut Lime Chicken
Easy Slow-Cooked Ribs
Easy Honey Dijon Chicken
Easy Freezer Pulled Pork
Hawaiian Chicken

PREP
Prep your bags—either print labels using these ready-made printable labels or use a permanent marker to label each bag with the name of the recipe, date prepared, and cooking instructions. DO NOT SKIP THIS STEP! While you might think that you’ll remember what is in every bag, I promise you will forget!
Chop onion and set aside
Peel garlic and set aside, (or mince if not using garlic press, then set aside.)
Prep chicken if necessary
PREPARE
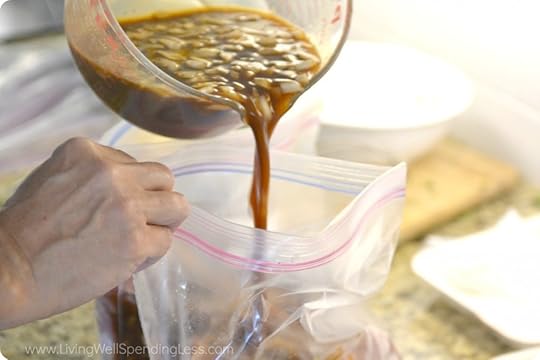
Prep Easy Crockpot Pulled Pork using instructions found here . (Use 1 cup of chopped onion.) Place pork into 2 freezer bags and cover with sauce, then press out excess air and seal well. Place bags in refrigerator.
Prep Easy Crockpot Ribs using instructions found here . Place meat into 2 freezer bags and cover with sauce, then press out excess air and seal well. Place bags in refrigerator.
Prep Honey Dijon Grilled Chicken using instructions found here . (Use only 1 cup of the already chopped onion.) Divide meat into 2 freezer bags, cover with marinade, press out excess air, and seal well. Place bags in refrigerator.
Prep Hawaiian Chicken using instructions found here . Place chicken into 2 freezer bags and cover with marinade, then press out excess air and seal well. Place bags in refrigerator.
Prep Coconut Lime Chicken using instructions found here . (Add any leftover onion to marinade, if desired.) Place chicken into 2 freezer bags and cover with marinade, then press out excess air and seal well. Place bags in refrigerator.
* * *
Have you tried making 10 meals in an hour yet? What tricks or tips can you share?
Pin It
The post 10 Freezer Meals in One Hour 2 appeared first on Living Well Spending Less®.
August 14, 2014
Thrifty Thursday {Week 73}
Happy Thursday! I hope you are all having a fabulous week! I don’t know about you, but I seriously can’t believe that summer is almost over! My girls go back to school next week Thursday, but not before we celebrate my oldest daughter’s 8th birthday this weekend. She wants a Lego Friends theme which has been surprisingly challenging! If you’ve got any fun ideas, please let me know!

In other news, I am excited to let you know that How to Blog for Profit (Without Selling Your Soul) is now available in paperback on Amazon.com! This expanded 2nd edition contains about 30% more content than the previous version, including a lot more information on Facebook, Pinterest, and a whole new chapter on creating a business plan for your blog. As much as I love the convenience of a Kindle, there are definitely some books that are better in paperback. This is is definitely one of them!
Here are the most clicked links from last week:
1. Family Balance Sheet { Debt Free Stories: Meet Krista & Jon }
2. The Latina Homemaker { 7 Reasons You Keep Over Spending }
3. Taylor-Made Ranch { Decluttering Your Home & KEEPING it Decluttered! }
4. Snail Pace Transformations { 5 Yard Sale Finds Worth Reselling for Profit on eBay }
5. The Budget Mama {No Spend Challenge-Update #5}
6. The Beautiful Useful Project { Five Easy to Form Habits That Will Save You Money }
7. Born Free { How We Reduced Our Spending by $23,537 in a Year }
8. Purposely Frugal { 5 Frugal Things }
9. Laura Sue Shaw { 3 Habits for a Better Day }
10. Simplee Thrifty { What to Buy in August }
Never linked up before? Here’s how:
Scroll down, find the little blue “Add your Link” Button and click on that.
Follow the instructions on the next page – add a great image of your project and an interesting title. Make sure you link to the direct page of your budget friendly post – not the main page of your blog!
Try to visit at least a few other blogs at the party. Be sure to leave a comment to let them know you stopped by!
Please link back to this post somehow. There are badges available here; a simple text link is just fine too.
Feel free to tweet about Thrifty Thursday so others can join the fun, and don’t forget to check back here Sunday morning to see which posts have been featured this week at Weekend Wandering!
If this is your first time here I also invite you to check out my blogging guide, How to Blog for Profit (Without Selling Your Soul). It is a fantastic resource if you are interested in building your blog, getting more traffic, or learning how to monetize. Or, if you have read the book and are still looking to take your blog to the next level, I encourage you to check out Elite Blog Academy.
An InLinkz Link-up
Pin It
The post Thrifty Thursday {Week 73} appeared first on Living Well Spending Less®.
August 13, 2014
Grandma’s Sloppy Joes

 Does your family have any famous recipes that have been passed down through the years? These oh-so-easy Sloppy Joes were my grandmother’s specialty, and although she has been gone for ten years, I still can’t make this recipe without thinking of her and our Sunday afternoon family gatherings. I love that they have now become a favorite for my own family!
The original recipe calls for ground beef but I make it vegetarian friendly (and much lower in calories) by using vegetarian crumbles instead–it is delicious either way! I like serving it with some store-bought coleslaw on the side, but that is just a personal preference. The recipe whips up fast with just a few basic ingredients, and makes enough to feed a crowd. It also freezes beautifully which makes it the perfect recipe to include as part of a freezer cooking day, or simply divide it into bags to eat some now and save some for later!
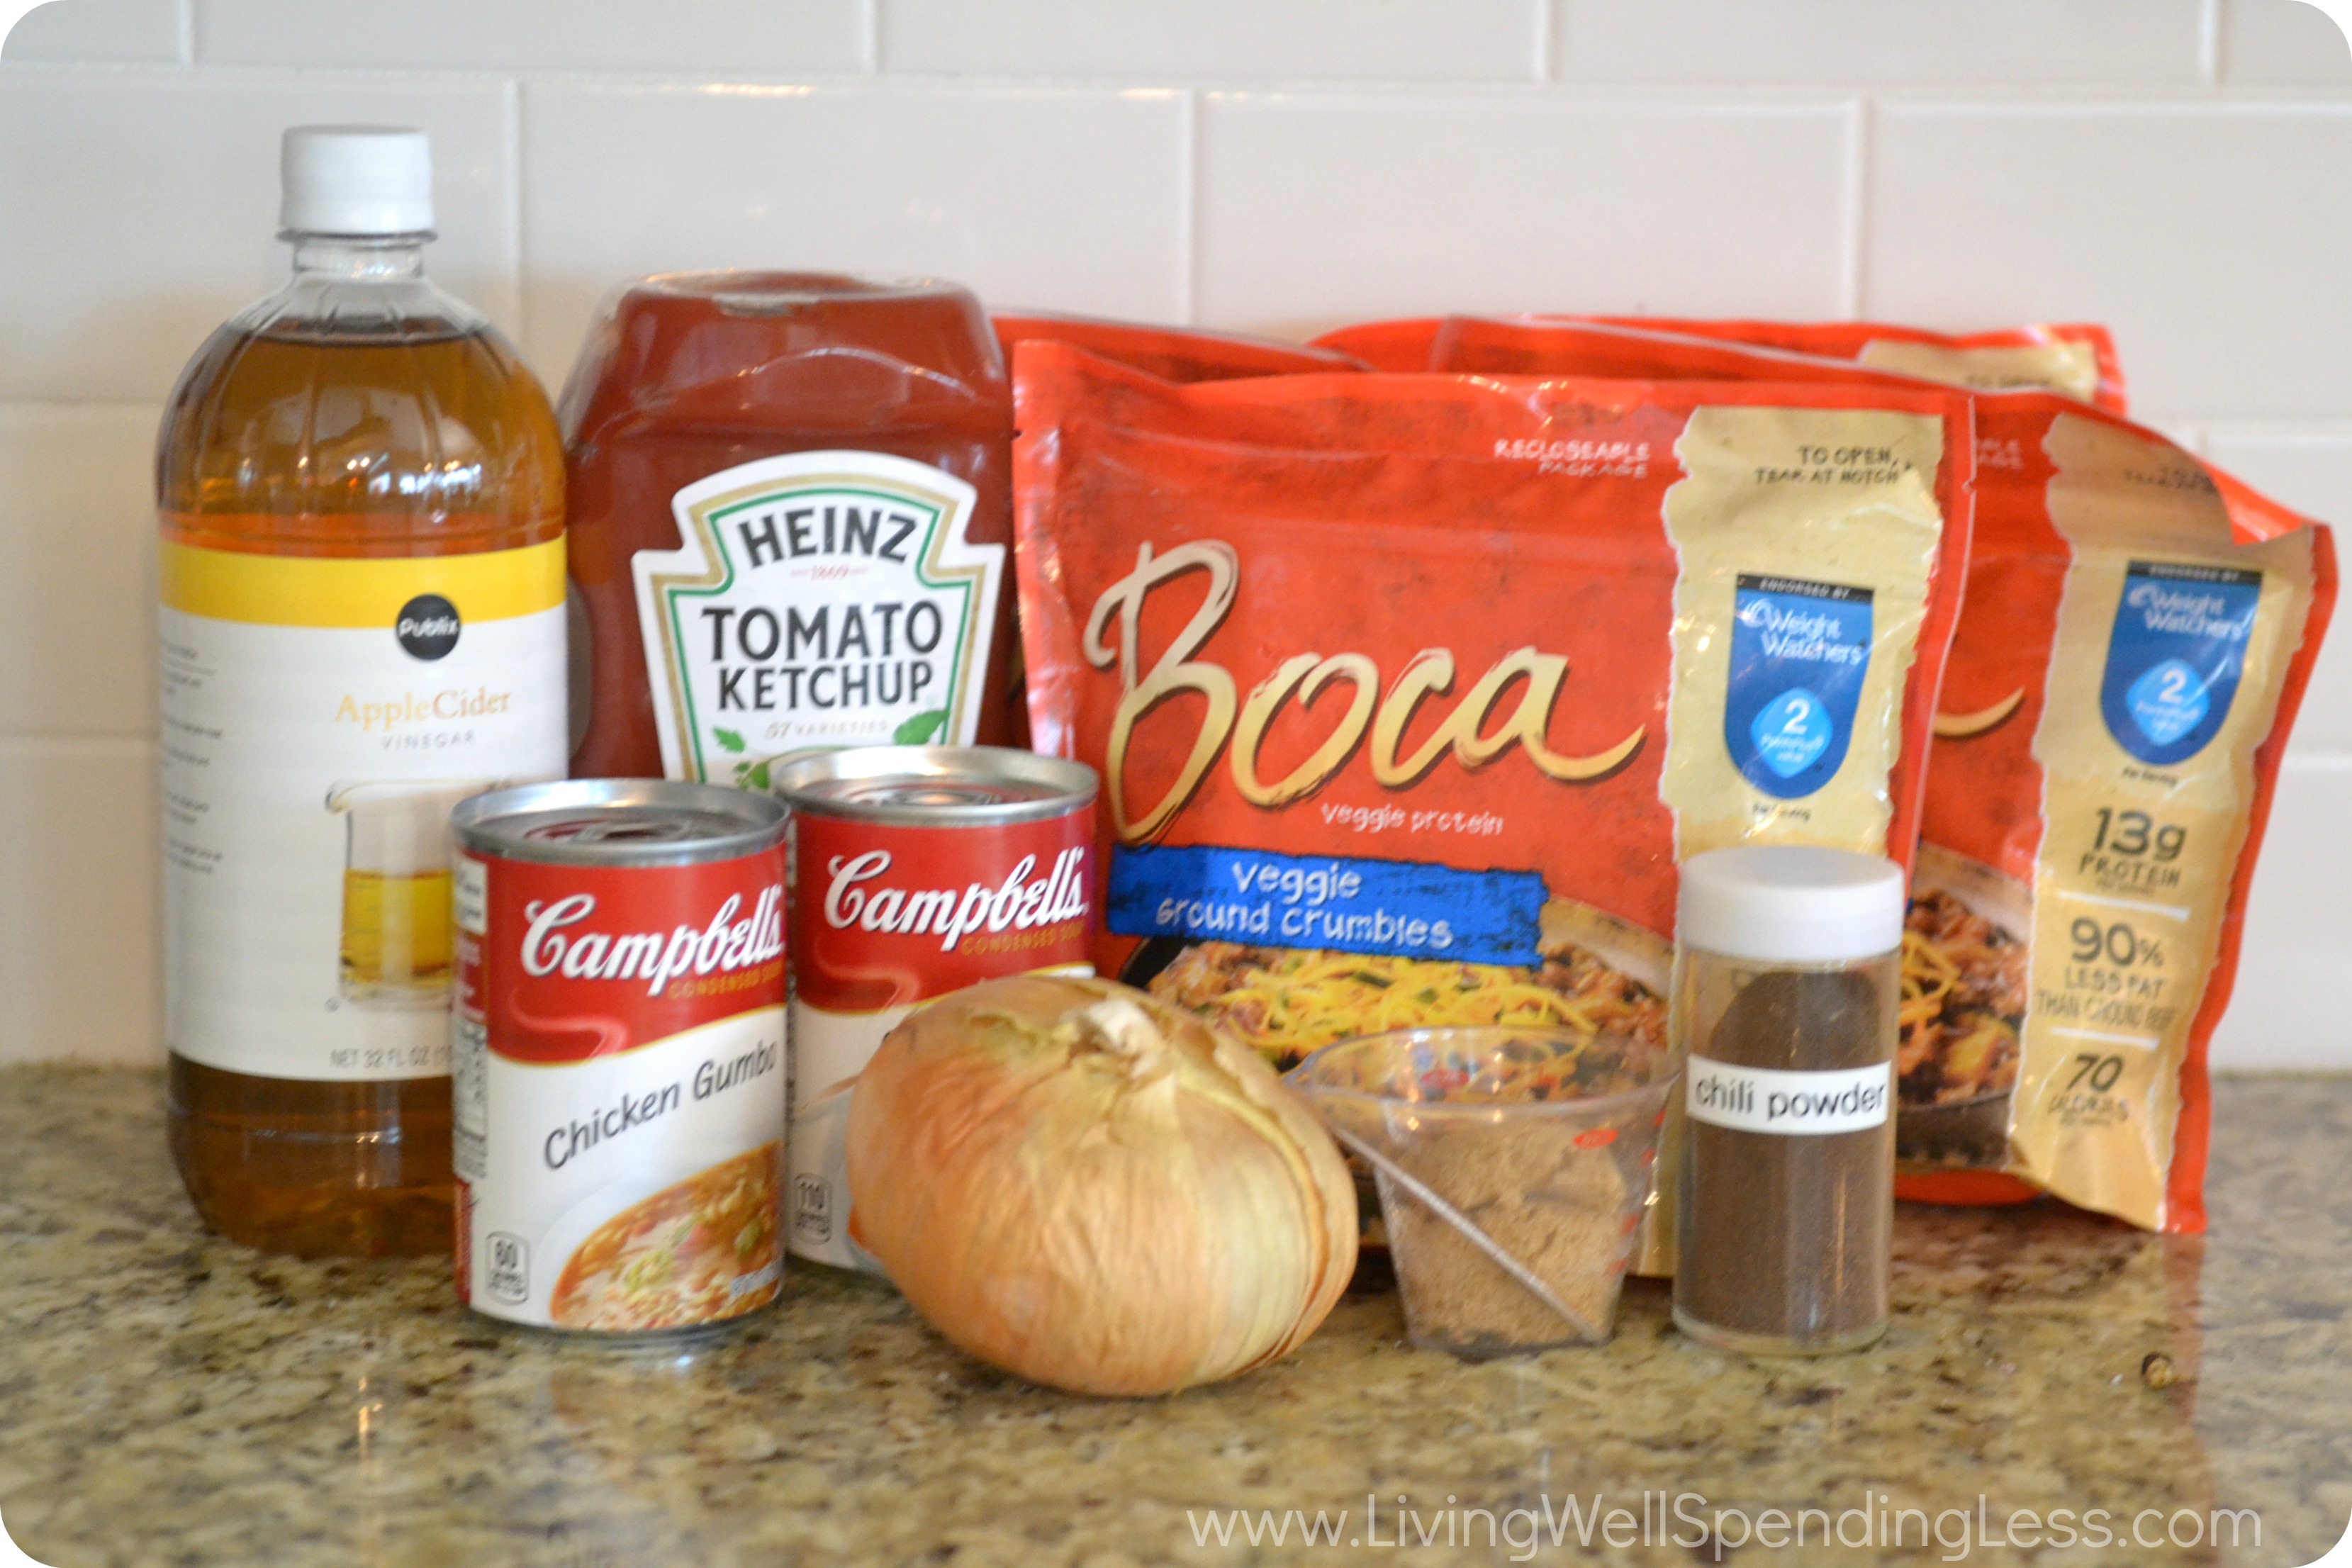
Here is what you need:
4 lbs ground beef or vegetarian crumbles
1 can chicken gumbo soup
1 or 2 cans tomato rice soup
1 large onion
1 1/2 tablespoons chili powder
2 tablespoons brown sugar
2 tablespoons apple cider vinegar
1 cup ketchup
deli coleslaw (optional)
Hamburger buns

Step 1: Chop onions.

Step 2: Brown ground beef ( or vegetarian crumbles) and then set aside.

Step 3: Whisk together soups, brown sugar, chili powder, vinegar and ketchup. If you are making the vegetarian version, you can skip the chicken gumbo and double up on the tomato rice instead.

Step 4: Add chopped onions and whisk well.
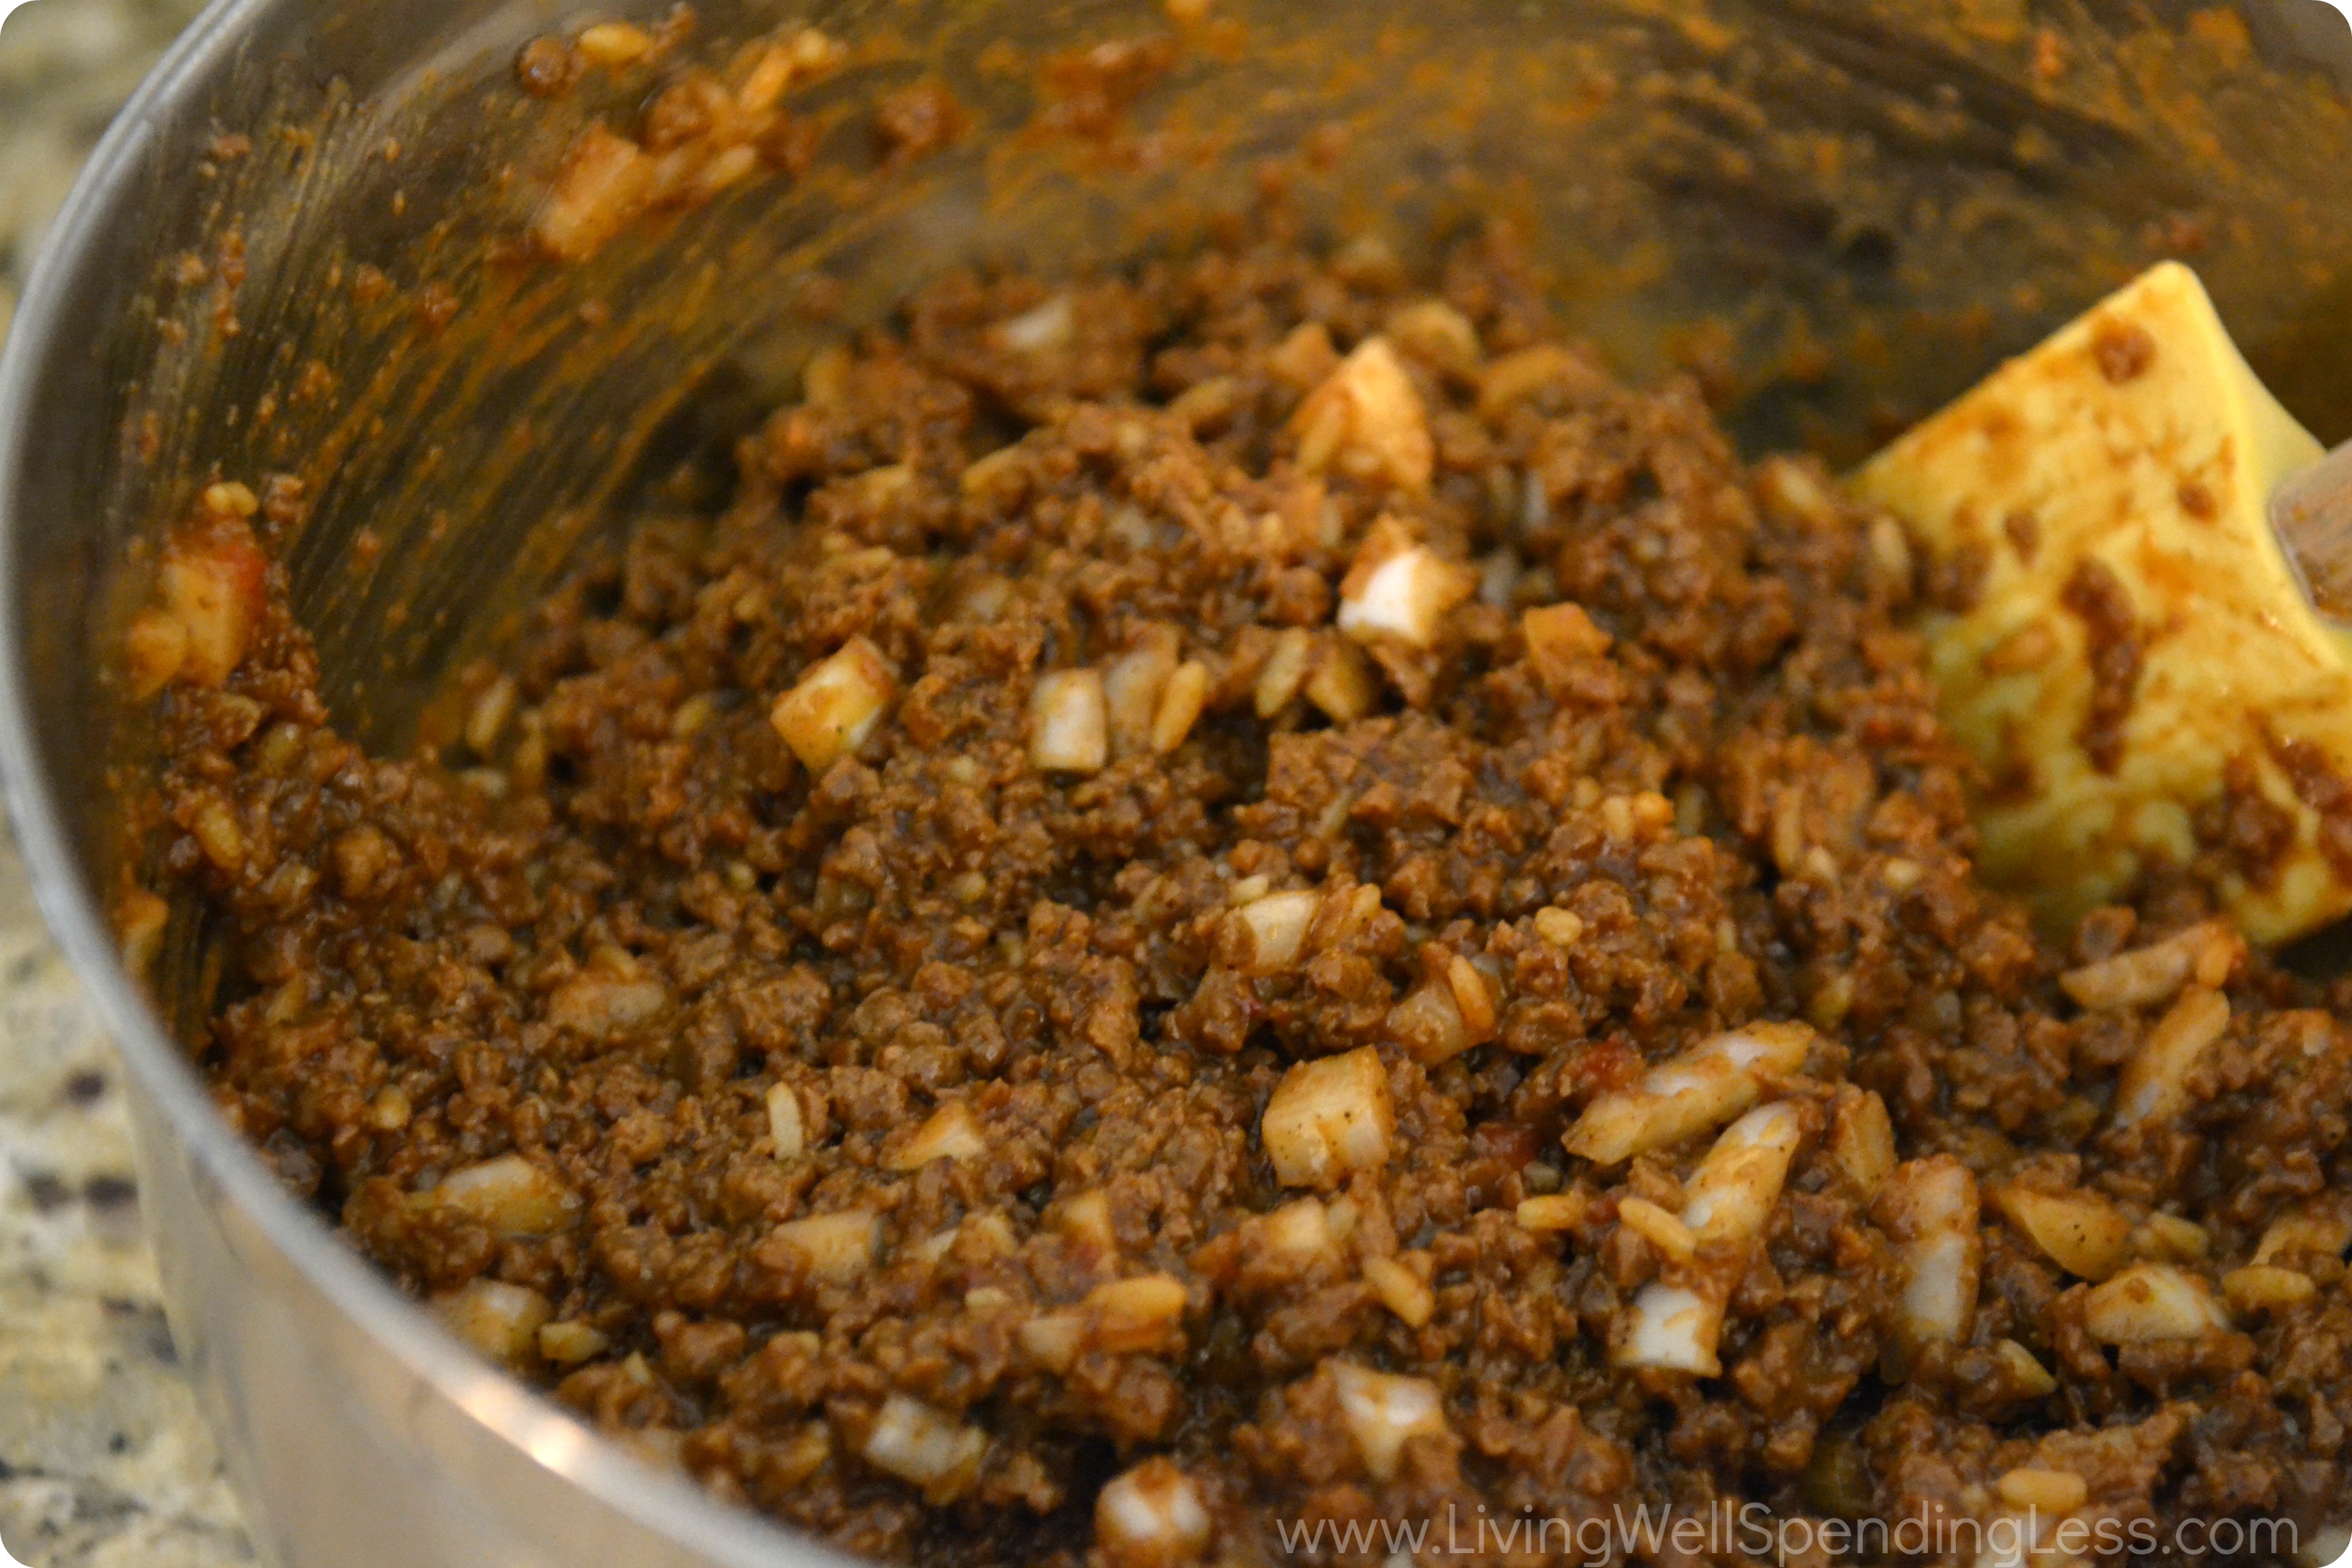
Step 5: Then add ground beef ( or vegetarian crumbles) and mix well.
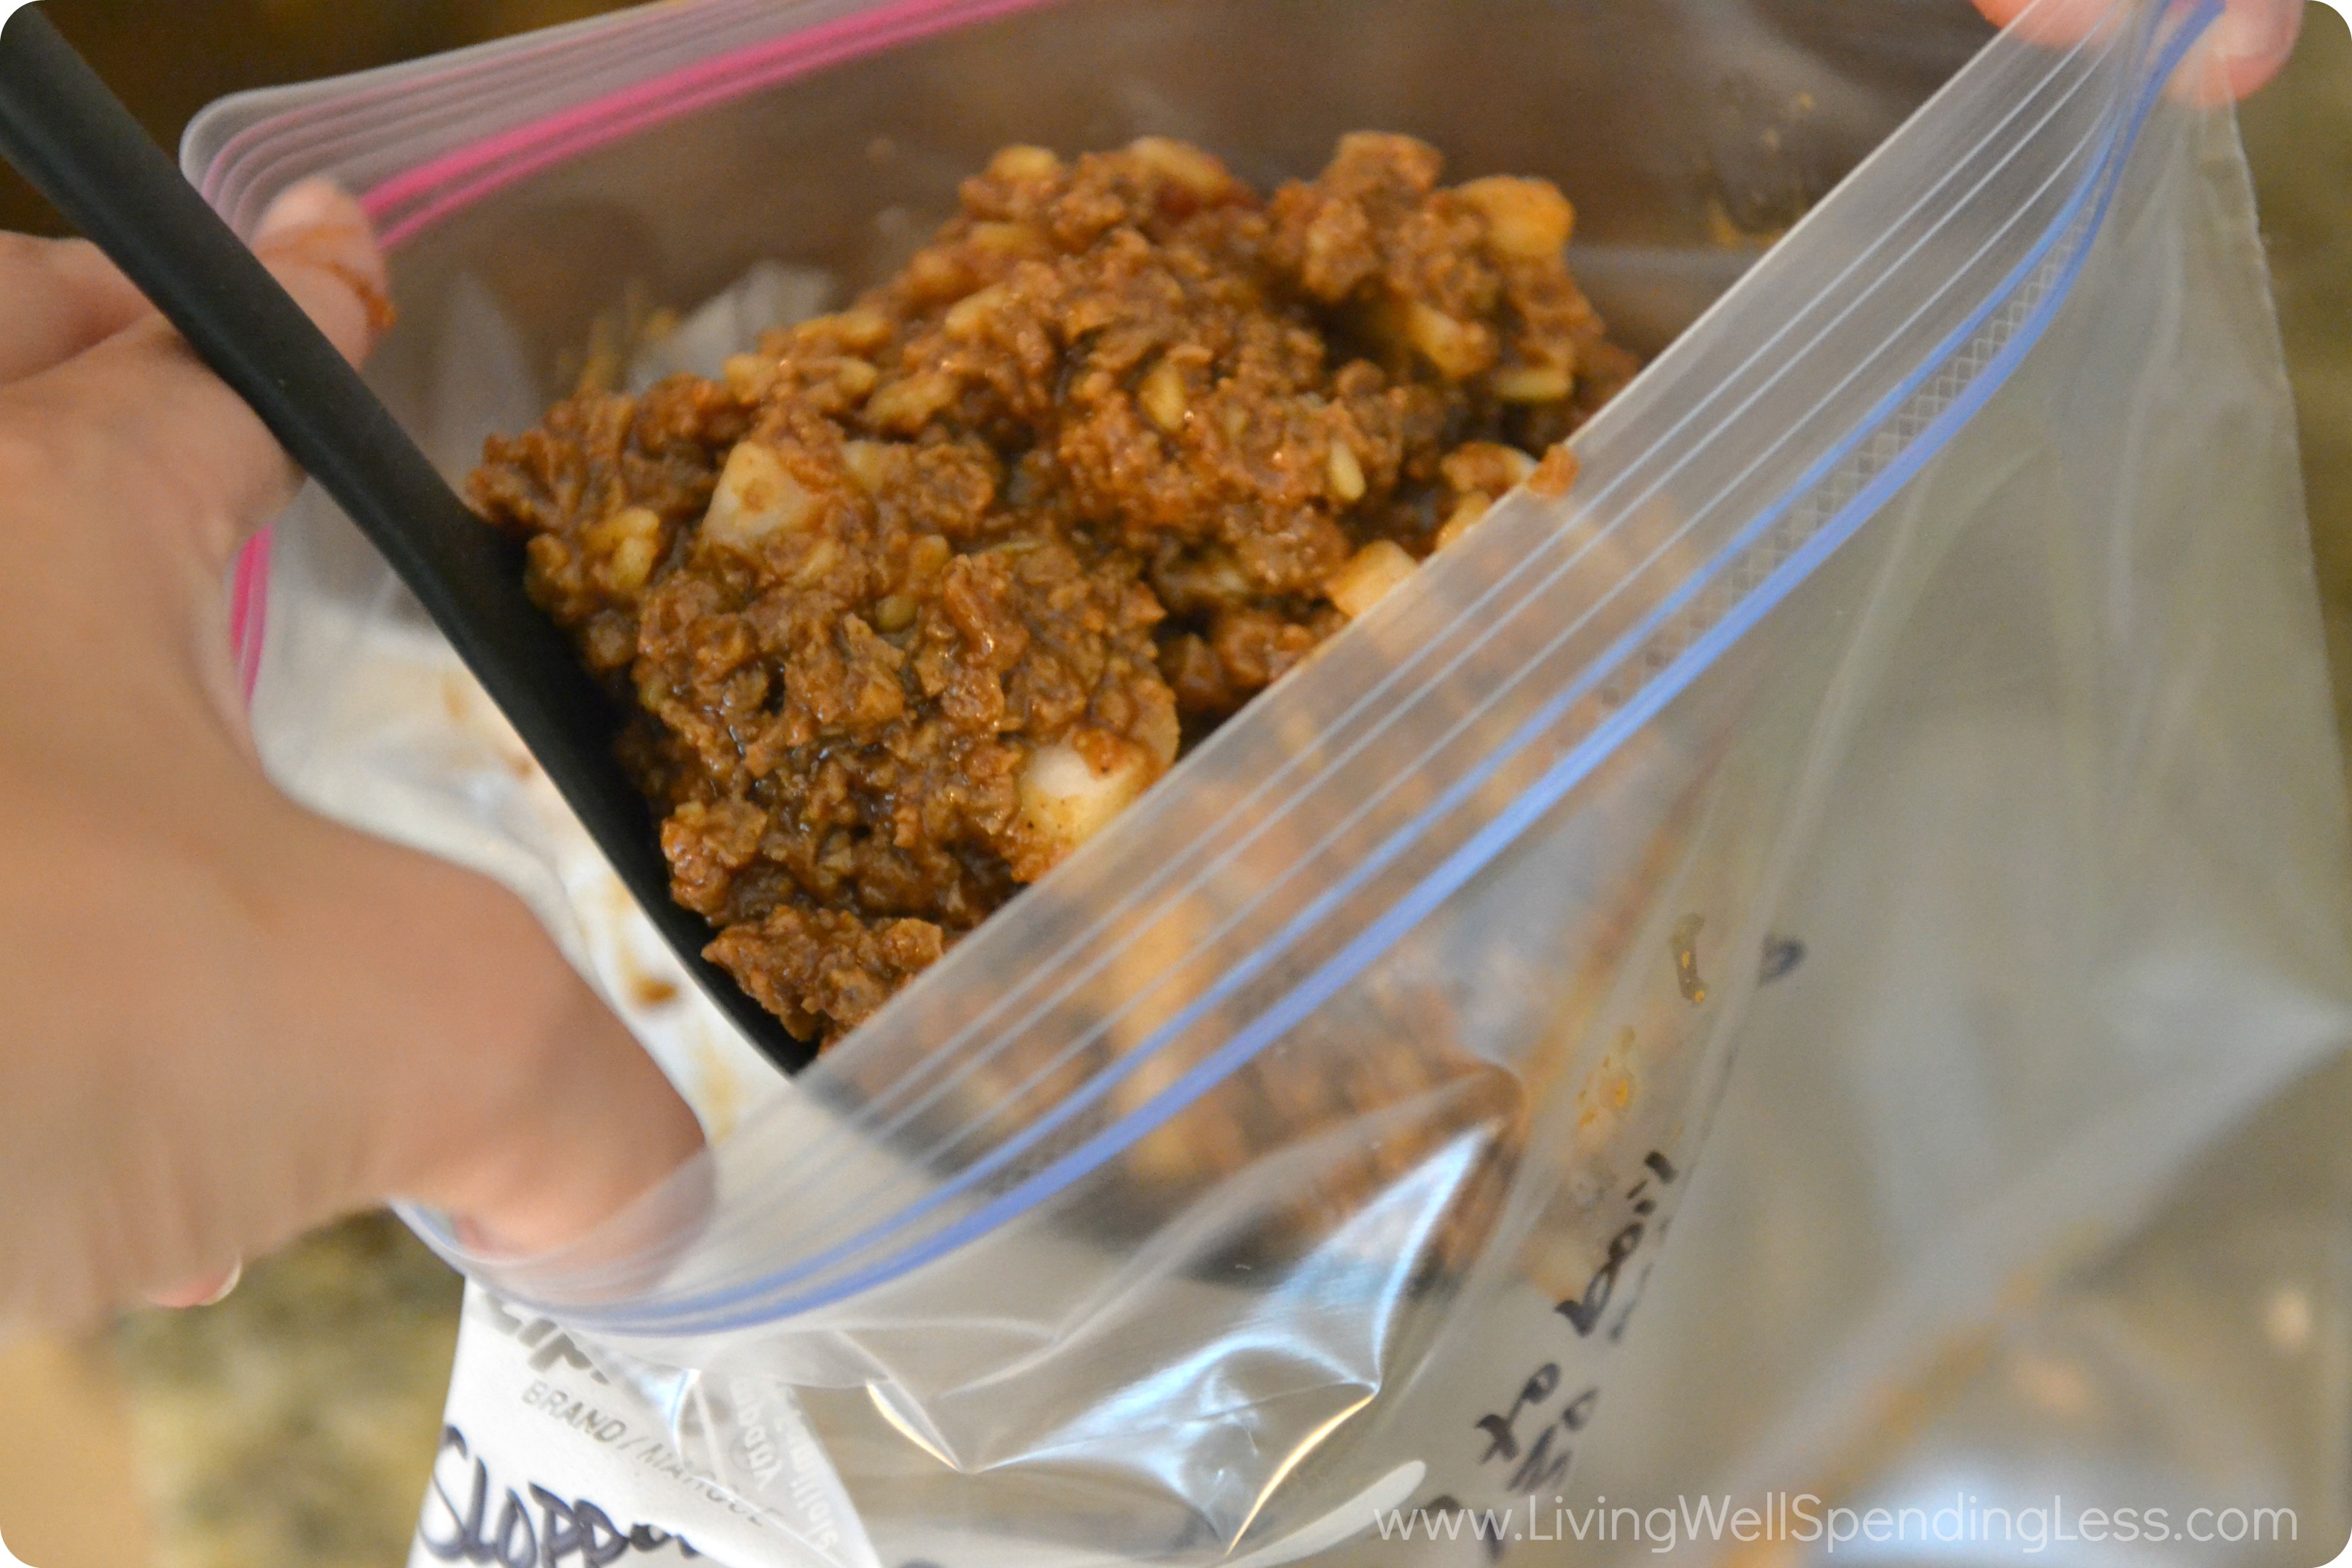
Step 6: Label freezer bags and then divide mixture into 2 bags.
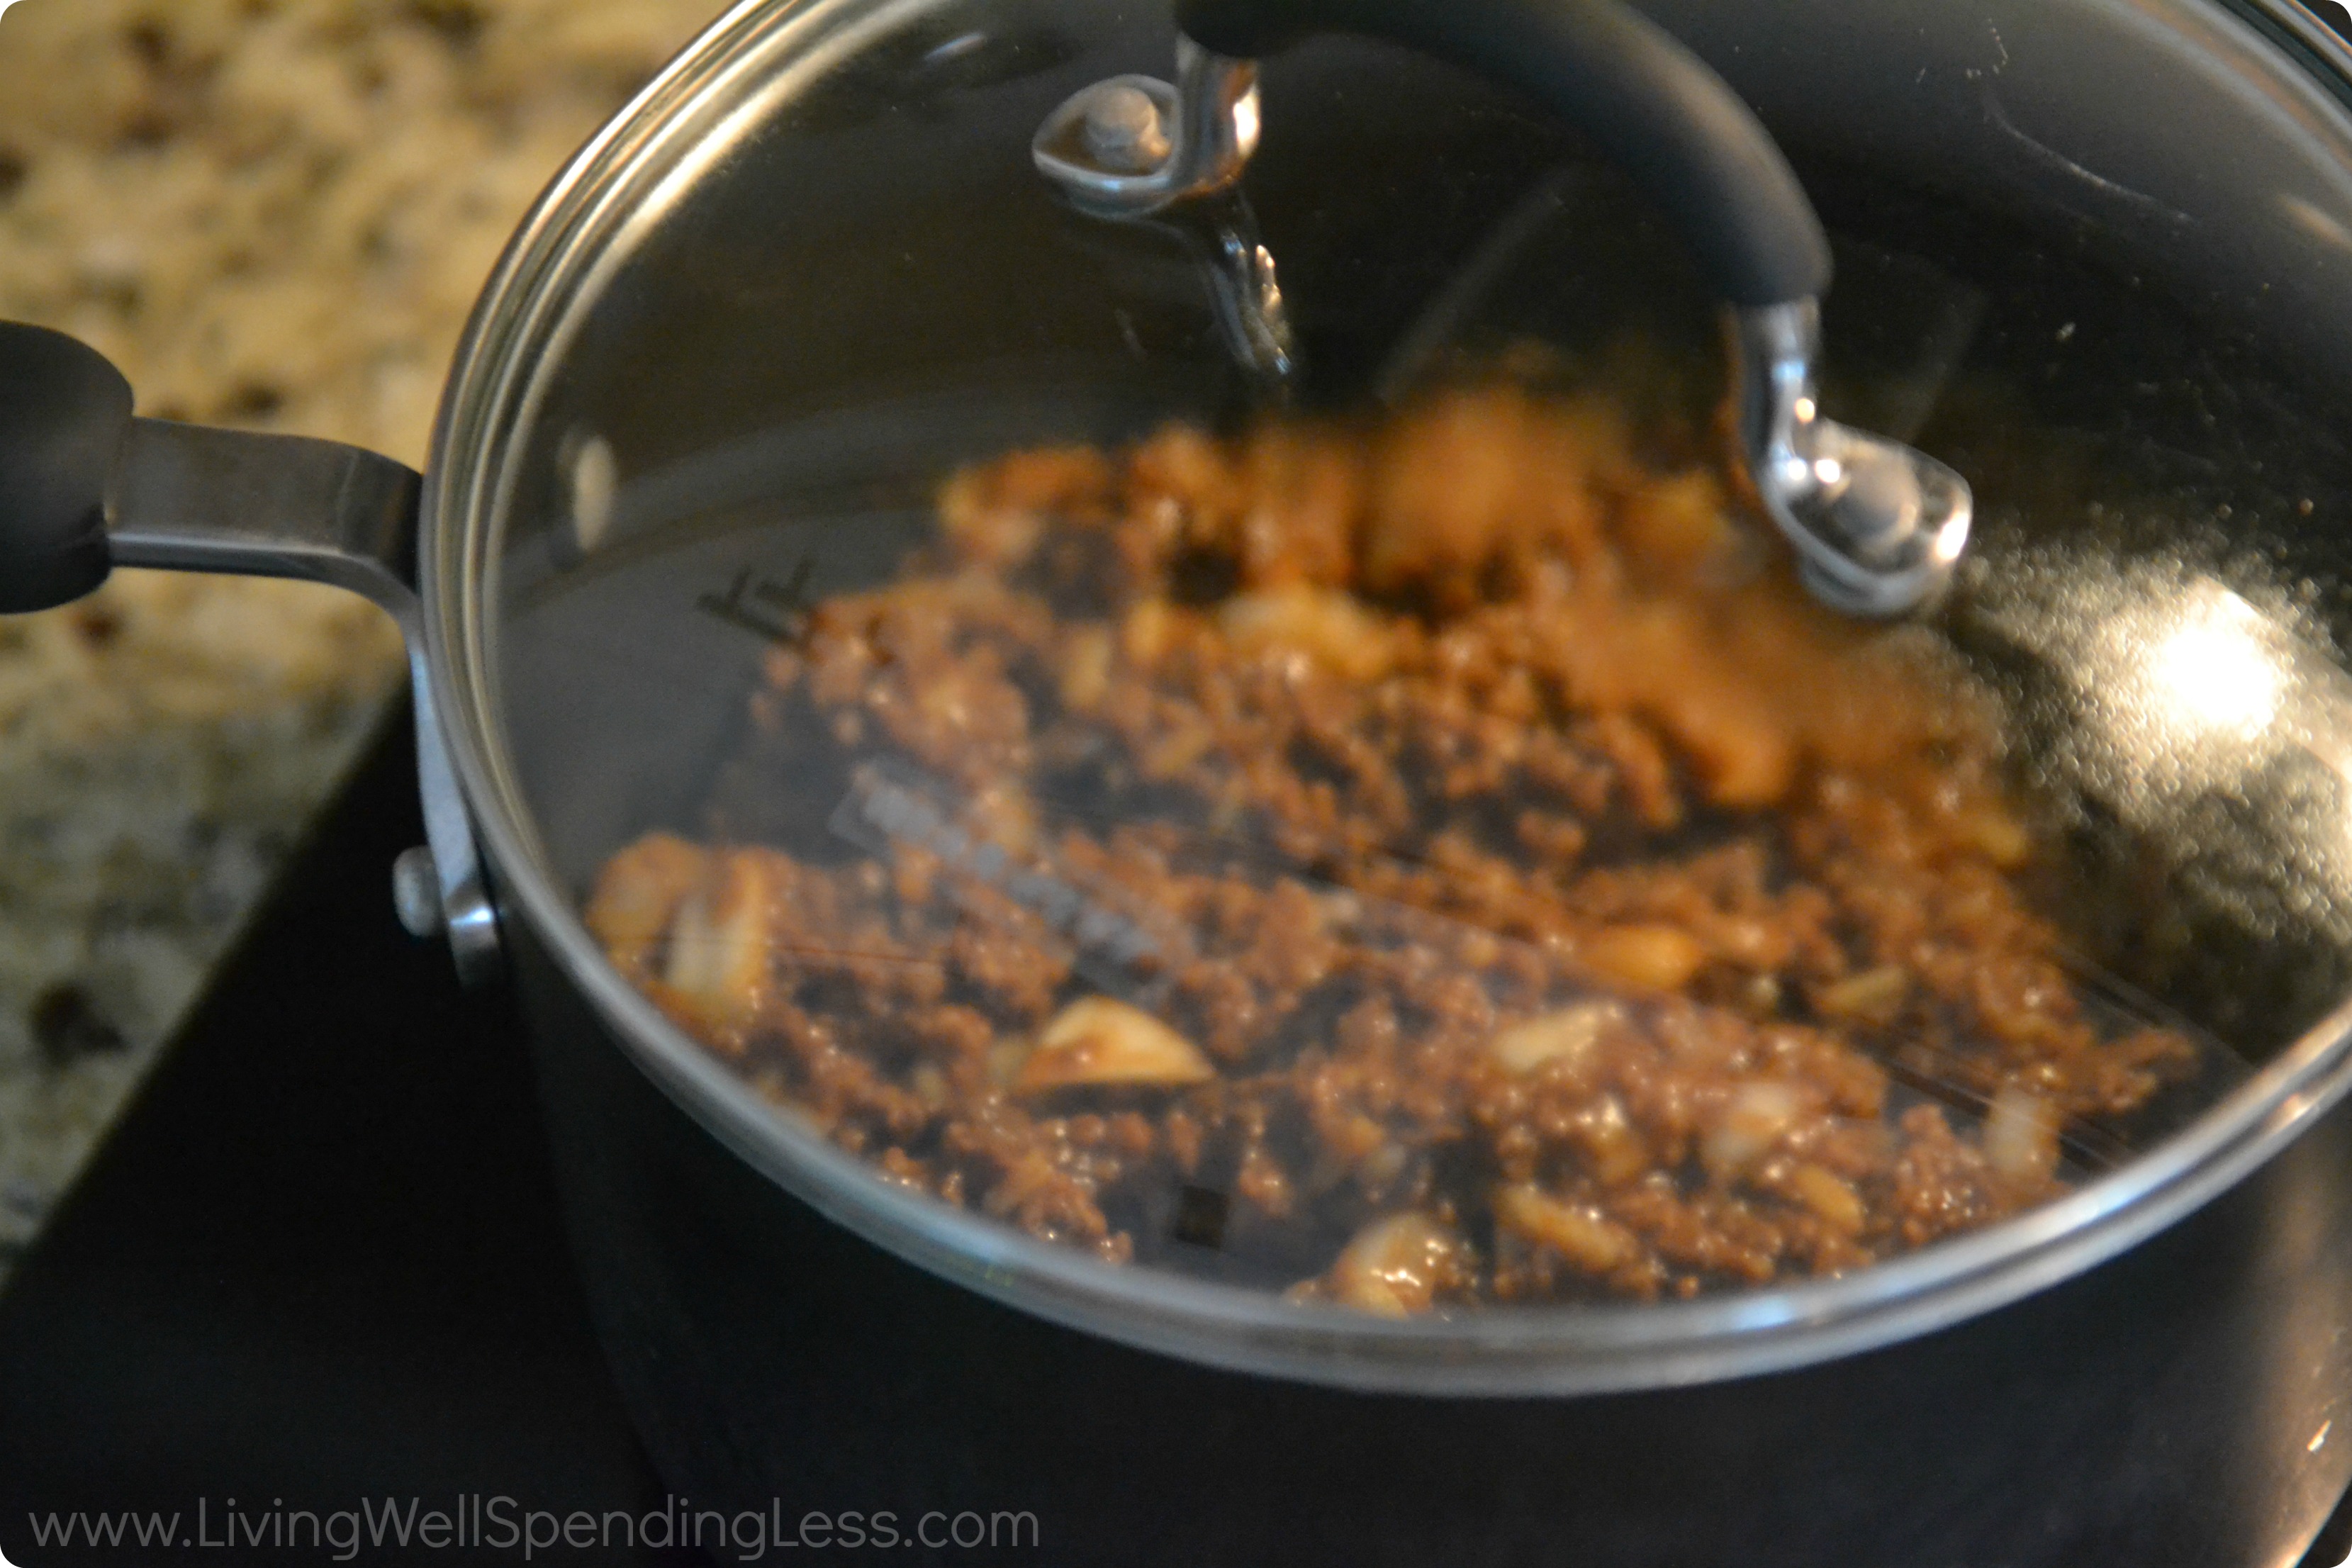
Step 7: Let thaw, heat mixture on stove-top, let it come to a boil then lower and simmer for 30-45 minutes or heat on low in crock-pot for 3-4 hours.

Print This!
Recipe: Grandma’s Sloppy Joes
Summary: This is my Grandma’s recipe and brings back such great memories. This will soon be your family’s new favorite as well!
Ingredients
4 lbs ground beef or vegetarian crumbles
1 can chicken gumbo soup
1-2 cans tomato rice soup
1 large onion
2 tablespoons brown sugar
1 1/2 tablespoons chili powder
2 tablespoons apple cider vinegar
1 cup ketchup
Instructions
Chop onions.
Brown ground beef ( or vegetarian crumbles) and then set aside.
Whisk together soups, brown sugar, chili powder, vinegar and ketchup. If you are making the vegetarian version, you can skip the chicken gumbo and double up on the tomato rice instead.
Add chopped onions and whisk well.
Then add ground beef (or vegetarian crumbles) and mix well.
Label freezer bags and then divide mixture into 2 bags.
Let thaw, heat mixture on stove-top, let it come to a boil then lower and simmer for 30-45 minutes or heat on low in crock-pot for 3-4 hours.
Preparation time: 10-15 minutes
Cooking time: 30-45 minutes on stove-top or 3-4 hours in crock-pot
Number of servings (yield): 16
* * *
What recipe has been handed down in your family?
Pin It
The post Grandma’s Sloppy Joes appeared first on Living Well Spending Less®.
August 11, 2014
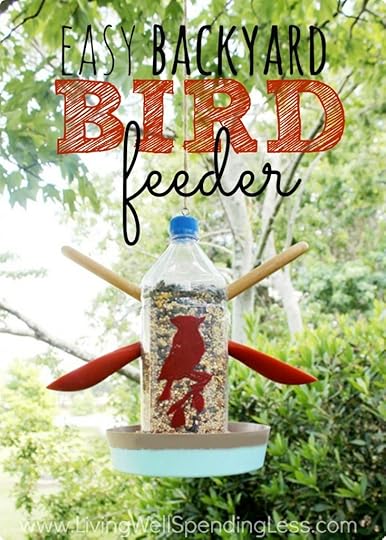
Easy DIY Bird Feeder
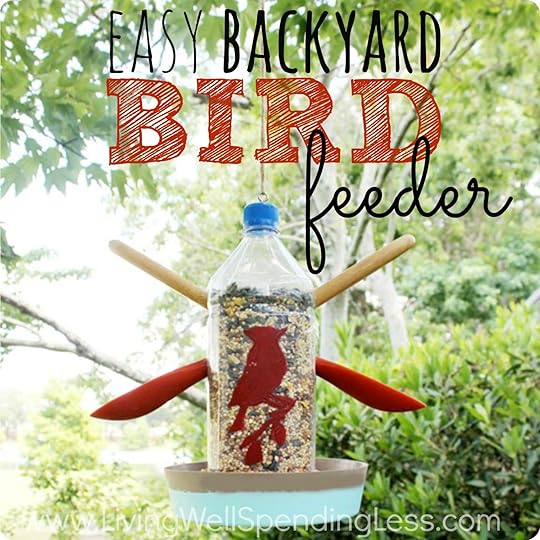
This is Week 11 of our 12-week Summer Fun with Kids series here at LWSL! Today we are welcoming Claire from A Little CLAIREification, who is sharing her super cute and easy DIY Bird Feeder . For more summer fun, check out the overview page.
***
How’s your Summer been going, my LWSL friends? It’s me, Claire from A Little CLAIREification, and I just cannot believe my boys start back to school next week!
We have tried to pack in as much fun as possible over the break and, earlier this Summer, my Littlest and I decided to make a little DIY Bird Feeder. We have a sweet pair of cardinals that live in the bushes just outside of our screened in pool patio and it’s so much fun watching them flit around – we love how they talk back and forth to each other. You can also pop over to my blog for more fun crafts like these DIY Glittery Glow Jars and I hope you’ll say hello while you’re there!!
Here’s how we did it on the cheap mostly using items we already had on hand.
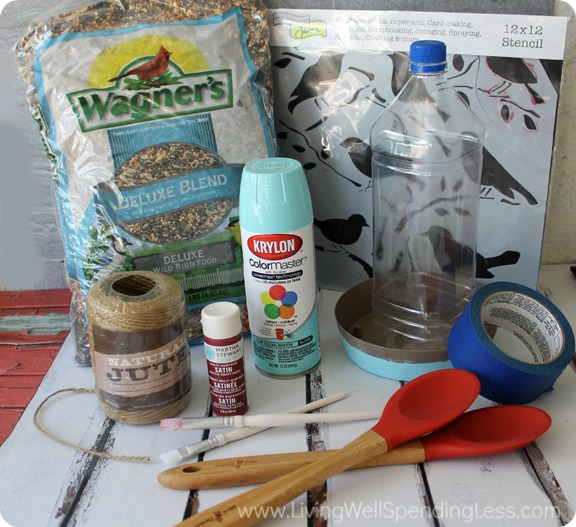
Here Is What You Need:
1.5 Liter Water Bottle (I like the square kind for this, such as Fiji) A round plant drip tray, at least 5″ across
Spray paint (color of your choice)
Painter’s tape
Two wooden spatulas (optional)
Stencil pattern of your choice (optional – we used a bird stencil from Amazon)
Acrylic paint (your choice of color)
Jute twine (or picture hanging wire)
Eye hook (not pictured but shown below)
Hot Glue (or heavy duty glue such as Gorilla Glue)
Bird Seed
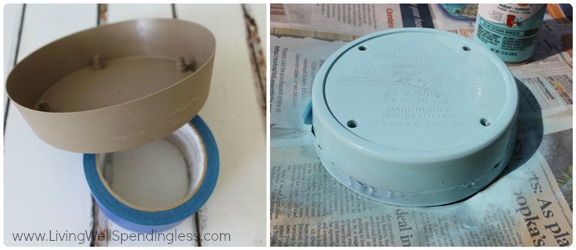
Step 1: To start, we taped off the lip of the plant tray since we didn’t want little bird feet getting paint on them. Could be toxic! You’ll see that several steps here are optional like this one but I thought it would be fun to have the feeder be aqua so once the lip was taped off we spray painted it and let it dry for a couple of hours.

Step 2: While that was drying, I used a craft knife to cut a couple of inches off the bottom of the water bottle – this is definitely a step that adults should do. I used scissors to even out any rough spots and make it sit level.
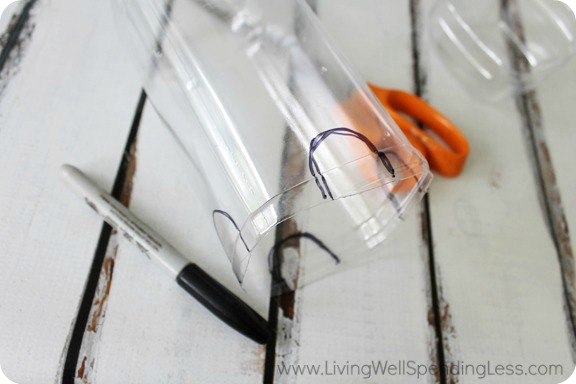
Step 3: Next we used a Sharpie to make a half circles / arches on each side of the bottom of the bottle and then we used scissors to cut out. This is so the bird seed can flow out into the tray. If using a round water bottle, just evenly space out 2-3 little arches.
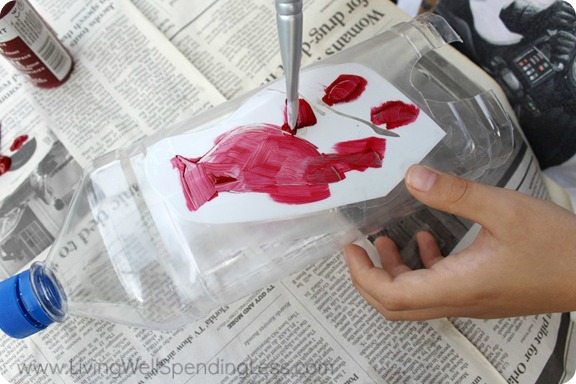
Step 4: We love our little bird stencils we found on Amazon but you could use whichever pattern you like. We cut out the one we wanted to use and taped it on the bottle to secure it, and then my Littlest painted it. Now, I added the spatulas and I am going to tell you this right now. I wouldn’t bother if we did it again. I thought it would give a a little landing spot for the birds and envisioned the bird seed flowing out onto them. This was not the reality.
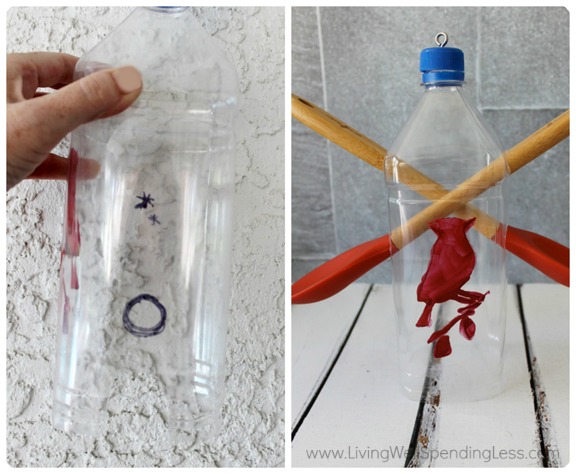
Step 5: I basically cut a small hole and a larger hole on two opposite sides so the handle could go through and out the other side. They look kind of cute, I know, but it really was an unnecessary step. In the end, I had to use clear packing tape to cover the holes so I feel like you should learn from this trial and error. The cardinals told us they didn’t care, by the way.
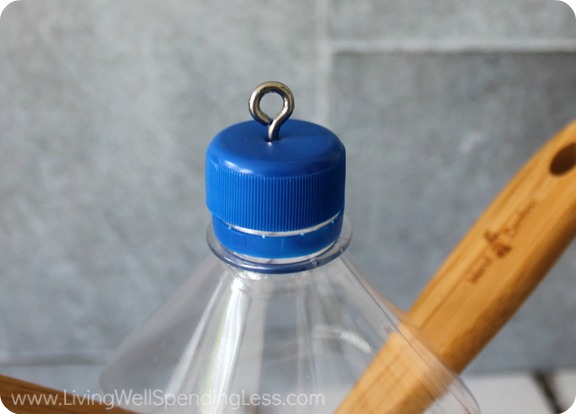
Step 6: We screwed a little eye hook into the cap for hanging. I actually added a little hot glue inside the cap for extra support because… well, “it’s for the birds” right?

Step 7: Next we placed the water bottle inside the tray and traced around with a Sharpie so I could place the hot glue in the right spot. I actually used both hot glue AND a little Gorilla Glue because… I did not want this to fall apart once it was hung, especially if a random squirrel decided to jump on board for lunch!
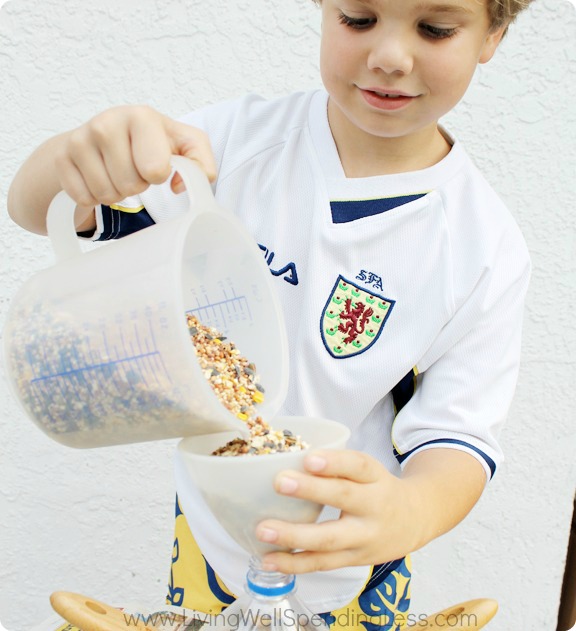
Step 8: Glue the water bottle into the planter and allow to dry for several hours. Next, funnel your bird seed into the finished Bird Feeder and hang using the twine. While it might take a few days, be prepared for your fabulous little feathered friends to notice. I sooo wish I could have gotten a closer pic but those smart cardinals were hip to my jive (not to mention my children are loud).
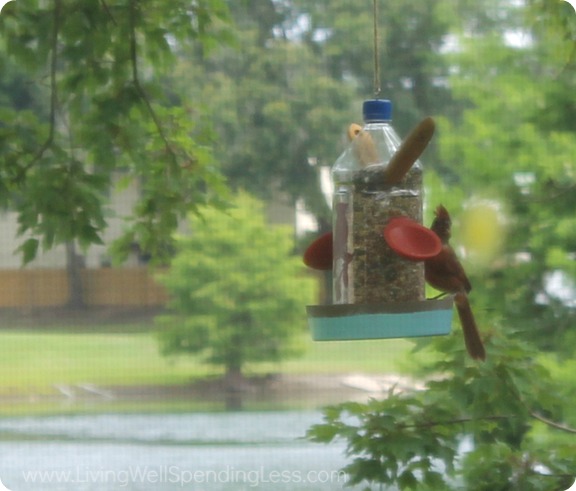
Her bright red Husband wasn’t willing to sign a photo release but he loves the bird feeder too. 
***GIVEAWAY***
And now it is time for another fun giveaway! Today we are again giving away something EVERYONE can use–a $100 Amazon Gift Card–that you can use to make your own summer fun, or to purchase your own Bird Feeder supplies! To enter, just follow the instructions in the box below:
Claire is a working Mama to three boys, a self-proclaimed cheese addict and a lover of all things crafty
and delicious. Her blog, A Little CLAIREification, is a lifestyle blog committed to bringing readers “Bright Ideas On A Budget” – from cooking, baking, crafting and DIY projects to time management tips, meal planning and inspiration.
* * *
What kind of wildlife visits your backyard?
Pin It
The post Easy DIY Bird Feeder appeared first on Living Well Spending Less®.
August 10, 2014
Weekend Wandering
Happy Sunday! I hope you are all having a fun & relaxing weekend! I am currently on my way home from the Becoming Conference, where I spoke on four strategies for living clutter free forever. It has been a super fun but very exhausting weekend, and I have to say that after such a busy summer of travel I am definitely looking forward to being HOME for a while!
One of highlights of my week is always checking out the great ideas & recipes that are shared at Thrifty Thursday, and this week was no exception! There were a TON of fantastic posts–444 of them this week–and it is always SO hard to choose! Here is what I loved this week:
* * *
First of all, this Rosemary Chicken, Avocado and Bacon Salad from Sarah Titus looks absolutely amazing. My whole family LOVES avocado!

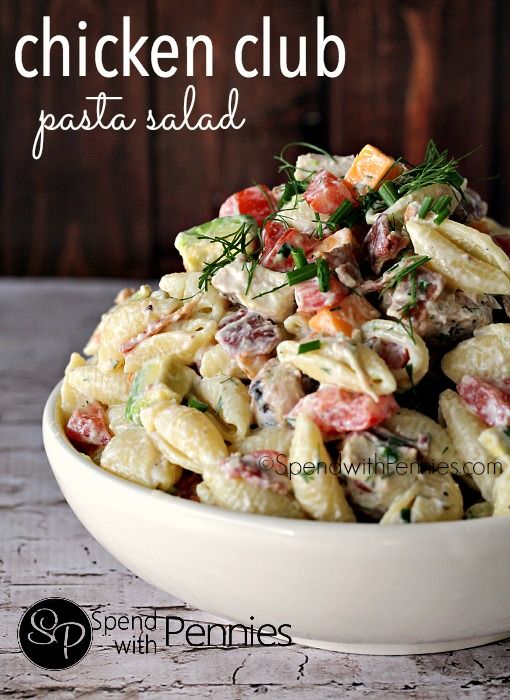
This Chicken Club Pasta Salad from Spend With Pennies looks like another great summer meal. YUM!
Can you tell that I’m craving some really fresh flavors? This Fast and Easy Avocado Corn Salsa from Little House Living would be the perfect start or side to any meal!

As we are gearing up for the start of a new school year, I would love to find some new snack options. These 30-Minute Homemade Soft Pretzels from Born to Bake Forever look delicious!

These Peanut Butter Chocolate Cookies from Creative Savings pair two of my absolute favorites! What a perfect sweet treat to slip into school lunches!

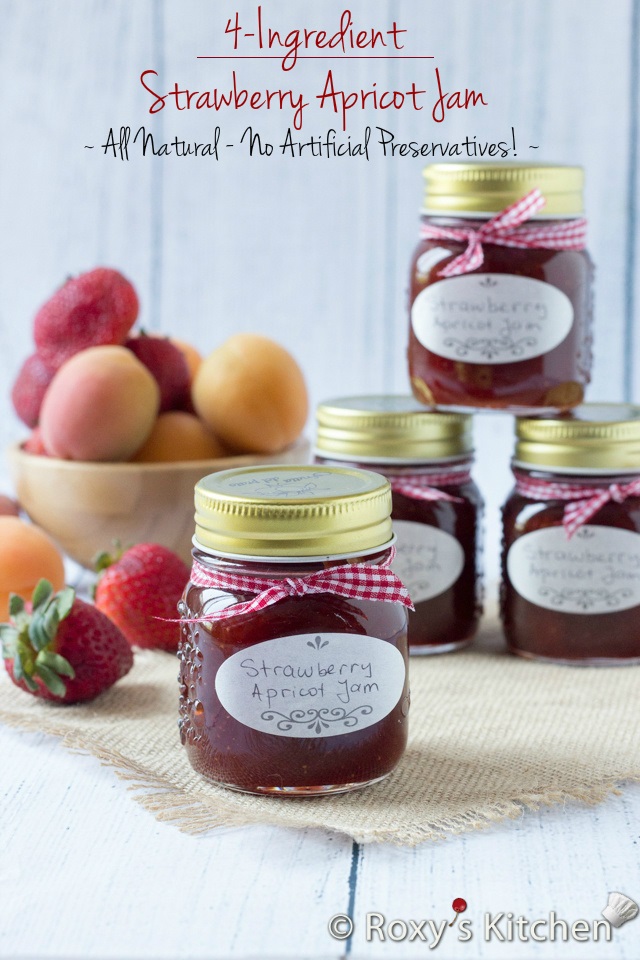
This 4 Ingredient Homemade Strawberry Apricot Jam from Roxy’s Kitchen would be the perfect match to my Basic Freezer Bread. Warm bread just out of the oven and homemade jam! What could be better then that? Yum!
I’m a big believer in trying to simplify and make life easier wherever we can. Whole Food Mom has 5 Things You Can do in Your Kitchen to Make Cooking a Breeze! Tip number 5 is right up my alley!
Moving on to some ideas for back to school snacks and DIY projects. A Mind “Full” Mom provides a Healthy Round-Up of After School Snacks. Over 22 snack ideas that are fun and good for you!

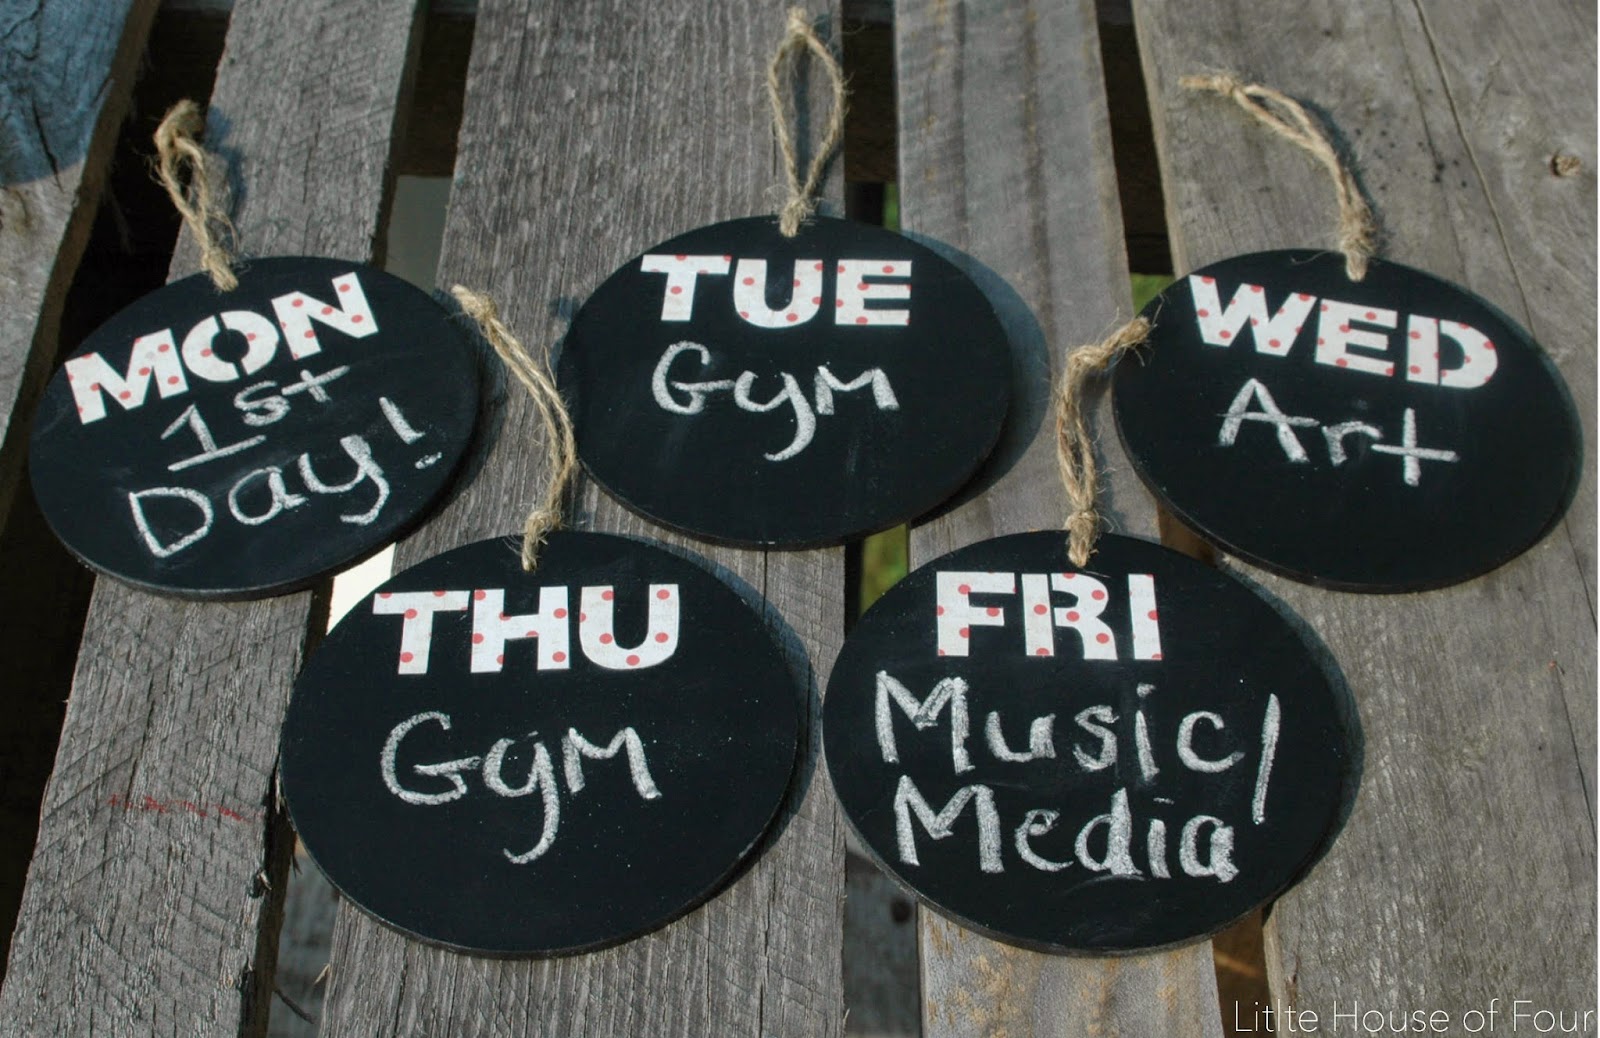
Do your children have a hard time figuring out what to wear in the morning? These super cute Monday-Friday Chalkboard Clothing Tags For Easy Mornings from Little House of Four are just adorable!
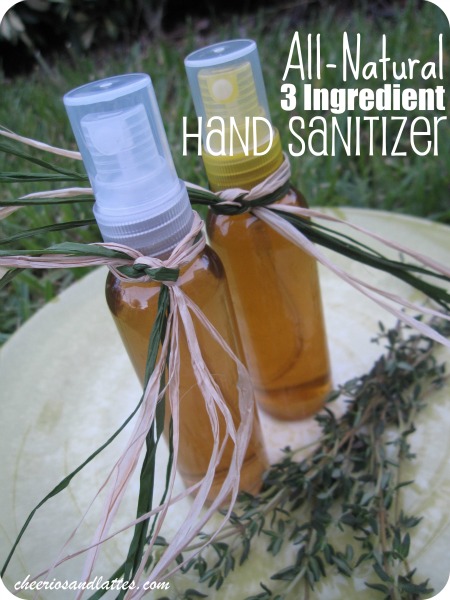
This All Natural 3 Ingredient Hand Sanitizer from Eyes on the Source would make a great back to school gift for teachers. The fresh sage and Tea Tree Oil helps kill germs and smells so good. It’s a win-win!
Money saving tips are always welcome what ever time of year. Coupon Crazy Girl has an informative list of What to Buy in August, from the best deals on produce to patio furniture.

Lastly, The Teacher’s Wife has 5 practical Financial Tips for College Students. Tip number 3 is so true but so hard! This is a MUST read!

* * *
What did you love this week?
Pin It
The post Weekend Wandering appeared first on Living Well Spending Less®.
August 8, 2014
10 Smart Ways to Save on Clothing

Do you ever look at your closet full of clothes and think, I have absolutely nothing to wear? Creating a wardrobe we love while sticking to a budget we can afford is not always easy, especially when we settle for items we don’t like that much simply because the price is right. And while in a perfect world, shopping would be a fun adventure for all of us, regardless of how much we have to spend, the reality is that shopping for clothes–especially clothes that fit well, flatter our shape and complexion, and hold up to everyday wear and tear–can be a challenge when money is tight.
As moms the problem is compounded even further when we become responsible for not only our own closets, but for the rest of our family’s as well. Fortunately, there are some relatively painless things we can all do to shop on a dime while creating a wardrobe we actually want to wear. Here are ten smart ways to save on clothing while still getting the looks you love:
1. Stock-Up Off Season
Shop ahead for upcoming seasons. With the quick turnover of clothing in and out of stores, shoppers who are prepared to think a season ahead have a great opportunity to get a great deal. This is easy for adults when you’re pretty confident which size to buy, but can also be done for kids by estimating the size your child or children will need. If you’re unsure which size to choose for kids and you’re planning for the next year, simply purchase a size or two bigger than they are currently wearing.
Here are a few general guidelines for when to stock up:
January – Winter clothing, sweaters, & coats; holiday apparel
April – Spring clothing, Easter dresses
May – Athletic Apparel
July –Summer clothing & swimwear
October – Fall & back-to-school clothing.
This is a great start, but just keep in mind there will always be exceptions. The important thing is to plan ahead and shop a few seasons in advance to always get the best deals. Nothing can derail your budget faster than being forced to pay full price because your child grew 3 inches overnight and suddenly has nothing to wear!

2. Check eBay Before You Buy
If you find a clothing item you like at a store or online, before you buy, go to eBay and search for the item by brand name and a brief description or size. Try it a few ways, as eBay sellers name their items differently (ie: “NWT Gap Women’s Dress” or “New Gap Blue Maxi Size 8”). Check to see if the item you want is available at a better price before you buy from a retailer at full price.
If you don’t find the exact item you’re looking for, you might even find a similar item that you like for a better price. This works especially well for items you buy every year for yourself or your kids like bathing suits, jackets, and holiday apparel. If you prefer a “new” item, vs. used, you can always select “New” or “New with Tags” to narrow down your search.
When you’re shopping on eBay, always check the photos and descriptions the seller provides to make sure the item is exactly what you’re looking for. Before buying, make a point to review other buyers’ comments on the seller to see if the seller typically receives positive or negative feedback. Try to only do business with those who have glowing reviews and at least a 95% approval rating.
3. Give New Life to Old Clothes
What do unwanted clothes + good friends + a few appetizers add up to? An evening of fun at a Clothing Swap Party!
Host a party where everyone brings a set number of clothing items they are ready to part with. Each person exchanges their items for others’ items and goes home with a shopping bag of “new” items. Add accessories to the mix to complete your outfits! Real Simple has great tips on hosting a Clothing Swap Party from appetizer ideas to organizing the party.
Furthermore, shopping secondhand stores for new treasures can be a great adventure, not to mention a great way to score some amazing deals on high quality clothing. Take the time to learn the sale cycles of your local thrift shops, as well as what days they put out their new items. You just never know what you might find! Even if the items you find aren’t perfect as is, you can easily learn to repurpose and refashion old clothes into something new and amazing.
Check out these 20 cool ideas for inspiration, or visit Refashionista.net to see all the cool ways in which she’s turned some truly horrible thrift store finds into adorable new outfits with just some basic sewing skills.
4. Sign-Up to Save
Make a list of the retailers you love to shop with. Go to each of the store’s sites and sign up to receive email from them. In the past, you may have chosen not to do this to avoid “SPAM”. However, retailers spend most of their efforts on sending consumers money saving coupons and other incentives, sometimes even daily, that will help you save the next time you want to make a purchase! (Note: If you’re concerned with sharing your information, view the retailer’s privacy policy posted on their website to see how your information will be used. Many times, retailers choose to protect your information and will keep it private, not selling it to third parties.)

5. Participate in Loyalty Programs
A loyalty program is a rewards program a company offers to customers who shop with them. By signing up for a loyalty program and shopping with that company, program members have the opportunity to receive rewards such as exclusive coupons, invitations to private sales and more.
Retailers spend a lot of time and money analyzing shopping information to market to you in a way that makes you want to buy more – more often. Why not use their efforts to your advantage? There’s a reason why there are over 2.5 billion loyalty memberships in the U.S.! (Colloquy)
When you maximize your loyalty program memberships, the results can be mutually beneficial. Take time to read through the pamphlets or emails you’re given/sent when you sign up for a program. Understanding point scales and all of the soft benefits of the loyalty program will make it even more beneficial. Last October, Consumer Reports reported on the TOP loyalty programs… many of them were clothing retailers you may already frequent like Target, JCPenney, and GAP!
6. Get Smart with Coupons
Make a coupon binder – a binder full of clear page protectors for all of the coupons you receive by mail or in-store. If you receive a coupon by email, print it and store it in the binder, as well. When you begin a day of shopping, peruse the binder to see which shopping stops you should make.
Having coupons organized also works great right before the holiday season. When you’re making a list for others, you can use the coupons you’ve collected to decide where to shop for gifts. Matching sweaters for the nephews? Use that 40% coupon you’ve been saving. Make sure to organize coupons by date so that you use the coupons before they expire. The key to maximizing coupon usage is organization.

7. Wait to Buy
If you love it now, you’ll love it later. Just be sure to keep a watchful eye in-store or online for that item you love and nab it when it goes on SALE. Chances are you won’t have to wait too long. Retailers try to move merchandise as fast as possible, which means that even brand new items get marked down fairly quickly. Whenever possible, try to avoid buying items full-price… there will always be a better price. Just make sure you’re willing to part with the item you’re waiting for in case your preferred size isn’t available when the item goes on sale. It happens!
8. Shop Discount Retailers
Retailers like TJ Maxx, Marshalls, and Ross sell clothing and other items at lower prices than you can find at other stores. They can do this, in part, because they sell merchandise from a previous year or season another store couldn’t sell, and they were able to buy it at a very low price, passing on savings to customers.
When shopping discount retailers, you have to set your expectations for the shopping trip. KNOW that you will spend more time than usual looking through racks – typically everything is organized by type and size but there may only be 1 of each in each size. I’ve gotten by taking not only 1 but 2 kids into these retailers and having a successful shopping trip. Setting expectations and having patience (and a snack or 2J) is key.
Prefer to shop online? There are several sites like Zulily, Gilt, Jane and Bluefly that have daily and ongoing deals at great prices. Much simpler than digging through clothing racks…especially when you have littles.

9. Save Online
You’ve filled your virtual shopping cart, proceed to check out and see a space for “coupon code”…now what? Before you check out, search for online savings codes at sites like RetailMeNot, CouponCabin and CurrentCodes.com.These sites have a database of online coupon codes that give consumers everything from free shipping to hefty percent and dollar-off discounts when you apply the code at check out.
Another great option for your own wardrobe, especially if you are having trouble finding items you really love, is to take advantage of an online personal shopping service such as Stitch Fix. Each month, based on a survey of your preferences, your own wardrobe stylist will personally select and send you five items to choose from within your selected budget. The service costs $20 per box, but you will get a $20 credit towards any of the clothing that you keep, and you can choose to keep as many of the items as you like. This innovative service can save you money in a couple ways. First, it keeps you out of the stores, where the temptation is to buy more. Second, it allows you to focus on just a few pieces that you love rather than buying a bunch of random things just because. Finally, it allows you to set a reasonable clothing budget for yourself each month.

10. Downsize and Organize
By downsizing and organizing your closet, you might just be delightfully surprised how many new outfits you can come up with by using clothing and accessory items you already have! (Especially when you add “new” items from the Clothing Swap Party you just hosted…See #3 above!) Need help in the closet organization department? Check out simple ways you can improve your closet and minimize your wardrobe for maximum style with a 40 hanger closet.
* * *
How do you save on clothing?
Pin It
The post 10 Smart Ways to Save on Clothing appeared first on Living Well Spending Less®.


