
Ruth Soukup's Blog, page 100
October 7, 2014
31 Days to a Clutter Free Life: Toys (Day 7)
Day 7: Toys
Anyone who has read my now-infamous post about why I took my kids’ toys away (and why they won’t get them back) probably already knows that I am not a big fan of toys, especially not in excessive quantities.
The truth is that no child needs a whole room full of toys, regardless of whether those toys happen to be expensive name-brand items or fantastic hand-me-down bargains snagged at a neighbor’s yard sale.
Regardless of how much was spent, the result is the same. Kids are overwhelmed by their choices so they take everything out and play with nothing. Do yourself and your family a favor by drastically limiting the number of toys your children own, as well as the number of toys they have access to at any given time, and I promise your life will suddenly become a whole lot easier.
Objective: A small but purposeful collection of toys and games that your children actually play with, stored in a functional and organized space.
Assess the current situation: What is the current state of your children’s toys? Do they have too many? Are there some toys they never play with? How are they currently stored and organized? What are your biggest clutter struggles when it comes to your kids’ toys? What would you like to change?

{Get Day 7 De-cluttering Checklist here}
Assignment:
1. Bring all toys to one central location to sort. Depending on your kids’ ages and personalities, you may want to involve them in this process.
Keep only toys or games that:
Your children play with regularly
Are in good condition
Are “special” in some way
Encourage imaginative and creative play
Do not keep toys or games that:
Your children don’t play with
Are broken, damaged, or missing key pieces
You feel obligated to keep because they were expensive
You feel obligated to keep because they were a gift
Drive you crazy
Cause fights among your children
Have a million tiny pieces that constantly end up on the floor
2. Donate unwanted toys and games. Consider giving them to a local thrift shop, church nursery, or daycare facility, or try selling any larger items that may be valuable on Craigslist or Facebook.
3. Create a functional storage area for your remaining toys and games. Be sure to sort them in a way that makes sense and makes them easy to access, and LABEL EVERYTHING! Consider separating the toys into 2-4 different bundles, and then rotate your kids’ access to the different bundles on a weekly or monthly basis. This keeps the quantity of toys out at one time to a minimum and makes all the toys more interesting and exciting for your kids.

1. Princess Perfection Playroom (PotteryBarnKids.com)
2. Tackle The Toy Mess (ContainerStore.com)
3. Tuck Away Table (PotteryBarnKids.com)
4. Shade of Grey Storage (PotteryBarnKids.com)
5. Plenty Of Room For Play (Ikea.com)
Living Well Spending Less®.


October 6, 2014
31 Days to a Clutter Free Life: DVDs & Video Games (Day 6)
Day 6: DVDs and Video Games
Video games, DVDs and other media are largely a modern phenomenon, but one that can easily get out of control. While watching whatever we want, whenever we want, can be deeply satisfying and entertaining, it can also be a major source of clutter and mess. Video game consoles become a tangle of cords, controllers and cases, and nothing is more frustrating than sitting down to watch a favorite movie only to find that it is not in the proper case.
Fear not! Taking just a little time to organize video games, DVDs and entertainment media can be simple and it will really pay off. With Netflix, HBO GO, Hulu and Amazon, almost anything can be instantly streamed and watched, which means that hopefully within a few years, DVD and video clutter will be a thing of the past!
For those films (particularly children’s movies) that get watched (or games that get played) over and over, purchase only the items you can fit in an allotted space. Store them in a labeled container or organizer and reassess frequently. Sell, donate or trade-in used films and games and never keep something that is scratched, damaged or that you no longer love.
A word about VHS: Film does not age well and many VHS tapes will naturally “erase” or become damaged and unreadable over time. If you are still holding on to home movies on VHS, it is important to have them digitally archived so you do not lose these treasured memories. Look for a local service to copy these treasures onto DVD, which you can then back up in your digital archives.
Objective: A collection of DVDs and video games that you actually watch or play, stored in a functional and organized space.
Assess the current situation: What is the current state of your DVDs and video games? Do you have too many? Are there some you never watch? Do you have empty cases or discs with no cases? How are they currently stored and organized? What are your biggest clutter struggles when it comes to DVDs and video games? What would you like to change?
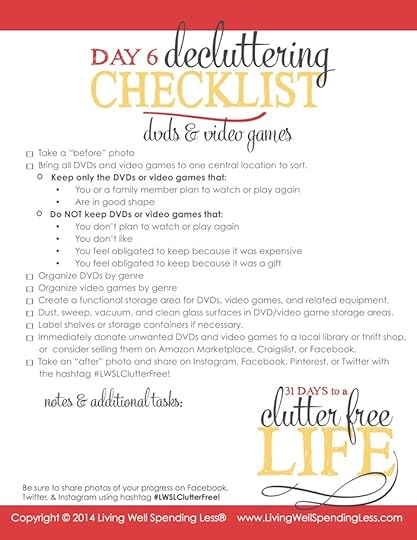
{Get Day 6 De-cluttering Checklist here.}
Assignment:
1. Declutter. Gather all DVDs and video games throughout the house and bring to one central location to sort and declutter.
Keep only the DVDs or video games that:
You or a member of your family plans to watch or play again
Are in good shape (i.e. not scratched or damaged)
Do not keep DVDs or video games that:
You don’t plan to watch or play again
You don’t like
You feel obligated to keep because it was expensive
You feel obligated to keep because it was a gift
2. Donate unwanted DVDs and video games. Most local libraries or thrift shops will gladly accept them; you may also consider selling any games or DVDs that may be valuable.
3. Create a functional storage area for your remaining DVDs and video games. Be sure to sort them in a way that makes sense and makes them easy to access, and LABEL EVERYTHING so that everyone in your family knows where things go!
4. Have any old home movies transferred to digital format. VHS tape will break down over time, so preserve those memories by having them transferred to DVD or digital format as soon as possible.
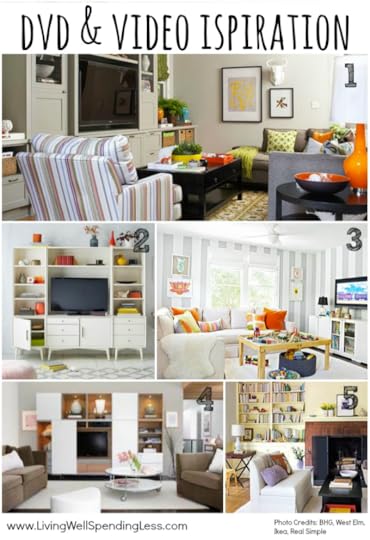
1. Simpler Media Storage (BHG.com)
2. Sophisticated Storage (WestElm.com)
3. A Place For Everything Living Room (BHG.com)
4. Elegant & Inexpensive Storage Solutions (Ikea.com)
5. Pretty & Practical (RealSimple.com)
An InLinkz Link-up
Pin It
The post 31 Days to a Clutter Free Life: DVDs & Video Games (Day 6) appeared first on Living Well Spending Less®.
October 5, 2014
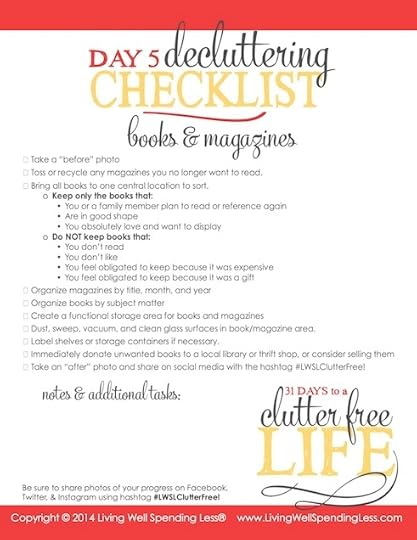
31 Days to a Clutter Free Life: Books & Magazines (Day 5)
Day 5: Books and Magazines
Even in the age of eBooks and the Internet we still have not outgrown books. There’s something almost magical about turning pages and many writers and poets have waxed lovingly about the feel, texture and even scent of reading materials.
All of this book love can make it difficult to part with books. Our homes become libraries housing tomes of literature we fell in love with. Letting go of a book sometimes feels like saying goodbye to a friend.
And while letting go of books can present one problem, organizing all those well-loved books can sometimes be a challenge as well. Different shapes and sizes can be hard to store, plus they are heavy and take up a lot of room. Unfortunately, paper can yellow, fade, and attract dust mites and mildew. Storing endless paperbacks is not feasible or necessarily even healthy. As with all organizing, pare down to the things that are really important to you.
First ask yourself if you, or anyone in your house, will be reading the book again or will reference the book. If you can’t commit to sitting down with the book for another go, it’s time to pass it on. Libraries, schools, and churches will often take book donations. Also consider building a Little Free Library or another outside-the-box organization/donation method for books.
Magazines and other periodicals can also be clutter disasters. Digital subscriptions and services that offer access to several magazines (like Next Issue, for example) can really cut back on the clutter. For print magazines, make it a policy to read them once and then pass them on, or tear out the pages you like and keep them in a single binder.
Start a magazine exchange with a few girlfriends that have similar tastes or donate extras to a doctor’s office or another business’ waiting room area. (Mechanics and salons are often grateful to give customers reading material, just black out your subscription information first.) Unless you truly reference scholarly journals or instructional magazines, most things can be found online or at a local library and there is no reason to save periodicals beyond their date.
Objective: A collection of books and magazines that you enjoy reading, stored in a functional and organized space.
Assess the current situation: What is the current state of your books and magazines? Do you have too many? How are they currently stored and organized? What are your biggest clutter struggles when it comes to books and magazines? What would you like to change?
{Get Day 5 De-cluttering Checklist here}
Assignment:
1. Toss or recycle any magazines you no longer wish to read. There is no point in holding on to magazines you have no intention of reading again. If you are holding on to a particular magazine because of one article or recipe, simply tear out the page and create a binder to store your saved articles. (You could also consider taking a picture of the page and storing it digitally!)
2. Declutter books. Gather all the books in the house and bring them to one central location to sort and declutter.
Keep only the books that:
You or a member of your family plans to read or refer to again
Are in good shape
You absolutely love and want to display
Do not keep books that:
You don’t read
You don’t like
You feel obligated to keep because it was expensive
You feel obligated to keep because it was a gift
3. Donate unwanted books to a local library or thrift shop. Many libraries welcome used books, if not to use in the library then to sell for additional fundraising. Most secondhand stores also accept books. Alternatively, you could try selling your used books on Amazon Marketplace (though I recommend getting rid of items as quickly as possible.
4. Create a functional storage area for your remaining books and magazines. Be sure to sort them in a way that makes sense and makes them easy to access, such as like books together. Label shelves or bins.

1. Light & Lovely Library (WestElm.com)
2. Clutter Free Library (RealSimple.com)
3. Modern Magazine Storage (WestElm.com)
4. Color Scheme Storage (BHG.com)
5. Bench Book Cubbies (HomeDepot.com)
An InLinkz Link-up
Pin It
The post 31 Days to a Clutter Free Life: Books & Magazines (Day 5) appeared first on Living Well Spending Less®.
Weekend Wandering


Happy Sunday! I hope you are all having a fabulous weekend! My family and I are currently on our way to Miami to board the Carnival Breeze for a six day cruise, where we were invited to experience the cruise line’s Carnival Live concert series, which brings big name bands right to the ship. My husband is pretty pumped that we are seeing one of his favorite bands ever–Styx–in such an intimate setting!
In other news, there is still time to participate in our Clutter Free Challenge, which is happening here at Living Well Spending Less the entire month of October! This fun 31 day challenge is absolutely free to join, and if you are a blogger you can join in the fun by blogging about it and linking up each day!
Here is what I loved this week:
* * *
Nothing says fall like a hearty soup or stew. This Hearty Steakhouse Stew from Leaving the Rut can be made with leftover cuts of meat and all your favorite veggies!

These Spicy Griddled Tofu “Steaks” from The Woks of Life sound like a great meat alternative!

These French Toast Cups from Cincy Shopper can be made the night before and placed in the oven for a delicious hot breakfast any day of the week. YUM!

These Dulce de Leche Blondies from Belle of the Kitchen look so amazing!

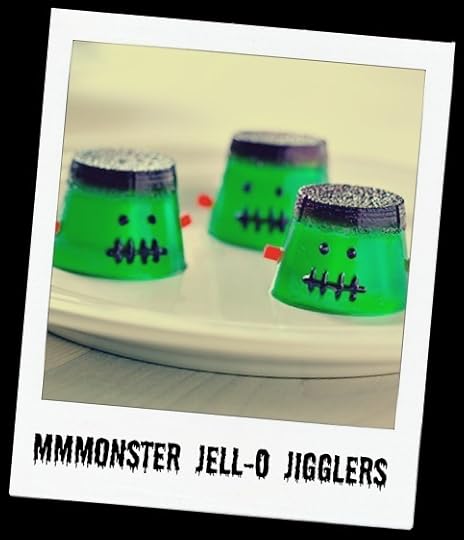
These Monster JELL-O Jigglers from Woman of Many Roles would be the perfect sweet treat for Halloween! They are cute and scary!
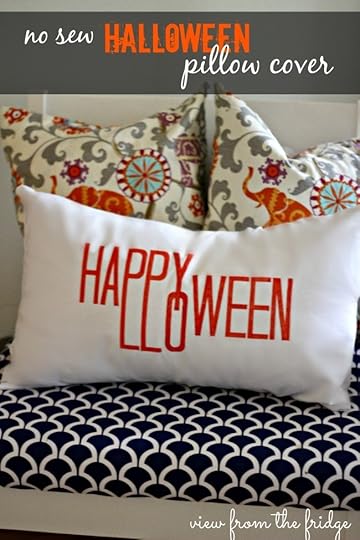
Moving on to some fall-inspired crafts and DIY projects…..This No-Sew Halloween Pillow Cover from View From the Fridge is made easy following the step-by-step tutorial!
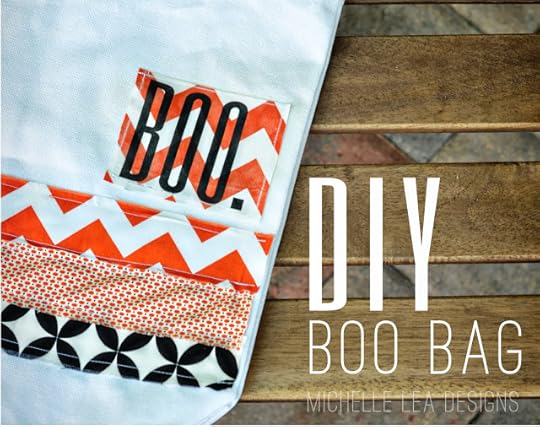
This DIY Boo Bag from Michelle Lea Designs is just adorable!
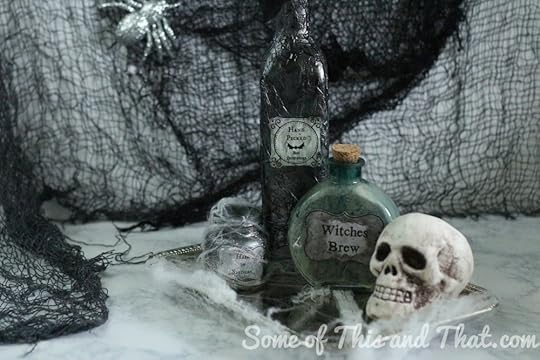
These DIY Potion Bottles from Some of This and That can add that spooky feel to your Halloween decorations.
The Moody Fashionista has a perfect alternative to sugar laden treats with these Pumpkin Crayons. So CUTE!
This Halloween Scavenger Hunt from Mortiz Fine Designs is a great party activity for kids of all ages!

Graceful Little Honey Bee has 30 Frugal Meal Ideas for When Your Broke. This is a great resource to have on hand.

Lastly, How Do The Jones Do It? provides a list of 10 Ways to Gain Financial Hope. I whole heartily agree with tip number 9!

* * *
What did you love this week?
Pin It
The post Weekend Wandering appeared first on Living Well Spending Less®.
October 4, 2014
31 Days to a Clutter Free Life: Living Room (Day 4)
Day 4: Living Room
Your living room, by definition, is the central hub of your home. It should be a room where everyone can come together, relax, play games, read, convene, hang out, and even watch television. The living room should offer a space for each person in the household to relax. There should be plenty of seating, arranged in a way that encourages conversation, connections and family. There’s a tendency to point all seating towards the television, but you should also consider the other more interactive activities that go on in your family’s living room. Display items in the room that represent who you are as a family and items that you truly love. Obey the rule that everything should be something you use or something you love. Knickknacks and trinkets should be pared down to the most important items—don’t detract from them by letting them become dust collectors. Display them proudly, like a museum of your family’s treasured artifacts. Give new life to older and damaged items with a fresh coat of paint, a good cleaning, new pillows or pretty throw blankets. Toss out old magazines, paperwork and other items that pile up. Pare down knick knacks, books, and even furniture that you no longer use or that your family has outgrown—perhaps that old piano? Old gaming consoles? Give these items new life by donating them to an afterschool program or to a charity. Give yourself permission to let go. Objective: An open, comfortable, and inviting room for guests and family to gather, connect, and relax. Assess the current situation: How is this room used right now? List all the purposes of this room. What are the biggest clutter struggles in this room? (Toys, clothing, paperwork, garbage, etc.?) How is the layout of the room working for you? What would you like to change?
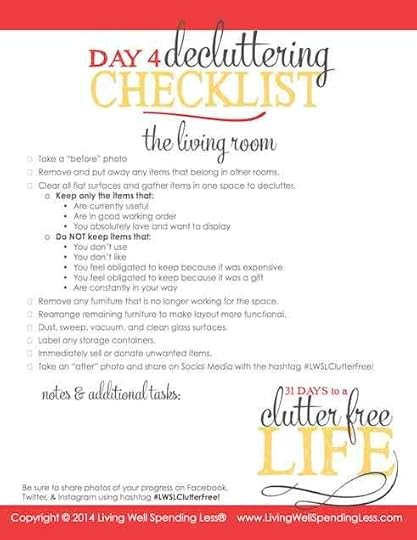
{Get Day 4 De-cluttering Checklist here}
Assignment:
1. Remove and put away any items that belong in other rooms. If necessary, use a basket to collect items, then distribute them to their proper homes. 2. Clear all flat surfaces—tables, desks, consoles, shelves, etc. Collect all items (picture frames, candles, decorative knick knacks) in one area, such as the dining room table or kitchen counter. De-clutter remaining items. Keep only the items that:
Are currently useful
Are in good working order
You absolutely love and want to display
Do not keep items that:
You don’t use
You don’t like
You feel obligated to keep because it was expensive
You feel obligated to keep because it was a gift
Are constantly in your way
3. Remove any furniture that is no longer working for your space, whether it is broken or damaged or simply not a good fit for the room. Either throw it away, donate it, or sell it on Craigslist or Facebook, then, if necessary, rearrange remaining furniture to make your layout more functional.
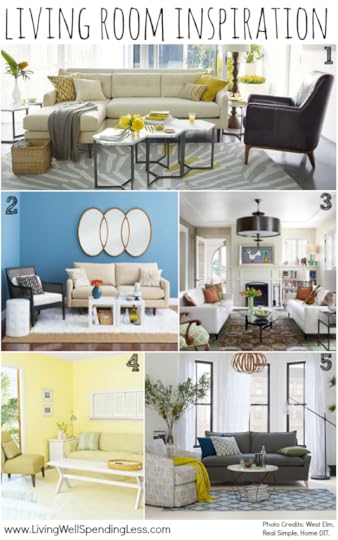
1. Sunny Mid Century (WestElm.com)
2. Simple Statement Living Room (RealSimple.com)
3. Elegant Living Room (HomeDIT.com)
4. Calm and Clean Living Room (RealSimple.com)
5. Bright Brownstone Living Room (WestElm.com)
An InLinkz Link-up
Pin It
The post 31 Days to a Clutter Free Life: Living Room (Day 4) appeared first on Living Well Spending Less®.
October 3, 2014
31 Days to a Clutter Free Life: Mail (Day 3)
Day 3: Mail
Paper clutter is a huge struggle for most families! Throughout this month we are going to work to create practical, easy-to-maintain systems for all of the different paperwork that finds its way into our lives. The first thing on the list? Mail!
There is unfortunately no good way to stop the onslaught of paper mail that continually pours into our homes. Thus the best way to keep all that mail clutter from getting out of control is to create a workable system that ensures no important letters in bill (literally) slip the cracks.
The system that seems to works best and be easiest to follow involves immediately dealing with junk mail by recycling it as soon as it comes through the door, while simultaneously collecting the important mail items in a central location to be dealt with at a regular day and time.
Objective: An easy-to follow system that ensures all mail is dealt with in a timely manner.
Assess the current situation: What is happening with mail right now? Where does it go? What are your habits? What are your biggest struggles?
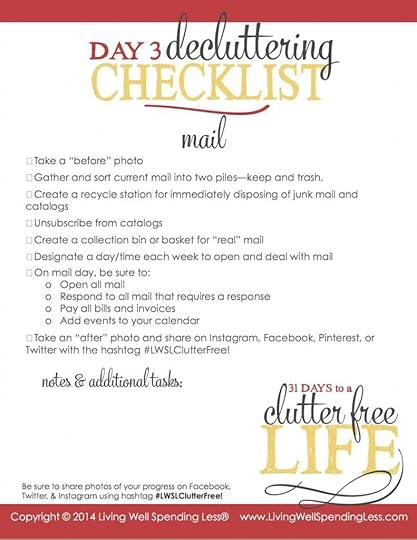
{Get Day 3 De-cluttering Checklist here}
Assignment:
1. Gather and sort current mail into two piles—keep and trash. Start your mail organization process by dealing with the mail that has already piled up. Immediately discard your trash pile, then spend time getting caught up on your “keep” items.
2. Create a recycle station for immediately disposing of junk mail and catalogs. A pretty bin just inside your front door is ideal, but you could also create a recycle station in the kitchen, laundry room, garage, or utility room. Just make sure it is someplace where you will use it!
3. Unsubscribe from catalogs. Spend an afternoon removing yourself from as many company mailing lists as possible. There is unfortunately no easy way to do this, but a phone call directly to each company should be sufficient.
4. Create a collection bin or basket for remaining “real” mail. Pick a pretty basket that can collect the mail you actually need to deal with. Put it in a convenient place where you will actually use it. For example, if your mail normally piles up on a particular counter in the kitchen, put the box or basket right on that counter.
5. Designate a day/time each week to open and deal with mail. Try to do it at the same time each week so that nothing slips through the cracks.

1. Wire Mail Basket (LiveSimplybyAnnie.com)
2. Wall Hung Mail and Key Sorter (LiveSimplybyAnnie.com)
3. Fabric Mail Sorter (BrightandBlithe.wordpress.com)
4. Lid Rack Mail Sorter (MarthaStewart.com)
5. Daily Mail System and Organizer (PotteryBarn.com)
An InLinkz Link-up
Pin It
The post 31 Days to a Clutter Free Life: Mail (Day 3) appeared first on Living Well Spending Less®.
October 2, 2014
31 Days to a Clutter Free Life: Entryway (Day 2)

Day 2: Entryway
What better place to start our challenge than at the first place we see when we walk in? I don’t know how it works in your home, but that area right inside our front door tends to be the dumping ground for everything—shoes, purses, backpacks, umbrellas, lunchboxes, school papers, random toys and pretty much anything else that comes through our door. Thus, it is a little disheartening to walk inside and immediately see a pile of clutter!
Today’s assignment will help clear the clutter that tends to pile up in this zone and instead help create a clear, organized, and super-functional space that sets the standard for a clutter-free home.
Objective: A clear entryway that sets the tone for the rest of the home.
Assess the space: What needs to stay, what needs to go? Do we use it here? Does it have a home here? Is this the most convenient space for this object to stay.
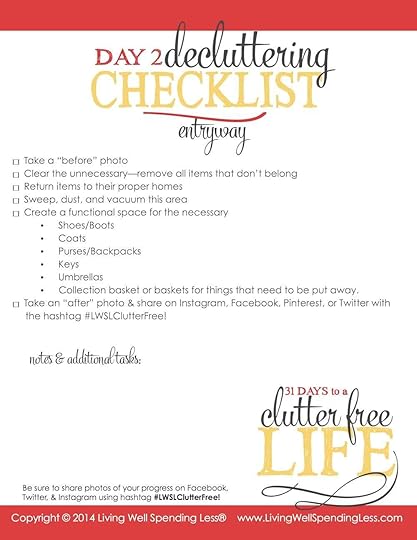
{Get Day 2 De-cluttering Checklist Here}
Assignment:
1. Clear the unnecessary-Get rid of anything that does not belong in this area or add to the functionality of this area.
2. Create space for the necessary:
Shoes/Boots—consider using a pretty shoe rack, baskets, or boot tray to store and contain the shoes or boots that tend to collect in this area.
Coats—make sure the coat closet is free and clear of clutter and contains sturdy hangers for hanging coats. If there is not closet, provide sturdy hooks or a free-standing coat rack.
Purses/Backpacks—sturdy hooks on the wall or placed on the back of a coat closet door make ideal storage for purses and backpacks.
Keys—small hooks, a pretty bowl, or an actual key rack are perfect for eliminating misplaced keys.
Umbrellas—a pretty umbrella stand or even a tall, sturdy vase is ideal for storing umbrellas until you need them.
Collection basket or baskets—it is handy to have a basket or set of baskets right at the entry to store and collect any stray items that need to be put away.
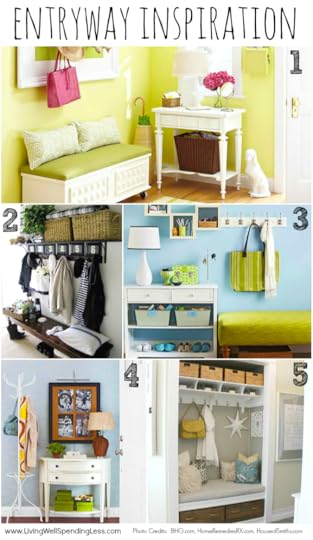
1. Pretty entry with bench (BHG.com)
2. Family entry with numbered cubbies and hooks (HomeRemediesRX.com)
3. Entry with shoe storage, bench, and hooks (BHG.com)
4. Creating a pseudo-entry with coat rack and table (BHG.com)
5. Hall closet converted to entry (HouseofSmiths.com)
An InLinkz Link-up
The post 31 Days to a Clutter Free Life: Entryway (Day 2) appeared first on Living Well Spending Less®.
Thrifty Thursday {Week 80}

Happy Thursday! My head is still spinning a little from the whirlwind of the past few weeks but I am SO excited that October is finally here! My husband and I are super pumped to tackle the clutter this month in every area of our home–I’m pretty sure that he is even more excited than I am!
If you haven’t checked out the details of the Clutter Free Challenge, be sure to do that today–we would LOVE to have you join in the fun! If you are blogging your way through the challenge you will be able to link up each day, and you can share photos of your progress on Instagram, Twitter, & Facebook using hashtag #LWSLClutterFree.
Here are the most clicked links from last week:

1. A Cultivated Nest { The No Stress Way to Build a Stockpile }
2. Graceful Little Honey Bee { 12 Easy Freezer Meals in 2 Hours }
3. Pulling Curls { Make a Budget: Our Family Budget }
4. Humble in a Heartbeat {Do I Really NEED That?}
5. Mums Make Lists { Build Exercise into Daily Life }
6. Creative Home Keeper { 5 Tips for Transitioning Your Wardrobe to Fall and Winter }
7. My Mothermode { When the Paycheck Stops }
8. Laura Sue Shaw { Quick & Simple Dinner Ideas for Busy Evenings }
9. Save to Splurge { What I learned From Two Failed Blogs }
10. Six Figures Under {Why I Don’t Say “We Can’t Afford That”}
Never linked up before? Here’s how:
Scroll down, find the little blue “Add your Link” Button and click on that.
Follow the instructions on the next page – add a great image of your project and an interesting title. Make sure you link to the direct page of your budget friendly post – not the main page of your blog!
Try to visit at least a few other blogs at the party. Be sure to leave a comment to let them know you stopped by!
Please link back to this post somehow. There are badges available here; a simple text link is just fine too.
 Feel free to tweet about Thrifty Thursday so others can join the fun, and don’t forget to check back here Sunday morning to see which posts have been featured this week at Weekend Wandering!
If this is your first time here I also invite you to check out my blogging guide, How to Blog for Profit (Without Selling Your Soul). It is a fantastic resource if you are interested in building your blog, getting more traffic, or learning how to monetize, and the expanded 2nd edition is now available in paperback! Or, if you have read the book and are still looking to take your blog to the next level, I encourage you to check out Elite Blog Academy.
An InLinkz Link-up
Pin It
The post Thrifty Thursday {Week 80} appeared first on Living Well Spending Less®.
October 1, 2014
31 Days to a Clutter Free Life: The Ground Rules (Day 1)
The older I get, the more STUFF I seem to accumulate, and the more desperately I long to live a life free of clutter. While I don’t think I will ever be considered a minimalist, I dream of a home that is pared down to just the essentials—only those things I love and use on a regular basis. I dream of order and organization and simplicity, of fewer things and less stress, and of more meaning and greater purpose.
And so, this year, I thought it was time to take on a new challenge:
31 Days to a Clutter-Free Life.
Do you want to join me?
In this challenge we will be giving ourselves one month to scale back on all the things we no longer want or need. One month to purge the excess and to instead create a home that fosters balance and harmony. One month to simplify the chaos and calm the storm that comes with always having too much stuff.
I’m ready. In fact, I’m more than ready!
Are you?
Then let’s get started!
Every challenge needs a few ground rules, so before we dive right in, I think it is essential that we establish some firm guidelines for how to tackle the clutter we find throughout our space.
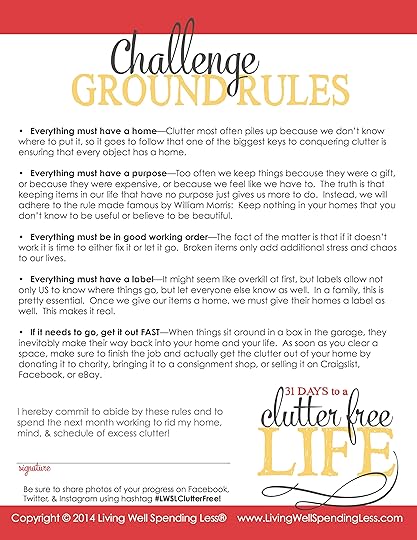
{Get the Ground Rules Printable here}
Challenge Requirements:
Everything must have a home—Clutter most often piles up because we don’t know where to put it, so it goes to follow that one of the biggest keys to conquering clutter is ensuring that every object has a home.
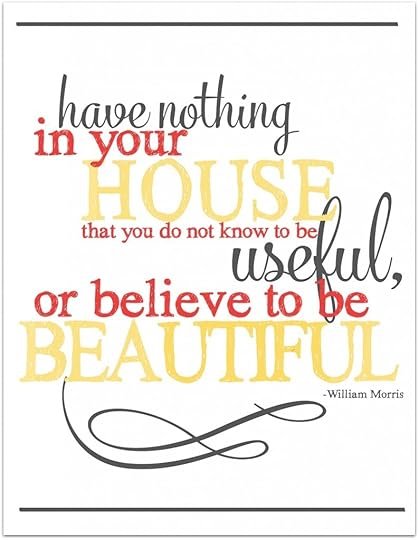
Everything must have a purpose—Too often we keep things because they were a gift, or because they were expensive, or because we feel like we have to. The truth is that keeping items in our life that have no purpose just gives us more to do. Instead, we will adhere to the rule made famous by William Morris: Keep nothing in your homes that you don’t know to be useful or believe to be beautiful.
Everything must be in good working order—The fact of the matter is that if it doesn’t work it is time to either fix it or let it go. Broken items only add additional stress and chaos to our lives.
Everything must have a label—It might seem like overkill at first, but labels allow not only US to know where things go, but let everyone else know as well. In a family, this is pretty essential. Once we give our items a home, we must give their homes a label as well. This makes it real.
If it needs to go, get it out FAST—When things sit around in a box in the garage, they inevitably make their way back into your home and your life. As soon as you clear a space, make sure to finish the job and actually get the clutter out of your home by donating it to charity, bringing it to a consignment shop, or selling it on Craigslist, Facebook, or eBay.
How to Prepare:
Prepare your mind. Mentally commit to the process of letting things go. Realize that things will not improve unless you are ready to make some serious changes, and that those changes may at times be a little painful.
Prepare your family. Let your spouse and children know that change is coming and that you plan to drastically purge the clutter that is currently weighing you down. Let your kids know that if they have things they don’t want to lose, they will need to find a home for them. Discuss with your spouse what kind of changes you are both comfortable with so that you are on the same page. Keep your family as involved with the process as you can.
Prepare your schedule. Reserve 30-60 minutes each day this month to focus on this challenge and to complete your assignment. Block out even more time on the weekends to get caught up and to sell or donate any items you are getting rid of.
Prepare your supplies. Gather the items you will need to complete your assignments—boxes for collecting the items you plan to get rid of, a camera for taking photos of the things you plan to sell, and a label maker for labeling everything. You may also need to collect some practical storage bins or containers, but it is generally better to figure out exactly what you need for a particular area first.
Prepare your space. It is generally more motivating and less overwhelming to de-clutter when you start with a relatively clean space. While it might not always be possible, try to start with a quick speed-cleaning session each day, or, at the very least, make sure your dishes are done, your counters are clear, and the general mess has been tidied.
Don’t forget to share your signed ground rules page on Instagram, Facebook, and Twitter with the hashtag #LWSLClutterFree! My team and I will be following this hashtag closely, and may even have a few fun surprises up our sleeves for those who are sharing on social media!
For more moral support and to share ideas and encouragement you can also join the 31 Days to a Clutter Free Life forum thread found at our members-only site, www.LWSLEveryday.com. Or, if you are blogging your way through this challenge, you can link up here at LWSL each day, beginning with your Day 1 post below:
An InLinkz Link-up
* * *
Are you READY for the Clutter Free Challenge?
Pin It
The post 31 Days to a Clutter Free Life: The Ground Rules (Day 1) appeared first on Living Well Spending Less®.
September 29, 2014
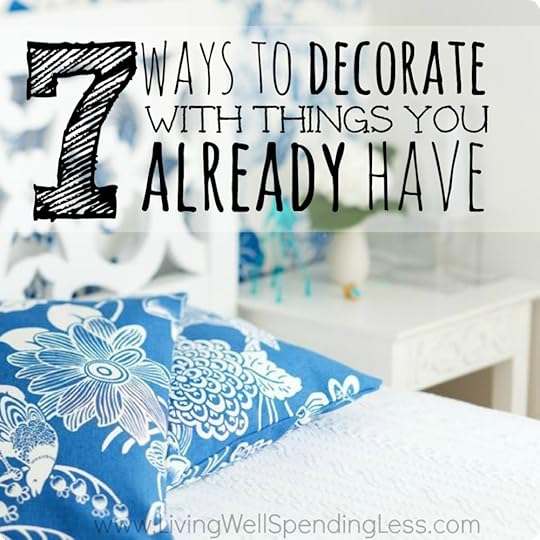
7 Ways to Decorate with Things You Already Have
I am not a decorator. Not even close. While it is lovely, it will never be featured in House Beautiful or Better Homes & Gardens. I am totally okay with that. My goal is not to win any decorating awards, but to have a functional, cozy space that I love. For me, that means a space that is organized, free of clutter, and reflects my family’s interests.
And most of the time, I feel like it does, but every few months I start getting an itch to do a little redecorating. It could be inspiration from Pinterest, a magazine photo, or just noticing something cute during a visit to a friend’s house. Over the years I’ve realized that change and beauty are necessary to keep us inspired and motivated, so I am always on the lookout for new, fun, and inexpensive ideas to breathe a little fresh air into my décor.
As anybody who’s gone through the pain of a remodel knows: real, serious, redecorating can be quite an undertaking—not only because of the schedule disruption (and spatial disruption), but also the mounting costs to your pocketbook. The whole process can wreak havoc on your budget…and your sanity! But sometimes we all need a little refresher to our living space. Rather than going wild at Pottery Barn or even IKEA, there are simple ways that anyone can enjoy a new look, even on the tightest shoestring budget.
Here are 7 ideas to get you started:
1. Rearrange
One of the easiest, least expensive things is do rearrange the furniture you own. Try something different—split up your sectional, put your bed on the opposite wall, or change the end table to the other side of the chair.
Enlist the help of a husband or patient friend, and try switching things up. If you’re very particular about the process, you’ll want to use a measuring tape and sketch out your plan beforehand. If you’re moving very large items, keep in mind the placement of artwork, wall hangings and lighting.
Rearranging can be a simple undertaking or a day-long project. If you’re really set on the arrangement you have or if your furniture really only works in one set up, try changing out table items. Move the accessories from the living room to the dining room or move in a lamp from the bedroom to a corner of your office.
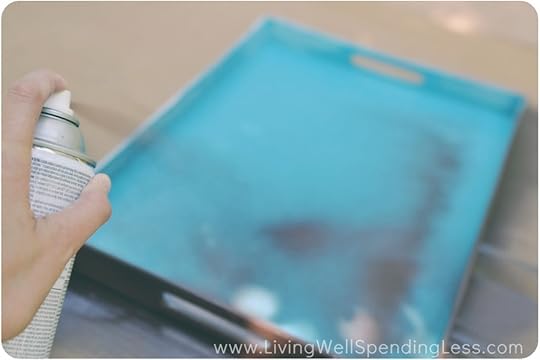
2. Apply a Fresh Coat
Adding a new paint color to anything can change the whole look of a piece. Watch for a thrift store or flea market piece, sand it, add a fresh color—and voila! Teacarts, end tables and plant stands can be a great place to start. Bookshelves really stand out when the back is painted. The effect is subtle, but definitely gets noticed.
Many stores offer small “sample” paint bottles that have enough paint to cover a very small item. Spray paint can also work beautifully and can really add a lot of oomph for just a few dollars.
If you have a box of outdated knickknacks somewhere, you’ll be amazed what a coat of white paint can do. Cover picture frames and a few vases or flowerpots with a glossy white paint and you suddenly have a collection of fine “porcelain” accessories that look amazingly uniform and chic on a bookshelf. Try black, red or any solid color. (Watch out though—painting can get addicting!)
Fabric can also be painted. Any canvas-like fabric will take well to latex paint. Rugs and pillows (although not as comfortable) can be easily covered. The old standby of Rit Dye can be used to dye washable fabrics, like throws, as well as curtains. Be sure you test the dye first and don’t color anything you’re too attached to. Mistakes can happen, of course, but so can happy accidents.
3. Add Accent Colors for POP!
Assess your room and look for a contrasting color to add some life—a few strategically placed items in red or orange, or a rosy, happy hue can punch up a room. Add red ribbons as tiebacks on blue curtains or add them to trim the edge of a white lampshade in a fun color.
If you aren’t sure what goes with your current color scheme, check out a fabric store. Look for swatches that contain the main colors from your décor, plus an accent. Often remnants can be purchased for deep discounts. Try covering a few throw pillows for a great and easy look. If sewing just isn’t your thing, try covering a dining chair seat. Believe it or not—just a little stretching and stapling can give you an instant room makeover with absolutely zero sewing.
Also look for subtle colors already in the room, like a hint of yellow in an accent rug, or a bit of blue in a piece of artwork. Once you’ve found a color that speaks to you, add it here and there, and watch as it stands out.
When in doubt, metallic can make a huge statement—plus, it really goes with everything. Chrome paint, silver trim or brass accents can be achieved with a little paint. New vintage-look drawer pulls or handles can be purchased at home improvement stores and closeouts, adding a lot of bang for your buck.
4. Get Artsy with Decoupage
Everything old is new again…the 1960s and 70s trend of decoupage can be used in surprisingly fresh and interesting ways to give new life to all sorts of items. A bottle of Mod Podge is just a few dollars. Simply follow the instructions and hit the final product with a coat of polyurethane to finish.
Try covering some clear bottles (you can reuse candle jars) with tissue paper and decoupage medium. The effect is surprisingly glass-like and beautiful and it can really bring out an accent color. Use washi tape, scrapbook or origami papers in pretty patterns to cover aluminum cans to spice up a desk or to use as a cute herb planter in a kitchen window, or use pretty fabric to cover an old cookie sheet for an instant tray.
Frames and boxes also look beautiful with a decoupage cover made of wrapping paper or decorative paper. For something a little funkier, try maps or vintage magazine pictures and clippings. Go really wild and cover a tabletop or surface. The trick to keeping things fresh is to use a uniform color scheme, such as black and white with blue accents.
5. Share Meaningful Memories
Decorate using items that are meaningful and important to you—it’s one of the most impactful ways to decorate any space. Framed pieces created and drawn by a child? A framed map outlining the route of a recent family vacation? Some of the best “art” I’ve ever seen!
Bring the outdoors in. When you go on a family hike or trip to the beach, collect seashells, rocks or other small items and group them on a bookshelf. Mount a wine cork from your anniversary on a piece of white foam core, include the date and frame in an inexpensive shadow box.
The impact of like-items is huge. Frame the tickets from a sporting event and group them with your son’s prized bobble-head and signed ball. Every time you pass the shelf you’ll smile and remember that day.
On the same token, avoid feeling too “themey” or tied to one idea. Themed rooms can quickly become dated or feel too contrived. By adding just a few items that are meaningful and cherished, you can be sure that your house reflects your family and doesn’t feel cluttered or overwhelming.

6. Go Big
If you want a lot of impact for very little cost, try a DIY art project on one wall of a room. While this is not for the faint of heart, it can offer a huge return with little investment. The canvas above is one I made to fill the huge wall above our library. It is very large and it took forever to make, but five years later, I still love it. It is also the first thing most people comment on in our home!
Try a modern look by painting a few canvases with a solid color or adding a gradation effect by fading one color into another. Young Picassos can try their hand, too! Your kids will be thrilled when their work is receiving compliments as the modern wall hanging in the dining room.
Black and white photo prints literally make everything look great. Try converting some family favorites to black and white, then grouping them together on a wall. Printing them out and placing several together in dollar store frames can make quite a statement. To add a little more to the look, try painting a series of different vintage frames a uniform color.

7. Declutter
Sometimes we forget that the best decorating doesn’t come from adding new things, but from paring down to the items you really love. As much as I tell myself that a quick trip to Target will be the answer to my slump, the truth is that most of my restlessness in decorating comes from having too much stuff, not too little. It is always amazing to me how much more I love and enjoy my spaces after I have spent some time getting rid of the things I don’t really like that much.
If decluttering is on your list but you aren’t quite sure where to begin, be sure to check out our free Clutter Free Challenge, which starts October 1st!
Take it Slow….
With just a little bit of time and effort, you can have the change you crave without spending a fortune. And don’t worry about doing everything all at once. Decorating isn’t about expensive designer items, but about using the items that are important, meaningful and joyful to you and using them to inspire within your home. Figuring out what you really like can take a while. I know it has for me!
Share your ideas with others and look on Pinterest and or design blogs for ideas. Keep notes on things you like. What doesn’t work for your house in the summer may really warm it up in the winter. Find inspiration in nature and from your family and those around you, then incorporate that beauty in your home to make it exactly what you want it to be.
Inexpensive Decorating Projects
Still not sure where to start? I’ve done a lot of cheap or free decorating projects over the years! Here are some of my favorites:
Fabric Covered Tray
Dollar Store Ombre Vases
DIY Beach Glass Bottles
Easy Burlap Wreath
Chalkboard Canvas Wall Art
Framed Fabric Art
Upcycled Pallet Art
Cozy Chevron Minky Throw
Dollar Store Makeup Tray
Embroidery Hoop Art
DIY Fabric Covered Candle
Easy Fabric Table Runner

* * *
What are your favorite frugal decorating tips?
Pin It
The post 7 Ways to Decorate with Things You Already Have appeared first on Living Well Spending Less®.


![[image error]](http://www.livingwellspendingless.com/wp-content/uploads/2014/09/7-Ways-to-Decorate-with-Things-You-Already-Have-on-Hand-5.jpg)
![[image error]](http://www.livingwellspendingless.com/wp-content/uploads/2014/09/Easy-Does-It-option-1.jpg)
![[image error]](http://www.livingwellspendingless.com/wp-content/uploads/2013/05/DSC_0864.1.jpg)