
Ruth Soukup's Blog, page 99
October 15, 2014
31 Days to a Clutter Free Life: Master Bathroom (Day 15)
Day 15: Master Bathroom
An organized master bathroom can diminish stress and help you in a variety of ways. From more efficient mornings to better hygiene, skin care and general health, having an organized master bathroom is key. Just like a command center for your home, your master bathroom is a command center for your body and beauty.
Second to the kitchen, the master bathroom is probably one of the biggest areas of clutter accumulation, and one of the most challenging areas to keep clean. Beauty and bath products can pile up in drawers—and hair, hairspray, moisture and mildew add to the mix, making it a perfect storm of gross and grime (and that’s not even counting the toilet).
Yet, the master bath is a place that we clean the dirt of the world off our bodies, so it should become a sanctuary where we can literally put on our best face to the world. Organization and cleanliness is mandatory in this area of your home.
Objective: A clean, organized “body command center.”
Assess the current situation: What products do you use daily? Weekly? Are you utilizing storage space efficiently? Where does dirt, grime and mildew hide in the bathroom and how can you prevent it?
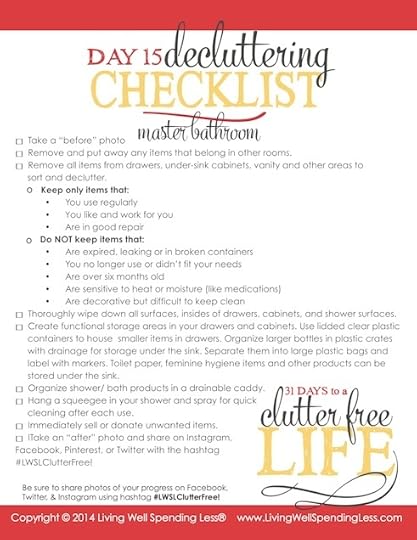
{Get Day 15 De-cluttering Checklist here}
Assignment:
1. Remove and put away any items that belong in other rooms. If necessary, use a basket to collect items, then distribute them to their proper homes.
2. Sort and Declutter. Remove all items from drawers, under-sink cabinets, vanity and other areas. Discard anything that has not been used within the last three months. Check all expiration dates and discard anything that is over six months old. (Lotion can separate, and sunscreen and other products lose effectiveness and can even go rancid.)
Keep only items that:
You use regularly
You like and work for you
Are in good repair
Do not keep items that:
Are expired, leaking or in broken containers
You no longer use or didn’t fit your needs
Are over six months old
Are sensitive to heat or moisture (like medications)
Are decorative but difficult to keep clean
3. Clean. Thoroughly wipe down all surfaces, insides of drawers and cabinets, and shower surfaces. Shower organizers can be scrubbed or run through your dishwasher.
4. Organize. Place “like” items together—for example: hair products and accessories, shower products, under-sink storage items.
5. Beautify. If you like, line drawers with pretty paper or drawer liners.
6. Create functional storage areas in your drawers and cabinets. Use lidded clear plastic containers to house smaller items in drawers. Organize larger bottles in plastic crates with drainage for storage under the sink. Separate them into large plastic bags and label with markers. Toilet paper, feminine hygiene items and other products can be stored under the sink.
7. Organize shower and bath products into a drain-able caddy—keep one of each type of product (one shampoo, one conditioner, etc.). Hang a squeegee in your shower and spray for quick cleaning after each use. Discard any sponges, loofahs, or other items that are more than one month old (they are a prime area for bacteria growth) and run synthetic scrubbies through the wash on a weekly basis to disinfect.

1. Storage Packed Master Bath (Ikea.com)
2. Cabinets Galore (HGTV.com)
3. Clever Bathroom Storage (MarthaStewart.com)
4. Tame Your Hair Dryer (RealSimple.com)
5. Casual Cabinet (GoodHouseKeeping.com)
An InLinkz Link-up
Pin It
The post 31 Days to a Clutter Free Life: Master Bathroom (Day 15) appeared first on Living Well Spending Less®.


October 14, 2014
31 Days to a Clutter Free Life: Master Closet & Drawers (Day 14)

Day 14: Master Closet and Drawers
Closets vary greatly in shapes, sizes and storage solutions. Just like variations in each person’s own personal style, each closet is completely different too. Perhaps you share a closet with your spouse. Perhaps you are lucky enough to have a walk-in closet. Perhaps you live in an apartment where an out-of-the-box wardrobe is your only solution to clothing storage.
No matter the space, having a closet that is easily accessible, clean, organized and beautiful is key; your entire persona, your style and your sense of self will benefit from having a great closet.
Imagine quickly finding items every morning and always having great outfits that are in-style, clean, in good repair and fit properly—right at your fingertips! How much easier would that be, rather than frantically searching for a matching pair of socks, dealing with a broken heel, realizing there is a snag in your sweater, or discovering a fallen pant hem?
Not only does proper closet storage make it easier to feel and look great, but it truly prolongs the life of your clothing because closet organization means your clothing is not stretched, smashed and wrinkled, or tossed on the floor. You will get more wear out of your outfits and they will last longer when they are stored neatly with plenty of space.
Objective: An organized master closet space that houses your current wardrobe in a clean, easily accessible manner.
Assess the current situation: What items need repair, are soiled, stained, snagged or show signs of wear? How much closet space do you have, realistically? What accessories need to be stored in your closet and do you have the proper containers to do so? Do you love everything in your closet? Does your clothing flatter you and is it currently in style?
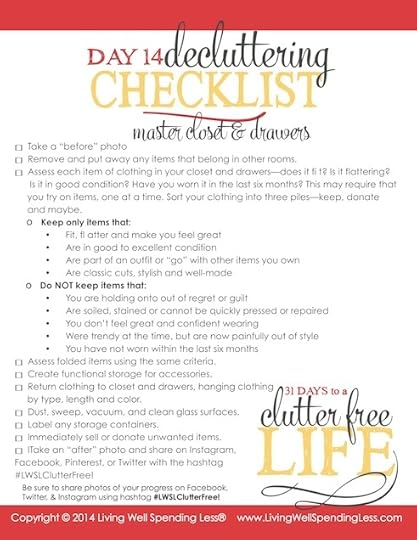
{Get Day 14 De-cluttering Checklist here}
Assignment:
1. Remove and put away any items that belong in other rooms. If necessary, use a basket to collect items, then distribute them to their proper homes.
2. Assess each item of clothing in your closet and drawers—does it fit? Is it flattering? Is it in good condition? Have you worn it in the last six months? This may require that you try on items, one at a time. Sort your clothing into three piles—keep, donate and maybe.
Keep only items that:
Fit, flatter and make you feel great
Are in good to excellent condition
Are part of an outfit or “go” with other items you own
Are classic cuts, stylish and well-made
Do not keep items that:
You are holding onto out of regret or guilt, or to those items you’re hoping to fit into again “someday”
Are soiled, stained or cannot be quickly pressed or repaired
You don’t feel great and confident wearing
Were trendy at the time, but are now painfully out of style
You have not worn within the last six months (or the last year for special occasion items)
3. Re-assess the maybe pile. Discard anything that cannot be repaired or cleaned within one week. Let go of anything you don’t love or that doesn’t fit.
4. Assess shoes. Polish if needed and wipe bottoms with a damp cloth. Store all shoes in a shoe rack or container.
Keep only items that:
Fit
You can wear for an entire day or walk in for a half an hour
Do not require more than a polish or a quick fix (or those you will repair within one week)
Do not keep items that:
Are uncomfortable
Are out of style
Will not fit in your allotted space
5. Assess folded items and accessories. Hang scarves and ties on proper hangers, discard or donate any item you have not worn or used in six months. Store handbags, empty and clean, stuffed with tissue paper and housed in stackable boxes.
6. Hang clothing by type, length and color. Face hangers the same direction, leaving at least half an inch between each item. Use proper hangers for slacks and skirts. Keep only items that will fit in your allotted space.
7. Keep it organized. Going forward, start on one side of your closet and wear a different item each day, taking a quick snapshot of yourself each morning. When you get to an item that you don’t want to wear, or discover upon wearing that it doesn’t fit, flatter or needs to be fixed, discard or donate it rather than putting it back in the closet.

1. Custom Closet Organization (BHG.com)
2. Customizable Closet Systems (ContainerStore.com)
3. Dream Walk In (EasyClosets.com)
4. Modern Masculine (Ikea.com)
5. Create Your Ideal Closet (MarthaStewart.com)
An InLinkz Link-up
Pin It
The post 31 Days to a Clutter Free Life: Master Closet & Drawers (Day 14) appeared first on Living Well Spending Less®.
October 13, 2014
31 Days to a Clutter Free Life: Master Bedroom (Day 13)
Day 13: Master Bedroom
Is your bedroom a sanctuary? If not, it should be. Most sleep experts recommend that your bedroom should be primarily for sleeping and relaxing. The room should be cool, calming and inviting. It should also be free of dust and clutter, particularly for allergy sufferers.
The sad truth is that in today’s busy world, our beds often become places where we work, hang out with children and pets, eat, watch television, store things under, and do everything BUT sleep. However, proper sleep has been linked to weight loss, increased productivity, concentration and happiness, and general well-being. Ensuring your bedroom is a place where you and your partner can connect, relax and find solace and peace from the outside world is vital.
Whenever possible, bedrooms should have minimal décor and soothing colors. Bedding should be clean, dust-free and changed weekly. Pillows and mattresses are home to dust mites and should be encased in allergen-protective covers. Pillows should be washed monthly and replaced regularly (every 6-12 months is recommended.) Food (and yes, even pets) should be kept out of the bedroom. Under-bed storage should be minimal (if at all) and your bedroom should be free of electronics, piles of books and work, or anything that makes you feel uneasy.
Studies show that the ideal temperature for sleeping is 65 degrees. A fan can help ensure your bedroom stays cool as well as create white noise. Use caution with electronics in the bedroom—even the light created by an alarm clock or bedside phone can cause sleep disturbances. A small bedside table should hold a reading item, a water bottle, tissues, and little else. Lamps or soft lighting are preferred, as they help relax and prepare your body for sleep. Your bedroom should be a peaceful comforting place where you can rest soundly and awake refreshed and ready to face the day.
Objective: A relaxing bedroom sanctuary free of clutter that promotes and encourages good sleep practices.
Assess the current situation: What items do you truly need for sleep? What items can be removed from the bedroom and stored elsewhere? What do you store under your bed? What items are on your nightstand? What are your electronic, fan and lighting situations in the bedroom and how can these be improved?

{Get Day 13 De-cluttering Checklist here}
Assignment:
1. Remove and put away any items that belong in other rooms. If necessary, use a basket to collect items, then distribute them to their proper homes. Be sure to especially focus on items that distract from sleeping.
2. Sort and declutter. Clear all flat surfaces and gather items in one place to sort and declutter.
Keep only items that:
Pertain to sleep and bedtime
Are calming, soothing and relaxing
Are currently useful
Are in good working order
You absolutely love and want to display
Do not keep items that:
Should be stored elsewhere
Interfere with your sleep
Cause you anxiety or reduce your concentration
You don’t use
You don’t like
You feel obligated to keep because it was expensive
You feel obligated to keep because it was a gift
Are constantly in your way
3. Change bedding. Ensure that comforters, pillows and blankets are washed and clean. Replace if necessary.
4. Remove items that are stored under the bed. Under-the-bed storage can add to an overall feeling of clutter in the room. This area also tends to collect a lot of excess dust which is detrimental to healthy sleep.
5. Remove any furniture that is no longer working for your space, whether it is broken or damaged or simply not a good fit for the room. Either throw it away, donate it, or sell it on Craigslist or Facebook; then, if necessary, rearrange remaining furniture to make your layout more functional.
6. Toss unwanted items, or donate them to a local thrift shop if appropriate. Consider selling any expensive items that may be valuable on Craigslist or Facebook.

1. Traditional Elegance Work Space (RealSimple.com)
2. Contemporary Design with Practical Storage (ArchiMagz.com)
3. Simple Storage Solution (GoodHouseKeeping.com)
4. Mid Century Modern (WestElm.com)
5. Sweet Dreams Bed With Storage (HomeDesignerIdeas.com)
An InLinkz Link-up
Pin It
The post 31 Days to a Clutter Free Life: Master Bedroom (Day 13) appeared first on Living Well Spending Less®.
October 12, 2014
31 Days to a Clutter Free Life: Pantry (Day 12)
Day 12: Pantry
Now that you’ve tackled your cupboards, the next logical step is to declutter your food pantry. A well-stocked pantry is saves time by allowing you to keep essentials on hand, thus cutting back on trips to the store. An organized pantry also helps you save money by eliminating the need to eat out because there is nothing to eat.
Pay attention to staples that your family uses—pastas, cereals, low-sodium canned vegetables and fruit, beans and tomatoes, dried fruit, rice, grains, nut butters and baking ingredients. When you see these items on sale, stocking up on a few of each item can ensure you always have a go-to solution to feed your family.
By the same logic, pantries should be easily accessible, just like at the store: labels should be face-out and ingredients should be rotated regularly. Everything should be stored in airtight containers, clearly labeled and easy to access. It is important to remember that the pantry should NOT become a dumping ground for expired, strange or never-used ingredients. While some storage of lesser-used appliances, paper towels, and other items might be necessary, the primary purpose of a pantry is to store food.
Objective: A convenient and easily accessible pantry stocked with only staple, regularly used ingredients and basics for you and your family.
Assess the current situation: How much pantry space to you have? Are the items in your pantry old, expired or rarely used? What are the main staples your family uses during a typical week? Similar to your cupboards, what items are essential, and what items can be donated or thrown out? Are the shelves and storage containers appropriate or do you need other storage solutions?
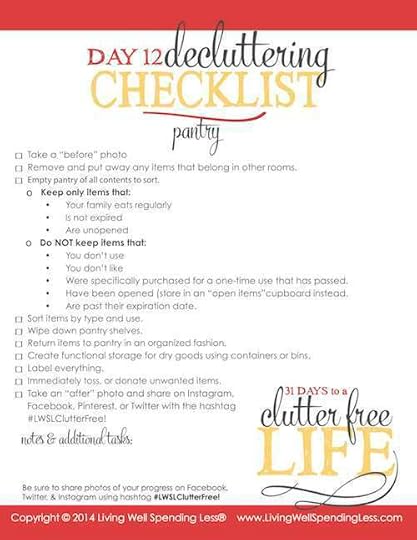
{Get Day 12 De-cluttering Checklist here}
Assignment:
1. Remove and put away any items that belong in other rooms. If necessary, use a basket to collect items, then distribute them to their proper homes.
2. Empty pantry of all contents to sort. Discard any open or expired items; rarely used ingredients that are unopened should be donated to your local food pantry.
Keep only the pantry staples that:
Your family eats during a typical four-week period
Is not expired and unopened
Do not keep items that:
You don’t use
You don’t like
Were specifically purchased for a one-time use or occasion
Have been opened (currently open items should be stored in the cupboard, rather than the pantry)
Are beyond their expiration date
3. Return items to pantry in an organized fashion. Pair like-items together and turn labels forward so they can be easily read. Place items with expiration dates far in the future at the back. Pasta and dry ingredients can be repackaged into dry, airtight storage containers or jars and labeled with expiration dates. (Tip: Freezing rice and pasta for 24 hours then storing in airtight containers can help prevent weevils!)
4. Store bulky items. Place paper towels, bulk food items, and rarely used appliances on the top or bottom shelves to keep ingredients at eye-level. Prioritize and keep only what you will use and what you can reasonably organize into the space.
5. Ensure all items are accessible. Consider storage solutions like stackable containers for dry ingredients.
6. Toss unwanted items, or donate them to a local thrift shop if appropriate. Consider selling any expensive items that may be valuable on Craigslist or Facebook.
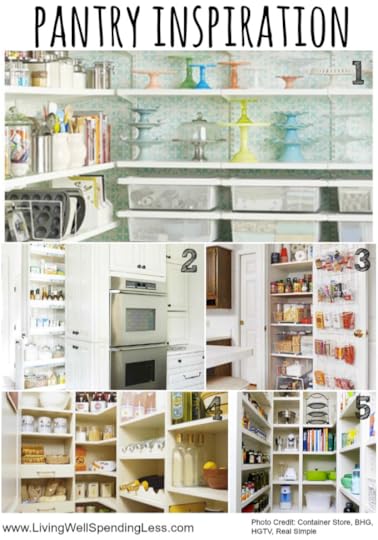
1. Pretty Bakers Pantry (ContainerStore.com)
2. Pull Out Pantry (BHG.com)
3. Stash Items Over The Door (RealSimple.com)
4. Stay Well Stocked (HGTV.com)
5. Easy Finds (BHG.com)
An InLinkz Link-up
Pin It
The post 31 Days to a Clutter Free Life: Pantry (Day 12) appeared first on Living Well Spending Less®.
Weekend Wandering


Happy Sunday! I hope you are all having a wonderful & relaxing weekend! After six days onboard the Carnival Breeze, we are now home and ready to jump back into our October projects (in between loads of vacation laundry, of course!) This morning Chuck and I are planning to plant our fall garden, which we are pretty excited about. This will be our fourth attempt, and while we have learned a lot each time, we have yet to actually harvest more than a few random tomatoes and cucumbers. However, this year we have done a lot more research and we are trying our hand at square foot gardening. If you have any tips, we’d love to hear them!
This afternoon we are planning to get caught up on the days we missed in the Clutter Free Challenge! If you haven’t joined yet, there is still time! It is absolutely free to participate, and if you are a blogger you can join in the fun by blogging about it and linking up each day!
But now on to the good stuff! Here is what I loved this week:
* * *
First of all, I wish it would get a bit cooler here so I could start taking advantage of all these lovely soup recipes! This Copycat Panera Broccoli Cheddar Soup from Cincy Shopper sounds delicious

This Quick Chicken Orzo Soup from With a Blast cooks in no time and serves as a wholesome weeknight meal!

These Pumpkin Muffins with Cream Cheese Frosting from The Little Farm Diary might be the perfect fall recipe.

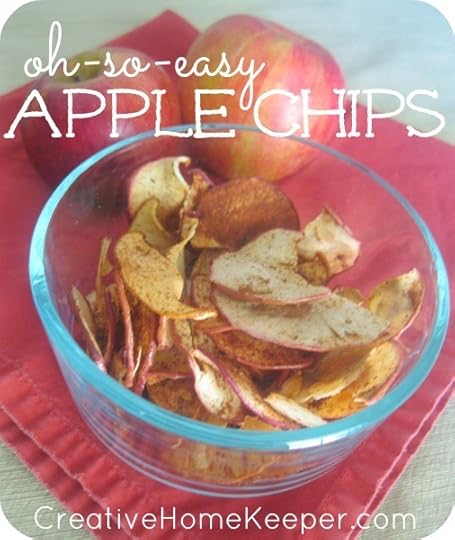
Of course these homemade Oh-So-Easy Apple Chips from Creative Home Keeper only require two ingredients. Yum!
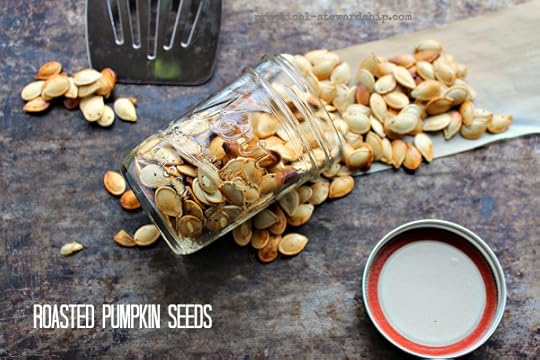
Mmmmmm…..pumpkin seeds! This Roasted Pumpkin Seed Recipe from Practical Stewardship can be made sweet or savory.
There were a ton of gorgeous fall and Halloween-themed DIY projects this week. These Rustic Bookpage Pumpkins from View From the Fridge are so adorable!

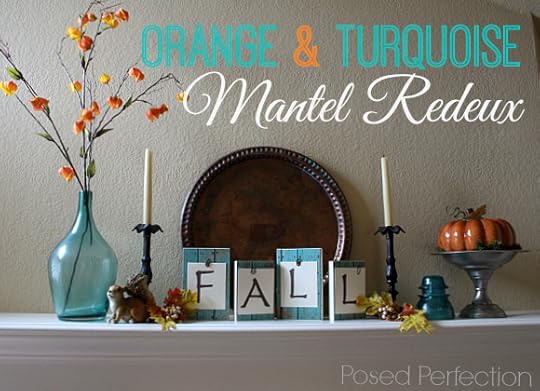
Posed Perfection shares the decor for her Orange and Turquoise Mantel Redeux with her finds from the local Goodwill. What a great way to keep things fresh!
Crafty Allie turns a simple store bought straw wreath into this fabulous Fall Wreath. I love the fabric flowers!

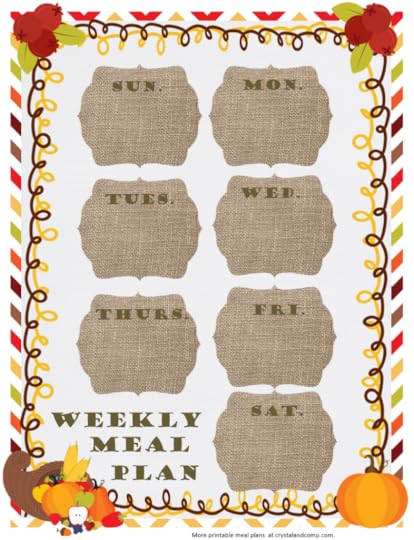
Faith Filled Food for Moms has an adorable Fall inspired Meal Planner that is printable and free!
Planning a date night can be tricky at times, especially on a tight budget. These Free Printable Date Night Starters from Time 2 Save Time 2 Give can make any night special, even if you are staying in!

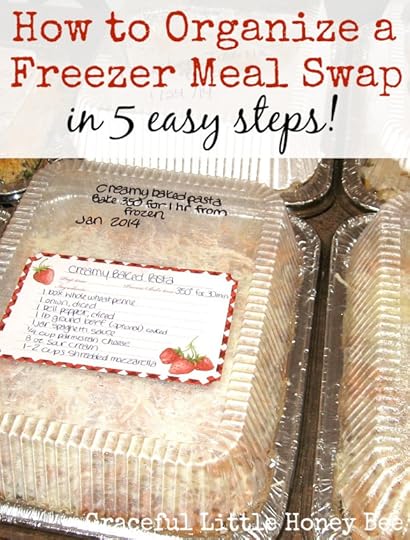
Have you ever wanted to Organize a Freezer Swap? Graceful Little Honey Bee has 5 easy steps to follow to have a successful and stress free freezer swapping event!
There were lots of fantastic money saving tips this week. From This Kitchen Table 10 Ways to Drastically Reduce Your Grocery Budget. Number 5 is a must!

Frugality Gal has Budgeting for Beginners: How to Treat Your Budget Like a Diet.

These 3 Steps to Setting Financial Goals from The Budget Mama are great practical life lessons that can be applied to any part of your life!

Finally, Six Figures Under has 6 Smart Ways to Prevent Buyer’s Remorse. Tip number 4 is definitely easier for my husband then for me!

* * *
What did you love this week?
Pin It
The post Weekend Wandering appeared first on Living Well Spending Less®.
October 11, 2014
31 Days to a Clutter Free Life: Kitchen Cupboards (Day 11)
Day 11: Kitchen Cupboards and Drawers
With your newly-cleared counter surfaces to inspire you, it is time to dig a little deeper, into those sometimes-scary-but-usually-hidden areas behind closed doors Yes, it is time to tackle the kitchen cupboards (and drawers.)
How ironic that the exact feature that makes them so useful—closed doors—is the feature that also makes them so prone to clutter and to collecting far more kitchen items than we can realistically use? The key to permanently ridding this zone of clutter will be a combination of refusing to store the unessential and vigilantly labeling everything.
Objective: Organized and functional kitchen cupboards and drawers that contain only the essentials and make necessary items easy to find.
Assess the current situation: How are your cupboards being used right now? What are your biggest clutter struggles in your kitchen cupboards? What would you like to change?
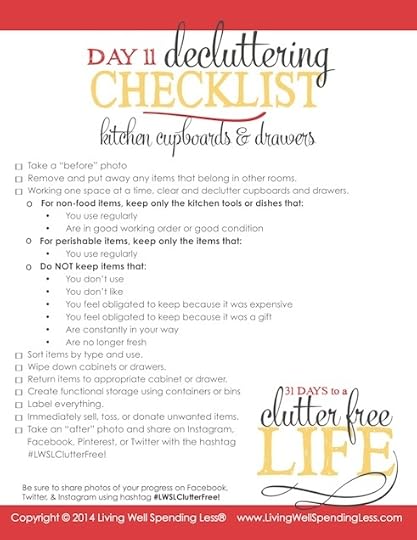
{Get Day 11 De-cluttering Checklist here}
Assignment:
1. Remove and put away any items that belong in other rooms. If necessary, use a basket to collect items, then distribute them to their proper homes.
2. Clear and declutter. Working one drawer or cabinet at a time, clear and declutter each individual space.
For non-food cabinets/drawers:
Keep only the tools, dishes, or kitchen items that:
You use regularly
Are in good working order
Are in good condition
Do not keep items that:
You don’t use
You don’t like
You feel obligated to keep because they were expensive
You feel obligated to keep because they were a gift
Are constantly in your way
For baking and seasoning cabinets/drawers:
Keep only the baking and seasoning items that:
You use regularly
Do not keep items that:
Are no longer fresh
You don’t like
3. Sort items by type and use. Put like items together in a way that makes sense and creates the most functional use, such as baking supplies, pots and pans, cooking essentials, etc.
4. Return items to cabinets or drawers in an organized fashion, creating functional storage using containers or bins wherever necessary for smaller or perishable items.
5. Label everything! The more clearly a designated home for an item is labeled, the more likely it that it will be returned to its proper spot.
6. Toss unwanted items, or donate them to a local thrift shop if appropriate. Consider selling any expensive items that may be valuable on Craigslist or Facebook.
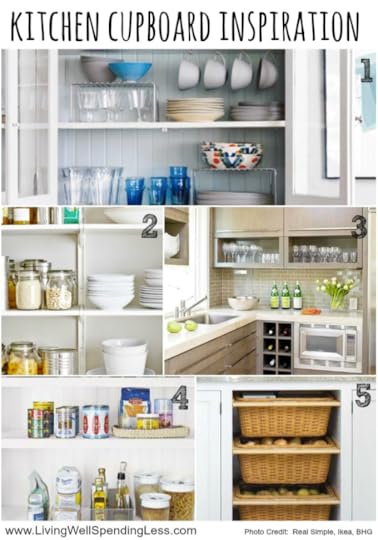
1. Dishes on Display (RealSimple.com)
2. Smart Shelving (Ikea.com)
3. Kitchen Cabinets That Store More (BHG.com)
4. Categorize Foods (replace this image maybe) (RealSimple.com)
5. Basket Case (BHG.com)
An InLinkz Link-up
Pin It
The post 31 Days to a Clutter Free Life: Kitchen Cupboards (Day 11) appeared first on Living Well Spending Less®.
October 10, 2014
31 Days to a Clutter Free Life: Kitchen Counters (Day 10)
Day 10: Kitchen Counters
Like the dining table, the ample flat surface area provided by kitchen counters is often a catch-all for, well, everything—mail, an endless stream of school papers, groceries, appliances, dishes that need to be put away, fruit bowls, the butter dish, salt and pepper shakers, loaves of bread, recycling……you name it. If it comes in the kitchen, it will most likely end up on the counter.
The problem with this is that cluttered counters do not a happy kitchen make! It is difficult and frustrating to try to cook and work on counters full of things that don’t belong.
The trick to tackling this easily cluttered space will be to establish a clear and vigilant no-clutter policy by removing everything but the barest essentials, and then creating a collection zone for the items that find their way in so that they can be quickly removed.
Objective: Clear and functional kitchen counters that make cooking and working in the kitchen a pleasure instead of a chore.
Assess the current situation: How are your counters used right now? What are your biggest clutter struggles on the counters? What would you like to change?

{Get Day 10 De-cluttering Checklist here}
Assignment:
1. Remove and put away any items that belong in other rooms. If necessary, use a basket to collect items, then distribute them to their proper homes.
2. Clear and de-clutter counters. Remove all items that are not absolutely critical, using the following criteria.
Keep only the appliances or other items that:
You use more than three times a week
Are in good working order
Do not keep items that:
You don’t use
You don’t like
You feel obligated to keep because they were expensive
You feel obligated to keep because they were a gift
Are constantly in your way
3. Create new storage space. You will need to create additional storage options for any appliances or other counter items that you still want to keep but don’t use very often.
4. Toss unwanted items, or donate them to a local thrift shop if appropriate. Consider selling any expensive items that may be valuable on Craigslist or Facebook.
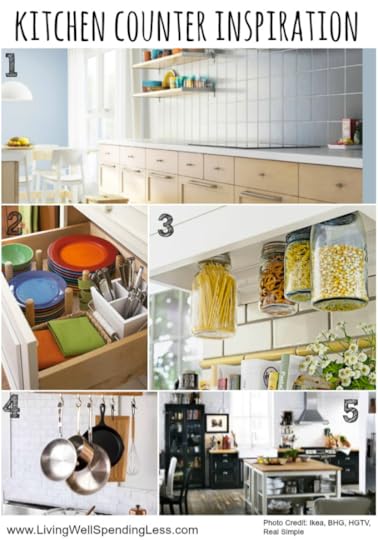
1. A Kitchen Catered to You (Ikea.com)
2. Dish Drawer For Snappy Table Setting (BHG.com)
3. Ditch the Bulky Boxes & Save Space At the Same Time (HGTV.com)
4. Clutter Free Countertops (RealSimple.com)
5. Form & Function- Kitchen Island & Storage Area (Ikea.com)
An InLinkz Link-up
Pin It
The post 31 Days to a Clutter Free Life: Kitchen Counters (Day 10) appeared first on Living Well Spending Less®.
October 9, 2014
31 Days to a Clutter Free Life: Dining Area (Day 9)
Day 9: Dining Area
Sharing meals together is one of the most important things you can do for your family. Believe it or not, family dinners are more important than play, reading stories, or any other family events in young children’s vocabulary development. Furthermore, kids who eat more often with their parents are far more likely to earn all A’s and B’s in school, and far less likely to smoke, use drugs, become depressed, or develop eating disorders.
I don’t know about you, but for me those are some pretty compelling reasons to make sure that my family’s dining area is ready for, well, dining. The problem in this space, of course, is that dining tables are useful for so many other things, such as homework, playing bills, doing puzzles or craft projects, or holding all the paper clutter or other items we’re just not sure what to do with.
The key, then, to tackling this space, is to make sure that the table surface is kept clear but that there are nearby storage solutions for any other uses that the table may serve.
Objective: An open, comfortable, and inviting dining space for guests and family to gather, connect, relax, and eat together.
Assess the current situation: How is this room used right now? List all the purposes of this room. What are the biggest clutter struggles in this room? (Toys, clothing, paperwork, garbage, etc.?) How is the layout of the room working for you? What would you like to change?
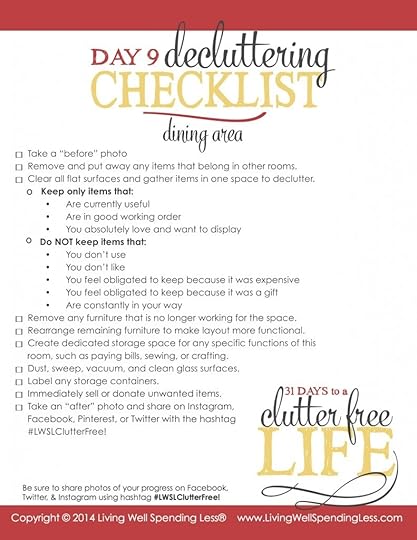
{Get Day 9 De-cluttering Checklist here}
Assignment:
1. Remove and put away any items that belong in other rooms. If necessary, use a basket to collect items, then distribute them to their proper homes.
2. Clear all flat surfaces—dining table, shelves, buffets. Collect all items (picture frames, candles, decorative knick knacks) in one area, such as the dining room table or kitchen counter. De-clutter remaining items.
Keep only the items that:
Are currently useful
Are in good working order
You absolutely love and want to display
Do not keep items that:
You don’t use
You don’t like
You feel obligated to keep because it was expensive
You feel obligated to keep because it was a gift
Are constantly in your way
3. Remove any furniture that is no longer working for your space, whether it is broken or damaged or simply not a good fit for the room. Either throw it away, donate it, or sell it on Craigslist or Facebook; then, if necessary, rearrange remaining furniture to make your layout more functional.
4. Create dedicated storage areas in this space that coincide with the way the space is used. Do you pay bills and sort paperwork at the table? Consider adding a pretty file cabinet that can hold all your necessary items for when you need them. Is this where your family does homework or crafts? Determine what items you need and create simple storage solutions that work.

1. Sophisticated Storage For Entertaining (BHG.com)
2. Ideas That Bring Everyone To The Table (Ikea.com)
3. Classic Comfort Cube Storage (ArchitectureArtDesigns.com)
4. Storage That Satisfies Your Cravings (Ikea.com)
5. Mix & Match Storage Style (RealSimple.com)
An InLinkz Link-up
Pin It
The post 31 Days to a Clutter Free Life: Dining Area (Day 9) appeared first on Living Well Spending Less®.
Thrifty Thursday {Week 81}

Happy Thursday! I hope you are all having a fabulous first week of October! If you follow me on Instagram you already know that my family and I are on vacation this week with my dad and stepmom onboard the Carnival Breeze. We don’t get to see my family very often so it has been wonderful to get in some good grandparent bonding time! We’ve realized this trip that our kids are finally at the perfect age–old enough to be somewhat self-sufficient, but still young enough that they love hanging out with us. I truly wish there were some way to bottle it and keep them exactly like this forever! Anyone else feel that way?
In other news, if you haven’t checked out the details of the Clutter Free Challenge, be sure to do that today–we would LOVE to have you join in the fun! If you are blogging your way through the challenge you will be able to link up each day, and you can share photos of your progress on Instagram, Twitter, & Facebook using hashtag #LWSLClutterFree.
Here are the most clicked links from last week:
1. Graceful Little Honey Bee { 30 Frugal Meal Ideas for When You’re Broke }
2. Adventures in Coupons { 15 Websites Frugal People Love to Visit }
3. Three Kids and a Fish { 5 Dinners for $50 }
4. Life in the Orchard {Forget the Budget and Start With You}
5. Single Moms Income { How to Save $500 by Christmas! }
6. Six Figures Under { Can You Freeze THAT? }
7. The Budget Mama { 31 Days of Real Life on a Budget }
8. Going Reno { How to Stock a Pantry }
9. Coupon Crazy Girl { What to Buy in October }
10. Humble in a Heartbeat {Cost Comparison: Cheese}
Never linked up before? Here’s how:
Scroll down, find the little blue “Add your Link” Button and click on that.
Follow the instructions on the next page – add a great image of your project and an interesting title. Make sure you link to the direct page of your budget friendly post – not the main page of your blog!
Try to visit at least a few other blogs at the party. Be sure to leave a comment to let them know you stopped by!
Please link back to this post somehow. There are badges available here; a simple text link is just fine too.
 Feel free to tweet about Thrifty Thursday so others can join the fun, and don’t forget to check back here Sunday morning to see which posts have been featured this week at Weekend Wandering!
If this is your first time here I also invite you to check out my blogging guide, How to Blog for Profit (Without Selling Your Soul). It is a fantastic resource if you are interested in building your blog, getting more traffic, or learning how to monetize, and the expanded 2nd edition is now available in paperback! Or, if you have read the book and are still looking to take your blog to the next level, I encourage you to check out Elite Blog Academy.
An InLinkz Link-up
Pin It
The post Thrifty Thursday {Week 81} appeared first on Living Well Spending Less®.
October 8, 2014
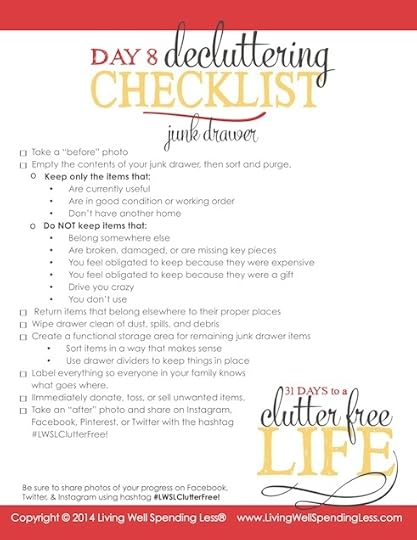
31 Days to a Clutter Free Life: Junk Drawer (Day 8)
Day 8: Junk Drawer
While maintaining a “junk” drawer might seem counterintuitive to a challenge that is intended to rid our lives of excess clutter, the reality is that this type of catchall space holds an important purpose in a well organized, clutter-free home. The fact is, not every single item we own can be easily categorized into a larger, more purposeful space. Sometimes we just need a place to hold on to the little things so we know where to find them when we need them. That said, it is also important to keep this space from becoming too, well, junky.
Objective: An organized an purposeful “junk drawer” that serves as a catchall for life’s little necessities that otherwise might not have a home.
Assess the current situation: What is the current state of your junk drawer? Do you actually use the items that are found there? Do you currently throw things in at random, or do only certain things belong? Do you have more than one junk drawer? How many catchall drawers do you think are realistically necessary in your home? What are your biggest clutter struggles when it comes to your junk drawer? What would you like to change?
{Get Day 8 De-cluttering Checklist here}
Assignment:
1. Declutter. If you have multiple junk drawers, only focus on one drawer at a time. Empty the drawer of all contents, then sort and purge:
Keep only items that:
Are currently useful
Are in good condition and good working order
Don’t have another home
Do not items that:
Belong somewhere else
Are broken, damaged, or missing key pieces
You feel obligated to keep because they were expensive
You feel obligated to keep because they were a gift
Drive you crazy
You don’t use
You don’t need or want
2. Get rid of unwanted items. Donate them to a local thrift shop if appropriate, or consider selling any expensive items that may be valuable on Craigslist or Facebook.
3. Create a functional storage space for your remaining junk drawer items. Be sure to sort them in a way that makes sense and makes them easy to access. Use drawer dividers to create specific areas for each item, and LABEL EVERYTHING so that everyone in your family knows where each item belongs!
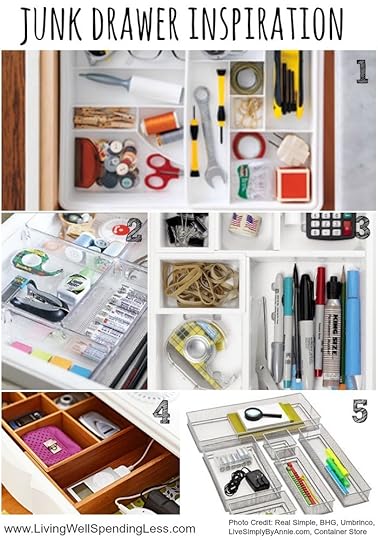
1. Tidy & Tucked Away (RealSimple.com)
2. Unclutter Your Drawers (LiveSimplyByAnnie.com)
3. Divide & Conquer (Umbrinco.com)
4. Tame Your Junk (BHG.com)
5. Everything Organized (ContainerStore.com)
An InLinkz Link-up
Pin It
The post 31 Days to a Clutter Free Life: Junk Drawer (Day 8) appeared first on Living Well Spending Less®.


