B.A. Fegles's Blog, page 16
October 6, 2016
DiscoverThe Best WordPress Drag and Drop Page Builders
The secret of WordPress blogging is that it is way simpler and more relaxed than on similar CMS platforms and that it requires minimal publishing optimization or knowledge in order to make changes on your blog.
In this aspect, WordPress made sure users can adjust settings, change or remove themes, install plugins, or complete any custom change in an intuitive way, balancing carefully between what they expect, and what is expected from them.
One way to make your WordPress blog look the way you like it is to customize yourself, but the final design can be achieved in a much easier way using WordPress page builders. These are, in fact, plugins that give you full control over your website’s aesthetics, and involve all tools you need to alter the elements or create new ones on the existing template.
These functions make page builders a reasonable visual asset all bloggers need to improve their website with a simple drag and drop mechanism. The builders market is constantly reinventing the idea and has consequently provided a variety of similar tool for both premium and free themes for designers and bloggers who simply won’t make peace with traditional websites.
The rationale that caused page builders to appear is that conventional layout customization is difficult even for experienced designers, as most themes (premium ones in particular) are packed with layouts that require HTML or CSS coding to match the design concept.
Luckily, we now have the drag and drop builders which can customize whatever element on your website, and not involve a single line of code. You can use them to add parallax backgrounds, change the number of columns, and include content sliders and full-width imagery, and much more. Whatever theme you may be using, a page builder will definitely be available.
There are two basic tasks every page builder should perform:
To let you monitor the modification while you’re making it;
To cut the time needed to build a proper website.
Let’s be honest about it: drag and drop mechanisms are the school example of quick modifications, and they won’t make you switch from the front to the back end user and the other way around in order to see what you have done. That’s why they are especially recommended for beginners looking to build great websites, but also experienced professionals who wish to become more productive.
Long story short, drags and drops are good for everyone, and that’s why you will see them in every page building plugin. On the long run, they won’t only save your time, but your money as well.
Here are few examples of great WordPress page builders you can use to create, customize, or edit your layouts without coding knowledge:
Beaver Builder
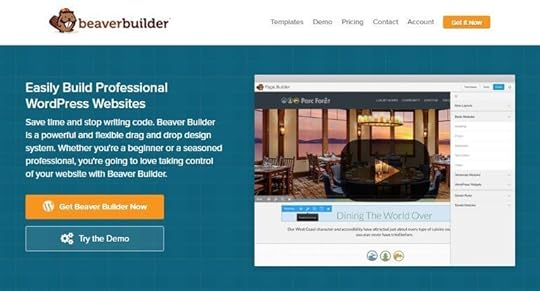
Beaver Builder is an easy drag-and-drop builder for premium WordPress themes. Its exclusive advantage is speed, the same as built in full onboarding tours thanks to which users understand your interface since moment one.
While designing, Beaver Builder allows you to observe changes while they’re being added, as there is a single sidebar from where you can drop elements on the page. Once added, you can adjust the element’s properties on the same page.
Unyson

Unyson has been developed by the ThemeFuse team. It’s a free and open source drag & drop WordPress framework with a range of extensive and flexible features.
It comes with a lot of built-in extensions like SEO, Styling, Sidebars, Sliders and more. The icing on the cake being the visual Drag & Drop Page Builder that will let users create countless pages at a drop of a dime. An awesome feature of the Unyson framework is that it includes a backup and restore tool to protect your work from user error and data loss.
Customize stunning WordPress websites with the Unyson framework, the most powerful tool for agencies and freelancers!
Site Origin’s Page Builder

The current user satisfaction leader with over 500,000 downloads is Site Origin’s Page Builder. The reason why this plugin is so popular is that it comes for free, even if it is fully functional and gives you a variety of different themes to select the one you like.
According to satisfied bloggers, Site Origin is amazing because it works with all possible themes, be those premium or free ones. The way it was designed, this plugin can respond to simple editing needs rather than requiring you to create a theme from scratch, which means it is not just another boilerplate that will waste your time.
Thanks to it, you can benefit from real-time editing, many interesting and interactive widgets, and out-of-the-box repositioning and content layouts, all of them fully displayable on mobile devices.
Upfront

Upfront can help you create stunning pages in less than no time, and does so in an easy and fun way. Using it is as simple as dragging, dropping, scaling, customizing, positioning, and monitoring changes as they happen. It will certainly do for a simple text and images website, but you can also spice it up with high-quality videos, sticky navigation, parallax, Google maps integrations, mega sliders, and much more.
WR Page Builder

WR Page Builder is a backend builder for responsive layouts with notable simplicity. You can use it to build new pages or work on your old ones, adding full-page elements, shortcodes, widgets, and other elements for unique styling variations.
Aqua Page Builder

Aqua Page Builder offers an unlimited number of variations and drag-and-drop options for creative designers, and it is at the same time one of the simplest and most intuitive builders mentioned in this article.
MotoPress

MotoPress is used for both front-end and back-end editing and includes and advanced MotoPress Content Editor Button which helps you switch between the two.
Live Composer

Live Composer used to be exclusively a premium page builder, but the fluid front-end editing it provided for users, and the multiple simplified drag-and-drop modules inspired developers to turn it into a universal WordPress solution. Nowadays, you can use it for all types of styling, image editing, or simply to add few rows and columns at a fraction of the price.
Page Layout Builder

The same as in other cases, Page Layout Builder uses drag-and-drop functionalities to transform every theme and involves special options for designers interested in squeezing modules or entire pages. It is just perfect for landing page creation, and it makes it possible to import completed layouts to new websites in seconds. You won’t be required to rebuild the same layout over and over again.
Forge

Forge has the advantage of being a real-time drag and drop building plugin, thanks to which bloggers can craft the most responsive layouts for any WordPress theme they’re using.
There is a free version of the plugin, which gives you access to features such as import/export, competitor patterns, action history, parallax integration, and much more. The developers focused on improvements and introduced a number of shortcuts for front-end compatibility, rapid changes, and smooth transition from front to back-end editing.
Octonis

Octonis is a relatively new catch for page building, where the drag-and-drop mechanism is based on styling blocks you can customize as you like or need. For the purpose, you won’t have to be a designer or an experienced coder, but some raw CSS and HTML knowledge will do for advanced customization. Note that Octonis is programmed to work with absolutely every WordPress theme.
As you can see, all it takes to create a stunning, complex, and productive page is a drag-and-drop plugin, maybe even one that doesn’t cost a dime, and which won’t require you to possess coding knowledge. The main advantage of using such plugins is that they save time, and will allow you to create your amazing website much faster than raw source codes would.
You may also like:
WordPress SEO checklist
What are push notifications, and how to use them on your WordPress site
Schema.org and WordPress – all that you need to know


October 4, 2016
ThemeFuse Update We’ve Changed our Pricing Model
We recently changed our themes’ pricing model a bit and I wanted to take a minute to explain the new changes. Some stayed the same, some changed, we think for the better. The new plans are as follows:
Personal

A Personal License purchase gives you access to a single theme of your choosing that you can use on a single website (domain). This is a one time only payment (usually $59) and it’s the best for a personal website purchase.
Basically, if you need a website for yourself or you plan to use the theme only on one website (domain) then a Personal license is the way to go.
Developer

The Developer Membership gets you access to all our current themes and all future releases with unlimited websites usage for the duration of your subscription.
This is a yearly recurring payment of $99 that will be great for designers or developers that need constant access to premium WordPress themes.
Lifetime

This is the ultimate WordPress membership. Purchasing this plan will give you full access to all our themes we currently have in our portfolio, plus all the themes we’ll be releasing for LIFE with unlimited website usage.
This is a one time only payment with no recurring fees. Perfect for web studios, web agencies or anyone that doesn’t want to bother buying another WordPress theme from here on out.
IMPORTANT! If you have the previous $195/year membership active we’ll automatically cancel your recurring billing and upgrade your ThemeFuse account to the Lifetime Access plan. Enjoy a lifetime of WordPress themes.
Conclusion
We are very excited about these new changes. They are mostly aimed at helping designers, developers, and web studios to get their hands on more premium WordPress themes for their clients. More about every plan can be found on our Pricing Page.
If you are looking to purchase one of the plans, just keep in mind that you can test any theme for free for 14 days in our Test Labs.
You may also like:
We Have to Let Some of Our WordPress Themes Go
The Practice 2.0 Is Here
The Flavour 2.0 Just Been Released

October 3, 2016
DiscoverWordPress SEO checklist
WordPress is the market’s leader among content management system, and SEO is one of the main reasons why. Put this way, you’d probably think there is no need to get yourself involved improving SEO, but that’s not exactly right. There are many best practices, such as the one outlined in our article that you can use to help your rankings improve and to drive more traffic to your website.
1. Basic SEO for your WordPress

URLs
Before doing whatever, you need to change the permalink structure. The way to do it is to click on Settings and thank Permalinks.
WWW or non-WWW
This depends on whether you want to display your website as sample.com, or www.sample.com. For the purpose, choose the appropriate version in Settings-General.
The thing, however, doesn’t end up here – you must check Google Search Console, and set the preferred domain correctly. Click on Settings, and then Preferred domain, check it, and it will be done.
Using stop words
In order to improve WordPress SEO, the worst thing you can do is to remove stop words. By stop words, we are referring to ‘a’, ‘at’, ‘the’, ‘and’, and others.
Still, we don’t recommend you to do this once the post has been published and went online, because people already used it, and there is a risk they won’t be appropriately redirected to the new one. It is WordPress that does the redirecting process, but in case it doesn’t. it will be up to the user to do this manually. That’s simply devastating for traffic.
SEO optimized titles
The content’stag, the same as the title itself, are the main ranking factors that can affect your SEO position. The mistake many website owners make is to neglect the first line that appears after the snippet and the URL, namely the date-related meta description which also stands for a title, and can help your optimization the same way the title can.
There are many blogs, where titles still look like this: ‘Title of the Blog – Blog Archive – Keyword rich post title’ or ‘Title – Keyword rich post title’. In the WordPress case, the other way around will be better, and there are two reasons for that:
The ‘early’ keywords matter more to search engine, so don’t expect the last among them to make your website rank better.
The first words will also be the ones to appear first when people are searching for your website, and they dictate your chances to get more clicks.
Optimization of individual posts
The title mentions the name of your brand and does so in the end so that people would depict it in their consecutive search. The first words are always keywords because they help people detect your posts in future. Everything else included in the title should be an additional motivation for readers to choose your post over the others.
Optimization of descriptions
The meta description of your posts is just as important as the title because search engines are about to display it in the snippet, in the form of bolded text accompanying the URL. However, the meta description is only relevant when it contains potentially researchable keywords, and in case you don’t include such, the engine will pick them automatically from the document you’re trying to post.
Optimization of images
Images are often neglected when handling WordPress SEO, even if all it takes to distinguish your images from similar file searches is to tag them, write a good description, or think of an interesting name. This way, you are enabling readers depict information that the screen reader is hiding from them, and notice your post regardless of the device they’re using.
2. Templates optimization

Breadcrumbs
Breadcrumbs are important for all of your pages and posts. They represent links added above the post’s title, displayed in the following order: Home-> Articles -> The Title of the Article. Breadcrumbs have two essential functions: they ease the website’s navigation and help search engines understand its structure in a breeze.
Headings
Headings are probably the easiest WordPress hint because all you need to do is to put your post title in brackets. What you need to remember is that you have to do this for every category page and post, instead of keeping it on the front page only. Avoid cramming the sidebars with extra headings, such as , , and so on.
Clean codes
Move all the CSS and JavaScript codes from the templates to the external files, and make sure the coding is clear enough to get a good WordPress SEO. From the users’ perspective, this means readers can cache your files while they’re loading and that the search engine won’t have to download the repeatedly.
HTML sitemaps
Not all websites need HTMP sitemaps, in particular, such that function as blogs. HTML sitemaps were designed for complex corporate sites, where pages are divided into different levels. In their case, it is exactly an HTML sitemap that helps search engines and users detect a particular post.
3. Advanced SEO tips and handling duplicate content

After handling all of the basic SEO tips we mentioned, the remaining problem will be duplicate content. The challenge of handling duplicate content is a serious one, as WordPress has several types of taxonomy:
Based on date
Based on categories
Based on tags
In addition, the WordPress logic is that users would switch between pages from the front page (namely the first post you’ve ever done). Another problem that may arise is that authors have their personal archives stored as /author/, meaning that content is automatically duplicated on their blog.
What we are trying to say here is that in conditions of total negligence of duplicate content, your post will appear on 5 different pages except the one where it was created.
4. Optimizing comments
Bloggers love comments, not just because they reveal how people like their content, but also because they are a precious source of critics and mistakes that need to be corrected. At the same time, they are the nicest and most successful way to engage clients, and motivate them to link posts o your content: in the eye of the reader, responding to a comment means you genuinely care about you’re the conversation, and you are trying hard to build a relationship with him.
If you want readers to perform a certain action on your website, go ahead and ask for it. You can do it in many ways, as for instance creating a poll, asking opinions, motivating users to share similar stories, etc.
5. Evaluating your SEO results

It is not enough to update your website in order to examine the quality of your SEO strategy – you need to measure the effect of the changes you’re making, and extract both best practices and negative trends that should be altered.
A great way to measure success is to recheck your position on the search engine, even if this can be a cumbersome process. You will have to distinguish localized from personalized rating unless your traffic has confirmed you that you’re doing a good job.
6. Optimizing SEO

The main tool for SEO optimization is keywords and key-phrases, which are in fact the words people would use to reach your content on a specific topic.
This practice reveals information but also helps you tailor your content to the requirements of different search engines, and give you an idea of how to write your posts to make them more popular.
Google offers an amazing keyword tool that depicts the most popular options, but also measures the search volume of those keywords, and determines their relevance to the competitiveness of your website.
In order to be effective, your titles must be optimized according to SEO practices, so that search engines will discern them, and offer them to readers as ‘compelling content’.
Another element to consider here is permalinks (URLs), which you can find right under your title box. Here, all terms to be included in the URL will be denoted, and unless you alter it yourself, WordPress is probably going to include all of the words mentioned in your title. While this is a good practice for ‘Eat Healthy!’ posts, it can be detrimental for the ones with larger titles.
You also need to consider categories, as they indicate the post is a part of a larger group. Tags, on the other hand, continue describing the topic and the post. You should use the preview option in every case because it will reveal the mistakes you neglected at first sight.
7. Great SEO practices for the current year

The main purpose of SEO is to drive traffic to your website, but in order to make this happen, you need a proper plan and a checklist to save you time and efforts.
The challenge that must be taken into account here is the mobile optimization, now that mobile usage is slowly taking over the desktop one.
By mobile-optimized, we mean not only mobile friendly but responsive as well. The way things are now, you should first consider the mobile version of your website first, and only then draft the desktop one.
Luckily, there are many strategies and tips you could use for better optimization. Videos, for instance, help a big deal, because they are more interesting than plain text and engage users into your B2B and B2C marketing strategy. If you skip videos, you will fall behind your competitors, and there is no exception to this rule.
Another practice is that your website content nowadays is by default social content. Social media is given incredible real estate on all search engine ratings, and we believe they will soon be treated as the same thing. For you, this will mean that you have to optimize your content with keywords for social media (prepare separate posts for it, or alter the ones you have), and index them to become relevant on all important platforms.
You may also like:
What are push notifications, and how to use them on your WordPress site
Schema.org and WordPress – all that you need to know
SEO Myths That Should Be Ignored

September 29, 2016
How To’s & TutorialsThe Fundamentals of Frontend Development: Getting Started & Beginner’s Tips
Starting on the web with no prior experience can be intimidating. But with the right resources and a clear study plan you can learn a lot about front-end web development.
In this post, I’ll share tips across the board for every phase of the web development pipeline. It doesn’t matter what your prior experience is or what your background is for working on the web. You can start from anywhere with any experience level as long as you’re willing to practice and put in the work.
There is no single correct way to learn or practice web development. But these tips can get you thinking about what you need to study and how to progress as a frontend developer.
Modern HTML & CSS
A lot has changed in the past decade on the web. The landscape of frontend development is a lot more streamlined, yet also much more complicated with tons of open source tools and libraries.
It’s crucial to start at the beginning with HTML and CSS. These languages have been the foundation of the web dating back to the 1990s and this won’t be changing anytime soon.
But the modern era of web development relies on HTML5 and CSS3, the two current specs released by the W3C for developers.
I could prattle on about all the new features but these can all be found online in much greater detail.
Instead, let’s cover a modern workflow for frontend development. It’s pretty simple and I break it down like so:
Code raw webpage in HTML
Add CSS for structure & style
Add extra features like responsive styles
Full browser testing for support
You can find dozens of free open source HTML/CSS libraries to help you build sites faster. These free resources like 960gs offer pre-built grids and page templates so you can focus on building layouts without worrying about every piece of code.

If you’re a complete beginner and have no idea how to write HTML or CSS then you’ll need to start with practice projects first. The more you practice the more you’ll learn, and you really can’t move onto frontend frameworks without this existing knowledge.
Here are some basic resources to get started if you’re completely new to frontend development:
Must-Know Tips To Become A Web Developer
Learn CSS Layout
/r/Frontend Community
Coding An HTML 5 Layout From Scratch
Frontend Tooling
Just because every website needs raw HTML and CSS doesn’t mean you have to code it all from scratch. Once you understand the basics of CSS classes and positioning you can pick up tools that’ll improve your speed and precision.
The best place to start is with a CSS preprocessor. These are free tools like Sass and Less that come with options for automating CSS with variables, loops, functions, and similar features. This may seem scary but it’s a fundamental part of modern development.

Many developers agree that preprocessing is necessary is you want to get full-time work. This technology is only growing in popularity and it ties into the modern frontend workflow.
Another tool you might try is HTML templating. This is typically used in conjunction with a JS framework like Angular, but it can be used separately.
I personally do not use much HTML templating because I think it’s excessive for most projects. But something like Haml or Slim can save you time writing verbose HTML code by hand.

The good news is you can practice a lot of this stuff online for free.
Cloud IDEs like CodePen have built-in support for HTML/CSS preprocessing engines so you can write code and see how it compiles live on the web.
One thing to note is that you must fully understand the basics of HTML/CSS before moving onto preprocessing. If you don’t understand the basics then you’ll really struggle with these tools.
In fact, I’d recommend only writing basic HTML/CSS for a while until you feel incredibly comfortable with the languages. From there you might even try using a framework like Bootstrap or Foundation if you’re looking for a way to build layouts fast.
These frameworks do not force Sass or HTML templating into your workflow. They come packaged with grids, typography, and responsive CSS classes so you can focus on building the layout without worrying about the little details.

Even if you never plan to use frameworks professionally I’d still recommend studying Bootstrap or Foundation. Try building a sample project just to understand how they work and why people use them.
If you can work in Bootstrap comfortably then you likely have enough knowledge of HTML/CSS to move into more advanced challenges.
And remember that every developer is always trying to learn more. Nobody’s perfect and since the web is constantly changing there’s always new stuff to learn.
Open Source JavaScript
If you know the fundamentals of HTML and CSS then you know enough to build websites. But in the modern era, there’s one more language that can really up to your frontend game: JavaScript.
All modern browsers support JavaScript and the language has been a hit with open source projects. The most popular is jQuery which is a free open source library made to simplify JavaScript on the web.
But the newest ES6 code makes it even easier to write great JavaScript from scratch. You can use the TypeScript language for enhanced JavaScript that naturally compiles down to ES5 for compatibility.
You may be confused about all this terminology so let’s break it down.
ES5 – the current version of JavaScript supported by all browsers
ES6 – the newest version of JavaScript; includes many new features but must be compiled into ES5 to run in browsers
TypeScript – a superset language of JavaScript very much like ES6; it also compiles down to ES5 so it can run in browsers
If you start by learning basic vanilla JavaScript then you’re learning ES5. They’re the same thing.
But the newest features in ES6 can help JS developers write better code that’s easier to sustain and debug. TypeScript is very similar and it’s basically JavaScript with extra features.
Since modern browsers only support ES5 web developers use compilers like Babel to convert their code for use on the web.
There’s a big push for TypeScript code over ES6 because it’s heavily supported by Angular. If you’re not sure about TypeScript then check out this post to learn what it is, how it works, and why it’s gaining traction.
But if all of these words sound confusing then I highly recommend learning the basics first. There’s a free book online called Eloquent JavaScript and it’s the go-to resource for anyone who wants to learn proper JS code from scratch.
Once you go through a few of those lessons I’d suggest moving onto jQuery. It’s a free open source library that runs in all browsers without any compiler. It just saves you time writing the same JS code repeatedly.

Beyond jQuery and ES6/TypeScript there’s a whole world of free open source JavaScript available. Most JS libraries solve very specific problems like file uploads or data visualization. But check out this huge list if you want to learn more.
When just getting started don’t worry much about these other libraries. Nobody can learn everything and you only need to learn a library if it solves a specific problem.
Instead focus on the basics of JavaScript first and make sure you feel comfortable with the syntax. Here are some further learning resources for beginners.
How to Learn JavaScript Properly
The Best Way to Learn JavaScript
ES6 Basics
Getting Into JS Frameworks
I don’t want to go into too much detail here, but I can’t possibly avoid the surging popularity of frontend frameworks.
Modern frontend frameworks are different than the previous frameworks I mentioned like Bootstrap, primarily because they solve different problems. Frontend JS frameworks mostly work in the MVC or MVVM models which connect views on the frontend to data on the backend through a controller.
Normally data transfers occur with a backend language. But web development has been moving towards the single-page application structure and this seems to be growing quickly.

The most notable frontend library is React because it handles page components very differently than a full MVC framework. React mostly handles the frontend data which can then pass onto the backend through other libraries.
This primer is a great intro but it’s not for the faint of heart.
I would not recommend JS frameworks until you’re fully comfortable with JavaScript at all levels. You should be comfortable writing code, debugging code, and solving your own problems in Google.
But if you’re willing to get started brush up on MVC for JavaScript and spend time studying what this means.
Many of these frameworks go beyond frontend development so I don’t think every developer should worry about them. However, if you’re interested in the field of frontend development these libraries will only become more relevant as time goes on. If you’re willing to try then these resources will help you get started:
Choosing A Front End Framework: Angular vs. Ember vs. React
Top 7 JavaScript frameworks for efficient front-end-development
Node Package Manager
You may or may not know about Node.js but it’s taking the frontend world by storm.
Node is a free open source JS environment that can run on the frontend and backend of a server. Many devs now use Node for full stack web development. But frontend devs like it for the package manager which supports automation and quick versioning of frontend resources.

There are many package managers but few have captured as much attention as Node’s alternative.
The Node package manager goes by the name npm and it’s a very simple concept in theory. You can install npm on your computer once you install Node and from that, you get two big features:
The npm repository of libraries, plugins, and projects
The npm command line interface for running npm commands locally
Once you’re somewhat comfortable with vanilla JavaScript you really should look into npm. You don’t need to know about Node to use npm, just like you don’t need to know Ruby to use Sass.
The underlying language isn’t as important as the functionality.
Since npm runs in the terminal you will need to get comfortable in the command line.
For anyone without prior terminal/CLI experience, this can seem like a pain. But in modern frontend development, the command line is vital if you want to do this work professionally.
Node is just one example, not to mention all the extra tools like Sass and Git that run through a CLI interface.
I’ve also struggled with this and I know it can be challenging. Especially if you have absolutely no idea why you’re learning NPM or where to get started.
The answer lies in practice. Come up with cool projects and practice building them with the command line. Check out this beginner’s tutorial explaining the basics of NPM and how to use it on a web project.
Once you find a couple features that save time you’ll really grow to appreciate everything you can do with the terminal.
Grinding with Gulp
Task automation is perhaps the best emerging toolset you can learn for frontend development. Free tools like Gulp and Grunt allow you to automate mundane processes through the command line.
Both are great tools, although I personally recommend Gulp because of the larger fanbase. It also runs through npm which is a cornerstone of modern frontend development.

With Gulp you can write commands in JavaScript that run plugins or functions automatically. For example, you can automate your Sass->CSS workflow using Gulp Sass, a free plugin made for Gulp users.
Everything runs through the terminal so Mac, Windows, and Linux users all have access.
Getting started is much easier than you’d think, although mastering the Gulp workflow takes time.
Do some research and see what’s out there for Gulp tooling. Check communities like /r/WebDev and /r/JavaScript and be willing to ask questions. Most people are very friendly and they’ll be happy to help you along with advice & suggestions.
But don’t jump right into Gulp without knowledge of both JavaScript and NPM. If you already feel comfortable installing NPM and working in the terminal then you’ll have a much easier time automating tasks with Gulp.
If you’re more of a practical learner then try some of these tutorials:
Automate Your Tasks Easily with Gulp.js
Getting Started with Gulp.js
An Introduction to Gulp.js
A Typical Frontend Workflow
What exactly is a typical frontend development workflow?
This is a common question and unfortunately, there’s no right answer. Each developer has their own best workflow and you’ll need to find yours too.
But I can at least help you get on the right track with suggestions for a semi-typical workflow on a new dev project from start to finish.
Always start with HTML and CSS first. This can include Sass and/or an HTML shorthand like Haml. Both of these have Gulp plugins so you can automate your dev process via npm.

Every time you sit down to work fire up the same dev environment. Launch your Gulpfile and try setting up an automation routine ASAP. The folder structure can be anything you prefer, although there are some best practices you can follow.
Make sure your HTML/CSS layout works properly before adding any JavaScript.
Test all modern browsers and try resizing them to check the responsive layout too. This is a good routine for progressive enhancement which is a webdev technique that supports the least amount of features first, then slowly moves up.
If you’re willing to learn Git version control this can also be added to your workflow. And while there are some cool tutorials for learning Git, it can become just another confusing technology to study.

I’d suggest adding Git only once you’re comfortable building frontend projects from scratch. If you’re already using Sass and Gulp then you’re probably comfortable in the command line. And if you can build projects from scratch you’ll have a reason to add Git version control into the workflow.
My last suggestion is to consider emerging technologies and how they might fit into the workflow. It’s easy to start with HTML/CSS, create your automation, run browser tests, and finally add JavaScript into the mix.
But what if you want to start with a framework like Bootstrap? Or what if you want to try Web Components with a library like Polymer?
Be willing to attempt new practice projects and try adding new features each time. The best way to learn and improve your workflow is to push yourself to try new things. Keep what works & discard the rest.
Just make sure you’re comfortable with the basics of HTML/CSS, Sass, and Gulp/NPM before moving onto frontend frameworks and additional libraries.
Moving Forward
As I mentioned before there is no single right or wrong workflow. But there are certain tools that are almost mandatory for any serious frontend developer. I’ve covered all these tools in this post and I hope my tips can offer guidance to get you started.
The web industry changes rapidly so you’ll need to be on top of these changes to see real progress. The tools and tips in this post are the best resources for modern web dev. If you start here and gradually increase your skills you’ll have no problem building professional web projects from scratch.
You may also like:
How to find blogging inspiration
20 Simple Tricks to Boost Your Website’s Traffic
How to write SEO-Friendly URLs for your WordPress site

September 27, 2016
The Core: Tips, Tricks & TutorialsThe Contact Form Builder
Every website needs a contact form, right? The answer to that question is obvious. What is not that obvious is that every contact form might be different.
Some people will need multiple choice fields, list selection, inputs, text area, captcha. What about the structure or styling of the contact form?
The truth is that building a WordPress contact form is pretty easy if you know what fields you need. But how do you build a system that lets other people create the contact forms they want with full control over structure and design?
These are some of the questions we’ve asked when we started to create the contact form module included in our The Core multi purpose premium WordPress theme.
And then it hit us … our powerful visual page builder, why not use that to create a contact form builder and the elements you’ll use can be inputs, text area, radio boxes and so on. This way you’ll get full control on what you can create.
Here is how it works
The process of a creating a contact form for your website is composed of two steps:
1. Adding the contact form shortcode to the page
– Go to Pages > All Pages
– Create a new page or click on an existing page that is already created
– Click on the Contact Form shortcode in order to add a new contact form to your page

2. Creating the contact form using the form builder
– Click on the Contact Form Shortcode added to the page and this will open a pop up with the Contact Form Builder

– Use this builder in a similar way as the visual page builder in order to create your desired contact form by dragging & dropping any of the form fields on the page.

– Click any shortcode to access the options for that field. From here you can control different settings depending on the field: label, mandatory setting, restrictions, placeholder text, etc.

Tips & tricks you might find helpful
– Every contact form field comes in its own default 2/3 column that can be changed if you use the arrows.

– The Title and Subtitle area is “set in stone” and can’t be deleted. If you choose not put anything in these fields then the title and subtitle will not be displayed.

– You can edit any label in place if you click on it.

– You can toggle the mandatory field option directly from the main screen by clicking the red star in the top right corner of the column.

– All the fields have simplified representations containing helpful info about that field. It can be the placeholder text in the case of single line text, or the first choice in the case of a multiple choice field.

Test it for FREE, right now
If you are one (of the few :P) that didn’t purchase our The Core multi-purpose WP theme yet, you can test it for FREE right now for 14 Days. Just press the button …
You may also like:
How to Use the Visual Builder Templates
How to Change Your Website’s Width and Background Color
How to Style Your Website Using the Color Palette

September 26, 2016
DiscoverWhat are push notifications, and how to use them on your WordPress site
The reason why you’re posting content and investing efforts to make it sound interesting is that you’re targeting a specific audience, which is probably how you understood quality comes only after you’ve captured people’s attention. The blogging world is more or less directed towards the same audience, and that makes it incredibly difficult to stand out of the crowd and be chosen.

The best practice to keep readers on board is to retain them with push notifications, thanks to which they will always know what your content is about. It would literally mean sending messages and notifications for people to see on their devices, in the shape of modest reminders that help your content be seen and appreciated.
The concept of push notifications was originally developed for mobile apps, but its immense success pushed it WordPress websites, where it is most widely applied.
In the WordPress scenario, you can trigger push notifications to inform contacts and subscribers of what is currently happening on your website and send messages concerning new posts. Some of those notifications can even appear on their device without them necessarily browsing the site.
Experienced website owners share numerous push notifications benefits, highlighting the one of staying connected to your audience regardless of their location or activities.
Using push notifications on WordPress websites works in the same way as a mailing list does: it contains the people you know are interested in your content, and it encourages those to come back and check what’s new.
The hint is that the person will be able to see them on every occasion, and won’t even have to open them to consider rechecking your website.
Setting up push notifications

The setup process is one of the simplest in WordPress optimization, mostly because it can be done with a single plugin. As usual, the market is overwhelmed by such plugins which all perform more or less the same functions.
The first thing is to choose and install an appropriate push notification plugin, and test your first-time visitors whether it actually delivers alerts in the right time and to the right people. If you see people are actually returning, you’ve found your perfect solution!
In most of the cases, push notifications will be popup messages that once clicked, lead to your website, and promote exactly the piece you want to push, though. Note that readers must have ‘opt out’ options from receiving your push notifications because you’re otherwise risking to overwhelm them and to appear too pushy.
The most useful push notifications plugins
Push notification plugins are categorized in many ways, but the best way to choose a good one is to look at the key features. Try answering the following questions before you’ve started:
Is the plugin compatible with all browsers and devices?
Do users have to download software in order to receive these notifications?
Does tagging content for push notifications happen smoothly?
Do you get to customize the notifications?
Can you use the plugin for analytic purposes?
Can you afford it?

PushUp Notifications is a specific plugin whose robust feature suite transfers notifications from WordPress websites to Apple devices (MAC OSX). Once installed, you can set it up quickly and with no effort, which makes it suitable even for beginners. There is only one opt-in form to fulfill, and a simple checkbox to select the posts which should be promoted.
PushCrew has its own website allegedly used by over 2,500 companies. The fact that there are currently more than 3,000 active installs of this plugin only confirms PushCrew has the credit to boast about popularity.
The process of using it, however, is more complicated: first, you’ll need to open an account and choose a plan that suits your needs. The plugin is mostly intended to serve enterprise-grade users, but individuals can also benefit from its free plan that sends notifications to 500 subscribers. Currently, the notifications are supported by Chrome and Firefox, and Safari is expected to jump in. Note that the free plan can only push notifications to local desktops – for a mobile device, you’ll have to switch to the premium one.
Chrome Push Notifications is another solid plugin you get to use for free, and which can send just as many notifications from your website as you need. The only limitation is that it works with no other browser than Chrome, and it lacks the extras we mentioned in some of the other cases. It is simple, to say at least.
Push Notifications for WordPress (Lite) is the right plugin for distributing notifications on mobile devices, covering Android, Fire, and iOS ones. The plugin is very fast and has an inbuilt hub for automated notifications which arrive in users’ devices without employing third-party servers for the purpose.
The alerts can be a new post or an older, popular one, or whatever else you think would retain random visitors and keep them engaged.
Push Notifications for WordPress (Lite) doesn’t only pay attention to functionality, but to beauty as well. You can build the most amazing apps ever without doing any back-end development work on your server, as content will be collected automatically, and there will be no need to do maintenance work.
The plugin is a great catch for mobile developers who wish to cut some of their work and simplify the process of embedding push notifications in their app. Now that they have this tool, there won’t be any push notifications hassle to worry about.
OneSignal represents an outstanding WordPress plugin that revolutionized the push notifications concept and transformed this service into an interesting and versatile experience. Thanks to it, you can send as many notifications as you need, and you can do so on literally every browser.
An impressive thing OneSignal does is to empower users to customize their push notifications and to send various types instead of only one. For instance, you can have push notifications for newly published content, or ones that remind users to check your content if it has been a while since they last did it. The plugin categories lead according to their status, usage frequency, location, and language.
Conclusion
Push notifications are amazing, but can be just as challenging. The problem wouldn’t be that serious if people were always willing to accept them, but for the matter, you have to target the right audience, and customize push notifications in the best way possible, and deliver an eye-pleasant popup users wouldn’t ignore.
Another challenge down the road is determining how many push notifications you need, trying to avoid sending them to the same people over and over. Users can easily become annoyed by a constant obstruction on their devices, sign off, and forget about the website in the worst scenario. This is why you need an analytically-enabled plugin to help you select and target the right audiences.
The strongest motive for using them is to increase traffic and click-through numbers, in particularly if you’re sending such that direct users to the site rather than a dedicated page.
Consider them as a powerful addition to your email newsletter, rather than its competitors. The role of these tools is completely different on the readers’ side, but the purpose is common for them: they need to motivate readers to return and ask for more content.
Technically speaking, push notifications are the bridge that leads random visitors to become regular subscribers, and once they’ve downloaded some of your free-to-use content, you can turn them into email subscribers as well.
You may also like:
Schema.org and WordPress – all that you need to know
SEO Myths That Should Be Ignored
Top 20 Free WordPress Themes

September 24, 2016
The Core: Tips, Tricks & TutorialsHow to Use the Visual Builder Templates
The reality is that in the process of building your website, you create a few sections that repeat themselves on most of the pages. This is a good thing.
You may want a testimonial slider at the bottom of every page for example, as a social proof. You may also want a contact form or a call to action in front of your visitors every time you get a chance.
With that in mind you’ll be happy to know that the visual builder from our The Core multi purpose WordPress theme comes with a cool feature called Templates.
I think every good website builder should have a template feature that lets you save pages or parts of it for later use.
The visual builder templates
To use this feature, go to Pages and open an existing page or create a new one. You can open the Templates dropdown by clicking on the Templates link from the right side of the builder.

Saving templates
The templates are separated in three categories:
– Full Templates – lets you save an entire page.

– Sections – lets you save a section and all its contents.

– Columns – lets you save a column and all its contents.

Saving a template lets you give it a name.

Loading templates
Once a template is saved, it will appear in the Templates dropdown under Load Template. Loading a full template will overwrite the content of the current page while loading a section or column will place its content at the end of your current page.

Click on a template name in order to load it into your current page.
Conclusion
I think this feature is a very powerful tool that will help you duplicate sections, columns or even full pages with all the shortcodes, settings, and options. This will truly save you a lot of precious time in the process of implementing your website.
You may also like:
How to Change Your Website’s Width and Background Color
How to Style Your Website Using the Color Palette
Setting a Backup Schedule

September 22, 2016
Rest in Peace We Have to Let Some of Our WordPress Themes Go
As much as we love all our themes, we have decided to let some of them go. There are a couple of reasons that led to this decision. Mainly because the themes were made in 2009 – 2010, have an outdated design and although we brought them up to date as much as we could in terms of features and functionalities, they still don’t compare with some of our newer themes. To sum it up:
– outdated design
– the themes are not responsive (to make them responsive requires the same effort as building a theme from the ground up, so we prefer to do that instead)
– old framework (again we plan to create new themes for these categories with updated design, built on the new framework rather than update these themes)
– lack in features and functionalities compared with some of our newer themes
Themes we are letting go:
September 2016
Writer
Sportage
Photo Artist
Coffee Lounge
Cloud Host
News Setter
Interakt
Conexus
The Muse
Metro Vibes
Collective
Envision
July 2014
Video Grid
Brand Crafters
Mobility App
Pixel Whiz
Lifestyle
Qlassik
My Journey
October 2013
Bon Appetit
SiliconApp
Creative Juice
Art Gallery
C3
Exquisite Works
Web Studio
Freshfolio
What does this mean?
We will not update these themes anymore but we’ll continue to offer support for existing clients as the dedicated support forums will continue to stay opened. However support will be prioritized on the not retired themes first, so expect some delay in receiving answers to your questions. Please consider switching to another theme from our gallery (we offer 50% discount).
50% discount for existing clients
We are offering a one time only 50% discount if you have purchased one of the retired themes in the past and you are interested in switching to another theme. To benefit of this offer please drop us a line on: hello@themefuse.com
100% discount for recent clients
If you purchased one of our retired themes in the last 2 months, calculated from the retiring day, you get a one time only 100% discount for another theme from our portfolio (in the same price category). Again, drop us an email on hello@themefuse.com to take advantage of this.
You may also like:
The Practice 2.0 Is Here
The Flavour 2.0 Just Been Released
In Shape 2.0 Is Here

Did you knowSchema.org and WordPress – all that you need to know
Gone are the days when keywords used to be optimized by attaching backlinks and having high keyword density. Presently, SEO gives you an attractive user experience and lots of well-structured and rich content. One of these rich elements is Schema.org, it offers a group of schemas which web designers can apply in marking up HTML pages, to forms accepted by search providers.
Schema.org

Search engines such as Bing, Yahoo, Google and Yandex depend on Schema.org Markups to make the search results have a better display. As a result, it is easier for people to track the correct web pages.
Therefore, schema.org markups enable web crawlers and bots to comprehend the structure and content of the HTML site correctly. When you utilize these markups, your website becomes very easy to be understood by the search engines.
The schema markups are also known as microdata, which gets incorporated into useful HTML parts. Different markups are present in the header, sidebar, content, footer, and body. This microdata is indexed by the search engines, to figure out the content of each part. Nevertheless, schema.org markups do not only the name but also explains the meaning of the content.
An addition of such microdata to your website makes it more meaningful than other sites. As a result, your website becomes more distinguished than others, hence more chances of being ranked higher.
The meaning of Schema MarkUp
Schema is an organized standard of data, which is accepted by different search engines. A schema can also be defined as a markup language of a certain quality, used to form data in web pages. There are document guide pages on schema.org website, which you can follow to start using schema manually.
Below are some common schema.org item types which can better your knowledge.
• Individual;
• Output;
• Outcome;
• Group, Locations, work, restaurant;
• Film, publication, and other creative works;
• Survey, value.
Schema Markup – Using Benefits
Over time, the search engine result pages have developed to suit loads of valuable information. Also, it is easier to get displayed in Google results.
The most common portrayed rich snippets are the rating and review stars, which are seen after the output results.
The place and outcome listings are among the few commonly displayed rich snippet markups in the search results.
The greatest advantage of getting an ample markup in your information is to aid in raising your WordPress blog SEO.
By improving your blog and information with the right schema markups, you can rise in search engines rankings, hence increasing your organic clicks in SERPs.
Plugins make it easier to implement schema markup on your WordPress websites. You can start the markups manually, although it will cost you a lot of effort and time if your blog has a lot of content.
A guide on using Schema.org on your WordPress Site
If you are still thinking about why you should invest time in adding schema markups on your site, the fundamental reason is for improving your search traffic. All search engines intend to show relevant results. If your content is well structured, you’ll be at an advantage over your competition.
Configured data such as schema.org usefulness is increasing significantly. As the internet grows, search engines get more content to examine and out bring in various ways. Therefore, if your content is well organized, you get more advantage when it comes to the competition.
WP Rich Snippets

It is an all in one plugin used in review sites having vast choices of increasing rich snippets. While using the plugin, you can design personalized and desirable reviews on your site, under the custom category. Besides, you can manage all user submitted reviews.
Schema App Structured Data

It is a free plugin, found in wordpress.org plugin directory. A plugin is a simple tool, which is created to enable WordPress users to edit their schema irrespective of any coding knowledge easily.
All In One Schema.org Rich Snippets

Just like the name indicates, the plugin makes it easy to determine the schema markups to use in your WordPress blogs. Besides, the plugin emphasizes on the useful appearances such as boosting CTR, improving SEO and other benefits of ranking. The plugin affirms to support any content generated by schema.org, such as reviews, recipe, articles, video, event, software application, product, and people.
It is among the most known free plugins dedicated to rich snippets. The plugin has a rating of 4+ stars and more than 100,000 downloads. It is simple and offers a quick alternative to adding data rich in pieces.
Rich Reviews

It is a free plugin found in wordpress.org, hence making the process of bringing out starred reviews on your blog easy and quick. If you add a 5-star rating on your website using shortcuts, the search results will display rich snippets having your ratings.
Rich Snippets WordPress Plugin

The plugin is a generator of schema shortcodes. You can utilize the plugin in designing short codes, which start up schema markups and also set your data to be visible or invisible.
You may also like:
SEO Myths That Should Be Ignored
Top 20 Free WordPress Themes
Using local SEO in 2016

September 21, 2016
Important UpdateThe Practice 2.0 Is Here
We’ve made an important update to our popular The Practice WordPress theme. Being one of our top themes we’ve decided to update the theme on our Unyson framework. If you’ve purchased The Practice before 21 September 2016 continue reading to find out what this means for you. This article doesn’t concern new The Practice clients that have purchased the theme after the 2.0 release.
Features added in 2.0
Drag & Drop Page Builder: Only drag & drop the design elements you want on the canvas and create complex pages at a drop of a dime. It is as easy as it sounds.
Woo Commerce Ready: Start selling your products today, using the popular WooCommerce plugin! We have customized everything, making the plugin perfectly integrated.
Page Load Animations: We have introduced a very easy way to add animations to any element within the theme.
Contact Form Builder: Use the contact form builder to create any contact form you need. Just drag & drop the fields you want and you are ready to go.
Backup Module: It takes a couple of seconds to set your backup schedule and then all the backups happen automatically.
BuddyPress Ready: BuddyPress helps you run any kind of social network on your WordPress, with member profiles, activity streams, user groups and more.
bbPress Ready: bbPress plugin allows you to include a forum in your existing WordPress website, that can help you boost your online presence.
Auto update from 1.0 to 2.0 is not possible
Although the theme looks exactly the same, because The Practice 2.0 was built on an entirely different framework, an easy auto update is not possible. So if you already purchased and have a website integrated on The Practice 1.0 you can’t upgrade to 2.0. You’ll need to start implementing your website from scratch.
We’ve replaced the theme in your account
Starting September 21, 2016, we’ve replaced your The Practice 1.0 theme in your account with The Practice 2.0. Starting with this date The Practice 1.0 will not be available for download anymore.
Updates & Support for The Practice 1.0
Even if we removed the 1.0 theme from your ThemeFuse account, we will continue to release updates for it (WordPress compatibility, bug fixes, etc) and they will be available directly from your WordPress update page. Moreover, you can contact us with any questions regarding The Practice 1.0 since we’ll continue offering support for it.
Conclusion
Basically, not much is changing for the clients of The Practice 1.0, you’ll continue to get updates for the theme, we’ll answer and give support on our helpdesk if you have any questions or encounter any issues, the only thing changing is that you can’t download the 1.0 theme anymore. If you plan to develop another website on The Practice just login into your account and download the 2.0 version and you’ll get all the features and benefits listed above.
Live Demo | Theme Details | Buy Link
You can always test the theme for free in our TestLabs (for 14 days).
You may also like:
The Flavour 2.0 Just Been Released
In Shape 2.0 Is Here
Philanthropy 2.0 is here