
Marisa McClellan's Blog, page 6
March 31, 2020
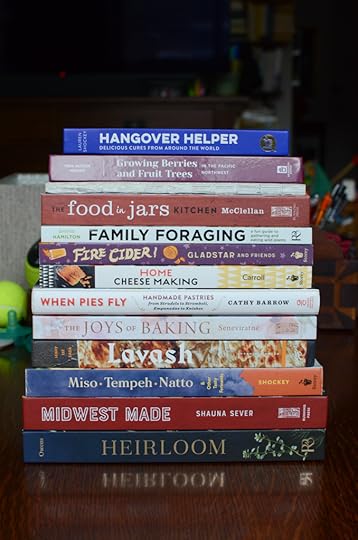
2019 Canning Adjacent Cookbooks
Oh friends. We’re living through unimaginable times, aren’t we. Like most of the rest of the world, I’ve been doing my part by staying home, keeping my distance from my neighbors, and cooking.
I’ve been finding a great deal of comfort and solace in paging through cookbooks. I’m reading far too much virus coverage and I can’t focus on novels. Cookbooks offer me the opportunity to take momentary respite and unlike fiction, are meeting me where I am.
I’ve had this stack of books sitting on my coffee table for four months. They are the ones that I think of as being adjacent to my canning practice. While not dedicated to putting food into jars, they all compliment a homemade pantry and are worthy of being on your shelf.
Our local, independent book stores need us now more than ever. If one of these books speak to you, please consider buying from Powell’s, Book Larder, Omnivore Books, Read It and Eat, Now Serving, Kitchen Arts and Letters, or your local that’s still offering shipping or contactless pick-up.
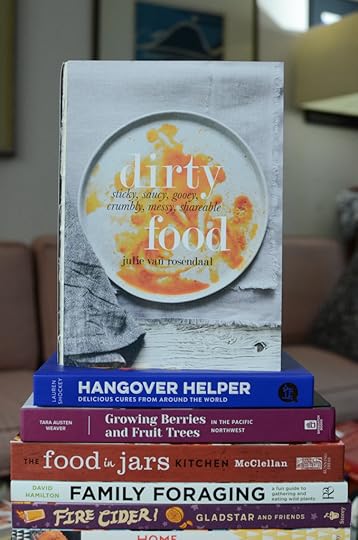
Dirty Food by Julie van Rosendaal – The title of this book is a playful response to the clean food movement and it celebrates all things messy, drippy, and crumbly. The flaky biscuits are amazing with jam. [Julie self-published this book and so it’s best to buy it directly from her.]
Hangover Helper by Lauren Shockey – Who knew how many traditional hangover remedies involve pickles? Also, the warming garlic soup is a pantry friendly dish that is great for these times (I’m making it for lunch later this week). [Powells | IndieBound]
Growing Berries and Fruit Trees by Tara Austen Weaver – The bulk of this book is dedicated to teaching people how to grow fruit in the Pacific Northwest. However, I think that even if you live outside that region, there’s space for this book in your library. The final third of the volume contains a thoughtful collection of recipes (the Everyday Oatmeal Fruit Muffins alone are worth the price of admission). [Powells | IndieBound]
The Food in Jars Kitchen by Marisa McClellan – This is my book (and it turns one on Thursday!). It’s all about making the most of your pantry (homemade or store bought), a topic which seems to be weirdly prescient in light of current events. [Powells | IndieBound]
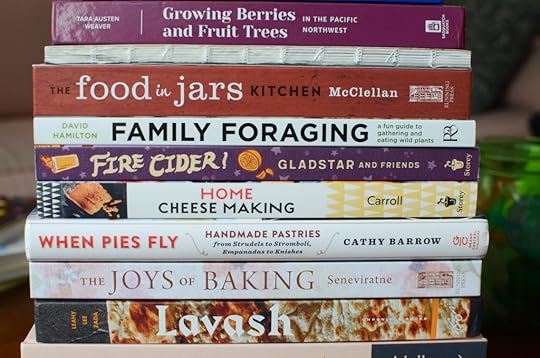
Family Foraging by David Hamilton – This is such a great book to help teach kids about wild edibles. If you’re looking for ways to keep your kids occupied during this time of isolation and you have a little outdoor space near you, this one could help keep them occupied. [Powells | IndieBound]
Fire Cider by Rosemary Gladstar and Friends – This is an entire book devoted to fire cider (a concoction of apple cider vinegar, horseradish, onion, garlic, ginger, hot peppers, and honey), flavored vinegars, and healthful, healing liquids. It’s great. [Powells | IndieBound]
Home Cheese Making by Ricki Carroll – This is a fully updated edition of a beloved cheese making guide. If you’re dealing with the pandemic by making food, perhaps you should take up a cheese making hobby. [Powells | IndieBound]
When Pies Fly by Cathy Barrow – This book embraces anything wrapped in pastry or dough (including a whole chapter dedicated to the knish). In a time when many of us have time on our hands and are in need of comfort food, we should all be cooking from these pages. [Powells | IndieBound]
The Joys of Baking by Samantha Seneviratne – This is a memoir disguised as a cookbook. Whenever I need a break from the reality currently swirling around me, I pick up this book. The recipes are also spectacular. [Powells | IndieBound]
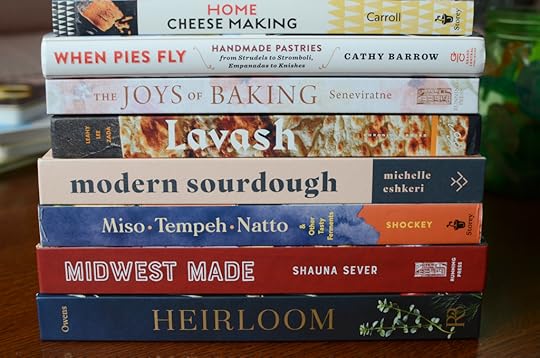
Lavash by Kate Leahy, John Lee, and Ara Zada – This book is a snapshot of Armenian cooking that uses that culture’s bread (that’s the lavash) as it’s centering point. The authors spent a lot of time in the country, gathering the recipes and experiences that fill its pages. It’s a remarkably wonderful book. Whether or not you get a copy, you should also listen to Kate and Ara talk about their experience writing it on the Book Larder podcast. [Powells | IndieBound]
Modern Sourdough by Michelle Eshkeri – This cookbook comes out of Margot Bakery in London. It’s a bit of a stretch volume for me, but there’s a nice chapter of jams and spreads in the back that keep it on my shelf. And for those of you who are currently diving deep into sourdough, it would be a good buy. [IndieBound]
Miso Tempeh Natto by Kirsten K. Shockey and Christopher Shockey – I feel like this is a book I could spend a lifetime exploring and I’d still only scratch the surface of what it has to offer. I can’t wait to dive in. [Powells | IndieBound]
Midwest Made by Shauna Sever – I have never lived in the midwest and it’s not a place where any of my people are from. And yet, I still everything to love in this thoughtful, delectable, downright beautiful book. I think I could be happy baking from these pages for the rest of my days. [Powells | IndieBound]
Heirloom by Sarah Owens – This book a wild, creative ride through preserving, fermentation, naturally leavened baking, and the recipes that use and love the products of those processes. Sarah is a genius and I wish my mind worked like hers does. [Powells | IndieBound]
Related Posts:Check the recipe index for more tasty preserves!


March 3, 2020
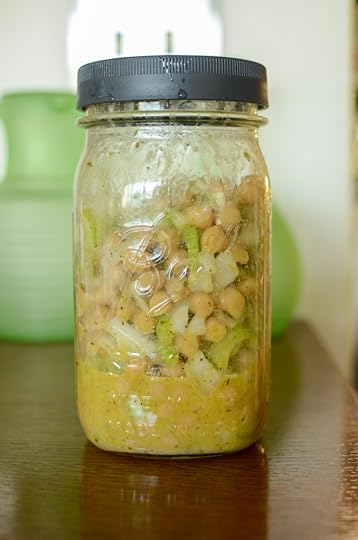
Marinated Chick Pea and Celery Salad
Everyone should have a simple potluck dish in their repertory. One that can impress with just a few ingredients, doesn’t need to be refrigerated immediately, and just gets better as it sits. This is mine.
Once a month (or thereabouts) my extended family gets together for dinner. We used to only gather for major holidays, but several years back, I realized that no one was getting younger and that we needed to take advantage of our proximity and spend time with one another. Having added our two boys to the mix makes this feel even more important than it once did.
These evenings are mostly potluck, with everyone volunteering to bring something that they want to eat (cohesion is secondary). In the past, I was pretty good at communicating with my various cousins and aunts what I was going to bring but last month, I failed miserably. Everyone would have given me a pass (and knowing my family, there would have been plenty of food even if I hadn’t managed to bring anything). But I wanted to bring something.
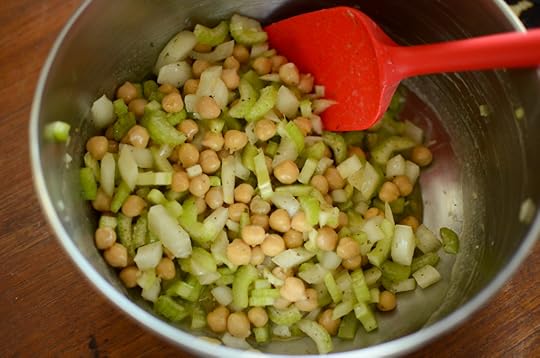
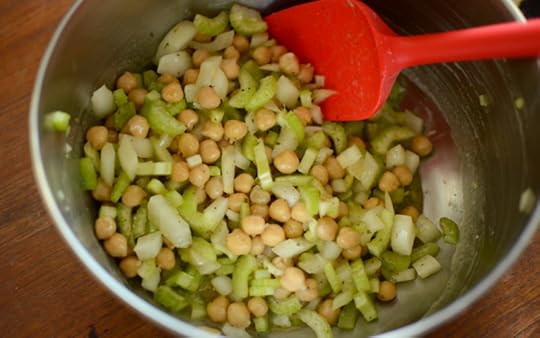
Looking at the fridge and pantry just an hour before we needed to leave, I realized that the pickings were slim. But there was still enough to build a satisfying little marinated salad of chick peas, chopped celery, and diced sweet onion. I pulled down my copy of Preserving by the Pint and made a version of the Herb Vinaigrette (swapping in dried oregano for the basil in the original recipe). I really do cook from my own books!
This blender vinaigrette recipe came to me from my mom’s best friend Maria and is such a great, versatile dressing. I will often make a batch over the weekend to have in the fridge. Knowing it’s there makes me want to take the time to make a salad for lunch rather than defaulting to peanut butter toast.
From there, it was a matter of combining chick peas, celery, and onions, and bathing in the dressing (I used half a batch). It was good and well-received at the potluck, but the leftovers continued to soak up flavor and goodness and were even better the next day.
PrintMarinated Chick Pea and Celery Salad
Prep Time:
Cook Time:
Ingredients
2/3 cup extra-virgin olive oil3 tablespoons red wine vinegar
3 tablespoons fresh lemon juice
2 cloves garlic, minced
2 teaspoons dried oregano
2 teaspoons dry mustard
1 teaspoon sea salt
1/4 teaspoon freshly ground black pepper
1 can chick peas, drained
3 ribs celery, minced
1/2 sweet onion, diced
Instructions
In a blender, combine the olive oil, red wine vinegar, lemon juice, garlic cloves, dried oregano, dry mustard, salt, and pepper. Blend until just incorporated.Combine the chick peas, celery, and onion in a large bowl and pour approximately half the dressing over the top.
Let the salad marinate for at least an hour before serving.
The salad will keep in the fridge for up to three days and the leftover dressing is good in the fridge for up to two weeks. 3.1https://foodinjars.com/recipe/marinated-chick-pea-and-celery-salad/
Related Posts:
Check the recipe index for more tasty preserves!
March 1, 2020
March Partners: Fillmore Container, EcoJarz, McDonald Paper, and Mason Jar Lifestyle

Happy March, dear readers! It’s the start of the month and that means that it’s time to thank the businesses that help make this site possible. Please do show them that you appreciate their support with your time and attention.
Lancaster, PA-based and family-owned Fillmore Container are with us again! They offer all manner of canning jars, lids, and other preservation gear and carry just about every Ball jar currently available, so if you’re looking for a particular style, check them out.
Our friends over at EcoJarz are another stalwart sponsor. They make an array of products designed to fit on top of mason jars, including cheese graters, coffee brewers, and stainless steel storage lids. Don’t miss their Bopple lids, which can close narrow-neck bottles.
McDonald Paper & Restaurant Supply is gear emporium located in Brooklyn, NY. They are open to the public and sell all manner of culinary supplies. Restaurant supply stores are a great way to get affordable, durable kitchen gear (including jars!). I’m a big of their big food storage containers for macerating fruit for jam, as well as these disposable containers for those times when you know you’re not going to be able to get your containers back!
Mason Jar Lifestyle is a one-stop shopping site for all the jar lovers out there. They sell all manner of mason jar accessories and adaptors. If you’re in the market for lids, straws, sprouting lids, fermentation weights, airlocks, tea light converters, cozies, they are there for you.
And if your company, shop, or family business is interested in reaching the food-loving and engaged Food in Jars audience, you can find more details here. Leave a comment on this post or drop me a note to learn more!
Related Posts:November Partners: Fillmore Container, EcoJarz, McDonald Paper, Mason Jar Lifestyle, and Sticker YouOctober Partners: Fillmore Container, EcoJarz, McDonald Paper, Mason Jar Lifestyle, and Sticker YouJuly Partners: Fillmore Container, EcoJarz, McDonald Paper, Mason Jar Lifestyle, and Sticker You
February 26, 2020
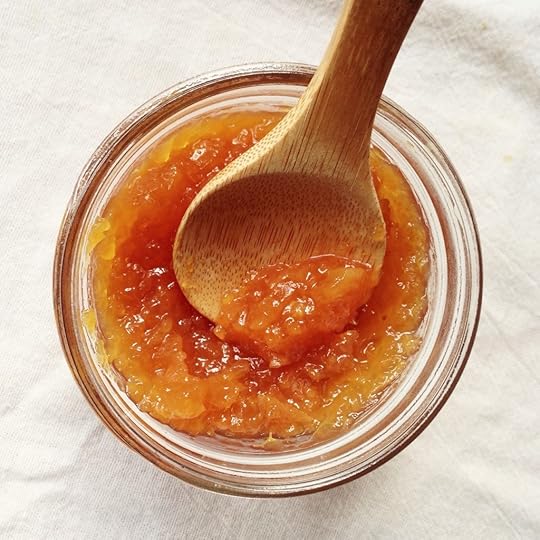
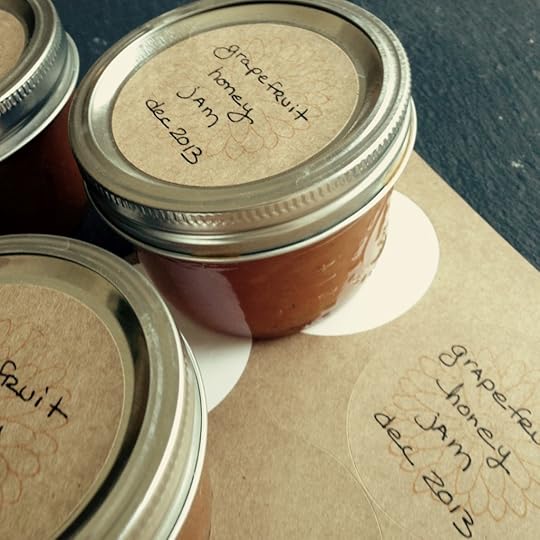
Honey-sweetened Grapefruit Jam
This May, our friend Shae Irving is shutting down her blog, Hitchhiking to Heaven. She has offered up some of her old posts so that they can continue to live and be useful after HtH closes its doors. This honey sweetened grapefruit jam is one we thought you all might appreciate.
At this time of year, citrus is rolling all over the Internet. Lately, I’ve seen lemons, blood oranges, and lots of kumquats.
I thought I’d better get my act together and write up this recipe before all the good grapefruits turn into strawberries, as they will before we know it. (You can see from the date in the picture that I’ve been meaning to get to this one for a while.) One of the reasons I’m keeping this blog, these days, is to document my experiments replacing sugar with honey in preserves, and this one was worth scribbling down.
A couple years ago, I decided to call these mashups of citrus and sweetness “jam,” though some people will definitely say “marmalade” because the whole fruit is used, even the rind. But I still believe marmalade is more intense and takes more time: the carefully sliced rind, the long soaking, the slow chase of the perfect, translucent set. (There’s a very interesting post about how marmalade sets at different temps here, BTW. Great visuals!)
To me, this is jam because it’s just fruit solids, honey, and lemon juice, mixed up and cooked fast. The grapefruit tastes surprisingly fresh. You can also find lovely citrus jams made in a more classic way, without the rind. The way I’m doing it here is decidedly rough cut — gosh, I’m tired of the word “rustic.” Are you?
This recipe is based on one of my all time favorites, Texas Ruby Red Marmalade, by the Cosmic Cowgirl — aka the award-winning Stephanie McClenny of Confituras, from Austin, Texas. I’ve been making her recipe several times a year for four years now, sometimes adding half a cup of champagne and calling it grapefruit mimosa jam. I never wanted to post my own version because who needs to mess with perfection?
But trying it without sugar — using only honey? I had no idea how this would work out. (I’ve successfully made jams with Meyer lemons and honey and Rangpur limes and honey, but this was a first for graperfruit.) Even as it was cooking, I didn’t know. Was it going to thicken enough? (Clearly, it did.) Would the honey taste overcooked? (Thank goodness, it doesn’t, because with three and a half cups of wildflower honey, that would be an expensive mistake.) I’m happy to have another preserve that works without refined sugar.
Do know that you must really and truly love grapefruit to love this preserve — either Stephanie’s version or this one. It’s got a bitter kick cuz it’s good that way.
PrintGrapefruit Honey Jam
Prep Time:
Cook Time:
Yield: makes 3 pints
Ingredients
3 pounds organic pink or red grapefruit3 1/2 cups wildflower honey
juice of one lemon
Instructions
Wash the grapefruits, slice them in half, and place them in a large stock pot. Add enough water to cover the fruit by a couple of inches and then simmer, uncovered, until the grapefruit halves are very soft. This usually takes about an hour and a half. (I test them with a wooden skewer. They’re done when it’s easy to pierce them all the way through.) Add more hot water if needed during the simmering process.Drain the grapefruit halves and set them aside until you can handle them without burning your hands. Then place a cutting board inside a roasting pan. Cut the grapefruit into chunks, removing the big seeds as you work. (This part is all from Stephanie. I’m so glad she figured out the cutting board in the roasting pan thing. It keeps you from making a huge mess.) Don’t worry about any tiny seeds. After what comes next, you’ll never notice them.
Put the grapefruit chunks into a food processor and process until finely chopped. (You can see a picture of this by following the link to the Cosmic Cowgirl recipe, above.) For this recipe, I think it’s best to chop them quite fine, though you don’t want to turn them into an indistinct mush.
Transfer the chopped grapefruit to your jam pot and add the honey and lemon juice. (Don’t scrimp on the quality of your honey. You will taste it, so it needs to be great.) I found it helpful to warm the honey first. Slowly bring the mixture to a gently boil, then simmer and stir frequently until the jam thickens. There’s really no need to do a fancy test for the set with this one. You’ll see distinct clear tracking (slow to fill) across the bottom of the pan when it’s done and it will already be mounding up on a spoon. (I forgot to write down how long this took. My best guess is 20-25 minutes.)
Ladle or pour the jam into clean, hot jars, leaving 1/4 inch headspace. Bubble your jars with a wooden chopstick or other tool of choice. Wipe rims, apply lids, and process 15 minutes in a hot-water bath, adjusting time for your altitude if necessary.3.1https://foodinjars.com/recipe/honey-sweetened-grapefruit-jam/
Related Posts:
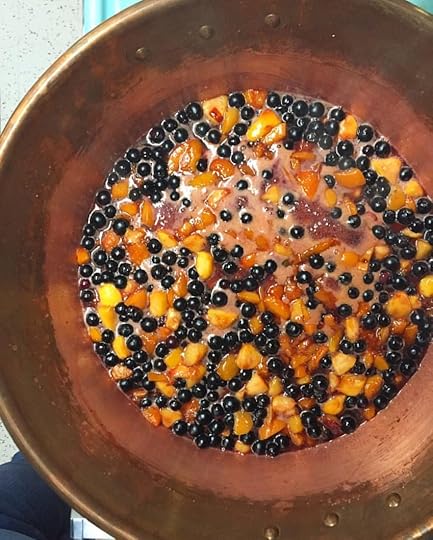
Is it Safe to Make Jam in a Copper Pan?
Proudly Homemade Strawberry Honey Butter from Ball® Fresh Preserving
Honey Sweetened Strawberry Jam on 100 Days of Real Food
February 19, 2020
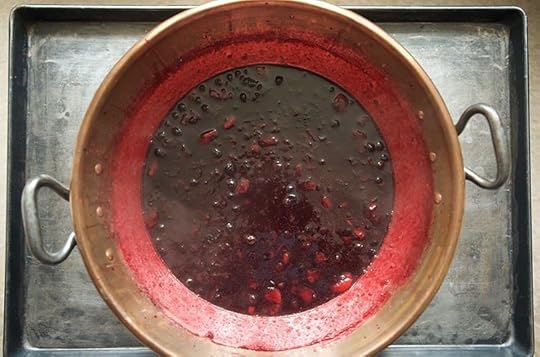
Is it Safe to Make Jam in a Copper Pan?
This May, my friend Shae is shutting down her blog, Hitchhiking to Heaven. She has offered up some of her old posts so that they can continue to live and be useful after HtH closes its doors. This piece about preserving in copper is one I’ve referenced repeatedly over the years and so I’m delighted to bring it over to Food in Jars.
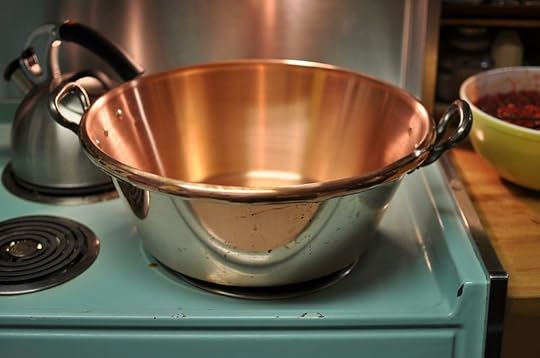
Some preserving experts swear by the centuries-old French practice of using unlined copper pans to make the finest preserves. Others swear it off, calling it unsafe.
When I outgrew my old 6-quart stockpot, I heard a copper jam pan calling my name, but then I got hung up worrying about poisoning people. (I hate it when that happens.) So is copper safe or not? It took some time to unravel the mystery. Here’s what I learned.
Why Use Copper?
There’s one big reason to use a copper jam pan: You won’t find a better heat conductor anywhere. Great heat conduction equals shorter cooking time — that means you spend less time boiling away the flavor, color, and texture of your fruit.
There are other features of a jam pan that will help you cook your mixtures quickly and evenly, most notably shallowness and slightly flared sides. (The slant helps moisture evaporate; it doesn’t run back into the mixture as with vertical sides.) Copper jam pans have it all.
I admit that I was also caught by the romance of using a gorgeous, heavy copper pan to make my jams. While I was shopping for copper, more than one person said to me, “This pan is something you’ll pass on to your heirs.” I don’t yet know who my heirs will be, but I was intrigued. We’re talking tradition here.
Finally, a good copper pan really lights up the kitchen. For a practice like jam making — as much art as science — investing in a tool that inspires you every day is a legitimate consideration.
When Copper’s Safe — And When It’s Not
Getting right to the point, an unlined copper pan is safe when you use it to cook a mixture of fruit and sugar. It’s not safe for fruit without added sugar. The road to this conclusion was a long one, and I’ll give you only an abbreviated version of the journey. (I know it doesn’t look abbreviated, but trust me.)
Confession: I somewhat impulsively spent a good chunk of this year’s tax refund on a copper pan without giving a thought to safety. But not long after I made my first batch of copper-pan jam, Stewart started pinging me with little emails about copper toxicity. He’s careful that way.
The more I read about cooking with copper, the more I worried about sickening myself and my loved ones with symptoms like fever, vomiting, and convulsions. (Here’s one source for more than you want to know about how too much copper can screw you up.)
When I turned to my preserving guides to learn more, I got confused. Christine Ferber, in Mes Confitures, states that she always uses a copper pan because of the superior heat conduction. On the other hand, in The Joy of Jams, Jellies, and Other Sweet Preserves (a book I love and use a lot), American expert Linda Ziedrich says copper’s not so smart:
The interior surface of the pan should be made of a substance that won’t react with acidic foods. This excludes iron and aluminum. Although French preserving pans were traditionally made of unlined copper — because copper would react with acid and thereby enhance gelling — such pans are frowned on today, at least in the United States, because copper can be toxic.
What’s the deal? Clearly, copper jam pans have been used for centuries without causing a mass die-off of jam eaters. But fruit is acidic and we know that acid and copper shouldn’t mix. Help!
For the final word, I contacted Rachel Saunders, former proprietress of Blue Chair Fruit. Rachel made all of Blue Chair’s small-batch preserves in unlined copper kettles — and she had the clearest, most practical answer to my question:
The key to using a copper pan is to put only the jam mixture in it — put the fruit in the pan only after it has been combined with sugar. Putting fruit in the pan on its own will cause the fruit to react with the copper and can be dangerous. I have made thousands of jars in our copper pans, and the results are excellent. The high concentration of sugar in the mixture prevents toxicity.
So there you go. Sugar prevents the acidic reaction. That’s why you should never prepare or macerate your fruit in unlined copper. Use glass or ceramic instead.
The truth about copper was good news and bad news for me. Good, because I can use my new copper pan for lots of preserves. Bad, because some won’t work.
I sometimes make jam with Pomona’s Pectin — a citrus-based pectin that allows you to dramatically cut the sugar in a recipe. The catch is that you add the sugar to the mixture very late. You prep and boil the fruit well before you add the sweet stuff — exactly what you don’t want to do with a copper pan. Boo. I still needed a pan I could use with my Pomona’s recipes. For that, I chose the Demeyere 10.6 Quart Maslin pan — stainless steel with a heavy bottom — which I’ve happily used for many years.
How to Care for a Copper Pan
When it comes to cleaning copper pans, it’s fine to keep things simple. The jam makers I talked to keep their pans clean and dry, but they’re not fussy about a little natural, penny-colored patina.
Rachel Saunders advises rinsing your pan right after you use it, cleaning it with a very mild detergent, and drying it at once. These simple precautions will help to prevent any unwanted reactions. If you do ever notice evidence of oxidation on your pan — a sort of green, mustardy ick, as I understand it — you can use a very gentle scouring pad to get rid of it.
Copper pans can take some abuse. From a safety perspective, there’s no need to worry about some scratches or scorching. Feel free to crank your copper to the highest heat. That’s what it’s made for.
Of course, if you want to keep your pan pristine, there’s lots of information out there about how to do it.
Want Copper? Sources for Your Fix
If copper grabs you like it did me, you’ve got a few choices to make: What brand? What size? How much are you willing to pay?
The brands you can most easily find and order in the U.S. are Mauviel, Matfer Bourgeat, and Baumalu. The smallest pans are around 10 quarts (Matfer makes one of these). None of them are cheap. Matfer is the lightest and least expensive of the bunch — you can find one for a little more than $100 — but keep in mind that lighter weight means lower quality.
A couple of places to start your search:
As with almost everything else on the planet, you can find Mauviel pans on Amazon.
For an interesting assortment of new and used pans, it’s fun to browse eBay. Search for “copper jam.” You may have to sort through a few pairs of copper-colored Nike Space Jam sneakers, but those are the search terms that will bring up the greatest number of copper jam pans, kettles, pots — whatever the seller decides to call them.
If you want to walk into a store, you can usually find the 11.6-quart Mauviel pan in stock at Williams Sonoma or Sur La Table. (Note from Marisa – If you’re local to Philadelphia, Fante’s in South Philadelphia typically has some lovely copper pans in stock.)
Of course, you don’t need copper to make good jam but, without a doubt, a quality pan can enhance your jamming experience. I love my copper pan. I feel almost like it talks to me — offering recognizable sights and sounds to indicate the phases my jam goes through as it cooks, especially when it’s ready to come off the heat. My old, dark pot didn’t provide the same clear signs about what my jam was up to. I say if you want copper and you’re willing to follow a few simple safety and cleaning precautions, go for it.
This piece was originally published on Hitchhiking to Heaven on June 1, 2010 and was written by Shae Irving.
Related Posts:Hitchhiking to Heaven e-Book GiveawayOpen Jars: Shae’s Banana Berry-Jam Bread
February 17, 2020
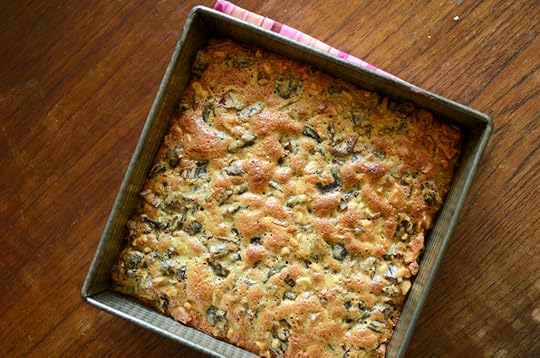
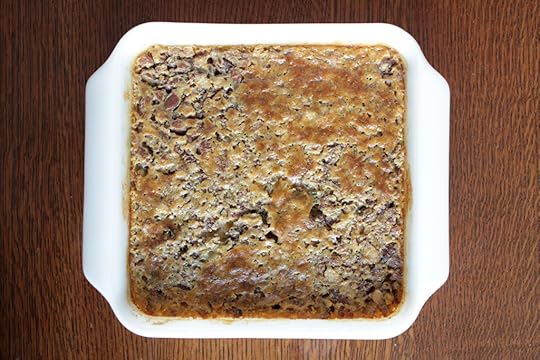
Date and Nut Squares
Last week, I did a bit of rearranging in the apartment. I moved a number of cookbooks to a shelf in our hallway so that I could make room for baby books in the living room (because let’s face it. Kids books are getting heavier use in my life right now than some of my more obscure cookbooks).
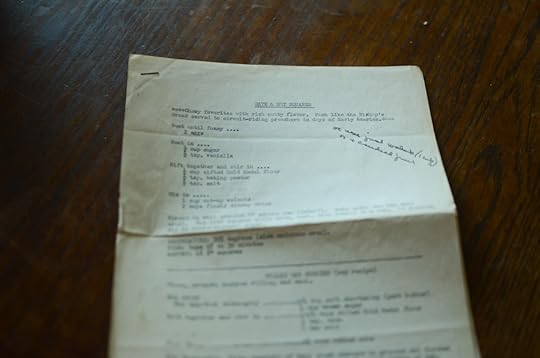
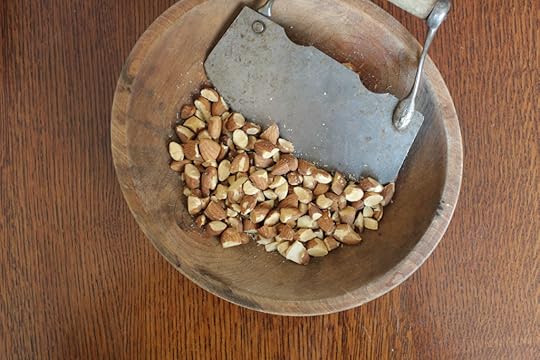
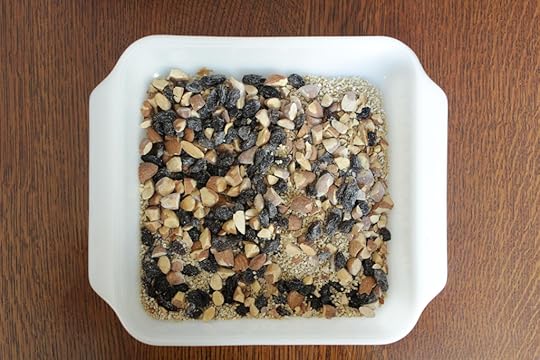
As I reshelved a stack of community cookbooks, a type written and stapled recipe handout fluttered out. The paper was yellowed and the page was annotated in faded ink. The first recipe on the page was for Date & Nut Squares. I stood in the hallway, unshowered and with babies playing on the floor, reading through the short recipe.
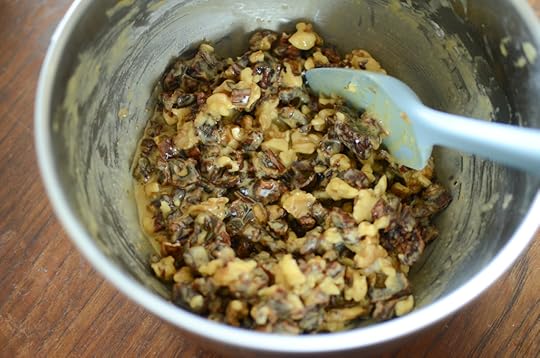
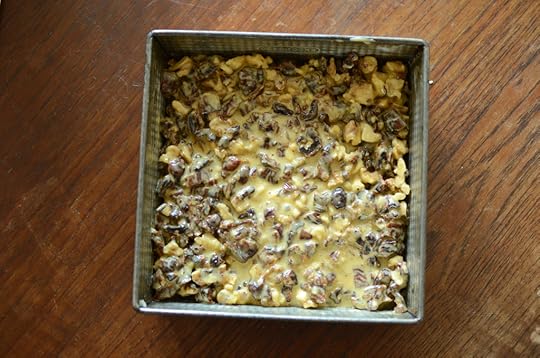
I had all the ingredients and 45 minutes before the next nap needed to start. I walked straight to the kitchen, whisked up the batter, and chopped up some dates and walnuts. Within five minutes, I had the bars in the oven (I even managed to take a few pictures!).
The finished squares are chewy, sweet from the dates, and have been a nice treat to have in the kitchen. What’s more, it was so satisfying to make something from start to finish in a single session (it took me a week and half to make a batch of lemon jam recently. This was a much shorter and more pleasing process). With each thing I make or bake, I feel like I’m reclaiming the bits of myself that having been set aside over the last year.
As I looked more closely at the handout, I realized that it had fallen out of one of my Aunt Doris’s old synagogue cookbooks and that the notes written in the corners were hers. She was the first people who showed me that there was deep pleasure to be gained from cooking for your family and I think about her a lot when I’m in the kitchen. It felt like a little gift to have carved out the time to make a recipe that had come from her.
Since making this first batch of squares, my brain spinning with ways to take the base recipe and turn it into something new. I’d like to do a batch with a medley of dried fruit that reduces the sugar in the batter (because really, who needs that much sugar when you’ve got dates and raisins!). I’ve also thought about making some that include some whole grains and seeds. I know that it’s a classic recipe and it feels like time to make it appropriate for the modern cooking age.
Related Posts:
Check the recipe index for more tasty preserves!
February 4, 2020
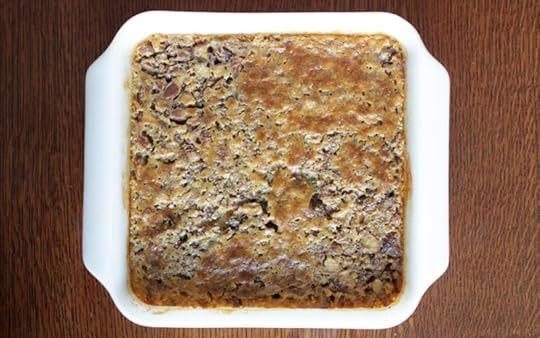
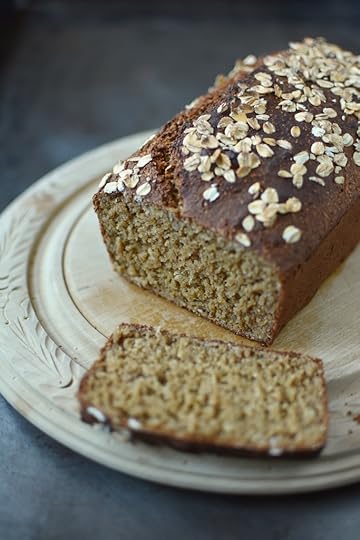
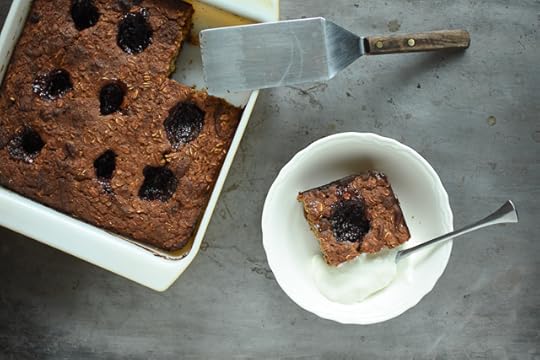
Baked Steel Cut Oatmeal with Dried Fruit and Nuts
I have known and loved many baked oatmeals over the years. There’s one in The Food in Jars Kitchen (featuring lots of applesauce) and a jam-studded one in the archives. I appreciate them for their ease. A single batch means breakfast is made for the week (something I particularly value these days).
All my previous baked oatmeal experiences have called for rolled oats, which are a staple in most kitchens (including mine). But when I found myself with a large jar of steel cut oats that needed to be used, I started to wonder whether they could sub in for their rolled brethern.
I did a little searching and discovered a recipe on Alexandra’s Kitchen that I used as my guide. I used more liquid (for a softer, more custardy consistency), opted for raisins rather than fresh fruit (for speed and sweetness), and omitted the additional sugar (opting instead to sweeten with a dollop of jam upon serving).
The finished baked oatmeal has a pleasingly nubbly texture from the steel cut oats and the plump, tender raisins are welcome counterpoints. If you hate dried fruit (particularly the rehydrated variety), feel free to use fresh fruit like Ali does. I like what the raisins do, and love the fact that all I have to do is tip the jar (rather than wash, peel, or chop).
I’ve been using my Breville CombiWave (see here for my partnership with Breville) to bake this oatmeal because it offers something my traditional oven doesn’t. Automatic shut-off. You choose the convection oven setting, select the temperature (I lower the temperature by 25 degrees when using convection), set the time and it cooks precisely and perfectly.
This means that no matter how distracted I get by the babies, I never lose track of the baking oatmeal and burn the batch. I realize that people have had ovens with automatic shut-offs for years, but with my 55 year old oven, I’ve never had that option. It’s glorious!
PrintBaked Steel Cut Oatmeal with Dried Fruit and Nuts
Prep Time:
Cook Time:
Ingredients
3/4 cup steel cut oatmeal1/2 cup chopped almonds, walnuts, or pecans
1 teaspoon baking powder
1/2 teaspoon kosher salt
3/4 cup raisins, chopped dried apricots, or other dried fruit
2 cups milk
2/3 cup water
1 large egg
3 tablespoons butter, melted and cooled slightly
2 teaspoons vanilla extract
Instructions
Preheat the oven to 375°F (if you're using convection, reduce heat by 25°).Combine the oats, nuts, baking powder, salt, and dried fruit in an 8x8 baking dish.
In a four cup measuring cup, whisk together the milk, water, egg, melted butter, and vanilla extract.
Pour the liquid over the ingredients in the baking dish. Place in the oven and bake for 45 to 50 minutes.
Eat hot, chilled or at room temperature. 3.1https://foodinjars.com/recipe/baked-steel-cut-oatmeal-with-dried-fruit-and-nuts/
Related Posts:
Cooking with Infants and the Breville Combi Wave
 3 in 1
January 27, 2020
The 2019 Class of Canning, Preserving, and Culinary DIY Books
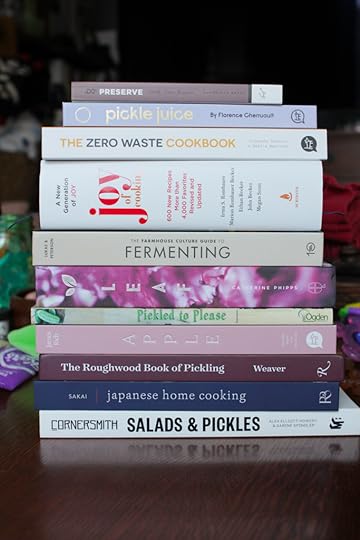
Most years, I get this post up sometime midway through December. After all, it makes sense to publish a round-up of cookbooks when people are still engaged in holiday shopping. But, as we all know, this has not been a normal year for me and so it’s taken me longer than normal to share these books. I do hope you all understand!
It was a strange year for preserving books. There was a handful of dedicated books, but not as many as in the past. So I’ve drafted a handful of books with robust preserving chapters to round out this stack.
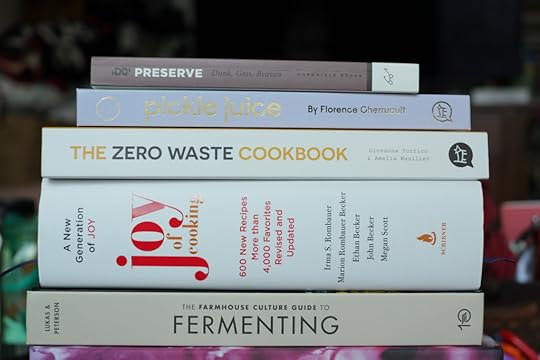
Do Preserve: Make your own jams, chutneys, pickles, and cordials by Anja Dunk, Jen Goss, and Mimi Beaven – This compact book is part of a UK series that has just recently been released in the US. The jams, pickles, and high acid preserves look lovely, but I wouldn’t trust the lower acid items (the authors’ understanding of low acid canning safety is suspect).
Pickle Juice by Florence Cherruault – This book is dedicated to drinks featuring shrubs, pickles, and other tangy preserves. There’s plenty here for both cocktail lovers and those looking to up their non-alcoholic game.
The Zero Waste Cookbook by Giovanna Torrico and Amelia Wasiliev – This is one of the books that doesn’t initially seem to fit, but does actually belong in this group. That’s because any time you’re working to reduce waste, preserving will play a role. You’ll find pickles, jams, spice mixes, homemade vinegars, and much more in this clever book.
The Joy of Cooking by John Becker and Megan Scott – We all know The Joy of Cooking as a useful, all-purpose cookbook. But people don’t necessary think of it as a preservation resource. That would be a mistake. The new edition has 60 packed pages devoted to canning, jam making, pickling, and fermentation. If you don’t want to clutter your shelves with multiple preserving books, this one will happily cover the basics plus so much more.
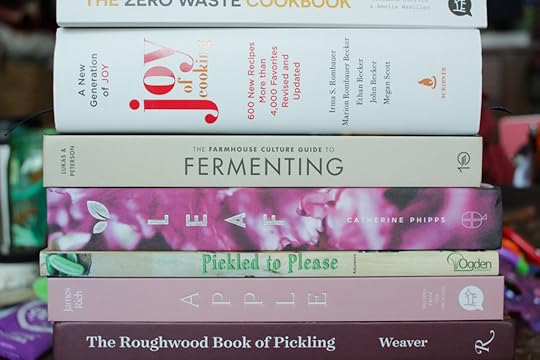
The Farmhouse Culture Guide to Fermentation by Kathryn Lukas and Shane Peterson – This a gorgeous book devoted to a wide range of ferments. If you’re a fan of the Farmhouse Culture line of products, this book is most definitely for you.
Leaf by Catherine Phipps – Okay, this book is a tiny bit of stretch for this list, but it does have a sweet little chapter devoted to preserves and drinks (including some appealing shrubs), as well as a very nice selection of sauces and page devoted to making herb jellies. More generally, it’s one of the most appealing books that crossed my path last year.
Pickled to Please by Tamika Adjemian – You may not know this, but Tamika has done a great deal of recipe development work for Ball. She is the genius behind many of their newer recipes and rarely does she get the credit she deserves for her hard work. This volume bursts with her brilliance and finally gives her the credit she is due. If you love pickles and want to add just one book from this list to your library, this is the one to buy. Also, if you find yourself in Unity, Maine, you can eat Tamika’s food at Unity Kitchen.
Apple by James Rich – This is another book that has a really nice preserving section, without being wholly devoted to the topic. If you have access to a wealth of apples in the autumn, this book should be on your shelf.
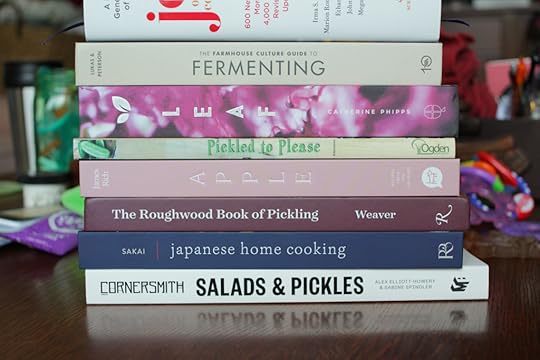
The Roughwood Book of Pickling by Williams Woys Weaver – This book is a survey course in pickles from around the world. No matter whether you want your pickles salty, spicy, or sweet’n’sour, you’ll find something to satisfy your tastes.
Japanese Home Cooking by Sonoko Sakai – If Japanese pickles are your love language, the chapter in this book devoted to their creation will delight you.
Cornersmith Salads & Pickles by Alex Elliott-Howery & Sabine Spindler – This volume comes from Australia and its small chain of Cornersmith Cafes. It’s a really nice collection of recipes for salads and pickles (just like the name suggests) and I’ve been taking lots of inspiration from it of late.
Related Posts:Fermentation Books to Take you FurtherCookbooks: A New Way to FoodCookbooks: Ibiza Land and Sea
January 13, 2020
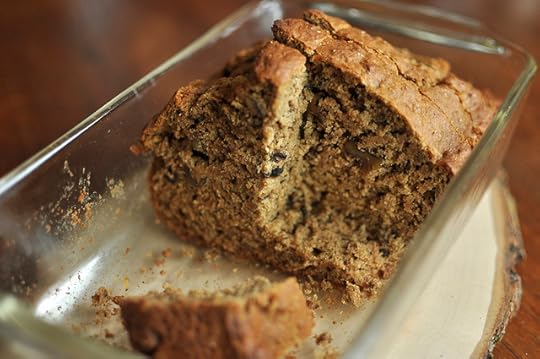
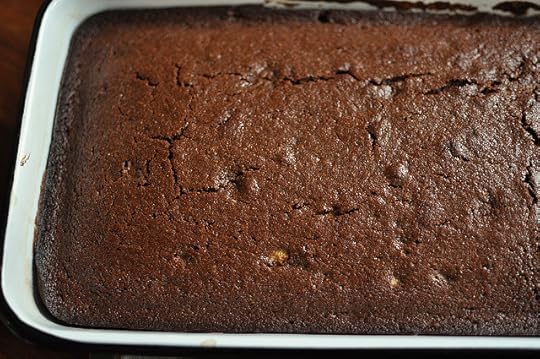
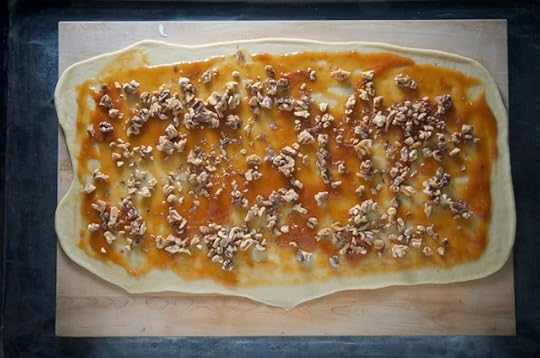
Quick Breads, Sweet Loaves, and Cakes to Bake in January
I know that most people think of January as a time of year to give up home baked goodies for more abstemious fare. But as far as I’m concerned, these chilly mid-winter days are the perfect time for a homemade loaf.
Over the years, I’ve built a deep well of recipes for these easy loaves and snacking cakes that are just the thing to ward off the darkness of the season. Dig in and enjoy.
If you are looking to shake up your baking game this season, I hope you find some inspiration.
Brown Breads
Brown Breads aren’t just for St. Patrick’s Day. They are durable, relatively neutral vehicles that pair with butter and beer, soups and stews, herby eggs, and other savory pleasures.
This Irish Brown Bread is known for its nutty flavor (supplied by the stoneground flour), crispy edges, and tender but sturdy crumb. For a less hardy but equally dense, nubby loaf, this Brown Soda Bread is the choice.
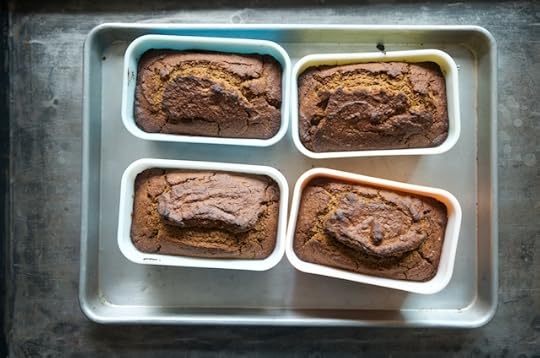
Squash Breads
One wonderful gift of cold weather is winter squash. You can adapt most squash to this recipe—butternut, acorn, delicata—I chose Kabocha Squash Quick Bread. It is naturally sweetened with coconut sugar and is luxuriously moist. Play with the spices to suit your tastes.
On the other hand, if you have a stash of grated zucchini in your freezer, this Zucchini Bread is the perfect way to use it. The finished loaf is lightly sweet, mildly spiced, and is textured with toasted chopped walnuts.
For a nut free loaf, try this Whole Wheat Millet Pumpkin Bread. The toasted millet gives it great texture and nutrition.
Fruit Filled Breads
Banana bread is the perfect baked good to use up whatever you have left in the kitchen, be it in the recipe—wheat germ, almond meal, oat flour, nuts, seeds, & dried fruit—or as a topper—the last scrapings of fruit butters, nut butters, jams, etc. This Odds and Ends Banana Bread is my favorite toasted.
If you’d rather swap the sugar for a natural sweetener, try my Maple Banana Bread, or a Maple Sweetened Banana Oat Cake if you’re baking for someone who can’t have gluten.
Likewise, Whole Wheat Spiced Applesauce Bread are easy loaves to whip up and makes a great gift for those opposed to the taste of banana! It is based off my banana bread recipe, but adapted to use up several unfinished jars of spiced applesauce.
If you’re missing the gingerbread you ate around the holidays, bake up a batch of this Pear Gingerbread. It’s deeply flavored with molasses and fresh ginger, and is made extra moist by bits of ripe, winter pears.
For a less spicy, yet still seasonally relevant loaf, try this Cranberry Bread, made with dried cranberries, chopped pecans, cinnamon, nutmeg, and orange juice.
Leftovers and Preserves in Action
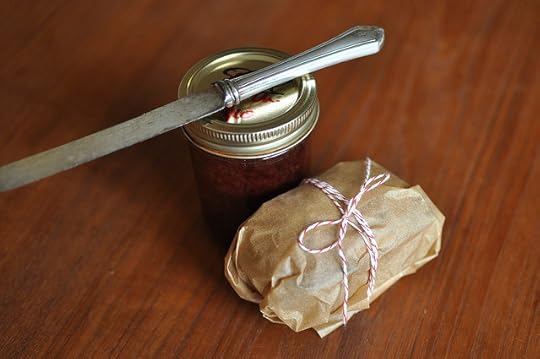
When it comes to baking, sometimes it’s best to make as much as you can while you have the energy. Babka For Now, Sticky Buns For Later is a recipe starts with a sweet, yeasty dough that turns into an apricot babka, as well as par-baked sticky buns that sit in the freezer until you’re ready to finish them off. Both recipes breathe new life into abandoned partial bags of nuts and leftover jam.
To put your other leftover preserves of the year in action, while still making something pretty and delightful, try this Simple Peach Cake, Rhubarb Cake, or Applesauce Loaf.
If you have yogurt you need to use before it turns, this Yogurt and Olive Oil Cake with Orange is a not-too-sweet cake made bright by orange zest. Yogurt is a superstar at keeping a loaf moist. I use it in this Rhubarb Yogurt Loaf as well.
What kind of baking are you doing to help get you through January?
[image error]
Related Posts:Hachiya Persimmon OatcakesPreserves in Action: Rhubarb Cake
December 18, 2019
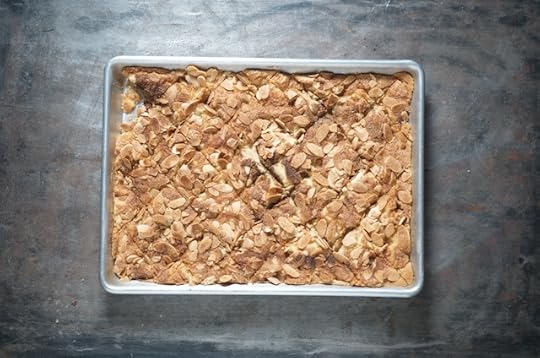
Cookies, Bars, Muffins, and other Grab and Gos
It’s the season of baking and giving. While there is no dearth of recipes out there for holiday treats, I thought I’d gather some of my favorites up for you here. I hope you enjoy!
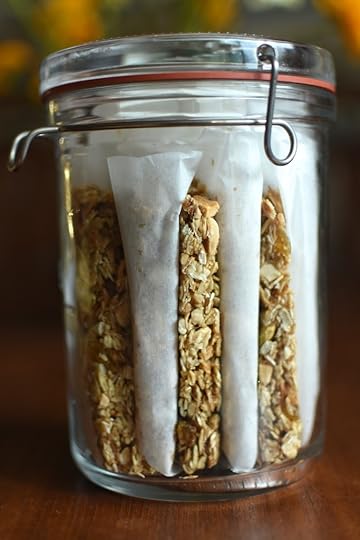
Granola Bars and Jam Bars
These Homemade Granola Bars With Nuts and Seeds are quick and easy, especially if you choose not to bake them (which is why I like to make these in the summer so I can skip the oven and still end up with a tasty treat).
These Oatmeal Applesauce Bars are featured in my fourth cookbook, the Food In Jars Kitchen, and are full of fiber and protein. The applesauce can be subbed with other fruit sauces, butters, or purees.
While granola bars are sturdy and akin to the bars you buy in stores, jam bars are more of a cross between granola bars and baked oatmeal layered with jam. Both are suited for travel and gifting, but the granola bars will always be more durable.
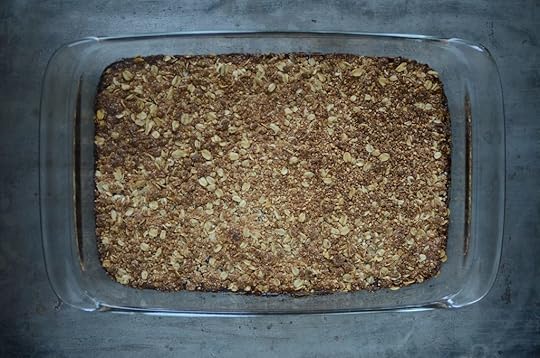
To make jam bars of any kind, you press two-thirds of a simple, crumbly dough into a baking pan pan, spread it generously with jam, and then distribute the rest of the dough on top.
Crunchy, fruity, and not too sweet, this Jammy Oatmeal Pecan Bar recipe can work as bars or cookies, breakfast or midday snack. Similarly, these Jam Bars from the cookbook Tartine All Day are flavored with vanilla and almond extracts, bound by nut butter, and tempered sweetness with lemon juice and salt
Meanwhile, this Jammy Baked Oatmeal is a heartier and can act as a full meal; it’s packed with protein and fiber, pairs great with yogurt, and is perfectly portable if you want to take it on the go.
These Persimmon Oatcakes are also great for a grab-and-go; they are somewhat of a cross between baked oatmeal and a muffin top, with a moist crumb and luscious persimmon flavor.
Cookies
Cookies are an inevitable and joyous holiday experience; baking them and allowing the aroma to fill the house, swapping them at parties, and, of course, indulging. If you haven’t noticed, I typically use whole wheat or oat flour in my recipes as opposed to white; if I have the opportunity to add fiber or protein without skimping on flavor, I’ll take it. For instance, these Whole Wheat Chocolate Chip Cookies are as sweet, buttery, and tender as the classic.
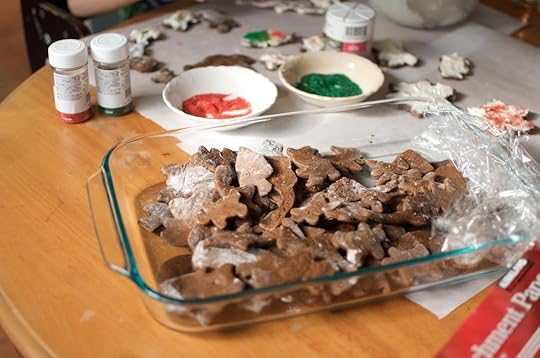
For something similarly nostalgic yet sweeter, these Classic Cut-Out Sugar Cookies, will fit the bill.
If you’re searching for a cookie more dramatic in flavor, these Ginger Spice Delights are spiced with ginger and orange zest, kept moist with applesauce, and pair with any tea, coffee, or holiday cocktail. These Salted Rye Cookies are buttery, sandy, and also great to dunk in tea.
These Jan Hagel Cookies are based off a traditional Dutch Christmas recipe that creates a charming cookie akin to almond shortbread and cooks in 10 minutes or less!
If you have a surplus of preserves, try utilizing them in this Classic Thumbprint Cookie recipe I use organic sweet butter to make these lightly sweetened cookies truly indulgent; my favorite pairings are apricot jam, fig jam, or sour cherry preserves. Likewise, these Granola Cookies are crunchy, chewy, satisfying way to use up some fruit butter and aging granola on hand.
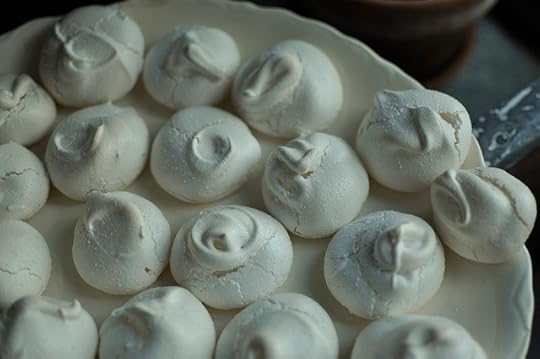
For a fancier looking dessert, try this variation of my Grandma Bunny’s Meringue Cookies; I chose to flavor them with vanilla, but you can alternatively add 1/4 cup unsweetened cocoa powder, some tiny chocolate chips, or 1/4 cup crushed candy canes to dress up the recipe.
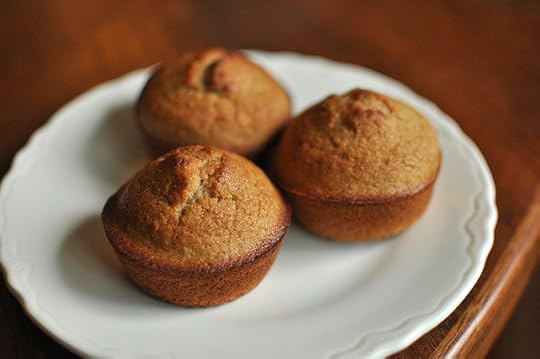
Muffins and Scones
Muffins and scones are great gifts for those who don’t have much of a sweet tooth, but still take pleasure in a baked good. The following hand-held delights are all simple, blank slates for whatever you choose to pair them.
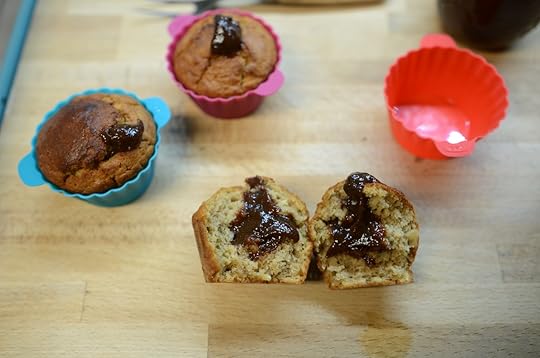
Chocolate Applesauce Muffins and Oatmeal Fruit Muffins, made with the dried fruit of your choice, are two of my favorite recipes; both use applesauce to provide moisture and lend a bit of healthiness.
Conversely, these Oatmeal Muffins are made moist with yogurt and lightly spiced with cinnamon and nutmeg; they’re a perfect base for any sort of jam or fruit butter.
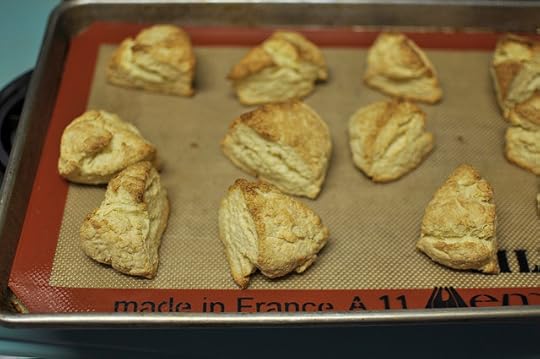
One of my go-to recipes are these Cream Scones from Dorie Greenpan’s book Baking: From My Home to Yours; they are a buttery and dependable vehicle for any sort of jam, dried fruit, or drizzle topper. Ideal for after holiday breakfasts and brunches.
If you are looking for versatility, these Cornmeal Muffins could rock either sweet or savory fixings; top with strawberry jam, fill with blueberries, or pair with chili and soups.
Similarly versatile are these Lemon Buttermilk Muffins, which are an adaptation of my Yogurt Olive Oil Cake (I merely swapped the yogurt for buttermilk and the orange for lemon). They have a firm but tender crumb, ideal for when you only have one hand to spare and are constantly on the go.
Whatever you choose to bake, make sure that it’ll be delicious!
Related Posts:Check the recipe index for more tasty preserves!


