
Marisa McClellan's Blog, page 4
April 30, 2021
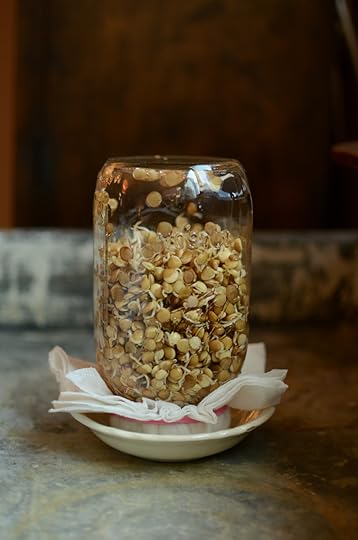
Sprouted Lentils with Ball® Home Canning presented by Newell Brands
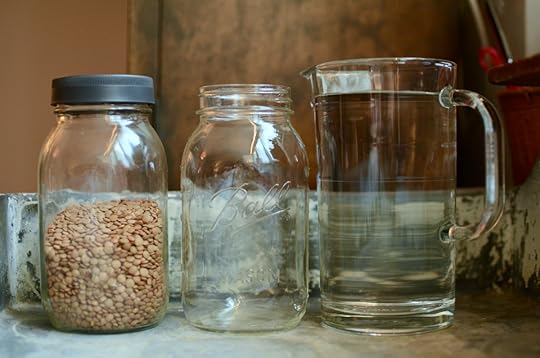
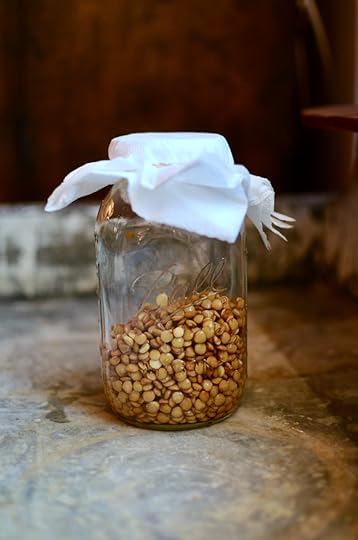
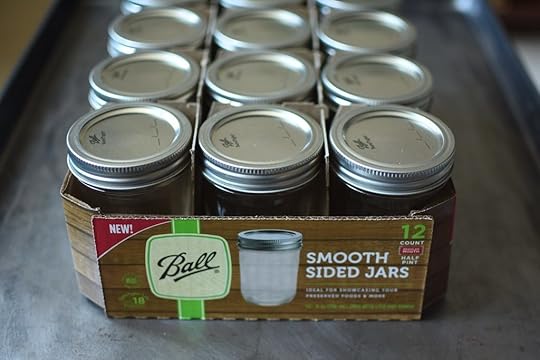
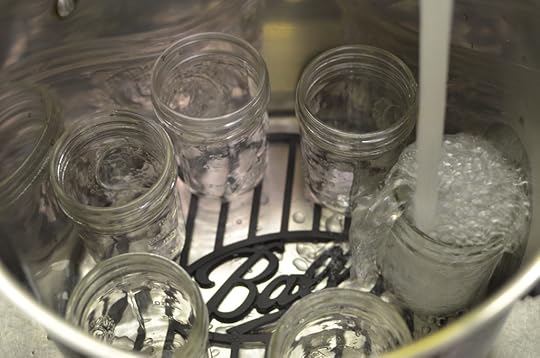
Making sprouted lentils is easy and all you need is a Ball® Regular Mouth Quart Jars and some brown lentils.
I am a Ball® Brand Ambassador and this post is sponsored by Ball® Home Canning presented by Newell Brands.
I first became aware of Earth Day when I was in 6th grade. A member of my middle school’s Green Club and burgeoning environmentalist, I was on fire to do my part to save the planet. I brought my lunch to school in a canvas bag. I recycled every scrap of torn notebook paper. And I pestered my parents to use reusable grocery bags in place of the plastic sacks from the store.
Fast forward 30 years and not much has changed. I still try to make the most environmentally smart choices as I’m able. These days, this means driving as little as possible, reducing our consumption of plastic, and preserving as much food as I can during the growing season.
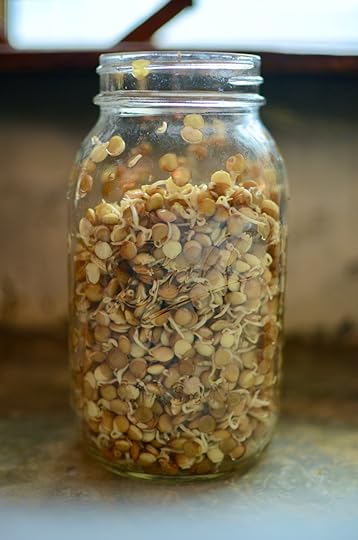
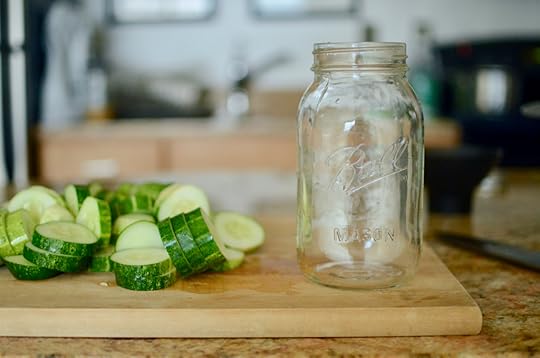
This year, I celebrated Earth Day by making my own sprouted lentils at home in one of my beloved Ball® Regular Mouth Quart Jars. Even though Earth Day/Week/Month is nearly over, you can still join me in the satisfying, sprouty fun.
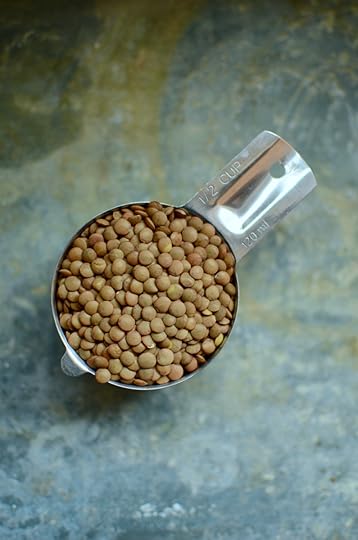
You’ll need a Ball® Quart Jar (I like to use a regular mouth jar because it allows you to better control the daily draining, but a wide mouth jar will also work) and some brown lentils. Pour half a cup of the lentils in the bottom of the jar and cover them cool tap water to rinse. Using a small mesh sieve, drain the water out and then fill the jar up again so that the lentils are completely submerged. Let them sit anywhere from 8 to 24 hours for this initial step.
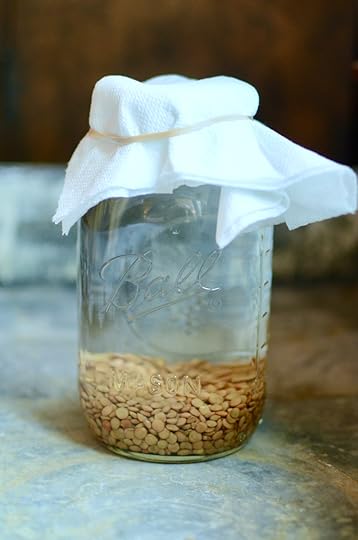
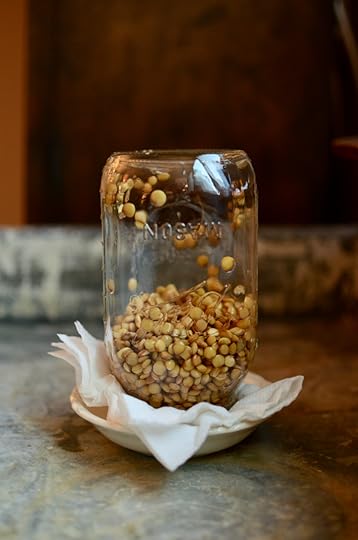
Once they’ve had a nice, long soak, drain the lentils, run some fresh water over them and then give them a final, vigorous draining. Put a small, clean kitchen cloth or a length of folded paper towel over the top of the jar, secure it tightly with a rubber band and set the jar upside down in a small bowl (this allows any remaining water to drain out of the jar and ensures that the lentils sprout rather than rot).
Set the jar and its dish someplace where it won’t get knocked over but not so out of the way that you will forget about it. For me, a patch of sunny windowsill that my kids can reach works best.
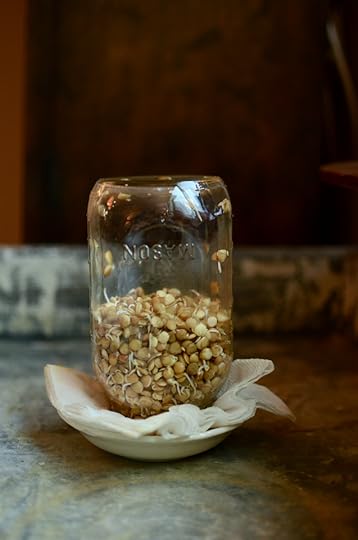
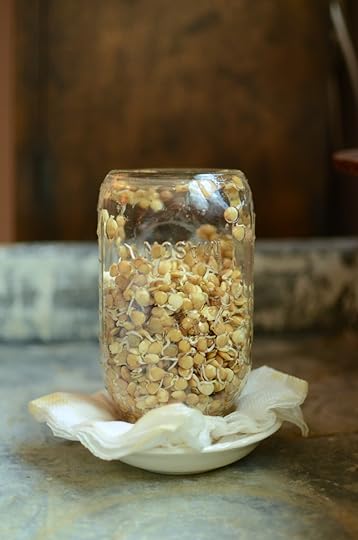
Now you’re going to visit your jar once or twice a day for the next four to six days. With each visit, remove the towel, run some water into the jar, drain it, replace the towel, and return the jar to the bowl. With each passing day, you’ll see more and more of the lentils popping open and growing white sprouts. Once the lentils have grown to fill most of the jar, you’re done. They should smell fresh and nutty, and have a crunchy, clean, nearly sweet flavor when eaten.
Cap the jar with a Ball® Leak Proof Storage Lid and refrigerate. The sprouted lentils will keep for several weeks in the fridge. You can use them to top salads, hummus bowls, and cooked grain dishes. For more on sprouting, check out this post from fellow Ball® Brand Ambassador Wholefully!
Here’s hoping this inspires you to pull down a mason jar and set some lentils to sprouting!
Disclosure: This is a sponsored post that is part of an ongoing partnership with Ball® Home Canning presented by Newell Brands. They have provided jars, equipment and monetary compensation. All thoughts and opinions expressed remain my own.
Related Posts:Proudly Homemade Antipasto Relish from Ball® Fresh PreservingHow to Grow Your Own SproutsInternational Can-It-Forward Day and Curried Fruit Compote from the Ball Blue Book

December 17, 2020
Ball® Home Canning Made For More Small Business Fund
This post, announcing the Made For More Small Business Fund is sponsored by Ball® home canning products.
I started this blog in early 2009 because I loved jars and wanted to deepen my canning practice. At the time, I had no expectations that it would ever become anything more than a useful hobby. However, soon after I started blogging in this space, opportunities to teach and write began opening up.
By the summer of 2011, I was doing this work full time. That means that next summer, this tiny business of mine will have been a full time endeavor for ten years. I have taught many thousands of people to make jam, pickle vegetables, and preserve tomatoes. And I’ve done it all using Ball® home canning products (truly, I could not have done it without them).
As we all know, the pandemic has been devastating for everyone, but particularly so for small business owners. Newell Brands, the maker of Ball brand home canning products, wants to show their loyal customers how much they mean to them with their Made For More Small Business Fund.
This fund is designed to give small businesses that use Ball brand home canning products in their work the opportunity to apply for 10 grants of up to $10,000 to fuel their survival and growth during this incredibly challenging period.
In addition, the awarded businesses will be showcased on the @BallCanning social media channels, featured on product packaging, and given business mentorship from senior executives.
The program is open to U.S.-based for-profit small businesses that have 99 or less employees, and that use Ball brand home canning jars and lids in some aspect of their business. Click here to enter. The entry period is open from Dec. 15, 2020 to Jan. 31, 2021, with public voting to take place from Feb. 15 to Mar. 10, 2021.
Disclosure: This is a sponsored post that is part of an ongoing partnership with Ball Brand Home Canning. They have provided jars, equipment and monetary compensation. All thoughts and opinions expressed remain my own.
Related Posts:Roasted Salsa Verde from Ball® Fresh PreservingProudly Homemade Strawberry Rhubarb Jam from Ball® Fresh PreservingInstant Shrub Sparkler with Ball® Canning
October 19, 2020
Sweet Yellow Tomato Chutney from Ball® Fresh Preserving
This post, featuring Sweet Yellow Tomato Chutney is sponsored by Ball® Fresh Preserving.
It’s time for my next partner post with Ball Canning. I’m working with them this season to share recipes, new products, and canning tips. So far this year, I’ve tackled a pantry makeover, shared my cheater shrub recipe, made a batch of strawberry rhubarb jam, cooked up some bread and butter pickles, fired up the oven for roasted salsa verde, and boiled up a small batch of pepper jelly
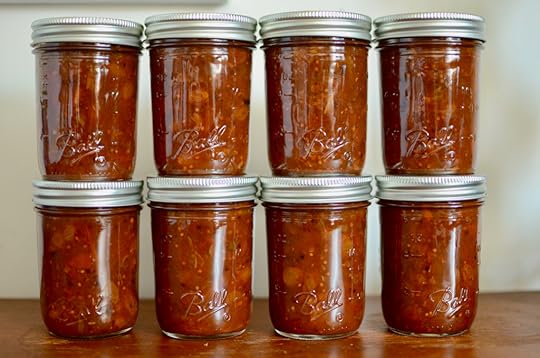
This month, I’ve made a large batch of Sweet Yellow Tomato Chutney. Most of the time, I prefer recipes that produce a smaller yield, but a few times a season, I like to opt for something that will give me a big bang for my energetic buck. That way, I have some dedicated products to pull from for holiday giving.
To my mind, chutney is the perfect product to choose when going big. It gets its consistency from evaporation, and so there aren’t any issues around getting sugar and pectin to set. You can toss everything into a large pot and then cook it down until you’ve reached your desired texture and reduction. Sometimes I even cook it down over the course of a couple days, to better make it work with my schedule. Chutney is forgiving that way.
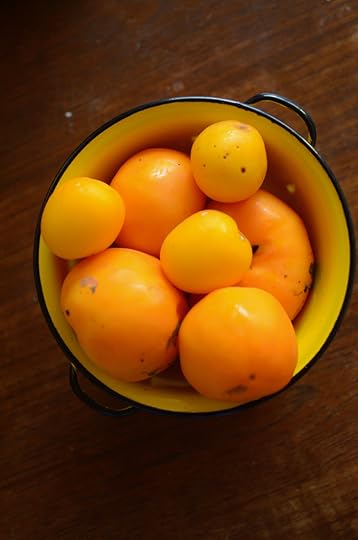
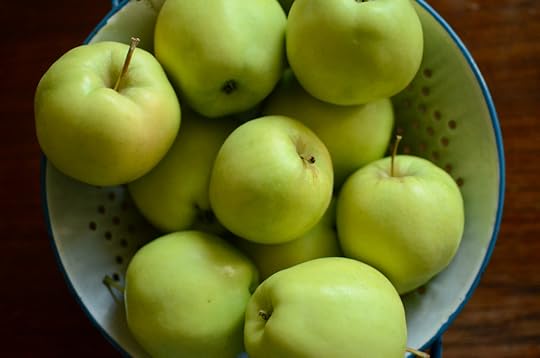
The backbone of this batch 12 cups of chopped yellow tomatoes (I struggled to find true yellow tomatoes, so instead opted for orange ones. They have a similar flavor profile and acid levels, so I feel fine with the swap). Nine cups of peeled and chopped green apples are the co-star.
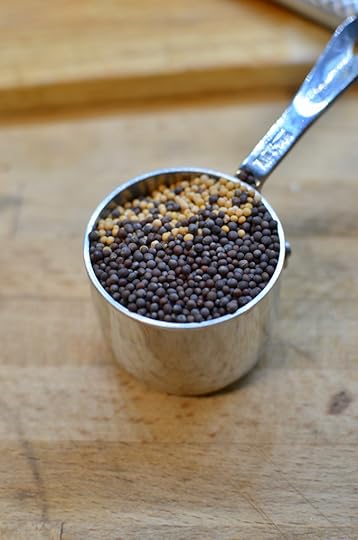
The rest of the ingredients include apple cider vinegar, golden raisins, minced onion, two kinds of sugar, three fresh chili peppers (I used Hungarian wax), garlic, mustard seeds, fresh ginger, cinnamon, and salt. These are classic players in traditional chutneys and give it its signature sweet/savory/spiced flavor that is so good with meat, fish, and cheese.
To prevent the apples from browning, you start by pouring your vinegar into a large stock pot (I used a 12 quart pot because this chutney starts with a lot of volume) and then drop your apple pieces in as you peel, core and chop.
The only issue with the technique is that it doesn’t allow you to precisely measure the number of cups of apples you use (and cups are the primary measurement), so you have to estimate a little.
Once your apples are chopped, you start working on the tomatoes. The recipe instructs you to peel and seed them before chopping. My tomatoes were too soft to peel easily, so I did my best with the peels and seeds, but didn’t try to be absolutely perfect.
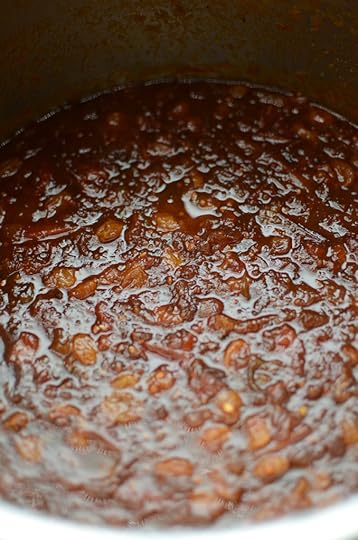
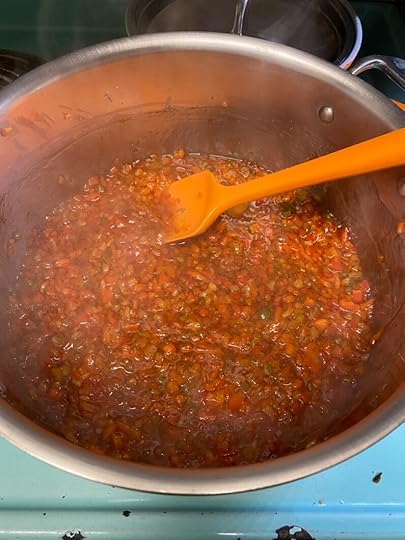
Once the tomatoes and apples are prepped, the rest of the ingredients join them in the pot. Then, you put the pot on the stove over high heat, bring it to a rolling boil, reduce the heat to medium-high and cook the chutney until it has reduced by about half.
Click here for the full Sweet Yellow Tomato Chutney recipe and complete instructions
The recipe claims that it should take no more than about an hour to cook down, but I found that it took far longer than that. My batch took just over four hours of gentle boiling (with lots of regular stirring to prevent sticking and burning on the bottom) to reduce to the point that it was thick, no water separated out, and it could mound on a spoon nicely.
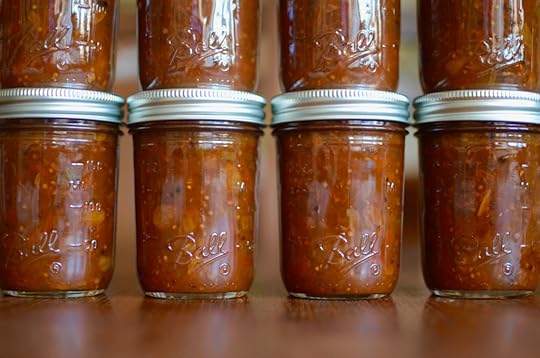
The other issue with this recipe is the yield. The starting ingredients total just over 34 cups. It states that it should make 6-7 half pints. The chutney would need to reduce to 1/4 of its original volume to get even close to 6-7 half pints. So going in I suspected it would make more than that. Boy, did it ever.
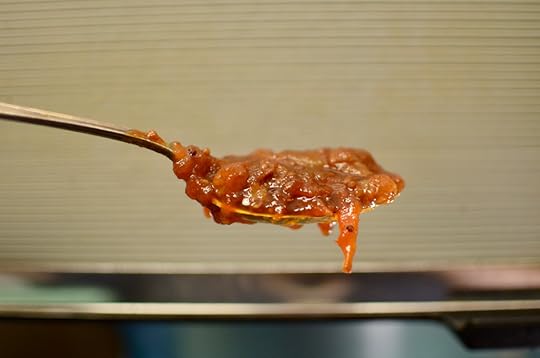
My batch reduced a little more than half (normal for chutney), which left me with a total yield of 16 half pints. The pictures in this post show eight of the 16 jars, because I ran out of matching jars and the finished pictures wouldn’t be nearly as pretty with all the motley jars I had to use to finish making all that chutney shelf stable.
I’m not at all sad about having so much chutney on the shelf (like I said earlier in the post, I like having a stash of things to give to friends and neighbors), but I am curious where the original recipe writer got 6-7 half pints for the yield. Unless they meant 6-7 pints? That would be closer to target.
Click here for the full Sweet Yellow Tomato Chutney recipe and complete instructions
Thankfully, the finished flavor of this chutney is bright, fruity, and just a little bit spicy (thanks to those hot peppers!). I’m working on filling a number of gift boxes to send to my family for the holidays this year (since we aren’t able to gather in person), and come November, jars of this chutney will be winging their way to my parents in Oregon and my sister in Texas. I know that they will be welcome accompaniments to cheese boards and turkey sandwiches.
To get the recipe for Sweet Yellow Tomato Chutney, click here. Make sure to visit Ball® Fresh Preserving for more seasonal recipes.
Disclosure: This is a sponsored post that is part of an ongoing partnership with Ball Canning. They have provided jars, equipment and monetary compensation. All thoughts and opinions expressed remain my own.
Note: I am working with Ball® Canning to resolve the yield and logistical issues in the Sweet Yellow Tomato Chutney recipe.
Related Posts:Check the recipe index for more tasty preserves!
September 23, 2020
Pepper Jelly from Ball® Fresh Preserving
This post, featuring Pepper Jelly is sponsored by Ball® Fresh Preserving.
It’s time for my next partner post with Ball Canning. I’m working with them this season to share recipes, new products, and canning tips. So far this year, I’ve tackled a pantry makeover, shared my cheater shrub recipe, made a batch of strawberry rhubarb jam, cooked up some bread and butter pickles, and fired up the oven for roasted salsa verde.
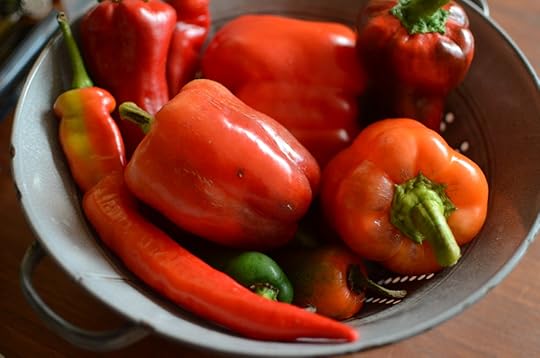
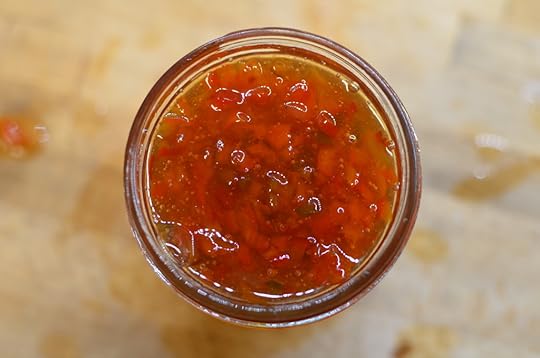
This month, I’ve made a batch of pepper jelly This recipe came at the exact right time for me. I’ve been getting a farmers choice box each week (it’s like a CSA, but you opt in or out each week) from my favorite local farm, and the last couple boxes have come with loads of crisp, sweet peppers.
The peppers were building up in my fridge and so I was happy to make good use of them. And pepper jelly is a particularly good use. It’s signature combination of sweet and heat makes for a useful, tasty condiment. While it’s traditional to serve it over cream cheese, I really like it shaken into vinaigrette, spread on a turkey sandwich, or used to glaze meatballs.
I first discovered how good that sweet hot combination could be when I was in high school. There was a food truck across the street from my campus that served grilled teriyaki chicken skewers over rice for just $3 a portion (this was 1995, after all).
When you placed your order, you could ask to have the chicken seasoned with a strip of warm Thai sweet chili hot sauce (it was always poured from a big Tupperware pitcher). Ever since, I’ve been a fool for the combination.
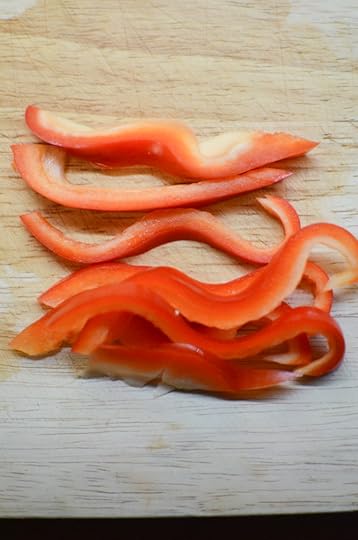
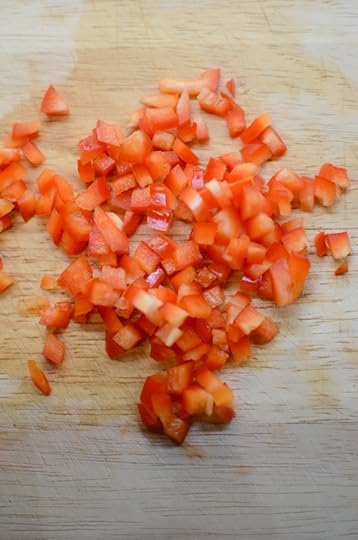
I made this pepper jelly over the course of two days. The first day, I gathered my peppers and carefully chopped them into tiny squares. You could use a food processor for this job, but I find the process of making a teeny, uniform dice quite soothing.
I didn’t wear gloves for the sweet peppers, when it came time to chop the jalapenos, I pulled on a pair of disposable gloves I keep in my kitchen for precisely this purpose.
In earlier days, I might have rolled the dice and hoped that the peppers weren’t too hot, but since I wipe tiny faces and change diapers a dozen times a day, I didn’t want to run the risk of having hot pepper oil on my hands.
If you have similarly sensitive people in your life, kitchen gloves are a must any time you handle hot peppers.
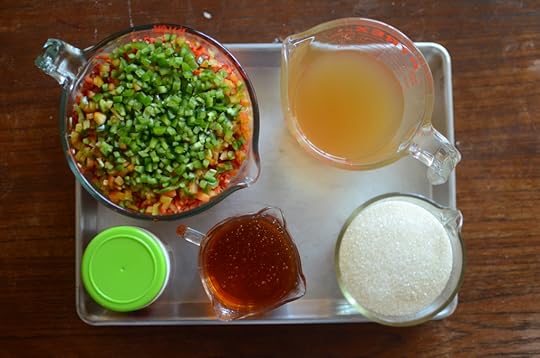
The next day, I took my carefully chopped peppers out of the fridge and gathered the rest of my ingredients. In addition to five cups of peppers (1/2 cup are hot), you need 1 1/4 cups apple cider vinegar, 2 cups granulated sugar, 1 cup honey, and 3 tablespoons of Ball Low or No-Sugar-Needed Pectin.
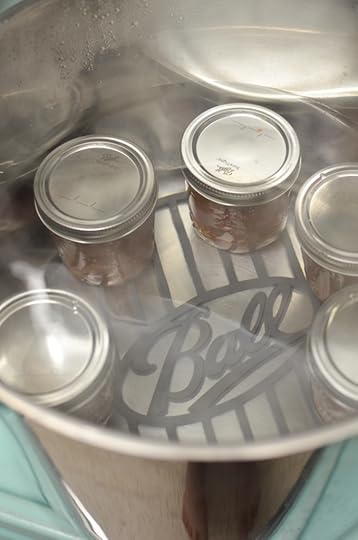
Once your ingredients are gathered, you want to pause of the making of the jelly and get your canning pot ready. Pull out your canner or line the bottom of a stock pot with a heat proof canning mat.
Arrange the necessary half pint jars on top of the mat or rack and fill them with hot tap water. Keep the water running until the jars are just submerged. If you have hard water, add a healthy glug of white vinegar to the pot to help prevent mineral deposits from adhering to your jars.
Put the pot on the stove and let it heat up while you make the jelly.
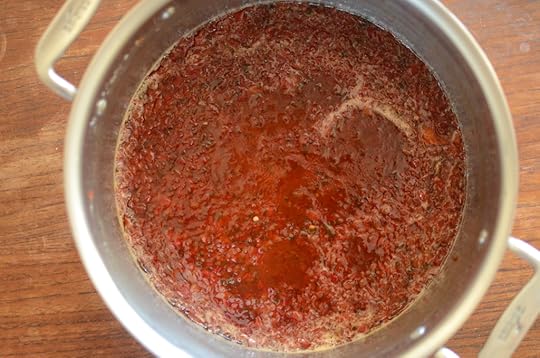
In a large pot (I used a low, wide 8 quart pan made from stainless steel), combine the peppers and vinegar. Bring them to a hard boil and stir in the pectin, one tablespoon at a time. Then, add the sugar and honey. Once all the ingredients are in, you let it boil hard for three minutes, and then the cooking process is done.
Click here for the full Pepper Jelly recipe and complete instructions.
Once the jelly is finished, it’s time to get it into the jars. Pull one of your hot jars out of the canner and put it on a heatproof surface (I like to work on my butcher block, because the wood absorbs the heat and doesn’t put the jars at risk).
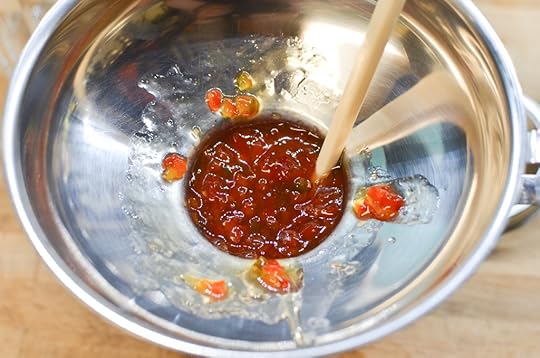
Fit your jar with a canning funnel and pour in the jelly, leaving 1/4 inch headspace. Use a chopstick or bubbling tool to remove any trapped air bubbles and check your headspace. If it has dropped below 1/4 inch, add a little bit more jelly.
Wipe the rim with a clean, damp towel. Place a clean, new lid on the jar and fasten it in place with a ring (taking care to only twist to fingertip tight). Return the full jar to the canner and repeat with the remaining jars and jelly.
Once all the jars are back in the canner, bring the pot to a rolling boil. Once it has achieved a boil, set a timer for 10 minutes (adjust the processing time if you live above 1,000 feet in elevation). When the processing time is up, turn off the burner and remove the lid.
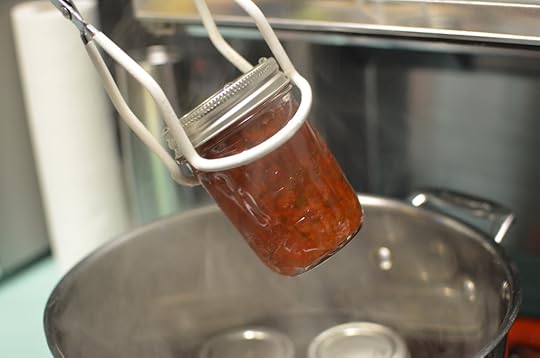
Let the jars sit in the cooling water for five minutes. This helps improve the quality of your seal and also helps prevent the product from siphoning out of the jars once they are removed from the canner.
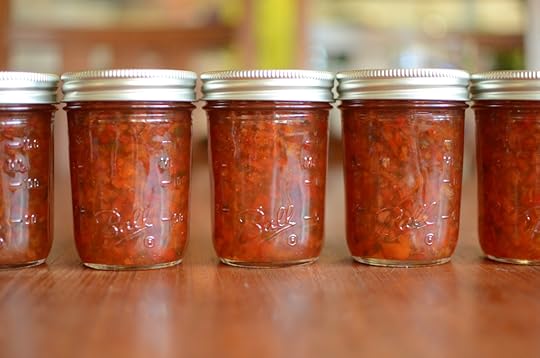
Finally, remove the jars from the canner and set them on a folded kitchen towel to cool. Let them sit undisturbed for 24 hours. Check the seals when that time is up. Any unsealed jars should be refrigerated and used promptly. Sealed jars can be stored in a cool, dark place for up to a year.
Pepper Jelly is a great preserve to have for holiday gatherings (if such things exist this year) and makes a lovely addition to gift baskets.
To get the recipe for Pepper Jelly, click here. Make sure to visit Ball® Fresh Preserving for more seasonal recipes, as well as to find new promotional offers throughout the summer!
Disclosure: This is a sponsored post that is part of an ongoing partnership with Ball Canning. They have provided jars, equipment and monetary compensation. All thoughts and opinions expressed remain my own.
Related Posts:Maple Applesauce from Ball® Fresh Preserving ProductsBlackberry Lavender Jam on Freshly Preserved IdeasCan-It-Forward Demo Videos Now Available on FreshPreserving.com + Home Depot Gift Card Giveaway
August 7, 2020
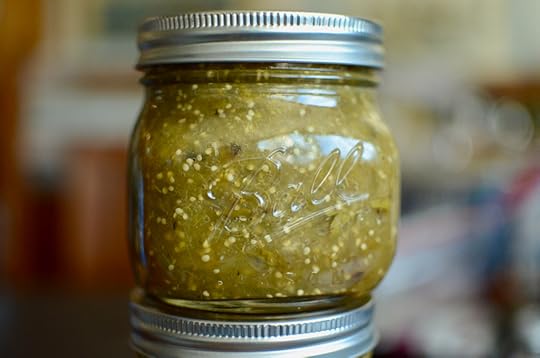
Roasted Salsa Verde from Ball® Fresh Preserving
This post, featuring Roasted Salsa Verde, is sponsored by Ball® Fresh Preserving.
It’s time for my next partner post with Ball Canning. I’m working with them this season to share recipes, new products, and canning tips. So far this year, I’ve tackled a pantry makeover, shared my cheater shrub recipe, made a batch of strawberry rhubarb jam, and cooked up some bread and butter pickles.
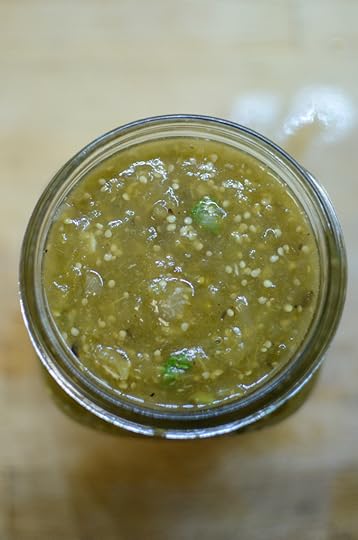
This time, I’ve made a batch of their Roasted Salsa Verde. This recipe speaks to me on a number of levels. First off, I love having a stash of tomatillo salsa in my pantry. Sure, it’s great with chips. But it can also do double duty as a simmer or green enchilada sauce. Anything that versatile has a place in my kitchen.

Second is that you can easily break the prep for the Roasted Salsa Verde up into multiple stages, which is a massive plus these days. My twins are now 13 months old and are into everything. I rarely get more than five minutes in a row at a time to focus on anything and I still managed to get this salsa made in relatively short order.
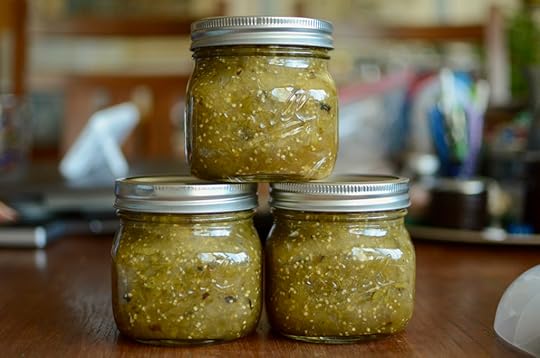
The final reason to love this salsa is that a single batch makes three pints for the shelf and another cup or so for the fridge that you can immediately eat with tortilla chips for lunch, or use as a braising sauce for chicken. Are you convinced yet?

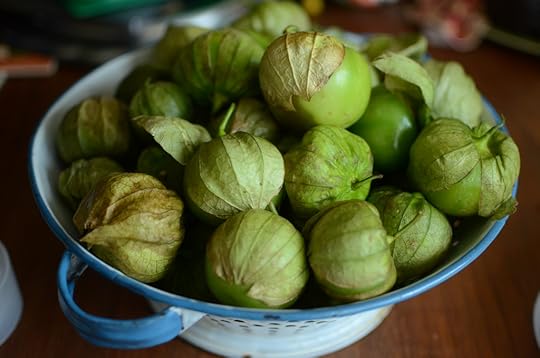
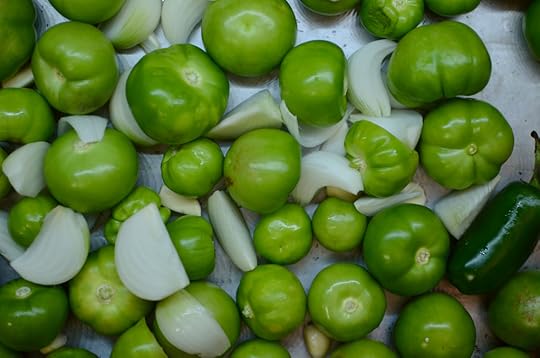
So here’s how it breaks down. You dehusk and wash four pounds of tomatillos. Cut the truly huge ones in half and arrange them on a rimmed baking sheet with wedges from two onions, some garlic cloves, and two hot peppers.
Once the vegetables are tender and have a bit of char, you remove the pan from the oven and let them cool a bit. Carefully stem and deseed your hot peppers once they’re cool enough to handle. I recommend disposal gloves for this step, so that you don’t burn your fingers with the pepper oil.
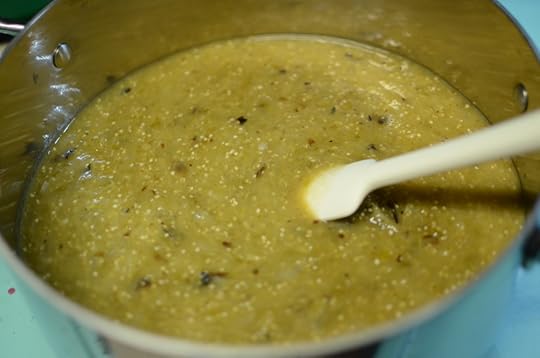
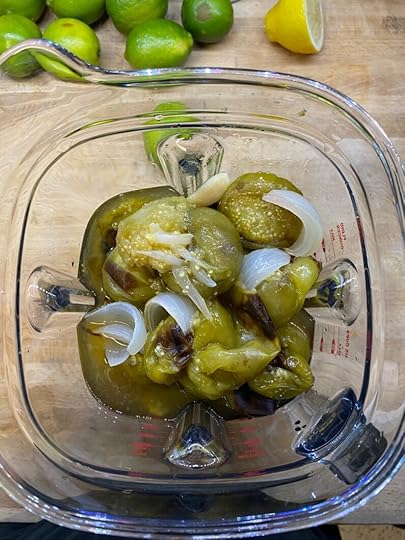
This is the one place where I parted ways with the recipe. I used my blender to mix the ingredients instead of the recommended food processor. My processor is a bit leaky and so I was afraid of having warm tomatillo juice all over my counters. Happily, the blender worked beautifully and I was saved extra clean-up.
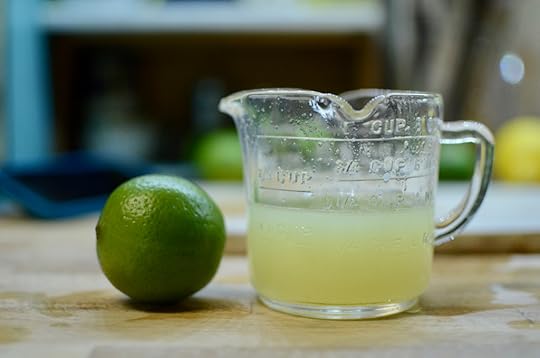
Once your roasted vegetables are smooth, you tip them into a saucepan and add freshly squeezed lime juice, chopped cilantro, salt, and pepper. Then you bring it to a simmer.
At some point in this process (perhaps while the roasted veg was cooling), you want to set up a boiling water bath canner with three pint jars. Get it going so that it is ready when your salsa is hot.
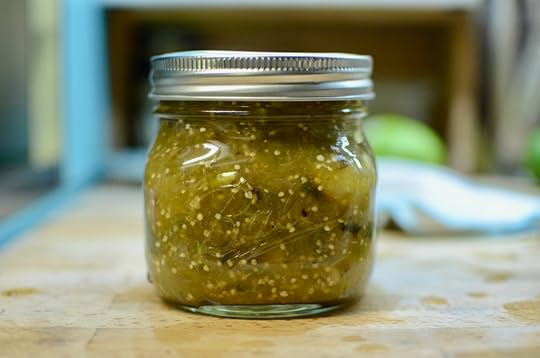
Then, remove one jar from the hot canner and fill it with the hot salsa, leaving 1/2 inch headspace. Wipe the rim, apply a new, clean lid, tighten the ring to fingertip tight and return it to the canning pot. Repeat this process with the remaining jars. If you have any salsa remaining when all the jars are filled, put it into a container for the fridge.

To get the recipe for Roasted Salsa Verde, click here. Make sure to visit Ball® Fresh Preserving for more seasonal recipes, as well as to find new promotional offers throughout the summer!
Disclosure: This is a sponsored post that is part of an ongoing partnership with Ball Canning. They have provided jars, equipment and monetary compensation. All thoughts and opinions expressed remain my own.
Related Posts:Proudly Homemade Bread & Butter Pickles from Ball® Fresh PreservingProudly Homemade Strawberry Rhubarb Jam from Ball® Fresh PreservingInstant Shrub Sparkler with Ball® Canning
August 6, 2020
California Capers aka Pickled Nasturtium Seeds
My friend Shae is shutting down her blog, Hitchhiking to Heaven. Before she takes it offline, she offered up some of her old posts so that they can continue to live and be useful. The first time I met her in person, she gave me a jar of these California Capers.
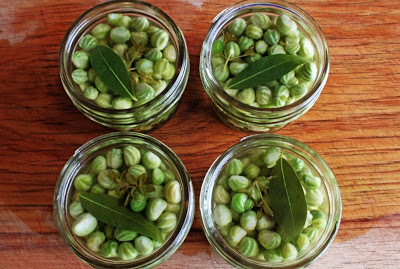
This is my favorite kind of canning project — making something wonderful (and a little bit quirky) from a plant, bush, or tree that we live with every day.
Some people hold Nasturtiums in the same esteem as weeds. The stems and foliage brown to a scraggle by summer’s end. They’re prone to aphids in downright creepy numbers. And once they take hold, they reseed with a vengeance.
Lucky for us, I say! (Well, not about the aphids — but the other parts.)
First of all, the flowers deliver pure, pop-in-the-eye color, and you can eat them in your salads . . .

Second, after the flowers are done, when what’s left starts to turn ugly, look a little closer.
These seedpods are nothing but beautiful — and tasty, when properly prepared.

You can pick the plump green pods and turn them into “false capers.” Soaking the pods in brine for three days (changing the solution once a day) mellows out their peppery burn and turns them into an excellent caper substitute — or an intriguing snack. I opened a jar and somehow they disappeared from the fridge before we had a chance to cook with them.

This recipe, which I adapted from The Splendid Table, calls for a pint of pods, but you can modify it to use what you have. Remember to go for the green pods; the brown ones won’t taste good. They’ll become next year’s crop.
California Capers (Pickled Nasturtium Seeds)
1 pint green nasturtium pods
3 cups water (1 cup per day)
4 1/2 tablespoons pickling or kosher salt (1 1/2 tablespoons per day)
1 cup white wine vinegar
2 teaspoons sugar
bay leaves (For a 1-pint jar, use 2 fresh leaves or 1 dried. For my quarter-pint jars, I picked one small bay leaf for each jar.)
fresh thyme (For a 1-pint jar, use 2 3-inch sprigs. For quarter-pint jars, I added a 1 1/2-inch sprig to each jar.)
Day One
Pick over the pods to remove any remaining stems or flower bits. Place the pods in a pint jar and cover them with a mixture of 1 cup water and 1 1/2 tablespoons pickling or kosher salt. Let them stand, uncovered at room temperature, for one day.
Day Two
Don’t be alarmed by the stinky sulfur smell coming from the pods. I don’t know what causes it, but it’s normal. Drain and rinse the pods and pick out any soggy bits of flowers left behind. Return the pods to the jar and cover them with a fresh mixture of water and salt. Let them stand for another day.
Day Three
Repeat the steps from day two.
Day Four
1. Drain and rinse the pods and put them into the jars you’ll use to keep them. I chose 4 quarter-pint jars so that I can easily give them as gifts.
2. Bring the vinegar, sugar, bay leaves, and thyme to a boil in a small pan. Pour the boiling vinegar mixture over the pods, distributing the bay leaves and sprigs of thyme among the jars.
3. You may process your jars in a water-bath canner for 10 minutes if you like (leaving 1/2-inch head space), but it’s not necessary. If you don’t want to use the water bath, simply allow the vinegar mixture to cool, cover your jars, and store them in or out of the refrigerator — it doesn’t matter which. (Canning expert Linda Ziedrich says so! Scroll down to her post from October 15, 2009 to see how she handles her pods.) I water-bath canned my jars because I thought the tight seal would be better for packing them up and shipping them cross country.
Yields 4 quarter-pint jars.

This piece was originally published on Hitchhiking to Heaven on August 12, 2010 and was written by Shae Irving.
Related Posts:Check the recipe index for more tasty preserves!
July 31, 2020
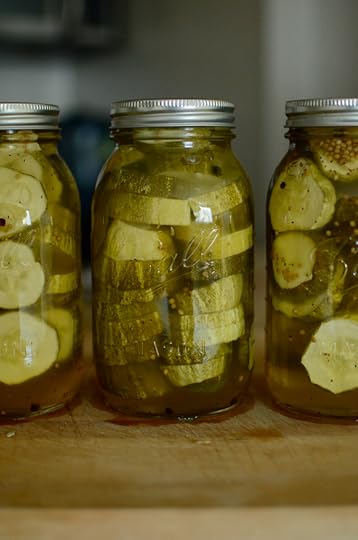
Proudly Homemade Bread & Butter Pickles from Ball® Fresh Preserving
This post, for Bread & Butter Pickles, is sponsored by Ball® Fresh Preserving.
For the last nine canning seasons (I can’t quite believe it’s been that long), I’ve been partnering with the folks at Ball Canning to share recipes, new products, and canning tips. So far this year, I’ve tackled a pantry makeover, shared my cheater shrub recipe, and made a batch of strawberry rhubarb jam.
This month, I’m sharing two recipes. First up is Bread & Butter Pickles made using Ball® Bread & Butter Pickle Mix. I’m doing more canning this season than I managed last year, but my time is still super limited. Because I have to squeeze all my food preservation endeavors into nap windows or late night kitchen sessions, I am taking short cuts wherever possible. The pickle mix is a very welcome helper this season.
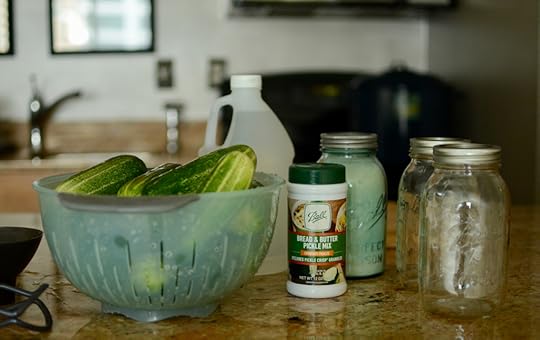
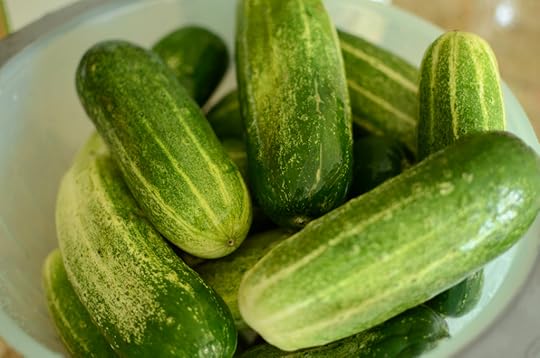
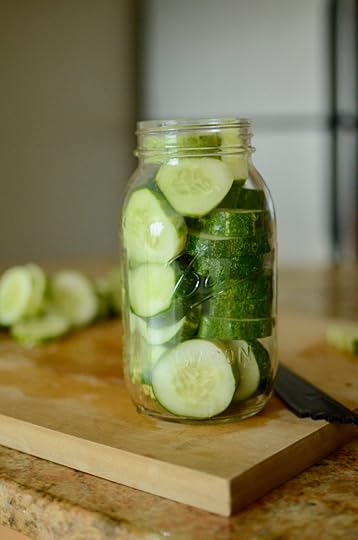
As with any canning project, the first step is gather all your ingredients. For these pickles, you need 3 1/2 pounds pickling cucumbers (if you plan on making these as refrigerator pickles, you can use other varieties, but if you’re canning them, stick with a pickling variety like Kirby), 2 1/2 cups 5% acidity white vinegar, 2 1/2 cups granulated sugar, and 1/4 cup Ball® Bread & Butter Pickle Mix.
The next step is to set up your canning pot. Place your jars in the pot and fill them with hot tap water. Run enough of that hot water in around the jars to mostly submerge them and if you have hard water, add a generous glug of white vinegar (it helps prevent mineral deposits from adhering to the jars). Put the pot on the stove and bring it to a boil. Wash the lids and rings with warm, soapy water and arrange them on a kitchen towel in a single layer to dry.
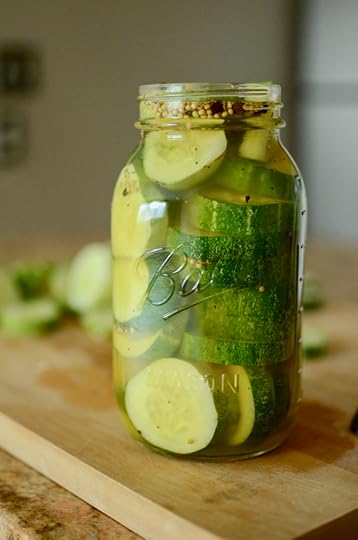
Prepare the brine in a medium saucepan. Combine the vinegar, sugar, and pickle mix and stir well. Bring the mix to a boil, stirring occasionally to make sure that the sugar is fully dissolved.
Wash your cucumbers well and cut them into half inch thick rounds. When all the cucumbers are prepared, and both the canning pot and brine pot are hot, it’s time to pack the jars.
Remove one jar from the canning pot. Then, working quickly, pack the cucumber slices into the jar, fill it with the hot brine to 1/2 inch headspace, and wiggle out the air bubbles (top with more brine if the level has dropped below 1/2 inch).
Wipe the rim, apply the lid and ring, and return the jar to the canner. Repeat the process with the remaining jars. Once all the jars are filled, process them in the boiling water bath canner for 15 minutes. When the time is up, turn off the heat, remove the lid and let the jars stand in the hot water for an additional five minutes.
If you struggle to keep your pickles from floating, make sure to use regular mouth jars. Their shoulders help keep the pickle slices tucked firmly below the top of the brine. The quality of the finished pickle is work the minor frustrations of getting all those cucumber slices to lay neatly in the jars.
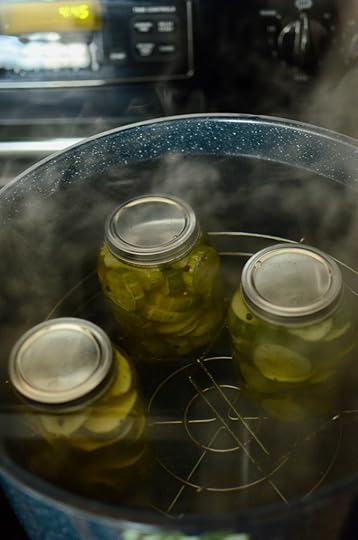
Once the jars have finished cooling in the water, remove them from the canning pot and place them on a folded kitchen towel to cool. These pickles like to have at least a month in the jar to allow the flavor to fully infuse before you open them up.
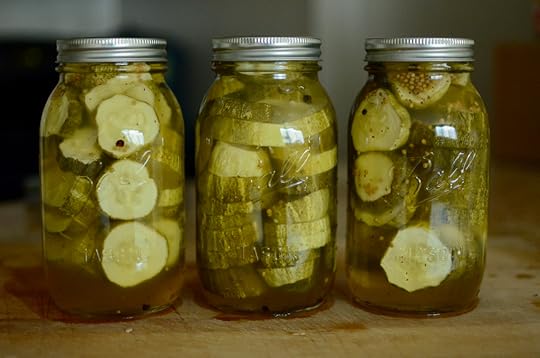
I had enough cucumbers to make three quart jars of pickles. One of the great things about using the Ball® Bread & Butter Pickle Mix is that you can make as big or as little a batch as you need. To get the recipe for Bread & Butter Pickles, click here. Make sure to visit Ball® Fresh Preserving for more seasonal recipes, as well as to find new promotional offers throughout the summer!
Related Posts:
Proudly Homemade Strawberry Rhubarb Jam from Ball® Fresh Preserving
Instant Shrub Sparkler with Ball® Canning
Small Batch Cherry Plum Jam
July 27, 2020
Small Batch Cherry Plum Jam

Every summer for the last decade, the kind folks from the Northwest Cherry Growers have invited me to be part of their Canbassador program. Most years, I spend a whole lot of time making things with the fruit they sent and sharing the resulting recipes. Last summer, the fruit arrived the day before I unexpectedly wound up in the hospital with preeclampsia, so I never got to make anything with those cherries (my friend Audra adopted many of last year’s cherries and dehydrated most of them).
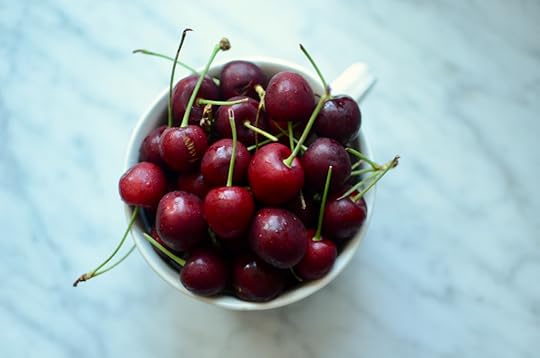
I’ve spent most of the last year looking forward to redeeming myself with this year’s partnership, but because of the pandemic, things are a little different than they’ve been in the past. Instead of sending me a truly epic volume of cherries, they gave me a gift card so that I could pick up cherries at a local market. Because I’m a rational person, I bought my cherries in more reasonable portions than they would have sent and have made a pair of preserves to share with you all.
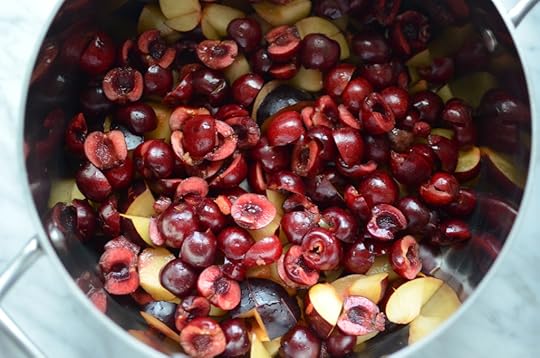
The first thing I’ve made is a small batch combo recipe. I paired one pound of sweet cherries with another pound of plums. I find that you have to be careful with cherries to prevent their flavor from tipping into cough syrup territory. I typically like to combine them with something acidity to temper them and in this case, the plums (along with a healthy squeeze of lemon juice at the end of cooking) do the job nicely.
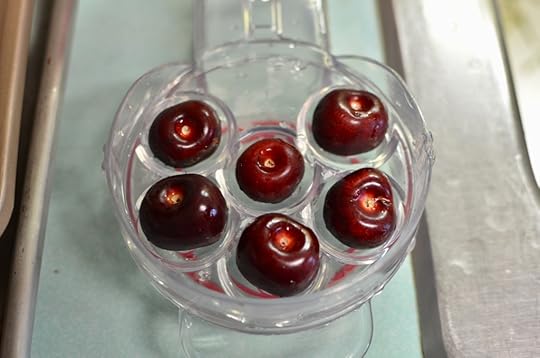
I used my six hole pitter to make quick work of the cherries. I bought this tool a couple of years ago and continue to appreciate the speed at which it allows me to pit a pound or two of cherries. It’s a massive upgrade from my single cherry pitter.

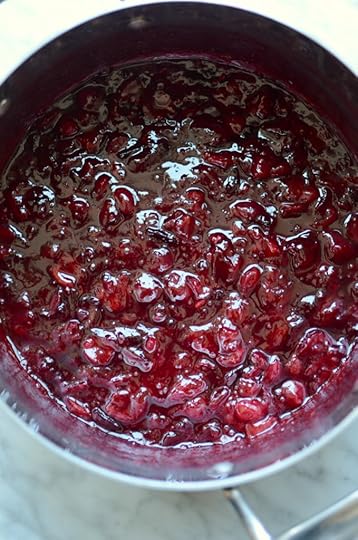
The finished flavor of this jam is cherry, mellowed by plum. I made this one relatively low in sugar so that the fruit would be shine through and I think it worked. This is one that I see using primarily on peanut butter toast. It’s a little too firmly set for yogurt and oatmeal.
Now, because I have so many years as a Canbassador under my belt, I have whole bunch of cherry-centric recipes that I’ve developed within this partnership. Go forth and preserve some cherries!

Sweet Cherry Butter (2018)
Sweet Cherry Balsamic Jam (2018)
Sweet Cherry Meyer Lemon Marmalade (2017)
Sweet Cherry Ketchup (2017)
Spiced Cherry Preserves (2017)
Sweet Cherry Barbecue Sauce (2016)
Sweet Cherry Rhubarb Jam (2015)
Cherry Kompot (2015)
Sweet Cherry Chutney (2014)
Sweet and Sour Cherry Jam (2013)
Pickled Sweet Cherries (2010)
Finally, for all things cherry, make sure to follow the Northwest Cherry Growers on Instagram, Twitter, and Facebook.
Yield: 3 1/2 half pints
Small Batch Cherry Plum Jam
Ingredients
1 pound sweet cherries, pitted and diced
1 pound plums, pitted and chopped
1 1/2 cups + 2 tablespoons granulated sugar
1 teaspoon calcium water (part of Pomona's Pectin)
1 teaspoon Pomona's Pectin
1/2 lemon, juiced
Instructions
Prepare a boiling water bath canner and enough jars to hold 3 1/2 cups of jam. Combine the prepared fruit with 1 1/2 cups sugar and 1 teaspoon calcium water. Stir to combine. Once the sugar has dissolved and the fruit looks juicy, place the pot on the stove. Bring to a boil over high heat. Once the fruit is boiling, reduce the heat to medium high and continue to cook for another 8-10 minutes, until the fruit is reduced. Combine the pectin powder with the final 2 tablespoons of jam. Add a bit of the pectin-spiked sugar to the jam and stir to combine. Continue to do this until all the pectin is incorporated. The jam should visibly thicken as you incorporate the pectin. Remove the pot from the heat. Funnel the finished jam into the prepared jars, leaving 1/2 inch headspace. Wipe the rims, apply the lids and rings, and process the jars in a boiling water bath canner for 10 minutes (adjusting for altitude if you live more than 1,000 in elevation). When the time is up, turn off the heat. Remove the lid from the pot and let the jars cool gradually in the pot for 5-10 minutes. Finally, remove the jars from the canner and place them on a folded kitchen towel to cool. When jars are cool enough to handle, remove rings and check seals. Store cool, sealed jars out of direct sunlight. Sealed jars will keep on the shelf for up to a year.
© Marisa
Category: jams, jellies, marmalades
Related Posts:
Small Batch Nectarine Lime Jam Recipe
Strawberry Ginger Jam
Lightly Pickled Sweet Cherries
July 3, 2020
What to do With Blackberries
My friend Shae has shut down her much loved blog, Hitchhiking to Heaven. Before she took it offline, she offered up some of her old posts so that they can continue to live and be useful. Here’s one on what to do with those blackberries that are coming into season.
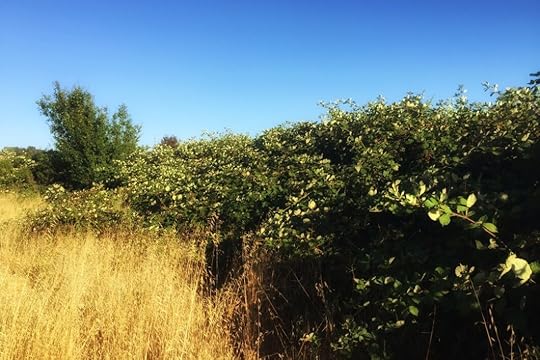
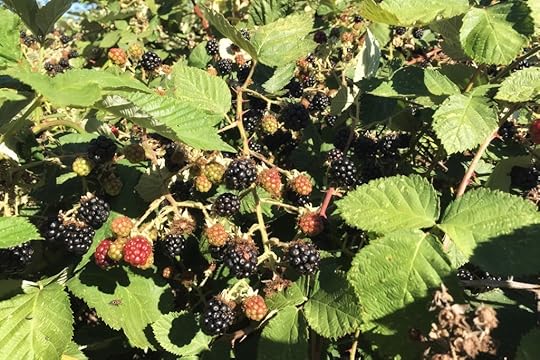
The past couple years have been terrible for blackberry picking here. The drought hit California hard and the berries suffered badly. In the patch I love, they fried before they were even close to ripe. (You know, I almost called these our “native blackberries,” but they’re definitely not.
What we get around here are mostly invasive Himalayan Blackberries, which I have happily picked since I was a kid. Native California blackberries do exist, however. They’re called the Pacific Blackberry, or Rubus ursinus, and I’m not sure I’ve ever even seen one. I need to do something about that.)
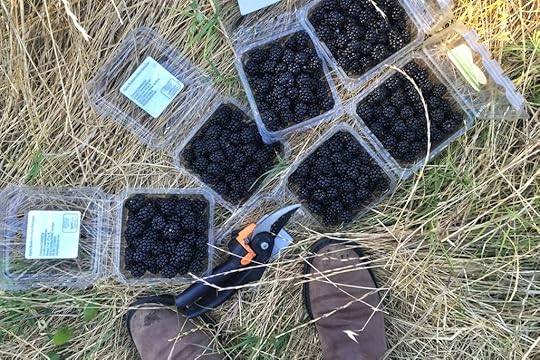
We’re still in a serious drought, but we had enough rain this year that the blackberries are back — and early, too! I went out to the patch yesterday evening, just to see how they were coming along, and I picked five pounds of fat berries in a little over an hour.
I’ve gotten into the habit of freezing almost all the blackberries I pick, which buys me time to decide what to do with them. With this first trip to the patch, I was so much on autopilot that I popped every berry into the freezer and forgot to keep any fresh for the fridge or for friends. That was dumb and I won’t do it when I go back out there later this week.
Here are some ideas for what to do with blackberries if you, too, are the recipient of what promises to be this summer’s great bounty. The list focuses on preserving blackberries, because that’s what I do — but down there at the end is one fun resource for bakers and cooks.
Things to Do With All Those Blackberries You Picked
1. Eat them warm from the bushes. It doesn’t get much better in the world of fruit.
2. Share them fresh. Store bought blackberries are expensive and they usually don’t taste like much. Many people don’t have the time, patience, or mobility to go out and pick their own. A gift of luscious, handpicked berries could make a person’s day.
3. Freeze them. To freeze blackberries, I turn them out onto cookie sheets, pick out any debris, then flash freeze them for a few hours. After that, I weigh them out into bags of one or two pounds each, making sure to label each bag with the weight, the year, and anything else I want to remember, like where I picked them if it was somewhere unusual.
Later on, your frozen berries will make great jam, or you can bake with them or put them in smoothies or whatever you like. For freezing, I use a Food Saver because it does a perfect job of pulling out all the air and sealing the bags tight. Before that, I used regular freezer bags and sucked the excess air out with my mouth (you can also use a straw for that) before sealing them.

4. Make blackberry jam. Of course. Here are some of my favorites.
Blackberry Strawberry Jam. This is my favorite of all blackberry jam recipes. It’s why I probably won’t ever post a new blackberry jam recipe here: I’ve already got what I want.
Blackberry Chambord Jam. Fancy! But you can leave out the Chambord to make a classic blackberry jam without pectin.
Blackberry Lime Jam with Pomona’s Pectin. Blackberries are great with lime, and this recipe lets you keep the sugar low.
Blackberry Mojito Jam. This one was just plain fun. If you check it out, you’ll see that the post about it was written by a porcupine.
And here’s a recipe from Marisa at Food in Jars that I’ll be making later this summer with rhubarb that’s already tucked away in the freezer. It looks too good to pass up . . .
Low-Sugar Blackberry Rhubarb Jam
5. Make blackberry juice. If you have a lot of berries, juice is an indulgence. I once made a nice Blackberry Rhubarb Juice using honey instead of sugar. You’ll find that recipe here on the blog and also in a large collection of blackberry juice recipes from Juicer’s Best on Pinterest. You might find something else on that list to try. I love my Mehu-Liisa Steam Juicer for juicing. (I bought mine used on eBay — a fine investment.)
6. Make blackberry syrup. It’s great to have in the fridge for summer drinks. Here’s an easy recipe from The Kitchn.
7. Make blackberry shrub. A shrub is basically a fruit syrup that includes vinegar. As the website for Shrub & Co. explains, “Vinegar works much like citrus in your drinks — it quenches thirst, cleanses the palate and is very refreshing.” Here’s a simple blackberry shrub recipe from Brooklyn Supper, including instructions for a tempting blackberry shrub collins with mint.
8. Make blackberry liqueur. I’ve made blackberry liqueur so many times that I’m surprised I’ve never posted a recipe here. It’s another simple project for blackberries. I like the look of this method on Serious Eats. Or, if you’re up for an experiment, you could try blackberry wine.
9. Make blackberry condiments. BBQ sauce, ketchup, vinegar. These all sound intriguing to me, though ketchup seems “interesting” in the weird sense of the word. You can suss out lots of recipes through a quick search.
10. Make blackberry fruit leather. Again, this is such an easy thing to do. You can use a dehydrator or just your oven on a low setting. (I think I’ll do blackberry-plum leather this summer. So many plums!) Here are some notes I made on making fruit leathers — and you can find many recipes out there.
11. Bake something, or . . . ? I rarely bake, so I won’t stumble into specifics here, but for goodness’ sake, check out this list of 30 of the Most Delicious Things You Can Do With Blackberries on the Country Living website. There are lots of great baking ideas and much more than that: milkshakes, popsicles, salads, sandwiches — you name it and you can probably find a good way to put blackberries in it. You may also want to knock yourself out with the images of all the blackberry ice cream recipes on Pinterest.
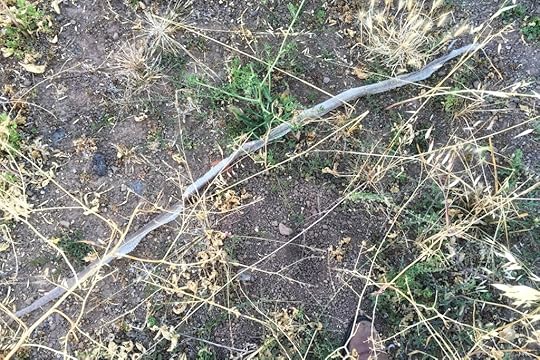
That’s about it, except for this reminder that there’s more than one reason to wear tall, heavy leather boots in the blackberry patch. They’re good for controlling the canes and minimizing scratches and snags, but check out the length of this snake skin I found out there last night (toe of my boot included for scale). It may well have belonged to a gopher snake, but a rattlesnake would be just as much at home in the area. I always approach with caution and watch where I step!
This piece was originally published on Hitchhiking to Heaven on July 5, 2016 and was written by Shae Irving.
Related Posts:Making Jam from Frozen FruitCanning 101: How to Swap Citric Acid for Lemon Juice and Vice VersaMy Jars Didn’t Seal! What Happened?
June 25, 2020
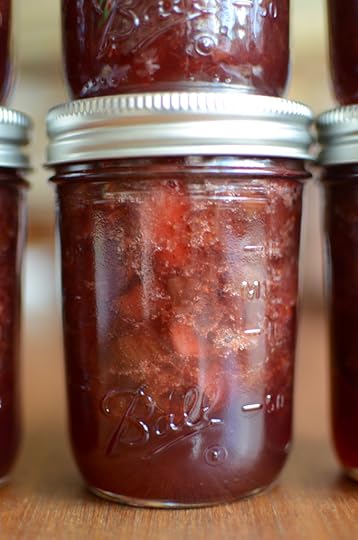
Proudly Homemade Strawberry Rhubarb Jam from Ball® Fresh Preserving
This post is sponsored by Ball® Fresh Preserving.
For the last nine canning seasons (I can’t quite believe it’s been that long), I’ve been partnering with the folks at Ball Canning to share recipes, new products, and canning tips. So far this year, I’ve tackled a pantry makeover (those clean-up shelves still bring me so much joy), and shared my cheater shrub recipe.

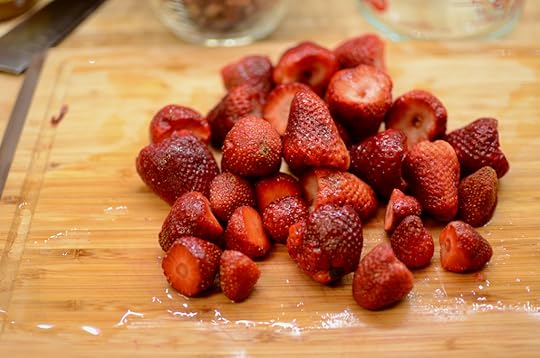
This month, I made a batch of Strawberry Rhubarb Jam using the recipe from Ball Canning. Strawberry season arrived quite late here in the Philadelphia region, and so I’ve been waiting on this recipe for a bit until the berries came in. But they finally arrived and they’ve been glorious. So plump, juicy and red!
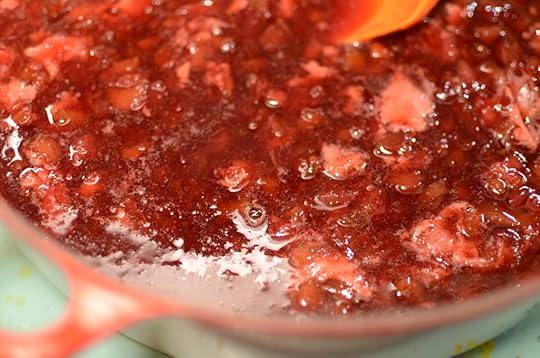
This recipe uses an approach to combining the fruit, pectin and sugar that I rarely opt for but think I might choose more often going forward. Instead of macerating the fruit with the sugar, you cook the fruit with the pectin for a time before adding the sugar.
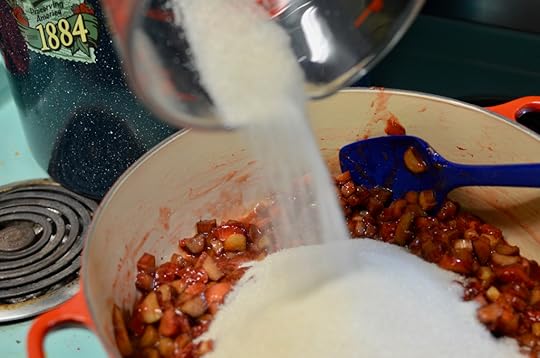
While you do have to stir near-constantly to ensure that the fruit doesn’t stick, this method shortens the cooking time and helps the finished jam retain a slightly more fresh tasting finished flavor.
This recipe does call for one vanilla bean to add flavor to the jam. Prices for natural vanilla beans are still high (there’s been a global shortage for several years now) and I exhausted my stash of beans last Christmas. In place of the bean, I used a teaspoon of vanilla bean paste. It’s my favorite substitute and brings both good vanilla flavor and those tell-tale vanilla bean specks.
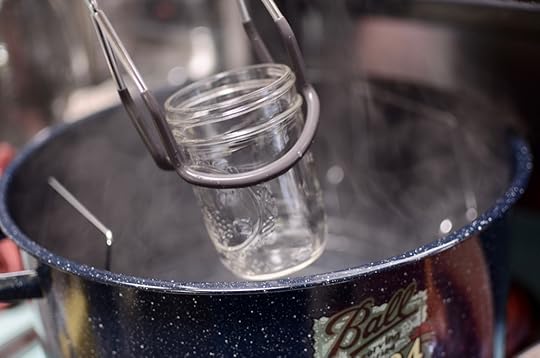
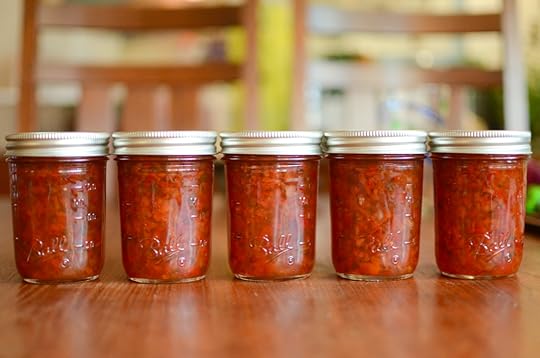
Prior to cooking the jam, you want to prepare your canning pot. Gather six half pint jars. If they’re new, wash them in warm soapy water before proceeding. If they’re jars that have been used before, be sure to give the rims a quick examination, to ensure that there aren’t any chips or cracks that would lead to seal failure.
Place the jars in your canning pot (if you don’t have a dedicated canner, you can use your tallest stock pot fitting with a rack. I like the one that comes in the Ball Preserving Starter Kit) and fill it about halfway up with water. Add a healthy glug of white vinegar if you have hard water. Bring it to a simmer so that it’s ready for you when you are ready for it.
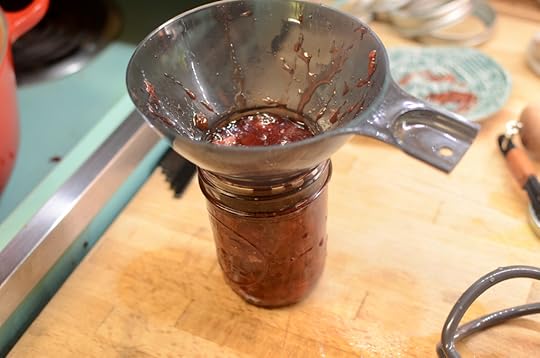
Once the jam is finished cooking, remove one jar from your canner. Place it on a wooden board or towel-lined countertop and fit it with a wide mouth canning funnel. Fill the jar with jam, leaving 1/4 inch headspace. Wipe the rim with a damp cloth and fit the jar with a new, cleaned lid (they don’t need to be boiled anymore, but they do need a quick washing in warm, soapy water before using). Secure the lid in place with a ring, taking care to not overtighten.
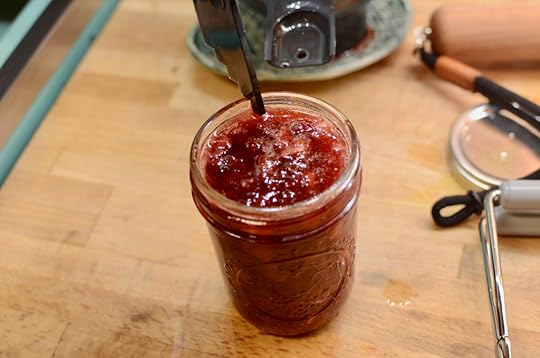
Place the filled jar into the canner and repeat the process with the next, until all the jars are filled. Process the jars for 10 minutes, adjusting for altitude.
When the processing time is up, turn off the heat, remove the lid from the pot and let the jars stand in the pot for an additional five minutes (this allows them to cool more gradually, which helps prevent siphoning and can also help develop a more robust seal).
Remove the jars from the canner and set them on a folded kitchen towel. Let them sit undisturbed for 12-24 hours so they can fully cool and seal. Before storing, make sure to check that the seals are firm and unbending.
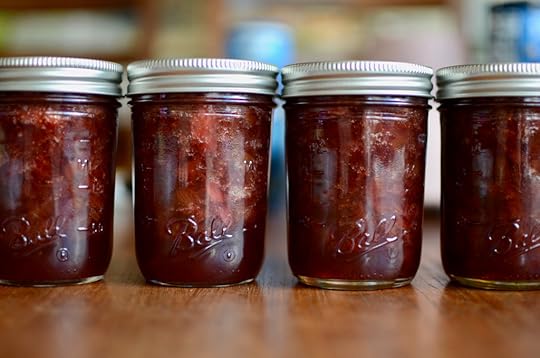
My batch matched the six half pint yield perfectly, with a tablespoon leftover for immediate snacking. The flavor is sweet from the berries, tart from the rhubarb, with the vanilla supporting both star players. To get the recipe for Strawberry Rhubarb Jam, click here.
Make sure to visit Ball® Fresh Preserving for more seasonal recipes, as well as to find new promotional offers throughout the summer!
Related Posts:
Instant Shrub Sparkler with Ball® Canning
A Pantry Makeover with Ball® Canning
Chocolate Applesauce Muffins with Ball® Fresh Preserving Products Maple Applesauce


