
Marisa McClellan's Blog, page 5
June 15, 2020
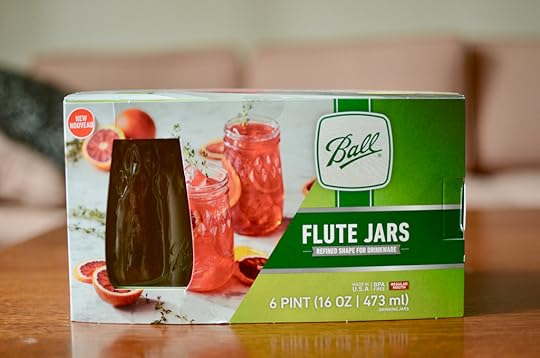
Instant Shrub Sparkler with Ball® Canning
This post is sponsored by Ball® Fresh Preserving.
I joined team shrub nearly a decade ago (this Black Raspberry Shrub was the first one I shared on this site). Most commonly made with equal parts fruit, sugar, and vinegar, shrubs can track their lineage back to the Colonial era.
It’s an easy way to preserve small amounts of fresh fruit and transform them into a syrup that is good in cocktails, pan sauces, and tall glasses of sparkling water (my preferred usage).
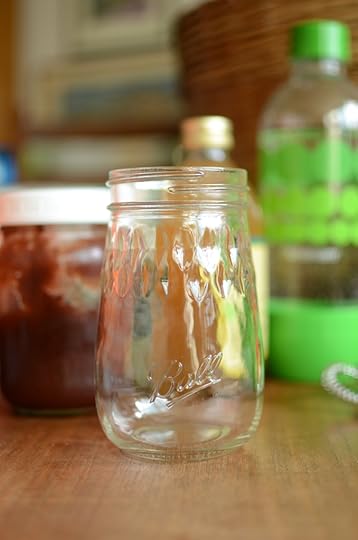
I’ve been turning to shrubs during this period of social isolation as a way to give myself a treat. During the day, I mostly drink coffee, lactation tea, and water, but when late afternoon rolls in, I like to pull out one of my new Ball® Flute Jars (they make me feel so fancy!), and make myself an instant shrub sparkler.
Sometimes I take the time to make a batch of shrub for the fridge (I prefer the cold process method), but there’s almost always a gap between the time when a batch runs out and I find the time to make a new batch. That’s when my trick for instant shrub comes in.
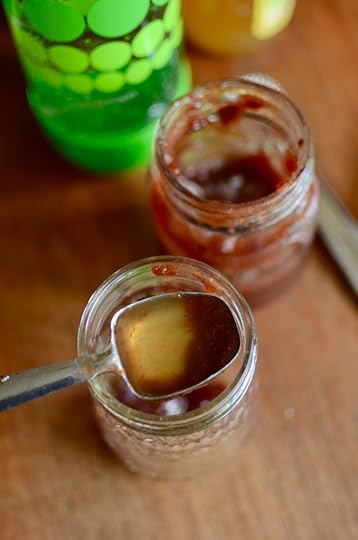
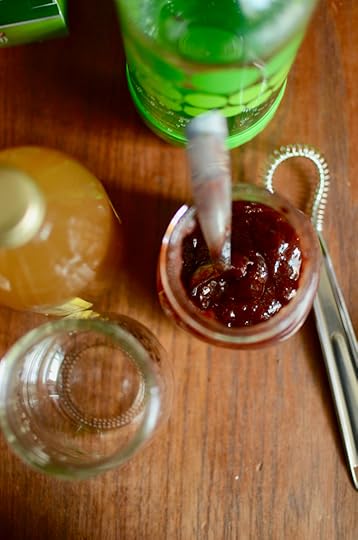
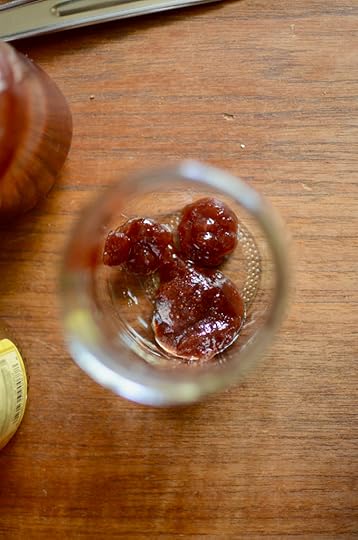
In the jar I plan on using for my drink, I combine two parts jam with one part vinegar (if you think about it, this roughly mimics the ratios found in most recipes) and whisk them to combine. If I have any tender fresh herbs (like mint or basil) around, I will bruise them and add them to the party for additional flavor.
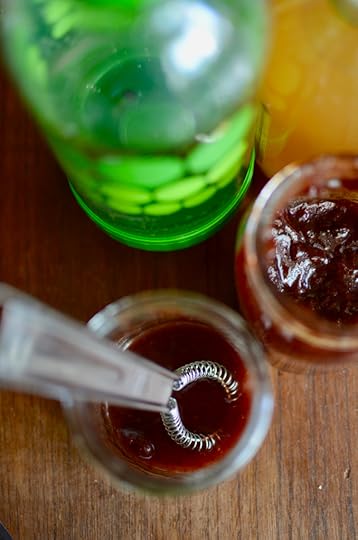
Now, I want to pause here to say that this technique leaves you with a bit of jam sediment in your drink. If you hate that, you can sieve your jam/vinegar slurry. In my previous, before twins life, I would have done that. But these days, I have approximately 45 seconds to make this from start to finish and so sieving is a thing of the past. Thankfully, I don’t mind the bits.
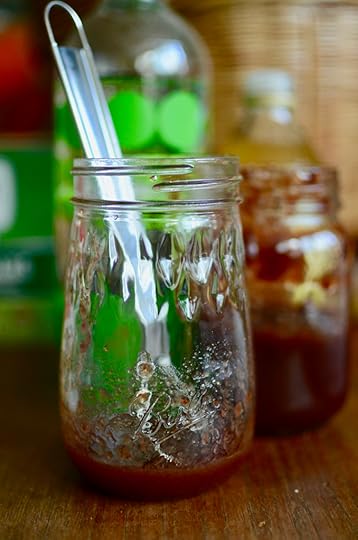
Once your jam and vinegar is well-combined, give it a quick taste so that you can adjust the balance should it be necessary. Too sweet? Add a touch more vinegar. Too astringent? A little more jam. Just remember that you’re about to dilute your instant shrub with sparkling water, so it’s okay that it is strong.
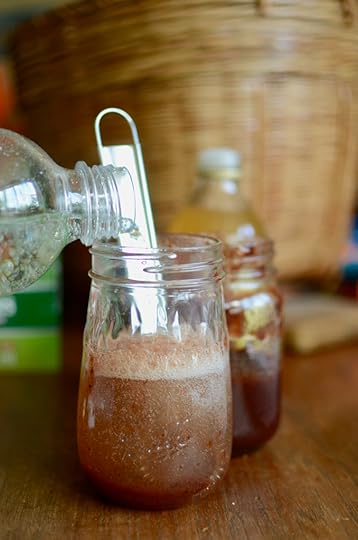
Finally, add your sparkling water. My seltzer maker and I are inseparable so my water is plain, but if yours comes with a bit of flavor, make sure to choose one that complements the jam you started with.
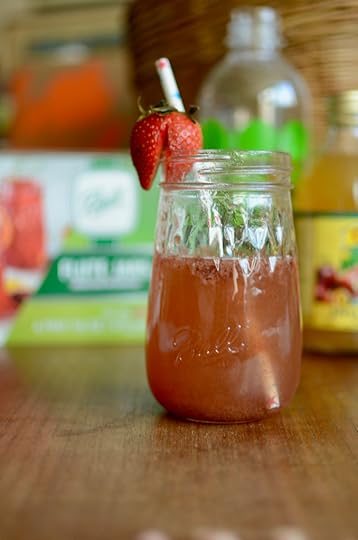
And that’s really it. On very hot days, I add ice cubes. If you drink alcohol, a splash of aromatic gin would be nice (I’m still breastfeeding my boys, so booze is mostly off the table for me these days). You could also add a drop of bitters if you have some. However, I like it just as described, particularly in these times where we’re all searching for ways to infuse pleasure into our days.
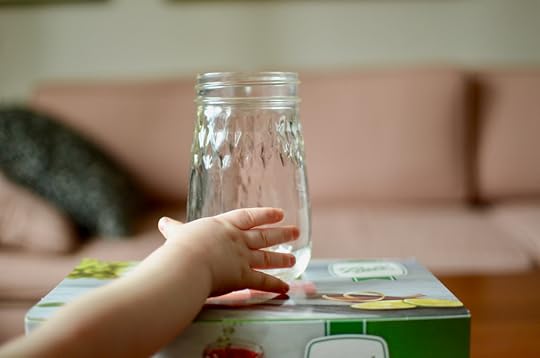
Oh, and just one more thing. I also really like these new because they’re a bit harder for babies to knock over than my traditional drinking glasses (I think it’s the wide base) but not at all precious should one get broken. It’s funny how much my requirements for glassware have changed.
Related Posts:A Pantry Makeover with Ball® CanningChocolate Applesauce Muffins with Ball® Fresh Preserving Products Maple ApplesauceCooking with Infants and the Breville Combi Wave
 3 in 1


May 29, 2020
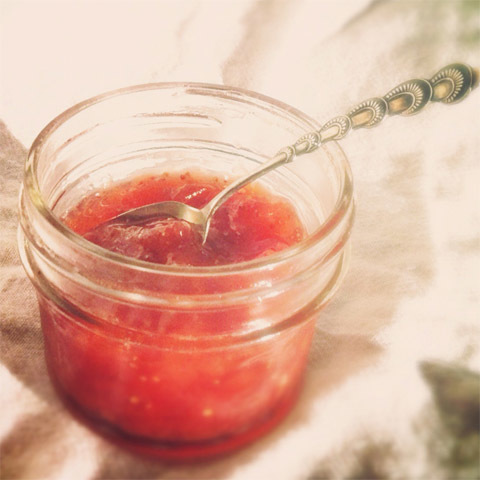
Strawberry Feijoa Jam
My friend Shae has shut down her blog, Hitchhiking to Heaven. Before she took it offline, she offered up some of her old posts so that they can continue to live and be useful. I often get questions about what to do with feijoa/guava so am very happy to bring this lovely recipe to Food in Jars.
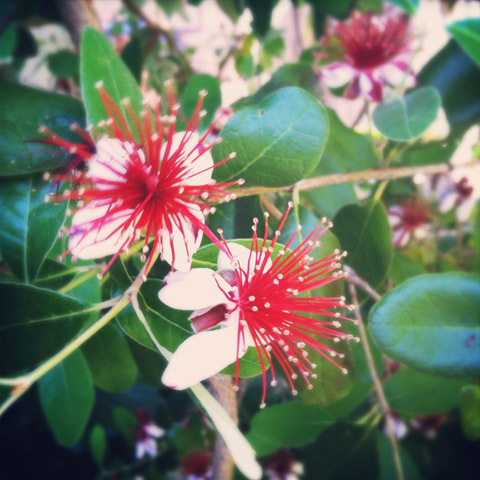
If you met a feijoa on the street, how would you say hello? You could greet it in Spanish (fay-ho-ah), Brazilian (Fay-zhwa), or as they do down under in Australia and New Zealand (fee-joe-ah). Or you could chuck all that and simply call it a pineapple guava. It will answer to any of these names and then happily offer itself to you so you can eat it up.
They’re funny things, feijoas are. The blossoms are beauties — and edible, too. The fruits themselves are odd: mottled green torpedos with fuzzy little antlers. (If you drew a face on a feijoa, it would make a pretty good Muppet.) That starburst of scarlet stamens dries up into hard little bristles that you sometimes have to pick out of your preserving bowl. On the inside, the flesh of feijoas is subtly gritty; they’re sandy enough that some people just don’t like them.
I like feijoas very much. They have an intriguing, candy-sweet fragrance. (A friend says it reminds her of Pez candy. When’s the last time you smelled those?) It’s difficult to describe the taste. In her book The Joy of Jams, Jellies, and Other Sweet Preserves, Linda Ziedrich says, “The sweet, highly perfumed flesh reminds people of pineapple, guava, strawberry, or a combination of these.” (Her book contains a recipe for a nice, low-sugar feijoa jam for the fridge.)
The Tropical Fruit Society of Sarasota does a good job of summing up the entire experience of a feijoa, including the parts that make some people go “ick”: “The thick, white, granular, watery flesh and the translucent central pulp enclosing the seeds are sweet or sub-acid, suggesting a combination of pineapple and guava or pineapple and strawberry, often with overtones of wintergreen or spearmint.”
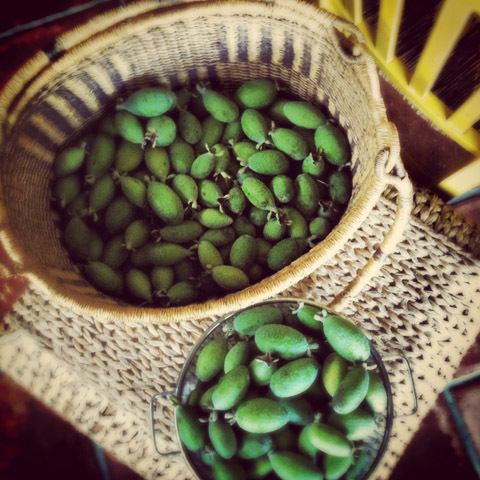
Given all of that, strawberries seemed like a natural partner for feijoas in a jam. The flavors are a great match. The berries smooth out the texture of the feijoas somewhat, and they definitely improve the color. (Feijoas are not a knockout color to start with, and they easily oxidize and turn brown.) We can get decent strawberries at our farmers markets here in California in November, but the ones I used are my favorite local berries, which I froze at the height of their flavor in June.
Personally, I adore this jam, but in the spirit of full disclosure, I’ll confess that tasters have given mixed reports. Last year, I offered three different jars of jam to an organization for their winter silent auction, and the person who won the jams contacted me to see whether she could get more of this jam, in particular. She loved it. On the other hand, a good friend with impeccable taste dipped into an open jar the other day and scrunched up her face. “It’s the grittiness,” she said, “I don’t think I like feijoas.” So you’re on notice. Weirdly, I find the grit interesting and even entertaining. And it completely disappears when the jam is on toast: Is that my toast or my jam that’s crunchy? Who knows!
Two things to know about preserving feijoas: One is that they are not highly acidic. I have read that they are on the borderline of safe pH for canning (though I wasn’t able to find the exact value), so do use tested recipes if you want to seal them in jars. Between the strawberries and the added lemon juice, this jam recipe is thoroughly acidified. I tested the final product with a commercial pH meter and got a reading of 3.11, way below the safe mark of 4.6 — so no worries here. The other thing to keep in mind is that most of the pectin is in the skin. To capture the pectin and ensure a good set, this recipe includes a cup of feijoa juice made from the skins. It’s all described below . . .
Strawberry Feijoa Jam
Ingredients
2 1/4 pounds feijoa flesh (weigh after peeling)*
1 pound strawberries
4 cups sugar
2 ounces lemon juice (6 tablespoons)
1 cup feijoa juice
Instructions
Day One
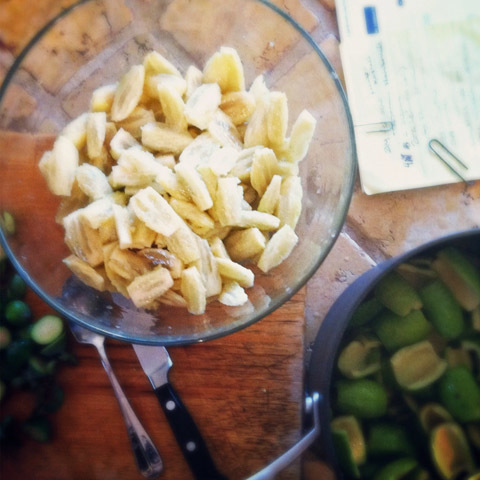
1. Rinse the feijoas, cut off the blossom ends (the ends with the hairy antlers), and slice the fruits lengthwise. Scoop out the flesh with a spoon. Put the flesh into a large bowl and, at the same time, drop the skins into a large, nonreactive saucepot. (You will use these skins to make the juice in Step 3.) Mash the flesh with a potato masher and set aside.
2. Rinse, hull, and roughly chop the strawberries — or get ’em out of the freezer if that’s where they are. Add the strawberries to the bowl with the feijoa flesh, then add the sugar and lemon juice to this bowl and set it aside.
3. Make the feijoa juice by covering the peels with water until they are submerged by about 1 inch and simmering for 20 – 25 minutes. Strain out the peels. (You will have a lot more juice than you need. I think this is a good thing, because you can refrigerate or freeze that juice to make a wonderful feijoa syrup later; see below.) Add 1 cup of feijoa juice to the bowl with the rest of the ingredients, gently mix, cover tightly, and place in the fridge to macerate for about 24 hours.
Day Two
1. Sterilize your jars and place 5 metal teaspoons on a small plate in the freezer, to test your jam for doneness later.
2. Transfer the contents of the bowl to your jam pan. Heat the mixture on medium, stirring frequently until the sugar is fully dissolved. Then turn up the heat and bring the mixture to a boil, stirring as needed to prevent sticking or burning. (If it starts to stick at any point, turn down the heat a bit.) Use a shallow, stainless-steel spoon to skim some of the stiff foam off the top of the mixture as it cooks, taking care not to scoop up the jam liquid as you do so. You may also want get in there with your potato masher again if you feel moved to do so. In my 11-quart copper jam pan, the total cooking time for this jam is 20-24 minutes. Watch the mixture and test it when it starts to thicken up, the foam settles down, and the bubbles become small and shiny.
To test your jam for doneness: Remove the pan from the heat. Use one of your frozen spoons to scoop up a little bit of jam — not a whole spoonful. Return the spoon to the freezer and wait 3 minutes. Retrieve the spoon and hold it vertically. If the mixture just fails to run and is thick and gloppy when you push it with your finger, it’s done. If the jam isn’t ready, cook it a few minutes more.
3. When the jam is done, ladle or pour the hot mixture into sterilized jars, leaving 1/4-inch head space. Wipe the jar rims clean and secure the lids. Process 10 minutes in a hot-water bath canner.
Yields about 6 half pints.
*If you don’t have enough feijoas, or if you prefer more strawberry, you can change the proportions of fruit to include more or mostly berries — just shoot for 3 1/4 pounds of fruit overall, and keep in mind that changing the proportions may change your cooking time, as well.
Notes
Bonus Feijoa Syrup
You can use the leftover juice from the jam recipe to make an easy feijoa syrup for homemade sodas or cocktails. Simply combine 1 part juice with .75 parts sugar and simmer for about 15 minutes. Skim off the little bit of skin that might form on top of the syrup, let it cool, and bottle it for the fridge. I like to add some chopped, fresh ginger while the syrup simmers, and then the juice of a couple of limes after I remove the syrup from the heat. Experiment! (But please remember this syrup isn’t for canning. Store it in the fridge or freezer.)
© Marisa
This piece was originally published on Hitchhiking to Heaven on October 26, 2012 and was written by Shae Irving.
Related Posts:
Honey Sweetened Strawberry Jam on 100 Days of Real Food
Strawberry Meyer Lemon Jam
Links: Chicago Events, Strawberry Jam, and Winners
May 27, 2020
Simple Vanilla Cake with Jam Topping
Oh friends. We are living through an extraordinarily strange and disorienting time. My little family is doing well, despite our relatively close quarters. The babies are nearly 11 months old and are now overwhelmingly mobile. Their needs give shape to my days and I am grateful for the structure they lend (especially since Scott is now working from home and so can’t rely on his comings and goings to give me some sense of rhythm).
I have groceries all over my apartment because at the beginning of this thing, I did a little anxiety-fueled shopping. Worried I wouldn’t be able to get fresh vegetables, I bought multiple bags of spirulina powder thinking we might need it as a source of healthy greens. Thankfully, we haven’t had any trouble getting fresh produce, so I’ve been making smoothies on a near-daily basis to try and use some of it up.
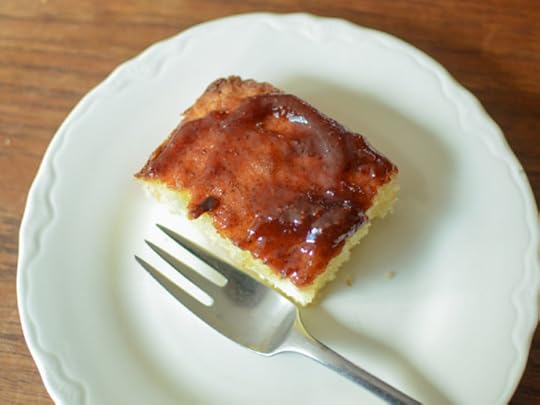
Like just about everyone else, I’ve been doing a whole lot of baking as a way of coping. And because I’m me, I’m always looking for ways to incorporate my preserves into any and all baked goods. Ages ago, I spotted a post on Instagram from fellow cookbook author Anja Dunk for a simple cake that is topped with berry jam and and dried coconut. A classic UK school dessert, it was typically served in a puddle of custard.
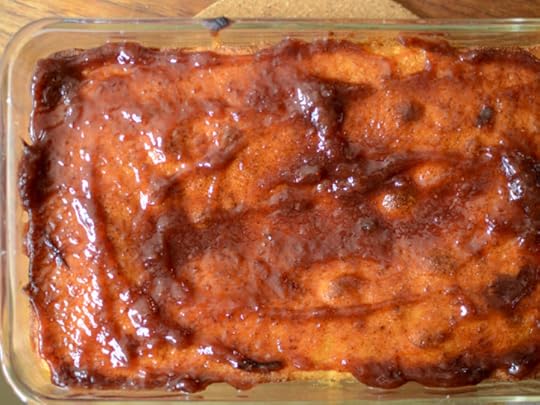
I didn’t have any custard mix, and sadly dried coconut isn’t an ingredient Scott is into, but the bones of the treat spoke to me. An easy cake topped with a layer of jam?! Sign me up.
Reading through the comments, Anja mentioned that she used a classic recipe using 125 grams of sugar, flour, and butter with two eggs. I took those instructions and ran with them. I kept the measurements the same, but included 1 teaspoon vanilla extract, 1 teaspoon of baking powder, 1/2 teaspoon fine salt. However, any cake recipe would work fine here, since the bulk of the trick is to spread it with a goodly amount of jam while the cake is still hot.
Scott and I ate this over the course of three days, carving off slivers whenever we passed by. He offered his highest cake compliment, which is that it tasted like one made from a box (this might not sound particularly flattering, but he is someone for whom there is no better cake than Funfetti made from mix).
If you’ve not encountered Anja Dunk in your travels through the food world, she is someone well worth a follow. I greatly enjoy her Instagram account (she has the most glorious wall of jars) and her books are just so good to read and cook from. She co-wrote the charming book Do/Preserve and Strudel, Noodles and Dumplings is one that I often read, novel-style when I need a moment of escape from two very active crawling, climbing babies.
I have included instructions below using the metric measurements that I cribbed from Anja. If you don’t have a scale, you can either use a converter to switch this recipe to work with cups, or just use one like this.
Simple Vanilla Cake with Jam Topping

Ingredients
125 grams all purpose flour
1 teaspoon baking powder
1/2 teaspoon fine salt
125 grams room temperature butter
125 grams sugar
2 eggs
1 teaspoon vanilla extract
1/2 cup jam (according to my research, berry is traditional, but I think apricot or even marmalade would also be good here)
Instructions
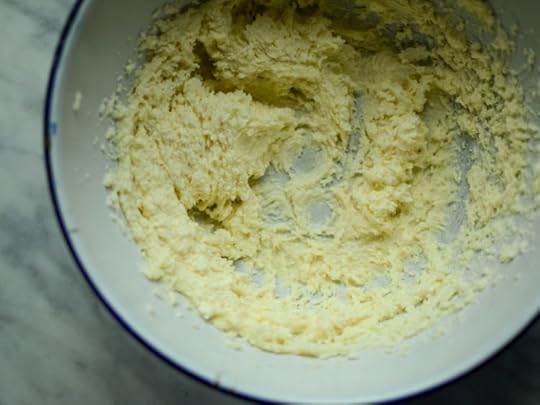
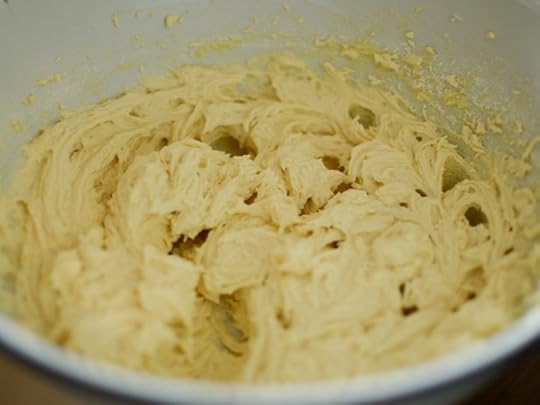
Preheat the oven to 350°F/177°C. Butter a baking dish that can hold 6 cups. It can be a square 8x8, a round 8x2, or some other shape. I used a vintage rectangular pan that happened to be in circulation at the time I was making this cake. Whisk the flour, baking powder and salt together in a small bowl and set them aside. In a large bowl using an electric hand mixer, whip the butter and sugar together for 3-4 minutes. You want it to become really light and fluffy. Add the eggs and vanilla extract and mix to combine. Add the dry ingredients to the wet and mix on the slowest setting, just until everything is uniformly combined. Scrape the batter into the prepared pan and bake for 18-20 minutes, until a toothpick inserted into the center of the cake comes out mostly clean (a couple dry crumbs are okay). Let the cake cool for a few minutes and then top with the jam. You want it to be warm so that it absorbs the flavors a bit, but not so hot that the jam liquifies. Serve warm or at room temperature.
© Marisa
Related Posts:
Check the recipe index for more tasty preserves!
May 22, 2020
Making Jam from Frozen Fruit
My friend Shae has shut down her blog, Hitchhiking to Heaven. Before she took it offline, she offered up some of her old posts so that they can continue to live and be useful.

Last year, two things came into my life that changed the way I preserve fruit. One was an upright storage freezer, which now lives in the basement. The other was a Food Saver, which allows me to freeze fruit in vacuum sealed packages at the height of just-picked excellence, without the danger of ruin from stale air and freezer burn. (Even before the Food Saver, I’d started freezing summer fruit in this way, using heavy-duty freezer bags and sucking out the excess air through a straw or with my mouth — all of which is easier than it might sound.)
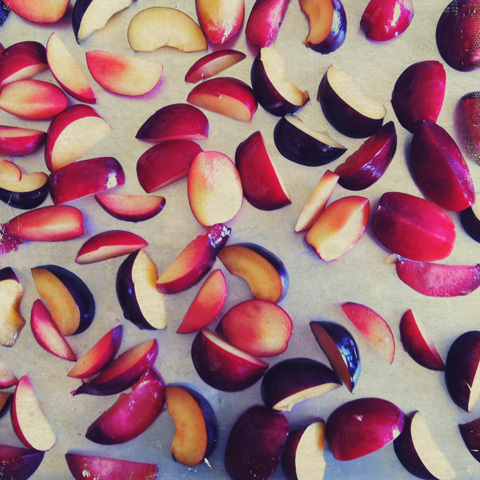
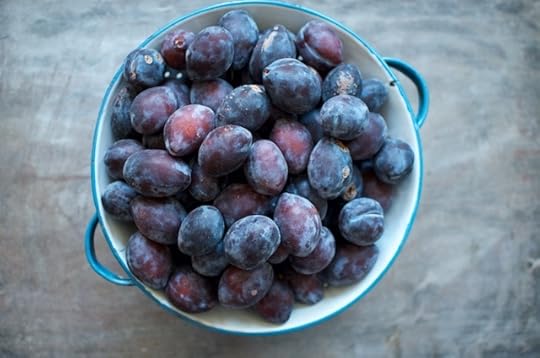
The ability to freeze good fruit is important to me, in part, because we spend the peak preserving month of August far away from home, at our cabin in Alaska. Just before we leave, I am slammed with pounds and pounds of berries and plums — more than I could sanely process, given everything else that’s going on. It’s a huge relief to be able to flash freeze, package, and tuck away the harvest to make jam later.
When I started to create jams with my frozen summer’s haul, I was of two minds: Mostly, I loved having the luxury of combining so many fruits. Opening the freezer to securely preserved strawberries, blackberries, raspberries, plums, and figs was like diving into a chest of colorful, edible art supplies. I had strawberries to blend with feijoas when the latter showed up in November. (I’ll be sure to post that recipe next fall when feijoas come in again. It was one of my favorite jams of the year.)
I made a luscious plum, strawberry, and ground cherry jam that I never would have thought of if I’d used up all those strawberries in June. The frozen plums — at least three different varieties – found their way into almost everything, lending a tart complexity and pectin boost to jams from October until just last week, when they finally ran out.

But I also felt guilty. Isn’t it cheating to make jam from frozen fruit? I let flavor decide that question. It’s all good jam. Because the fruit was frozen with care, at the very point where I would want it for jam making — some of it perfectly ripe and some of it just under — the difference in flavor was negligible to nonexistent. As Darina Allen says in her gorgeous book, Forgotten Skills of Cooking:
If you don’t want to spend your whole summer in the kitchen, the most practical approach is to freeze fruit in perfect condition in small, measured quantities, so that you can make jam as you need it throughout the year. Jam made from frozen fruit will taste infinitely fresher and more delicious than a six- or seven-month-old jam even if it is made in peak season.
So. Yes. You can make some damned fine jam from frozen fruit. Here, I thought I’d share a few tips and the method I like to use for jamming frozen fruit.
How to Make Jam From Frozen Fruit: Tips and Tricks
Start with the best. What goes into your jars is what you get out of them, so use the best fruit you can find. Depending on the type of fruit, you’ll want to freeze it at the peak of flavor or when it’s just a tad underripe. Hitting that peak of ripeness is critical for fruits like strawberries or figs, where a little bit to one side or the other makes all the difference between the jam you want and the one you don’t. With fruits like plums, blackberries, or raspberries, however, I like a mix of perfectly ripe and just under, for both the extra pectin and the extra pucker that the less ripe fruits provide.
Don’t get it wet. I pick over berries. I gently spot clean plums. I remove any bad bits from strawberries. But I don’t wash fruit before I freeze it. It’s all organic or foraged from unsprayed places. I pick it myself, or I know the people who do. I’m also going to boil the bejeezus out of it, so I don’t worry about skipping the wash. (As an aside, some professional jam makers I know and respect don’t wash their organic fruit before jamming it. That’s how I learned to stop doing it, myself. So if a professional jam maker jumped off a bridge, would I jump off a bridge, too? I suppose I might.)
Slice, dice, and weigh. Before you freeze the fruit, cut it to the size you think you’ll want it to be when you use it later, because you probably don’t want to mess around with trying to chop up plum halves or whole, huge strawberries after they’ve been frozen. If you want different textures for different jams, freeze multiple bags, each containing the size you’ll want. You may want to plan for bags of various weights, too. I prepped a lot of two- and three-pound bags, but found that I also loved having single-pound bags to play with.
Flash freeze first. You already know about this, right? It’s where you put the individual pieces of fruit on trays and freeze them until they’re just solid. Then you put the flash frozen fruit into freezer bags. This is how you avoid things like whole bricks made of blackberries. Do note that some fruits have special needs when it comes to freezing.
For example, I freeze figs in sugar syrup to retain color and texture. You can learn about that here. And you can find detailed information about freezing other types of fruit here. I have never, for example, frozen peaches, nectarines, or apricots because I haven’t had enough to warrant it. I’d want to check up on the particulars of freezing those or other fruits before attempting it for the first time.
Get the air out. Suck it out with a straw, give your freezer bags mouth to mouth, or get a Food Saver — just extract as much air as you can before you seal the bags. Then double check the seals.
Label it now or regret it later. On the outside of the freezer bag, jot down not just the fruit it contains, but the weight and the date you froze it, along with anything else you might want to remember, like where you picked it or who gave it to you. You’ll be glad you did. (For those of you who are ahead of me in the labeling game, would you please tell me your favorite way to label freezer bags? I write on them with a sharpie, but that makes reuse challenging. I travel with my toiletries in a bag labeled “Blackberries 2010.”)
Plan before you jam. Before you start pulling summer out of the freezer, think about what you want to make. It’s not a big deal — just some recipe notes so you can get in and out of the freezer quickly and not grab or thaw a lot more than you need.
Mmm . . . macerate. This is the best part. I start almost all my frozen fruit jams by macerating the fruit in sugar while it thaws. Doing it this way means you won’t end up with sad, pulpy bits of skin floating in a mess of juice. As the fruit thaws, the sugar nestles it and absorbs the liquid, so you end up with a mixture that is thick, bright, pectin rich (provided you’ve chosen a blend of fruits that provides enough pectin to make a successful jam, which is actually kind of hard not to do) and ready to cook.
I don’t add powdered or liquid pectin to my frozen fruit jams and I’ve not yet had a bad experience with one. In terms of how much sugar to use, that’s up to you and your fruit. I usually use 60%-75% of the weight of the fruit, depending on how much pectin it has (less pectin = more sugar) and how sweet it is to start.
Anyway, go clean out your freezer and make some jam. Because it’s spring and rhubarb is already upon us!
This piece was originally published on Hitchhiking to Heaven on March 25, 2012 and was written by Shae Irving.
Related Posts:Canning 101: How to Make Jam With Frozen Fruit + Apricot Meyer Lemon JamCanning 101: How to Swap Citric Acid for Lemon Juice and Vice VersaMy Jars Didn’t Seal! What Happened?
May 18, 2020
A Pantry Makeover with Ball® Canning
This post is sponsored by Ball® Fresh Preserving.
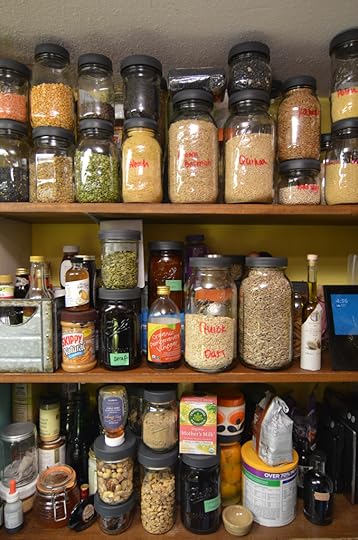
Among my family and friends, I’ve long been known as an organized person (when I was a kid, my idea of a good time was to organize my doll accessories). But between last year’s book tour and birth of my twins, many of my orderly systems have broken down.
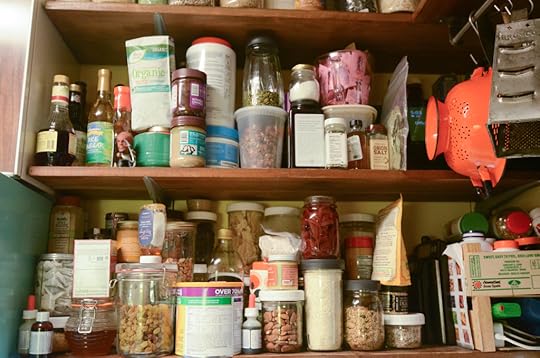 Before I tackled this makeover. As you can see, things had gotten pretty messy.
 One spot where entropy had hit the hardest was my pantry shelves. This storage area exists at the far end of my kitchen (remember, my kitchen is just 80 square feet, so we’re not talking about a vast room) and is a space we use and access constantly.
More often than not, things got shoved in wherever we could find room. The lack of order meant that I never knew when I was out of critical ingredients and when I had more than I needed (during this reorg, I found three bags of chickpea flour. I like a chickpea crepe as much as the next home cook, but even I admit that this is more than I need).
So when the folks from Ball® Canning asked me if I might be interested in participating in a pantry makeover featuring their Ball® Leak-Proof Storage Lids, I said yes. I’m cooking at home more than ever right now (like so many folks) and I desperately needed to create some order. Plus I love those leak-proof lids (seriously. They’re so great).

In my pre-child life, I would have been able to knock this makeover out in a day (two, tops!). However, in my current parenting life, it took me more than a week to get these shelves in order. I worked on it section by section, moving things out of the motley assortment of containers and rehoming them in the new jars from Ball® Canning.
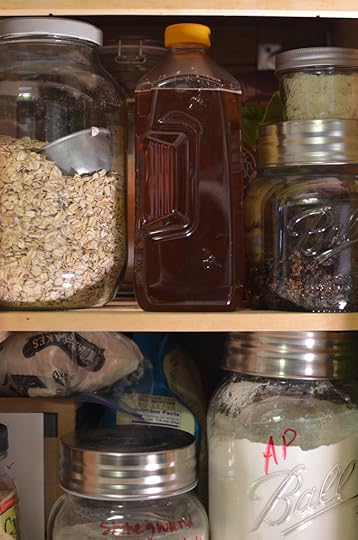
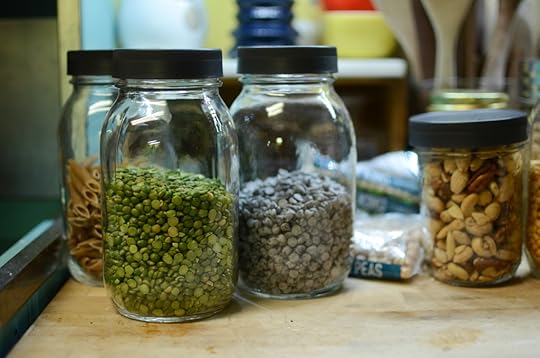
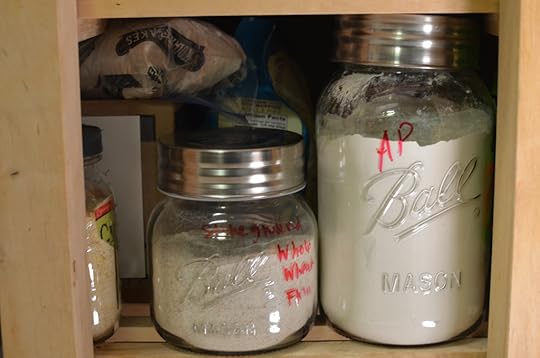
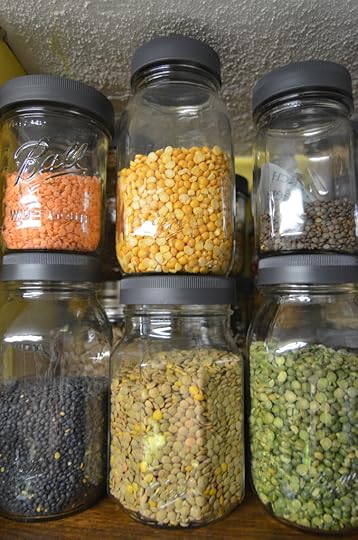
I used Regular Mouth Smooth-Sided Jars for a lot of my items, because I find that they pour nicely and the unembellished sides allow me to write the contents with a Sharpie (it comes right off with the scrubby side of the sponge).
They also sent me a number of the Amber Jars, which are great for things that degrade with light exposure (I always stash my coffee beans in them).
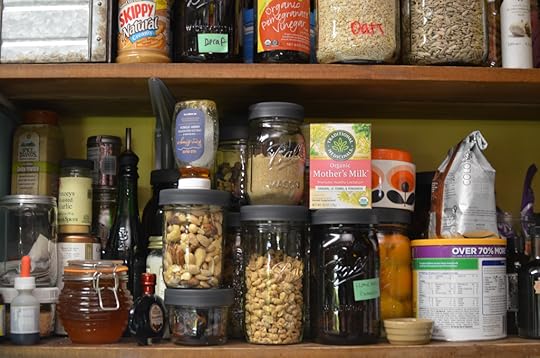
My plan with this makeover was not only to get everything into fresh, clean jars fitted with those Ball® Leak-Proof Storage Lids, but also to create zones. Instead of having lentils shoved next to the brown sugar, I wanted to get all the legumes in one place (though I’ll confess right now that I have a bean annex in our front hall closet. Early on, I channeled some of my pandemic anxiety into a very large order from Rancho Gordo). Same with the flours, sweeteners, grains, etc.
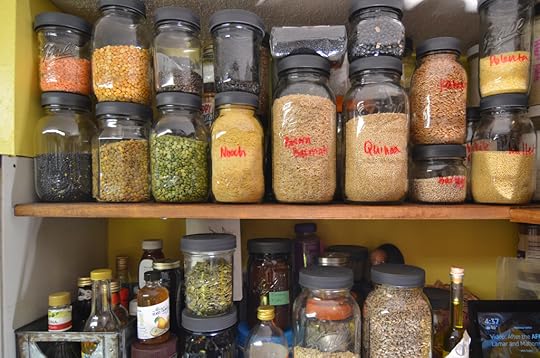
Investing this time into redoing these shelves has already yielded a great deal of relief and pleasure. Knowing what I have and where I have it makes it so much easier to cook for my family, particularly during this time when each day is inherently stressful.
Related Posts:Cooking with Infants and the Breville Combi Wave
3 in 1Proudly Homemade Antipasto Relish from Ball® Fresh PreservingARM & HAMMER Fruit & Vegetable Wash
May 3, 2020
May Partners: Fillmore Container, EcoJarz, Sticker You, McDonald Paper, and Mason Jar Lifestyle
Happy May, dear readers! It’s the start of the month and that means that it’s time to thank the businesses that help make this site possible. Please do show them that you appreciate their support with your time and attention.
Lancaster, PA-based and family-owned Fillmore Container are with us again! They offer all manner of canning jars, lids, and other preservation gear and carry just about every Ball jar currently available, so if you’re looking for a particular style, check them out.
Our friends over at EcoJarz are another stalwart sponsor. They make an array of products designed to fit on top of mason jars, including cheese graters, coffee brewers, and stainless steel storage lids. Don’t miss their Bopple lids, which can close narrow-neck bottles.
Back again is Sticker You. They sell custom die-cut vinyl stickers, labels, decals, tattoos, magnets and more, in any size, shape and quantity. They have a wide variety of labels you can order to make your preserves look slick and professional.
McDonald Paper & Restaurant Supply is gear emporium located in Brooklyn, NY. They are open to the public and sell all manner of culinary supplies. Restaurant supply stores are a great way to get affordable, durable kitchen gear (including jars!). I’m a big of their big food storage containers for macerating fruit for jam, as well as these disposable containers for those times when you know you’re not going to be able to get your containers back!
Mason Jar Lifestyle is a one-stop shopping site for all the jar lovers out there. They sell all manner of mason jar accessories and adaptors. If you’re in the market for lids, straws, sprouting lids, fermentation weights, airlocks, tea light converters, cozies, they are there for you.
And if your company, shop, or family business is interested in reaching the food-loving and engaged Food in Jars audience, you can find more details here. Leave a comment on this post or drop me a note to learn more!
Related Posts:November Partners: Fillmore Container, EcoJarz, McDonald Paper, Mason Jar Lifestyle, and Sticker YouOctober Partners: Fillmore Container, EcoJarz, McDonald Paper, Mason Jar Lifestyle, and Sticker YouJuly Partners: Fillmore Container, EcoJarz, McDonald Paper, Mason Jar Lifestyle, and Sticker You
April 24, 2020
C is for Celery Citrus Salad
This May, our friend Shae Irving is shutting down her blog, Hitchhiking to Heaven. She has offered up some of her old posts so that they can continue to live and be useful after HtH closes its doors. This Celery Citrus Salad is quick, convenient, and a refreshing respite from the heavier foods that winter has to offer us.
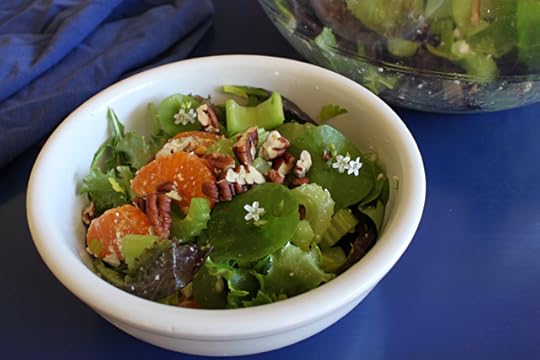
It is spring! That pleases me for many reasons, mostly having to do with the garden and a long list of dirt-digging tasks. But it’s also a perfect day to have this Celery Citrus Salad for lunch. Doesn’t it look like spring in a bowl?
This salad is the “official” entry for my personal veggie challenge, in which I am working my way through the vegetable alphabet and posting a related recipe on the last day of every month. (So far: A is for Artichoke and B is for Bok Choy.)

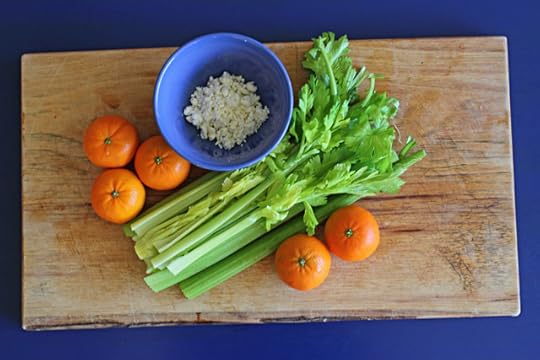
Last year, celery grew very well for me in a half-wine barrel. Right now, my celery plants are babies — about 3″ tall — but I’ll be glad to have something new to do with that celery when it’s ready. (When I got caught with too much last year, I enjoyed making ultra-simple Summertime Celery Water, which is a refreshing, mineral-rich drink for hot days.) If you have a favorite way to use celery — something that takes it beyond its unfair reputation for being nothing but boring diet food — would you share in the comments?
The original recipe for this salad came from the free, take-away magazine published by Whole Foods. I like to pick up a copy when I shop there because I often find good, budget-friendly recipes in it. (This, despite the universal understanding that Whole Foods is not the most budget-friendly place to shop. Their large assortment of clear, practical recipes makes the Whole Foods shopping experience more sane.) Whole Foods has a well developed recipe forum on its website, too.
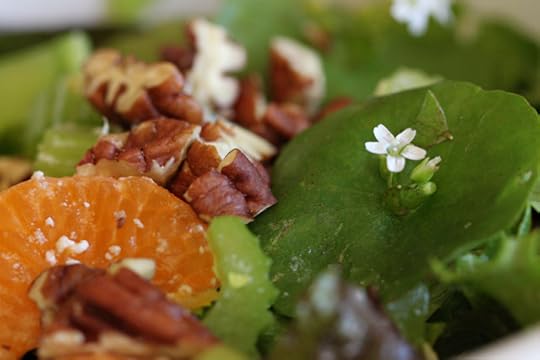
I did make some changes to the original recipe. I cut the amount of celery called for to reflect the amount I had. I replaced regular balsamic vinegar with golden, to keep the color bright. I added flowering miner’s lettuce from our yard and a handful of chopped pecans. This is one of the best things about salads; they invite play.
If I’d had time, I would have followed Kaela’s lead and made honey roasted nuts to top my salad. (She posted those just this morning and I wasn’t quite fast enough to get my head around them, but I will make them sometime soon.) Still, I’m not complaining about the pecans. They added great flavor and enough substance to make the salad act more like a meal.
Happy Spring!
Celery Citrus Salad
Ingredients
5 tangerines or mandarin oranges (I used Clementines)
1/4 cup feta cheese
2 tablespoons golden balsamic vinegar
1 cup roughly chopped celery leaves
2 cups sliced celery
4 cups (approximately 1/4 pound) mixed salad greens
1/2 cup chopped pecans
cracked black pepper
Instructions
Squeeze the juice from one of the fruits into a large bowl. Add the vinegar and cheese and mix well with a fork, mashing the cheese as you go. Peel the remaining fruit and separate into segments, removing any stringy bits before adding the segments to the bowl. Add celery leaves, sliced celery, and salad greens, and toss well. Top with chopped pecans and add cracked black pepper to taste.
Related Posts:
Check the recipe index for more tasty preserves!
April 17, 2020
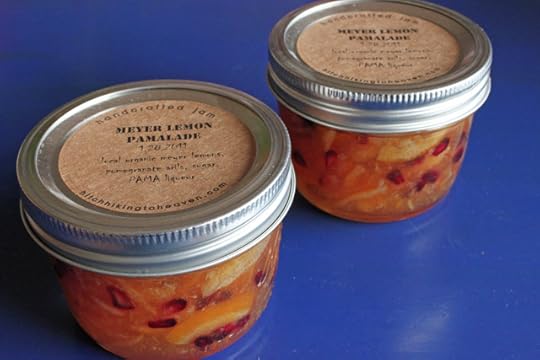
Meyer Lemon PAMAlade
This May, our friend Shae Irving is shutting down her blog, Hitchhiking to Heaven. She has offered up some of her old posts so that they can continue to live and be useful after HtH closes its doors. This Meyer Lemon Marmalade with Pomegranate Seeds is one we thought you might appreciate.
One of the most popular recipes posted on Hitchhiking to Heaven is a tasty, simple Pomegranate Champagne Jelly. In the comments to that post, a couple of folks asked whether it would be okay to include the pomegranate arils — that is, the seeds in their beautiful red, fleshy wrappings. I didn’t think it would lead to happy results.
That particular jelly needs to go into the jars piping hot and the arils would float to the top. If you waited for the jelly to cool enough that the arils wouldn’t float, the texture of the jelly would be wrecked. I concluded this from my experiences trying, mostly unsuccessfully, to float intriguing things in jelly — like slivered almonds or flowers.
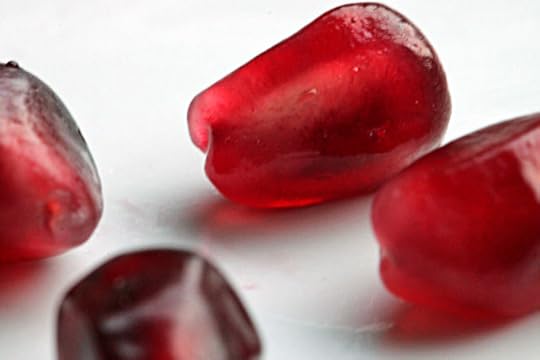
Pomegranate Arils or Pomegranate Seeds
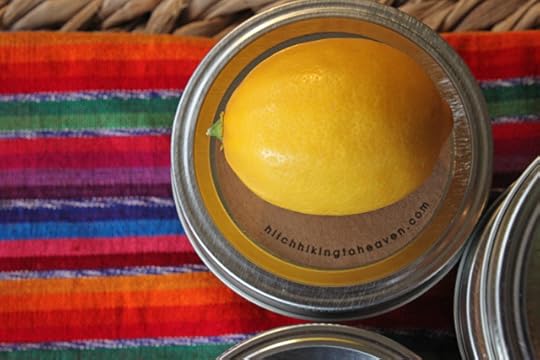
Still, those tiny red jewels kept rattling around in my head. When I spied some lovely arils at Whole Foods the other day, knowing I had a bag of freshly picked Meyer lemons in my car — well, you can see what happened. I decided to try the arils in a chunky Meyer Lemon Marmalade, and it worked out great. To add a splash of complexity, I included some booze from my stash of liquor minis for jamming: a pomegranate liqueur called PAMA.
And that’s how the marm got its name.
If you like to eat pomegranate arils (they’re good for you — full of fiber and antioxidants) you might want to experiment with something like this. As marmalades go, this one isn’t very labor intensive. It’s a one-day process instead of the usual two or three. Meyer Lemon Marmalade can be prepared more quickly than most marmalades made with other types of citrus, because the lemons are so soft.

Yield: About 6 half-pints
Meyer Lemon PAMAlade
Ingredients
2 pounds Meyer lemons
5 1/2 cups water
5 cups sugar
2 ounces (50 ml bottle) PAMA (pomegranate liqueur)
1 cup pomegranate arils
Instructions
1. Slice your lemons according to the directions in How to Slice Citrus Fruit for Marmalade. Strain the leftover lemon juice (the post about slicing fruit explains this) and set it aside.
2. Put the lemons, strained lemon juice, and water into a large, nonreactive saucepot. Bring the water to a boil and then immediately reduce to a simmer. Simmer the lemons for 5 minutes only.
3. Transfer the lemons and water to a large glass or ceramic bowl and set them aside to soak, covered, for 4-6 hours. (It’s fine to leave them at room temperature.) Don’t leave them to soak any longer than 6 hours. You don’t want them to fall apart. I usually prepare the lemons early in the day and then come back to cook them in the late afternoon or evening.
4. After the lemons have soaked, sterilize your jars and put 5 metal teaspoons on a plate in the freezer to test the marmalade for doneness later.
5. Place the lemons and their liquid in a large, nonreactive jam pan. Bring the liquid to a boil and then immediately reduce to a simmer. Simmer until the lemons are tender. If a slice of lemon easily comes apart when you press it against the side of the pot with a wooden spoon, the lemons are ready.
6. Add the sugar to the pot and stir well. Bring the mixture to a boil on high heat and leave it on high heat to cook. Stir very little during this initial cooking phase, so the mixture doesn’t cool too much.
7. Add the PAMA and pomegranate arils toward the end of the cooking process. I added them after the mixture had been cooking for about 30 minutes, expecting that my marmalade would set somewhere between 35-40 minutes. As it turned out, the addition of the cooler liquid and the arils extended the cooking time quite a bit. It took closer to 45 minutes for the marmalade to cook. Next time I do this, I will add the liqueur and arils later, at about 35 minutes.
8. Start to test the marmalade for doneness* when you notice that the mixture has thickened and the bubbles have become smaller, shinier, and more concentrated. You will also notice an increase in foaming when you stir the marmalade during this final stage.
9. When the marmalade is finished, remove it from the heat and skim the foam. Allow the mixture to cool for about ten minutes, giving it a gentle stir every couple of minutes or so to distribute the arils. Then ladle or pour the marmalade into the sterilized jars, leaving 1/4-inch head space. Wipe the jar rims with a clean, damp cloth if necessary, and secure the lids.
10. Process in a water-bath canner, using the correct time for your altitude: 5 minutes for 0-1,000 feet above sea level, plus 1 minute for every additional 1,000 feet.
Notes
*Testing the marmalade for doneness. Remove the mixture from the heat. Use one of the frozen spoons to scoop up a little bit of marmalade — not a whole spoonful, more like half. Return the spoon to the freezer and wait 3 minutes. Retrieve the spoon and hold it vertically. If the marmalade doesn’t run and has reached a semi-solid consistency, it’s done. Alternatively, give the mixture a push with your finger. If it wrinkles all the way through, it’s done. If the marmalade isn’t done, return it to the heat, cook it for 2-3 more minutes, and test again.
Related Posts:
Double Meyer Marmalade
Citrus for the January Mastery Challenge
Citrus Smash Jam
April 10, 2020
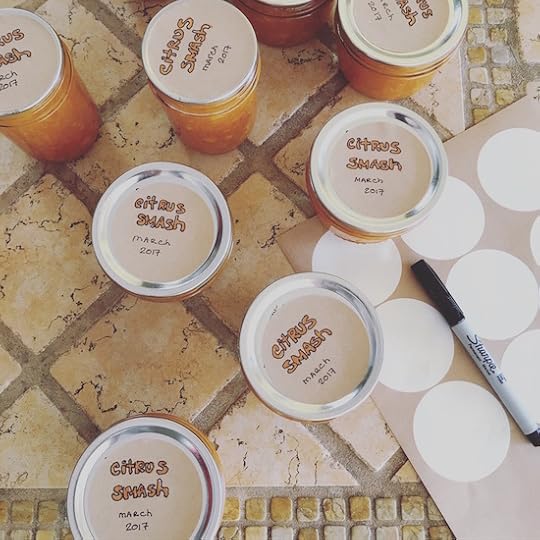
Citrus Smash Jam
This May, our friend Shae Irving is shutting down her blog, Hitchhiking to Heaven. She has offered up some of her old posts so that they can continue to live and be useful after HtH closes its doors. This mixed citrus jam is both versatile and delicious, making it a must-share here at Food in Jars.
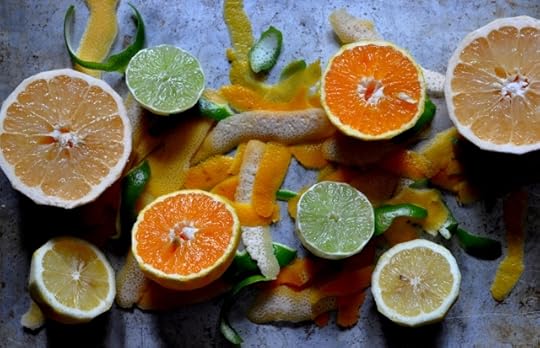
It’s not the first time I’ve had to do this. A few days before leaving town at the peak of citrus season and one or two of my trees are still laden with fruit; this year it was limequats and Valencia oranges. Plus there was an assortment of citrus rolling around in the bottom drawer of the fridge — a couple Meyer lemons, several Cara Cara oranges, and one lone grapefruit.
In these moments of too much citrus fruit and too little time, the easiest, most satisfying thing I’ve learned to make is mixed, whole-fruit jam. (There are other options: Put the fruit zest into baggies and squeeze the juice into ice cube trays, freezing everything to use later. Or put it all in a flat-rate box and send it to friends in colder climates. Whatever, just keep moving.)
Where I’m headed is the opposite of citrus season. I’m going to Fairbanks for a month to learn a few things about winter. Even though we’re approaching spring, Fairbanks temps are predicted to be about 28 degrees below zero when I arrive tonight, quickly warming up to a beautiful, sunny week with highs between 5 and 20.
So if you’ve got a pile of citrus fruit, I hope you’ll have fun with this jam. Please don’t expect precision here — it’s a process. In practice, it’s so easy to do. I wish it didn’t take so many words to explain it! I call it either Citrus Smash Jam (after the cocktail) or Sunshine Jam, depending on whether or not I add liquor.
Yield: 8-10 half-pin
Citrus Smash Jam
Ingredients
Instructions
Cut and prepare the fruit*. Slice each piece lengthwise along the stem. Notch out the pith from the centers of the fruit, retaining those pithy centers so you can squeeze juice from them later**. Then, using a small bowl with a strainer suspended over it, run your thumbs along the insides of the notched fruit to remove any seeds while collecting the juice in the bowl. Squeeze the pithy centers over the strainer also. The goal is to collect as much juice as you can at the same time as you are preparing the fruit pieces for cooking. Set the bowl of juice aside.Cook the fruit. Place the cut fruit pieces in a big, nonreactive pot, and cover with cold water so they float freely. Bring to a boil, reduce the heat, and simmer until the skins are soft enough to pierce with a skewer***.Drain the fruit. (Keep the cooking liquid if you want to make it into syrup as a side project, which you can do by adding sugar at a 1:1 ratio and simmering for about ten minutes.)Combine the cooked fruit and the fresh juice from Step 1. Puree in a VitaMix or food processor, but don’t completely liquefy the mixture. Leaving small chunks of rind gives the finished jam a better texture.Transfer the fruit mixture to a large glass or ceramic bowl, measuring it out to see how many cups you have. Stir in one cup of sugar for each cup of puree. Cover the bowl tightly, and let it rest in the fridge overnight. (Honestly, you don’t have to wait if you don’t want to. If you want to keep right on cooking, go directly to the steps for Day Two. I usually break it up so I have time to do other things, like packing.)Sterilize your jars. You’ll have to guess at how many you need. It shouldn’t be more than ten half-pints.Transfer the fruit mixture to your jam pan (I use an 11-quart stainless steel or copper pan) and slowly bring to a boil, then reduce heat to medium and cook until the mixture reaches a jam-like consistency. Stir frequently to prevent sticking, and you may have to reduce the heat as the jam cooks down, so it doesn’t scorch. Mine usually takes 20 minutes or less. Look for the point at which excess liquid has evaporated from the top of the mixture and the bubbles become smaller and more settled. You’ll also probably start to see clear tracks at the bottom of the pan when you stir, and the surface will start to subtly crease. With all this citrus, you definitely won’t have trouble achieving a good set.Remove the jam from the heat. Pour the jam into hot jars, leaving 1/4-inch head space. Wipe the rims clean, apply lids, and process in a hot water bath for 5 minutes, adding time for your elevation if necessary.
Notes
Note that this is a time consuming recipe; if you're keen to break the work into two-days, Steps 1-5 cover day one, while Steps 6-8 cover day two.
*Depending on the kind of fruit you’ve got, you may end with neat halves, ugly chunks, or random pieces. It really doesn’t matter.
**If you’re working with tiny fruit like limequats, you may end up picking out the seeds. Do what you have to do to nip out the pith and seeds from the core of the fruit.
***There’s more than one way to approach this step. If some of your fruit is thick skinned (think grapefruit or tougher skinned oranges) you may want to separate out those pieces and cook them in a separate pot where they can simmer longer. Or you can do it the lazy way by cooking everything in the same pot then straining the fruit when most of it is ready. (Don’t dump the liquid!) After that, you’ll need to separate out any thick-skinned pieces and return them to the cooking liquid to simmer until all the fruit is of a fairly equal texture. You can see this is not an exact science!
Related Posts:
Low Sugar Strawberry Rhubarb Jam
Small Batch Blueberry Cara Cara Orange Jam
January 2019 Mastery Challenge Round-up
April 3, 2020
Double Meyer Marmalade
This May, our friend Shae Irving is shutting down her blog, Hitchhiking to Heaven. She has offered up some of her old posts so that they can continue to live and be useful after HtH closes its doors.
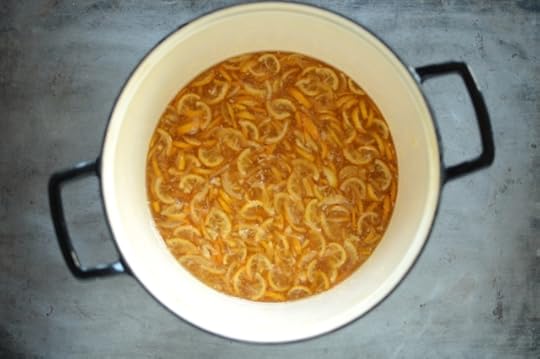
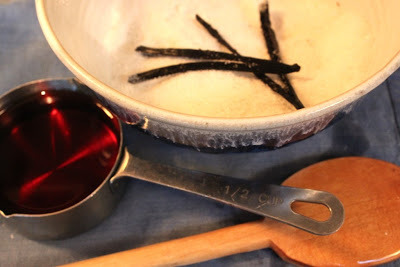
So I was looking in the liquor cabinet, because that’s where I keep my canning supplies (honest). Right up front was a bottle of Myers’s Rum. And sitting on my kitchen counter were a couple dozen Meyer lemons, of which I am blessed with a year-round supply. Myers’s Rum, Meyer lemons? Double Meyer Marmalade. True, it would be even better if the Misters Myers and Meyer — Fred and Frank, respectively — had gotten it together on the spelling of their surnames, but I tried a bunch of different names (“Fred and Frank’s Fabulous Fruit?” asked Stewart) and came back around to this one. Make mine a double.
I had no idea how much rum to add to my regular Meyer Lemon Marmalade recipe to get the right mix. I poked around on the Internet and saw folks adding a tablespoon of rum to this and a splash of rum to that, but what has a tablespoon of rum ever done for anyone, really?
So I got scientific about it and added the amount that first popped into my head, which was half a cup — plus an extra tablespoon at the very end, which seemed to make a nice difference. By some divine grace, perhaps by the will of Fred and Frank, it turned out well. Half a cup gave the fruit a mild but discernible rum flavor. You could certainly bump it up a little if you wanted to, and next time around I may do just that. Might throw in some nutmeg, too.
 Also, if you prefer, you could go the other direction and make a basic, luscious Meyer Lemon Marmalade by leaving out the rum and vanilla bean — keepin’ it simple.
Yield: About 9 half-pints
Double Meyer Marmalade
Ingredients
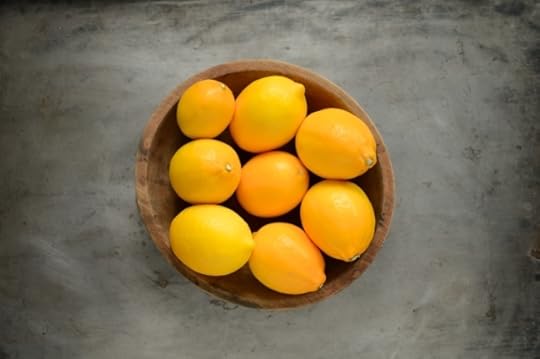
2 1/2 pounds Meyer lemons
7 cups water
6 1/2 cups sugar
1/2 cup Myers’s Rum, plus 1 tablespoon to add at the end
1 vanilla bean
Instructions
Wash the lemons and then chill them for at least an hour. Chilling is optional, but it’s so much easier to thinly slice a cold lemon.Slice each lemon along the stem and then cut a notch from the center to remove the pith.Hold each lemon over a bowl and run your thumb along the inside of the notch to remove the seeds. (This is my favorite part. I don’t know why; it’s just fun.) The bowl will catch the seeds and the juice, which you should set aside until Step 5.Slice the lemons as thin as you like.Put the lemon slices and the 7 cups of water into your heavy-bottomed, nonreactive pot. Strain the set-aside juice and seeds and add the juice to the pot, too.Simmer for five minutes, then transfer the mixture to a large bowl, cover it, and let it stand in the fridge overnight.When you're ready to return the next day, sterilize your jars.Prepare the vanilla bean. (I used only one bean, but if you want a more intense vanilla flavor, I think two would work.) Slice the bean lengthwise and separate the seeds by running your thumb along the inside. I followed a tip I read that suggested mixing the seeds with about a cup of the recipe’s sugar, to ensure they’re evenly distributed when you add them to the mixture. It worked well for me, though I couldn’t say whether or not it’s really necessary to go to the extra trouble.Simmer the lemons and water in your big pot until the peels are soft. (If they come apart easily when you try to separate them with a wooden spoon, they’re done.)Add the sugar, 1/2 cup of rum, and the vanilla bean and seeds. Boil the mixture until it reaches the jelling point. Be patient, because this takes some time — usually 30-40 minutes for me. I usually remove the mix from the heat as soon as it reaches 220F on my candy thermometer. I test it for jelling on a cold surface and then boil it a little longer only if I need to. I really don’t like overcooked Meyer Lemon Marmalade, so I always try to remove it just when it hits the jelling point, no later.When the mixture is ready, stir in 1 tablespoon of rum. Remove the vanilla bean from the pot. I rinsed the bean and cut it up into smaller slices, then put one piece into each jar when I filled it.Ladle the mixture into the sterilized jars and process. I left 1/4 inch head space and processed for ten minutes in a water bath canner.
Notes
Note that this is a two-day process. Steps 1-6 are the first day, allowing time for the mixture to sit in the fridge overnight. Steps 7-13 are for day two.
© Marisa
Related Posts:
Citrus for the January Mastery Challenge
Meyer Lemon Ginger Marmalade + Giveaway
Strawberry Meyer Lemon Jam


