
Marisa McClellan's Blog, page 3
September 13, 2021
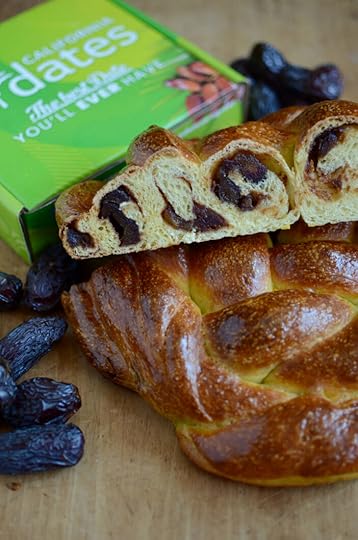
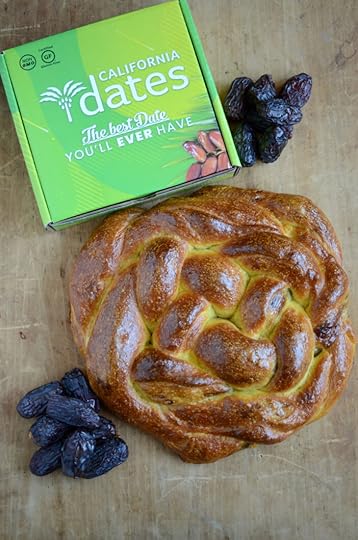
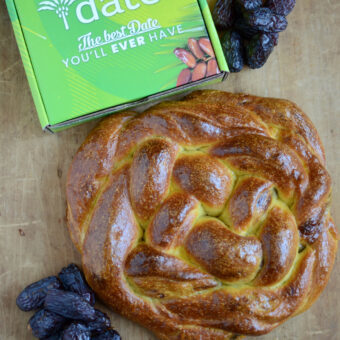
Apple Butter and Date Challah
This tender, celebratory loaf of apple butter and date challah is the perfect way to showcase homemade preserves and California Dates.
I have always loved the idea of a filled or stuffed challah, but until recently, I’d never made one. I’d gotten it into my head that it would be a hard thing to execute and that it might be beyond my skills. But when the folks from California Dates got in touch and asked if I had any new ideas for them, I suggested a loaf of challah filled with apple date butter and bits of whole dates. They loved the idea and so I was forced to confront my hesitations.
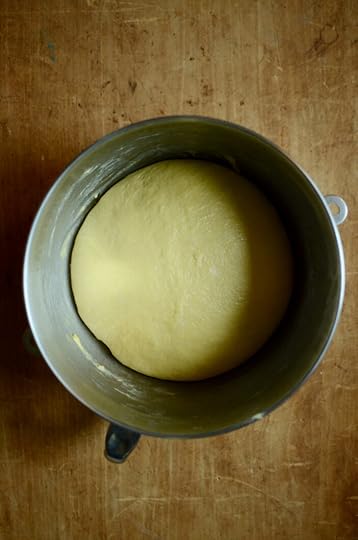
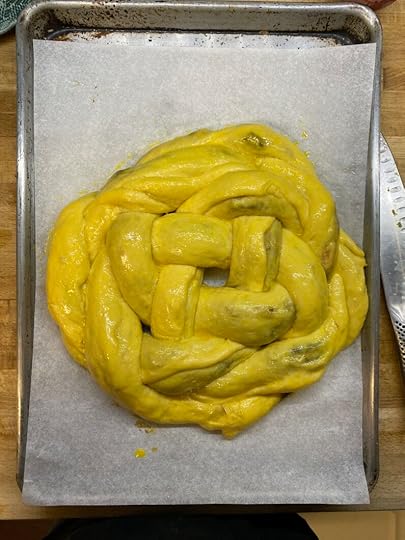
I used my standard challah loaf dough and once it had finished the first rise, I divided the dough into four equal parts. Using a rolling pin, I pressed each piece into a long rectangle (the trick here is to roll without using any flour, so that it sticks to the counter a little. That makes it easier to stretch). Then, I spread a thin layer of apple date butter across that portion (leaving a a small margin across the top so that I could seal it again), dotted it with dates, and carefully rolled it into long snake.
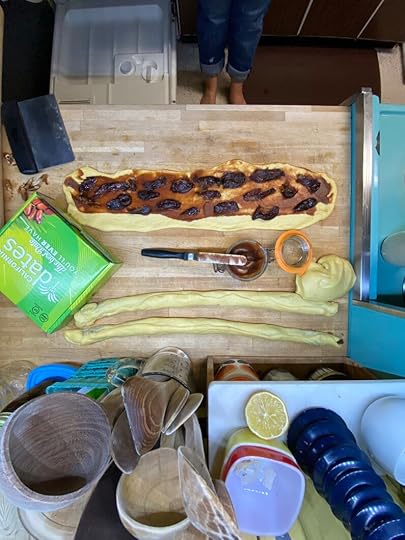
I repeated that rolling, filling, and rerolling until all four portions were complete. I wove it into a round loaf (this blog post has a good tutorial). I was careful to leave a little space in the center so that it didn’t get too dense in the middle once the loaf was finished rising.
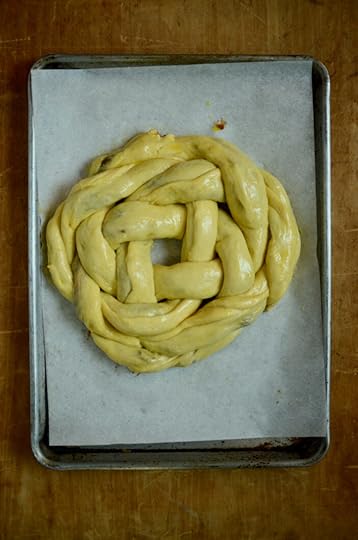
When the loaf was formed, I gave it the first of two egg washes. Whenever I make challah, I paint it twice with an egg wash. The first goes on before the second rise, to help prevent it from drying out. The second wash goes on just before baking. The second coat fills in any gaps that formed in the wash and ensures a really glossy surface.
Baked at 350°F for 40 minutes (don’t rely just on time, it is done when an instant read thermometer inserted in the very center reads at least 190°F). The finished loaf is so shiny and impressive. It’s lovely fresh, or toasted the next day. I froze some in order to turn it into french toast on an upcoming weekend morning.
 PrintApple Butter and Date Challah#wprm-recipe-user-rating-0 .wprm-rating-star.wprm-rating-star-full svg * { fill: #343434; }#wprm-recipe-user-rating-0 .wprm-rating-star.wprm-rating-star-33 svg * { fill: url(#wprm-recipe-user-rating-0-33); }#wprm-recipe-user-rating-0 .wprm-rating-star.wprm-rating-star-50 svg * { fill: url(#wprm-recipe-user-rating-0-50); }#wprm-recipe-user-rating-0 .wprm-rating-star.wprm-rating-star-66 svg * { fill: url(#wprm-recipe-user-rating-0-66); }linearGradient#wprm-recipe-user-rating-0-33 stop { stop-color: #343434; }linearGradient#wprm-recipe-user-rating-0-50 stop { stop-color: #343434; }linearGradient#wprm-recipe-user-rating-0-66 stop { stop-color: #343434; }A round loaf of challah, filled with apple butter and datesPrep Time 4 hoursCook Time 40 minutesAuthor Marisa McClellanIngredients4 1/2 cups all purpose flour2 teaspoons instant yeast 1 1/2 teaspoons salt1 cup water 110F 3 tablespoons honey4 eggs1/4 cup neutral oil plus more for oiling the bowl1 cup apple buttInstructionsPlace 4 cups of all-purpose flour in the bowl of a stand mixer (you can also mix this by hand, but using a mixer is admittedly easier). Stir in the yeast and salt. Stir the warm water and honey together so that the honey dissolves. Add the honey water, three beaten eggs, and oil to the flour and mix to combine in the bowl of a stand mixer using the paddle attachment. Once the ingredients are integrated, switch to the kneading hook and begin to knead (you can also do this by hand on a board). Work the dough for 5 to 7 minutes, adding more flour to the dough as you work, if it’s too sticky. Eventually, the dough should come together into a soft, slightly tacky, smooth ball. Grease a large bowl with a drizzle of oil and place the dough ball in the bowl. Move it around until the dough is fully coated with the oil. Cover with a plastic bag or a damp kitchen towel and tuck it some place warm for a couple hours, or until the dough has doubled in size. Once the dough has risen sufficiently, gently deflate it. Divide the dough into four equal portions and roll one into an elongated rectangle on an unfloured board or countertop. Spread the rectangle of dough with 1/4 cup apple butter, leaving a thin bare margin of dough along one of the long ends, to ensure that you can pinch the roll closed. Dot the dough with bits of the dates. Carefully roll the rectangle of dough up so that you're left with a long snake of dough. Pinch the dough closed to keep the apple butter and dates contained. Repeat with the remaining portions of dough. Using the instructions in this blog post, weave the four pieces of dough into a round loaf. Place the formed loaf on a parchment-lined baking sheet and paint with beaten egg. Let the loaf rise for about an hour, until the loaf looks plump and filled out. Paint with another layer of the beaten egg. Bake the challah for 40 to 45 minutes. It is done when it is deeply browned and sounds hollow when you tap the bottom. If you have an instant read thermometer, the interior of the loaf should register at least 190°F. Let the loaf cool completely before slicing.
 Disclosure: This is a sponsored post. California Dates provided the dates you see here, and provided additional compensation to cover time and ingredients.


August 9, 2021
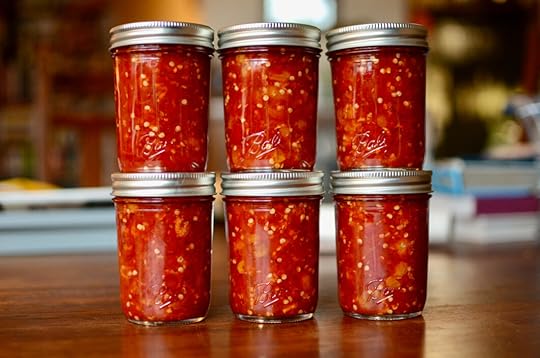
Singapore Red Chili Sauce
Sweet, tangy, and spicy, this Singapore Red Chili Sauce combines chilies, garlic, ginger, and golden raisins(!) for an enticing and habit-forming condiment.
This post is sponsored by the makers of Ball® home canning products.*
I never thought of myself as someone who favored hot sauces and spicy pickles. However, given that this is my second such preserve in just the last couple months, it’s probably time to come to terms with the changes in my taste buds. My theory? The isolation of the early parenthood and the pandemic has left me looking for excitement wherever I can find it. Thankfully, it’s a pretty innocuous way to get a few kicks.
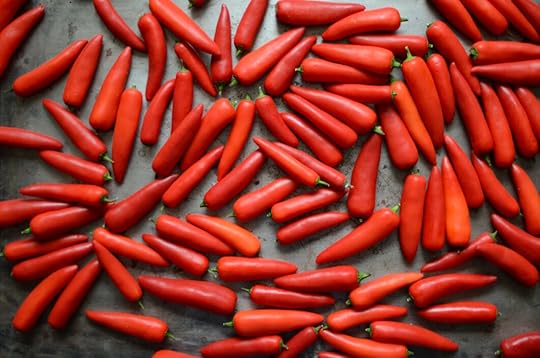
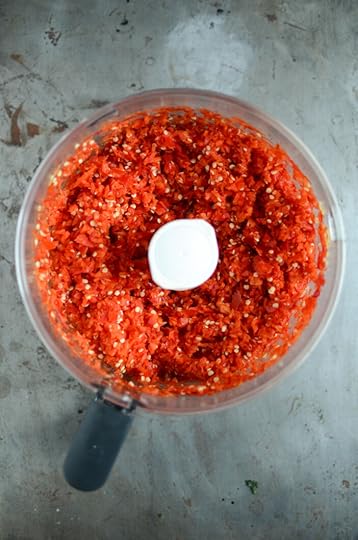
You start the Ball® Singapore Red Chili Sauce by chopping enough red chili peppers to total four cups. I found that I needed two pounds of chilies to get me to that volume. The recipe doesn’t offer guidance about how to chop the peppers, so I used my food processor. I like the uniform chop that it gives and it kept the bulk of the hot pepper oils off my hands.
 Just a note. The recipe calls for white vinegar, but all I had was apple cider vinegar, so I made the swap. As long as both vinegars have 5% acidity, it’s a safe switch to make.
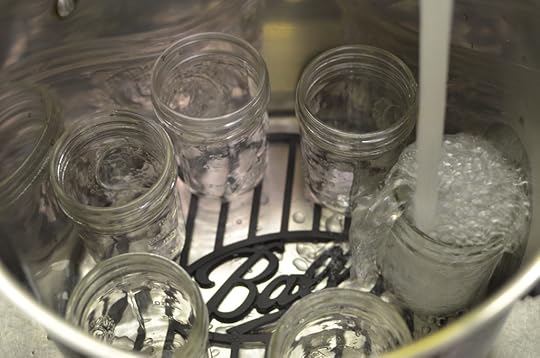
 When you’re ready to cook, take a moment to set up your canning pot. Fit your pot with a rack (I like the silicone mat that comes with the Ball® Canning Starter Kit). Place seven half pint jars (I used Ball® Smooth Sided half pints here) on top of the mat and fill the jars and pot with tap water (the recipe yield is 6 half pints, but my yield was actually seven, so heat the extra jar. It may pay off). Add a generous splash of white vinegar to prevent mineral deposits on your jars, and place the pot on the stove to heat.
Wash your new lids and rings with warm, soapy water and set them aside so that they’re ready for you when you’re ready for them.
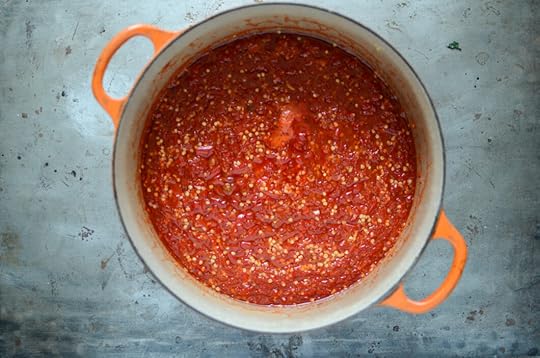
Finally, combine 2 1/2 cups of white vinegar and 2 1/2 cups of granulated sugar in a large, non-reactive pot and bring that to a gentle a boil. Simmer for a few minutes to reduce. Then, add the chopped peppers along with 1 1/2 cups golden raisins, 1/4 cup chopped garlic, 1 tablespoon grated ginger, and 2 teaspoons salt. Bring it to a boil and cook for approximately five minutes, until the vegetables are heated through.
Make sure you have your windows open or your exhaust fan running as you bring this sauce up to a boil (or both!), as it puts off an intensely peppery, vinegar forward scent.
Once the chili sauce is done, remove the pot from the stove and get a hot jar from your prepared canner. Funnel some sauce into the jar, leaving 1/2 inch headspace. Wipe the rim, apply a clean, new lid and a ring and return the jar to the canner. Repeat this process with the remaining jars and sauce.
Process the sauce for 10 minutes, adjusting for altitude if you live above 1,000 feet in elevation. When the time is up, remove the jars from the canner and place them on a wooden board or folded kitchen towel to cool. Let the jars rest undisturbed for at least 12 hours and then check the seals. Sealed jars are shelf stable for up to 18 months. Any unsealed jars should be refrigerated and used promptly.
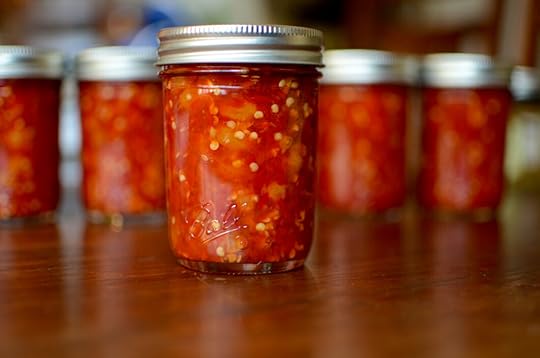
The finished sauce reminds me a lot of the red chili hot sauce that’s often sold in narrow neck bottles at Asian grocery stores (and occasionally, Trader Joe’s). It’s actually something I typically have in my fridge, and so I’m delighted to have found a viable homemade replacement. And given the speed I go through it (not actually all that quickly), I’m all set for the next couple years at least!
*Disclosure: This is a sponsored post that is part of an ongoing partnership with the Fresh Preserving Division of Newell Brands. They have provided jars, equipment and monetary compensation. All thoughts and opinions expressed remain my own.
August 4, 2021
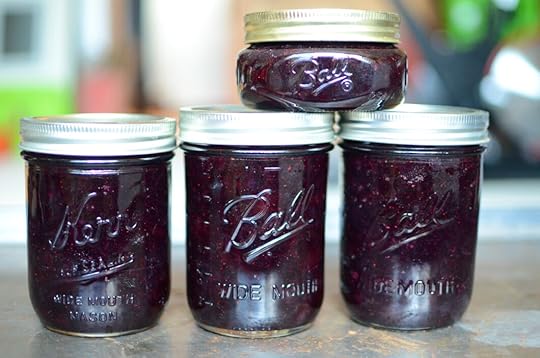
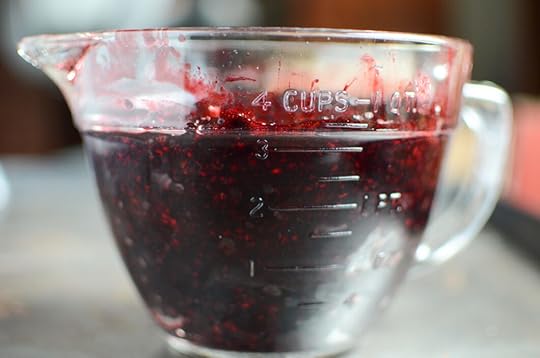
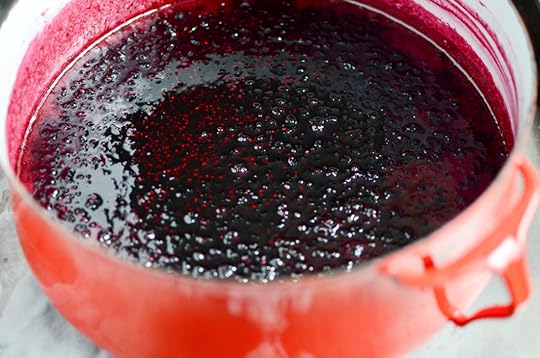
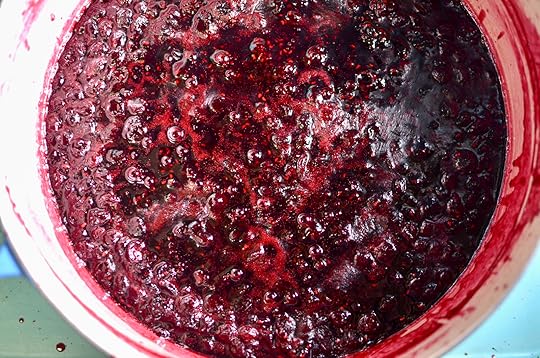
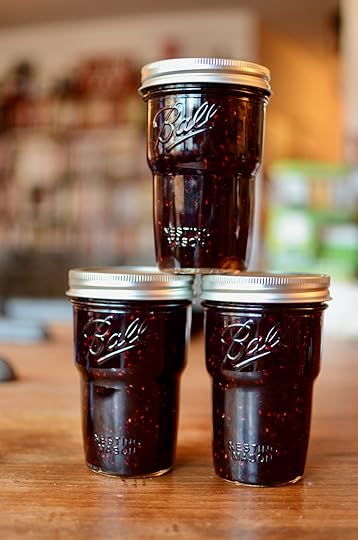
Cherry Blueberry Jam
This cherry blueberry jam is richly hued, sweet, and fruit forward. It would be great in a layer cake or ribboned through a batch of scones.
Cherry season has been really good to me this year. Back in June, I came across a sour cherry tree dripping with fruit and filled a gallon sized bag (I combined them with apricots and made a big batch of this jam). Craving more, I bought a full flat of sour cherries to freeze and make my bourbon sour cherries.
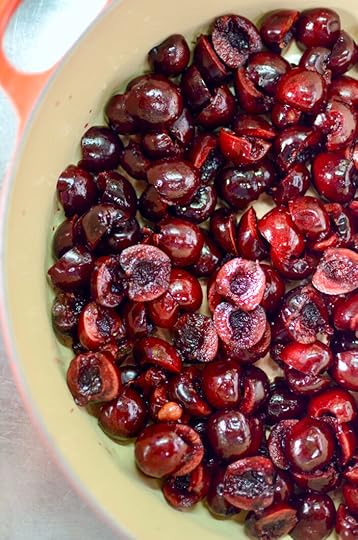
When Rainier cherries started appearing at my local farmers market, I gave myself permission to buy a quart a week (bliss!). And then, just when I figured things were slowing down, the folks from Northwest Cherry Growers sent me a 27 pounds of perfect, deep red sweet cherries.
I have eaten a ton of those cherries straight from the colander. I shared some with friends and neighbors. And I have also done a goodly amount of preserving. Cherry butter. Cherry chutney. And this cherry blueberry jam (I am still planning on making a cherry elderberry jelly. Keep your eyes peeled).
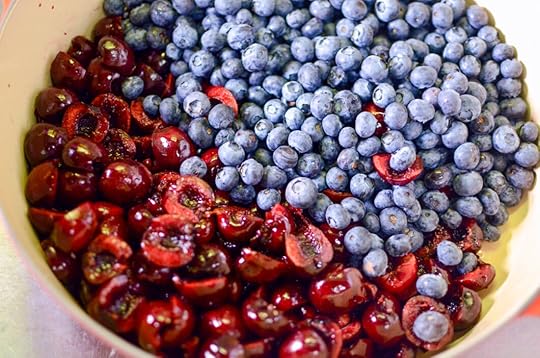
Whenever I preserve sweet cherries, I like to pull in another flavor to help keep the cherries balanced. Some times I do this with lots of citrus or even some vinegar. Other times, I draft another fruit. This time, I tapped blueberries and the result is really lovely. The finished jam has deep, dark hue and a bright, rich finished flavor. This is one that would be excellent ribboned through a batch of scones.

I’ve now been partnering with the Northwest Cherry Growers for more than a decade, so if this recipe doesn’t speak to you, there are many others from which to choose.
Small Batch Cherry Plum Jam (2020)Sweet Cherry Butter (2018)Sweet Cherry Balsamic Jam (2018)Sweet Cherry Meyer Lemon Marmalade (2017)Sweet Cherry Ketchup (2017)Spiced Cherry Preserves (2017)Sweet Cherry Barbecue Sauce (2016)Sweet Cherry Rhubarb Jam (2015)Cherry Kompot (2015)Sweet Cherry Chutney (2014)Sweet and Sour Cherry Jam (2013)Pickled Sweet Cherries (2010)Finally, for all things cherry, make sure to follow the Northwest Cherry Growers on Instagram, Twitter, and Facebook.
Yield: 3 1/2 pintsCherry Blueberry Jam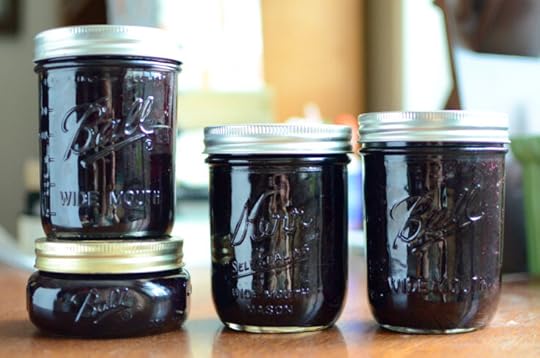 Print
PrintBright from cherries and earthy from blueberries, this jam is perfectly sweet and spreadable. It is the best of summer, preserved for later in the year.
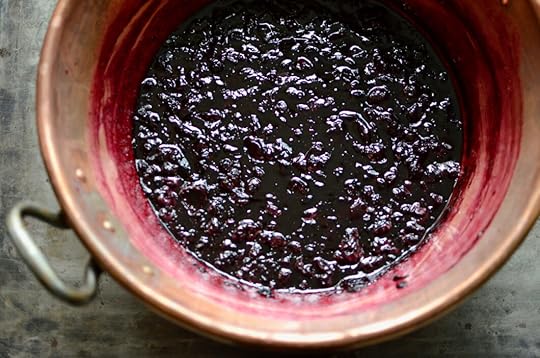
Prep Time45 minutes Cook Time25 minutes Additional Time10 minutes Total Time1 hour 20 minutes Ingredients2 pounds sweet cherries, pitted and chopped2 pounds blueberries, crushed4 1/2 cups granulated sugar4 tablespoons powdered fruit pectin1 lemon, juicedInstructionsPrepare a boiling water bath canner and enough jars to hold 7 half pints of jam. In a large, nonreactive pot, combine the prepared cherries, crushed blueberries, sugar, and pectin. Stir well to combine. Place the pot on the stove over high heat and bring to a boil. Reduce the heat to medium-high and cook at a boil for 20-25 minutes, stirring regularly, until the jam has reduced by about a third and has thickened (here's my favorite way to test for set). When the jam is finished cooking, remove the pot from the stove. Take one jar from your canner. Place it on a wooden board or towel-lined countertop and fit it with a wide mouth canning funnel. Fill the jar with jam, leaving 1/4 inch headspace. Wipe the rim with a clean, damp cloth and fit the jar with one of your clean lids. Secure the lid in place with a ring, taking care to not overtighten.Return the filled jar to the canner and repeat the filling process with the remaining jars. Process the filled jars at a full, rolling boil for ten minutes. When the time is up, turn off the heat, remove the lid, and let the jars cool in the pot for five minutes. When that cooling time is up, remove the jars from the canner and set them to cool on a wooden cutting board or folded kitchen towel. When the jars are completely cool, remove the rings and check the seals. Sealed jars are shelf stable for at least a year. If any jars did not seal, refrigerate them and use promptly. NotesTo quickly pit the cherries, I use this six slot pitter. I cannot recommend it highly enough.
© Marisa McClellanCategory: jams, jellies, marmalades
August 2, 2021
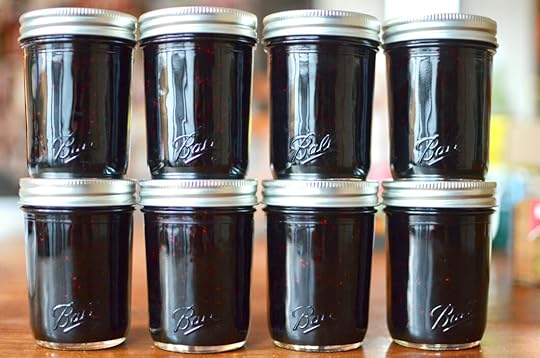
Classic Black Raspberry Jam Recipe
This simple recipe for Black Raspberry Jam uses liquid pectin to achieve a soft, spreadable set. A single batch fills eight Ball® Smooth Sided half pint jars.
This post is sponsored by the makers of Ball® home canning products*.
I discovered the joys of fresh raspberries when I was nine and we moved to Portland from Southern California. Our next door neighbor had trained raspberry canes to run up the fence that separated our driveway from hers. At the height of their season, there were more raspberries than there was fence. I’d sit on our side and eat every ripe berry within reach. Then I’d scoot down and do it again.
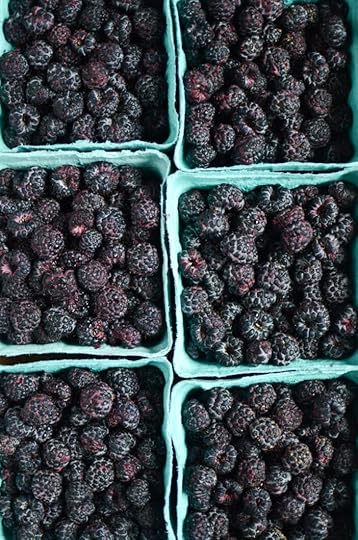
When I moved to Philadelphia in my early twenties, I learned that there was more to discover in the world of raspberries. A friend introduced me to black raspberries and my love instantly expanded to include them. These days, finding enough berries and the time to preserve them is always among my summertime priorities.
In the past, I shared a lower sugar black raspberry jam recipe, but this year I was only able to get a relatively small volume of berries. So I opted to use the Ball® Black Raspberry Jam recipe from @ballcanning. It employs more sugar than my recipe, which allowed me to stretch my berries. It also ensured that the finished jam holds its quality for a longer period of time, thanks to the preservative power of sugar.
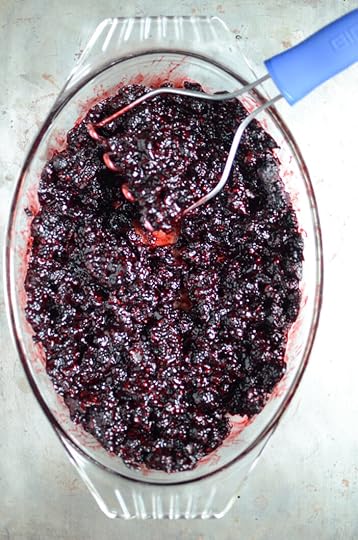
To start this recipe, you crush enough berries to yield 3 1/2 cups of pulp (in my case, I needed a little over four pints of berries). Once the berries are ready, you combine them in a non-reactive pot with 7 cups of granulated sugar and 1/4 cup bottled lemon juice. The pot goes on the stove and let it come to a boil.
While your fruit and sugar come to a boil, set up your canning pot. Fit your pot with a rack (I like the silicone mat that comes with the Ball® Canning Starter Kit). Place eight half pint jars (I used Ball® Smooth Sided half pints here) the on top of the mat and fill the jars and pot with tap water. Add a generous splash of white vinegar to prevent mineral deposits on your jars, and place the pot on the stove to heat.
Wash your new lids and rings with warm, soapy water and set them aside so that they’re ready for you when you’re ready for them.
Once the fruit has come to a full, rolling boil that doesn’t diminish when you stir, stream in one 3 ounce packet of Ball® RealFruit Liquid Pectin and then boil hard for 1 minute. Remove the pot from the heat.
Take one jar from your canner. Place it on a wooden board or towel-lined countertop and fit it with a wide mouth canning funnel. Fill the jar with jam, leaving 1/4 inch headspace. Wipe the rim with a damp cloth and fit the jar with one of your clean lids. Secure the lid in place with a ring, taking care to not overtighten.
Place the filled jar into the canner and repeat the process with the next, until all the jars are filled. Process the jars for 10 minutes, adjusting for altitude if you live above 1,000 feet in elevation.

When the processing time is up, turn off the heat, remove the lid from the pot and let the jars stand in the pot for an additional five minutes (this allows them to cool more gradually, which helps prevent siphoning and should also help develop a more robust seal).
Remove the jars from the canner and set them on a folded kitchen towel. Let them sit undisturbed for 12-24 hours so they can fully cool and seal. Before storing, make sure to check that the seals are firm and unbending.

The finished jam has a soft set and offers a burst of deep, rich raspberry flavor. It’s glorious on toast, but is a really great preserve for pairing with cheese. I can imagine it with a gooey triple creme or a crumbly goat cheese. It will be my go-to this holiday season.
*Disclosure: This is a sponsored post that is part of an ongoing partnership with the Fresh Preserving Division of Newell Brands. They have provided jars, equipment and monetary compensation. All thoughts and opinions expressed remain my own.
Yield: 8 half pintsClassic Black Raspberry Jam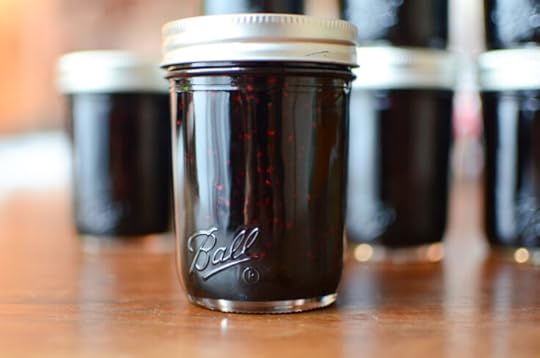 Print
PrintThis simple recipe for Black Raspberry Jam uses liquid pectin to achieve a soft, spreadable set. A single batch fills eight half pint jars. It captures the deep, rich flavor that are a signature of black raspberries.
Prep Time15 minutes Cook Time35 minutes Additional Time15 minutes Total Time1 hour 5 minutes Ingredients3-1/2 cups crushed black raspberries (about 5 pints)1/4 cup lemon juice1 3-oz pouch Ball® RealFruit Liquid Pectin1/2 tsp butter or margarine, optional7 cups sugarInstructionsVisit freshpreserving.com for the instructions!
NotesTake care not to overcook this jam. It can fo from supple and spreadable to dense and unyielding in a minute of inattention.
© Marisa McClellanCategory: jams, jellies, marmalades
July 22, 2021
Date Sweetened Peach Drizzle
This date sweetened peach drizzle (thicker than a syrup, thinner than a butter) tastes like peach caramel. It’s perfect for spooning over pancakes, waffles, and french toast.
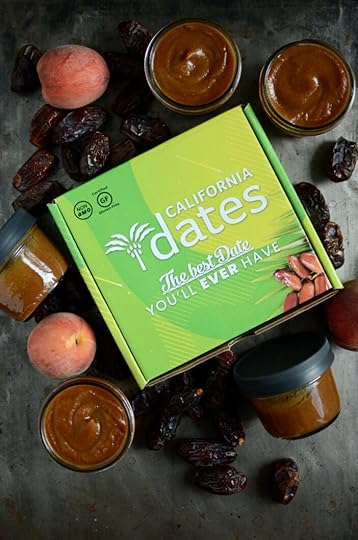
I started working with California Dates sometime last fall. They’d send me dates, I’d develop a recipe, and I’d share it to Instagram. Earlier this week, they gave me the go-ahead on my latest recipe and the thought occurred to me that I should post it to the blog as well as Instagram. Because this Date Sweetened Peach Drizzle is so delicious, it deserves the extended life the blog will give it.
Working with dates always takes me back to the time when I was writing Naturally Sweet Food in Jars. That book contains a whole chapter devoted to preserves sweetened with dried fruits and I relied heavily on dates in that section. If you like that book, this drizzle will speak to you.
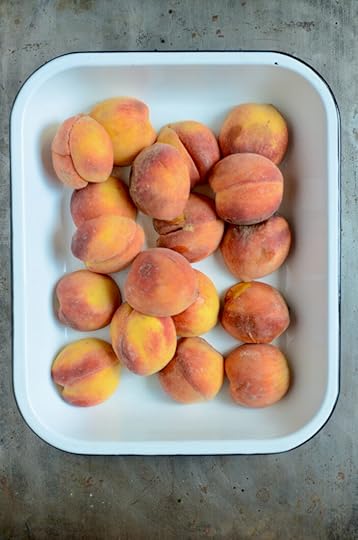
You start by peeling two pounds of peaches. I like do to this by cutting the peaches in half and arranging them in a heatproof baking dish. Then I bring a kettle of water to a boil and pour it over the halved peaches. I let them sit in the hot water for a couple minutes and then drain and rinse. After that, the peels typically lift right off (bruised ones will offer slightly more resistance).
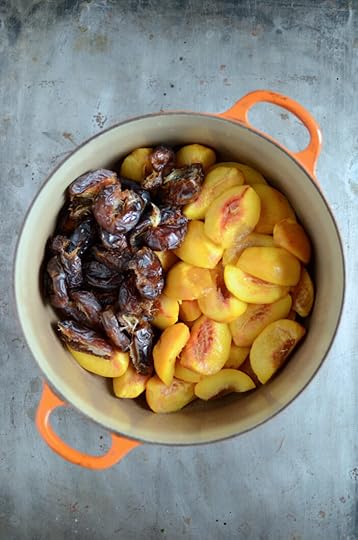
Then you combine the peaches in a pot with a pound of pitted dates and add a cup of water. Place a lid on the pot, place it on the stove, and bring it to a boil. Reduce the heat to medium and cook for 15-20 minutes, until the peaches and dates are completely soft.
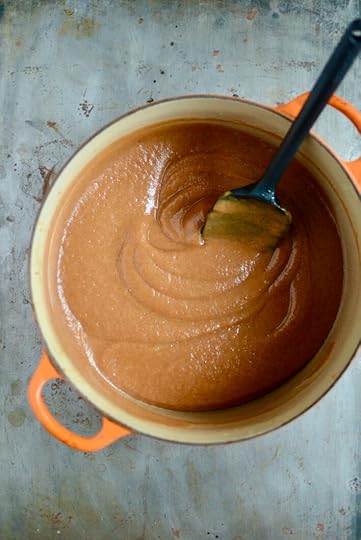
Let the peaches and dates cool for a few minutes and then transfer them to a blender. Puree until smooth. Finally, you return the peach and date puree to the pot and cook over medium-high heat for a few minutes, stirring constantly. The goal is to reduce the drizzle just until there’s no water separating out. Don’t cook it too long or it will lose its peachy hue and drizzleable consistency.

Finally, spoon the finished drizzle into freezer safe containers. Because this preserve has such a high volume of dates, which are lower in acidity, I don’t feel comfortable processing it for shelf stability. Instead, I portion it out into jars or containers that can be frozen. It will keep a couple weeks in the fridge or up to six months in the freezer.
I really love using this one to sweeten my toddlers’ morning yogurt. It’s also great on pancakes, waffles, french toast, Dutch babies, and slabs of cornbread.
And if you like the concept of a fruit drizzle, make sure to check out my Peach Vanilla Drizzle, Pear Vanilla Drizzle, Mixed Stonefruit Drizzle, and Pear Drizzle with Lemon and Ginger.
Yield: 6 half pintsDate Sweetened Peach Drizzle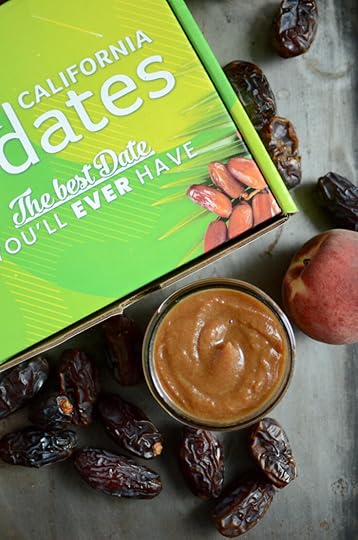 Print
PrintThis date sweetened peach drizzle (thicker than a syrup, thinner than a butter) tastes like peach caramel. It's perfect for spooning over pancakes, waffles, and french toast.
Prep Time15 minutes Cook Time40 minutes Total Time55 minutes Ingredients2 pounds peaches, peeled1 pound dates, pitted1 cup waterInstructionsIn a large pot, combine the peeled peaches, pitted dates, and water. Place the lidded pot on the stove over high heat and bring it to a boil. Reduce the heat to medium and cook for 15-20 minutes, until the peaches and dates are completely soft. When the fruit is soft, let it cool for a few minutes. Then transfer it to a blender container and puree smooth. Return the peach and date puree to the pot and cook over medium-high heat for a few minutes, stirring constantly. The goal is to reduce the drizzle just until there's no water separating out. Spoon the finished drizzle into clean, freezer safe containers. The drizzle will keep a couple weeks in the fridge or up to six months in the freezer. NotesWhen peeling a small volume of peaches, don't use the traditional blanching method. Instead, cut the peaches in half and arrange them in a heatproof baking dish. Bring a kettle of water to a boil and pour it over the halved peaches. Let them sit in the hot water for a couple minutes and then drain and rinse. After that, the peels typically lift right off (bruised ones will offer slightly more resistance).
© Marisa McClellanCategory: butters, sauces, curds
July 16, 2021
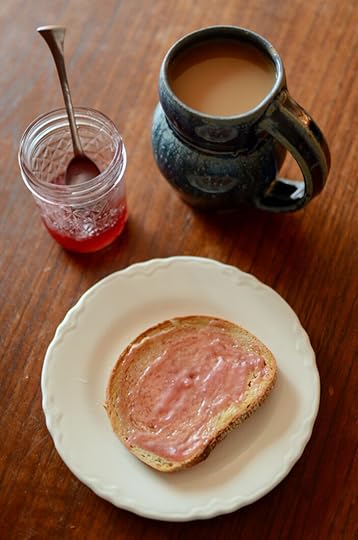
Pomegranate Jelly
This sweet, speedy Pomegranate Jelly can go from conception to canner in less than an hour. It’s perfect recipe for gift baskets and party favors!

This post is sponsored by the makers of Ball® home canning products.
I have a small mental file of recipes that can be made in a flash. These are the recipes I can turn to for gift bags, charity donations, and other moments when I don’t have enough of one particular thing to share with a crowd. Thanks to this Pomegranate Jelly recipe from @ballcanning, that file is now one preserve richer.
Of course, if you have access to an abundant source of inexpensive pomegranates, you can juice them fresh. Sadly, pomegranates are a precious and pricy commodity here in Philadelphia, so I opt for bottled juice instead (that’s what makes this jelly so lightning fast!).
Before you start the jelly (it cooks so quickly that you want everything ready before you being), set up your canning pot. Fit your pot with a rack (I like the silicone mat that comes with the Canning Starter Kit). Place six half pint jars on top of the mat and fill the jars and pot with tap water. Add a generous splash of white vinegar to prevent mineral deposits on your jars, and place the pot on the stove to heat (at this phase, aim for a gentle simmer rather than a rolling boil).
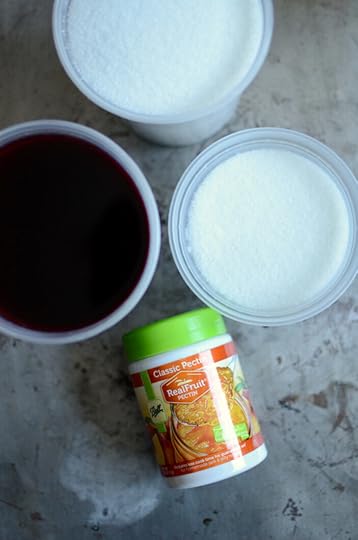
Then, pour 3 1/2 cups of pomegranate juice into a large pot (I used an 8 quart pot to ensure I had plenty of room to contain the foaming) and whisk in 6 tablespoons of Ball® RealFruit Classic Pectin. Bring that to a boil and stream in 5 cups of sugar. Once the sugar is fully incorporated, bring the liquid to a hard boil that you can’t stir down. Then boil for 1 minute.
Remove the pot from the stove and get a hot jar from your prepared canner. Funnel some jelly into the jar, leaving 1/4 inch headspace. Wipe the rim, apply a clean, new lid and a ring and return the jar to the canner. Repeat this process with the remaining jars and jelly.
Process the jelly for 10 minutes, adjusting for altitude if you live above 1,000 feet in elevation. When the time is up, remove the jars from the canner and place them on a wooden board or folded kitchen towel to cool. Let the jars rest undisturbed for at least 12 hours and then check the seals. Sealed jars are shelf stable for up to a year. Any unsealed jars should be refrigerated and used promptly.
Do you have any beloved preserving recipes like this one that can be made quickly and are good for sharing? Tell me about them in the comments!
Disclosure: This is a sponsored post that is part of an ongoing partnership with the Fresh Preserving Division of Newell Brands. They have provided jars, equipment and monetary compensation. All thoughts and opinions expressed remain my own.
Yield: 6 half pintsPomegranate Jelly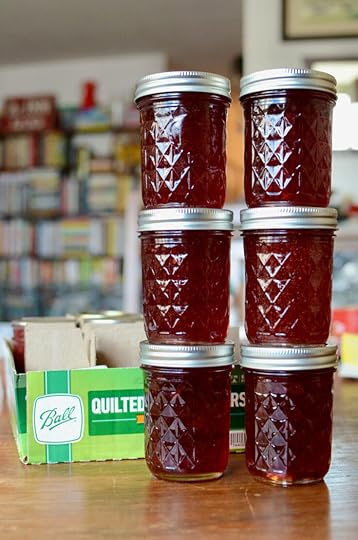 Print
PrintThis super speedy Pomegranate Jelly recipe from Ball® Home Canning is a fast, easy preserve for those times when you need something to round out a gift basket or bag.
Prep Time5 minutes Cook Time15 minutes Additional Time15 minutes Total Time35 minutes Ingredients3-1/2 cups prepared or bottled pomegranate juice (about 7 to 10 large or 2 16-oz bottles)6 Tbsp Ball®RealFruit Classic Pectin 1/2 tsp butter or margarine, optional5 cups sugarInstructionsClick here to visit freshpreserving.com to get the recipe instructions. © Marisa McClellanCategory: jams, jellies, marmalades
July 6, 2021
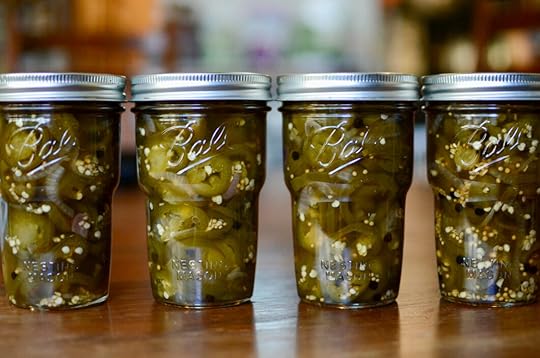
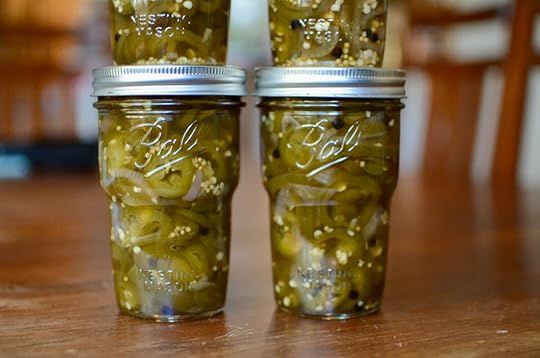
Maple Pickled Jalapeños
These sweet and spicy maple pickled jalapeños add an amazing burst of flavor to tacos, salads, and cheese plates.
This post is sponsored by the makers of Ball® home canning products.
Basic pickled jalapeños have long been on my yearly must-make list. I like having them around for folding into burritos, stirring into chili, and adding to blender salsa. But until recently, I never even considered making a sweet pickled hot pepper. I figured I was covered with my simple, savory pickle. Oh, how wrong I was!
As part of my June assignment for my @ballcanning partnership, I cooked up a batch of Maple Pickled Jalapeños and now, my jalapeño priorities are changed forever. This perfectly balanced pickle is sweet, spicy, tangy, and earthy. It’s the new must-have condiment in my household!

As with any canning project, you start by setting up your canning pot. Fit your favorite canner with a rack and set four pint jars on top. Fill the jars with hot tap water and then fill the pot (doing the jars first ensures they don’t float and clank around). Add a generous splash of white vinegar to prevent mineral deposits on your jars. Put the canner on the stove and bring it to a simmer. Wash four new lids with warm soapy water and set them to air dry. Position four rings nearby.
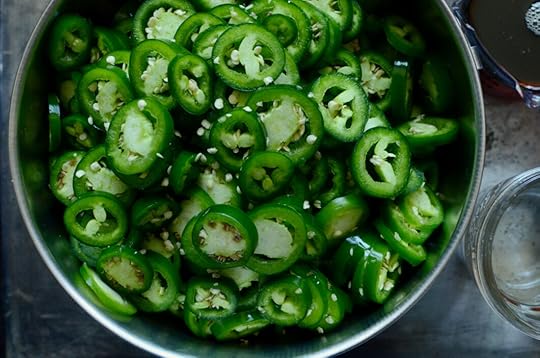
Once the canner is doing its thing, turn your attention to 3 pounds of jalapeños. Wash the peppers well and then clear the sink so anything that has hot pepper residue on it can get washed immediately after use. Pull on a pair of disposable kitchen gloves (I keep a box of these under my sink) to protect your hands from the capsaicin burns.
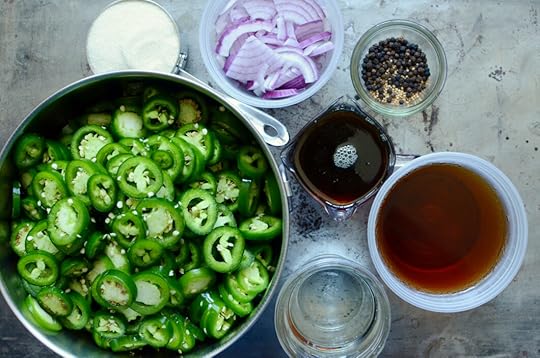
Make sure that you can chop the peppers from start to finish without interruption. I waited to make these until a day when my husband was home and could take the boys out to the park. I didn’t want them anywhere near potential pepper irritation. Finally, slice those peppers into rounds around 1/4 inch thick.
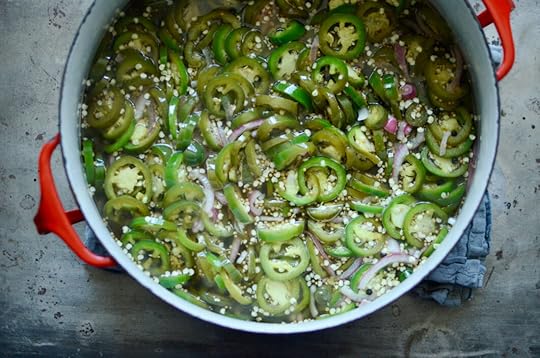
Once your peppers are chopped, it’s time to assemble. Get out a big pot. Add 3 cups of apple cider vinegar, 1 1/2 cups water, 1 cup granulated sugar, 1 cup maple syrup, and salt, mustard seeds, and black pepper corns (click here to get the complete recipe). Bring that to a boil and then add the jalapeño rounds, along with a finely sliced red onion.
Return the liquid to a boil and cook for 5 minutes. Make sure to turn on your kitchen fan and open any nearby windows at this stage, as this pickle puts out a pungent fragrance as it cooks.
Once the cook time is up, remove the pot from the stove. Remove one of your hot jars from the canner and fit it with a wide mouth funnel. Using tongs, fill the jar with the peppers and then ladle the brine in on top, leaving 1/2 inch headspace. Remove any trapped air bubbles from jars and add more brine, if necessary. Wipe the rim, apply the lid and ring, and place the filled jar in the canner. Repeat with the remaining jars.
When all the jars are full, bring the canner to a boil and process for 15 minutes (if you live above 1,000 feet in elevation, make sure to adjust your processing time accordingly). After the processing time is up, turn off the heat, remove the lid, and let the jars cool in the pot for 5 minutes.
Finally, remove the finished jars from the canner and set them on a wooden board or a folded kitchen towel to cool. Let them rest undisturbed for at least 12 hours. When the time is up, check the seals. Any unsealed jars should be refrigerated and used promptly. Sealed jars are shelf stable for up to a year.
Are you a fan of sweet and spicy pickled peppers? Use the comments section to share how you like to eat them!
Disclosure: This is a sponsored post that is part of an ongoing partnership with the Fresh Preserving Division of Newell Brands. They have provided jars, equipment and monetary compensation. All thoughts and opinions expressed remain my own.
May 30, 2021
Berry Jam with the Makers of Ball® Home Canning Products
This flexible recipe for Berry Jam is made with just fruit and sugar. Keep it on hand for any time you have a glut of sweet, summer berries. A single batch fills three pint sized Ball® Nesting Jars perfectly.

I am an ambassador Ball® home canning products.
According to my very informal polling (I asked my Facebook friends), berry jams are among the most highly valued of all the sweet, summer preserves. And I understand why. Flavorful and visually beautiful, they can be used on toast, as a filling in a cake (or as a topping for one!), swirled into yogurt, or as part of an after dinner cheese board. A sealed jar is also the perfect thank you gift for a teacher, neighbor, or gracious hostess.
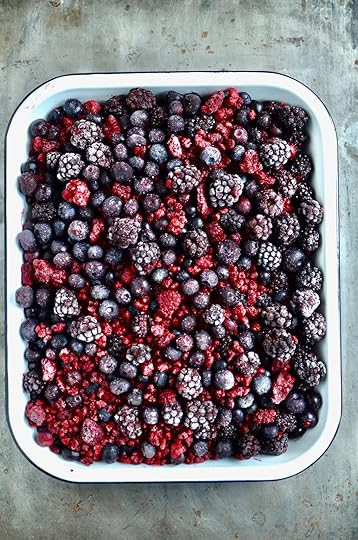
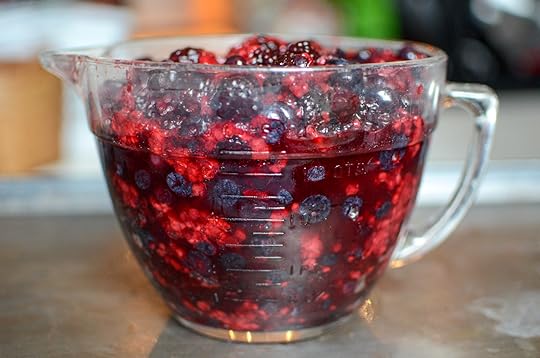
I recently did a bit of a freezer clean-out in preparation for the coming season and unearthed several pounds of frozen blueberries and blackberries that needed to be used. I supplemented my stash with some store bought frozen raspberries and called on this versatile Berry Jam recipe from @ballcanning to transform my motley assortment into shelf stable jam.
This recipe is a classic, long cooking one that doesn’t employ any commercial pectin. Instead, it relies on the fruit’s natural pectin and the ability of sugar to form a gel when heated to 220F. It takes a little more time and attention than jams that are enhanced with pectin, but I love the soft set and fruit-forward flavor you get from this style of jam making.
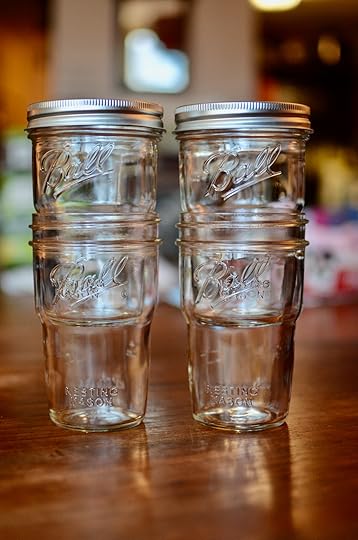
I canned this batch of jam in the new Ball® Nesting Jars. These wide mouth, pint sized jars are designed to stack inside one another when empty (they also fit neatly inside conventional wide mouth pints). This means that they take up less space on the shelf once you’ve eaten their contents. They are sold in boxes of four jars.
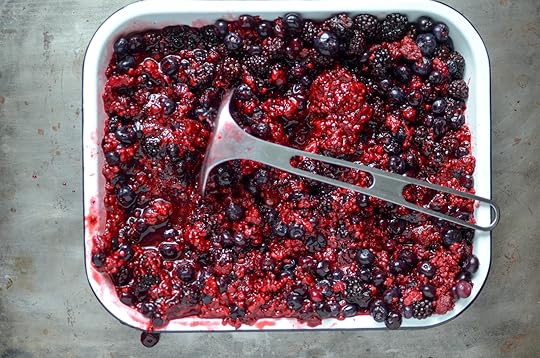
To make this jam, you need 9 cups of crushed berries. This works out to be between 4 and 5 pounds of fruit. If you’re using frozen fruit like I did, begin by letting the fruit defrost most of the way (there should still be some ice crystals present). Once the berries are just soft enough to crush, use a potato masher to break them down in batches. Transfer the crushed berries into a measuring cup, continuing until you have the necessary 9 cups.
If you have any leftover fruit once you’ve got enough for your jam, drape it over vanilla ice cream. It’s the right thing to do.
Once you have sufficient crushed fruit, scrape it into a large, nonreactive pot. Opt for the widest vessel you have that meets that description. Because this jam depends on an extended boiling period to create its set, more surface area is better. It allows the water to cook off more efficiently and the jam will reduce more rapidly. In turn, that will allow the sugars to concentrate and start elevating the temperature towards the set point.
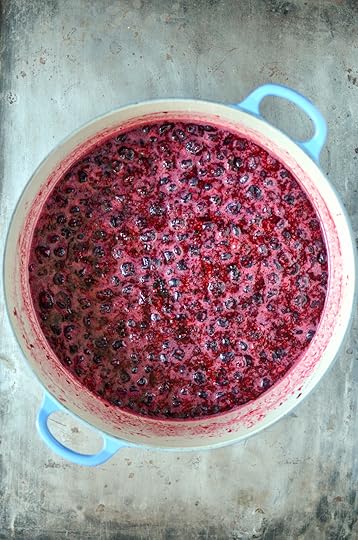
Add six cups of sugar and stir to combine. Place the pot on the stove and bring it to a boil, stirring often. Once it reaches a hard boil, keep cooking and continue to stir regularly. As the jam approaches the set point, it will start to look more viscous. The personality of the bubbles will change. The fruit will begin splattering your stovetop. It will start coating the walls of the pot thickly. And the total volume will have reduced by at least a third.
You can also look at how the droplets fall off your spoon to see if you’re getting close to the set point. Stir vigorously and then hold your utensil up over the pot. Watch how the jam falls off the spoon and back into the pot. If the droplets begin to form thick bases and move slowly as they drop, it’s another good sign that the jam has thickened.
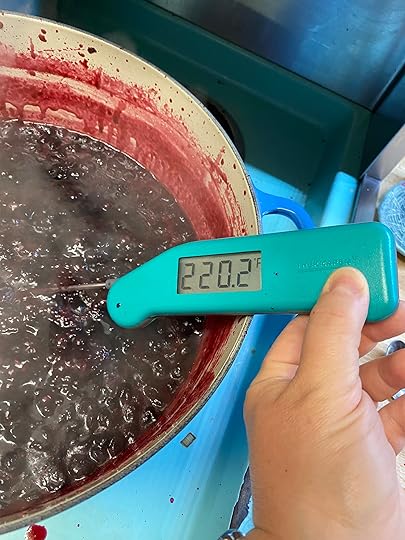
Once I notice a few of these signs of set, I pull out my instant thermometer and take a reading. In this case, it immediately reached the necessary temperature. All told, once my pot reached 220F, it took 25 minutes of hard boiling to get to this point.
If you’re new to using a thermometer to check for the set point, I highly recommend that you read through this post before you begin. It will help you avoid the common pitfalls that occur with thermometers.
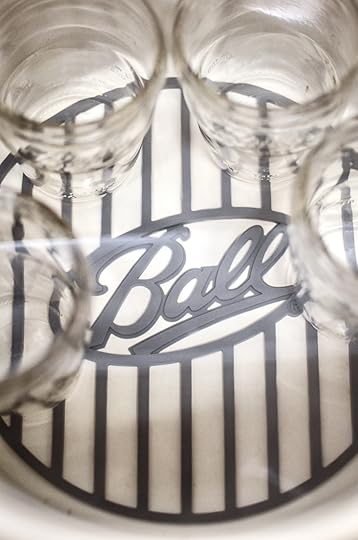
While your fruit and sugar cook down, set up your canning pot. Fit your pot with a rack (I like the silicone mat that comes with the Canning Starter Kit [NEED LINK]). Place four pint jars on top of the mat (this recipe should yield at least three pints, but sometimes produces four, so it’s better to be prepared than have to hurriedly warm another jar) and fill the jars and pot with tap water. Add a generous splash of white vinegar to prevent mineral deposits on your jars, and place the pot on the stove to heat.
Wash your new lids and rings with warm, soapy water and set them aside so that they’re ready for you when you’re ready for them.
When the jam is finished cooking, remove the pot from the heat. Take one jar from your canner. Place it on a wooden board or towel-lined countertop and fit it with a wide mouth canning funnel. Fill the jar with jam, leaving 1/4 inch headspace. Wipe the rim with a damp cloth and fit the jar with one of your clean lids. Secure the lid in place with a ring, taking care to not overtighten.
Place the filled jar into the canner and repeat the process with the next, until all the jars are filled. Process the jars for 15 minutes, adjusting for altitude if you live above 1,000 feet in elevation.
When the processing time is up, turn off the heat, remove the lid from the pot and let the jars stand in the pot for an additional five minutes (this allows them to cool more gradually, which helps prevent siphoning and should also help develop a more robust seal).
Remove the jars from the canner and set them on a folded kitchen towel. Let them sit undisturbed for 12-24 hours so they can fully cool and seal. Before storing, make sure to check that the seals are firm and unbending.
The finished jam is brightly flavored and perfectly spreadable. As we move through the season, I’ll make this same recipe three or four more times, with different combinations of berries. If you live in a place where wild blackberries grow in abundance, it’s a really good one remember. And if those berries are too seedy for you, sieve the pulp to remove the seeds and proceed with the recipe with the seedless pulp.
What combination of berries most speaks to you?
Disclosure: This is a sponsored post that is part of an ongoing partnership with the Fresh Preserving Division of Newell Brands. They have provided jars, equipment and monetary compensation. All thoughts and opinions expressed remain my own.
Yield: 3-4 pintsBerry Jam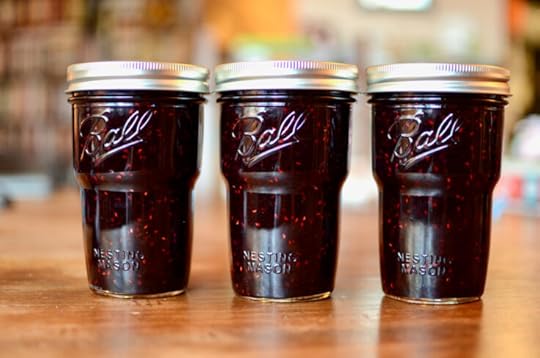 Print
PrintThis classic, long-cooked berry jam uses just fruit and sugar for a sweet, fruit-forward spread that is great on toast, in yogurt, or as a cake filling.
Prep Time10 minutes Cook Time40 minutes Additional Time20 minutes Total Time1 hour 10 minutes Ingredients9 cups crushed berries (4-5 pounds)6 cups sugarInstructionsPREP: Wash berries under cold running water, drain. Coarsely crush berries one layer at a time using a potato masher. Measure 9 cups of crushed berries. COOK: Combine crushed berries and sugar in a larger saucepan. Bring mixture slowly to a boil, stirring until sugar dissolves. Increase heat to medium-high and cook rapidly to gelling point (220F), stirring to prevent sticking. Remove from heat. Skim off foam if necessary. FILL: Ladle hot jam into a hot jar, leaving 1/4-inch headspace. Remove air bubbles. Clean jar rim. Center lid of jar and adjust band to fingertip-tight. Place jar in hot canner and repeat until all jars are filled. PROCESS: Ensure jars are covered by at least 1 inch of water. Adjust heat to medium-high, cover canner and bring water to a rolling boil. Process half-pint or pint jars 15 minutes. Turn off heat and remove cover. Let jars cool 5 minutes. Remove jars from canner; do not retighten bands if loose. Cool 12 hours. Check seals. Label and store jars. NotesThis jam can be made with a one or many types of berries. The best varieties to choose from include blackberry, blueberry, boysenberry, dewberry, gooseberry, loganberry, raspberry, and youngberry.
© Marisa McClellanCategory: jams, jellies, marmalades
May 25, 2021
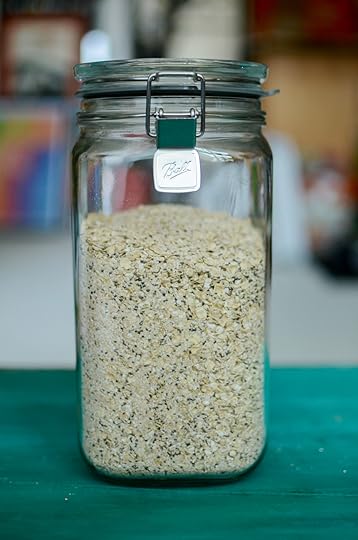
Homemade Instant Oatmeal in Ball® Storage Latch Jars
Homemade instant oatmeal is a quick, simple breakfast that the whole family can make and enjoy. One batch stashes perfectly in a large Ball® Storage Latch Jar.
I am a Ball® Home Canning Ambassador and this post is sponsored by the makers of Ball® home canning products.
I became an instant oat convert when my twins were newborns. My husband was back at work after 6 weeks of parental leave and I was on my own with two tiny, attention-hungry infants. In the mornings, I typically had about ten minutes to make myself breakfast after their morning feedings and diaper changes and before they’d need to go down for their morning nap (which they preferred to take on my body).
It was just enough time boil a kettle, rip open a couple packets of instant oats, and make a big mug of black tea. If I was lucky, I’d also be able to slice an apple. I’d carry my speedy meal back to the couch, where I’d settle myself back into my giant breast feeding pillow, position the boys on either side and eat my meal while they nursed and then snoozed.
These days, my twins are nearly two, but I still depend on instant oats for quick morning meals. Instead of tearing open a packet, I mix up large batches using quick cooking oats, homemade oat flour, chia seeds, maple sugar, and cinnamon. It replicates the flavor of store bought maple cinnamon oats, but for far less money and less packaging too!
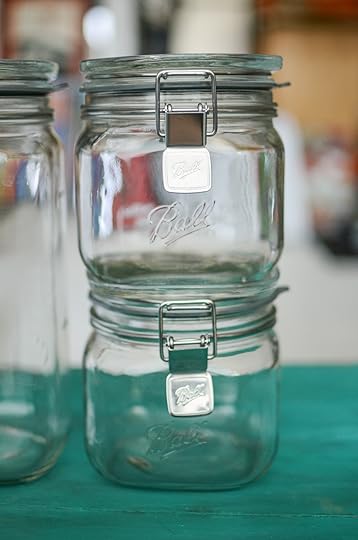
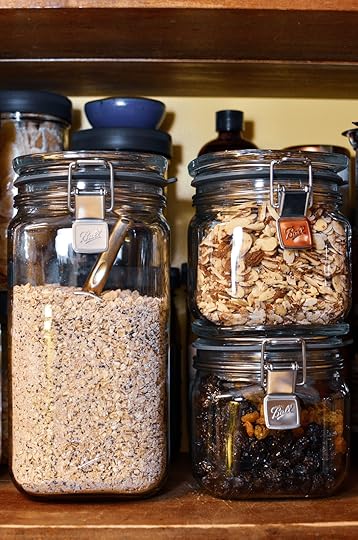
I’ve taken to keeping my homemade instant oats in one of the new Ball® Storage Latch Jars. I use the large jar, which holds 9.9 cups. My batch makes just over 8 cups of oats, which means that this jar holds it all, with room to spare for a scoop for easy portioning. These fab, stackable jars also come in a smaller version, which holds 4 cups. I’m currently using two of those to hold the raisins and sliced almonds that I put on top of my oats. With the tea kettle close by, it becomes a really handy one-stop breakfast bar.

These oats are really easy to make. You start by putting 2 1/4 cups of rolled oats into the blender. Then you blend until they break down into flour. I don’t just use this trick for instant oats. I make oat flour all the time to use in quick breads and little cakes. It’s a great way to affordably and easily incorporate whole grains into your diet (this Maple Sweetened Banana Oat Cake is one such example!).
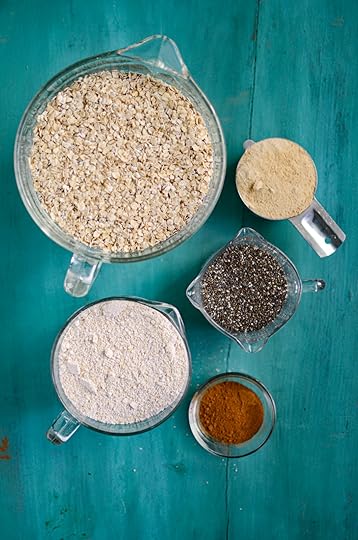
Then you need about four cups of quick cooking oats. I typically buy these rather than trying to make them. If you’re not shopping in the bulk section, this is typically a whole grocery store canister of quick oats.
In addition to the oats and oat flour, you need 3/4 cups chia seeds, 1/2 cup maple sugar (cane or brown sugar also works, you just won’t get the flavor of maple in the oats), and 1 tablespoon cinnamon.
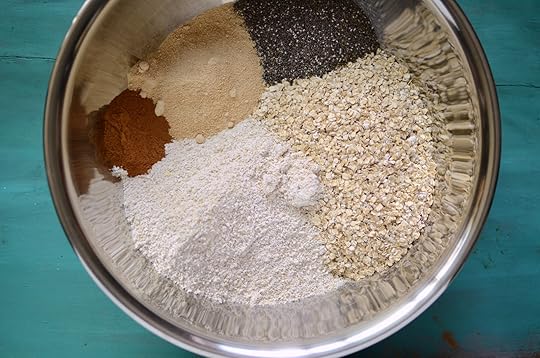
Place all the ingredients in a large bowl and use your largest whisk to combine. Of course, you can vary up the spices and sweetener level to satisfy your own taste preferences. I’ve also made this with vanilla powder and pumpkin pie spice, which are both quite delicious.
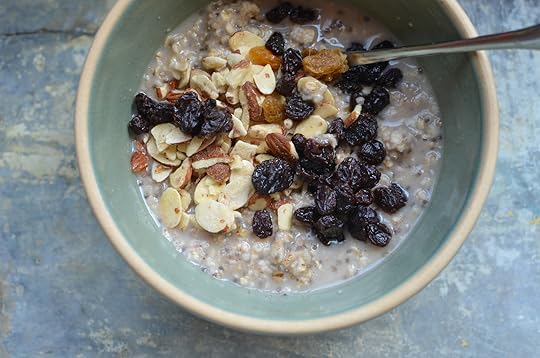
To make the oats, I portion a scant half cup of the instant oat mixture into a heatproof bowl and top it with a cup of boiling water. I put a sandwich plate on top of the bowl to trap the heat and set a timer for five minutes. When the time is up, the oats are ready to eat. I like to stir in a little milk and top my bowl with sliced almonds and raisins. Once the summer berries and stone fruit start, I’ll swap those in for the raisins.
For those of you looking to use up your homemade preserves, you can always swirl in a spoonful or two of apple butter, strawberry jam, or a chunkier compote. It’s your bowl, so be creative!
How would you use a set of these Ball® Storage Latch Jars? Would you stash your oats in them too? Or would they serve a different purpose in your kitchen?
Disclosure: This is a sponsored post that is part of an ongoing partnership with the Fresh Preserving Division of Newell Brands. They have provided jars, equipment and monetary compensation. All thoughts and opinions expressed remain my own.
Yield: 16 servingsHomemade Instant Oatmeal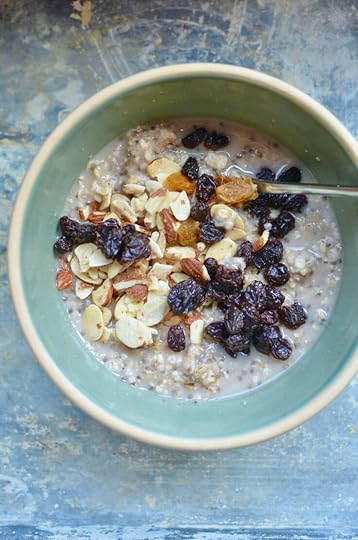 Print
PrintThis homemade instant oatmeal is a quick, filling, and tasty way to make quick work of your morning meal!
Prep Time10 minutes Cook Time5 minutes Total Time15 minutes Ingredients4 cups quick cooking oats2 1/4 cup rolled oats3/4 cup chia seeds1/2 cup maple sugar (cane or brown sugar are also fine)1 tablespoon cinnamonInstructionsMeasure out the quick oats and place them in a large bowl. Grind the rolled oats into flour in a blender container and add them to the quick oats. Add the chia seeds, sugar, and cinnamon. Whisk to fully combine all the ingredients. Place in a large storage jar or container, like the Ball® Latch Storage Jar. To serve, place 1/2 cup of the oat mixture in a heatproof bowl. Pour 1 cup of boiling water on top. Cover with a small plate and let the oats stand for five minutes. When the time is up, serve with milk, dried fruit, and nuts. NotesIf you prefer, you can also prepare these oats in the microwave. Use 1 cup of cold water for every 1/2 cup of oat mixture, and microwave on medium power for 2 1/2 to 3 minutes. Let the oats stand for five minutes before serving.
© Marisa McClellan
May 12, 2021
Hibiscus Syrup + 2021 Ball® Home Canning Ambassador
This post is sponsored by Ball® Home Canning presented by Newell Brands.
[image error]Hello friends! It’s been ages since I’ve been able to make my way to this space in any real way. The double whammy of new parenthood and pandemic really threw me and for a long stretch of time, I felt like I forgot how to string words together in any kind of meaningful pattern. My recipe development skills went soft (I can’t tell you the last time I canned anything). To be perfectly honest, I felt more than a little lost.
But now, we’re at the start of another canning season and I can’t bear to let this one go by in the same fog I felt last year. And so, here I am. Kicking things off with a simple little recipe for hibiscus syrup to celebrate the fact that I’m here and that I’m an @ballcanning ambassador again this season (there’s nothing like a well-aligned partnership to keep me present and creative).
Twice a month for the rest of the year, I’ll be sharing recipes, ideas, and new products from Ball® Home Canning presented by Newell Brands.
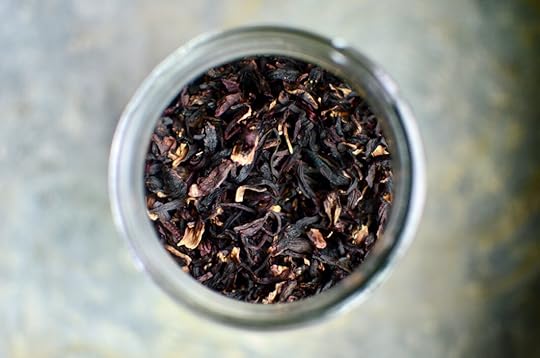
[image error]So let’s talk about hibiscus syrup. I have long been in the habit of keeping dried hibiscus flowers in my pantry to make various teas and infusions (they also add welcome color and brightness to this rhubarb jam). They keep indefinitely (I like to store them in the Ball® Amber Jars, to help extend their life even longer), aren’t particularly expensive (a pound will cost between $10-20, depending on the source) and are always ready to transform into a ruby-hued liquid.
Once the days turn warmer, I find that I like to have a homemade syrup or two in the fridge, to give a little flavor to my quart jar of fizzy water. As fresh fruit comes into season, I’ll use whatever is available, but right now, I’m turning to my stash of dried hibiscus flowers to give my water some pep.
The process could not be simpler. Working by volume, combine one part hibiscus flowers, two parts granulated sugar, and two parts water in a saucepan. Bring it to a boil, simmer for five minutes, let cool, and strain. For this most recent batch, I used one cup of hibiscus, and two cups each sugar and water and had just enough to fill a single Ball® Flute Pint Jar. Now, I know that this feels like a lot of sugar, but because the flavor and sweetness are so concentrated, a little will go a very long way.
Once your syrup is made, you can use it like I do in sparkling water (just a teaspoon or two in a Ball® Pint & Half Jar of water does the trick for me). It’s also tasty drizzled over berries that need a little lift or as the sweetener in a batch of lemonade. It’s also a good thing to have on hand if you like to have an homemade cocktail. I’d love to hear how you’d use it!
Though hibiscus is naturally high in vitamin C, this is not a recipe that has been tested for safe canning. Make it in small batches and keep it in the refrigerator.
Disclosure: This is a sponsored post that is part of an ongoing partnership with Ball® Home Canning presented by Newell Brands . They have provided jars, equipment and monetary compensation. All thoughts and opinions expressed remain my own.
[image error]Related Posts:Sprouted Lentils with Ball® Home Canning presented by Newell BrandsProudly Homemade Antipasto Relish from Ball® Fresh PreservingInternational Can-It-Forward Day and Curried Fruit Compote from the Ball Blue Book

