
Marisa McClellan's Blog, page 56
September 15, 2016
Nectarine Conserve with Lemon, Raisins and Walnuts
This nectarine conserve features thin slices of whole lemon, plump golden raisins, and toasted walnuts. Add it to your next cheeseboard!

I firmly believe that conserves are poised for a resurgence in popularity. Much like how old fashioned names are all the rage with today’s parents, conserves represent a bygone age of preserving that is ripe for renewal. Truly, their time has come!

For those of you not in the know, conserves are typically defined as a soft set jam, with the addition of dried fruit, citrus peel, or nuts. They are good alongside various cheeses, they can enhance cold roast chicken, and they’re delicious stirred into bowls of oatmeal or other warm grain cereals.

This particular nectarine conserve was made with some of the fruit that the nice folks from the Washington State Fruit Commission sent me back in August. I realize that waiting this long to share this recipe puts us at the outer edge of nectarine season, but I did spot some at my local farmers market last weekend, so there are still a few to be had (in a pinch, frozen peaches would also work here).

Like so many of my recipes, this nectarine conserve uses as little sugar as seems reasonable, and tries to be as no-nonsense as possible. I left it relatively unspiced, but next time around, I might add a little freshly grated ginger, or a teaspoon of cinnamon. You can, of course, spice it to your heart’s content.

Finally, if stonefruit is well and truly gone in your area, consider making this very same recipe with just-ripe pears. The finished preserve won’t have the same vibrancy of color, but will still be quite tasty.
PrintNectarine Conserve with Lemon, Raisins and Walnuts
Yield: makes 8 half pint jars
Ingredients
4 pounds yellow nectarines2 lemons (orangic, if you can find them)
2 cups granulated sugar
1 1/2 cups golden raisins
2 tablespoons bottled lemon juice
1 cup walnuts, toasted and roughly chopped
Instructions
Prepare a boiling water bath canner and 8 half pint jars.Cut the nectarines into thin slices and place in a large, non-reactive pot.
Wash the lemons with warm, soapy water. Cut them in half and cut the halves into paper-thin half moons (poking out seeds as you slice). Add the lemon slices to the pot.
Add the sugar to the nectarines and lemons and stir to combine. Let it sit for 15 or 20 minutes, until the sugar has dissolved and the fruit is juicy.
Stir in the raisins and the lemon juice and set the pot on the stove over high heat. Bring to a boil and then reduce the heat to medium-high.
Cook, stirring regularly, until the conserve has thickened and reduced by about a third.
Near the end of cooking, stir in the walnuts.
When you're happy with the consistency of the conserve, remove the pot from the heat.
Funnel the conserve into the prepared jars. Wipe the rims, apply the lids and rings, and process in a boiling water bath canner for 15 minutes.
When the time is up, remove the jars and set them on a folded kitchen towel to cool. When the jars have cooled enough that you can comfortable handle them, check the seals. Sealed jars can be stored at room temperature for up to a year. Any unsealed jars should be refrigerated and used promptly.
3.1http://foodinjars.com/2016/09/nectarine-conserve-lemon-raisins-walnuts/
Related Posts:
Peach Habanero Hot Sauce
Honey Sweetened Gingery Peach Butter
Honey-Sweetened Roasted Nectarine Compote


September 14, 2016
Cooking Dinner with Blue Apron
Today’s post is sponsored by Blue Apron.

I live in an apartment in the middle of Center City Philadelphia, surrounded by restaurants of all stripes. And despite the fact I live in the midst of this edible bounty, I cook dinner at home most nights.
My reasons for cooking at home are many. It’s far more affordable that getting takeout every night. It’s often vastly more delicious (at least most of the time). And both Scott and I feel better when we eat food cooked at home.

However, I often find myself tumbling into home cooking ruts. No matter what I make, my food ends up tasting like my food. In the past, I’ve used cookbooks to help me out of these ruts. The only trouble there is that during particularly busy weeks, that can take more planning and careful shopping than I have time for.
Happily, I’ve discovered a new way to shake up my home cooking routine. Enter Blue Apron. Their chef-designed meal kits are the perfect way to breathe fresh inspiration into my kitchen routine.

My first encounter with Blue Apron was back in June, when they sponsored my husband’s podcast. Because he needed to share his experience with the meals, he did the cooking that week. Thanks to the easy-to-follow recipe cards, he was easily able to turn out a series of three seriously delicious dinners.
What’s more, I liked what he cooked so much that I ended up incorporating some of the techniques and flavor combinations into my own culinary skill-set.

More recently, the folks at Blue Apron approached me about a sponsored post. Having had such a positive experience with the food when Scott did it, I said sure. I had the meals sent to my sister’s house in Austin, Texas, to coincide with the week when I would be there visiting.

My thinking was that it would be an easy way to for me to cook for my sister and her family, and I hoped that by choosing the family portions (you can either get three meals that serve two, or two meals that serve four), we’d wind up things that my picky nephews would eat and enjoy.

Most of my hopes came true. Having the box sent to my sister’s house was a huge win when it came to being a good houseguest. The pre-portioned ingredients made life incredibly easy, the quality of the food was fantastic, and the adults in the house all really enjoyed the two meals I cooked. My sister and brother-in-law also appreciated having a break from kitchen duty.

Sadly, as excited as the little boys were when it came to unpacking the well-insulated box of food, they were not at all interested in the Lamb and Beef Feta Burgers when it came time to eat (though the two-year-old did end up absconding with one of the potato buns).
Thankfully, the Crispy Chicken Tenders and Roasted Potatoes were a bigger success with the pre-school set. No matter the response from Emmett and Benny, I still feel like it was a resounding success.

Blue Apron isn’t something I will use all the time. But it’s such a useful tool during busy weeks, when I need a little fresh inspiration in the kitchen, or when I want to be a helpful and considerate houseguest.
I plan on keeping my account open and occasionally dropping in to check out their new recipes. Perhaps I’ll treat myself to another box around the holidays, when baking for gifts takes over my culinary imagination!

If you’re intrigued by my experience with Blue Apron, they’ve got an offer for you, too! The first twenty readers to use this link to sign up for the service will get three meals for free on their first Blue Apron order. Oh, and if you want to take a peek at more of the possible meals you’ll get from Blue Apron, check out their recipe page.
Disclosure: This post is sponsored by Blue Apron. They sent me a Family Plan box, containing two meals for four people. They’ve also compensated me for my time and attention. However, all thoughts and opinions expressed are entirely mine.
Related Posts:
Sponsored Post: Durable Mesh Produce Bags from the MightyFix
Sponsored Post: A Lifefactory Deal from MightyNest’s MightyFix
Veggie Mac & Cheese
September 12, 2016
Giveaway: Kefirko and Rocky Mountain Water Kefir Grains from Masontops
Looking to get started making your own fizzy, probiotic beverages at home? Try starting with water kefir, using the Kefirko and grains from Rocky Mountain Kefir. They make super easy!

I was first introduced to water kefir three or four years ago, at one of our Philly Food Swaps. One of my fellow swappers included several sets of grains in their collection of swappable goods. She told me they were easy to use and produced a fizzy, pro-biotic beverage that she liked better than kombucha. At the end of the night, one of those jars of water kefir grains went home with me.

I’d like to tell you that I still have grains from that food swap, but sadly, that would be false. I did end up making my own water kefir for a period of months after that initial introduction and liked it very much. Sadly, they ended up getting shoved to the back of the fridge and then thrown out during a no-holds-barred cleaning spree.

Happily, thanks to my friends at Masontops, I’m back making my own water kefir and am delighted with it once again. Several weeks ago, they sent me a set of their Rocky Mountain Water Kefir grains. Using my trusty Kefirko (Masontops sells this useful devise, though I bought mine during the Kefirko Kickstarter nearly two years ago), it is incredibly easy to hydrate dried water kefir grains and then keep them happy and productive.

In order to start making water kefir, you need a set of grains, four cups of filtered water, 1/4 cup of sugar, and a vessel like a Kefirko in which to combine them all (if you don’t have a Kefirko, a quart-sized mason jar will also work).

First, you dissolve the sugar into the water. You can do this by heating it and then bringing it back down to room temperature. Or a couple hours before you want to start your kefir, add the sugar to the water and stir it vigorously. Come back and give it a good stir every half hour or so. The sugar will eventually dissolve into the water.

Put the dried water kefir grains into the bottom of your vessel and add the sugar water. If you’re using a Kefirko, screw the lid down loosely, so that there’s still a bit of air flow. If you’re using a mason jar, put a small kitchen towel, paper towel, or coffee filter on top of the jar and use a rubber band to keep it in place.
Let the grains spend three or four days rehydrating before you try to use them.

Once the grains are nice and plump, they are ready to use. Drain off the initial liquid (this is super easy using a Kefirko. If you don’t have one, make sure to use a nylon mesh strainer rather than a metal one, as the grains aren’t fans of metal). Then mix up another batch of sugar water and add it to the grains.

I typically let my batches of water kefir ferment for two days (though I let it go for a little less during really hot weather) before straining the grains and starting another batch. Sometimes I drink it plain and chilled for a light, fizzy pro-biotic drink (and despite what you might think, it’s not super sweet. The sugar serves as a food source for the grains that is transformed into the bright, tangy element in the water).
Other times, I do a second ferment, in which I combine the water kefir with chopped fruit, or even a bit of plain fruit juice. Either way, it’s refreshing and good for the gut!

This week, thanks to my friends at Masontops, I’m giving away a Kefirko Home Kefir Making Kit along with a set of Rocky Mountain Kefir Water Kefir Grains. Use the widget below to enter!
a Rafflecopter giveaway
Related Posts:
Giveaway: Deluxe Fermenting Tool Set From Masontops
Pickle Pipe Waterless Fermentation System Launches Today!
Giveaway: Pickle Packer and Pebbles from Masontops
Upcoming California Events: Pacific Grove! Healdsburg! San Francisco! Oakland!

Hello canners! On Wednesday, I’m hitting the road for the final big push of my Naturally Sweet Food in Jars book tour! This last flurry of events is taking place in California. If you live in or around one of the towns or cities I’ll be visiting, please mark your calendars and tell your friends!
Thursday, September 15 (Pacific Grove)
I’m kicking this trip off with a demonstration-style canning class at Happy Girl Kitchen (173 Central Avenue). I’ll show you how to make my strawberry cocoa jam, which is sweetened with coconut sugar and is set with Pomona’s Pectin and will talk about using natural sweeteners in canning. The event is from 6:30-8:30 pm and costs $35 (that free includes a copy of my new book). Sign up here.
Saturday, September 17 (Healdsburg)
Next, you’ll find me up north in Somona County, offering a hands-on canning workshop at the Shed Grange in Healdsburg (25 North Street). This workshop is from 1-3 pm and costs $60. Students will go home with a jar of preserves and a coupon for 10% off of SHED purchases. Register here.
Sunday, September 18 (San Francisco)
I’ll be at the Fort Mason Farmers Market (2 Marina Boulevard) from 10 am to 1 pm. The plan is that I will do a jam making demonstration every hour, on the hour, starting at 10 am. I’ll also samples of jam on hand for tasting, as well as books for sale and signature. Free!
Monday, September 19 (Fremont)
You’ll find me at The Nursery at Dale Hardware (3700 Thornton Avenue) at 6:30 pm. I’ll make a batch of jam and will offer plenty of time for questions (so come prepared with your quandries). Sign up by calling 510-797-3700. Free!
Tuesday, September 20 (San Francisco)
I’ll be at the San Francisco Public Library (100 Larkin Street), in the Latino/Hispanic Rooms A&B from 6-7:30 pm. I’ll demonstrate how to make a small batch of naturally sweetened jam and will have books on hand for sale and signature.
Wednesday, September 21 (Oakland)
The last stop on my California tour is a demo-style class and book signing at Pollinate Farm & Garden (2727 Fruitvale Avenue) from 6:30-8:30 pm. $17.50. Sign up here.
Related Posts:
Upcoming Events: Fayetteville, Atlanta, and Nashville!
Upcoming Events: New York! The Berkshires! Fayetteville! Atlanta! Nashville!
Upcoming Events: Headhouse Square! New York! Arkansas! Atlanta!
September 11, 2016
Links: Fridge Pickles, Muscadine Jam, and a Winner

It’s been something of a rough week over here at Food in Jars HQ (plus, there’s the general heaviness of today’s date). I got home from Nashville on Wednesday afternoon, just barely recovered from food poisoning and promptly came down with a cold. I think my non-stop summer is starting to catch up with me. I’ve got just one last trip to get through (California! I’m headed your way later this week!), and then things will quiet down a bit. As much as I love the teaching, demonstrations, and book signings, I’m ready for a break!
Easy garlic dills.
Sweet fridge pickles.
Muscadine jam.
Canning crushed tomatoes.
Slow cooker tomato pie.
Jam filled doughnuts.
Jam and almond cream tarts.
Concord grape cornmeal cake.
Forget conventional wisdom and salt your bean water.
Debunking canning myths.

The winner of the Fillmore Container giveaway is Jessica A. Stay tuned, another giveaway coming up tomorrow!
Related Posts:
Links: Cherries, Chick Pea Crackers, and Winners
Links: Strawberries, Pickled Cherries, and Links
Links: Plums, Gingersnap Granola, and a Winner
September 5, 2016
Links: Peach Butter, Pickled Okra, and Winners

I think I’m finally coming to accept that I can’t do everything all the time. I’ve been away from home for the last week and a half, and while I had grand plans to post in this space every day, I just couldn’t make it happen. There have been canning demos, time with my sister and her family, more travel, more demos, and then a wicked 24 hour bout of food poisoning keeping me away.
I’m currently in Atlanta, recuperating under the watchful eye of Lyn from Preserving Now. Tomorrow, I’m headed to Nashville for a class at the Green Door Gourmet (I will be completely recovered by then).
Tomato and fig jam.
Rum thyme peach butter.
Boozy blackberry kumquat jam.
On preserving peaches.
How to make jam in the microwave.
OXO published a handy guide to quick pickling (I offered them a little of my pickle wisdom).
On pickling beans.
Pickled smOkra.
Tarragon dill okra pickles.
Ten ways to use sauerkraut.
The days of small batches.
Jam crumble squares.
Savory granola bars.
Atlanta is getting a Learning Kitchen, which will offer classes devoted to canning, pickling, fermenting, bread baking, and home cooking. Check out the Indiegogo campaign here!

I never officially announced the winner of the freshTECH HarvestPro Sauce Maker from a couple weeks back. That person is Allison W. I will be in touch soon! And don’t forget, the Fillmore Container giveaway is still going on. You can enter here!
Related Posts:
Links: Roasted Carrots, Rhubarb, and a Winner
Links: Crabapples, Salsa, and Winners
Links: Kimchi, Cherries, and Winners
September 2, 2016
September Sponsors: Cuppow, Fillmore Container, EcoJarz, iLids, MightyNest, and more!

It’s the beginning of September, which means it’s time to thank the companies that help make Food in Jars possible! Tell them you appreciate their support of my work with a purchase or a social follow!
In the top spot our friends at Cuppow. They are the creator of the original mason jar travel mug topper and the BNTO, a small plastic cup that transforms a canning jar into a snack or lunch box. Parents and kids love their EIO set, with its grippy silicone sleeve and a lid that makes for easy sipping.
Lancaster, PA-based and family-owned Fillmore Container are next! They sell all manner of canning jars, lids, and other preservation gear. I’m currently running a giveaway of their 26 ounce square sided jars and a $50 credit to spend on the site, so make sure to enter!
After some time away, our friends over at EcoJarz are as a sponsor. They make an array of products designed to fit on top of mason jars, and they just released their PopTop lids in a regular mouth size. They also make stainless steel rings for both regular and wide mouth jars, and if you buy 10 or more, they’ll discount the price by 40%.
iLids is a Seattle-based small business that makes both storage and drink lids in both regular and wide mouth sizes for mason jars. Their storage lids are water tight and the drink lids can accommodate a straw. Best of all, their lids come in a whole bunch of different colors, so there’s something for everyone!
MightyNest is an amazing resource for non-toxic, natural, and organic products for homes and families. I’m a big fan of the MightyFix, their monthly product subscription program. For $10 a month, you’ll get a item for your home that will help you keep it greener and more sustainable!
Our friends at Mrs. Wages are on the roster again this month. They make pectin, vinegar, and more canning mixes than I can count. Their website is an incredible preserving resource and I can’t say enough good things about their salsa mix. If you need a little help getting your produce into jars, remember to seek out their products!
Orchard Road makes mason jars, lids, and rings for home canners. Their jars are sold in packs of six and come in sturdy boxes that can be used for storage. Orchard Road’s physical distribution is limited, but their online store is open for business, so you can now order them straight from the source.
Mason Jar Lifestyle is a one-stop shopping site for all the jar lovers out there. They sell all manner of mason jar accessories and adaptors. If you’re in the market for lids, straws, and cozies to transform your mason jars into travel mugs, make sure to check them out!
If your company or small business is interested in becoming a sponsor, you can find more details here. I offer discounts for multiple month purchases and am always happy to work with your budget. Leave a comment on this post or drop me a note to learn more!
Related Posts:
September Sponsors: Cuppow, iLids, Mason Jar reCAP, Fillmore Container, and More!
September Sponsors: Cuppow, Fillmore Container, Orchard Road, Felix Doolittle, Spice Ratchet, and More!
September Sponsors: Cuppow, Fillmore Container, and Preserving Now
August 31, 2016
Tomato Soup Concentrate for Canning
Having a stash of homemade tomato soup concentrate in your pantry is like doing a favor for your future self. Portioning it out in 26 ounce jars from Fillmore Container makes it look extra snazzy!
My tomato preservation approach is one that is forever evolving. I make a point of trying at least one new-to-me tomato recipe to each season, always hoping that I’ll discover something particularly delicious and worthy of my time, resources, and shelf space.

This year, there were two experimental recipes. The first was this barbecue sauce (which is quite delicious, but probably won’t be something I make every single year). The second is the tomato soup concentrate that I’m sharing today. I’m already hoping that when I get home from the trip I’m currently on (I’ve been away for a week, which accounts for the blog silence), I’ll be able to get enough tomatoes to make another batch.

Recipes for tomato soup concentrates that are safe for the boiling water bath canner aren’t always easy to find. I did a lot of reading and worked out more math problems than is typically required for a basic canning recipe in order to bring this to you today. I built my recipe upon the framework laid out in the National Center for Home Food Preservation’s water bath safe Tomato and Vegetable Juice recipe.

The thing in that recipe that made everyone here possible is the fact that it specifies that, “Not more than 3 cups of other vegetables may be added for each 22 pounds of tomatoes.” Taking my cue from there, I used 15 pounds of tomatoes, and a scant two cups of diced onions. I felt comfortable doing that, because I was keeping to their approach while reducing the batch size by one-third.

From there, it was a matter of chopping the tomatoes and cooking them down with the onion. Once they were soft, I pushed them through a food mill fitted with its finest screen. At that point, I had approximately 24 cups of flavorful tomato juice.
I added Italian seasoning and granulated garlic, and cooked it down until I had a thick, tasty 16 cups. Once I was finished cooking, I added salt to taste (it’s always best to wait until you’ve finished cooking something down before salting it. Otherwise, you can end up with something inedible).

Then I portioned 1/2 teaspoon of citric acid into five square sided 26 ounce jars from Fillmore Container and filled them up with my soup concentrate. I added five minutes to the processing time required by the NCHFP for the tomato and vegetable juice, to compensate for the increased thickness.
I love canning tomato products in these square sided jars because they give it a more professional look, and I find that the squared off sides make them easier to grab when I’m moving quickly. The 26 ounce size is also great from a portioning perspective. Reheated with a bit of milk, there’s just the right amount for two people to enjoy bigs bowls with a side of cheesy toast or garlic bread.
Oh, and if you find yourself liking the looks of the square shape, know that they’re also available in 8 ounce and 16 ounce sizes.

This week, the good folks at Fillmore Container have offered up a case of 12 square sided 26 ounce jars and a $50 credit that’s good in their online store for a giveaway. To enter, use the widget below. The recipe for the tomato soup concentrate is after the jump. Enjoy!
Disclosure: Fillmore Container is a Food in Jars sponsor. Their sponsorship helps keep the site afloat. They provided the jars you see here and are providing the giveaway prize, both at no cost to me. All opinions expressed are entirely mine.
PrintTomato Soup Concentrate
Yield: Makes approximately 16 cups of product
Ingredients
15 pounds of tomatoes2 cups diced onion
2 tablespoons granulated garlic
1 tablespoon dried Italian seasoning
1 tablespoon salt, plus more to taste
2 1/2 teaspoons citric acid
Instructions
Wash the tomatoes and cut them into quarters. Heap the chopped tomatoes into a large pot and add the diced onion.Add about a cup of water to the bottom of the pot to prevent scorching. Place the pot on the stove and bring it to a boil.
Cook, stirring occasionally for about an hour, until the tomatoes have lost their structural integrity and the pot contains nothing but super saucy tomatoes.
Remove the pot from the stove. Fit a food mill with its finest screen and position it over a large heatproof bowl.
Working in batches, start pushing the cooked tomatoes and onions through the food mill. You will probably need to stop three or four times to empty out the bowl into a clean pot.
Once all the tomatoes are milled, add the granulated garlic and Italian seasoning. Set the pot on the stove and bring to a low boil.
Cook for one to three hours, until the soup concentrate has reduced by at 1/3 and hopefully a bit more.
When you're pleased with the consistency, stir in the salt. Start with a tablespoon. Taste and add more as needed.
Divide the citric acid between five jars 26 ounce jars (the Ball brand 24 ounce Pint & Half jars are also a great choice for this one).
Funnel the finished soup concentrate into the jars, leaving 1/2 inch headspace.
Wipe the rims, apply the lids and rings, and process in a boiling water bath canner for 45 minutes (if you live above 1,000 feet in elevation, please adjust your processing times accordingly).
When the time is up, remove the jars and set them on a folded kitchen towel to cool. When the jars have cooled enough that you can comfortable handle them, check the seals. Sealed jars can be stored at room temperature for up to a year. Any unsealed jars should be refrigerated and used promptly. 3.1http://foodinjars.com/2016/08/tomato-soup-concentrate-canning/
Related Posts:
Homemade Barbecue Sauce + Canning in Sauce Bottles with Lug Lids
Giveaway: BBQ Sauce Bottles & Store Credit from Fillmore Container
Preserve the Harvest Giveaway
August 23, 2016
Marinated Dehydrated Tomatoes
Got a dehydrator and some tomatoes? Make these marinated dehydrated tomatoes! They are easy, delicious, and so satisfying come winter.

The first summer I had a dehydrator, I dried everything I could get my hands on. I did peaches, apples, herbs, citrus, tons of fruit leather and buckets of small tomatoes. I kept my sturdy Nesco running for days at a time, and found that I missed its constant drone when it was finally unplugged and put away.

Since that first heady season, I’ve narrowed down the things I regularly dehydrate. It is still one of my favorite methods of food preservation, I just have learned more about which dehydrated things that work best in my kitchen and have stopped doing the ones that I didn’t manage to use up as well.

Top on my must-dry list each year are tomatoes. I do them a couple of different ways. I always do two or three dehydrator loads of small tomatoes like grape and sungold to use in salads throughout the year. And I always (ALWAYS) make some marinated and dried tomatoes.

I first learned this trick years back from Kristina McLean’s blog Mouth From the South. She is an avowed tomato lover and takes the growing and preserving of tomatoes very seriously. So the first time I made them, I knew they’d be good. I just didn’t realize quite how life-changing.

If you have a dehydrator, these marinated dehydrated tomatoes are incredibly easy to make. You slice up about five or six pounds of tomatoes and heap them in a bowl. Then you puree together olive oil, balsamic vinegar, fresh parsley, rosemary, garlic, salt, red chili flakes, black pepper, and the juice and zest of a lemon.

Once the marinade is smooth, you pour it over the tomatoes. Using your hands, gently give it all a good stir and then let it sit. Because I rarely have enough space in my fridge, I only marinate for a couple of hours. You could also cover the bowl and tuck it in the refrigerator overnight if you’ve got more cold storage than I do.

Then you arrange the marinated tomatoes on your dehydrator trays, stack them up, and set it to 135 degrees F. I typically slice my tomatoes so that they’re a little more than 1/2 inch thick and they take about 18 hours like that. If you cut yours thicker, give them more time.
These days, I’m using the new Excalibur stackable dehydrator that I wrote about here. I particularly love the fact that it comes with the mesh screens that make it easier to remove the finished tomatoes (because they stick like crazy).
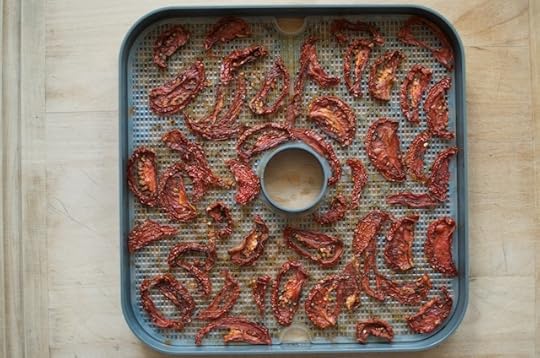
When the tomatoes are dry and chewy, they’re done. Then it’s just a matter of pulling them off the trays, heaping them in zip top bags, and stash those bags in the fridge or freezer (thanks to the oil, they really need the cold storage).
I often eat a few while thinking about what to make for dinner. They’re nice as a garnish on a bowl of soup or a grain salad. And for fancy times, I like to chop them and fold them into softened butter for tasty bread.
PrintMarinated Dehydrated Tomatoes
Ingredients
5 pounds tomatoes1 cup extra virgin olive oil
1/4 cup balsamic vinegar
1/4 cup freshly chopped parsley
1 sprig rosemary, leaves removed and chopped
4 cloves garlic, crushed
1 tablespoon sea salt
1 teaspoon dried red chili flakes
1/2 teaspoon freshly ground black pepper
zest and juice of 1 lemon
Instructions
Slice your tomatoes into sections that are about 1/2 inch thick and put them in a large bowl.Combine the olive oil, vinegar, parsley, rosemary, garlic cloves, salt, chili flakes, black pepper, and lemon zest and juice into a blender container and puree.
Pour the marinade over the tomatoes and let them sit for at least an hour or two.
When you're ready to start the dehydration process, arrange the tomatoes on the trays of your dehydrator. Set it to 135 degrees F and run for 18 to 24 hours, until the tomatoes are well-dried.
When they're done, pull the finished tomatoes off the trays and place them into zip top bags.
Keep in the fridge for 2-3 months or in the freezer for 6-8 months. 3.1http://foodinjars.com/2016/08/marinated-dehydrated-tomatoes/
Related Posts:
Tomato Classes with Weaver’s Way and Greensgrow
Tips for Tomato Canning Season
Dehydrating Meyer Lemons and Limes
August 22, 2016
freshTECH HarvestPro Sauce Maker Giveaway
Need a little help getting your tomatoes preserved this season? Check out the freshTECH HarvestPro Sauce Maker from Ball Canning!

We are in the midst of tomato season here in the Philly area and I’ve been in something of a canning frenzy trying to get as many put up as I can before I hit the road again. I find that there is a huge flavor difference between home canned tomatoes and grocery store ones, and so I know that I’m going to be said come January if I don’t take action now.
I used to do most of my tomatoes whole and peeled, packed in water. However, these days I find that I like to do a fifty-fifty split of whole tomatoes and tomato puree. I started doing a lot more tomato puree a few years ago, in large part because an electric tomato press came into my life.
There are a few different brands of these handy machines on the market, and this year, our friends at Ball Canning added one called the HarvestPro to their freshTECH line of appliances.
Having used a number of different tools for pressing tomatoes into sauce, this HarvestPro Sauce Maker is by far the easiest to set up, run, and clean up when you’re all done. It doesn’t splatter like my previous electric press, and the motor base plants itself solidly on your countertop. I’m a huge fan and will be making permanent space for this in my kitchen (or, more realistically, in my coat closet).
Right now, all the freshTECH appliances are 15% off on the Fresh Preserving website (I’m also a really big fan of the Electric Water Bath Canner). If you want to see it in action, I’ll be streaming on Facebook Live tomorrow night (Tuesday, August 23) at 9 pm eastern time for about a half hour to show you how it works.
I also have one of these handy machines to give away this week. Use the widget below for your chance to enter!
Disclosure: Ball Canning sent me the HarvestPro you see pictured here for review purposes and they are providing the giveaway unit. What’s more, I am also a paid brand partner. However, this post is outside our paid agreement. I just really liked this particular machine and so asked if I could share it with my readers. All thoughts and opinions expressed are my own.
Related Posts:
Giveaway: The All New Ball Book of Canning and Preserving + Mason Jar Lifestyle
Giveaway: Round Collection Elite Jam Jars (sponsored by Fillmore Container)
Can-It-Forward Demo Videos Now Available on FreshPreserving.com + Home Depot Gift Card Giveaway


