
Marisa McClellan's Blog, page 58
August 10, 2016
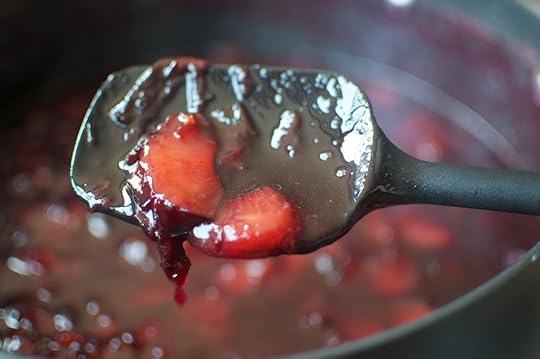
White Nectarine Jam with Rose Water
This simple, low sugar white nectarine jam uses a splash of rose water at the end of cooking to give it a hint of floral flavor. Try it stirred into yogurt!

A couple weeks back, I got an email from one of my regular fruit dealers, asking if I might be interested in a half bushel of white nectarine seconds. Despite the fact that white nectarines need a bit of extra consideration in preserving (they’re lower in acid than their yellow counterparts), I said yes. Because they are transcendently good nectarines.

When I was in grad school and on a very tight budget, I’d go to the farmers market each week with $20 to spend on produce. If I was careful, I could get just enough to see me through the week. When these nectarines were in season, I would allocate one-quarter of my budget to spend on them. I would ration them throughout the week, so that I could have a taste of sweetness every day.

So to have nearly 25 pounds of nectarines that had once been a major treat? I was all in. I’ve spent much of the last couple weeks working with these nectarines. I combined them with plums for a mixed fruit jam. I’ve pureed them down and made fruit leather with them. And I’ve also turned them into a pure white nectarine jam. This is a jam with plenty of lemon juice to make up for their lower acidity and a tiny bit of rose water, to emphasize the nectarine’s floral nature.

As with all seconds, these needed a little careful knife work to prep for the jam. My rule of thumb when working with seconds is to cut away anything that looks particularly gross, but not to obsess too much over every single shallow bruise. Whenever I’m in doubt, I give it a good sniff. If the bruised part smells fresh and fruity, I use it. If it smells boozy and weirdly off, it gets thrown out.

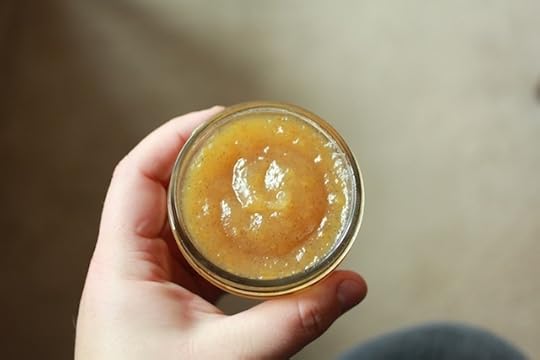
The finished white nectarine jam retains a rosy color that I just love. This is one that I’m particularly careful about storing out of direct sunlight, so as to retain that pink hue for as long as I can.
PrintWhite Nectarine Jam with Rose Water
Yield: makes between 4 and 5 pints
Ingredients
6 pounds white nectarines, pitted and chopped3 cups granulated sugar
1/4 cup bottled lemon juice
2 teaspoons rose water
Instructions
Prepare a boiling water bath canner and enough jars to hold between 4 and 5 pints of product.In a large, non-reactive pot, combine the chopped fruit (no need to peel nectarines, their smooth skin breaks down nicely during cooking), sugar, and lemon juice.
Set the pot over high heat and bring to a boil. Reduce the heat to medium and cook the fruit for 30-40 minutes, until the volume has reduced by at least 1/3 and it no longer looks watery.
When you're satisfied with the consistency of the jam, remove the pot from the heat and stir in the rose water (its flavor is fragile and so I don't add it until the active cooking time is up).
Ladle the jam into the prepared jars.
Wipe the rims, apply the lids and rings, and process in a boiling water bath canner for 10 minutes.
When the time is up, remove the jars and set them on a folded kitchen towel to cool. When the jars have cooled enough that you can comfortable handle them, check the seals. Sealed jars can be stored at room temperature for up to a year. Any unsealed jars should be refrigerated and used promptly.
Notes
Because this is a lower sugar jam that doesn't use any added pectin, I approach it a bit like making fruit butter. I cook at a lower temperature than I would with a true jam and count on simple reduction to get me to a thickened consistency. However, as a result, this jam is always going to have a softer set than you'll get with higher sugar jams with added pectin. If you can't deal with jams that retain a goodly amount of movement once in the jar, this isn't the preserve for you!
3.1http://foodinjars.com/2016/08/white-nectarine-jam-rose-water/Related Posts:
Strawberry Ginger Jam
Low Sugar Apricot Strawberry Jam
Low Sugar Blackberry Rhubarb Jam


August 8, 2016
Homemade Barbecue Sauce + Canning in Sauce Bottles with Lug Lids
Impress your friends with tasty homemade barbecue sauce, preserved in commercial sauce bottles and capped with one-piece lug lids. Enter here to win a case of the sauce bottles and a $50 store credit to Fillmore Container!

In the last few years, I’ve gone from being barbecue sauce ambivalent to being pretty into the stuff. A big part of my change in attitude stems from the fact that I make most of the barbecue sauce I consume these days. That means that I get to customize the flavor, sweetness, and heat and create something that I’m actually excited to paint on chicken or use as a braising medium for a meaty pork shoulder.

In the past, I’ve made barbecue sauce from peaches, cherries, and apple butter. This time, I’ve embraced the traditional approach and have made a version that starts with tomatoes. To maintain the classic theme, I’ve also preserved it in honest-to-goodness twelve ounce barbecue sauce jars from Fillmore Container (enter the giveaway for these jars and a $50 Fillmore Container store credit!).
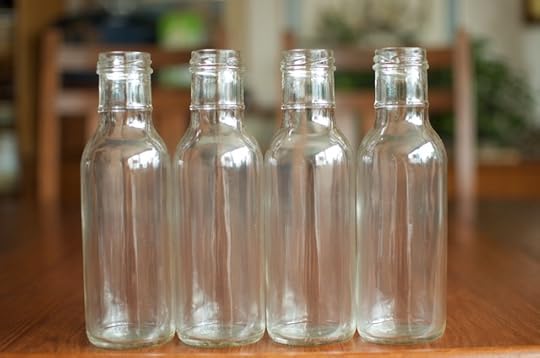
Let’s talk about preserving in these bottles before digging into the making of the sauce. They are designed for commercial production, so they will give your sauce a professional look (which is particularly fun if you’re giving the sauce away as a gift or taking it to a food swap).

These bottles come in two different versions. One uses lug lids, and the other uses a continuous thread (just like mason jars do). I typically opt to use the jars that take the lug lid closure because the lids have a button that depresses when the jar has sealed. I find that that makes it easier to tell whether you’ve gotten a good seal or not and I always appreciate that kind of clarity.
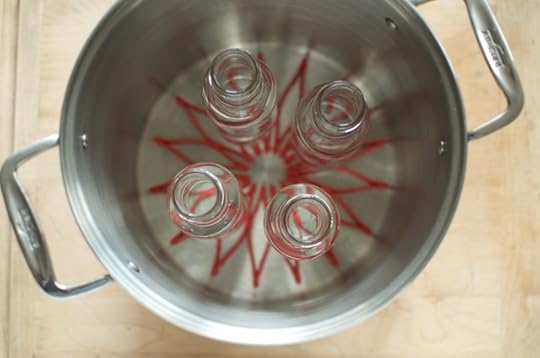
You prep these bottles the same way you do mason jars. Wash them with warm, soapy water and then when your sauce is nearing completion, put them in a boiling water bath canner and bring them up to temperature. You also want to warm the lids you’ll be using, to ensure that the plastisol is ready to form a good seal. For more on canning with one-piece lug lids, read through this post.
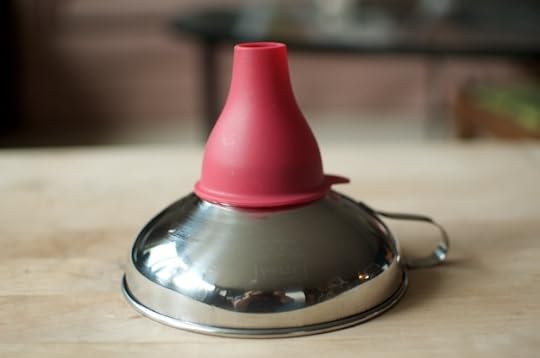
Once the jars are hot and the sauce is sufficiently cooked down, it’s time to fill. It can be tricky to fill these bottles because the opening is fairly narrow. I’ve solved that issue by using the wide-ish funnel from this set to adapt my regular stainless steel funnel to fit. It helps the get the sauce into the jars without splatter or mess.
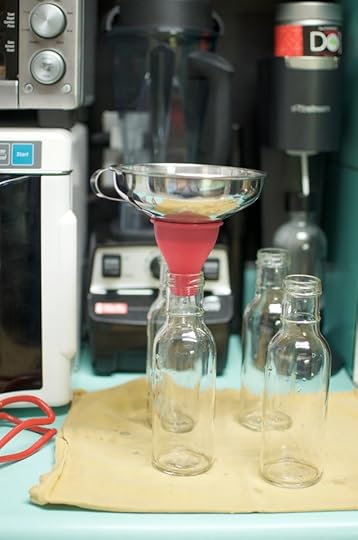
I fill the jars to approximately 1/2 inch headspace, wipe the rims, and twist on the lug lids. At this point, you want to take care to twist the lids tightly enough to ensure that the plastisol comes into contact with the rim of the jar, but not so tightly that the air can’t vent during the boiling water bath. Then you process.
Because the jars are nearly 8 inches tall, it can be a bit of a trick to find a pot that’s tall enough to hold them fully submerged. Make sure to test the jars for size in your pot before you get everything set up.

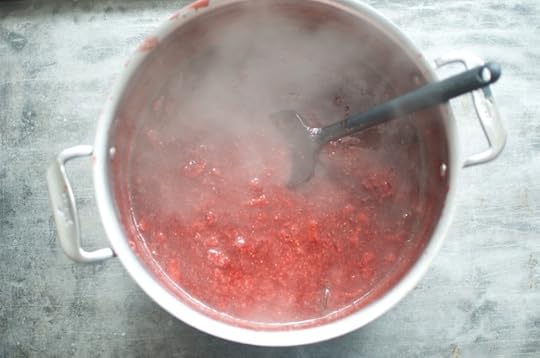
Now, to the sauce. As I was creating my recipe, I referenced a number of sources, including the National Center for Home Food Preservation, the Ball Blue Book, and the old Complete Book of Home Preserving. All three sources had nearly identical recipes, and so I used their work as a starting place.
I opted to leave out the peppers and celery, used a combination of brown sugar and molasses to sweeten, and upped the amount of vinegar a little to make a sauce that was a bit tangier.
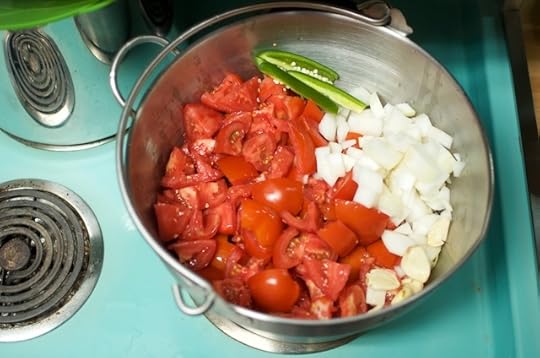
Making a sauce like this is a multi-stage process, but the end result is worth the effort. First, you combine the tomatoes, onions, garlic, and jalapeno in a large pot and cook them down until totally soft. Once the onions are tender (because they’re the toughest to start with), push the vegetables through a food mill fit with its finest screen. This separates the fibrous solids from the sauce and makes for a better finished product.

Then you add the remaining ingredients and cook the sauce until it has reduced to a thickness that satisfies your sense of what barbecue sauce should be. At this point, I like to puree it with an immersion blender, to get rid of any clumps that formed during cooking.

Then you funnel it into your bottles, cap them, and process for 20 minutes in a boiling water bath canner. When the processing time is up, you want to remove the bottles promptly. The seal is formed when the pressure changes thanks to the temperature differential and so you want to create a situation in which the pressure is strong so that they seal tightly and well.
Once the bottles are cool, they’re ready for labels and either the pantry or your gifting closet.
PrintHomemade Barbecue Sauce
Yield: makes 4 12-ounce jars
Ingredients
6 pounds tomatoes2 cups chopped onion
4 garlic cloves
1 jalapeno
2 cups apple cider vinegar
1 cups packed brown sugar
1/2 cup molasses
1 T crushed aleppo pepper
1 T dry mustard
1 T kosher salt
1 T smoked paprika
Instructions
Chop the tomatoes and onions and heap them in a large, non-reactive pot. Peel the garlic cloves and slice the jalapeno into quarters, and add it all to the pot, along with a splash of water to prevent burning.Set the pot over high heat and bring to a boil. Once it bubbles, reduce the heat to medium-high and cook for 25-30 minutes, until the tomatoes and onions are entirely tender.
Fit a food mill with its finest screen and push the tomato mixture through to separate out the flesh from the sauce. Work the pulp until it is very dry.
Return the sauce to the pan and add the vinegar, brown sugar, molasses, and spices.
Bring to a boil and reduce for 45-55 minutes, until the sauce has reduced by approximately half and is quite thick.
While the sauce reduces, prepare your boiling water bath canner and four 12 ounce jars.
When the sauce is ready, funnel it into the prepared jars. Wipe the rims, apply the lids and rings (or lug lids, if you're using sauce bottles), and process in a boiling water bath canner for 20 minutes.
When the time is up, remove the jars from the canner and set them on a folded kitchen towel to cool.
Once they've cooled, check the seals. Sealed jars/bottles can be stored at room temperature until opened. Any unsealed jars should be refrigerated and used promptly. 3.1http://foodinjars.com/2016/08/homemade-barbecue-sauce-canning-sauce-bottles-lug-lids/
Disclosure: Fillmore Container is a Food in Jars sponsor. Their sponsorship helps keep the site afloat. They provided the jars you see here and are providing the giveaway prize, both at no cost to me. All opinions expressed are entirely mine.
Related Posts:
Giveaway: BBQ Sauce Bottles & Store Credit from Fillmore Container
Preserve the Harvest Giveaway
August Sponsors: Cuppow, Fillmore Container, Mrs. Wages, Orchard Road, Punk Domestics, and Mason Jar Lifestyle
Giveaway: BBQ Sauce Bottles & Store Credit from Fillmore Container
Happy Monday, friends! I’m doing something a little different with this week’s giveaway. Often, when I have a tutorial or recipe to share that’s part of a giveaway, I put it all together in the same post.
However, things can get a little tangled when people want to ask questions about the information I’m offering when leaving a comment is also how you enter the giveaway. So this week, I’m splitting them apart.
This is the giveaway post. You’ll use the Rafflecopter widget below for a chance to win a dozen of these nifty BBQ sauce jars and lids and the $50 Fillmore Container store credit. To learn how to use these jars and to get the barbecue sauce recipe, visit this post. This division of content will allow me to better answer any questions you guys may have about the jars and the recipe.
Disclosure: Fillmore Container is a Food in Jars sponsor. Their sponsorship helps keep the site afloat. They provided the jars you see here and are providing the giveaway prize, both at no cost to me. All opinions expressed are entirely mine.
Related Posts:
Giveaway: Round Collection Elite Jam Jars (sponsored by Fillmore Container)
Sponsored Post: Gift Guides from Fillmore Container + Giveaway
Giveaway: Fillmore Container $50 Gift Codes
August 5, 2016
In Praise of Seconds + Other Good Things

If you follow me on Instagram, you’ll often see me posting pictures of the seconds I buy for my various canning activities. Seconds are simply the slightly-less-perfect produce that farmers typically can’t sell for full price. I never mind working around a few bruises or superficial marring and so embrace these seconds (both for their affordability and the fact that it helps prevent food waste) for jam, fruit butters, chutneys, and more. I wrote about my love of seconds for the summer issue of Edible Philly and you can read my full piece right here.
I was recently a guest on the 2 Weird Hungry Girls Podcast. We talked all about canning and preserving in this episode (we actually recorded two, so another one will be airing soon), and if you want to here me get geeky about food preservation, make sure to tune in.
Finally, don’t forget that I’ll be at Philly’s Headhouse Square Farmers Market this Sunday from 10 am to 2 pm with Food Swap! author Emily Paster. We’ll both have books on hand for sale and signature, and I’ll have some white nectarine and lemon jam for you to come and taste.
Oh, and if you need a canning project for this weekend, I highly recommend this Spiced Nectarine Jam. It’s a great one for holiday giving, if you’re starting to think about such things.
Happy weekend, friends!
Related Posts:
Jam & Tea at Valley Forge Flowers with WHYY
Upcoming Events – Eating Words! Greensgrow Farm! Local Mouthful Potluck!
Upcoming Events: Philadelphia! Short Hills, NJ! Hudson, NY!
August 3, 2016
Whole Foods Market Field to Store Program + Tangy Eggplant Tomato Spread
Today, I’m partnering with my area Whole Foods Markets to tell you about their 24 Hours Field to Store program and to share my recipe for Tangy Eggplant Tomato Spread. This is a sponsored post!

One of the things I love most about living in Philadelphia is the amazing access we have to really great, local produce. I’ve been here for nearly 15 years now and have watched how the city has changed for the better. Between the farmers markets, CSA shares, buying clubs, corner stores, and merchants at Reading Terminal Market, it is easier than ever to get my heads on hyper-fresh, seasonal fruits and vegetables that are grown nearby.
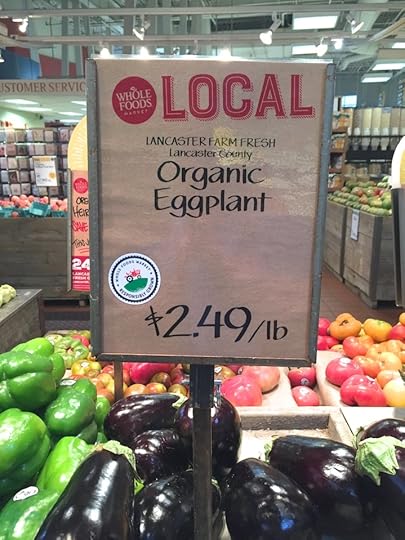
Now, thanks to a partnership between our 11 area Whole Foods Markets and the Lancaster Farm Fresh Cooperative, you can add one more option for incredibly fresh, local produce to the list. They have teamed up for a program called 24 Hours Field to Store. Certain products from LFFC are harvested from the field and delivered to all Philadelphia-area stores within 24 hours.

The featured item in the Field to Store program changes every two weeks. Last week, they were highlighting gorgeous heirloom tomatoes, and starting today and running through August 16, the featured item is eggplant!

I was at the Callowhill store on Saturday, and picked up a plump, firm, glowingly fresh eggplant and brought it home for a little experimentation. Knowing that eggplant is a low acid vegetable, I had to be careful when developing a recipe using it that would eventually go into a jar.

After doing a bit of research, I decided to make a highly acidified spread using eggplant, tomato, and garlic. I peeled and chopped the eggplant, and cooked it down with a small amount of olive oil, a pound of peeled and chopped tomatoes, three cloves of minced garlic, and a full 1 1/2 cups of red wine vinegar.

The resulting eggplant tomato spread is a luscious, tangy condiment. It is perfect on slices of toasted ciabatta or in place of tomato sauce on a homemade pizza. The yield is relatively small, so I plan on making more before eggplant season is done.

I’m looking forward to seeing what comes next in the 24 Hours Field to Store program!
PrintTangy Eggplant and Tomato Spread
Yield: makes 4 half pints
Ingredients
1 large eggplant (about 1 1/2 pounds)1 pound tomatoes
1 tablespoon olive oil
1 1/2 cups red wine vinegar (make sure it's 5% acidity)
3 garlic cloves, peeled and pressed or minced
2 tablespoons sugar
1 tablespoon salt
1/2 teaspoon coarse black pepper
1/2 teaspoon citric acid
Instructions
Prepare a boiling water bath canner and four half pint jars.Peel the eggplant and dice it into small cubes.
Peel the tomatoes and dice them into bits that are similarly sized to the eggplant.
Heat the olive oil in a low, wide, non-reactive pan and add the eggplant and tomatoes. Cook for 2-3 minutes and then add the red wine vinegar, garlic, sugar, salt, and black pepper.
Bring to a boil and then reduce the heat to a simmer. Cook, stirring often, for 20-25 minutes, until the liquid reduces and the the vegetables soften. If the eggplant isn't breaking down, use a potato masher to help the cubes meld into the spread.
Taste and adjust the salt and pepper levels, as necessary.
Remove the pot from the heat. Divide the citric acid between the four half pint jars and ladle the spread in on top. Use a chopstick or plastic bubbling tool to remove any trapped air bubbles and to work the citric acid into the spread.
Wipe the rims, apply the lids and rings, and process in a boiling water bath canner for 20 minutes.
When time is up, remove the jars from the canner and set them on a folded kitchen towel to cool.
When the jars are cool enough to handle, check the seals. Sealed jars are shelf stable for up a year. Any unsealed jars should be refrigerated and used promptly. 3.1http://foodinjars.com/2016/08/whole-foods-market-field-store-program-tangy-eggplant-tomato-spread/
Related Posts:
Food Swap Cookbook Philadelphia Events
End of Season Tomatoes and Drying Tiny Tomatoes
Live Online Tomato Canning Class Tonight!
Whole Foods Market Field to Store Program + Tangy Eggplant and Tomato Spread
Today, I’m partnering with my area Whole Foods Markets to tell you about their 24 Hours Field to Store program. This is a sponsored post!
One of the things I love most about living in Philadelphia is the amazing access we have to really great, local produce. I’ve been here for nearly 15 years now, and between the farmers markets, CSA shares, buying clubs, corner stores, and merchants at Reading Terminal Market, it is easier than ever to get my heads on hyper-fresh, seasonal fruits and vegetables that are grown nearby.
Now, thanks to a partnership between our 11 area Whole Foods Markets and the Lancaster Farm Fresh Cooperative, you can add one more option for incredibly fresh, local produce to the list. They have teamed up for a program called 24 Hours Field to Store, in which certain products from LFFC are harvested from the field and delivered to all Philadelphia-area stores within 24 hours.
The featured item in the Field to Store program changes every two weeks. Last week, they were highlighting gorgeous heirloom tomatoes, and starting today and running through August 16, the featured item is eggplant!
I was at the Callowhill store on Saturday, and picked up a plump, firm, glowingly fresh eggplant and brought it home for a little experimentation. Knowing that eggplant is a low acid vegetable, I had to be careful when developing a recipe using it that would eventually go into a jar.
After doing a bit of research, I decided to make a highly acidified spread using eggplant, tomato, and garlic. I peeled and chopped the eggplant, and cooked it down with a small amount of olive oil, a pound of peeled and chopped tomatoes, three cloves of minced garlic, and a full 1 1/2 cups of red wine vinegar.
The resulting spread is a luscious, tangy spread that it perfect on slices of toasted ciabatta or in place of tomato sauce on a homemade pizza. The yield is relatively small, so I plan on making more before eggplant season is done.
I’m looking forward to seeing what comes next in the 24 Hours Field to Store program.
PrintTangy Eggplant and Tomato Spread
Yield: makes 4 half pints
Ingredients
1 large eggplant (about 1 1/2 pounds)1 pound tomatoes
1 tablespoon olive oil
1 1/2 cups red wine vinegar (make sure it's 5% acidity)
3 garlic cloves, peeled and pressed or minced
2 tablespoons sugar
1 tablespoon salt
1/2 teaspoon coarse black pepper
1/2 teaspoon citric acid
Instructions
Prepare a boiling water bath canner and four half pint jars.Peel the eggplant and dice it into small cubes.
Peel the tomatoes and dice them into bits that are similarly sized to the eggplant.
Heat the olive oil in a low, wide, non-reactive pan and add the eggplant and tomatoes. Cook for 2-3 minutes and then add the red wine vinegar, garlic, sugar, salt, and black pepper.
Bring to a boil and then reduce the heat to a simmer. Cook, stirring often, for 20-25 minutes, until the liquid reduces and the the vegetables soften. If the eggplant isn't breaking down, use a potato masher to help the cubes meld into the spread.
Taste and adjust the salt and pepper levels, as necessary.
Remove the pot from the heat. Divide the citric acid between the four half pint jars and ladle the spread in on top. Use a chopstick or plastic bubbling tool to remove any trapped air bubbles and to work the citric acid into the spread.
Wipe the rims, apply the lids and rings, and process in a boiling water bath canner for 20 minutes.
When time is up, remove the jars from the canner and set them on a folded kitchen towel to cool.
When the jars are cool enough to handle, check the seals. Sealed jars are shelf stable for up a year. Any unsealed jars should be refrigerated and used promptly. 3.1http://foodinjars.com/2016/08/whole-foods-market-field-store-program-tangy-eggplant-tomato-spread/
Related Posts:
Food Swap Cookbook Philadelphia Events
End of Season Tomatoes and Drying Tiny Tomatoes
Live Online Tomato Canning Class Tonight!
Preserve the Harvest Giveaway

I don’t often post about giveaways that other sites are hosting, but this one is just too perfect for you all for me to skip it. Starting this week and continuing throughout the month of August, Countryside Magazine is hosting a series of four preserving-centric giveaways.
At the end of each week, a winner is chosen and the giveaway clock resets with a new collection of tools, supplies, and resources. Food in Jars sponsors Fillmore Container and Mason Jar Lifestyle are both participating, and Fillmore has included copies of my books in weeks one and three!
To learn more about the prizes from Fillmore Container, go here. To enter the first week of giveaways, head over to Countryside. Good luck, friends!
Disclosure: Fillmore Container and Mason Jar Lifestyle are both sponsors of this site. However, no one asked me to write this post. I just wanted to make sure that you guys heard about this awesome opportunity. All thoughts and opinions remain my own.
Related Posts:
August Sponsors: Cuppow, Fillmore Container, Mrs. Wages, Orchard Road, Punk Domestics, and Mason Jar Lifestyle
July Sponsors: Cuppow, Fillmore Container, Knives Ship Free, Mrs. Wages, and more!
June Sponsors: Cuppow, EcoJarz, Fillmore Container, Mrs. Wages, Mason Jar Lifestyle
August 2, 2016
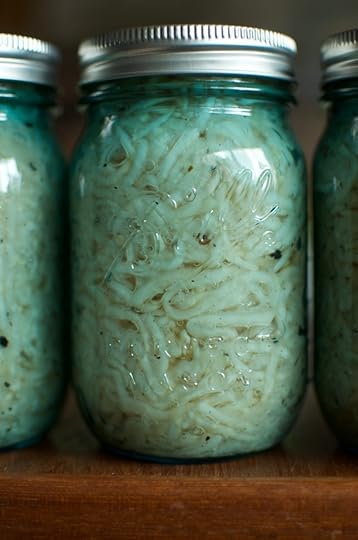
Garlicky Kohlrabi Relish
Looking for something easy and delicious to do with the all the kohlrabi you’ve been getting in your CSA share this summer? This garlicky kohlrabi relish is just the ticket!
Kohlrabi. It’s one of those vegetables that you find primarily at farmers markets and in your CSA baskets. Knobby round balls with gangly stems and oversized leaves, they look a little like disastrously malformed broccoli.

Once you trim away the stems and leaves (try them in your next veggie stir fry) and peel off the tough outer layer, you’re ready to pickle. You can use kohlrabi in a variety of pickle applications, but I particularly like turning them into a shredded relish.
This is one of those preserves that is half pickle, half salad. A forkful or two alongside your favorite sausage is nice. Adding it to a cool soba noodle dish is really delicious. And it’s weirdly delicious in an egg sandwich.
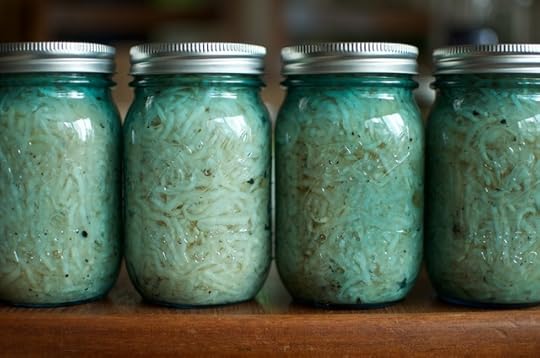
If you can’t find kohlrabi, peeled broccoli stems have a similar density and flavor and can easily be swapped in.
PrintGarlicky Kohlrabi Relish
Yield: makes 4 pints
Ingredients
4 pounds kohlrabi3 cups apple cider vinegar
5 garlic cloves, pressed or minced
2 tablespoons sea salt
1 tablespoon crushed black pepper
Instructions
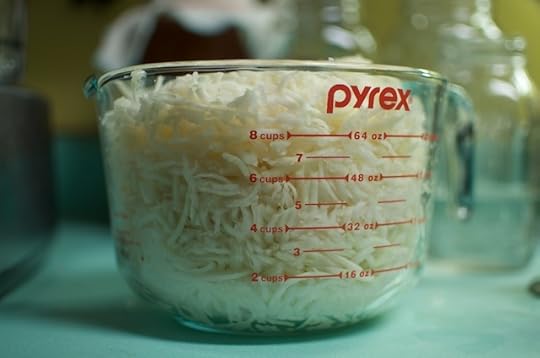
Prepare a boiling water bath canner and four pint jars.Shred the kohlrabi using the grating disc of your food processor or a box grater. You should have about ten cups of grated kohlrabi.
In a large, non-reactive pot, combine the kohlrabi, apple cider vinegar, garlic, salt, and pepper. Set over high heat and bring the contents of the pot to a boil. Once the liquid boils, cook for 3-4 minutes, until the kohlrabi slumps a little and release some of its liquid.
Using tongs, pack the kohlrabi into the prepared jars and ladle the liquid over to cover, leaving 1/2 inch headspace. Use a chopstick or plastic bubbling tool to remove any trapped air bubbles, and add more liquid, if necessary.
Wipe the rims, apply the lids and rings, and process in a boiling water bath canner for 15 minutes.
When time is up, remove the jars from the canner and set them on a folded kitchen towel to cool. 3.1http://foodinjars.com/2016/08/garlicky-kohlrabi-relish/
Related Posts:
The Agricola Cookbook and a Kimchi Recipe
International Can-It-Forward Day and Onion Pickles from the Ball Blue Book
Tiny White Turnips, Fermented
Upcoming Events: Headhouse Square! New York! Arkansas! Atlanta!
Hello canners! I have some fun news. After a month of sticking close to home and offering just a handful of classes and events, I’m headed back on the road a bunch in August and September. Mark your calendars for my free events and sign yourself up for my classes. I so look forward to seeing some of you there!
Sunday, August 7 (Philadelphia)
You’ll find me at the Headhouse Square Farmers Market with my friend and fellow cookbook author Emily Paster. We’ll have tasty samples of things from our new books (Emily’s is Food Swap!) and will have copies of our books on hand for sale and signature.
Monday, August 8 (Sewell, NJ)
I’ll be at the Margaret E. Heggan Free Public Library for a canning demo from 7-8 pm. I’ll show you how to make a batch of the Gingery Plum Jam from Naturally Sweet Food in Jars and will have books on hand for sale and signature. The event is free, but you can reserve your spot by registering here.
Saturday, August 13 (Millersville, PA)
I’m headed out to Lancaster County for a morning canning class at Homefields Farm. This hands-on class is from 10:30 am to 12:30 pm. We’ll work together to make a batch of Plum Jam with Vanilla and everyone will go home with a small jar. The class fee is $15 and you can register here.
Friday, August 19 (Amaganesett, NY)
This particular Friday, you’ll find me teaching a hands on canning class at Amber Waves Farm. We’ll make tomato jam, dilly beans, and quick pickled cucumbers. All students will go home with jars of preserves made that day. The class is from 3-6 pm. $150. Register here.
Saturday, August 20 (Great Barrington, MA)
I’ll be spending a morning at the Great Barrington Farmers Market, demonstrating how to make small batches of honey-sweetened jam, I’ll have copies of my books on hand for sale and signature and a few jars of jam ready for sampling. Look for me between the hours of 9 am – 1 pm.
Sunday, August 21 – (Hillsdale, NY)
In this demo-style canning class, I’ll feature two seriously delicious recipes from Naturally Sweet Food in Jars. We’ll make Caramelized Red Onion Jam (sweetened with maple sugar) and Peach Rosemary Glaze (sweetened with honey). at Hillsdale Home Chef. 2:30-5 pm. $65. Register here.
Wednesday, August 24 (Chestnut Hill, PA)
I’ll be back at the Chestnut Hill Friends Meeting House with the team from Weaver’s Way Co-op for the final class in our summer preserving series. In this one, we’ll make Easy Tomato Salsa and will talk all about safely canning tomatoes. 7-9 pm. Register here.
Saturday, August 27 (Fayetteville, AR)
I’ll be offering a canning and preserving demo at the Fayetteville Roots Festival. 2 pm! More details to come!
Saturday, September 3 (Decatur and Atlanta, GA)
11:15 – 12 noon, you’ll find me at demonstrating at the Decatur Book Festival. After the demo is over, I’ll be signing books! Then, from 3 to 4:30, I’ll be at Atlanta Botanical Garden, teaching a demo-style class. Registration info here. So much fun in a single day!
Sunday, September 4 (Chattahoochee Hills, GA)
I’ll be at the Bosch Experience Center in Serenbe for a five course Prepared Pantry Dinner. Every course of the meal is based on a recipe from Naturally Sweet. Thanks go to Lyn Deardorff from Preserving Now for making this event happen! 4-7 pm. $75 (which includes a copy of my new book). Get your tickets here.
Tuesday, September 6 (Nashville, TN)
I’ll be teaching a demo-style class at Green Door Gourmet. More details to come!
Saturday, September 10 (Philadelphia)
I’m returning to Greensgrow to teach a class that is focusing in on canning tomatoes. We’ll make honey sweetened tomato jam and talk about to ensure that your preserved tomatoes are safe and delicious. 12-2 pm. $35. Register here.
After that, I head to California for a handful of events. I’m still nailing down all the details, but here’s where you’ll find me!
September 15 – Pacific Grove, CA! Canning demo at Happy Girl Kitchen. More details to come!
September 17 – Healdsburg, CA! Canning class at The Shed. 1-3 pm. Details here.
September 18 – San Francisco! Fort Mason Farmers Market. More details to come!
September 20 – San Francisco Public Library. More details to come!
September 21 – Oakland, CA! Canning demo and book signing at Pollinate Farm & Garden. 6:30-8:30 pm. $17.50. Sign up here.
Related Posts:
Upcoming Events: Philly! Ambler! Bryn Mawr! Chestnut Hill!
Upcoming Events: Philly! Brooklyn! Manhattan!
Upcoming Events: July and August 2016
August 1, 2016
My Jam Didn’t Set! What Should I Do?
This post is for new jam makers. If you are an experienced and seasoned canner, I invite you to leave your wisdom in the comments section!

You’re a new canner and your jam didn’t set. It is runny and sloshy and you don’t know what to do. Before you start to worry, let me ask you a few questions.
When did you make the jam? It can sometimes take 24-48 hours for a batch of jam to finish setting up. If your jam is still just an hour or two out of the canner and you’re worried about the set, it’s time to chill out. Literally. Walk away. Stop thinking about.
Okay. You’ve let the jars rest for a day or two and it’s still more sauce than jam. Next question. Did you follow the recipe? Many of us look at jam recipes and are aghast at the amount of sugar it calls for. So we reduce the amount of sugar, thinking that it won’t do anything but make the jam less sweet.
Sadly, sugar plays a huge role in set. If you cut the amount in the recipe and you don’t compensate with a pectin designed for low sugar preserving, your jam may well be runny.
Did you check for set while the jam was cooking? Any time a recipe gives you a cooking time, it’s simply an approximation. During cooking, you also need to be checking for signs of set. You do this by using the frozen plate test, watching how the jam sheets off the spatula, and taking the temperature of your cooking jam. More on those techniques here.
You followed the recipe, it’s been a couple days since the jars came out of the canner, and still, your jam is runny. What kind of pectin did you use? If you used Certo or Sure-Jell liquid pectin, that might be the culprit. They changed their formulation a few years ago and I find that it’s not as effective as the other options on the market.
So. You followed a recipe, you checked for set, you used reliable pectin, the jars have been out of the canner for a few days, and still, the jam is too darned soft. Put a jar in the fridge and check the consistency in 24 hours. Cooler temperatures often help the jam find its way to a firmer consistency.
If you’ve gotten to the end of this post and you’re still unhappy with the way your jam turned out, you’ve got a couple of options. The first is to rename the preserve you’ve made. Call it sauce, pancake topping, or preserves. By changing the name, you shift your expectations and suddenly, runny jam doesn’t seem like such a bit deal.
Or, if you absolutely, positively need to have a firm set, you can always remake the jam. I’ve got instructions on how to do that here. Just know that you’ll lose some yield in remaking it, and that there are no guarantees that you’ll end up with exactly what you want.
Related Posts:
Canning 101: Resources for New Canners
Canning 101: How to Make Jam With Frozen Fruit + Apricot Meyer Lemon Jam
Canning 101: How to Prevent Jam Separation


