
Marisa McClellan's Blog, page 16
November 28, 2018
Guest Post: Atchara Pickles with Heather Francis
Today’s guest post is from adventurer and home canner Heather Francis. She is originally from Nova Scotia, Canada but has lived and worked on the ocean for over a decade. A professional cook who’s worked on both land and sea, these days you’ll find her in the galley of Kate, the Newport 41’ sloop she and her Aussie partner, Steve, have been sailing since 2008. Follow their adventures on Yacht Kate.
What I preserve is influenced not only but what produce is in season but by the places that we sail. In Fiji, which has a large Fijian-Indian population, I made batch after batch of mango chutney and mango pickles to accompany the dhal and curry dishes that became dinner staples.
The cool mountains islands and French influence in Vanuatu meant that delicate string beans and fresh dill could usually be found at the municipal food market, so I put up jars of dilly beans. The rich, volcanic soils in Papua New Guinea produced huge, juicy tomatoes that just begged to be made into a sweet relish and a spicy salsa.
This year we spent the rainy season in the Philippine Islands in the boatyard doing major engine repairs. Not only did the dark grey skies and heavy rains stunt the tomatoes, they also did not inspire me to spend hours beside the stove when all the hatches were closed. Yet, when the progress on our boat ground to a halt, and stayed that way for several weeks, I yearned to get in the galley and make something.
The galley (aka the kitchen on a boat) is always the spot I turn to when my nerves are frayed, and stress levels are on the rise. I know that I have no control over equipment failures or weather patterns, but I find doing little projects in the galley that are easy to complete and yield successful, delicious results are a balm. These tasks keep my hands busy and my mind off the problem.
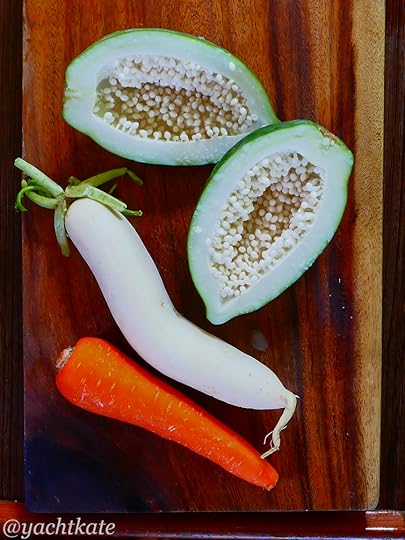
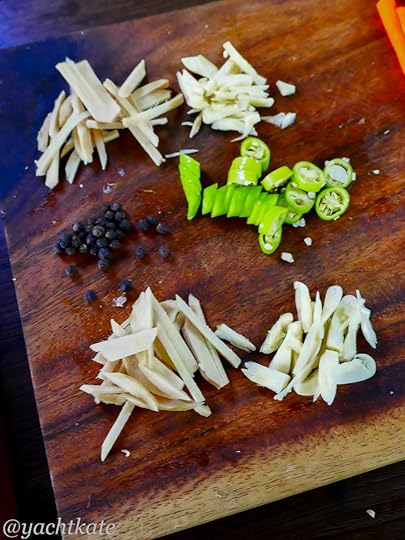
Regulars in the market, even during rainy season, are green papaya, carrots and daikon, a long, white radish. Together with a few of my galley staples – ginger, garlic, turmeric, vinegar, sugar, salt and peppercorns – I knew I had the makings of atchara.
Atchara (also achara, atsara) is a sweet-sour pickle that is served as an accompaniment to many Filipino dishes. Like most traditional recipes it has many variations – how the vegetables are cut, the addition of raisins or bell peppers, how sweet or sour it is. It is also similar to pickles of the neighbouring cuisines of Indonesia and Malaysia.
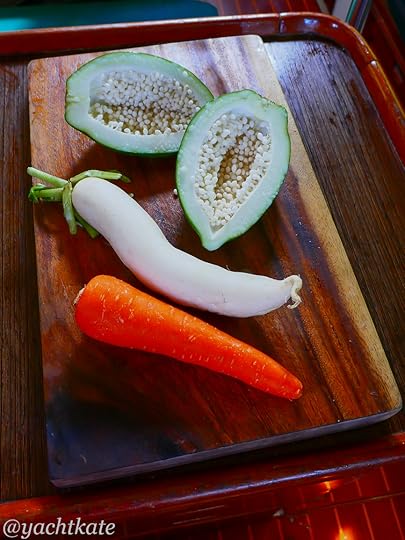
Whatever version you prefer, they all depend on one ingredient; green papaya. Like cucumber or zucchini green papaya has a neutral flavour but shares the ability to soak up and take on whatever flavours it is prepared with. It also retains its crispness, an important pickle characteristic.
Green papaya, especially if it is freshly picked, will exude a white sap when cut that can stain fabrics and, sometimes, irritate skin. If you are sensitive to latex you also might be bothered by papaya sap, so it is advisable to wear gloves. Peeling the papaya under the kitchen faucet also helps.
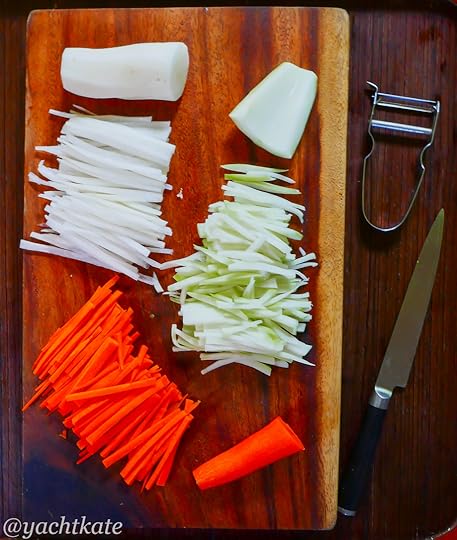
Most recipes call for the vegetables to be shredded or grated. I find grating the papaya, carrot and daikon results in a mushy pickle. Instead, I prefer to finely julienne all the vegetables by hand, careful to make everything about the same thickness and length. The work is quiet and methodical and perfect for occupying a worried mind. (For those of you with power-on-demand and space to store a bulky appliance, you could use a food processor.)
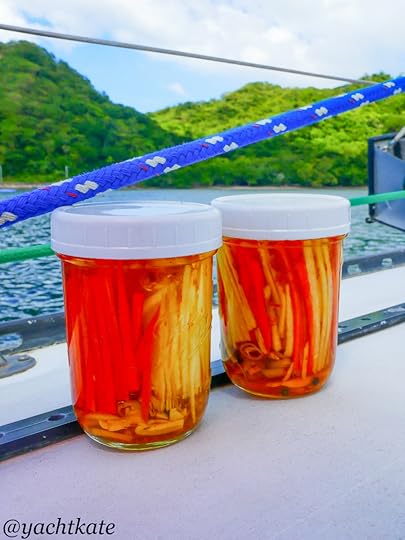
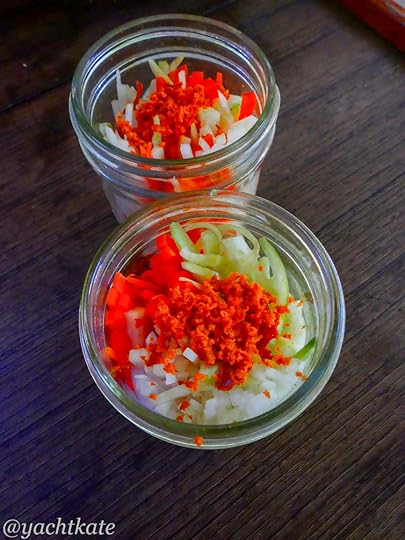
Once all the hard veggies are cut I peel and finely slice a knob of ginger and some cloves of garlic. I like 2-3 cloves of garlic per jar and about the same quantity of sliced ginger. A medium hot chili gets washed and sliced and then everything gets neatly packed into clean ½ quart jars. I add the ginger, garlic and chilis to the bottom of each jar along with a couple peppercorns, then tightly pack in the batons of vegetables.
Over the top I grate some fresh turmeric (or fish some out of my gin jar), this way I get maximum flavour and colour with a minimum mess. BE WARNED fresh turmeric will stain anything it touches bright yellow; fingers, cutting boards, plates and small animals. I have seen atchara sold commercially with and without turmeric, so if you don’t have fresh turmeric or do not like the flavour you can omit. I would not advise using ground turmeric as it will not lend the same flavour and will make for a gritty brine and pickle.
Into a small sauce pan goes the vinegar, sugar and salt. I use cane vinegar and raw cane sugar as they are found most abundantly in the Philippines. A nice white vinegar or a mild cider vinegar would be a fine substitute. Bring the brine to a gentle boil and stir to dissolve the sugar and salt. Remove from heat and carefully pour the brine in the jars, making sure everything is submerged. All that is left is to screw on a lid.
I make these as a refrigerator pickle, but as they are a pickle with a highly acidic brine, they could certainly be water bathed processed and properly sealed. Just know that it will soften the texture. At least a week in the fridge allows for the flavours to develop, a week or two more and the pickles will really start to sing!
One thing to know. If papaya is not available a firm cucumber or jicama can be substituted. And if you’re not sure what to do with the other half of the papaya, treat it like a zucchini and add it to your favourite stir fry, curry, casserole or muffin recipe.
PrintGuest Post: Atchara Pickles with Heather Francis
Yield: makes 2 pints
Ingredients
½ small green papaya1 medium carrot
1 medium daikon radish
1 inch chunk fresh ginger root
1 inch chunk fresh turmeric root
1 fresh chilies
4-6 garlic cloves
12 peppercorns
2 cups cane vinegar
2/3 cup raw cane sugar
2 tablespoons sea salt
Instructions
Cut papaya in half and scrape away the white seeds and membranes. Using a sharp vegetable peeler, remove the green skin. Peel the carrot and daikon. Finely julienne all three, cutting to lengths to fit into your jar.Peel and finely chop ginger and garlic. Slice chili. Place half the ginger, garlic and chili in the bottom of each clean jar. Add 6 peppercorns.
Tightly pack equal amounts of the papaya, carrot and daikon batons in each jar. You can keep them separated or mix them up, depends on your mood.
Grate equal amounts turmeric on top of veggies in each jar.
In a non-reactive pan over high heat bring vinegar, sugar and salt to a gentle boil, stirring to dissolve.
Carefully pour half the brine into each jar, making sure the vegetables are covered.
Screw on lid and when cooled, completely refrigerate for 1 week before eating.
Notes
Most recipes for atchara call for almost a 1:1 ratio of vinegar to sugar, making for a sweet and slightly sour pickle. My preference for pickles leans to the other extreme, I like a sour and slightly sweet pickle, so I have reduced the sugar considerably.
3.1https://foodinjars.com/recipe/guest-post-atchara-pickles-with-heather-francis/Related Posts:
Check the recipe index for more tasty preserves!


November 26, 2018
Canning in an Instant Pot Max
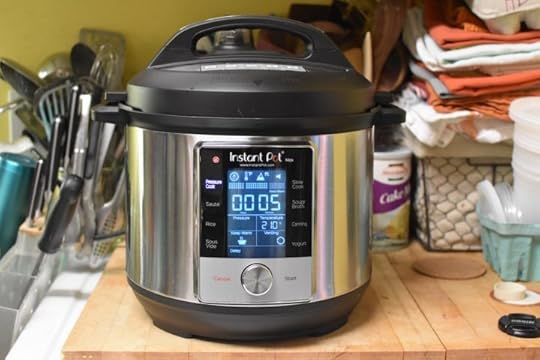
Earlier this year, Instant Pot announced that they were adding a multicooker to their line that would include a canning setting. The internet (well, as least the portion of it interested in home food preservation) went wild with hope and curiosity. Would this be the electric pressure canner that many of us have hoped for?
It quickly became clear that the answer was no. The Instant Pot Max is a very able electric pressure cooker that has the ability to go up to 15 pounds of pressure, but it is not the electric pressure canner of our collective dreams. There are a couple reasons for that.
The first is that no testing has been done by the National Center for Home Food Preservation or any other US-based cooperative extension to determine if products processed in the Instant Pot Max reach a sufficient internal temperature to kill off any botulism spores that might be present.
Additionally, when pressure canning times are developed, the time required to come up to temperature and back down again are factored into the total process. These pre- and post-processing times are altered with an Instant Pot Max and there’s no understanding yet of how that change will effect the finished product.
Setting aside the first reason (which pretty effectively shuts down one’s curiosity about the device from a canning perspective), the second reason why the Instant Pot Max isn’t an ideal canning vessel is simply its size.
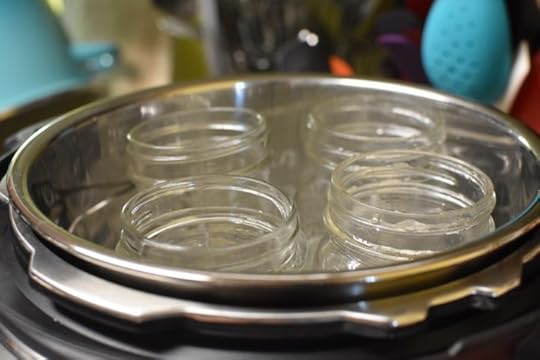
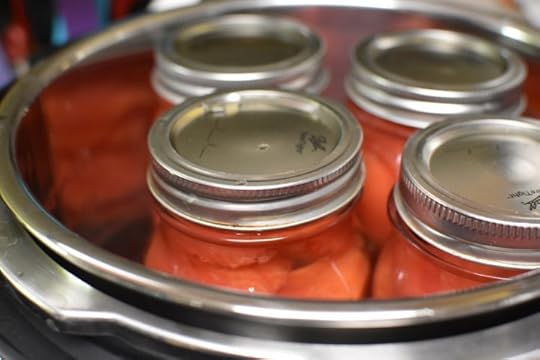
It’s a six quart pot and can only hold four pint jars. If you are someone who does pressure canning on any scale, you will find this limitation totally infuriating. There’s very rarely an instance when four pint jars is the sum total of a batch of stock, or beans, or pumpkin cubes.
Despite knowing all of the above, when a representative from Instant Pot reached out back in the spring to ask if I might want to test a review unit of the Instant Pot Max from a canning perspective, I said yes. I wanted to be able to speak about this particular unit with some level of first-hand experience and this seemed like a very good way to gain it.
(If you’re curious about how Instant Pot instructs people to use this device as a pressure canner, click over to the user manual and read that section – pages 23-26. It is quite thorough.)
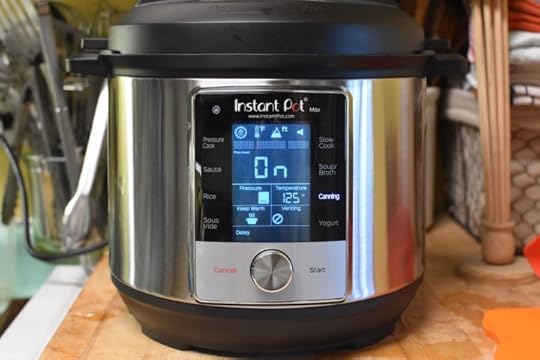
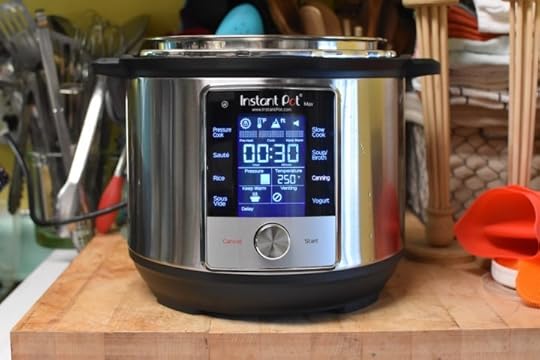
So sometime in June, the Instant Pot Max arrived at my apartment. I used it for cooking almost immediately upon arrival and I quickly found myself preferring it over my Instant Pot Duo. I appreciated the large LED screen and the fact that the controls were more intuitive.
I liked the fact that the read-out always showed the pot’s internal temperature. And I loved the Automated Steam Release feature, that allows you program the pot to do a quick release when the cooking time is up (this is particularly useful when you’re using it to hard boil eggs).
Because I’m a thorough person, I even tested the canning setting. While I didn’t feel comfortable using the Instant Pot Max to process low acid food (my hesitations are laid out in the third and fourth paragraphs of this post), I decided it wouldn’t be too risky to use it to process an acidified product that had optional pressure canning instructions.
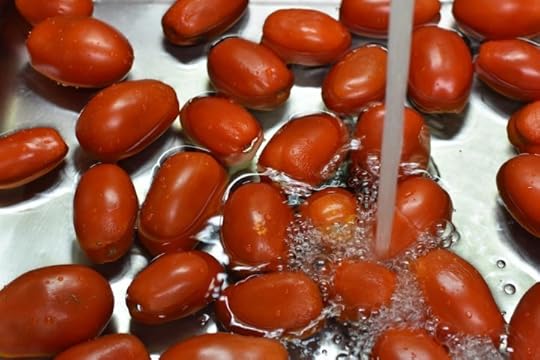
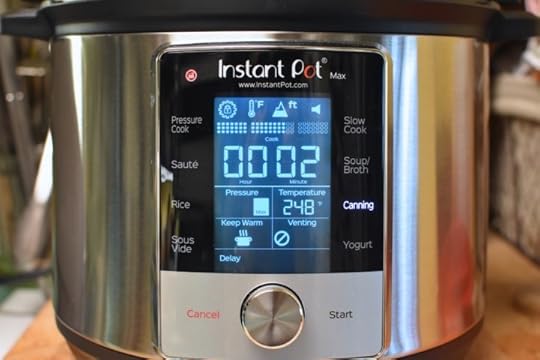
And so I made a batch of acidified whole peeled tomatoes packed in water and used the timing for pints in a weighted gauge canner. When you can in an Instant Pot Max, it gives you two pressure options. There’s the low setting, which reaches 6.5 PSI (this setting is recommended for high acid foods), and the max setting, which reaches 15 PSI (this is the level they recommend for low acid foods). For my tomatoes, I opted to go with the max pressure, thought it was more pressure than was strictly required.
It was an entirely smooth experience and the jars came out beautifully. There was less siphoning than you often see with water packed tomatoes processed in a pressure canner. And I loved the fact that I didn’t have to watch a dial gauge and monitor my stove temperature.
I look at this experience canning in the Instant Pot Max as a glimpse of what might be possible in the future. I makes me wish that Instant Pot would team up* with the National Center for Home Food Preservation and fund some extensive testing on this device so that we home canners could use this unit for pressure canning without reservations. Once that was done, I’d then wish for a slightly larger capacity unit that could hold quart jars in addition to pints.
The bottom line is that if you are looking for an exceptionally user friendly and hard working multicooker, the Instant Pot Max is a fantastic unit. However, until more data is available, I cannot recommend that you buy it to use as a pressure canner.
Disclosure: Instant Pot sent me a review unit of the Instant Pot Max at no cost to me. No additional compensation was provided and all thoughts and opinions expressed in this post are entirely my own.
*Just after I published this post, my contact at Instant Pot provided the following information:
For Max Canning, Instant Pot is currently working with McGill University, a 3rd party food science research facility to validate the Max meets canning regulations. There are 3 phases to the process, (1) Validating the temperatures, (2) Canning food (low and high-acid) and verifying post-canning result, and (3) Potentially, developing new canning times for certain food groups.
We can confirm phase 1 has been completed and the “Low Pressure” 230°F (110°C) setting sustains an average temperature between 110 and 111°C which can be for high-acid canning foods. With “Max Pressure” we can confirm a sustained temperature of 240-247°F (116.5-119°C) for low-acid canning foods.
When canning, recipes must be closely followed, modifying cooking times, ingredients or temperatures can be dangerous.
So some testing is being done, but I worry that because it’s being done at a Canadian university, the National Center for Home Food Preservation may still not accept it. Additionally, until all three phases of testing are complete, I still do not recommend that people go out and buy an Instant Pot Max expressly for canning.
Related Posts:
Cookbooks: Modern Pressure Canning
Submit your October Mastery Challenge Here!
Dehydrating and Pressure Canning for the October Mastery Challenge
November 19, 2018
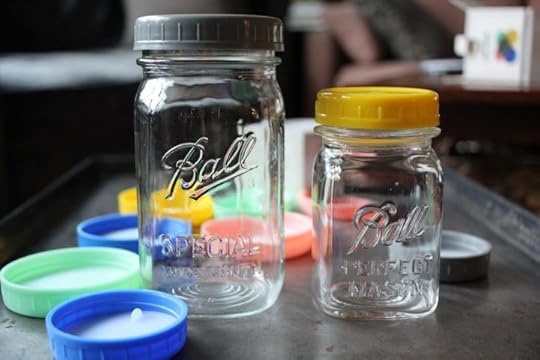
Giveaway: Mason Jar Lifestyle Leak Proof Plastic Storage Lids
This is a sponsored post.
In the last decade, I have spent more time than is reasonable looking for affordable, leak proof lids for mason jars (I realize that this is a highly specific mission, but if you read this blog, I think you’ll feel me). While the two-piece lids we use for canning can be leak proof, if they’re not sealed to the jar they’re not always perfectly reliable.
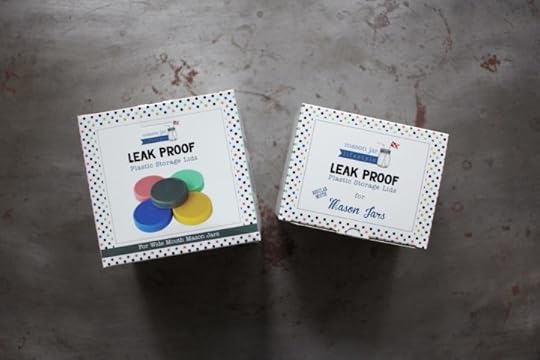
A handful of companies have brought various leak proof lids to market in recent years, and while they are perfectly useful, they don’t always meet the affordability market. Happily, the folks at Mason Jar Lifestyle have cracked the code. They’ve recently introduced a line of totally leak proof, airtight, and entirely affordable lids. I could not be more pleased.

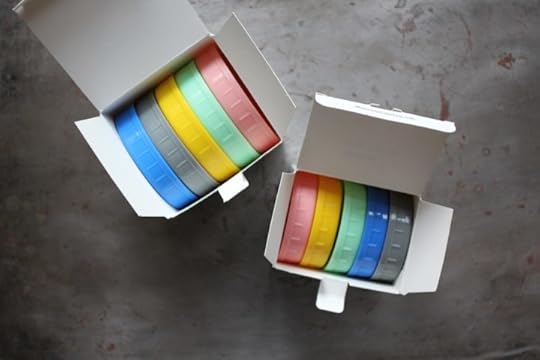
The lids come in both regular and wide mouth sizes. Sold in boxes of five, they cost $14.99 for the regular mouth and $16.99 for the wide mouth. Each box contains a rainbow of lids, which means you can color-code your leftovers or lunch packing (a different color for everyone in the family, perhaps?).
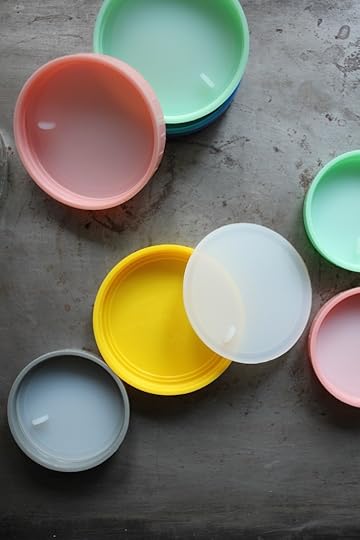
The thing that makes these lids different from all the other storage lids out there is the fact that each one is fitted a removable liner made out of food safe, platinum cured silicone. Because it’s a full liner rather than a gasket, your food or drink never comes in contact with the plastic lid (though it is BPA-free, if you’re concerned). Both lids and liners are dish washer safe.
These are now the first lids I reach for when I’m putting away leftovers or opening a jar of jam for the fridge. I may need to buy another set, just to keep from running out!
The good folks at Mason Jar Lifestyle want to share the storage lid love and so have offered up two sets of lids (each set includes on box each of regular and wide mouth lids) to our Food in Jars community. Please use the widget below to enter (US residents only).
Know also that Mason Jar Lifestyle is going to be having a giant sale over Black Friday, so make sure to visit their site and sign up for their newsletter to stay in the loop and get your hands on that discount code!
Disclosure: Mason Jar Lifestyle is a Food in Jars partner and this blog post has been written as part of our ongoing partnership. Additionally, they sent the lids you see pictured here to me at no cost to me. However, all thoughts and opinions expressed here are entirely my own.
Related Posts:
Giveaway: Stainless Steel Storage + Sprouting Lids from Mason Jar Lifestyle
November Partners: Fillmore Container, EcoJarz, McDonald Paper, and Mason Jar Lifestyle
October Partners: Fillmore Container, EcoJarz, McDonald Paper, and Mason Jar Lifestyle
November 13, 2018
Cookbooks: Weck Small-Batch Preserving
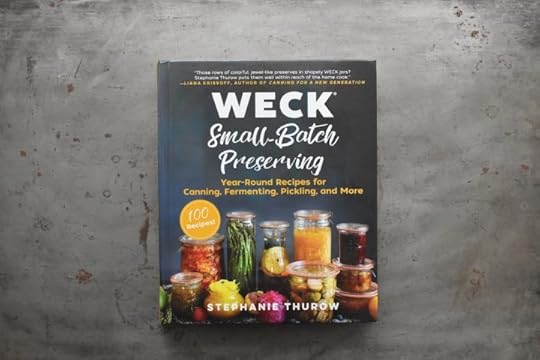
I have been a fan of Weck preserving jars since I first discovered them in my early days of canning (gosh, that’s more than a decade ago now!). At the time, they we were hard to come by and finding reliable information on how to use them was a challenge. While they’re not as much of a mystery as they used to be, there’s now a cookbook devoted to preserving with Weck that is certain to become the definitive resource for all of us who use and admire these stylish glass jars.

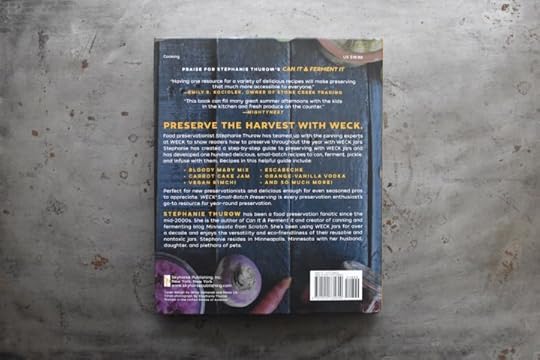
This new book is called Weck Small-Batch Preserving and is written by Stephanie Thurow. Stephanie is also the author of 2017’s terrific book Can It & Ferment It and she blogs over at Minnesota from Scratch.
While this is essentially a cookbook filled to bursting with recipes scaled for Weck jars, it also contains some fascinating information about the origins of Weck jars, including the fact that Johann Weck got into the business of selling jars because he wanted to divert some of the abundant fruit harvest away from alcohol production!
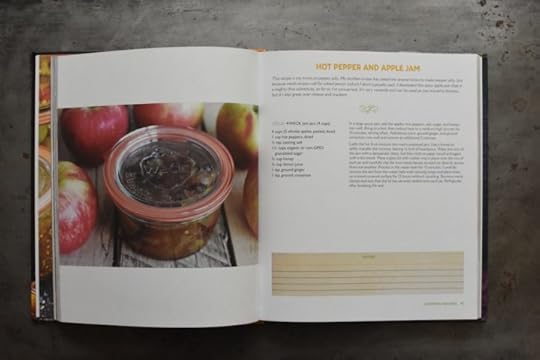
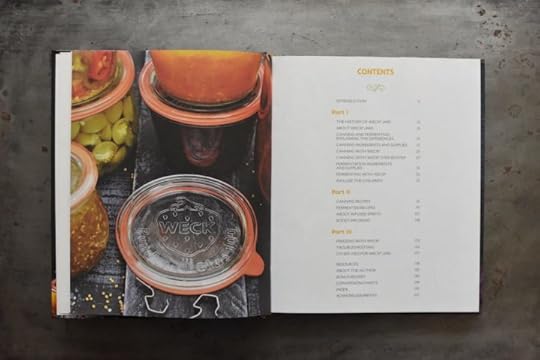
As you move through this book, you’ll find that the recipes break down into three categories. There are preserves designed for the boiling water bath canner (like the Hot Pepper and Apple Jam pictured above that I’m itching to make).
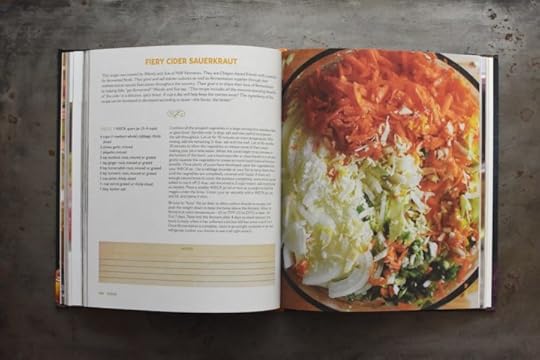
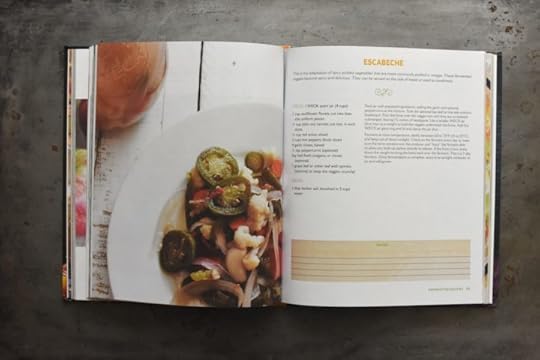
There are lots of ferments, including recipes for kvass, kimchi, and pickles. The Fiery Cider Sauerkraut that’s pictured above and the Escabeche that’s pictured below are two examples of this robust fermentation section (they’re also the two ferments I’m hoping to try out soon in my own kitchen. I do love a zippy, spicy pickle!).
And despite Johann Weck’s desire to move away from alcoholic things, Stephanie has included a most useful section on boozy infusions. They are all relatively fast infusions, which means they’d all be great options if you’re hoping to make and give some homemade liqueurs this holiday season.
If you’re a fellow Weck jar lover, I recommend checking out this book.
Disclosure: I received a review copy of this book at no cost to me. I was not paid for this post and all opinions expressed here are entirely my own.
Related Posts:
Cookbooks: Cured Meat, Smoked Fish, & Picked Eggs
Cookbooks: Modern Pressure Canning
Cookbook: Jam Session
November 12, 2018
ToGoJar Travel Set & EcoJarz
This is a sponsored post, written in partnership with EcoJarz.
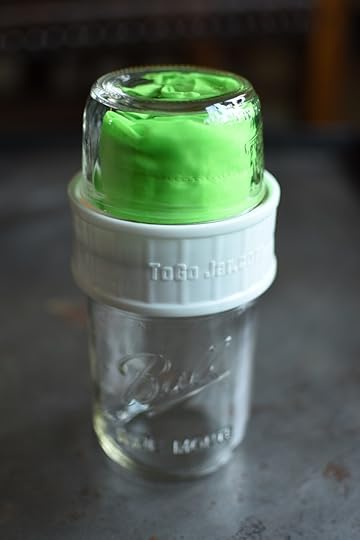
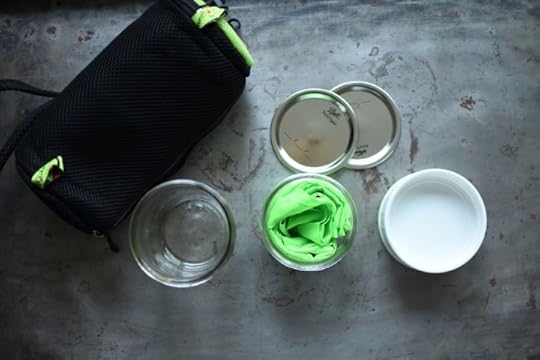
Four years ago, I was introduced to a magical thing called the ToGoJar. A plastic coupler designed to connect two mason jars (the jars are fitted with flat lids to prevent leakage), it was hugely practical item for those of us who keep an army of mason jars in our homes and like to take our meals and dishes out into the world.
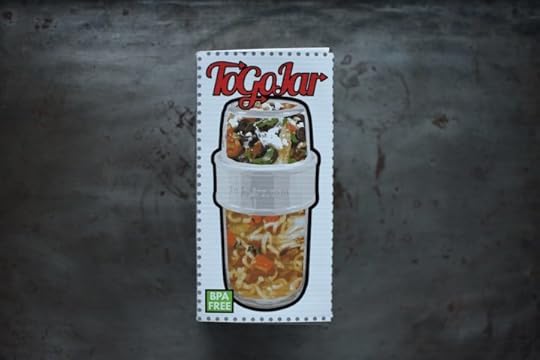
In the intervening years, the ToGoJar has come in and out of availability (I first wrote about it as part of their initial Kickstarter). I’ve used the two I have endlessly, and I’m delighted to say that this handy item is now within easy reach again. The good folks over at EcoJarz are selling it on their website and have two options to choose from.
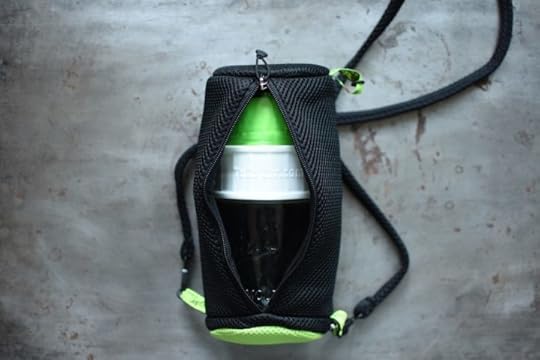
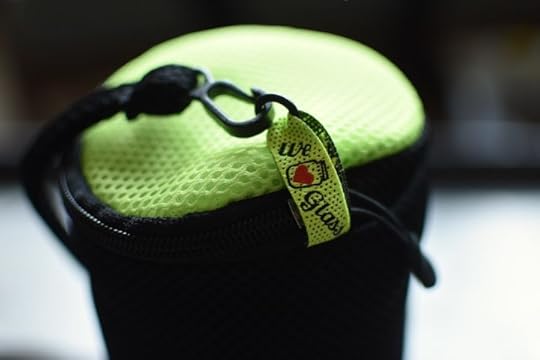
You can either buy the ToGoJar individually (you’ll get the plastic coupler and two flat lids), or you can pick up the ToGoJar Travel Set. I’m partial to the Travel Set includes two wide mouth jars with their flat lids (one pint jar and one half pint jar), the ToGoJar coupler, a protective cozy that zips up around the jars, and a bright green reusable tote bag.
I find the Travel Set so useful this time of year, when I find myself packing up food for family gatherings and holiday parties. Because the ToGoJar coupler connects two jars together, I can pack up my salad toppings in glass without ever worrying that the jars are going to bump into one another in transit and potentially break.
It also makes an ideal lunch kit. If you keep a bowl at your desk, you can pack a serving of soup in the larger jar and put croutons, toasted nuts, or bits of crushed tortilla chips in the smaller one. When you get hungry, pour the soup into your bowl and reheat. Top the warm soup with your garnish of choice and congratulation yourself on a tasty, waste-free meal.
For those of you who have a jar lover who has everything on your holiday list, I think a ToGoJar Travel Set might be just the ticket!
Related Posts:
EcoJarz Relaunches Fermentation Kit
November Partners: Fillmore Container, EcoJarz, McDonald Paper, and Mason Jar Lifestyle
October Partners: Fillmore Container, EcoJarz, McDonald Paper, and Mason Jar Lifestyle
November 11, 2018
Cranberry Orange Compote Facebook Live

It’s been a little while since I’ve made my way to this space. First, I went to Texas to spend a week with my sister and her family. I was there for Halloween (though it rained buckets during the trick or treating window) and my older nephew’s seventh birthday (I love it when I’m able to be present for the milestones).
I flew home just long enough to cast my ballot on election day, do a load of laundry, repack my suitcase and fly off again, this time to Tennessee. I was there for the Saveur Food Blog Awards and while I didn’t win, I had ridiculous amount of fun, spent time with a collection of delightful people, and fell a tiny bit in love with the city of Memphis.
Now I’m back home, fumbling my way back towards routine and normalcy. First on the docket is getting back into my twice monthly Facebook Live habit. Tomorrow night (Monday, November 12) at 9 pm ET/6 pm PT, I’ll be doing the first live demo of the month over on the Food in Jars Facebook page. I’ll be showing you how to make a batch of Cranberry Orange Compote.
If you want to cook along with me, you can find the recipe here.
Related Posts:
Monday Night Facebook Live + Other Updates
Small Batch Tomato Jam Livestream
Fermented Hot Sauce Livestream Tonight!
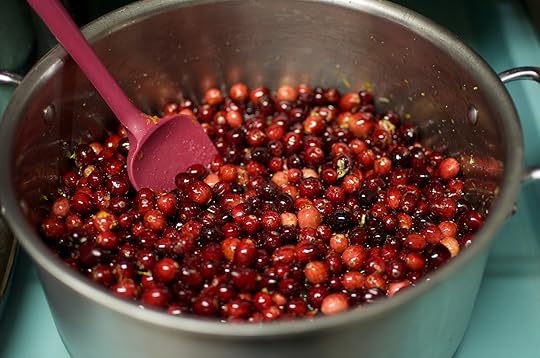
Cranberry Orange Compote
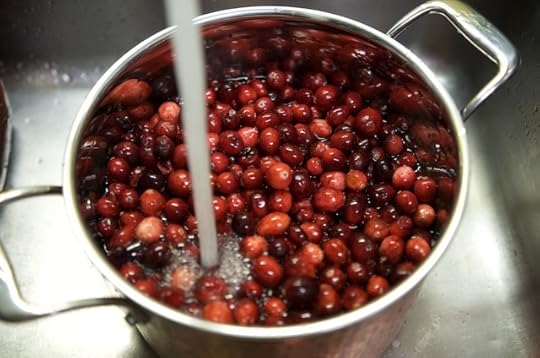
Every year around Thanksgiving, I make a new variation on cranberry sauce. This year’s version includes fresh cranberries, fragrant orange zest, and segmented orange flesh, and is sweetened with honey. You can see me demonstrating this recipe over on the Food in Jars Facebook page on Monday, November 11, 2018 at 9 pm ET/6 pm PT.
PrintCranberry Orange Compote
Yield: 3-4 half pints
Ingredients
4 cups cranberries, washed and picked over2 navel oranges, zested and segmented
1 cup orange juice
2/3 cup honey
Instructions
Prepare a boiling water bath canner and enough jars to hold 4 cups of product.In a medium pan, combine the cranberries, orange zest and segments, orange juice, and honey.
Put a lid on the pan, place it on the stove over high heat, and bring the liquid in the pan to a boil.
Reduce the heat to medium-high, remove the lid, and stirring occasionally, simmer until the cranberries pop and the liquid has reduced.
When you like the consistency of the compote, funnel it into jars, wipe the rims, apply the lids and rings, and process the closed jars for 10 minutes in a boiling water bath.
When the time is up, pull the pot off the heat, remove the lid, and let the jars cool gradually in the water for ten minutes.
When that time is up, remove the jars and set them on a folded kitchen towel to cool. When the jars have cooled enough that you can comfortably handle them, check the seals. Sealed jars can be stored at room temperature for up to a year. Any unsealed jars should be refrigerated and used promptly.3.1https://foodinjars.com/recipe/cranberry-orange-compote/
Related Posts:
A Gravy Story in the Fall Issue of Edible Philly
Honey Maple Cranberry Sauce for Thanksgiving
My Imaginary 2016 Thanksgiving Menu
November 1, 2018
November Partners: Fillmore Container, EcoJarz, McDonald Paper, and Mason Jar Lifestyle
Happy November, dear readers! It’s the start of the month and that means that it’s time to thank the businesses that help make this site possible. Please do show them that you appreciate their support with your time and attention!
Lancaster, PA-based and family-owned Fillmore Container are first! They offer all manner of canning jars, lids, and other preservation gear and carry just about every Ball jar currently available , so if you’re looking for a particular style, check them out. Their blog is also a great resource, so keep it on your must-check list!
Our friends over at EcoJarz are another stalwart sponsor. They make an array of products designed to fit on top of mason jars, including cheese graters, coffee brewers, and stainless steel storage lids. Keep your eyes peeled for some fun new stuff coming from them later this month!
Back for another month is McDonald Paper & Restaurant Supply. Based in Brooklyn, they are open to the public and sell all manner of culinary supplies. Restaurant supply stores are a great way to get affordable, durable kitchen gear (including jars!). I’m a big of their big food storage containers for macerating fruit for jam and or brining a Thanksgiving turkey.
Mason Jar Lifestyle is a one-stop shopping site for all the jar lovers out there. They sell all manner of mason jar accessories and adaptors. If you’re in the market for lids, straws, sprouting lids, fermentation weights, airlocks, tea light converters, cozies, they are there for you. Later this month, I’ll be featuring some of their new products, so stay tuned for that!
And if your company, shop, or family business is interested in reaching the food-loving and engaged Food in Jars audience, you can find more details here. Leave a comment on this post or drop me a note to learn more!
Related Posts:
October Partners: Fillmore Container, EcoJarz, McDonald Paper, and Mason Jar Lifestyle
September Partners: Fillmore Container, EcoJarz, McDonald Paper, and Mason Jar Lifestyle
August Sponsors: Fillmore Container, EcoJarz, McDonald Paper, and Mason Jar Lifestyle
October 30, 2018
Election Day Cake
Many years ago, when I still had a full-time job in the travel and tourism world, I went to a conference dedicated to culinary tourism. While there, I sat through a session in which someone said, “No matter what a traveler’s unique interests might be, they always have to eat. Food unifies and transcends.”
I think about that quote a lot, but with the word traveler replaced with the word person. We all have to eat. And when we eat together, the sharing of that nourishment (whether it be a snack or a full meal) does have the power to both unify and transcend.
There have been some really hard, painful things happening lately in our world. Both individuals and communities are feeling broken and fragmented. More than ever, we are looking for ways to come back together and remember our humanity. For many of us, the act of preparing and sharing food can be part of this healing.
With Election Day rapidly approaching here in the US, it seems the perfect time to be civic minded and engage in some much-needed culinary healing. To that end, let me tell you about my friend Kim’s campaign to bring back the tradition of Election Day Cakes (read the story she originally wrote on the subject).
These cakes were originally prepared for people who had to travel long distances to vote. In this modern era, our polling places are typically relatively close to home, but that doesn’t mean that there’s no need for a slice of cake. The traditional Election Day Cake is a yeasted round that is lightly sweetened and studded with raisins and nuts, but other cakes are welcome to apply.
Next week, bake something and take it to your local polling place. Tell your colleagues you’ll bring treats for everyone wearing an “I Voted” sticker. Offer something sweet to your neighbors. Follow the Election Day Cake Instagram account. And make sure to vote!
Related Posts:
Check the recipe index for more tasty preserves!
October 29, 2018
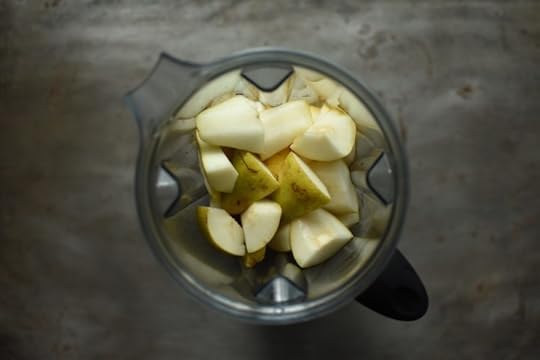
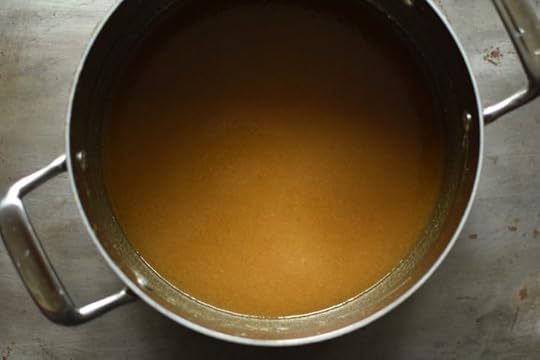
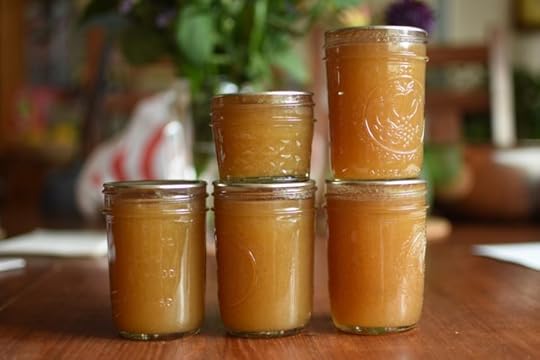
Pear Vanilla Caramel Sauce

A few weeks ago, I wrote about my Pear Vanilla Caramel Sauce class that I taught this last weekend at Lampeter Cafe (big thanks to everyone who came out and joined me). A number of you got in touch, saying that you were too far away to make the class, but would I share the recipe once the class was over?
The answer to everyone who asked was, of course! I’d been planning on posting it once the class was over, because it’s such a good one for holiday gift bags and boxes. I’ve shared similar recipes in the past, but this is a particularly delicious version (there’s also a similar, smaller-scale version of this pear caramel in Preserving by the Pint).
For those of you who haven’t considered such a preserve before, know that it’s delicious on ice cream, as a condiment for cheese, or as filling for cookies (this works best when you’ve cooked it quite thick).
These sauces work much the way dairy-based sauces work. You combine sugar and water and bring it to a boil. Once it has reached between 250°F and 290°F (the higher you go, the more intense the caramel flavor will be), you pour in a fruit puree and return it to a boil, stirring constantly. If you want your sauce to drizzle, take it up to around 215°F. If you want it to spread, aim for 225°F.
There are two things to keep in at the front of your mind when you’re making caramel sauces. The first is that it’s important to stay aware and alert when you’re working with boiling sugar. This is not the kind of project that goes well if you’re multi-tasking.
The second thing to remember is that while using an instant read thermometer is really helpful, it’s also imperative that you also trust your judgment. If the sauce looks like it’s overcooking, but the thermometer isn’t reading a particularly high temperature, trust your eyes rather than the tool.
PrintPear Vanilla Caramel Sauce
Yield: Makes 4 half pints

Ingredients
2 pounds ripe pears2 teaspoons vanilla bean paste
1 teaspoon sea salt
3 cups granulated sugar
1 1/2 cups water
Instructions
Prepare a boiling water bath canner and four half pint jars.Peel, core and chop pears. Place them in a blender with the vanilla bean paste, salt, and 1/4 cup water. Puree until smooth. You should have approximately 3 cups pear puree.
Combine sugar with the 1 1/2 cups water in a sauce pan. Place over medium-high heat and simmer for 15-20 minutes, until the sugar reaches between 250°F and 290°F and darkens to the color of an old copper penny (the higher the temp, the more assertive the caramel flavor). Do not stir the cooking syrup. Instead hold the handle and gently swirl the pot to move things around.
Once the syrup has reached your desired temperature, remove the pot from the heat and stir in the pear puree. It will bubble and spatter, so take care. Stir puree into the sugar and reduce the pot to the heat. Continue stirring and cooking, until the pear caramel sauce reaches between 215°F and 225°F.
Remove caramel from heat and funnel into prepared jars. Wipe rims, apply lids and rings, and process in a boiling water bath canner for 10 minutes.3.1https://foodinjars.com/recipe/pear-vanilla-caramel-sauce/
Related Posts:
Urban Preserving: Pear Vanilla Drizzle


