
Ali Edwards's Blog, page 19
September 24, 2024
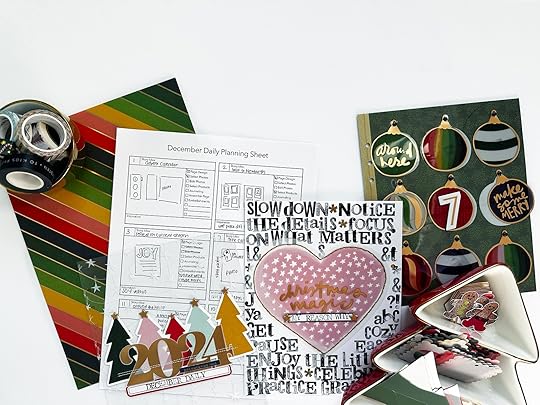
December Daily® 2024 | Special Guest Jill Drangsholt
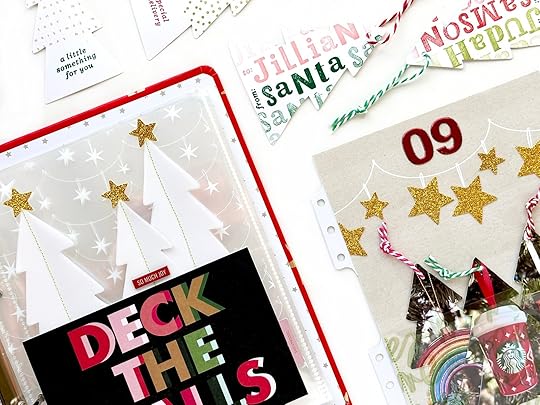
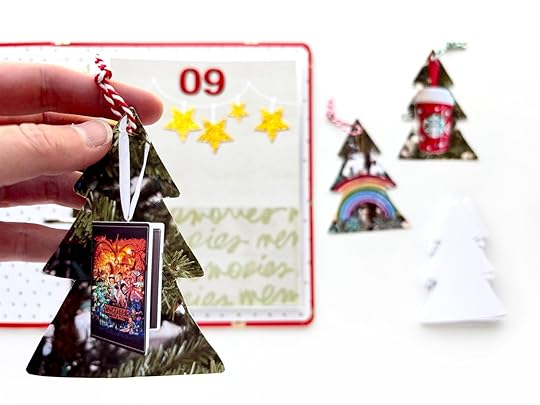
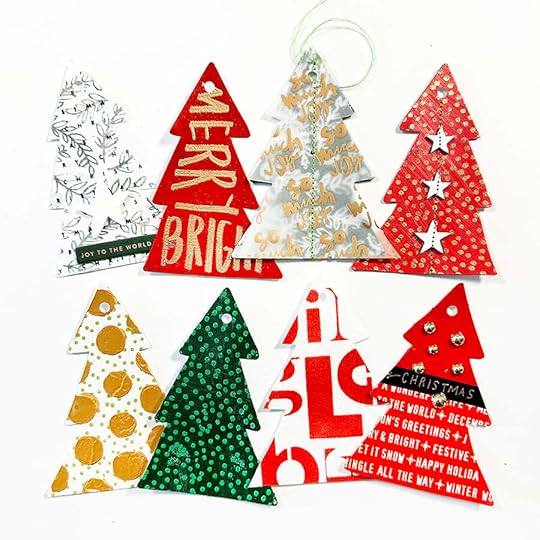
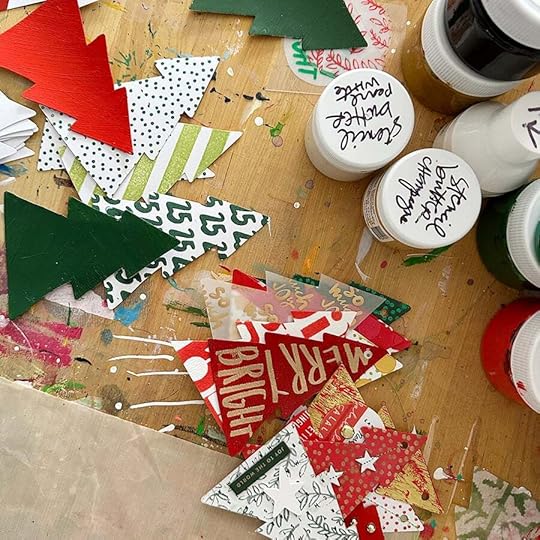
Hi again friends! For my final blog post during this year's boxing period, I will be focusing on ways to use the die cut trees. This pack comes with a whopping 50 trees in it, so I not only have a few pages ideas, but a couple of ideas for what to do with the rest in the pack if you are not joining Ali in her mixed media adventures.
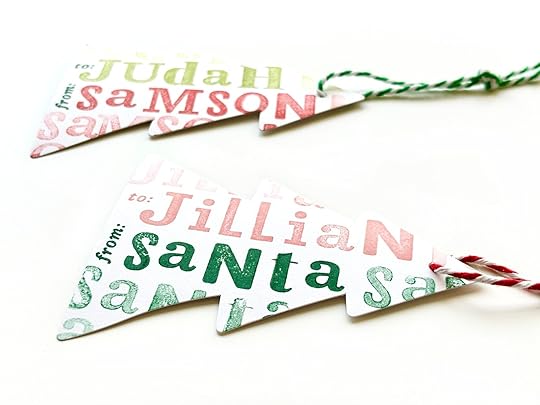
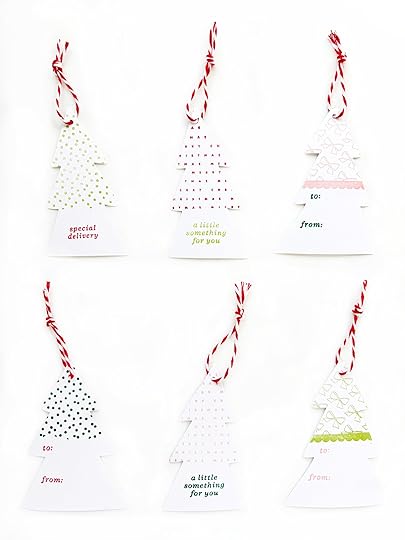
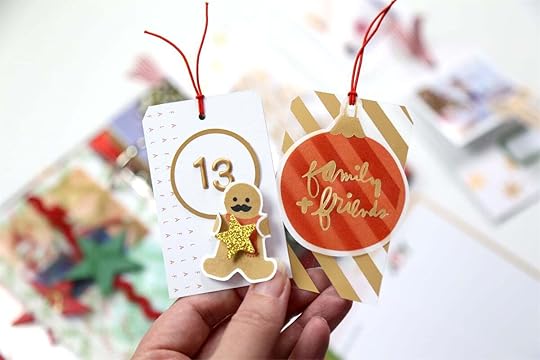
First up, I have some gift tag ideas for you! These trees paired with a few of the stamp sets make the cutest little gift tags!
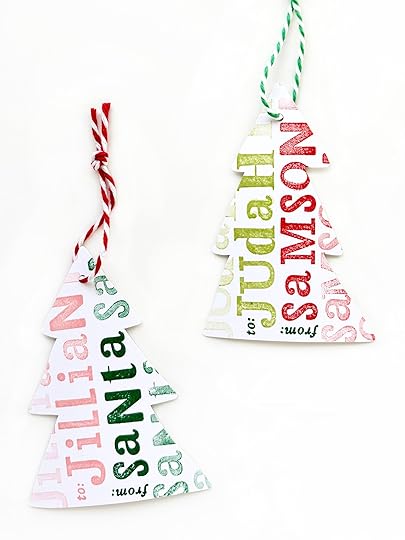
My favorite way to make gift tags was using the fun mixed alphabet stamp to stamp out the names in two colors. But I admit that it is not super practical for doing more than a few tags. So for a quicker tag option, check out my samples using the Scalloped and Holiday Tag 6x8 Stamp Sets.
My second idea to use up a bunch of the trees is to make Christmas cards with them! And as an added bonus, you can stash bust some Christmas patterned paper for your backgrounds! Or snag the digitals if you want a bunch of the same pattern, like this HOHOHO paper.
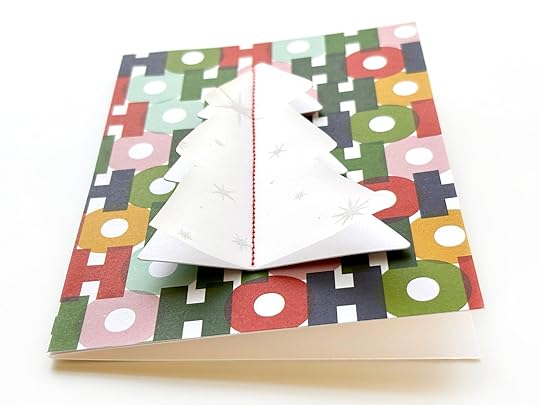
Check out the process video to see how I used the silkscreens, vellum, and some stitching to add some flair to the trees for my cards.
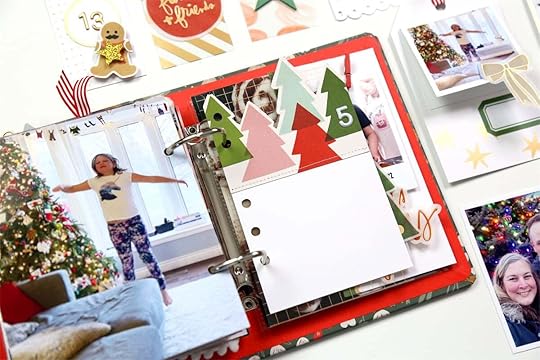
For my first actual page idea, I decided to carry over the layered vellum trees I made for the Christmas cards. How cute are they as a little grove of trees!
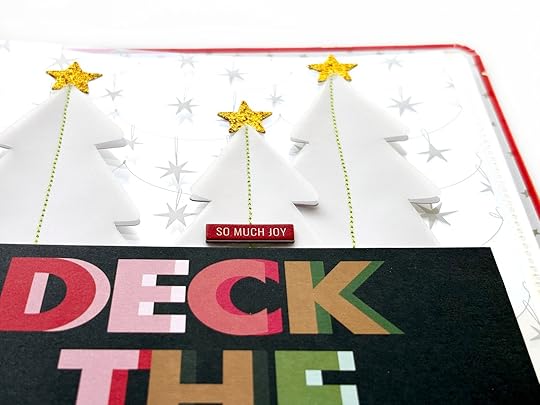
I really wanted a subtle tone on tone look with these white trees, so I paired them with the white garland transparency. And then for a pop of color, I had them sit on top of this "deck the halls" card.
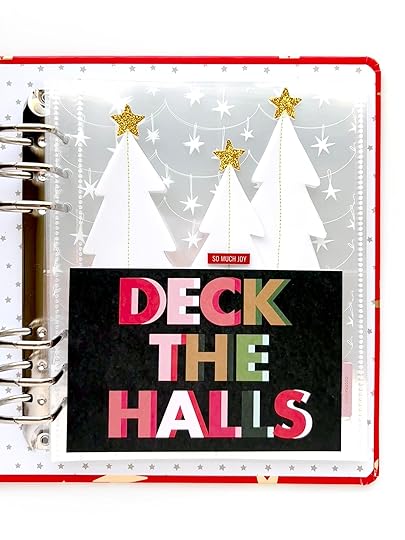
To give this page some room for a story and/or photos, I turned the "deck the halls" card into a flip up and added a tab. My plan for the back is to add some more trees and maybe a photo at the bottom.
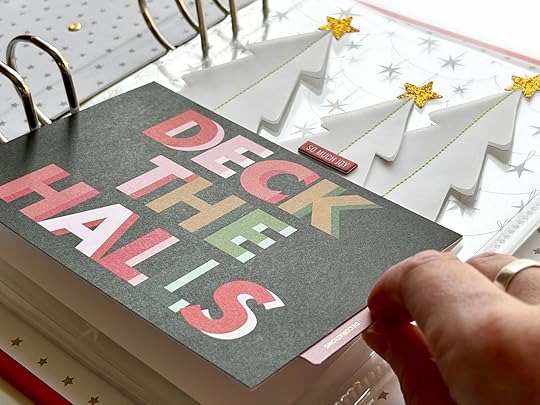
I finished off the page with some glitter stars at the top of the trees because every page needs some sparkle!
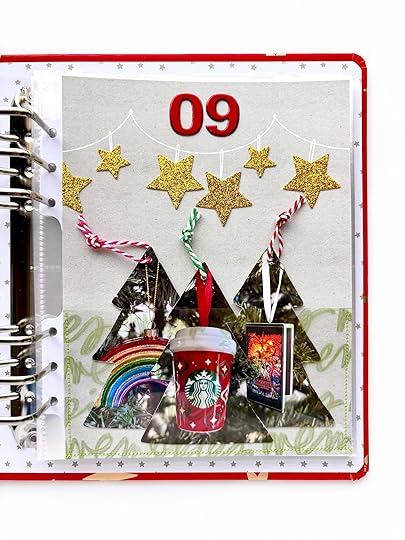
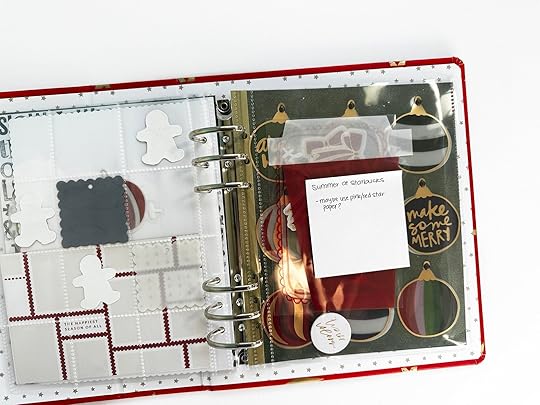
For my last idea, I thought it would be fun to use the trees as a home for the new ornaments I get this year. For the purpose of this lesson, I used photos from past years. When I use this page later this year, I will take the photos a little more zoomed out so that the ornaments fit better within the trees.
I chose to make a pocket for my trees using the neutral garland 10x8 paper. I love that it allows the trees to pop off the page and that the garland fits with the trimming the tree theme. To make the pocket, I stitched a bit of the green brush lettering transparency on the page.
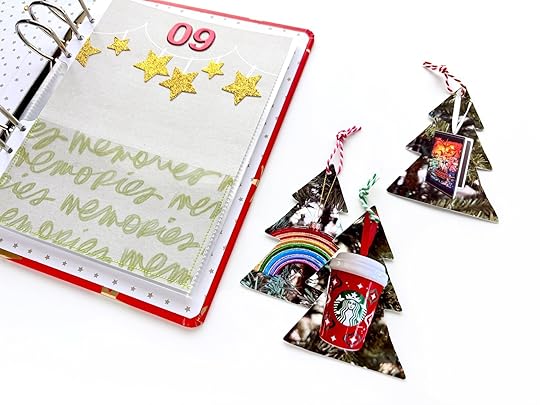
After I had cut down my paper with the garland centered, there was an awkward partial white star on one side. It was really bothering me so I experimented with adding the gold glitter stars on top of the garland to hide that and balance the page out. I love the result!
Painted Wood Veneer Stars
Merry Christmas Envelope Bundle
Main Kit
Gold Foil Number Puffy Stickers
Small White Plastic Numbers
December Moments Phrase Sticker Sheets
3x8 Transparency and Journal Card Set
Stars 6x8 AlbumCardstock Die Cut TreesAlpha & Numbers 4x6 Stamp SetScalloped 6x8 Stamp SetHoliday Tag 6x8 Stamp SetDecember Moments Silkscreen PackMerry Merry 10x8 Paper PackDecember Memories 6x8 Transparencies
I hope you enjoyed following along with all of my December Daily ideas this month! You can find me on Instagram at @jill.drangsholt if you want to follow my December Daily journey and my other crafty adventures.


September 23, 2024
December Daily® 2024 | Ali's Mixed Media Trees | Part 01

One of the super fun holiday crafting projects I embarked on last year was creating .
Here's how that turned out:
I loved that adventure so much last year that I decided to do something similar again using a tree shape instead of an ornament shape. Because I knew I wanted to do tree shapes for 2024 we were able to offer a die cut tree pack as part of our December Daily® collection (includes 50 die cut trees). In addition to those die cut trees I'm also incorporating a shorter, wider tree shape that we are offering as a metal die. I haven't decided if I'm going to do a wall hanging again or use these on a tree or something else - I'm simply diving in to the process of playing.
NOTE: Don't forget that our December Daily® Boxing Period is coming to an end on September 30th. Make sure to get everything added to your box to take advantage of our shipping specials. Also, this week we are doing some fun 24 hour sales happening on the sale page.
I've been filming myself through the process of working on these trees and have the first video to share with you today showing how I'm getting started and some of the things I'm playing with this year.
Let's dive in:
Here's a look at some of the trees I've created so far:
Bring on the layers!!!
I'll be back again in a couple weeks sharing another look at where I'm at with the trees.
December Daily® Die Cut Trees December Daily® Metal Tree Die December Daily® Holiday Tree 6x8 Stamp December Daily® Scalloped 6x8 Stamp Set December Daily® Holiday Phrase 4x6 Stamp December Daily® 4x6 Number Stamp Set AED Paint Pack (on sale) December Daily® 2024 Stencils December Daily® 2024 Silkscreens Grafix Plastic Deli Sheets Sizzix Big Shot Manual Die Cutting Machine POSCA Paint Pens Blue Tape Scrapbook.com Artis Craft Glue (dries clear) Anti Static Pouch (for embossing) Gold Embossing Powder Embossing Ink Embossing Pen Distress Rock Candy Glitter Heat Gun Snappy Tray Tim Holtz Stencils The Crafters Workshop Stencil Butter Holiday Pack Palette Knives The Crafters Workshop Foil Transfer Sheets The Crafters Workshop Tacky-When-Dry Gel Medium Additional supplies via my Amazon Storefront
December Daily® 2024 | Special Guest Pam Baldwin
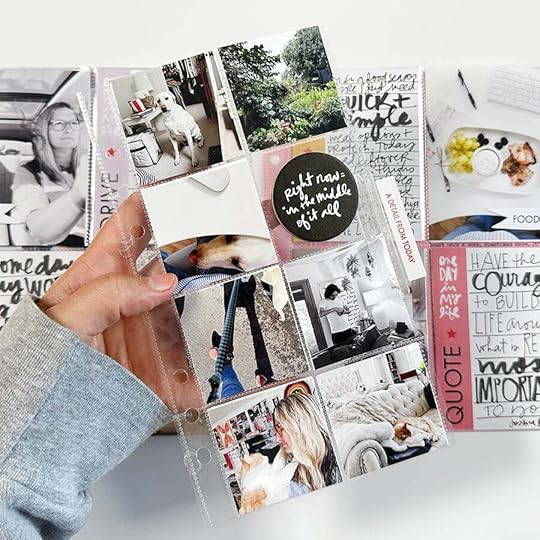
Hi friends! I’m excited to be back with you this week, sharing more foundation page ideas for the 4x6 album. This week the 3x8 journaling card and transparency pack is my jumping off point. I kid you not, the hardest thing about documenting this December is going to be deciding which pages to use, because I’ve got enough foundation pages from the 3x8 set for a whole second album/year of stories, it’s that good! Why don’t we start with a little album flip through and then we’ll break it down into the specifics of how I made these (very simple!) pages.
The pages I made with this collection fit into 3 categories: transparencies, pockets and tags/journaling spots. Although my pages are designed to fit the 4x6 album, this set and these ideas will definitely translate easily into a 6x8 or 10x8 format.
3x8 Transparencies
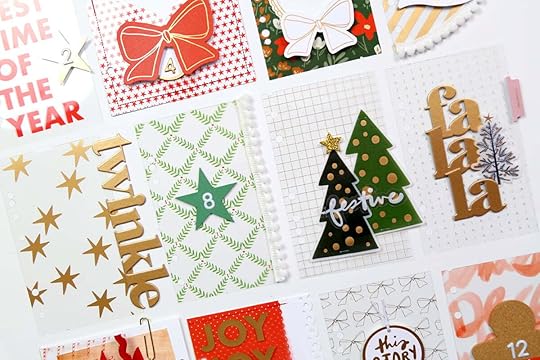
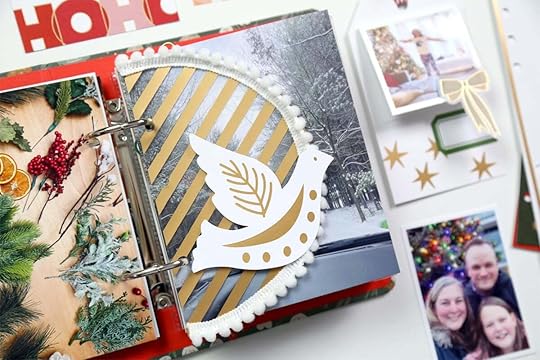
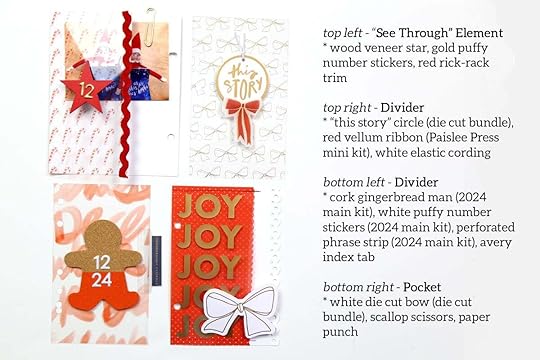
I LOVE including transparencies in my projects! There’s something about being able to sneak a peek at the layers beyond that makes me so happy. For this project, I was used the transparencies as dividers, pockets and see through elements.
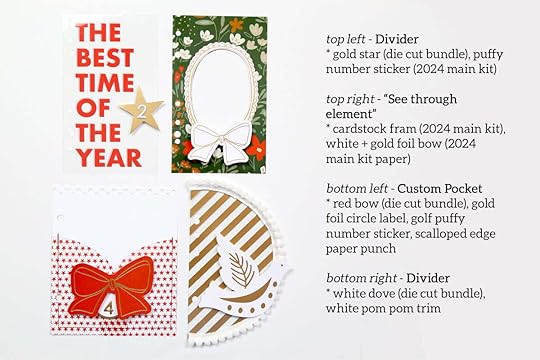
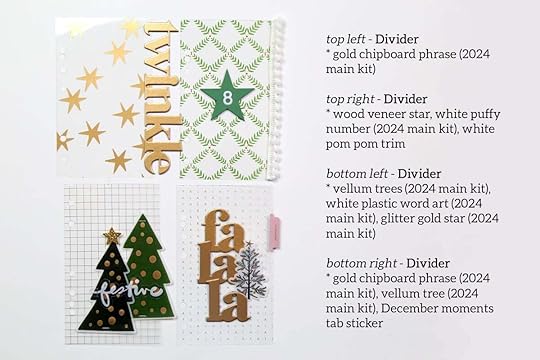
Dividers: Start by trimming the pages down to fit the 4x6 album and have fun embellishing! Consider adding ribbon and trim to the edges for extra texture and a playful touch, or try cutting your divider into a different shape (eg. half circle)
Pockets: Custom pockets are my favourite way to add extra journaling, photos and ephemera to my projects. Consider playing with both traditional horizontally oriented pockets and non-traditional side pockets to maximize the space you have to work with.
“See through” elements: Two fun options to play with the “see through” features of the transparencies. 1) Cut out a window. Remember, this window can by any shape you want it to be! This would be a great use of the Christmas tree die from the 2024 collection. Also consider shaped punches, or play with a custom shape. 2) Create a “see through flap” on an enlarged photo or patterned paper. Trim the transparency to 6.25” in height (this is the “outside the page protector” size of the pages). Score the transparency vertically on the side of the holes app ¼-1/2” from the edge. Fold and adhere this edge behind an enlarged photo / cardstock / patterned paper to create a flap.
Here’s a break down of the supplies I used for each of these transparency pages.
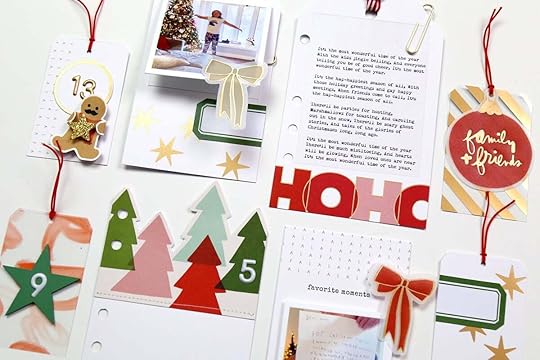
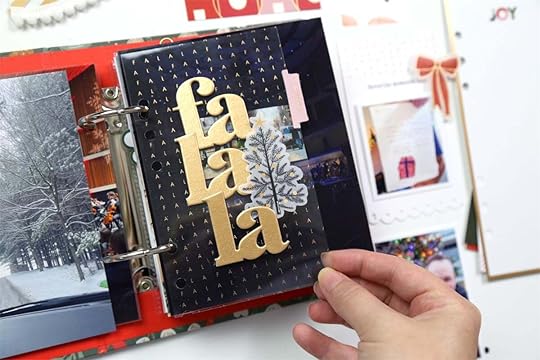
My approach to using the journaling cards was pretty much the same as what I did with the transparencies, but because there are repeated designs in the journaling card collection, I approached these next few pages with ideas for each design style. These journaling cards come with pre-punched holes, but that doesn’t mean you need to use them. You can definitely cut them off and have fun creating new shapes (eg. My love for tags!) that can be used on either the right or left side of a spread.
Scalloped borders: These lovely cards can be trimmed down to fit the 4x6 format while maintaining the design AND be turned into a pocket, all at the same time!
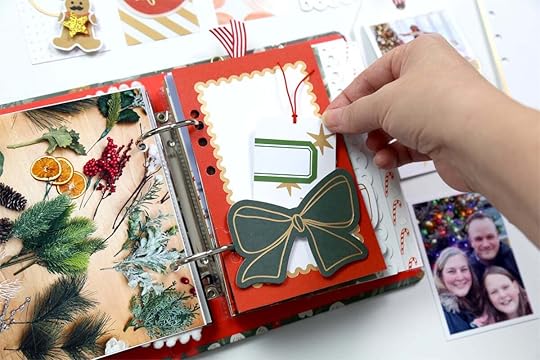
They also make a lovely home for extra photos, ephemera, embellishments and/or journaling as an interactive “flip out” from a full page photo or patterned paper.

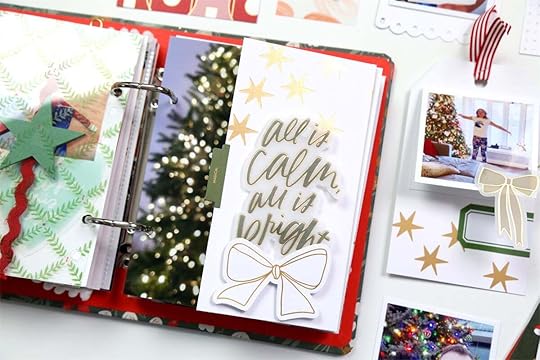
Gold foil stars: I adore this pattern! It was very tempting to use them all up right now, but I managed some restraint and have 1 left still to allow for some flexibility in December. I used the other two as an interactive “flip out”, a folio style pocket, and tags in 2 different sizes. A bonus feature of this design is that it’s reversible; with pre-punched holes, this design can be flipped upside down and still make sense when you put it on the left side of your spread.

Gold foil word art: When I see this style of paper, with a beautiful design oriented to the top of the page and a clearly defined horizontal line, my brain immediately thinks “make a pocket”! So that’s what I did. I like the idea of using punches and/or shaped scissors along the top of the pocket for playful bit of detail. I have one card left still, and I’m thinking next time I’d like to score the paper a little further down the white section to leave a white line at the bottom of the design where I can stamp the date.
Journaling prompt: The journaling prompt papers are so lovely in their simplicity and have me wanting to use that space as intended for journaling. That’s pretty much what I’ll do here. They can be cut to size, and in the smaller 4x6 format, they can absolutely be a story all on their own with the addition of a small photo. They’re also another great opportunity to play with your scissors and punches, or reshape them into tags.
Individual designs (Colourful Christmas trees, Ho Ho): I loved cutting up the colourful Christmas tree card to highlight the shape of the trees and create a custom “die cut insert”. This might be one of my favourite cards from the bunch!
Bonus mini tags: Save your scraps!! Because these transparencies and journaling cards are sized to “outside the page protector”, they’re actually 3.75” x 8.25” in size. When you trim them down to fit the 4x6 format, you’ve got an extra 2” x 3.75” canvas to play with. You can turn these scraps into super fun little tags that could create an entire series that could be used in this project or saved for something else! In theory, you could create a coordinated collection of 31 numbered tags!
Friends, thank you so much for joining me today! I hope this post has brought you some inspiration (and maybe convinced you to love the 3x8 transparency and journaling card sets as much as I do!). Definitely let me know if you have any questions in the comments below, and happy December Daily-ing! Those packages will be arriving before you know it!
September 20, 2024
In Case You missed It | September 20

Happy Friday, friends! Welcome to the latest
In Case You Missed It. Just a reminder that this is a quick post that will happen every Friday afternoon with all the updates and links that have happened throughout the week. So, let's get to it:
THANK YOU FOR JOINING US FOR DAY IN THE LIFE
This week the community documenting day for Day In The Life happened. Ali has been on the blog sharing her tips and advice. Today she is sharing her completed project here. Thank you so much to those that joined us.
2024 DECEMBER DAILY® PRODUCTS
The 2024 December Daily boxing period is currently live. From now until September 30th 11:59pm ET you are able to add items to your box for a single shipping charge. Order will ship the first week of October. Due to manufacturing constraints, sold out items will not be reordered. Our 2024 Collection Preview Post is available here. We also shared a How It Works post for all of the information you need to know to prepare for the boxing period launch on Tuesday, August 27th at 10am Eastern. Not signed up for our newsletter? Head to www.aliedwards.com and sign-up in the footer of our site. Be sure to follow us over at @decemberdaily, our official account for all things December Daily®. We also invite you to join us in the December Daily® Facebook group for more merriment. Find additional resources and inspiration, including Ali's completed albums, on the blog via the December Daily hashtag. Learn more about the project here.
NEW DECEMBER DAILY® COMMUNITY SPACE
We invite you to join us in this free December Daily® community classroom. We know that many in the community don't care to share their December Daily® projects on social media. And for those that do, constant algorithm updates and unreliable hashtag searches make it challenging to connect with others or to find inspiration and encouragement. So with this in mind, we are excited to offer this space as a place to share your work with other memory keepers and storytellers who are participating in this special project. Register for free here.
2024 DECEMBER DAILY CLASSES
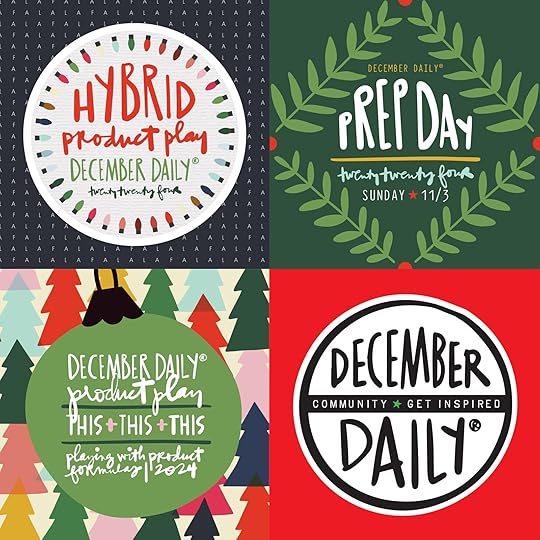
December Daily® Product Play | This + This + This workshop registration is open and available at an intro price of $20 during the Order Selection Period. After that time it will move to the official price of $25. More details on this year's workshop can be found at the bottom of this post (workshop begins November 5th). December Daily® Hybrid Product Play workshop registration is open and available at an intro price of $12 during the Order Selection Period. After that time it will move to the official price of $15. Read below for more details (workshop begins on October 11th to correspond with our December Daily® Digitals release the same day). December Daily® Prep Day is happening this year on Sunday, November 3rd starting at 10am ET. You can sign up for this $5 online event on Tuesday August 27th during Order Selection Period as well.
SEPTEMBER REVEAL
This week revealed a new Story Kit™ theme: SCHOOL! Everyone has a story about school. Most of us probably have more than one from all the years sitting in a classroom (or maybe your experience was totally different - that's a story too). This month we are coming together to tell stories about education and school experiences over the course of our lives (stories could be about you or someone you care about). In addition to our new Story Kit™ theme, we also have a brand new Stories By The Month™ kit, a New Halloween Kit, the next edition in our Alphas Are Awesome series, and our most recent One Little Word Mini Kit. Head to the link in our bio for Ali’s blog post with all the details about this month’s release. Head to the blog for Ali's post with all the details about this month’s release.
SEPTEMBER DIGITALS
The first Friday of every month we have a new digital release available in the shop. Play with scale, recolor objects, add journaling, print multiples…the sky is the limit when playing with digitals. Shop digitals here. As a special bonus, we've released our Halloween collection early for those wanting to play before October.
2024 PROJECTS + PRODUCTS SCHEDULE
As we continuing easing into 2024 we put together an overview of our schedule of projects + product releases for the upcoming year. We are sharing this as a way for you to plan, think about what you might want to participate in this year, and simply share some of the things we have coming up to help support + inspire storytelling. For the last few years we've followed a fairly similar cadence for our releases and our major projects will follow that release schedule again this year. Please note that, as you might imagine, this schedule is subject to change throughout the year based on a variety of variables. Find the post here.
As always, we’re so grateful to have you all as members of this community! Thanks for joining me today and have a great weekend!
Story Play | Day In The Life™ 2024 | Ali's Completed Project
I love finishing up another documenting project!
This Day In The Life™ adventure is so worth the effort. I love that I've done this project so many times over the years and can see the passage of time through the stories told. If you missed the earlier post this week I shared a look back at many of my past Day In The LIfe™ projects which you can check out here.
For 2024 I decided to add this project to my 6x8 story album. I had mentioned previously that I might add it to Project Life but as I was bringing the content together it just made more sense to me to put it into the 6x8 this time.
Want to use the Day In The Life™ logo in your project? You can download it here.
Here's a look at it coming together via video:
Here's a look at my finished project via images:
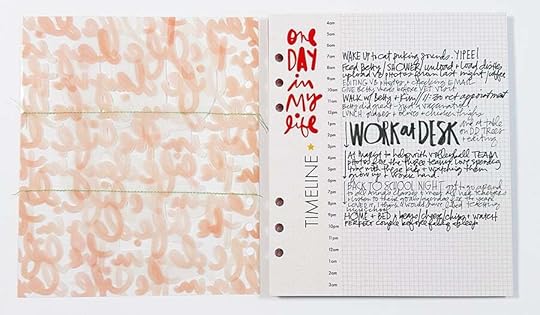
As I was working though bringing this all together I felt like it made the most sense to start with the timeline.
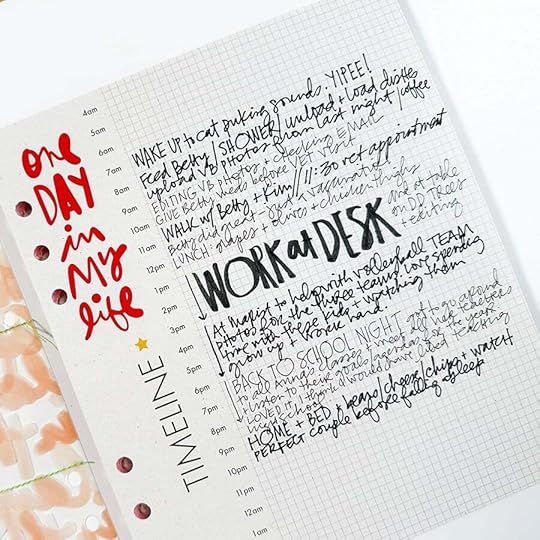
I'm using three different pens here: .05 Micron, Kuretake Brush Pen, and Staedtler Lumocolor F.

Photos added to the "a detail from today" paper were cropped to 2.25 inch x 2.25 inch.
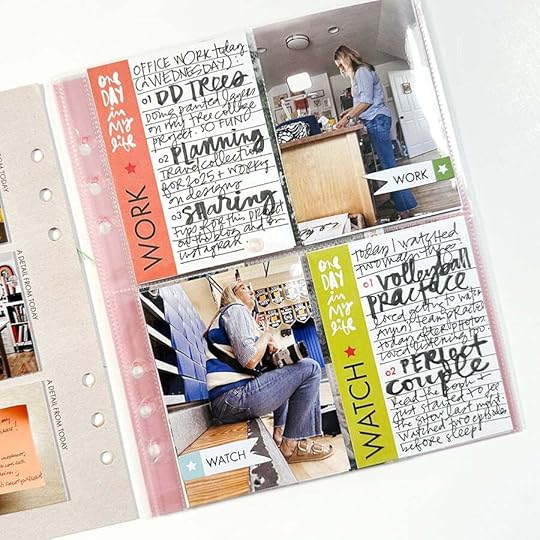
For each of my "main" themes this time I printed a 3 inch x 4 inch photo and used the 3x4 Stamp Set to add words to the banner stickers from the kit. My journaling was often a mixture of the Micron Pen and the Kuretake Brush Pen. In the video you'll hear me say that I wish I had used red ink for the numbers on that "work" card (it was the first one I did) - I love the little pop of red on the numbers on the "watch" card.
And repeat!
Because I had more photos I wanted to include from my day I grabbed a 2x2 page protector and trimmed off the outside column of pockets to fit the number of photos I wanted to include (front + back). On the one empty pocket I added 2 inch chipboard circles to the outside of the pocket.
Love this glimpse of my day.
It all goes by so fast.
I took the journaling I added to my blog post yesterday and copied and pasted it into two canvasses in Illustrator (you can do the same thing in Photoshop or Canva).

Day In The Life™ 2024 Kit (included with bundle) (digital available) Day In The Life™ 3x4 Stamp Avery Index Tab We R Memory Keepers Hole Punch Micron Pen Kuretake Brush Pen Staedtler Lumocolor Pen StazOn Ink Pendleton Red Ink 6x8 Page Protectors 6x8 Little Details Album Additional basics via my Amazon Storefront
September 19, 2024
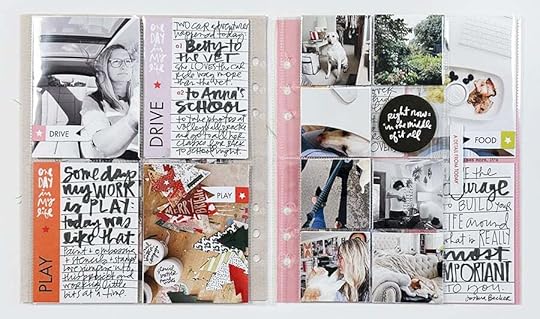
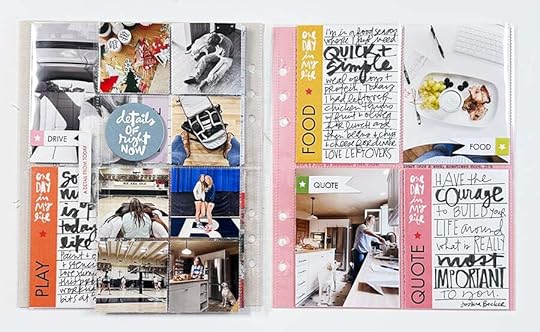
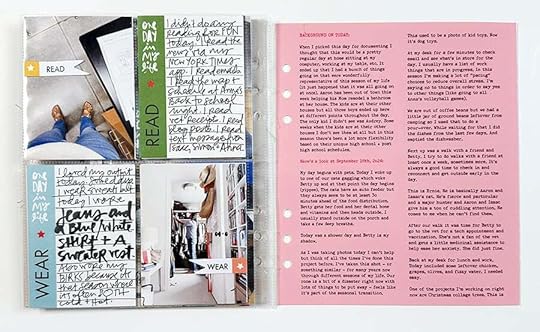
Story Play | Day In The LIfe™ | Ali's Day
When I first sat down today to get my Day In The Life™ photos into this post I was thinking I hadn't taken that many but I actually took a good representation of my day. Initially I thought I'd use my big camera for my documenting but pivoted to use my phone + watch for easy timer shots. I'm happy with that choice! As you'll see below I ended up getting myself in a lot of the photos by using the timer - I just set my phone down on a counter, table, etc and then use the timer function on my Apple Watch. It makes it so easy to get yourself into the photos.
BACKGROUND ON TODAY: When I picked this day for documenting I thought that this would be a pretty regular day at home sitting at my computer, working at my table, etc. It ended up that I had a bunch of things going on that were wonderfully representative of this season of my life (it just happened that it was all going on at once). Aaron has been out of town this week helping his Mom remodel a bathroom at her house. The kids are at their other houses but all three boys ended up here at different points throughout the day. The only kid I didn't see was Audrey. Some weeks when the kids are at their other houses I don't see them at all but in this season there's been a lot more flexibility based on their unique high school + post high school schedules.
Here's a look at September 18th, 2024:
My day begins with pets. Today I woke up to one of our cats gagging which woke Betty up and at that point the day begins (yippee). The cats have an auto feeder but they always seem to be at least 30 minutes ahead of the food distribution. Betty gets her food and her dental bone and vitamins and then heads outside. I usually stand outside on the porch and take a few deep breaths.
Today was a shower day and Betty is my shadow.
As I was taking photos today I can't help but think of all the times I've done this project before. I've taken this shot - or something similar - for many years now through different seasons of my life. Our room is a bit of a disaster right now with lots of things to be put away - feels like it's part of the seasonal transition.
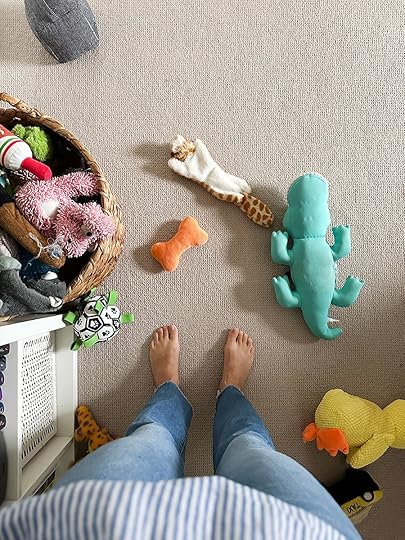
This used to be a photo of kid toys. Now it's dog toys.
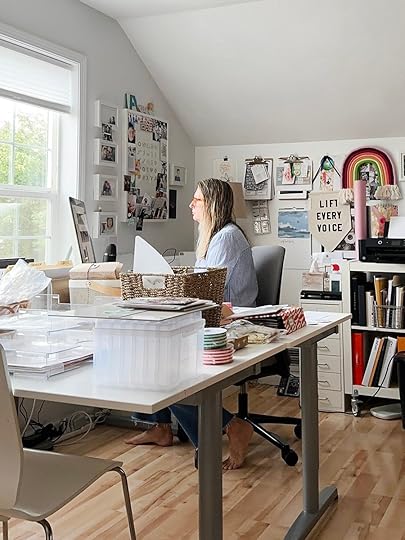
At my desk for a few minutes to check email and see what's in store for the day. I usually have a list of work things that are in progress. In this season I'm making a lot of "pacing" choices to reduce overall stress. I'm saying no to things in order to say yes to other things (like going to all Anna's volleyball games).
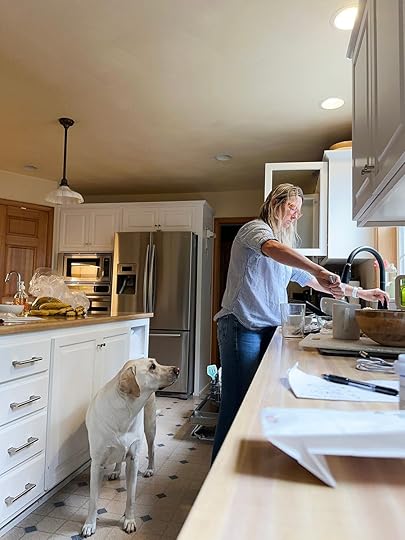
We are out of coffee beans but we had a little jar of ground beans leftover from camping so I used that to do a pour-over. While waiting for that I did the dishes from the last few days.
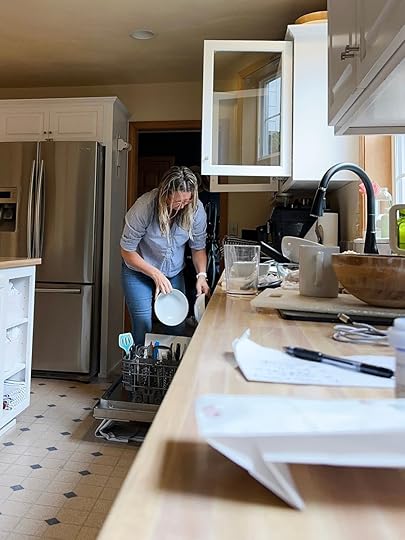
And emptied the dishwasher.
Next up was a walk with a friend and Betty. I try to do walks with a friend at least once a week, sometimes more. It's always a good time to check in and reconnect and get outside early in the day.
This is Ernie. He is basically Aaron and Isaac's cat. He's fierce and particular and a major hunter and Aaron and Isaac give him a ton of cuddling attention. He comes to me when he can't find them.

After our walk it was time for Betty to go to the vet for a tech appointment and vaccination. She's not a fan of the vet and gets a little medicinal assistance to help ease her anxiety. She did just fine.
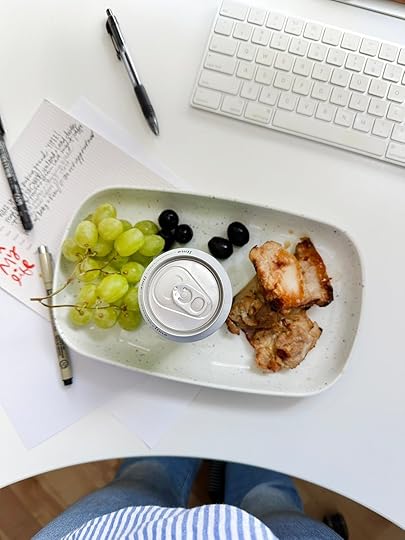
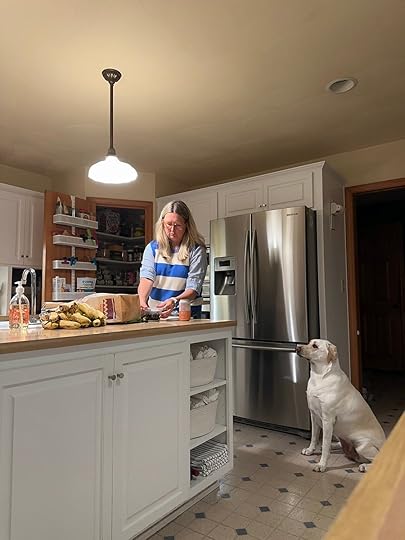
Back at my desk for lunch and work. Today included some leftover chicken, grapes, olives, and fizzy water. I needed easy.
One of the projects I'm working on right now are Christmas collage trees. This is inspired by a project I did last year (). I'm using both the die cut pack of tress from the December Daily® collection and the tree die. I do a variety of layers and I LOVE IT. I'll share more on this in a blog post soon. It's a super fun project for me and I'm excited to be playing again!

She's never far away.

Except when she heads to other spaces in the house to sleep or hang out.

Elliott was here for a bit doing the stuff he does: music, friend hang outs, making food, etc.

Simon was here for a bit because he wanted to work on a film project in this house. He was getting batteries for some equipment here.
He's doing great!

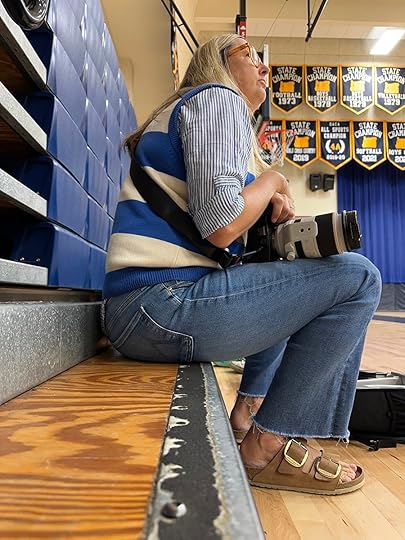
It was a windows down on the drive kind of afternoon as I drove over to Anna's school to help with her volleyball team photos.
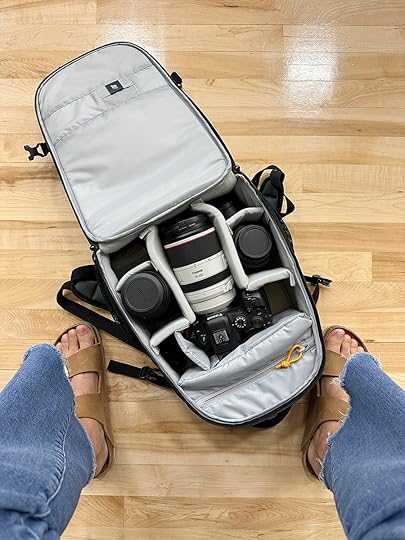
It feels full circle all over again to be back into using my big camera more regularly. For sports I'm using a Canon EOS R6 and a 70-200 lens. I got a new backpack recently to be able to bring "all the things" with me to the matches.
One of the big reasons I started getting into taking sports photos, besides a deep love of images, is that it helps ease some of my competitive anxiety. And I'm loving sharing them with the kids so they can see themselves as they are in this season of their lives.
Today I ended up assisting one of the coaches who is a professional photographer. I'm loving learning from her!
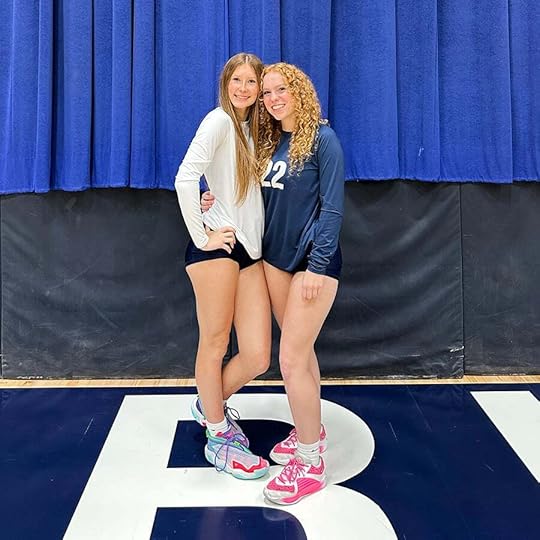
Anna + Keegan.
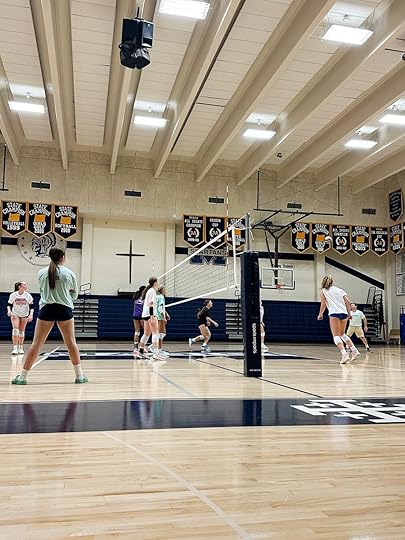
After all three teams had their photos taken I got to watch a little of Anna's practice while I waited for the Back To School Night to begin. You better believe I loved getting to sit and watch and listen to them talk strategy for an upcoming tournament with some big games on Saturday.
Back To School night included going to each of Anna's classes and having a 5 min intro to the teacher. Chris, Tiffany and I ventured around campus together laughing because we kept having to look at the map. Sitting in each of those classrooms was like a time machine back to my own high school experience. I loved school. I loved being in a learning environment.
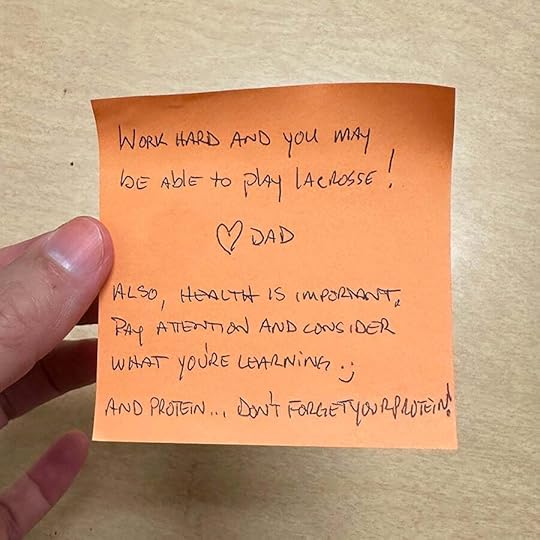
In Anna's health class we were invited to write some words of wisdom for these sophomores and it could be general or specific to your kid. Chris wrote this to Anna. Last spring Anna played Lacrosse for the high school team while also playing club volleyball and it was A LOT and something had to give. It was a good season of learning about time management and focus and priorities. She's got some awesome goals for herself this year and we're here to support her along the way.
Back at home for a late dinner that I ate in my bed while starting The Perfect Couple.
It was a big, full day.
Thank you for coming along with me! I'll be back tomorrow with a look at the finished project!
December Daily® 2024 | In The Classroom
This year we're excited to offer three classes and a new community space to inspire your December storytelling!
December Daily® Product Play | This + This + This workshop registration is currently open and will be available at an intro price of $20 during the Order Selection Period. After that time it will move to the official price of $25. More details on this year's workshop can be found at the bottom of this post (workshop begins November 5th). December Daily® Hybrid Product Play workshop registration is currently open and will be available at an intro price of $12 during the Order Selection Period. After that time it will move to the official price of $15. Read below for more details (workshop begins on October 11th to correspond with our December Daily® Digitals release the same day).
December Daily® Prep Day is happening this year on Sunday, November 3rd starting at 10am ET. You can sign up for this $5 online event now.December Daily® Community is a new free community classroom with a dedicated space to share your December Daily® projects.
Here is more information about each:
December Daily® Product Play is all about ideas and inspiration for working with physical products from the December Daily® Collection.
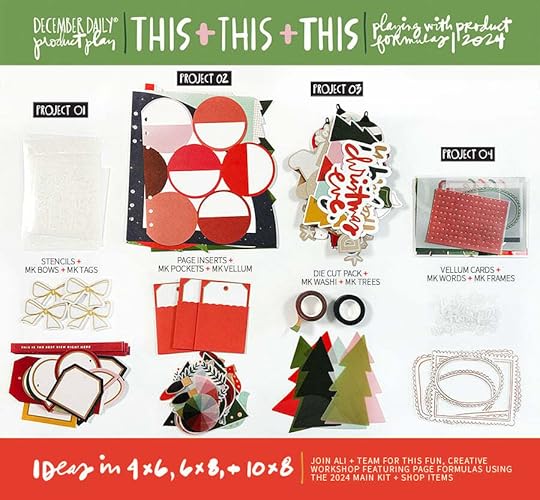
For our 2024 December Daily® Product Play workshop Ali + team will using four product formulas (2 products from the Main Kit + a product from the shop) as the jumping off point for creating pages to hold your stories. During each of the four weeks of this workshop Ali + team will use the following product formulas to create a project in the three album sizes (meaning each week will include one 10x8 idea, one 4x6 idea, and one 6x8 idea using the product formulas).
Our goal for this class is to provide inspiration to support your December storytelling by showcasing creative ways to mix and match the collection. Some ideas shared in this workshop will be completed spreads with images and journaling and some ideas will be for foundation pages to spark your creativity and help you to create homes for your December stories.
In addition to the Main Kit Ali and the team will be using the following:
2024 Stencil Pack 2024 Die Cut Page Insert Pack 2024 Die Cut Pack 2024 Specialty Card Pack (includes vellum + transparency)
This year's contributors:
Morgan BealBarbara PicinichRachel HartJill BroadbentAnnette HaringLesley Vander WaalDanielle Menage-JensenAmy Gretchen
Registration is currently open. Sign up during the boxing period for $20. After the boxing period ends the class will be $25. Class begins Tuesday, November 5th.
2024 DECEMBER DAILY® HYBRID PRODUCT PLAY

Hybrid scrapbooking combines digital products with physical supplies to create paper (or printed) memory-keeping projects. For this class, our contributors will share fun, creative ideas and inspiration for working with digital products from the 2024 December Daily® Collection via written and video tutorials.
This year's contributors:
Denine ZielinskiKim HurstJessica LutherIngunn MarkiewiczJennie ReyVirginie GoujonRonelia MortonSarah JuersAmy SackrisonCJ Flynn
All of the projects and techniques provided in this self-paced class will demonstrate how versatile digital products can be in helping you get your stories told. Our hope is that you will come away with ideas for using digital products to create homes for your December stories.
The price for this class will be offered for $12 during the boxing period. After the boxing period ends on 9/30 the price will go up to $15. Please Note: This workshop is not meant as an in-depth software workshop. The contributors of the class will be using either Photoshop, Photoshop Elements or Canva, and the examples and projects they share will show you the steps they take to create physical projects using digital memory-keeping products.
2024 DECEMBER DAILY® PREP DAY
Join the December Daily® community for a fun online December Daily® prep day on Sunday, November 3rd, 2024. Use this opportunity to finish past December Daily® projects or start working on your project for 2023. The first live video will start on Sunday, November 3rd at 10:00 am Eastern.
Cost is $5.
Each lesson will be open for you to access 15 minutes prior to the live content which will be available at the top of each hour. Then after the discussions and/or project ideas, you are free to work on your own projects, clean up, prep, etc.
Note: We will have more details about the schedule and content in the coming weeks.
Each topic will have its own Lesson within the 10 Hour Classroom. Inside each lesson you'll find the live video, a free download, a challenge, and a spot for conversation in the comments section of the lesson. Live chat will be available for anyone who wants to converse back and forth during the live event. Note: All videos will be recorded so you can watch them at your own pace. You don't have to be online on the 3rd to access the content.

We invite you to join us in this free December Daily® community classroom. We know that many in the community don't care to share their December Daily® projects on social media. And for those that do, constant algorithm updates and unreliable hashtag searches make it challenging to connect with others or to find inspiration and encouragement. So with this in mind, we are excited to offer this space as a place to share your work with other memory keepers and storytellers who are participating in this special project.
In this classroom you will have access to the photo galleries for sharing your progress as you work to finish previous years' projects (aka Done by December) or work on this year's project. We won't be adding any new lesson content, but from time to time we may share helpful information that points to the blog or other resources.
We wholeheartedly believe that projects and stories are at the heart of December Daily® and we are excited to offer this dedicated community space for sharing them.
September 18, 2024
December Daily® 2024 | Special Guest Linda Jordan
Hi everyone, it’s Linda and I’m so excited to be back today to share more December Daily ideas! I was on the blog earlier this month to share my 10 tips of what you can do now to get ready for December Daily, so if you missed that you can check out that post here.
Today, I am back to share with you my top tips for making this project manageable for you so that you can stay on track and finish your album.
10 THINGS TO STAY ON TRACK WITH DECEMBER DAILY
December Daily is a super fun project, but it can also be really intimidating. It’s easy to look at other people’s albums and feel like you don’t have the time, energy, or space to make something like that, which leads a lot of people struggling to finish.
I think it’s important to keep in mind that, even though we are all brought together by our love of documenting our December, we are all different people with different interests and lives. If you are in a season of life where you have a lot on your plate, whether it’s working a stressful job, parenting small children, or living with a chronic illness, you might not be able to take on as much as someone who does not have these things right now. Likewise, if you are a person who has a lot of hobbies in addition to scrapbooking, you won’t be able to spend as much time on this project as someone who devotes all their free time to scrapbooking.
Keep this in mind while setting your goals for this project. If you are in a season of life with more on your plate, consider what you really want to get out of this project.
Is your ultimate goal to finish? If so, pick a smaller album or consider working with a daily formula (Pam’s recent blog post shared lots of tips for this!)
Is your goal to just have fun with products? If so, don’t worry about finishing and just do what you can. Maybe focus on creating a few spreads that you absolutely love rather than worrying about making 25.
Is your goal simply to capture the memories? If so, maybe consider focusing on capturing the words + photos and then putting your project together at a later date.
If, instead, you are in a season of life where you might have more time or energy to devote to this project than you have in the past, ask yourself the similar questions when setting your goals.
Do I want to use my extra time to focus on finishing this project “on time” or do I want to spend my extra time making more elaborate spreads?
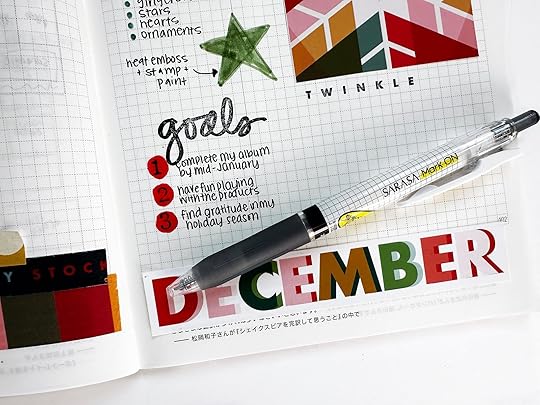
My top goals for this project are: (1) To have a completed album by the middle of January; (2) To have fun playing with my products; and (3) To find gratitude in my holiday season. These 3 goals are going to guide me in setting up my plan + working through this project.
What are your top goals for this project?
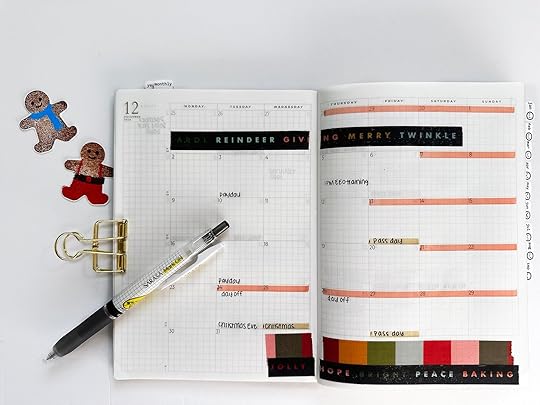
Once you’ve established your goal for this project, you need to make time to prioritize this project. For me, I know it’s not feasible to work on this project every single day in December because I work full time and on days I go to the office I am just too tired by the time I get home, cook dinner, do chores, etc. So, instead, I plan to work on this project a few days at a time on chunks, primarily on the weekends during December and maybe into early January. I also will try to find a few week days that I can work on this project as well. I already “set up” my December spread in my planner and added a red highlight to days that I don’t have work. I know some of these days will be devoted to activities/chores and others will be devoted to crafting.
Once I’ve selected times that work in my schedule to devote to this project, I think of ways I can eliminate other activities that would otherwise take up that time. For me, that means pre-planning some youtube content for my channel so I can devote my crafty time purely to this project. It also usually means taking one or two vacation days during the month of December to give myself extra space for this project (and all the other responsibilities of the holiday season).
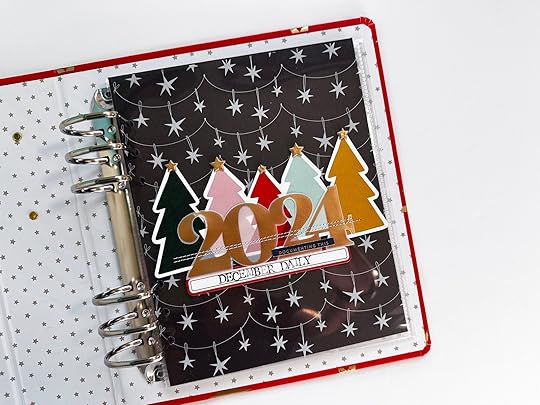
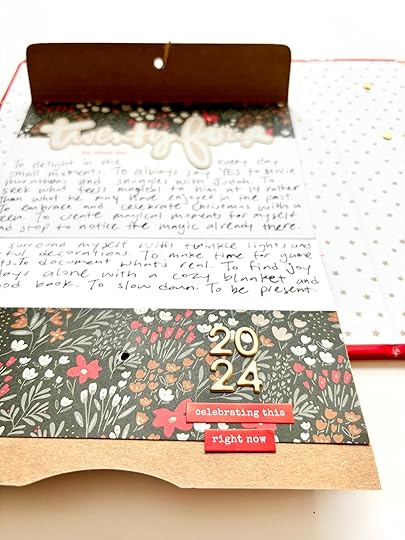
Before we get to foundation pages, there are other ways you can “set up” your album before the month. In addition to daily stories, you might want to include some other things in your album. Consider decorating your album cover, spine or inside cover. You can also create a title page, your reason why page, and your table of contents.
In the video below, I set up my title page + reason why.
I chose to set up a title page that requires me to only add a photo during the month of December which will be super easy. I spent a lot of time creating a detailed reason why page, and I love how it turned out. I am happy to spend the extra time stamping + stitching before December rolls around because I know I might not have the motivation or time to do it during the month.
Ali has shared her reason why for a lot of projects in the past, including December Daily, and I think this is an important part of the process. Even if you don’t want to create a detailed page for your album, identifying your reason why (and revisiting it during the season) can help create the motivation to get through the “messy middle” of this project later in the process.
Here is a closer look at my completed reason why page:
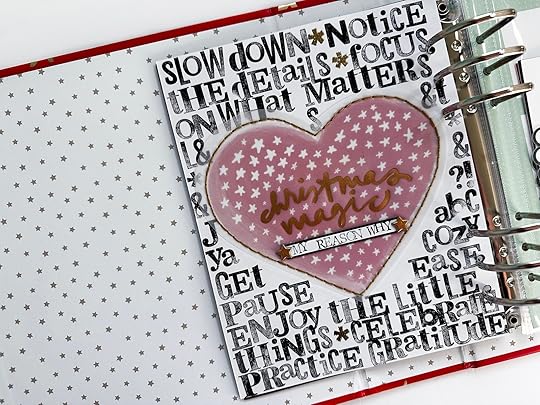
To create this page, I took a little bit of time to think about my reason why behind this project and wrote out a list in my daily journal. Then I stamped out some of the more important words using the new wonky alpha stamp that was released this year, leaving space for the large die cut heart that says “Christmas Magic” Then, I added some embroidery to attach the heart to my page. Finally I added a few final touches and slipped it into my album. Just having this start in place makes me feel so much more prepared for this project!
Foundation pages can be one of the most fun parts of this project! In case you’re not familiar with foundation pages, the concept is to create the “fun” decorative part of a page now, so that once the month rolls around, you can simply add your photo + text and all the crafty work is done ahead of time. There is a lot of previous content on this blog sharing way more details and ideas for foundation pages if this is something that interests you.
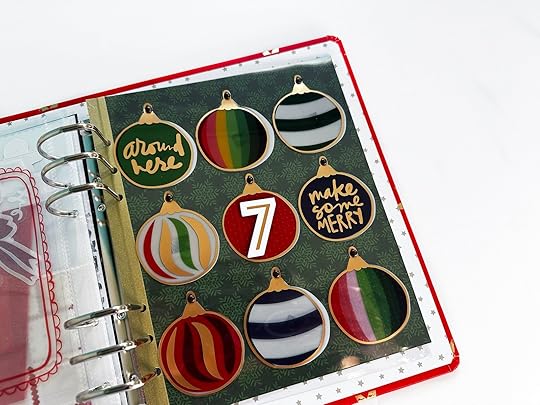
I created a foundation page shown above using the ornament transparencies. I cropped down and adhered the white ornament transparency to a piece of patterned paper in the kit so it would fit in my album. Then I cut out nine of the transparent decorative ornaments and added them on top of the white ornaments with a brad so that they can rotate out of the way. My idea is to add photos punched into a circle shape or words typed on clear sticker paper behind each of the ornaments to tell a story.
In the past, I’ve done a range of foundation pages. I’ve found that creating only 2 or 3 fully “created” foundation pages like the one above makes sense, for me, because I like to have the flexibility to tell organic stories + create pages during the month that are inspired by my photos + words. Foundation pages are one of those situations where you really have to think about what works for you—what works for other people might not work for you. If foundation pages are not your thing, don’t worry, there are other things you can do to get prepped for the month!
Creating pre-made foundation pages is not the only way to set up your album in advance. If you want more flexibility during the month, but still want a starting place to make this project more manageable, consider creating partial foundation pages or page kits. Even if foundation pages aren’t for you, you want to make sure your supplies are accessible during the month so that you can minimize decision fatigue and remember to get your favorite products into your album.
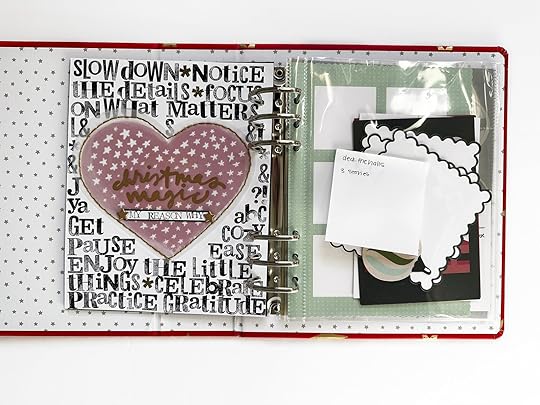
One of my favorite ways to do this is by adding some of my favorite products directly into my album as a place to store them until I’m ready to create a page with them. This way I will see them every time I open my album to work on it and I’m more likely to use them as a jumping off point for a spread.
In the video below, I talk you through a few of the page kits I set up and my thought process behind them. This way, I have a starting point when I go to work on these days, but I am not limited by a completely pre-made page.
In the video above I talked through a few ways to create page kits + some of the page kits that I set up for myself. These might not look as “pretty” in the album at this point, but they are super helpful when I go to put my album together during/after December!
Page kits are a great way to give yourself a jumping off point for a spread without “locking” yourself into any specific design. In the video I went through some of the page kits that I set up and talk through some ideas for how to create your own.
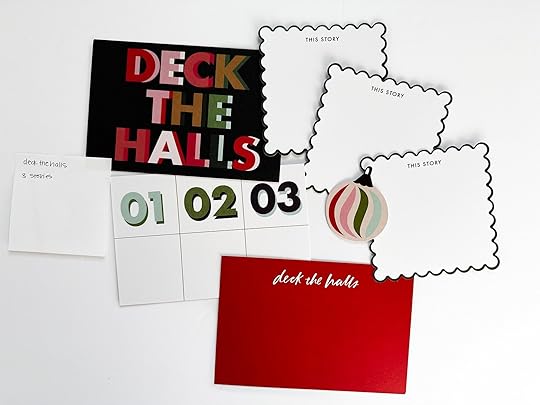
Some specific ideas for creating page kits (more details in the video):
Use a story that you know you are going to want to tell as a jumping off point and select supplies that will support that storyUse the supplies as a jumping off point for a story. Select specific supplies that prompt a story + pair them with supporting supplies that coordinate. Use a base page protector (such as the 2x2 pockets) or pattern paper as a jumping off point and select coordinating embellishments to fit in all of the spots. Use a specific shape as a jumping off point and collect various supplies that coordinate together with that shape. Last year I did this with circles and tags, but you could do different shapes like stars or hearts.Use a specific color scheme as a jumping off point and pair supplies that coordinate with that color scheme.
6. Come up with a plan to collect your stories
One of the best things you can do to set yourself up for success with this project is come up with a system to collect your stories during the month. Whether your goal is to complete this project in December or come back to it later, you have to collect the stories during the month of December or you will forget the details.
Before the month starts, come up with a plan that is doable for you to collect your stories + words + photos + ephemera each day. Here are some ideas:
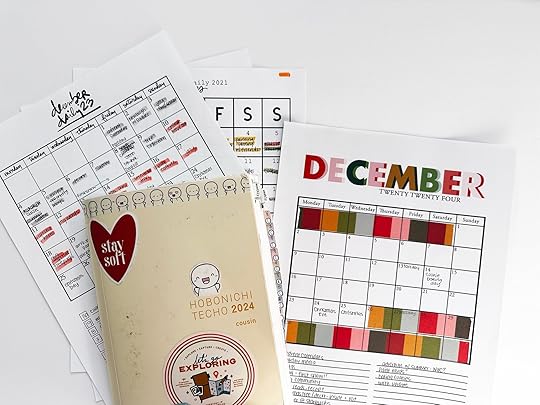
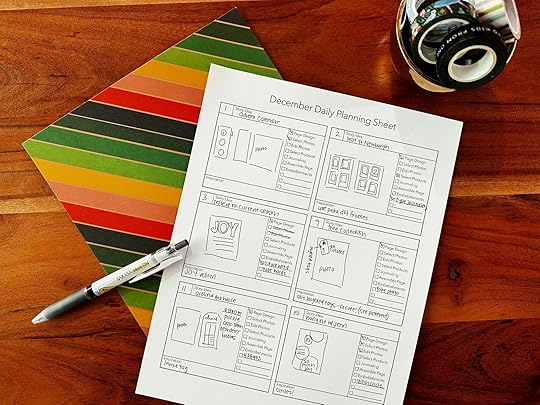
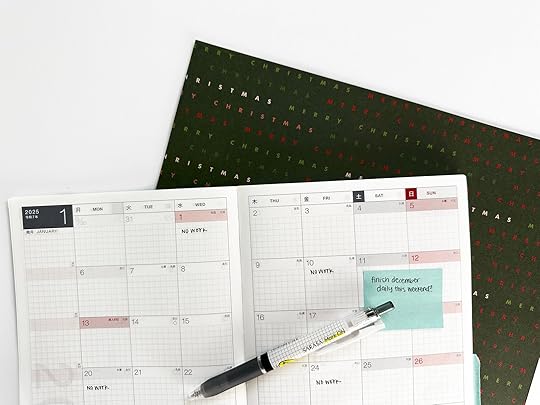
Use an app (such as Day One) or a journal to write down your story for the day. This can even be just a simple few words, outline or bullet point list, if you don’t have time to write a detailed story.Use your notes app to jot down details during the day such as quotes from your family members, story ideas, or details of what happened. You can also try the talk to text function if you don’t have time to stop and type.Use social media as a home to collect your stories during the month. This could mean a daily instagram post or story to document what happened (note: you can access your own older stories that have expired by going back and adding them to a highlight).Use sticky notes to jot down story ideas and stick them in your album throughout the month.Use my downloadable calendar to write down your story on each day + make extra notes at the bottom of the page. If you missed it, you can download the calendar at the bottom of my previous blog post here.
This year, my plan is to use a combination of my printable calendar + my daily journal (in a Hobonichi cousin pictured above) to capture my stories. I will likely jot down quick ideas on the calendar and use that to help arrange which story goes where. I will also likely add some longer words in my cousin for stories that happened on specific days that I want to jot down in the moment.
With any large project like December Daily, it’s easiest if you break it up into smaller steps. For each day your steps might look something like this:
Come up with a storyDesign your pageSelect and edit photosWrite your journalingAssemble your pageSelect a numberAdd embellishments
For me, with any large project, I look at each of these steps individually and think about how I can best accomplish everything. I might not have time to sit at my craft desk every day, but I can come up with my story while doing chores + add it to a quick note in my journal. I can select + edit my photos on my iPad while watching TV from the couch. Think about what steps you can easily do up front so that when you do have time to sit down to craft you can focus on the parts that you couldn’t do elsewhere.
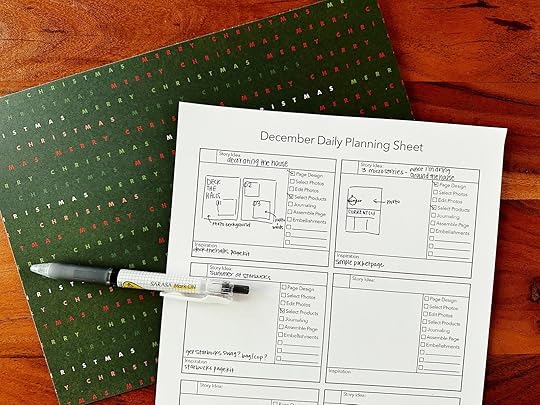
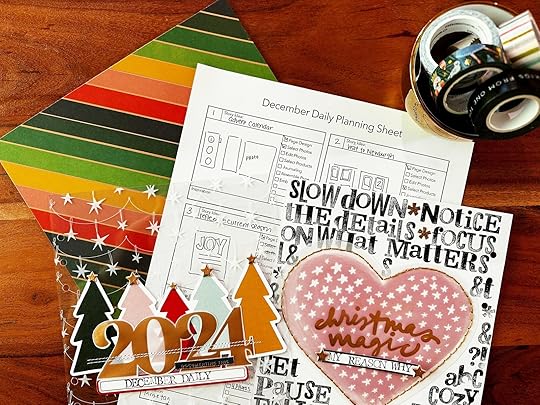
I have created a downloadable PDF for you to help you break down your project + organize your ideas as you are putting together your album. You can download this sheet at the bottom of this lesson.
Each page has space for you to sketch out 6 pages for your album with a checklist of steps. You can simply cross off steps that don’t apply to your page and add in extra ones that you might need. You can print out as many pages as you need and either keep these with your supplies as whole sheets, or cut out each rectangle to add with your supplies in your album like I did in the photo below.
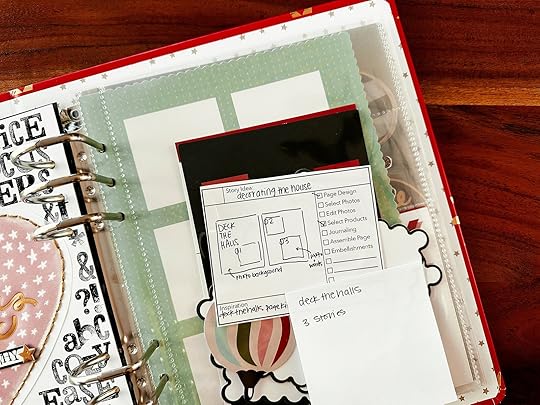
I haven’t yet fully planned out my 2024 album because most of these sheets will be filled in during the month of December, but I mocked up a planning sheet to show you how I would’ve used this for my 2023 album based on notes I had from creating that album. This year I plan to use these sheets in sketching out my project and cut them out to add into my album as placeholders until I get a page assembled.
If you’ve taken my class Plan Prep & Play or followed me for awhile you might’ve heard me talk about batch processing. This can work for a project like December Daily too, especially if you “fall behind.”
Essentially what batch processing means is that you group similar tasks together and you can create more in the same amount of time. So, if for example, I wanted to catch up on 5 days in my album at once, I would work on each step (listed above and on the planning sheet) for all 5 days at once. Meaning, I would come up with my stories for each page and write those onto my planning sheet before moving on. Next, I would sketch out all 5 pages at once. Then I’d move onto selecting and editing photos.
Sometimes a big project like this can really start to feel like a lot, especially when you’re in what Ali likes to call the “messy middle.” If you find yourself struggling to work on this project, consider what parts you are most excited to work on, and do those first. That might mean you really just want to play with the products or look through your photos. Whatever it is, do what makes you excited to work on December Daily!
If you are still struggling to find the motivation to work through this project, consider revisiting your reason why. If you have a strong reason why for wanting to do this project, that should help you with the motivation you need to move forward. If not, you might want to revisit whether or not you need to take your project in a different direction to help get you excited about it again. Remember, this is supposed to be fun! If it’s not fun anymore, change it up.
My final tip, and probably the most important one to actually completing this project, is to set a realistic goal to finish your project. If you tell yourself you have to finish by December 26, but you are traveling to see family for Christmas, that is probably not a realistic goal. If you set too high of expectations for yourself, you will be disappointed when you fail to meet those unrealistic expectations, and you’ll get discouraged with the project.
Instead, I encourage you to take a realistic look at how much time this project will actually take and what your schedule looks like. Try to set some time aside for yourself to work on it during the month of December, if that is what you would like to do. If you want to finish this project during January, make sure to give yourself extra time to work on it.
If, instead, your calendar just doesn’t work with that goal, that’s okay. Your realistic goal might be to finish 10 pages before the end of the season + take notes for the rest of your pages and then put your project away until next September. There is no award for finishing first. Instead, focus on enjoying the process of documenting your December memories.
Download my project planning worksheet here.
I will be on the @DecemberDaily instagram account this Friday chatting about staying on track for this project + setting up your album before December. If you have any questions you’d like for me to address in that live, leave them down below or message me on instagram. More details on the live will be announced on instagram this week.
In the meantime, you can find me on instagram or youtube.
Story Play | Day In The Life™ | You've Got This
Today is our community documenting day for Day In The Life™! Let's have some fun telling stories together!
Start right now. Grab your camera and take a photo of what you are sitting and what you are doing. No matter what time you are seeing this post. Set hourly timers on your phone if you are worried you might forget to take photos today. This will help keep you accountable. Capture what is real about your life right now: the highs + the lows, the messes, the clean spots, the frustrations, the celebrations, and the mundane basics of today. We never know when things will change in an instant.
My hope today is to have fun with my camera + capture pieces that make "this season" this season.
Here's some things to think about:

You've got this!
September 17, 2024
December Daily® 2024 | Special Guest Jill Drangsholt
Hi friends! This week I have several ideas for you including creating a space for your reason why inside the craft tree envelope, a simple pocket page using the scallop cards, a pocket made out of the 3x8 transparencies, and as an added bonus I am showing you how I was able to fit 18 years of my Christmas cards into the 4x6 album!
I have been thinking about how to use the colorful tree craft envelope in my album for several weeks and I am so excited to show you what I finally came up with! Of course, if you have the 10x8 album, you can just pop it in there and have a pocket read for your stories. But I'm using a 6x8 album, and didn't want to just attach it sideways because sideways trees just look weird!
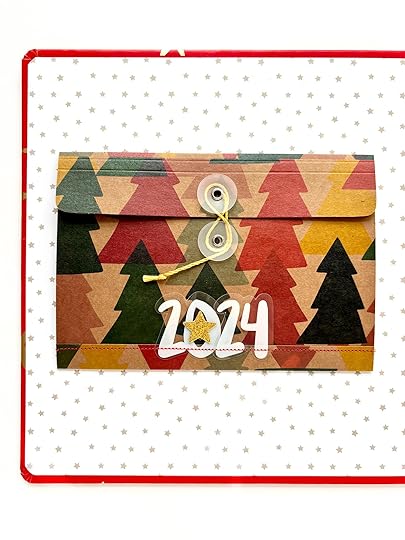
So I came up with two ideas. The first is to cut off both ends of the pocket so that it is 6 inches wide with the string enclosure in the middle and sew both sides back up with an attacher sticker sandwiched on the left side. That would give you a cute new envelope that fits in the 6x8!

The second idea is for those of you without a sewing machine. You can skip sewing the sides and just leave it as a fold out element that you can tuck your photos and stories inside of. You can either add the attacher stickers like in the first idea OR you can do what I did and attach your new fold out piece onto the front cover of your album for your reason why! And if you are doing that, feel free to make it slightly bigger. I cut mine to be 7 inches wide.
I love how cute this looks on the inside cover of my album! It would also look cute inside the 10x8 or the tree album. Check out the process video to see how it came together.
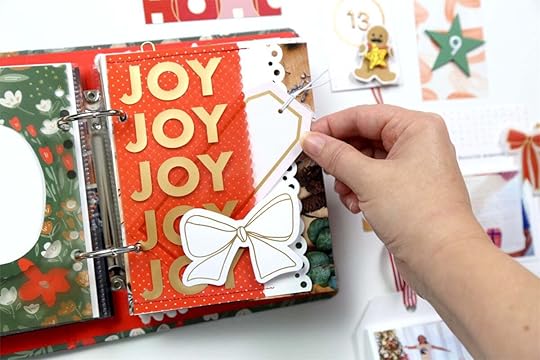
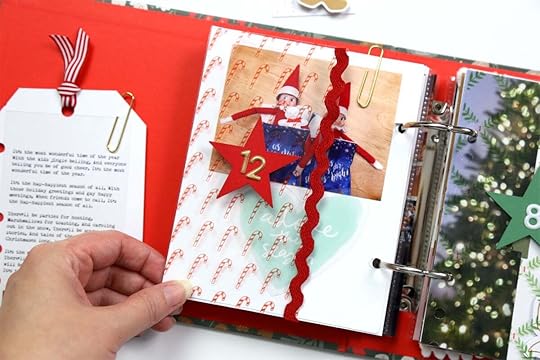
Another pocket?! Yes! I can never have enough pockets. LOL. I love this 3x8 transparency with the repeated JOY on it so much that I had to make something out of it. Last year I used a 3x8 pocket to do my Christmas day reflections, so I wanted to make a similar pocket this year. You could use the green one in the envelope pack, but I had cut mine up already last week so I made my own!

To embellish the pocket, I thought it would be cute to add the wood veneer stars in the O's of joy. But I really wanted 5 colors to go in the 5 joys and there are only red, green, and white stars. My solution was to paint two of the white stars pink and mint to match a few of the other colors in the collection. I love how they turned out!
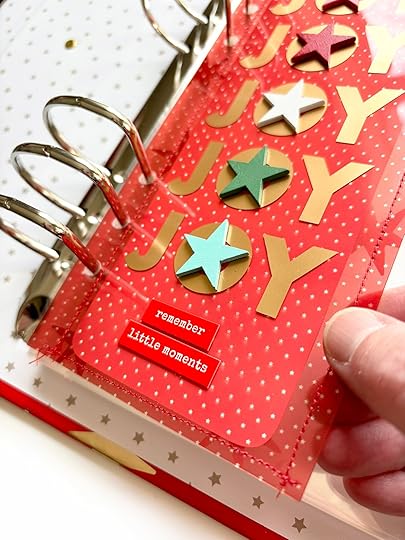
You'll have to watch the video to see my failed attempt at making a notch on the top that explains why the final pocket has the top of the transparency cut off with the tag sticking out of the top. Sometimes we just have to roll with it and I am still happy with my final product.
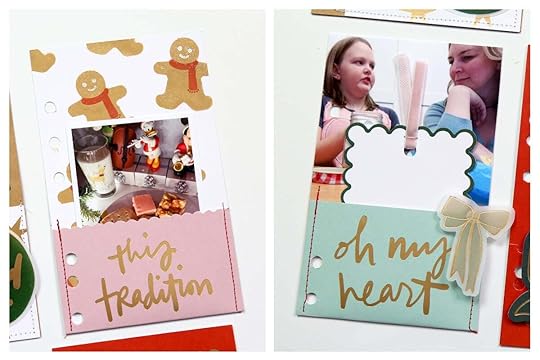
For this easy pocket page idea, I wanted to show you that you can not only flip the scallop tags over to create a cute white scallop frame for your photos, but you can also layer multiple tags to make your frame even bigger!
If you have the 10x8 album, imagine how cute it would be to layer three of the scallop tags to make a really long frame for the 4x10 pocket pages?
Check out the process video to see how this came together.
Since I'm not using the 4x6 album for my project this year, I was determined to use it for something else. It's just so cute! So I decided to see if I could fit the last 18 years worth of my Christmas cards into it. The verdict is that YES with the help of the attacher stickers and some creative folding and hole punching, they all fit in there. Even the crazy big 6x8 card and the oddly shaped homemade ones.
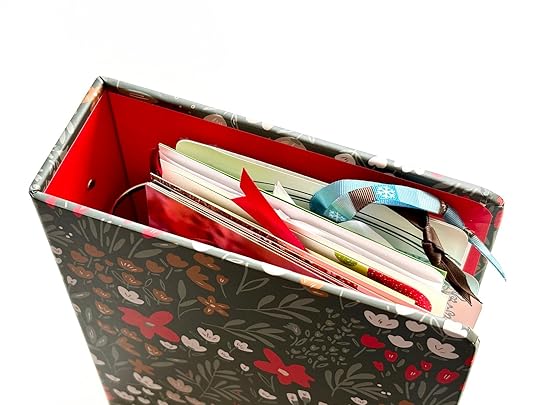
After doing this project, I really recommend the attacher stickers if you are using this album. The single hole ones work great for adding things into this ring configuration.
I think this would be such a great gift idea for a family member that may have been collecting all of the cards you've sent over the years. Mom, do you need one of these? 😉 Also, I got a little excited looking through all of my cards so this video turned into a bit more of a show and tell than I anticipated. Enjoy!
Scalloped Die Cut Tags Painted Wood Veneer Stars Merry Christmas Envelope Bundle Main Kit Paislee Press Mini Kit Gold Foil Number Puffy Stickers Small White Plastic Numbers December Moments Phrase Sticker Sheets December Routines Variety Die Cut Bundle 3x8 Transparency and Journal Card Set Stars 6x8 Album Vertical Floral 4x6 Album
I will see you again next week and in the meantime, you can find me on Instagram at @jill.drangsholt if you want to follow my December Daily journey and my other crafty adventures.


