
Ali Edwards's Blog, page 20
September 17, 2024
Story Play | Day In The Life™ | Ali's Plan For Wednesday Documenting
Tomorrow (Wednesday, September 18th) is our community documenting day for Day In The Life™ 2024!
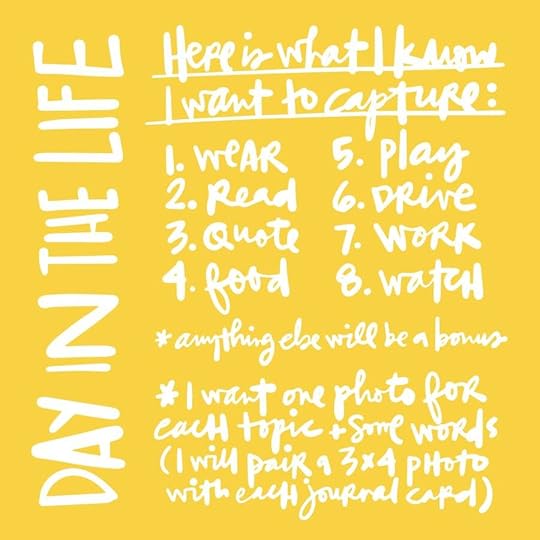
In today's post I'm sharing how I'm approaching documenting my day + what I'll be using to hold my stories from the day.
First and foremost a universal reminder: EVERYONE HAS A STORY + no one can tell the same story as you. It doesn't matter what season of life you are in, you have a story to tell about your everyday life. Every single day we are living a variety of stories - some people can see on the outside and others that are internal. Participating in this project is a great opportunity to slow down + take a closer look at your life right now and document it with some photos and some words.
Don't have the kit? Do not let that stop you from documenting your day. I bet you have some supplies in your stash you could use to hold the stories of the day.
A couple notes about my personal plan this time:
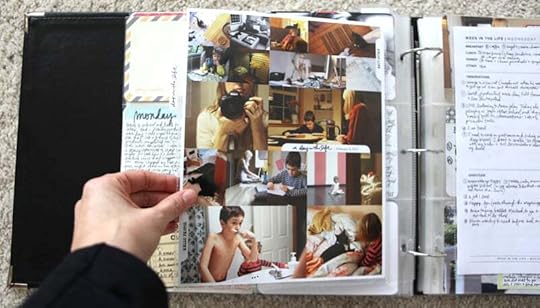
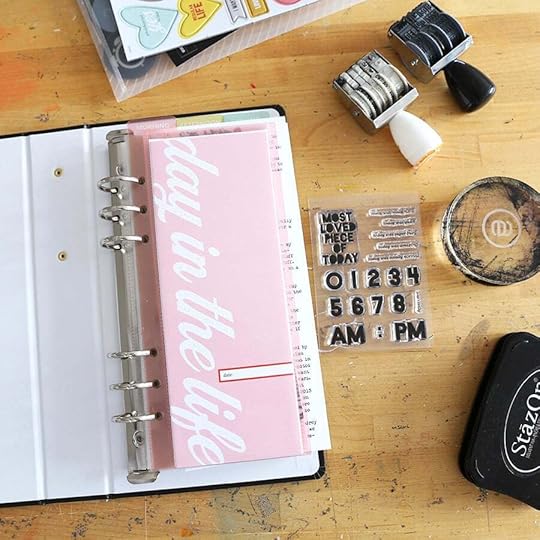
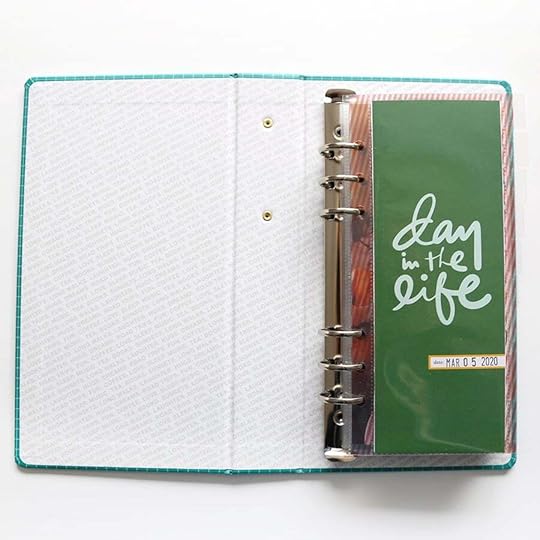
I'm planning to use my "big" camera for my documenting + have some fun just taking MORE photos on this particular day. Only have a phone? PERFECT. Use the camera that's available to you. I'm going to handwrite my journaling on the cards and on the papers. Do whatever makes sense to you in this season.I'm either going to add my stories as an insert into my Project Life album or add them to my 6x8 stories album for 2024. I'm not sure concerned about where it will end up - either will be just fine! I'm using the Day In The Life™ kit we released at the beginning of the year as part of our Story Play Collection. We do have a few kits left as part of the bundle and we also have a digital kit option available that you can print out at home.
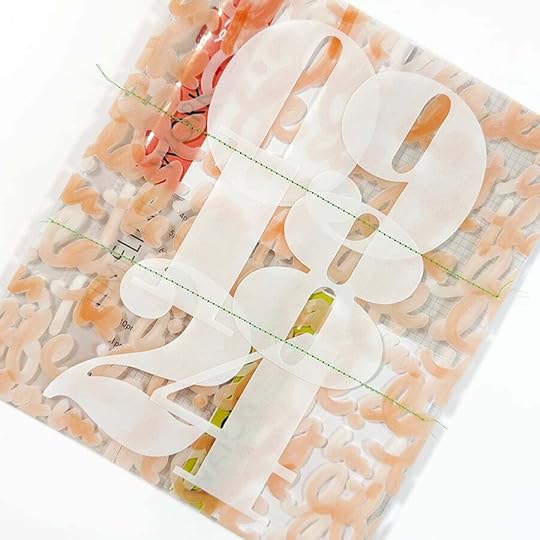
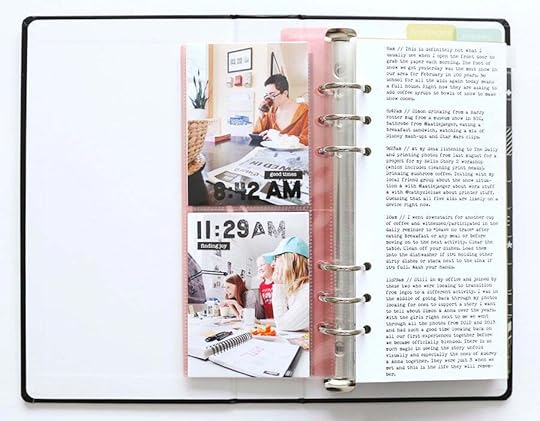
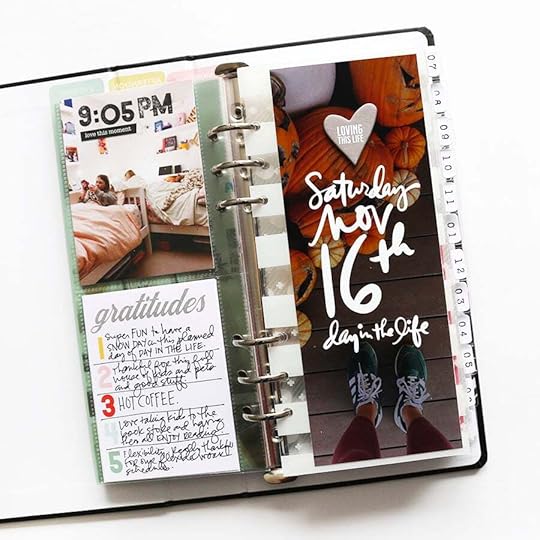
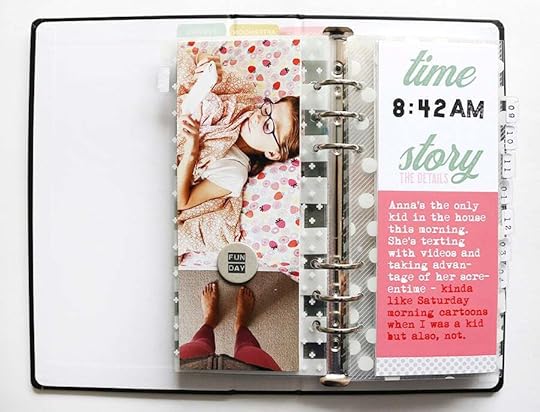
Here's a look at how I'm setting up my documenting home for Day In The LIfe™:
And some images to go along with that video:
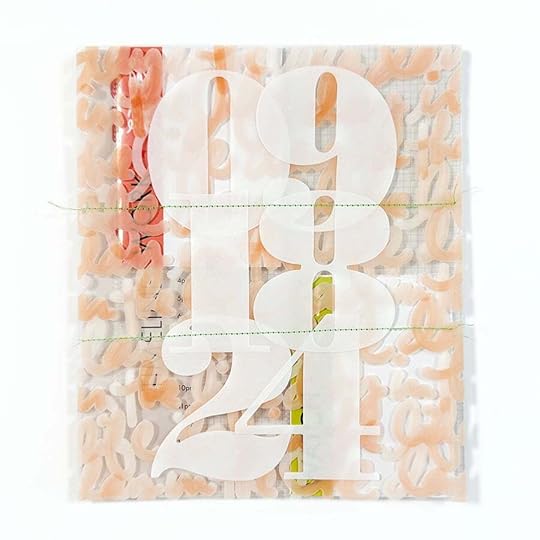
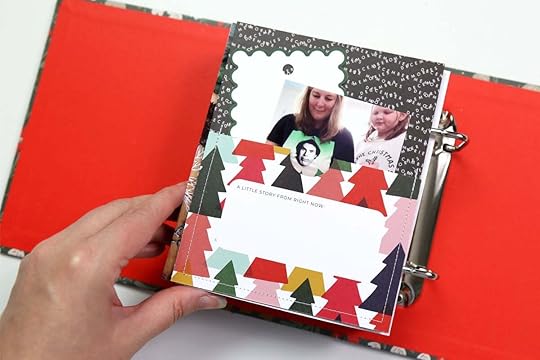
As I was doing my video overview I started talking about the idea of using large numbers as a "title" on the outside of the transparent page. I dove into my number stash and found these plastic numbers which I think were from a past Week In The Life™ collection. I temporarily adhered the numbers and then ran them through my sewing machine.

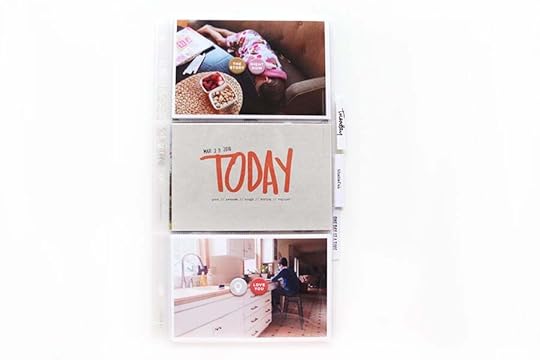
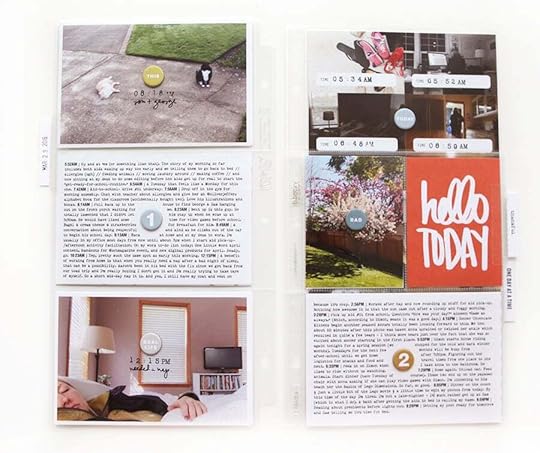
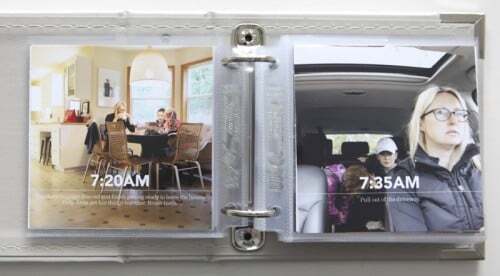
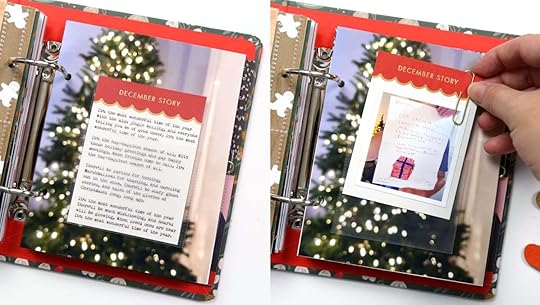
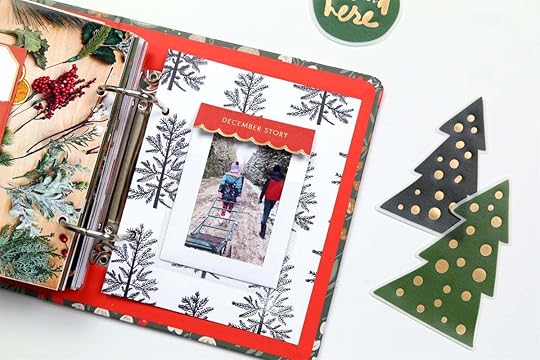
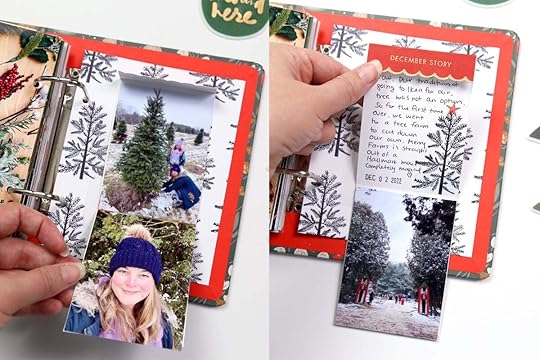
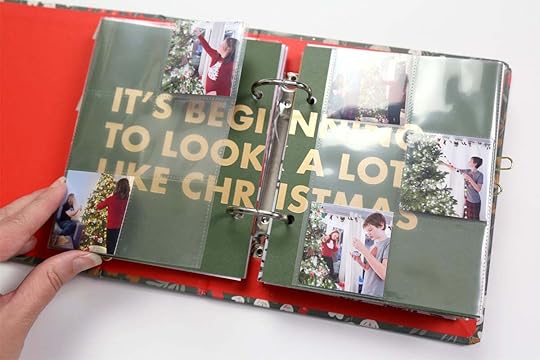
After the transparency I'm using two 6x8 page protectors to hold the 3x4 inch prompt cards. I'll be adding my journaling directly to each of the cards and then pairing those with a 3x4 inch photo.
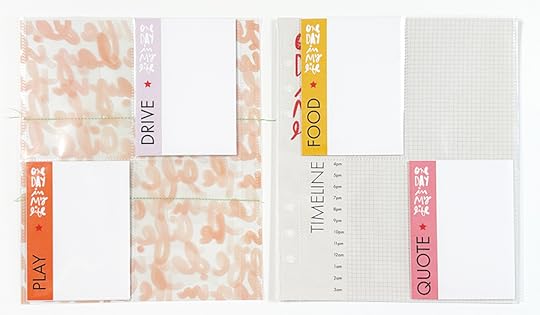
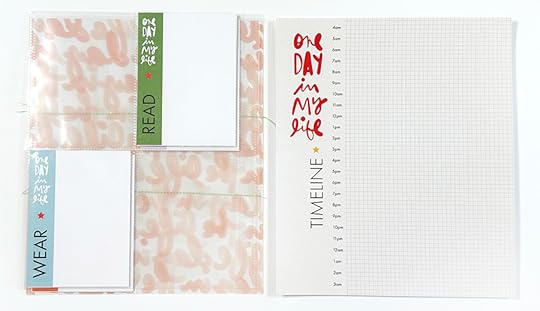
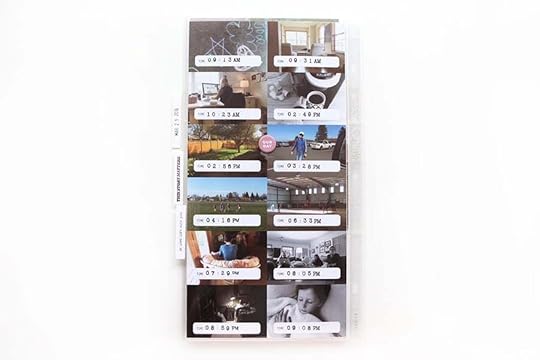
I'm also going to use the two papers that were included with the kit. I'm going to adhere these two back to back and fill in the timeline during the day.
In addition to those eight prompts on the cards I'm also planning to add either words or photos to these spaces:
I love having a plan!
Don't overcomplicate this for yourself.
Let's tell some stories together! I'll be back tomorrow morning with a reminder about documenting your day and a little pep talk.


September 16, 2024
Story Play | Day In The Life™ | Looking Back At Ali's Past Projects
This week on Wednesday (September 18th) I'll be doing my Day In The Life™ project for this year.
In 2024 the Day In The Life™ kit was released with our Story Play collection at the beginning of the year. The physical kit I'll be using is sold out but you can grab the digital version here or you can order the Story Play bundle that includes the DITL ki t.
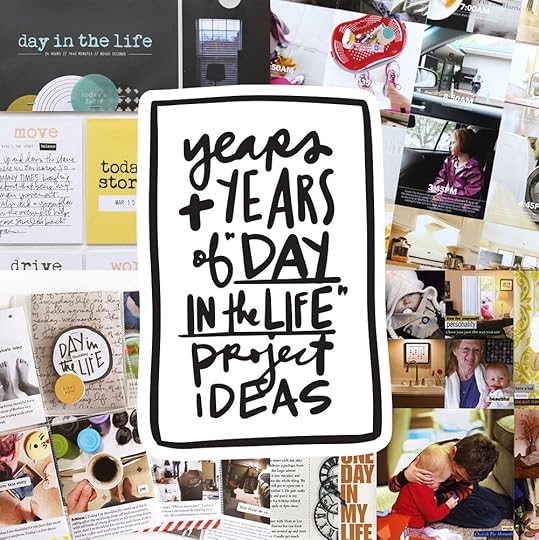
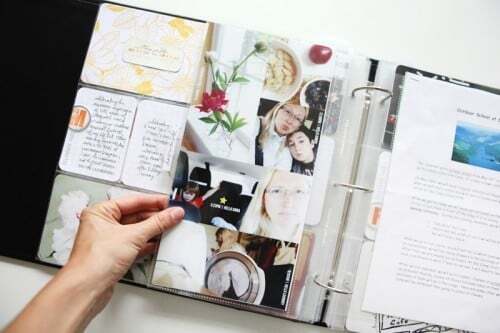
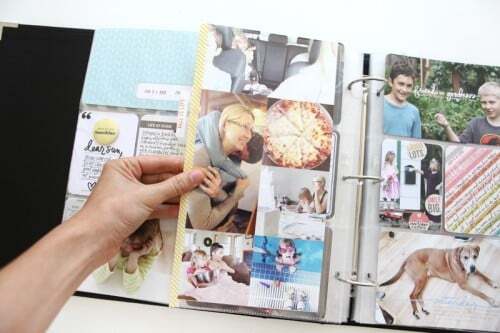
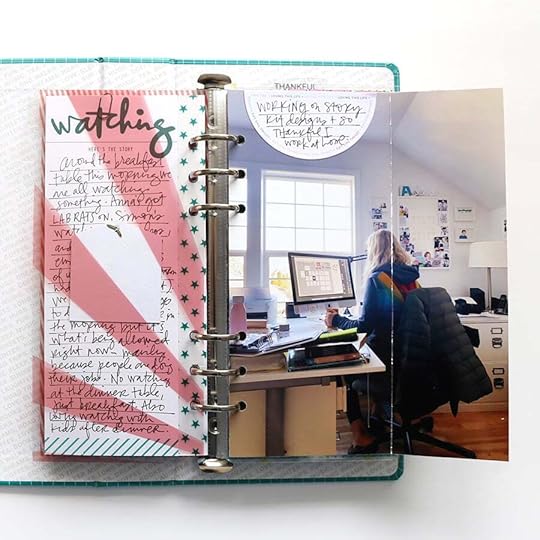
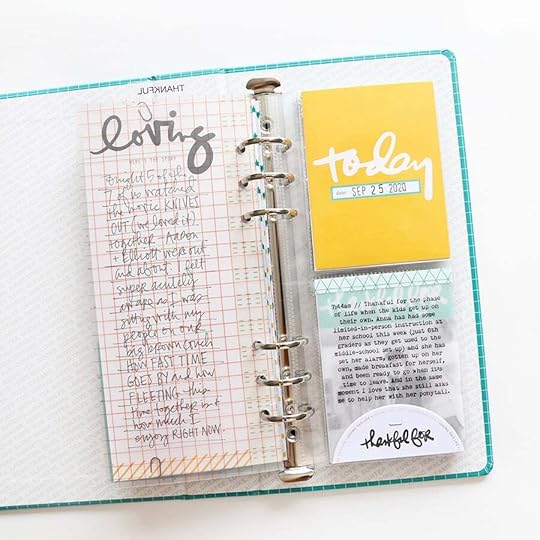
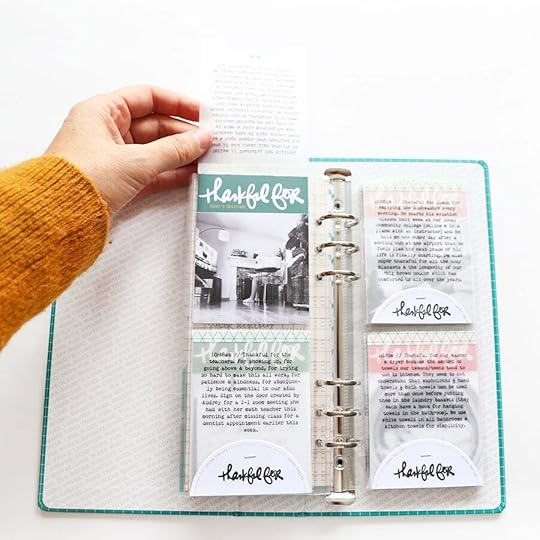
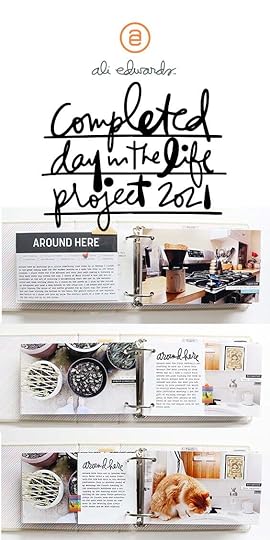
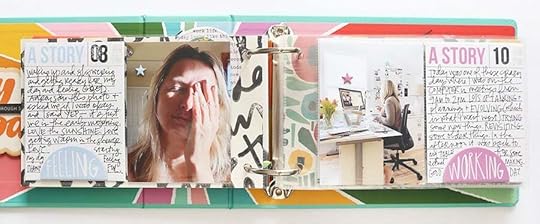
To kick things off this time I decided to put together a compilation post of a bunch of past Day In The Life™ projects. Some years I've done this project monthly, some years I've done it a couple times during the year, and the last couple of years I've just been doing it once a year.
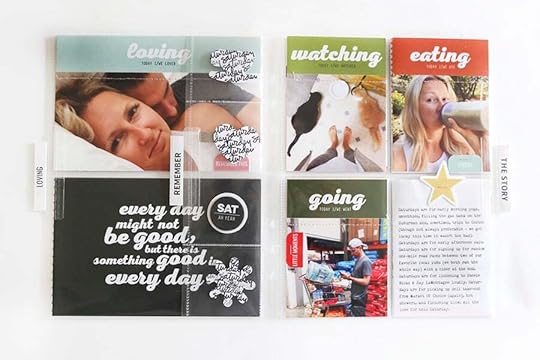
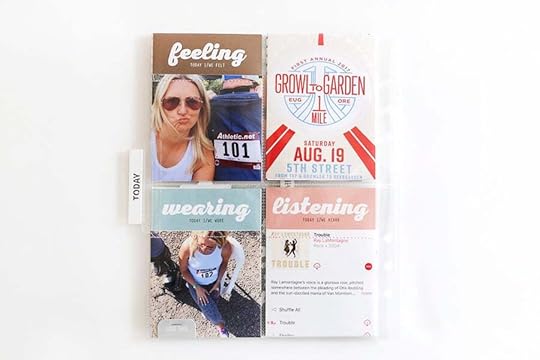
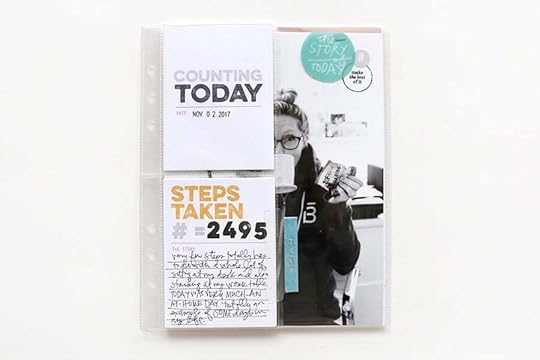
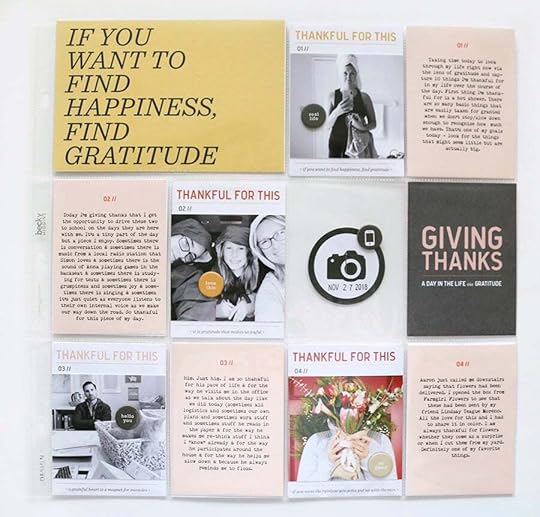
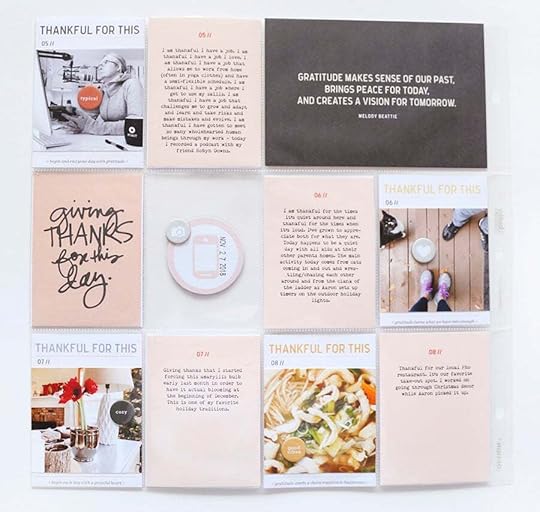
As with all projects, there isn't a right or a wrong. I've done this project as a traditional scrapbook layout, in a Project Life spread, as a mini book in a couple sizes, using layered templates, and added into a 6x8 album. Sometimes I've used a timeline, sometimes I've used different themes/lenses to guide my documenting (such as gratitude or -ing words), and sometimes I've just taken photos over the course of the day. This is 100% a project that can fit into your season of life.
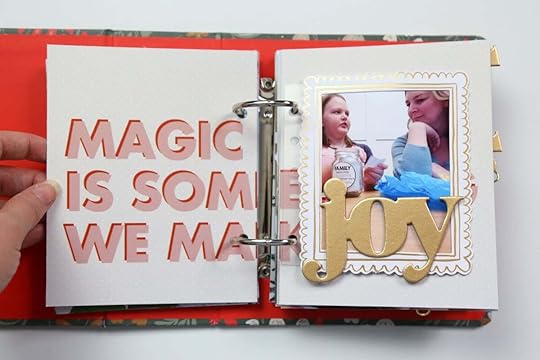
The main goal: tell the story of your day using words + photos.
Here are some additional project links:
Prefer a video overview? Here's a link to a video walk-through I did of many of these projects back in 2021.
Words + Photos + Throughs On Documenting Day In The Life (general pep talk post)Tips for Words (from 2023)Tips for Photos (from 2023)
You can always access my Day In The Life™ Blog Archives here.
In tomorrow's post I'll share my documenting plan for Wednesday using pieces from the kit to guide my documenting!
Let's dive in!

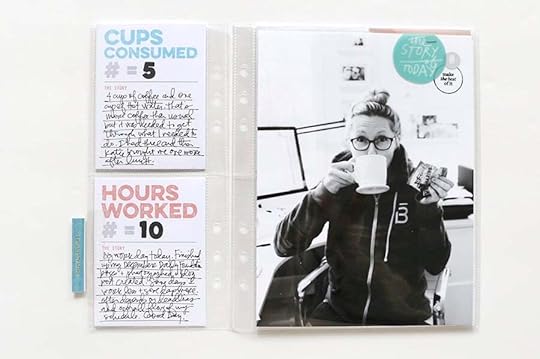
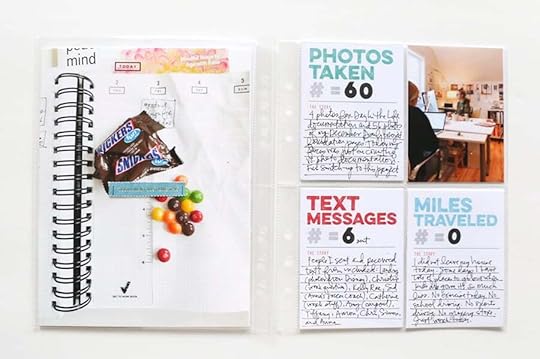
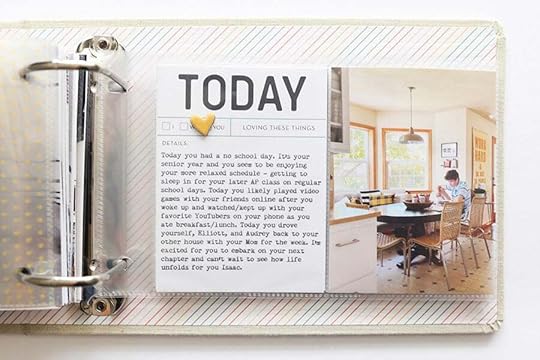
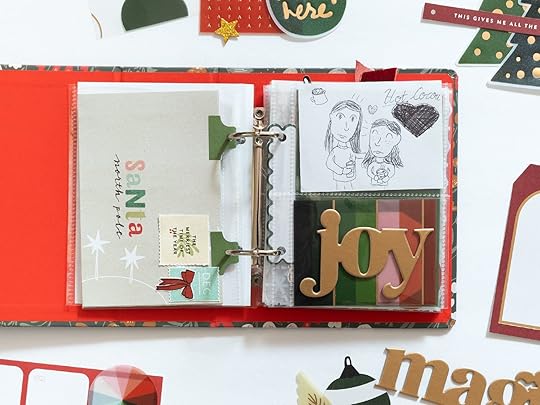
This layout, part of the Yesterday + Today workshop, was created in 2009. I don't think this was the first time I did this project but it's the first layout I remember when I think back on this project.
2012 | 8.5x11 INSERT
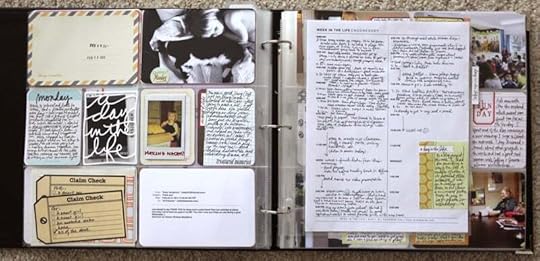
In 2012 I used a Week In The Life printable to document the day via a timeline and inserted it into my 12x12 Project Life album. On the back I created a collage of photos from the day.
JANUARY 2013 | 6x12 INSERT
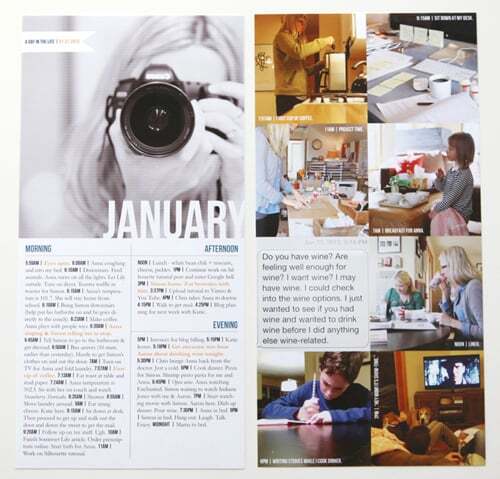
For this one I used a 6x12 Layered Template set for the front and back.

See full post here. And the finished Project Life spread here.
FEBRUARY 2013 | 6x12 INSERT
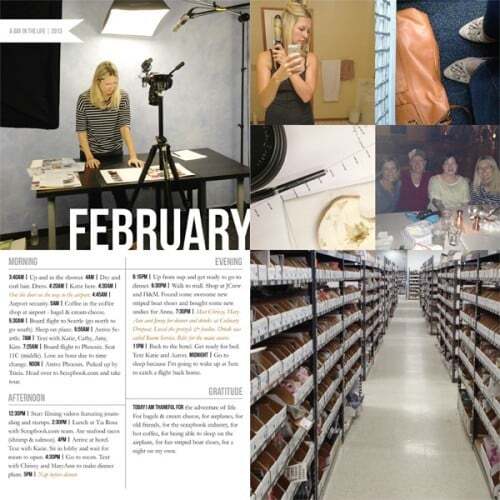
Details here and added to my PL album here.
MARCH 2013 | 6x12 INSERT
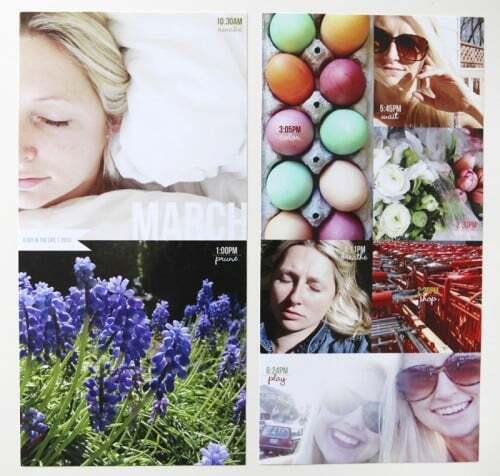
For this one I just did photos + no words. See the full post here.
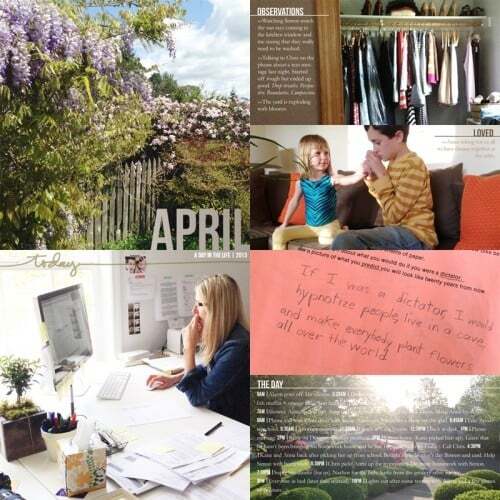
APRIL 2013 | 6x12 INSERT
Blog post here.
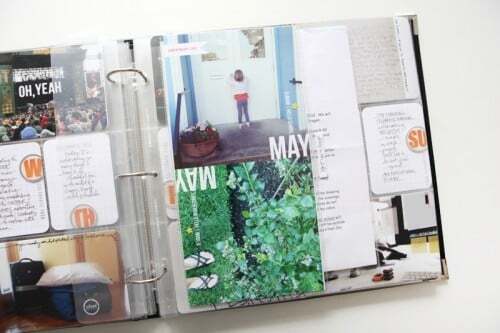
MAY 2013 | 6x12 INSERT
Blog post here.
JUNE 2013 | 6x12 INSERT

Blog post here.
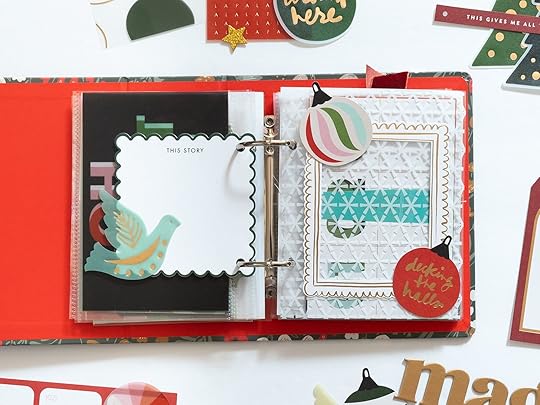
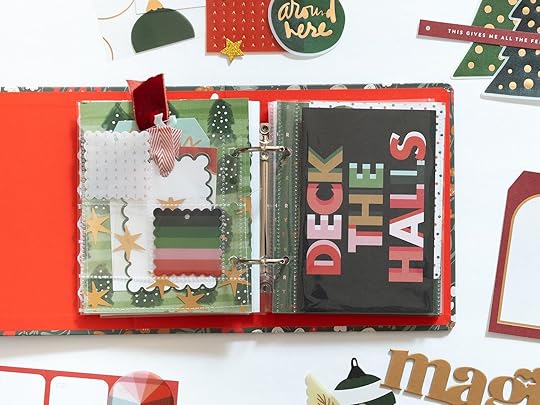
MARCH 2016 | 6x12 INSERT
Multi-page 6x12 Project Life insert. A good reminder that sometimes I use a lot of words + other times I'm just happy to have photos collaged together.

Full post on this example here.
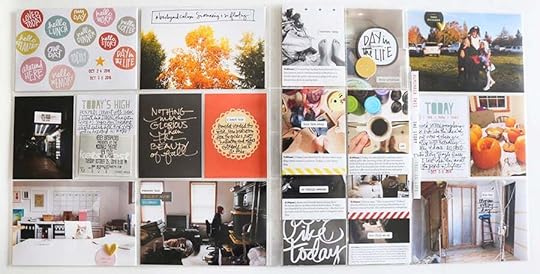
JULY 2016 | 12x12 INSERT
For this documenting day I used two 12x12 divided page protectors to add my story to my Project Life album.
Full blog post here.
OCTOBER 2016 | 6x8 INSERT
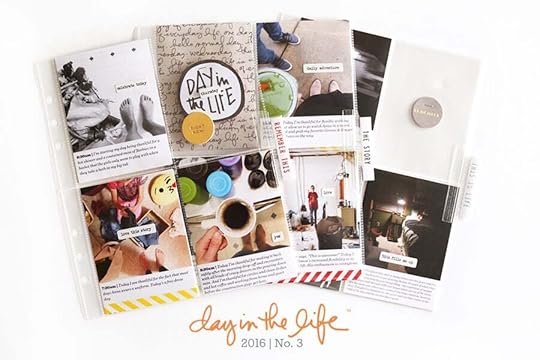
Full blog post here.
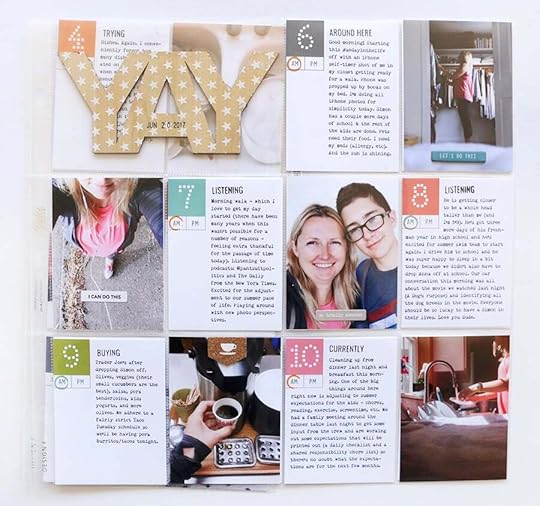
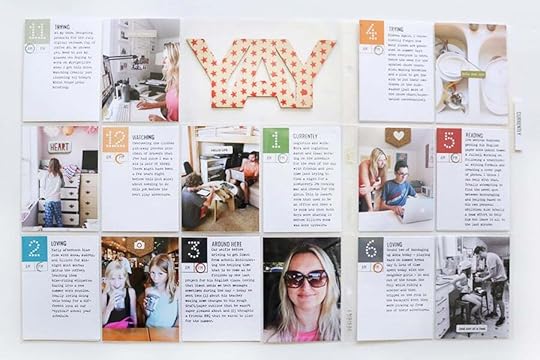
JUNE 2017 | 12x12 INSERT
Full blog post here.
AUGUST 2017 | 6x8 INSERT
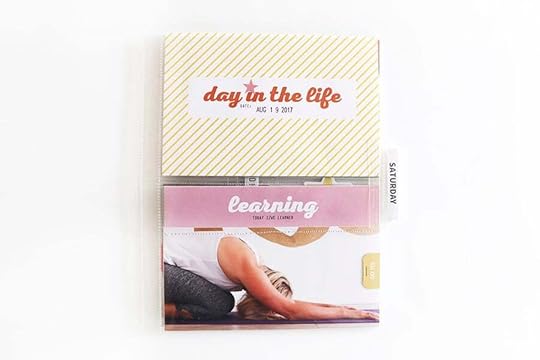
Full blog post here.
NOVEMBER 2017 | 6x8 INSERT
Full blog post here.
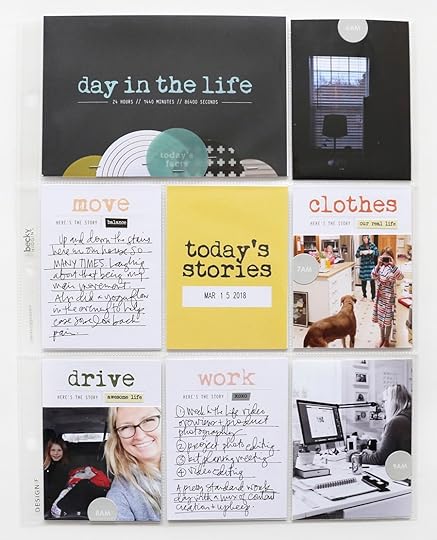
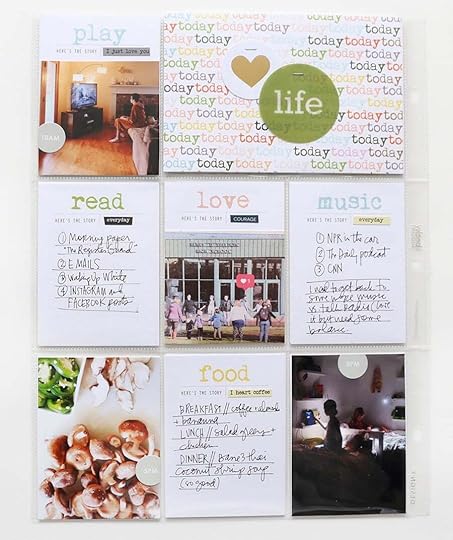
MARCH 2018 | 9x12 INSERT
Blog post here.
NOVEMBER 2018 | 12x12 INSERT
Full blog post here.
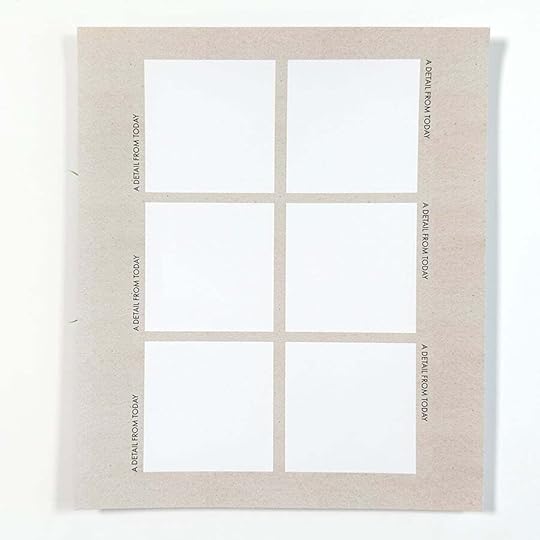
In 2014 I put together a 4x4 Mini Book to hold the stories from one day in my life.

Full blog post here.
In 2019 I did this project twice - once in February and once in November. Both live in a 3x8 album.
FEBRUARY 2019

Full post here.
NOVEMBER 2019

Full blog post here.
MARCH 2020


Full blog post here.
SEPTEMBER 2020
Full blog post here.
Full blog post here.
OCTOBER 2021 | 4x6 MINI ALBUM

Full blog post here.
MARCH 2022 | 4x6 MINI ALBUM
Full blog post here.
OCTOBER 2022 | 4x6 ALBUM
Full blog post here.
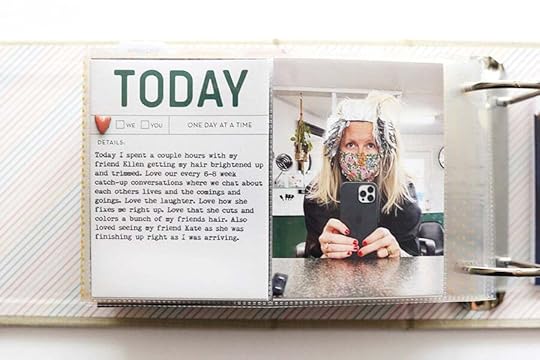
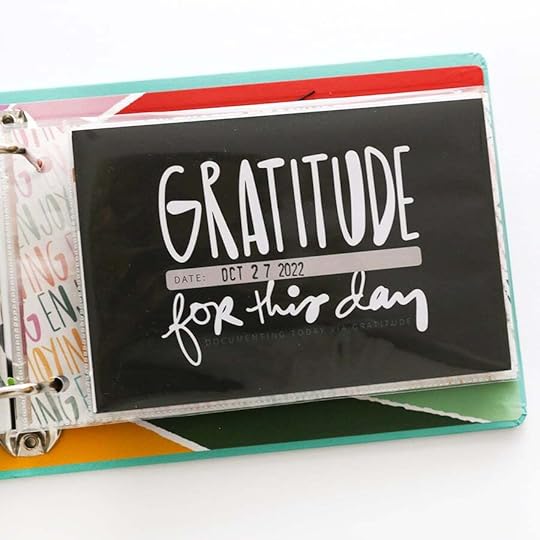
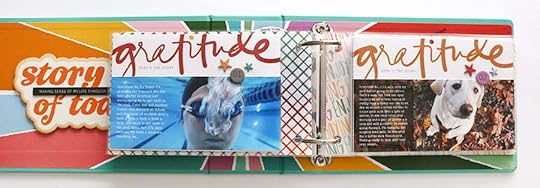
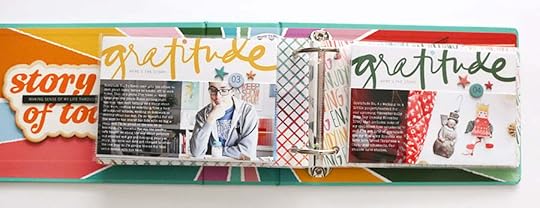
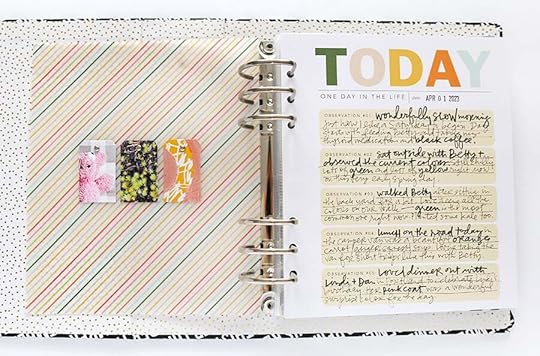
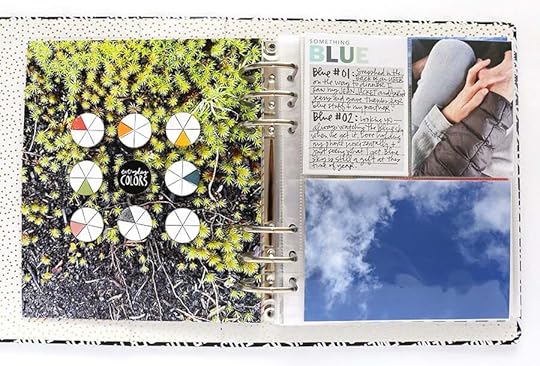
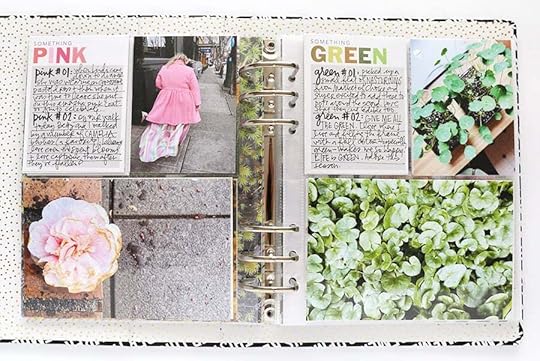
In 2023 we started offering a Day In The Life kit as part of our Story Play Collection. Last year the lens for the day was color.
Full blog post here.
September 13, 2024
In Case You Missed | September 13

Happy Friday, friends! Welcome to the latest
In Case You Missed It. Just a reminder that this is a quick post that will happen every Friday afternoon with all the updates and links that have happened throughout the week. So, let's get to it:
2024 DECEMBER DAILY® PRODUCTS
The 2024 December Daily boxing period is currently live. From now until September 30th 11:59pm ET you are able to add items to your box for a single shipping charge. Order will ship the first week of October. Due to manufacturing constraints, sold out items will not be reordered. Our 2024 Collection Preview Post is available here. We also shared a How It Works post for all of the information you need to know to prepare for the boxing period launch on Tuesday, August 27th at 10am Eastern. Not signed up for our newsletter? Head to www.aliedwards.com and sign-up in the footer of our site. Be sure to follow us over at @decemberdaily, our official account for all things December Daily®. We also invite you to join us in the December Daily® Facebook group for more merriment. Find additional resources and inspiration, including Ali's completed albums, on the blog via the December Daily hashtag. Learn more about the project here.
2024 DECEMBER DAILY CLASSES
December Daily® Product Play | This + This + This workshop registration is open and available at an intro price of $20 during the Order Selection Period. After that time it will move to the official price of $25. More details on this year's workshop can be found at the bottom of this post (workshop begins November 5th).
December Daily® Hybrid Product Play workshop will open on Tuesday August 27th (DD launch Day) and will be available at an intro price of $12 during the Order Selection Period. After that time it will move to the official price of $15. Read below for more details (workshop begins on October 11th to correspond with our December Daily® Digitals release the same day).
December Daily® Prep Day is happening this year on Sunday, November 3rd starting at 10am ET. You can sign up for this $5 online event on Tuesday August 27th during Order Selection Period as well.
SEPTEMBER REVEAL
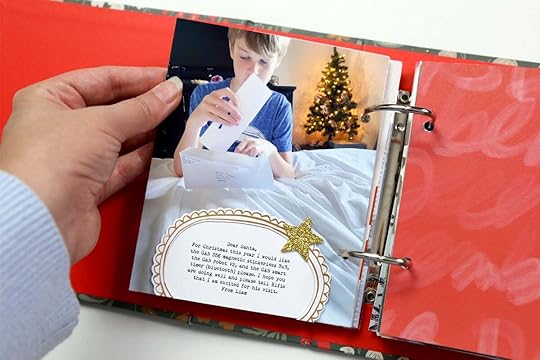
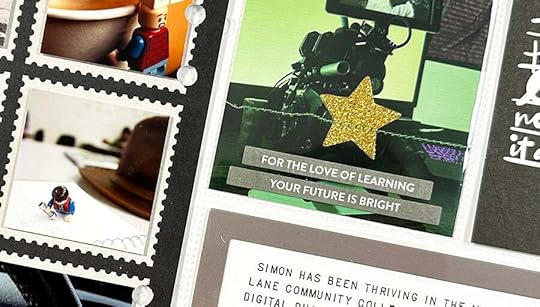
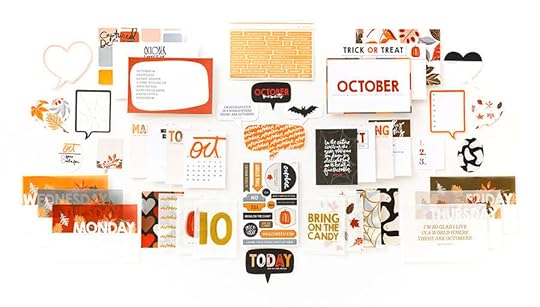
This week revealed a new Story Kit™ theme: SCHOOL! Everyone has a story about school. Most of us probably have more than one from all the years sitting in a classroom (or maybe your experience was totally different - that's a story too). This month we are coming together to tell stories about education and school experiences over the course of our lives (stories could be about you or someone you care about). In addition to our new Story Kit™ theme, we also have a brand new Stories By The Month™ kit, a New Halloween Kit, the next edition in our Alphas Are Awesome series, and our most recent One Little Word Mini Kit. Head to the link in our bio for Ali’s blog post with all the details about this month’s release. Head to the blog for Ali's post with all the details about this month’s release.
SEPTEMBER DIGITALS
The first Friday of every month we have a new digital release available in the shop. Play with scale, recolor objects, add journaling, print multiples…the sky is the limit when playing with digitals. Shop digitals here.
2024 PROJECTS + PRODUCTS SCHEDULE
As we continuing easing into 2024 we put together an overview of our schedule of projects + product releases for the upcoming year. We are sharing this as a way for you to plan, think about what you might want to participate in this year, and simply share some of the things we have coming up to help support + inspire storytelling. For the last few years we've followed a fairly similar cadence for our releases and our major projects will follow that release schedule again this year. Please note that, as you might imagine, this schedule is subject to change throughout the year based on a variety of variables. Find the post here.
As always, we’re so grateful to have you all as members of this community! Thanks for joining me today and have a great weekend!
December Daily® 2024 | Special Guest Jen Wong
Hello, friends! I’m thrilled to share some fun ideas for creating a December Daily album for kids, using the new vertical 4x6 album.
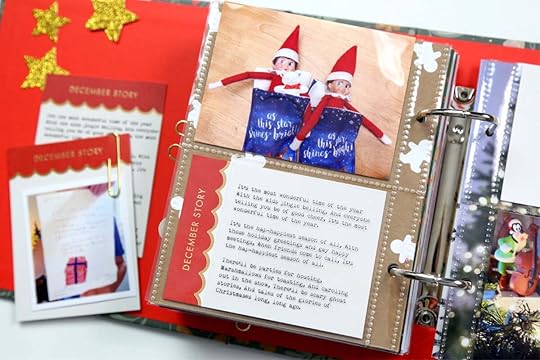
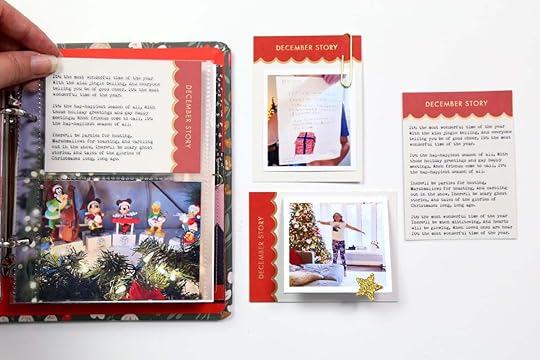
My daughter, who’s 9, has been dabbling in holiday journaling for a couple of years now and has seen me work on my own album every December with interest. Last year, I was touched when I found her
flipping through my past albums. She loved seeing photos of herself when she was younger and reading the stories from those past years. She loves drawing and writing and I know she will love doing the project. I’ve already mentioned it to her and she’s super excited!
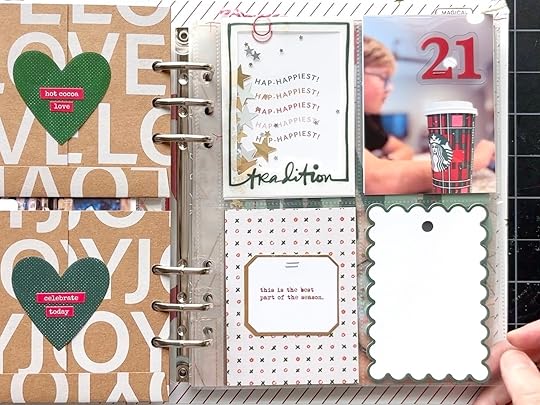
My ApproachWith a shorter attention span and limited time, I want to make this project fun and easy for her. There’s no pressure to create intricate pages or spend hours working on it. For this reason, I’m doing something I don’t normally do for myself – preparing foundation pages. These premade layouts will make it simple for her to add a photo, drawing, or a quick journal entry. She might even finish her album in December… unlike her mom, LOL!
I’ve made her a mini album in the past, where I created all the pages ahead of time, and then she filled them in. It worked really well, and she especially loved the interactive pages. I plan to make some interactive pages again here, but also mix in some simple ones. I’ve created a prompt list to get started. Although it’s early in the year, I already know a few events happening this December. Planning the album is a bit similar to how I prepare for my own December Daily album, jotting down story ideas and traditions we do every year, like writing to Santa, watching holiday movies, or baking together. I put together all the ideas I had onto a page which can be found here.
My plan is to create pages based on these prompts, with a mix of simple and interactive elements.
I started with a few interactive pages and wanted to share these ideas, because they could work for any album, kid's or not!
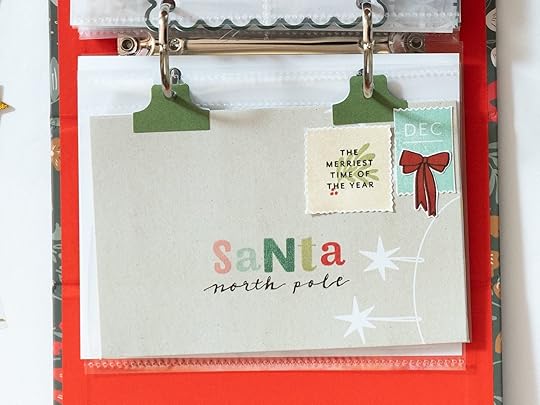
Idea 01: Letter to Santa String-Tie Envelope
Other: string, 2 eyelets, corner rounder (optional)
My daughter writes a letter to Santa every year and I thought it would be fun to make a decorative mailing envelope to hold some writing or even a photo of her letter to Santa. Using one of the papers from the Merry Merry 10x8 Paper pack, I designed the envelope so it would measure 4” x 6” and would go into the album with page attachers. As I said in the video, originally I thought I would make the envelope the full size of the page protector so that I could directly punch holes into it, but I realized that the 10x8 paper was too short to make this work, given the measurements I was using.
To construct the envelope, I scored the paper horizontally at 0.5”, 4.5”, and 8.5” and then vertically at 1.5” and 7.5”. Here is a diagram that I made which shows the measurements.
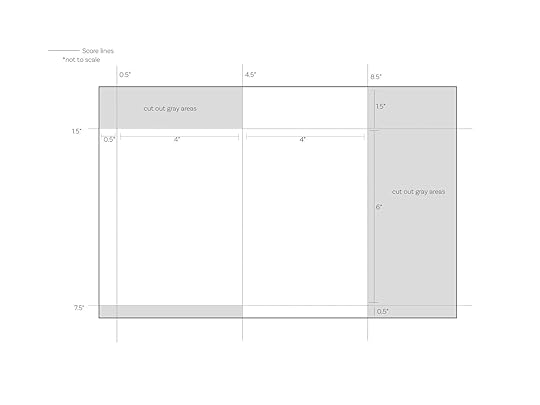
I then cut out the grayed out portions of the paper. I folded along the score lines to make the envelope, eventually glueing together with adhesive. To create the tie anchors I started by punching two 1” circles with a circle punch. Then, using an eyelet setter, I punched holes into the circle, inserted the eyelet, and set it with the tool.
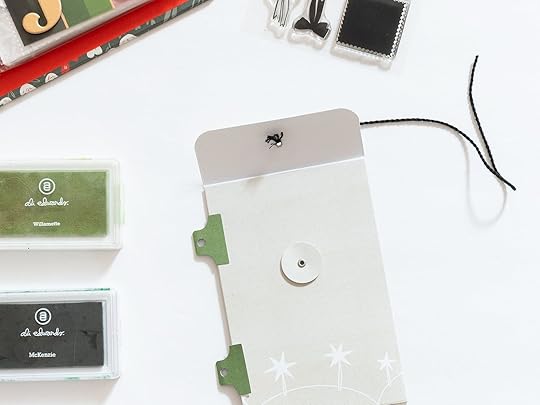
Then it was time to decorate the front of the envelope! I created two postage stamps using the Paislee Press stamp and stamped “Santa” inn the center. I wrote “north pole” underneath. After the decoration was done, I added adhesive to the envelope bottom and sides to put it all together.
You can see the steps I took to make this in the video below.
Idea 02: Transparent Pocket with Custom Tags
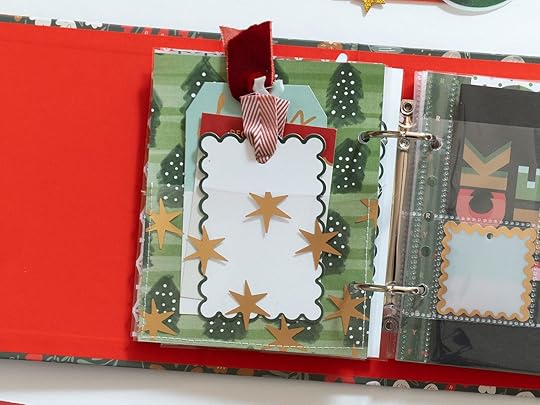
Other: various trim
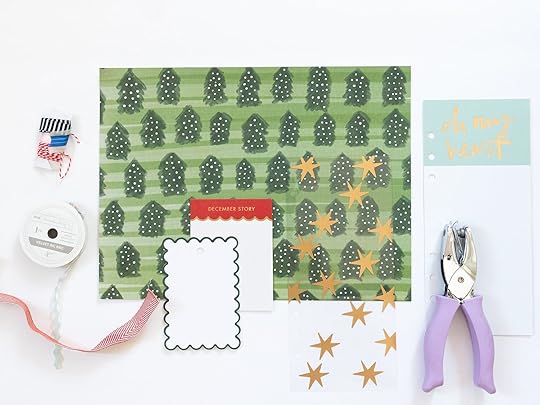
This idea is an easy one, but one I almost always do in my albums. I’m always looking for ways to include more into smaller albums and pockets is one way to do so! I love this green tree pattern from the Merry Merry 10x8 paper and starting with this, I cut the base of the pocket to 5” x 6.25” so that it would be the same size as a page protector. I made the tags next. Using the yellow-rimmed tag from the main kit, I traced the tag outline onto the 3” x 8” paper that reads “oh my heart” on top. I cut the height of this tag to 5” tall and trimmed off the ends so it would look like a tag. I then added various trim to the ntops of the tags.
I love the way a transparent pocket looks so I used the gold start transparency from the 3” x 8” paper pack for the pocket. I trimmed this to 5” wide and cut off the hole punches on the edge. Then, with my tags inside the transparency, I used my sewing machine to stitch the pocket. I always try to add the items that will be in the pocket before sewing so as not to make the pocket too tight! You can hear my thought process, see what other options I considered, and watch the project come together in the video below.
I love how these turned out! Pockets are a great way to stuff in more journaling, photos, or ephemera.
Idea 03: Interactive Slider Flip-up Card
Other: 1” circle punch, foam adhesive, washi tape, penny
I loved the styled look of the gold star against the colorful vellum piece and knew I wanted to use this somewhere in an album. I thought I could use this circle as a sliding element to highlight some text underneath a track. To make the sliding element, I started with two front pieces that I cut using a file I made in Silhouette Studio. (I am not able to convert the file to an SVG but if anyone would like the studio3 file, just let me know). Turning over the back piece with the decorative side face down, I lined up the word phrase along the track so it would be visible from the front. I still can’t decide if the bottom part of the track should read from left to right or right to left as it goes down, but it was easier to cut the words reading them left to right! If you watch the video, you’ll see that my initial idea was to use two 1” circle pieces and a brad as the slider element but I found it didn’t slide very well. I ended up changing this to use a penny beneath with foam adhesive attached to a 1” circle on the front. The front and back pieces of the scalloped front are held together with two layers of foam adhesive. To make the page backing, I cut a 5” x 6.25” piece from the dark green Merry paper, which is the same size as a page protector. The slider front is joined to the back with some washi tape.

You can see how this came together in the video below.
As I said in the video, there is no real reason for making a slider, except it’s fun! The word phrase serves as a prompt for journaling or a photo beneath. By the way, most of these ideas will translate to a 6x8 or 10x8 album! You might need to tweak a few things, like scaling some of the measurements, but the concepts will still work beautifully! The rest of the pages I’ve put together so far have been much simpler. While I could easily make every page elaborate and interactive, I know I’ll quickly run out of space if I do that, and I don’t need my daughter to have two albums for her first real December Daily! I used some cards just as they are and added a thing or two on others.
Here’s a look at how the album is looking right now.
I've included a few photos of the foundation pages below.

I love having a transparent element as an opening page and this gold heart cut down perfectly.
It's fun to include different size pages even in this smaller album. Some items like these 4" x 4" scalloped cards can be punched and added directly into the album.
Those gold chipboard words really pop in the 4" x 6" album and not much else is needed except a pretty pattern behind them. My daughter saw some of the sticky notes as a reminder for photos, so she's added her own illustrative examples. :)
The chipboard frames are perfect for adding in a photo, a drawing, or even some journaling. I love pairing them with transparency or vellum.
You can cut down a 2x2 page protector into 4x4 like I did here, or even 2x4. I hope I was able to share some inspiration with you. Are any of you planning to make an album for your kids? I’d love to hear about it! If you have any questions at all, please feel free to comment below. You can find me also on Instagram @circleplusarrow or YouTube @circleplusarrow. Until next time, friends!
September 12, 2024
December Daily® 2024 | Merry, Shiny + Bright with Nolana Lynch
Hello Everyone!
It’s the MOST WONDERFUL TIME OF THE YEAR! December Daily season is upon us and I couldn’t be more jolly to share some of my ideas for the 2024 collection!
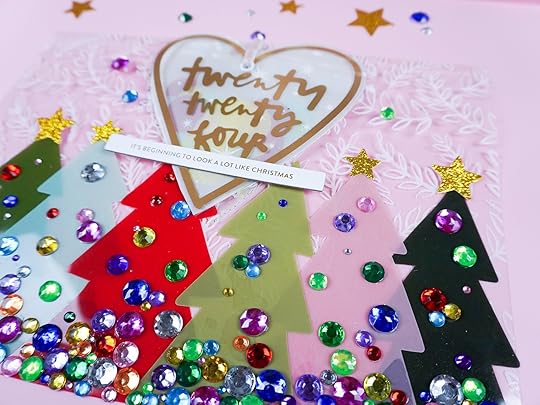
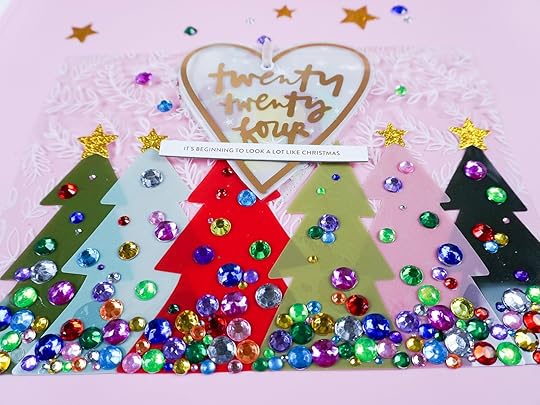
I kicked things off with my Title Page and Reason Why for this year. The colourful plastic trees from the Main Kit immediately caught my eye, and I knew they had to be my title page! The ideas began flowing for colourful Christmas trees and I loved where it all landed.
Last year, I used a lot of sequins, and during the year, I have been in my confetti era, so I decided to try rhinestones for my title page. I picked up a bunch from my local craft store and began clustering them from the base of the plastic trees and staggering them upwards.
Earlier this week, I did a Live Crafting session in the December Daily group. Today, I am sharing two process videos; the first is my preparation for the live which shows how I started the rhinestone trees, creating the vellum using the silkscreens, and creating the vellum hearts and confetti for my title and reason why.
The second video is the remainder of the process - putting the page together during this week’s Merry, Shiny and Bright Live Crafting session in the December Daily Facebook Group. Here’s the video:-
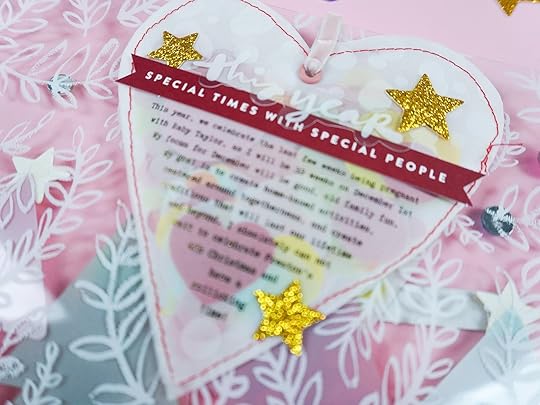
I love the transparency pack and initially thought I’d used the “Christmas Time is Here” for my title page, but then the “Twenty Twenty Four” heart framed the trees so nicely, I had to use it! This was the jumping-off point to create two dangling heart ornaments - the front with the “Twenty Twenty Four” title and the back with my Reason Why.
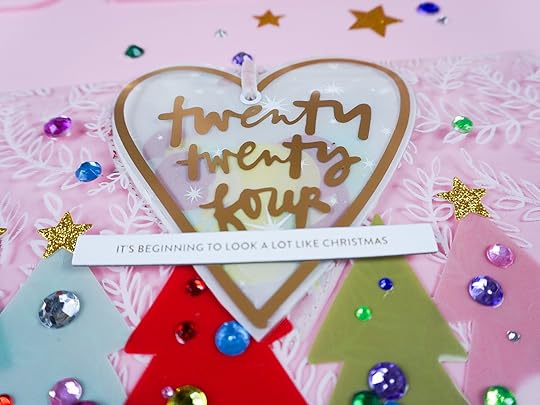
I used the digital from the transparency pack to get the shape of the heart for my journaling for my Reason Why. I printed this on tracing paper using my laser printer and foiled it with my Minc machine. Then, I traced the heart from the transparency pack onto it and cut it out. I left about a quarter inch all around to stitch them together. I created some white patterned vellum using the Stars from the silkscreen pack and using circle/dotted stencils from my stash. I then used my confetti punch to fill the hearts with vellum confetti of colors that matched the trees, and I put them all together.
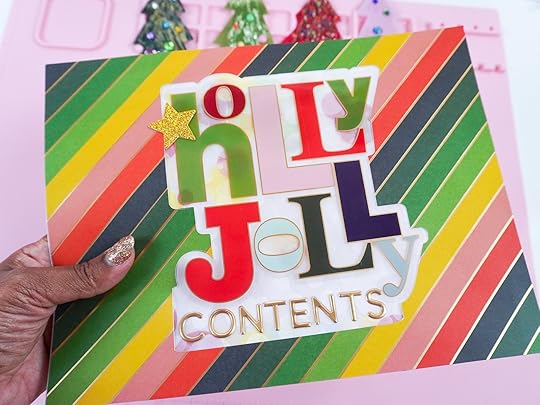
I then decided to work on my Table of Contents. I wanted to feature the gorgeous plastic phrases. The term “Holly Jolly Contents” felt like an accurate representation of the contents in my December Daily album! Here’s the video of how it all came together:-
I do feel like the plastic phrases need white space so that they stand out, so I thought of ways to cut and create a window for the piece. This could have easily been a rectangle, or a banner or any shape really, but in the end I decided to use the shape of the Holly Jolly and add a rectangle below for the word “contents”. I thought of tracing the shape and cutting it out with a scissors, but then I used my Cricut instead - either way would work just fine.
Following this, I worked on creating a page to mount my banners on using a transparency from the 10x8 pack. I love these fine word transparencies and elements in this year’s collection, and I used some baker’s twine and eyelets to create this page. I would then glue the banners on to the twine, and add in bits and pieces from each page during the month of December to bring it all together
I’ve really enjoyed putting the first few pages of my 2024 December Daily album together! OH WHAT FUN! Thank you so much for being here. As always, feel free to comment below, I’d love to hear from you! If you’d like to see more of my work you can check me out on Instagram or YouTube.
Wishing you a wonderful rest of the year and December Daily prep season!
SuppliesMain Kit Gold Puffy Alphas 10x8 Transparency Pack Large Plastic PhrasesSeptember 11, 2024
December Daily® 2024 | Special Guest Pam Baldwin
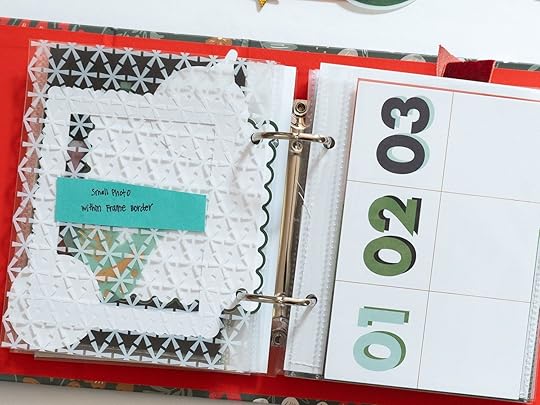
Hi friends! I’m so happy to be back with you for the 2024 December Daily season! My plan for the 2024 season looks a little different from what I’ve done in the past. This year my hope is to work on my album IN the month of December, so I’ve been spending a lot of time thinking about what will help me be successful in COMPLETING my album in (or very near) December. First of all, I’m downsizing from 6x8 to 4x6 (and I have to tell you, after preparing some pages for this post, I have no regrets about this decision at all! It has been a JOY to work with!). Secondly, I want to head into this documenting season not feeling like I need to reinvent the wheel for every spread. That means simple foundations that can be repeated throughout.
In this post, I’m focusing on the 2024 Main kit. This kit is AMAZING!! One of the things I so appreciate is how there are multiple elements that allow for repeated design formulas. I’ve picked out 7 of these elements (plus a bonus page protector orientation) and worked out 3 different ideas for how each of these elements could be used. This is like a menu, and the level of difficulty is generally pretty low. For example, putting 3x4 cards into a 3x4 pocket, lol. If you were to pick 1 strategy for each item and repeat it 3 times, you’ve got yourself 24 pages to hold your stories. Also, for many of the kit items, there is enough to repeat more than 3 times OR enough to use the item in multiple ways.
A couple of things I’d like to mention before we jump in.
You’ll clearly hear me say in the intro video that I am not making completed pages/spreads for the purpose of this post, because my intention was to make “foundation pages”. I did print photos from a past December to better demonstrate how the spread might work, but these are not “completed” spreads or pages. And you can definitely use plain white cardstock as placeholders, or even sticky notes for ones you want to try. I’ll narrow down my final foundation pages in November and I look forward to using these strategies in December! The “journaling” in these pages is printed on transparency with song lyrics just to illustrate how the spaces might look with text. My journaling cards are still pretty much intact and ready for December documenting! While the scale of my projects may take some tinkering to translate nicely into a 6x8 or 10x8 format, the ideas can definitely be used for any size album. Most of the supplies in these pages are from the Main kit, but there are a few shop items that snuck in there. 2 of my favourites from the stamp collection: Holiday Icons 6x8 stamp and the Gingerbread Men 4x6 stamp set.
Okay, let’s dive in!
Item 1: 3x4 journaling cards
Fill the pockets. The 4x6 album comes with 10 divided page protectors that has 2 – 4x3 pockets. Pair a journaling card with a 4x3 photo and add your story, extra photos, or small pieces of ephemera.
Use page protectors from your stash to make extra pockets that can be added onto full page photos (5x6.25 for this 4x6 album) or background papers. Add journaling or additional photos to the white space of the journaling card.
Turn the 3x4 card into a mini booklet (interactive element) to hold additional photos and journaling.
Item 2: 10x8 patterned paper
Feature a patterned paper across a 2 page spread. (This is also a great strategy for some of the awesome designs in the 10x8 extra paper pack and 10x8 specialty paper.)

Cut out some of the fun designs for extra embellishments. I started with the bows; the doves and ornaments are also great choices!
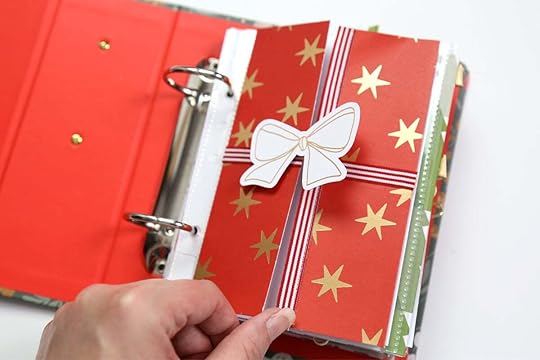
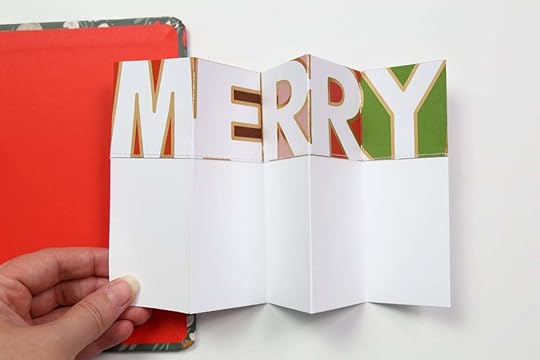
Use the paper to create interactive elements. The “present” could be repeated with any of the patterned papers. The letters in the “MERRY” text pattern are approximately 2x2 and would look great in 2x2 pockets as well.
Keep it simple. Add the 4x4 card onto a patterned paper background.
Use a large photo as your background and turn the 4x4 card into a pocket for additional photos, journaling or ephemera.
Use the 4x4 card as an insert. Add it to your album by punching holes directly into the card OR use a plastic attacher.
Item 4: Scalloped tag pockets
These pockets are so beautiful!! They speak for themselves and really don’t need any extra frills. This whole category falls under “keep it simple”. Add it to some background paper.
Or a photo.

Or turn it into it’s own insert (just like the 4x4 scalloped cards)
Item 5: Gold chipboard words
There are 7 of these beautiful pieces in total. 2 of them fit horizontally in the 4x6 format, the other 5 work best when they’re turned on their side. You can expand the size of your page to 8x6.25 and fold in the over hang. These chipboard pieces make a really cool decorative edge.
Turn your chipboard word into a tab to pull out hidden journaling or photos. When added to a transparency, the chipboard piece appears to be “floating” for an extra bit of magic.
Use the chipboard as a decorative title on the edge of a photo or journaling spot. The gold on kraft combo looks even better in real life!
Item 6: 4x6 journaling cards
Some of the 4x6 cards are designed as story prompts and they are PERFECT, just as they are! So tuck those ones into some 4x6 page protectors and let the prompts be your story telling guide.
Pockets that hold extra photos and journaling and ephemera are a fun, tactile way to get more stories in your album. These pockets can be made with 4x6 cards and some patterned paper! (I haven’t punched holes in my custom pockets yet, waiting to figure out where they’ll land in my album this year)
Don’t be afraid to cut up your journal cards to make them work for you!
Item 7: 2x2 Pocket pagesI love the option of adding in a 3rd style of page protector in the 4x6 album! All this requires is a few extra 6x8 page protectors with a 2x2 pocket design that you’re willing to cut up. These can be used exactly as they are intended (as a pocket page!) as shown above with the cut up journaling card.
I also shared the idea of using these extra pockets as “flip outs” from photos or patterned paper. This technique can be done with any of the page protectors that fit in the 4x6 album, it doesn’t have to be just the 2x2’s (but they are an awful lot of fun!)
The 2x2 pockets really are the perfect home for the plastic scallop edged 2x2 pieces in this year’s collection. I love the idea of using a skinny column (quite certain this idea was shared by Lesley aka. @scrapandtell on Instagram recently!).
Item 8: Cardstock framesThe 4 gold foil card stock frames is this kit have my heart!! In the video, you’ll see how they fit so beautifully into the page protectors. I’m thinking the largest one may be my intro page this year (along with a family photo if luck is on my side). They would also look pretty great floating on top of a transparency (on my to-do list!).
I said I wasn’t going to cut the frame in my video, but I couldn’t help it! These frames are lovely as journaling spots, and I’m always especially fond of items like this running right off the page.
They can also be turned into little interactive elements. I discussed my plan for the 2nd largest frame in my video but didn’t actually record the part where I put it together. I did in fact use one of the heavy plastic attachers to get it into the album. This piece opens into a booklet that’s just waiting for some journaling to capture the rest of this story.
Okay friends, 7 (+1) different items from the main kit, 3 different strategies each, that’s 24 options (+) to start planning your foundation pages. Keep it simple. Find a technique that you like and repeat!! Thank you so very much for being here today. I’m looking forward to sharing some more ideas for the 4x6 album with you soon (think transparencies and pockets!)!
September 10, 2024
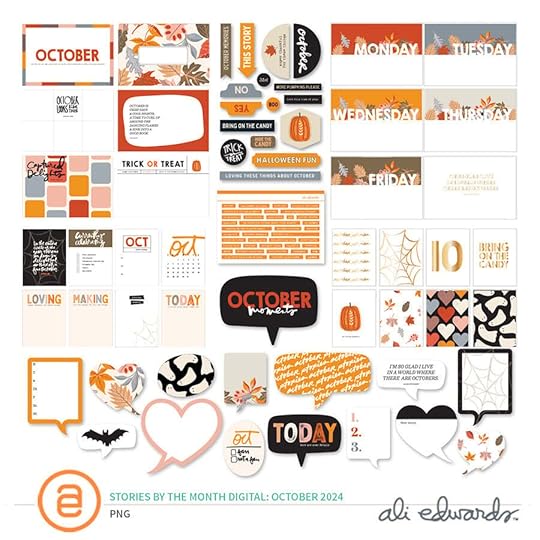
School Story Kit + October 2024 Stories By The Month + OLW Mini Kit + Halloween Kit
Today's the 10th of the month and that means a new
Story Kit, Story Stamp, and Stories By The Month kit.
This month we are focusing on stories related to the theme of
School.
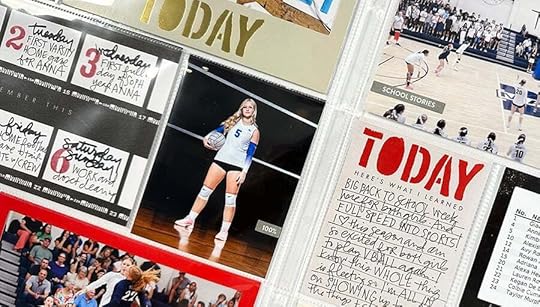
Everyone has a story about school. Most of us probably have more than one from all the years sitting in a classroom (or maybe your experience was totally different - that's a story too). This month we are coming together to tell stories about education and school experiences over the course of our lives (stories could be about you or someone you care about).
Story ideas for this theme include:
What is your favorite memory about school growing up (you could even break this down into elementary, middle, high, and college)?When you think back, what teacher made the biggest impression on you? What did you love about school and what did you not love about school? STORY KIT™
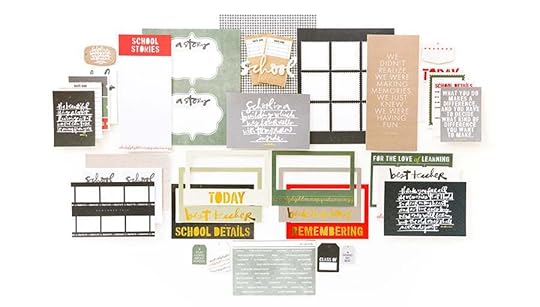
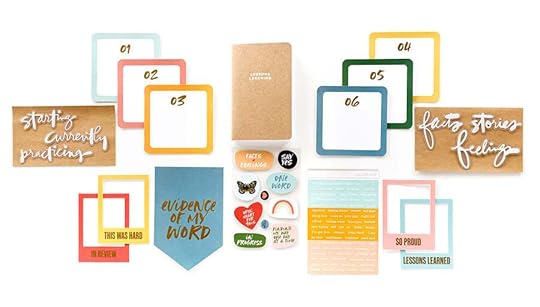
The Story Kit™ includes:
Here's a video overview of the Story Kit™ and Add-On options this month:
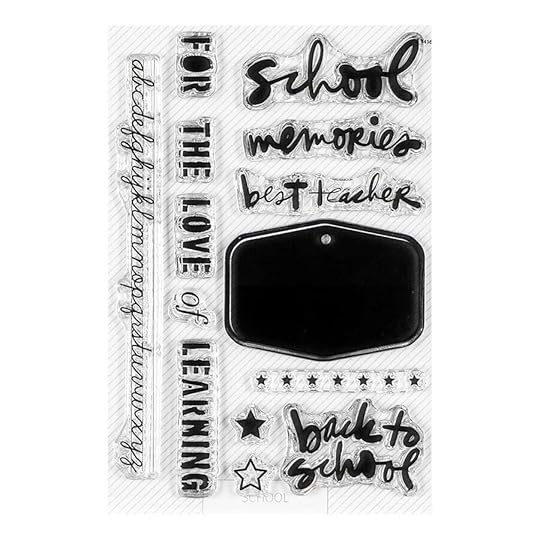
STORY STAMP™
The Stamp Set:
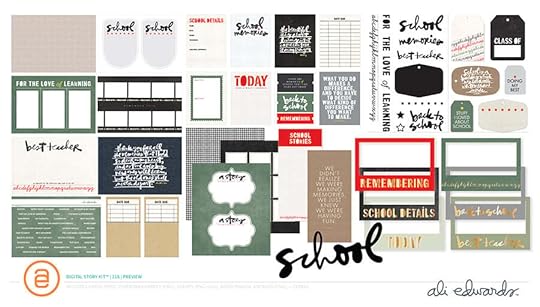
Here's a look at what's included in the Digital Story Kit™:
Your digital kit and the classroom and any Add-Ons purchased will be available to you on the 12th once your card has been charged for the month.
This kit is also available to physical kit subscribers as an Add On each month.
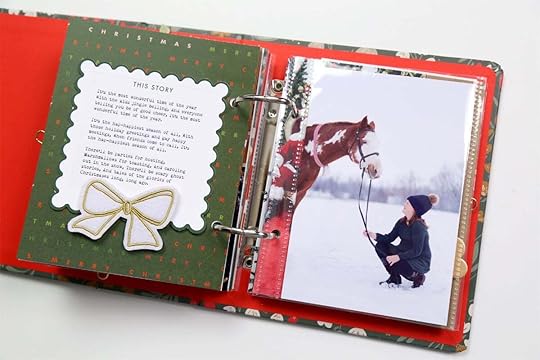
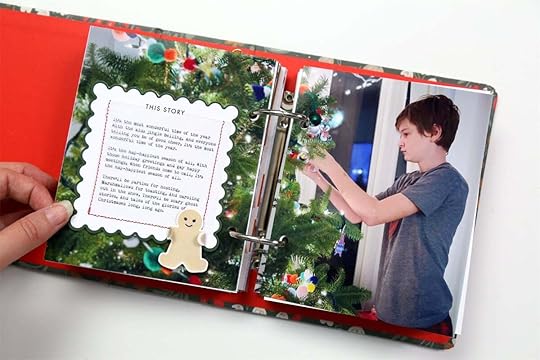
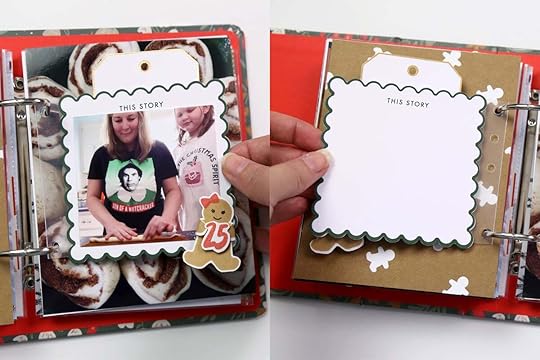
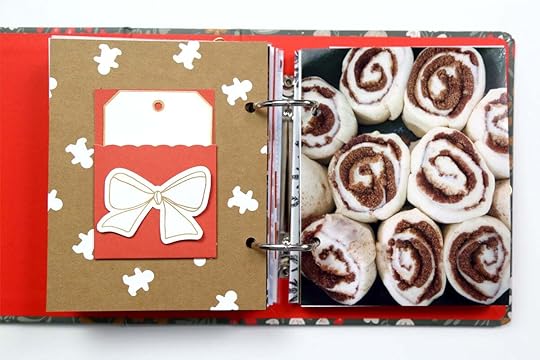
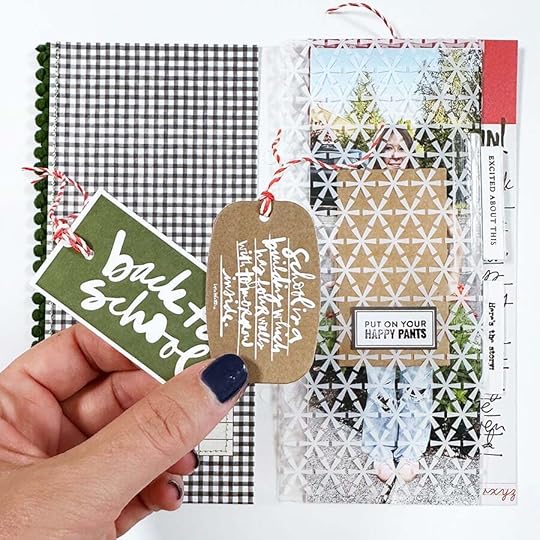
Here are a few project samples from Ali:
Again, thanks so much for subscribing and/or considering our
Story Subscription program! If you have any questions about this program please let us know below in the comments.
Here is a full look at the kit this month:
And a video overview:
This subscription is a great option for those who are looking to tell more calendar/everyday life sorts of stories.
Our Digital Stories By The Month™ kit is now called Inspiration By The Month™. With this subscription you receive access to the Inspiration By The Month™ classroom and the digital kit.
This kit is also available to physical Stories By The Month™ kit subscribers as an Add On each month.
This 6x8 stamp set is available to subscribers to add to their box during the Add On period and
also offered in the shop for anyone else.
*Waiting for this to arrive at my house so no samples at this time.
ONE LITTLE WORD® MINI KIT
Here's a video overview:
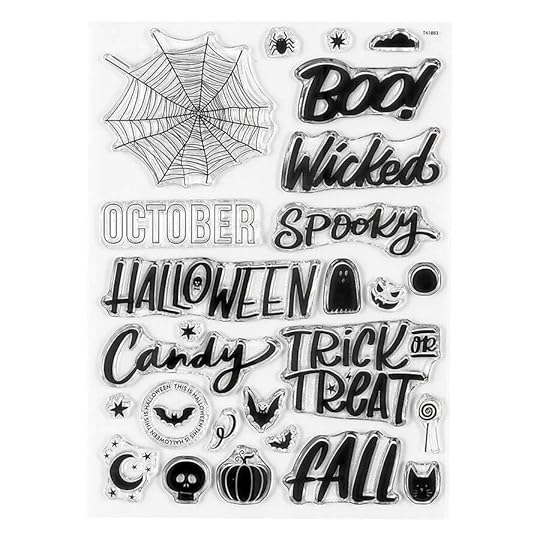
HALLOWEEN KIT + DIE CUT PACK + STAMPS
Subscribers will be able to add the Halloween Kit, Die Cut Pack, and stamps to their box during the Add On period. This is also now available in the shop for non-subscribers.
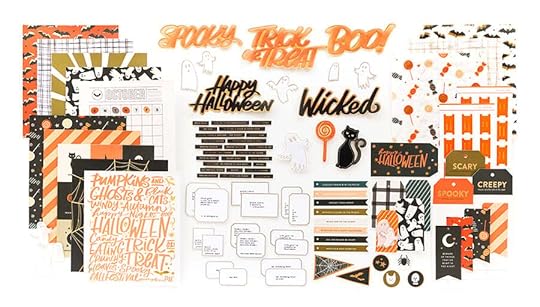
Here's a closer look at the kit:
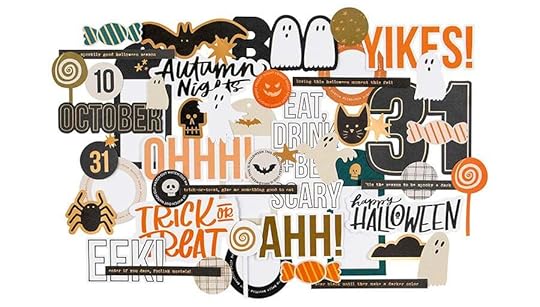
And the die cuts:
And two stamp options including 4x6 phrases:
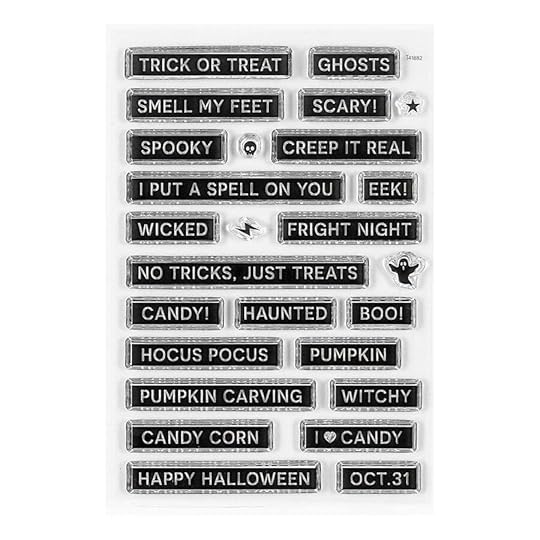
And 6x8:
Here'a a video walkthrough:
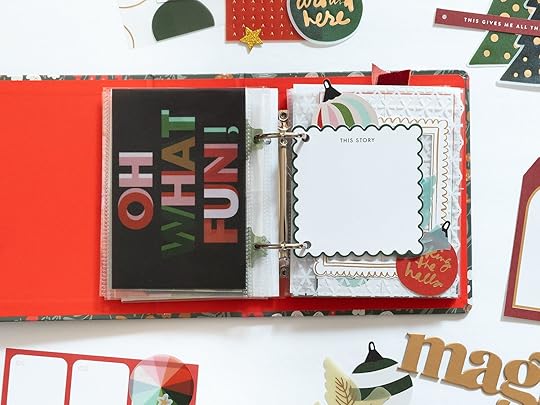
December Daily® 2024 | Special Guest Jill Drangsholt
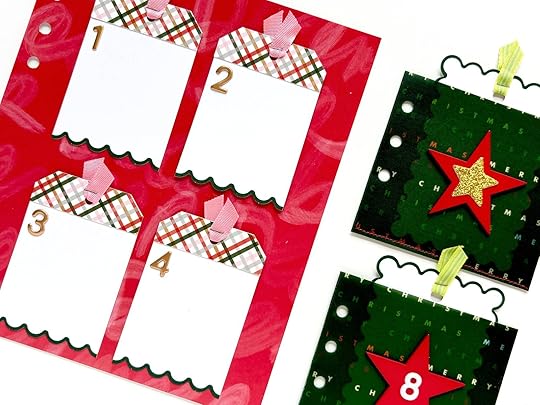
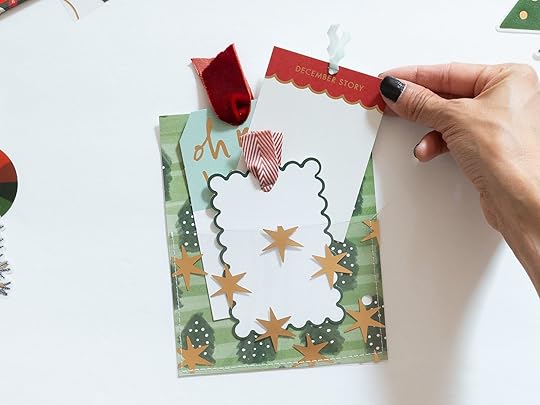
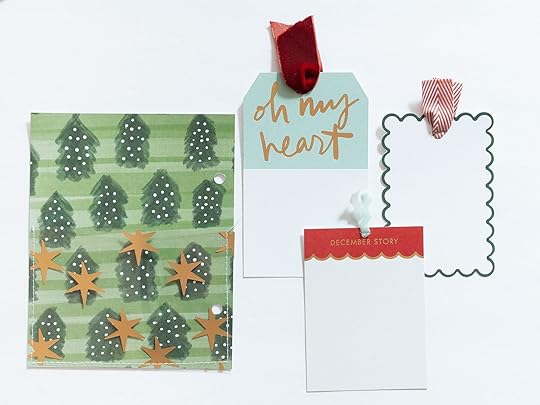
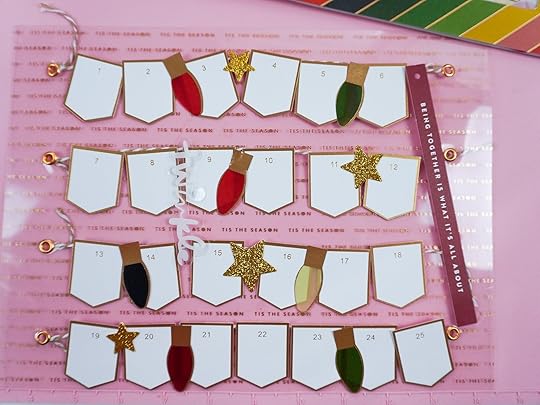
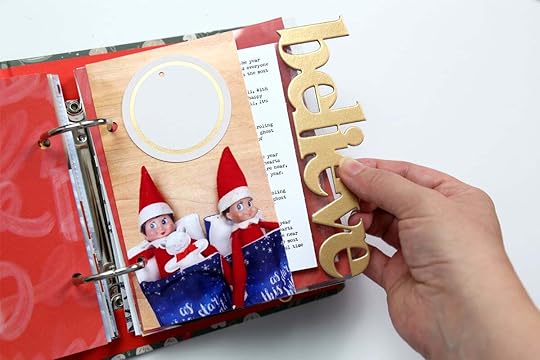
Hello again! I'm excited to be back on the blog today with some ideas for ways to use the Scalloped Die Cut Tags. I always use a ton of tags in my December Daily projects, so this product (found in the embellishments section) was really fun for me to play with!
But before we get to that, I wanted to show you an example using last year's album of how cute they look when you simply slip them in a pocket. I love the contrast between the scalloped edges and the straight edges, and the little peek at the next page it gives you!
I have two projects for you today. One where I alter the tags themselves and another where I create cute pockets for them using the 3x8 vellum envelope.
PROJECT ONEMy first idea was to actually cut down the tags so that I could fit four on a 6x8 page. I love the look of just a hint of a scallop on the bottom of each tag. Watch the process video below to see how they come together and then check out a few photos of the project in process as well as the final layout.
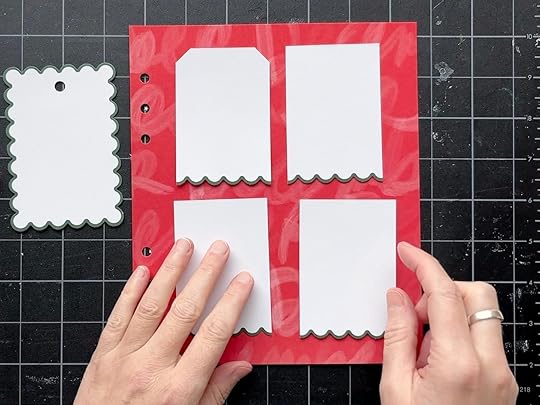
I really wanted to fit 4 tags on this layout, so I decided to cut down the tags to make them smaller. I cut off the scallops on both sides and cut the top off right below the hole. I love how they now have just a hint of scallop!
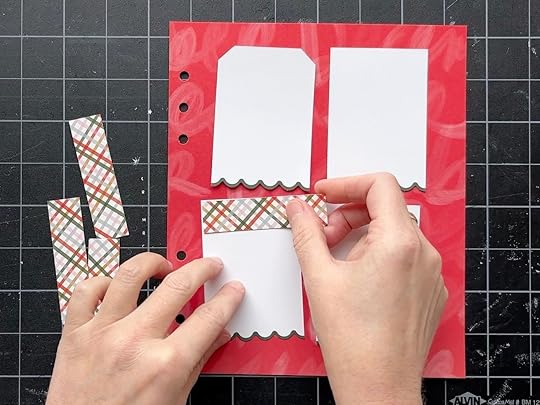
To further transform my tags, I added a .75 inch strip of patterned paper at the top. I chose to cut down this plaid 3x4 card from the mini kit because it had a small scale pattern and I love how colorful it is.
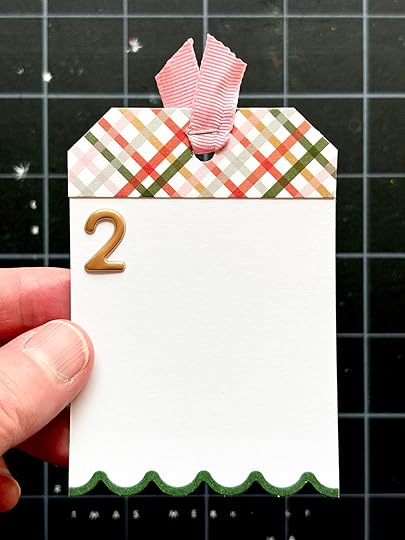
Then I used another tag as a template to cut down the corners, punched new holes at the top, and embellished with gold numbers a a pink ribbon.
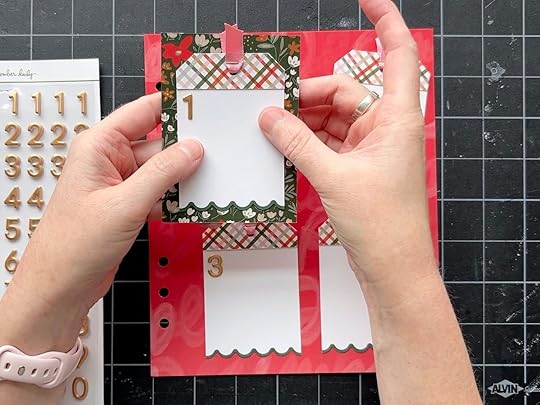
I adhered my tags lightly to the background paper to give me flexibility later if I want to switch up the patterned paper or decide to put the tags on 3x4 cards instead.
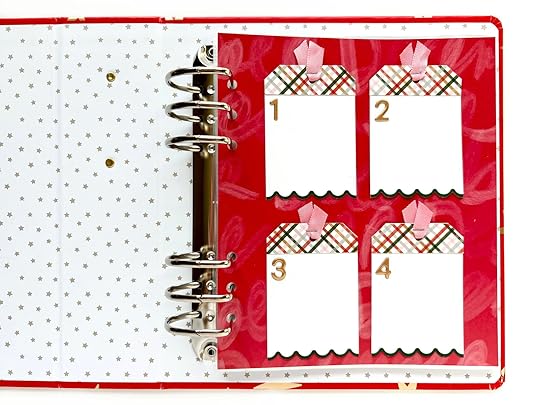
I'm excited to fill these cute tags with a story!
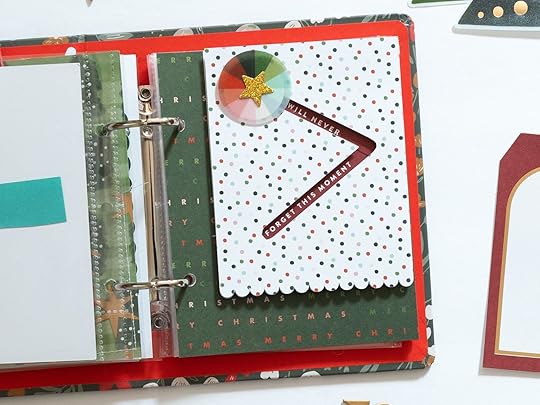
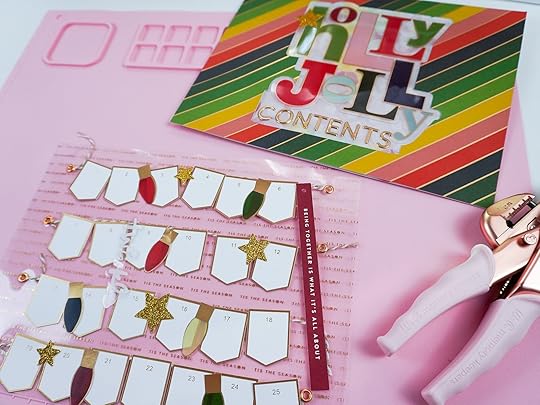
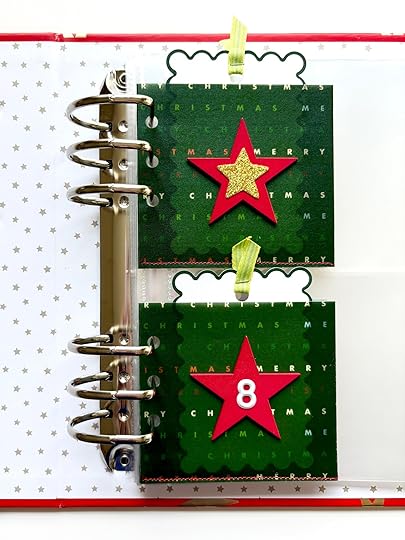
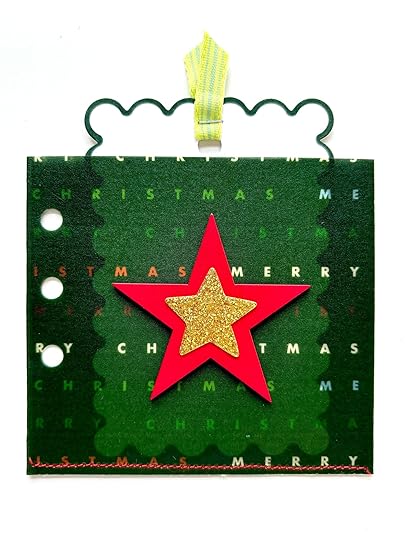
PROJECT TWOFor my second project, I really wanted to find or make a pocket for the scallops to peek out of. The only pocket I could find in this year's collection that fit this tag is the 3x8 vellum pocket from the envelope bundle. While these tags are way too short for that pocket, I really loved how they looked inside, so I decided to make it work by transforming it into two pockets!
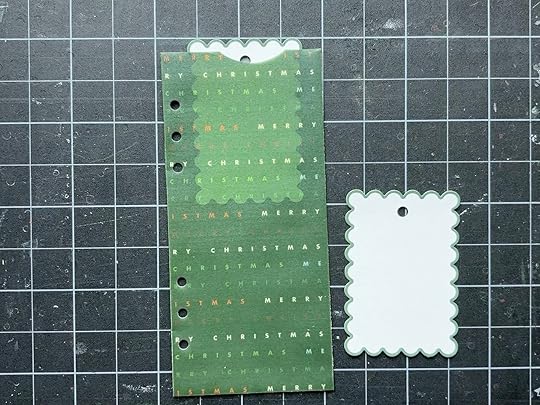
Watch the process video below to see how I made that happen and then check out more photos of the process and the final project.
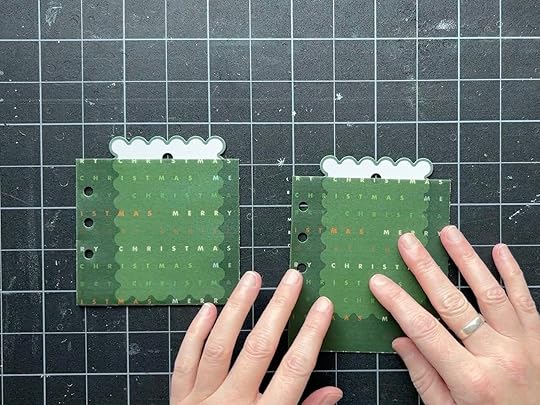
First, I cut off the bottom of the pocket right where I wanted the tag to peek out (left), then I trimmed off the top of the pocket to cut off the notch (right) and make it the same measurement above the hole punches as the other one. I used the text on the pattern as my guide because they are in the same location above both sets of hole punches.
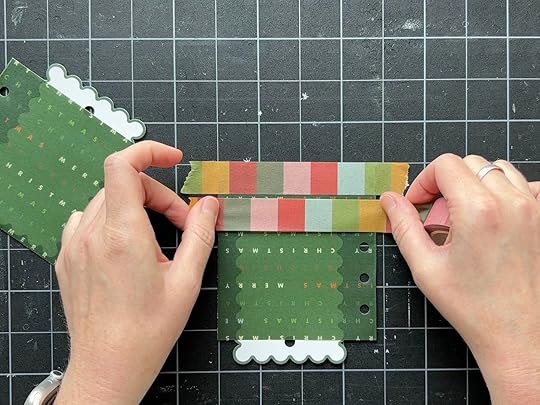
Then I used washi tape to give myself a guide to stitch along the bottom of the top pocket and then trimmed off the excess. I ended up also stitching along the bottom of the other pocket just to make them match.
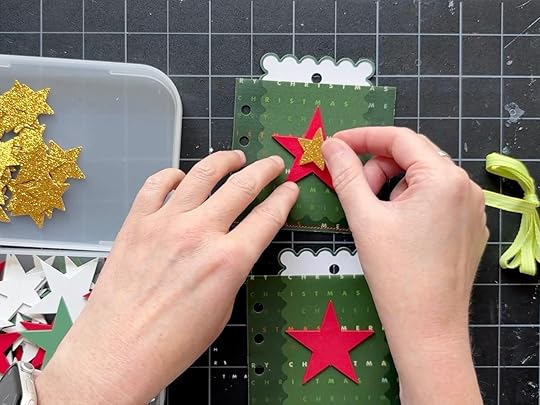
I embellished the pockets with some wood veneer stars, gold glitter stars, and a white puffy number. I also added a pop of bright green ribbon.
I hope these two projects got you inspired to play with these tags and all of the other fun scallops in this year's collection!
I will see you again next week and in the meantime, you can find me on Instagram at @jill.drangsholt if you want to follow my December Daily journey and my other crafty adventures.
September 9, 2024
December Daily® 2024 | Denine Zielinski
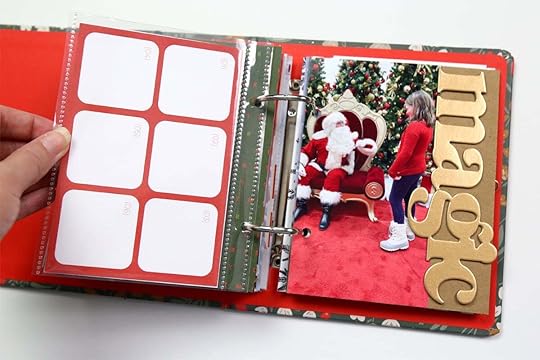
Hey friends! It’s Denine here once again, and I am excited to be back on the blog this week to do more December Daily stamping with you. There are so many awesome stamp sets with this year’s release, and it was so hard to decide which ones to work with first. Last week, we had some fun with the Holiday Trees 6x8 Stamp Set, and this week we will be playing around with a couple new sets. Let’s start out with the Holiday Tag 6x8 Stamp Set. This one is so super versatile and would be great for making your own personalized gifts tags this year. I, however, had other plans for this one.
A part of my December Daily for the past couple years has been to document my creative journey either through the past year or with the DD project itself. Last year, I did the entire year, and this year I will be just doing my December Daily story (I’m trying to keep it slim this year).
I chose the scalloped circle tag for this project, and I stamped it several times on a few scrap papers from last year as well as one of the papers from this year’s Paislee Press Mini Kit. I chose neutral tones and paired them with kraft scalloped circles. I wanted to just have pops of color. This would also look super cute using the scalloped square stamp and mixing it with the plastic scalloped squares!
One thing that was so much fun was using a paper crimper on the kraft cardstock before using the scalloped circle punch. I haven’t crimped paper in ages!
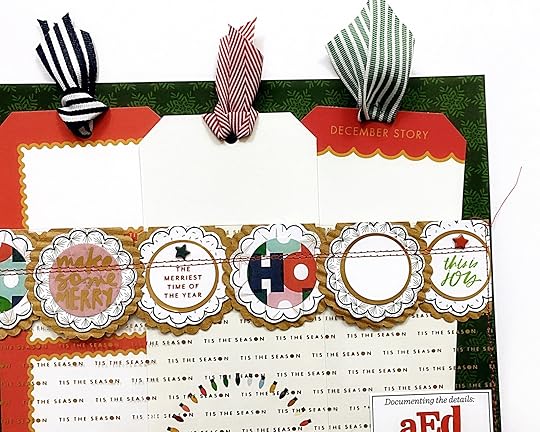
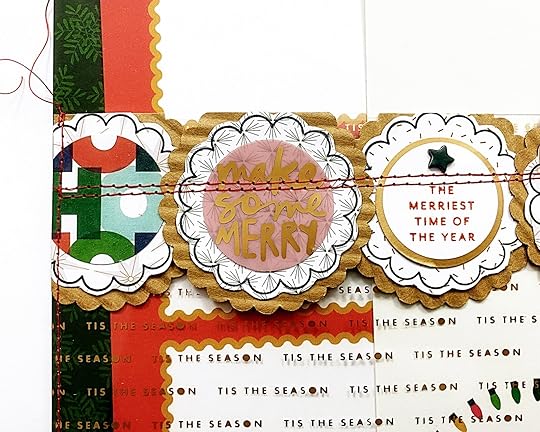
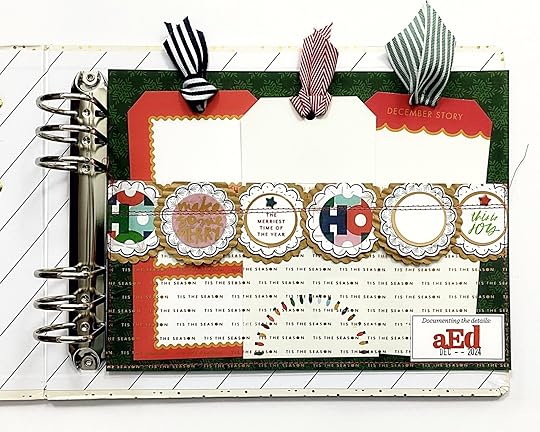
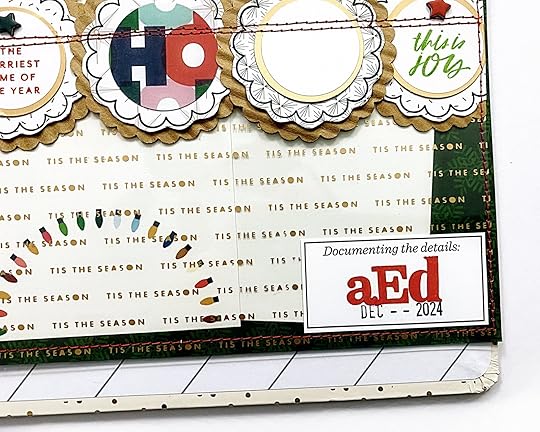
I created a pocket using one of the papers from the Merry Merry 10×8 Paper Pack and the 10x8 Tis The Season transparency. I made a line of circles across the middle of the transparency and ran it through my sewing machine. I then cut the transparency down to make the pocket and sewed it to the background paper. I added some colorful circles, a few Gold Foil Die Cut Circle Labels, and the Make More Merry scalloped plastic square (punched into a 1 ½ inch circle). I did a bit more stamping on two of the Gold Foil Die Cut Circle Labels using the Our Merry Era 4×6 Stamp Set by Paislee Press. I left the last one blank to add the story number when it makes it into my album.
You can see how this page came together in the video below.
Here is how the page will look once it is in my album. You can see that it’s not in the rings yet as I did not punch the holes. Since I’m not sure where this will end up in my album, I will wait to punch the holes depending upon what side of the album it falls on.
Oh yes….I almost forget to mention that I also added a little label to the lower right-hand corner of the pocket after I recorded my process video. I was dying to do something with the Alpha and Numbers 4×6 Stamp Set. I love all of the different letter styles! This stamp set will make its way into my album A LOT this year!
The large tags inside of the pocket were created by using Photoshop Elements to resize some of the cards + papers from the Main Kit. I may end up adding some other fun die cuts or plastic pieces to my pocket, as well.
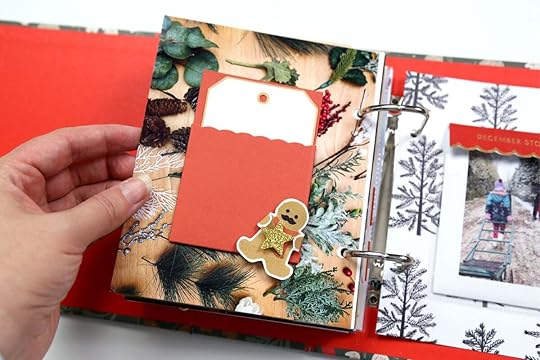
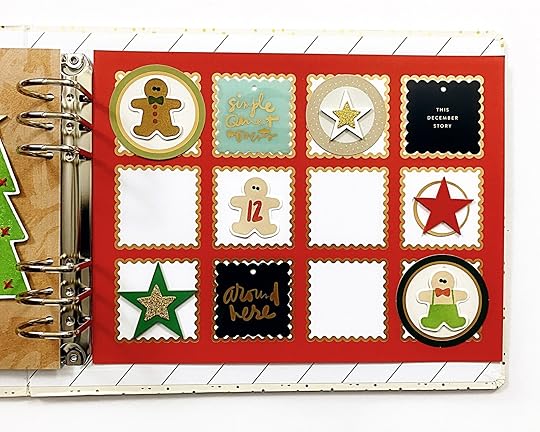
Next up is the absolutely adorable Gingerbread Men 4×6 Stamp Set. If building our own gingerbread-folk isn’t the most fun ever, I don’t know what is! I had a blast just stamping the afternoon away. I seriously had to stop myself because it was getting out of hand. I created so many little gingerbread men, yet I barely hit the tip of the iceberg. The different iterations are seemingly endless!
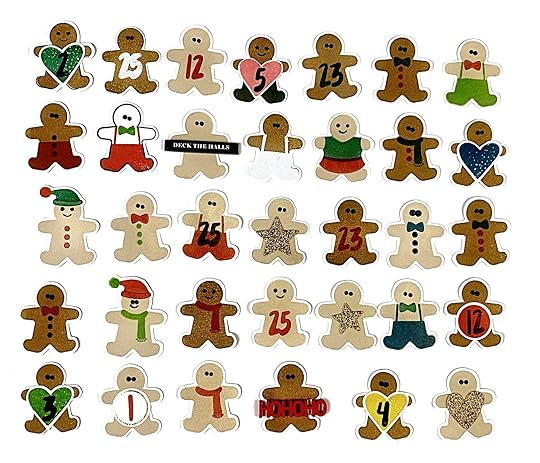
The above photo shows some of the gingerbread folk that I created, and this isn’t even all of them! I had to narrow it down somehow!
I did not create a foundation page with these guys because I really couldn’t decide which idea to go with. Instead, I just pulled out some of the journaling cards + papers from the release and gave you some of the ideas that were floating around in my head.
Here is a close-up of a few things that you could do with these little guys.
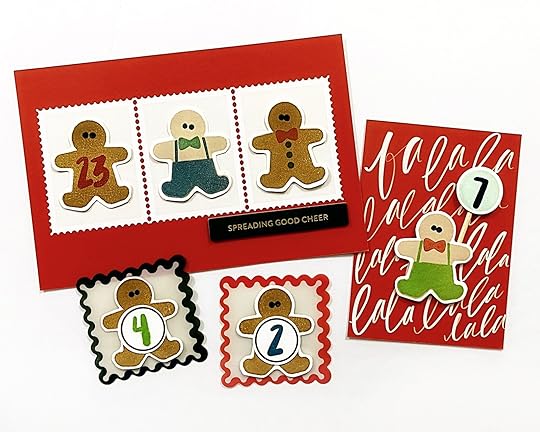
In the photo below, I added 7/8-inch circles (stamped with numbers from the Number 4×6 Stamp Set) to the gingerbread folk and then mounted them on top of some of the Scalloped Plastic Squares. I slipped them into the pockets of a 6x8 page protector. In the open spaces, you could add photos and/or journaling. You could also staple the Scalloped Plastic Squares to the outsides of the pockets and have your journaling underneath. That would leave room for more photos, and the journaling would peek through the plastic pieces which always makes me happy!
The gingerbread folk also fit perfectly inside of the stamp shaped rectangles on this 4x6 card from the Paislee Press Mini Kt.
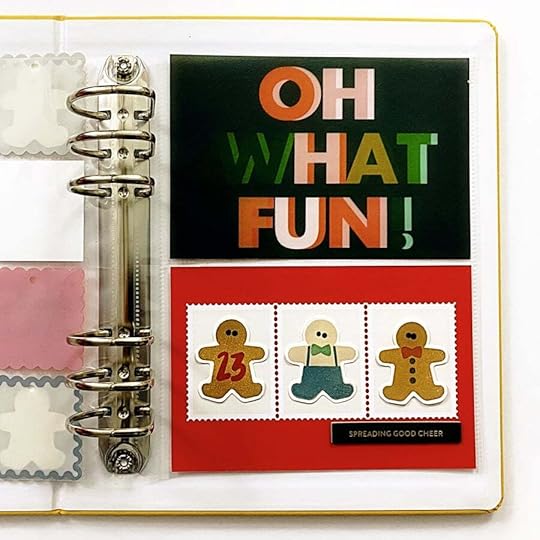
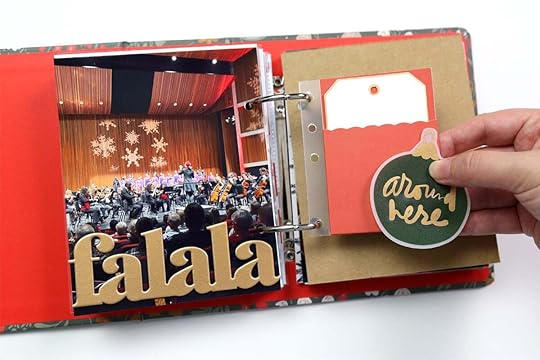
In the photo below, I added one on top of the Fa La La 3x4 card from the Paislee Press Mini Kit. I also cut down a toothpick and added a 7/8-inch circle to make it look like he’s holding a sign!
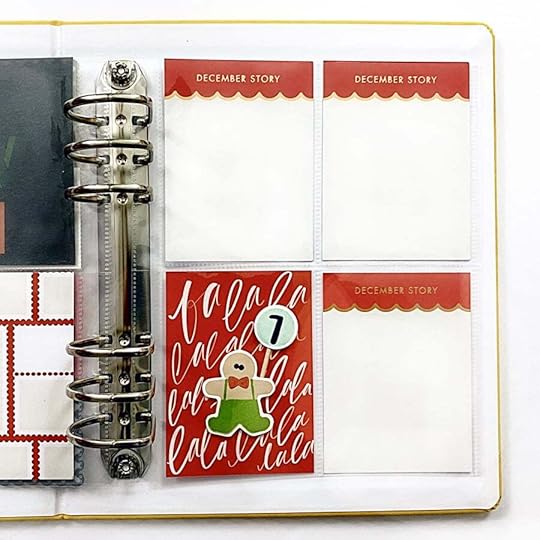
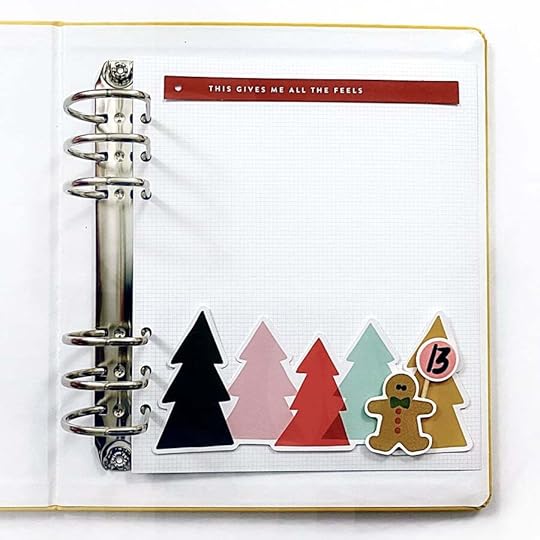
I did the same thing below but stood him in front of the colorful trees die cut piece.
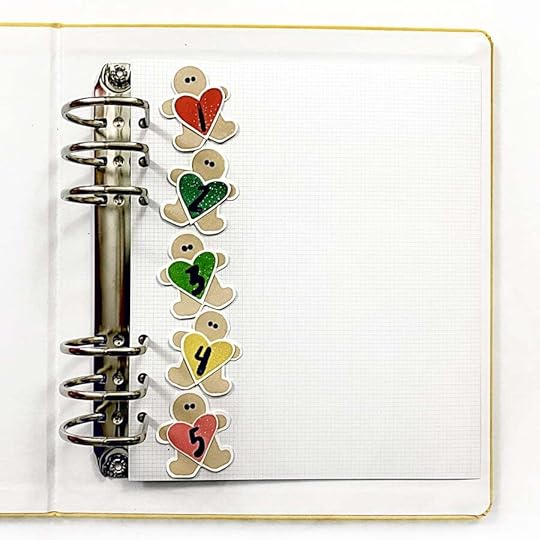
Here they are on top of one another holding little hearts with numbers for a numbered list.
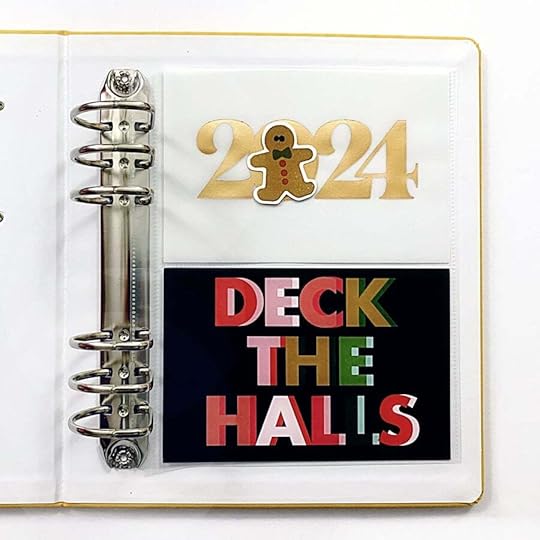
Here is one of the gingerbread folk hanging out inside the “0” in 2024.
Below is one of my absolute favorites for this little guy. I hung him from the felt nine using a gold miniature ornament hook. Gosh, he’s just the cutest ever!

Last, but not least, here is the Scalloped Boxes 10x8 paper from the Main Kit all decked out with a few gingerbread folk + some other goodies.
The video below has a whole bunch of other ways that you can add these little gingerbread folk into your December Daily album.
Stamping – 0:00 – 5:48
Creative Ideas – 5:51 – 11:53
One more thing before I go…you DO NOT have to fussy cut these little guys out. I just like doing that. You can totally 100% just stamp them directly onto your paper, journal card or project. A lot of the ideas that I showed you here would work beautifully without having to cut the gingerbread folk out. I know that not everybody is a fan of fussy cutting like myself, and that is fine. This stamp set is still for you!
As always, this was so much fun, and I thank you all for being here with me today. If you have any questions, please feel free to comment below. You can also see more of my work on Instagram @denine2 and YouTube @Denine2. Happy Storytelling + Happy December Daily! See you all very soon!
Friendly reminder that we are following the same process as last year for securing your stamp orders. In order to meet the high demand for stamps this year, we are asking you to add the stamp sets you would like to receive in your box by 9/9 at 11:59pm ET to guarantee your order for shipping with your box in early October. We will be ordering a limited amount of each design in addition to stamps sets secured by customers that will be available after 9/9. If you do not secure the stamps you would like by 9/9 at 11:59pm we cannot guarantee we will have enough quantity to fulfill demand and they may sell out. Find them here.
September 6, 2024
In Case You Missed It | September 6
Happy Friday, friends! Welcome to the latest
In Case You Missed It. Just a reminder that this is a quick post that will happen every Friday afternoon with all the updates and links that have happened throughout the week. So, let's get to it:
2024 DECEMBER DAILY® PRODUCTS
The 2024 December Daily boxing period is currently live. From now until September 30th 11:59pm ET you are able to add items to your box for a single shipping charge. Order will ship the first week of October. Due to manufacturing constraints, sold out items will not be reordered. Our 2024 Collection Preview Post is available here. We also shared a How It Works post for all of the information you need to know to prepare for the boxing period launch on Tuesday, August 27th at 10am Eastern. Not signed up for our newsletter? Head to www.aliedwards.com and sign-up in the footer of our site. Be sure to follow us over at @decemberdaily, our official account for all things December Daily®. We also invite you to join us in the December Daily® Facebook group for more merriment. Find additional resources and inspiration, including Ali's completed albums, on the blog via the December Daily hashtag. Learn more about the project here.
2024 DECEMBER DAILY CLASSES
December Daily® Product Play | This + This + This workshop registration is open and available at an intro price of $20 during the Order Selection Period. After that time it will move to the official price of $25. More details on this year's workshop can be found at the bottom of this post (workshop begins November 5th). December Daily® Hybrid Product Play workshop will open on Tuesday August 27th (DD launch Day) and will be available at an intro price of $12 during the Order Selection Period. After that time it will move to the official price of $15. Read below for more details (workshop begins on October 11th to correspond with our December Daily® Digitals release the same day). December Daily® Prep Day is happening this year on Sunday, November 3rd starting at 10am ET. You can sign up for this $5 online event on Tuesday August 27th during Order Selection Period as well.
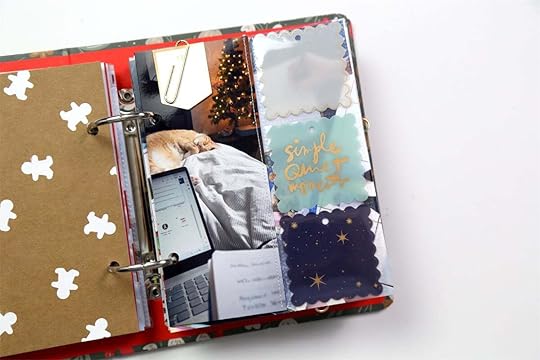
AUGUST REVEAL
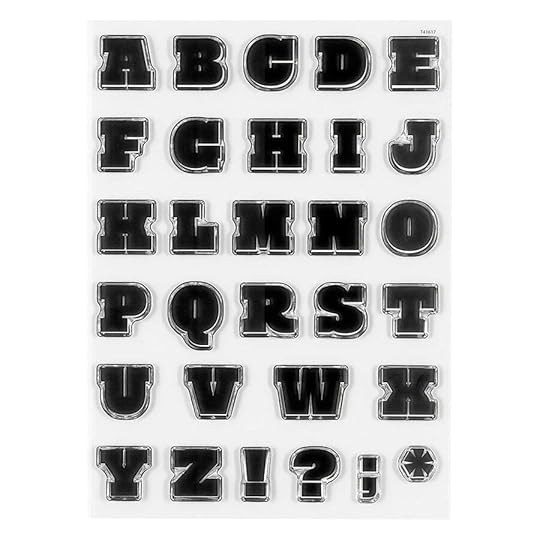
Only a few days left to subscribe and receive the Story Kit™ theme: QUIET! Ah, quiet. Sometimes it's elusive and sometimes it's oppressive and sometimes it's the exact relief we need. This month we are telling stories about being quiet, searching for quiet, embracing quiet, and generally reflecting on how we feel when things are quiet in our lives. In addition to our new Story Kit™ theme, we also have a brand new Stories By The Month™ kit, the next edition in our Alphas Are Awesome series, and our most recent Quarterly Scrapbook Kit (alphabet-theme). Head to the blog for Ali's post with all the details about this month’s release.
AUGUST DIGITALS
The first Friday of every month we have a new digital release available in the shop. Play with scale, recolor objects, add journaling, print multiples…the sky is the limit when playing with digitals. Shop digitals here.
2024 PROJECTS + PRODUCTS SCHEDULE
As we continuing easing into 2024 we put together an overview of our schedule of projects + product releases for the upcoming year. We are sharing this as a way for you to plan, think about what you might want to participate in this year, and simply share some of the things we have coming up to help support + inspire storytelling. For the last few years we've followed a fairly similar cadence for our releases and our major projects will follow that release schedule again this year. Please note that, as you might imagine, this schedule is subject to change throughout the year based on a variety of variables. Find the post here.
As always, we’re so grateful to have you all as members of this community! Thanks for joining me today and have a great weekend!


