
Ali Edwards's Blog, page 24
July 19, 2024
In Case You Missed It | July 19
Happy Friday, friends! Welcome to the latest
In Case You Missed It. Just a reminder that this is a quick post that will happen every Friday afternoon with all the updates and links that have happened throughout the week. So, let's get to it:
NEW TRAVEL CLASS | START TO FINISH 04
Let us help you bring your travel stories to life! Join contributors Shannon Flatley, Yin Goh, Kendra Wietstock, Kelly Watson, Jeanne Williams, and Diane Dziuban as they each create a travel album using products from the 2024 Travel Collection. In this class you will find a variety of styles and approaches that includes more recent travels as well as travel stories collected from over the years. From planning and organization to creative ways of using products, this class is all about providing you with inspiration and ideas to help you create your own travel album. Learn more and
register here.
2024 TRAVEL COLLECTION
Our brand new 2024 Travel Collection is here! The products are in the warehouse and ready to ship to you! We’re excited to offer free shipping ($20 international flat rate) with a $75 purchase in the travel collection category. Use code TRAVEL24 during checkout. We’ve also got a brand new Start To Finish Travel Workshop coming this summer using products from this collection! Lessons will go live each Friday starting July 5th until August 9th.
NEW CLASS FROM ALI | STASH CLASS
Join Ali for a fun, motivating adventure into some ways to deal with all the scrapbooking stuff you’ve collected over the years and still have. Sometimes we need to press pause on our storytelling adventures for just a bit in order to get a handle on the fun things we’ve added to our physical product toolbox. Let’s come together as a community + spend some time prioritizing starting with our stash to get more of our stories told. In this four week workshop you’ll spend the first two weeks sorting + organizing supplies (or getting ideas about what might work for you) and the second two weeks creating projects using what you already own. Learn more here.
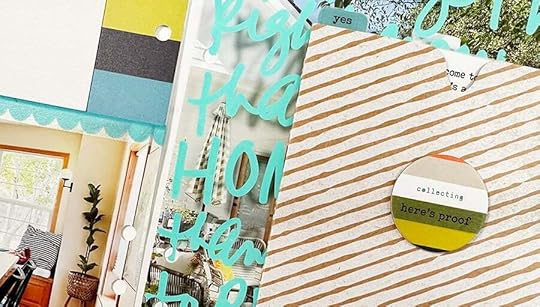
JULY REVEAL
Earlier this month we revealed a new Story Kit™ theme: COLLECT! To collect can mean to bring or gather together, to solicit and receive, or to regain control of oneself. As memory keepers we are often collectors of photos and words and supplies and we bring those things together to document our lives. What do you collect in your life? What did you collect when you were a kid? This month we are coming together to tell stories of collecting whether they are things or memories or friends or books or thoughts or something else entirely. Head to the blog for Ali’s post with all the details about this month’s release.
JULY DIGITALS
The first Friday of every month we have a new digital release available in the shop. Play with scale, recolor objects, add journaling, print multiples…the sky is the limit when playing with digitals. Shop digitals here.
2024 PROJECTS + PRODUCTS SCHEDULE
As we continuing easing into 2024 we put together an overview of our schedule of projects + product releases for the upcoming year. We are sharing this as a way for you to plan, think about what you might want to participate in this year, and simply share some of the things we have coming up to help support + inspire storytelling. For the last few years we've followed a fairly similar cadence for our releases and our major projects will follow that release schedule again this year. Please note that, as you might imagine, this schedule is subject to change throughout the year based on a variety of variables. Find the post here.
As always, we’re so grateful to have you all as members of this community! Thanks for joining me today and have a great weekend!


July 17, 2024
2024 Travel Collection | Special Guest Nolana Lynch
Hello Everyone!
How are you doing today? I am so excited to be back with you to share more of my projects with the 2024 Travel Collection.
I decided to tackle our one-month trip from September to the end of October last year. I have been contemplating how to tackle this trip over the past few months - as there are sooo many photos and soo much to document!
I have always wanted to create an “artsy” word art page with various sizes of alphas. Earlier this year, when we were driving from the most beautiful little beach town - Sorrento, back to my in-laws’ home in Melbourne, there were the most beautiful art pieces on the highway (freeway). I remember marveling at the commissioned word art with the towns’ names under the flyovers leading to the respective town - while I was not fast enough to take a photo - it remained etched in my brain.
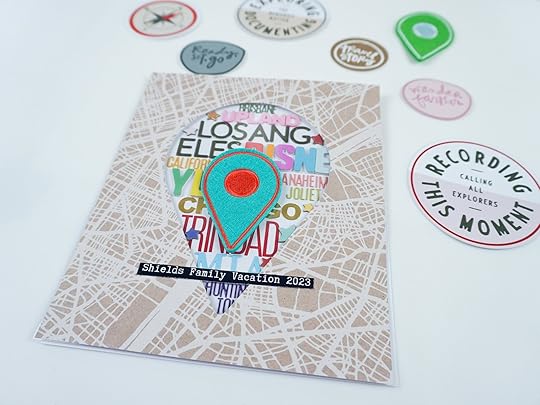
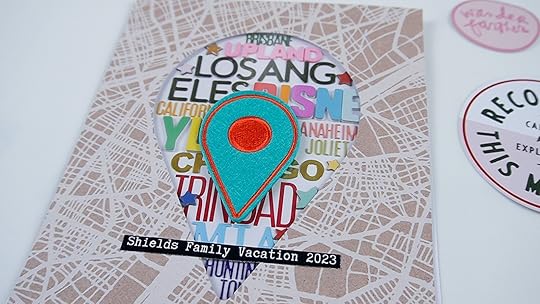
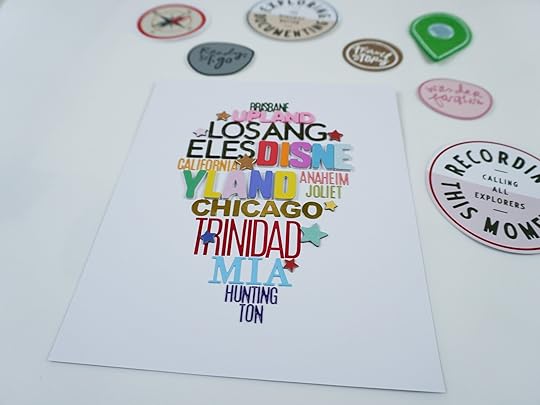
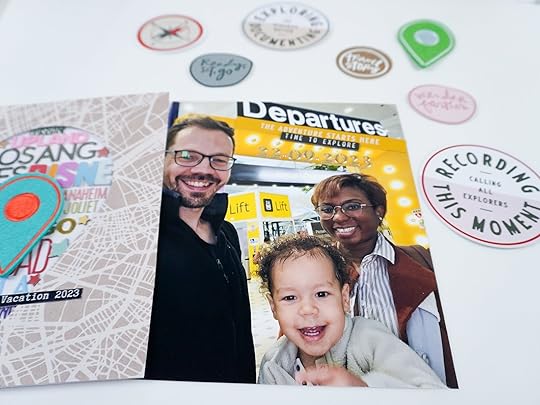
Once I saw the city street map in the paper pack, and the colourful geotags, I was inspired to create this title page with the names of all the cities we visited during our trips. At first the idea was to have the alphas adhered to the top page but, when I was finished, it felt too pretty to be covered up, so I decided to leave it unattached so that I (and anyone who views my album) can see the full city names
To the back of this page, I added a full-page photo of our family at the Departure gate of our city, full of excitement for our fifteen-hour flight, while being a tad bit nervous about how our toddler would sleep on his first long-haul flight.
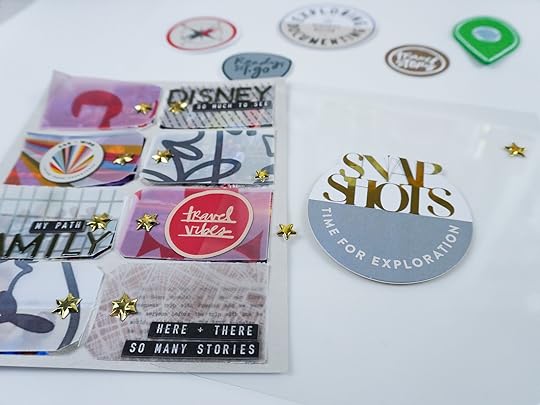
While working on my pages, I thought it would be great to do a Snapshots page - as we took seven flights, and visited seven cities during our trip. I went through the paper pack and chose the tag page, as there were eight spots to document the various Snapshots from our trip.
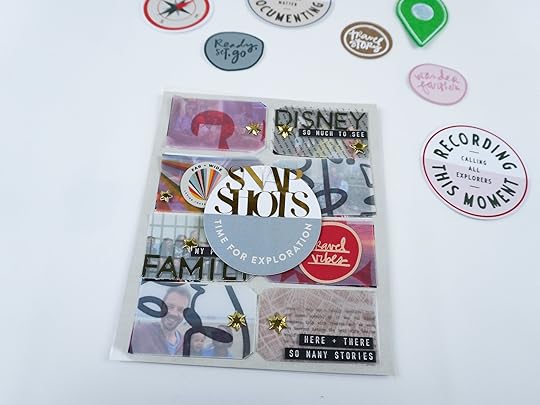
I chose one photo to represent each leg of our trip. I used the 4x6 vellum journal cards and printed a few of the patterned papers on vellum to create tags that fit perfectly on top of the tag page. I created a “stencil” using the digital stamp that matched the tag paper in my Cricut Design Space program - and these cut out perfectly.
I sized the journaling blocks and photos in Canva using the digital tag page as a template and printed the journaling on clear adhesive sheets and the photos on Epson Glossy photo paper. I then cut them down to size with my rotary trimmer. For the “Snapshots cover page”, I used a 7x8.25 inch piece of acetate, one of the circle die-cuts, and the digital alpha stamp in Cricut to cut out the words “Snapshots” using Gold Mylar.
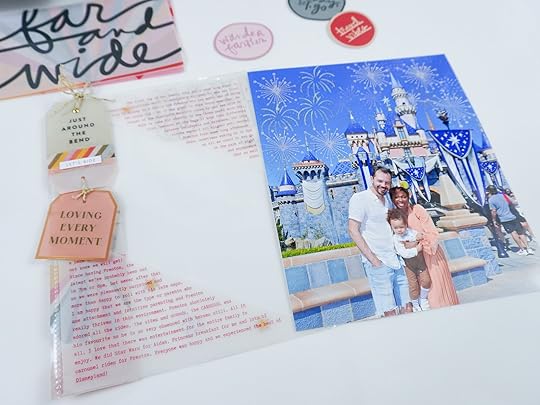
I’ve been most excited to document the Disneyland component of our trip, so I kicked that off with a title page/summary page of that portion of the trip. This was so much fun!
Of course, I used our photo in front of the castle - I toyed with whether to use our day or night photos here - but in the end, I felt like I could still put fireworks on the day photos - hah! I grabbed my firework stamps from previous kits and got to work stamping with white shimmer ink. I then used a page protector to create some angled segments. These portions contain vellum, journaling, a few stars, and the title in Gold Mylar. I love how it frames us.
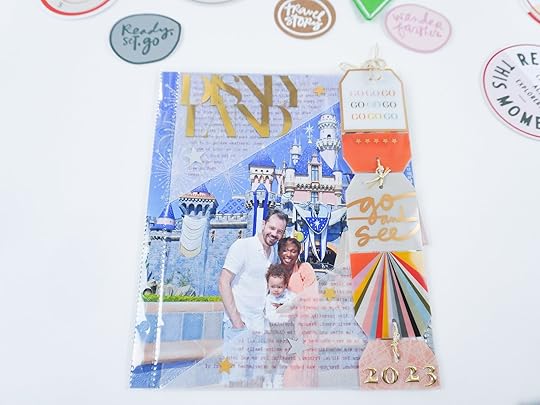
I then used the Plastic Tags down the side, tied them together with ivory and gold baker’s twine, and placed the year in gold puffy alphas on the end. I also did this on the flip side.
Here's how I plan to tackle the remainder of the album:-
I have printed my photos for the very first leg of the trip and decided to do a mini-book of these photos on one layout. I realized that this album may take a lot longer than I envisioned, so summary pages/layouts may help it move along faster
I will then choose, edit and print the photos one leg at a time so that I won’t get overwhelmed by the sheer amount of photos, or get bored or frustrated with editing hundreds, perhaps thousands of photos in one big go!
I will then work through my layouts for that particular leg of the trip, and sit and savour the process of putting it all together, before moving on to the next leg.
Thanks so much for joining me here for some insights into my travel documenting process!
Happy Scrapping!
Find more inspiration from Nolana on Instagram here.
July 10, 2024
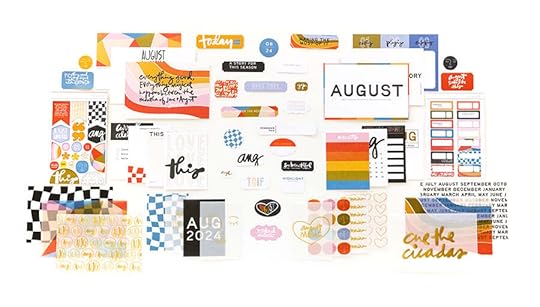
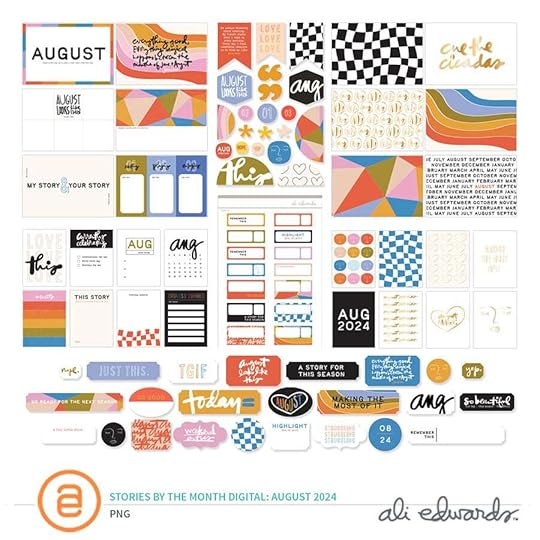
Collect Story Kit + August Stories By The Month
Today's the 10th of the month and that means a new
Story Kit, Story Stamp, and Stories By The Month kit.
This month we are focusing on stories related to the theme of
Collect.
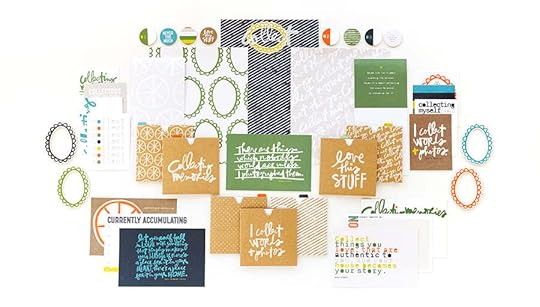
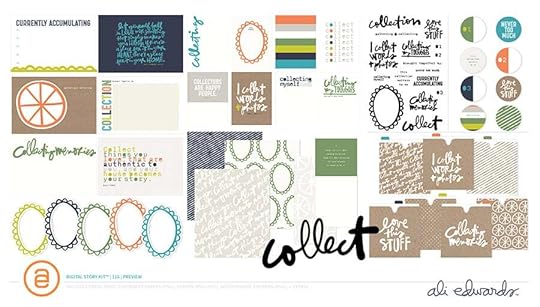
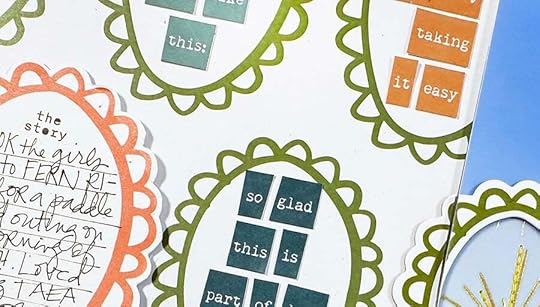
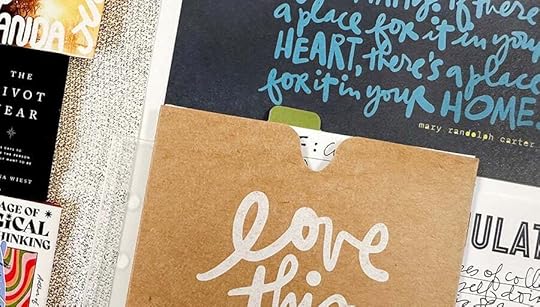
To collect can mean to bring or gather together, to solicit and receive, or to regain control of oneself. As memory keepers we are often collectors of photos and words and supplies and we bring those things together to document our lives. What do you collect in your life? What did you collect when you were a kid? This month we are coming together to tell stories of collecting whether they are things or memories or friends or books or thoughts or something else entirely.
Initial story ideas for this theme include:
Make a list of things you are currently collecting. Tell the story of a time you had to collect yourself before responding or reacting. Did you collect something as a kid? Tell that story. STORY KIT™
The
Story Kit™ includes:
Here's a video overview of the
Story Kit™ and Add-On options this month:
STORY STAMP™
The
Stamp Set:

PLEASE NOTE: Sharing the digital preview because I didn't receive the physical product in time for this blog post.
STORY CLASS // INCLUDES DIGITAL STORY KIT
Here's a look at what's included in the Digital Story Kit™:
Your digital kit and the classroom and any Add-Ons purchased will be available to you on the 12th once your card has been charged for the month.
This kit is also available to physical kit subscribers as an Add On each month.
Here are a few project samples from Ali:
Again, thanks so much for subscribing and/or considering our
Story Subscription program! If you have any questions about this program please let us know below in the comments.
We are changing things up with our Stories By The Month™ subscription for 2024 and
you can read all the details here.
Here is a full look at the kit this month:
And a video overview:
This subscription is a great option for those who are looking to tell more calendar/everyday life sorts of stories.
Our Digital Stories By The Month™ kit is now called Inspiration By The Month™. With this subscription you receive access to the Inspiration By The Month™ classroom and the digital kit.
This kit is also available to physical Stories By The Month™ kit subscribers as an Add On each month.

This 6x8 stamp set is available to subscribers to add to their box during the Add On period and
also offered in the shop for anyone else.
PLEASE NOTE: Sharing the digital preview because I didn't receive the physical product in time for this blog post.
July 5, 2024
In Case You Missed It | July 5
Happy Friday, friends! Welcome to the latest
In Case You Missed It. Just a reminder that this is a quick post that will happen every Friday afternoon with all the updates and links that have happened throughout the week. So, let's get to it:
NEW TRAVEL CLASS | START TO FINISH 04
Let us help you bring your travel stories to life! Join contributors Shannon Flatley, Yin Goh, Kendra Wietstock, Kelly Watson, Jeanne Williams, and Diane Dziuban as they each create a travel album using products from the 2024 Travel Collection. In this class you will find a variety of styles and approaches that includes more recent travels as well as travel stories collected from over the years. From planning and organization to creative ways of using products, this class is all about providing you with inspiration and ideas to help you create your own travel album. Learn more and
register here.
2024 TRAVEL COLLECTION
Our brand new 2024 Travel Collection is here! The products are in the warehouse and ready to ship to you! We’re excited to offer free shipping ($20 international flat rate) with a $75 purchase in the travel collection category. Use code TRAVEL24 during checkout. We’ve also got a brand new Start To Finish Travel Workshop coming this summer using products from this collection! Lessons will go live each Friday starting July 5th until August 9th.
NEW CLASS FROM ALI | STASH CLASS
Join Ali for a fun, motivating adventure into some ways to deal with all the scrapbooking stuff you’ve collected over the years and still have. Sometimes we need to press pause on our storytelling adventures for just a bit in order to get a handle on the fun things we’ve added to our physical product toolbox. Let’s come together as a community + spend some time prioritizing starting with our stash to get more of our stories told. In this four week workshop you’ll spend the first two weeks sorting + organizing supplies (or getting ideas about what might work for you) and the second two weeks creating projects using what you already own. Learn more here.
JUNE REVEAL
Final days to subscribe and receive this month's kit! Earlier this month we revealed a new Story Kit™ theme: NATURE! This month we are turning our eyes and hearts and memories to the natural world with a kit inviting you to document nature. Whether you are an indoor person who enjoys looking out the windows or growing plants inside or someone who can't imagine not living as much of your life out in the woods as possible let's get some stories told about our life experiences with nature. In addition to our new Story Kit™ theme, we also have a brand new Stories By The Month™ kit, and the next edition in our Alphas Are Awesome series. Head to the blog for Ali’s post with all the details about this month’s release.
JULY DIGITALS
The first Friday of every month we have a new digital release available in the shop. Play with scale, recolor objects, add journaling, print multiples…the sky is the limit when playing with digitals. Shop digitals here.
2024 PROJECTS + PRODUCTS SCHEDULE
As we continuing easing into 2024 we put together an overview of our schedule of projects + product releases for the upcoming year. We are sharing this as a way for you to plan, think about what you might want to participate in this year, and simply share some of the things we have coming up to help support + inspire storytelling. For the last few years we've followed a fairly similar cadence for our releases and our major projects will follow that release schedule again this year. Please note that, as you might imagine, this schedule is subject to change throughout the year based on a variety of variables. Find the post here.
As always, we’re so grateful to have you all as members of this community! Thanks for joining me today and have a great weekend!
July 3, 2024
2024 Travel Collection | Special Guest Nolana Lynch
Hello Everyone! Nolana here! I am so very excited to be with you to share my plans for using this year’s gorgeous travel collection. Travel stories are some of my favourites and I could not wait to dig in!
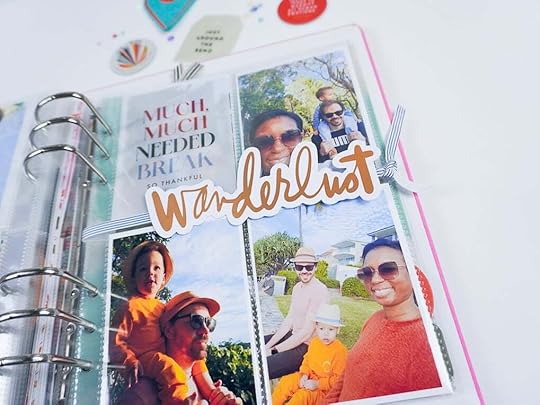
I am kicking things off by documenting a lovely trip we took to Noosa Beach a few weekends ago. This trip tends to be a beautiful break from the winter chill and is only a 2-hour drive from where we live. I decided to incorporate this into my Project Life album using pocket cards. This year’s main kit includes vellum and cardstock journal cards. Over the years, I have collected many travel-themed journal cards - so I am ecstatic to be using them for this first set of layouts.
I love how the “Wanderlust” die-cut looks layered over the vellum card “Much Much Needed Break” and I enjoy seeing three of our photos from the trip, even though one is from a page protector below. I attached the die-cut to some ribbon and created a closure with the back page of the layouts for this trip.
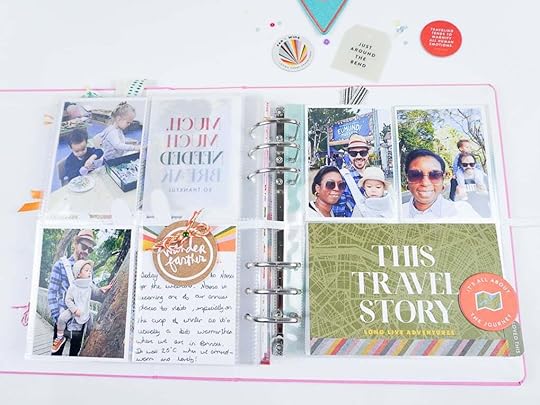
On Day 2 of our trip - Saturday, we visited the famous Eumundi Market for the very first time and it was everything I dreamed it would be and more! For this layout, I used a 3x4 card and created a swivel with one of the die cuts, paired with two 4x6 cards which I created a flip-up.
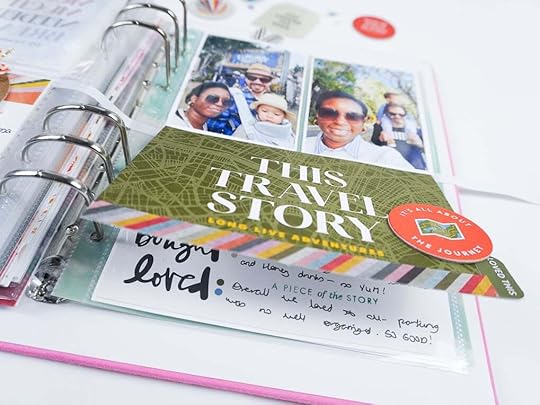
For the next page, I documented what turned out to be my favourite dinner for the trip - at Seasons Restaurant right on the beach. I added in two 3x4 cards - 1 a vellum background with a circle in the centre, the perfect space for one of the pleather circles, and the other a tag.
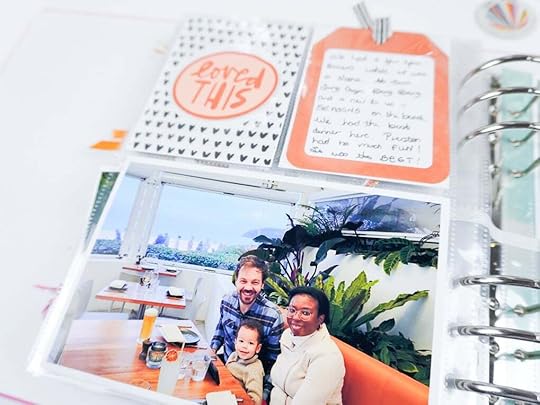
I then added a tag to one of the photos on the other page to balance things off.
To close things off, I added a few journal cards to the back side and a piece of 7x8.25 inch acetate from my stash, affixed to the ribbon.
I do hope you’ve enjoyed this blog post, and it inspires you to document more travel stories!
Find more inspiration from Nolana on Instagram here.
June 29, 2024
Project Life® 2024 | January through April Walk-Through
Today I'm sharing a walk-through of my 2024 Project Life® album from January through April.
Individual posts for each of these spreads are available here on the blog under the Project Life® archive category.
June 28, 2024
In Case You Missed It | June 28
Happy Friday, friends! Welcome to the latest
In Case You Missed It. Just a reminder that this is a quick post that will happen every Friday afternoon with all the updates and links that have happened throughout the week. So, let's get to it:
2024 TRAVEL COLLECTION | FINAL DAY FOR FREE SHIPPING
Our brand new 2024 Travel Collection is here! The products are in the warehouse and ready to ship to you! We’re excited to offer free shipping ($20 international flat rate) with a $75 purchase in the travel collection category. Use code TRAVEL24 during checkout. We’ve also got a brand new Start To Finish Travel Workshop coming this summer using products from this collection! Lessons will go live each Friday starting July 5th until August 9th. Sign up by July 3rd at 11:59 pm ET to get the workshop at our early introductory price of $25. Starting July 4th the price will go up to $30. Use code ADVENTURE5 for $5 off registration. As with all of our collections, we will have digitals available the first Friday of July, July 5th. Everything that translates to the digital format will be available, including album art.
PLEASE NOTE: You can use both promo codes (free shipping and class discount) at checkout, however you must purchase $75 in physical product to meet the free shipping threshold. The cost of the class will NOT count towards that minimum.
NEW TRAVEL CLASS | START TO FINISH 04
Let us help you bring your travel stories to life! Join contributors Shannon Flatley, Yin Goh, Kendra Wietstock, Kelly Watson, Jeanne Williams, and Diane Dziuban as they each create a travel album using products from the 2024 Travel Collection. Sign up by July 4th at 11:59 pm ET to get the workshop at our introductory price of $25. Starting July 5th the price will go up to $30.
In this class you will find a variety of styles and approaches that includes more recent travels as well as travel stories collected from over the years. From planning and organization to creative ways of using products, this class is all about providing you with inspiration and ideas to help you create your own travel album. Learn more and
register here.
NEW CLASS FROM ALI | STASH CLASS
Join Ali for a fun, motivating adventure into some ways to deal with all the scrapbooking stuff you’ve collected over the years and still have. Sometimes we need to press pause on our storytelling adventures for just a bit in order to get a handle on the fun things we’ve added to our physical product toolbox. Let’s come together as a community + spend some time prioritizing starting with our stash to get more of our stories told. In this four week workshop you’ll spend the first two weeks sorting + organizing supplies (or getting ideas about what might work for you) and the second two weeks creating projects using what you already own. SIGN UP BEFORE JUNE 18th AND SAVE $5 OFF W/CODE STASHCLASS IN ALI’S NEWEST CLASS. Learn more here.
JUNE REVEAL
Earlier this month we revealed a new Story Kit™ theme: NATURE! This month we are turning our eyes and hearts and memories to the natural world with a kit inviting you to document nature. Whether you are an indoor person who enjoys looking out the windows or growing plants inside or someone who can't imagine not living as much of your life out in the woods as possible let's get some stories told about our life experiences with nature. In addition to our new Story Kit™ theme, we also have a brand new Stories By The Month™ kit, and the next edition in our Alphas Are Awesome series. Head to the blog for Ali’s post with all the details about this month’s release.
JUNE DIGITALS
The first Friday of every month we have a new digital release available in the shop. Play with scale, recolor objects, add journaling, print multiples…the sky is the limit when playing with digitals. Shop digitals here.
2024 PROJECTS + PRODUCTS SCHEDULE
As we continuing easing into 2024 we put together an overview of our schedule of projects + product releases for the upcoming year. We are sharing this as a way for you to plan, think about what you might want to participate in this year, and simply share some of the things we have coming up to help support + inspire storytelling. For the last few years we've followed a fairly similar cadence for our releases and our major projects will follow that release schedule again this year. Please note that, as you might imagine, this schedule is subject to change throughout the year based on a variety of variables. Find the post here.
As always, we’re so grateful to have you all as members of this community! Thanks for joining me today and have a great weekend!
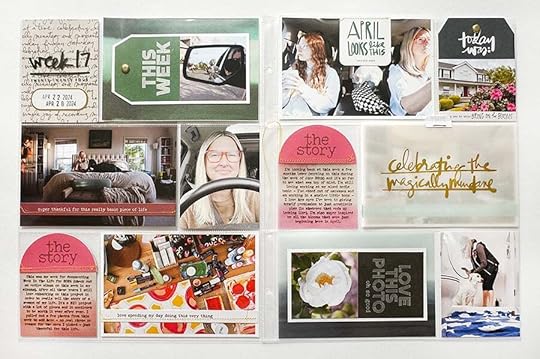
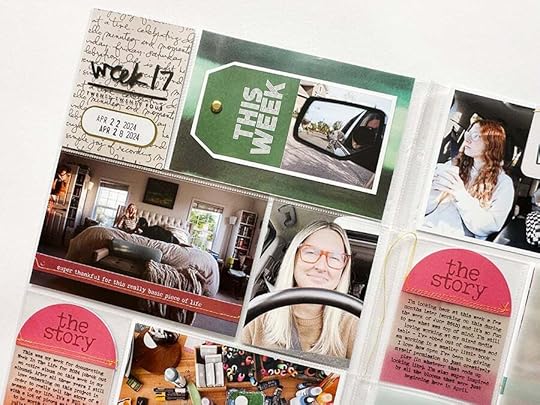
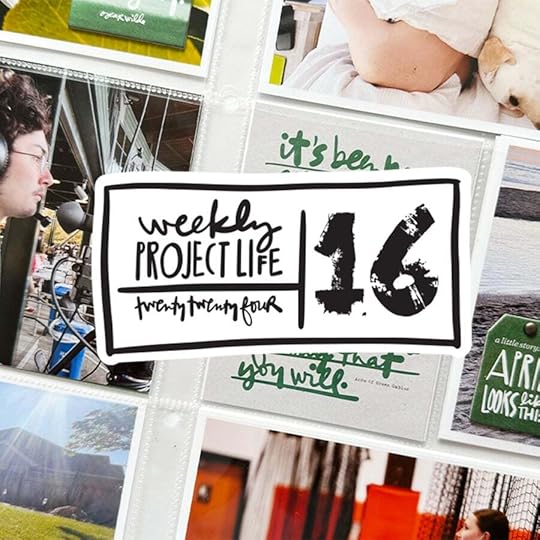
Project Life® 2024 | Week 17
In this post I'm sharing a look at Week 17 in my 2024 Project Life® album.
This is the same week as I documented Week In The Life™ this year. My goal in this spread, along with simply getting some stories told, was to play with some of the larger die cuts that were included in the April Stories By The Month™ kit.
Let's dive in to the process video:
Here's a look at the spread via images:
This was a fun one to put together.
As I looked back at all the photos I took during Week In The LIfe™ to figure out which ones to add to this spread I simply picked a few that I felt represented the week/the season as a whole. I knew I didn't need to write a lot so I decided to write from today (end of June) with a looking back perspective (most of the time when I add stories to Project Life I'm writing with a present day perspective).
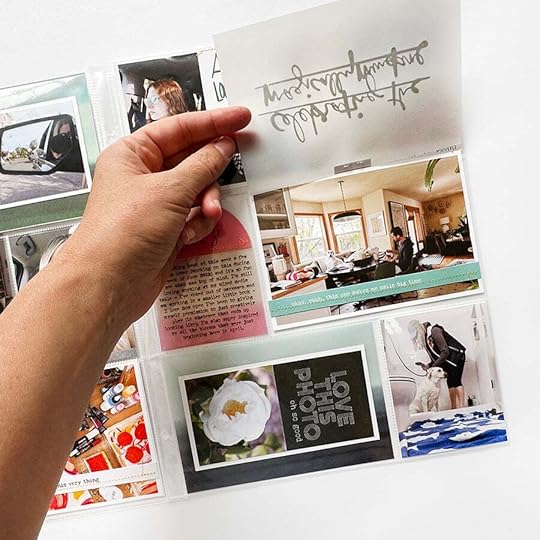
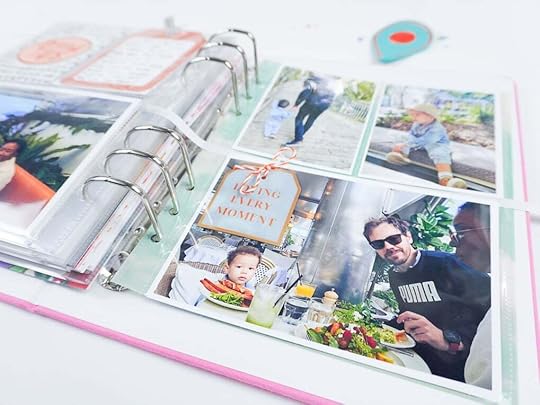
I used a tab sticker from the April kit to create a flip up on top of one of my photos. I used a long reach stapler to get into that spot.
On top of three of my 4x6 photos I adhered the long tag strips and then ran it through my sewing machine.
To play with some of the larger die cut tags I created a new shape by printing a similar sized photo, taping the back of the die cut + my photo, and then backing it with white cardstock before adhering it to one of the vellum 4x6 cards. I added gold brads and a gold label sticker to repeat the gold on the vellum flip up.
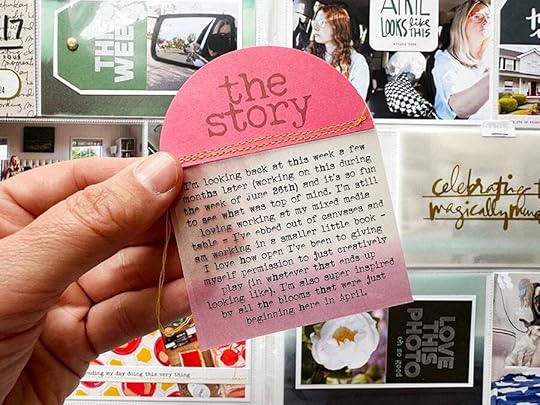
I used the 1/2 circle "the story" die cut pieces to create journal cards with the 4x6 vellum (cut in half). You can print directly on the vellum or you can print on a transpareny and add it on top of the vellum. I ran it through the sewing machine a couple times to add the yellow stitching along the top. On the other side of these I'll repeat this same shape (I did that on Week 16 - I put together Week 17 before 16 this time).
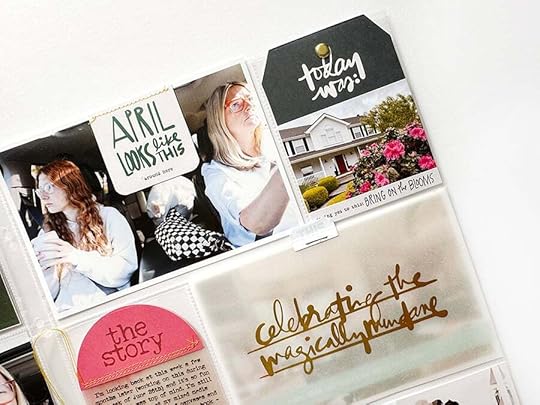
I cut up the "looks like this" card and turned that into a tab added to one of my photos. I added a photo onto the "today was" tag and a little strip from another 4x6 card to the bottom.
It feels so good to have some space to fill in the pockets again!
SUPPLIES9x12 Album 9x12 Page Protectors April 2024 Stories By The Month Kit StazOn Ink Rolling Date Stamp Long Reach Stapler Scrapbook.com Rolling Adhesive Tiny Attacher Epson PictureMate PM400 Printer Other basic supplies can be found via my Amazon Storefront (printers, etc)
June 27, 2024
Project Life® 2024 | Week 16
And I'm back!
Working on content for my new Stash workshop (and a little more space in my schedule) has really gotten me excited about working on my weekly Project Life again. Today I'm sharing Week 16 and tomorrow I'll share Week 17 as I actually worked on them together.
Keeping it simple. Getting the pockets filled. Having fun in the process + letting it be what it is for me in this season.
Let's dive in:
Here's a look at the spread in my album:

Chipboard from April STBM + mini brads + Slick Writer pen + a little stitching to capture a few pieces from this week.

Loving using the weekly transparent cards on top of pattern cards from my stash (you can grab the file + print your own here).

I've got yellow thread in my sewing machine right now and I love the pop of color it's adding to my projects.

9x12 Album
9x12 Page Protectors
April 2024 Stories By The Month KitJuly 2024 Stories By The Month Kit
StazOn Ink
Rolling Date Stamp
Scrapbook.com Rolling Adhesive
Tiny Attacher
Epson PictureMate PM400 Printer
Other basic supplies can be found via my Amazon Storefront (printers, etc)
June 21, 2024
In Case You Missed It | June 21
Happy Friday, friends! Welcome to the latest
In Case You Missed It. Just a reminder that this is a quick post that will happen every Friday afternoon with all the updates and links that have happened throughout the week. So, let's get to it:
OUR 2024 TRAVEL COLLECTION IS NOW AVAILABLE
Our brand new 2024 Travel Collection is here! Click on the link in our profile to shop this awesome new collection! The products are in the warehouse and ready to ship to you! We’re excited to offer free shipping ($20 international flat rate) with a $75 purchase in the travel collection category. Use code TRAVEL24 during checkout. We’ve also got a brand new Start To Finish Travel Workshop coming this summer using products from this collection! Lessons will go live each Friday starting July 5th until August 9th. Sign up by July 3rd at 11:59 pm ET to get the workshop at our early introductory price of $25. Starting July 4th the price will go up to $30. Use code ADVENTURE5 for $5 off registration. As with all of our collections, we will have digitals available the first Friday of July, July 5th. Everything that translates to the digital format will be available, including album art. PLEASE NOTE: You can use both promo codes (free shipping and class discount) at checkout, however you must purchase $75 in physical product to meet the free shipping threshold. The cost of the class will NOT count towards that minimum.
NEW TRAVEL CLASS | START TO FINISH 04
Let us help you bring your travel stories to life! Join contributors Shannon Flatley, Yin Goh, Kendra Wietstock, Kelly Watson, Jeanne Williams, and Diane Dziuban as they each create a travel album using products from the 2024 Travel Collection. Sign up by July 4th at 11:59 pm ET to get the workshop at our introductory price of $25. Starting July 5th the price will go up to $30.In this class you will find a variety of styles and approaches that includes more recent travels as well as travel stories collected from over the years. From planning and organization to creative ways of using products, this class is all about providing you with inspiration and ideas to help you create your own travel album. Learn more and register here.
NEW CLASS FROM ALI | STASH CLASS
Join Ali for a fun, motivating adventure into some ways to deal with all the scrapbooking stuff you’ve collected over the years and still have. Sometimes we need to press pause on our storytelling adventures for just a bit in order to get a handle on the fun things we’ve added to our physical product toolbox. Let’s come together as a community + spend some time prioritizing starting with our stash to get more of our stories told. In this four week workshop you’ll spend the first two weeks sorting + organizing supplies (or getting ideas about what might work for you) and the second two weeks creating projects using what you already own. SIGN UP BEFORE JUNE 18th AND SAVE $5 OFF W/CODE STASHCLASS IN ALI’S NEWEST CLASS. Learn more here.
JUNE REVEAL
Earlier this month we revealed a new Story Kit™ theme: NATURE! This month we are turning our eyes and hearts and memories to the natural world with a kit inviting you to document nature. Whether you are an indoor person who enjoys looking out the windows or growing plants inside or someone who can't imagine not living as much of your life out in the woods as possible let's get some stories told about our life experiences with nature. In addition to our new Story Kit™ theme, we also have a brand new Stories By The Month™ kit, and the next edition in our Alphas Are Awesome series. Head to the blog for Ali’s post with all the details about this month’s release.
JUNE DIGITALS
The first Friday of every month we have a new digital release available in the shop. Play with scale, recolor objects, add journaling, print multiples…the sky is the limit when playing with digitals. Shop digitals here.
2024 PROJECTS + PRODUCTS SCHEDULE
As we continuing easing into 2024 we put together an overview of our schedule of projects + product releases for the upcoming year. We are sharing this as a way for you to plan, think about what you might want to participate in this year, and simply share some of the things we have coming up to help support + inspire storytelling. For the last few years we've followed a fairly similar cadence for our releases and our major projects will follow that release schedule again this year. Please note that, as you might imagine, this schedule is subject to change throughout the year based on a variety of variables. Find the post here.
As always, we’re so grateful to have you all as members of this community! Thanks for joining me today and have a great weekend!


