
Ali Edwards's Blog, page 21
September 6, 2024
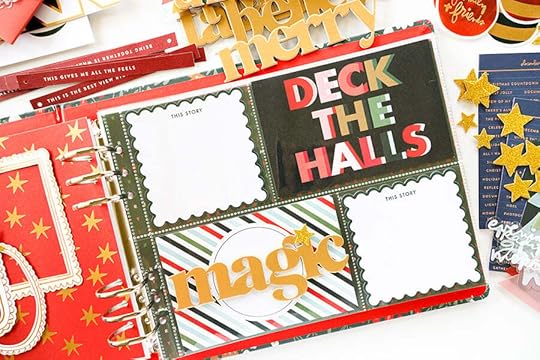
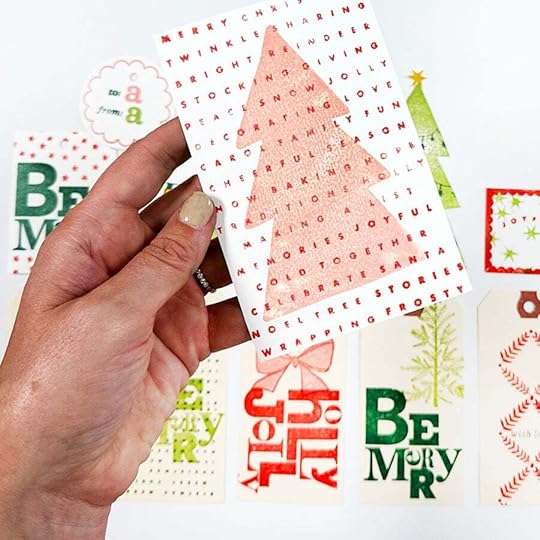
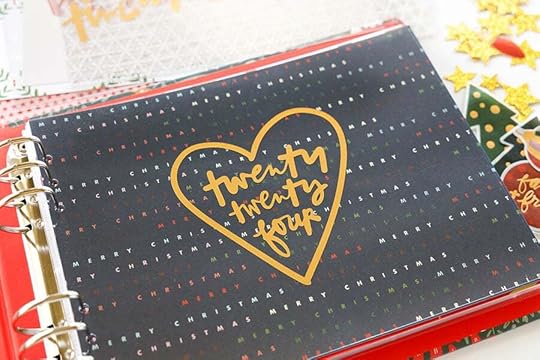
December Daily® 2024 | 4x6 Album Idea
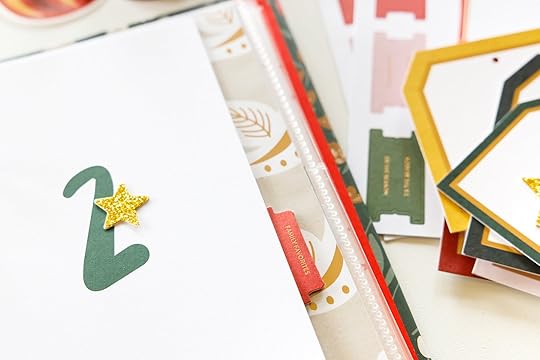
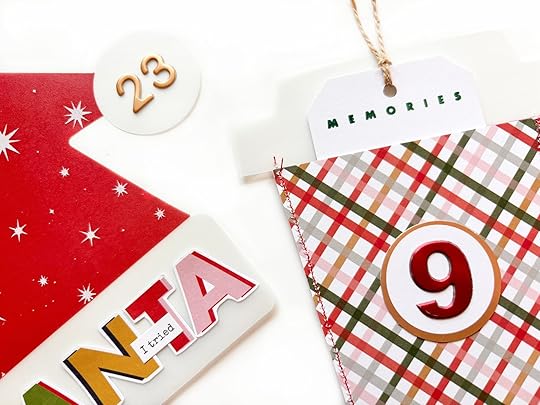
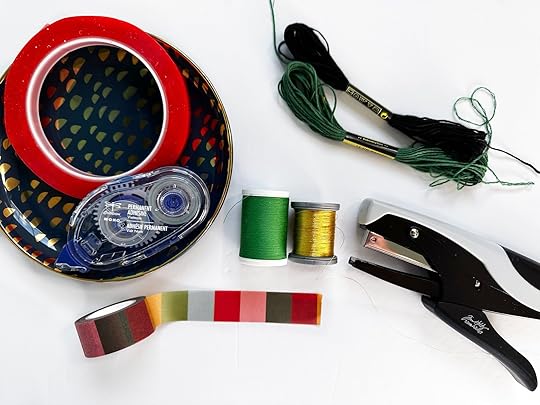
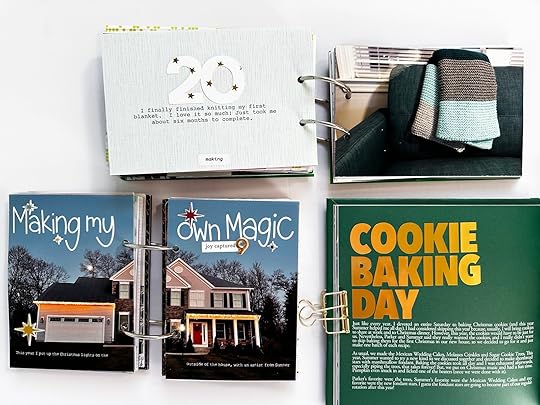
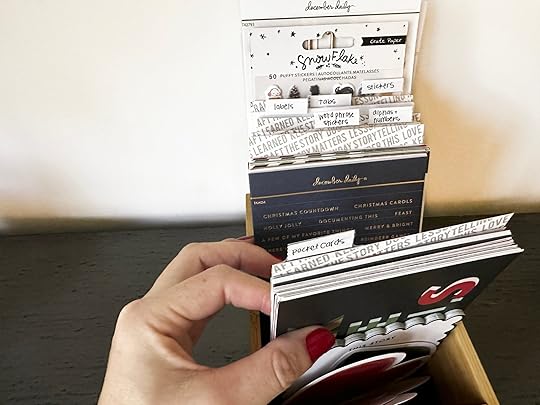
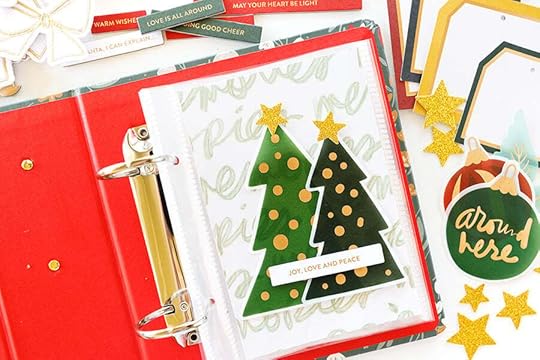
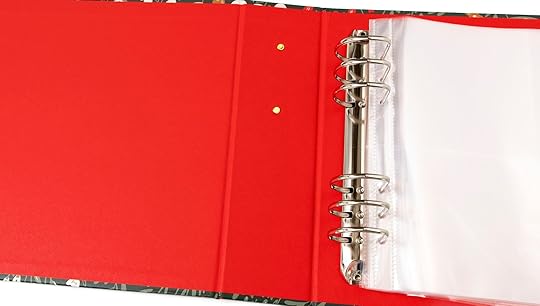
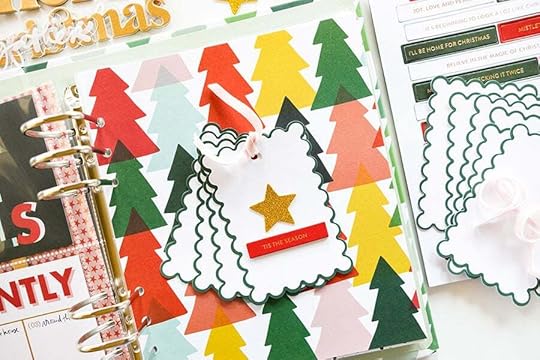
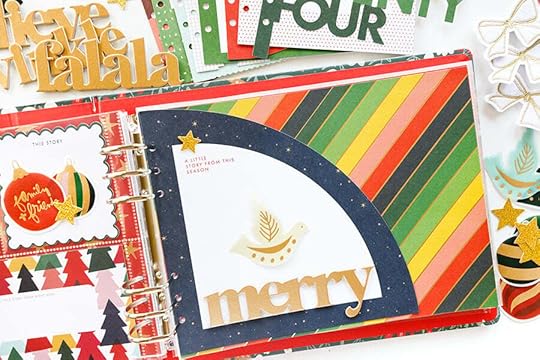
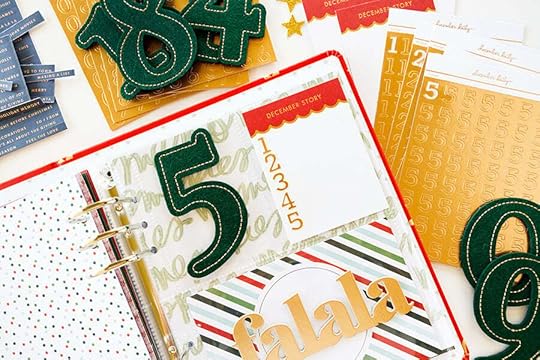
Hello everyone. It's Kelly Ishmael here and today I am sharing some ideas for using the Vertical Floral 4x6 Album and the Cover Cards from the 2024 Advent Calendar.
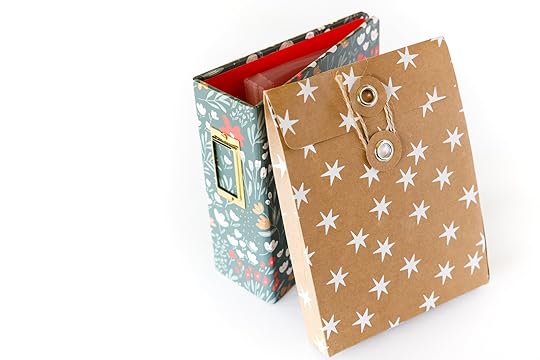
The original inspiration for these ideas came from a question asked during one of Ali's Q&A's on Instagram recently. The question was if the cover card from the advent calendar would fit inside the page protector of the 4x6 album.
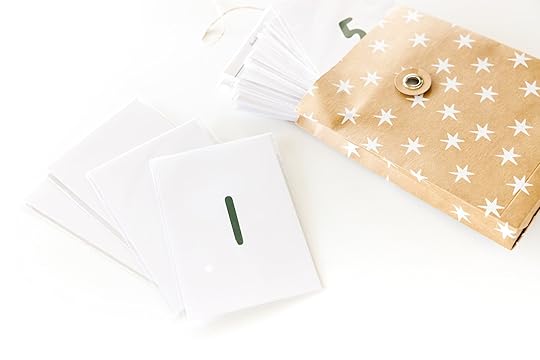
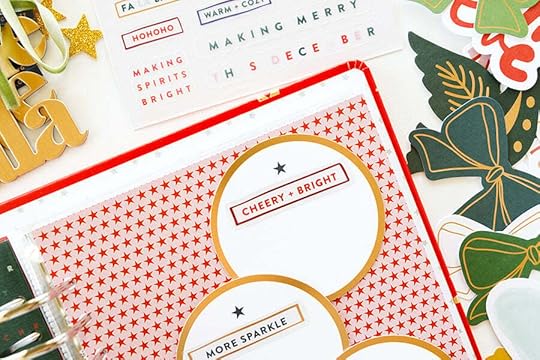
Note:Just to add some context to the question, each envelope in the advent calendar comes with a cardstock cover card to conceal the surprise inside.
We loved this idea so much and thought it would fun to play around with other ideas for using these cover cards.
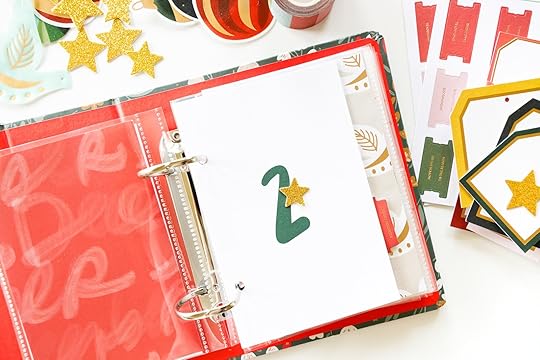
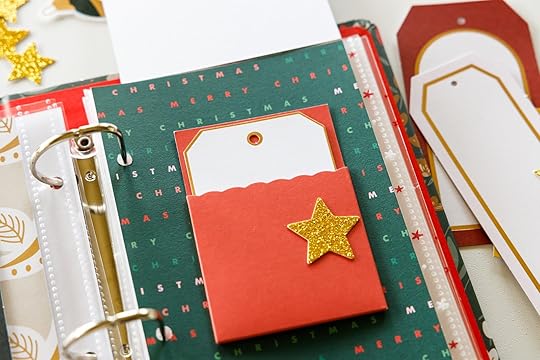
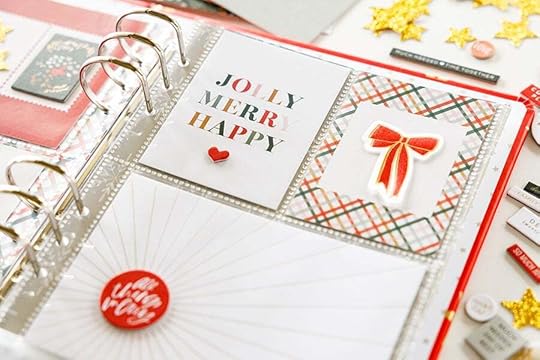
Idea #1 | Inside the page protector

The cover cards measure 4x6 inches and fit perfectly inside the full-size page protector. This would be a fun, simple way to use the cards to document the month with a streamlined formula!
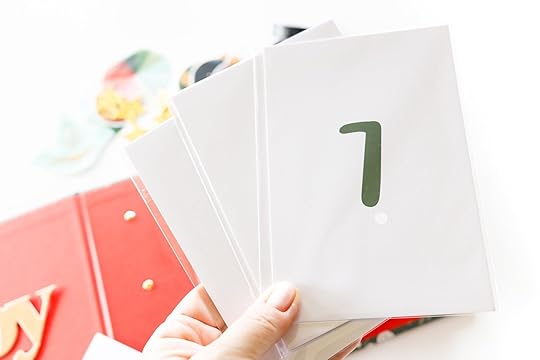
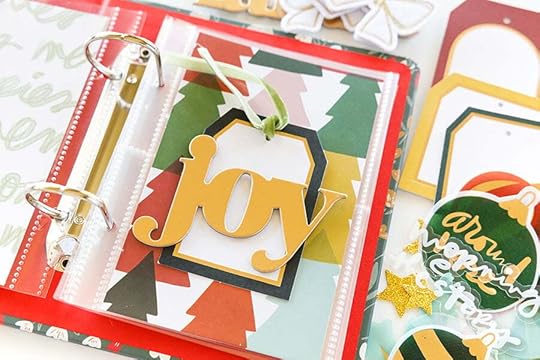
Idea #2 | Outside the page protector
My next idea was to punch holes in the side of the cover card to use it outside the page protector. I love that it is slightly narrower than the page protector and that it is a perfect spot for using a tab sticker along the edge.
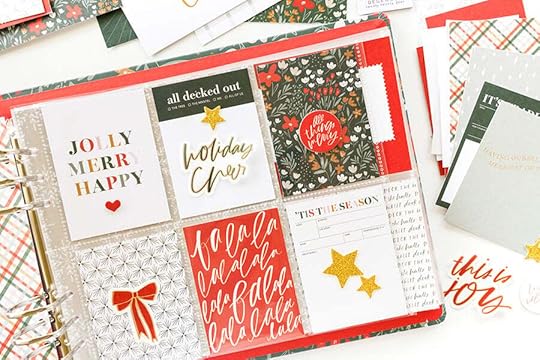
Another simple idea is to trim the top and bottom of the cover card to use inside one of the 4x3 pockets. There are 10 of these 3x4 two pocket page protectors included with the album and I think this makes for a really cute pocket card.
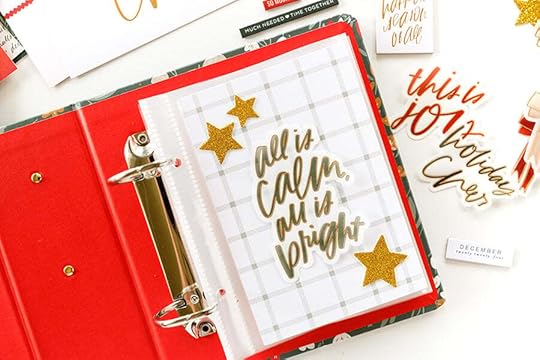
Idea #4 | Flip-up card
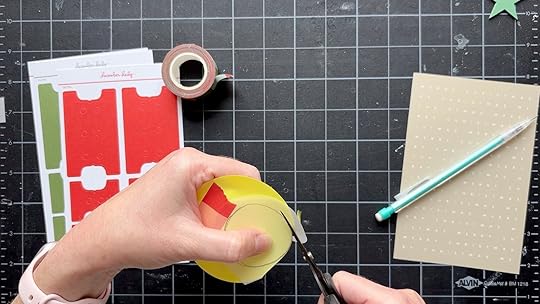
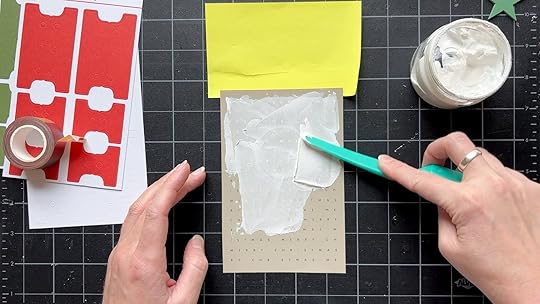
For this idea I cut down a piece of patterned paper that measures 5x6.25 inches as a base (this is the full size of the page protector). I then lined up the cover card along the top and left a small margin along the left side for the holes. I created a flip up by adding a piece of the color block wash tape along the top and then folding it over the back side of my patterned paper. I added a second piece of the words pattern washi tape to give it a little more interest.
I ended up trimming about a 1/4" along the right side to match the width of the cover card. Under the flip you could add photos or journaling or other embellishment. This tag + pocket from the main kit are just the right size for this darling album.
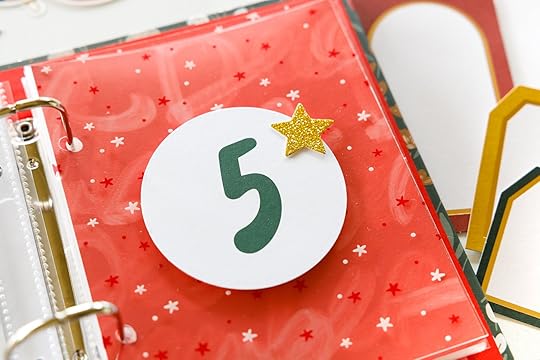
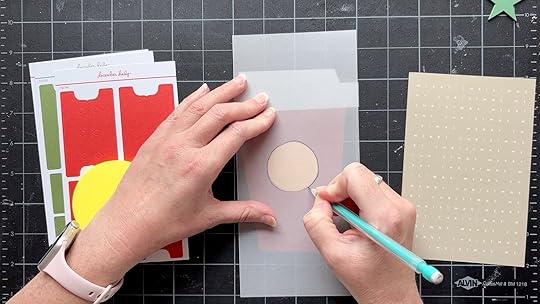
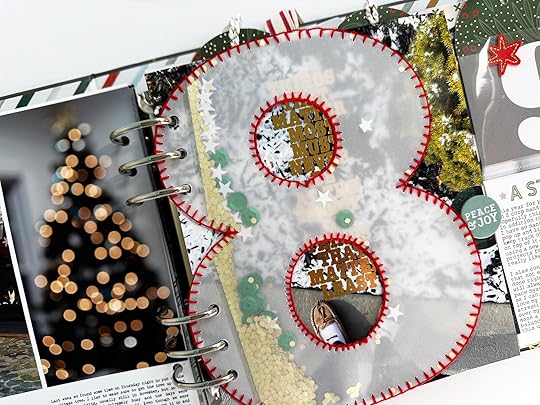
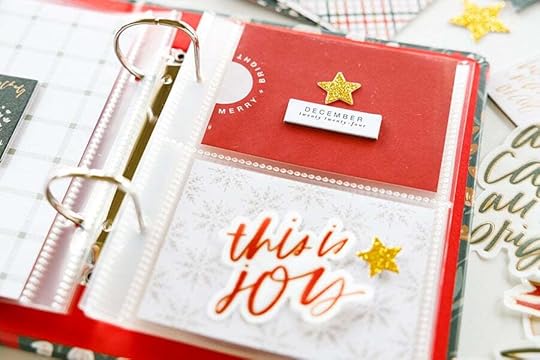
Another simple idea for the cover cards is to punch out the number with a circle punch. I cut down a piece of transparency from my stash to 5x6.25 inches and added the circle on top. On the back side of the circle I added one of the fun color block circles from the main kit, but you could add a photo or journaling too.
Idea #6 | Scalloped edges
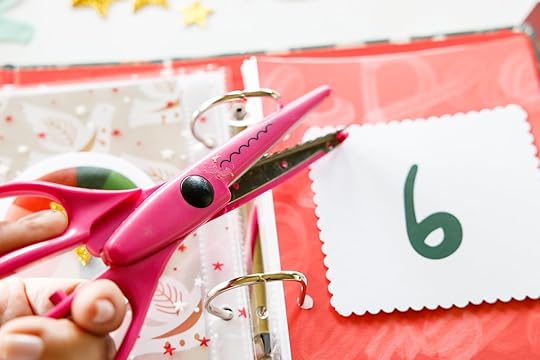
Anyone have some of these scalloped edge scissors in their stash?? I adore all of the scalloped edge details included in the this year's product release, and I remembered that I still had my pair from WAAAAYYYY back in the day (lol). I thought it might be fun to add that edge treatment to a cover card. I started by cutting one inch from the top and bottom to create a 4 inch square. Next I trimmed along the edge with my scissors. (Pro tip! make sure you have them turned the right direction lol.)

It turned out really cute and it's a fun way to include that design element in other ways in your project. If you don't have scalloped edge scissors, you could use a scalloped edge craft die (scrapbook.com has quite a few options) or a square paper punch (here's one from Amazon).
You can watch my process for each of these ideas in the video below.
Thank you for joining me today. I hope this post has given you some ideas for working with the 4x6 album and the advent calendar cover cards. Sound off with your ideas in the comments below!


September 5, 2024
December Daily® 2024 | Special Guest Jill Drangsholt
Hi friends! I'm so excited to be back with you this year to share ideas using the 2024 December Daily collection! You may remember that last year I did a whole series on mixed media ideas using the DD products. This year I will not be focusing primarily on mixed media, so if you would like more in depth tips on how to use the stencils, silkscreens, or using paint with the stamps, you can find my series on the blog (search paint + play with Jill).
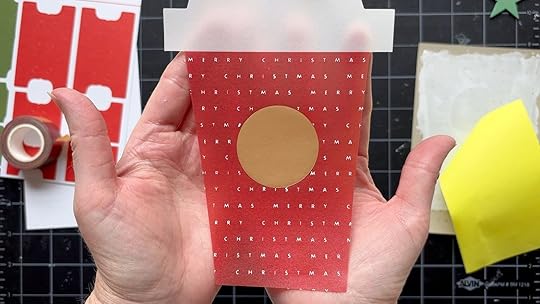
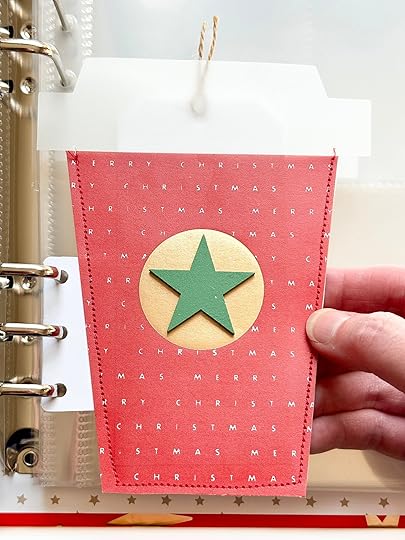
I know I just said I wouldn't be doing mixed media, but today I do have a project using the silk screens because they are so great for adding patterns onto some of the products in the collection. For this project, I was inspired to play around with everyone's favorite large vellum red cup and add a fun pattern on it using the silkscreens. I also wanted to try turning it into a pocket that I can insert into my album using the page attacher stickers. For a bonus project, I used the same silkscreen technique to jazz up the large vellum Santa hat. But first, the red cup....
PROJECT 1: RED CUP POCKETI have broken this project into 2 videos: the silkscreening and making the cup into a pocket. Watch my process video below for the best instructions on how to do the masking and silkscreening. However, I will also include a few process photos below the video.
To mask this red cup, I used a rectangular sticky note across the top and then used a spare piece of vellum to help me cut out a circular mask to cover the gold circle in the middle. Lay the scrap of vellum on top of the red cup and trace the circle in pencil.
Roughly cut out your traced circle, tape it onto a sticky note with washi tape, and cut around both at the same time. Make sure you are cutting a portion of the sticky note that has the sticky backing! Lay your new circular mask on the red cup and you are ready for silkscreening!
Gently take the silkscreen off of the backing, and smooth it over your red cup. Make sure it is stuck on there firmly. Then scrape a small amount of paint over your silkscreen using either an old gift card or a pallet knife. Make sure to cover the entire image with a thin layer of paint. Gently lift the silkscreen from your red cup.
I love these silkscreens. I also love stencils for messy mixed media stuff, but if you want a pattern or image that is more crisp, I recommend trying silkscreens instead. As long as you make sure they are stuck really well onto your surface and you scrape thin layers of paint on them, they will turn out great every time.
And don't forget to wash and dry them after EVERY time you use them to maintain that crisp image.
Now let's make our red cup into a pocket!!!
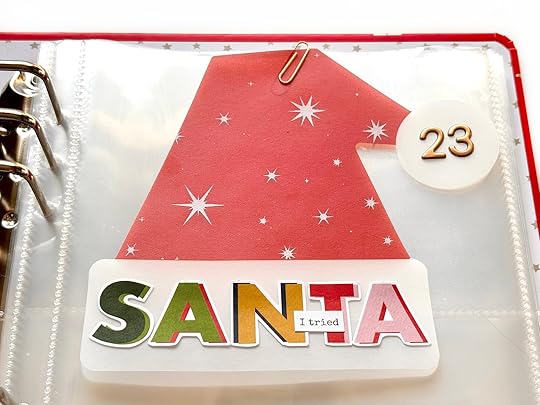
Enjoy this bonus project using the Santa hat vellum piece and silkscreens for a flip up that I plan to use to tell a story about my dog Samson trying his very best to be a good boy this Christmas. I won't tell Santa about the 5am wake up calls or occasional "presents" Samson left on the floor. LOL
I hope these two projects inspired you to try out the silkscreens to add some flair to your products or to create more pockets and flip ups from other products in the collection!
I will see you again next week and in the meantime, you can find me on Instagram at @jill.drangsholt if you want to follow my December Daily journey and my other crafty adventures.
September 4, 2024
December Daily® 2024 | Special Guest Linda Jordan

Hi everyone, it’s Linda and I’m so excited that it’s December Daily season again! Even though we still have a few months until the actual project, there is still a lot you can do now to get ready for December. Here are my top 10 tips to do before December rolls around to make this a fun + manageable project (plus to dig in when you’re so excited from the release!).
10 THINGS TO GET READY FOR DECEMBER DAILY
One of my favorite tips for this time of year, is to pull out your old albums and flip through them. Not only is it fun looking through the memories and a great way to get you in the mood for the season, looking back on your old albums can give you tons of ideas for the upcoming season.
When looking through your albums think about the stories + photos + products that worked for you in the past. What would you like to bring into this year’s album? What didn’t work for you in the past that you want to move on from?
Last year I shared a detailed look through some of my old albums + thoughts. I encourage you to check out that post for more ideas in looking through your albums, you can find it here.
December Daily is one of my absolute favorite projects, but it is very time consuming and pretty much takes over my crafting during the month of December (and maybe a little of November and January too!). As scrapbookers, we often have other projects that we like to work on so now is a great time to focus on making extra space for December Daily by finishing up those other projects.
This might look like: finishing old December Daily albums (check out the hashtag #donebydecember for lots of inspiration!), catching up on Project Life, working through travel albums, or putting together story kit projects to clear up space on your desk.
For me, I am going to work on putting together a travel album for my recent summer adventure, finishing a few of the recent story kits + being all caught up on Project Life so that, going into December, I can prioritize this project.
Now is a great time to stock up on basic supplies + other things that you will use for this project. For me, this means making sure I have enough photo paper + ink for my printer (I print my photos at home), adhesives, and pens.
Typewriter. I have a typewriter that I have used in the past in many of my projects. I like to decide in advance if I’m going to use this in my album so that I can use it on a few pages to create a more uniform style across the album. Stamped alphas. I am obsessed with stamping words in my albums + I love all the alphas are awesome stamps for this. If you also want to stamp in your album, I highly recommend selecting a few alpha stamps in advance. That will cut down on your options during the month of December and help create a cohesive album. And don’t forget to pick up ink!
December Daily is a time to play with products! This is the time of the year that I see the most inspiring creations using all sorts of fancy tools. I want to disclaimer this post by saying, please do not go out and buy all these expensive tools for this project! You don’t need them! Take this time to watch the inspiration that is out there and consider what tools you might want to invest in in the future.
But, I know lots of us have invested in tools over the years, whether it’s a Cricut, a sewing machine, or a Minc, and then we haven’t used them because they do take time to learn! So, if that is you, take this as a push to go figure out how to use what you have BEFORE December rolls around so you are ready to use these supplies in your album. Maybe make a few embellishments or foundation pages to use during December, or just learn the basics of your tools so that when December is here you can easily pull it out and play.
I also wanted to mention that some of these tools can be a good way to use the digitals from the December Daily collection. You can use a silhouette or cricut to cut out the die cuts or use a foil quill or minc to add gold to printed out digitals. There is also so much to do with digital products in various programs such as Photoshop or Procreate. Depending on what tools you have, you might want to consider picking up digitals when they go on sale and creating your own physical versions of the products.
I have had a lot of fun in the past with my silhouette, my foil quill, my sewing machine, my typewriter, heat embossing, and using my apple pencil in procreate in my album. These are all so much fun! But, they are time consuming to learn and to use, and they can be expensive, so I highly recommend that you pick just ONE new thing to add to your toolbox for this year.
Many of us already placed our orders, but most of the albums are still available in the shop + you might have a selected more than one (or have some in your stash) and are still deciding which album is the “right” one for you this year.
After a lot of debate, I decided to go with the red 6x8 album for this year. I have done various sizes in the past from 4x6 to 10x8 and they all have pros/cons. You might have your own list/considerations, but here are a few thoughts I had when considering what album size to use.
I have used this size many times, and am going to use it again this year. Here were my observations that could help you decide if this is the right size for you.
Good For:
Lots of Inspiration. This feels like the most common size in the community (at least from those who share online) and has been around the longest, so there is a lot of inspiration out there for using this size. Page protector variety. Although there is a new page protector style of 10x8 this year, and a few fun ones for 4x6, 6x8 albums have been around for awhile so there are lots of configurations out there if you like to mix it up and work inside of page protectors. Best for 3x4 cards. If you like to use a lot of 3x4 cards in pockets, this is the best size for you because 6x8 divides evenly by 3x4, so you can fit these cards in many of the page protector styles. Vertical photos. If you take a lot of vertical photos, this album is great because you can print those as a full 6x8 to take up a page. Printing at home. Unless you have an oversized photo printer, this album is a good size where you can easily print at home on a standard size photo printer, or even a smaller one.Bad For:
Uniqueness. 6x8 albums are most common, which means that your album will look more similar to others. Also, if you’ve been doing this project for a long time, your albums can start to look the same over time if you always use this size (but, you might also love that uniformity!). A ton of content. If you struggle to narrow down your photos + stories, you might have trouble fitting everything into one 6x8 album.Bottom Line: 6x8 is a perfect middle of the road album. It’s big enough to fit most embellishments + give you a lot of options, but doesn’t feel overwhelming with choice. It’s a good album for newbies.

I used a 10x8 album in 2021 and I had a lot of fun with it. Here were my observations that could help you decide if this is the right size for you.
Good For:
Large HORIZONTAL photos. If you are someone who takes a lot of horizontal photos and likes to blow your photos up (and has the ability to print that size easily), this is a great album. Including a lot of photos. You just have more space in this size, so you can easily include a lot of photos in one spread, especially if you use layered templates, divided page protectors, or flip ups. Large scale supplies/embellishments. Do you like the super bold statements? Huge text? Large die cuts + pieces? This album is great for those larger scale supplies. Lots of supplies. If you have a lot of supplies you want to use, having a larger album just gives you more real estate to include more stuff. Lots of text. If you want to include some longer stories, you can really fit A TON in one spread in the 10x8 size. Varied page sizes. Just because the album is 10x8, doesn't mean all your pages need to be! You can include a range of page sizes which gives you a lot more options when creating your spread.Bad For:
More time consuming. Because the pages are bigger, it just takes more time to put an album of this size together. Consider if you have the time/bandwidth for this prior to diving into 10x8. More options. Yes, this is listed in the pros above, but more options can also be a bad thing. You have more options for page size/style and can include more photos, more supplies, and more words, all of which means more choices. If you struggle with narrowing down your choices, this might not be the album for you. Vertical photo takers. I am someone who takes 90% of my photos vertically because I am addicted to Instagram stories. This shape just doesn’t work great for the 10x8 format. Yes, you can include some 6x8 pages to add in vertical photos, but if those are all of your photos, it becomes a little more difficult.Bottom Line: 10x8 is perfect if you want to include all the photos + words + products and have extra space to play and get crafty!
This is a super fun, mini size and I was so excited to see Ali offer this as an option this year. I used a vertical 4x6 in 2022 and used a horizontal 4x6 in 2017.
Good For:
Quick. A smaller album, means less choices + less “work” to put it together. If you find yourself pressed for time this season or worried you won’t finish, this is a great option to make this project really manageable. One photo per day. If you struggle to take a lot of photos or have photos that you love, this size is perfect for including only one photo (or no photos!) on a spread. Specific orientation. If you work in a vertical 4x6 album (like the one in this year’s collection) this album is great for vertical photos, if you work in a horizontal 4x6 album, then it is great for horizontal photos. Minimalist design. If you want to work from less products or keep a very minimalist style, this album size works great. Printing at home. If you don’t have a large size printer, this album size is great for printing small.Bad for:
Lots of photos/stories. If you struggle to narrow down your photos/content per day, this album size might be difficult to work with. Larger embellishments. Some of the products in the collection this year are big + bold! Many of those can be fit into this album if you get creative, but a few of them just won’t work. It’s important to keep that in mind when selecting products to work with a smaller album. Lots of stash. If you have a large stash of products or picked up a lot from this year’s collection, this might not be the best album for you because you just won’t be able to fit as much into this album as you would in a larger size.Bottom Line: 4x6 is perfect if you want to include only a few photos + supplies and get this project done quicker.
OtherAlthough only the above sizes are part of this year’s collection, there are endless types of albums out there! You could use a different size, include your December Daily project within a larger project (like project life), or use something else entirely, such as a traveler’s notebook, a journal or an altered book. The possibilities are endless.
Bottom Line: Doing something else is perfect if you want to mix it up + get creative + think outside of the box!
If you have done December Daily in the past, you most likely have some supplies from older years. Now is a good time to pull out those supplies and go through them. Decide what will coordinate with the supplies you picked up this year + what supplies will fit with your album selection.
Now is a great time to purge those older supplies that are no longer your style or you know you’re never going to use. It’s also a great time to take stock of what you have and what you might want more of (or what you definitely don’t need more of!).
In addition to December Daily supplies, consider supplies that are not December Daily focused but might work for this project.

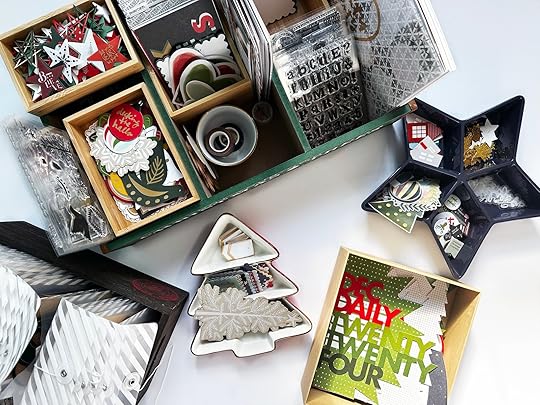
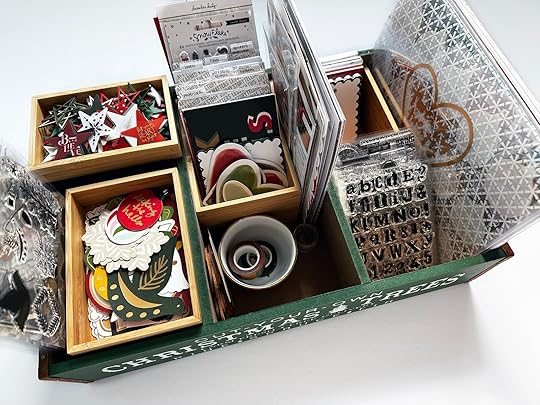
Once your supplies arrive, dive in and organize them! Getting everything set up in a format where you can see what you have and access it during the month is key to keeping up with this project. For me, I like to keep my products out on my desk in an organized tray during the month of December. In the video below, I walk you through setting up my supplies for this year + working in some of my stash products.
Some things to keep in mind when organizing your supplies:Out of sight, out of mind. For most people, if you can’t see it, you forget you have it and you won’t use it. I highly recommend creating a set up where you can see what you have and leave it out, if possible. If this isn’t feasible because you have small children, pets, or your craft space doubles as another space, consider using clear organizers or a tray that can easily be moved. Album size. Hopefully you’ve already chosen an album size (and if not, this could help you commit!). Some supplies just don’t work well with certain album sizes, whereas other supplies really shine. Consider what size album you’re working with and select supplies that will pair nicely with it.
Now is a great time to review all the inspiration for this project! In addition to the new content on the blog this year + the classes that are coming soon, take some time to revisit older December Daily classes + inspiration. There is so much to see here on the blog if you look under the tag December Daily. If you’ve never taken Ali’s older class called Storytelling with December Daily I highly recommend, I look back on it each year. You can purchase it here.
I also love instagram + Pinterest for searching for inspiration. I save projects that I love to refer back to as inspiration for my project. I also love just looking through the products and seeing what ideas are sparked, now is the time to just think of all the ideas!
In addition to looking at other people’s December Daily projects, I like to expand my search to include other things that could inspire my project. Some of the things that I look at: holiday decor, Christmas graphic design, holiday card designs, magazine spreads, or other types of crafts, such as art journal spreads.
Don’t just review inspiration, but come up with a way to collect it. I absolutely love paper, so for me, this means printing out some of my favorite inspirational pieces + making notes/sketches in my craft planner. See above for my collection so far this year! But you could definitely do this digitally. Both instagram + pinterest have great options for saving inspiration.
Also note, though, that my notes don’t include any photos of other people’s projects (although you can definitely include that + I’m sure I will once I start seeing people working with this year’s collection). I have expanded my inspiration to include other types of images + sketched out some notes/ideas that were sparked looking at the products + inspirational content. I also added in a few swatches of washi + of a magazine page + some markers to find my color scheme/help coordinate my style for this year’s album.
If you are someone who frequently screenshots inspiration and find it is just getting lost in your camera roll, consider using Pinterest to catalog it! You can create a private pinterest board (since it won’t link back to original sources) and upload your screenshots to that board to view later. Then, they’ll all be in one place, and you can delete them from your phone!
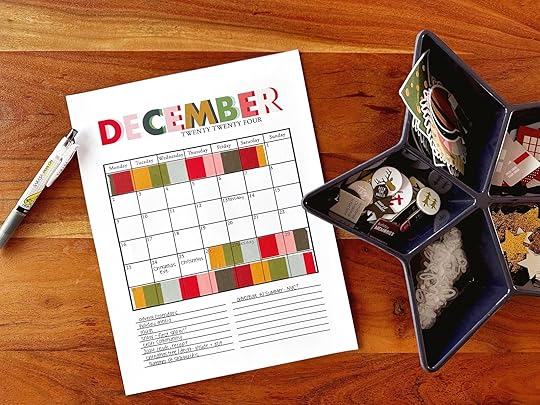
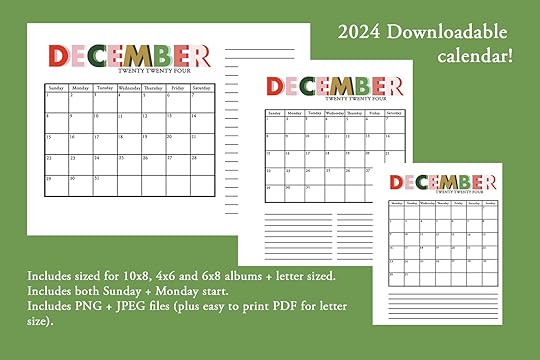
The last few years I have created and shared a planning calendar here + I am doing it again because it is so helpful to me (and I hope to you too). In the video below I am setting up my calendar for this year + sharing how I use it.
In addition to using this calendar for planning, a lot of you used it last year as part of your album (or kept the planning one with your album) so this year I made it coordinate with the collection. I have created it in sizes for the 3 albums from Ali Edwards 2024 collection + standard letter paper to make it easy to print at home. I also have created a Monday start and a Sunday start for each size.
Note: The calendars are sized to fit OUTSIDE the page protector, but the calendar itself should be small enough if you want to trim the page down to fit it inside the page protector. Please tag me on instagram if you share how you’re using your calendar so I can see + share it with the community!
I hope this post helped get you started in prepping for the upcoming season!! I will be back later this month to share more tips for staying on top of this project during the month of December.
September 3, 2024
December Daily® 2024 | Special Guest Denine Zielinski
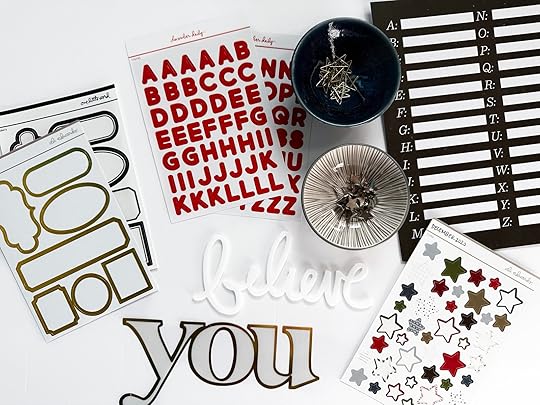
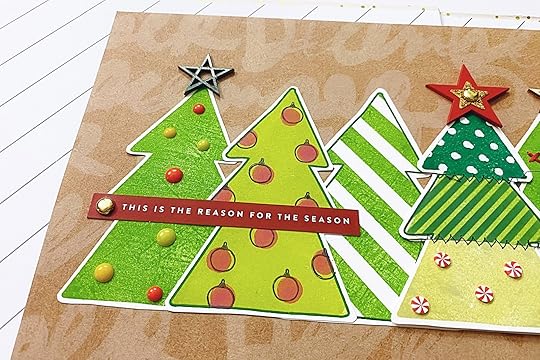
Hi everyone! This is Denine, and I am so excited to be here today on the blog stamping with you. One of the first stamp sets from this December Daily release that called my name was the Holiday Trees 6x8 Set. I love the three different stamps for the trees as well as the itty-bitty ornaments and lights!
I had absolutely no plan at all when I started stamping, so I just got after it. I picked a whole bunch of different green inks from my stash and decided to just play around. I generally use two different types of white paper for scrapbooking. One is a cardstock, and the other is a coverstock. The coverstock is significantly thicker, and I most often use it for the bases of my pages. I did a test stamp on each of them, and I ended up going with the coverstock for this post. I liked how it felt as well as how the images stamped.
VIDEO OVERVIEWI will begin with a video of my entire process, which I feel has three parts. Here are the times of each part in case you want to just view a certain segment of my process.
Stamping – 0:00 – 11:29 Embellishing – 11:30 – 18:23 Creating a page – 11:25 – 22:22
As you saw in the video, I basically just played around with stamps + inks + embellishments. Some trees turned out better than others, and I was totally okay with that. I was having fun, and I did stamp an excess amount of trees for that purpose.
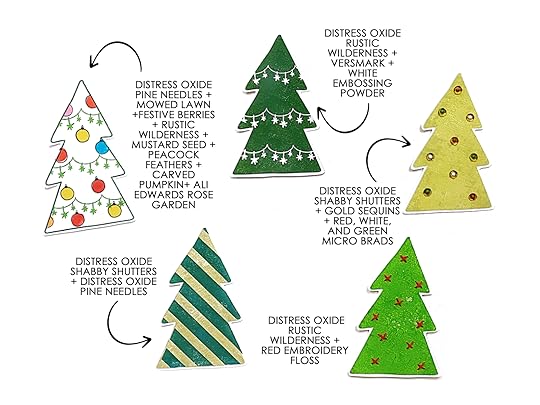
Here are a few of the trees that I stamped along with a little details about what inks and/or embellishments I used.

In the video you saw that I did stamp a tree with the cute little lights, but I cut it up and didn’t like how it looked. I will be re-stamping one of those. It was so fun + easy! I stamped the outlines of the lights first, and it was simple to line the insides up looking at the stamped outline through the acrylic block. Of course, if you would rather not stamp the insides, you can use marker, colored pencil, or even watercolors to color the bulbs.
I like some of the color combinations better than others, and I like some of the embellishments better than others.
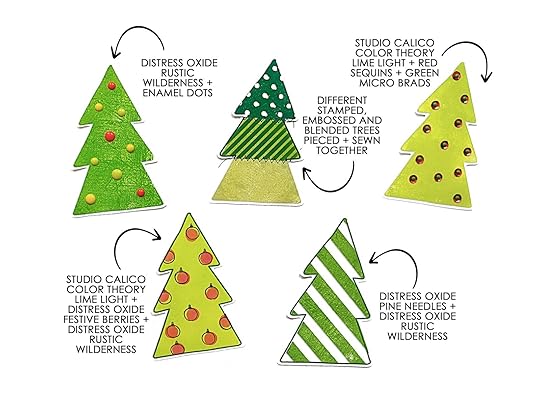 As usual, for me, my stamped images turned out better after stamping the first impression. Here’s a tip to get your stamped images to look better when you use stamps for the first time. Use Versamark Ink on your new stamp. Just ink it up and make your first impression on scrap paper. Then, use stamp cleaner on the stamp and dry it off. It really works. Unfortunately, this is something that I often forget to do because I am just excited to get going. It really does make a difference, though.
Another thing that I always seem to forget to do is use my Anti-Static Pouch on my paper prior to stamping + heat embossing. It’s always right on my desk, but again, I’m in a hurry. I did remember to use it this time (like once or twice), and I can definitely see the difference between when I used it and didn’t use it.
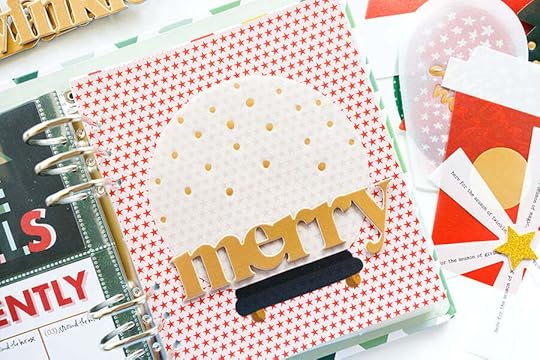
So, now that I had a whole bunch of trees, what to do? I wanted to make something that I was going to add to my album, so I decided to make my Reason Why page here with you guys. Here is the finished page where I added five of my trees across the page. For the background paper, I modified the digital version of the 10x8 December Pattern Paper from the Main Kit. I tried the trees on some of the physical papers from the kit, and I just felt like the bold colors took the viewers eyes away from the trees. The joy of hybrid scrapbooking!
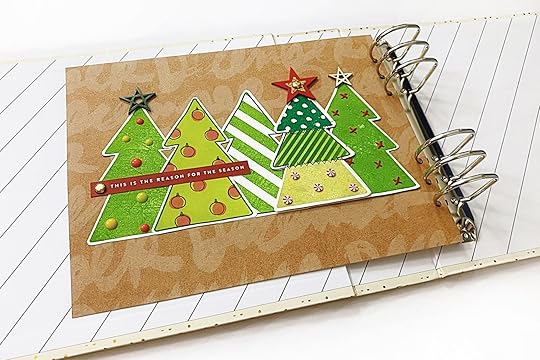
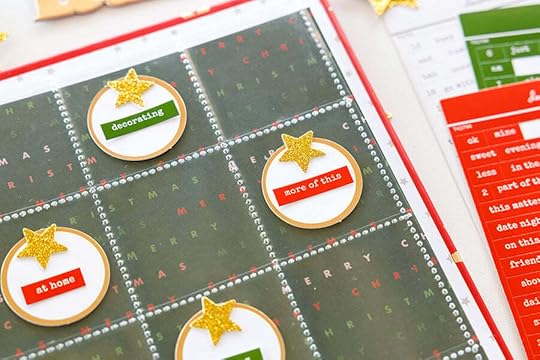
To embellish my stamped images and my page, I added a few things from the Main Kit including a red wooden star, a gold glitter star, and a die cut phrase strip. Some people may frown upon using the two different reds (the die cut + the star) on the same spread, but I am slowly becoming more open + flexible when it comes to that stuff. We all have our own ways, right? You do you…always! I also still have a bunch of the stars from last year’s release, so I ended up adding two of those, as well.
Below is how my page looks when you swing the tree over to reveal my reason why. I created a custom shape text box to have my words in the general shape of the tree. I have included it here in case anyone is interested. I used Photoshop to create it, but it can totally be opened and used with Photoshop Elements.

I printed my journaling out on white cardstock, laid one of my stamped trees on top of it, and outlined it with a pencil. Then, I fussy cut it out. If you want the tree with the journaling to be totally hidden, cut inside of the pencil line. Here is a close up of my reason why.

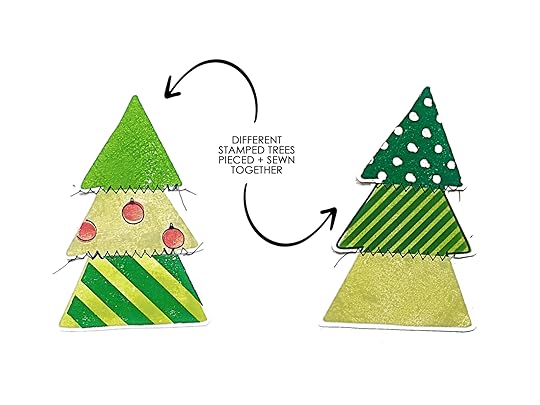
You can also see from my images + video that I cut some of the trees that I stamped into three parts – top, middle, and bottom. I then pieced different parts of different trees back together for a little bit of an eclectic look. I experimented with sewing on my machine for that. It was fun!
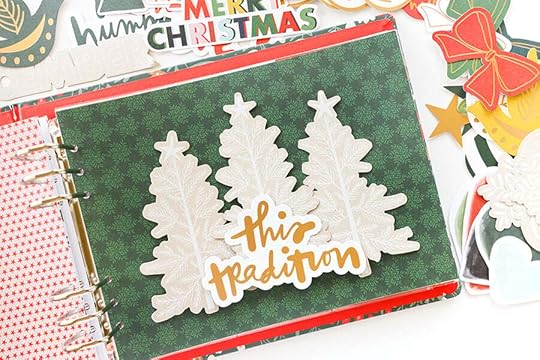
These trees are so simple + versatile.
You can add them to a page similar to how I did and have photos underneath or photos + journaling underneath. You can add one in the center of a page with a simple die cut or chipboard phrase underneath. You can add them to the front of a pocket. You can back each tree with white cardstock + add your journaling to the back of each tree + then put them all into one pocket. You can totally fill an entire page with them (some would be hanging off the edge which would be so fun). You can fill a page with the trees like I said in the above bullet point + then also cut photos in the shape of the trees to add amongst the trees. You can stamp them in the colors of the Main Kit for some super colorful fun!
I am sure there are many more ways to add them into your album. Those are the ones just off the top of my head.
Thank you so much for joining me here on the blog for some December Daily tree stamping. I hope you had as much fun as I did! I will be here again this month with more stamping. Yay! If you have any questions or would like to see me play with a certain stamp set, please feel free to comment below. You can also see more of my work onInstagram @denine2 and YouTube @Denine2. Happy Storytelling + Happy December Daily! See you all soon!
Friendly reminder that we are following the same process as last year for securing your stamp orders. In order to meet the high demand for stamps this year, we are asking you to add the stamp sets you would like to receive in your box by 9/9 at 11:59pm ET to guarantee your order for shipping with your box in early October. We will be ordering a limited amount of each design in addition to stamps sets secured by customers that will be available after 9/9. If you do not secure the stamps you would like by 9/9 at 11:59pm we cannot guarantee we will have enough quantity to fulfill demand and they may sell out. Find them here.
September 2, 2024
December Daily® 2024 | Start Here
Happy Monday, friends! Last week we launched our 2024 December Daily® collection! Throughout the boxing period and leading up to December documenting, we have all kinds of fun and inspirational content planned. Today, it seems appropriate to start with her posts related to the fundamental ideas behind December Daily® and what she hopes you take away from this project. So we're taking a deep-dive into the treasure trove of education, advice, and inspiration that can be found here on the blog. Going back to 2007, this has been the home for Ali's daily pages and more. We hope you enjoy this trip down memory lane!
December Daily® 2023 | Ali's Start Reason Why
5 Tips For Getting Ready For December Daily®
December Daily® 2020 | Let The Storytelling Begin 2020
December Daily® 2019 | Bring On The Stories
December Daily® 2018 | Here We Go
December Daily® 2017 | Let's Begin
December Daily® 2016 | Let's Begin
December Daily® 2016 | Beginning Preparations
December Daily® 2016 | My Hopes For You
December Daily® 2015 | Let's Begin
December Daily® 2014 | Let's Begin!
December Daily™ 2013 | Let's Begin!
December Daily™ 2012 | Saying Hello & Looking Back & Looking Ahead
December Daily 2011 | 25 Ideas And Story Inspirations
December Daily 2010 | Simple Tips Thoughts On The First Of December
Shop the collection
here. Join a group of like-minded and passionate crafters in our December Daily® With Ali Edwards Design Inc Facebook group. Find inspiration and updates over on our official Instagram account: @decemberdaily. And check out our newest December Daily® classes for a wide variety of topics related to the project:
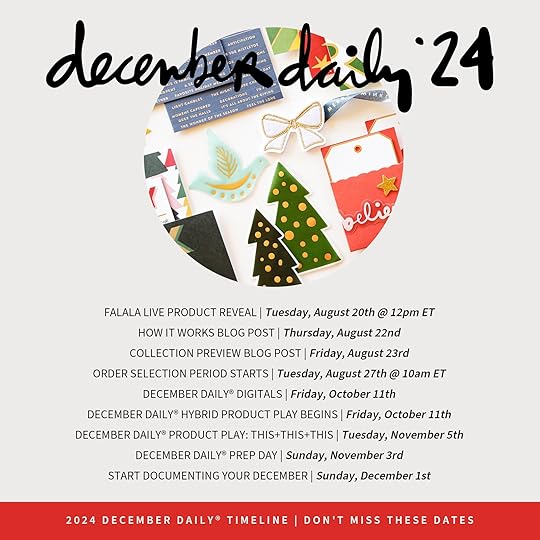
December Daily® Product Play | This This This workshop registration is open and available at an intro price of $20 during the Order Selection Period. After that time it will move to the official price of $25. More details on this year's workshop can be found at the bottom of this post (workshop begins November 5th). December Daily® Hybrid Product Play workshop will open on Tuesday August 27th (DD launch Day) and will be available at an intro price of $12 during the Order Selection Period. After that time it will move to the official price of $15. Read below for more details (workshop begins on October 11th to correspond with our December Daily® Digitals release the same day).December Daily® Prep Day is happening this year on Sunday, November 3rd starting at 10am ET. You can sign up for this $5 online event on Tuesday August 27th during Order Selection Period as well.
August 30, 2024
In Case You Missed It | August 30

Happy Friday, friends! Welcome to the latest
In Case You Missed It. Just a reminder that this is a quick post that will happen every Friday afternoon with all the updates and links that have happened throughout the week. So, let's get to it:
2024 DECEMBER DAILY® PRODUCTS
The 2024 December Daily boxing period is currently live. From now until September 30th 11:59pm ET you are able to add items to your box for a single shipping charge. Order will ship the first week of October. Due to manufacturing constraints, sold out items will not be reordered. Our 2024 Collection Preview Post is available here. We also shared a How It Works post for all of the information you need to know to prepare for the boxing period launch on Tuesday, August 27th at 10am Eastern. Not signed up for our newsletter? Head to www.aliedwards.com and sign-up in the footer of our site. Be sure to follow us over at @decemberdaily, our official account for all things December Daily®. We also invite you to join us in the December Daily® Facebook group for more merriment. Find additional resources and inspiration, including Ali's completed albums, on the blog via the December Daily hashtag. Learn more about the project here.
2024 DECEMBER DAILY CLASSES
December Daily® Product Play | This + This + This workshop registration is open and available at an intro price of $20 during the Order Selection Period. After that time it will move to the official price of $25. More details on this year's workshop can be found at the bottom of this post (workshop begins November 5th). December Daily® Hybrid Product Play workshop will open on Tuesday August 27th (DD launch Day) and will be available at an intro price of $12 during the Order Selection Period. After that time it will move to the official price of $15. Read below for more details (workshop begins on October 11th to correspond with our December Daily® Digitals release the same day). December Daily® Prep Day is happening this year on Sunday, November 3rd starting at 10am ET. You can sign up for this $5 online event on Tuesday August 27th during Order Selection Period as well.
AUGUST REVEAL
Earlier this month we revealed a new Story Kit™ theme: QUIET! Ah, quiet. Sometimes it's elusive and sometimes it's oppressive and sometimes it's the exact relief we need. This month we are telling stories about being quiet, searching for quiet, embracing quiet, and generally reflecting on how we feel when things are quiet in our lives. In addition to our new Story Kit™ theme, we also have a brand new Stories By The Month™ kit, the next edition in our Alphas Are Awesome series, and our most recent Quarterly Scrapbook Kit (alphabet-theme). Head to the blog for Ali's post with all the details about this month’s release.
AUGUST DIGITALS
The first Friday of every month we have a new digital release available in the shop. Play with scale, recolor objects, add journaling, print multiples…the sky is the limit when playing with digitals. Shop digitals here.
2024 PROJECTS + PRODUCTS SCHEDULE
As we continuing easing into 2024 we put together an overview of our schedule of projects + product releases for the upcoming year. We are sharing this as a way for you to plan, think about what you might want to participate in this year, and simply share some of the things we have coming up to help support + inspire storytelling. For the last few years we've followed a fairly similar cadence for our releases and our major projects will follow that release schedule again this year. Please note that, as you might imagine, this schedule is subject to change throughout the year based on a variety of variables. Find the post here.
As always, we’re so grateful to have you all as members of this community! Thanks for joining me today and have a great weekend!
August 23, 2024
In Case You Missed It | August 23
Happy Friday, friends! Welcome to the latest
In Case You Missed It. Just a reminder that this is a quick post that will happen every Friday afternoon with all the updates and links that have happened throughout the week. So, let's get to it:
COUNTDOWN TO DECEMBER DAILY®
Mark your calendars! We are so thrilled to share that our 2024 December Daily® order selection period will begin on August 27th at 10:00am ET. 😍 Our 2024 Collection Preview Post went live today and is available here. We also shared a How It Works post for all of the information you need to know to prepare for the boxing period launch on Tuesday, August 27th at 10am Eastern. Not signed up for our newsletter? Head to www.aliedwards.com and sign-up in the footer of our site. Be sure to follow us over at @decemberdaily, our official account for all things December Daily®. We also invite you to join us in the December Daily® Facebook group for more merriment. Find additional resources and inspiration, including Ali's completed albums, on the blog via the December Daily hashtag. Learn more about the project here.
AUGUST REVEAL
Earlier this month we revealed a new Story Kit™ theme: QUIET! Ah, quiet. Sometimes it's elusive and sometimes it's oppressive and sometimes it's the exact relief we need. This month we are telling stories about being quiet, searching for quiet, embracing quiet, and generally reflecting on how we feel when things are quiet in our lives. In addition to our new Story Kit™ theme, we also have a brand new Stories By The Month™ kit, the next edition in our Alphas Are Awesome series, and our most recent Quarterly Scrapbook Kit (alphabet-theme). Head to the blog for Ali's post with all the details about this month’s release.
TRAVEL CLASS | START TO FINISH 04
Let us help you bring your travel stories to life! Join contributors Shannon Flatley, Yin Goh, Kendra Wietstock, Kelly Watson, Jeanne Williams, and Diane Dziuban as they each create a travel album using products from the 2024 Travel Collection. In this class you will find a variety of styles and approaches that includes more recent travels as well as travel stories collected from over the years. From planning and organization to creative ways of using products, this class is all about providing you with inspiration and ideas to help you create your own travel album. Learn more and
register here.
CLASS FROM ALI | STASH CLASS
Join Ali for a fun, motivating adventure into some ways to deal with all the scrapbooking stuff you’ve collected over the years and still have. Sometimes we need to press pause on our storytelling adventures for just a bit in order to get a handle on the fun things we’ve added to our physical product toolbox. Let’s come together as a community + spend some time prioritizing starting with our stash to get more of our stories told. In this four week workshop you’ll spend the first two weeks sorting + organizing supplies (or getting ideas about what might work for you) and the second two weeks creating projects using what you already own. Learn more here.
AUGUST DIGITALS
The first Friday of every month we have a new digital release available in the shop. Play with scale, recolor objects, add journaling, print multiples…the sky is the limit when playing with digitals. Shop digitals here.
2024 PROJECTS + PRODUCTS SCHEDULE
As we continuing easing into 2024 we put together an overview of our schedule of projects + product releases for the upcoming year. We are sharing this as a way for you to plan, think about what you might want to participate in this year, and simply share some of the things we have coming up to help support + inspire storytelling. For the last few years we've followed a fairly similar cadence for our releases and our major projects will follow that release schedule again this year. Please note that, as you might imagine, this schedule is subject to change throughout the year based on a variety of variables. Find the post here.
As always, we’re so grateful to have you all as members of this community! Thanks for joining me today and have a great weekend!
December Daily® 2024 | Full Collection Overview + Price List
In this post we are sharing all the products we are offering for December Daily® 2024. All products will all be available on
Tuesday, August 27th at 10am Eastern.
In addition to the new products shown below we will have some past December Daily® products available to add to your box at various times throughout the boxing period (read more about our Boxing Period schedule here) as well as some basic items from our shop (such as page protectors, tools and inks).
PRICE LIST: Download the 2024 Printable Price List here. Please know that our goal in sharing the price list is to help you plan for Tuesday. There will likely be other items, basics such as inks and the paint bundle, that will be available in the Box Order Period (along with sale items that will be added later in September).
UPDATES + REMINDERS
Make sure to read our How It Works post for all the details about how our box ordering process works and few new updates for this year's process & schedule (it's different from our regular shopping interface). That post also includes shipping details. Follow December Daily® on Instagram for additional information and inspiration and/or join our December Daily® Facebook group . You can get more details on the schedule for the December Daily® season here. Read below for all the class + event details.
DIGITAL PRODUCT DETAILS
All items listed below that translate easily to a digital format/product will be included in our December Daily® digitals release for 2024. The digital versions of the items below along with new layered templates + overlays will be available in our regular shop on
Friday, October 11th.
Our team put a lot of love, effort and thought into our 2024 December Daily® release and we are so excited to share it with you! We are real people over here who love this project and deeply care about creating products to support both your storytelling + your creative spirit.
Let's dive right in!
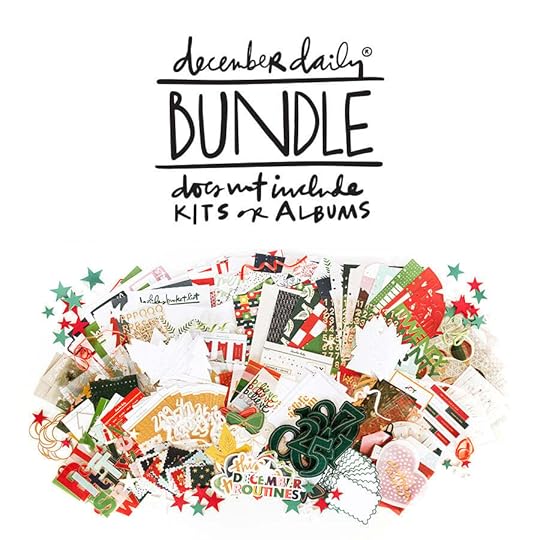
NEW FOR 2024 | LIMITED QUANTITY BUNDLE OPTIONS
This year we are offering two limited quantity bundle options. This first is a Stamp Bundle which includes all nine of the new stamp sets. The second is a bundle that includes most new shop items (with the exception of kits, albums, advent calendar and stamps).
STAMP SET BUNDLE | $200
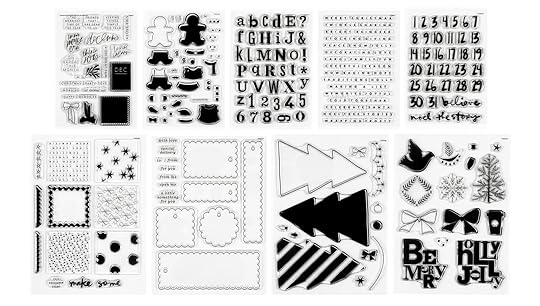
The stamp bundle features all nine sets shown above (five are 4x6 and 4 are 6x8).
DECEMBER DAILY® BUNDLE | $270
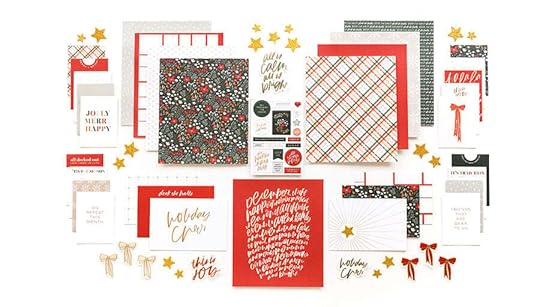
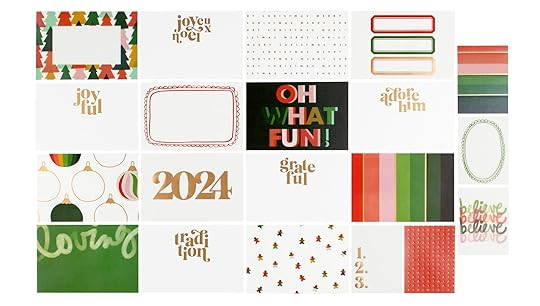
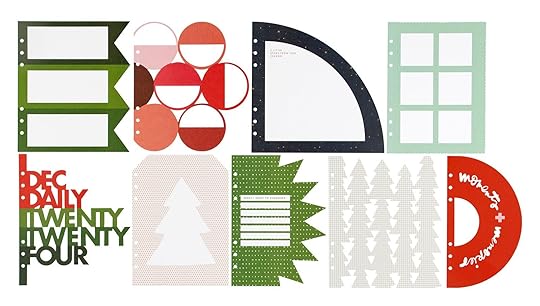
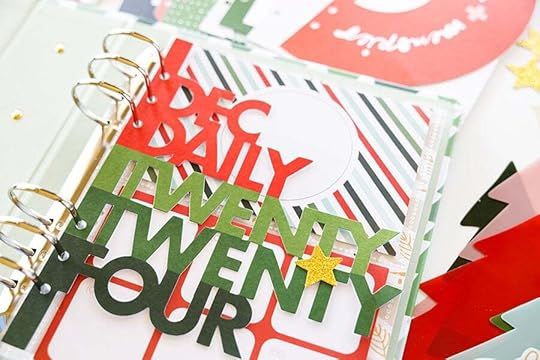
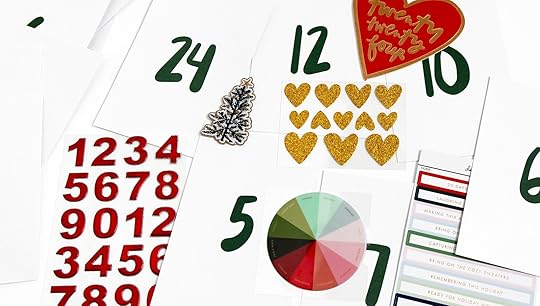
This Bundle includes 3x8 Transparency + Journal Card Set, 6x8 Transparencies, Envelope Bundle, Die Cut Paper Inserts, 3x4 + 4x6 Specialty Journal Card Set, 10x8 Transparencies, 10x8 Papers, Prompt Paper Pack, Scalloped Squares Pack, Plastic Phrases, Large Vellum Pieces, Wood Veneer Stars, Scalloped Tags, Cardstock Trees, Tree Metal Craft Die, Velvet Trim Pack, Gold Foil Paper Circles, Variety Die Cut Bundle, Small Plastic Numbers, Large Felt Numbers, 6x8 Chipboard Phrase Sheet, 6x8 Clear Sticker Sheet, Alpha Puffy Sticker Sheet, Phrase Sticker Sheets, Tab Sticker Sheets, Number Sticker Sheet, Silkscreen Pack, and Stencil Pack
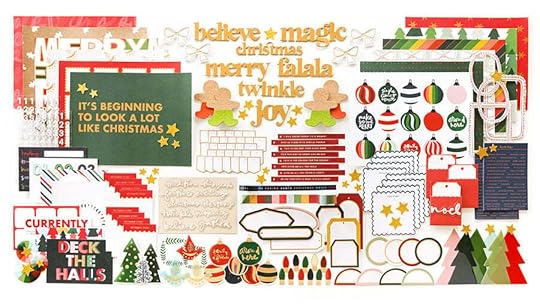
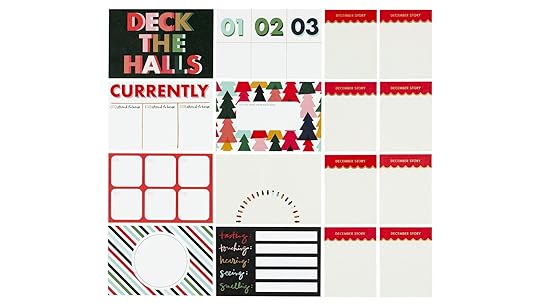
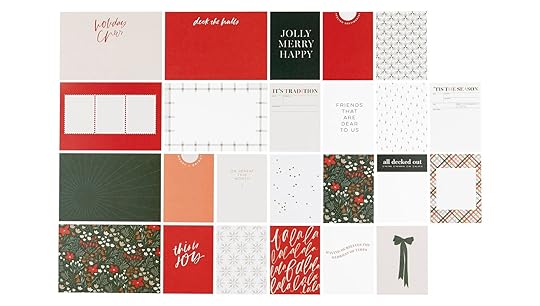
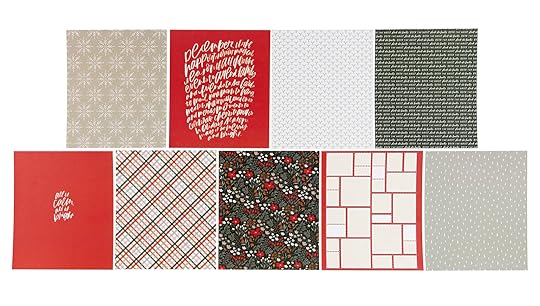
Components this year include:
12 - 10×8 single-sided papers 8 - 4×4 prompt story cards 8 - 3×4 single-sided journal cards 6 - 4×6 single-sided journal cards 2 - 4×6 puffy number sticker sheets 3 - 3×4 library card pockets 3 - 3×4 library card inserts 1 - 6×8 perforated phrase strips 1 - 12mm washi tape roll 1 - 20mm washi tape roll 4 - 3.5" cork gingerbread men 31 - 1.5" paper pennant die cuts 4 - 4" cardstock frames 24 - 2.5" to 5" cardstock pieces 6 - 5" plastic trees 29 - 1.5" to 4" vellum die cuts 7 - 3.75" to 6" chipboard phrases 11 - 3" plastic words 30 - 0.75" to 1.25" glitter die cut stars 4 - 2.5" felt bows
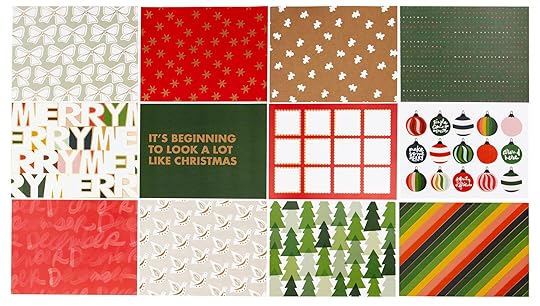
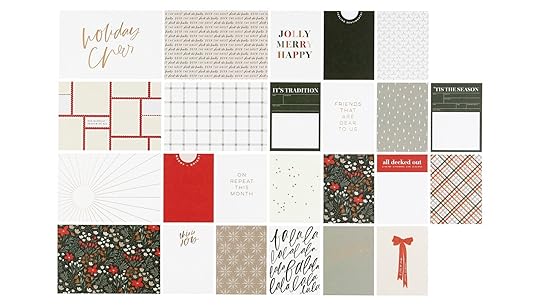
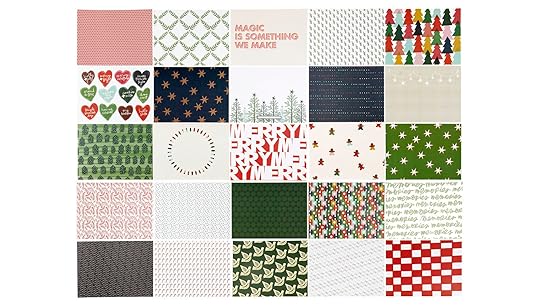
Here's a closer look at the papers:
And the 4x6 and 3x4 cards:
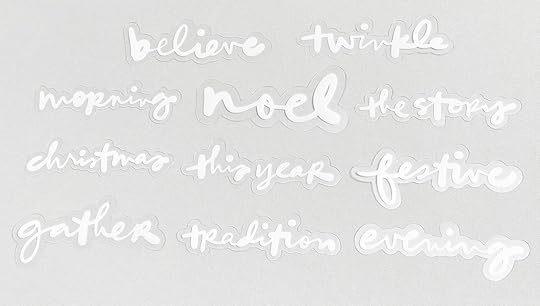
Vellum pieces:

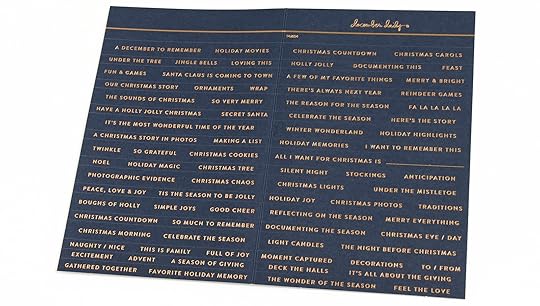
Perforated word/phrase strips:
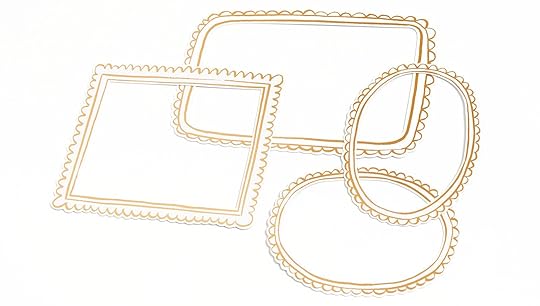
Frames:


Here's a video walkthrough of this kit:
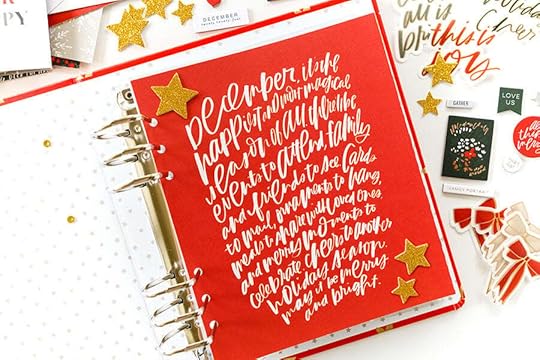
Here are some images of the kit in action in the 10x8:

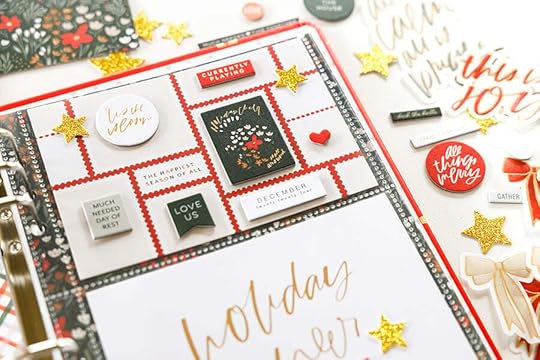
Here are some images of the kit in action in the 6x8:
Here are some images of the kit in action in the 4x6:
We are super happy to have Liz Tamanaha creating a mini kit for us again this year!
Components this year include:
9 - 7×8.25 double-sided papers 8 - 4×6 double-sided journal cards 16 - 3×4 double-sided journal cards 1 - 4×6 chipboard shape sheet (adhesive backed) 9 - 2" to 3.5" vellum die cuts 15 - 0.75" to 1.25" glitter die cut stars
The Paislee Press Kit includes double-sided cards:
The papers have a neutral grid on the other side:
Here's a video overview of this kit:
Here are some images of pieces in the 6x8 album:
Here's an image of pieces in the 10x8 album (showcasing the new page protector included in the album):
Here are some images of pieces in the 4x6 album:
In addition to the above kits we offer a variety of additional supplies to support your December storytelling including albums, stamps, papers, embellishments, etc.
Let's dive in with an overview video (stamps have their own video below):
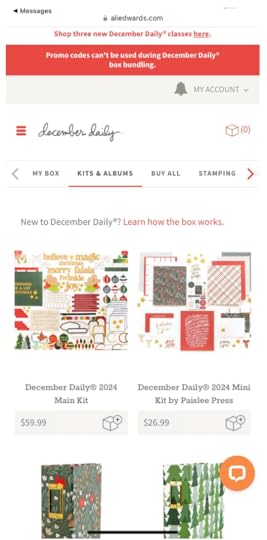
ALBUMS
10x8 FLORAL | $32.99
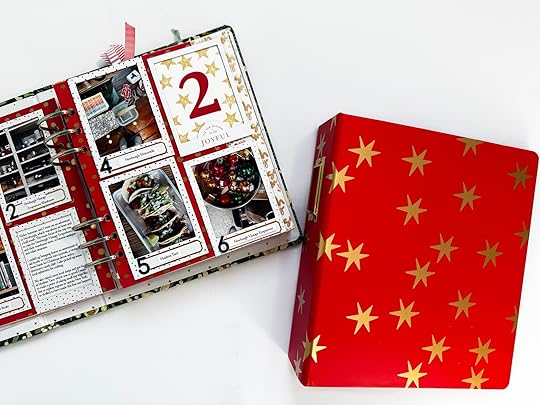
Includes 25 page protectors: (7) - 10×8 one pocket(6) - 4×4 two pockets and 4×6 two pockets(6) - 10×4 two pockets (6) - 3×4 six pockets. We're excited to offer a new page protector configuration for this album size: six 3x4 pockets. This new configuration will be available in the multipack as well as in an individual pack.
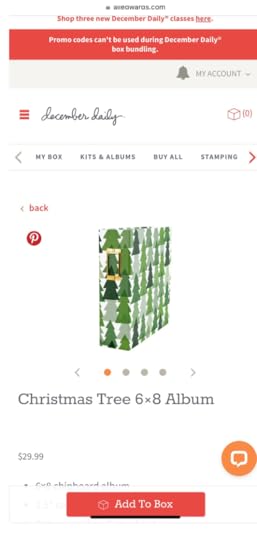
6x8 TREE ALBUM | $29.99
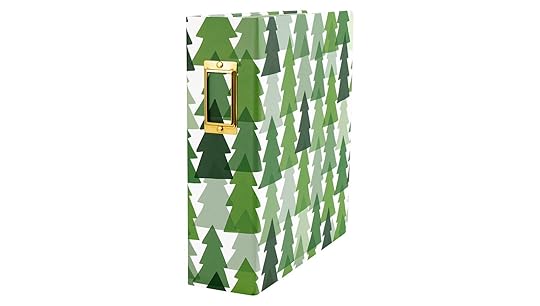

25 Total Page Protectors: (7) - 6x8 one pocket (2) - 2x2 twelve pockets (6) - 3x4 two pockets and 4x6 one pocket (5) - 3x4 four pockets (5) - 4x6 two pockets
6x8 RED STAR ALBUM | $29.99
This is the album Ali will be using this year.
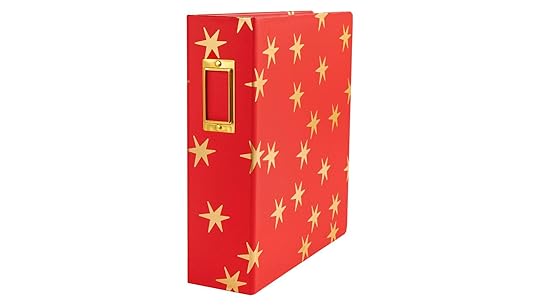
Includes 25 page protectors. 25 Total Page Protectors: (7) - 6x8 one pocket (2) - 2x2 twelve pockets (6) - 3x4 two pockets and 4x6 one pocket (5) - 3x4 four pockets (5) - 4x6 two pockets
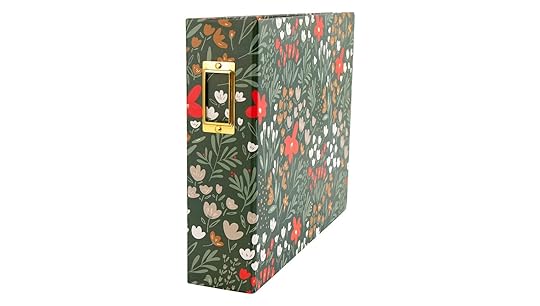
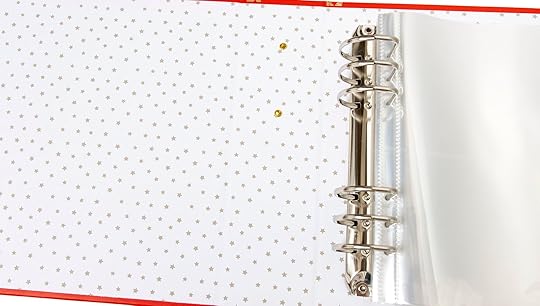
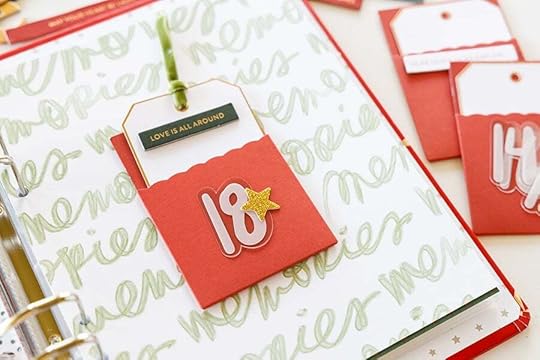
4x6 VERTICAL FLORAL ALBUM | $19.99

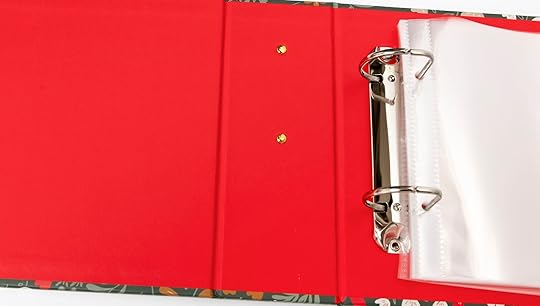
25 Total Page Protectors: (15) - 4x8 one pocket (15) - 3x4 two pockets. The outside of the page protector size for this album is 5x6.25. Both page protector packs for this album will be available to add to your box.
There will be a limited number of buy-all bundles for our nine new December Daily® stamps available or you can purchase them individually.
NOTE: We are following the same process as last year for securing your stamp orders. In order to meet the high demand for stamps this year, we are asking you to add the stamp sets you would like to receive in your box by 9/9 at 11:59pm ET to guarantee your order for shipping with your box in early October. We will be ordering a limited amount of each design in addition to stamps sets secured by customers that will be available after 9/9. If you do not secure the stamps you would like by 9/9 at 11:59pm we cannot guarentee we will have enough quantity to fulfill demand and they may sell out.
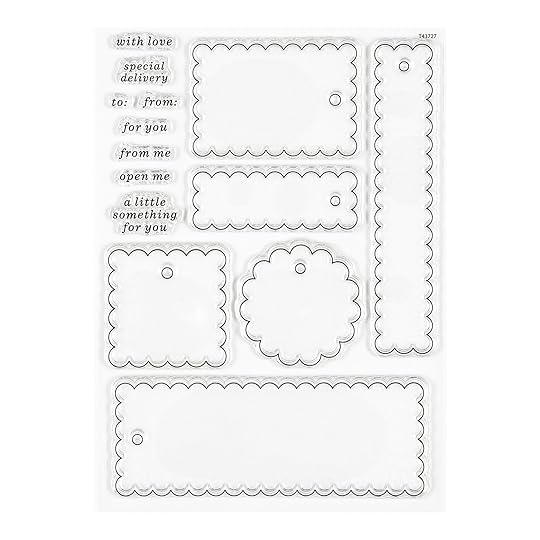
SCALLOPED 6x8 STAMP | $28.99
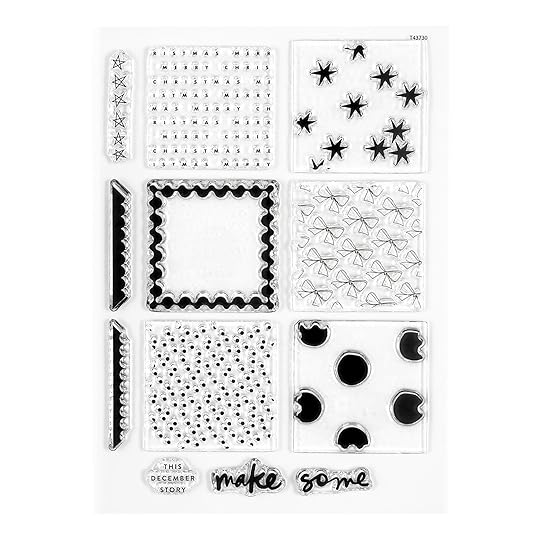
HOLIDAY ICONS 6x8 STAMP | $28.99
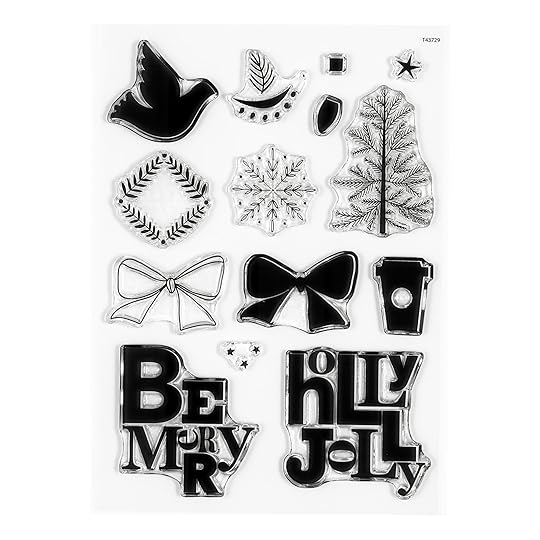
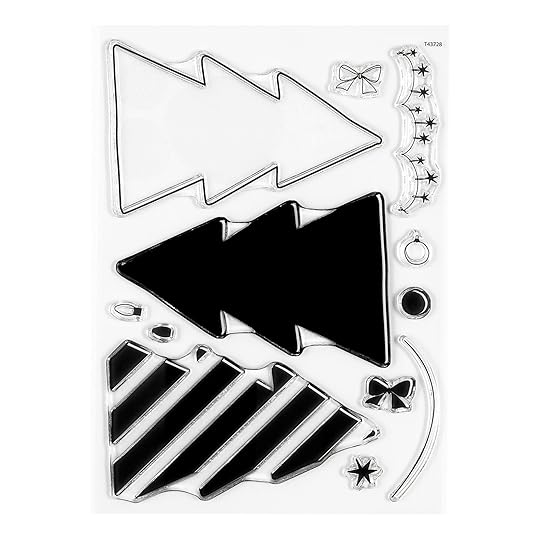
HOLIDAY TREE 6x8 STAMP | $28.99
Trees are about 4.25 inches tall and 3 inches wide.

HOLIDAY TAG 6x8 STAMP | $28.99
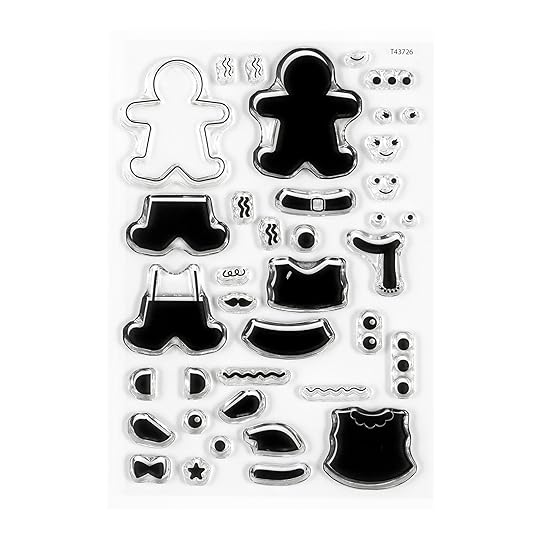
GINGERBREAD 4x6 STAMP | $19.99
ALPHA + NUMBERS 4x6 STAMP | $19.99
These are a little over .5 inches tall.

HOLIDAY PHRASE 4x6 STAMP | $19.99
ALI'S NUMBERS 4x6 STAMP | $19.99
These are a little taller than .5 inches.

PAISLEE PRESS 4x6 STAMP | $19.99

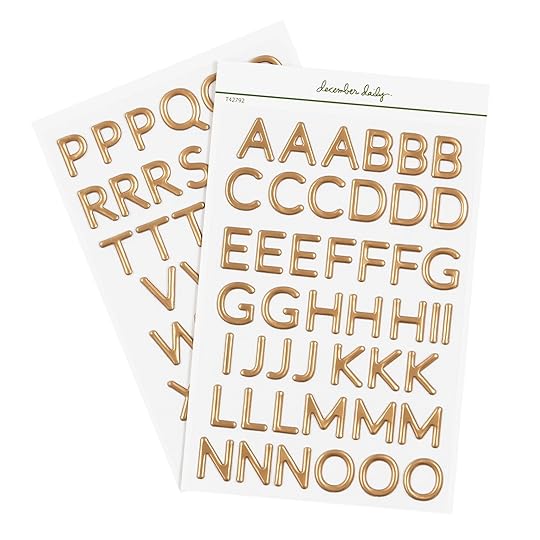
In addition to the new December Daily® stamps above we also have some new alpha and number stamps available.
Here's a video overview of the stamps that includes Ali playing with the sets.
In the video above Ali used this
2x2 square punch, this 2.25 inch circle punch, this 2.5 inch circle punch, and this stamp platform. We will also have stamp blocks + inks available during the Order Selection Period to add to your box.
Individual inks + ink bundles will be included in the box ordering options this year. We are not releasing any new colors this year.
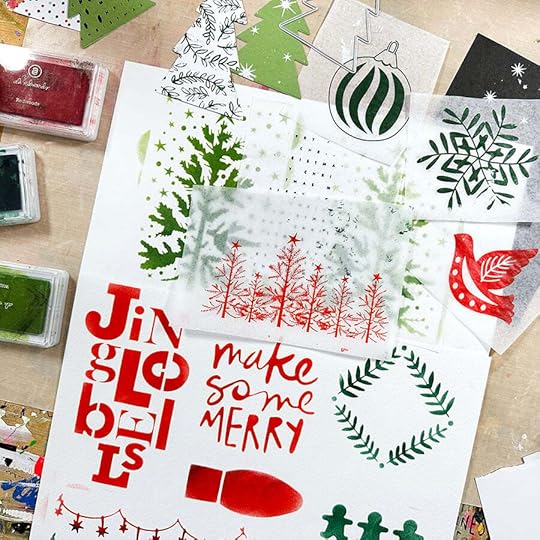
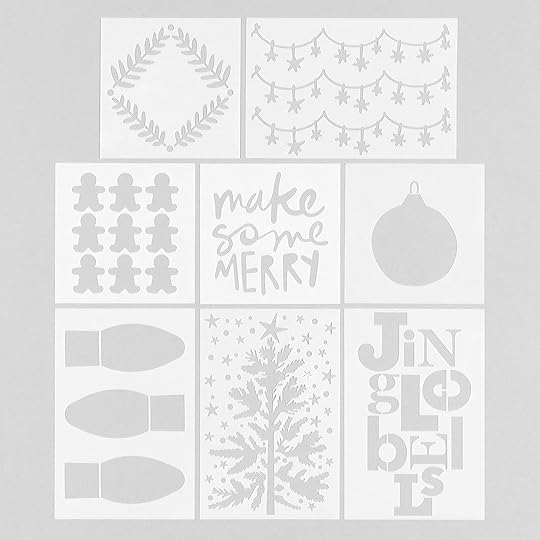
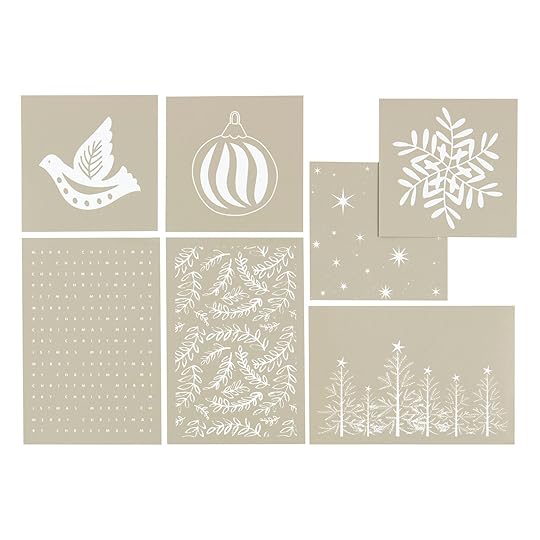
MAKE SOME MERRY STENCIL PACK | $14.99
These are matte stencils in 4x4 and 4x6.
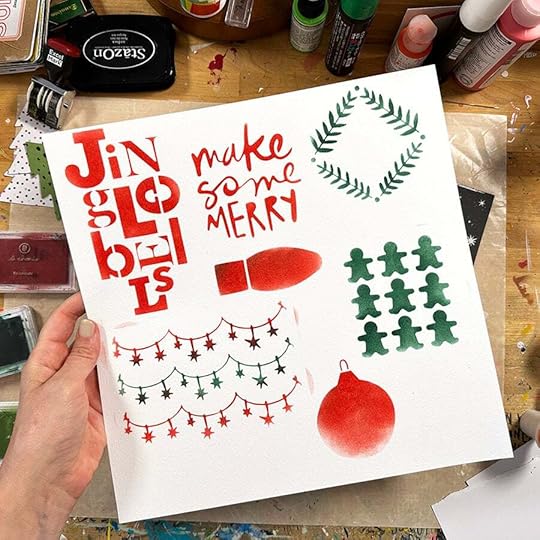
DECEMBER MOMENTS SILKSCREEN PACK | $14.99
Silkscreens are so fun + work really well with paint! These are 4 inch x 4 inch and 6x4 inch.
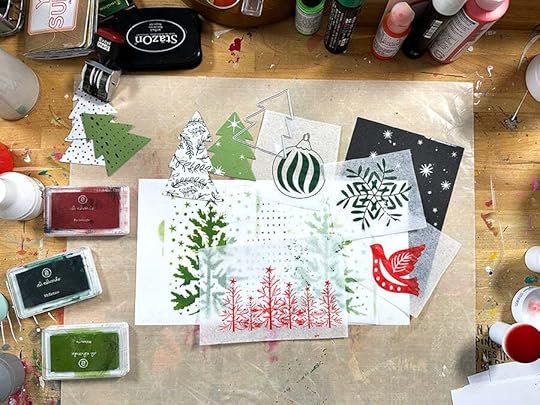
Here's a video of Ali playing with the silkscreenss + paints:
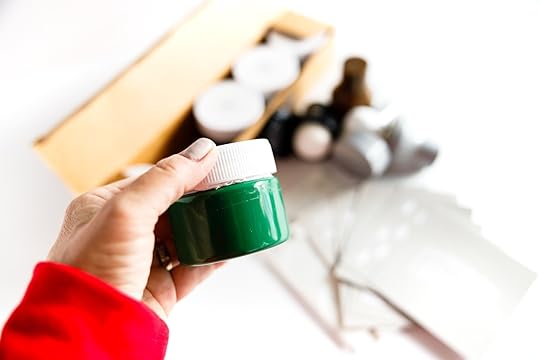
PAINT PACK | $19.99
5, 100ml paint bottles
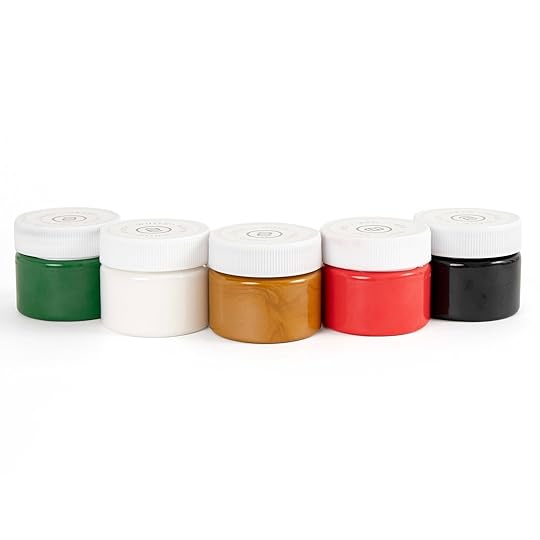
You can see Ali playing with these paints in the silkscreen video above.
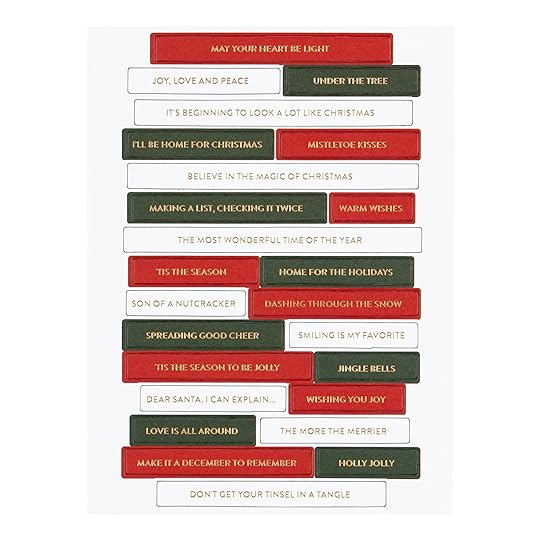
TIS THE SEASON CHIPBOARD PHRASES 6x8 | $6.99
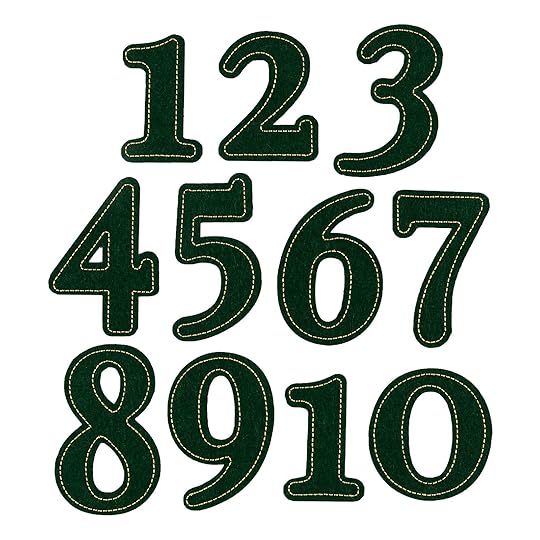
LARGE GREEN FELT NUMBERS | $9.99
4 inches tall
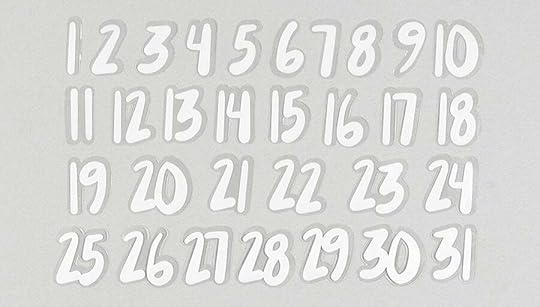
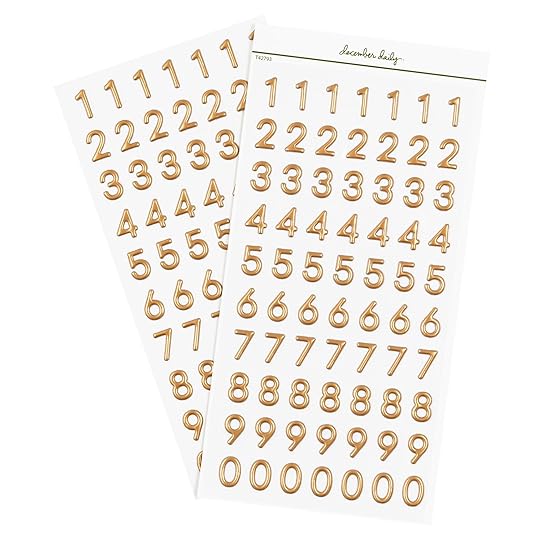
SMALL WHITE PLASTIC NUMBERS | $8.99
31, 1.5 inches tall
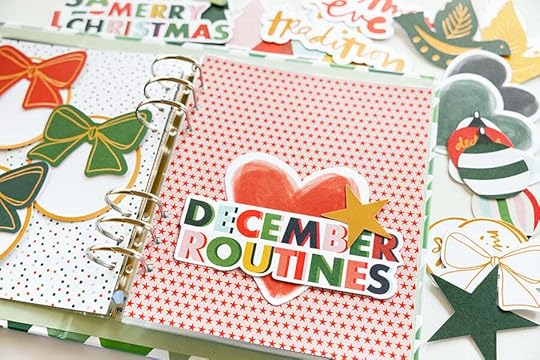
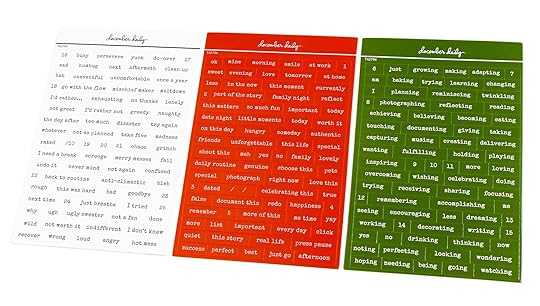
DECEMBER ROUTINES VARIETY DIE CUT BUNDLE | $9.99
50, .75 inch - 6.25 inch die cut shapes

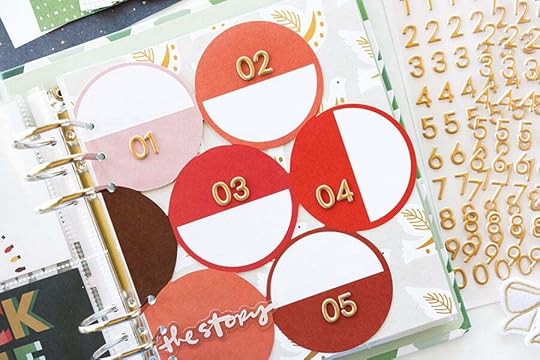
GOLD FOIL DIE CUT LABELS | $5.99
50, 1.5 inch circles
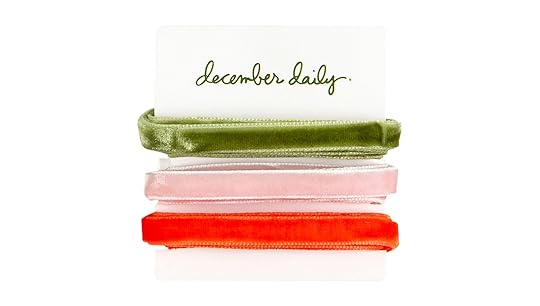
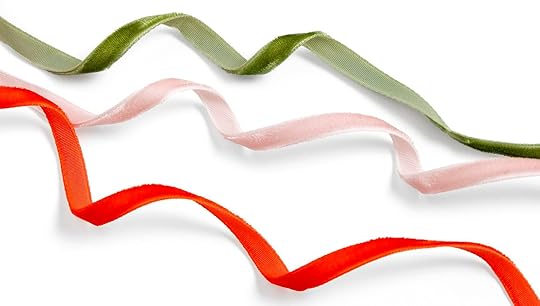
VELVET TRIM PACK | $5.99
METAL CRAFT DIE TREE | $8.99
1, 2.5 inch x 3 inch metal craft die

CARDSTOCK DIE CUT TREES | $6.99
50, 2.5 inch x 4 inch cardstock trees
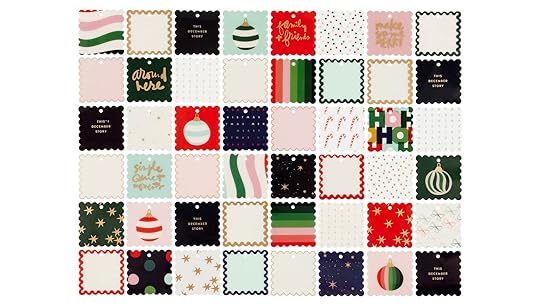
SCALLOPED DIE CUT TAGS | $5.99
12, 2.75 inch x 4 inch
PAINTED WOOD VENEER STARS | $8.99
50, .75 inch - 2 inch wood stars
CHRISTMAS MAGIC LARGE VELLUM PIECES | $12.99
8, 4 inch - 6 inch vellum shapes
BE MERRY PLASTIC PHRASES | $9.99
5 - 3.4" to 5.6" plastic phrases
SCALLOPED PLASTIC SQUARE PACK | $9.99
48, 2 inch scalloped plastic squares
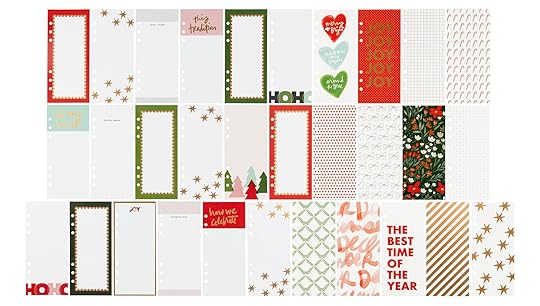
HOLIDAY STORIES PROMPT PAPER PACK | $5.99
NOTE: These were manufactured on a much thinner paper than we usually use and we were unable to re-print them. They are sized outside of the page protector. Ali will definitely be using some of these in her album (they are one of her favorites this year) and backing them with a photo or other pattern paper to create pages in her album. These come with the digital product.
5, 7 inch x 8.25 inch and 3, 11 inch x 8.25 inch prompt papers
MERRY MERRY 10x8 PAPER PACK | $12.99

MAKE SOME MERRY 10x8 TRANSPARENCY PACK | $14.99

OH WHAT FUN SPECIALTY JOURNAL CARD SET | $10.99
Incudes paper with gold foil, vellum, and transparency in 3x4 and 4x6.
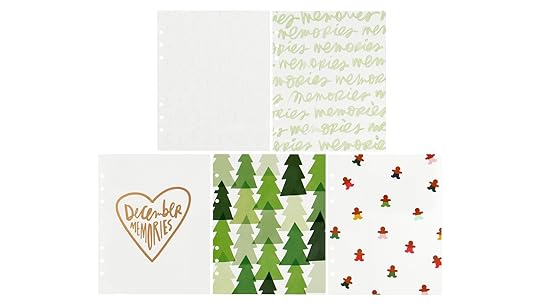
MOMENTS + MEMORIES DIE CUT PAPER INSERTS | $10.99

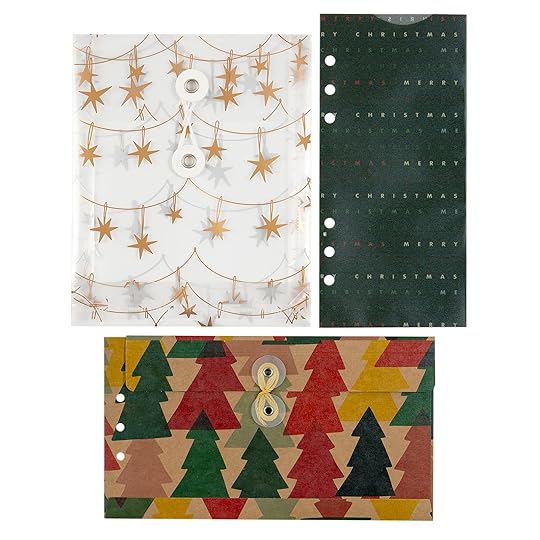
MERRY CHRISTMAS ENVELOPE BUNDLE | $14.99
1, 6x8 kraft envelope, 1, 4.5 x 7.5 inch plastic pocket, 1, 3x8 vellum pocket

DECEMBER MEMORIES 6x8 TRANSPARENCY PAGES | $9.99
BEST TIME OF THE YEAR 3x8 TRANSPARENCY + JOURNAL CARD SET | $19.99
18, 3.75 x 8.25 journal cards + 13, 3.75 x 8.25 inch transparencies
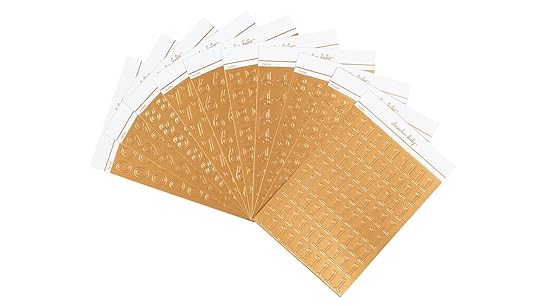
GOLD FOIL NUMBER STICKER SHEETS 4x6 | $9.99
DECEMBER MOMENTS TAB STICKER SHEETS | $3.99
ATTACHER STICKER BUNDLE | $3.99
DECEMBER MOMENTS PHRASE STICKER SHEETS 4x6 | $3.99
GOLD FOIL PUFFY NUMBER STICKER SHEETS | $5.99
GOLD FOIL ALPHA PUFFY STICKERS | $5.99
HOLLY JOLLY CLEAR STICKER SHEET | $6.99

Our sticker advent calendar is filled with 24 adhesive backed stickers + embellishments (packaged the same as last year each item in it's own poly bag with a 4x6 number card). It's become a community favorite! You might choose to open one per day before December (so you can use the elements in your album or during December! If you'd like to see all the contents we've got a spoiler video available below.
If you are someone who likes to see all the contents in advance you can check out the spoiler video here.
If you want to be surprised,
SKIP THIS VIDEO.
2024 LIFESTYLE
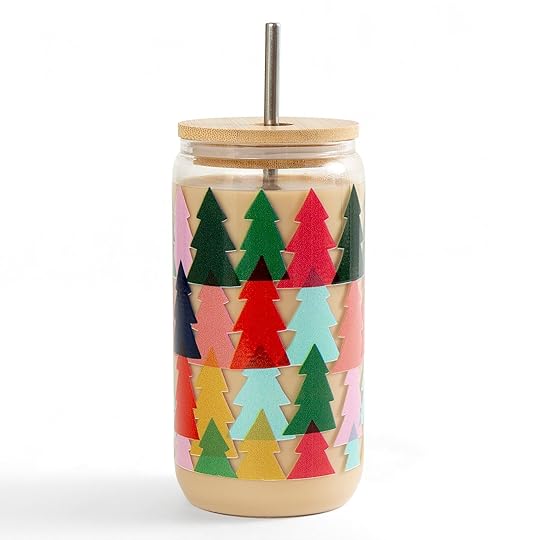
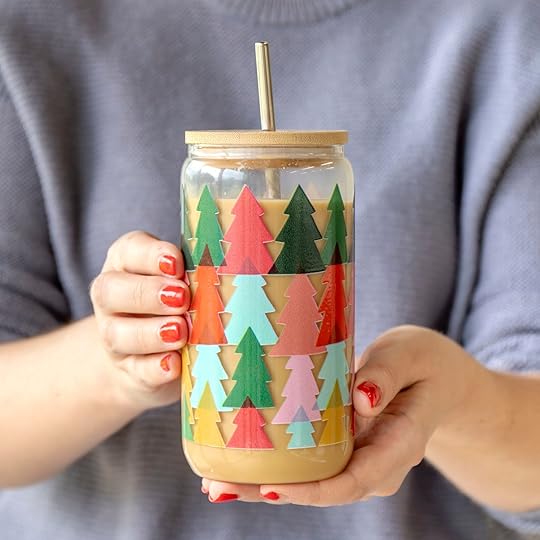
CHRISTMAS TREE GLASS CAN | $22
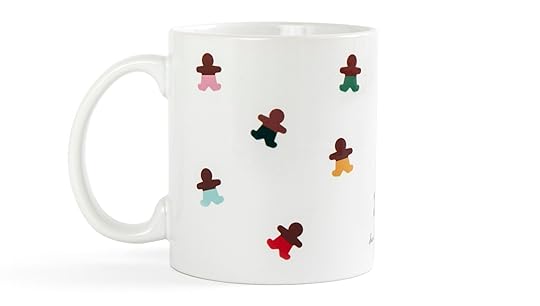
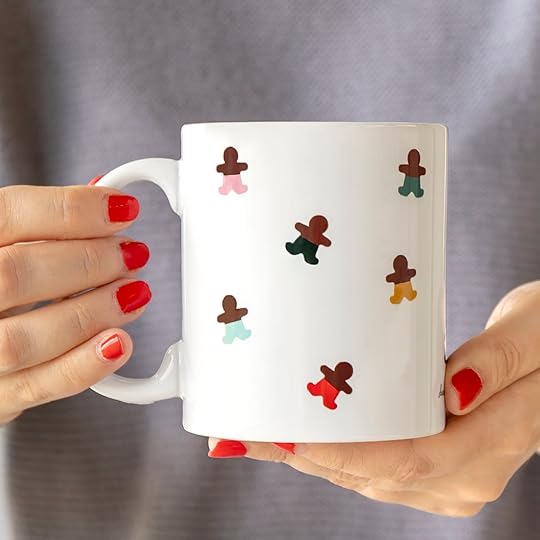
GINGERBREAD MUG | $12.99
DECEMBER DAILY® 2024 ENAMEL PIN | $4.99

BE MERRY ENAMEL ORNAMENT | $9.99

MAKE SOME MERRY SWEATSHIRT | $52
Starting on 9/9 you will be able to secure your apparel items and we ask that you add these items to your box by 9/16 at 11:59 PM ET in order to guarantee your items are included in your box that will ship out in early October. If you choose to wait to add apparel items to your box after 9/16 at 11:59 PM ET quantities will be limited and may sell out.

DECEMBER DAILY® RED SWEATSHIRT | $52

Ali is 5'9 and wearing a M. She usually gets a M or L sweatshirt or a size 10 top.
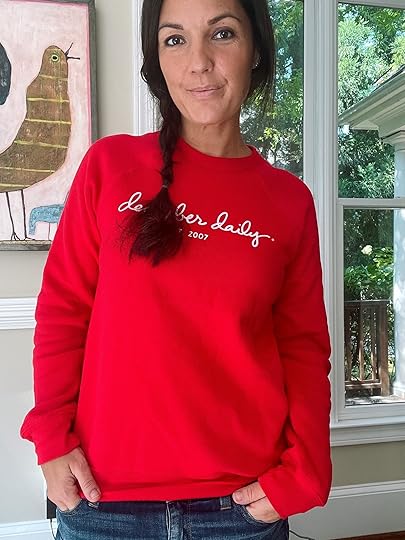
Lisa is 5'7 and is wearing a S. She usually gets a size S or M sweatshirt and wears a size 4 top.
This year you will be able to register for any or all three workshop/event registrations through our box order system:
December Daily® Product Play | This + This + This workshop registration will open on Tuesday August 27th (DD launch day) and will be available at an intro price of $20 during the Order Selection Period. After that time it will move to the official price of $25. More details on this year's workshop can be found at the bottom of this post (workshop begins November 5th). December Daily® Hybrid Product Play workshop will open on Tuesday August 27th (DD launch Day) and will be available at an intro price of $12 during the Order Selection Period. After that time it will move to the official price of $15. Read below for more details (workshop begins on October 11th to correspond with our December Daily® Digitals release the same day).
December Daily® Prep Day is happening this year on Sunday, November 3rd starting at 10am ET. You can sign up for this $5 online event on Tuesday August 27th during Order Selection Period as well.
Here is more information about each:
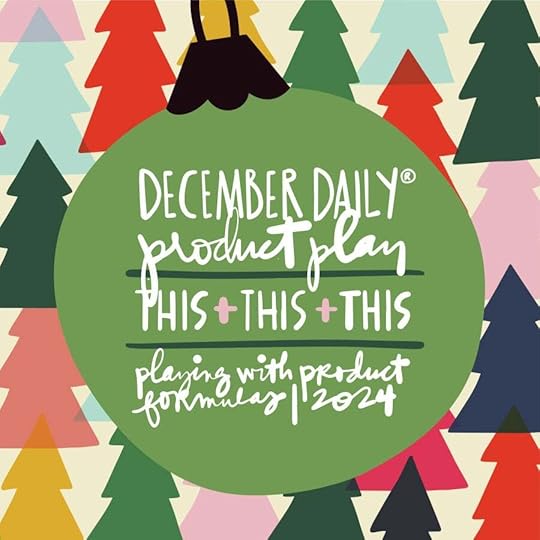
December Daily® Product Play is all about ideas and inspiration for working with physical products from the December Daily® Collection.
For our 2024 December Daily® Product Play workshop Ali + team will using four product formulas (2 products from the Main Kit + a product from the shop) as the jumping off point for creating pages to hold your stories. During each of the four weeks of this workshop Ali + team will use the following product formulas to create a project in the three album sizes (meaning each week will include one 10x8 idea, one 4x6 idea, and one 6x8 idea using the product formulas).
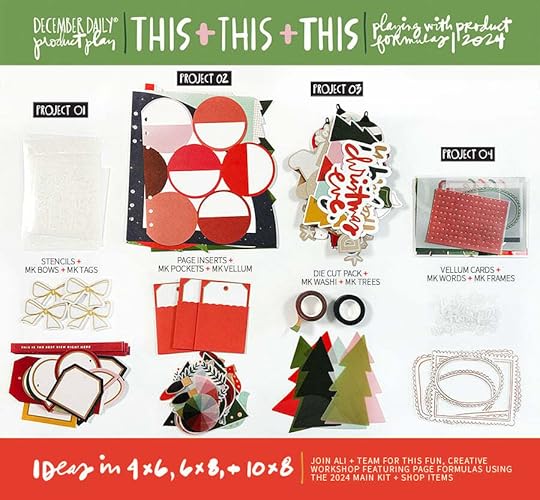
Our goal for this class is to provide inspiration to support your December storytelling by showcasing creative ways to mix and match the collection. Some ideas shared in this workshop will be completed spreads with images and journaling and some ideas will be for foundation pages to spark your creativity and help you to create homes for your December stories.
In addition to the Main Kit Ali and the team will be using the following:
2024 Stencil Pack 2024 Die Cut Page Insert Pack 2024 Die Cut Pack 2024 Specialty Card Pack (includes vellum + transparency)
Registration will open on Tuesday August 27th at 10am ET. Sign up during the boxing period for $20. After the boxing period ends the class will be $25. Class begins Tuesday, November 5th.
2024 DECEMBER DAILY® HYBRID PRODUCT PLAY

Hybrid scrapbooking combines digital products with physical supplies to create paper (or printed) memory-keeping projects. For this class, our contributors will share fun, creative ideas and inspiration for working with digital products from the 2024 December Daily® Collection via written and video tutorials.
All of the projects and techniques provided in this self-paced class will demonstrate how versatile digital products can be in helping you get your stories told. Our hope is that you will come away with ideas for using digital products to create homes for your December stories.
The price for this class will be offered for $12 during the boxing period. After the boxing period ends on 9/30 the price will go up to $15. Please Note: This workshop is not meant as an in-depth software workshop. The contributors of the class will be using either Photoshop, Photoshop Elements or Canva, and the examples and projects they share will show you the steps they take to create physical projects using digital memory-keeping products.
2024 DECEMBER DAILY® PREP DAY
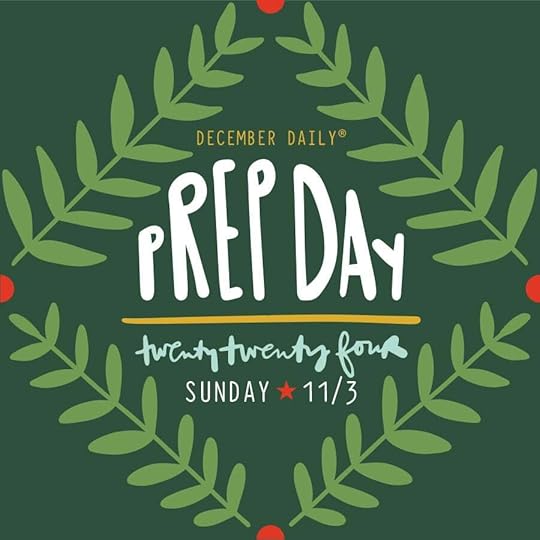
Join the December Daily® community for a fun online December Daily® prep day on Sunday, November 3rd, 2024. Use this opportunity to finish past December Daily® projects or start working on your project for 2023. The first live video will start on Sunday, November 3rd at 10:00 am Eastern.
Cost is $5.
Each lesson will be open for you to access 15 minutes prior to the live content which will be available at the top of each hour. Then after the discussions and/or project ideas, you are free to work on your own projects, clean up, prep, etc.
Note: We will have more details about the schedule and content in the coming weeks.
Each topic will have its own Lesson within the 10 Hour Classroom. Inside each lesson you'll find the live video, a free download, a challenge, and a spot for conversation in the comments section of the lesson. Live chat will be available for anyone who wants to converse back and forth during the live event. Note: All videos will be recorded so you can watch them at your own pace. You don't have to be online on the 3rd to access the content.
August 22, 2024
December Daily® 2024 | Schedule & How It Works
Each year before the release of the December Daily® collection our team likes to go over how the Order Selection Period works to refresh everyone's memory and introduce newcomers to the community about how ordering works for these specific products as well as go over the schedule for how things are going to flow this holiday season as we all prepare to document our December
We are hopeful that the changes we made to the order process over the last few years will continue to alleviate some of the slow loading and other issues we've faced in the past for this very popular release. That said, we are imperfect people trying to get it right and it's totally possible that there will be issues on the day the products go live (next Tuesday, August 27th, 2024 at 10am ET). We thank you in advance for your patience if issues do arise. Our goal is to create an awesome experience for you and we don't like it just as much as you don't like it when things don't run smooth.
Below we are showing screen shots of what the shopping experience looks like on desktop and mobile so you will have the opportunity to be more familiar with the process before the page goes live.
Take a few minutes to read through the details.
Feel free to ask questions in the comments below.
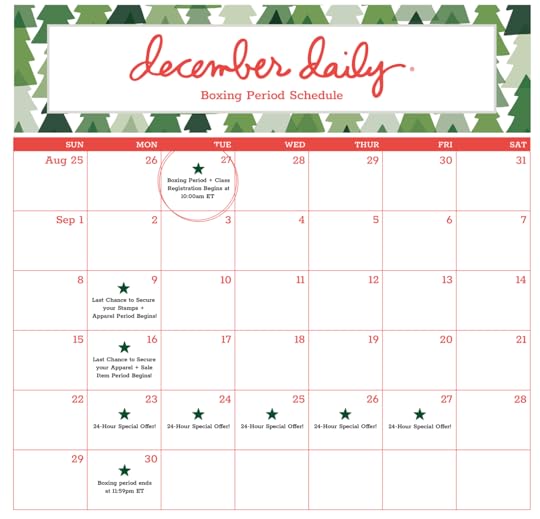
We will be following a similar schedule that we introduced last year for our Order Selection Period (see calendar above). Will be offering some past December Daily® items at various discounts throughout the second half of the month. Be sure you are signed up for our newsletter and follow us on Instagram to be the first to hear when those items are available to add to your box.
This year we are excited to add a dedicated sale category to the Order Selection Page that will go live on 9/16 in hopes of making the shopping experience even smoother for those items.
The Order Selection Boxing Period will end this year on 9/30/24 at 11:59pm ET.
STAMPS | We are following the same process as last year for securing your stamp and apparel orders. In order to meet the high demand for stamps, we are asking you to add the stamp sets you would like to receive in your box by 9/9/24 at 11:59pm ET to guarantee your order and that they will be shipped with your box in early October. We will be ordering a limited amount of each design in addition to stamps sets secured by customers that will be available after 9/9/24. If you do not secure the stamps you would like by 9/9/24 at 11:59pm ET we cannot guarantee we will have enough quantity to fulfill demand and they may sell out.
APPAREL | We will follow the same process for our apparel items. Please place orders for apparel items by 9/16/24 at 11:59pm ET in order to guarantee your items are included in your box that will ship out in early October. If you choose to wait to add apparel items to your box after 9/16/24 at 11:59 PM ET quantities will be limited and may sell out.

When the products go live on Tuesday morning there will be an option under the
December Daily® dropdown menu to shop (right now the main drop down menu is for the "Travel Collection" - that will be updated when the products go live).
When the December Daily® shopping experience is live you will see that we have broken the products down into seven categories. Each one will have their own tab across the top of your browser window:
My Box, Kits + Albums, Stamping, Embellishments, Stickers, Paper, Lifestyle, and Classes. On 9/16 an eighth category will be added for sale items titled "Sale".
Kits + Albums: Includes kits, albums, page protectors.
Buy All: This year we are offering two buy all bundles. One for stamps and one for shop items (excluding kits + albums).
Stamping: Includes stamps, inks, stencils, silkscreens, paint, stamping tools, pens.
Embellishments: Includes advent calendar, vellum, chipboard, paper, plastic, etc.
Stickers: Includes puffy, phrase, number and attacher stickers, etc.
Paper: Includes paper packs, journal card sets, transparencies, inserts, etc.
Lifestyle: Includes, mug, apparel items, glass can, enamel pin etc.
Classes: Similar to last year you will be able to add new December Daily® classes to your box to purchase at the same time as the physical products. We will be offering two December Daily® classes as well as December Daily® Prep Day this year. Check back here on the blog tomorrow for full class descriptions in our December Daily® Collection Preview Post . You will not be charged for shipping if you only are checking out with classes in your box.
Checkout: Once you have added any items to your box a tab titled "Checkout" will appear in red. You can click this to checkout or use the red button under your box in the top right corner. You will also be able to check out via the red box icon on the top right corner.
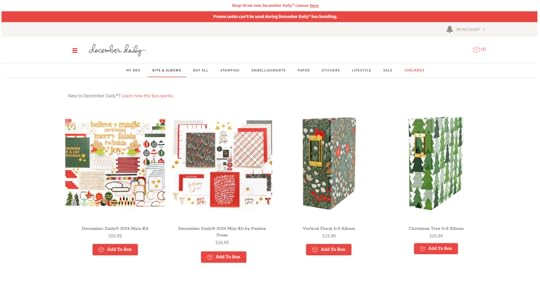
When the products are live you will be able to click on any product image and will be taken to a product page that includes a description and additional product details. You will also be able to add to your box from the main shopping page (as you see above) or from the individual product page.
When you add an item to your box from this main shopping page the red "add to box" will temporarily turn green showing you that the item has been added to your box. It will return to red enabling you to add more if you want of that product.
PLEASE NOTE: We highly recommend identifying the items you are most interested in and checking out with those things first. Let's say you know for sure you want the Christmas Tree Album + Floral 10x8 Album. Add those two items to your "DD cart" (the red box icon in the top right) and then go through the checkout process to secure those items. Those items will then appear in your "My Box" tab - as will any additional items you add to your "DD cart" and "checkout" before the 29th. Items in your "DD cart" aren't secure until you have actually checked out.
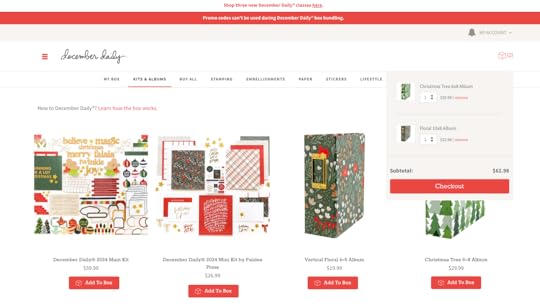
The above screen shot shows where your "DD cart" is located while you are shopping the December Daily® products. You will not be able to add products from our regular shop to this cart - it is a completely separate cart for December Daily® during the Order Selection Period.
You can adjust the amount of the item you want to order or remove the item from your box (only before checking out) in this area. Please make sure to double-check your quantities before checking out.
Once you have clicked "checkout" and gone through that process your products will then appear under the "My Box" tab.
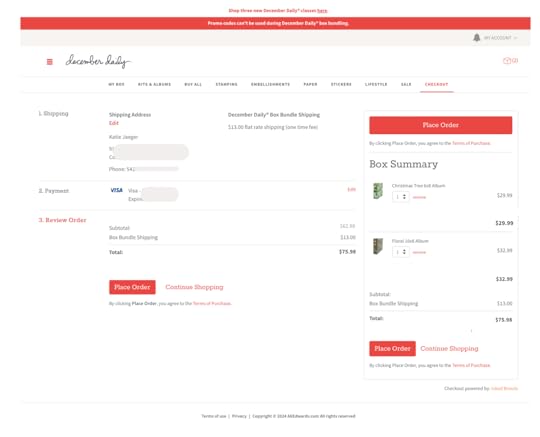
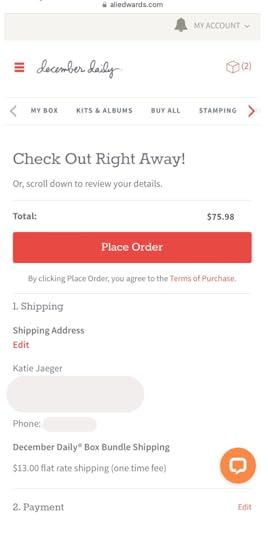
Above is a screenshot of the checkout page for desktop users. We are able to offer flat rate shipping again this year ($13 for domestic, $16 for Canada, and $29 for all other international locations) you will be charged this flat fee the first time you check out. After that it will note "PAID" in green for "Box Bundle Shipping" on any future checkouts.
MOBILE USERS
Did you know that almost 50% of you use a mobile device for shopping on my site?
Here's a look at what you will see on your mobile device. Again, the navigation between the different categories will be right there along the top:
From this screen you are able to add products directly to your box by clicking the small box icon under the product. The small red box in the upper right corner is what you currently have in your "DD cart." Once you complete the checkout process your products will then be viewable under "My Box" in the main navigation.
You will also be able to click on the individual product to see more images or get more details:
If you are shopping from a mobile device you will have an option when you are checking out to "Check Out Right Away"
OR to scroll down to review your details before checking out. Please note that once you have completed checkout you will not be able to remove items or edit order. Please be sure to review your order quantities before checking out.
IMPORTANT REMINDERS
The Order Selection Period for December Daily® begins on Tuesday August 27th, at 10am ET and will end on Monday, September 30th at 11:59pm ET. After the Order Selection Period closes we will box up your order and ship it to you. Please note that we will be prioritizing shipping international shipments first due to the project timeline and extended shipping delays internationally. Please rest assured that our team is working very hard behind the scenes to pack up your orders as fast as they can after the Order Selection Period ends to ensure a timely delivery for December documenting.
Make sure you have an updated credit card and shipping address on file with us and that you are signed in under your "My Account" before starting to shop. Go do that now. Promo codes cannot be used at checkout during the Order Selection Box Period.Gift cards can be used at checkout during the Order Selection Box Period. Paypal can be used at checkout during the Order Selection Period Box Period.
Once you have checked out you CAN NOT remove products from your box or edit your order. Customer Service will not be able to make adjustments to your order after you have checked out. Please verify the numbers of product placed before checking out - you will be able to see an adjust the quantity of an item before you check out via the box icon on the top right of your page.
The project will always be more important than the products.
If there are complications on the website when the products go live for purchase, please know our team will be working hard behind the scenes to solve them as quickly as possible. FLAT RATE SHIPPING RATES FOR 2024
For 2024 the Box Shipping rates will be as follows:
$13 Domestic Flat Rate
$16 Canada Flat Rate
$29 International Flat Rate
This will be charged on your first "checkout" and that will be the only time you are charged shipping. After that if you checkout again under "Box Bundle Shipping" it will say "PAID."
Our hope in sharing this information with you today is that it will help you have a better idea of what the shopping experience will look like. Please let our team know if you have any questions below.
We will be posting walkthrough videos and images of the full 2024 December Daily® collection (kits, albums, shop products) here on Friday August 23rd along with a printable price list to help you decided what you'd like to purchase. Be sure to check out our @decemberdaily instagram account where we revealed the kit and album offerings for 2024 during some fun lives with Ali and Lisa. They are saved there for you to view at your own convenience. If you don't use Instagram you can view the live conversations here: https://www.instagram.com/decemberdaily/
August 21, 2024
Project Life® 2024 | Week 32

Continuing right along with the 2024 Project Life album! Today's post features Week 32.
Ideas to note:
For this particular week I spent the most time working on a 6x8 page insert to tell the story of taking the girls to see Olivia Rodrigo. I printed out two full page photos and adhered them back to back and used a page attacher to add it to my album. On the top of each photo I created a pocket using a pattern paper from the Frames Scrapbook Kit + Grafix Plastic Sheets. To go along with my images I stamped "before" on one side and "after" on the other using Staz On ink. This week also features August Stories By The Month 3x4 cards for my journaling to go along with my 4x6 photos. Nice + simple with handwritten journaling to go along with the photos.
Let's dive right in to the process video:
Here's a look via images:


 SUPPLIES
 9x12 Album 9x12 Page Protectors August 2024 Stories By The Month Kit Frames Scrapbook Kit (pattern paper) Plastic Page Attacher Avery Index Tab Grafix Plastic Sheet Before/After Stamp Set StazOn Ink Rolling Date Stamp Scrapbook.com Rolling Adhesive Epson PictureMate PM400 Printer Other basic supplies can be found via my Amazon Storefront (printers, etc)


