
Ali Edwards's Blog, page 17
November 15, 2024
December Daily® 2024 | Special Guest Jen Wong
Hi friends! I’m happy to be here sharing about my plans to finish my 2023 album this year. I almost never finish my December Daily album within the month of December (or let’s be honest, January of the following year) and I know I’m not alone. December is a whirlwind for most of us, and by the end of the day, I’m often too tired and lacking brain power to work on my album. But that’s perfectly okay!
I don’t feel any guilt about it because I know that eventually it will get done. I enjoy working on the previous year’s album prior to December of the current year. In the months prior to December, the anticipation is in the air, there are new products to play with, and the holiday spirit is building up again!
When I first dusted off my 2023 album and supplies, I’ll admit that I felt that familiar twinge of overwhelm. But, I took a deep breath and reminded myself that big projects just need to be broken down into small steps, and got to work.
Accessing the Starting Point
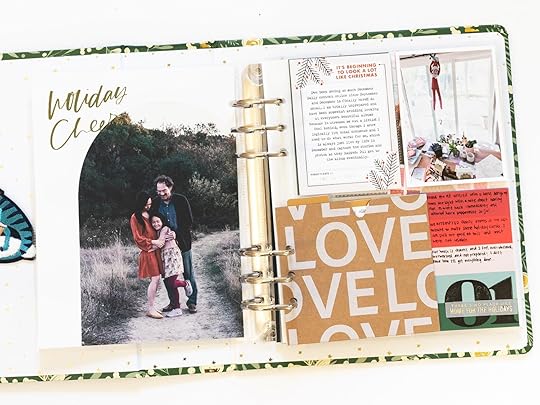
I opened my 2023 December Daily album in August and found I had barely completed anything except a handful of pages. Here’s a look at a couple of them.
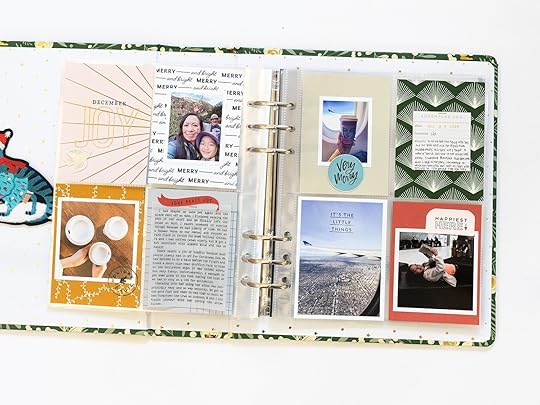
Since then, I’ve been plugging away ever so slowly, and have been making progress, bringing up my total to around twelve pages.
I usually take my albums until Day 25, but because in 2023, my family and I traveled to meet our extended family in Europe, I will go all the way until January 4, one day after we returned home, which feels like a good place to wrap up the album. That leaves over 20 pages left, which if I’m being honest, feels challenging.
The good news is that even though I didn’t finish many pages last year, I did complete the recording portion of the project. If you’ve heard me talk about my documenting process in general elsewhere, I have an established habit of journaling in an online note-taking app, and I found plenty of content for last December. This makes it easier to remember what happened last year and what stories I want to tell.
The other thing I did was to curate and edit my photos. I take a lot of photos during December (and even more while traveling), so there were a lot of photos to go through. But during December and January of last year, I took some time to upload all the photos from my camera and phone, and gather the photos from other people I might want to use (my partner, other family members, friends, etc). I have already done some basic editing on the photos and they are all tagged in Lightroom so I can easily see how many and which photos I plan to use each day.
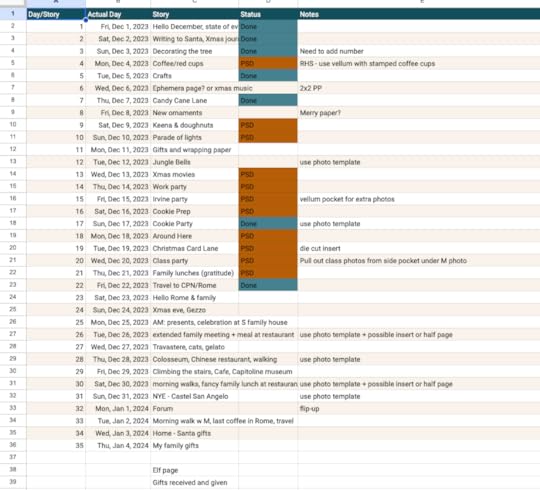
When I picked the project back up recently, it wasn’t too difficult to go through my journaling and smaller set of photos to loosely plan which stories I would feature on each day. I jotted down any notes I wanted to remember if I had them. This is what my planning sheet looked like earlier last month.
With photos and a game plan, I am ready to create pages. As someone who likes working with Photoshop, I am the most efficient when I mock up pages in the software. I already print at home and have to resize photos to print, so it makes sense for me to bring the photos onto canvases so I can easily plan out the spread.
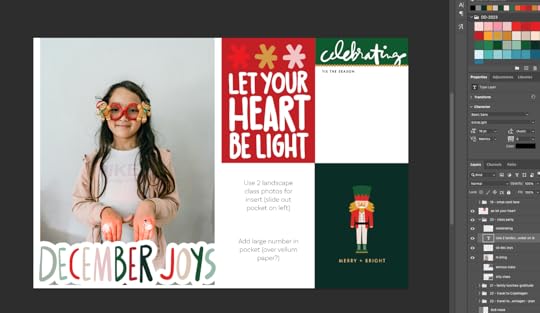
I don’t always plan everything down to the minute detail, but once I feel it’s good enough to create, I will go ahead and print the photos and put it together.
Though I love interactive elements and won’t say I am completely ruling them out, I probably will lean heavily on simple spreads and photo templates to get the project done. My focus is to create a home for photos and stories, and not so much on the products.
I also know that because I am trying to fit in 35 double page spreads, I can’t add too much bulk to my album. I try very hard to only have one album per year because I do not have the shelf space!
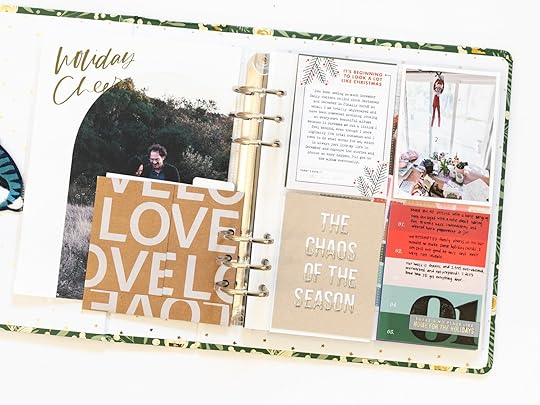
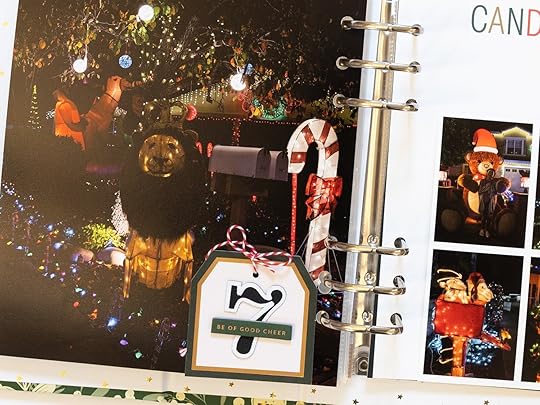
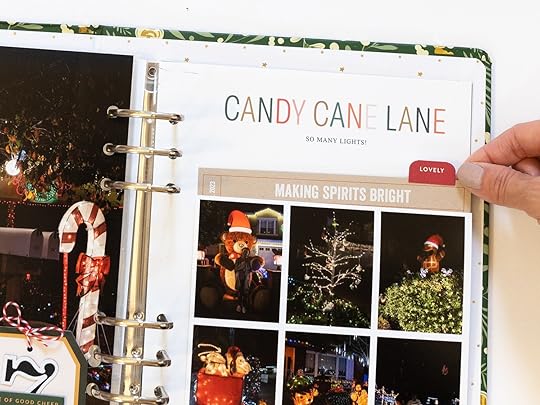
Here’s a look at a few of the new pages I’ve completed recently.
This one was mostly done actually, and I just needed to add the number to the page. I am not sure if I will add any more to it.
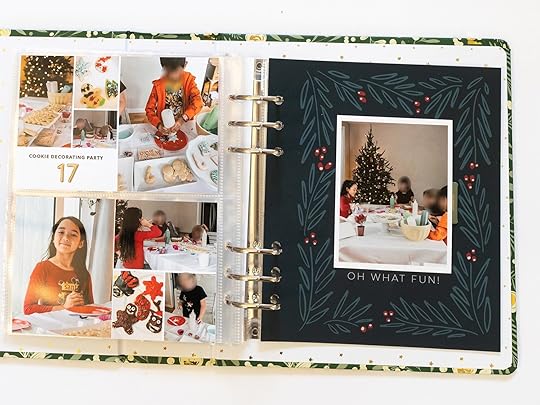
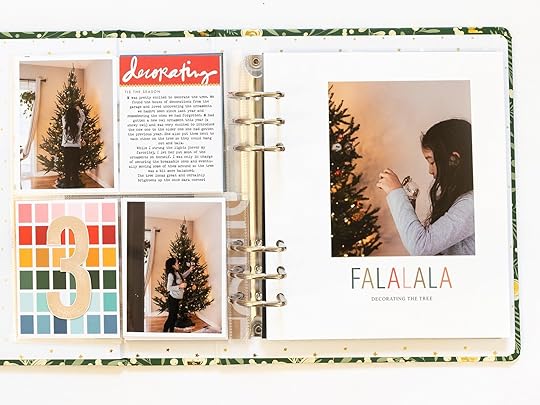
Using photo templates is an easy way to fit in lots more photos from an event.
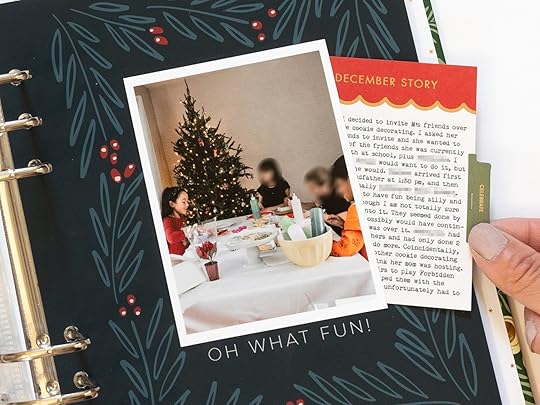
I love little pockets for journaling cards and this one pulls out from behind a photo.

Using the same style of font and colors, I hope to make the album look consistent.
I added another pocket behind this photo template to hold a 4” x 6” journaling card.
Moving Forward: Getting it Done, One Page at a Time
From here, I’ll keep loosely mocking up pages on my computer, printing photos and digital elements in batches, and pulling out any physical supplies I’ll need. I create mini “kits” (also known as “piles on my desk”), so when I have a few minutes here and there, I can jump right in.
I don’t know if I will realistically get my album done by December but I’m not stressing it either. Any progress is one step forward in the right direction. This is supposed to be fun, and I already have enough deadlines in my regular job and life that I don’t need to put pressure on myself.
I’ll continue to share my progress on Instagram, so you can follow along if you’d like to see my December Daily spreads unfold! You can find me at IG: @circleplusarrow. Here’s to celebrating each step forward, small win, and creating homes for our stories!


November 14, 2024
December Daily® 2024 | Foundation Page Idea From Ali
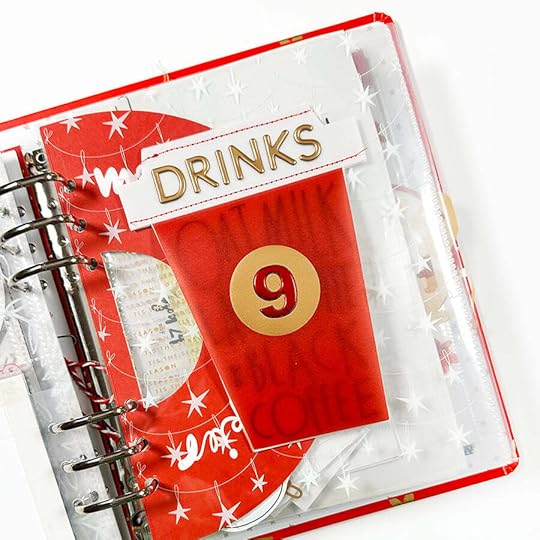
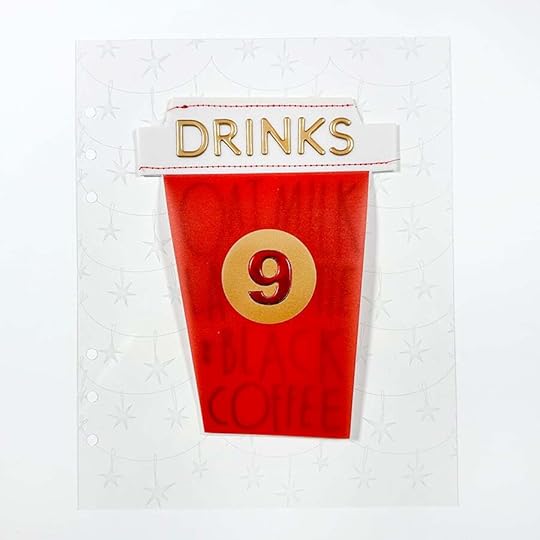
Here's a fun idea to document this December: What's your coffee/drink order during the holiday season?
I'll be using this as Story 09 in my 2024 December Daily® album.
Let's dive in to the video:
Here's a closer look at this foundation page:
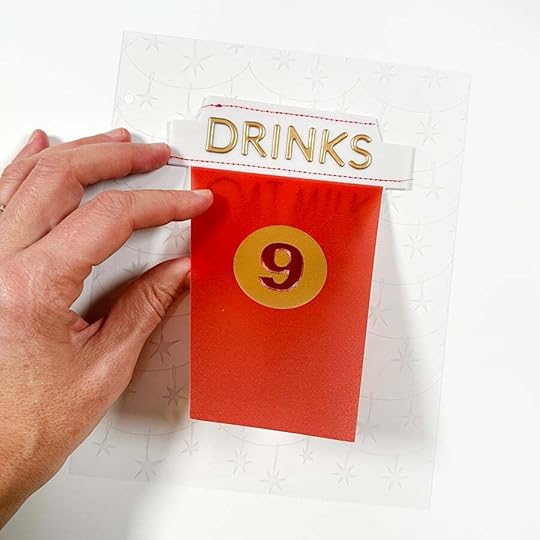
One of the things I love to do is look through pieces from this year's collection and identify ones that can act as a jumping off point for a story. This large vellum coffee cup die cut said, "Use me to tell the story of what drink people like to order in December." Ah yeah! Let's do it!
Along the top of the cup I used the gold puffy alpha to add the word "drinks" and the number nine sticker is from the 2024 Advent Calendar.
If you missed out on the physical version of the vellum die cuts you can get the digital here.
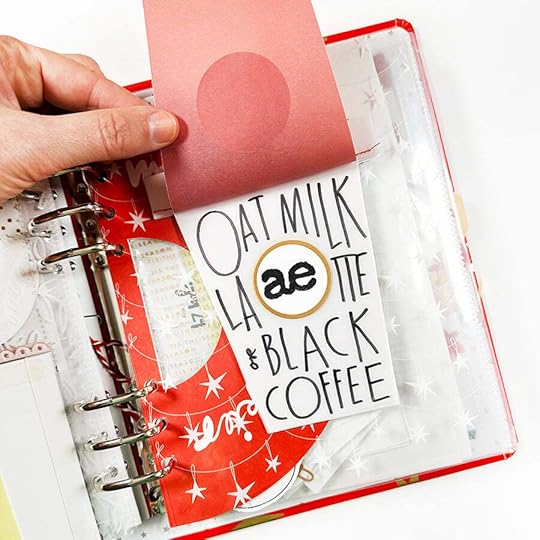
I started by using the vellum coffee cup as a template to cut seven additional coffee cups (one for each of my family) from plain vellum. It doesn't have to be perfect! On top of each piece of plain vellum I added a gold-rimmed white circle with our initial stamped on top using a typewriter stamp set.
You could document friends or extended family members drink preferences here too!
I went ahead and added my own order on the first page (using a Staedtler Lumocolor Pen) and then will add the rest when it's time to tell story nine.
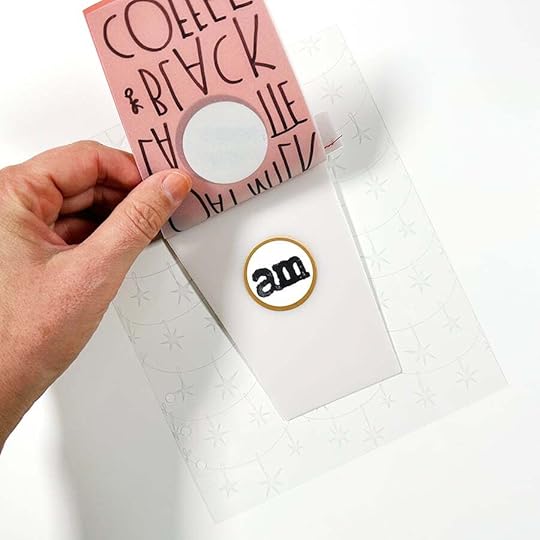
Just waiting for their drinks to be added!

I might add a photo to go along with this page (to make it a spread) or I might just leave this as a no-photo story.
After I had all the pages ready to go I ran the entire pack through my sewing machine to connect it all together. You could use brads, staples, etc if you don't have a sewing machine.
December Daily® Stars 6x8 Album
December Memories 6x8 Transparencies
Large Vellum Pieces (digital available)
Gold Foil Puffy Alpha
2024 Advent Calendar (Red Number)
Plain Vellum
StazOn Ink
Typewriter Alpha Stamp Set
White Circles With Gold Rims
Staedtler Lumocolor Pen
Basics via my Amazon Storefront
November 10, 2024
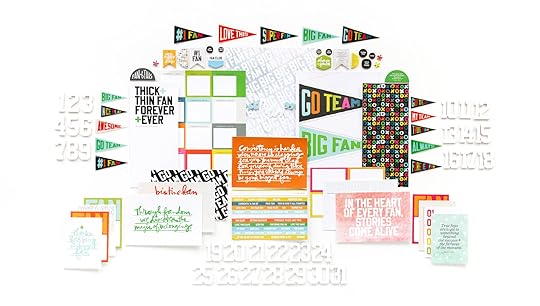
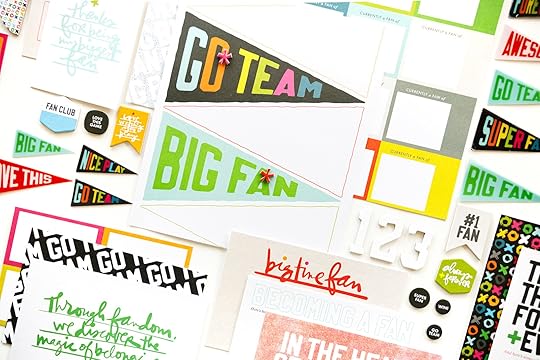
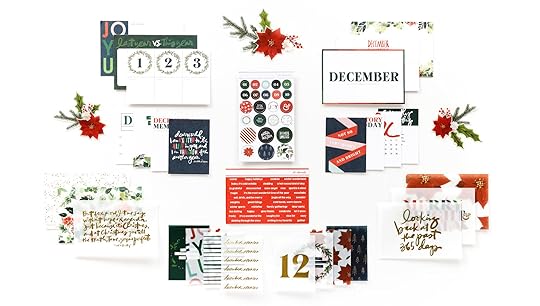
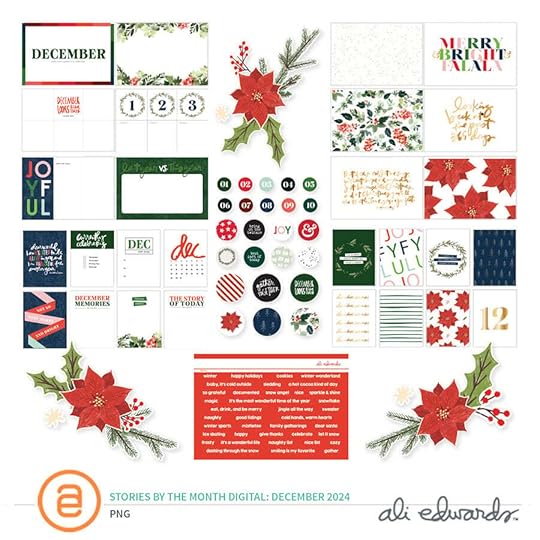
Fan Story Kit + December 2024 Stories By The Month + Watercolor Scrapbook Kit
Today's the 10th of the month and that means a new
Story Kit, Story Stamp, and Stories By The Month kit.
This month we are focusing on stories related to the theme of
Fan.
Every single one of us is a fan of something. We might be fans of a sports team or a movie franchise or a way of cooking. This month we are coming together to tell stories about what it's like to be a fan in this season (or any season) of life.
Story ideas for this theme include:
What are you a fan of in this season of life? How about a super fan?
Being a fan isn't just about sports - there are all kinds of different fandoms out there. Tell a story of a time you participated in a fandom and what that looked like and felt like.
Do you have a story about being a fan through thick + thin? Is there a team that you have supported through highs + lows? What has that been like for you? STORY KIT™
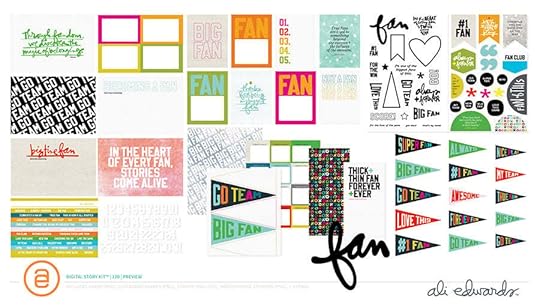
The
Story Kit™ includes:
Here's a video overview of the
Story Kit™ and Add-On options this month:
STORY STAMP™
The
Stamp Set:
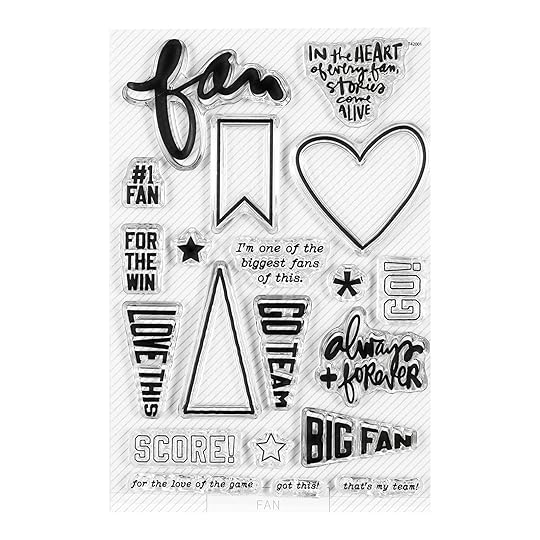
Here's a video overview:
Here's a look at what's included in the Digital Story Kit™:
Your digital kit and the classroom and any Add-Ons purchased will be available to you on the 12th once your card has been charged for the month.
This kit is also available to physical kit subscribers as an Add On each month.
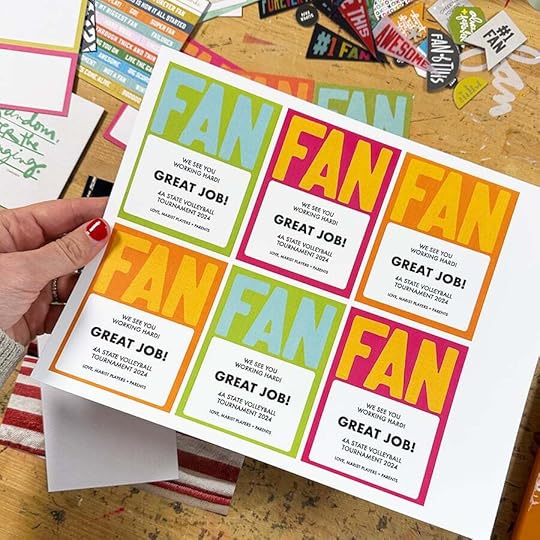
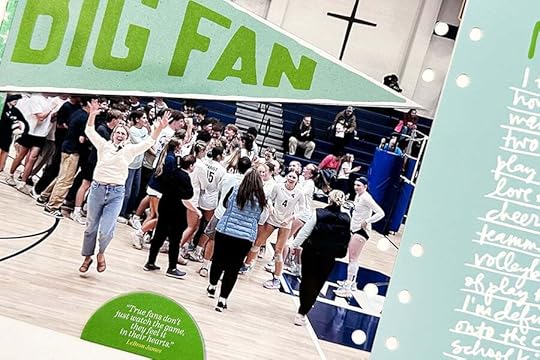
Here are a few project samples from Ali:
Again, thanks so much for subscribing and/or considering our
Story Subscription program! If you have any questions about this program please let us know below in the comments.
Here is a full look at the kit this month:
And a video overview:
This subscription is a great option for those who are looking to tell more calendar/everyday life sorts of stories.
Our Digital Stories By The Month™ kit is now called Inspiration By The Month™. With this subscription you receive access to the Inspiration By The Month™ classroom and the digital kit.
This kit is also available to physical Stories By The Month™ kit subscribers as an Add On each month.
This 6x8 stamp set is available to subscribers to add to their box during the Add On period and
also offered in the shop for anyone else.
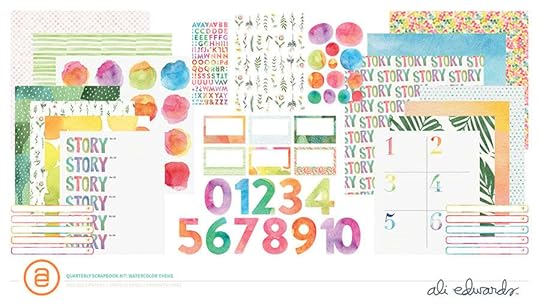
This will be our last quarterly Scrapbook Kit! The theme this time is watercolor. Here's a look at the kit:
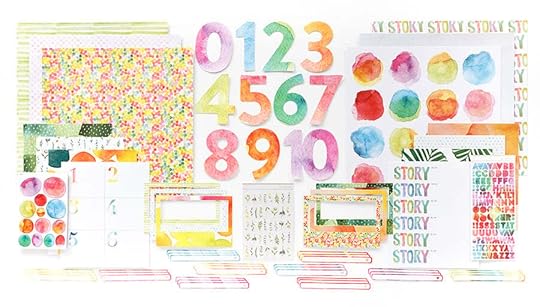
Here's an overview of the kit:
Don't forget that the Quarterly Scrapbook Kit includes the digital kit as well.
November 8, 2024
In Case You Missed It | November 8
Happy Friday, friends! Welcome to the latest
In Case You Missed It. Just a reminder that this is a quick post that will happen every Friday afternoon with all the updates and links that have happened throughout the week. So, let's get to it:
SAVE 20% SITE WIDE WITH CODE GRATEFUL20
Here's to finding those perfect pieces for your next story. Get 20% off sitewide throughout November with code GRATEFUL20 and enjoy. Check back weekly for new deals and promotions.Some exclusions apply.
NEW CLASS | MIX + MATCH STORY SPARKS
We are excited to offer this new self-paced class that celebrates fun, creativity and playfulness in our memory keeping projects. The Mix + Match Story Sparks Class will feature a combination of story ideas and creative techniques in a variety of formats with the goal of providing you with product inspiration using the Mix + Match Kit as "story sparks" or jumping off points for their personal storytelling. Join contributors Ali Edwards, Sabrina Poole, Laura Wonsik, Jill White, Pam Baldwin and Jamie Leija as they share how they were inspired or prompted by the products (i.e., story spark) and then how they implemented those products in their final designs. Learn more and register here.
2024 DECEMBER DAILY® DIGITALS ARE HERE
The 2024 December Daily® Digitals are here! Kits, Stamps, Paper, and Embellishments...the same fun & festive designs as the physical @decemberdaily products, only in digital format. We love to see how this incredibly creative community plays with digitals! Resizing elements and cards, adding journaling to papers, creating cut files, transforming files into transparencies, the sky is the limit with digital files.
Want to learn more about creating with digital files? Our newest class December Daily® 2024 Hybrid Product Play is live today. We have incredible content from six amazing contributors ready to explore at your convenience.
Please note: new 2024 layered templates will be coming to the shop in November. Shop digitals here.
NEW DECEMBER DAILY® COMMUNITY SPACE
We invite you to join us in this free December Daily® community classroom. We know that many in the community don't care to share their December Daily® projects on social media. And for those that do, constant algorithm updates and unreliable hashtag searches make it challenging to connect with others or to find inspiration and encouragement. So with this in mind, we are excited to offer this space as a place to share your work with other memory keepers and storytellers who are participating in this special project. Register for free here.
2024 DECEMBER DAILY CLASSES
December Daily® Product Play | This + This + This workshop registration is open. More details on this year's workshop can be found at the bottom of this post (workshop begins November 5th). December Daily® Hybrid Product Play workshop registration is available now. December Daily® Prep Day is available for those who missed it. All content is recorded and available.
OCTOBER REVEAL
This month we are revealing a new Story Kit™ theme: GRIT! This month we are focusing on stories related to the theme of Grit. Ah, grit. This month we are coming together as a community to document stories in our lives of making it through, of beautiful courage, of determination, and what that might look like in various chapters of our lives. In addition to our new Story Kit™ theme, we also have a brand new Stories By The Month™ kit and the next edition in our Alphas Are Awesome series.
Head to the blog for Ali's post with all the details about this month’s release.
NOVEMBER DIGITALS
The first Friday of every month we have a new digital release available in the shop. Play with scale, recolor objects, add journaling, print multiples…the sky is the limit when playing with digitals. Shop digitals here. As a special bonus, we've released our Halloween collection early for those wanting to play before October.
2024 PROJECTS + PRODUCTS SCHEDULE
As we continuing easing into 2024 we put together an overview of our schedule of projects + product releases for the upcoming year. We are sharing this as a way for you to plan, think about what you might want to participate in this year, and simply share some of the things we have coming up to help support + inspire storytelling. For the last few years we've followed a fairly similar cadence for our releases and our major projects will follow that release schedule again this year. Please note that, as you might imagine, this schedule is subject to change throughout the year based on a variety of variables. Find the post here.
As always, we’re so grateful to have you all as members of this community! Thanks for joining me today and have a great weekend!
November 1, 2024
In Case You Missed It | November 1
Happy Friday, friends! Welcome to the latest
In Case You Missed It. Just a reminder that this is a quick post that will happen every Friday afternoon with all the updates and links that have happened throughout the week. So, let's get to it:
50% OFF STAMPS | TODAY 3-6PM ONLY
ARE YOU READY? 50% off flash sale on stamps kicks off today! It’s happening TODAY, Friday November 1st at 3:00pm ET and ends at 6:00 pm ET. We encourage you to fill your cart with your favorite stamps and have your promo code handy. The code will be active beginning at 3pm ET: STAMP50.
PREP DAY HAPPENING THIS SUNDAY
Our 2024 December Daily® Prep Day is only a few days away and it’s not too late to register now! Join the December Daily® community this Sunday, November 3rd, 2024. Use this opportunity to finish past December Daily® projects or start working on your project for 2024. The first live video will start on Sunday, November 3rd at 10:00 am Eastern. Cost is $5. US FRIENDS PLEASE MAKE NOTE OF THE TIME CHANGE HAPPENING THIS WEEKEND.NEW CLASS | MIX + MATCH STORY SPARKS
We are excited to offer this new self-paced class that celebrates fun, creativity and playfulness in our memory keeping projects. The Mix + Match Story Sparks Class will feature a combination of story ideas and creative techniques in a variety of formats with the goal of providing you with product inspiration using the Mix + Match Kit as "story sparks" or jumping off points for their personal storytelling. Join contributors Ali Edwards, Sabrina Poole, Laura Wonsik, Jill White, Pam Baldwin and Jamie Leija as they share how they were inspired or prompted by the products (i.e., story spark) and then how they implemented those products in their final designs. Learn more and register here.
2024 DECEMBER DAILY® DIGITALS ARE HERE
The 2024 December Daily® Digitals are here! Kits, Stamps, Paper, and Embellishments...the same fun & festive designs as the physical @decemberdaily products, only in digital format. We love to see how this incredibly creative community plays with digitals! Resizing elements and cards, adding journaling to papers, creating cut files, transforming files into transparencies, the sky is the limit with digital files.
Want to learn more about creating with digital files? Our newest class December Daily® 2024 Hybrid Product Play is live today. We have incredible content from six amazing contributors ready to explore at your convenience.
Please note: new 2024 layered templates will be coming to the shop in November. Shop digitals here.
NEW DECEMBER DAILY® COMMUNITY SPACE
We invite you to join us in this free December Daily® community classroom. We know that many in the community don't care to share their December Daily® projects on social media. And for those that do, constant algorithm updates and unreliable hashtag searches make it challenging to connect with others or to find inspiration and encouragement. So with this in mind, we are excited to offer this space as a place to share your work with other memory keepers and storytellers who are participating in this special project. Register for free here.
2024 DECEMBER DAILY CLASSES
December Daily® Product Play | This + This + This workshop registration is open. More details on this year's workshop can be found at the bottom of this post (workshop begins November 5th). December Daily® Hybrid Product Play workshop registration is available. Workshop begins on October 11th to correspond with our December Daily® Digitals release the same day. December Daily® Prep Day is happening this year on Sunday, November 3rd starting at 10am ET. You can sign up for this $5 online event on Tuesday August 27th during Order Selection Period as well.
OCTOBER REVEAL
This month we are revealing a new Story Kit™ theme: GRIT! This month we are focusing on stories related to the theme of Grit. Ah, grit. This month we are coming together as a community to document stories in our lives of making it through, of beautiful courage, of determination, and what that might look like in various chapters of our lives. In addition to our new Story Kit™ theme, we also have a brand new Stories By The Month™ kit and the next edition in our Alphas Are Awesome series.
Head to the blog for Ali's post with all the details about this month’s release.
OCTOBER DIGITALS
The first Friday of every month we have a new digital release available in the shop. Play with scale, recolor objects, add journaling, print multiples…the sky is the limit when playing with digitals. Shop digitals here. As a special bonus, we've released our Halloween collection early for those wanting to play before October.
2024 PROJECTS + PRODUCTS SCHEDULE
As we continuing easing into 2024 we put together an overview of our schedule of projects + product releases for the upcoming year. We are sharing this as a way for you to plan, think about what you might want to participate in this year, and simply share some of the things we have coming up to help support + inspire storytelling. For the last few years we've followed a fairly similar cadence for our releases and our major projects will follow that release schedule again this year. Please note that, as you might imagine, this schedule is subject to change throughout the year based on a variety of variables. Find the post here.
As always, we’re so grateful to have you all as members of this community! Thanks for joining me today and have a great weekend!
October 31, 2024
December Daily® 2024 | Ali's Intro + Reason Why + Table Of Contents
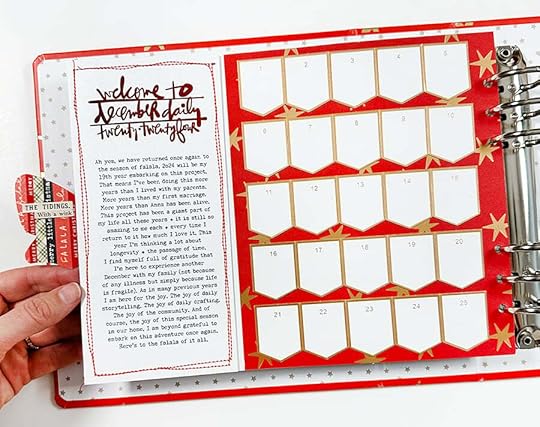
If you hear a whispered falala-ing anytime over the next few months it's just me reaching out to you to say "you got this" and "thanks for valuing your own story" and a here's gentle reminder that "magic is something we make."
Welcome to my Intro Page/Reason Why/Table Of Contents post for December Daily® 2024. I'm so happy to be in holiday crafting mode and excited to be sharing with you again this year here on the blog.
It's been a busy few months over here in this particular season and although this post is a bit later than usual (or at least in previous years), I'm truly ready to be here and have fun and make space to get some stories told in December.
Last year I did fewer overall foundation pages (pages I make in advance of December to make storytelling easier for myself during the actual month) and found myself really creatively motivated. I've worked on a few foundation pages so far including 4 that will be featured in our Product Play Workshop (sign up here for class content beginning on November 5th). We are also hosting our annual $5 Prep Day this Sunday - it's always a fun online gathering and time to come together to dive into this year's project or work on a previous year or simply enjoy the company of other like-minded memory keepers.
Did you know this year is year 17 of December Daily®? As you'll see below I talk about that in my journaling as I reflect on the impact this project has had on me and how I approach the season. Next year I'll turn 50 and this project will turn 20: so much to celebrate. As with many previous years, I'm here for the joy of it all.
If you are brand new to December Daily®, welcome! There's never going to be a right or a wrong way to participate in this project - it's something that can evolve with you through the various seasons in your own life. You can simplify when you need to and go all out when that feels like the best path. I've got years + years (literally) of past blog posts showing most of my past albums which is accessible to you here. If you'd like a more structured experience check out my Storytelling With December Daily® online workshop that will set you up for storytelling success + help you wrap both your mind and your heart around this project. Other than that, dive in! We all start somewhere and we are so glad you decided to see what this was all about. We release a new collection of products each year in early September that ship in early October. You can sign up for our mailing list here (and get a free class called "Storyology" too).
This year I've curated a list of products I use in this project for my Amazon Storefront. You'll find links to the printers + papers I use along with other basic supplies and any extras like ribbons. I'll add to it as I use any other items over the next few months. I'll continue to list out supplies at the bottom of each post with a general link to the Amazon Storefront.
Ah, deep breath in + out. I'm so excited!
Let's dive in to my first process video:
Here are images of my intro/reason why/table of contents pages:
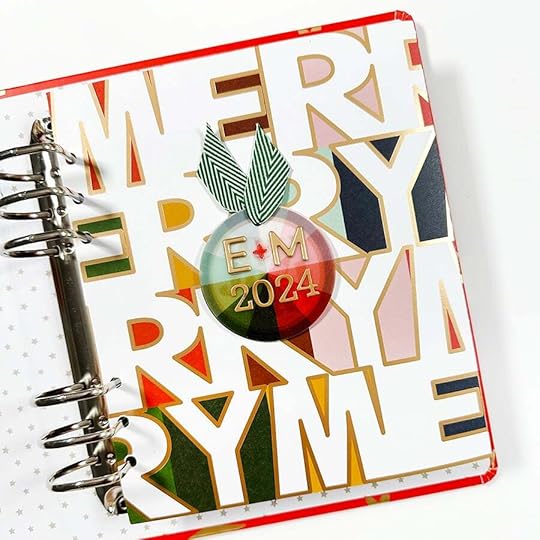
Last year was all about colorful fun and as you can see here, some of that is seeping into 2024. Part of this reason could be that I often design the next year's product collection in December (meaning last year while I was working on my 2023 album I was also designing pieces for 2024). If you aren't a fan of all that color for the holidays you can easily substitute that "merry" paper for a different pattern paper from the Main Kit or 10x8 Paper Pack (or another paper of your own choosing). This colorful "merry" paper is from the 10x8 Paper Pack. Heads up that I do use the same design in the red/white color scheme for an element in one of my Product Play projects.
Rather than cutting up this pattern paper I simply folded it over along the outside edge. This gives me more space on the reverse to hold both my journaling and my table of contents. More on that in a bit.
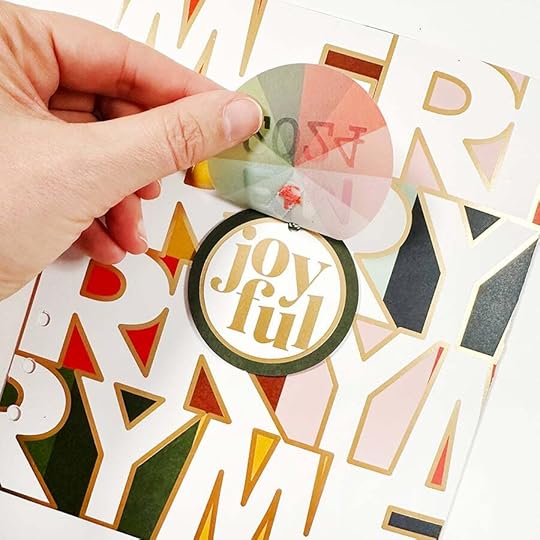
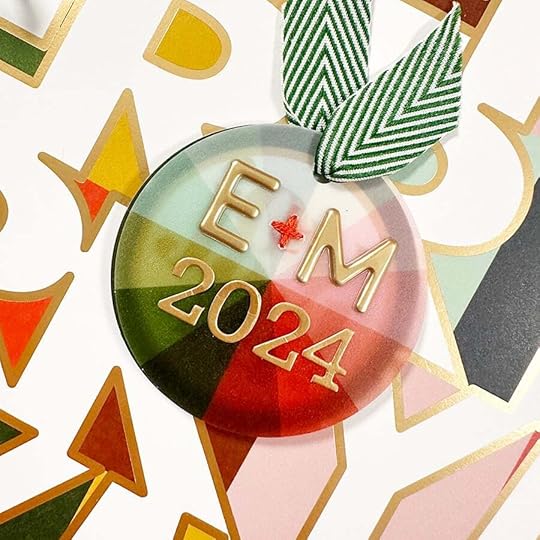
There all kinds of fun things from the collection you can add on top of the pattern paper. I chose a circle tag from the Main Kit as my base embellishment. On top of the that I used a 2 inch circle punch to cut out the "joyful" letter press portion of one of the 4x6 letter press cards from the Specialty Card Pack.
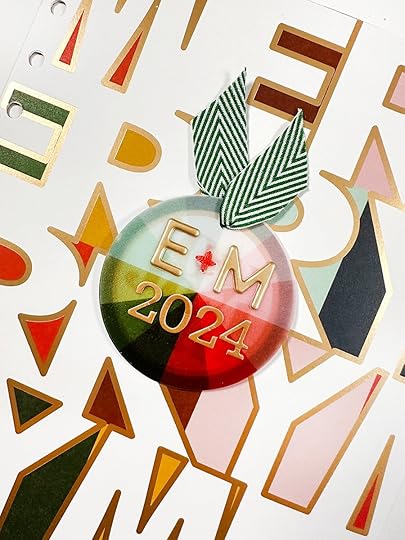
On top of that I layered one of the vellum color wheels from the Main Kit along with gold puffy alpha stickers and number stickers from our new set. I used a little bit of embroidery thread to create the
plus sign between the E and the M. If you are new here the E is from Edwards and the M is for McKercher (the two last names in our household). To hold it all together I'm using a bit of green ribbon that is adhered with a glue dot or a foam dot.
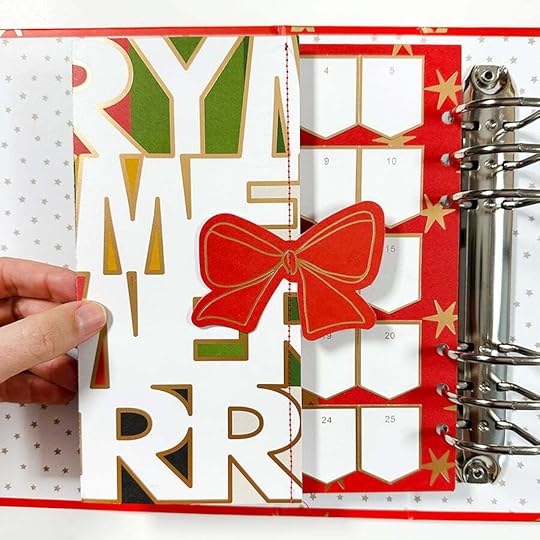
When you turn the page you'll see the folded pattern paper flap. I knew I wanted to add something to the flap that would stick out a bit (in the video you can see me go through some ideas) and ended up choosing one of the red ribbons from the big Die Cut Paper Pack. I ran that through my sewing machine to stitch in place. You could also adhere it with a brad or double sided adhesive or some handstitching.
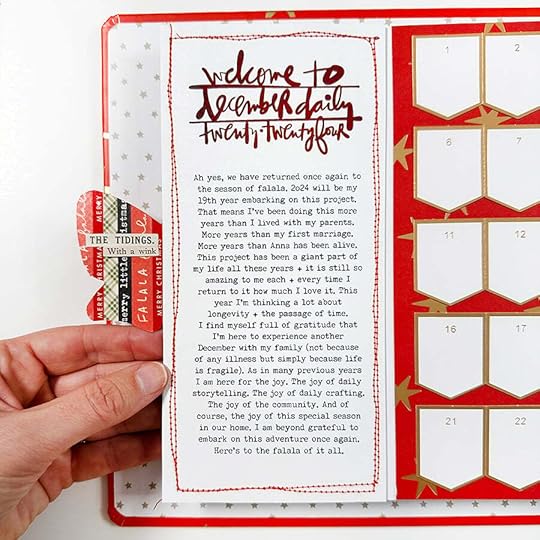
When you open the flap you'll find my journaling and my table of contents using the flaps from the Main Kit. I ended up taping the backs of each of my rows so that they are each one piece before adhering. You can choose any pattern paper for the background.
I created a custom title for this section which can be downloaded here (this is one single PNG file to download).
I printed out the title and journaling on my laser printer before running just the title through my Minc machine to add red foil (it's a little hard to see in the photos). And before adhering it all down into the folded pattern paper I ran it through the sewing machine a couple times (making it imperfect on purpose because that's how I roll right now).
PS: I know I made a mistake in my journaling saying year 19 vs. year 17. HA HA. I might have to rework my journaling a bit - or create an addendum.
When attaching the bow along the edge of the flap you end up with a white cardstock background. There are lots of things you could do including cover it with pattern paper, stamp on it, etc. I chose to add strips of washi tape and then a couple phrase stickers from Tim Holtz that felt a little falala (I'm creating my own definition which feels fun too).
Feeling all the feels this year.
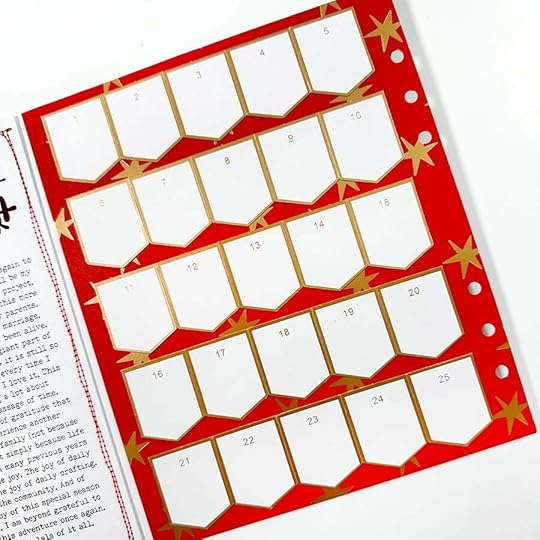
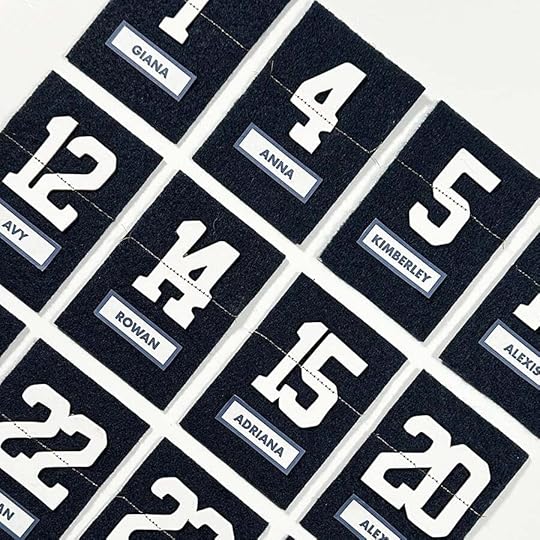
And a closer look at my table of contents. For each of my 25 stories I'll add a title or some other information to the little banners. I've loved seeing my table of contents fill up over the month when I've done this the past two years. I'm so excited to fill up these spaces during December!
And we are off. As always, thanks for being here and for being a part of this community.
I hope to make a few more foundation pages before December begins and I'll share them here on the blog when they are done!
December Daily® 6x8 Album December Daily® Main Kit (digital available) December Daily® 10x8 Pattern Paper Pack (digital available) December Daily® Large Die Cut Pack (digital available) December Daily® Specialty Card Pack (digital available) December Daily® 10x8 Transparency Pack (digital available) December Daily® Gold Number Sticker Pack December Daily® Gold Puffy Alpha stickers Washi Tape (various from my stash including this one from Tim Holtz) Tim Holtz Phrase Stickers “Christmas Noel” (from 2023) Font = Secretary Typewriter Additional Basics (Printers, Trimmers, Sewing Machine, Etc) via My Amazon Storefront
October 30, 2024
A New Chapter Is Coming | Subscription Changes For 2025
NOTE: We recently shared updates about changes to our monthly kit subscriptions with subscribers via email and within the classrooms. Today we are sharing the details with our extended community. Thank you for being a part of this community. Thank you for valuing memory keeping as a part of your life.
After nine years of Story Kits + Story Stamps (that's 110 Story Kits - one each and every month since 2015) I've decided it's time to change things up.
Story Kits, Story Stamps, Just Write and the Quarterly Scrapbook Kit will be retiring at the end of 2024. As you might imagine, this is not a decision I took lightly and rest assured that the business is not shutting down and I'm not stopping scrapbooking. In fact I'm feeling even more excited about memory keeping after deciding to make these changes. Story Kits have been a wonderful chapter in my life personally and in the life of my business. I hope they brought you joy and helped you to creatively document pieces of your life over the years.
Starting in January 2025 we will be offering a new quarterly kit subscription that combines elements of the Story Kits and the Quarterly Scrapbook Kit (read more about that below). This will be called the
Storyteller Kit. We will also be offering a new 6x8 stamp subscription called Stamps Are Fun (read more about that below).
Thank you so much for being a part of this adventure (for whatever length of time you've been a part of this subscription). Working on this content each month for nine years has taught me so much about myself and I've told SO MANY stories along the way.
Here is the message that was shared with subscribers:
Here's what's coming next:
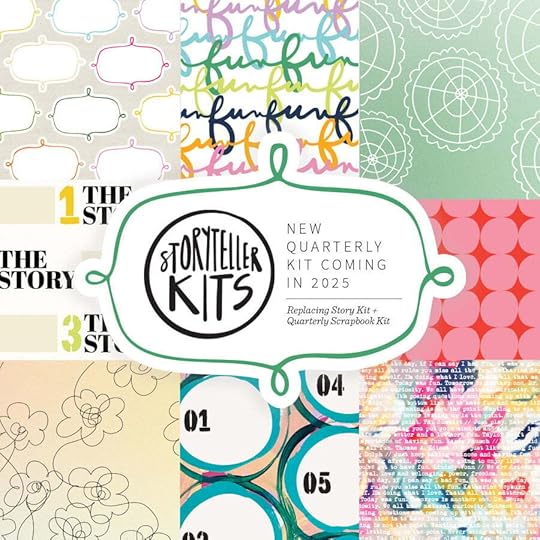
In 2025 we will be offering a new kit that essentially combines pieces of the Story Kit with pieces of the Quarterly Scrapbook Kit to create one new quarterly subscription called Storyteller Kit.
Current Story Kit subscribers will be automatically added to the subscriber list for the Storyteller Kit. If you decide not to join us in the next chapter of kits you can reach out to my Customer Service Team to cancel before December 31st without penalty.
Here are some details:
Each Storyteller Kit will have a "general" theme. The themes for 2025 include: Fun, Q+A, Colors, and High/Low.
Kits will include 12x12 pattern papers, 6x8 pattern papers, 3x4 cards, die cuts, 6x8 chipboard, etc.
The new Storyteller Kit will also include a classroom similar to this one with projects from me + from our team. We are working on details for the classroom but anticipate that we will be stretching out the lessons over the three month period between kits.
There will be a digital option for those that enjoy that format. Subscribers will have the option to add the digital during the Add On period.
$49.99 per quarter
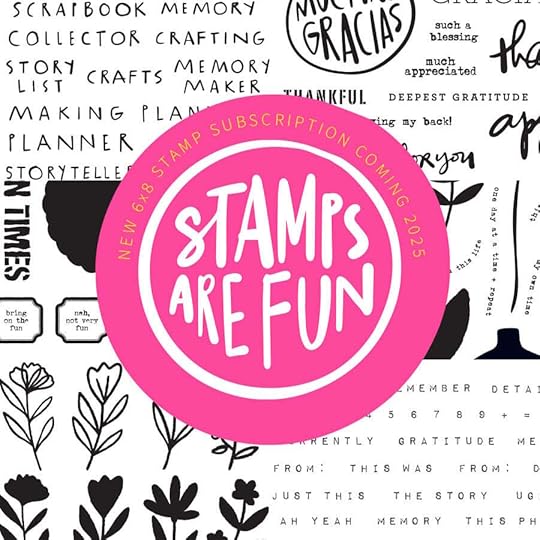
Story Stamp will also end with the December 2024 stamp set (theme of Hello). In 2025 we will offer a new stamp subscription called
Stamps Are Fun that will feature a 6x8 stamp set each month.
Current Story Stamp subscribers will be automatically added to the subscriber list for Stamps Are Fun. If you decide not to join us in the next chapter of kits you can reach out to my Customer Service Team to cancel before December 31st without penalty.
Here are a few additional details:
There will not be a classroom for this subscription. Ideas + inspiration will be shared on the blog and social media.
These may or may not correspond to the Storyteller Kit themes. Some months will be shapes, some months will be text, and other months will be a combination of the two.
In the image above you can see pieces of the first six stamp sets.
12 month subscription = $20.99 per month // 6 month subscription = $23.99 per month // month to month = $28.99SUBSCRIPTION UPDATE BASICS
Story Kit, Story Stamp, Quarterly Scrapbook Kit and Just Write will be ending in December 2024.
A new quarterly kit that combines elements of the Story Kits with elements from the Quarterly Scrapbook Kit will be released in January 2025. This new subscription will be called Storyteller Kits. Themes for 2025 include Fun, Q+A, Colors, and High/Low. As I design these kits I'm keeping the theme in mind but I'm also including basic storytelling prompts, words, etc.
There will be a digital option for the Storyteller Kits. This will also include access to the Storyteller Classroom.
Stamps Are Fun is a new 6x8 monthly stamp subscription that will replace the Story Stamp. There will not be a specific classroom dedicated to the Stamps Are Fun subscription. Our team will share inspiration on the blog and via social media.
One Little Word® Mini Kits will continue.
Stories By The Month™ + Inspiration By The Month (digital version) will continue with monthly releases.
Kit add-ons will still be available when new kits are released.
You will still be able to access all the Story Kit classrooms from previous years. A NOTE ABOUT ALBUMS
After the recent announcement from Studio Calico regarding changes to their business we received a number of questions regarding our plans for stocking specifically 9x12 albums.
At this time we do not plan to continue offering pleather 9x12 or 6x8 albums. We will absolutely continue to offer album options when we release project collection. Albums are expensive and we've found over the years that the project albums we offer are much more popular than the basics (meaning they sit in the warehouse for longer than we want in the way our business operates at this time).
I am still planning to use a 9x12 album for my Project Life® in 2025. At this time we do have 9x12 navy albums still available.
If you are looking for black (or other colors) of pleather 9x12 or 6x8 albums check out Scrapbook.com. Please note that the 9x12 albums from Scrapbook.com have 3 ring holes instead of 4 ring holes.
Again, thank you so much for your support and your participation in this community.
Let's keep telling stories together!
October 27, 2024
Pieces Of Us 2024 | Ali's Completed Notebook

Pieces Of Us came at the perfect time for me in this season - I had the best time responding to the prompts this past week.
I never know exactly how I'm going to approach these notebook projects until I dive in with the first prompt. This time around my design formula ended up featuring black and white photos, 4x4 journal cards from a One Little Word® Mini Kit, stamped titles using Alphas Are Awesome #14, printable sticker paper for my journaling, and a few pages built on vellum.
Here's a look at each of the spreads:


I love it so much. Thanks for playing along with another chapter in our Pieces Of Life series!
SUPPLIESPieces Of Us Notebook
Pieces Of Us Stamp
One Little Word® Mini Kit 2024 #3Alphas Are Awesome #14Alpha Are Awesome #17 (used the plus sign on vellum)
Maco Sticker Paper
StazOn Ink
Epson XP15000 Printer
Additional basics via Amazon Storefront
October 21, 2024
Pieces Of Us 2024: How We Met
Welcome to Pieces Of Us week!
This week I'm responding to the Pieces Of Us prompts and telling some stories in the notebook. You're invited to play along no matter how you choose to document these stories. Pieces Of Us can be about any relationship including spouses, partners, pets, parents, children, etc. My plan is to share today on the blog and Instagram. For the rest of the week I'll share daily on my Instagram and at the end of the week I'll share a full look here on the blog.
Have fun with it!
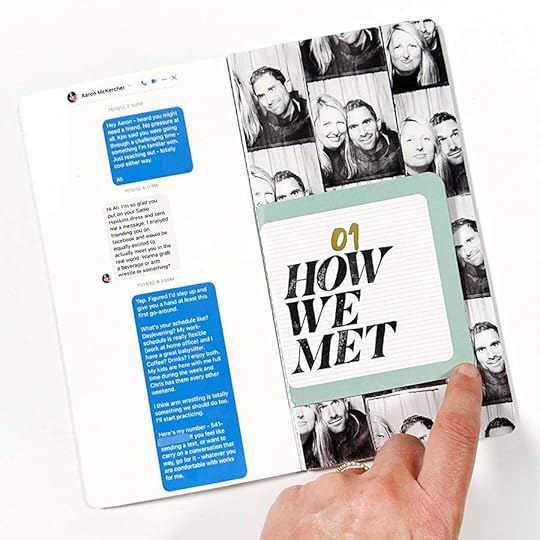
For this project I'm documenting more about my relationship with Aaron. For the "How We Met" prompt I decided to dive back into my Facebook archives and find the first messages between us. I took screenshots of the messages and then arranged them on a canvas in Photoshop (4.25 in x 8.25 in) and printed here at home.
As I was thinking about how I wanted to tell this story I picked out these 4 inch x 4 inch cards from the current One Little Word® Mini Kit to use as inserts. There are only 6 of them so there aren't enough for each prompt but I'll figure something out as we go along - maybe replace one of them with extra photos cropped to the same size. To add it as an insert into the notebook I folded along the edge of the card and added red line tape before adhering it to the back of the photo collage. Then I adhered the entire photo collage to a page in the notebook.
On the front of the 4x4 card I used our Alphas Are Awesome #14 stamp set to add "how we met" and then used sticker paper to add my journaling to the back.
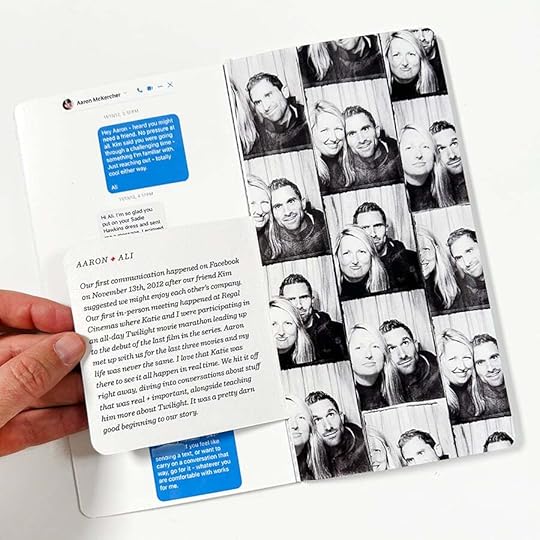
I created the photo collage using a Photo Booth photo strip and repeating it multiple times on the same canvas before printing.
Love recounting another piece of our origin story!
PS: You might notice that the prompts are out of order in the notebook! You can choose to cover up the pages like I'm doing or simply add your story to the corresponding page in the notebook. Get your stories in there!
SUPPLIESPieces Of Us NotebookOne Little Word® Mini KitAlphas Are Awesome #14Corner RounderRed Line TapeSticker Paper
Pieces Of Us: How We Met
Welcome to Pieces Of Us week!
This week I'm responding to the Pieces Of Us prompts and telling some stories in the notebook. You're invited to play along no matter how you choose to document these stories. Pieces Of Us can be about any relationship including spouses, partners, pets, parents, children, etc. My plan is to share today on the blog and Instagram. For the rest of the week I'll share daily on my Instagram and at the end of the week I'll share a full look here on the blog.
Have fun with it!
For this project I'm documenting more about my relationship with Aaron. For the "How We Met" prompt I decided to dive back into my Facebook archives and find the first messages between us. I took screenshots of the messages and then arranged them on a canvas in Photoshop (4.25 in x 8.25 in) and printed here at home.
As I was thinking about how I wanted to tell this story I picked out these 4 inch x 4 inch cards from the current One Little Word® Mini Kit to use as inserts. There are only 6 of them so there aren't enough for each prompt but I'll figure something out as we go along - maybe replace one of them with extra photos cropped to the same size. To add it as an insert into the notebook I folded along the edge of the card and added red line tape before adhering it to the back of the photo collage. Then I adhered the entire photo collage to a page in the notebook.
On the front of the 4x4 card I used our Alphas Are Awesome #14 stamp set to add "how we met" and then used sticker paper to add my journaling to the back.
I created the photo collage using a Photo Booth photo strip and repeating it multiple times on the same canvas before printing.
Love recounting another piece of our origin story!
PS: You might notice that the prompts are out of order in the notebook! You can choose to cover up the pages like I'm doing or simply add your story to the corresponding page in the notebook. Get your stories in there!
SUPPLIESPieces Of Us NotebookOne Little Word® Mini KitAlphas Are Awesome #14Corner RounderRed Line TapeSticker Paper

