
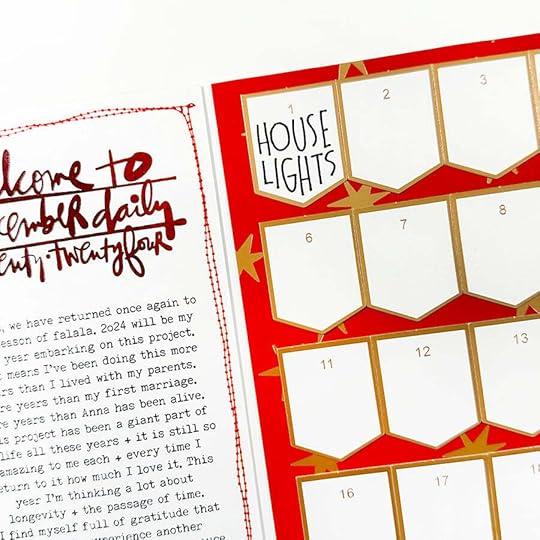
Ali Edwards's Blog, page 15
December 9, 2024
Story Play Read | Special Guest Pam Baldwin
Hey friends! I’m really excited to be here with you today, sharing 3 projects inspired by the “Story Play: Read” theme. I have loved reading for as long as I can remember and try to get a little bit of quality time in with a good book on a daily basis, even if it’s just a few minutes. These 3 projects are just the tip of the iceberg for story ideas, but let’s take a look.
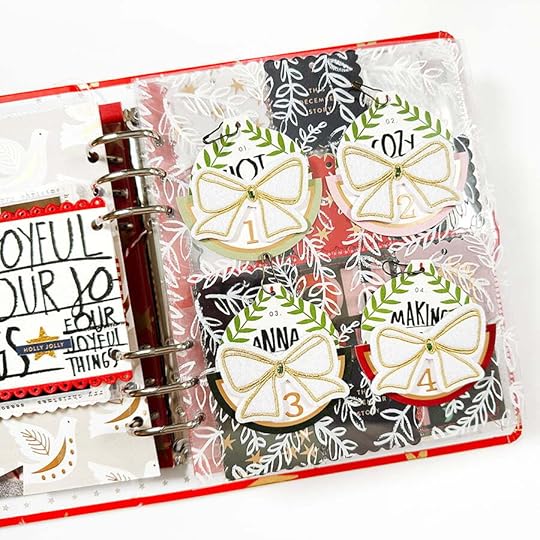
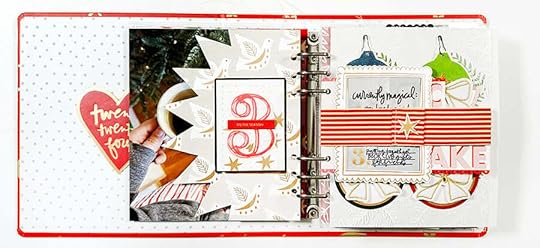
Project 1: Year in Review!
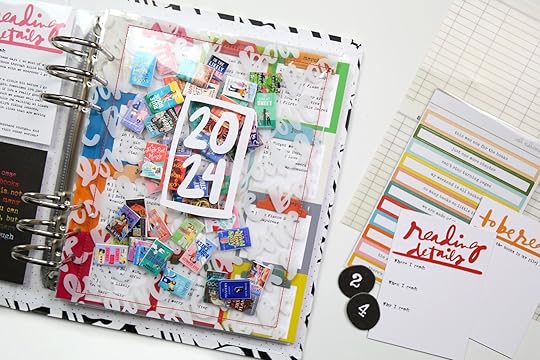
The chipboard pieces from this collection were the starting inspiration for this 2-page 6x8 spread + shaker pocket. My intention is to add this to my 9x12 pocket page album when I finally get around to documenting December in there. It’s got 3 distinct parts.
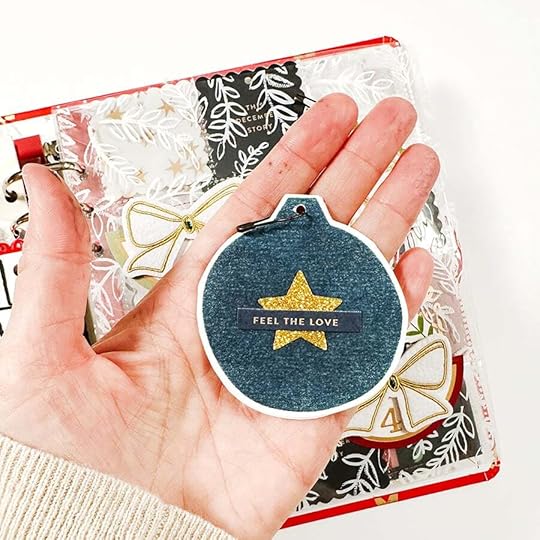
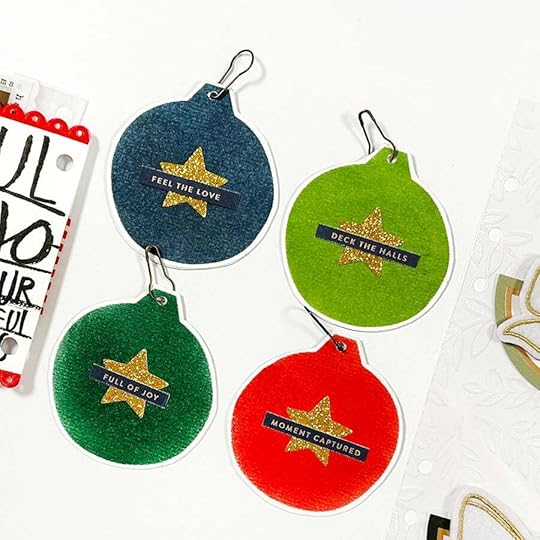
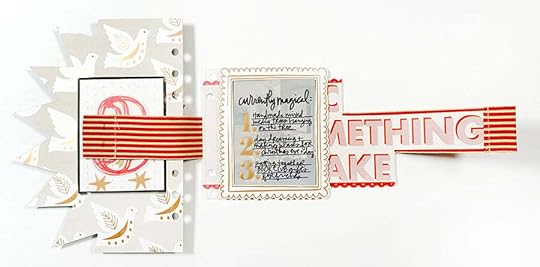
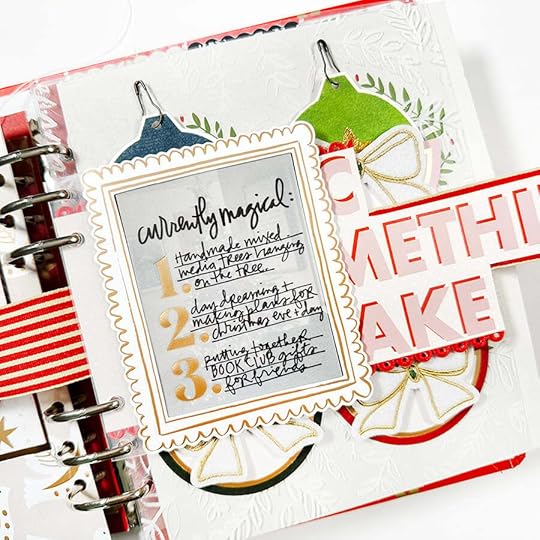
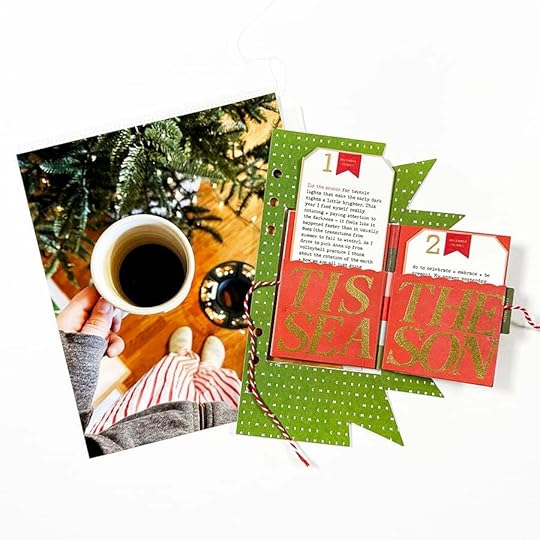
Prompt cards from the Read kit help capture some details about how I read and my top 5 book picks for this year. I paired them with a reading selfie and the colourful quote card also from the Read kit.
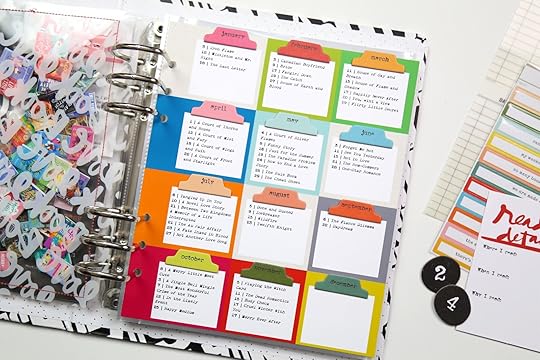
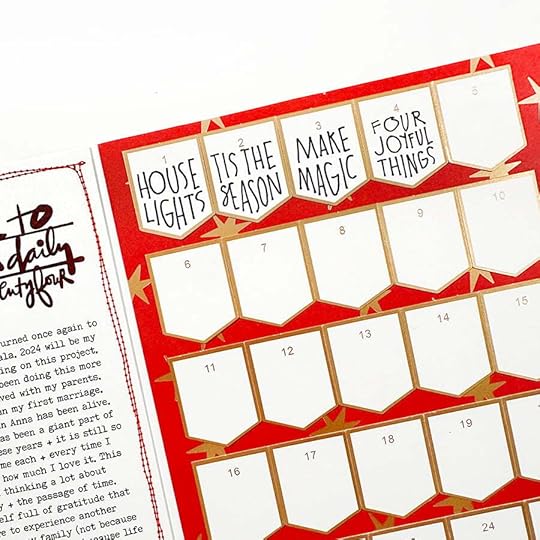
Books by the month – I borrowed a digital paper from the recent “Fan” Story Kit and made a few modifications (removed the titles from each box and moved the page margin to the left). I used the 12 squares to write which books I had read for each month and added the colourful month tabs from the Read kit to the top of each square. December’s blank at the moment, because we’re not done with it yet. At the end of the month, I’ll print my titles onto clear sticker paper to finish the last box.
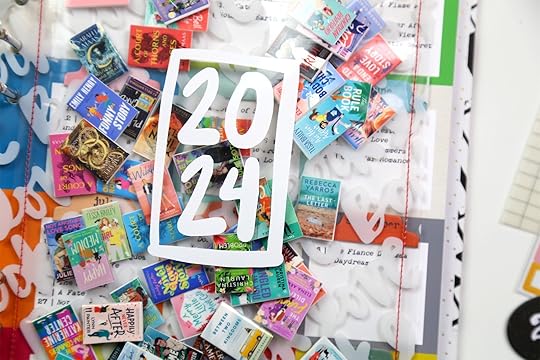
Mini book shaker pocket – THIS. IS. AWESOME! It turned out better than I could have imagined!! I usually track my reading for through Goodreads, which came in very handy for putting this spread together. It was also the source of the book cover images for all of my books this year. I made them all mini and printed the images onto glossy vinyl sticker paper. I cut out each cover and stuck it to thin white craft foam to make the miniature books.
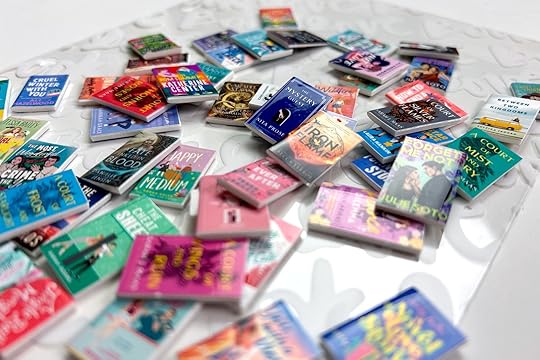
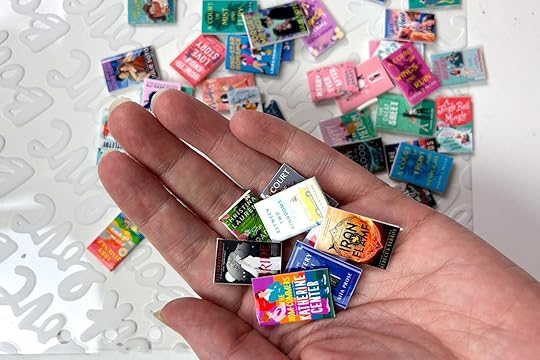
I then created a shaker pocket using the “book love” transparency from the Story Play collection and plastic from an extra page protector. I used my sewing machine to create a pocket and slid the books inside before completing the last bit of stitching. I also used the 2024 digital word art to create a vinyl sticker for the front of the pocket. So very happy with how this turned out!
Here’s the process video for how this project came together.
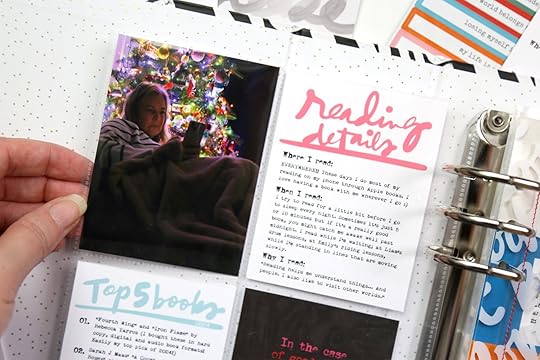
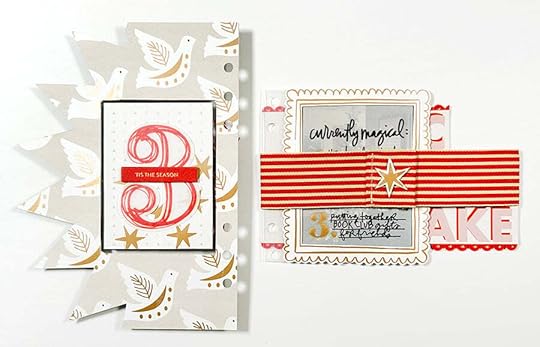
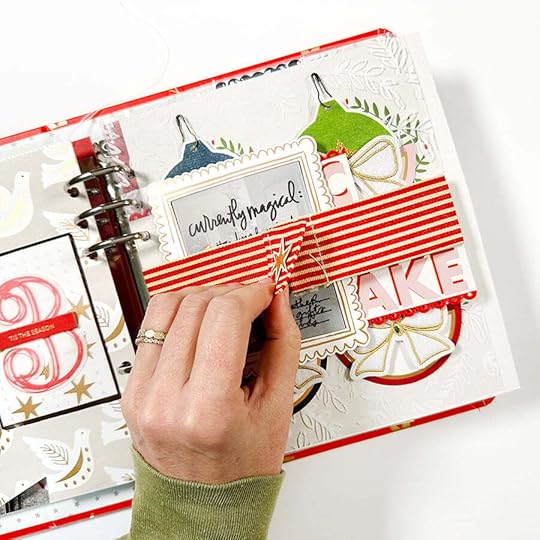
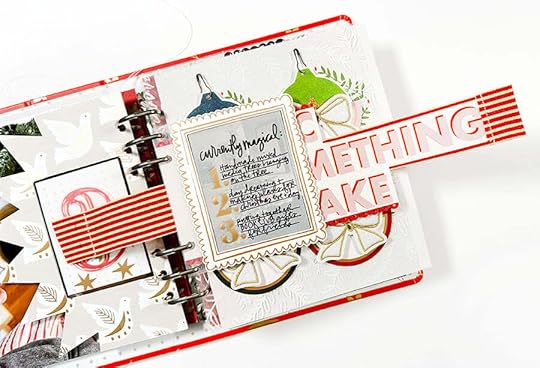
Project 2: December Daily – Currently Reading
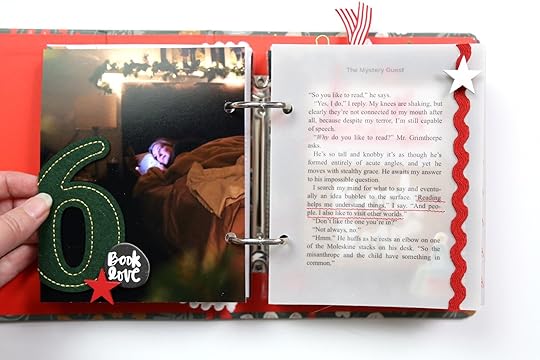
I’m working in the 4x6 album this year, and while I had it in mind to use the Read theme for one of my days, the timing of this story was pretty magical. I’m currently reading “The Mystery Guest”, a cozy mystery that’s the sequel to a book by Nina Prost called, “The Maid”. I’ve got to tell you, the first week of December this year was a rough one. I very much needed some down time by Friday night, and reading is like a form of self-care for me. As I was reading, I came to a part where the main character (as a child) was answering a question about why she likes to read, and her answer was perfection! I took a screen shot (I do most of my reading from my phone) and was able to include it in this story. Three components for the second story:
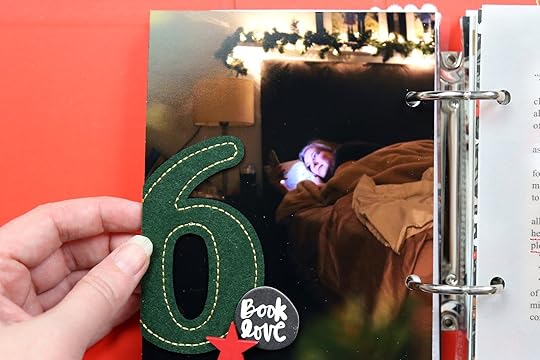
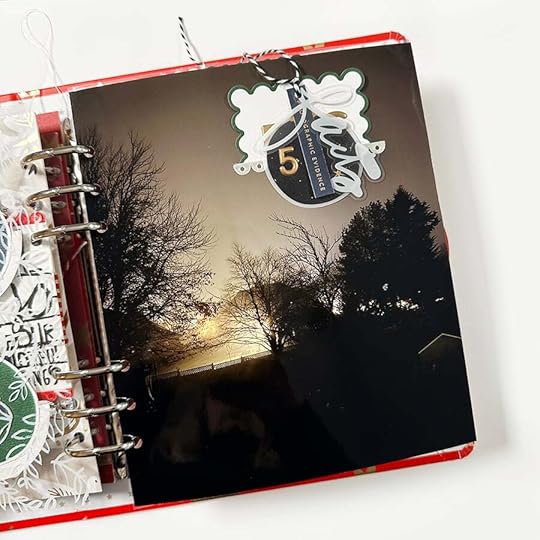
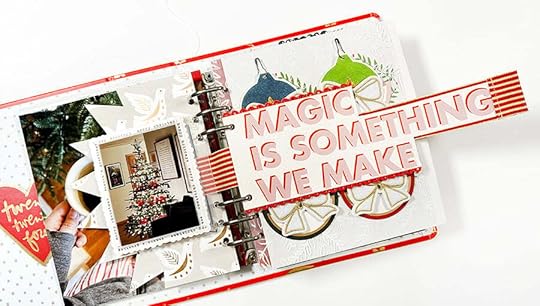
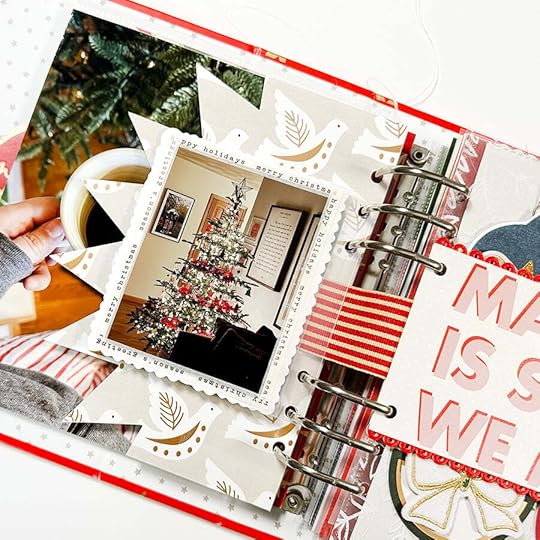
Reading selfie! I read from my phone, so the glow from the screen always lights up my face, but I’ve got to get out my big camera to be able to get the shot because I can’t use my phone as my camera if I’m reading from it, ha! Also!! I saw a great trick to be able to mimic the same capture when reading from an actual book. Tuck your phone with the flashlight on (or a bright screen) in the pages to light up your subject’s face before taking the photo. The demonstration was with kids reading books in front of a Christmas tree and it made the whole scene magical. I printed my photo to be a full 5x6.25 page and added a large green felt number + a wood veneer star from the 2024 December Daily collection + the chipboard “book love” circle from the “Read” Story Play kit.
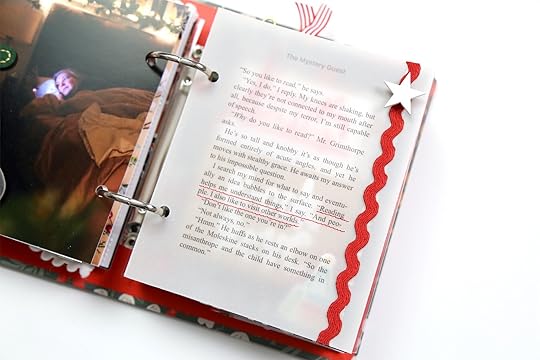
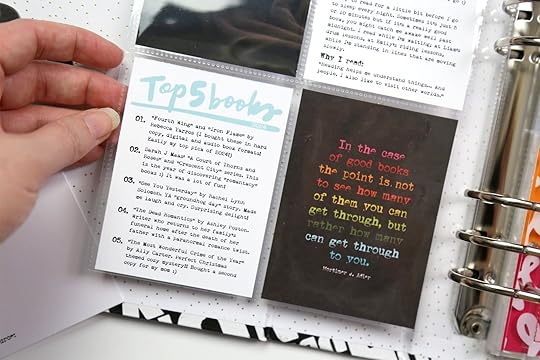
My book passage – It took me some time to figure out how to include all the elements I wanted to in this spread, and I REALLY wanted to make sure this text from the book was here. I printed it on velum, used my sewing machine to underline the words I wanted to highlight, and added a bit of rick rack + a wood veneer star. It would have also looked lovely with nothing extra at all.
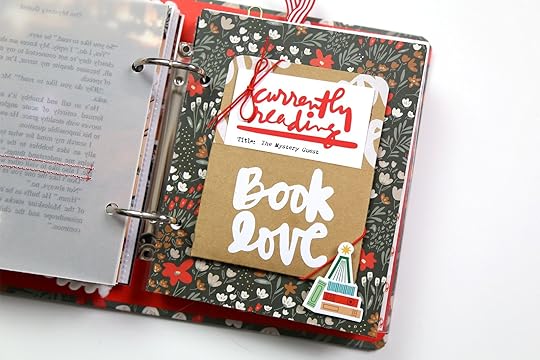
Library pockets seem like such a natural fit for stories about books and reading! I made some of these in the 2024 Prep Day classroom as well. Here, I constructed the pocket out of the kit packaging envelope. I also used a digital version of the “currently reading” card to write about my book.
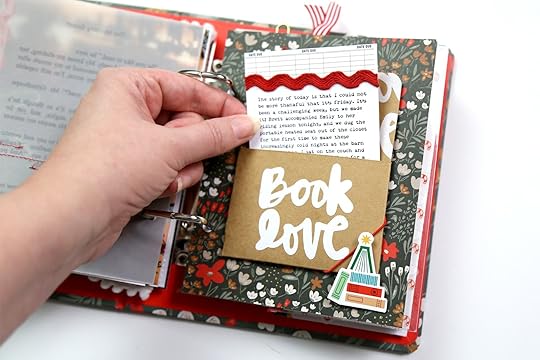
I still wanted to be able to explain more of the context of the day, so I added additional journaling on the back of the card too.
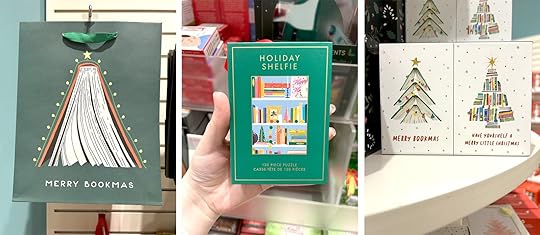
There are some really fun Christmas book icons out there this year!! I was enjoying a bookstore wander in November and took a few pics of some of the imagery that was inspiring me at the time. Geralyn Sy from In a Creative Bubble has also recently released a new Christmas digital collection, which is where the little tree bookstack die cut is from!
Here’s the process video for project #2!
Project 3: “Books are life”
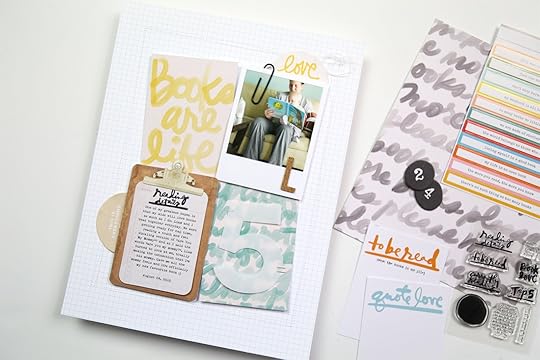
Some of my favourite reading memories are of reading to my kids when they were little(er). I wanted to capture at least one of these stories and made a really simple 8.5 x 11 scrapbook page using the Read Story Play kit and some fun stuff from my stash.
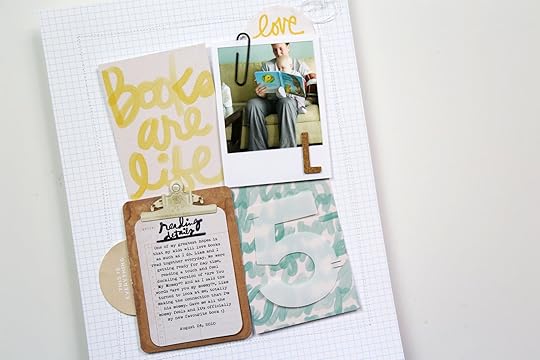
I opted for a simple grid using the 3x4 kit cards. I printed my photo as if it were an instax/polaroid, and used a cardstock diecut clipboard (Heidi Swapp product) to hold my journaling.
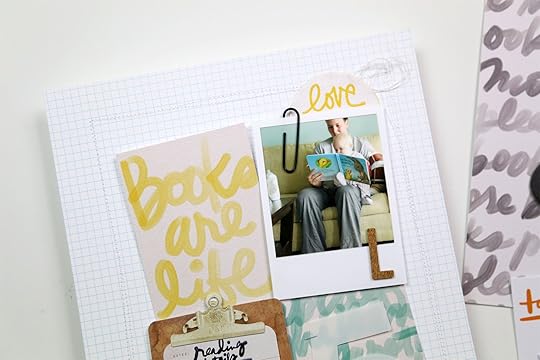
I used dimensional foam tabs to life some of the edges up off the page and give the grid a more layered look. I also intentionally placed the cards a bit tilted to break up the lines of a uniform grid.
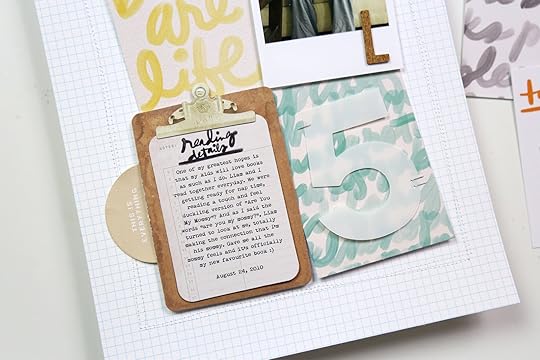
I added embellishments from my stash including some fabric half circles from a previous AE kit, cork alpha letters, a paper clip, and ran some stitching around the outside to frame it, leaving the extra threads loose for a little more texture. It’s a super simple layout, but it’s also another story captured!!
Last but not least, process video for project #3!
I hope you’ve found some inspiration here for your own stories about reading!! Definitely let me know if you have any questions in the comments below, and thank you for being here!


December 8, 2024
December Daily® 2024 | Story 07
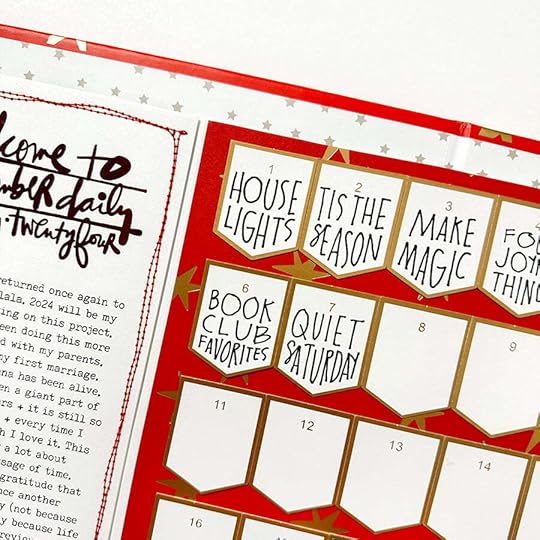
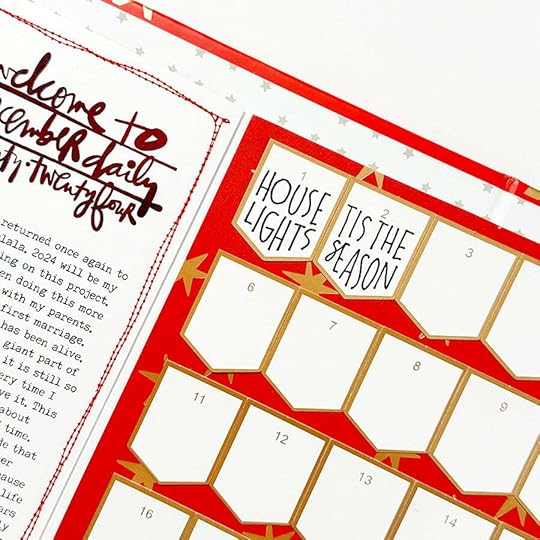
Welcome to Story 07 in my 2024 December Daily® project!
I took the day off yesterday to spend some quality time with Aaron and I'm excited to be back to my table this evening after some volleyball in the early morning.
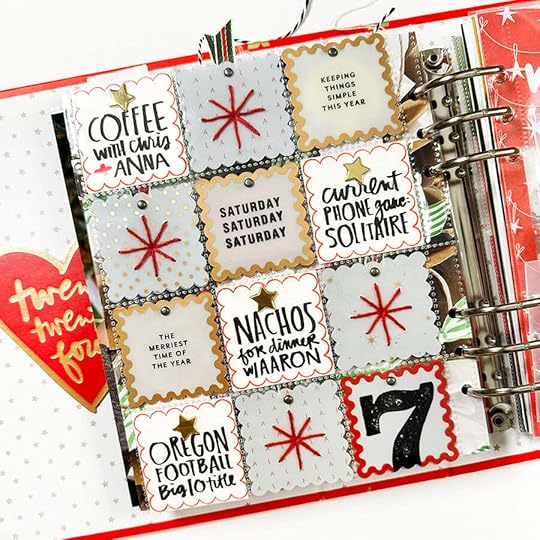
Story 07's home is on the back side of the 2x2 pocket page protector used in Story 06. This one was originally sparked by one of the scalloped plastic tags that had the words "simple quiet moments" printed on top. I ended up not using that particular piece after I got going (I need up decided to stamp + use red embroidery floss) but it was definitely the spark that invited me to jot down a couple things I did on my quiet Saturday.
Let's dive into the process video:
Here are additional images of the completed page:
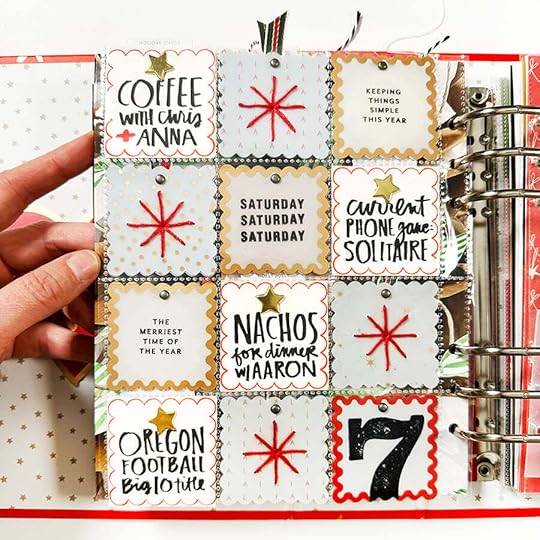
For this design I ended up with three categories of squares:
1. Four 2x2's started with white cardstock as the base. On top of each I stamped the scalloped square tag stamp, trimmed it to 2x2, added my activity using a brush pen, and then finished it off with a gold star brad.
2. Four 2x2's started with a pattern scalloped plastic tag. On top of each of those I used embroidery floss to create a "star." I punched holes first to make the stitching easier (started my stitching from the outside holes into the center).
3. Four 2x2's started with the bold outline scalloped plastic tags. On top of those I either stamped the day of the week, the large number seven, or a couple sentiment stamps from the Paislee Press stamp set.
I really ended up loving how this one all came together!
6x8 Star Album (includes page protectors)
December Daily® 2x2 Scalloped Plastic Tags
Holiday Tag Stamp Set
Numbers Are Awesome Stamp #7
Paislee Press 2024 December Daily® Stamp Set
Misti Stamp Platform
Pendleton Ink
Kuretake Brush Pen
Star Brads
Mini Brads
Embroidery Thread
StazOn Ink
Basics via my Amazon Storefront (printers, etc)
December 6, 2024
December Daily® 2024 | Story 06
Welcome to Story 06 in my 2024 December Daily® project.
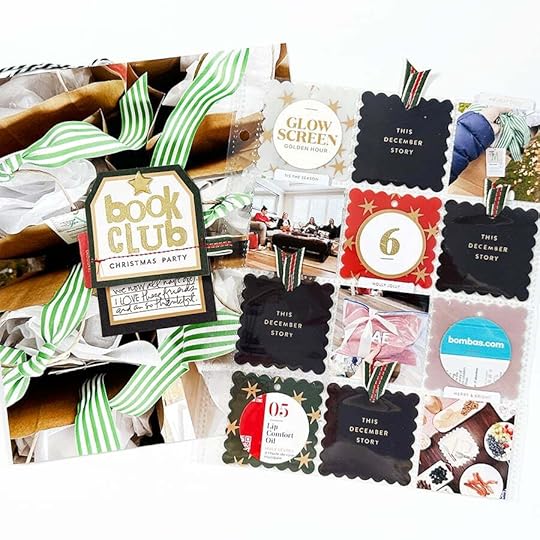
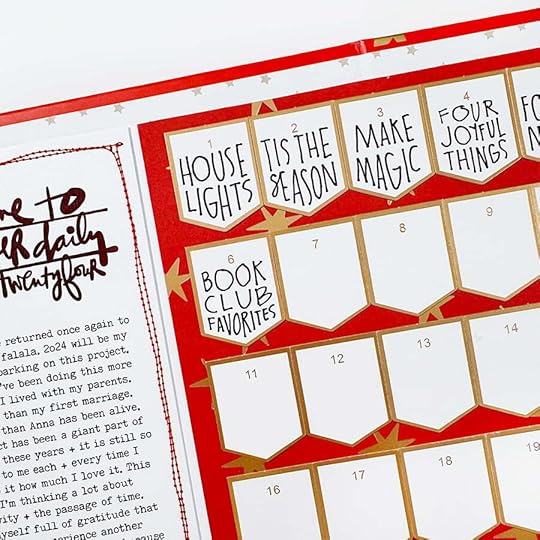
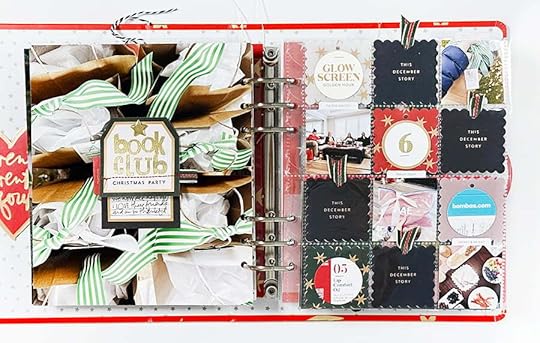
We had our annual Book Club Christmas gathering this morning so that became my story for today. I'm pairing a full page photo with two tags layered on top (one for the title and one for the journaling) with a 2x2 page protector. Inside the page protector I've got a bunch of the 2x2 scalloped squares and some photos from today's get together.
Let's dive in to the video:
And here are additional images of my pages:
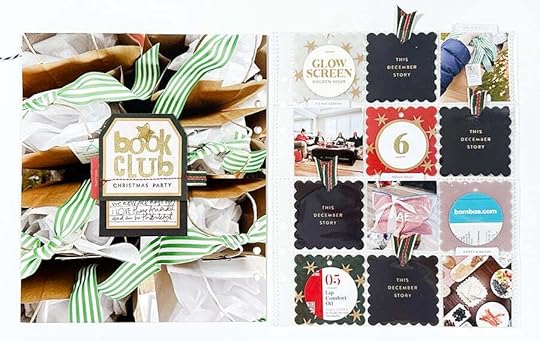
I took that top down photo of my gift bags and ribbons before heading over to my friend's home this morning. Don't forget to play around with photo angles - I love this top down view.
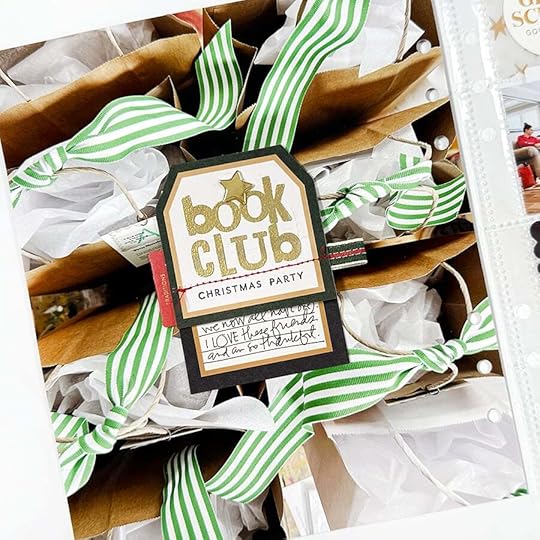
For my title and journaling I used two tags from the Main Kit layered on top of each other. I used a star brad to hold them together.
On the title tag I used the 4x6 alpha and number stamp set and embossed with gold embossing powder. I added "Christmas Party" from the Paislee Press stamp set this year and ran it through the sewing machine so it would have that pop of red. Along the outside edge of the top tag I added some ribbon from one of the gifts I received to create a little tab to turn the tag.
I also added a tab sticker to the back of the bottom tag.
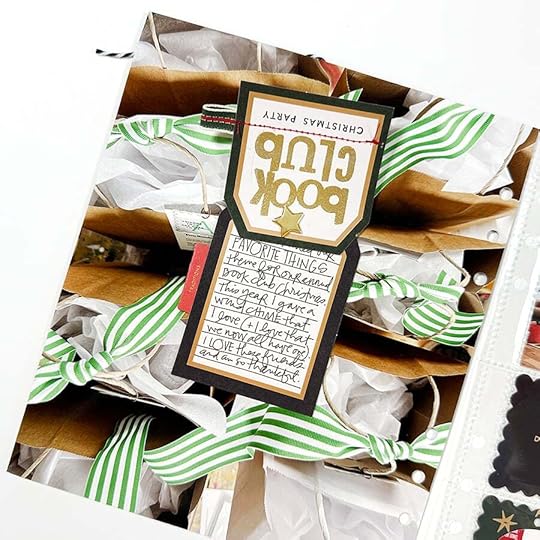
Love the layers of these two tags.
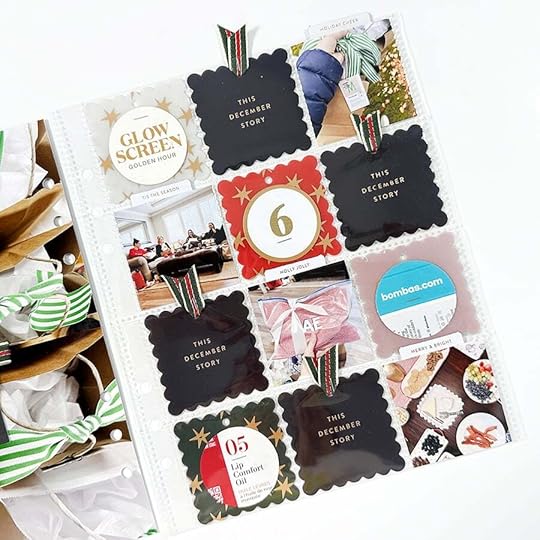
For the second page I used a 1.5 inch circle punch to punch circles from some of the gifts I received today. I stapled those onto the plastic tags. I embossed the number 6 onto a gold rimmed circle tag and added tab stickers to the tops of each of the photos. To finish it off I used ribbon from one of the gifts and added that to each of the "this December story" tags.
Star 6x8 Album
December Daily® Main Kit
Star Brad
1.5 Inch Circle Punch
December Daily® Tab Stickers
December Daily® Sticker Advent Calendar
4x6 Alpha + Number Stamp Set
Paislee Press Stamp Set
December Daily® Gold Rimmed Circles
December Daily® Scalloped Plastic Tags
Versamark Embossing Ink
Gold Embossing Powder
Tiny Attacher Stapler
Basics via Amazon Storefront (printers, paper trimmer, etc)
In Case You Missed It | December 6

Happy Friday, friends! Welcome to the latest
In Case You Missed It. Just a reminder that this is a quick post that will happen every Friday afternoon with all the updates and links that have happened throughout the week. So, let's get to it:
END OF YEAR SALE HAPPENING NOW
After 9 incredible years of storytelling and creativity, it's time to say goodbye to our Story Kit, Story Class, Just Write, and Scrapbook Kit subscriptions. These products have been at the heart of so many treasured moments, and we're beyond grateful for the community that has grown with them. To celebrate and show our appreciation, we're offering a special end-of-year sale— a heartfelt thank you for making these kits such a meaningful part of your creative journey. Let's honor the memories and look forward to what's next together! Shop $10 kits, Story + Story By The Month classes, and add-ons now!
MARK YOUR CALENDARS | STORY PLAY READ
Mark your calendars for our next Story Play documenting week: READ! We'll be sharing daily content beginning next Monday, December 9th. Shop the mini kit here.
NEW CLASS | MIX + MATCH STORY SPARKS
We are excited to offer this new self-paced class that celebrates fun, creativity and playfulness in our memory keeping projects. The Mix + Match Story Sparks Class will feature a combination of story ideas and creative techniques in a variety of formats with the goal of providing you with product inspiration using the Mix + Match Kit as "story sparks" or jumping off points for their personal storytelling. Join contributors Ali Edwards, Sabrina Poole, Laura Wonsik, Jill White, Pam Baldwin and Jamie Leija as they share how they were inspired or prompted by the products (i.e., story spark) and then how they implemented those products in their final designs. Learn more and register here.
2024 DECEMBER DAILY® DIGITALS ARE HERE
The 2024 December Daily® Digitals are here! Kits, Stamps, Paper, and Embellishments...the same fun & festive designs as the physical @decemberdaily products, only in digital format. We love to see how this incredibly creative community plays with digitals! Resizing elements and cards, adding journaling to papers, creating cut files, transforming files into transparencies, the sky is the limit with digital files.
Want to learn more about creating with digital files? Our newest class December Daily® 2024 Hybrid Product Play is live.
Shop digitals here.
NEW DECEMBER DAILY® COMMUNITY SPACE
We invite you to join us in this free December Daily® community classroom. We know that many in the community don't care to share their December Daily® projects on social media. And for those that do, constant algorithm updates and unreliable hashtag searches make it challenging to connect with others or to find inspiration and encouragement. So with this in mind, we are excited to offer this space as a place to share your work with other memory keepers and storytellers who are participating in this special project. Register for free here.
2024 DECEMBER DAILY CLASSES
December Daily® Product Play | This + This + This workshop registration is open. More details on this year's workshop can be found at the bottom of this post (workshop begins November 5th).
December Daily® Hybrid Product Play workshop registration is available now.
December Daily® Prep Day is available for those who missed it. All content is recorded and available.
NOVEMBER REVEAL
This month we are revealing a new Story Kit™ theme: FAN! This month we are focusing on stories related to the theme of Fan. Every single one of us is a fan of something. We might be fans of a sports team or a movie franchise or a way of cooking. This month we are coming together to tell stories about what it's like to be a fan in this season (or any season) of life. In addition to our new Story Kit™ theme, we also have a brand new Stories By The Month™ kit and the next edition in our Alphas Are Awesome series.
Head to Ali’s blog post for all the details about this month’s release.
DECEMBER DIGITALS
The first Friday of every month we have a new digital release available in the shop. Play with scale, recolor objects, add journaling, print multiples…the sky is the limit when playing with digitals. Shop digitals here.
2024 PROJECTS + PRODUCTS SCHEDULE
As we continuing easing into 2024 we put together an overview of our schedule of projects + product releases for the upcoming year. We are sharing this as a way for you to plan, think about what you might want to participate in this year, and simply share some of the things we have coming up to help support + inspire storytelling. For the last few years we've followed a fairly similar cadence for our releases and our major projects will follow that release schedule again this year. Please note that, as you might imagine, this schedule is subject to change throughout the year based on a variety of variables. Find the post here.
As always, we’re so grateful to have you all as members of this community! Thanks for joining me today and have a great weekend!
December 5, 2024
December Daily® 2024 | Story 05

Welcome to Story 05 in my 2024 December Daily® project.
Today I wanted a simple story so I chose to document the foggy nights we've been having this month. I printed a full page photo and then cut a slit in the photo with a craft knife that becomes a home for the scalloped journal card + my short story. After I recorded the video I went back in and added the scalloped trim along the line I cut into the photo in order for it to feel a little more finished.
Here's the process video:
And here are some additional images:

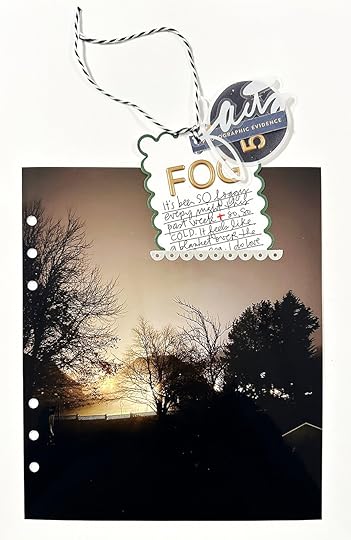
I love playing around with ways to incorporate a story onto a full page photo. Sometimes I will add a plastic pocket directly onto the photo with red line tape and other times I'll cut into the photo in order to create a pocket.
Today I cut a slit in the photo just a but wider than the scalloped journal card and added adhesive trim right along the bottom.

On top of the tag I used the gold puffy alpha to add the word "fog" and then journaled below. I used a POSCA Paint Pen to add a touch of red within the journaling. Attached to the tag is a vellum ornament with a puffy number 5, a perforated phrase strip, and a plastic word "facts" which is from a recent One Little Word® Mini Kit.
6x8 Star Album
December Daily® 2024 Main Kit (digital available)
Scalloped 3x4 Tags
Gold Foil Puffy Alpha
Gold Foil Puffy Numbers
Black + White Twine
Large Foam Tape Roll
6 Hole Punch
POSCA Paint Pen .7mm
Plastic Words from One Little Word® Mini Kit
Additional basics via my Amazon Storefront (printers, etc)
December 4, 2024
December Daily® 2024 | Story 04
Welcome to Story 04 in my 2024 December Daily® project.
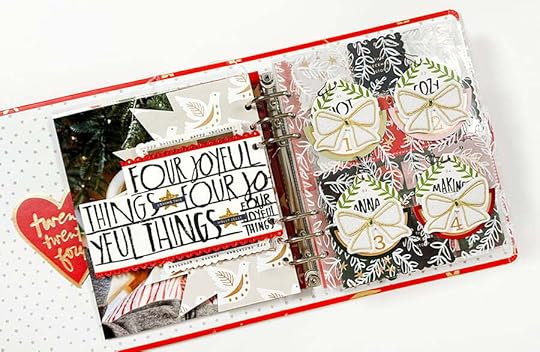
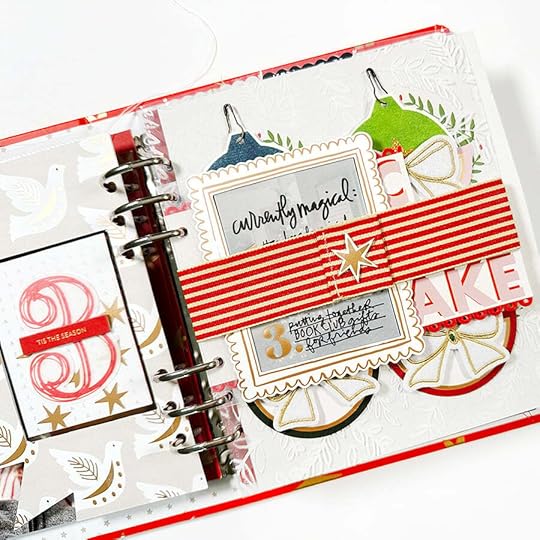
Today's story has been added to a foundation page I created for our Product Play workshop this year. The jumping off point for my journaling comes from one of the Prompt Papers which I end up cutting up and adding to the backs of the stenciled ornaments. I used a Kuretake Brush Pen to add my current four joyful things.
Let's dive into the video:
Here are additional images of this story:
For this story I'm working on the back of Story 03 and then on the foundation page I previously created using elements from this year's product collection. I love when I have a wonderfully simple prompt that invites me to capture basic everyday things in this season.

Brush pens are fantastically messy and I love it! I added "four joyful things" to the back of story 03 and just filled the space with the repeated title.
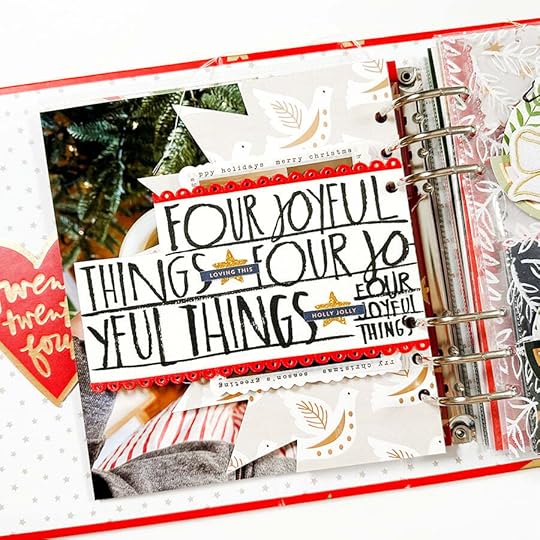
In between the written words I added gold glitter stars and phrase strips from the Main Kit.
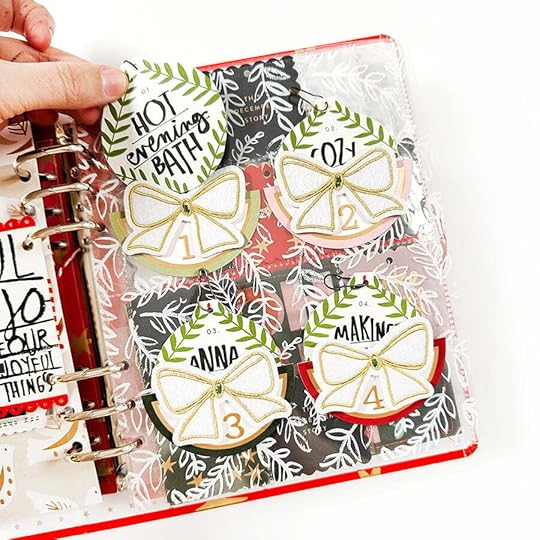
I cut up the Prompt Paper to fit on the back of each of my ornaments. I then used the Brush Pen to add one joyful thing to each of the four ornaments.
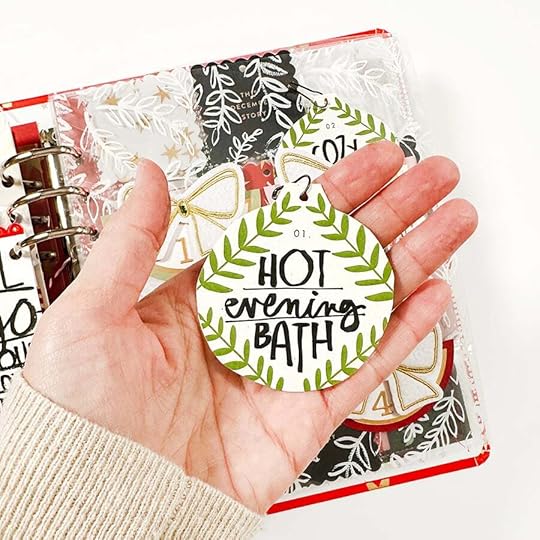
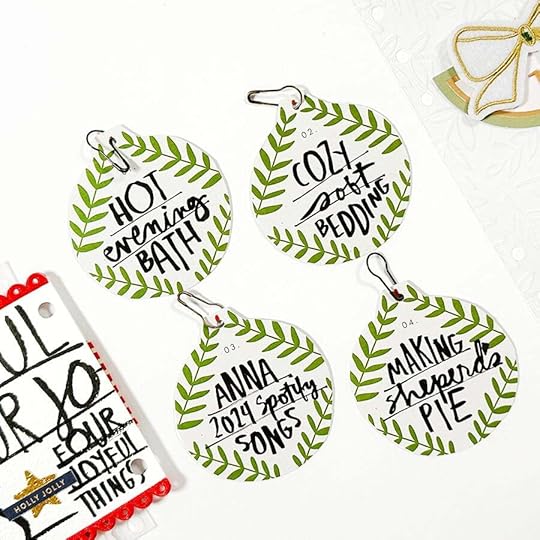
SImple joys right now.
I added a phrase strip to each of the glitter stars on the ornaments.

Here's what this transparent page looks like from the back. I'm pretty sure that I will just leave the back as is and start a new page for Story 05 tomorrow.
6x8 Stars Album
December Daily® Main Kit (bows, glitter stars, half-circles)
December Daily® 10x8 Transparencies (you can also use the 6x8 size)
December Daily® Prompt Papers (digital available)
December Daily® Stencils
AED INKS: Deschutes (navy), McKenzie (dark green), Willamette (green), and Pendleton (red), Metallic Gold
Kuretake Brush Pen
Tim Holtz Loop Pins
Red Line Tape
Embroidery Floss + Needle
White Cardstock
Picket Fence Paper Pouncers
Blue Tape
We R Memory Keeper Hole Punch
Additional basics from my Amazon Storefront
December 3, 2024
December Daily® 2024 | Story 03
Welcome to Story 03 in my 2024 December Daily® project.
Today's story is about how I'm making magic at this point in the month. You can see the initial process for building the page foundation here.
Let's dive in to the video:
And here are images of my completed spread:
Added an entry to my table of contents. I'm using a Staedtler Lumocolor Pen (fine tip) for writing these words.
Today's spread includes the back of Story 02 + a belted ribbon section with a vellum journal card inside a frame + two of the same photos adhered back to back + washi tape + a cut up piece of one of the 10x8 pattern papers.
It's always fun to take it out of the album and photograph it on its own too.
To create the "belt" for this spread I used magnets. Thanks to Lisa Soares for sharing what magnets have worked for her! I used red line tape to adhere the magnets to the ribbon and then folded the ribbon to cover the magnet and ran it through my sewing machine.
Using magnets was a great way to reduce bulk with the ribbon (in my already bulky project).
On top of the vellum I used two weights of Staedtler Lumocolor Pens to write my journaling. I used the Medium Tip of the title and the Fine Tip for the individual items on the list.
Behind the vellum is a photo of our tree that I printed twice. It measures 3.25 inches x 4.25 inches.
I love the reminder today that journaling doesn't have to be paragraphs to capture a story. Lists for the win!
On the back of the vellum/chipboard frame is the second printed photo of our tree.
Around the outside of the photo I used a thin cream washi tape (from my stash) to adhere the photo to the back of the Main Kit frame.
Red Star 6x8 Album December Daily® Main Kit (digital available) December Daily® Die Cut Pages (digital available - includes Studio file) December Daily® Chipboard Set (digital available) December Daily® 10x8 Paper Pack (digital available) December Daily® 3x8 Transapency + Journal Card Set 6x8 Page Attacher Red Line Tape Red/Cream Ribbon May Arts Red Scallop Adhesive Ribbon (May Arts has some that's not red here) Magnets Cream Washi Tape (check out the various Christmas Washi Tape available at Scrapbook.com) Staedtler Lumocolor Pen Additional basics via my Amazon Storefront
December 2, 2024
December Daily® 2024 | Story 02
Welcome to Story 02 in my 2024 December Daily® album!
Today I'm working with a foundation page I created for our 2024 Product Play workshop. As many of you know, I find value in setting up some of foundation pages prior to December. Today is a great example where I came to my table and all I needed to do was add my photo and my story. I love that I was able to focus a little more on the words for my story since the majority of the page was crafted in advance.
PROMPT IDEA: Tis The Season
I ended up using "tis the season" as the jumping off point for my journaling today. You could use this prompt to write up a list of things that it's "tis the season" for in your own life or pick one thing and go deeper like I did. I've been thinking a lot about how dark it gets here during December and am really working on embracing it for the short time it's here.
Let's dive into the video:
And here are images of my pages for Story 02:
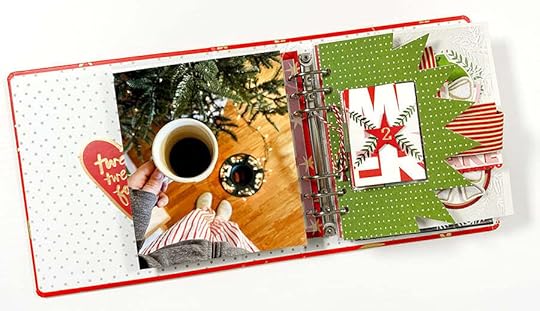
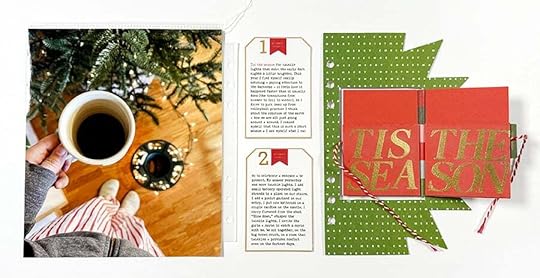
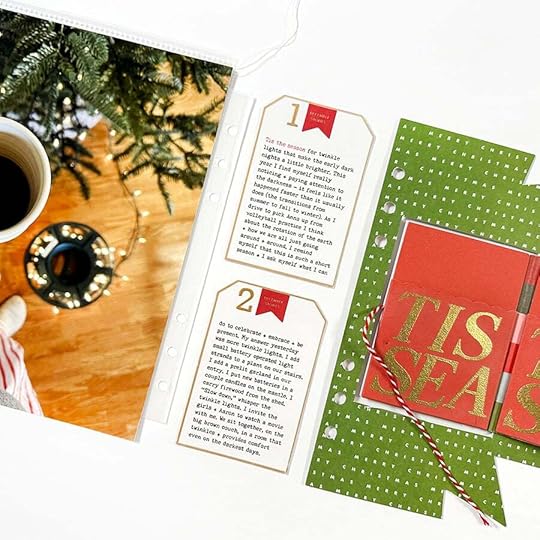
A nice big full page photo is always a good idea! I considered adding some embellishments to my photo but decided to just let it breathe and let the second page do the heavy lifting.
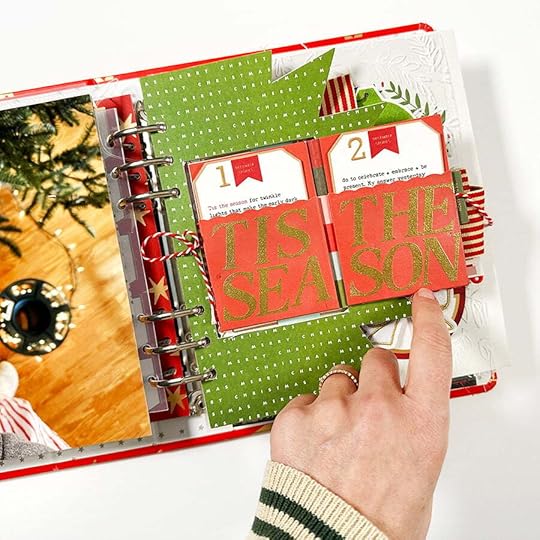
Since most of this page was put together in advance, my main focus today was typing up my story and printing it on MACO Sticker Paper before adding it directly to the tags.
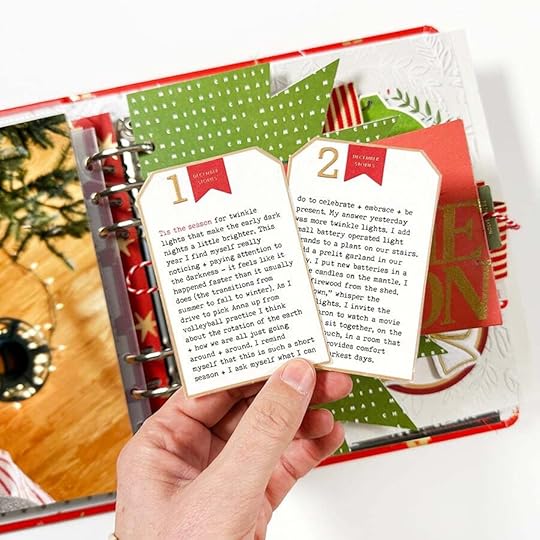
I measured the tags (2.5 x 3.75 inches) and then set up two text boxes before printing on the sticker paper. Along the top I added a couple stickers from the December Daily® Advent Calendar (this was a nice option vs. ribbon to keep the bulk down a bit) as well as a couple number stickers to designate which to read first.
Today's writing is about how I combat the darkness with twinkle lights in December.
Creating your own December Daily® this year? We'd love to have you share your project + pages in our
free December Daily® Community. Get the details here.
December Daily® 6x8 Album
December Daily® Main Kit (digital available)
December Daily® Die Cut Inserts (digital available that includes silhouette files)
December Daily® Tab Stickers (digital available)
December Daily® Sticker Advent Calendar
December Daily® Gold Number Stickers
MACO Sticker Paper
December Daily® Wood Veneer Stars
Gold Foil Number Sticker Sheets
Uppercase Alpha Stamp Set
Gold Embossing Powder
Versamark Embossing Ink
Anti-static Pouch
Heat Gun
Grafix Plastic Sheet
Craft Knife + Metal Ruler
Glue Stick (to adhere vellum)
Basics via my Amazon Storefront
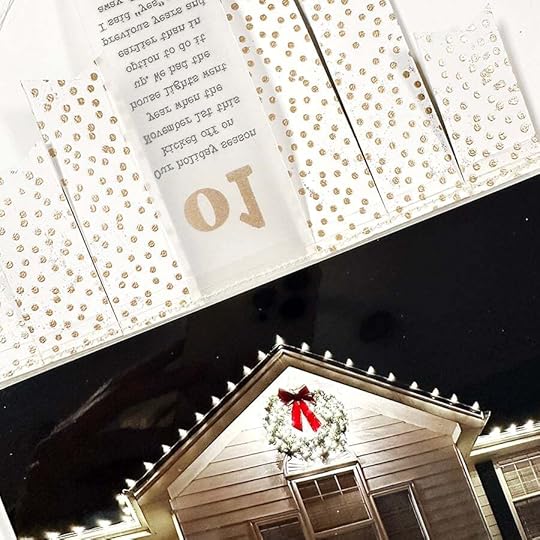
December 1, 2024
December Daily® 2024 | Story 01
Welcome to the documenting portion of
December Daily® 2024! I'm so excited to dive into this part of the project alongside you.
Let's have some fun!
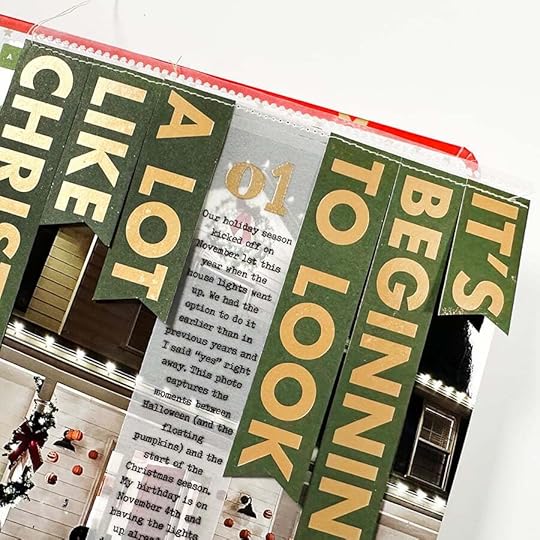
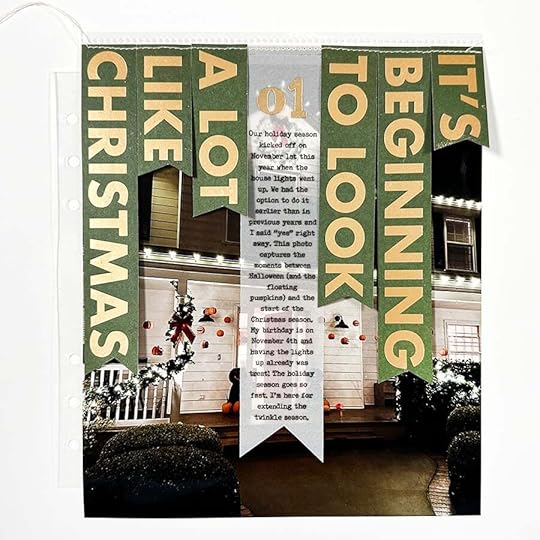
To start off my storytelling I printed out a full page photo of my house the night that we got our lights put up. This year is was extra early and we still had Halloween pumpkins hanging from the porch. I had set aside one of the pattern papers from Main Kit knowing that I wanted to figure out a way to include it in my 6x8 album. I've used a variety of the 10x8 papers in my foundation pages already and have enjoyed folding many of them to create flip outs. For this one I was interested in playing around with the idea of cutting up the phrase and orienting it vertically on the page in some way. Check out the video below to see how this came together and the decisions I made along the way.
Looking for a flip-through of what my albums looks like before today?
Check out this post.
Here's the process video:
And here's a look via images:
This year I'm doing a table of contents again using the banners from the Main Kit. Each day I'll be adding a story title using a
Staedtler Lumocolor Pen.
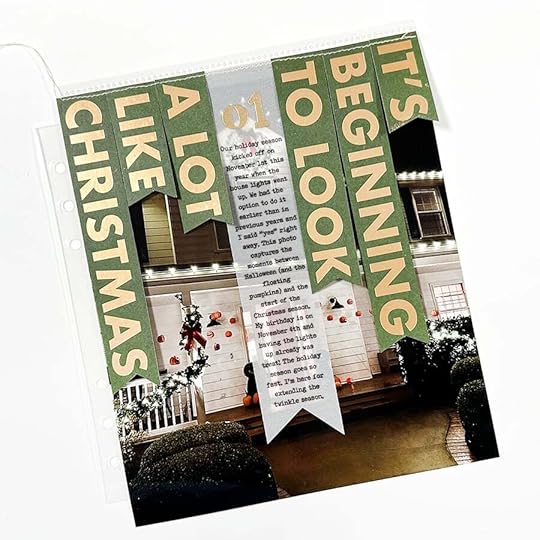
I ended up cutting up the words on the pattern paper to create little banners. I printed my journaling on vellum and then embossed the "01" using gold embossing powder and one of the stamp sets that was part of this year's collection. I stitched those pieces together and then used a cut up piece of page protector to create the flip up.
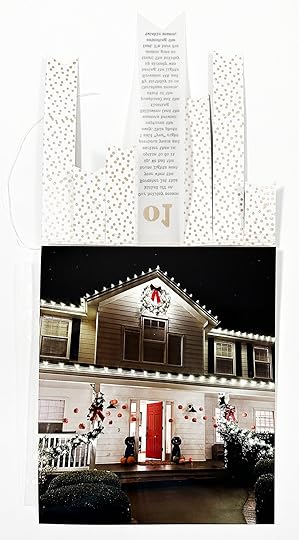
On the underneath side of each of the strips I used a dot pattern stamp to create the dots with gold embossing powder. There are all kinds of things you could do on the other side of those strips including adding more words, pattern paper, word stickers, etc.
Creating your own December Daily® this year? We'd love to have you share your project + pages in our free December Daily® Community. Get the details here.
SUPPLIESStar 6x8 Album December Daily® Main Kit (digital available) 4x6 Alpha + Number Stamp Set 6x8 Scalloped Stamp Set (dots) Red Line Tape Printable Vellum Gold Embossing Powder Versamark Ink Staedtler Lumocolor Pen Fine Basics from my Amazon Storefront
November 27, 2024
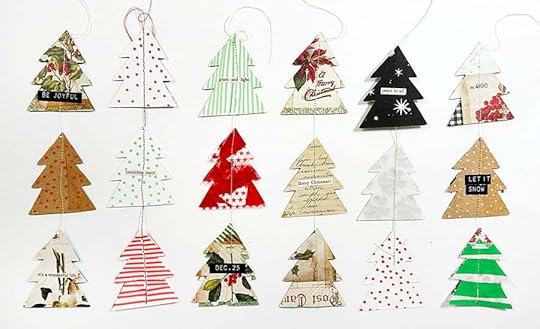
December Daily® 2024 | Ali's Mixed Media Trees | Part 02

Man I love this playful, handmade project!
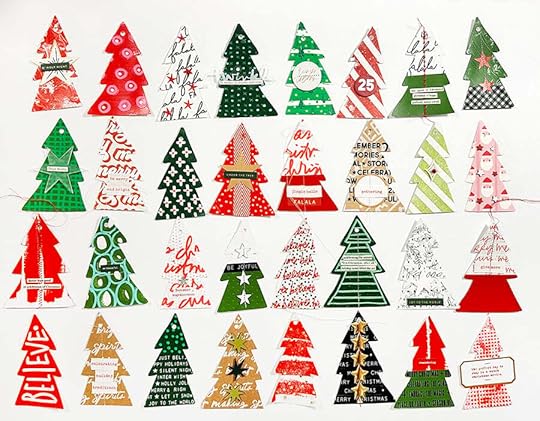
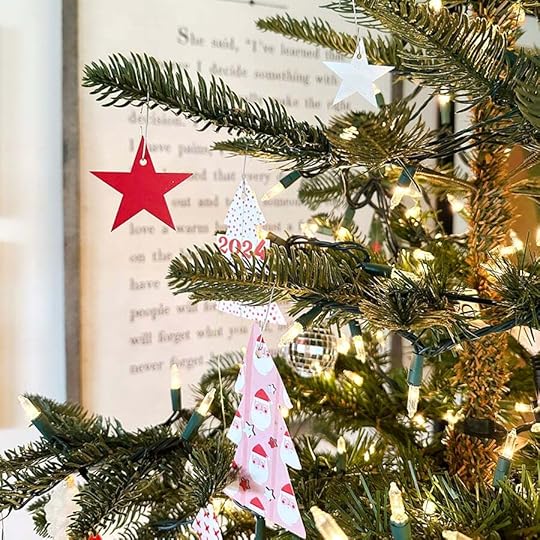
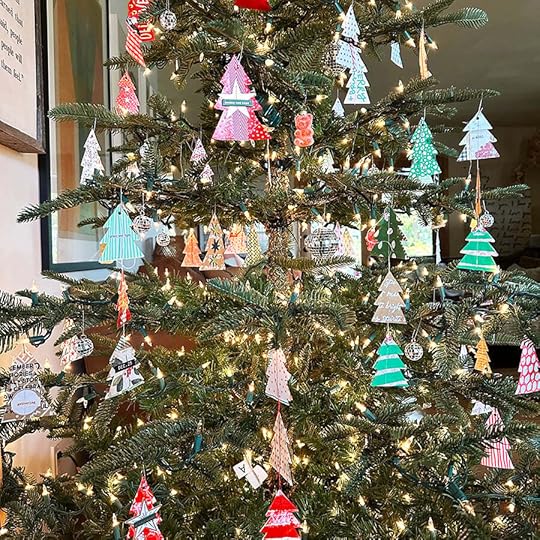
I wrapped up my mixed media tree project yesterday and got them all added to my Christmas tree that I put up this past week. We do still have some cardstock die cut tree packs in stock if you'd like to make something similar. I think this could be a fun craft project to do with kids too! As you'll see below I played around with using the trees to make a garland but ultimately decided to add them to my tree this year and then string them together as a garland for future seasons.
You can see Part 01 of my mixed media trees here.
Let's dive in to the video that shows more of the second half of my process:
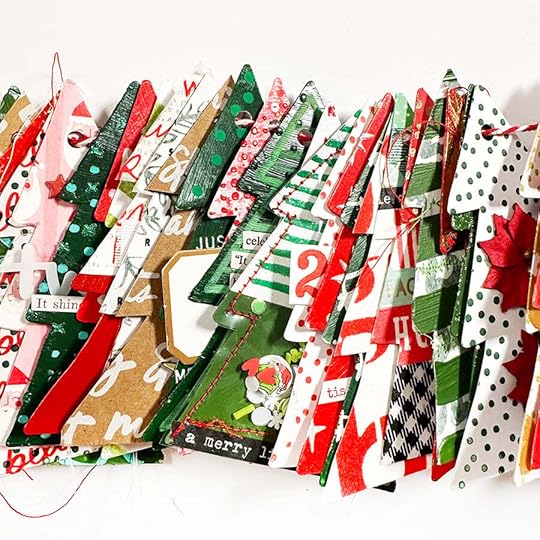
Here's a bunch of the newer ones:
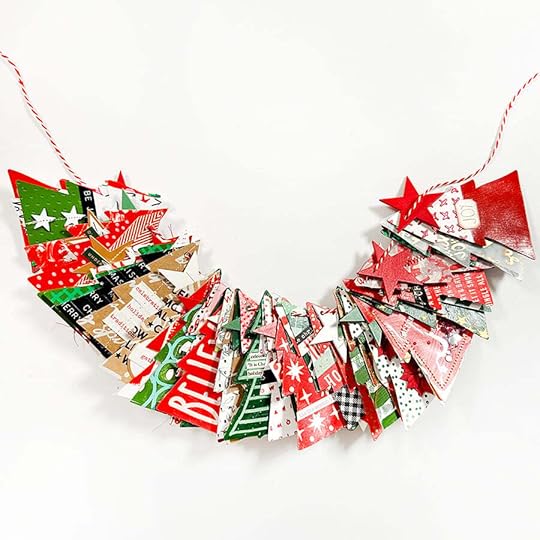
I added
wood stars in between each group of five trees.
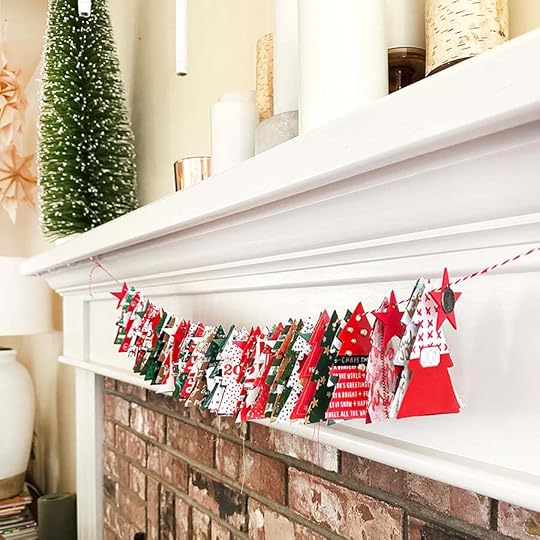
I thought about hanging them as a garland but then decided I could do that next year and pivoted back to my original idea which was to add them to my tree to create a tree of frees.
Before I took them off the string and added them to the tree I used Posca Paint Pens to create simple patterns on the back (dots, stripes, etc).
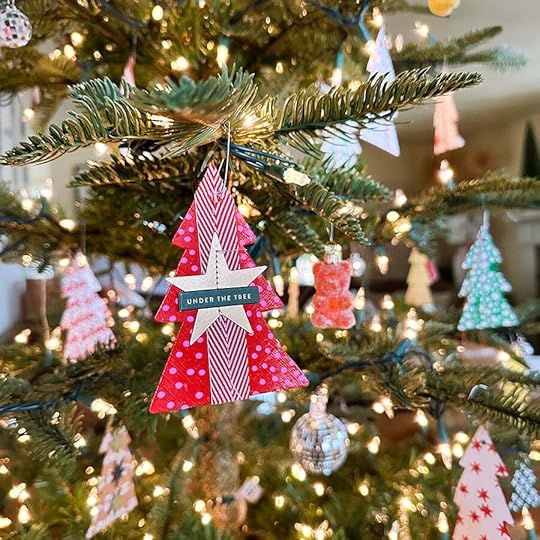
I also decided to add some of the wood veneer stars. I used a Crop A Dile to punch holes and then an ornament hanger to add them to the tree.
I also cut a bunch of trees using the
tree metal die. These ones are double sided:
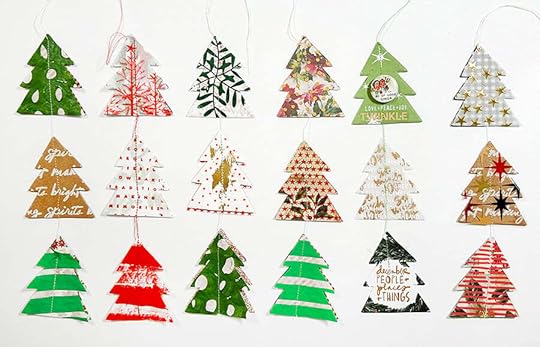
For these I used the metal die and a manual die cutting machine. I used papers I painted along with papers from a past Tim Holtz Christmas release (those were double sided and made this even easier). To attach them together I run them through my sewing machine.
Side Two:
I decided to hang these on the tree too. I love how they look on there and I might do a few more. I punched a hole in the top tree and then used an ornament hanger to place them around the tree.
December Daily® Die Cut Trees December Daily® Metal Tree Die December Daily® Holiday Tree 6x8 Stamp December Daily® Scalloped 6x8 Stamp Set December Daily® Holiday Phrase 4x6 Stamp December Daily® 4x6 Number Stamp Set AED Paint Pack (on sale) December Daily® 2024 Stencils December Daily® 2024 Silkscreens Grafix Plastic Deli Sheets Sizzix Big Shot Manual Die Cutting Machine POSCA Paint Pens Blue Tape Scrapbook.com Artis Craft Glue (dries clear) Anti Static Pouch (for embossing) Gold Embossing Powder Embossing Ink Embossing Pen Distress Rock Candy Glitter Heat Gun Snappy Tray Tim Holtz Stencils The Crafters Workshop Stencil Butter Holiday Pack Palette Knives The Crafters Workshop Foil Transfer Sheets The Crafters Workshop Tacky-When-Dry Gel Medium Additional supplies via my Amazon Storefront


