
Rinku Bhattacharya's Blog, page 18
December 20, 2020
Whole wheat Sourdough Pita
 Like many others, my sourdough adventures started with COVID 19. Recently my son enquired about Pinocchio (my starter’s age). Well, born in April 2020, he is about 9 months old. Reminding me of how long we have been coping with the pandemic. The latest in my round of sourdough adventures is Sourdough Pita. Whole wheat sourdough Pita to be specific. Once you realize how easy it is to make these beauties, you will never buy readymade pita again. And like all things sourdough, it needs a wee bit of time, but is easy and super flavorful.
At baseline plan on about 5 hours of rising time, with active starter. However, something quite magical happens if you let the dough rest in the refrigerator for 2 days doing a cold rise. In addition, to having the dough available for you, the flavor deepens and creates something light and fluffy.
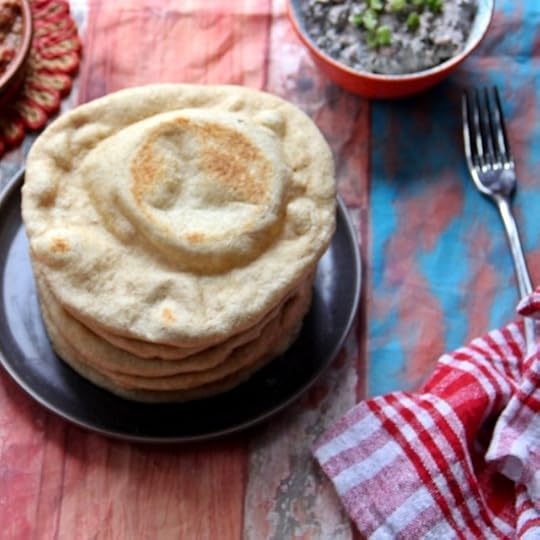
Now, you can use my recipe and add a tablespoon of quick rise yeast. It is not quite as much fun, but, it gets the job done. Done fresh and fluffy, these whole wheat pita’s are a good substitute for Naan, and have the benefit of being vegan. And the whole wheat flour that I use for this recipe is atta, or Indian whole wheat flour.
And I cannot believe that the year is truly drawing down to a close. While there are few things to be grateful about, if I am truly being honest it is not the best of years. Just is not. I want to be able to travel to India. I am worried about my mother, who is alone dealing with all the craziness of COVID. There I said it, and now we can get back to business of making soft and puffy pita breads.
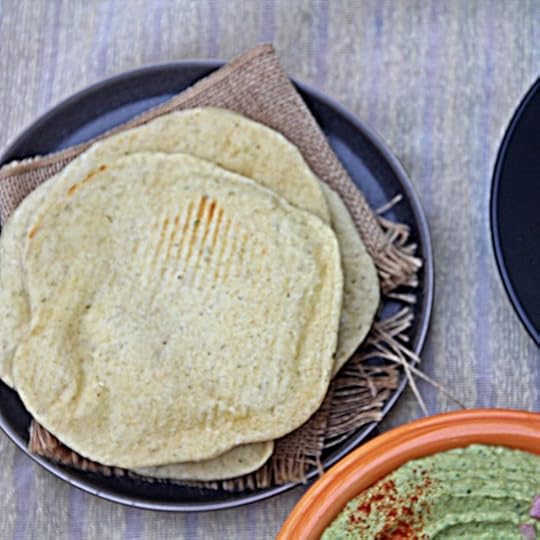
A few things that I found that helps with the formation of the pocket.
Allow your dough to rise for 2 cycles. As in give it a good knead after 3 hours, and allow it to rise and double again.
Make sure your oven in nice and hot, yes, the 425 degrees is essential.
Let is rise undisturbed for the 4 minutes, do not open the oven door while it is cooking.
Do not roll them out too thin or thick. About 1/2 cm in thickness seems to work.
While the unused ones will stay, I just think it is so much fun to actually make them fresh. It is a better idea to have the dough handy.
And our new favorite thing to enjoy has been pita bread with this avocado hummus. Pita pockets just seem to be so much work.
PrintWhole wheat Sourdough Pita
Prep Time: 5 hours, 10 minutes
Cook Time: 10 minutes
Total Time: 5 hours, 20 minutes
Yield: Serves 6 to 8

An easy to make wholesome take on sourdough pita. You can make with yeast as well.
Ingredients
2 cups of whole wheat flour such as atta1 teaspoon salt
3/4 cup active sourdough starter (see notes for using yeast)
2 tablespoons olive oil
1/2 cup water as needed to form the dough
Instructions
Place the whole wheat flour, salt, and active starter in a food processor and pulse to mix. Add in the olive oil and just enough water to form a soft and smooth dough. This should not be wet.Cover in a large bowl and set aside in a warm place for about 3 hours. Your dough should have risen and doubled by now.
Mix well and set aside to rise again. In about 2 hours, this should have doubled.
Turn the oven on to 425 degrees. Line a baking sheet with parchment.
Break the dough in balls about the size of a small orange. Roll out into 6 inch rounds about 1/2 cm in thickness. Use flour as needed for rolling.
Place on the baking sheet and in the oven for 4 minutes. Your pitas should puff up. Note, not all my pitas puff up completely, but they still taste amazing.
Notes
To use yeast add 1 tablespoon of yeast in warm water or milk with a little sugar and when frothy add to the flour and continue as described.
3.1https://spicechronicles.com/whole-wheat-sourdough-pita/
The post Whole wheat Sourdough Pita appeared first on Spice Chronicles.


December 17, 2020
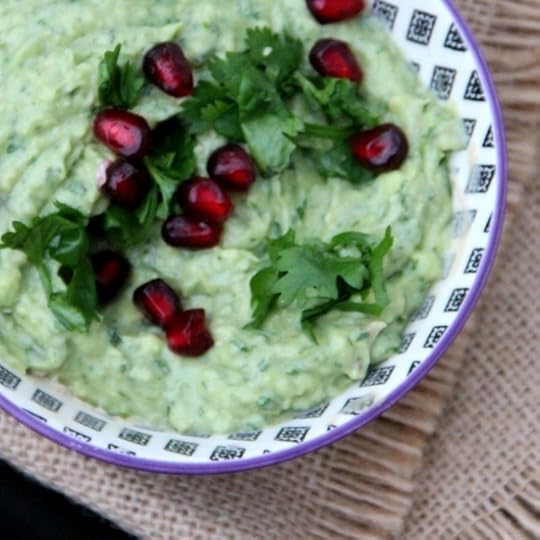
Avocado Hummus
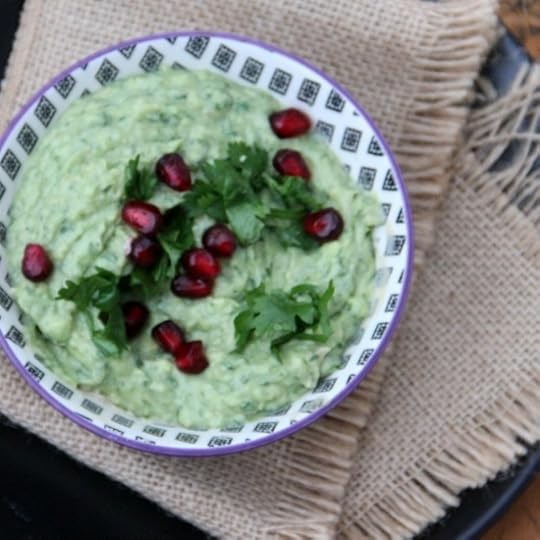 One of our favorite discoveries this year is the convenience of dips and spreads. Making a bunch of them, with good breads is a really convenient meal for all at home. And this Avocado Hummus is one of our favorite contenders for good dip status. But, there are quite a few other right where this came from.
As we all know, avocado hummus is an adapted thing. And what a lovely idea it is. Adaptations and getting things to work for you differently is not a bad thing. In my humble opinion, learn from grandma, but pause and make something your own. Lightning will not strike. In fact, the clouds will part and you will relish the rays of sunshine.
Today is this super snowy day here. I am grateful for a little reprieve in the general pace of things. There is always something pristine and beautiful about the first snow of the season. My son is lamenting the fact that he does not have a snow day today. Indeed, with the new normal of everything being remote, snow days just might be fewer and far between.
I am however grateful that I can work in my PJ’s. We should have a mandatory work in your PJ’s day ever so often. It makes things more relaxes.
Down to the hummus,
I use a lot of avocado, mint and chickpeas to make this happen.
The olive oil can certainly be skipped or reduced significantly any way.
I make my chickpeas in the instant pot, but steamed chickpeas like these are also a great idea for this recipe.
It is a great marriage of traditional hummus and guacamole leaning more towards the hummus. Yes, the bright green color would have you think otherwise.
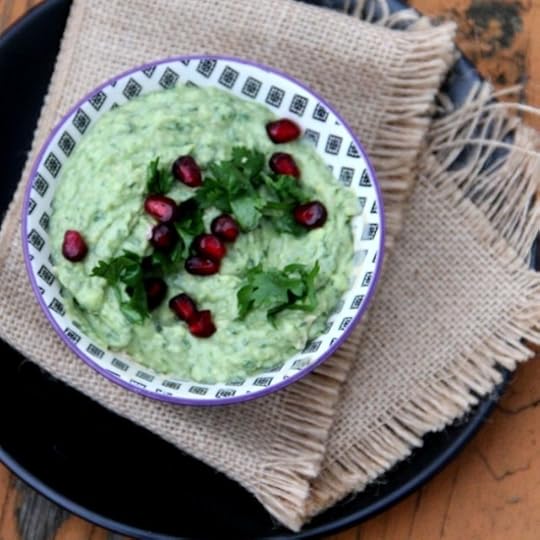
This is great with fresh pita or over wedges of a good baguette.
If you like this recipe and want more ideas, do join my Indian Instant Pot Facebook group and Legume Love Group. Of course Instant Indian is waiting to be ordered, joining its siblings The Bengali Five Spice Chronicles and Spices and Seasons.
PrintAvocado Hummus
Prep Time: 25 minutes
Total Time: 20 minutes
A smooth green avocado hummus, that is healthy, rich, and very flavorful.
Ingredients
3/4 cup cooked chickpeas1/2 cup chopped mint
1/2 cup chopped cilantro
1 teaspoon salt to taste
1 green Serrano chili
2 tablespoons tahini
1/4 cup lime or lemon juice or to taste
1/4 cup water
2 medium sized ripe avocadoes
Pomegranate seeds to garnish
Instructions
Place the chickpeas and the mint, cilantro, salt, serrano chili and tahini in a food processor. Blend until smooth. Add in the lime juice and water and blend until smooth.Add in the avocadoes and process until smooth.
Place in serving bowls and garnish with pomegranate seeds.
3.1https://spicechronicles.com/easy-and-healthy-avocado-hummus/
The post Avocado Hummus appeared first on Spice Chronicles.
December 8, 2020
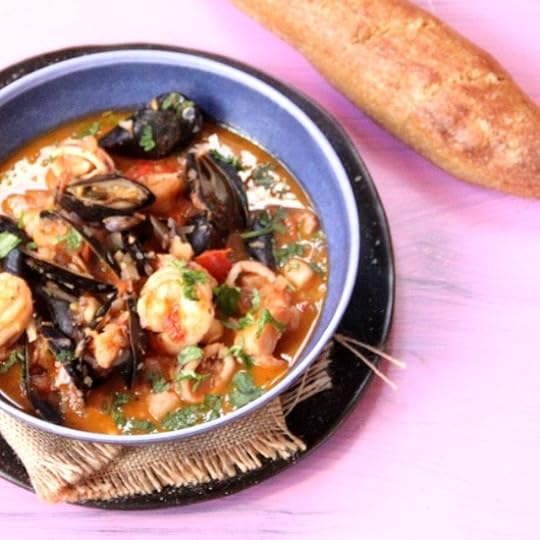
Cioppino – Seafood Stew
 And just like that it is stew and soup weather. I tried making Cioppino and am happy with the results. My version is simple and satisfying offering the perfect excuse to visit the seafood market. After perusing a few recipes, I have adapted my recipe closely following this one.
Cioppino is a classic Italian American stew that hails from San Francisco. It is festive and comforting and easy to put together.
Most of the recipes, I looked at had fairly large quantities of seafood. My version is scaled down to allow a comfortable amount for 4 to 6 servings. So naturally, you can double this if you want to accommodate a larger group. Most recipes call for white wine, but it looks red wine is also an option.
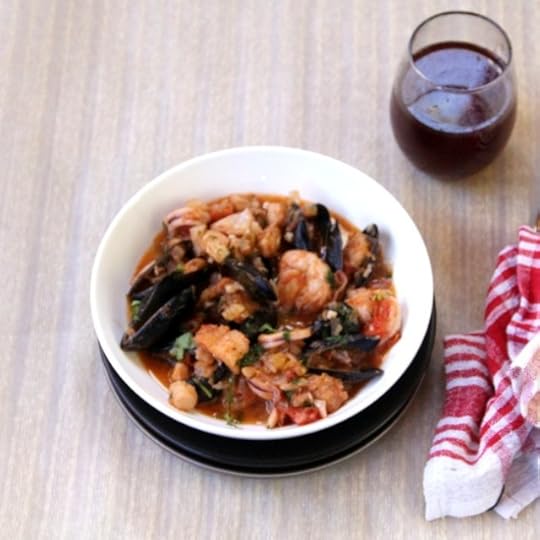
To keep things simple, I used fresh cod, bay scallops, shrimp, squid, and mussels. The clams can certainly be substituted for the mussels. Or a combination of mussels and clams can be used. The shrimp adds some nice body to the dish, so I would say that it is a keeper.
The base can certainly be done in the instant pot. I will save that for a later day. My signature addition to the recipe is ramping it up with more herbs. The rosemary and thyme are my enhancements. The parsley and oregano are essential to the flavor of the dish.
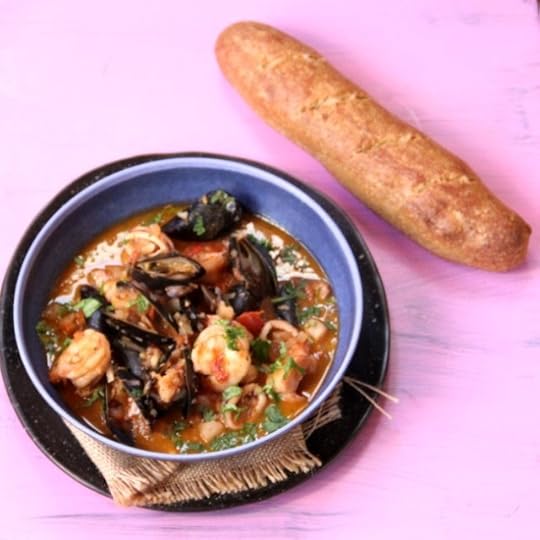
And, you need good bread with the Cioppino. It is almost like a comforter in winter. It completes the season. And, I learnt how to make sourdough baguettes. And, it is a monster. I think the baguettes are my favorite sourdough creation yet.

The next few weeks are beyond predictably busy at work. Meals like this are a lifesaver as they are festive and feel like a lot of work. This said, unlike some of dishes making a cioppino will entail a trip to your market. The assortment of fish needs to be fresh. So the only thing needed for the cioppino is a little planning.
Now without much fuss, here is my recipe.
PrintCioppino – Seafood Stew
Prep Time: 15 minutes
Cook Time: 45 minutes
Total Time: 1 hour
Yield: Serves 4 to 6
A gorgeous seafood stew from San Francisco, Cioppino is a festive one pot meal.
Ingredients
1/4 cup extra virgin olive oil4 shallots or 1 large onion diced
4 cloves of garlic, chopped
1 small fennel bulb, cut into small pieces
2 to 3 bay leaves
1 teaspoon red pepper flakes or to taste
2 cups diced tomatoes (canned with juices)
1 and 1/2 teaspoons salt
1 teaspoon dried oregano
1 teaspoon chopped thyme
1 cup white or red wine
1 cup clam juice
2 cups water or broth
1 teaspoon chopped rosemary
3/4 pound white fish such as cod cut into pieces
1/2 pound shrimp, shelled and deveined
1/2 pound scallops or bay scallops
1/2 squid, cleaned and cut into rings
20 to 25 mussels, scrubbed and de-bearded
1/2 cup chopped fresh parsley
Instructions
In a large pot heat the oil and add in the shallots or onion and the garlic and fennel and cook for about 6 to 7 minutes, until fragrant.Add in the bay leaves, red pepper flakes, diced tomatoes, salt, oregano, thyme, and the wine, clam juice and broth or water. Bring to a simmer and allow it to simmer for about 10 minutes. I use this time to prep and clean the seafood.
Add in the white fish, shrimp, scallops and squid and cook for 2 minutes. Gently add in the mussels and cook until all the mussels open. Discard any mussels that do not open.
Check the seasonings and add in the parsley. Serve hot with bread for dipping.
3.1https://spicechronicles.com/cioppino-seafood-stew/
The post Cioppino – Seafood Stew appeared first on Spice Chronicles.
December 6, 2020
Caribbean Sorrel
 I tasted Caribbean Sorrel about 2 years ago. The tangy refreshing quality hit me instantly. I love this drink. Both alcoholic and non-alcoholic versions. The lovely lady whose recipe I mostly stick to is from Antigua.
I see that there are several general variations of this absolutely gorgeous drink. Citrus, sorrel and spice make it a great fit in my kitchen. The warming spices give this drink a feel good festive flavor.
If you are Bengali like me, I have grown up with hibiscus or sorrel. It is the preferred offering to the goddess Kali. Devotees ensure that their offerings include a fresh garland of these flowers. It is always interesting for me to see how the world is interconnected.

So, down to this drink, it is sweet, fragrant and naturally tangy. If you are looking for Sorrel, they can be readily found dried in most stores.
In the Islands sorrel or hibiscus planting starts early in the year, in time for a December harvest
All working out to make this a gorgeous Christmas drink. In terms of making the drink, I make it in the Instant Pot. Seriously, you knew that was coming right? Well, you can simmer it on the stove top following the same general directions. Just as a note, I have not tried making this in the instant pot using fresh sorrel.

In general,
Do not over do the spices, you want them to complement not compete with the natural flavors of the sorrel.
If you can, allow the drink to steep well for a couple of hours before straining and serving. So, essentially, if doing the instant pot thing just let this rest in the instant pot.

If you like this recipe and want more ideas, do join my Indian Instant Pot Facebook group and Legume Love Group. Of course Instant Indian is waiting to be ordered, joining its siblings The Bengali Five Spice Chronicles and Spices and Seasons.
PrintCaribbean Sorrel
Prep Time: 5 hours, 5 minutes
Cook Time: 15 minutes
Total Time: 5 hours, 20 minutes
Yield: Serves 4 to 6

A refreshing drink that is great as tangy spicy punch.
Ingredients
1/2 cup dried sorrel (hibiscus flowers)5 cups water
2 to 3 cloves
1 tablespoon finely chopped fresh ginger
3/4 cup sugar
1 teaspoon all spice
1 or 2 pieces star anise
1/2 cup white rum (optional)
2 to 3 oranges or clementine slices
Instructions
Place the sorrel flowers. water, cloves, ginger, sugar, allspice and star anise in the instant pot and pressure cook for 1 minute and allow an natural release. Alternately simmer on the stove top for 5 to 10 minutes.Cool slightly and strain the drink. Place in a pitcher. Add in the rum and orange slices. Chill thoroughly before serving.3.1https://spicechronicles.com/caribbean-sorrel/
The post Caribbean Sorrel appeared first on Spice Chronicles.
December 3, 2020
Creamy Coconut Mint Saag Chicken
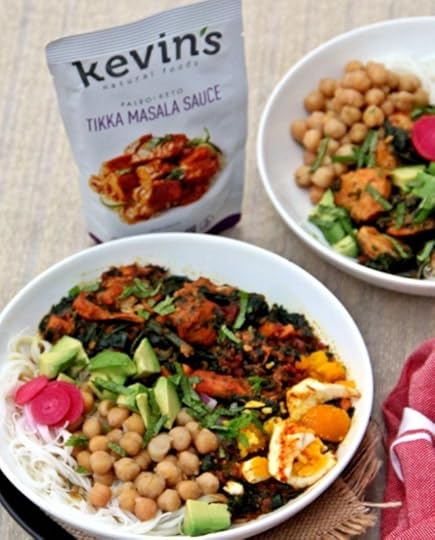
 This post is Sponsored by Kevin’s Natural Foods. I recently received some of their sauces to work with. And, here is my first recipe that I made with the sauces. I will confess that I am skeptical of premade sauces. In particular, premade Indian sauces. However, the flavors of Kevin’s Tikka Masala worked out really quite well. Having a bunch of these sauces on hand is a seriously good idea. Especially with the need for more home cooking courtesy COVID-19. Mint saag chicken, given this dish a bright and nutritious power boost.
Strictly speaking the sauce did not need a lot, however, I wanted to create something that added both protein and veggie goodness to the dish. In line with winter, I also ensured there is a pop of brightness in the flavor. So, I simmered chicken with pureed ginger, turmeric, mint and lots of spinach. Of course, some of the Kevin’s Tikka Masala sauce to create an easy and flexible option. Adding in some coconut milk was a good call, and lastly I finished this with some lime juice. If you are adhering to dietary restrictions, the sauces are both Keto and Paleo. And, the chicken curry as I have prepared it actually also fits the bill.

If you are an instant pot aficionado like me, this is a great Instant Pot recipe. I am constantly on the lookout for quick and easy life solutions. This being said, as someone who does a bulk of the cooking for family, it is important for me to ensure taste and healthy options.

These sauces are all natural and highly adaptable. Saag is the Indian generic word for greens. Instead of the spinach you can adapt with any and all kinds of greens.
I have served them with all kinds of sides and toppings,
Chopped avocadoes
Pickled Vegetables
Chickpeas (if you you so choose)
Chopped Boiled Eggs
And just a good one pot meal by itself.
With the right combination of bright flavors and maybe 15 minutes of additional effort, you can enjoy this bright recipe. If you want to use a homemade Tikka Masala sauce, you can always use the recipe from Instant Indian.
If you like this recipe and want more ideas, do join my Indian Instant Pot Facebook group and Legume Love Group. Of course Instant Indian is waiting to be ordered, joining its siblings The Bengali Five Spice Chronicles and Spices and Seasons.
PrintCreamy Coconut Mint Saag Chicken
Prep Time: 5 minutes
Cook Time: 20 minutes
Total Time: 25 minutes
A beautiful bright and comforting curry made with pre-made tikka masala sauce, spinach and mint.
Ingredients
1 tablespoon ghee1 tablespoon minced ginger
1/2 teaspoon turmeric
2 pounds boneless skinless chicken thighs cut into pieces
1 cup Kevin's Tikka Masala Sauce (see note)
1/2 cup coconut milk
2 cups chopped fresh spinach (about 6 ounces)
1/2 cup coarsely chopped mint leaves
Optional to serve
Sprouts
Pickled Vegetables
Chopped Eggs
Chopped Avocado
Chickpeas
Instructions
Heat the ghee in a skillet and add in the minced ginger, turmeric and the chicken and sauté lightly for 3-4 minutes.Add in the Chicken Tikka Masala sauce and coconut milk and cover and simmer for 15 minutes, until the chicken in tender. To do this in the instant pot, you can cook for 4 minutes on high pressure and then do a quick release.
Remove the cover in the spinach and mint and cook for another 2 minutes until the spinach and mint is wilted.
Serve by itself or with your choice of suggested topping.
Notes
If you want you can make this with any pre made tikka masala sauce, such as my recipe from Instant Indian.
3.1https://spicechronicles.com/creamy-coconut-mint-saag-chicken/The post Creamy Coconut Mint Saag Chicken appeared first on Spice Chronicles.
December 1, 2020
Marbled Chai Spiced Buttermilk Banana Bars
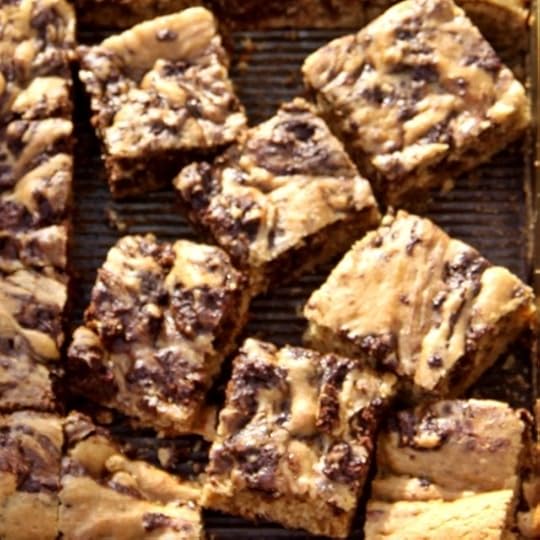 I am not a huge fan of winter. But every season has its moments. Winter’s moments include warm beverages paired with something soothing warm and fragrant. Much like these Marbled Chai Spiced Buttermilk Banana Bars. If you know my family, we have a difficult time truly agreeing on anything food. Well, other than the fact that we all love to eat. It is not different for sweet treats. This is where a ridiculously simple and multilayered cake comes in handy. These bars are in the style of a snacking cake, they are quick, simple, and not overly sweet. But in their simple appearance lurks loads of flavor. A wide array of magical notes that hit you in different ways when you enjoy these bars.
The cake gets a nice amount of lightness from the buttermilk, notes of spice from the orange, cinnamon, cloves and ginger. To ensure that the marbling keeps up with with the spice this has both coffee and cocoa. And anything that uses bananas just makes for a warm moist hug. This cake takes about 15 minutes to put together. Around the time it takes for the oven to reach the baking temperature. So, there really is no reason not to make it anytime the craving hits. And it is one in bowl. In fact, my food processor toe be specific.

In terms of the fussy factor, this cake makes banana bread people (read my daughter), citrus and spice people (red me) and chocolate people (read everyone in the house except me). Now, the marbling is all about a mocha component. Interestingly enough, I am surprised to see how much difference a little coffee can make with the chocolate action. If like the rest of my family you like chocolate, consider this absolutely luscious instant pot chocolate pudding.

There is little to offer by way of tips. Just through everything in and bake. It really is just that simple.
At home or not. This ridiculously simple and easy to make snacking cake will make you happy. And, yes, just like that it will make you smile about a chilly winters day.
PrintMarbled Chai Spiced Buttermilk Banana Bars
Prep Time: 15 minutes
Cook Time: 30 minutes
Total Time: 45 minutes

An easy to put together fragrant and soft marbled Buttermilk Banana bar cake.
Ingredients
1/2 cup butter, can be cold or at room temperature, plus more to great the baking sheet11/4 cup light brown sugar
2 eggs
1 teaspoon vanilla extract
zest and juice of an orange
2 cups all purpose flour
1 teaspoon baking powder
1/2 teaspoon baking soda
1 teaspoon powdered ginger
1/2 teaspoon powdered cinnamon
1/2 teaspoon powdered cloves
3/4 cup buttermilk
2 tablespoons sour cream
1/2 cup good quality unsweetened cocoa
2 teaspoons instant coffee powder
Instructions
Preheat the oven to 350 degrees. Grease and prepare the baking sheet.I do this in a food processor, and you can do this using a mixing bowl and electric beater.
Place the butter, brown sugar, eggs. vanilla extract and beat well until well mixed. The mixture might look a little curdled but this fixes itself out when cooking.
Mix together the flour, baking powder, baking soda, powdered ginger, cinnamon, cloves. Add this into the butter mixture and mix well. Add in the buttermilk and sour cream if using.
Remove half the mixture and spread over the baking sheet. Add in the cocoa and coffee to the remaining mixture. Give it a good mix.
Add to the plain mixture and swirl it unevenly to create a marbled effect. Bake for 25 to 30 minutes, until the cake is done. Check with a toothpick inserted in the mixture to ensure that it is cooked through.
Cut into bars and enjoy!
3.1https://spicechronicles.com/marbled-chai-spiced-buttermilk-banana-bars/
The post Marbled Chai Spiced Buttermilk Banana Bars appeared first on Spice Chronicles.
November 29, 2020
Perfect Egg Biryani (Stove Top or Instant Pot)
 Since I have nothing better to do, I spent a large part of today, testing and trying the Perfect Egg Biryani. I worked with getting this done in both the stove top and the Instant Pot. Well, here is the deal, I am doing this for a project. But, given my instant pot affection I wanted to see what worked better. And honestly they both work fine. So the good news here is you can try this recipe and cook it however you wish to. The Instant Pot will save you from needing to seal the pot, but it takes a little longer to fry the onions in the instant pot. So it really depends on you.
Biryani comes to the Indian Subcontinent by way of Persia. The word Biryan, which translates to fried before cooking. The dish traveled to India during the times of the Moghul Empire, and what is fascinating how every region of the sub-continent has added its own custom touches to this iconic dish. A good Biryani is worth every minute of its precise fragrant slow cooking magic.

A general note, like a lot of dishes that travel the sub-continent the Biryani has many different styles across the sub-continent. If you want more biryani options, try my Lunchbox Chicken Biryani.
The best cohort for a biryani is raita, you can try this with this easy pomegranate raita.
This egg Biryani, is done in the Kolkata style of sealed pot cooking. The good news about doing this recipe is that most of the cooking is hands off. Here are my suggestions for ensuring the best results,

If you are doing this on the stove top (instructions in notes) do not skip sealing the pot.
The water needs to be relatively precise as you want to make sure that the rice is cooked through and not dry.
I highly recommend keeping the egg aside after frying as you do not want the yolks dried out.
As with any recipe, use fresh homemade garam masala or Biryani masala and good quality ghee.

Another week is on its way. I am a little wistful that the long weekend is over, but here is to a lovely week ahead.
If you like this recipe and want more ideas, do join my Indian Instant Pot Facebook group and Legume Love Group. Of course Instant Indian is waiting to be ordered, joining its siblings The Bengali Five Spice Chronicles and Spices and Seasons.
PrintPerfect Egg Biryani (Stove Top or Instant Pot)
Yield: Serves 6 to 8

A gorgeous and deeply flavorful take on egg biryani, done either in the instant pot or stove top.
Ingredients
For the Eggs8 hard boiled eggs (done for about 7 minutes)
1/2 cup yogurt
1 teaspoon turmeric
1 teaspoon ginger paste
1 teaspoon garlic paste
1 and 1/2 teaspoons red cayenne pepper
For the Biryani
1/4 cup oil plus 1 tablespoon oil
1 tablespoons ghee plus 1 tablespoon
2 onions, thinly sliced
1 teaspoon fresh ginger paste
1 teaspoon fresh garlic paste
1 and 1/2 cups extra long grained basmati
2 bay leaves
1 tablespoon garam masala
1 teaspoon red cayenne pepper
6 to 8 baby potatoes, peeled
1 cup finely chopped mint leaves
1 cup yogurt or buttermilk
2 teaspoons salt or to taste
1 and 1/2 cups water
Chopped cilantro to garnish
Instructions
Peel the eggs and gently slit them on each side, about 1/3 inch. Mix the yogurt, turmeric, ginger paste, garlic paste and red cayenne pepper. Add the eggs to this mixture and allow it to coat. Let the eggs rest for about 30 minutes in this mixture.Turn the instant pot to sauté mode. While the eggs are marinating. Add the 1/4 cup oil and 1 tablespoon of the ghee and add the onions and fry until golden and crisp. This will take about 8 minutes. Remove half the onions. Add in the eggs and cook until the eggs are lightly seared. Remove the eggs.
Add in the rice and the remaining 1 tablespoon of oil and add the ginger and the garlic and sauté lightly.
Add in the rice and stir well. Add in the bay leaves, garam masala, red cayenne pepper and the baby potatoes and the mint leaves. Stir in the yogurt and the salt. Add in the water. Set to rice mode and cook and allow a natural release.
Remove the pressure, mix in the eggs, and the reserved onions. Add in the remaining tablespoon of ghee and chopped cilantro.
Serve hot.
Notes
Stove top Method
You will need water and flour mixed to form a ball of dough. This should be enough to line your pot.
You will need 3 cups of water, instead of 1.
Peel the eggs and gently slit them on each side, about 1/3 inch. Mix the yogurt, turmeric, ginger paste, garlic paste and red cayenne pepper. Add the eggs to this mixture and allow it to coat. Let the eggs rest for about 30 minutes in this mixture.
While the eggs are marinating, Add the 1/4 cup oil and 1 tablespoon of the ghee in a heavy bottomed pot and add the onions and fry until golden and crisp. This will take about 8 minutes. Remove half the onions.
Add in the eggs and cook until the eggs are lightly seared. Remove the eggs.
Add in the rice and the remaining 1 tablespoon of oil and add the ginger and the garlic and sauté lightly.
Add in the rice and stir well. Add in the bay leaves, garam masala, red cayenne pepper and the baby potatoes and the mint leaves. Stir in the yogurt and the salt. Add in the water.
Now form a rope using the dough and use this to line the pot. Cover the pot pressing into the dough, this will effectively seal the pot. Cook on low heat for 25 minutes. Let the rice rest for 10 minutes before prying open the seal.
Mix in the eggs, and the reserved onions. Add in the remaining tablespoon of ghee and chopped cilantro.
Serve hot.
The post Perfect Egg Biryani (Stove Top or Instant Pot) appeared first on Spice Chronicles.
November 27, 2020
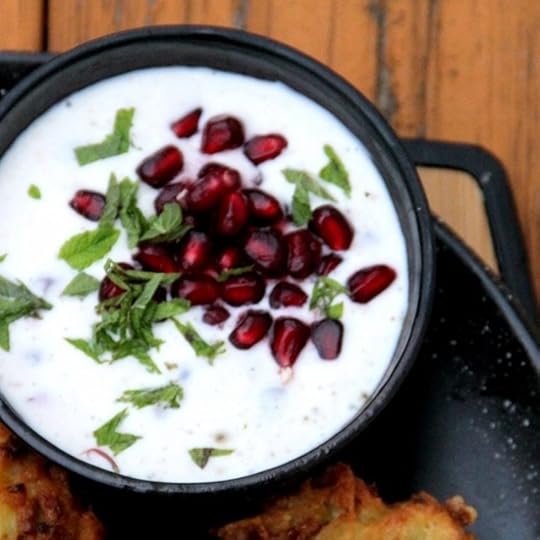
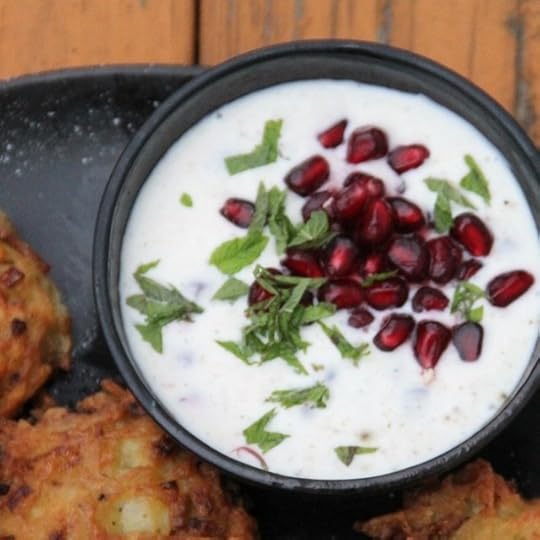
Pomegranate Raita
 This Pomegranate Raita is one of my favorite things to make this time of the year. It is not anything complex, but I make it often enough to want to write it up. And believe it or not, one of my favorite things to serve this with is latkes. And truth be told, latkes are one of our favorite holiday foods. Crisp potato or other vegetable pancakes, these babies are quite magical. However, this raita brightens most tables and is great for all things raita.
Thanks to the instant pot, there is never a dearth of good fresh natural yogurt in our house. Here is how I make my yogurt. And, yes you will find plenty of basic recipes like this in the Instant Indian cookbook. Hanging out right there with the more complex sort of stuff. And, today is day one post Thanksgiving in the time of COVID, a very quiet kind of day. I guess, I should be grateful that I like the quite solitude of our house as much as I like company. Yes, I certainly miss the ability to catch up with friends which is what I usually do this weekend. This said, the house is peaceful and nice and clean. My son’s gift to me has been to organize my pantry.
It is a super thoughtful gift. For all my culinary prowess, I am a bad housekeeper. It took him sometime to get things where they are. All in all, extracting a promise from me to try and keep it this way forever. I will try. Especially since with COVID, I really have reduced my habit of buying more things than I need.
Down to this raita, it pretty and tangy with a nice hint of sweetness from the pomegranate seeds. And a raita for the uninitiated is an Indian type yogurt salad. It is served as a condiment and it lends a cooling quality to the spicier offerings on the table. Here is a cucumber raita and a beet raita.
Just a few little tips,
Do not clutter the flavors in the raita, it will help the flavors of the pomegranate shine.
I add in just a little chat masala to the raita, and that is enough to round out the flavors.
Use relatively fresh yogurt. This is important when making fruit raitas.
As a variation you can throw in some diced pineapple and red onions.

Have fun with this raita and let me know how you made it your own.
If you like this recipe and want more ideas, do join my Indian Instant Pot Facebook group and Legume Love Group. Of course Instant Indian is waiting to be ordered, joining its siblings The Bengali Five Spice Chronicles and Spices and Seasons.
PrintPomegranate Raita
Prep Time: 15 minutes
Yield: Serves 4 to 6
A beautiful fresh and vibrant raita. This is a great way to enjoy pomegranates.
Ingredients
1 cup natural yogurt1 to 2 teaspoons chaat masala (this depends on taste)
3/4 cup pomegranate seeds (about 1/2 a large pomegranate
3 to 4 tablespoons chopped mint
Instructions
Beat the yogurt with the chaat masala until the mixture is smooth and well mixed.Stir in all but 1 tablespoon of the pomegranate seeds. Stir in the chopped mint. Place the raita in a serving bowl. Garnish with the reserved tablespoon of pomegranate seeds. Let the raita rest for about 15 minutes and serve and use as desired.3.1https://spicechronicles.com/pomegranate-raita/
The post Pomegranate Raita appeared first on Spice Chronicles.
November 26, 2020
The Perfect Latke (Potato Pancake)
 If you peruse through this site, you will find that we are huge fans of all things latke. There is something magical about the simplicity of a vegetable pancake. And, this is how I make the classic potato pancakes. Or what we in the Spice Chronicles household, refer to as the perfect latke. There are a few degrees of separation here and there. However, it had all the elements of a classic potato pancake. And, frankly it is hard to visualize something less perfect than crisp, hot, and flavorful potato pancakes.
In a year, where people are still sorting out feelings and emotions. Trying to reflect on how to brace for winter. There is a crying need for simple comfort. This is where a simple classic potato pancake or the perfect latke fits in.
On a day like today, when I am feeling peaceful, I feel the need to write down an essential recipe that we love. And, while my serving these with pomegranate raita might seem a little unconventional, let me assure you, my latke game is pretty spot on. In fact, in addition to these mostly conventional ones, I have a tandoori spiced cauliflower latke, and a harvest vegetable variation as well.

And look if creme fraiche is your thing, you can actually try making some at home. And I have a gently spiced take on applesauce too! However, let us focus on the star of the show, which are the latkes. A good latke is a happy marriage of potatoes and onions, and maybe garlic if you want to push the envelope just a little bit. Latkes done right, should be crisp around the edges and creamy and softer in the center.
Here are my tips and suggestions on how I do this right.
We start with the potato, and the potato of choice really is the homey starchy russet. The high starch content in these potatoes allow them to bind well, ensuring good tight latkes.
The preferred cooking medium is schmaltz, which is rendered chicken fat. Now, by all means if you can find some use it. What I do is add in some ghee to my cooking oil to give it flavor without dealing with the schmaltz.

Then there is the onion, I actually like using shallots as they are a little sweeter.
Lastly, I strongly recommend using a hand grater for the potatoes. It takes a little bit longer, but the texture is well worth it.
And then there is the frying, you want to fry them low and slow.

And of course, serve these just before you are ready to eat them. They are best served piping hot. And these are the reason, why we love Hanukah.
PrintThe Perfect Latke (Potato Pancake) and Radish Creme Fraiche
Prep Time: 45 minutes
Cook Time: 30 minutes
Total Time: 1 hour, 15 minutes
A recipe for latkes or classic potato pancakes.
Ingredients
for the latkes2 large russet potatoes (about 1 and 1/2 pounds)
1 tablespoon kosher salt
2 shallots, very finely chopped
1 teaspoon minced garlic (about 3 cloves)
1 egg beaten
1/3 cup flour or matzo meal
2 cups of grapeseed oil
2 tablespoons clarified butter
Apple sauce and or Creme Fraice for Serving
Instructions
Peel the potatoes grate the potatoes using the large side of a box grater and place in a colander.Add in the kosher salt and let the potatoes rest for 30 minutes to an hour allowing the water to drain from the potatoes, squeeze out any excess water.
Place the potatoes in a mixing bowl and add in the onion and garlic and mix well.
Beat the egg and add in the flour or matzo meal.
Place the oil and the butter in an eight inch cast iron skillet and heat on medium heat until well heated, test with a tiny bit of batter it should sizzle and rise to the top.
Lower the heat a little (mark 3 or medium low) and add the potato pancakes in small tablespoons about 3 inches in diameter, about 3 to 4 at a time. Note, you can always use a larger skillet and do more at a time.
Fry them on medium low heat undisturbed for about 3 minutes and turn, you want an even golden color, not too dark.
Cook the other side and drain on paper towels before serving. These latkes like other deep fried things need patience, so I would actually do other things such as mix the toppings while they are frying to resist the urge to keep turning them.
3.1https://spicechronicles.com/the-perfect-latke-potato-pancake/
The post The Perfect Latke (Potato Pancake) appeared first on Spice Chronicles.
Turkey Legs Confit with Garlic and Rosemary
 So, this year like many of you my Thanksgiving is a simpler, quieter affair. Instead of the whole bird, I made Turkey Legs Confit. And, I am absolutely thrilled with the results! This is one for the books. I am mostly done with enough time to spare and sneak in a post. See, I like that! However, I also want to fanfare and the company of many people around the table. And then, I also want to feel done with dinner and take a break to share some of my cooking. That is the problem I feel with me anyway, I want it all. Well this year, it is the turn of quiet and tranquility. As always, I love Thanksgiving as the holiday gives me a time to reflect acknowledge all that is good and relevant.
And now on to the Turkey Legs confit. A traditional confit is French in origin. It is a brilliant way of cooking (usually duck in its own fat) as a way of preserving it. And, when you see recipes adapting this technique for other poultry, they suggest cooking the bird in duck fat.
This being that it is mostly us. And, then factor in vegetarian daughter, even a small turkey seemed excessive. So, I opted for whole legs and wings and made turkey legs confit. And, I am quite hooked. It will be difficult to not want this back every year. It will take a little planning but the results are spectacular. I used EVOO to make the turkey. The oil added a not of flavor and acidity to the mix. The legs,

taste rich full of flavor and are deep and moist.
Need minimal hands on time to accomplish this rich full flavored goodness.
Are finished to perfect crispness.
The flavorful cooking oil can be strained and used for other things.
So yes, we get crisp outside and perfect deep and moist meat inside. So without much ado let me tell you how I did this. Before that let me take a moment to wish you and yours a very happy Thanksgiving.
PrintTurkey Legs Confit with Garlic and Rosemary
Prep Time: 24 hours
Cook Time: 3 hours, 30 minutes
Total Time: 27 hours, 30 minutes
Yield: Serves 4 to 6

An easy and very flavorful way to cook turkey legs. These turkey confit legs can be made ahead and enjoyed when needed.
Ingredients
4 turkey legs and 2 wings (about 7 lbs)1 lemon halved
1 tablespoon red cayenne pepper
2 tablespoons kosher salt
For the confit
3 cups EVOO
1 whole garlic, peeled and separated into cloves
3 shallots, halved
2 tablespoons whole black peppercorns
2 to 3 sprigs rosemary
2 springs thyme
Instructions
Wash and dry the turkey. Rub well with the lemon. Toss well with the cayenne and salt. Cover and set in the refrigerator the night before cooking the turkey.When ready to cook, preheat the oven to 300 degrees. Place the turkey in a large Dutch oven. Add in the oil, the garlic, halved shallots, peppercorns, rosemary and thyme.
Cover and let the turkey cook for 3 hours. Turn off the oven and allow the mixture to cool. Ideally place in the refrigerator over night, of not let it rest for 3 to 4 hours.
When ready to serve remove the meal from the cooking oil and place on a baking sheet. The oil can be straight and reused.
Cook in the oven at 350 degrees for about 20 minutes, until crisp and golden. Enjoy!
3.1https://spicechronicles.com/turkey-legs-confit-with-garlic-and-rosemary/
The post Turkey Legs Confit with Garlic and Rosemary appeared first on Spice Chronicles.


