
Rinku Bhattacharya's Blog, page 14
June 13, 2021
Cheesy Masala Laccha Paratha
 Much like Ferris Bueller’s day off, this weekend is Mom’s day/days off. It is after a long time I have been alone in the house. And, I have spent the weekend re-working a cheese paratha recipe that Aadi seemed to be interested in. The herb garden gets some love as well. And generally things have been manageably quiet. The cheesy Masala Laccha Paratha is one for keeps! What exactly might this be you wonder? So sit around and listen…
There are plenty of paratha or Indian flatbread recipes on this site. Classic Alu parathas, paneer parathas and this romanesco paratha just to name a few. Today’s paratha is just a little different. It takes a laccha paratha and spices it up. A laccha paratha is made by rolling the dough into a rope (aka laccha) and then coiled and rolled out. Typically this is plain and quite rich and flaky. In my version, I add the seasoning on the coil before rolling it out. It is actually quite foolproof as I press in any of the spilled seasoning onto coiled roll before rolling it out.
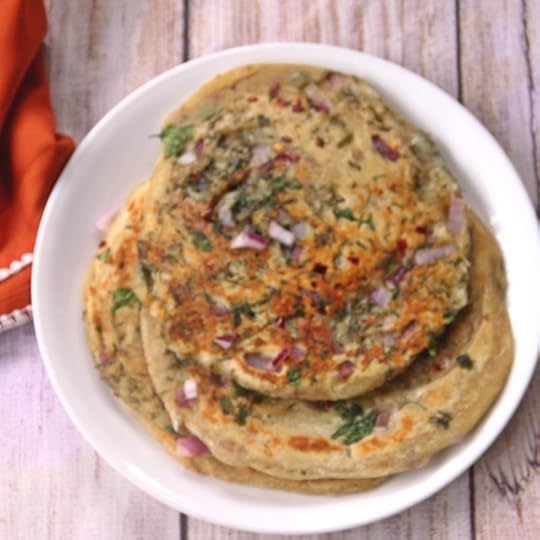
This paratha is crisy, spicy and golden brown from the melted cheese. The cheese is option and if you want to keep this vegan just increase the spice level on the flatbread. You can increase the spice level by increasing the red pepper flakes or adding in minced chilies. And for the cheese if you are using it, honestly I use the odds and ends on hand. If you have to pick, try a combination of pepperjack and some parmesan, but seriously use what you like. I use this recipe and many others to use what I have on hand.

A few things to note while making these parathas –
Allow the dough to rest to relax the doughIt is best to use the cheese in moderation, less is more here.You can freeze and re-heat when needed.The parathas are a hit me thinks. As for the weekend home alone, it is not bad once in a while.
So, try this and tell me what you think.
PrintCheesy Masala Laccha Paratha
Prep Time: 1 hour, 15 minutes
Cook Time: 20 minutes
Total Time: 1 hour, 35 minutes
Yield: Serves 4
Serving Size: 1 paratha

An easy to make paratha that is well seasoned, crisp and filling.
Ingredients
For the Paratha2 cups whole wheat flour (atta) plus extra for rolling
1 teaspoon baking powder
1 and 1/2 teaspoons salt
2 tablespoons yogurt
1 tablespoons oil
1/2 cup water or enough to for a pliable smooth dough
For the spice filling
2 tablespoons chopped red onions
1/2 teaspoon amchur powder
1 teaspoon salt
1 teaspoon red pepper flakes
2 tablespoons chopped cilantro
1/2 cup grated cheese
Oil for cooking
Instructions
Sift together the flour, salt, and baking powder into a mixing bowl. Rub in the yogurt and the oil until the mixture is crumbly. Add in the water gradually to ensure a nice pliable dough. Set aside for 30 minutes to an hour.In the meantime prep and mix the ingredients together for the spice filling
Give the dough a good knead. Break into 4 parts.
Spread a piece of parchment paper on the working surface. Lightly flour the parchment paper.
Roll out one of the dough balls into a rope about 1/2 thick. Carefrully press some of the spice filling across the lenght of the rope and roll into a coil to seal in the filling. Some of the filling will spill during this process you can press the coil to absorb this.
Gently roll out the dough into a circle, this has the tendency to be a little oval which is okay.
Finish all 4 parathas in this manner.
Heat a cast iron or other pan and press the paratha and heat for about 2 minutes and flip. You can add a little olive after 2 minutes. This paratha needs very little oil for cooking as the cheese melts and gives this a nice golden color.
Continue in this manner and serve hot.3.1https://spicechronicles.com/cheesy-masala-laccha-paratha/
The post Cheesy Masala Laccha Paratha appeared first on Spice Chronicles.


June 12, 2021
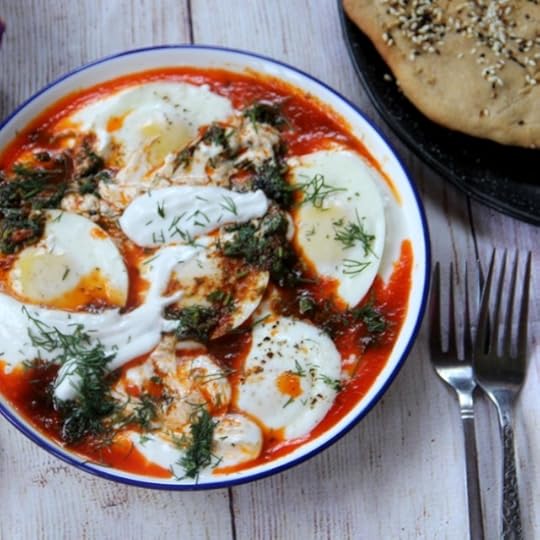
Cilbir – Turkish Poached Eggs in a Garlic Yogurt Sauce
 In looking at lively breakfast brunch options, I have eyed Cilbir. We have tried this lovely Turkish creation of poached eggs in a spiced yogurt sauce. Still, I did not know how the kids would react. I finally bit the bullet. In fact, even made some Turkish Flatbreads to go with them. The flatbreads are still a work in progress, but the eggs were a great hit. I am sure they will be back! By then, I will have my bread game perfected.
The brood has gone on a trip to drop Deepta off. She starts her internship next week at AFRL. Still sorry that she is out for summer but grateful that she has the opportunity. The report from the field say bad hotel choice. In addition, the meal options decided by Dad does not seem to be cutting the mustard. It has been such a whirlwind of a week. I am quietly processing and somewhat relishing the quiet solitude of the empty house. I will confess, I always commit to things that I will do with alone time but end up doing very little of what I plan.

Cilbir is just what I described and what makes the dish is the spiced butter that it folded into the yogurt. The concept is actually very similar to the Indian process of making tarka. Just the ingredients are a little different. I did rub in a piece of grated garlic into the yogurt. We love garlic in this household, well at least my son and I do. This is a very optional thing. So, overall this gets done with pantry staples. Yogurt is something that I make almost every day courtesy the instant pot. For this recipe you can either buy Greek yogurt, or alternatively strain homemade yogurt for about an hour. If you are an instant pot fan, the eggs are poached in the instant pot as well. However, feel free to poach them anyway you like.
And then assemble, poach and add eggs and stir in the spiced butter. And enjoy! Happy Sunday to everyone and here to a wonderful week ahead.
PrintCilbir – Turkish Poached Eggs in a Garlic Yogurt Sauce
Prep Time: 1 hour, 5 minutes
Cook Time: 20 minutes
Yield: Serves 4 to 6

A gorgeous brunch or any time dish, eggs, yogurt and spices there is nothing not to like.
Ingredients
1 and 1/2 cups natural yogurt2 cloves of garlic minced
1/2 teaspoon salt
4 to 6 poached eggs (see notes for Instant Pot Instructions)
1 tablespoons butter
1 teaspoon smoked paprika
1/2 teaspoon crushed red pepper flakes
2 teaspoons chopped dill
Instructions
If time permits strain the yogurt in a cheesecloth for 1 hour and you can certainly use Greek Yogurt if you wish.Beat the yogurt with the garlic and the salt and set asie in a serving bowl.
Prepare 4 to 6 small wells to nestle the eggs into the yogurt.
Heat the butter and add in the smoked paprika and the red pepper flakes and cook for 30 seconds.
Gently drizzle the seasoned butter over the eggs.
Garnish with the chopped dill and serve with some bread on the side.
Notes
To Poach the eggs in the Instant Pot
Lightly grease 4 silicone egg cups
Place 1 cup of water in the instant pot and set the saute mode.
Place a trivet in the instant pot and carefully place the egg cups over the trivet.
Turn off the saute mode and set to 2 minutes of high pressure. Do a quick release and carefully remove the eggs and use as needed.
The post Cilbir – Turkish Poached Eggs in a Garlic Yogurt Sauce appeared first on Spice Chronicles.
June 6, 2021
Agua Frescas and Paletas – A cookbook review
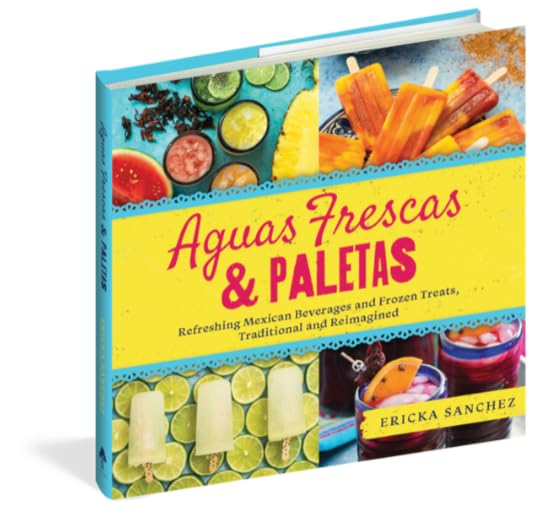 Ever so often a cookbook lands in your universe right in time to be used. And you welcome it with open arms and call it Serendipity. This is exactly what has happened with Erica Sanchez’s Agua Frescas and Paletas. A beautiful book that will help you stay hydrated and refreshed. You will find amazingly beautiful ways to put summer’s bounty to good use. A great demonstration is found at the Melissa’s Produce channel. Erica who blogs at Nibbles and Feast, demonstrates two recipes for us.
If you follow me on instagram and facebook, you should be able to see the fun I have been having with the book.
The book consists of 40 beautifully illustrated recipes. I made this Sorrel and Orange cooler the first day I got the book. Loved the use of cloves in this recipe. However, this is proof positive that the book is super practical. And beautiful and user-friendly.
View this post on InstagramA post shared by Rinku Bhattacharya (@spice_chronicles)
I learnt so many little things about Mexican ingredients, which is always my favorite part of any regional cookbook.
Did you know about Piloncillo? I did not.

I fell in love with Mexican chocolate after tasting these fudge like chocolate popsicles.
Tamarind Paletas have got to be the best way to savor the tangy fruity flavors of Tamarind. And, one of these days I will tell you how to use the instant pot to remove the tamarind seeds.
If you stick through the book, you will find sustainable ways to use ingredients. There is a beautiful canteloupe cooler which I enjoyed.

And the fun part of it is that you can save the melon seeds, and make a quick horchata. Not quite so elaborate, but, it brings back Thandai memories.

The avocado and coconut popsicles are oh so good, and so rich and satisfying. Next on the list are the rice pudding pops. If you are looking for a nice summer book, this might just be the one.
The post Agua Frescas and Paletas – A cookbook review appeared first on Spice Chronicles.
Perfect Millet in the Instant Pot
 Deepta heads of for her internship next weekend. And then college. Time almost passes like the blink of an eye. Despite being realy busy at work, I cannot shake of the impending sense of emptiness. The feeling of when your chick is ready to fly away from home. Hence, the term empty next. I have been trying to do a crash course on food basics. Despite the amount of food cooked in the house, her actual exposure to cooking is relatively minimal.
The last week I spent a lot of time looking at wholesome options in the store. I was actually very suprised to see that Whole Foods Market has an entire freezer section devoted to cooked grains. I figure getting these down is an easy start. With an instant pot, it is even easier. Actually having a mini is a great idea for a minimalist. Because in addition to the pressure cooker, you can actually use it as a saute pan. So lesson number two is making perfect millet in the instant pot.
Lesson one in case you are wondering is cooking rice.
View this post on InstagramA post shared by Rinku Bhattacharya (@spice_chronicles)
So, we use a fair amount of whole grains aka ancient grains in our cooking. Of course, we are also rice eaters. Millet cooks extremely easily and if you have cooked millet on hand you can make a pilaf like this, add it to soup, or just enjoy it as a whole grain side. It tends to keep one fuller longer.
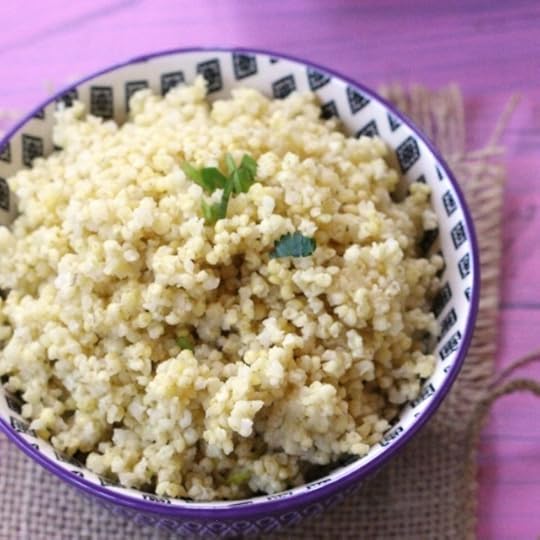
I have found it fairly convienient to buy these grains of Amazon. I like Bob’s Whole Mill getting my whole grains. The millet being used here is pearled. It is high in fiber, minerals, and protein. Use it much like rice.

It keeps well for upto a week. And it cooks in about 15 minutes in the instant pot. Just one minute of pressure with natural release. It takes about 25 minutes on the stove top. But plenty easy either way.
If you like this recipe and want more ideas, do join my Indian Instant Pot Facebook group. Of course Instant Indian is ready for order, joining its siblings The Bengali Five Spice Chronicles and Spices and Seasons.
PrintPerfect Millet in the Instant Pot
Prep Time: 2 minutes
Cook Time: 15 minutes
Total Time: 17 minutes
Yield: 2 cups of cooked millet

How to cook millet in the instant pot or stove top
Ingredients
1 cup millet1 and 1/4 cups water
1 teaspoon salt
Instructions
Place the millet, water, and salt in the instant pot. Set to 2 minutes of high pressure allow a natural release. You should have perefectly cooked grains of millet for your use.Notes
To cook this on the stove top increase the water by a cup. Add the water and millet andin a heavy bottomed pot. Bring to a boil, lower the temperature and simmer covered for about 20 minutes. All the water should be absorbed by now.
Let it rest for about 10 minutes, Fluff and serve.
The post Perfect Millet in the Instant Pot appeared first on Spice Chronicles.
May 31, 2021
Classic Masala Chai and no its not Chai Tea
 I love my tea and am finicky about the way its made. Most of my mornings start with a cup of perfectly brewed Darjeeling tea. However for lesurely weekends I will make masala chai or Indian spiced tea. And let me tell you a secret, there is really not recipe. Every household makes it differently. However, there are a few core guidelines. I promise to share my tested and tried way as long as you do not call it Chai Tea. I have no idea who came up with the Chai Tea name but it is one of the surefire ways to annoy an Indian. Saying Chai Tea is like saying Tea Tea.
Why do we say Masala Chai, now that is a different story. Masala means spice and Chai is Tea, so well spiced tea is Masala Chai. I actually sometimes do make it in the instant pot and you can find my Instant Pot recipe in my Instant Pot cookbook. And, like many others I use the Masala Chai Flavors in Baking. Here are my Chai Banana Bars.

However let us now get down to Masala Chai.
I like to use whole spices and fresh ginger. I find that they offer the best flavor. Since I use loose black tea, I have to strain the tea anyway.Darjeeling tea is best brewed rather than boiled, so you do not want to use it for Masala ChaiA strong black tea such as an Assam tea is a good idea

The way I make this tea, you can enjoy it with or without milk. Well, being a tea purist, I sometimes skip the milk even with my masala chai. And some masala chai cohorts if you are looking for ideas are,

Nankhatai – Indian Almond Shortbread Biscuits
Nimki – Bengali Savory Crackers (this is what I enjoyed yesterday) and of course
Shingara – Bengali Cauliflower Samosas
So, here is to a warm and satisfying week ahead. May the days be well seasoned and spicy.
PrintClassic Masala Chai and no its not Chai Tea
Prep Time: 3 minutes
Cook Time: 15 minutes
Total Time: 20 minutes
Yield: Serves 4

How to make perfect masalal chai
Ingredients
1 stick cinnamon1 or 2 black cardamoms
2 to 3 green cardamoms
A few cloves
2 to 3 star anise
1/2 inch piece of ginger, thinly sliced
1/4 teaspoon whole peppercorns
4 teaspoons strong black tea
3/4 cup whole milk or other milk of choice
Sweetener of your choice
Instructions
In a large saucepan place 5 cups of water and add in the spices. Bring to a boil and simmer for 6 minutes.Add in the tea and simmer for 3 to 4 minutes. Turn off the heat.
Strain into serving cups, leaving 1/4 cup space for milk.
Add in milk and sweetener to taste. Enjoy hot!3.1https://spicechronicles.com/making-a-good-cup-of-masala-chai/
The post Classic Masala Chai and no its not Chai Tea appeared first on Spice Chronicles.
May 22, 2021
Cinnamon Sugar Sourdough Doughnuts and Relishing Sweetness
 Sometimes sugar makes everything better. Especially if it takes the form of gorgeous Cinnamon Sugar Sourdough Doughnuts. There is something simple and magical about these doughnuts. That mixture of tangy and sweet kissed with cinnamon is what weekends are about. Actually, why just weekends, any day sort off. And this is all about the slow rising goodness of sourdough.
I will give you a few caveats here. The actual cooking and putting together of the recipe does not take a lot of time. However as we know with most things sourdough you need a little bit of planning. However, I find that something like this fits in much better with my schedule that the exacting precision of having to bake this within a 8 hour window.
So, if your sourdough starter hangs out in the refridgerator, like my Pinocchio then you need to bring it out a day earlier. So your planning schedule witll look a little like this.

So, a little less than 48 hours, but the timing can vary and is a little flexible. All you need to do is start the process about 2 days ahead of time. As you can see that the actual cooking process is relatively short. So, why waste all this time, with the sourdough. Well, these doughnuts are quite magical. Since they are mostly wholewheat they have a nice body. The sourdough gives them a nice tangy crusty texture outside and soft fluffiness inside. These are best served and eaten warm.

My recipe offers you a smallish batch. This made about 8 3-inch doughnuts and doughnut holes. They did not last very long. And heere is looking ahead to a rather hot week ahead.
And if you are looking for more breakfast options for your sourdough, you might want to give these English Muffins a try.
PrintCinnamon Sugar Sourdough Doughnuts and Relishing Sweetness
Prep Time: 24 hours, 10 minutes
Cook Time: 30 minutes
Total Time: 48 hours, 40 minutes
Yield: Makes 8 to 10 doughnuts

An easy and delicious tasting wholewheat sourddough doughnut.
Ingredients
3 cups of white whole wheat flour3 tablespoons sugar
3 tablespoons melted butter
1 egg, beaten
3/4 cup of active sourdough starter (well fed and bubbly)
1/2 warm milk or as needed to form a smooth dough
1 and 1/2 cups oil for frying
To finish
1/2 cup raw cane or brown sugar
1 and 1/2 teaspoons powdered cinnamon
3 tablespoons salted butter melted
Instructions
Sift the flour in a large mixing bowl. Stir in the sugar, melted butter and beaten egg.Gradually add in the sourdough starter and mix well. The dough should come together but be just a little sraggy.
Add in the milk gradually to form a soft dough. Cover and set this aside to rise for 12 to 14 hours or until doubled. Mix well.
Line a baking sheet with parchment paper.
Roll out the dough to 1/4 inch thickness, cut out the doughnuts, reworking any dough until all the dough is used up.
Place each cut doughnut on the baking sheet. Cover and set aside to rise overnight or 10 hours.
Mix the sugar and cinnamon, place the melted butter in a wide bowl.
Heat the oil. Carefully add one or two doughnuts at a time and fry on each side for about 2 minutes until nice and golden.
Dip the doughnut into melted butter and dunk in the cinnamon sugar to coat. Enjoy warm with tea or coffee.3.1https://spicechronicles.com/cinnamon-sugar-sourdough-doughnuts-and-relishing-sweetness/
The post Cinnamon Sugar Sourdough Doughnuts and Relishing Sweetness appeared first on Spice Chronicles.
May 17, 2021
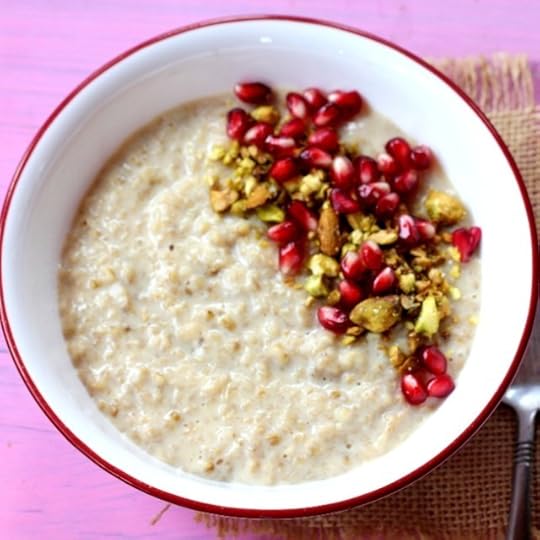
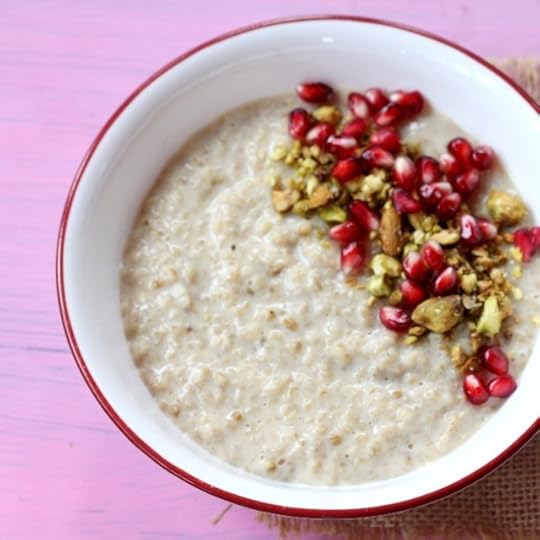
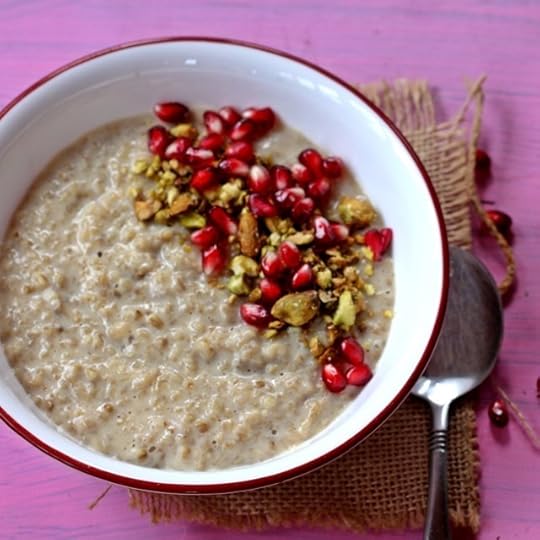
Creamy Instant Pot Oatmeal and Craving Comfort
 Oatmeal comes and goes in spurts in our house. It was quite the regular about 4 years ago. During their middle school years. Since I use steel cut oats, it used to be a 30 minutes affair. The kids got bored of it and I gave up on it for a while. Now, it has made a comeback thanks to the Instant Pot. I have perfected this rather simple method. It does need a little bit of one step planning. As in soaking the oatmeal the night before you make it. The bonus of that is the next morning you can just push the button and have your breakfast cook while you brush your teeth and get ready for other things in life. So, here is me feeling happy about Instant Pot Oatmeal. As this is easy, comforting outrageously creamy and so good for you.
I have been craving general comfort. I got a major scare yesterday when my mother had sent me a text telling me she was visiting a doctor. The 7 hours between 12am (EST) when I got the text and the time I reached her to find out that it was not COVID related was terrifying. I am however happy to see that West Bengali has a strict lockdown. And in the middle of the lockdown the Bengali humor prevails.
Back to this oatmeal. I offer you a basic foolproof recipe. You can season this to taste, my consistency is gruel or porridge like. You can have it a little thicker if you wish. One of my go to seasonings is maple sugar, cardamom, topped with pistachio and pomegranate seeds. You can finish or season as you see fit. To get this perfect creamy wholesome texture,
Do:
Use steel cut oats (they keep you full longer)Make sure you add in that 1/2 cup milk or almond milk to finish.Pop in the cardamoms or cinnamon while cookingAllow at least 10 minutes before releasing pressureUse a 1 is to 2.5 oatmeal to water ratio while cooking[image error]
Do not
Skip the overnight soakOver seasonMiss the opportunity to enjoy jaggery or maple syrup to sweeten this.If you like this recipe and want more ideas, do join my Indian Instant Pot Facebook group. Of course Instant Indian is ready for order, joining its siblings The Bengali Five Spice Chronicles and Spices and Seasons.
PrintCreamy Instant Pot Oatmeal and Craving ComfortPrep Time: 8 hours
Cook Time: 25 minutes
Total Time: 8 hours, 25 minutes
Yield: Serves 4
Ingredients
1 cup steel cut oats2.5 cups water
3 to 4 pods cardamom
1/2 cup milk or almond milk
To finish
1/2 cup maple syrup or powdered jaggery
Pomegranate seeds (see note)
Chopped Pistachios
Instructions
Place the oatmeal, water and cardamoms in the instant pot base overnight. In the morning give it a stir, set to 4 minutes of pressure and allow a natural release.Remove the lid and stir well. Gently add in the milk or almond milk. You can extract the cardamom pods and stir in the maple syrup or jaggery.
Top with the pomegranate seeds and pistachios and enjoy warm.
Notes
1. You can use a cinnamon stick instead of the cardamom pods.
2. You can top this with any topping or enjoy plain.
Stove Top Instructions
Place the soaked oatmeal and bring to a simmer. Cover and simmer for 30 minutes, stirring occasionally and adding more water if needed.
The mixture should be thick and smooth when done. Stir in the milk and finish as needed.
The post Creamy Instant Pot Oatmeal and Craving Comfort appeared first on Spice Chronicles.
May 8, 2021
Eggs Benedict and the Pandemic goes on
 This week has stretched on with a crazy load of fear and uncertainity. As with everything after the initial shock a sort of acceptance settles in. As always, cooking and sticking to a routine helps me find solace. I have worked and perfected this recipe for a very easy take on Eggs Benedict. I mean you could go all out and make your own English Muffins. Trust me you will not regret that. But, other than that with my blender hollandaise you will be in the Eggs Benedict business in 35 minutes or less. In a week of one pot simple meals, closing down with this brought my kids infinite happiness.
As for me, I will be happy if I make this for my mother sometime soon. Honestly anything. I just want to see her. I am terribly grateful to my childhood friends who have taken turns to safely visit mom and sent me pictures. Not the same, but at this point I am just glad for the moment she is safe.

Last weekend inspired by the chives in my garden I concoccted an easy version of Eggs Benedict. The two things that make this version seriously easy is using blender Hollandaise and poaching the eggs in the Instant pot. I will offer a more detailed post on just this one of these days. I have found this the easiest of the options. None of the fuss of boiling water and such. It is a few good key ingredients, this is about the magic of eggy softness and butter comming together with lemon. Typically put together over Canadian Bacon, you can skip it and it will still taste pretty good.

In our house, we usually do this for the four of us. Two with the bacon and two without. And that is often what being a mother is about. Being about to be flexible.
If you like this recipe and want more ideas, do join my Indian Instant Pot Facebook group. Of course Instant Indian is ready for order, joining its siblings The Bengali Five Spice Chronicles and Spices and Seasons.
PrintEggs Benedict and the Pandemic goes on
Prep Time: 20 minutes
Cook Time: 10 minutes
Total Time: 30 minutes
An easy and foolproof take on Eggs Benedict.
Ingredients
4 eggs1 tablespoon coconut oil
Salt and Pepper
2 English Muffins
Butter for the Muffins
4 slices Canadian Bacon
1 serving Easy Hollandaise Sauce.
Chopped Chives to Finish
Instructions
To make the poached eggs in instant pot, you will need silicon moulds or muffin cups. Gently grease the molds using coconut oil. You will not need all of it. Just use enough to evenly grease the cups.Place 1 and 1/2 cups of water in the instant pot and start the saute mode. Carefully crack each egg into the molds. Place a trivet with handles into the instantpot. Place the molds over the trivet.
Turn off the saute mode. Cover and set to 3 minutes of pressure and do a quick release. Remove the trivet with the eggs immediately.
In the meantime toast and butter the English Muffins.
Place a slice of Canadian Bacon over the muffins. Carefolly remove the eggs (one at a time and place over the bacon. Sprinkle with salt and pepper.
Top with about a tablespoon of the Hollaindaise. It is quite rich and I find this is enough. Top with the chives and enjoy!
3.1https://spicechronicles.com/eggs-benedict-and-the-pandemic-goes-on/
The post Eggs Benedict and the Pandemic goes on appeared first on Spice Chronicles.
May 5, 2021
A perfect pot of Black Beans (Instant Pot)
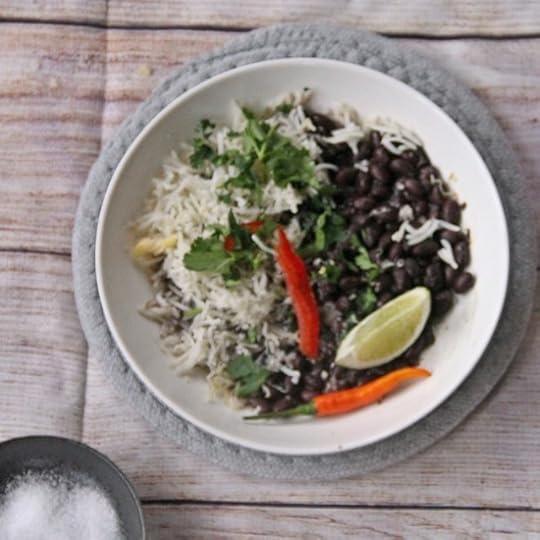
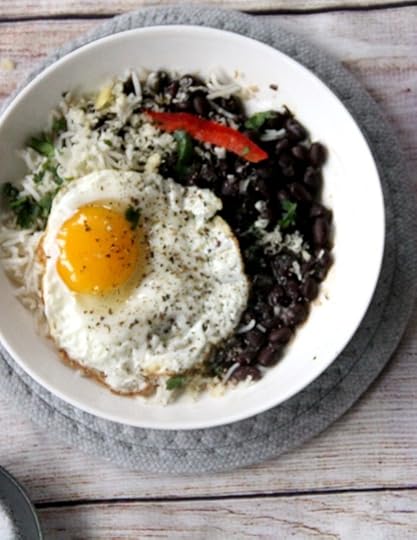 A rainy evening is the perfect opportunity for a perfect pot of Beans. And, today’s bean of choice is my black beans. It is really such a wonderful idea to have a batch handy. The possibilities with these along the week is quite endless. And anyone who tries them absolutely agrees that they are indeed a perfect pot of black beans. Of course, as suggested by the times, the perfect beans are what you have lying around in your pantry. And, honestly this framework of a recipe will work for almost all beans of your choice. And, this is how the last day of her last school break is ending. I love to share with you anytime I get a basic done right. Especially in the Instant Pot.
Here are the perfect chickpeas and perfect brown rice for more ideas.
In fact, the girl is now handling the car just fine. She took us for a short spin before we headed out to the city. She is bubbly and excited these days. Awaiting the close out of a good year, and new and fresh pastures. And, I sit and wonder about how empty the house will be without her. As with every rite of passage I know I will get used to it and good things will happen. In fact, this year I am already counting my blessings. At least until COVID struck India, but hopefully this too will pass.

And now onto the beans. A few easy tips and then onto the framework. I am trying to avoid calling this a recipe.
If time permits soak the beans, you will get a more even and soft creation.If you are planning to make a batch for multiple uses, keep the seasons somewhat simple like I have done. The reason for this is to ensure flavor but allow enough room to build on the base.If you want to make a double batch and freese some this will work very well.Good uses for these beans is to serve along side rice, enjoy in tacos, and or quesadillas.
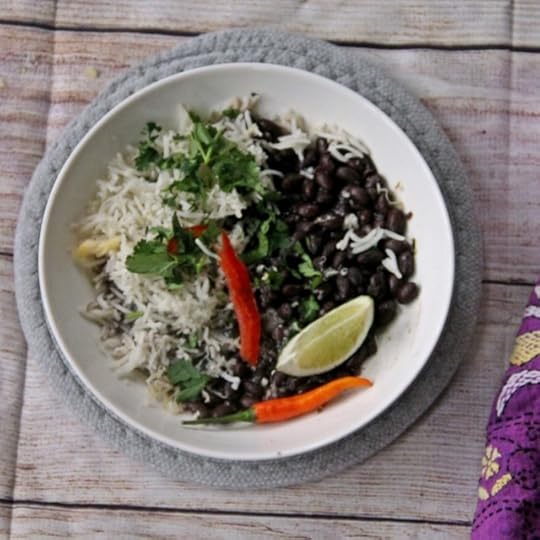
Today I served them over rice with lots of lime and cilantro. I topped them with a fried egg and called it a cinco de mayo meal.
If you like this recipe and want more ideas, do join my Indian Instant Pot Facebook group. Of course Instant Indian is ready for order, joining its siblings The Bengali Five Spice Chronicles and Spices and Seasons.
PrintA perfect pot of Black Beans (Instant Pot)
Prep Time: 4 hours, 20 minutes
Cook Time: 20 minutes
Total Time: 4 hours, 40 minutes
Yield: Serves 4 to 6
A perfect pot of black beans, well seasonsed , soft and creamy.
Ingredients
3 tablespoons oil1 small red onion, diced
2 cloved garlic minced
1 and 1/2 cups of dried black beans (preferably soaked for a few hours) (see note)
2 teaspoons salt
1 teaspoon dried oregano
1 teaspoon powdered chipotle or cayenne
1/2 teaspoon dried basil
3 cups water
Instructions
Turn the instant pot on to saute mode. Add the onions and the garlic and stir well and saute for about 4 minutes.Add in the drained black beans, salt, oregano, chipotle, dried basil and water.
Turn off the saute mode. Cover and set to 6 minutes of cooking time. Serve over rice or store and use in your favorite meal.
Notes
If you do not have time to soak the beans you can actually increase the cooking time by 4 minutes.
3.1https://spicechronicles.com/a-perfect-pot-of-black-beans-instant-pot/
The post A perfect pot of Black Beans (Instant Pot) appeared first on Spice Chronicles.
May 4, 2021
Julia Child Inspired Blender Hollandaise
 I never thought I would be making let alone posting a recipe for Hollandaise sauce. I mean, that belongs to the world of serious cooking. Classic French cooking to be specific. This said, I fell in love with the rich yolky, lemony flavors of Hollaindaise sauce long before I even knew what I was eating. Those were peaceful days. My early days in the US. No family, no pandemic, and a world waiting to be explored. It has not been a bad ride. However, the last year has been strange. Truth be told the situation in India is troubling me more than the past year. And so bring on the comfort foods.
Hollandaise is in the ilk of an aioli, as in an eggy rich sauce. However,a hollaindaise uses lemon and butter rather than garlic and olive oil. Traditionally the emulsion relies on a lot of beating aka elbow grease. A lot of precision. In other words a lot of things that is not me. The reason for this is to create an emulsion you are mixing together two ingredients that are technically unmixable. In this case, that is the lemon juice and butter.

I have been doing a lot of borrowing from the libraries. And recently have been reading up Julia Child’s Mastering the Art of French Cooking. Who knew? This sauce comes to you using her blender technique. My version is a little pink as I use cayenne pepper and a lot of lemon juice. The result is still a very rich sauce, with a little kick and brightness. As for egg yolks, they are a luck of the draw. Orange bright egg yolks will get you a brighter color. However, if you are an eggs benedict fan, this sauce will be your new best friend. I love it over asparagus and salmon. In short, it is what I call a spring sauce with attitude.
For 15 minutes and pushing a few buttons, I think you get a lot from this peppy rich sauce.
PrintJulia Child Inspired Blender Hollandaise
Prep Time: 15 minutes
Yield: Makes 3/4 cup

An easy fool proof take on making hollandaise sauce in the blender.
Ingredients
8 tablespoons butter (1 stick)2 large egg yolks
1 teaspoon salt
1/2 teaspoon red cayenne pepper
3 tablespoons (1/2 a lemon) juice
Instructions
Carefully melt the butter on low heat, do not allow the butter to come to a boil.Place the eggs, salt, red cayenne pepper and the lemon juice in the blender. Blend for 30 seconds on medium speed. The mixture will thicken slightly and the eggs will turn paler.
Carefully add the butter through the blender top in 4 additions blending throughly (about 15 to 20 seconds) after each addition. The mxiture will thicken and turn smooth.
Use as needed. This will keep in the refridgerator for 3 to 4 days.3.1https://spicechronicles.com/julia-child-inspired-blender-hollandaise/
The post Julia Child Inspired Blender Hollandaise appeared first on Spice Chronicles.


