
Rinku Bhattacharya's Blog, page 20
October 25, 2020
Easy Flakey Buttermilk Biscuits
 I have been practicing these biscuits over the last few weeks. I feel that I finally have a recipe that I can stand by. In time, for my upcoming cooking class for biscuits done 3 ways. Needless to mention, I have not grown up eating biscuits. However, I am a huge fan of biscuits especially for breakfast. These biscuits turn out just the way I like them with relatively minimal effort. I have two variations here, a plain Jane version and a spice and herb variation. Either way, the process is pretty much the same. And let me tell you how I do it.
The one thing that you know about me, is that if I am posting a recipe for something baked it will be nice and easy. And these biscuits do not disappoint. They live up to their reputation. They take maybe 20 minutes to put together and another 15 minutes to bake.

There are a handful of things needed to ensure that the biscuits are light and flakey.
Do work with cold butter and buttermilk. They help with the flakiness.

Work with a nice and hot oven, you need that immediate rise.
Do not overwork the dough, in fact, it will be a little scraggy.
Lastly, do not add more moisture than needed, as it will feel like your dough is dry, but too much moisture will weigh it down.
Also, while the conventionality is debatable I add in an egg to the dough, I like the rise that this adds to the biscuit.

I am giving you just a couple of options, you can play with this basic recipe a number of ways – add cheese. Add different flavors. You get the drift. The festive weekend passed by in a very strange way. We are putting finishing touches on my daughter’s college apps. It all feels so real. A little exciting, a little nerve racking and this mom is beginning to feel plenty sad.

Here is wishing everyone a wonderful festive season. If you are Bengali like me, join me as we celebrate everything in sight. While we cannot control the world, we can control our spirit. The ability to take pleasure in simple beauty, like beautiful hot buttermilk biscuits.
PrintEasy Flakey Buttermilk Biscuits
Prep Time: 20 minutes
Cook Time: 15 minutes
Total Time: 35 minutes

An easy and foolproof recipe for making biscuits.
Ingredients
2 and 1/2 cups all purpose flour1 teaspoon salt or to taste
2 tablespoons baking powder
1/2 teaspoon baking soda
1 tablespoon sugar
6 tablespoons chilled butter
3/4 cup buttermilk
1 egg
Butter for greasing the pan
Instructions
Pre-heat the oven to 400 degrees.Line a baking sheet with parchment paper.
Sift the flour, salt, baking powder, baking soda, and sugar in a mixing bowl.
Grate the butter using the large side of a box grater and quickly work into the dough.
Beat the egg and buttermilk together and add and beat the mixture working into a rough but well mixed dough.
Flour a working surface and place the dough onto the surface.
Using your hands flatten out the dough. Cut into four parts and stack the them over each other. Gently press down the dough with a rolling pin and roll out lightly to about 1 inch in height.
Using a biscuit cutter, cut the dough into 2.5 to 3 inch biscuits. This will make about 6 biscuits.
Brush the biscuits with buttermilk.
Place on the baking sheet and bake in the oven for about 15 minutes until fragrant, well risen and golden.
Remove and cool slightly before serving.
Notes
For a Herb and Spice Variation
Mix together 1 tablespoon red pepper flakes, 1 teaspoon parsley, 1 teaspoon garlic powder and 1/2 teaspoon thyme.
Add this to the flour while mixing and continue with the recipe as described.
The post Easy Flakey Buttermilk Biscuits appeared first on Spice Chronicles.


October 24, 2020
Quick and Easy Sesame Chicken (or Fish)
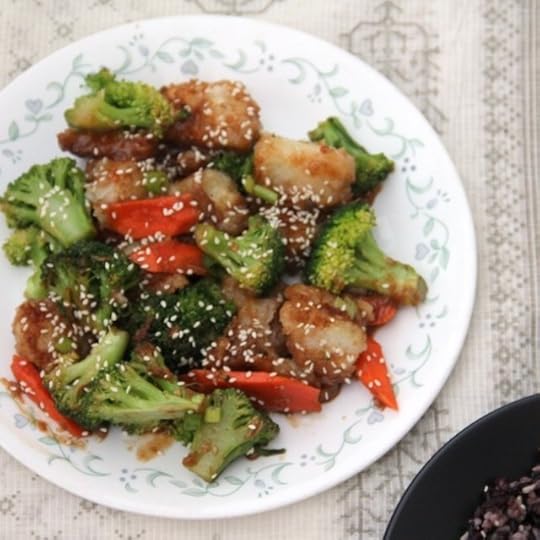
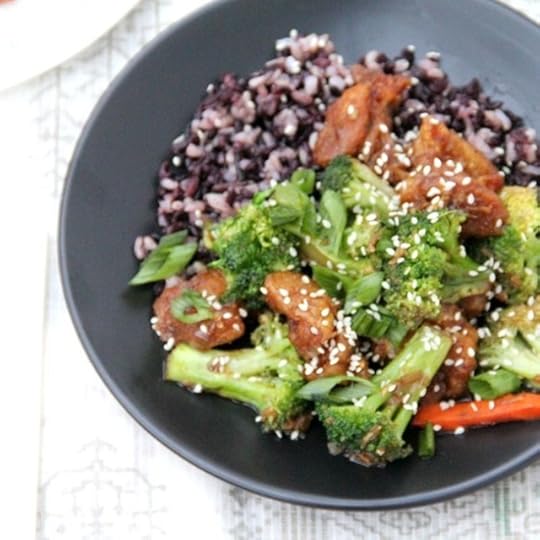
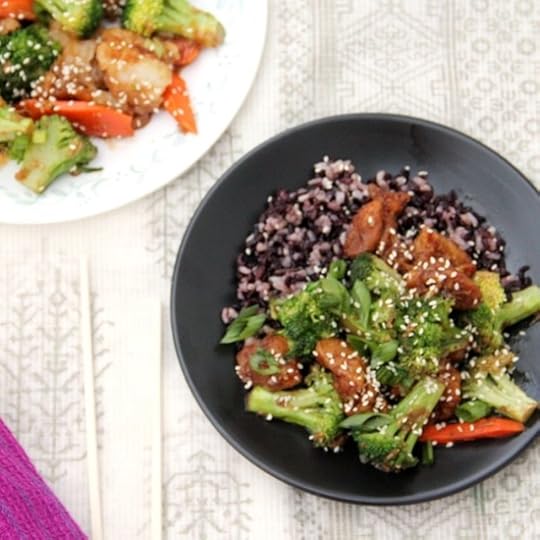 When your Saturday is longer than you like, weekend dinner has to be simple, flavorful, and impressive. This recipe fits all those checkboxes. I made very minimal changes to the recipe, which by my standards is rare. It does indeed get done very quickly and tastes like a good Sesame Chicken or Fish depending on you protein preferences. In my house as you know that no one can agree on anything. So chicken for my son and fish for my daughter. And if you read through you will see how this is done and a few things here and there.
I have never used dry cornstarch like this before. The result is pure genius. You get a lovely crispy crust on your chicken. I also tried baking and air-frying small amounts of the fish and chicken. So, I really do not think the baking works well. The air-frying works well especially for the fish however unless you have a large air-fryer you will need to do this in batches. You will not need to attend to it, but you do not necessarily save a lot of oil. So, it is up to you entirely what you want to do. I have given you the air-frying option in the notes.
For the fish variation, I used chunks of cod. This gets done quickly and results in a lighter tasting affair. Today I was tied up with a few volunteer assignments. I have managed to get quite involved with quite a few things in the past few weeks. The net result is keeping me very busy. Part of this is by design. I really feel anxious in these crazy times when I am not busy with things. At least, volunteering helps giving back and keeps me positively engaged. It is such a beautiful time of the year however I really am really missing doing something for Puja.
This is why, I will be posting a series of different recipes and meals that I am doing for different groups over the next few weeks for the holidays. And now to eat this amazing chicken/fish and maybe wind down with a rom com.
So, the meal on the white dish features the fish. Since, I ate them both, I think it is difficult to choose. I would say that the fish cooks quicker. And the secret ingredient in this dish is the Sriracha sauce. Do not skip it. It does something magical when combined with the honey.
PrintQuick and Easy Sesame Chicken (or Fish)
Prep Time: 10 minutes
Cook Time: 25 minutes
Total Time: 35 minutes
Yield: Serves 4 to 6

An easy homey dish for sesame chicken or fish that gets done easily in about 30 minutes.
Ingredients
4 cups of broccoli florets (about 1 and 1/2 pounds)1 medium sized carrot, peeled and sliced at an angle
3/4 cup of corn starch
1 teaspoon salt
Several grinds of black pepper
3 pounds of chicken thighs or white fish, cut into 1 inch cubes and dried well
1/3 cup of oil
2 teaspoons freshly grated ginger
2 teaspoons freshly grated garlic
2 tablespoons honey
1 tablespoon rice vinegar
2 tablespoons soy sauce
1 tablespoon sesame oil
1 and 1/2 teaspoons sriracha or to taste
3 scallions, finely chopped
Sesame seeds to garnish
Instructions
Heat the water in a large pan (large enough to hold the broccoli and carrots) and add in the broccoli and the sliced carrots. Bring to a boil and boil for 4 minutes.In the meantime prepare a bowl with ice.
Drain the vegetables in a colander and place over the ice.
Mix the cornstarch with the salt and pepper.
Place the chicken or fish in the cornstarch mixture and mix thoroughly to coat the coat the mixture.
Find a large skillet. Ideally one that you can place your chicken or fish in a single layer while cooking. A good nonstick skillet works well.
Place on the heat and add the oil and heat well for 2 minutes.
Place the chicken or the fish in a single layer and cook undisturbed for about 4 minutes and turn and cook for another 3 to 4 minutes. This should be long enough to allow a thick crust to form.
In the meantime mix the ginger, garlic, honey, rice vinegar, soy sauce, sesame oil and sriracha together with 1/3 cup water.
Pour this mixture into the pan and let it cook for 2 to 3 minutes until the mixture thickens and coats the chicken or the fish.
Turn off the heat and add in the broccoli and carrots and mix well.
Add the scallions and sprinkle with sesame seeds and serve over rice or any grain of your choice.
3.1https://spicechronicles.com/quick-and-easy-sesame-chicken-or-fish/
The post Quick and Easy Sesame Chicken (or Fish) appeared first on Spice Chronicles.
October 23, 2020
Malai Chop – Deconstructed Rasmalai
 Original Post on October 27, 2015.
If you like roshogolla, you will like malai chop. If you have no idea what I am talking about, this dessert is a fun project dessert. I made this recipe again today.
It is time to repost with some of the new tweaks and easier variations. My home crew still is calling it a deconstructed rasmalai. Not sure why, but, since they like it, all is well. So let us talk malai chop.
 This dessert and actually a lot of these elaborate desserts were much loved by my father, who would have been celebrating a birthday yesterday, had he been with us. Hopefully, somewhere dad you get the message that we are thinking of you.

For my topping, I have used a combination of whipped cream folded into thickened milk just like rasmalai.

Essentially a very indulgent affair, where this does better than rasmalai is that it is more portable, no bowl needed so it is a fun gift for people.
 I have topped it adding some pistachios and almonds, it is entirely optional but is certainly fun this way. In essence a malai chop is a spongy soft base, with a creamy rich topping hence what we want to call a deconstructed rasmalai.
I have done a few fun things with this recipe, I give you an easy way to make the base in the instant pot. I am using the same technique as the rasmalai in the Instant Indian cookbook. The second change is with the malai topping, I have made it thicker using milk powder and tinted it with saffron.
PrintMalai Chop – Deconstructed Rasmalai
Prep Time: 2 hours, 30 minutes
Cook Time: 30 minutes
Total Time: 3 hours
A delightful dessert, the malai chop is a almost like a deconstructed rasmalai, with a spongy base topped with cream, saffron and nuts.
Ingredients
For the base1/2 gallon whole milk
1 lime
3 cups of water
11/2 cups of sugar
8 to 10 cardamoms
For the malai topping
1/2 cup whipping cream
1/2 cup whole milk powder
A teaspoon of saffron strands
Chopped pistachios and or almonds
Instructions
Place the milk in a heavy bottomed pan and bring to a rolling boil. Turn off the heat and let the milk rest for at least 30 seconds.Cut the lime in half and squeeze in the juice, and stir the milk should begin separating. Add in the remaining half and the milk should separate into paneer curds.
Drain into a cheesecloth and hang the paneer or chenna for at least 2 hours, to drain out the whey.
Remove the chenna and pulse for about 30 seconds in a food processor, do not over process. Remove and place on a flat surface to knead with about 1 tablespoon of flour and shape into small round flat cakes, cover and let this rest for about 20 minutes.
In the meantime add the water and sugar with the cardamoms in a pot and bring the water to a boil to firm a light syrup about 1/2 strand in consistency. We do not like the desserts to be excessively sweet so I stay away from very thick syrup. It also keeps the base softer. To do this in the instant pot, see the notes.
Gently place the ovals into the syrup and poach the cheesecakes for about 25 minutes. At this point, they should become spongy and porous.
Remove from the syrup and set aside to cool.
Whip the cream, and mix in milk powder and the saffron strands. Allow the mixture to rest to allow the color of the saffron to shine through.
To assemble place a little of this creamy mixture over the spongy cakes. This will be much like spreading icing on a cupcake, except it will be a much thinner layer.
Garnish with nuts of your choice and let this chill in the refrigerator for an hour before serving.
Notes
To Make the Malai Chops in the Instant Pot.
Make the channa, drain and shape the cakes as described above.
Mix the sugar, water and cardamoms in the instant pot. Bring this to a simmer sauté mode. Simmer for about 5 minutes to thicken the syrup. Turn off the heat.
Place the rested cakes into the simmering liquid. Do not overcrowd the pot. I make 8 2 inch oval cakes at a time.
Cover and set to 5 minutes of low pressure and allow a complete natural release.
Let the cakes cool and remove from the syrup and proceed with topping as described above.
The post Malai Chop – Deconstructed Rasmalai appeared first on Spice Chronicles.
October 19, 2020
Fried Eggs with Parmesan and Tangled Beet Greens
 It is no secret that we love breakfast and brunch in this household. Those simple light meals are all coming in very handy for more than just breakfast. With the hybrid learning going strong the off week lunches are really a reworking of these brunch dishes. Much like this Fried eggs with Parmesan and Tangled Beet Greens. These are spontaneous, flavorful, and a perfect use of the gorgeous bunch of beet greens that just came with the beets that I pulled out. An easy meal idea, that needed to be documented. Some recipes live because of the pure joy of the moment that they bring you. This is one of them. They just give you simple unblemished delight when cooking them.
All of this over some beautiful garlic rubbed slices of homemade sourdough bread. This is all so great by itself. And, makes this amazing dinner with maybe a hearty soup like this Tuscan White Bean soup. It feels a little early to do the hearty soup thing. But, then yet again the weather seems to be so unseasonably cold. Or, is it just me, not wanting the cold winter to arrive. We seem to be caught up in this long relentless monotony of sorts. The thought of ice and snow to compound this seems a little scary and nerve wracking. The thought that even the little normalcy we currently have being destroyed is nerve wracking.

However, proceeding with the task on hand is not. It is really less of recipe and more of a possibility something that opens up many different ideas. It is but in the tradition of our favorite meal. Well, with the exception of our Sunday global adventures. A few good things,

If you are using fresh and flavorful greens like me, do not clutter them. Less is more, and it helps the flavors shine.
I like parmesan in this recipe but, I think almost any kind of cheese would work.
The garlic for the toast is important
Otherwise, it is one of those 6 ingredient meals to start out your week on the right foot.
PrintFried Eggs with Parmesan and Tangled Beet Greens
Prep Time: 10 minutes
Cook Time: 20 minutes
Total Time: 30 minutes
Yield: Serves 4

A easy and flavorful quick meal featuring fresh and seasonal beet greens.
Ingredients
4 sliced whole wheat sourdough bread4 tablespoons extra virgin olive oil divided
2 cloves of garlic
1 medium sized onion thinly sliced
3 cups of chopped very fresh beet leaves
Salt to taste
Shaved parmesan cheese
Everything bagel seasoning and or freshly ground black pepper
Instructions
Pre-heat the oven to 350 degrees. Drizzle the bread with 1 tablespoon of the olive oil. Rub generously with the garlic cloves.Place on a sheet pan and bake until crisp (about 6 to 8 minutes). Turn off the oven.
While this is happening, heat another 2 tablespoons oil and cook the onions until soft, wilted and beginning to turn golden. Add in the beet greens and cook until wilted. Add in salt to taste.
Top the toasts evenly with the greens. Add a sprinkling of the shaved Parmesan cheese.
Place this back in the oven to keep warm.
Fry the eggs until the sides begin to turn a little golden. Place over the toasts.
Sprinkle with the shaved parmesan and everything bagel seasoning and or black pepper and serve immediately.
3.1https://spicechronicles.com/fried-eggs-with-parmesan-and-tangled-beet-greens/
The post Fried Eggs with Parmesan and Tangled Beet Greens appeared first on Spice Chronicles.
October 18, 2020
Sourdough Salted Butter Blondies
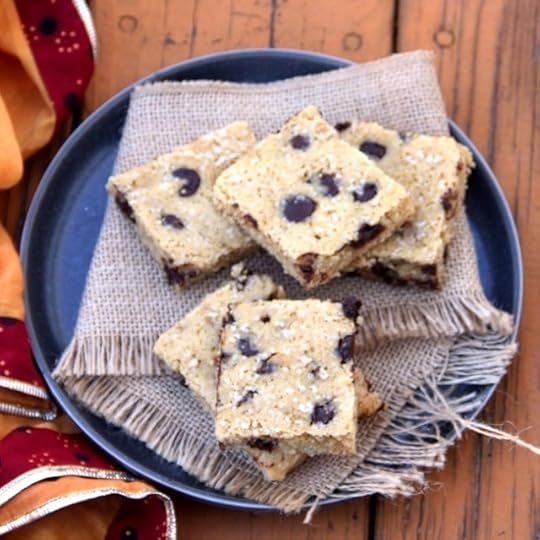 I think that the best part about maintaining a sourdough starter is being able to do fun discard recipes. Like these gorgeous, deeply satisfying Salted Butter Blondies. As some of you know, I am not a huge chocolate fan, unlike the rest of my family. But, we all love the combination of butter and brown sugar. I mean what’s not to love. And the chocolate chips in a blondie is kind of like a consolation for my chocolate loving family.
Well, truth be told there is nothing consolatory about these these blondies. They are the real deal. They are one of my favorite cookies. These blondies pack a nice softness and tang from the sourdough making them so full of flavor. Today is the first day of Navratri or Durga Puja and what would have been Mahalaya. Everything is different this year. I also happens to be my birthday even. So, I made a treat we were all happy about.

Now, the tang and lightness seals these blondies together. So, if you do not have sourdough discard on hand, use some buttermilk. It is not identical but does give the blondies some character. Interestingly enough, back in the day I used to pick up non-descript blondies in these New York cafes without knowing what they were. It just goes to prove,
What’s in a name?

A good blondie by any other name will steal your heart. The second ingredient here that makes and adds a depth of flavor is the salted butter. It fills the blondie with this uniform saltiness. My children are now into the sweet and salty thing. So this makes them happy. I sometimes wonder who I will cook for once they leave the house. The thought does scare me a little. As does almost any right of passage all the time.

Part of everything is that so much in my life is adapted around them. What they like, the garnishes they care for. All of that good stuff. But, today, on this absolutely perfect fall day, let us enjoy these very simple and easy blondies.
PrintSourdough Salted Butter Blondies
Prep Time: 20 minutes
Cook Time: 20 minutes
Total Time: 40 minutes

An easy full flavored brownie recipe that is brimming with the flavors of a few simple ingredients.
Ingredients
12 tablespoons salted butter, softened at room temperature1 cup of brown sugar
3 eggs beaten
1 and 1/2 teaspoons vanilla extract
3/4 cup sourdough discard or 1/2 cup buttermilk
3 cups all purpose flour
1 and 1/2 teaspoons baking powder
1 cup dark chocolate chips or chunks
2 tablespoons granulated white or brown sugar for sprinkling on top
Instructions
Grease and prepare a small baking sheet. Line with parchment paper it makes clean-up ridiculously simple.Pre-heat the oven to 375 degrees.
In a large mixing bowl beat the butter and sugar until well mixed and slightly lightened. This can be done with a good wooden spoon or an electric mixer.
Beat in the eggs. Stir in vanilla extract and the sourdough discard or buttermilk.
Sift in the flour and baking powder and mix well. Stir in the chocolate chips. Sprinkle with the granulated sugar.
Spread the batter in the prepared cookie sheet and bake for 20 minutes until the mixture is golden and the kitchen smells fragrant.
Turn off the oven and let the cookies cool in the oven for 5 minutes before removing them. Cut into your desired size with a pizza cutter and enjoy warm.
3.1https://spicechronicles.com/sourdough-salted-butter-blondies/
The post Sourdough Salted Butter Blondies appeared first on Spice Chronicles.
October 12, 2020
Easy Macher Chop (Air Fryer) – Bengali Fish Croquettes
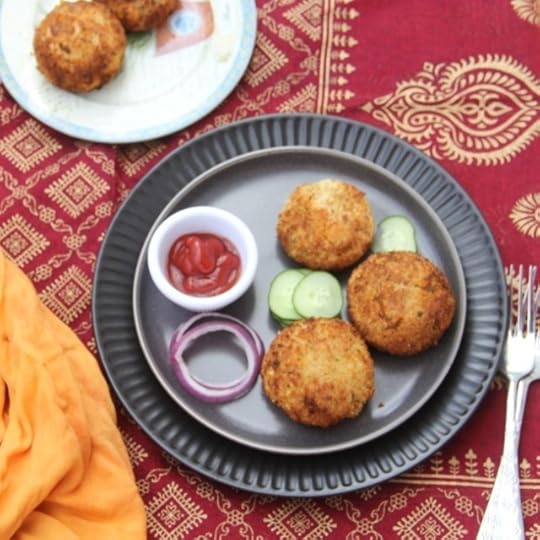 This easier version of Macher Chop is a keeper. I made this with some skepticism in the air fryer and am really thrilled with the results. A more authentic version of this can be found here, but this healthier easier version will hold its own next to them. And if you want to make them even healthier you can adapt this version with sweet potatoes. Perfect on this rainy day. It is a calm and peaceful sort of Monday. In fact, almost too calm with the festive season upon us. However, this is the year where we will learn how to find our own calm, and the beauty of simply things. But, enough with this philosophy. I am actually really excited to share this creation with you.
Now, I will warn you, that making chops are a labor of love. So, even this simplified version will need some planning. However, it is certainly well worth the effort.
So, a few things that I have done to make this really simple and fuss free
I am using canned tuna for this recipe.
The spices are simpler and pretty much a shake and fix kind of affair.
Last but not the least, I am using an air fryer for this recipe. Now, using the air fryer in addition to making it a little healthier also ensures that is less messy. And of course, it can be done with minimal attention.
The added bonus is that you do not waste extra oil and when the craving strikes you can just pop in a couple of the chops into your air fryer for and enjoy!
Do not skip the step of letting the chops rest in the refrigerator for about 20 to 30 minutes before air frying them.
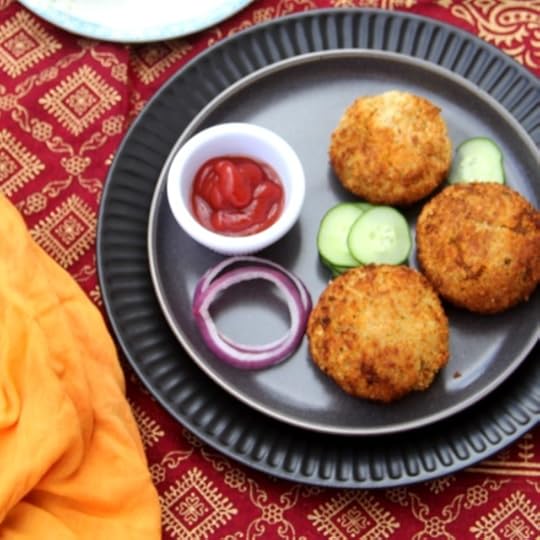
While I am normally flexible about the kind of potatoes, if you are air frying I recommend using good old russet potatoes. The lower moisture and higher starch helps. A few thoughts and idea before I unleash this recipe on to you.

Storage: They will last if kept for 2-3 days over paper towels in the refrigerator.
Other cooking options: You can absolutely fry them the conventional way. I am never one to get in the way of old fashioned indulgence. So without much ado here is my easy version of macher chop.
If you like this recipe and want more ideas, do join my Indian Instant Pot Facebook group and Legume Love Group. Of course Instant Indian is ready for order, joining its siblings The Bengali Five Spice Chronicles and Spices and Seasons.
PrintEasy Macher Chop (Air Fryer) – Bengali Fish Croquettes
Prep Time: 45 minutes
Cook Time: 30 minutes
Total Time: 1 hour, 15 minutes
Yield: Makes 12 fish croquettes
A healthier take on classic Bengali Fish chops
Ingredients
IngredientsFor the potato shells
2 large russet potatoes, about ¾ pounds
1 teaspoon salt
1 teaspoon red cayenne pepper to taste
1 teaspoon amchur (dried mango powder) or 1 tablespoon fresh lime juice
For the filling
2 tablespoons vegetable oil, such as canola oil
1 teaspoon whole cumin seeds
1 medium sized onion, diced
2 teaspoons minced ginger
2 cans of water packed tuna, drained
2 green chilies, such as serrano minced
2 teaspoons garam masala powder
1 teaspoon salt or to taste
2 tablespoons chopped cilantro
1 teaspoon sugar
To assemble and coat
1 egg, beaten
½ cup flour
Water to make a thick batter
1 teaspoon salt
2 cups breadcrumbs (a mixture of panko and regular breadcrumbs lends extra crunch)
Oil or cooking spray for cooking
Instructions
Halve the potatoes and boil them in their jackets, until soft. Make sure they do not get mushy. Cool and peel.Place in the mixing bowl and mash well with the salt, red cayenne pepper and the dried mango powder. Set this aside.
In the meantime, heat the oil for the filling and add the whole cumin seeds. When then sizzle add in the diced onion and ginger and sauté for about 5 minutes, until the onion wilts and begins to turn softly golden.
Add in the water packed tuna and green chilies and mix well. Add in the garam masala, salt, and chopped cilantro and sugar. Cook until the mixture is fragrant and fairly dry.
When this is cool enough to handle. Create bring the potato mixture to shape the croquettes.
Take about 3 tablespoons of the potato mixture, using your hands shape into a hollow pocket. Fill comfortably with the tuna mixture. Your goal into have a good amount of filling inside a potato shell. Cover and fill with the potato mixture.
Flatten to shape into a flatter shape.Continue until all the potatoes are used up.
Beat the egg and flour with enough water to make a thick batter.
Spread the breadcrumbs on a large piece of parchment paper. Dip the formed potato fish ball in the batter and then coat well with the breadcrumbs, this should fill dry and uniform. Place on a paper towel lined tray.
Complete all the chops and place the tray in the refrigerator for 30 minutes.
To air fry, spray the chops with oil or cooking spray place in the basket.
Air fry at 375 degrees for 12 minutes, turn and air fry on the other side for 4 minutes.
Enjoy piping hot. It will probably take two batches to make them all.
3.1https://spicechronicles.com/easy-macher-chop-air-fryer-bengali-fish-croquettes/
The post Easy Macher Chop (Air Fryer) – Bengali Fish Croquettes appeared first on Spice Chronicles.
October 7, 2020
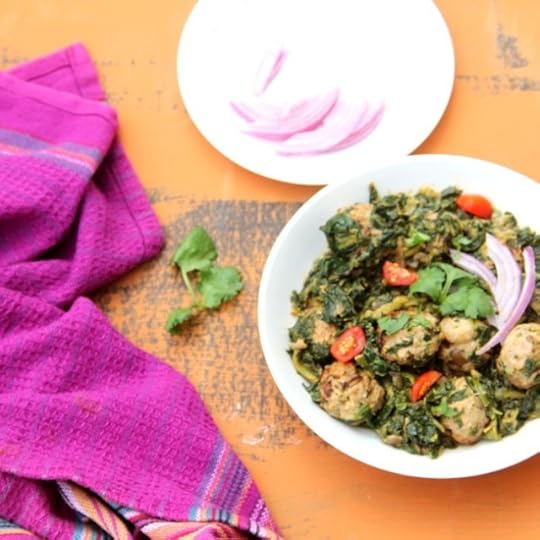
Saag Kofta – Chicken Meatballs with Spinach
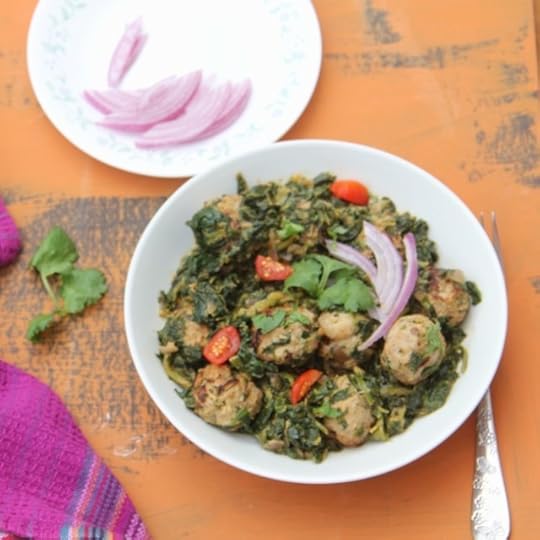 This week has me feeling like that proverbial hamster on a wheel. Ok make that this year! Just when I think I am finding my wavelength, something else comes up. However, that should not distract from a homey comforting seasonal dish. The kind you will want always in your dinner rotation. It certainly seems to have made everyone happy in my house, Well, except the vegetarian daughter. I however made her this Channa Saag and all worked out ok. But today’s dish is Saag Kofta- Chicken Meatballs with Spinach. This is inspired by something my son wanted to try in a restaurant. Actually, something that sounded rather flat and the dish seemed overpriced. On one of those fusion, almost everything works kind of menus. Well, ok bottom line I do not like paying $25 plus for something I can replicate without much difficulty at home.
So what exactly is saag kofta? Saag aka greens, can be spinach or any seasonal greens. Kofta is meatballs, in this case chicken meatballs. Simple, right?
I did this in an absolute hurry, so pretty much tossed everything in the instant pot and let the instant pot do its magic. And in my ever moving quest of life time saving hacks, I have learnt that I can season and shape the ground chicken into meatballs and freeze them. And then of course, use them as needed. I will share more about that on a different day.
This recipe is homey and simple, like this Saag chicken recipe that is actually in the Instant Indian cookbook. It works well with,
Frozen chopped spinach, without any thawing or gimmicks
Can be done with any greens of your choice, I will be doing this soon with a whole bunch of mixed greens.
Is done in a single step, almost a push and dump affair.
Uses a splash of coconut milk to finish, and is there for a lean and protein rich affair.
The one change that I make with this, which is different from other saag recipes, is that I actually reduce any water making the sauce thick and clingy. I think this works well for this somewhat chunkier texture.
The flavors are mild enough to use in other recipes to repurpose leftovers. The last four years have been a political roller coaster. Things just seem to be more rough and divided in the country. There are so many lives lost but I am not sure if the right lessons are being learnt.
I generally love NY, and am glad we are taking the pandemic seriously. I hope that you will give this recipe a try, and stay safe and happy.
If you like this recipe and want more ideas, do join my Indian Instant Pot Facebook group and Legume Love Group. Of course Instant Indian is ready for order, joining its siblings The Bengali Five Spice Chronicles and Spices and Seasons.
PrintSaag Kofta – Chicken Meatballs with Spinach
Prep Time: 20 minutes
Cook Time: 25 minutes
Total Time: 45 minutes
Yield: Serves 4 to 6

A wholesome easy to make dish that is versatile, comforting and perfect for any meal.
Ingredients
For the meatballs1 pound ground chicken
2 teaspoons minced ginger
2 teaspoons minced garlic
2 green chilies such as serrano, finely minced
1 teaspoon powdered cumin
1 teaspoon powdered coriander
2 tablespoons chopped cilantro
2 teaspoons salt or to taste
1 tablespoon coconut oil
1 egg
! For the spinach
2 tablespoons oil such as olive oil
1 teaspoon whole cumin seeds
1 medium sized red onion, finely chopped
1 tablespoon minced garlic
2 tomatoes, diced
1 large 16 oz bag of chopped frozen spinach (feel free to sub with any greens of your choice)
2 teaspoons salt
2 tablespoons coconut milk
1 and 1/2 teaspoons garam masala
2 tablespoons fresh lime juice
Chopped cilantro, diced red onions, and tomatoes to finish
Instructions
Place the ground chicken, minced ginger, garlic, green chilies, powdered cumin, powdered coriander and chopped cilantro, salt and coconut oil in a bowl. Drizzle in the beaten egg. Mix all the ingredients together.Shape to form medium sized meatballs, a little larger than walnut sized. Place in the refrigerator for about 20 minutes as you continue with the rest of your prep.
Turn the instant pot onto a high sauté mode. Add in the oil and heat for about a minute and add in the whole cumin seeds and wait for the seeds to sizzle.
Add in the red onion and minced garlic and stir well. Add in the tomatoes and cook for another minute or two until they are just softened.
Add in the chopped frozen spinach, there is no need to thaw. Add in 2 tablespoons water. Turn off the heat and make sure that there is nothing sticking to the bottom of the pot. Stir in the salt.
Carefully place the meatballs of the spinach in a single layer. Cover the instant pot and set to 3 minutes of pressure and allow a natural release.
Remove the cover and stir well. Add in the coconut milk and the garam masala and turn the sauté mode on to evaporate any residual moisture. The sauce is thick with just a little texture.
Sprinkle with the lime juice.
Serve garnished with cilantro, tomatoes and chopped onions.
3.1https://spicechronicles.com/saag-kofta-chicken-meatballs-with-spinach/
The post Saag Kofta – Chicken Meatballs with Spinach appeared first on Spice Chronicles.
October 4, 2020
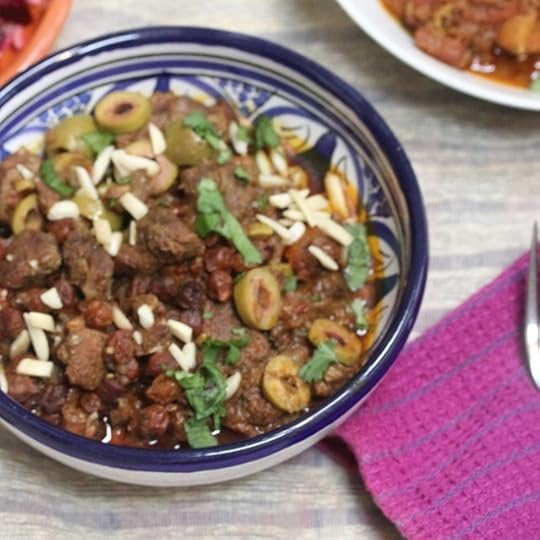
Quick and Easy Lamb Tagine with Olives
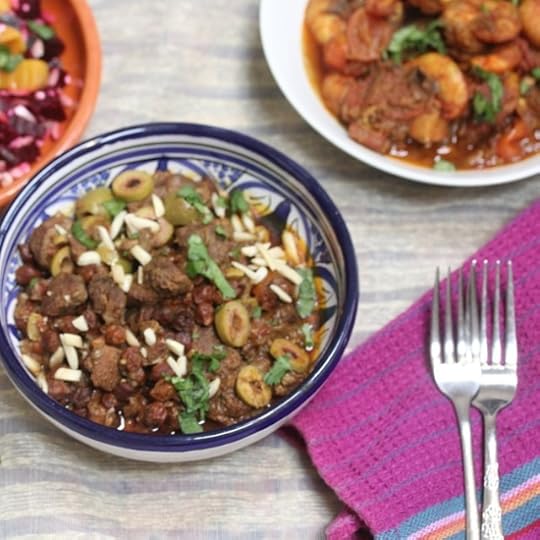 This lamb tagine has taken me a few happy iterations. I am happy with its hints of sweetness. And, am finally please with how I can fit this into the instant pot. Given that a tagine is a slow cooked affair, it might seem a little counter intuitive to make this in the instant pot. But, having tried it both in a tagine and the Instant Pot, I do feel the IP does a good job without sacrificing flavor. The seasons is pretty simple. The flavors are very nicely trapped in the instant pot. So, you get that deep and rich flavor in a fraction of the time.
This week has started with some strange muggy weather. Almost like July. The sun however is out, the day is lovely and all seems so good and well. I squeezed in a sudden errand this afternoon. I sometimes wish that I took more advantage of the relative flexibility that these times offer. I guess, to a degree, it is habit. And partly, I just have been busier than usual so, the flexibility of venue has not mattered much. I also picked up a large Starbucks coffee.
Interestingly not my favorite, but something that happened in my Grand Central route. Funny, how something is a part of one’s psyche without realizing it.
Now, back to this lamb tagine:
I mostly use Ras-el-Hanout for flavor. A good fragrant all purpose recipe that you should be able to handle at home.
Preserved lemons are traditional, but, if you cannot find them use some lemon zest
I use a small amount raisins, to cater to my son. He is not a fan of dried fruit. However, if you like dried fruit feel free to add in more like dates, etc.
I use boneless leg of lamb for convenience.
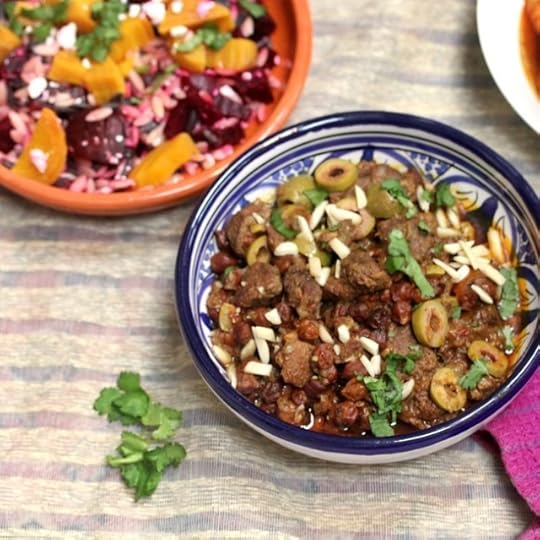
And, usually when I do my Sunday global adventures, I do try to make it a themed meal, so a few things that I did with this one was,
Make Ras-El-Hanout from the Scratch, toss together this gorgeous beet salad with Orzo, and make this ridiculously easy Semolina Cookies. And so, if you are looking for mealtime inspiration I have you covered.
If you like this recipe and want more ideas, do join my Indian Instant Pot Facebook group and Legume Love Group. Of course Instant Indian is ready for order, joining its siblings The Bengali Five Spice Chronicles and Spices and Seasons.
PrintQuick and Easy Lamb Tagine with Olives
Prep Time: 10 minutes
Cook Time: 50 minutes
Total Time: 60 minutes
Yield: Serves 6 to 8

A gorgeous Moroccan Lamb stew enriched with dried fruits.
Ingredients
2 tablespoons oil1 large onion, halved and thinly sliced
4 cloves of garlic, minced
1 tablespoon minced ginger
2 pounds of boneless leg of lamb cubed
2 teaspoons salt
2 tablespoon ras-el-hanout
½ cup large raisins
¼ cup dates, pitted and halved
1 cup water or broth
½ cup green olives sliced
2 tablespoons fresh chopped mint
2 tablespoons sliced almonds
Instructions
Turn the instant pot onto sauté mode and add in the oil and heat for a minute. Add in the onion, garlic and ginger and sauté for 3 minutes. Add in the lamb and cook for 2 minutes. Add in the salt and the ras-el-hanout and sauté for 3 minutes. This initial step takes about 10 minutes and is important for building flavor.Turn off the sauté mode. Add in the raisins and dates and the water or broth. Stir well to deglaze the pot. Cover and set on 25 minutes of pressure and allow a natural release.
Remove the cover and turn on the sauté mode. Stir in the green olives and mint and cook for 2 to 3 minutes. Turn off the heat and serve garnished with the sliced onions.
Notes
Tagine Instructions
Place the tagine on the stove on medium heat and add in the oil and heat for 2 minutes. Add in the onion, garlic and ginger and sauté for 10 minutes. Add in the lamb, salt and the ras-el-hanout and stir in for 5 minutes.
Add in the raisins and the dates and the water or broth. Cover and cook on medium heat for 3 hours. Remove the cover and stir in the green olives and mint. Serve garnished with the sliced onions.
The post Quick and Easy Lamb Tagine with Olives appeared first on Spice Chronicles.
September 28, 2020
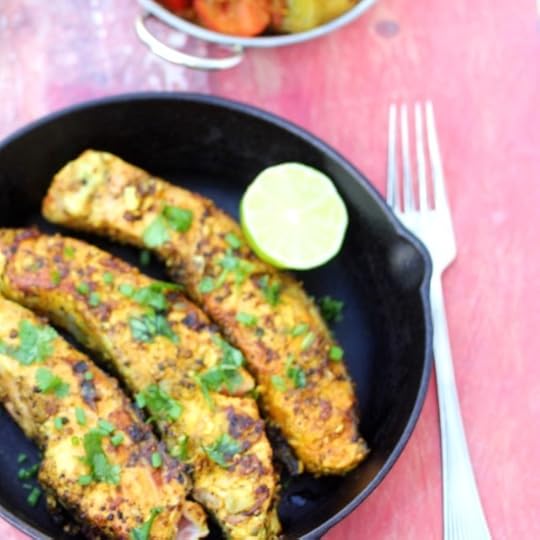
Mangalorean Fish Masala Fry (Oven or Air Fryer)
 I am really excited about this fish. On surface, it seems like just another fish dish, but, this Mangalorean Fish Masala Fry is quite a winner. I have made this with salmon steaks and with chunky pieces of firm white fish like cod. So, you can decide what floats your boat. Mangalore is in the coastal Konkan coast of India, with flavors that cross between Western India and the South. The food is bold and vibrantly spiced. This fish dish is my adaptation of the bold flavors. It is lighter but quite flavorful. You can bake, air fry, or pan fry them. This is one of our new favorites, thankfully adapted for my newest cooking class.
In adapting the recipe, I have essentially simplified the marinade to make this closer to a spice crust. Spices, lime, and fresh and fleshy fish. All of this together gives you a taste tempting experience. As you can see, I have large steaks that I serve as a main course and of course you can use smaller pieces as an appetizer. If you want to try ways to add a spice crust to your fish, here is another air fryer fish recipe, you will find a walnut crusted fish recipe in my Spices and Seasons cookbook, and there are other flavorful fish dishes in Instant Indian.
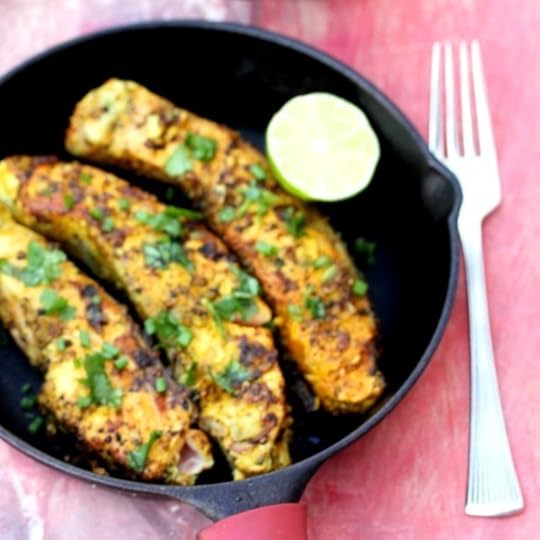
To ensure perfectly moist and well seasoned fish,
use fresh spices, look that is always essential.
marinate the fish for between 30 minutes to an hour. Do not do this for much longer, it will make the fish rubbery.
Work with a hot cooking surface, this is controlled in the air fryer, but pre-heat your oven or your pan.
Make sure you have lots of fresh lime wedges and cilantro or mint to serve your fish with.
And as always, here is wishing everyone an absolutely wonderful week ahead. If you are into bitter melon, I actually have a pretty amazing dish in store for you. One of these days, when I can photograph and post.
If you like this recipe and want more ideas, do join my Indian Instant Pot Facebook group and Legume Love Group. Of course Instant Indian is ready for order, joining its siblings The Bengali Five Spice Chronicles and Spices and Seasons.
PrintMangalorean Fish Masala Fry (Oven or Air Fryer)
Prep Time: 1 hour, 10 minutes
Cook Time: 15 minutes
Total Time: 1 hour, 25 minutes

A zesty light and lively fish dish from the western coast of India.
Ingredients
For the marinade1 teaspoon black peppercorns
1 teaspoon whole coriander seeds
1 teaspoon cumin seeds
1 teaspoon turmeric
1 inch piece of ginger
3 cloves of fresh garlic
15 curry leaves
1 tablespoon fresh lime juice (about 1/2 lime)
2 pounds salmon steaks, cut into half (about 4 pieces)
2 tablespoons coconut oil
Freshly chopped cilantro or mint
Extra lime juice
Instructions
Lightly toast the black peppercorns, coriander and cumin until just aromatic. This will take about 3 to4 minutes.Grind to a powder. Place in a blender or mini chopped with the turmeric, ginger, garlic, curry leaves and grind to a smooth paste.
Coat the fish with this paste and set aside for 30 minutes to an hour.
Rub the fish with the coconut oil
Place in your air fryer basket (see notes for baking) and cook at 400 degrees for 5 minutes, turn and cook for five more minutes.
Serve immediately tossed with chopped cilantro or mint and extra lime juice.
Notes
To Bake
Pre-heat the oven to 375 degrees. Place on a sheet pan.
Cook for 20 minutes turning once. Broil for about 3 minutes and then serve garnished with mint or cilantro.
The post Mangalorean Fish Masala Fry (Oven or Air Fryer) appeared first on Spice Chronicles.
September 26, 2020
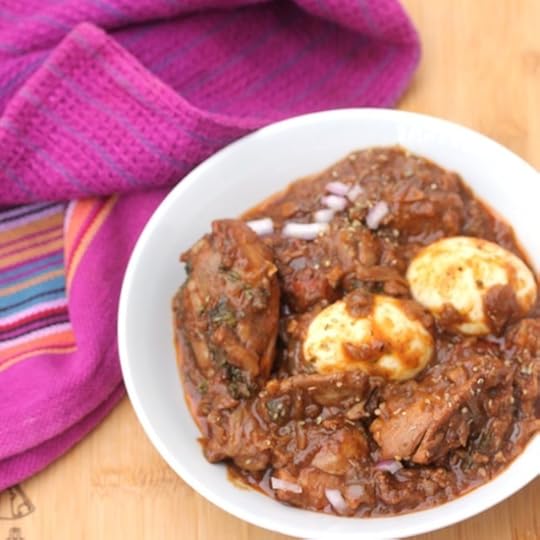
Doro Wat – Ethiopian Chicken Stew in the Instant Pot
 If you have been following this blog for a while, you probably know that we often try different cuisines especially on a Sunday. I have made this Doro Wat a couple of times and as usual did not quite get my act together to share it. I made it again today, and took notes, and am sharing it for your edible pleasure. If you do not know what Doro Wat is, honestly it is time to find out. It is not Ethiopia’s signature dish for nothing. And what it is simple and very flavorful in the instant pot, it works out just as well on the stove top in something like a Dutch Oven.
A couple of other Ethiopian Dishes on this site, especially if you want to make a meal out of it. A fun fact, before I move on to other things. I visited Ethiopia over 35 years ago and tasted cold chicken for the first time there.
So typically severed as a part of a complete meal which includes injera (here is my version with sorghum) and Misir Wat, which is Ethiopian spiced red lentils. At the heart of a lot of Ethiopian dishes including this one is the Ethiopian spice blend Berebere. And see I have a tested and tried recipe for you. I am good that way. But, you can certainly buy a good variety from any where else.

A few things to guarantee that classic deep and flavorful taste:
Use dark meat on the bone. Chicken legs or thighs or a combination.
Ideally done with Ethiopian spiced butter Niter Kibbeh you can use ghee for good results.
The stew gets a lots of flavor from onions cooked low and slow, do not rush this step.
The effect of dipping a soft spongy piece of Injera in this rich sauce is quite magical. However, if you do not have any injera on hand, you can use your favorite flakey flat bread.
Speaking of flatbreads, they have been one of my obsessions since the pandemic. There is something quite magical about getting one’s hands all worked up with flour.
If you like this recipe and want more ideas, do join my Indian Instant Pot Facebook group and Legume Love Group. Of course Instant Indian is ready for order, joining its siblings The Bengali Five Spice Chronicles and Spices and Seasons.
PrintDoro Wat – Ethiopian Chicken Stew in the Instant Pot
Prep Time: 10 minutes
Cook Time: 45 minutes
Total Time: 55 minutes
Yield: Serves 4 to 6

A deeply seasoned rich tasting stew, that is often called Ethiopia's natural dish.
Ingredients
1 tablespoon ghee2 tablespoon olive oil
3 medium sized red onions, halved and thinly sliced
2 cloves of garlic minced
1 tablespoon Berebere.
2 pounds skinless chicken on the bone
1 tablespoon tomato paste (optional)
1 and 1/2 teaspoons salt or to taste
4 boiled eggs (allow one per person)
Instructions
Turn the instant pot onto the sauté mode. Add in the ghee and the olive oil and let it heat for 1 or 2 minutes. Add in the onions and cook this slowly stirring occasionally until the onions soften and turn into a deep toffee color. This will take about 10 to 15 minutes.Add in the garlic and the Berebere, the chicken and the tomato paste if using and the salt and stir well. Turn off the instant pot. Add in 1/2 cup water and use this to deglaze the pot. Cover and set on 4 minutes of pressure and allow a natural release.
Add in the eggs and stir well. This stew can be made a day ahead to allow the flavors to deepen.
Notes
For the Stove Top
Use a heavy bottomed pot such as a Dutch Oven. Turn the heat. Add in the ghee and the olive oil and let it heat for 1 or 2 minutes. Add in the onions and cook this slowly stirring occasionally until the onions soften and turn into a deep toffee color. This will take about 10 to 15 minutes.
Add in the garlic and the Berebere, the chicken and the tomato paste if using and the salt and stir well. Cook for about 5 minutes.
Add in 1 cup water and use this to deglaze the pot. Cover and cook on low heat for about 45 minutes. Remove the cover and stir well. The sauce should be fairly thick.
Add in the eggs and stir well. This stew can be made a day ahead to allow the flavors to deepen.
The post Doro Wat – Ethiopian Chicken Stew in the Instant Pot appeared first on Spice Chronicles.


