
Rinku Bhattacharya's Blog, page 16
March 16, 2021
Classic Brown Irish Soda Bread
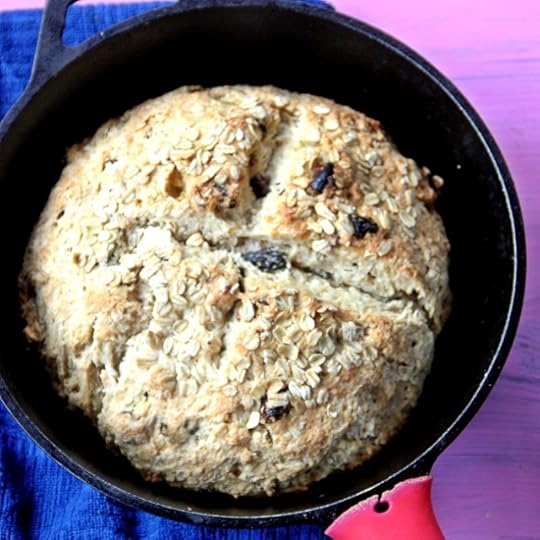 St Patricks Day to me is about all things green, cabbage, and soda bread. I like soda bread with raisins. My son does not like raisins. Hence like anything else in my life, I do not make it. This year is different. I have one child close to flying the coup. Some of her acceptances are in. Looks like we are heading for a Baby Beaver in our household. Me, I am just happy some decisions are made. But wistful. I am always wistful when they reach milestones. I cannot help but acknoledge that they are moving away. So it is time to cook for myself. Sometimes any way. So raisins are in. And this soda bread is easy, seriously good, and fun to put together.
In simple terms a soda bread is bread that is raised or leavened with baking soda rather than yeast. This makes it a quicker bread. There are many variations of this recipe. Several stating their authenticity. This is where it gets tricky.
I will not profess this is a family heirloom or any such. However, my fairly good variation culled from a few recipes that caught my eye. Most notably this recipe and then this one.
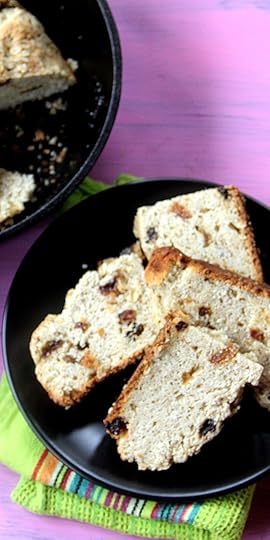
The version I have here offers a very mildly sweetened slightly dense loaf. It is pefect for both sweet and savory dishes. Yes, it is that kind of good. Great plain, seriously good with butter and jam. And, yes, it would be nice to dunk into your favorite stew.
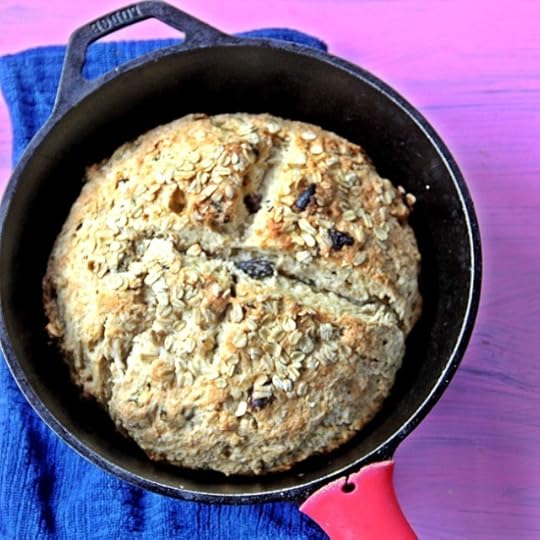
Overall, the technique will remind you of making biscuits. A lightly handled dough. Shaggy and a little rough around the edges. And needs the magic of buttermilk and baking soda to do its good stuff. Sure you can add an egg. The recipe however does not include one.
Points to note.
Make sure your butter is very cold.Do not overwork the doughAllow yourself a nice working surface to shape the dough.Allow yourself a good walk if the weather holds out. Come back and enjoy a slice with a hot cup of tea or coffee.
PrintClassic Brown Irish Soda Bread
Prep Time: 15 minutes
Cook Time: 30 minutes
Total Time: 45 minutes
Yield: Makes about 20 to 25 slices

An easy to follow fool proof recipe for soda bread.
Ingredients
2 cups of whole wheat flour (I used white whole wheat)1 and 1/2 cups of all purpose flour
2 teaspoons baking powder
1 and 1/4 teaspoon baking soda
1/4 cup sugar
1 teaspoon salt
6 tablespoons salted butter
3/4 cup raisins
1 and 1/2 cups of buttermilk
1 and 1/2 tablespoons of rolled oats (optional)
Instructions
Pre-heat the oven to 425 degrees.Grease and prepare a baking pan. I feel that if you have a cast iron skillet, it works well for this recipe.
Sift together the flour and the baking soda. Stir in the sugar and the salt.
Cut the butter into the mixture. It should be incorporate well, but still be cold. A pastry cutter, fork, or your hands are a good idea with this. Do not use a food processor.
Stir in the raisins.
Add in the buttermilk to form a dough. It will be a little shaggy. Shape into a round.
Place in your baking pan. Sprinkle with the oats if using. Score a cross across the center.
Bake in the hot oven for about 30 minutes. The bread will be done through and the top will be gently browned.
It is best served slightly warm.3.1https://spicechronicles.com/classic-brown-irish-soda-bread/
The post Classic Brown Irish Soda Bread appeared first on Spice Chronicles.


March 9, 2021
Curried Coconut Masala Noodles
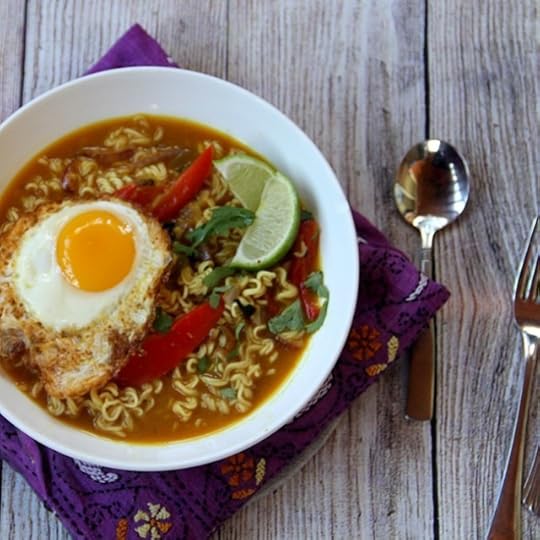
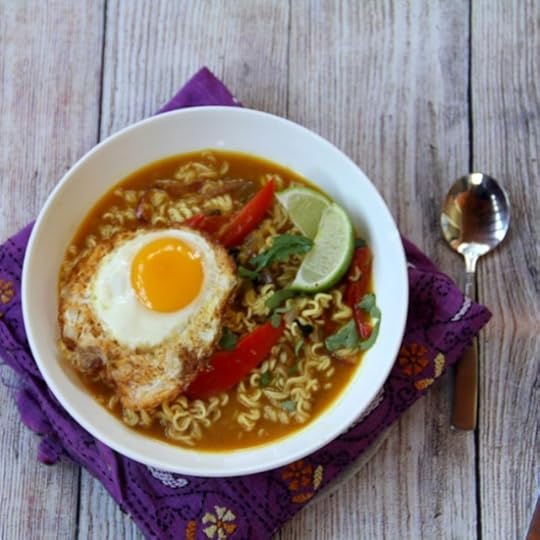
 Often following crazy busy phases are those catch up busy phases. Catch up busy phases are when you are catching up on all things sort of fun. Semblances of me time. That is when meals like these Curried Coconut Masala Noodles come in handy. These noodles are brothy, spicy, creamy, limey and get done in under 30 minutes. So, yes, this is why they rank high on my list of what I love comfort foods.
There is a little bit of chopping involved, and some grinding of fresh spices. If you feel so inclined you can try one of these. As with all things brothy, it is all about the broth. So, despite the simplicity, this broth packs a lot of flavor. Clean ingredients and lots of ginger and lime. You can certainly up the ante with more vegetables, some shrimp if you feel like. It is a naturally gluten free and vegan broth. So you can keep it that way depending on your choice of noodles.
Me, I like to top them with an egg. The kind that is fried until the edges are nice and crisp. All I need is a large bowl of these noodles to beat the chills. Ending the day with these and watching this is my kind of wind down. Please tell me that I am not the only one still binging on Netflix. Hey, for the most part I am still stick to the basics. Finish off with a lot of fresh lime juice and cilantro and all the herbs you have on hand.
If you like noodles as much as I do, you can try my,
Singapore Curry Noodles -Instant Pot
I cannot believe that it is March already. Happy COVID anniversary to anyone who is tracking. Honestly, it is difficult to believe that we have been this way for almost a year now. In some ways, we have become more used to things. Just waiting and watching for that coveted shot.
And so, here is a good bowl of noodle soup for you.
If you like this recipe and want more ideas, do join my Indian Instant Pot Facebook group and Legume Love Group. Of course Instant Indian is ready for order, joining its siblings The Bengali Five Spice Chronicles and Spices and Seasons.
Do not forget to get social with me, Facebook, Twitter, Instagram, Pinterest and even Youtube
PrintCurried Coconut Masala Noodles
Prep Time: 5 minutes
Cook Time: 30 minutes
Total Time: 35 minutes
Yield: Serves 4

A gorgeous bowl of creamy tangy noodle soup. The egg makes a perfect topping for these coconut masala noodles.
Ingredients
2 tablespoon coconut oil1 tablespoon minced ginger
1/2 teaspoon turmeric
2 teaspoons coriander powder
1 teaspoon cumin powder
1 tablespoon soy sauce
1 teaspoon salt
1 tablespoon sugar
2 teaspoons sesame oil
3/4 cup coconut milk
2 cup water
1 bell pepper thinly sliced
10 ounces dried noodles
Chopped cilantro
1/4 cup fresh lime juice
Optional garnish
2 tablespoons coconut oil
1 egg per person
Instructions
Heat the oil in a heavy bottomed pot. Add in the minced ginger and sauté for 30 seconds. Add in the cumin and coriander and mix well.Add in the soy sauce, salt and the coconut milk and bring to a simmer. Add in the water and simmer for 10 minutes. Add in the bell pepper and simmer for 2 minutes.
Add in the noodles and cook until soft (about 3 to 4 minutes) depending on your noodles.
Stir in the lime juice and cilantro.
Place in 4 serving bowls. If add the eggs. Heat the oil in a skillet (allow about 1 teaspoon per egg), heat for 1 minute and crack in the egg. Allow the egg to cook until the sides are crisp around the edges. Place over each bowl of soup.3.1https://spicechronicles.com/curried-coconut-masala-noodles/
The post Curried Coconut Masala Noodles appeared first on Spice Chronicles.
February 24, 2021
Golden Millet, Chickpea, and Vegetable Pulao
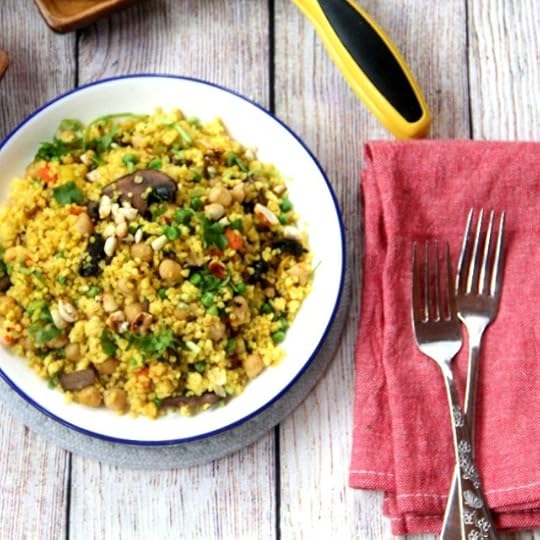
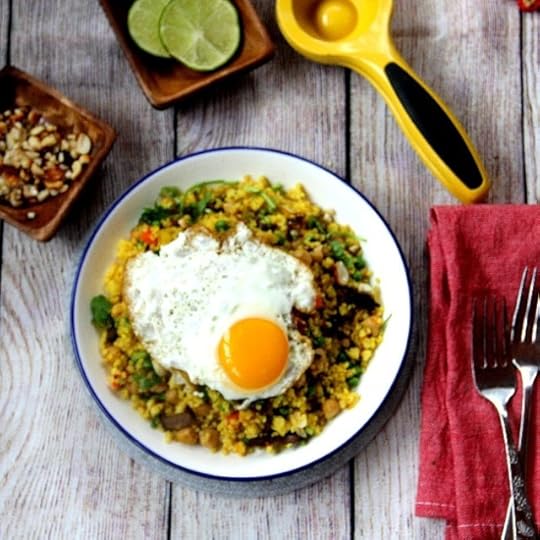
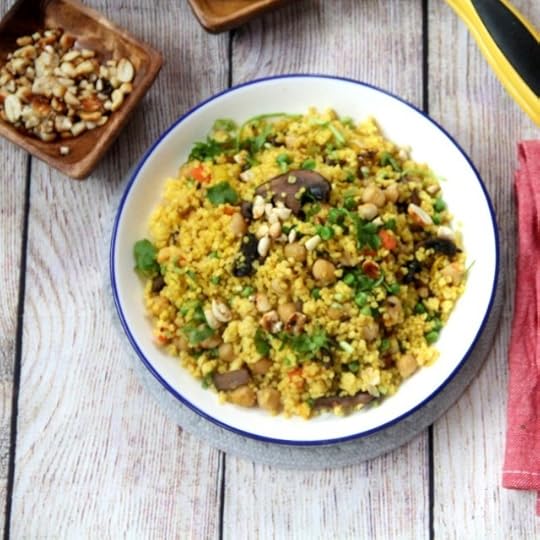 A pulao is one of those catch of dishes on the Indian table. Made with almost anything on hand, bound together with a few fragrant spices. My vegetarian kitchen sink version uses millet instead of rice. And hence I call it my Golden Millet, Chickpea, and Vegetable Pulao. In addition to chickpeas, I add deep meaty mushrooms and almost any vegetables that I have on hand. Gently seasoned with turmeric, ginger, lime, and garam masala. The result is a perky fragrant creature. A perfect mid season kind of dish.
One of my to do’s on weekends is to prep some chickpeas. They always find their place on my table. One of my favorite ways to use them is in this quick spinach chickpeas.
But I digress. This week features a large batch of this pulao. The home crew seems please with it. I think I have a keeper. Today’s version is done with a chock full of vegetables on hand. I am not abover trying variations to it. But then again, why mess with a good idea.
Left to it’s own devices, it is both vegan and gluten free. However, if like me you love the idea of an egg on top, go for it. With me, if we are doing the egg on top it has to be cooked until the sides are all nice and crispy. And to complement the flavors of this rather comforting pulao, I actually fry the egg in coconut oil.
Soothing, comforting, and colorful. Did I say wholesome, filling, and flavorful, it is my kind of good for all seasons dish. And yes, it can be done in your instant pot. But, works just as well on the stove top. So as they say it’s all good. A few more busy days ahead.
If you like this recipe and want more ideas, do join my Indian Instant Pot Facebook group and Legume Love Group. Of course Instant Indian is ready for order, joining its siblings The Bengali Five Spice Chronicles and Spices and Seasons.
PrintGolden Millet, Chickpea, and Vegetable Pulao

Ingredients
3 tablespoons coconut oil, divided1 tablespoon minced ginger
1 teaspoon whole cumin seeds
1 cup pearled millet such as Bob's Red Mill
1 cup chopped vegetables such as carrots and peas
1 stick cinnamon
2 to 3 cloves
2 to 3 green cardamom
1 and 1/4 cup cooked chickpeas
3/4 teaspoon turmeric
1 and 1/2 teaspoons salt or to taste
8 to 10 mushrooms thickly sliced
To garnish
4 tablespoons fresh lime juice
2 tablespoons chopped cilantro
Optional garnish
1 tablespoon coconut oil
1 egg (per person)
Instructions
Heat the 2 tablespoons coconut oil in a heavy bottomed skillet or on sauté mode in the instant pot.Add in the ginger and cumin seeds and wait until the cumin seeds sizzle.
Add in the millet and stir well. If using the instant pot, turn off the sauté mode.
Add in the vegetables, cinnamon, cloves, and cardamom. Add in 1 cup of water for the instant pot and 2 cups for the stove top.
Add in the chickpeas, turmeric and salt. If using the instant pot, cover and set to 1 minute of cook time and allow a natural release. If doing this on the stove top, cover and simmer for about 15 to 20 minutes until all the water is absorbed and the millet is tender.
While this is cooking, heat the remaining tablespoon of oil and sauté the mushrooms until fragrant about 3 to 4 minutes. Stir into the millet.
Add in the lime juice and the cilantro.
Only if desired, heat the oil and crack an egg and cook until the sides are nice and crisp. Gently top your bowl of millet pulao with the egg. Enjoy!3.1https://spicechronicles.com/golden-millet-chickpea-and-vegetable-pulao/
The post Golden Millet, Chickpea, and Vegetable Pulao appeared first on Spice Chronicles.
February 19, 2021
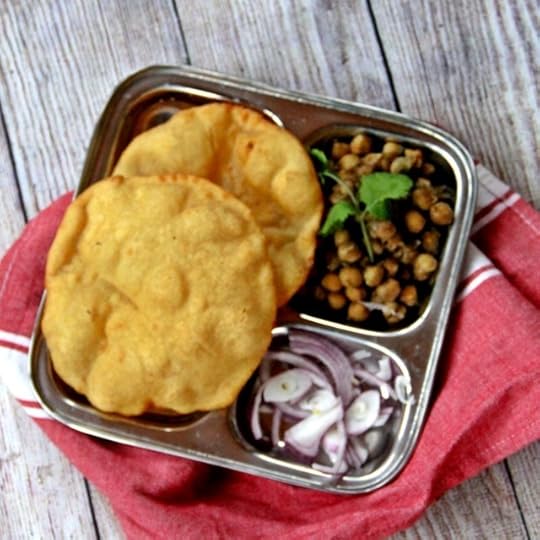
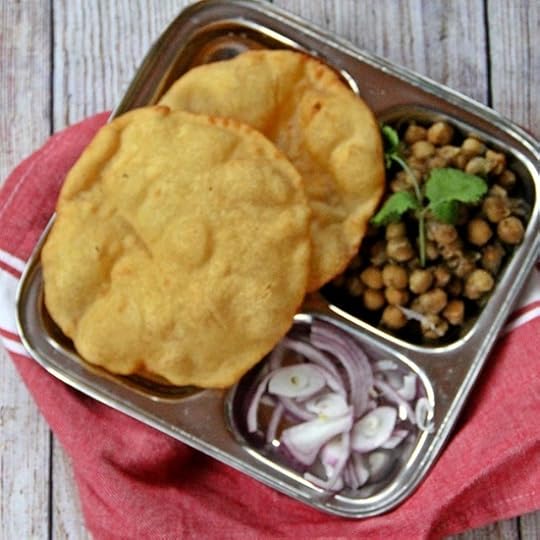
Bhatura – Crisp and Fermented Fried Bread
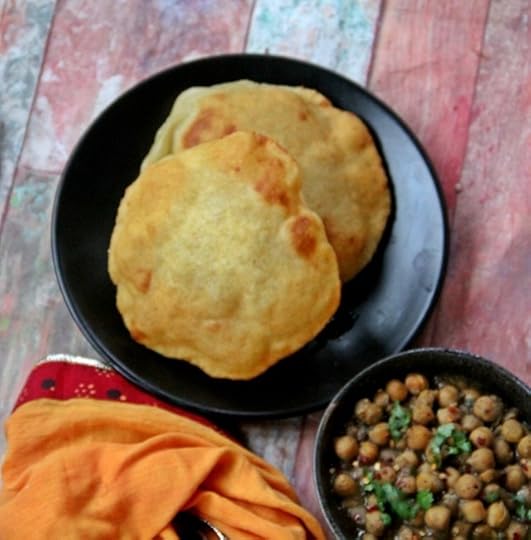 One of our (the husband and mine) favorite Indian roadside treats is eating Choley with Bhatura. Now the Bhatura for the uninitiated is a seductive, fermented slightly chewy, slightly tangy, fried bread. Bhatura is a native from the Northern State of Punjab. Traditionally, I imagine, done without yeast and refined flour. Most recipes tend to use all purpose flour and semolina with yeast for quick results. My recipe here uses sourdough starter, and whole wheat flour and the instant pot to ferment the batter. The result is pure magic! Delicate in its texture! And absolutely perfect for this crazy cold and snowy weather. I made some over the weekend, and baring the fermentation this is delight without a lot of effort.
And, for the fermentation, the oven with the pilot light, or frankly any good warm place in the house would work. And for me, until I can hit StreetSide stalls in India again, this will get me through. A note of the planning like most things, that I need to ferment, such as dosa or idly, I just plan on this at night and let the yeast do an overnight party. It guarantees good results and makes good use of human sleeping hours.
A few things for the Bhatura dough, texture and puffiness.
Do give the dough enough time to rest and rise. It needs to double happily and feel soft and puffy.When rolling make sure there are no little holes in the Bhatura dough, it is easy to get fooled with its puffy composition.To ensure that your Bhatura’s puff up you need to make sure that your oil is hot, hot, hot.
And I am happy to report that my recipe collection of sourdough flatbreads on this site is growing. For good measure try,
If you like this recipe and want more ideas, do join my Indian Instant Pot Facebook group and Legume Love Group. Of course Instant Indian is waiting to be ordered, joining its siblings The Bengali Five Spice Chronicles and Spices and Seasons.
And to get social with me, follow me on Instagram, Facebook, Pinterest and Twitter.
PrintBhatura – Crisp and Fermented Fried Bread
Prep Time: 10 hours, 20 minutes
Cook Time: 20 minutes
Total Time: 10 hours, 40 minutes
Yield: Makes 12 to 15 medium sized bhaturas

A sourdough fermented whole wheat version of this signature bread from North India.
Ingredients
3 cups whole wheat flour (atta)1/2 cup semolina (sooji)
1 teaspoon salt or to taste
2 tablespoons yogurt
1/2 cup sourdough discard
water as needed for rolling the dough
2 to 3 cups of neutral oil such as Canolla
Instructions
Mix the wholewheat flour with the semolina. Stir in the salt. Add in the yogurt and the sourdough discard to form a shaggy dough. Add in enough water to make a smooth but not overly soft dough.Place in a container with enough room to allow the dough to rise and grow and place in a warm place. For instant pot proofing, place this in the instant pot. Set on yogurt mode for 8 hours.
The dough should have doubled by now. Push down and allow this to rise for a couple of hours. Break into 10 to 12 balls. Roll into 4 to 5 inch circles, about 1/4 cm thick. It is a little thicker than puri.
Heat the oil in a large wok (large enough to comfortably allow the bhatura to rise and cook).
Again the oil should be very hot.
Add the bhatura's one at a time, allow them to puff up. Cook them until golden brown on each side and turn.
These will be a little darker than what you find in a restaurant, or roadside as they are made with wholewheat flour.
Serve hot with your favorite chickpea recipe.3.1https://spicechronicles.com/bhatura-crisp-and-fermented-fried-bread/
The post Bhatura – Crisp and Fermented Fried Bread appeared first on Spice Chronicles.
February 13, 2021
Easy Chicken Keema Samosa and Cooking Therapy
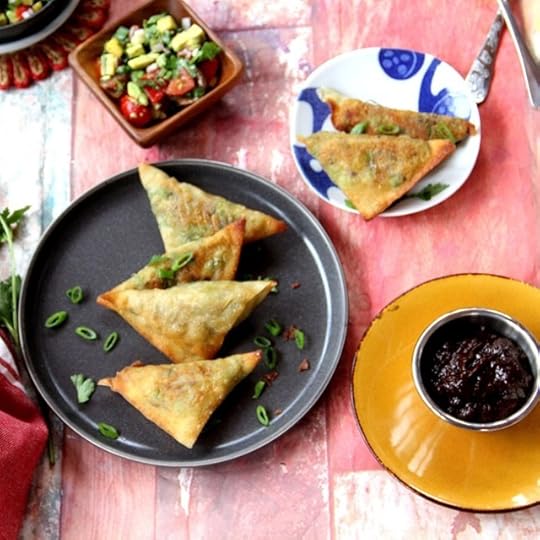
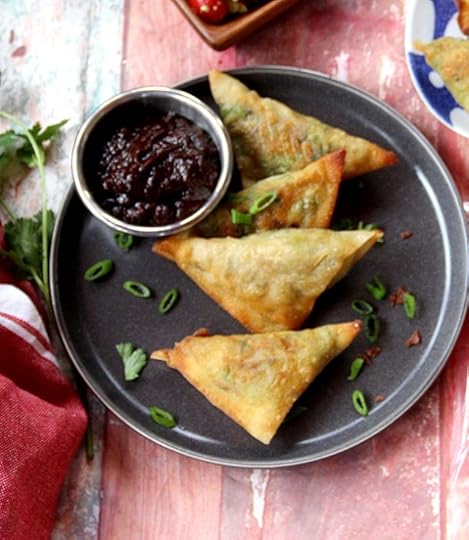 I spent most of the day running around cooking and food shopping. It is my all time favorite thing to do to unwind. Part of today’s cooking included an online cooking class. Among other things, I made this easy Chicken Keema Samosas. Crisp and gently spiced, I used egg roll wrappers to make these. They can be done with egg roll wrappers, cut into half and folded. Or they can be done with wonton wrappers. Naturally the later is even quicker and easier. I however prefer the egg roll wrapper version, as it makes for a sturdier and crisper samosa. However you can decide what you want to do.
The last offering from the stash of wrappers from JSL foods, using their twin draggon wrappers. Honestly, I have realized how versaltile these wrappers are. Now hop along to see how I make these samosas.
In case you are wondering, these low sodium wonton wrappers from JSL foods are found at Walmart, Albertsons, Shaw’s, Von’s, Stater Bros, Fred Meyer, QFC, Safeway, Giant Stores, Shop N Shop, Winco, and Price Chopper. And Insta Cart delivers them too. And you can find them on facebook or instagram.
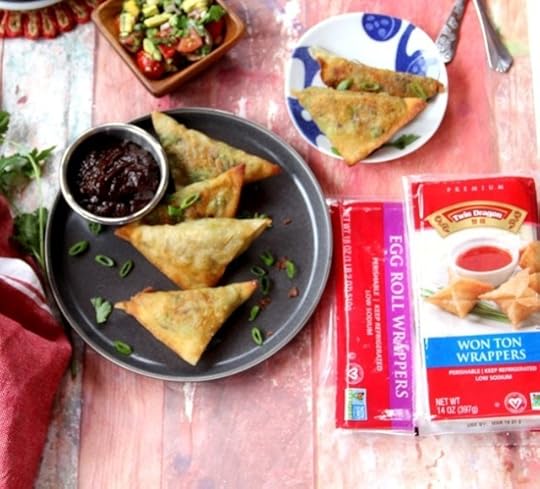
A little on these samosas. While vegetable usually potato samosas are more popular. This chicken based version is found in many parts of India. It is also one of my go to snacks to pick up in Bangladeshi hole in the wall restaurants. One of my favorite ones is in the Bronx is Curry and Kebab.
Meat based samosas traditionally have thin crisp wrappers, thus the wonton or egg rolls skins are a perfect quick fix for these samosas. I keep the filling simple, and serve with tamarind chutney and any kind of salad. Perfect for your favorite party. And perfect for cooking therapy. There is something quite amazingly good about biting into these crispy bites of perfection.
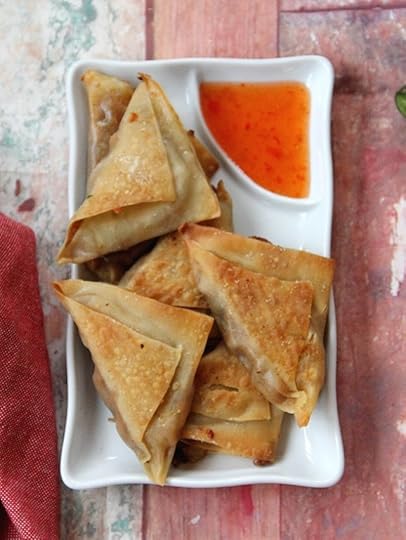
As a general note, I have tried air fryer and pan frying these beauties and they both work out very well. You get a little more of the uniform golden color with the pan frying. But as they say its all good. I did not find a whole load of difference in the taste.
A few tips in terms of the samosas,
The potato in the filling is a good idea as it gives the filling a softer texture, making it easier to stuff.As with homemade samosa dough, make sure that you seal all edges of the samosa.The samosas keep well upto 3 to 4 days in the refridgerator once assembled.
Air frying or pan frying, it is important to get the maximum crispness from your samosa. For this you want to cook them on low heat. With the air frying, spray the samosas every 3-4 minutes to get that uniform golden color. See the version on the white plate.
If you are staying indoors, and doing cozy things tomorrow, make yourself a large batch of these. I plan on doing just that.
If you like this recipe and want more ideas, do join my Indian Instant Pot Facebook group and Legume Love Group. Of course Instant Indian is ready for order, joining its siblings The Bengali Five Spice Chronicles and Spices and Seasons.
And to get social with me, follow me on Instagram, Facebook, Pinterest and Twitter.
PrintEasy Chicken Keema Samosa and Cooking Therapy
Prep Time: 25 minutes
Cook Time: 15 minutes
Total Time: 40 minutes
Yield: Makes 20 samosas

A quicker take on flavorful chicken samosas, made with quick wonton or egg roll wrappers.
Ingredients
For the Filling2 tablespoons vegetable oil
1 teaspoon whole cumin seeds
1 small red onion, diced
1 tablespoon minced ginger
1/2 pound ground chicken
1 teaspoon salt or to taste
1 teaspoon turmeric
1/2 teaspoon red cayenne pepper
1 large potato peeled and cubed
1 and 1/2 teaspoons garam masala powder
1/2 cup chopped tomatoes
3/4 cup frozen peas
1 tablespoon fresh lime juice (about 1/2 lime)
4 tablespoons chopped cilantro
For the samosas
1/2 cup water
1tablespoon cornstarch
20 wonton wrappers or 10 egg roll wrappers
1 cup oil for pan frying or cooking spray for air frying
Tamarind chutney, ketchup and other condiments to serve
Instructions
Heat the vegetable oil and add in the red onion and saute well for about 3 to 4 minutes Add in the minced ginger and cook for a minute. Add in the chicken and stir well.Add in the salt, turmeric, red cayenne pepper, cubed potato, garam masala and chopped tomatoes and stir well and cook for about 2 minutes on high heat. Lower the flame and cover and cook for about 10 minutes. Remove the cover and make sure the potatoe is very soft. Continue cooking to dry out any residual liquid and mash the potato into the mixture.
Stir in the frozen peas, lime juice and chopped cilantro. Allow the mixture to cool. If needed mash the potato in with a fork, the mixture should have a soft binding and uniform texture.
Prepare a slurry with the water and cornstarch.
If you are using the egg roll wrappers, cut in half, roll the first triangle and fold over, seal with stlurry. Fold over once more and seal with slurry. You will have a pocket and an open flap. Fill the pocket comfortably with the filling. Line the remaining flap with the slurry and seal. This will not come all the way through, that is ok. Crimp and pinch the sides to seal.
If using the wonton wrapper, line the sides with the slurry, place about a tablespoon of the filling in the center and fold over and seal. Crimp the sides and let it seal over.
One all the samosas are done you can either fry or air fry them
To fry them heat 1 cup of oil in a large skillet, turn the heat on low, and gently cook the samosas until golden brown about 3 minutes, and turn and brown the second side. Drain on paper towels and serve.
To air fry, spray well with cooking spray. Cook at 375 degrees for 8 minutes, spraying once in between. Turn and cook for another 8 minutes.
Enjoy with your favorite condiment.
3.1https://spicechronicles.com/chicken-keema-samosa/
The post Easy Chicken Keema Samosa and Cooking Therapy appeared first on Spice Chronicles.
February 12, 2021
Butternut Squash and Kale Ravioli with a Brown Butter Herb Gremolata
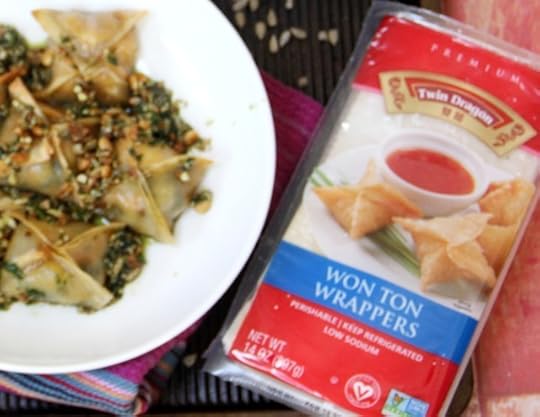
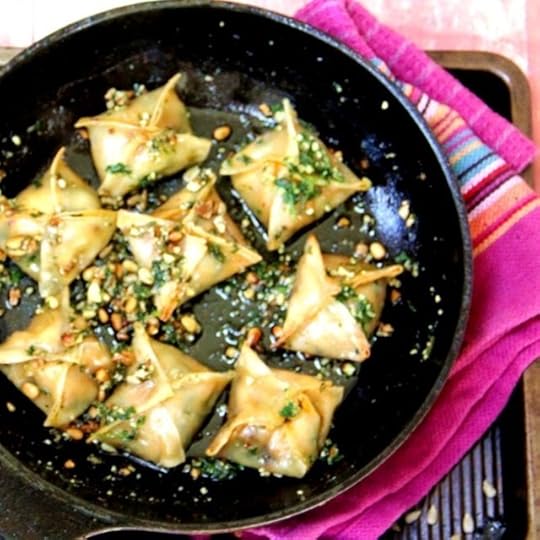
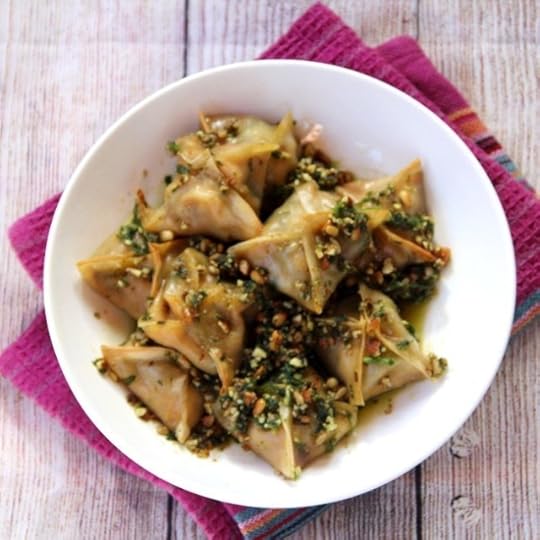 As you know, I recently made these Chicken Taco egg rolls with the wrappers from JSL foods. I still had some wonton wrappers on hand. The voice in my head went – yeah, more fun with flavors. I love making little packages. So, with the wonton wrappers emerged this Butternut Squash and Spinach Wonton Ravioli. The ravioli is indeed the love child of classic ravioli and wontons. Soft but crisp at spots, giving you just enough texture to have fun with. And then they get tossed with brown butter and a herby nutty gremolata.
The magic in the filling is about squash that has roasted low and slow reached buttery deep sweetness.
So let me tell you how I make them.
The low sodium wonton wrappers from JSL foods are found at Walmart, Albertsons, Shaw’s, Von’s, Stater Bros, Fred Meyer, QFC, Safeway, Giant Stores, Shop N Shop, Winco, and Price Chopper. And Insta Cart delivers them too.
Now with these wonton ravioli, the good news is you can make a large batch and freeze them. Just like any other kind of wontons. I have kept the wrapping rather simple, but I am sure you can get plenty creative with them. I have tried these in a light broth like soup as well, but, I will save that for a different day.
The filling is rather simple, you do need to roast the squash. That is the only way you will reach this absolutely gorgeous deep and sweet buttery flavor.
After it cools, mash and add a few key ingredients. I have used kale here, but honestly spinach or even collard greens would be fine. The ginger and nutmeg mesh beautifully together with the minced scallions and miso to give the filling a nice depth of flavor.
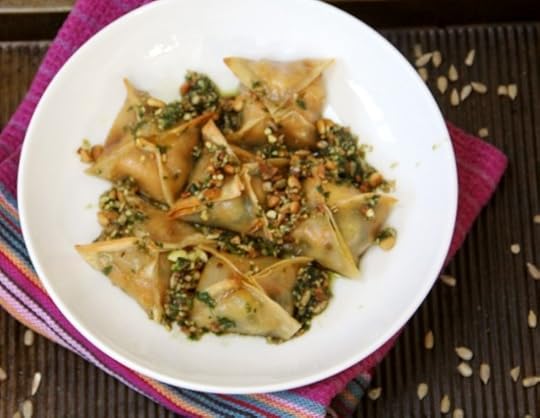
As for the sauce, it is all about browning butter to perfection. Add DO NOT skip that tablespoon of maple syrup. For some texture and flavor boost, I have the pine nut and herb gremolata. It is what winter comfort is all about. If you like it spicy, the crushed red pepper is a good idea. This is great as a small comforting party appetizer but certainly has main dish potential as well. It is important to cover all bases when it comes to cooking during COVID.
I needed this long weekend. I plan on cooking and spending quality time in the kitchen. Well it is my kind of weekend fun.
PrintButternut Squash and Kale Ravioli with a Brown Butter Herb Gremolata
Prep Time: 1 hour
Cook Time: 2 hours, 25 minutes
Total Time: 3 hours, 25 minutes
Yield: Makes 30 raviolis

An balanced and nuanced ravioli, with butterniut squash kale and a brown butter sauce.
Ingredients
For the filling1 small butternut squash (about 1 to 1/2 pounds)
1 tablespoon olive oil
1 tablespoon minced ginger
1 tablespoon minced garlic
1 cup of kale, finely chopped
1 tablespoon miso
Additional salt if needed to taste
1 tablespoon cornstarch
4 tablespoons water
25 to 30 Twin Draggon Wonton Wrappers
For the sauce
3/4 cup fresh herbs (I used basil and parsly)
1/4 cup pinenuts
3 tablespoons olive oil
2 tablespoons salted butter
3 cloves minced garlic
1 tablespoon maple syrup
Instructions
Preheat the oven to 325 degrees. Place the butternut squash in the oven and allow it to roast for 2 hours. You can do this a day ahead or when ever you have the time. When ready the squash will smell fragrant and even crack slightly at points.When cool enough to handle, cut the squash into half. Scoop out the seeds. Then scoop out the flesh. It should be very soft and easy to handle.
Heat the tablespoon of olive oil and add in the ginger and garlic and saute lightly. Add in the kale and allow the kale to wilt. Mix in the squash and the miso and salt if needed and mix well to mash in the squash. Allow the squash to cool well.
Mix the cornstarch and the water to form a slurry.
Pre-heat an oven to 350 degrees.
Lightly grease a baking sheet. Gently moisten the edges of the wonton wrapper and place about 1 tablespoon of filling in the center and seal the edges much like an envelop. Place on the baking sheet. Continue until all the wrappers are filled.
Spray the wontons with baking spray and bake for about 10 minutes, until they darken and the edges being turning golden. This will allow the ravioli to be firm and easy to handle.
Grind the herbs and the pinenuts together until coarsely mixed. You can either use a mortal and pestle or pulse in a blender.
In a large pan, heat the butter and olive oil for about 4 to 5 minutes, until the butter melts and stops foaming and starts turning darker. Add in the garlic and cook for another minute.
Add in the ravioli and toss well to coat. Add in the pinenut herb mixture and the tablespoon of maple syrup.
Mix well and cook for a minute or two.
Serve as needed. Allow one or two raviolis as an appetizer.3.1https://spicechronicles.com/butternut-squash-and-kale-ravioli/
The post Butternut Squash and Kale Ravioli with a Brown Butter Herb Gremolata appeared first on Spice Chronicles.
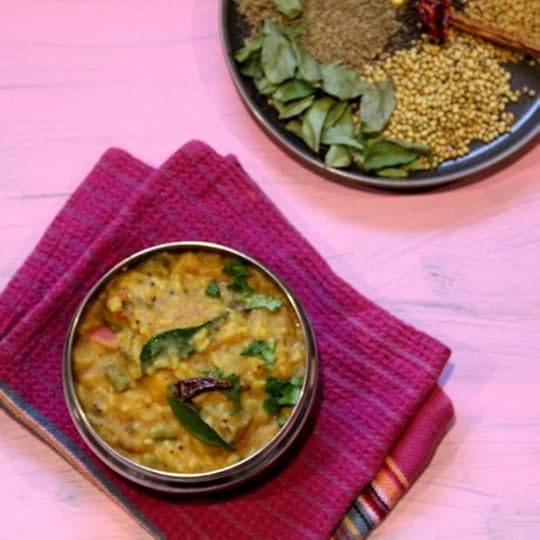
Sambhar Sadham or Rice (Instant Pot)
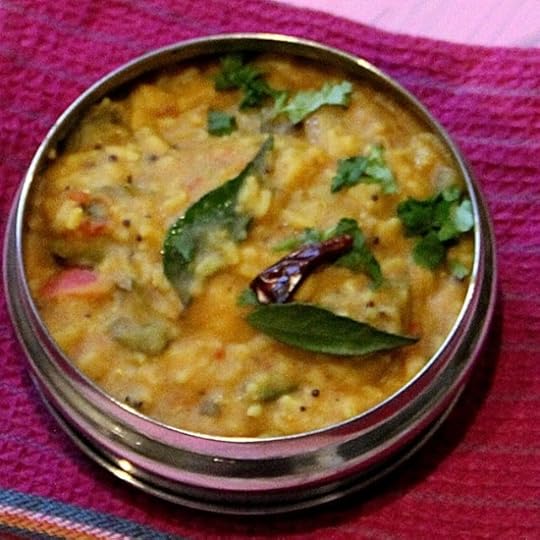 I have been told that my Sambhar Rice or Sambhar Sadham is very good. And, since it is a regional specialty, I only lay such claim to fame when it is regionally approved. What I mean by this is that my version of this recipe has been bless and approved by my South Indian friends. Which is important. After all, Sambhar Sadham is ultimate and comforting South Indian soul food.
So what exactly is Sambhar Sadham also known as Sambhar Rice. Well it is just as it sounds, a combination of Sambhar the ubiquitous lentil stew of South India, Happily melded with its favorite cohort rice. But, here is a case of the some of the parts being greater than the whole. When the rice and lentils are cooked together, they work together to maximize the flavors. And you get a dish that is wholesome, and guaranteed to beat the chills. So, while I have been ridiculously busy the past couple of weeks, the weather has inspired me to make some seriously good comfort food.
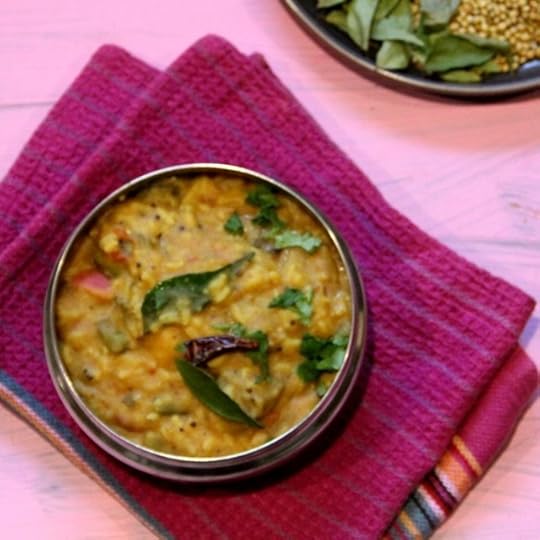
I hope to work through and share these with you one by one. Now for good sambhar and sambhar rice, you need good sambhar masala. A blend that is at the health of good wholesome sambhar. And if you want my tested and tried blend without the effort of making it yourself you just need to get it from my Etsy store. Yes, another one of my COVID endeavors.
So, I do make this in three steps – I cook the lentils and then add in the rice, vegetables and all the seasonings. Finally, last but not the least I finish with tarka or tempering. An essential step without which no Indian lentil dish is complete.

PrintSambhar Shadum or Rice (Instant Pot)
Ingredients
3/4 cup toor dal1 teaspoon salt
1 teaspoon turmeric
1/2 teaspoon red cayenne powder (more or less to taste)
1 tablespoon minced ginger
1/2 cup rice
2 tablespoons sambhar masala
1 tomato, diced
2 tablespoons tamarind pulp
1 and 1/2 cups assorted vegetables (such as carrots, eggplants, potatoes and peas)
1 tablespoon ghee or coconut oil
1 teaspoon mustard seeds
1/4 teaspoon asafetida or hing
8 to 10 curry leaves
2 tablespoons chopped cilantro
Instructions
Place the toor dal, 2 cups water, salt, turmeric, red cayenne powder in the instant pot and set to 10 minutes of cook time.In the meantime you can prep the vegetables, etc.
Release the pressure. Stir the lentils, add in the rice, sambhar masala, diced tomato, tamarind pulp, and assorted vegetables. Add about 1 and 1/2 cups of water. Set on 4 minutes of pressure.
Release the pressure and stir well.
Heat the ghee or coconut oil and add in the mustard seeds and wait until they crackle. Add in the hing and curry leaves. Pour the oil over the sambhar rice and stir in.
Stir in the cilantro and serve hot.3.1https://spicechronicles.com/sambhar-sadham-or-rice-instant-pot/
The post Sambhar Sadham or Rice (Instant Pot) appeared first on Spice Chronicles.
Sambhar Shadum or Rice (Instant Pot)
I have been told that my Sambhar Rice or Sambhar Shadum is very good. And, since it is a regional specialty, I only lay such claim to fame when it is regionally approved. What I mean by this is that my version of this recipe has been bless and approved by my South Indian friends. Which is important. After all, Sambhar Shadum is ultimate and comforting South Indian soul food.
So what exactly is Sambhar Shadum also known as Sambhar Rice. Well it is just as it sounds, a combination of Sambhar the ubiquitous lentil stew of South India, Happily melded with its favorite cohort rice. But, here is a case of the some of the parts being greater than the whole. When the rice and lentils are cooked together, they work together to maximize the flavors. And you get a dish that is wholesome, and guaranteed to beat the chills. So, while I have been ridiculously busy the past couple of weeks, the weather has inspired me to make some seriously good comfort food.
I hope to work through and share these with you one by one. Now for good sambhar and sambhar rice, you need good sambhar masala. A blend that is at the health of good wholesome sambhar. And if you want my tested and tried blend without the effort of making it yourself you just need to get it from my Etsy store. Yes, another one of my COVID endeavors.
So, I do make this in three steps – I cook the lentils and then add in the rice, vegetables and all the seasonings. Finally, last but not the least I finish with tarka or tempering. An essential step without which no Indian lentil dish is complete.
PrintSambhar Shadum or Rice (Instant Pot)
Ingredients
3/4 cup toor dal1 teaspoon salt
1 teaspoon turmeric
1/2 teaspoon red cayenne powder (more or less to taste)
1 tablespoon minced ginger
1/2 cup rice
2 tablespoons sambhar masala
1 tomato, diced
2 tablespoons tamarind pulp
1 and 1/2 cups assorted vegetables (such as carrots, eggplants, potatoes and peas)
1 tablespoon ghee or coconut oil
1 teaspoon mustard seeds
1/4 teaspoon asafetida or hing
8 to 10 curry leaves
2 tablespoons chopped cilantro
Instructions
Place the toor dal, 2 cups water, salt, turmeric, red cayenne powder in the instant pot and set to 10 minutes of cook time.In the meantime you can prep the vegetables, etc.
Release the pressure. Stir the lentils, add in the rice, sambhar masala, diced tomato, tamarind pulp, and assorted vegetables. Add about 1 and 1/2 cups of water. Set on 4 minutes of pressure.
Release the pressure and stir well.
Heat the ghee or coconut oil and add in the mustard seeds and wait until they crackle. Add in the hing and curry leaves. Pour the oil over the sambhar rice and stir in.
Stir in the cilantro and serve hot.3.1https://spicechronicles.com/sambhar-shadum-or-rice-instant-pot/
The post Sambhar Shadum or Rice (Instant Pot) appeared first on Spice Chronicles.
February 6, 2021
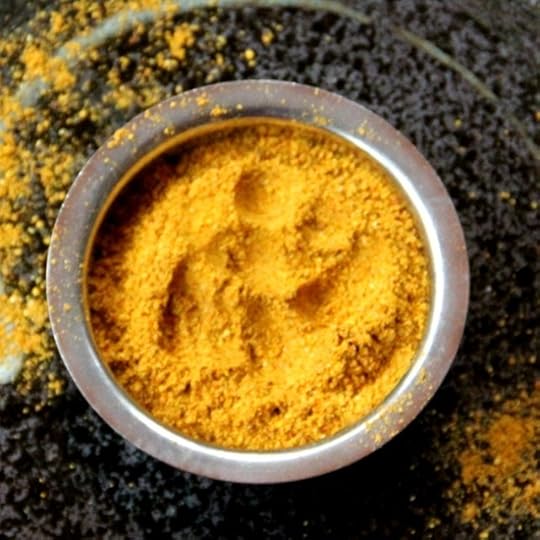
Homemade Sambhar Masala with a touch of the blues
 Do you sometimes get the blues, just because? Usually my go to cure for the blues is to sort through and replenish my spice closet. There is something rather magical for me anyway to peruse through and work with spices. The colors, the fragrances and everything in between. And, this week to get me through my shot of the blues, I made Sambhar Masala. For the uninitatiated Sambhar masala at its simples is a mesmerizing spice blend with at least 10 to 12 different spices. It is used to make well you guess it – Samhhar.
I think the intensity of the pandemic state of affairs and the lack of progress on certain fronts has been getting to me. One month has probably been enough for me to realize that we are looking at more of a long haul before things get better. And, this week the snow seems to have hit us in all earnest. And seems like there is some more along the way. All things considered though it has been my kind of snow. Soft fluffy cotton wool like flakes that make all things spicy seem like a weighted blanket. Cosy and comforting. Satisfying and inviting.
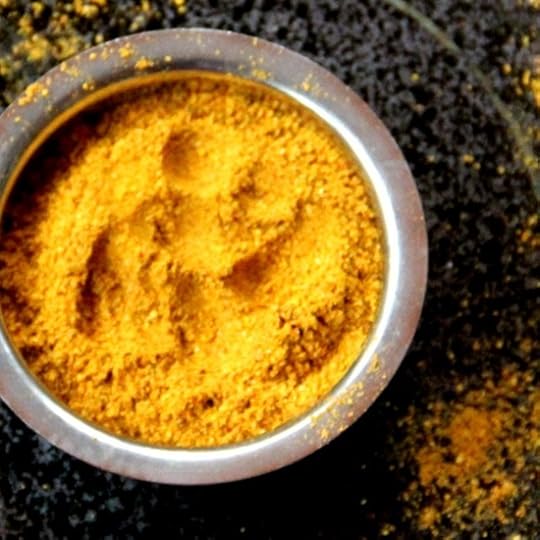
And, to make good dishes you need good spices. One of my favorite spice blends is Sambhar Masala. Like most blends that I use, I like to make my own Sambhar Masala. And by the way if you are interested in getting custom made home ground spices, check out my Etsy shop.
And, like all spice blends, there are many recipes for a particular blend. My sambhar masala recipe is something that I cannot even remember how it came my way. But, with tweaks and turns and adaptations it is what fuels and makes my sambhar pot simmer. I will mention that it is on the milder side. So, you might want to notch up the number of dried red chilies if you are making this.
PrintHomemade Sambhar Masala with a touch of the blues
Prep Time: 15 minutes
Yield: 3/4 cup
A simple and flavorful take on samhar masala.
Ingredients
1/4 cup curry leaves (about 4 to 5 sprigs)8 to 10 dried red chilies
2 tablespoons channa dal
1/4 cup coriander seeds
1 tablespoon cumin seeds
2 teaspoon fenugreek seeds
1 tablespoon black mustard seeds
1 large cinnamon stick broken into smaller pieces
1 tablespoon rice flour
Instructions
In a small to medium skillet add the curry leaves, dried red chilies, channa dal, coriander seeds, cumin seeds, fenugreek seeds, black mustard seeds and cinnamon stick and roast for about 3 to 4 minutes until the spices are fragrant and darkent slightly.Grind to a smooth powder.
Stir in the rice flour and turmeric and store and use as needed.3.1https://spicechronicles.com/homemade-sambhar-masala-with-a-touch-of-the-blues/
The post Homemade Sambhar Masala with a touch of the blues appeared first on Spice Chronicles.
January 31, 2021
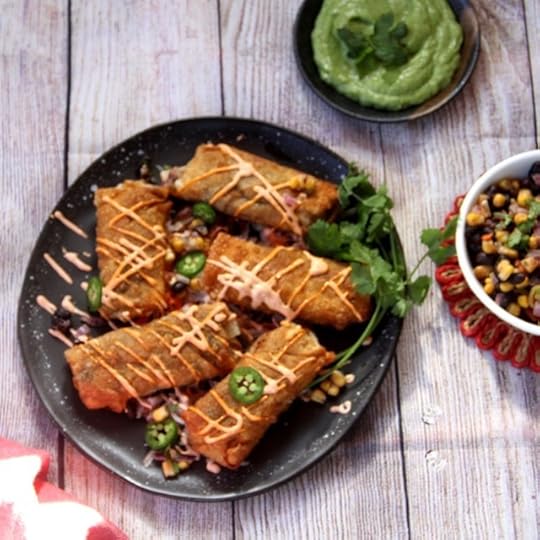
Chicken Taco Egg Rolls with a Sriracha Chipotle Drizzle
 Do you live with someone who sometimes dreams up crazy food ideas? No, well, my family does. My son thankfully indulges these ideas, still. The others not so much.. This idea for Chicken Taco Egg Rolls comes via JSL foods. They recently sent me a bunch of their wrappers. And these Chicken Taco Egg Rolls were born. When I floated the idea, my son said, I like chicken tacos and I like egg rolls, so why not!
There is a little more to the story. Well, you know me, I am always about a story. Well, here is the deal, much as I like JSL products -see my Sweet Corn and Chicken Udon and Sweet Chili and Peanut Noodle Salad I do not like egg rolls. There is something weird about them. At least the ones I have tried in most places. So, I was a little skeptical about doing working with these wrappers.

This said I persisted. My first attempt with these rolls were good. However, I do not share a recipe unless I have tweaked it to happy satisfaction.
At by attempt 3 I had the cheesy, well seasoned, crispy crunchy version that I can stand by. Actually, when playing with flavors it takes a little time to get them to the balance that you want. And the fixings, honestly the sriracha chipotle drizzle is enough, but for my avocado obsessed family and others like them, I also have an avocado lime dipping sauce.

In fact, by the time I got to this version, I ran out of my supplies of wrappers. It turns out Insta Cart delivers. You will find them at Walmart, Albertsons, Shaw’s, Von’s, Stater Bros, Fred Meyer, QFC, Safeway, Giant Stores, Shop N Shop, Winco, and Price Chopper. And on facebook and instagram, ok not the rolls but some great recipes.
Enough of all that, now down to these Chicken Taco Egg Rolls. The addition of shredded kohlrabi and carrots give these rolls just the crunch that you need. If you love tacos, these rolls are a perfect addition to a party. They can be pre-assembled and fried or air fried just in time for eating.

A few tips for getting these just right,
Be generous with the filling, the wrappers are sturdy and will hold nicelyDo not skimp on the cheese. You want that cheesy balance in every bite.The chicken is relatively easy to put together, I even give you an instant pot option.And yes, the egg rolls can be either pan fried or air fried or baked.Do not skip the Sriracha chipotle drizzle.So, you end up with all the goodness of tacos meshed with the convenience of egg rolls. Not all my crazy inspirations are bad!
PrintChicken Taco Egg Rolls with a Sriracha Chipotle Drizzle
Prep Time: 40 minutes
Cook Time: 15 minutes
Total Time: 55 minutes
Yield: 20 Egg Rolls
Serving Size: 2 egg rolls per person
A portable take of flavorful chicken tacos. These are wrapped in egg roll wrappers.
Ingredients
For the Chicken Taco Filling2 tablespoons oil
2 cloves of garlic, minced
1 onion, finely diced
1 and 1/2 pounds of boneless skinless chicken thighs
1 teaspoon dried oregano
1 tablespoon paprika
1/2 teaspoon red cayenne pepper
1 and 1/2 teaspoons salt
3 tablespoons lime juice
1/2 cup chopped fresh cilantro
1/2 cup shredded fresh kohlrabi or napa cabbage
3 carrots shredded
1 and 1/2 cups shredded cheddar cheese
2 tablespoons cornstarch
Water to create a slurry
20 egg roll wrappers
Oil for pan frying the egg rolls
Sriracha Choptle Sauce
1 tablespoons sriracha
1/4 cup sour cream
2 tablespoons mayonaise
1 teaspoon chipotle powder
Avocado Lime Sauce
1 medium avocado, seeded
1/2 cup chopped cilantro
1 teaspoon salt
4 tablespoons lime juice (Juice of 1 lime)
Water as needed
Instructions
To make the filling, heat the the oil in a pan with a tight lid. Add the onion and garlic and saute well for 3 to 4 minutes. Add in the chicken and stir well. Add in the dried oregano, paprika, red cayenne pepper and salt and stir well. Add 1/2 cup water and cover and cook the chicken for 25 to 30 minutes.Remove the cover and evaporate any remaining liquid. Shred the chicken. This should happen easily with two forks.
Add the lime juice and the cilantro and stir well. Add in the shredded kholrabi and the napa cabbage. Sir in the cheese.
Prepare a slurry as in sticking liquid with the cornstarch and water.
Organize your work area, to make space to roll and save the rolls, allowing room to organize the filling.
Prepare each egg roll, by adding about 1/4 cup of the filling in the center. Fold three of the sides like an envelope. Moisten the corners of the last side with the cornstach slurry and fold and seal. It is a good idea to fill these rolls as much as you can. This makes for a nice crisp roll.
Heat the oil in the pan (see notes for air frying) and fry the egg rolls about 1 and 1/2 minutes on each side. You want a nice golden brown color.
Drain on paper towels and serve drizzled with the Sriracha chipotle sauce and the avocado sauce on the side if desired.
To make the sriracha chipotle drizzle, mix all the ingredients together.
For the avocado sauce, place the avocado, cilantro and salt in the blender add enough water about 1/2 cup to make a smooth sauce. Serve along with the egg rolls if desired.
Notes
Instant Pot Version
To make the chicken in the instant pot, follow the same process using the saute mode. Then set on 3 minutes of pressure and allow a natural release.
Air Fryer
To air fry the egg rolls, set the air fryer at 400 degrees and fry for about 8 minutes, turn and fry for another 6 minutes.
3.1https://spicechronicles.com/chicken-taco-egg-rolls-with-a-sriracha-chipotle-drizzle/The post Chicken Taco Egg Rolls with a Sriracha Chipotle Drizzle appeared first on Spice Chronicles.


