
Rinku Bhattacharya's Blog, page 23
July 24, 2020
Quick Ferment Wholesome Dosa
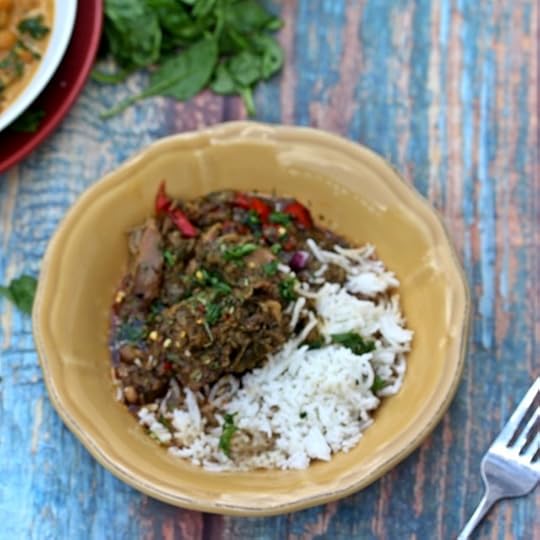
 This dosa recipe has been a long time in the making. It is a healthy wholesome dosa, made with lentils and millet flour. That is right, no rice involved. However, is fermented and tangy just like the real deal. This is done using a cup of prior dosa batter or sourdough discard. And, the best part of all of this is that if you stick to the process, you can have this ready in about 5 hours regular fermentation and 2 to 3 hours using the instant pot.
So, Manisha over @indianfoodrocks posts these amazing Indianish things she does with her sourdough discard. So a year or more ago, I saw what she did and went on a trip and got myself all kinds of flour – sorghum, millet, and I am sure there were some lentil flours in the mix. Well, since I did not know jack about how the sourdough I never did try her techniques. I found ways to use the other flours, all except the 3 bags of millet flour. I know, I am so excessive in my exuberance.
Now fast forward to this year. Pandemic and all, I have my own sourdough starter called Pinocchio. Now, all except my millet flour is gone. So, with all my trial and errors I have this version of dosa, which I make from a cup of the prior batch of the dosa batter. I find this works better and keeps the recipe gluten-free. You will find a recipe for traditional dosa batter and all the fixings in Instant Indian.

The traditional dosa batter is made with rice and lentils, in fact about 60 perfect rice and takes a good 24 hours between the soaking, grinding, and fermenting. So, I was a skeptic. However, loads of millet flour and all the extra cooking helped me nudge my adventurous side. Not that it needs too much coaxing. And, voila a new, easier, and healthier dosa is born.
I used hot water to quick soak the lentils and fenugreek seeds for an hour and then blend and mix. About 3 hours in the instant pot or 5 hours outside is enough for the batter to ferment. Since this is being done with older batter, keeping it out longer gets the batter tangier than typical. But, still pretty good. So, yes if you want to do this before you sleep and work with it in the morning that too is possible.

A few things to ensure about this variation.
I use whole lentils and add in millet flour later in the process. If you want to use lentil flours, the soaking will not be needed.
Instead of the millet flour, I have tried this with 3/4 cup of quinoa, in which case I soak everything together.
This proportion yields enough for about 2 32 ounce yogurt containers. Usually enough for two batches of just dosas in our household.
And yes, this freezes very well. So, now you are talking to a major quick dosa convert.
If you like this recipe and want more ideas, do join my Indian Instant/Air Fryer Facebook group and Legume Love Group. Of course Instant Indian is ready for order, joining its siblings The Bengali Five Spice Chronicles and Spices and Seasons.
PrintQuick Ferment Wholesome Dosa
Prep Time: 4 hours
Cook Time: 30 minutes
Total Time: 4 hours, 30 minutes
Yield: Serves 4 to 6

A wholesome and quick ferment technique for making dosas.
Ingredients
1 cup of mixed lentils (1 use a mixture of urad, moong, and channa dal)1 teaspoon fenugreek seeds
3/4 cup millet flour (see note)
1/2 cup fermented dosa batter or sourdough discard
Salt to taste
Oil as needed to make the dosas
Instructions
Rinse the lentils thoroughly and place in a mixing bowl with fenugreek seeds. Pour about 3 cups of boiling hot water and set aside for at least an hour. At this time the lentils should have softened and absorbed a lot of the water.Grind the soaked lentils to a paste. Add about 1 cup of water, you can use the soaking water if you wish.
Place in a large bowl on instant pot insert, if you are fermenting in the instant pot. Stir in the millet flour and the fermented batter and salt. Add in enough water to make a thick batter. This needs to be thicker than pancake batter.
Stir in the salt. Place in the instant pot on yogurt mode for 2 hours or cover and set aside in a warm place for 4 to 5 hours. The batter should be fermented and bubbly.
At this point, if you want to freeze any of the batter you can do so, by placing in a container with a tight lid and placing in the freezer.
Thin the batter enough to make a pancake like consistency. Heat a skillet for about 3 to 4 minutes, test with a drop of water, it should sizzle off. Drizzle with a little oil.
Pour the batter and spread it into outward circles. Allow it to cook for about 3 to 4 minutes. When done the dosa is fairly crisp and comes off the pan easily.
Clean the pan well and continue making the dosas in this manner. Enjoy with chutney or any vegetable or sambhar of your choice.
Notes
You can substitute the millet flour with either rice or quinoa, in which case you need to soak it with the lentils.
3.1http://www.spicechronicles.com/quick-ferment-wholesome-dosa/The post Quick Ferment Wholesome Dosa appeared first on Spice Chronicles.


July 21, 2020
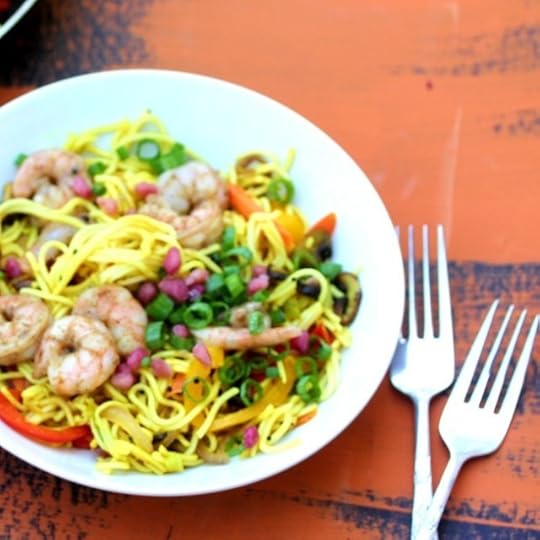
Chatpata (Zesty) Yakisoba Noodles
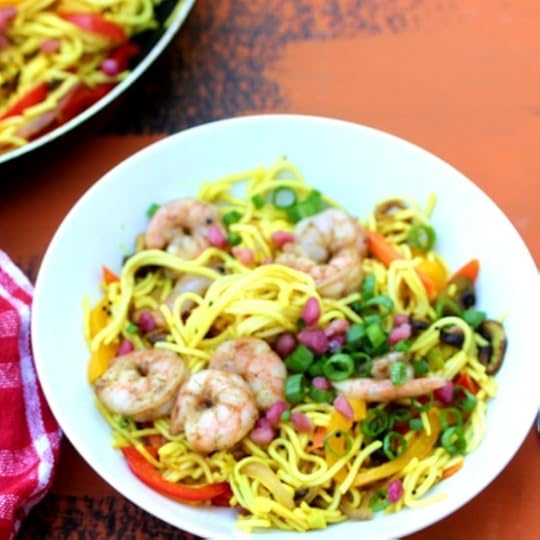 In an attempt for sustenance, creativity and some good I created these noodles. It is difficult to go wrong with noodles. They offer so much potential for fun and flavor. I started with some of these Fortune Yakisoba Noodles, and then went on a playful party of seasonings. Just what I love doing. These are noodles for a good cause, as the company is donating money for every noodle recipe shared and posted. All you need to do is cook and share with the #fortunecares.
Now, just as a point of reference, you can make these with just the veggies, or play with your protein. I did the quick cook protein variation with the shrimp in the pictures, and also did a tofu and a chicken variation. Just ran out of steam to take all those pictures. Hey, given how hot it is, the family should be happy that I am cooking.
So, in summary, the word Chatpata means zesty. The noodles have some of the flavors of South Indian Iddiappam noodles, lots of bright pomegranate seeds and then the goodness of these fresh noodles. The Teriyaki flavor is actually a great addition to all of this. In short, a lunch that made us weekend happy. Despite, the Indian flavors this was a nice change from the typical Indo Chinese Noodles. In terms of ingredients there is not a lot one does with noodles, so the seasonings are important. This is where you can get creative.

The herb project is coming along, keeping me both busy in so many ways. In some ways, all of this is timely. In fact, the recent times column has an article on the benefits of gardening. I am certainly not a gardener by any stretch of imagination, but having been doing more this year than all my other attempts combined. And yet, there is a jasmine flower on the plant that I call my
Hope plant. I somehow feel that when it grows all is well all is hopeful. In fact, I almost thought that it had died this winter. It however, returned and from a leafless twig it is now flowering. Hence, I feel hopeful whenever I see it. I will hopefully be doing this as a live demo very soon. Do not forget the curry leaves!
PrintChatpata (Zesty) Yakisoba Noodles
Prep Time: 40 minutes
Cook Time: 20 minutes
Total Time: 1 hour
Yield: Serves 4

A beautiful and easy to make take on noodles with a distinct Indian vibe. The best flavors are those that travel.
Ingredients
For the shrimp1 tablespoon oil
1 teaspoon crushed black pepper
1 teaspoon sumac or amchoor or lemon juice
1 teaspoon minced ginger
1 pound of shrimp
For the noodles
2 tablespoons oil, divided
2 bell peppers, thinly sliced
1 cup of mushrooms, sliced
1 teaspoon black mustard seeds
1/2 teaspoon turmeric
8 to 10 curry leaves
Crushed Red Pepper flakes to taste
12 to 14 ounces cooked thin noodles (Such as the Fortune Ramen Yakisoba Noodles)
3 tablespoons lime or lemon juice
1/2 cup pomegranate seeds
Chopped Scallions and or Cilantro
Instructions
Toss the shrimp with the oil, crushed black pepper, sumac and minced ginger. Set this aside for about 20 minutes.Sear well in a pan for about 10 minutes until just pink and cooked through. Set this aside.
Wipe the pan lightly and add a tablespoon of oil and lightly cook the bell peppers and mushrooms and set this aside.
Heat the remaining tablespoon of oil and add in the mustard seeds and wait until they crackle. Add in the turmeric, curry leaves, and red pepper flakes and quickly toss with the noodles. Work with low heat at this point and mix well to allow the noodles to absorb the turmeric. If using the Fortune Noodles, stir in the teriyaki tastemaker.
Lightly toss in the vegetables and the shrimp. Stir in the lime juice and the pomegranate seeds.
Garnish with the scallions and or cilantro. Serve hot!3.1http://www.spicechronicles.com/chatpata-yakisoba-noodles/
The post Chatpata (Zesty) Yakisoba Noodles appeared first on Spice Chronicles.
July 20, 2020
Tempered Watermelon Salad
 Somethings just don’t get any easier. And this week is about those easy cooling recipes. I am playing with all the herbs that I can find, so I am absolutely in my happy place. This tempered watermelon salad is a result of my games. It is a keeper and it offers you a very unusual use for your air-fryer. I certainly do not deal well with the heat. I know that I keep saying this. Thankfully, this is where the air-fryer and the instant pot come in handy. A large watermelon, and I made this creation about 4 times. I am happy with this version. Needless to mention, with every variation I worked on extracting just a little more flavor and making it just a little easier.
Essentially I temper oil, pour this over the watermelon cubes, and pop this under in the air-fryer. Stir once and cook some more. Drizzle this with a few more herbs and serve this war. There really is not much more to this. In India, cooking watermelon with savory spices to beat the heat is not uncommon. I am playing with that concept and just adding my own light touch to it. Also, am taking advantage of some of the tools that a modern kitchen offers. Interestingly enough, the high heat from the air fryer allows the fruit to gently release its juices without cooking it too much.
If like us you like the sweet and savory blend of flavors that a dish like this offers you will enjoy this over quinoa, couscous or just by itself. I have been busier than ever this past week. Prepping for online classes, busy at work, all things that help the day just breeze by.
I am also trying to make a little more sense of the schedule that seems to have moved to something reminiscent of an owl. I am up well into the wee hours of the morning and then sleep in until 10 am.
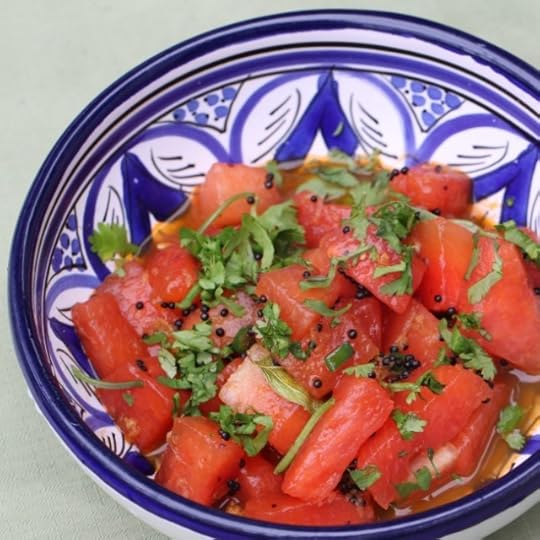
But, all that later. Here is to a light an lively watermelon salad. Did you know warmer watermelon is even healthier for you? Now, I like the plain Jane version, some of the home crew enjoyed this with feta cheese, I am just putting it out there.
If you like this recipe and want more ideas, do join my Indian Instant/Air Fryer Facebook group and Legume Love Group. Of course Instant Indian is ready for order, joining its siblings The Bengali Five Spice Chronicles and Spices and Seasons.
PrintTempered Watermelon Salad
Prep Time: 5 minutes
Cook Time: 20 minutes
Total Time: 25 minutes
Yield: Serves 4

A vibrant and gorgeous summer salad, that is done easily in your air-fryer.
Ingredients
2 cups of watermelon cubes2 tablespoons olive or coconut oil
1 teaspoon black mustard seeds
1 teaspoon minced ginger
1 tablespoon minced rosemary
1 tablespoon pink or black salt
1 green chili finely chopped
a few curry leaves (optional)
2 tablespoons lemon or lime juice
Additional rosemary and finely chopped cilantro to garnish
Instructions
2 cups of watermelon cubes2 tablespoons olive or coconut oil
1 teaspoon black mustard seeds
1 teaspoon minced ginger
1 tablespoon minced rosemary
1 tablespoon pink or black salt
a few curry leaves (optional)
2 tablespoons lemon or lime juice
Additional rosemary and finely chopped cilantro to garnish
Directions:
Place the watermelon cubes in a small round shallow pan, I use a baking pan rather than the wire basket.
Heat the oil and add in the black mustard seeds and when they crackle, add in ginger and turn off the heat in 30 seconds. Stir in the rosemary, salt and green chili. Mix well and pour this over the watermelon and stir well.
Place the baking pan over the trivet in the pressure cooker basket.
Place the air fryer lid over the pan and set for 15 minutes at 400 degrees. Stir once halfway. At this point the water melon should have released some of its juices.
3.1http://www.spicechronicles.com/tempered-watermelon-salad/
The post Tempered Watermelon Salad appeared first on Spice Chronicles.
July 13, 2020
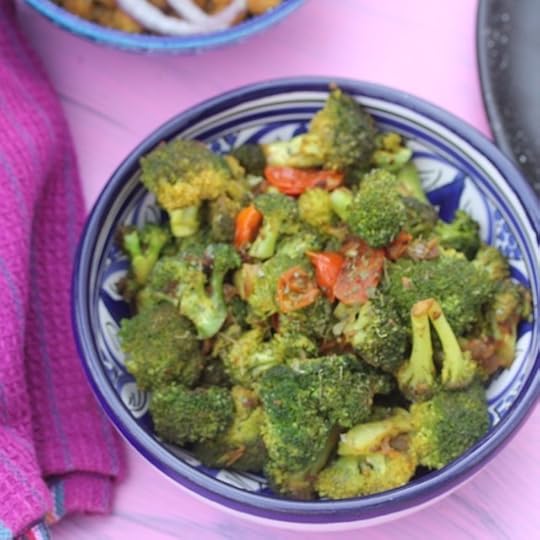
Perfect Instant Pot Broccoli with Ginger, Tomato, and Garam Masala
 Broccoli gets a bad rep for no reason at all. The right kind of broccoli, as in tender fresh broccoli with some gentle flavors is a good thing. Your instant pot is your friend when it comes to good broccoli. I season my Broccoli with Ginger, Tomato, and Garam Masala. If you give yourself about 15 minutes, you will be on your way to perfect Instant Pot Broccoli. So, it has been a good few days away from this space. I have been grappling with the heat. I am also bracing for a rather busy week. The kind that will disappear before I know it, and wonder what hit me on Friday.
But, Friday is five days away. And, in today’s world that is 20 meals away. So, with the mercury soaring and some gorgeous broccoli in season, let me tell you about how I make perfect fork tender broccoli every day. And since we love fresh flavors in our house, I make sure that the broccoli is gently seasoned with enough flavor to make you wonder why you have not been a broccoli fan all these days.
So, just a few tip and tricks before we move on to the recipe.
Choose good young broccoli, they should be bright green with tight tops. The pressure cooker will make any kind of broccoli soft however, there is a difference in taste and freshness between young broccoli and the slightly older variety.
The entire process will take about 15 to 20 minutes, as you have to account for the time to allow the pot to come to pressure and the resting time. It is tempting to want to speed this up by increasing the pressure time. Resist that temptation. We make broccoli at least once a week, so the timing is tested and tried.
Cut the the broccoli into larger pieces, otherwise it will dis-integrate while cooking.
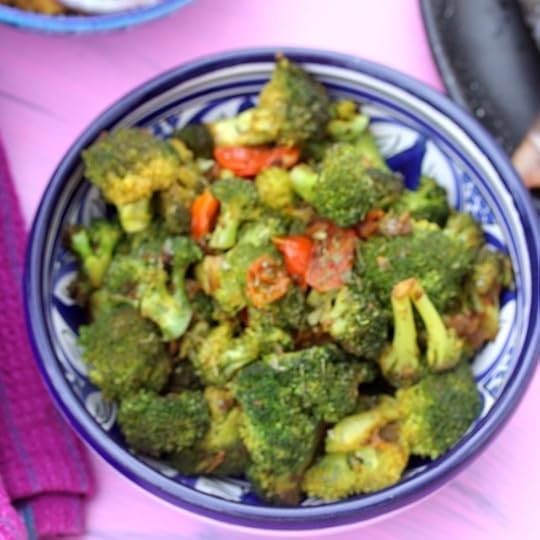
Between the tomato and broccoli you should not need add more than the 3 tablespoons that I suggest. This is just to loosen and de-glaze the pot.
If you like this recipe and want more ideas, do join my Indian Instant Pot Facebook group and Legume Love Group. Of course Instant Indian is ready for order, joining its siblings The Bengali Five Spice Chronicles and Spices and Seasons.
PrintPerfect Instant Pot Broccoli with Ginger, Tomato, and Garam Masala
Prep Time: 5 minutes
Cook Time: 15 minutes
Total Time: 20 minutes
Yield: Serves 4 to 6
A well seasons and easy take on cooking broccoli in the instant pot.
Ingredients
2 tablespoons olive oil1 teaspoon whole cumin seeds
1 tablespoon minced ginger
2 pounds of broccoli, cut into 2 inch pieces
1 large tomato, diced ( 3/4 cup)
3 tablespoons water
1/2 teaspoon red pepper flakes
1 teaspoon salt or to taste
1 teaspoon fresh garam masala to finish
Instructions
Turn the instant pot onto saute mode.Add in the oil and allow it to turn hot, this will take a couple of minutes. Add in the cumin seeds and wait until they crackle. Add in the ginger and cook briefly for about 30 seconds.
Add in the broccoli and the tomato and mix well. Stir in the water and use this to scrape and de-glaze the bottom of the pot well. Turn off the heat.
Add in the red pepper flakes and the salt. Cover and set on pressure cook mode for 1 minute.
Release the pressure after 5 minutes.
Remove the lid and stir well.
Sprinkle with the garam masala and serve.
3.1http://www.spicechronicles.com/perfect-instant-pot-broccoli-with-ginger-tomato-and-garam-masala/
The post Perfect Instant Pot Broccoli with Ginger, Tomato, and Garam Masala appeared first on Spice Chronicles.
July 8, 2020
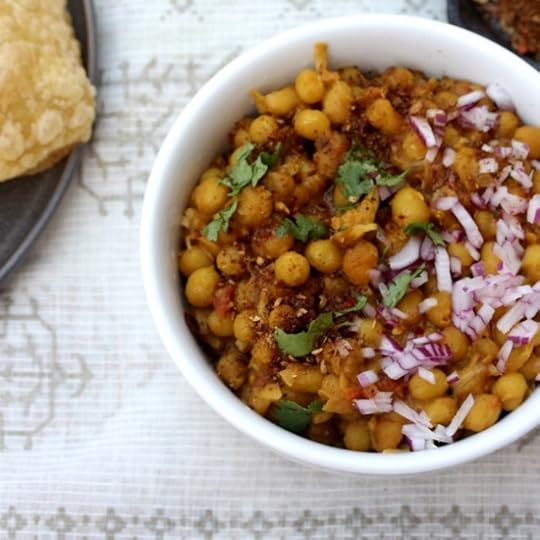
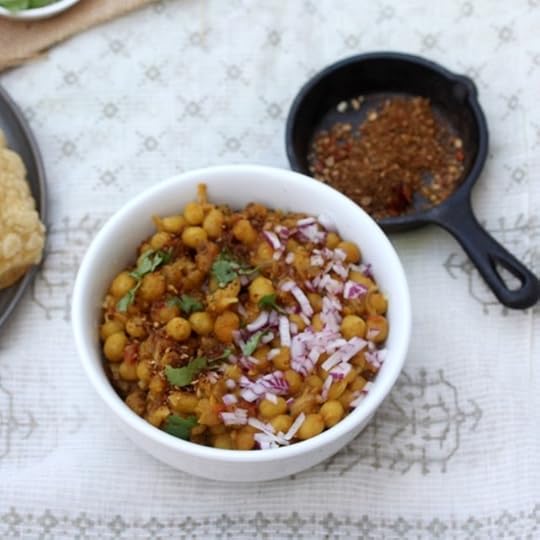
Perfect Bengali Ghooghni in the Instant Pot
 Ghooghni and I have an interesting relationship. It is one of those dishes, I have learnt to love after moving away from India. Yes, all those eons ago. And yet, it is such an indelible part of my childhood. In most Bengali households this dish made of hydrated dried peas, is the quintessential snack especially for a crowd. Elaborate ghoognis can have meat added to it, and the vegetarian version often has potatoes added to it. Yes, only for us Bengalis, potatoes end up somehow being a substitute for meat. Despite my love for potatoes, my vegetarian variation which I share with you today, actually is done without potatoes. The important thing about the ghoogni is the texture and the seasoning. So, join me as I demystify this for you.
The important thing to note, is that ghoogni is made with white dried peas. Essentially the whole version of what is sold as split peas. You will find these labelled as Vatana in the Indian stores. Whatever you call this, handled right they are rather scrumptious and not difficult to make. So, in short a good thing to have lurking around your dried staples.

Soaking the peas:
It is essential to soak the peas for this dish to get the right texture. Not a difficult step, but one that does need a little planning.
Cooking the peas:
This is where the instant pot is your friend. The electric precision helps you get just the right texture without over or under cooking the peas. The magic number is 9 minutes with a natural release. Try it first with my numbers before you mess with quick release timings.
The finishing spice:
At the heart of a good ghooghni, is the finishing spice or moshla. Mine is fairly simple, but, again essential in giving the ghooghni that final pop. Also, essential are the garnishes – I stick to chopped onions, green chilies, and cilantro. But, knock yourself out with diced tomatoes, carrots, you get the idea. So, here is me, offering you another slice of nostalgia perfected in the instant pot.
And lastly, to truly enjoy your ghooghni, enjoy them with a batch of fresh pooris.
If you like this recipe and want more ideas, do join my Indian Instant Pot Facebook group and Legume Love Group. Of course Instant Indian is ready for order, joining its siblings The Bengali Five Spice Chronicles and Spices and Seasons.
PrintPerfect Bengali Ghooghni in the Instant Pot
Prep Time: 6 hours, 10 minutes
Cook Time: 20 minutes
Total Time: 6 hours, 30 minutes
Yield: Serves 4 to 6

A gorgeous preparation of dried peas made easy in the instant pot. This is a Bengali chili of sorts.
Ingredients
1 cup of dried yellow peas (sold as vatana in Indian stores) soaked for about 6 hours3 tablespoons oil
1 teaspoon whole cumin seeds
1 onion, thinly sliced
1 tablespoon minced ginger
2 to 3 bay leaves
1 teaspoon powdered coriander
1 teaspoon powdered cumin
1/2 teaspoon turmeric
1 teaspoon red cayenne pepper
2 tablespoons diced or shredded coconut (see note)
2 tomatoes, diced
1 and 1/2 teaspoons salt or to taste
Finish spice
1 teaspoon whole cumin seeds
1 dried red chili
1/2 teaspoon fennel seeds
1/4 teaspoon whole black pepper corns
Finishing garnishes
2 to 3 tablespoons very finely chopped onions
Chopped cilantro
Chopped green chillies
Lime Wedges
Instructions
Turn the instant pot onto saute mode. Add in the oil. Heat the oil until it is very hot. Add in the onions and cook for 3 to 4 minutes, stirring frequently.Add in the ginger and the bay leaves and cook for 1 or 2 minutes.
Add in the powdered coriander and the cumin and mix well.
Add in the peas. Mix in the turmeric, red cayenne pepper, shredded coconut and the salt. Cook for 2 more minutes. Add in 1 and 1/2 cups of water. Use the water to de-glaze the instant pot. Set to 9 minutes of pressure and allow a natural release.
In the meantime, in a dry skillet add the whole cumin seeds, dried red chili, fennel seeds and the peppercorns and toast the spices for a good 3 to 5 minutes. The mixture will darken and will smell toasty. Grind to a powder.
Remove the pressure cover. Serve the ghughni with some of the finishing spice. Set some aside for the user to enjoy.
Serve with the garnishes.
Notes
You can use desiccated coconut instead of fresh coconut for this dish, it works fine in a pinch.
3.1http://www.spicechronicles.com/perfect-bengali-ghooghni-in-the-instant-pot/
The post Perfect Bengali Ghooghni in the Instant Pot appeared first on Spice Chronicles.
July 6, 2020
Poori – Perfect Indian Fried Puffed Breads
 Poori is a gorgeous deep fried, Indian balloon bread. It is a close cousin of the Bengali loochi, but not quite the same. The process of making them is similar, but I do not want you saying I did not point out the difference. No matter what you call them, the general concept is the same, and the result is ultimate satisfaction. I am sure for most of us, this ended up being a strange holiday weekend. Well, the consistency of an added holiday making it a long weekend is always appreciated.
The weeks and days are back to being fairly busy. Some of this is because the children are at home. I am cooking more meals. They are glued to their computers, doing summer camp from home. A dream come true, not. Anyway, among other things, doing somewhat special weekend breakfasts have been going a long way in terms of earning good mommy points. It helps me to stay occupied as well. My project classes are hits. All is well.

Now these pooris, are relatively easy to put together once you know what to do with them.
What exactly are pooris?
They are as we Bengali’s like to say, the north Indian version of luchis. Well, seriously speaking, a poori is a flaky, puffy, golden deep fried bread. The word poori actually means complete. They are an accompaniment to a festive meal, or also served in the mornings with a lighter vegetable. My go to as a breakfast dish is this light potato and cauliflower medley. This is much lighter than the typical that the more evening meal worthy alu gobi.
Hot well done puris are crisp and light, not greasy. They also absorb less oil than some other shallow fried breads.

What is the flour of choice for pooris?
Atta a finely ground whole wheat flour is the flour of choice for pooris. This is typically used for Indian flat breads such as chapatis and parathas as well.
A couple of tips and tricks.
Add water gradually while kneading. A good puri dough is supple and smooth to touch.
Allow the dough to rest a couple of hours, to relax the gluten. It saves you from extra kneading. Indian bread doughs do not need overworking. So, why add more effort when it is not needed.
You can watch this video to get an idea of what is going on here.
So, without much delay, here is one of my favorite homemade Indian breads.
PrintPoori – Perfect Indian Fried Puffed Breads
Prep Time: 2 hours, 15 minutes
Cook Time: 25 minutes
Total Time: 2 hours, 40 minutes

A gorgeous golden deep fried puffy bread.
Ingredients
3 cups of atta (note you can use whole wheat pastry flour)1 tablespoon oil
1 teaspoon salt
1 tablespoon oil
3/4 cup water
2 cups oil for frying
Instructions
Add the atta in a mixing bowl, add in the oil and the salt and mix in.Gradually add in the water mixing in to make sure that you add enough to make a pliable not overly soft dough.
Let the dough rest for about 2 hours.
Break the dough into small balls and roll into small rounds about 3 to 4 inches in diameter.
Heat the oil in a wok. The oil needs to be very hot to ensure that the puris puff up. Test with a little bit of the dough. The dough should sizzle right away, there is no room for tentativeness.
Fry the puris, let them rest on paper towels just before serving.
Serve piping hot!
3.1http://www.spicechronicles.com/poori-perfect-indian-fried-puffed-breads/
The post Poori – Perfect Indian Fried Puffed Breads appeared first on Spice Chronicles.
June 22, 2020
Easy Channa Saag/Palak -Spinach and Chickpeas
 Rich, creamy, wholesome, and healthy these chickpeas are vegan, gluten-free and so good for you! This Easy Channa Saag, uses a little coconut milk to great a rich and nutty creamy texture. All you need is 35 minutes and your instant pot. This is from my Sunday zoom cooking class. I am set for the first half of the week at least. And it does promise to be a busy week. And, if you run a hair salon, get ready to be mobbed.

The only thing to plan around this recipe is to soak the chickpeas. And if you forget no worries, just increase the cooking time. And, I know next up you will want to ask me whether you can used canned chickpeas. You can, but seriously you guys..if you have an instant pot or electric pressure cooker put it to good use. But yes, canned chickpeas will not have quite the same depth of flavor but will work. Of course, you will need to reduce your cooking time.
And here is the fun part, there is no pureeing needed. And much like this saag paneer, you can mix and match your greens. I am just keeping things simple by suggesting spinach for this recipe.

Now here is the deal, with New York opening up and all that I have to hit pause on my weeknight Bollywood Binges. After all, I can hardly be up until all the wee hours of the morning. Life is often however about hitting a pause button. We did step out on Father’s day for dinner. The food was acceptable, but, everything felt so very special to us. I imagine that will be the case when we travel again.
If you like this recipe and want more ideas, do join my Indian Instant Pot Facebook group and Legume Love Group. Of course Instant Indian is ready for order, joining its siblings The Bengali Five Spice Chronicles and Spices and Seasons.
PrintEasy Channa Saag/Palak -Creamy Spinach and Chickpeas
Prep Time: 10 minutes
Cook Time: 35 minutes
Total Time: 45 minutes
Yield: Serves 4 to 6

A gorgeous wholesome pairing of chickpeas, spinach, and coconut milk.
Ingredients
3 tablespoons olive oil1 teaspoon whole cumin seeds
1 red onion, finely chopped
1 tablespoon minced ginger
1/2 tablespoon minced garlic
1 teaspoon powdered cumin
1 teaspoon powdered coriander
1 teaspoon red cayenne powder or to taste
1 teaspoon turmeric
2 medium tomatoes, chopped
3/4 cup dried chickpeas soaked overnight
1 and 1/2 teaspoons salt
10 ounces organic baby spinach
1/2 cup whole coconut milk
1 teaspoon garam masala powder
Optional Lime juice to finish
Instructions
Turn the instant pot onto the sauté mode and add in the oil. Heat for about 2 minutes and add in the whole cumin seeds.Add in the red onion and cook for 3 to 4 minutes. Add in the ginger and garlic and cook for another couple of minutes.
Add in the cumin, coriander, red cayenne powder, turmeric and stir well. Add in the tomatoes and mix well.
Turn off the sauté mode. Add in the chickpeas and a cup of water. Stir in the salt and stir well to make sure that you have used the water to deglaze the pot.
Cover and set on high pressure for 18 minutes and allow a natural release. Remove the cover and turn the sauté mode back on. Stir in the spinach in batches and allow it to gently wilt. Add in the coconut milk and turn off the heat.
Sprinkle with the garam masala powder and the lemon juice if using. Enjoy!
3.1http://www.spicechronicles.com/channa-saag-creamy-spinach-and-chickpeas/
The post Easy Channa Saag/Palak -Spinach and Chickpeas appeared first on Spice Chronicles.
June 21, 2020
Instant Pot Trinidad Chicken Stew
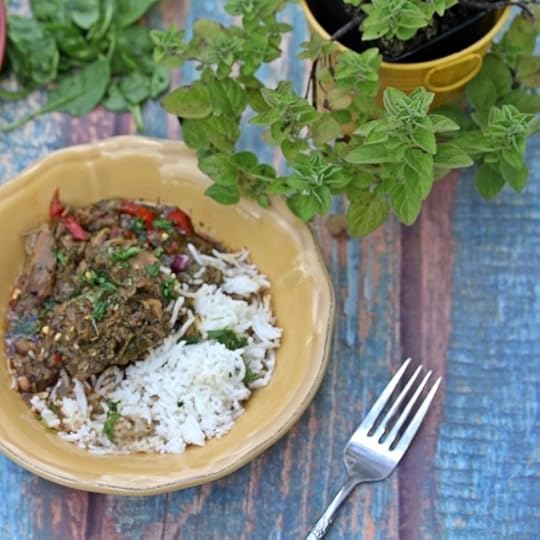 A few things collided to bring you this amazing chicken stew which I have happily adapted for the instant pot. Trinidad Chicken Stew aka Trini Chicken Stew is sweet, spicy, herby, and savory. In short, it is a flavor explosion in a comforting chicken stew. So, someone in the Facebook group talked about the stew and alluded to trying to work it as an instant pot version. This being Caribbean Heritage month, I thought it would a fun thing to work into our SundayGlobalAdventures. And so I worked on this Instant Pot version.
I worked off a recipe from a cookbook called Sweet Hands. If you want to see me in action, you can actually see the facebook live video. And now on to my instant pot version. I think having made this so many times that my family is kind of getting rather fed up of it. But, since it does get all finished in fairly record time I think this will be in favor for a while.

At the heart of this stew is a green seasoning mix – essentially a mixture of garlic and an assortment of herbs. I used chives, cilantro, oregano, parsley, and thyme. I love using fresh herbs in my cooking so I think I have been quite liberal in its use. This gives the stew a lovely floral undertone. The deep brown color is a combination of browning the chicken in caramelized sugar and soy and Worcestershire sauce. Yes, can you see the hint of colonial influences here? In face, that is what makes the cuisine of the Islands so much fun. They seem to combine a little bit of everything – Indian, Chinese, and the British influence to make it a melting pot that is unique.
And while the stew tastes great with steamed rice, I also enjoy it with my Jamaican Rice and Peas.
Something that you can maybe also whip up in your instant pot. Here is wishing everyone another good week ahead.
If you like this recipe and want more ideas, do join my Indian Instant Pot Facebook group and Legume Love Group. Of course Instant Indian is ready for order, joining its siblings The Bengali Five Spice Chronicles and Spices and Seasons.
PrintInstant Pot Trinidad Chicken Stew
Prep Time: 2 hours, 10 minutes
Cook Time: 25 minutes
Total Time: 2 hours, 35 minutes

A lovely wholesome Trinidad Chicken Stew done in the instant pot
Ingredients
2 cloves garlic1 tablespoon each of chopped chives, cilantro, oregano, parsley, and thyme
3 pounds, skinless chicken on the bone cut into smaller pieces
2 tablespoons avocado or other vegetable oil
2 tablespoons sugar or brown sugar
1 large onion, thinly sliced
2 cloves of garlic, minced
1 teaspoon freshly grated ginger
1/2 medium sized red bell pepper, thinly sliced
2 teaspoons soy sauce
2 teaspoons Worcestershire sauce
1 tablespoon hot sauce such as sriracha
1 bay leaf
1 cup water or chicken broth
Instructions
Place the garlic and mixed herbs in a mortar and pestle and crush to a paste.Toss the chicken in this seasoning mix and marinate for about 2 hours or longer (I usually do this overnight)
Turn the instant pot onto the saute mode and add the oil. Heat for 2 minutes and add in the sugar. Allow the sugar to melt and turn pale golden. This will take a few minutes.
Add in the chicken with the green seasoning and stir well to coat and brown the chicken for 3 to 4 minutes.
Add in the onion, garlic and ginger and stir well and cook for about 4 minutes. Turn off the saute mode.
Add in the bell pepper, soy sauce, Worcestershire sauce, hot sauce, bay leaf, and the water or chicken broth.
Stir well, using the liquid to de-glaze the pot. Cover and set to 5 minutes of high pressure. Allow a natural release or release the pressure after 3 to 5 minutes.
Stir well. Serve the chicken stew with rice.3.1http://www.spicechronicles.com/instant-pot-trinidad-chicken-stew/
The post Instant Pot Trinidad Chicken Stew appeared first on Spice Chronicles.
June 20, 2020
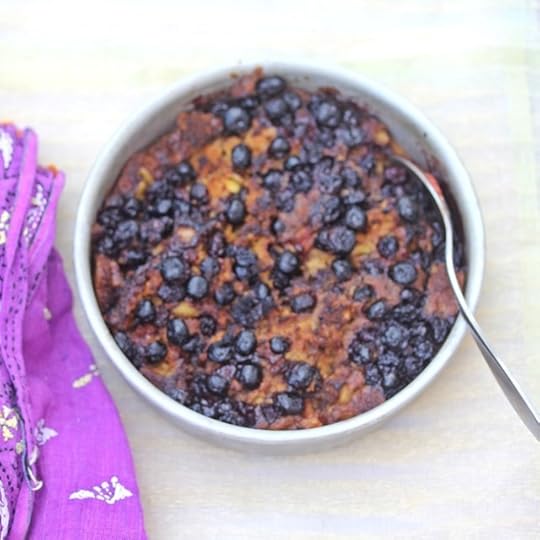
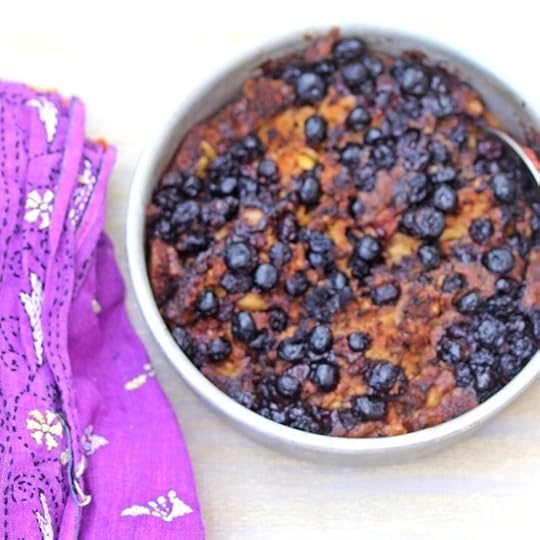
Cardamom Molasses Blueberry Spoon Cake
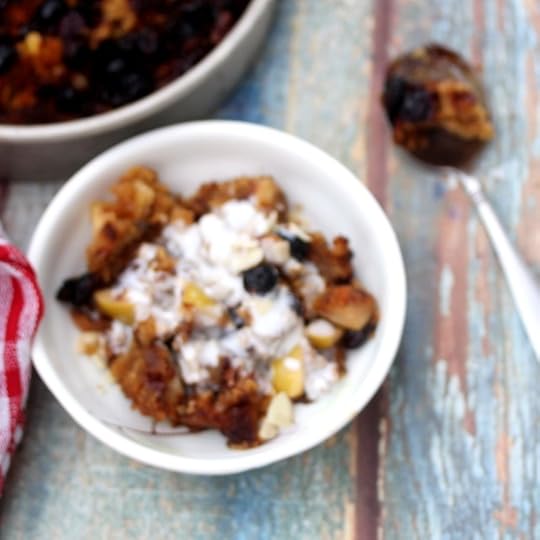 This weeks NYT email had something called a Strawberry Spoon Cake. It caught my eye and then this Cardamom Molasses Blueberry Spoon Cake happened. It is almost like a downside up cake. Naturally, it can work with almost any fruit that you have on hand. In fact, when I went down to making it I realized that the strawberries were all eaten up. Blueberries were around. My son is not a huge fan, so that stay longer. He actually did enjoy this cake. We all ate it bit by bit, a couple of spoonfuls at a time.
We had an apple out and about, making this taste like a love child of an apple pie and a blueberry buckle.
And let me tell you the real secret. I made this in an air-fryer. It is just the perfect size. And, it cooks in about 20 minutes. So keep those spoons ready. If you are thinking of an add on for fathers day, look no further. And of course, it will work in your regular oven.
My accidental extra supply of molasses is being put to good use. I have been using it as an enhancer for my sourdough bread. And finally, I am happy with my sourdough results. I promise to have a recipe up this week. I am so excited with this cake, I could not help sharing this with you right away. Yes, that is spontaneous and impulsive me.
But, seriously a warm, fragrant, jammy cake in the peak of summer. Without having to turn on my oven. I am so converted. Actually, while I do use my air fryer a little less than my instant pot, I love the convenience. Quicker and so much easier to clean up. I need to start featuring it in my next live. Happy Father’s day to all my readers.

Other than the fact, it is a little hotter than I would like, I think we are in good shape for father’s day in our household.
If you like this recipe and want more ideas, do join my Indian Instant Pot Facebook group. Of course Instant Indian is out and about, joining its siblings The Bengali Five Spice Chronicles and Spices and Seasons.
Do not forget to get social with me, Facebook, Twitter, Instagram, Pinterest and even Youtube.
PrintCardamom Molasses Blueberry Spoon Cake
Prep Time: 10 minutes
Cook Time: 20 minutes
Total Time: 30 minutes
A fragrant and crumbly spoon cake that is perfect with blueberries or any other fruit of your choice.
Ingredients
1 cup (about 8 ounces) blueberries1/2 cup plus 3 tablespoons brown sugar, divided
3 tablespoons molasses
4 tablespoons melted butter
1 cup all-purpose flour
1 teaspoon baking powder
1 egg lightly beaten
1 teaspoon freshly ground cardamom
1 apple, diced, with or without the peel
Optional light cream or ice cream to serve
Instructions
Place the blueberries, 1/2 cup sugar, and molasses in a small bowl and set aside for 2 to 3 hours. Occasionally stir and press the berries to lightly crush and macerate the berries.Prepare a six to seven inch baking pan by greasing the pan.
In a mixing bowl stir in the melted butter, all purpose flour, baking powder, remaining brown sugar and beaten egg until well mixed.
Stir in the cardamom and the diced apple. Pour into the cake pan. Lightly pour the blueberry mixture over the batter.
If you are using a mealthy like me, place the pan on a trivet. Set the air fryer to 400 degrees for 15 minutes.
Gently stir the mixture to allow the fruit mixture to penetrate lightly into the cake. Cook for another 4 minutes.
Serve spooned into bowls drizzled with cream or ice-cream.3.1http://www.spicechronicles.com/cardamom-molasses-blueberry-spoon-cake/
The post Cardamom Molasses Blueberry Spoon Cake appeared first on Spice Chronicles.
June 19, 2020
Roasted Corn Chaat – Warm Roasted Corn Salad
 I do not fare well with the mercury rising. The hot weather makes me stay away from cooking. This easy roasted Corn Chaat is one my compromises this summer. I love the idea of roasted corn and vegetables. This corn is then tossed with lime juice, lots of lime juice, chaat masala, chopped cilantro and some red pepper flakes. There are a handful of other vegetables here and there, and then some crushed pumpkin seeds for crunch. We felt things were getting a little boring with adding peanuts to everything so pumpkin seeds helped me mix things up a bit.
Now,here is the fun part of things. I have used organic frozen corn for this recipe, drizzled a little mustard oil and roasted the corn. And, I used my air fryer for roasting the corn. Keeps thing somewhat cool, Less mess, and I do not have to attend to it. This chat is a good breakfast item too! In fact, I got the idea from my sister in law who serves it for breakfast. It is great as an anytime snack. And, most often, I serve it as a side salad.

To get the best from the roasting, just make sure that the corn and vegetables are spread out in a uniform layer on your air fryer basket. Do not heap the vegetables as they will not roast and char properly. I am using frozen corn for convenience. With all the summer corn on its way, this will be a fun recipe to try with fresh corn kernels as well.
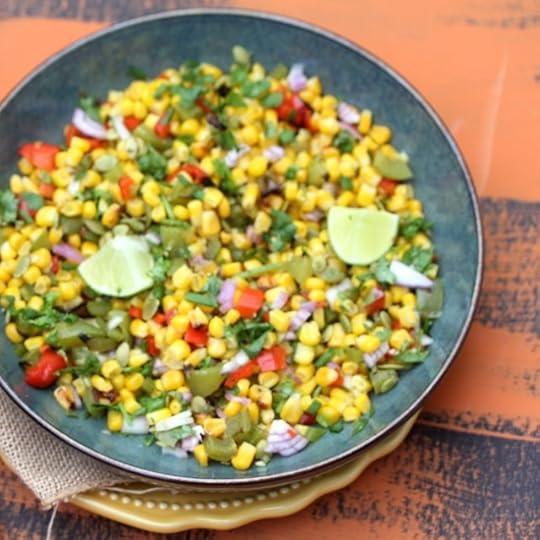
In terms of the rest of the seasonings, I like keeping things basic. It show cases the fresh flavors and vibrant colors of the dish well. If you like things spicy you can chop in some green chilies into the mix.
If you like this recipe and want more ideas, do join my Indian Instant Pot Facebook group. Of course Instant Indian is out and about, joining its siblings The Bengali Five Spice Chronicles and Spices and Seasons.
Do not forget to get social with me, Facebook, Twitter, Instagram, Pinterest and even Youtube.
PrintRoasted Corn Chaat – Warm Roasted Corn Salad
Prep Time: 10 minutes
Cook Time: 15 minutes
Total Time: 25 minutes

A light and lively warm roasted corn chaat that is a perfect light meal.
Ingredients
2 cups of frozen organic corn, slightly thawed1 small red bell pepper, finely diced
1 small green bell pepper finely diced
2 teaspoons minced ginger
1 teaspoon salt or to taste
1 tablespoon mustard or olive oil
3 tablespoons fresh lime juice
1 and 1/2 teaspoons chaat masala
1 teaspoon red pepper flakes
1/4 cup finely chopped red onions
4 tablespoons chopped cilantro
1/4 cup lightly crushed pumpkin seeds
Instructions
Mix the corn, red bell pepper, green bell pepper, minced ginger, salt and mustard oil in a mixing bowl.Spread on an air fryer basket and cook for 10 minutes at 500 degrees. You may need to do this in two batches depending on the size of your air fryer.
In the meantime mix the lime juice, chaat masala, red pepper flakes, red onions, and chopped cilantro.
Place the roasted vegetables in a mixing bowl. Toss in the lime juice mixture.
Add the pumpkin seeds and serve warm.3.1http://www.spicechronicles.com/roasted-corn-chaat-warm-roasted-corn-salad/
The post Roasted Corn Chaat – Warm Roasted Corn Salad appeared first on Spice Chronicles.


