
Rinku Bhattacharya's Blog, page 15
May 3, 2021
Versatile Everyday Pasta Sauce (Instant Pot)
 Every household needs to have a versatile everyday pasta sauce. At least that is what I believe. And this one is mine. I think it hits all the high notes, tastes better than most commercial varieties and it very flexible. Despite all the fancy varieties out there, my children seem to dig this one. It takes me about 15 to 20 active minutes and then I let the instant pot do it’s magic. And then I have homemade sauce. I feel like a domestic diva plus good mom every time I replenish a batch. So there are bonus therapy points involved as well.
I am a huge fan of make ahead sauces. Here is my go to basic curry sauce.
Now, one can definitely try to vary this with fresh tomatoes. I will save that for another day. A note on canned/jarred tomatoes. In terms of taste, I have found canned tomatoes from Trader Joe’s or the Whole 365 brand to be pretty good. What I have settled for is this Pomi variety mostly because it is readily available, does not break the bank and is well not canned. The objective of this however is to make this an easy fuss free option. So for the diced canned jarred tomatoes use whatever is your favorite brand.

Adding in mushrooms, onions and carrots boosts the flavor profile. It is also a good way to use up what you have on hand. I have been known to throw any any and all aromatics and root vegetables on hand. I just do not want to scare you with a long list of ingredients. There are loads of instant pot pasta recipes on this site.

My favorites to use this sauce in are my spaghetti and meatballs and the Putanesca.
Actually with some additional garlic and red pepper flakes it doubles up as a great dipping sauce as well.
If you like this recipe and want more ideas, do join my Indian Instant Pot Facebook group and Legume Love Group. Of course Instant Indian is ready for order, joining its siblings The Bengali Five Spice Chronicles and Spices and Seasons.
PrintVersatile Everyday Pasta Sauce (Instant Pot)
Prep Time: 10 minutes
Cook Time: 25 minutes
Total Time: 55 minutes
Yield: Makes 2 jars of sauce

A robust and rich tasting tomato sauce that this good for pasta. It gets done easily in the instant pot.
Ingredients
1/4 cup oilve oil1 red onion, diced
2 tablespoons minced garlic (about 6 cloves)
1 teaspoon dried basil
1 teaspoon dried oregano
2 carrots peeled and cubed
1/2 cup finely chopped mushroom (optional, but adds a nice rich flavor)
1 large (26.5 oz) pack of diced tomatoes or 1 large can
2 teaspoon salt
1 tablespoon soy sauce
1 cup red wine
2 tablespoons sugar
2 tablespoon tomato paste
1 cup red or white wine
2 cups water
Instructions
Turn the instant pot on to saute mode. Add in the olive oil and heat for 2 minutes. Add in the onions and garlic and saute for 3 to 5 minutes. The onions should soften and begin to turn golden.Add in the basil and oregano and the carrots and the chopped mushroom if using. Give it a good stir.
Add in the tomatoes, salt, soy sauce, wine, sugar, and tomato paste. Add in the water.
Turn off the heat and cover the pot. Set to 15 minutes of pressure and allow a natural release. Stir well. Puree with an immersion blender for a smooth finish.
Store in jars in the refridgerator. This will keep well in the refridgerator for about 2 weeks. Or you can freeze and use as needed.3.1https://spicechronicles.com/versatile-everyday-pasta-sauce-instant-pot/
The post Versatile Everyday Pasta Sauce (Instant Pot) appeared first on Spice Chronicles.


May 1, 2021
Sourdough English Muffins – The Lazy Method
 Sourdough baking is back with a vengance. These english muffins had been on my bucket list for a while, and this weekend I made them. I have been orcilating between despair, exhaustion, and doing calming things. The Covid crisis in India is nerve racking. I have been cooking and walking to try and stay calm. Shaping and working with anything bread like helps! And, the sourdough continues to make me happy. As with a lot of my sourdough baking, I use some or all wholewheat flour. Other recipes that you can try with sourdough are right here.
Sourdough Wholewheat Pita Bread
Sourdough Whole Naan just to name a couple.
I used this recipe as a guide. I used 2/3 white whole wheat flour, did not use the yeast. With the overnight cold rise this turned out plenty soft. To get good soft pillowy results,
Do not skip the overnight cold riseAllow time for the muffins to rise after they are shaped.The fun part about the muffins are that they are not baked. Rather they are cooked on a griddle. I have tried these on an electric griddle and a cast iron griddle on medium heat. The electric griddle if you have one tends to be a little easier as you do not have to worry about managing the temperature. But, the fun part is not having to heat and oven or worry about a hot pan in and out.

Just a general note, not all the muffins rice uniformly so despute using the same sized cutter the sizes will vary just a little. But they taste pretty amazing. While they are perfect fresh with just butter and a little jam. You can always try my recipe for ricotta eggs.

They store well in the refridgerator for up to a week. They toast up beautifully. Try making a batch and you will see why I am excited about them.
PrintSourdough English Muffins – The Lazy Method
Prep Time: 24 hours
Cook Time: 20 minutes
Total Time: 36 hours, 20 minutes
Yield: Makes 15 muffins

A great recipe for sourdough English muffins. They are chewy with just the right amout of tang.
Ingredients
2 cups white whole wheat flour or any whole wheat flour of your choice1 cup bread flour
1 cup active/fed sourdough starter
1/2 cup warm water (a little more if needed)
1 tablespoon sugar
2 teaspoons salt or to taste
1/4 cup powdered milk
2 tablespoons melted butter
1/2 cup fine cornmeal for shaping and rolling
Instructions
In a large mixing bowl add in the flours, the starter, warm water, sugar, salt, powdereded milk and the melted butter and mix well using a dough wisk or hand until well mixed. This should result in a smooth not to soft dough.If you feel it is wet to touch add in extra flour. This can depend on the starter.
Cover and set aside for about 4 hours. The dough should have doubled. Give it a good knead and cover and place in the refridgerator overnight. I have kept this up to 2 days and had good results.
When ready to shape. Dust a piece of parchment paper generously with fine cormeal. Place the dough and lightly roll out to 1/8 inch thickness.
Using a round cutter cut into 2 1/2 to 3 inch circles.
Allow them to rise for 2 hours.
Heat an electric griddle to 350 degrees or use a skillet on medium heat. Carefully place the muffins and cook for 5 minutes or so on each side. The muffins will puff up and turn pale brown on the bottom. The internal temperature should register 190 degrees or higher.
Serve warm with butter and or jam.3.1https://spicechronicles.com/sourdough-english-muffins-the-lazy-method/
The post Sourdough English Muffins – The Lazy Method appeared first on Spice Chronicles.
April 28, 2021
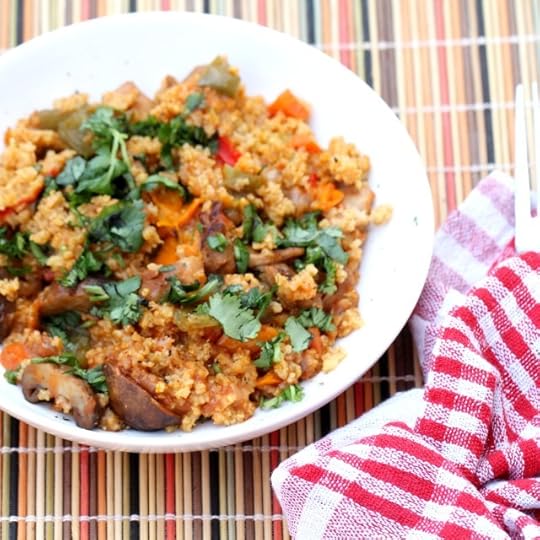
Millet Jambalaya
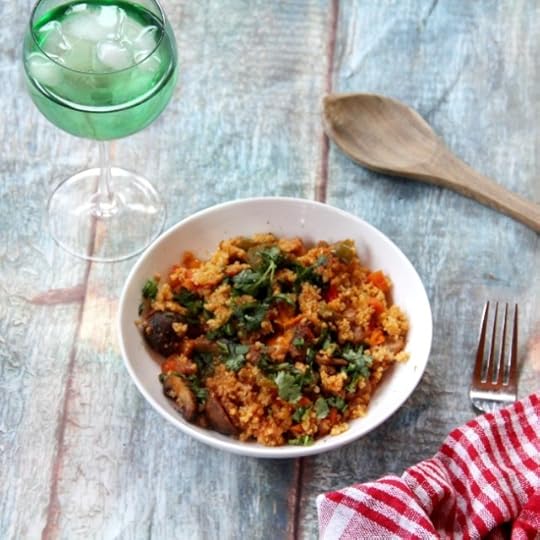 What if I offered you a dish that brought to your table all the comforts of a classic Jambalaya with the healthfulness of millet? It can be done in the instant pot. It is also easily adapted for the stovetop. So, maximum ease, comfort and nourishment all in one. That is exactly what this millet Jambalaya is doing for you. Done with a chockfull of veggies – the rich flavors of chicken and andouille sausage and all the fresh herbs that your can find. Then some peppers, celery and carrots thrown in for good measure. Millet is one of my favorite grains to work with. I usually use this variety.
So I made this for dinner last night. But between the father and the children, I am told this is good stuff. A winner. A Jambalaya is one of those forgiving one pot dishes, that allow you to put everything that you have on hand to good use. And, I even added in some okra as I had some on hand. Shrimp is not a bad idea, in fact usually a traditional add on however thanks to my young man I leave it optional. The past few days have been a blur of things. This is usually the time of the year when we try to wind down things. With the daughter is is an extra crazy wind-down of sorts! She of course is on cloud nine. It is a time of excitement and new beginnings.
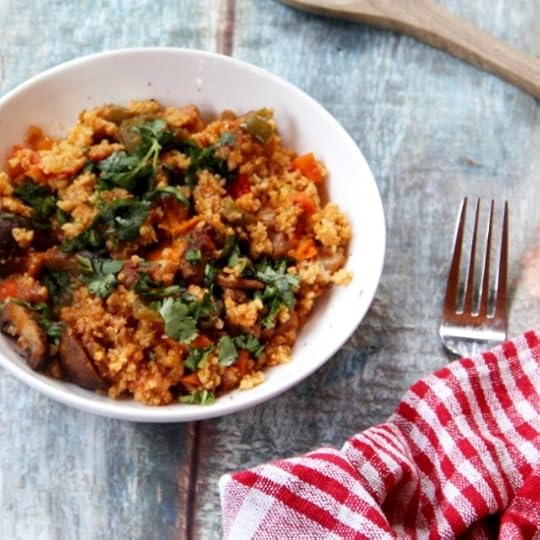
Me, I am thrilled that my shot two is all done. This new guidance for CDC is all promising. I will be teaching this for my Friday Mt Kisco class. Warm, bright and sunny! Pop a batch of this jambalaya in your instant pot and go out for a nice long walk. That is how I do dinner! So should you.
If you like this recipe and want more ideas, do join my Indian Instant Pot Facebook group and Legume Love Group. Of course Instant Indian is ready for order, joining its siblings The Bengali Five Spice Chronicles and Spices and Seasons.
And to get social with me, follow me on Instagram, Facebook, Pinterest and Twitter.
PrintMillet Jambalaya
Ingredients
1/3 cup extra virgin olive oil1 cup chopped red onion (about 1 large)
1/2 cup chopped celery (about 3 stalks)
2 bell peppers (red and green) pepper chopped
2 andouille sausages, cubed
1/2 pound cubed boneless skinless chicken
1 cup crushed tomatoes
2 bay leaves
1 teaspoon dried thyme
1 cup pearled millet
1 and 1/2 teaspoon salt
1/2 teaspoon red cayenne pepper (or to taste)
1 cup water
1/4 cup sliced okra
Chopped parsley to finish
Instructions
Turn the instant pot onto sauté mode. Add in the oil and heat well. Add in the red onion, celery, and bell peppers and sauté lightly for 2 to 3 minutes.Add in the sausage and the chicken and cook for 3 to 4 minutes. Add in the crushed tomatoes, bay leaves, thyme and millet and stir well.
Add in the salt and the red cayenne pepper and mix well. Add in the water and the okra. Cover the instant pot and turn off the sauté mode. Set to 3 minutes of high pressure and allow a natural release.
Serve garnished with the chopped parsley.3.1https://spicechronicles.com/millet-jambalaya/
The post Millet Jambalaya appeared first on Spice Chronicles.
April 25, 2021
Durga Puja and Sandesh – Rose-Scented Bengali Cheesecake Balls

Sandesh is the simplest and most essential of Bengali sweets. It is perfect for celebrations, but also for prayers, and quite times. I had to make some today. The COVID news from India is so distressing. I keep feeling a lump in my throat thinking of my mother and other loved ones. The pictures are horrible. As with anything good or bad, my only coping mechanism is cooking.
Original Post from September 2009
This year, I shall actually try to do a festival series on the blog. This series is really for my little daughter. She went to the Durga Puja in Stamford, CT this weekend and now wants the entire lowdown! In keeping with the festive spirit, I share with you a recipe for Sandesh. A simple Bengali sweet. Made with two ingredients – sugar and chenna (fresh homemade paneer).

 Well, the bengali version, is interesting in the the bad guy is actually destroyed by a powerful woman. A ten handed woman to boot! The concept highlights female power or shakti. This is an especially interesting story to come up with for my daughter.The demon Mahishashura recieved a boon from Lord Shiva. He could not be killed by any man. He took advantage of this and continued to terrorize people. The gods fed up of this, created the goddess Durga, who epitomizes the power of the woman. She is a 10-armed mother goddess who rides a lion. She is shown with her 4-children. They in turn merit their own festivals but we shall save that for another time. Durga kills Mahishashura – thereby vanquishing evil.While this is technically a ten-day festival commencing with Mahalaya. Most of the religious festivities take place during the last five days of the festivals. There are different religious offers, most notably prayers including pushanjali (floral offerings).
There are food offerings most popularly the myriad number of sweets.I miss all of that, but most of all I miss is the incredible transformation that takes place in the city of Kolkatta during Durga Puja. A week long carnival where Mardi Gras meets Christmas with a very Indian flavor.To bring back just a little memory of this period, I made Sondesh probably the closest to Indian Cheesecake make with fresh paneer. I was pleasantly surprised at how well this turned out, call it luck…Now, my recipe simply shapes these into handmade balls, in India, there are actually various moulds available for this dessert that allows you to shape it in a multitude of ways. PrintDurga Puja and Sandesh – Rose-Scented Bengali Cheesecake Balls
Prep Time: 2 hours
Cook Time: 20 minutes
Total Time: 2 hours, 20 minutes
Yield: Makes 20 pieces
Serving Size: 1-2 pieces
A homestyle recipe for the classic Bengali dessert called Sandesh
Ingredients
1/2 gallon 2% milk1/3 cup tart natural yogurt
1/3 cup sugar can be more if you like it sweeter
1 teaspoon rosewater
To Garnish
Chopped Crasins
Instructions
Place the milk in a sauce pan and bring to a boil, when the milk is bubbling, add in the yogurt and stir.In about 10 to 15 seconds, the milk should separate into cottage cheese or whey, if needed you can add some more yogurt.
Strain the mixture in a cheesecloth, discarding the whey, drain the cheese for about 11/2 hours.
Place the cheese in a food processor and process for about 1 minute, the mixture should collect into a ball at this point.
Notes
Most of the prep time is to allow the whey to drain.
3.1https://spicechronicles.com/durga-puja-sandesh-rose-scented-bengali-cheesecake-balls/The post Durga Puja and Sandesh – Rose-Scented Bengali Cheesecake Balls appeared first on Spice Chronicles.
April 19, 2021
Sweet and Sour Chicken
 This recipe for Sweet and Sour Chicken almost captures my mood. It is bright, sweet, with just some notes of sour. Isn’t that sometimes life. Well, since I nailed the perfect air fried chicken bites, this is how I put them to good use. Sweet and sour chicken is such a classic. Like most Chinese recipes it can be adapted to suit your taste. I like it fruity spiked with a little heat and finished with cilantro. A little shy of calling it a kick. This is one of my son Aadi’s favorite Chinese recipes. A perfect dish to start out our weekend.
The weekend overall, feels strange. Groups of other parents, all talking college. Some excited, others undecided. It is exciting and a little scary to see the face of promise. My boy turned a year older. Being the other resident foodie in our house, there was a lot of food to be had. Despite all the vaccines rolling out things are far from normal. And, once again things in India are taking a bad and scary turn. What if the pandemic just does not work itself out of the world? It just shows us the crazy interconnected nature of the world.

The next few weeks are predictably busy. However, I seem to have a handle on the projects. The one skill that I hopefully will not lose any time soon.
So, a few things on this dish, I use a combination of frozen pineapple and pineapple juice. If you wish, you can use canned pineapple and the reserved juice. I use very little cornstarch for the sauce, so it is nice and light. I personally love this with my tested and tried coconut and ginger rice.

In fact, with a little planning you can pull this lovely meal in about 45 minutes, prep and all. A maximum of an hour. Cheaper and healthier than take out. So, there you have it a perfect and easy recipe for Sweet and Sour Chicken to get your week started. Some nuances to my recipe, are the addition of a good pop of ginger and sesame seed finish.
PrintSweet and Sour Chicken
Prep Time: 10 minutes
Cook Time: 20 minutes
Total Time: 30 minutes
Yield: Serves 4 to 6

A beautiful and lively take on Sweet and Sour Chicken that is quick, festive, and flavorful.
Ingredients
1/2 cup pineapple juice1/4 cup ketchup
2 tablespoons soy sauce
1 teaspoon sriracha or to taste
1/3 cup hot water
1 and 1/2 teaspoons cornstarch
1 and 1/2 tablespoon oil
2 teaspoons minced ginger
1 red bell pepper cubed
1 yellow bell pepper cubed
1/2 cup cubed pineapple pieces
1 recipe Crispy Chicken Cubes
Instructions
Mix the pineapple juice, ketchup, soy sauce, and sriracha in a bowl. Mix in the hot water and cornstarch separately and then turn into the bowl.Heat the oil and add in the the ginger and stir lightly. Add in the red and yellow bell pepper and cook for about 4 minutes. Add in the pineapple cubes and the pineapple juice mixture. Allow the mixture to come to a simmer.
Add in the chicken cubes and cook for about 2 minutes.
Serve over rice garnished with scallions, cilantro, and sesame seeds.3.1https://spicechronicles.com/sweet-and-sour-chicken/
The post Sweet and Sour Chicken appeared first on Spice Chronicles.
April 18, 2021
Perfect Basic Air Fryer Crispy Chicken Cubes
 This is a basic recipe for Crispy Chicken Cubes, perfected for the air fryer. It has taken me some time to get this down to a comfortable level of ease and crispness. It is perfect by itself, but great as a base for a lot of quick chicken dishes. This can be used for chili chicken or the sesame chicken.
And of course, they are perfect with your favorite dipping sauce. Me, well I sneak a few pieces straght off the pan. Well, sometimes we need to come clean. So let us talk chicken.
I like to air fry these, mostly because this way they get done as I am tossing up a sauce. The technique use here is a quick and light battering technique and can be done ahead and kept in the refridgerator. You can pan fry these using a non-stick skillet if desired. The air fryer saves you the time needed to watch and wait and a few tablespoons of oil.
I have created this basic recipe, mostly to be used for stir fries. The chicken cubes that result from this are crisp and flavorful. There is no super heavy coating. Just about enough to give you a nice and crispy texture. And since there is not a lot of batter action happening, you can make them ahead of them and keep in the refridgerator.

One of the key things with air frying is to learn that water is not your friend. At least that is what I have found. It has been rather crazy in the house the past few weeks. And now here is Sunday! Trailing an action packed weekend. However, I am sneaking in this recipe for a new cooking class series. This one the class has decided will be a series of asian recipes. Right in my comfort zone.
So, before we get down to saucing, here is my easy to make crispy chicken cubes. A few tips around this recipe.
Parchment is your friend. It makes clean up easy.Get generous with the cornstarch, the chicken pieces should feel dry to touch.If you want to enjoy them as a snack by themselves consider drizzling with a flavored oil.

If you are a tofu kind of person, consider making my air fryer tofu recipe. Here is wishing you a great week ahead. May you get some time to stop and smell the flowers
If you like this recipe and want more ideas, do join my Indian Instant Pot Facebook group and Legume Love Group. Of course Instant Indian is ready for order, joining its siblings The Bengali Five Spice Chronicles and Spices and Seasons.
And to get social with me, follow me on Instagram, Facebook, Pinterest and Twitter.
PrintPerfect Basic Air Fryer Crispy Chicken Cubes
Prep Time: 45 minutes
Cook Time: 15 minutes
Total Time: 1 hour
Yield: Serves 6 to 8

A great basic recipe for crispy chicken cubes. This is an air fryer version, with pan fryer modifications.
Ingredients
1 and 1/2 pounds boneless skinless chicken pieces (can be tenders or boneless, skinless chicken thighs)1 teaspoon salt
1 teaspoon ginger paste
1 teaspoon garlic paste
Freshly ground black pepper
2 egg whites well beaten
3/4 cup cornstarch
1/4 cup rice flour
2 tablespoon vegetable oil
Instructions
Dry the chicken and toss with the salt, ginger paste, garlic paste, and black pepper. You can let this rest for 25 to 30 minutes or overnight if desired.Toss with the egg whites.
Spread the cornstarch and the rice flour on a large piece of parchment paper. Toss the cubes to coat uniformly with the mixture.
Chill for 20 minutes or longer to allow the cornstarch to better cling to the chicken.
To cook the chicken, heat the the air fryer to 400 degrees. Drizzle the chicken with the oil and cook for about 8 minutes, turn and shake well. Drizzle with a little more oil and cook for another 4 to 6 minutes. The outer coating should be crisp and pale golden. It does not have to be very uniform.
Use in cooking or serve with your favorite sauce.
Notes
Note:This can be pre-prepped in 2 stages.You can toss with the ginger and garlic and leave overnight.
Alternately, you can coat with the cornstarch and leave for a few hours or overnight. You might needs to toss lightly again in the constarch again.
Pan Frying Instructions
In a large skillet (preferably non-stick) heat the skillet until very hot. Add a little oil about 1/3 cup and place the chicken pieces in a single layer for about 4 minutes.
Turn and cook for another 4 minutes.
The post Perfect Basic Air Fryer Crispy Chicken Cubes appeared first on Spice Chronicles.
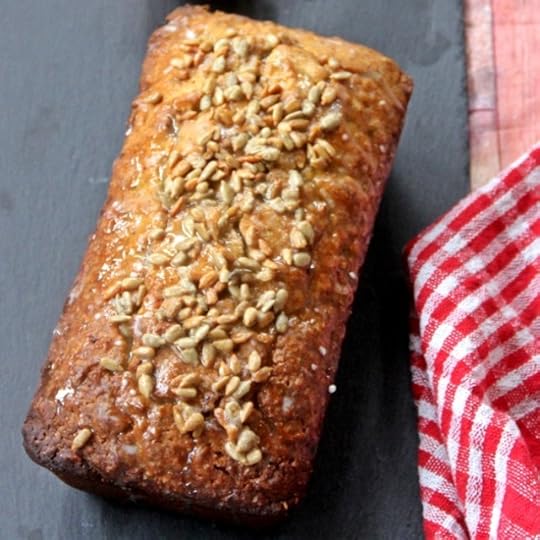
April 16, 2021
Meyer Lemon and Sunflower Seed Loaf
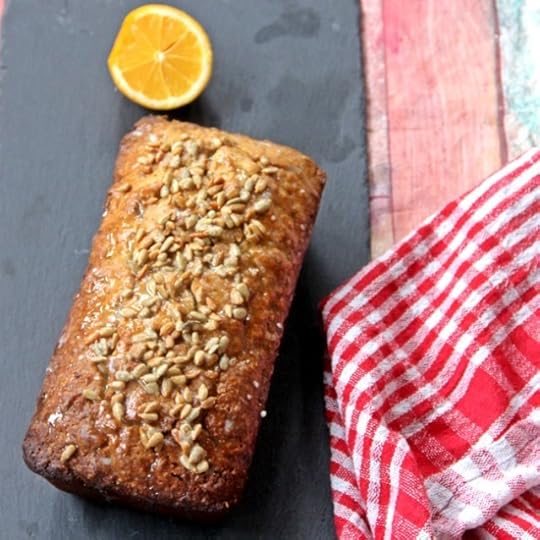 So this Meyer Lemon Sunflower Seed loaf is an emergency affair that is a success. This weekend we are on the road, traveling to Boston to visit the daughters prospective college. En Route, we planned on stopping over at a friends house. I diligently made a loaf of my very crowd pleasing banana bread. The only problem is that this never lasts in my house. So, scrambling around, I found some Meyer lemons and sunflower seeds. And this bright and crumbly Meyer Lemon and Sunflower Seed Loaf was born. So I guess I can say, when life gives you Meyer Lemons, make Meyer Lemon and Sunflower Seed Loaf. This does sound cliched, but, I could not help slipping it in.
This loaf is a riff of a mint, orange and almond cake I had created a few years ago. Same basic concept, nice and very bright flavors. Using the sunflower seeds keeps this cake nut free in case of allergies. And guess what, if you so desire, you can actually do this with walnuts as well. To make the sunflower you can grind it an make your own. This is what I did. Not surprisingly, you can buy your own pre-made sunflower seed flour.
I usually like to think of this loaf, as a breakfast sort of loaf. It is not overly sweet or rich. In fact, the olive oil gives it a lighter flavor profile. The mint and citrus together give it a start your day right kind of brightness. Great alone, and absolutely perfect with your morning tea or coffee.
To get the texture and flavors for this loaf,
Do not skimp on the meyer lemons. I have a hunch that regular lemons will do just fine.Unless you have a very sweet tooth, do not mess with the sugar content in the cake. It is gently sweetented, and that is fine.The glaze helps you infuse this with a deeper lemon flavor.The topping with the toasted sunflower seeds gives it both texture and a finished appearance.
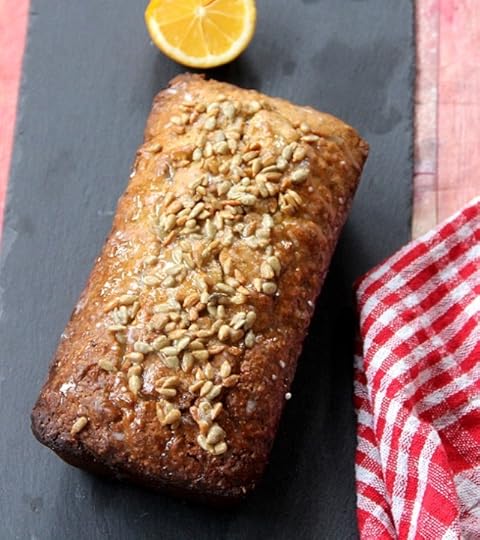
And since it gets done with minimal planning. As in no need to pre-soften butter and such. You are just a couple of hours away from a fun seasonal pick me up. And, it makes a good visiting cake of sorts. Here is wishing one and all a very happy weekend ahead.
PrintMeyer Lemon and Sunflower Seed Loaf
Prep Time: 50 minutes
Cook Time: 50 minutes
Total Time: 1 hour, 40 minutes

A great tasting lemon and mint loaf that is not overly sweet and bursting with the brightness of mint.
Ingredients
1/2 cup olive oil3/4 cup agave nectar
2 eggs
1/4 cup Meyer Lemon juice (about 2 lemons)
1 tablespoon lemon zest
1 and 1/4 cups whole wheat or all purpose flour
1 teaspoon baking powder
1/2 teaspoon baking soda
3/4 cup sunflower seed meal (see note)
1 teaspoon dried mint or 1/2 cup fresh mint leaves very finely chopped
For the topping and drizzle
2 tablespoons Meyer Lemon juice
1/2 cup powdered sugar
1/2 tablespoon salted butter
1/2 cup whole sunflower seeds
Instructions
Pre-heat the oven to 325 degrees.Grease a standard sized loaf pan (9in by 5in)
Place the olive oil and agave nectar in a mixing bowl and mix well.
Beat the eggs and mix into the olive oil mixture. Stir in the lemon juice and the lemon zest.
Sift in the whole wheat or all purpose flour, baking powder, and the baking soda.
Stir in the sunflower seed meal and the mint.
Pour into the baking pan. Bake for about 45 to 50 minutes, until the cake is golden brown and set in the center. Test with a toothpick inserted in the center. Allow it to rest in the oven for 5 to 10 minutes. Remove from the oven and allow it to cool outside.
Carefully loosen and over turn the cake,
Prepare the glaze by mixing in the lemon juice and the sugar. This will be runny, it is mostly to infuse an additional pop of lemon flavor.
Heat the butter until melted and toast the sunflower seeds until very lightly browned and spread over the loaf.
Notes
If you do not have agave nectar you can use sugar.
You can use almonds instead of sunflower seeds and also vary the citrus.
The post Meyer Lemon and Sunflower Seed Loaf appeared first on Spice Chronicles.
April 9, 2021
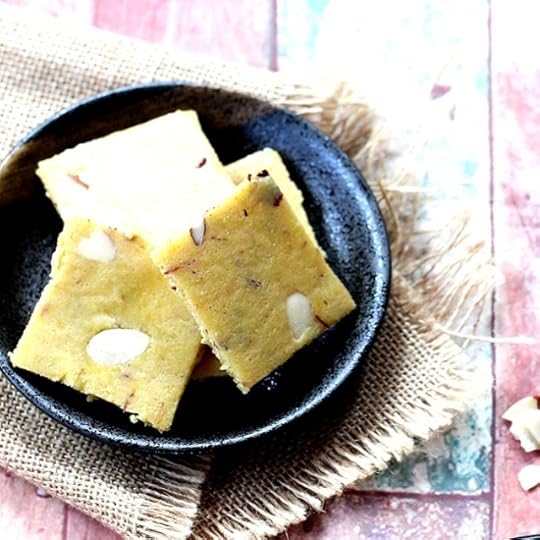
Easiest Ever Saffron Almond Burfee
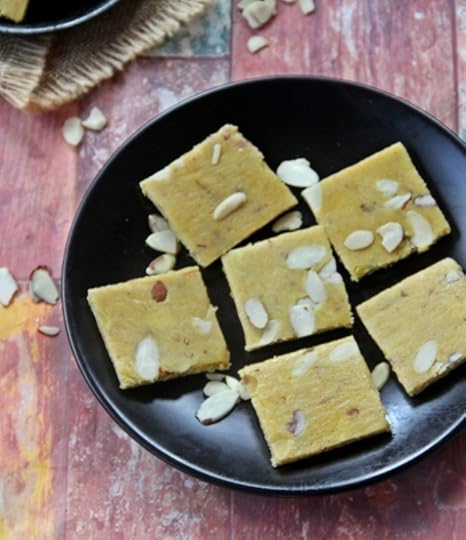 This versatile recipe for Almond Burfee takes 15 to 20 minutes of hands on time. It is a favorite with my family! I have tried the Instant pot version, but actually find the stove top version easier and quicker. Now that does not happen too often. It has taken me a few attempts to get this to the science that I will describe. If you want to get creds for an easy and fool proof dessert, this one is for you. It makes an impressive and easy to put together gift too!
It has been a busy week in the household. I am throwing in this quick post before we head out for the weekend. We are Boston bound. The daughter is visiting her college. Of course, there are no official college trips around. This is an unofficial one. Nonetheless, the young lady wants to check out her future digs. I accept with mixed feels, this is happening.
My home is getting emptier and soon will be empty. But, again, such are the rites of life. 2021 is breezing along at a fast fast speed. It has not been a bad year, thus far. I am 50% vacinated. So, one shot done and should be complete by the end of the month.

As for the burfee, it is essentially an Indian Almond Fudge. It is vegan and as I mentioned it is ridiculously easy to make. It takes 4 ingredients including the saffron. And if you want you can make this with cashew nuts as well. I use ready made almond flour, found easily at Trader Joes or Costco. Not really any different in terms of the result. The few strands of saffron give it a nice pale golden color. An alternate flavoring would be crushed cardamom.
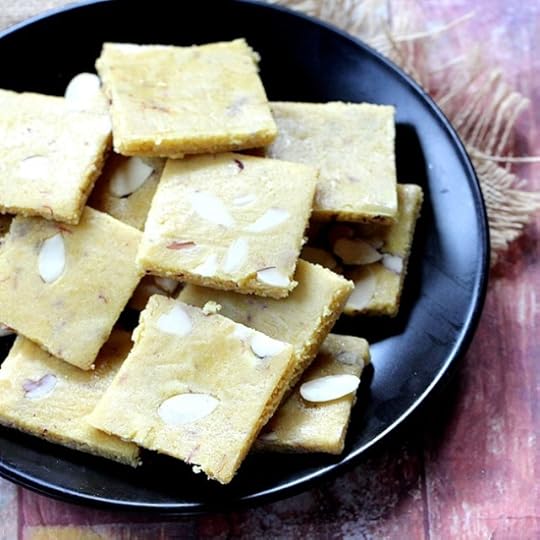
There are a few things to watch to get absolutely perfect burfee or fudge.
Do not add too much water to melt the sugar. I mean it when I say 1/4 cup.Once the almond meal is added, gently cook and mash much like cooking a dough. You ultimately want an almost dough like consistency.Use parchment paper to roll out the fudgeAnd that is it. My version is not super sweet. And if you wish you can use ghee instead of coconut oil.
PrintEasiest Ever Saffron Almond Burfee
Prep Time: 2 hours, 5 minutes
Cook Time: 20 minutes
Total Time: 2 hours, 25 minutes
Yield: 15-20 pieces
A ridiculously easy and versatile Indian treat, that comes together in 15 to 20 minutes of hands on time.
Ingredients
1/4 cup water1 cup sugar
3/4 teaspoon saffron strands
2 and 1/2 cups almond flour
2 tablespoons coconut oil
2 tablespoons sliced almonds to decorate (optional)
Instructions
Prepare 2 large sheets of parchment paper and set aside.In a large wok or other cooking pan (something wide makes it easy to manage) add the water and the sugar and bring to quick simmer. The sugar should melt and the syrup should begin bubbling. It should be thick enough to coat the back of a spoon. Add in the saffron.
Add in the almond flour, working quickly to stir well into the mixture. This happens very quickly.
Lower the temperature and add in 1 tablespoon of the oil. Continue cooking and mashing the mixture. It should become faily dry and smooth. It has the texture of dough and will not stick to the sides of the pan or the spoon. This takes about 10 minutes
Add in the second spoon of coconut oil cook for another 4 to 5 minutes.
Sprinkle the parchment paper with the sliced almonds (if using)
Turn off the heat and place the mixture on the parchment paper oover the sliced almonds (if using) Cover with the second piece of paper and roll out to about 1/4 inch thickness. The depends on you. The key is to roll this as close to possible into a square like shape.
Allow the mixture to cool for 2 hours. Remove the parchment and cut into square or diamond shapes. Allow the burfee to cool completely. It will dry out. You can then enjoy!3.1https://spicechronicles.com/easiest-ever-saffron-almond-burfee/
The post Easiest Ever Saffron Almond Burfee appeared first on Spice Chronicles.
April 2, 2021
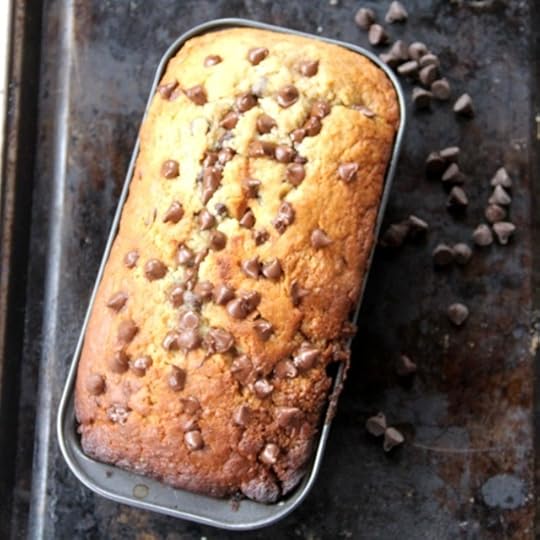
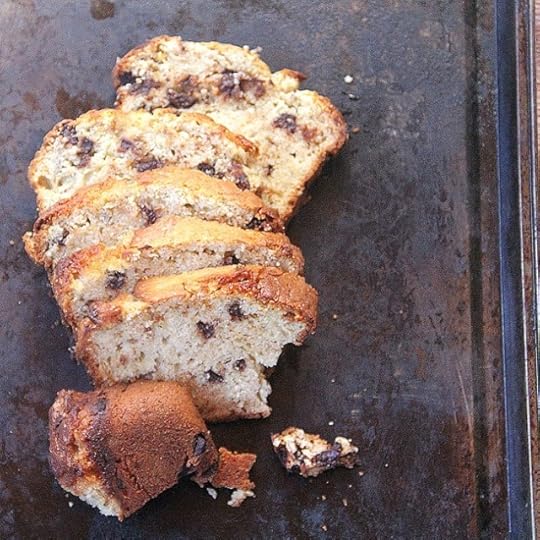
Chocolate Chip Banana Bread
 There are few things in my house that is a cure for everything. Other cures are have their individual specialties. And then there is banana bread. Honestly, I make banana bread with lots of variations. But my absolute favorite and ridiculously easy version is this chocolate chip banana bread. It is done in one bowl. No fuss at all. The only absolute for this is finding those nice fragrant, ripe, brown bananas. The kind that you smell as you walk into the room.
And this bread it is what cures all ills in my family. The good news is that like all my baking it is ridiculously simple.
The only planning needed is pop the butter out of the refrigerator a couple of hours before. If like my household you have a thing for desserts with bananas, you can also try the,
Instant pot banana bread, Marbled Chai Banana Bars, and Best Ever Banana Bread Muffins.

The Banana Bread has a nice pound cake like texture. The magic ingredient here is the sour cream. The overall effect is rich tasting but not heavy. The flavors are basic, comforting and simple. With such few ingredients, you want the best. So splurge on the vanilla and the butter. Your taste buds will thank you.
Some day, I will update the post with better pictures. The truth be told, this never lasts long enough in my house of any kind of picture taking. We love it warm and fragrant, practically straight out of the oven.
Maybe it is just me, but somehow I feel that April is cooler than usual this year. However, the birds are out and about as are the daffodils. The abundance of daylight is always welcome. Of course, the best way to warm up a chilly weekend is to bake. And so here is wishing you a warm and cosy weekend ahead.
PrintChocolate Chip Banana Bread
Prep Time: 15 minutes
Cook Time: 40 minutes
Total Time: 55 minutes
Yield: 12 slices

A comforting and easy to make banana bread that comes together so very easily.
Ingredients
1/2 cup salted butter softened at room temperature plus extra butter for greasing the pan3/4 cup brown sugar (you can add more to taste)
2 teaspoons vanilla extract
2 very ripe bananas
1/2 cup sour cream
2 eggs
2 cups all purpose flour
1 and 1/2 teaspoons baking powder
3/4 cup semi sweet chocolate chips
Instructions
Preheat the oven to 350 degrees. Grease a standard loaf pan and set aside.In a large mixing bowl, beat the butter and sugar until soft, well mixed and pale. This is for about 3 minutes.
Add in the banana extract and the bananas and beat well until incorporated. Beat in the sour cream and eggs.
Sift over the all purpose flour with the baking powder and mix well.
Stir in the chocolate chips, you can save about 1 and 1/2 tablespoons to add over the top.
Place in the oven and bake for about 40 minutes or the bread is done. You can test this by inserting a toothpick in the center.
Turn off the oven. Remove the banana bread and press the reserved chocolate chips over the bread, lightly.
Allow the bread to cool for at least 30 minutes. Remove from the pan by first loosening the sides.
Slice and serve.3.1https://spicechronicles.com/chocolate-chip-banana-bread/
The post Chocolate Chip Banana Bread appeared first on Spice Chronicles.
March 16, 2021
Quick and Easy Thandai
 I am roll since the beginning of March. I always love working in the kitchen, but seem to be on a major creative upswing. And now comes Thandai. What is that you might ask? Well, Thandai is a milk based nourishing and thirst quenching drink. It is a classic recipe for the festival of Holi.
Every part of the world ushers in the change of seasons and welcomes spring in their own way. In India, spring is welcomed with a riot of colors and classic sweet and savory dishes. And, a signature drink for Holi is Thandai.
The name Thandai comes from Thanda, meaning cold in Hindi or Bengali. The unique combination of fennel, black pepper, and cardamom brings a refreshing effect. Essentially an assortment of nuts, spices, are powdered and then mixed into milk. This milk can be tinted with saffron and garnished with all kinds of colorful ingredients such as edible rose petals.

If you are feeling adventurous you can spike your Thandai as well. A generous shot of vodka or coconut rum is never a bad idea.
Back to the Thandai, if you know me by now. You will know that I like to keep things simple. To ensure that my Thandai is smooth without the fuss of sifting and straining, I do the following.
I grind the nuts and spices separately in a spice/coffee grinder until very smooth.I then grind with a little milk in the blender to form a pasteLastly I mix then in the milk.

The mixture is naturally gluten free, and if you want to keep it vegan I would suggest almond milk and increasing the amount of nuts. In addition to the traditional rendition of whole milk, I have tried it with an assortment of vegan milks. My vote in the later dimension is for almond milk.
And even if you are not looking at Holi, this is a lovely feel good indulgent sort of drink.
PrintQuick and Easy Thandai
Prep Time: 2 hours, 25 minutes
Yield: Serves 4 to 6

A gorgeous chilled drink that is lush, rich, and uniquely seasoned.
Ingredients
3/4 teaspoon whole black peppercorns1 teaspoon whole fennel seeds
1 teaspoon cardamom seeds
1 blade of mace
1/2 cup shelled blanched almonds (see note)
1/2 cup shelled pistachio
1/4 cup melon seeds
1 teaspoon saffron strands
1/2 cup honey
1/4 cup sugar
5 cups of whole milk
1 tablespoon rose water
Rose Petals and Chopped Nuts to garnish
Instructions
Grind the peppercorns, fennel seeds, cardamom seeds and mace in a spice/coffee grinder until powdered.Grind the almonds, pistachios, and melon seeds until powdered. Mix well together. If you wish you can make this mixture ahead of time and store and use as needed.
Add this powdered mixture to 1/4 cup of milk and blend until a smooth paste is formed.
Warm the remaining milk and add the saffron strands. Stir in the prepared paste and warm through but do not boil. Stir in the honey and sugar.
Pour into glasses or a serving jug and chill.
Serve over ice garnished with rose petals and additional chopped nuts.
Enjoy chilled.3.1https://spicechronicles.com/quick-and-easy-thandai/
The post Quick and Easy Thandai appeared first on Spice Chronicles.


