Tina O'Hailey's Blog
April 30, 2024
Dark Drink Sheperd’s List

https://shepherd.com/best-books/unconventional-stubborn-loyal-characters-with-expl
The best books with unconventional, stubborn, loyal characters who have explorer’s hearts —in their chests, not in their backpack.
I said yes to this interesting way to promote your book: a reading list on a topic your book would fit into. I could have made a list on digital stalkers or creepy f*ers from your past or buddies with secrets or something like that. Instead I chose the heart of what I like: loyal explorers.
Check it out.
March 15, 2024
Get 20% off Rig it Right
Just got this in from the publisher: Rig it Right – 20% Discount with code AFLY01 (free shipping)
www.routledge.com/9781032555232


March 5, 2024
Rig it Right, third edition—now available!

Rig it Right is now available and I have to tell you two things:
Thank you to those who helped this book get there.What is so special about this third edition? New chapters!You can get the new edition of Rig it Right here: https://www.amazon.com/Rig-Right-Tina-OHailey/dp/1032555238The full companion data can be found here: https://rigitright.gumroad.com/Special thanks to those that helped with the new chapters for the third edition:
Jayme Wilkinson, profiler and evaluation toolkit museJoseph O’Hailey, hard-core tech editing while working on a thesisLluis Llobera and Javier Solsona, rig101wireControllers scriptJason Bickerstaff, modeling techniquesMarty Altman, manageSuffix and extractFaces scripts, and always proofing my math.*Eric Allen, edgeloop rulesAshwin Inamdar, modeling techniques, https://www.iashwin.net/rigsMia Pray, Rijah Kazuo, Sagar Arun, Aang model with excellent edgeloops, https://rigstation.gumroad.com/l/CFLLUThe additional chapters for the third edition of this book were funded (in part) through a Savannah College of Art and Design Faculty Sabbatical AwardThe new pages in Rig it Right’s third edition are:
Edgeloop for Good – an additional insert for Chapter Two covering the rules of edgelooping and why it is so important. To quote Jason Bickerstaff (Pixar), “solving the quad problem” is fundamental to everything else. I had to add in some pages for proper topology. I could write a whole book on the subject – but kept it to an insert.
2. Rigging for a Parallel World: Rig it right, then rig it fast. In this chapter, I dive into some advanced topics. It is an overview of Maya’s memory management to help you get a start into this next level of rigging. We cover using Parent Offset Matrixes instead of constraints, using the scene profiler and evaluation toolkit in Maya to see where slow points occur in the rig, and utilize scripts to dial into the profiler even closer. The chapter ends with links for amazing resources to continue your journey into parallel in Maya.

We (the tech editor and I ) went through the rest of the book updating all of the maya files to be .ma(s), making sure everything still worked, adjusting for any newer tools or buttons, and simplifying any images.
Sadly, the AR solution I had for the second edition did not last. HP bought out the company I had used and killed that solution off. (https://coffeediem.wordpress.com/2019/12/31/rig-it-right-ii-ar-feature-has-been-hp-ed/) Pity. I really liked that solution for seeing the images better. I only get so many pages and have to squeeze the images in.
I’m teaching modeling more than I am rigging now-a-days. Though, I do consult on a lot of senior and thesis films for rig problem solving. This update let me put in more on modeling and stretch my brain into the more advanced things I had been curious about.
Hope this book helps you out on your journey to Rig it Right. Happy Rigging!!
….tina
–if I missed anyone, please forgive me. Last summer feels like 5 years ago.
* Marty has been gone from us many years, but he would often gift me with tar balls of scripts and tools for my enjoyment. I opened one last summer to find the exact script I needed for that exact moment. Years later, he is still helping me be a better problem solver. *hugs*
February 21, 2024
Pre-Order Rig it Right, get 20% off
Pre-Order Rig it Right (third edition), and get 20% off!!
Use discount code SMA21 at http://www.routledge.com/9781032555232
Are you excited? I’m getting excited! Launches March 4, 2024
Companion data will be available here: https://rigitright.gumroad.com/l/rigitright

October 12, 2023
Edgeloops in Dan-yr-Ogof’s dinosaurs!
They said there were dinosaurs. But I didn’t realize how MANY dinosaurs or how well they were made. Having grown up in tourist town (near Orlando, Florida), I’m used to the road-side dino attractions that are dingy, held together with duct-tape, and barely photo-worthy.
Visiting Dan-yr-Ogof in the The National Showcaves Centre for Wales was another story entirely. We were going to cave at DYO, and were warned that there would be dinosaurs at the entrance of this cave. It was a tourist thing. We’d walk past it and swim into the wild part of the cave. I expected shabby. Instead, I found something worthy of study. *Takes off caver’s helmet and puts on metaphorical Professor’s Hat.* Let’s discuss:
Edgeloops at The National Showcaves Centre for Wales Myself getting a closer look at that dino
 Photo from The National Showcaves Centre for Wales
 When we talk about edgeloops in 3D modeling – we usually talk about articulation. We run edgeloops around joints so that when the character is rigged, it can bend well at the joints.
 Edgeloop at the crux of a joint’s bend (Anatomy for Sculptors)
 knee edgeloop, modeled by Mia Pray for the Aang rig found on https://agora.community/content/aang
But another focus for edgeloops is along wrinkles as well. We add deformational topology to wrinkles so that when the character bends, the wrinkles…ummm, wrinkle. Note in these following images the attention to wrinkles. First in concept sketches for a character in Dreamwork’s The Bad Guys. You can see the wrinkle added to the topology of Mrs. Incredible in her grimace. In the third image you can see the wrinkles described in the topology of the pants. There is no mistaking where the pants will wrinkle when the leg is bent. It is modeled to bend in an intentional way.
 Dreamwork’s Bad Guys
 Pixar’s Incredibles
 pant’s wrinkles
To see this IRL, we can study sculptures and I had 200 life-sized dinosaurs to look at. A few of them were even animated animatronics. Since these are stylized (cartoony) we can see the wrinkles both in the coloring and shape of the dinos as they flow along the skin. See images below.
The simplest way to add a wrinkle in a quad topology is with these cuts described by David Komorowski http://www.thehobbitguy.com/tutorials/polymodeling/page15.htm (I first learned the concept of edgeloops from David eons ago.)
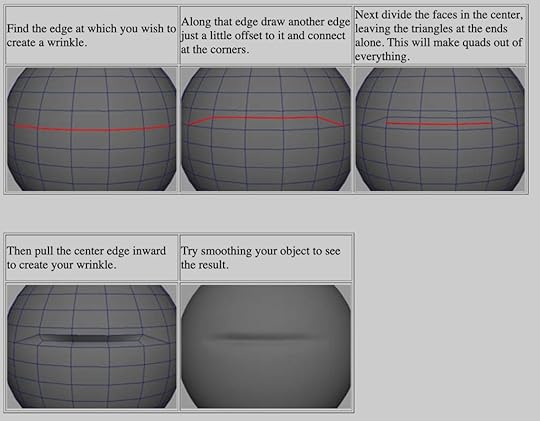
In class, as an exercise, I have students draw over the wrinkles and plan out how the topology will be added to any of the following images (Pick a wrinkle, any wrinkle.):
 Photo from The National Showcaves Centre for Wales
 Trunk wrinkles
 Look at that shoulder wrinkle
http://www.havekidscantravel.co.uk/family-attractions-in-the-brecon-beacons-dont-miss-dan-yr-ogof/
Look for the very exaggerated wrinkles and also consider how these would move:
 Photo by Rebecca Smith
 Photo from The National Showcaves Centre for Wales
 WRINKLES!!


 Needs better edgeloops
And if dinosaurs aren’t your thing – we can use dragons too. This family was found while I was on vacation in Cardiff and I’ll include it here. I wasn’t expecting to find these while wandering ruins.
 Dewi and Dwynwen (mum and dad dragons) at Cardiff Castle (construction of the castle began in 1258)
Note: photos with drawovers of topology will be added soon (after the class gets ahold of these)
Perhaps, this can boil down to one thing — you never know where you will find inspiration. And – I finally managed to combine my love of caving directly with modeling/edgelooping, even if it was by way of dinosaurs.
October 11, 2023
Rig it Right: Edgelooping for a parallel workflow (pt 2) or Creating edgeloops like an artist or Making peace with Zremesher
Creating edgeloops like an artist.
Normally, I edgeloop in Maya and send that low-res (well looped mode) on for simultaneous rigging and sculpting in zbrush. This lets the rigging get a head start. Read up on that process here: https://coffeediem.wordpress.com/2023/09/04/rig-it-right-edgelooping-for-a-parallel-workflow-pt-1/
But what if I wanted to sculpt more before making the edgeloops? Ah, I have to make peace with Zbrush’s Zremesher. Below is my attempt to capture my experimentation with this process.
There is something satisfying in painting edgeloops though. Once you get the hot keys down.
The final-ish results (a technical exercise, those loops need better placement, and the sculpt isn’t SCULPTed):
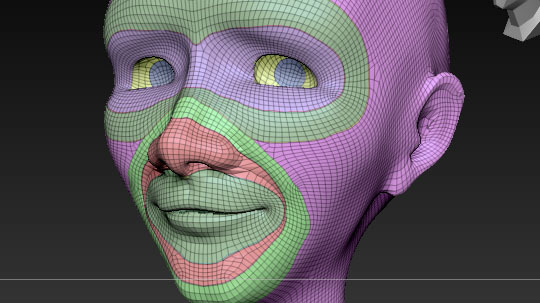
 Using Zbrush Polygroups to define edgeloops when using Zremesher (Don’t look at her ear. It did get lost in the testing. I’m just focused on the face.)
Getting the hot keys down for your sanity:
Set center of camera rotate: Command click (Mac) on an area and the rotate centers around that areaAdjust the polyframe to be lighter so you can see the polygroups!: Preferences > Draw > PFrame ,PFill, PFillSat, and put on a Skin Shader so that thing reflects more light! Adjusting PFrame on dense meshes so you can see the polygroup edges. Model has a Skin Shader applied so it is not too dark
Using Zremesher and polygroups to make edgeloops
 Draw the mask for the desired edgeloop (CNTRL + LMB)Draw the mask for the desired edgeloop (CNTRL + LMB)Blur it – CNTRL click. (FYI make it sharper by ctrl+alt click. (CNTRL + Option on mac))Polygroup > Group MaskedZremesher – turn on Keep Groups and zremesh (100 = 100,000)
 Mask with polyframe showing (very dense mesh) – still have clay shader here, so it is dark
 Polygroups created from the masked areas – still have clay shader here, so it is dark
 Zremesher, keep groups turned on, at highest polygon count (100 = 100,000)
Not too bad. But we need to add more polygroups and remesh to get more control of your edgeloops!
How to get more control of zremesher’s edgeloops with strategic polygroups
Add mask for the inner eye socket, make that mask sharperRepeat – polyggroup > Group Masked & Zremesher with keep groups onBut those jaggies –Geometry > EdgeLoop. With default options, click on Group Loops
 Smoothing out the jaggies by adding edgeloop with group loops turned on
Now you have rings that are a little better
Before using Zremesher we need to add those to the existing polygroups. This one baked my noodle the first time I saw someone do all of this clicking.
Buttons we need to know:
Polygroup > Group VisiblePolygroup > AutoGroupAnd toggling polygroup visibilityThese were listed at the top of the pageIsolate a polygroup: Shift + CNTRL and click on the polygroupToggle visible polygroups: Shift + CNTRL and click and drag a box on the empty grey spaceShow all polygroups: Shift + CNTRL and click on empty grey spaceMy first goal is to add the light purple to the dark purple polygroups around the eyemask. This is the technique:
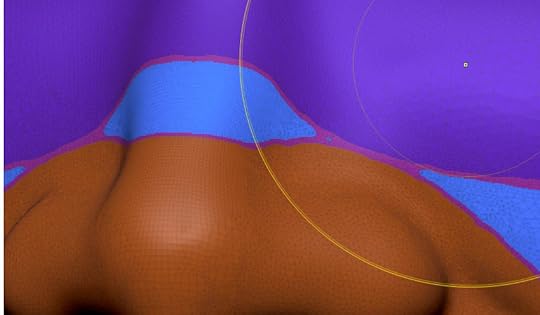
The main part I want gone is the face –
Isolate the area by Shift + CNTRL and click on the face polygroupThen reverse that by Shift + CNTRL and dragging a box on the grey area. Now the eyes and nose are showing and not the rest of the faceNow Shift + CNTRL on the eyes, for example and hide them. Since some items are already hidden, this will now hide polygroups. I know. That’s weird AF.I masked the parts of the loops that I didn’t want to deal with. (Cntrl and paint a mask.) Then reversed what was masked (Cntrl click on the grey blank space) I know. Then hid what was unmasked (Visibility > Hide pt)PolyPaint > Auto Groups.Shift+ Cntrl click in grey space to get everything back.Repeat for other areas 1) Isolate the area by Shift + CNTRL and click on the face polygroup
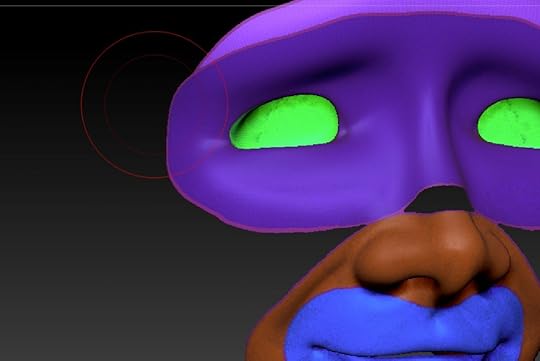 2) Reverse what polygroups are visible
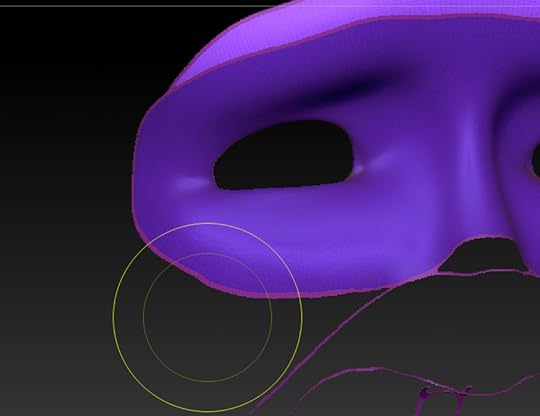 3 & 4 hide polygroups, hide masked, whatever you need to do to get to the loop groups you want to combine then proceed with steps 5 – 6 listed above.
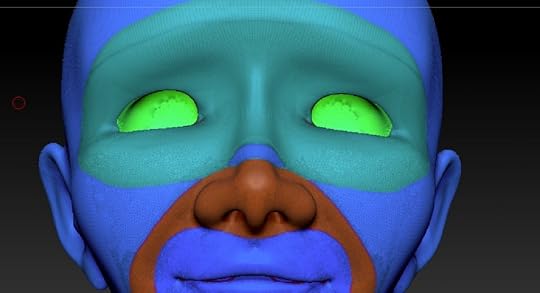 Better edges to the polygroups by using edgeloop’s group loop turned on
That takes a second to master all of the clicking, maybe it’s just me. Eventually, it becomes second nature, like any tech.
Look at this nose area. I want that to join the eye mask polygroup.
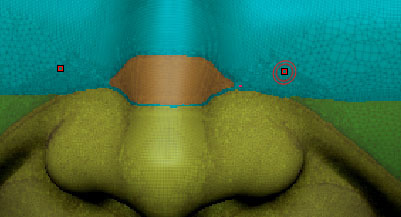
(The mouth is in a separate polygroup – it’s just a very close color to the others ones, FYI) That little blue line on the nose is bugging me too.
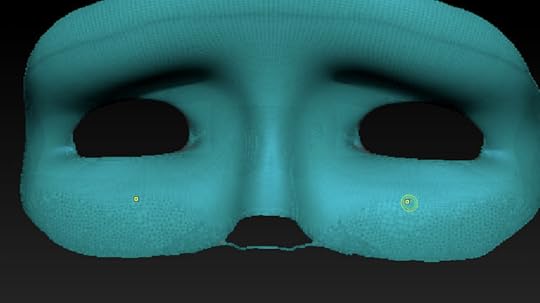 Eye mask area in one polygroup now. But that missing bit)
Cleaning up areas if you got sloppy in the original masking
Hide all polygroups but the eyemask, in this caseMask the offensive bitPolygroup > Group MaskedNow show only the polygroups that you want to have as onePolygroup > Group VisibleOkay, I’ve got some more patience to put into this technique – but I’ll get quicker at each go. Let’s see what type of edgeloops we get out of this now.
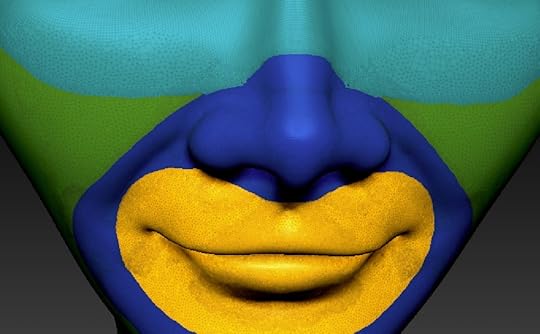 Cleaned up polygroups on very high res sculpt
 Zremesher with groups on, set to 100,000 polygons
 Closeup of zremesher’s edgeloops using polygroups. Workable.
Well, not amazing – but something that can be worked with. Let me test a little more and move some quads around.
Testing 1 — 12 million polys:
First I’ll take my 627,000 sculptris pro model with messy geometry (Note for myself as to which file: 01_Brandy_Body_GEO_02.5_sc12bEL.ztl)
Duplicate it, zremesh without polygroups to 100,000 (the highest I think I can get that to go with zremesh). Now I have a model with no actual thought out edgeloops on it.
Check the silhouette and details. Matches. Good.
 627,000 sculptris sculpted model
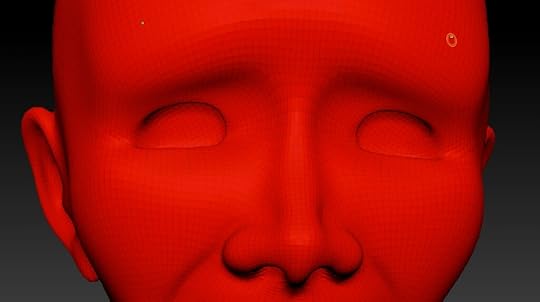 100,000 polygons with zremesher, no polygroups just to get flat quad topology. Silhouettes match.
Now I’ll duplicate that 100,000 version and mess with edgeloops.
HUGE!! Made a 12,000,000 polygon version, polished the 2nd division.
Added polygroups. Did a few loop groups.
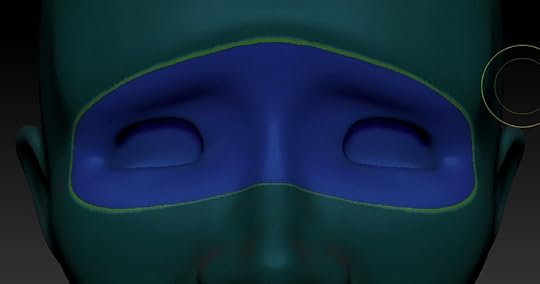
Zremesher with curve strength at 53
Dark purple loop should flow along the top of the mouth/nose loop.
 12 million polygon with polgygroups
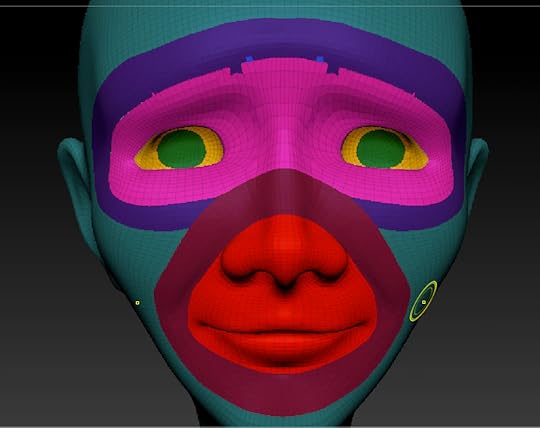 zremeshed to 100,00 from 12 million. Get a nicer flow, as expected.
Some clean up needed, but not awful. There is a nicer flow having more polygons as the base. That’s not surprising. I got a few weird blips in the brow region that need to be cleaned up
I tried different numbers of polys with zremesher. Turning out very well. (those polygroups aren’t the best edgeloops in the world, btw). I’ve adjusted the polyfill to be less saturated in the pictures below so I could see the polframe (Edgeloops) better. Starting to lose the ears at 50,000.
 100,000
 75,000
 50,000
Testing 2 — less than 1 million polys:
Note to me: Medium (01_Brandy_Body_GEO_02.5_sc12bEL.ztl)
Test with not an insane amount of polys, and not doing a lot for the edgeloop edges
Going back to the 627,000 sculptris model and recreating polygroups
Making polygroups on mask from outer to inner so I don’t get weird missing sections over the nose. That worked out much nicer. Less futzing around with lost bits. Mask from outer to inner. Got it.


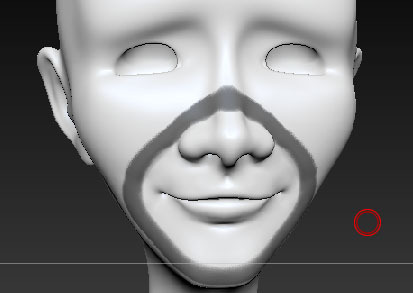
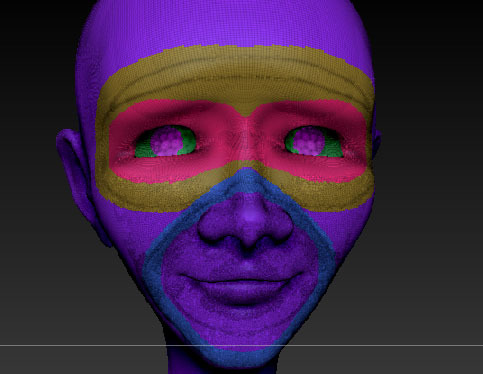
Zremesh polycount 100 defaut. Pretty good!

Testing small loop groups:
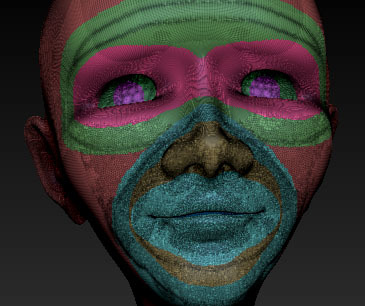
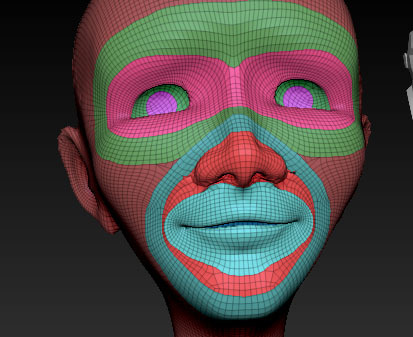
Adjusted Zremesher’s curve strength to help eliminate strays. You can see the improvement around the nose:
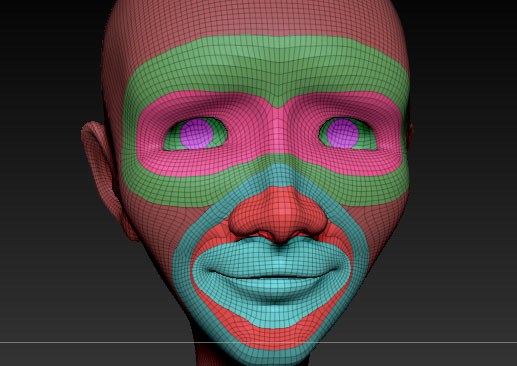
Testing putting in edgeloops on groups and not adding them to the polygroup then remeshing gives a distinct edgeloop:
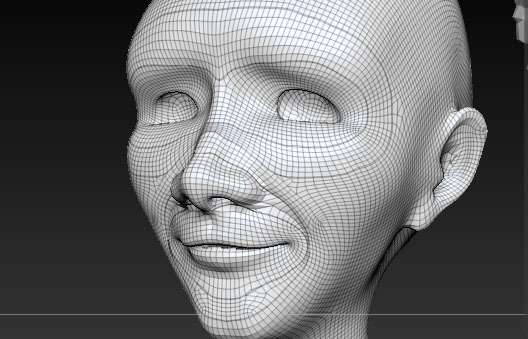
Divided twice then zremeshed back down – sure enough, that does a good job and those distinct edgeloops could be easily collapsed:
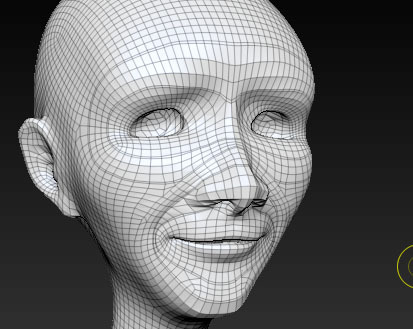
In conclusion: using zremesher and polygroups works surprising well for creating edgeloop flow. For artists that do not know polygon modeling, or don’t want to bother with it can – they create loops in zbrush. This low res with edgeloops could be sent to the riggers as the base mesh while the sculpter continues sculpting. The model itself might need just a little bit of cleanup with polygon tweaking. That’s a workable pipeline.
Fun. (with a lot of hot keys)
October 5, 2023
Rig it Right: save some clicks when edgelooping (or sculpting) in Zbrush
Want to save some clicking in Zbrush? Use this trick to keyframe the camera in zbrush. This lets you cycle through the keyframes quickly while sculpting without having to keep adjusting the camera.
 Keyframe (orange circle) added to the timeline by CNTRL + click.
Using timeline
Movie > Timeline > ShowBy default it sets camera keyframesPosition your model. Example: Eye closeup, Nose closeup, Under the chin, 3/4, etc.Cntrl + Click on the timeline to create keyframesRight and left arrow cycles through the keyframes!But – this doesn’t save with the tool. Oops. Ask me how I know.Remember to save the timeline (Movie > Timeline > Save) and then load it (Movie>Timeline>Load)
If you are a save the project type of person – the timeline might save with it. I tend not to since those get bloated and huge with things I don’t want saved.
 Keyframe set for this framing of the face
 Another keyframe set for this framing of the face. Use the right and left arrow keys to cycle through the keyframes! Saves time when sculpting.
 Now I can have all the camera positions saved for cycling around the face while sculpting (like for masking edgeloops) without manually moving the camera.
Happy rigging! And in this case, sculpting.
September 4, 2023
Rig it Right: Edgelooping for a parallel workflow (pt 1)
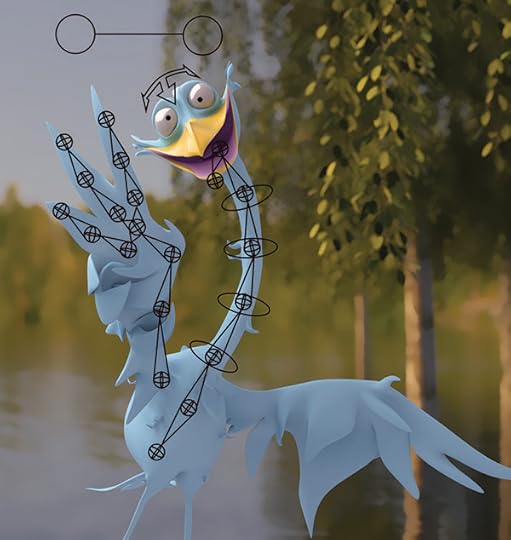 Rig it Right 3rd edition cover by Tina O’Hailey. Model by Alston Jones. Background by Danny O’Hailey.
 Rig it Right third edition is scheduled to release in March 2024. [YIPEE!!]
I expanded upon the edgeloop paragraphs of the 2nd edition and made that into its own chapter. Rule #1 of Rig it Right: Good Edgeloops.
Many sculpting workflows may create great edgeloops but sacrifice parallel workflow. A parallel workflow can be used to create the final sculpt and the animation rig at the same time. Very efficient.
This Maya > Zbrush > Maya workflow allows for proper edgeloops first and parallel rigging :
Reference and design sketches. We need a solid idea ahead of time of what the character needs to look like, and have plenty of reference to use as modeling/sculpting guidance. Rough sketch of character with under developed arms and hands. Lowres basemesh from library of basemeshes with proper edgeloops taken into Zbrush and adjusted.Model the BaseMesh WITH proper Base Edgeloop and UVs Having a poly (heck, NURBS) modeling background I usually start with Maya first for the basemesh. Note, poly modeling can be done in anything. Following Tarek’s edgelooping methods for blocking [https://www.youtube.com/watch?v=yBi-CBYZF5k&t=506s] I have always made proper loops in Maya then brought that basemesh (less than 10,000 polygons) into Zbrush to refine. This becomes the low resolution base mesh for use in the rig and animation. (Save as a .fbx file)Another method I explored is to bring a basemesh from your library of basemeshes* with good edgeloops into Zbrush. Using the move tools, etc. and working on the lowest resolution – adjust the basemesh to be the desired silhouette to match or improve upon the character (If you had under developed designs and you are finding the sculpt/character in Zbrush.) But the focus is – keeping those edgeloops. The sculpt details come later. Save out the FBX, lowest resolution basemesh. (If doing this method, I’m usually under 50,000 polygons)I may not need the UVs before sculpting but will need them before handing the basemesh model to the rigger. UV in your favorite place.
 Basemesh with edgeloops adjusted to match design but not fully developed just yet.*Library of basemeshes:
This summer, as part of my sabbatical study of edgeloops, I interviewed many individuals about edgeloops, pipelines, and doing draw-overs. One common thing found in the more established animation studios is the library of items for reuse. One being a library of base meshes with edgeloops intact. Once developed, the process is sped up as characters can be modified (as mentioned above) in shape and layout to match a new character while retaining the base edgeloops. Or, the edgeloops can be projected onto the sculpted model. (More on that workflow later in another article.)Send Basemesh with base edgeloops and uvs to rigging departmentThe basemesh (.fbx) goes off to to the rigging department so they can get a base rig created. Here’s what’s important for that to work:This basemesh needs those base edgeloops to be in place for the joints of the character (fingers, hips, knees, elbows, etc.) Maybe, not the face detail so much. This is so that the rigging artist can place the joints in the correct spot for the apex of each joint bend. The first version of the rig is for blocking and may not have a face.Model and Rig are kept in separate files. The model is referenced into the rig file, so that it can be updated later. (Specifically talking Maya workflow here.) If the basemesh is to be skinned, it must be UVed first before skinning. Any deformation will be done with shaders (displacement, normal maps, bump) and created in the model file which is referenced into the rig file.
 Basemesh with proper edgeloops has been further shaped to its final design by concepting in Zbrush. This basemesh with proper edgeloops can go on to be rigged while the sculptors continue. Export the lowest resolution mesh as FBX from Zbrush using the FBX exporter under ZTools.Rig base controls for blocking in animation**Character set-up artist can cut the mesh up and use parent contraints (or parent offset matrix, oooh fancy) to get the rig created without using skinning. (If they are expecting more modeling updates) This creates a fast rig. Character set-up artist can skin this version of the mesh directly as it is the basemesh and any further refinement will be done via displacement, normal, textures, etc.The rig itself, if putting into production for blocking animation can not have the hierarchy of the controls change. They can get more children controllers as you would if refining a rig.Send BaseMesh to sculptors for the sculpt and texturing.They can do their magic in zbrush even while your animators block in their animation.They will send back a high res sculpted version of their model. In class we stay under 8 million polygons, normal maps, bump maps, displacement maps. Everything needed to make your basemesh look high res and beautiful. Send base Rig to animators for blocking in animation.For this to work the model file is referenced into the rig file. The rig file is referenced into the animation file. To make things clean in the Maya scene file, make sure to use relative paths and not absolute paths. Here’s a video on that. https://www.youtube.com/watch?v=m2DMmDbpznEAnimators animate away, blocking in the character.
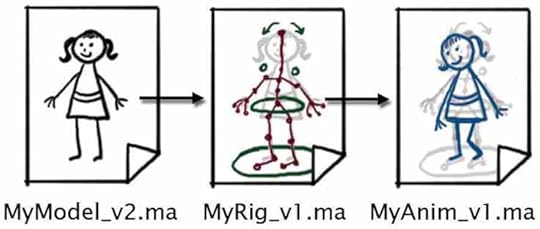 Finalize RigCharacter setup artists finish the rig with the following:Update rig’s reference to the basemesh to any new basemesh that may have come back from the sculptors. Usually the facial details and clothing etc. has been modified. Still should be under 100,000 polygons (for a student film.)Updated texture, displacement, normal, bump, etc. maps.Updated clothing, hair, etc. (I’m not discussing simulations at all – that’s different)Send finalized rig out into the teamAnimation updates rig and continues refining animationAnimators update their file’s rig reference to point to the new version of the rig (which points to the new model) and continue on with their animation.Render Rig updated at finaling stage, after animation is complete.In some pipelines a further refined model may be brought in after animation and applied to the rig, which is updated in the animation file and then rendered. This would be if the model was too heavy for the rig when animating and slowed down the animation process.Note: higher production value animation shows (think Pixar, Blue Sky in the day, Dreamworks) would not have this render rig after the animation is done. The focus there would be the most beautiful silhouette created by the final model/rig when keyframing. They have extra time to develop that rig and make it as responsive as possible. (See the other new chapter in Rig it Right third edition on Rig it Right – then Rig it Fast.)Note: if rendering on a render farm, references files will need to be imported
(Reference Editor window > File > Import References)
before rendering.
 This is a new process for me. Taking the base edgeloop mesh into Zbrush and pushing its base design there vs locking it down in Maya. Quite fun, and still lets me have those edgeloops I want for rigging and the sculpting the other side of my brain wants to do.
Now I will sculpt as normal and try a different workflow of creating the edgeloops at the end of the pipeline after sculpting. There’s some fun in those methods too while this method is the most efficient.
**Rig base controls for blocking in animation & refining rig:
For step by step on the rigging and referencing process, see Rig it Right. https://www.amazon.com/dp/113830316X
July 23, 2023
Rig It Right 3rd edition update: Rigging for a Parallel World
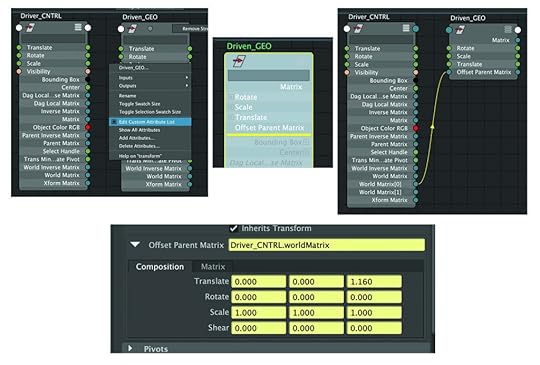
There it is. The most un-sexy but intriguing chapter for Rig it Right is done: Parallel processing in Maya. Rig it right then rig it fast.
I had 6 pages budgeted to explain how to use offset parent matrixes, how to use the profiler to evaluate rigs, evaluation modes, and point the way to further reading/viewing. I took 7 page. I’ll steal a page from somewhere else.
The two new chapters—good edgeloops for better rigs all the way through to how to make sure the rigs ran well in parallel mode—were an exciting addition to Rig it Right. I have many people to thank for allowing me to include their scripts with the book’s companion data; for talking to me about topology, edgeloops, memory management, and how to use the profiler. To serve that best, I’ll put blog posts out next week highlighting each of those wonderful contributors and enabelers.
Everything has been turned into tech edit. Now to double check the images for format and adjust whatever comes back. Should get it to the publisher for line edits a month early. Sweet. The publish date is somewhere in Spring 2024.
Instantly, my brain turns back to novels that have been put on hold for this textbook to get updated. But first, I need to finish a sculpt to complete the applied portion of my edgeloop study. Then – back to the thriller and sci-fi novels that have been waiting patiently in the wings.
But, maybe even first – some kayaking. Bet you thought I was going to say caving—that was yesterday. 
Happy rigging!
…tina
June 24, 2023
Rig it Right 3rd edition update: edgeloop chapter complete
 Look at those knee loops
Completed the new chapter for Rig it Right on edgeloops, a favorite topic of mine. I could write a book on it. But I’ll start with a chapter for Rig it Right.
It’s only a few pages, just enough to prime the reader’s understanding of why topology is so important for the rig and ultimately for the animator.
Take a look at this knee loop, modeled by Mia Pray for the Aang rig found on https://agora.community/content/aang It showcases what good loops can do for a rig.

And look at this cape for another Aang rig by Ashwin Inamdar https://www.iashwin.net/rigs You can feel how the cape edgeloop extends down the arms and under the deltoid like a pec should.
I’m excited for this chapter to be a part of Rig it Right. Also, I look forward to continuing to develop my fall lecture on the topic. More on that later as I finish my deeper dive into that. Meanwhile, it continues to be my happy place. Mmmmmm – Edgeloops https://www.pinterest.com/tinaohailey/mmmm_edgeloops/
But, first – one more chapter for Rig it Right: making your rig efficient with the profiler and evaluation toolkit. It will include offset parent matrixes and other extremely great things that have been added to Maya in the recent years. A dear friend, Jayme Wilkinson, spoke to me during his vacation (what a sport) to get me started down the right path. That is on the todo list for next month.
Until then, happy rigging!
…Tina


