
Gesine Bullock-Prado's Blog, page 26
September 15, 2011
WANTED! Candy Corn! Dead or Alive!
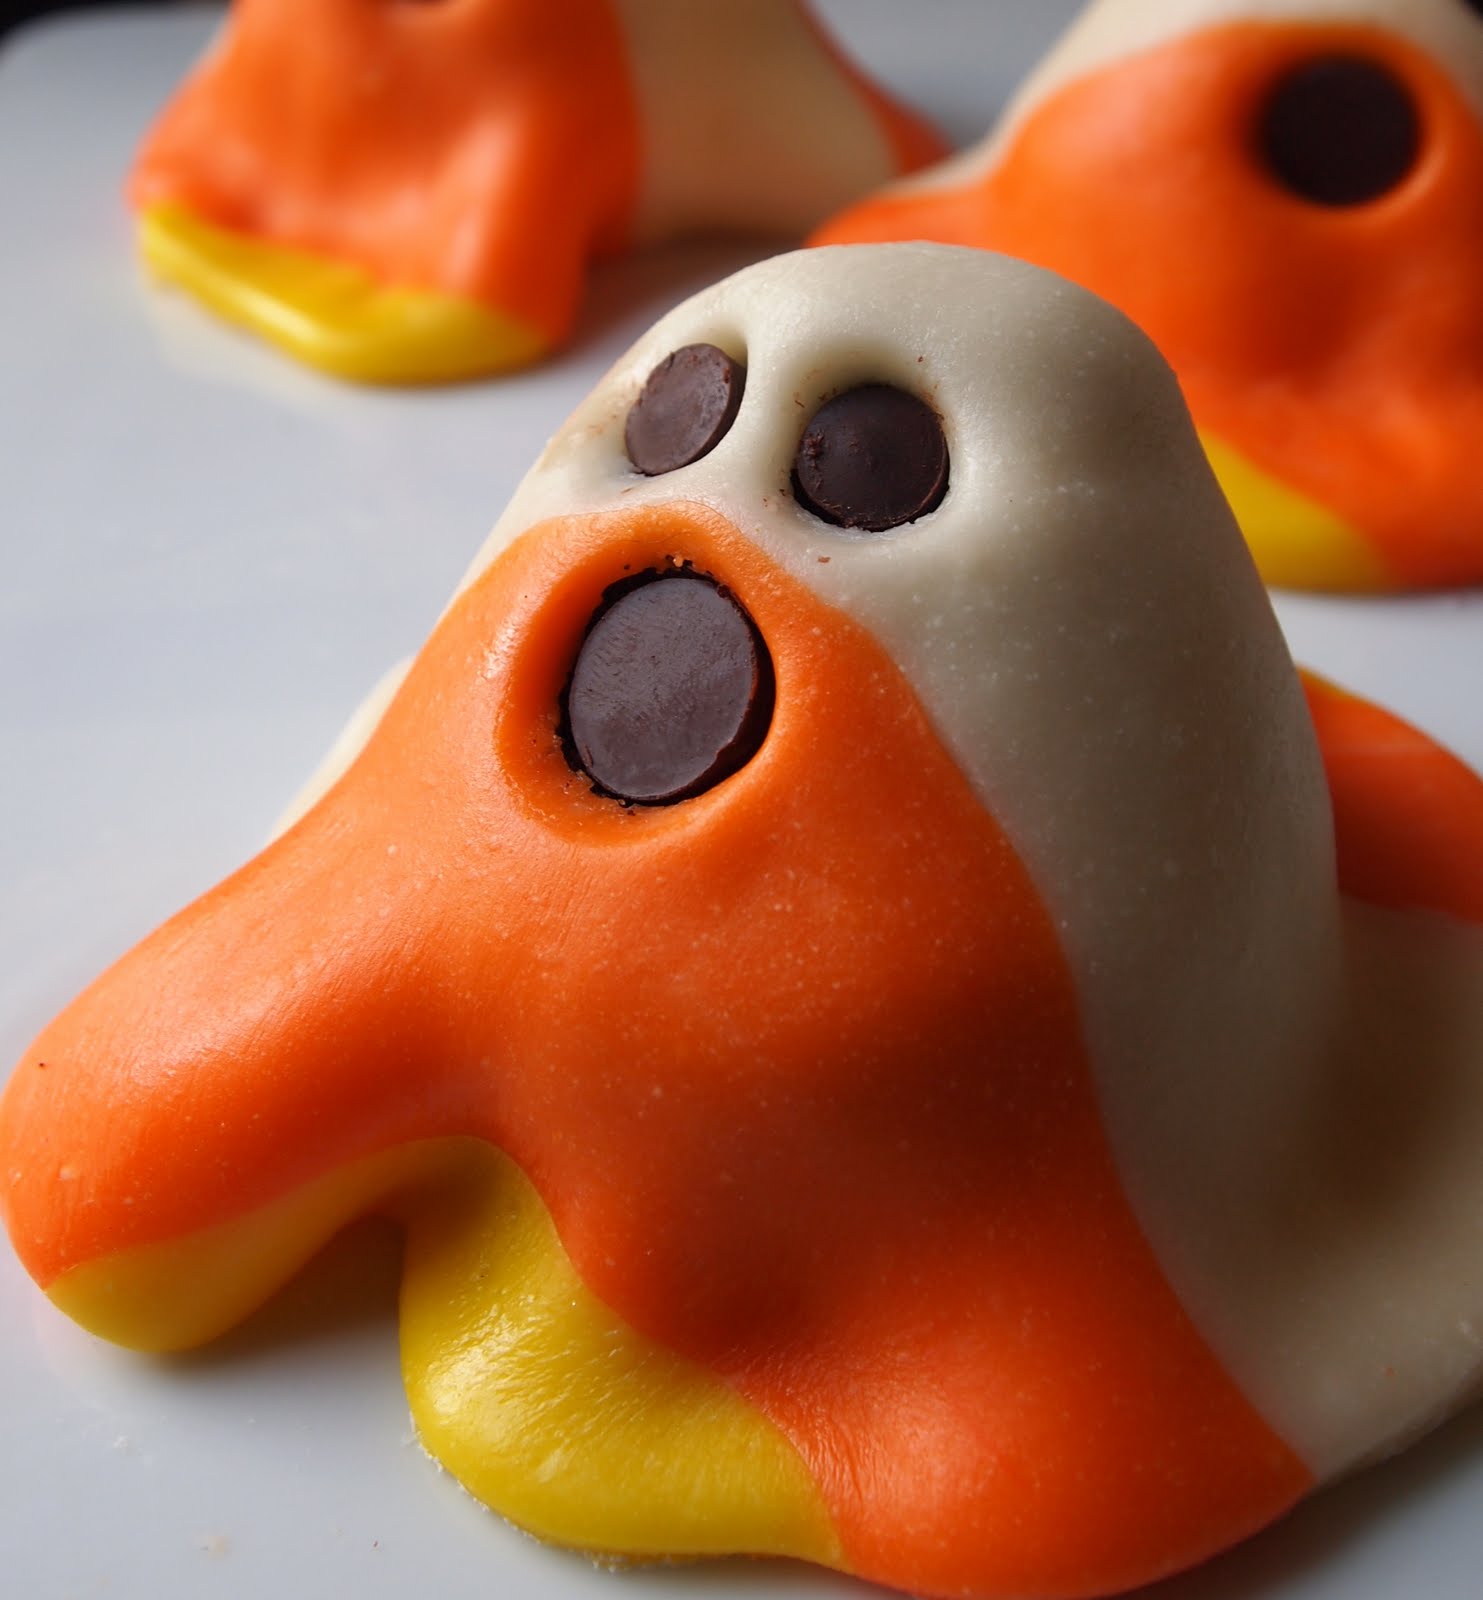
The following is an excerpt from SugarBaby extolling my love of candy corn:
My favorite halloween costume was a death trap: seven feet of chicken wire slathered in papier maché, festooned in flammable white, orange and yellow oil paint, made mobile with four shimmying grocery cart wheels, and equipped with a sticky trap door for candy deposits. I was the envy of every kid at Woodmont Elementary. I was the biggest candy corn on earth.
Sadly, there was no ventilation, it tipped whenever I tried to negotiate a curb, and the built-in mesh window was inches to low for my gangly frame. But I was happy to withstand any discomfort for a giant candy corn, even if it wasn't edible. Luckily, I usually got a few pounds of the real stuff deposited into the bucked attached precariously to the inside of the costume. Today, I bypass trick-or-treating and death-trap costumes and simply make my favorite ghoulish treat at home and in any shape I desire.
I also love chocolate cake and nougat filling.
Put it all together and you better believe you'll be in a sugar coma for a week. But I guarantee you'll be smiling!
Everything in this sweet cake can be found in SugarBaby. The chocolate cake's on page 216.
The innards of my fudgey chocolate cake are filled with vanilla nougat, which you can find on page 120 of SugarBaby.
The ghostly veil is candy corn (page 66).
Here's how I put it all together.

For the cake insides, I take half the fudgey chocolate cake recipe . I make a dozen cupcakes with the batter (they are baked for 15 to 20 minutes).
I then make half the vanilla nougat recipe while the cupcakes cool.
I level the tops of the cupcakes and put the tops aside.
 level all of the cupcakes
I take a melon or teaspoon cookie scoop and scoop the middle of each cup cake out.
 scoop the innards of the cakes. just enough to make a divet for the filling.
I then scoop nougat filling into the cake cavities!

I put one cupcake atop the other. Smush them together gently.

I then take the small slice we leveled off from one of the cakes and trim it to size to fit on top of our little cake tower and then place it on top and gently smush again. The cake is so moist, you'll find that everything adheres just fine.


 and here's what it looks like sliced in half. Yummy.
Make the candy corn recipe per the instructions in SugarBaby. Divide the candy corn into three even pieces while the candy is still quite warm (this differs from the book instructions because we want to work with the stuff while it's still pliable and easily draped into ghostly shapes).
Keep one piece plain and die one piece orange and the other yellow.
Roll the plain piece into a foot long rope.
Divide the orange and yellow pieces and roll them all into foot long ropes. Put the orange pieces on either side of the plain rope and the yellow pieces on either side of the orange ropes.

Make sure there's a fine layer of either corn starch or confectioner's sugar on your table and lightly dust a rolling pin with the same. Roll the ropes together into a 6" wide x 36" long strip. Stamp out 6, 6" rounds.
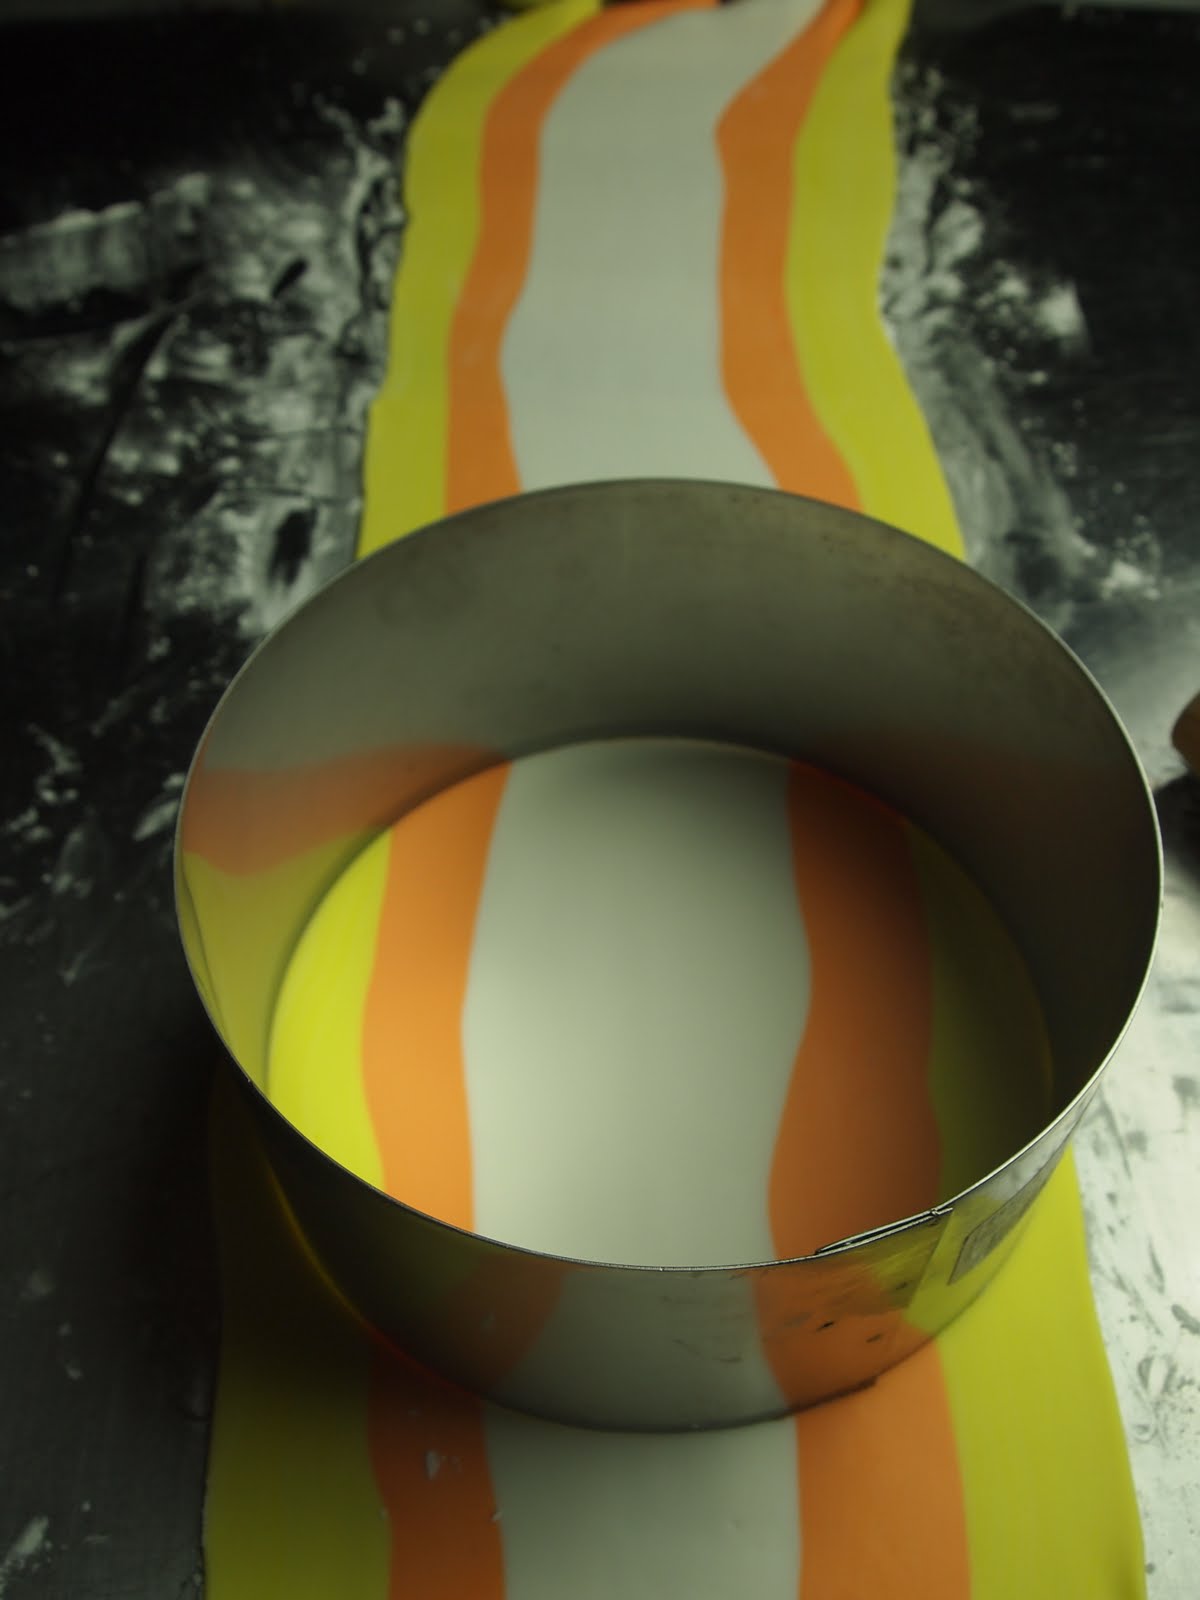
Gently cover each cake with the 6 inch round of candy corn.


Use a medium sized open pastry tip to cut out ghoulish eyes and a large pastry tip for the mouth.

If you like, fill the spooky eye and mouth cavities with melted chocolate or leave them deeply vacant with the promise of the deadly sweetness within.


September 5, 2011
Bakin' and Eggs: Irene, A Few Beautiful Birds and a Tasty Birthday Cake

I'm a lucky woman. Irene came and left, leaving destruction in my beautiful Green Mountain State. My sweet house on the hill still stands, unharmed. The same cannot be said for thousands of other Vermonters.

One of our neighbors, Suzy, has lost her house and her farm. The river rose and swept away her life. Where she once had thousands of chickens, she now has a few hundred. Her home is now uninhabitable. She has no power and no water. So how can she care for any remaining animals?

And from this great sadness it seems I've received a boon. If only temporary. One of Suzy's great joys is keeping Indian Runner Ducks and a gaggle of geese. The Indian Runners, well you simply have to watch them run and you'll understand why.
 The Indian Runners
As for the geese, well Suzy hadn't intended to keep any. Not until a lone Canadian goose decided to break off from her mates and hang out with Suzy's comic ducks. That was over a year ago. And now, Goosey the (Canadian) Goose has 5 friends with whom she frolics, thanks to Suzy who is such a wonderful water fowl mother that she couldn't leave Goosey to spend her days on the farm without some goose company.
 Goosey the (Canadian) Goose
I'm fostering Suzy's ducks and geese until she can patch her family's life together again. I'm going to have a hard time watching them go when the time comes; I'm already horribly attached. But I hope that it's soon; that a life so altered by a single storm is quickly restored. But I see water fowl in permanent residence on the homestead in the near future once they have to leave us. (You can get a little more background and meet the sweet flockers in motion here).
In the meantime, I collect the duck eggs (geese aren't laying right now) and I'm baking some beautiful pastries from the flock's collective labor, including but not limited to my Raymond's birthday cake.
My Raymond's Ducky Birthday Cake.

Yes, you can bake with duck eggs. They only taste marginally different from hen eggs but you can't discern the slight variance in most baked products. When fried, the consensus is that duck eggs cook up more firmly than hen eggs and have a slightly oily consistency. But this can be used to your advantage in baking if it doesn't appeal to you in a straight fried egg.
The adjustments you have to account for are that duck eggs contain more protein and usually have a higher volume than hen eggs.
The obvious difference is in size. For baking purposes, a standard hen egg weighs 1.6 ounces (the white 1 ounce and yolk .6 ounces). If you'd like to replace hen eggs with duck eggs, multiply the number of eggs called for in the recipe by 1.6 to get your weight measure. Weigh out the duck eggs (crack the eggs, don't weigh the shell) until you hit the approximate hen egg weight (a little over isn't going to kill you).
The other change you'll make when working with duck eggs is you'll have a hard time cracking the egg on a flat surface (as I'm sure you know, the standard practice for health and safety reasons is to crack a hen egg on a flat surface to minimize the risk of salmonella contamination. If you crack the egg on the side of the bowl, you force shell up into the egg and it's the shell that contains the ugly stuff). However, duck egg shells are rather tough and rubbery, so you'll likely have to use the corner of a bowl to finagle the good stuff out.
And one more thing to keep in mind is the higher protein levels in duck eggs. If a recipe calls for all purpose flour, I will only use half the amount of all purpose called for and replace the other half with cake flour (all purpose contains more gluten than cake flour and by halving the amount of all purpose, you help level out the protein ratios in the recipe).
This is a delicious recipe for using any duck eggs you happen to come across.

INGREDIENTS
(makes {3} 8" cake layers)
2 cups sugar
2 sticks unsalted, butter (preferably European which contains a high butterfat content and less moisture than standard butter)
4 duck eggs (weighing approximate 9 ounces)
1 1/2 cups all purpose flour
1 1/2 cups cake flour
1 cup buttermilk (non-fat or low fat)
1/2 cup freshly squeezed lemon juice (4 - 6 lemons depending on how juicy they are)
1 tablespoon baking powder
1 teaspoon salt
zest of 1 lemon
1 teaspoon lemon extract
PROCEDURE
•Preheat oven to 325º
•In a mixing bowl, whisk together the flour, baking powder and salt. Set aside.
•Stir together the buttermilk and lemon juice. Set aside.
•Spray 8" cake pans with non stick cooking spray. Line the bottoms with a round of parchment and spray the parchment with non stick spray.
•Cream together the butter and sugar until light and fluffy, about 5 minutes on high with the whisk attachment.
•Add duck eggs, one at a time, beating about a minute between each addition and scraping down the sides and bottom of the bowl to integrate all of the butter and sugar.
•Add the zest and lemon extract. Whisk on high until combined.
•With the mixer on low, add 1/3 of the flour mixture and then 1/2 of the buttermilk/lemon juice mixture. Mix until just combined. Add another 1/3 of the flour and then the remaining buttermilk/lemon juice mixture. Mix until just combined. Add the remaining amount of flour and mix on slow until the flour is completely integrated.
•Divide the batter evenly among the three cake pans and bake for 1/2 hour or until the cake just springs back when you poke it.
I filled Ray's birthday cake with lemon curd, local blueberries and lightly sweetened whipped cream and iced with lemon laced buttercream. You can do the same or fill with anything that strikes your fancy. Either way, you'll love how moist and supple this lovely cake is.
P.S. Thank you Toby for the title!

August 30, 2011
ILOVermont

I had to run the back roads to get to Quechee Village and this is what I saw...our sweet bridge has definitely seen better days. But what I didn't capture was the village coming together to clean the mess up!
Hurricane Irene. Damn you. Damn you for flooding our state, ripping apart our historic covered bridges, creating untold homelessness and decimating our local businesses. Not cool, lady.
Within HOURS of Irene's exit, the ferociously bad assed Green Mountain locals were cleaning and repairing the damage. While our state digs itself out from under inches of silt and water, there are many more who have nothing to save, their houses and lives have been swept away entirely. For them, there are organizations like The Vermont Food Bank and Vermont Red Cross who provide food and shelter for those most in need. You can text FOODNOW to 52000 and Vermont Food Bank will turn your $10 donation to $60 in food for those in need.
Thank you for all your lovely prayers and good wishes. We can feel the love!

July 29, 2011
a tart to savor

Some words won't be translated. German words find themselves particularly difficult to render into English with all their subtlety and depth. My little German cousin, brilliant little five-year-old toehead that she was, once used a word that spoke volumes of a single pastry. She sat on a picnic blanket on the edge of a small Alpine lake, her spindly legs tucked neatly beneath her, a tart cradled reverently in her delicate hands and she made a pronouncement: "Ich würde sie natürlich richtig genießen." The rough translation is "Of course I will enjoy this properly."
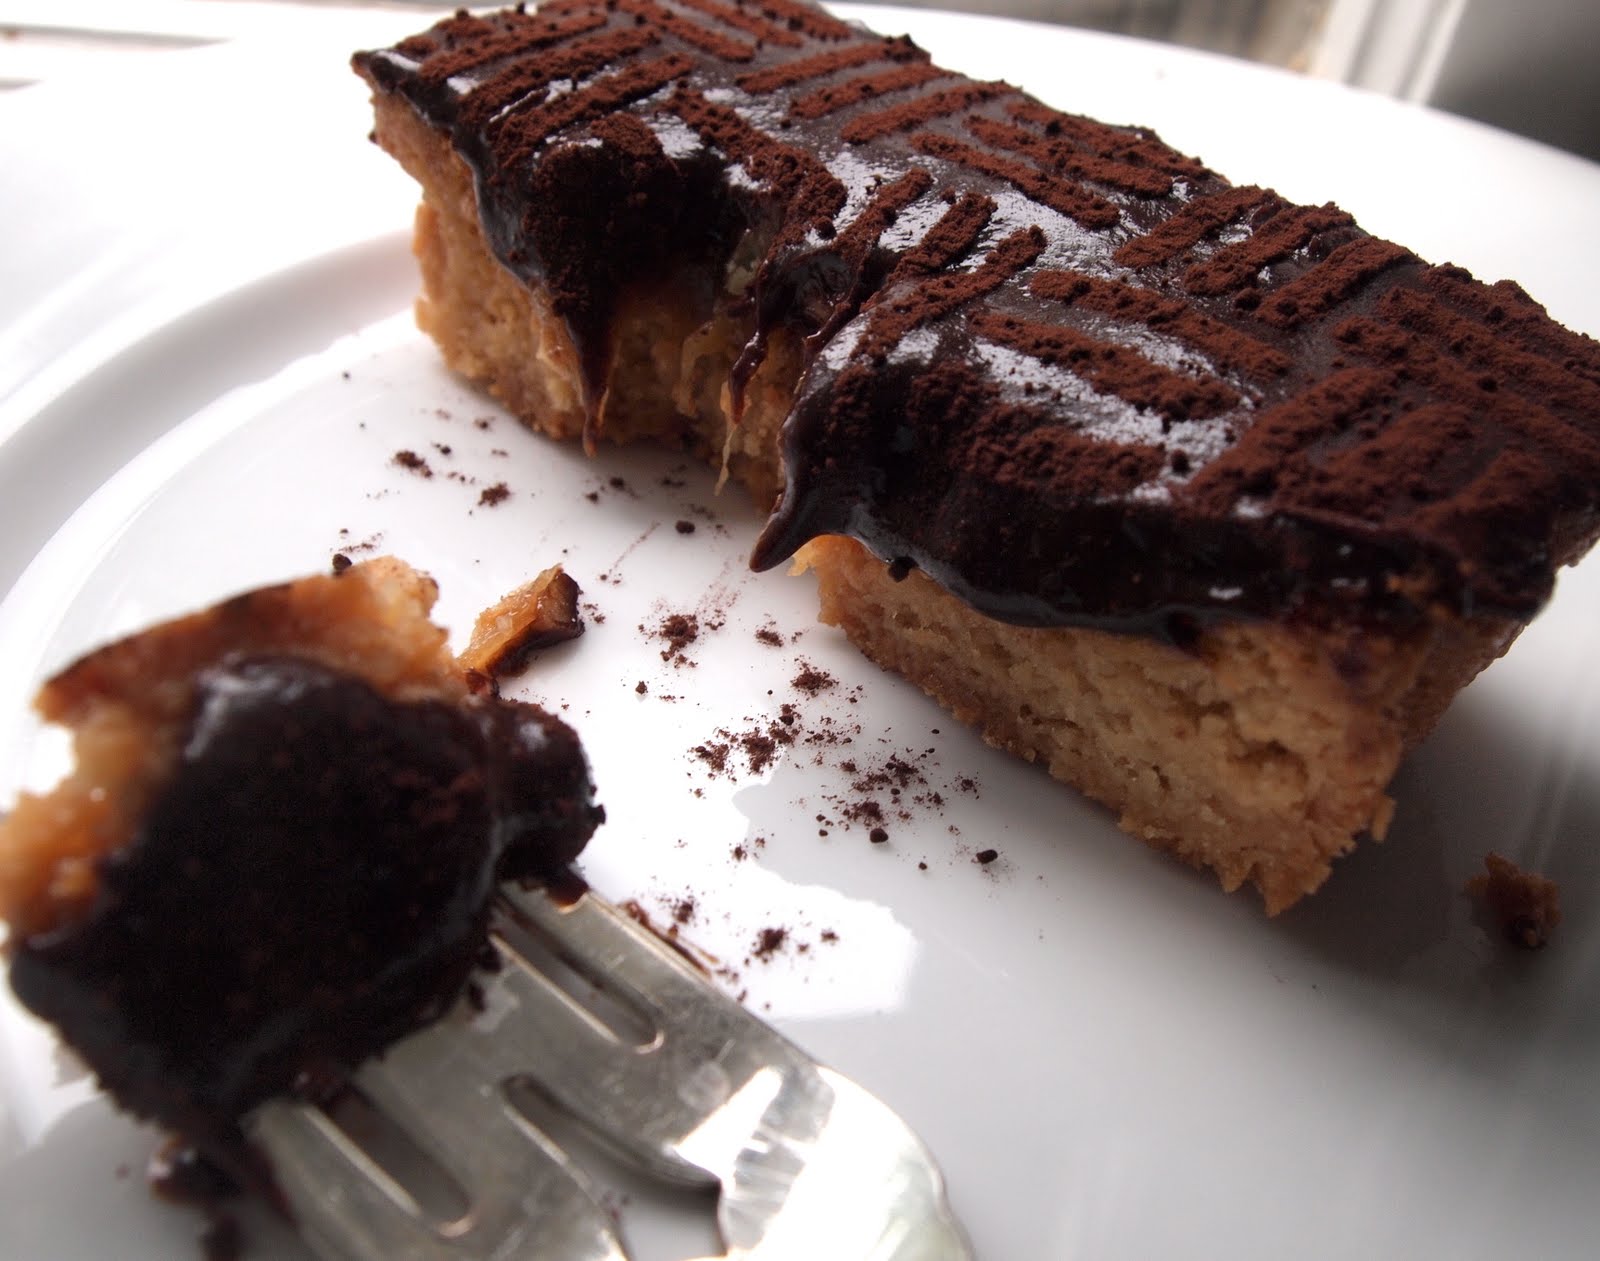
It's that one word, genießen, that I silently repeat to myself when confronted with a singularly glorious treat; a reminder of that sweet girl so long ago who knew at such a tender age what it meant to be in the presence of a beautifully made confection. "Enjoy" doesn't cut it. "Savor" is perhaps closer." "Revere" is probably on the mark but may seem a bit overwrought in reference to consuming a luscious trifle. Either way, it's meaning is plain when you're tucking into something worthy of such consideration. And that's just what I did today. I grabbed my sharpest knife and ran it under scalding water. I dried it quickly and sliced into my lovely tart with conviction And just before my fork made a mess of it, I said to my petite treat: "Ich würde sie natürlich richtig genießen."
Coconut, Caramel, Bittersweet Tart
PROCEDURE
This tart is made up of elements we've already visited here on this blog, simply reconsidered.
For instance, the crust is my coconut macaroon batter gently wrangled and pressed into a rectangular tart form. The only change is I halve the recipe and I make sure to generously spray the tart form with non-stick cooking spray. Bake the crust at 350º for 15 minutes. Remove from the oven and cover the top of the shell with a piece of parchment and fill with pie weights, pressing down gently. Bake for 20 minutes more or until the shell is deep golden brown. While the shell is still warm, remove it from the tart form and bake for 10 minutes more (this is important, to remove the tart while warm because it really starts to stick to the metal form as it cools). Set aside and allow to cool completely.
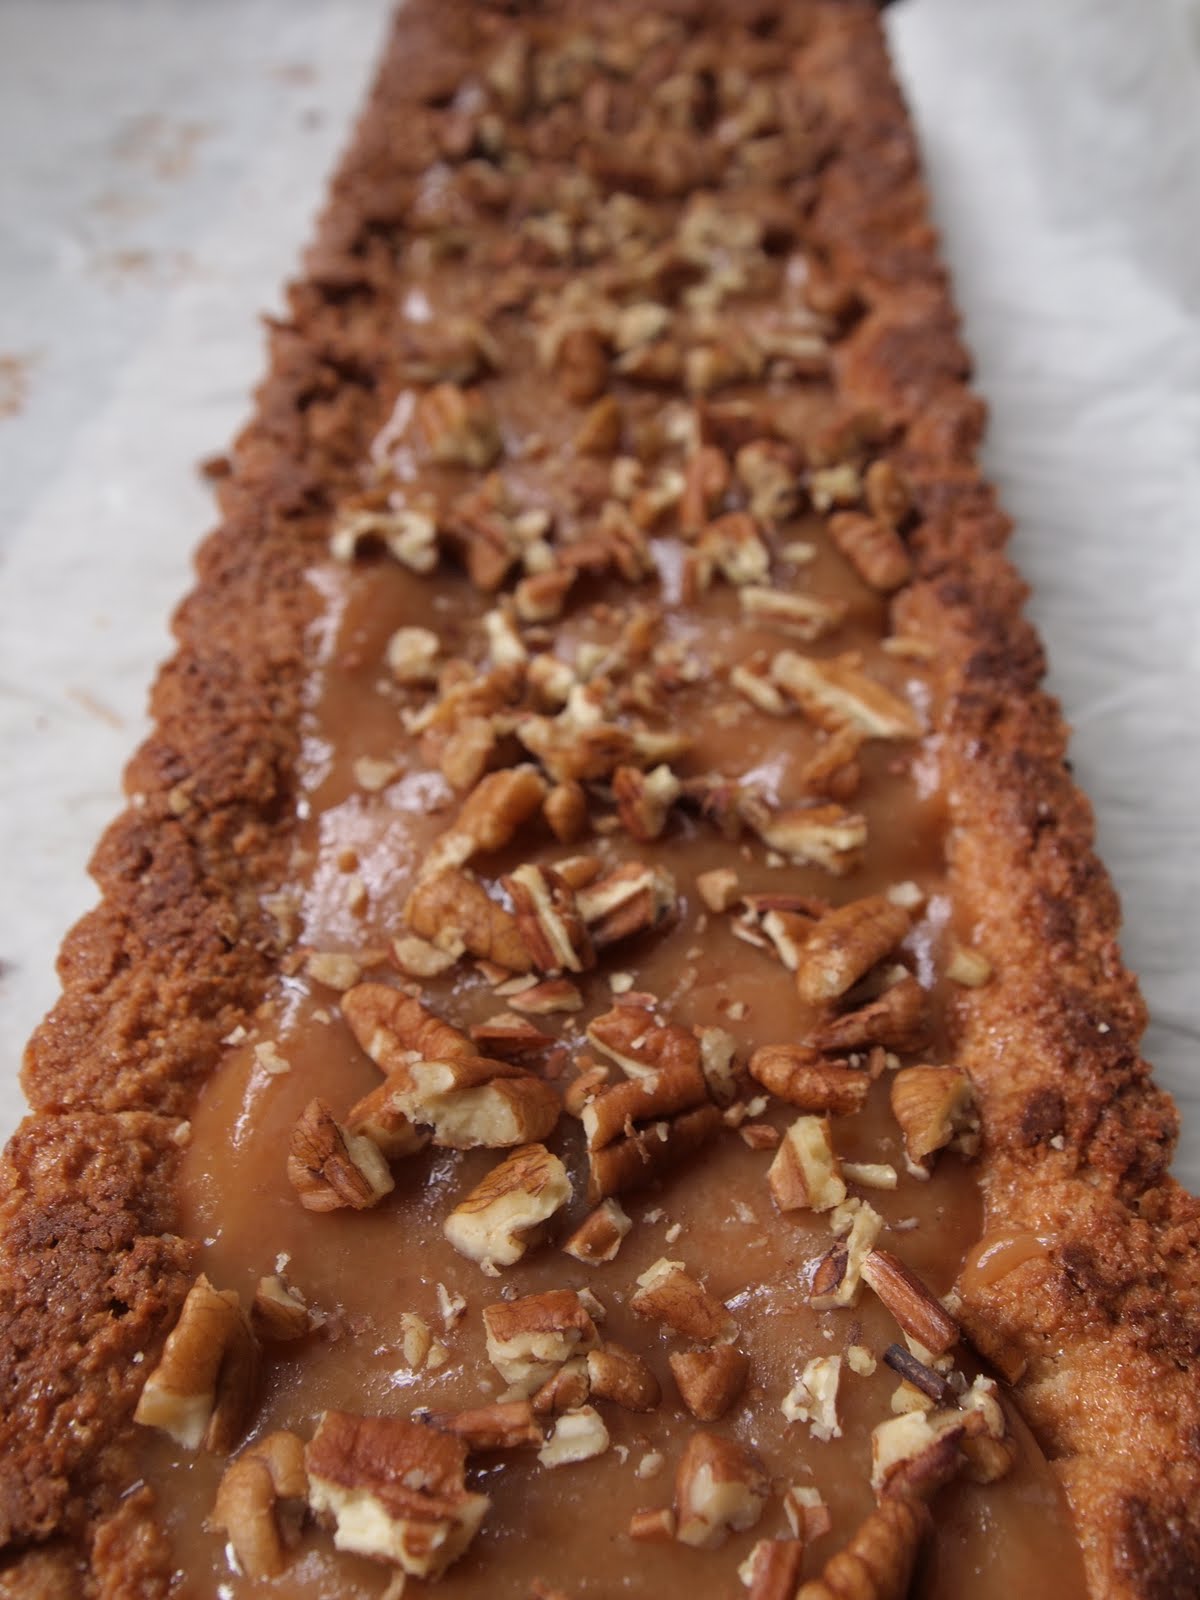
The filling is caramel studded with toasted pecans. I use the caramel sauce version from the blog post but I also take more care with the details. I use 1 cup of sugar, 2 drops of lemon juice, 1/2 teaspoon of salt and 1/3 cup of water and melt the sugar over low heat. I raise the heat to high once the sugar has melted and allow the caramel to become a medium amber and I make sure to cook the caramel to 245º and then add 2 tablespoons of butter and 1/4 cup of cream. Allow the caramel to cool slightly.
Pour the caramel into the prepared coconut shell and sprinkle with 1/2 cup of toasted pecans that have been roughly chopped.

Coat the top with an even layer of ganache. I halve this recipe and pour over the top of the tart when the ganache is still very viscous and warm. Allow the ganache to set completely and then dust the top with cocoa powder.


July 1, 2011
It's Been Zany!
I've been glaringly absent these past few weeks.
I swear I have a good excuse.
Or two.
Or three.
Maybe four, if I get to really thinking.
 what on earth am I doing? you'll find out in Pie It Forward!
I've been finishing up my second cookbook, Pie It Forward. The writing, testing/re-testing, photo shoot and finish editing have been wonderful and time consuming. I can't complain. The brilliant Tina Rupp photographed the book, she did SugarBaby. I don't have to tell you that those pictures were beautiful.
 happy girl on a pie crawl.
By way of research for savory pie recipes in Pie It Forward, I just HAD to go to England to double check that I was getting it right. Who needs a pub crawl when a pie crawl is where it's at, baby!
 Treats for the Today Show: rocket pops, brittle, popcorn balls, taffy, rock candy and fudge...oh my!
I've also been doing SugarBaby press in the midst of the Pie It Forward hijinks. Here's a link to my 2nd Today Show Appearance. Find the recipes in SugarBaby or the Today Show site!
http://today.msnbc.msn.com/id/43559123/ns/today-food/t/boardwalk-treats-spicy-brittle-pudding-pops/
 I'm in love.
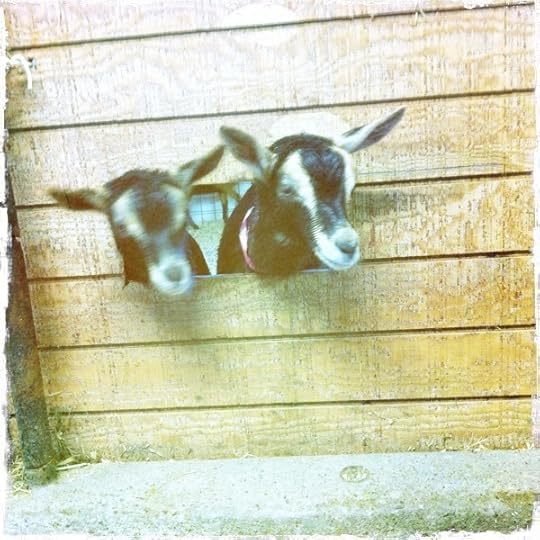
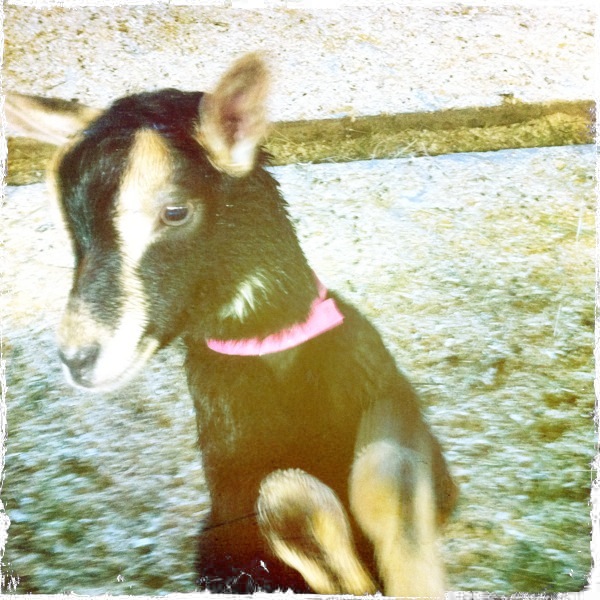
I also shot a lovely thing for a possible future endeavor. What I can say about it is that I got to visit the goats at Consider Bardwell Farm. I'm in love, with the goats AND their cheese. A few lady goats are in our family's future. I've been brushing up on my home cheese making skills in anticipation.
New and exciting recipes and posts coming soon, I promise! In the meantime, Happy Fourth!
 Fourth of July greetings from Freegrace! This will be her 217th Independence Day celebration!!!
I swear I have a good excuse.
Or two.
Or three.
Maybe four, if I get to really thinking.
 what on earth am I doing? you'll find out in Pie It Forward!
I've been finishing up my second cookbook, Pie It Forward. The writing, testing/re-testing, photo shoot and finish editing have been wonderful and time consuming. I can't complain. The brilliant Tina Rupp photographed the book, she did SugarBaby. I don't have to tell you that those pictures were beautiful.
 happy girl on a pie crawl.
By way of research for savory pie recipes in Pie It Forward, I just HAD to go to England to double check that I was getting it right. Who needs a pub crawl when a pie crawl is where it's at, baby!
 Treats for the Today Show: rocket pops, brittle, popcorn balls, taffy, rock candy and fudge...oh my!
 I've also been doing SugarBaby press in the midst of the Pie It Forward hijinks. Here's a link to my 2nd Today Show Appearance. Find the recipes in SugarBaby or the Today Show site!
http://today.msnbc.msn.com/id/43559123/ns/today-food/t/boardwalk-treats-spicy-brittle-pudding-pops/
 I'm in love.
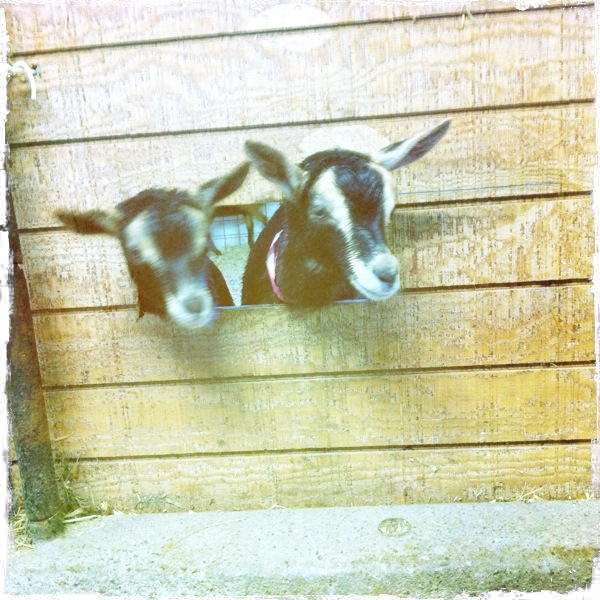
I also shot a lovely thing for a possible future endeavor. What I can say about it is that I got to visit the goats at Consider Bardwell Farm. I'm in love, with the goats AND their cheese. A few lady goats are in our family's future. I've been brushing up on my home cheese making skills in anticipation.
New and exciting recipes and posts coming soon, I promise! In the meantime, Happy Fourth!
 Fourth of July greetings from Freegrace! This will be her 217th Independence Day celebration!!!
June 11, 2011
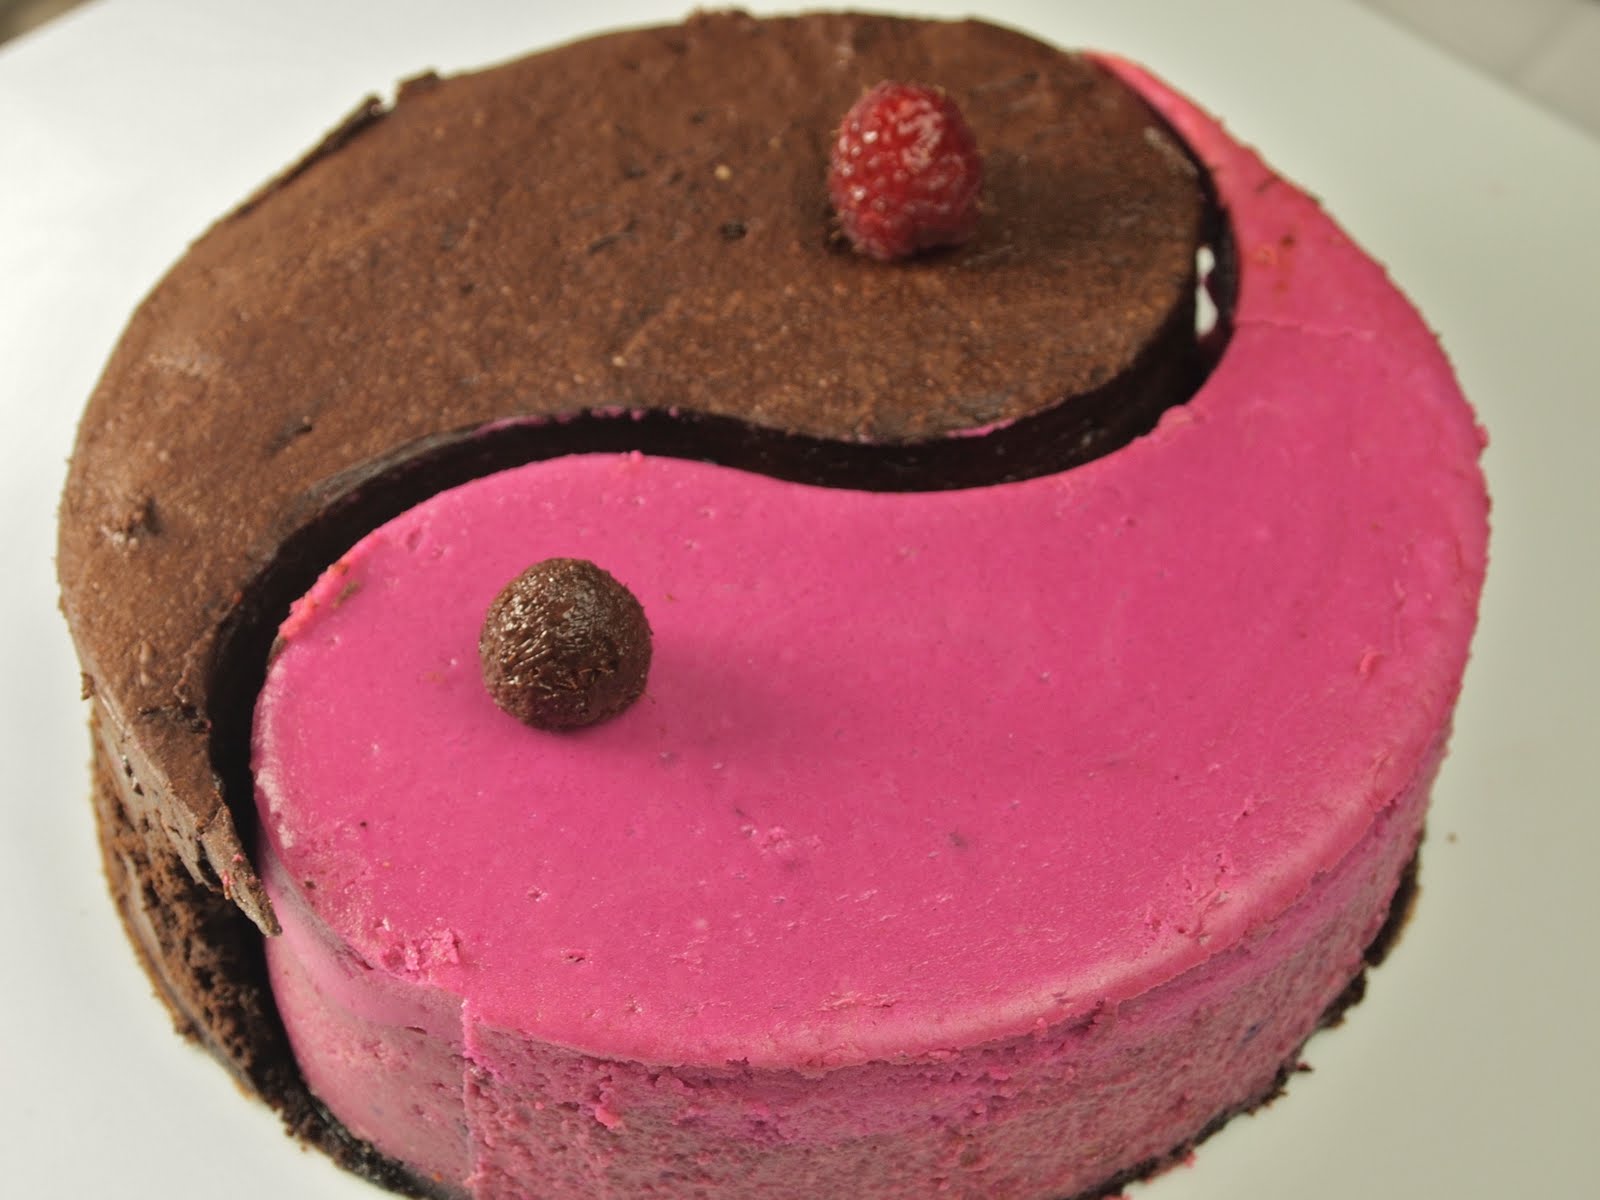
A Yin Yang Cheesecake for the Modern Dad
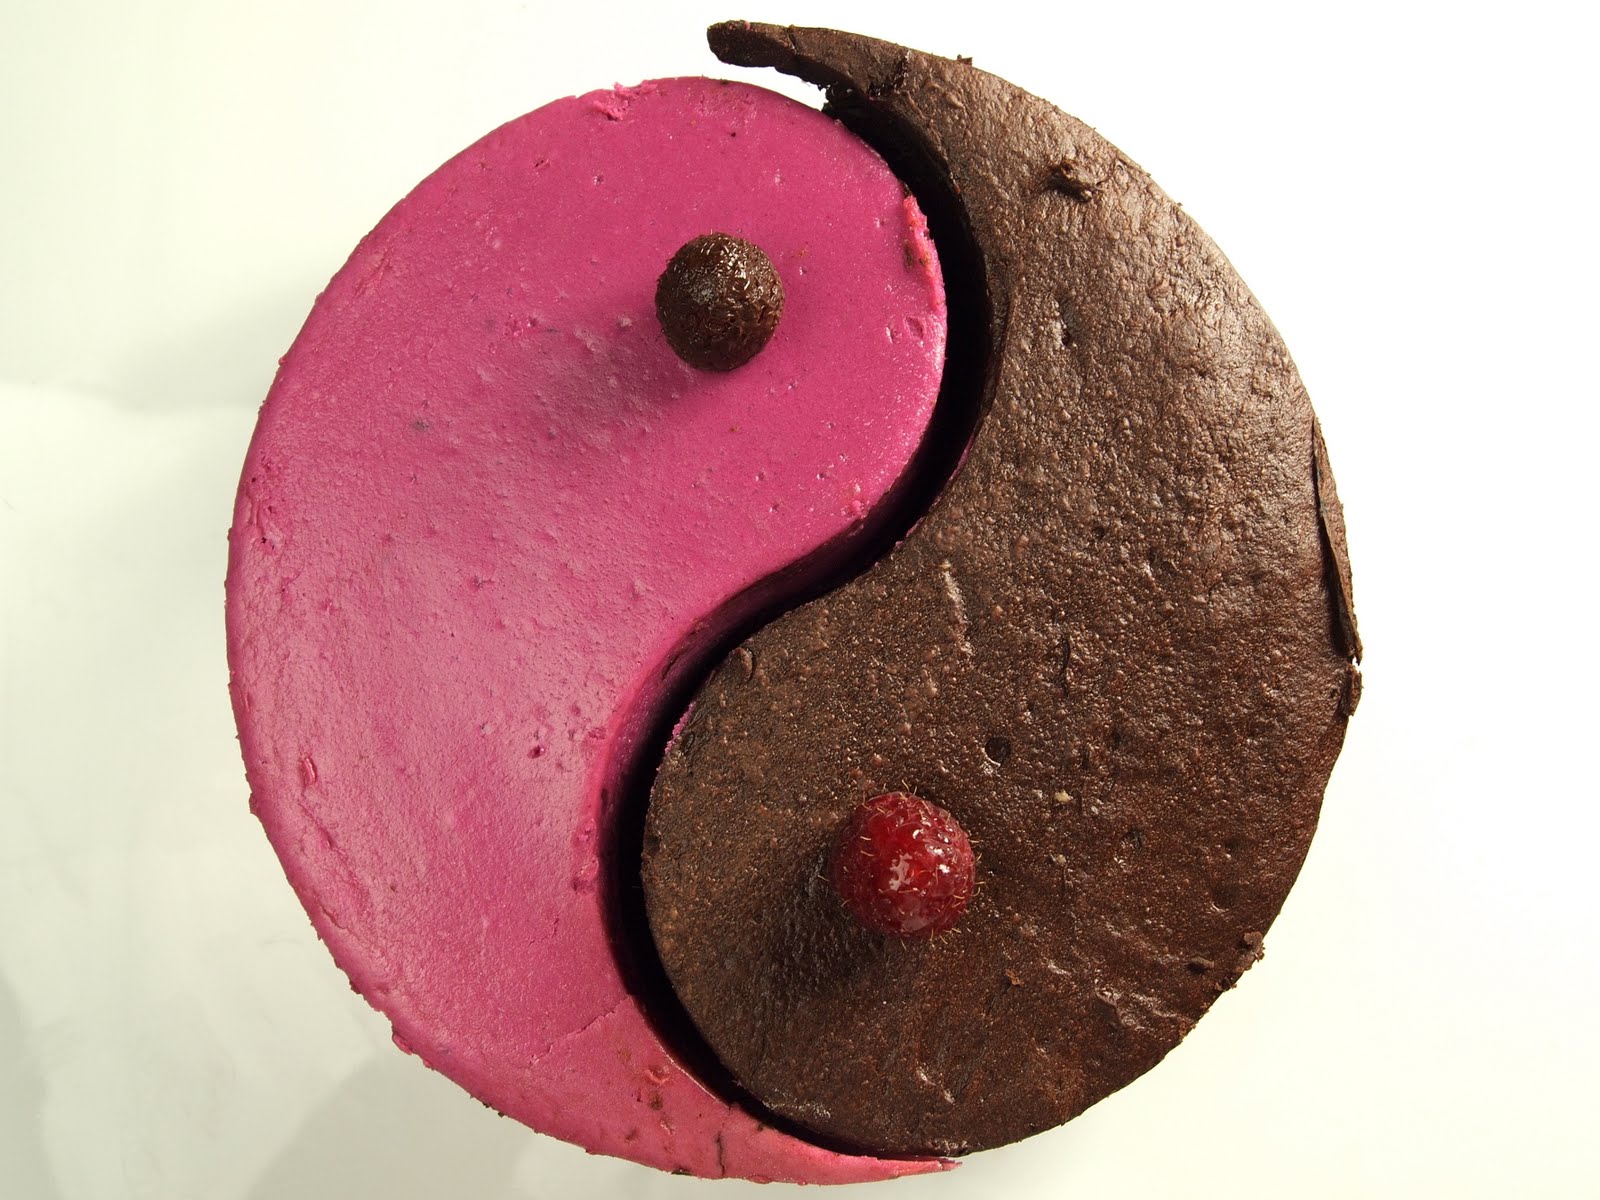
Modern dads must be all things to all people. On the one hand, they must be MEN who are resoundingly masculine and capable of of wielding power tools with confidence and safety. On the other, they're required to be sensitive and emotive. They must be all things to all people. They must seamlessly balance their yin with their yang.

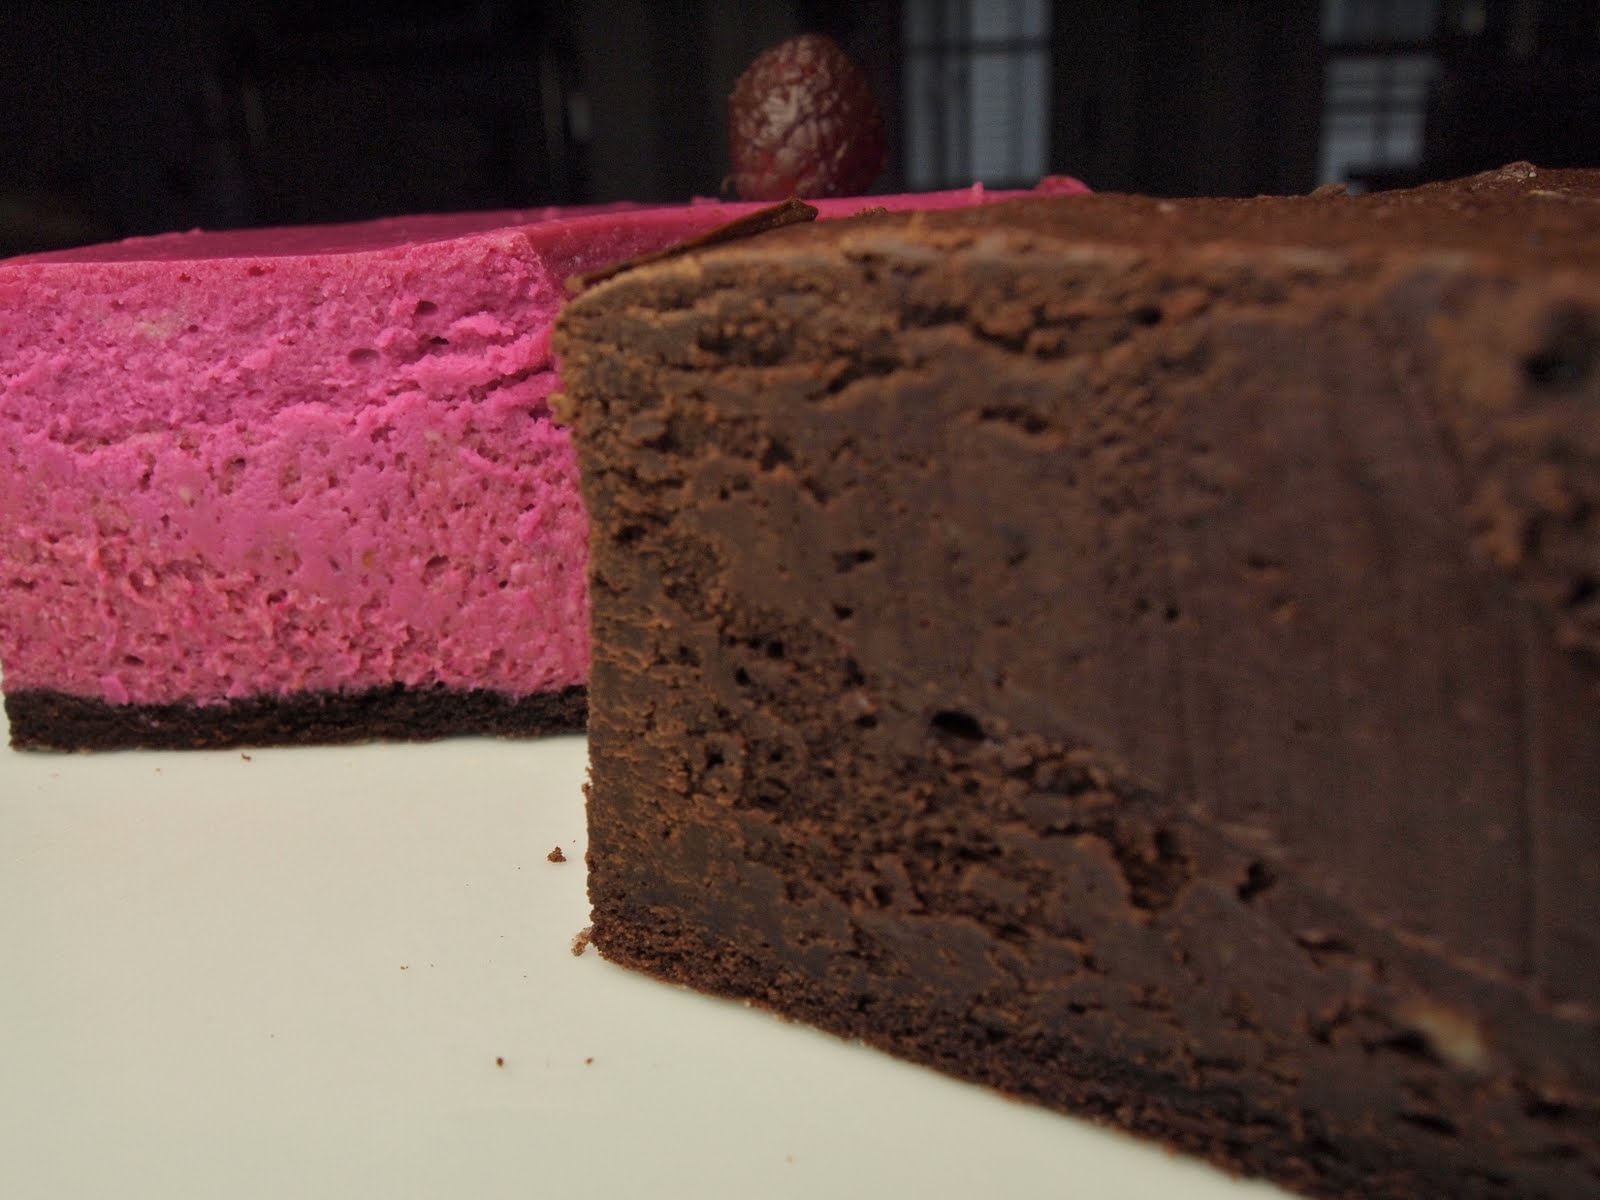
In honor of those wonderful papas on father's day, I give you the yin/yang cheesecake: a creamy delight of the darkest "brute" chocolate cheesecake that's dense and fudgy matched with the fruitiest of berry cheesecakes that's delicate and fluffy.
Happy father's day.
Yin Yang Cheesecake
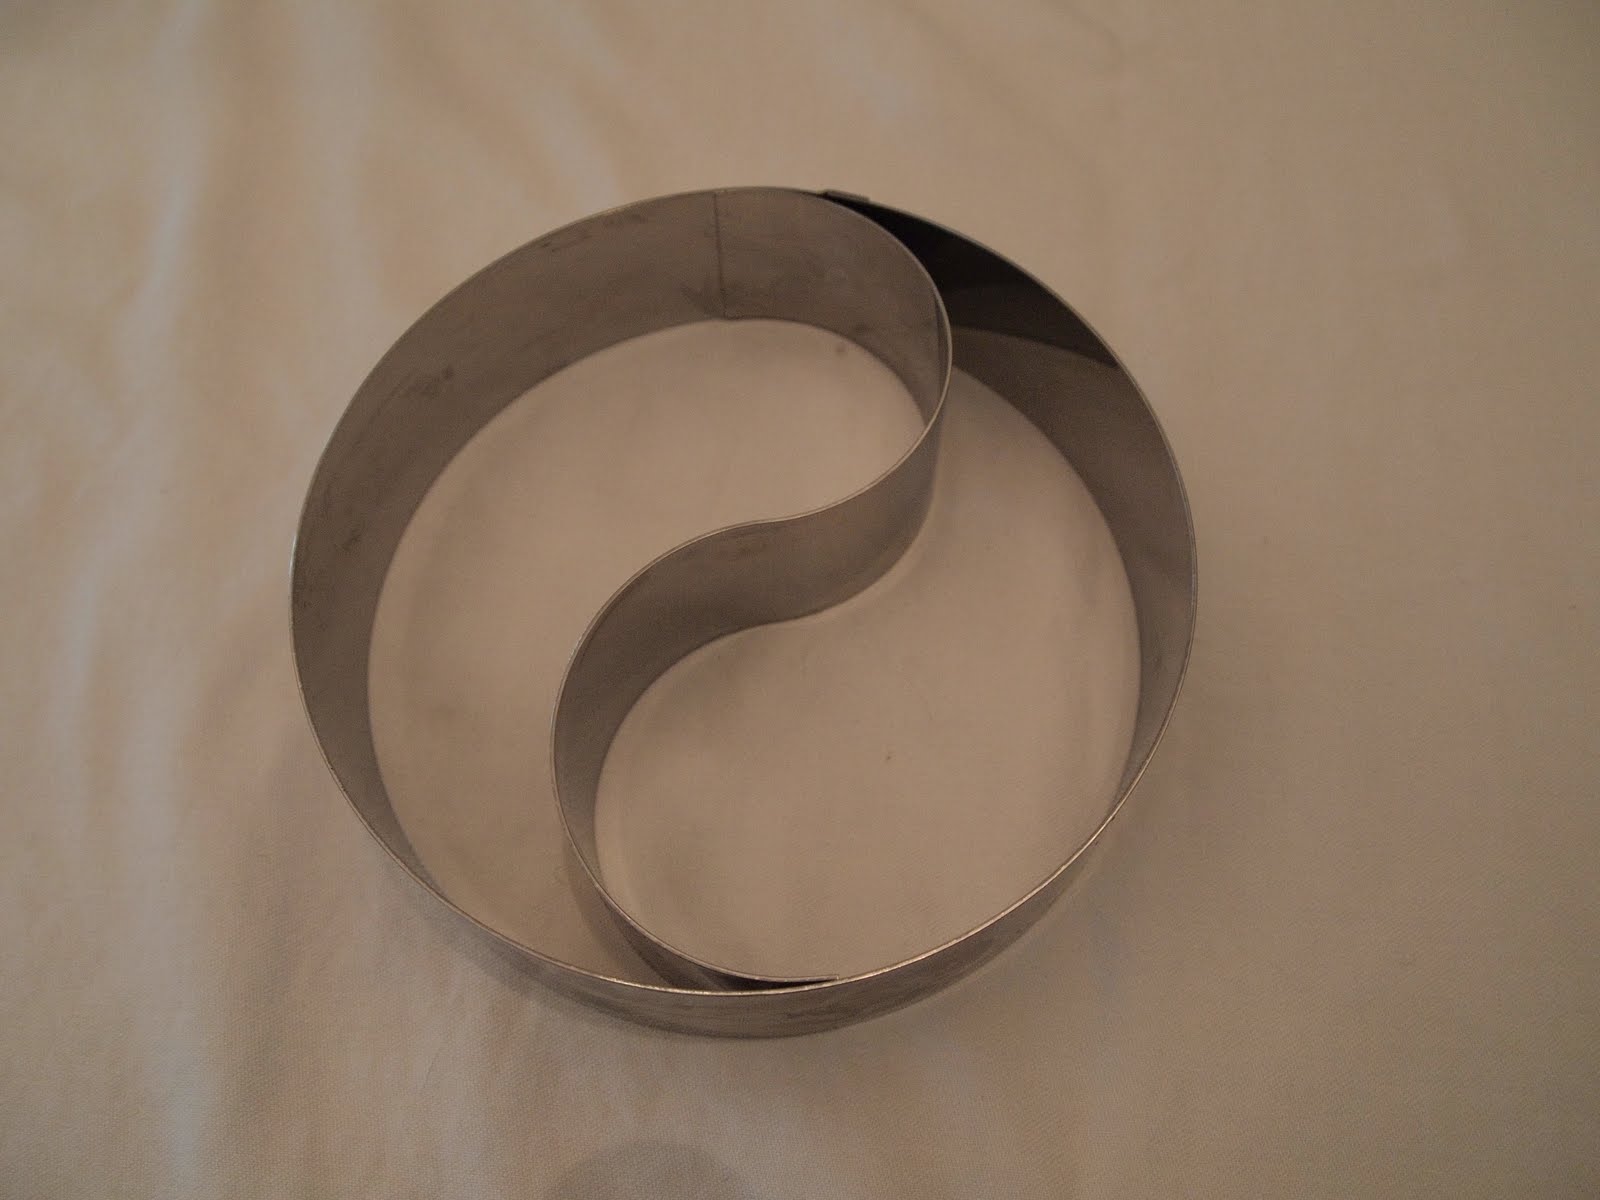
This cake requires a yin yang cake mold, available online from quite a few bakery resources. Just put in your order now....father's day is fast approaching.
INGREDIENTS
For the base:
2 cups chocolate cookie wafers
1/4 cup melted butter
Procedure for the base:
-Preheat oven to 325º.
-Grind the wafers in a food processor. Slowly add the butter, adding just enough so that the crust comes together when you pinch some between your fingers. You may not need all the butter, so check after you've added a few tablespoons.
-The "S" mid section that actually creates the separate yin and yangs is removable. Remove it for this part of the process. Place the cake ring that remains on a parchment lined sheetpan. Spray the sides and the parchment bottom with nonstick cooking spray.
-Pat the crust crumb so that it creates an even layer on the bottom of the cake pan.
-Bake the crust for 5 minutes.
For the filling:
(3) 8 ounce packages of cream cheese, room temperature
3/4 cup sugar
3 eggs
2 tablespoons flour
1/2 teaspoon salt
1 cup raspberry puree
8 ounces semi sweet chocolate, finely chopped and melted
1/4 cup dark cocoa powder (I use Callebaut extra brute)
Procedure for the filling:
-In a mixer fit with the paddle attachment, cream together the cream cheese and the sugar until smooth.
-Add eggs one at a time, scraping the bowl between each addition.
-Fold in the flour and the salt.
-Divide the batter into two bowls, put slightly more into one than the other, about 1/4 to 1/2 cup more.
-Stir the raspberry puree into the bowl with MORE batter and the chocolate and cocoa powder into the other.
-Reinsert the "S" separator back into the cake ring, pressing very gently so that the "S" touches the crust but doesn't slice all the way through it but do make sure that it has a firm grip on the crust to create an impenetrable barrier. Spray both sides of the "S" with nonstick cooking spray.
-Carefully pour the batters into the two separate sides, pouring the chocolate first. You'll notice that the chocolate batter will be noticeably THICKER than the raspberry. The chocolate seizes and stiffens the batter. This is normal. Make sure to keep the batter confined in its compartment. You'll need to coax the batter into the pointy part of the yin/yang mold. I use a wooden skewer to guide the batter into that hard to reach area. Use a small offset spatula to smooth the top. You may have extra batter. If you do, don't try to pile the batter higher than the sides of the mold. Just bake in a little ramekin for a snack.
-Fill the raspberry side.
-Place the cheesecake in the 325º oven. Close the doors and immediately turn the heat down to 225º.
-Bake for an hour or until the cheesecake is just set. What you'll notice is that when you give the sheetpan a nudge, the raspberry cheesecake will give a barely perceptible wiggle (the chocolate is so thick that it won't budge). Turn off the heat, open the oven door just slightly and allow the cheesecake to cool slowly.
-When the cheesecake is completely cool, CAREFULLY remove the mold by using a VERY thin knife ( I use a boning knife) along the edges of the mold, including the "S", to release the cheesecake from the mold. Sometimes the tips of the yin and yang fall off. Save them and reattach with a little melted chocolate.
-For the "dots" use one naked raspberry and paint the other with a very thin layer of melted chocolate or ganache.

May 20, 2011
Trend Schmend

My husband, working for a few weeks in L.A., mentioned an alarming trend in men's fashion. Every man within the 20 mile radius of Sunset and Vine was channeling the cowboy in the Village People.
Our young (and not so young) trendsters start with a slim fitting, Western inspired plaid shirt, often but not always bedazzled with pearlescent buttons, the breast pockets stitched with Merle Haggard flair . The look requires snug dungarees and a neutral pair of boots, neither full Frye, sh*t kicking nor jazz flat, something vaguely straddling that sphere and slightly scuffed. Of course the hair matters, it's closely shorn but artfully messy and the facial landscaping requires a mist of neer do well scruff. On occasion, A Clockwork Orange is consulted for sartorial inspiration and our ensemble is accessorized with a jaunty pair of black suspenders.
On a quick trip to New York this past week, I noticed the trend had spread to the east coast, infecting bouncing baby hipsters from Williamsburg to Noho. It's not an unattractive look but to see Howdy Couture gracing the boney shoulders of East Coast emo soldiers and West Coast actors/baristas is creepy.
The same can be said for food culture, once a trend hits, it hits hard and wends it's way onto pastry cases and dessert menus nation wide. Cupcakes, macaron, black pepper with vanilla, Thai basil with fruit and bacon with chocolate. Mini this, pop that.
But hell, in the case of fashion, if your skinny male posterior can carry off the hipster cowboy look, god speed. It's certainly more attractive than anything of the 70s gems you'll find here.
And so what if a food fad is ubiquitous and over done. Does it really matter if the result is tasty? Of course not. Especially chocolate and bacon, it's a combination that will probably survive being a trend and simply become a time honored flavor pairing.
So don your bedazzled Western blouse and break out the bacon and chocolate, we're embracing our inner Village Person today.

Brownies with a Dose of Trendy BaconFor the Brownies:
INGREDIENTS
1 stick or 8 tablespoons unsalted butter8 ounces bittersweet or semi-sweet chocolate, chopped ( I use Callebaut 60/40)1/2 cup unsweetened cocoa powder (I use Callebaut Extra Brute)1 cup all-purpose flour1/2 scant teaspoon baking powder (when you measure, level off the teaspoon aggressively so that instead of the baking powder being leveled evenly, you create a slight divet in the mixture to give you just a little less than 1/2 teaspoon)1 teaspoon sea salt1 cup sugar3 large eggs1 teaspoon vanilla bean paste2 tablespoons espresso1 tablespoon flake sea salt (optional), for sprinkling
For the caramel:
http://confectionsofamasterbaker.blogspot.com/2008/07/sweet-and-sticky-caramel-recipe.html (made with the heavy cream)
To finish:
bacon, fried until crispyvanilla ice creamnuts!
PROCEDURE:
-Preheat oven to 325º
-Melt the chocolate, butter, espresso powder and vanilla bean extract together in a heat proof bowl over simmering water (a bain marie) until completely melted. Set aside.
-In the bowl of an electric mixer, whisk the eggs until broken apart. Add the sugar and whisk until the egg mixture/sugar mixture is well combined.
-In a mixing bowl, whisk together the flour, cocoa powder, salt, and baking powder until well combined. Add half the flour mixture to the butter and sugar. Mix briefly. Add all of the chocolate mixture, mix briefly. And then add the remaining flour mixture. Mixing just until the ingredients are well combined.
-Gently stir the batter with a large rubber spatula to incorporate any errant bits of flour/cocoa.
-Transfer the mixture to a brownie pan (like mine in the picture) or a traditional Pyrex 8x8 of 9x9 baking pan.
-Sprinkle the top of the batter with bits of flake sea salt.
-Bake for 20 - 25 minutes if your using a Baker's Edge brownie pan. 30 - 35 minutes for a traditional pan. DO NOT OVER BAKE! If you insert a toothpick, small crumbs should still come off (but there shouldn't be a coating of wet batter either).
-Slice and top your brownie with ice cream, nuts, caramel and bacon. Crumbling the bacon is a lovely way to evenly distribute the flavors but brandishing a slice really screams "I'M A TRENDY PIECE OF BACON ON A CHOCOLATE DESSERT. DEAL WITH IT."

April 17, 2011
Flourless Chocolate Passover Hearts

Of the many sweets that flew out of the pastry case at my bakery in Montpelier, flourless chocolate hearts were among the most fleet of confectionary foot. They'd have hit the display no more than a moment that they'd be swiped from their platter, stuffed into beribboned boxes and rushed out the door. And at no time was there a speedier sugary exodus than at Passover.

Flourless chocolate hearts have the blessed benefit of being gluten free and unleavened with the bonus that they are delicious no matter the day, holy or otherwise.
Happy Passover!
Flourless Chocolate Passover Hearts
(makes approximately 24 small chocolate hearts or {1} 10" cake)
preheat oven to 350º
Ingredients
10 ounces bittersweet chocolate, finely chopped
1 cup dark/high quality cocoa powder (I use Callebaut extra brute or Valrhona)
1 cup sugar (you can replace with one cup agave nectar, the cake will not form a satisfying crust over the top but will still be tender and delicious)
6 eggs
8 ounces/16 tablespoons unsalted butter cut into small pieces
1 teaspoon salt
1 teaspoon vanilla bean paste (or extract)
3 tablespoon freshly brewed espresso or very strong coffee
 right out of the oven
Procedure
-Over a double boiler, gently melt chocolate, butter and espresso/coffee.
-In the bowl of an electric mixer, whisk together eggs, sugar (or agave), cocoa powder, salt and vanilla. Scrape the sides and bottom of the bowl to insure that the cocoa powder has not clumped together in a dry mass. Continue to mix and scrape until you are sure that the cocoa powder is well and truly mixed into the the initial batter.
-With the mixer on low, slowly pour the melted chocolate mixture into the bowl. If the mixer isn't running, you'll come out with chocolatey scrambled eggs. Continue to mix until the batter is smooth.
-Spray a heart shaped silicon (or metal ) baking pan or 10" cake pan with non-stick cooking spray (make sure that the spray doesn't contain flour). My silicone heart mold contains 8 cavities, so I make this in batches. The batter thickens as it cools, this is normal. Fill the cavities half way full and bake for 15 to 20 minutes (they should spring back when you poke them and keep an eye on the center of the cake that it's set). A 10" cake will take 45 to 50 minutes to bake. It's not uncommon for the cake to settle a bit as it cools.

April 13, 2011
Hot Cross Buns, New England style!

Hot cross buns are magical.
If you don't believe me, just get a load of the superstitions that cling to the sweet morsel to this day:
(1) Hot cross buns, if baked and served on Good Friday, will keep for a year without getting moldy.
(2) They are medicinal.
(3) Sharing a hot cross bun guarantees a solid friendship for an ENTIRE YEAR!
(4) Taken on a cruise, they guard against shipwreck (and if you are to believe #2, will also keep away the rampant gastrointestinal tom foolery that seems to attack Carnival Cruisers the world over).
(5) Hang them ornamentally in the kitchen and they prevent fires all year long!

All these wondrous benefits and they are awfully tasty. So I wish you a very healthy, non-shipwrecked, friendship filled and fire free year.
New England Hot Cross Buns
Maple. Cranberry. That's what makes for the New England in the bun!
Ingredients
1 pound bread flour
1 teaspoon nutmeg1 teaspoon saltgenerous pinch of ground cloves
1/2 ounce dry (not instant) yeast (2 packets)
1 cup whole milk, warm
pinch sugar
1/4 cup granulated sugar
1/4 cup maple syrup
1 egg
1 teaspoon vanilla bean paste
1 stick (4 ounces/8 tablespoons) unsalted butter
zest of 1 lemon
1 cup dried cranberries
Egg wash: 1 egg and 2 tablespoons water, beaten together
1/4 cup demerara or turbinado sugar for sprinkling
Icing for the cross: 1/2 cup confectioner's sugar blended with 1 tablespoon whole milk.
Procedure
Preheat oven to 400º
-Combine yeast, warm milk and pinch sugar. Stir and allow to bloom
-In the bowl of an electric mixer, whisk together the sugar, maple syrup, the vanilla bean paste, zest and the egg. Add the bloomed yeast.
-Add the dry ingredients, the flour, salt and spices and mix with the dough hook just combined. Add the softened butter in small pieces until completely incorporated.
-Continue to mix until the gluten develops and the dough is shiny and comes away from the bowl cleanly.

-Add the cranberries and mix until they are well incorporated and evenly distributed.
-Place the dough in a bowl sprayed with non-stick cooking spray. Spray the top of the dough as well. Cover the bowl with plastic wrap and allow to rest for 15 to 20 minutes.
-Divide the dough into 15 even pieces.
 the claw!
-Using the "claw," roll each ball into a tight ball. Place on a parchment lined baking sheet and cut a cross into each ball of dough.


-Allow to rise, covered loosely with a piece of plastic wrap, until the buns have not quite doubled in size
-Brush with egg wash and sprinkle with demerara (or turbinado sugar)

-Bake at 400º for about 20 minutes, until deep golden brown.
-Allow to cool slightly and then drizzle or pipe icing inside the cross.

April 1, 2011
Big Sweet Winners! Sugar Baby is here!

Today is the official publication date of Sugar Baby!
It's also the day the random number generator worked its little butt off and chose three lucky winners!
Congratulations Sweet People!
If you didn't win, you can still buy Sugar Baby because it's ON SALE NOW!
And now, drumroll please!
The lucky recipients of a signed copy of Sugar Baby, a super-duper Maverick digital thermometer and a Gesine Confectionary t-shirt are.......
Diane who wrote "Count me in! I pre-ordered your book in Jan! So excited to get my hands on your book." Written on March 11th.
Kristin M. (You left your email! Woohoo! Easy Peasy!)
and
Alejandra Ramos who wrote "Fingers crossed! I'm dying to get my hands that book (and my candy thermometer is on its last sticky legs definitely use another one." Written on March 20th.
For those who didn't leave me their email (Diane and Alejandra) write me at gesineconfectionary@gmail.com with your address and your shirt size! The shirts are made for women and slightly fitted so you may want to size up.
Congratulations!!!!!!!!

Gesine Bullock-Prado's Blog

- Gesine Bullock-Prado's profile
- 69 followers
Gesine Bullock-Prado isn't a Goodreads Author
(yet),
but they
do have a blog,
so here are some recent posts imported from
their feed.

