
Gesine Bullock-Prado's Blog, page 25
December 11, 2011
Merry. Jolly. Happy. Gingerbread.
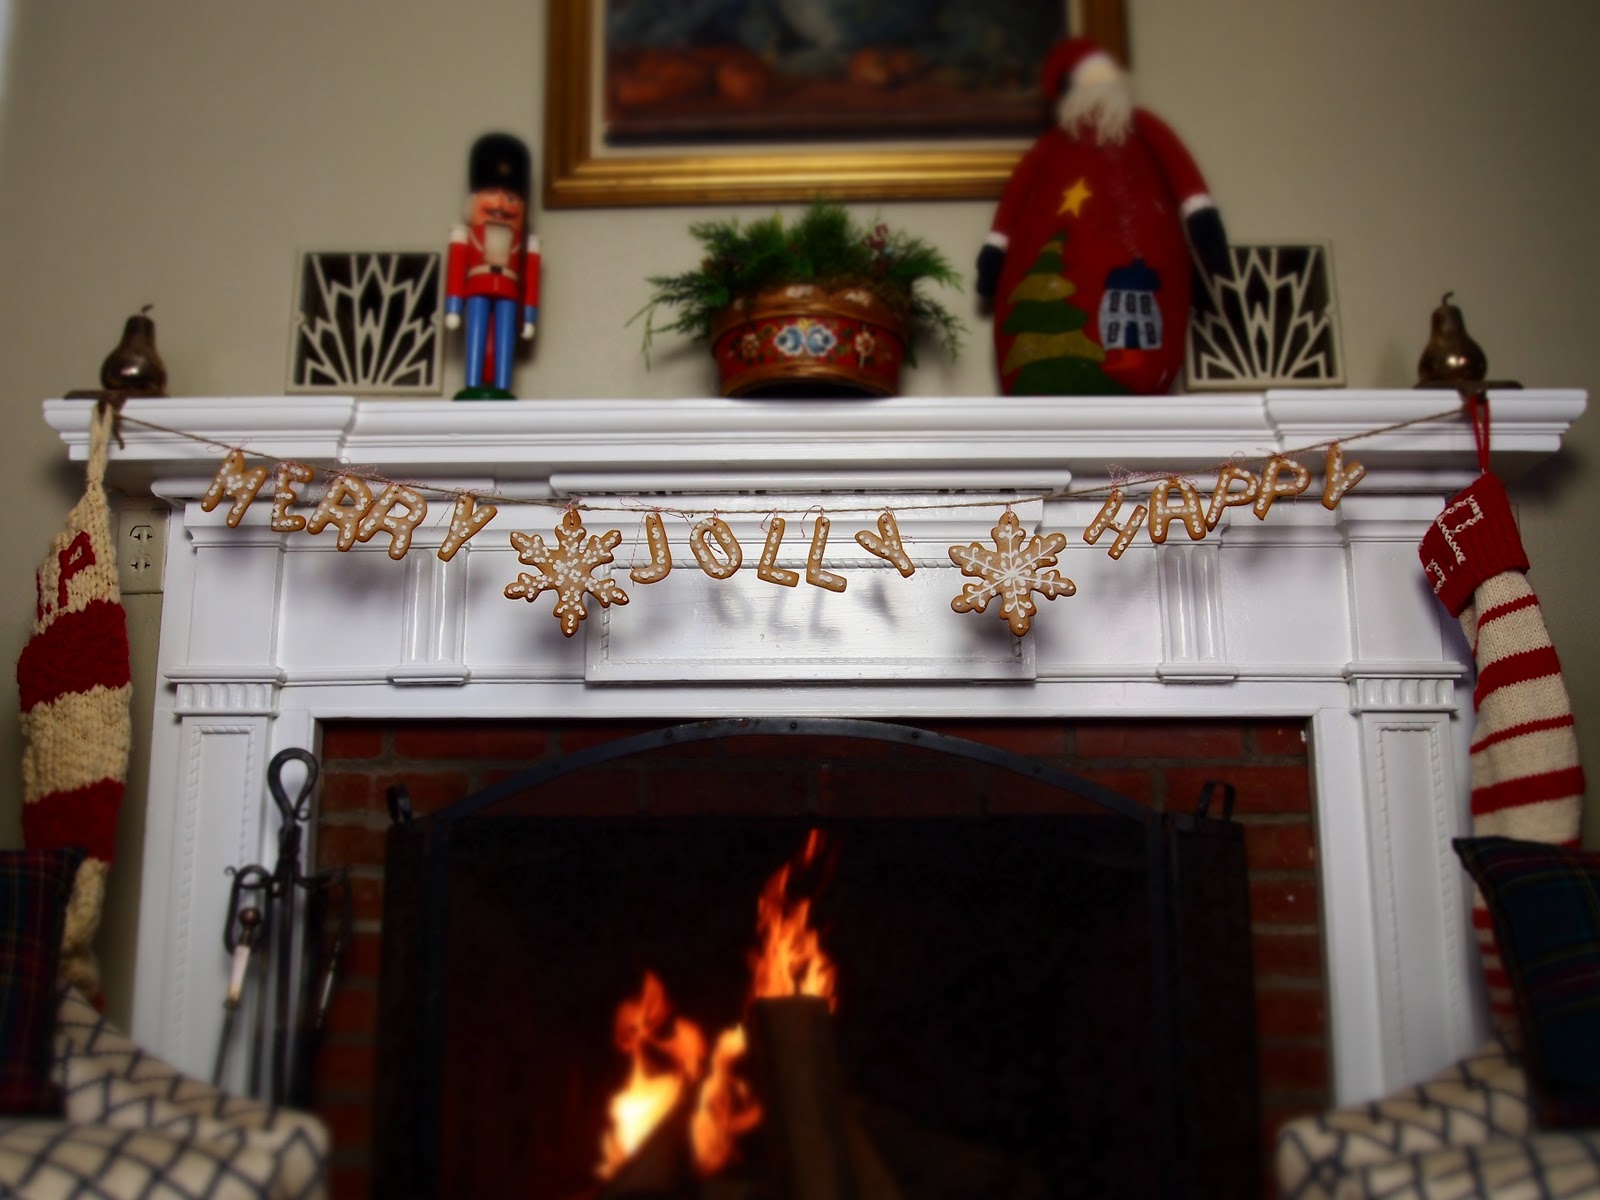


Merry. Jolly. Happy.Gingerbread(makes about 30 letter cookies and 2 large snowflakes)For the cookies:
INGREDIENTS3 cups all purpose flour1/2 teaspoon baking soda1 1/2 tablespoons ground ginger1 tablespoon cinnamon1 teaspoon white pepper1 teaspoon salt1/2 teaspoon nutmeg1/2 teaspoon ground cloves2 sticks unsalted butter3/4 cup dark brown sugar1/2 cup organic barley malt syrup1 egg1 teaspoon vanilla bean paste1 teaspoon grated fresh ginger (peel a nub of fresh ginger and use a microplaner to grate)1/2 teaspoon orange zest
PROCEDURE
•Preheat oven to 350º•In a large bowl, whisk together flour, baking soda, ginger, cinnamon, white pepper, salt, nutmeg and chives. Set aside.•In the bowl of an electric mixer fit with a paddle attachment, cream together butter, sugar and barley malt syrup until light and fluffy.•Add egg, continue to beat until completely incorporated. Add vanilla.•Slowly add dry ingredients, fresh ginger and orange zest. Mix until just combined.•Turn the dough out onto a sheet of plastic wrap. Cover and chill for 20 minutes.•Roll the dough out about 1/4 inch thick. Stamp out letters and place on a parchment lined sheetpan.•Place sheetpan with letters in the freezer for 10 minutes. Bake for 10 minutes or until just beginning to brown around the edges.•While the cookies are still hot, poke a hole into the tops of the letters with a skewer, large enough that a string can fit through. Allow to cool completely.
For the royal icing:
INGREDIENTS
1 egg whiteconfectioners sugar
PROCEDURE
•In the bowl of an electric mixer fit with a paddle attachment (*see note*), add egg white and 1 cup of confectioners sugar. Beat until smooth. Raise the paddle head to check the consistency of the icing. If it drips from the paddle, slowly add more confectioners sugar, 1/4 cup at a time, until the icing is thick, smooth and doesn't drip from the paddle.

•Immediately transfer the icing to a pastry bag fit with a small open tip. Decorate letters as you see fit. Allow the icing to crust over and harden completely before hanging.
*NOTE: Do use a mixer and paddle attachment. This insures that the icing is totally smooth and any clumps of confectioner's sugar are eradicated. Otherwise, as you're piping, the opening of the pastry tip with get clogged. That's a major pain.*


December 8, 2011
These Are Just Ducky, Santa!

We have chickens. I never bake in fear of being egg-less. Our sweet hens provide us with an abundance and we've taken their labor for granted.
Until today.
 It's cold at Freegrace.
It's cold. When it's cold, they stop laying. It's not in me to artificially force them into producing when they'd rather snuggle with each other and keep warm.
 Meet the Quackers. They keep laying through the frost. The geese, they may never lay.
The ducks, on the other hand, they ducks keep on keeping on. And while their eggs are fattier, contain more protein and make for a "stiffer" dough, I was thinking this might behoove my chocolate chip cookie preferences. You see, this added protein makes the finished product chewier yet allowing for a decent cooking time so that the edges can brown enough to develop a lovely crispness along the cookie perimeter.
 Crispy on the edges, chewy in the center. Just ducky.
Oh Santa, you'll be so pleased with your ducky cookies this year.
Ducky Chocolate Chip Cookies
INGREDIENTS
2 cups cake flour
1 1/2 cups bread flour
2 teaspoons sea salt (if using traditional salt, just 1 teaspoon)
1 1/2 teaspoons baking powder
1 1/4 baking soda
2 1/2 sticks butter
2 duck eggs
1 cup sugar
1 1/2 cups brown sugar
2 teaspoons vanilla bean paste
14 ounces bittersweet chocolate, chopped
PROCEDURE
•Preheat oven to 350º.
•In a large bowl, whisk together flours, salt, baking powder and baking soda. Set aside.
•In a microwave safe bowl, combine the butter and sugars. Microwave the butter and sugar together on high for 1 minute. Stir. Microwave for another minute. Stir. If the sugar isn't completely melted, nuke for another 30 seconds. Transfer to a stand mix bowl.
•In a stand mixer with the paddle attachment, beat the butter and sugars until the bowl is cool to the touch. Add eggs, one at a time. Make sure each egg is completely incorporated before adding the next. And scrape the bowl, including the very bottom, to insure the butter and eggs cream evenly.
•With the mixer speed on low, slowly add the flour mixture. Mix until JUST combined.
•Stir the chocolate into the batter with a wooden spoon.
•Using a medium sized cookie scoop, place the cookie dough on a parchment lined 1/2 sheetpan, spacing them at least 3 inches apart. Gently press the cookies down so they aren't completely rounded.
•Bake for 5 minutes. Open the oven and with your hands in an oven mitt, grab the sheet pan and SLAM it down on the oven rack so the cookies delate. Bake for 5 minutes more. Open oven, slam and continue baking for 5 to 7 minutes more or until the edges of the cookies are golden brown.
happy and merry!

December 3, 2011
You had me at chocolate covered...

I stole a box of Oreos from the Colemans when I was a minor. I add the age clarification in the event the authorities want to haul me in on grand theft charges. And you can read the extended version of this story in my baking memoir My Life From Scratch. See how I've managed to keep myself out of jail AND plug my book in just two sentences?

It took a minute to decide whether to shove the cellophane wrapped treasure under my sweatshirt. In the end, there was only one sane decision. Grab and run.

Now, had those Oreos been chocolate covered, well that's another matter entirely. I'd not have hesitated for a minute. Not even for a second. A rational girl doesn't second guess petty theft of ANYTHING chocolate covered. As long as you lift the stuff from a very nice neighbor. Can't have you manacled in front of the Jiffy Mart for palming a package of Twix now, can we?
Add mint to the mix and I'd even break into an armored vehicle to get at them.
Or just make them at home.
Criminally Good Minty Chocolate Cookies
(makes about 2 dozen sandwich cookies)
For the chocolate cookies
INGREDIENTS
1 cup all purpose flour1/2 cup unsweetened Dutch process cocoa powder. The darker the better.1/2 teaspoon baking soda1/2 teaspoon salt8 ounces bittersweet chocolate coarsely chopped1/2 cup (1 stick) unsalted butter1 cup sugar2 large eggs1 teaspoon vanilla extract1 teaspoon instant espresso powder
-Preheat oven to 325º. Whisk together flour, cocoa powder, baking soda, espresso powder and salt. Set aside.
-Melt chocolate with the butter in a metal bowl over a pan of simmering water.
-Put melted chocolate mixture, sugar, eggs and vanilla in a mixing bowl fit with a paddle attachment. Mix on medium until combined. Reduce speed and slowly add flour mixture.
–When combined, cover the mixing bowl with plastic wrap and refrigerate until the dough has stiffened enough to handle.
-Roll the dough into a long log, around 16 inches long and 2 inches in diameter. Wrap in parchment and then seal with plastic wrap. Refrigerate for 30 minutes.

-Slice 1/4" thick slices from the roll. Manipulate each piece as well as you can to insure that it's as round as possible and each piece is the same size and thickness. Place on a parchment lined baking sheet at least 2 inches apart. You'll need 2 or 3 baking sheets.
-Refrigerate the dough for 30 minutes more.
-Bake for 10 minutes or until the tops of the cookies crack slightly. Slam the cookies on your work surface as you take them out if they are puffing a bit in the middle. You want them flat for stacking.
-Cool completely.
For the mint fondant filling:
INGREDIENTS(adapted from my book Sugar Baby )
2 cups sugar1/2 cup water2 tablespoons corn syrup1/4 teaspoon salt4 tablespoons room temperature unsalted butter1-2 drops peppermint extract1/4 cup corn starch
PROCEDURE
-Place the sugar, corn syrup, salt and water in a heavy bottom sauce pan over medium-low heat. Stir until the sugar has completely melted. Brush the sides of the pan with a wet pastry brush to eradicate any sugar crystals that are clinging to the sides of the pan. Turn the heat to high, attach a sugar thermometer and heat to 245ºF.

-Pour the sugar syrup into a mixing bowl fit with the paddle attachment. Add the butter. Beat the mixture on high for a minute and then add the few drops of peppermint extract. Continue beating until the syrup begins to thicken and JUST starts to look as if it's drying out.

-Scrap the mixture out onto a work surface dusted with the corn starch. Knead the mass until smooth. WORK QUICKLY! IT DRIES OUT SUPER DUPER FAST.


-Using a rolling pin dusted with cornstarch, roll out the mint fondant until it's under 1/4 inch thick. Take a 2 inch cutter and cut rounds. You can't re-knead the fondant, it will be to dry, so make your rounds as close together as possible.
To assemble:
For the topping:
INGREDIENTS
14 ounces bittersweet chocolate cut into very small pieces1 tablespoon shortening
PROCEDURE
-Melt together the chocolate and shortening in 30 second short bursts in the microwave, stir between blasts. Otherwise, melt in a heat proof bowl over simmering water. Stirring constantly until completely melted.
-Take two cookies that are as dimensionally similar as possible and sandwich a round of fondant between them. Gently dip the cookie into the chocolate to coat the bottom and using a spoon, cover the top and sides of the cookie with the chocolate. Gently tap the cookie on the fork over the bowl to removes excess chocolate. Transfer to a piece of parchment to allow to set completely. Continue with remaining cookies. You may need to make another batch of topping to continue covering every cookie.


To finish:
Royal Icing
INGREDIENTS
1 cup confectioner's sugar1 tablespoon dried egg white powderenough water to make a thick paste
PROCEDURE-Stir together the confectioner's sugar, egg white powder and a bit of water at a time until you have a thick and smooth paste. Add more confectioners or water, depending on consistency. You want the royal icing to hold its shape when piped. Transfer the royal icing to a pastry bag fit with a small open tip.
-Once the chocolate coating is COMPLETELY set and dry, decorate as you see fit!


December 2, 2011
Deck the Halls with Wreaths of Almond, Yum Yum Yum Yum Yum, Yum Yum Yum Yum: Mandelkränzchen

I bought a box of confectionary tennis balls for a cute racquet savant when I was 13. Four gorgeous, life-sized orbs of marzipan for a hunky boy in Nürnberg.
I ate them, every one.

A young woman must follow her true passion, after all.
Now that I bake for a joyful living, I stock 10 pound canisters of almond paste just because I can. When I'm not eating straight from the container, I do my best to create lovely pastries that I happily share with my true love, Ray.
What better time to spread the sweet joy than during the holidays?

Mandelkränzchen
These are mandelhoernchen writ round, which means they are packed with almond flavor, slightly crispy on the outside and vaguely chewy on the inside.
Ingredients
1 pound almond paste4 ounces granulated sugar + 1/4 cup set aside for finishing3 egg whites + 1 egg white set aside for finishing1/2 cup All Purpose flour1/2 teaspoon salt6 ounces sliced almonds, preferably with skins still on (see picture)

1. Combine almond paste, sugar and salt in a mixing bowl using paddle attachment. Slowly add eggs whites, until a thick, sticky paste like dough is created. You may not need ALL of the egg whites, only enough to create a thick paste that holds its shape and is smooth. An alternative is to mix the paste and sugar in a food processor with a blade attachment and add egg whites while it's running.
2. Sprinkle the flour on a clean surface and rub some on your hands to make sure the almond dough doesn't stick to you. Gently knead the sticky almond dough into the flour until the mixture is less tacky and holds it's shape very well
3. Sprinkle half of the remaining 1/4 of sugar on your work surface. Divide the dough into 2 pieces and roll each into a log about 15 inches long on your sugared surface. Use only enough sugar to keep the paste from sticking to the table and to coat the piece. Cut the log into 13 pieces.
4. Roll each of the dough pieces in the sugar, making sure they stay shaped as little ropes. And make sure the sugar sticks all around. Keep rolling the logs until they are about 5 inches long.

5. Bend the pieces into circle, pinching the ends together to seal and place on a sheet pan lined with parchment paper. Using a pastry brush, brush each circle with the additional egg white.
6. Place overlapping almond slices all along the circle and along the sides.


7. Brush the almond slivers gently with egg white and sprinkle with sugar.

8. Allow them to dry at room temperature for 3 hours.
9. Bake at 350º for 20 minutes or golden brown. Allow to cool completely
10. Store in an airtight container up to a week or freeze in an airtight container up to a month.

November 21, 2011
Pumpkin Mousse Pullman Surprise!

If you've got a pullman loaf pan, you can make some extra special desserts. Just mix and match a few recipes and, voila, clean lines and fancy designs.

This combines 3 recipes already available on this blog:
(1) Joconde Decor Sides: Measure the bottom and sides (length and width) of your pullman loaf and cut your joconde to size and line the pan.
(2) Chocolate/Almond Roulade Cake: This applications requires the actual jelly roll alone and not the filling in the original recipe, so just follow that portion of the recipe/post for "the cake." And you just have to roll it up and cut it to the size (length) of the pullman.
(3) Mascarpone Pumpkin Mousse:This recipe is the perfect amount for this one cake.
PROCEDURE:
(1) Make the joconde sides. For this pattern, I used what's called a "decor grill" which is simply a template with holes in it over which you apply the tuile paste. You then remove the template and freeze the tuile as you would in the traditional recipe and proceed with the remaining instructions from there.
(2) Line the pullman loaf pan with plastic wrap, making sure the wrap falls over the sides so you have something to grab onto when you take the cake out of the pullman loaf pan.
(3) Make the roulade and allow to cool.
(4) Make the pumpkin mousse.
(5) Line the bottom and sides of the pullman loaf with the joconde decor.
(6) Place half the mousse inside the pullman loaf
(7) Place the trimmed roulade onto the mousse in the center of the pan.
(8) Add remaining mousse and, using a small offset spatula, smooth out the top of the mousse so that it's perfectly flat.
(9) Freeze the mousse overnight to set.
(10) Turn the pullman pan upside down on a serving platter. Gently warm the sides with a heat gun or blow dryer. Use the plastic wrap overhang to gently help release the cake onto the platter. Refrigerate to allow the mousse to thaw enough to comfortably slice through the cake, about 2 hours.

November 17, 2011
Pumpkin Chronicles
 Mousse
I wanted to get you oriented, as I've posted quite a few pumpkin recipes through the years. Pick and choose!
 cheesecake
Pumpkin Cheesecake
Pumpkin Mousse

Pumpkin Whoopie Pies

Pumpkin Pudding Cake

Pumpkin Eclairs (with Pumpkin Pastry Cream)

Sweet Potato Sweet Bread (can be adapted with 1 to 1 ration replacement with pumpkin purée)

November 16, 2011
Steam Your Buns Off!

I'm not going to natter on in this post. We just don't have time for storytelling when it's already mid-November...with American Thanksgiving just a week away. Maybe it's just me but time seems to be accelerating, with each successive new year racing behind us with lightening speed when we've only just celebrated the last. And that it's 2012 coming in for a landing, Mayan doom prophecies and apocalyptic John Cusack films dancing in my head, isn't making this holiday season any easier.
 Buns. Steamed and waiting for filling.
So I've spent the afternoon making steamed Chinese buns, in anticipation of Thanksgiving leftovers. It may seem too soon to start my post-turkey day prep but believe me, you'll be thrilled to have these puppies waiting for you in the freezer with leftover turkey is languishing in the fridge. The texture of Chinese steamed buns is so contrary to traditional Thanksgiving offerings that your roast bird will shine when nestled in these fluffy and gorgeously chewy buns. And to mix it up entirely, pull and toss your turkey in homemade BBQ sauce and chop up some crispy slaw and your leftovers will easily outshine your Thanksgiving meal. The chewy of the bun, the succulence of the turkey, the crispy spice of the slaw and the sweet comfort of the sauce will delight you and all your senses.
STEAMED CHINESE PULLED TURKEY BBQ BUNS WITH SPICY SLAW
The Steamed Buns
makes 36
(inspired by Momofuku's gorgeous pork buns)
INGREDIENTS
4 cups bread flour (I use King Arthur Flour)
1 tablespoon + 1 teaspoon (1 and 1/3 packet) instant yeast
1 cup non-fat milk
1/2 cup of water (held in reserve)
1/4 cup of sweetened condensed milk
1/3 cup duck fat
1 tablespoon kosher salt
1/2 teaspoon baking powder
1/2 teaspoon baking soda
PROCEDURE
•In the bowl of an electric mixer fit with the hook attachment, add the non-fat milk, sweetened condensed milk and duck fat.

•In a large bowl, stir together the flour, yeast, salt, baking powder and baking soda. With the mixer running on slow, patiently add the flour mixture. Mix for a few minutes and if the dough looks dry, slowly add the reserve water, adding just enough to form a smooth, soft dough that pulls from the sides of the bowl. Mix until smooth and shiny, about 10 to 15 minutes.
•Spray a large mixing bowl with non-stick cooking spray and transfer your dough to the bowl. Spray the top of the dough with non-stick spray as well and cover the bowl with a damp kitchen towel. Place the bowl in a warm corner of your kitchen to proof for about an hour The dough should double in size.
•Punch down the dough and divide the dough into thirds. Roll each third of dough into a rope and divide each rope into 9 EVEN pieces. Weigh the pieces of dough if you must to make sure they are even. Roll each piece into a tight ball and place on a sheetpan lined with parchment. Cover with plastic wrap. Allow your little dough balls to rest for a half hour.

•While the dough is resting, cut 36 small squares of parchment about 3" x 3" upon which you will rest your buns.

•With the heel of your palm, flatten the ball of dough and then using a rolling pin, roll the dough into an oval. Place a chopstick, greased with a bit of duck fat, in the middle of the oval. Fold the dough over to create a half-moon and press gently. Remove the chopstick and place your bun on your pre-cut piece of tiny parchment. Place the buns on a sheetpan and cover with plastic wrap as you work. The buns dry out easily so keep them covered as you work.

•Once you've folded all of your buns and covered them with plastic, allow them to rest for 1/2 hour to rise a bit.
•Fill a wok with a few inches of water and bring to a simmer. Place a bamboo steamer over the water. Steam small batches of buns at a time. I have a large bamboo steamer and place 5 buns on each level. Steam for 11 minutes.
 Steamy.
•Continue until you've steamed all your buns. Put aside those buns that you are going to eat immediately. The rest, tightly seal in freezer safe Ziploc bags and freeze. (To refresh the buns after freezing, allow to thaw in the fridge for a 1/2 hour and then steam for a few minutes in a bamboo steamer to perk them up again).
For the slaw
INGREDIENTS
2 cups green cabbage, finely chopped
2 cups red cabbage, finely chopped
1/2 a sweet onion, finely chopped
1 small jar pimenton, juices drained, finely chopped
1/4 cup jarred jalapeños, finely chopped
1/2 cup mayo
1/4 cup apple cider vinegar
3 tablespoons jalapeño juice (from the jarred jalapeños)
3 tablespoons dijon mustard
1 tablespoon maple syrup
salt and pepper to taste
PROCEDURE
•Stir everything together. Taste for seasoning.
For the BBQ sauce:
INGREDIENTS
1/2 cup ketchup
3 tablespoons Balsamic glaze
2 tablespoons brown sugar
1 tablespoon apple cider vinegar
salt to taste

PROCEDURE
•Stir BBQ ingredients together until smooth.
•Gently pull apart your remaining turkey meat from Thanksgiving into small, bite-sized pieces. Stir together the sauce and turkey until the meat is coated.
To assemble:
•Gently split your buns and fill with a few tablespoons of pulled turkey and top with a few tablespoons of slaw.

October 31, 2011
Scaaaary Story: Snowballs of the Undead

You can have your apparitions, ax murderers and zombies, I've lived through something far more harrowing than the undead chasing me down dead-end alley ways in pursuit of my succulent gray matter. Oh yes. I've lived through a living nightmare and survived:
It snowed 6 inches of the white stuff on the 29th of October, 2 whole days before All Hallow's Eve, and covered my artfully carved pumpkins.
 At least the snow geese were happy.
I'm not sure I'll ever recover from the shock.

SNOWBALLS OF THE UNDEAD
(Makes 12 snowballs)
To help promote recovery from my bloodcurdling experience, I called upon pastry therapy. And what better sweet to facilitate healing than coconut snowballs filled with dulce de leche. These puppies should take the edge off the early chill.
INGREDIENTS
For the cake:
8 eggs, room temperature and separated
3 cups cake flour
1 can organic coconut milk (13.5 ounces)
2/3 cup unrefined organic coconut oil
1 1/2 cups sugar
1 tablespoon + 1 teaspoon baking powder
1 teaspoon sea salt
1 teaspoon cream of tartar
1 teaspoon vanilla bean extract
For the filling:
1 can sweetened condensed milk
For the frosting:
1 batch vanilla buttercream, add 1 tablespoon of vanilla bean paste just as you add the butter
To finish:
2 cups sweetened, flake coconut

PROCEDURE
For the cake:
•Preheat oven to 325º.
•Place the jar of coconut oil in a pan of simmering water until the oil has melted. Measure out the oil and combined with the egg yolks and 1 cup of the sugar.
•Whisk together the oil, sugar and egg yolks until combined in a stand mixer. Add the coconut milk and whisk until just combined
•Sift together the flour, baking powder and salt. Sift a second time over the mixing bowl with the batter. Using a large rubber spatula, fold in the flour until the batter is smooth.

•Transfer the batter to a clean bowl and wash your mixing bowl and whisk attachment until sparkling and squeaky clean!
•Add the egg whites and cream of tartar to the clean stand mixing bowl and whisk until foamy. Slowly add the remaining 1/2 cup of sugar and whisk on high until you achieve medium-soft peaks.

•Transfer 1/3 of the egg whites to the bowl with the batter. Stir with a rubber spatula until the batter is "lightened" and no streaks of white remain.
[image error] add 1/3 of the egg whites
 stir until combined
•Add remaining egg whites and gently fold the egg whites into the batter until completely combined.
•Spray a silicon dome mold with non-stick cooking spray and dust with flour. Fill each cavity just a bit more than 3/4 full.

•Bake for 20 minutes or until the cake springs back when gently poked. Allow to cool completely.
For the filling:
•While the cake is cooling, pour the sweetened condensed milk into a heavy saucepan and stir over medium-low heat with a heat proof rubber spatula CONSTANTLY, until the the condensed milk thickens to the point that it adheres to the spoon and won't easily come off. Allow to cool.
To finish:
•Hollow out two half moons of cake and place a large dollop of dulce de leche in the cavity. Place the two halves together. Continue with the remaining cake and dulce de leche.


Make the buttercream:
•Using a small offset spatula, cover each cake orb with 2 - 3 tablespoons of buttercream (no need to be persnickety about it, you don't have to smooth the buttercream as you're going to be coating the buttercream with flake coconut.
•Press the coconut flakes in an even layer over the entire cake.
•Serve immediately and pray to the weather gods that we don't get any more snow until WINTER!


October 4, 2011
Sweet Letters to a Daughter


If there was ever any doubt that I was born to play with butter, flour and sugar (and really how, could there be) my mother's recipe box is incontrovertible physical evidence of my sweet destiny.
 Mom's recipe box.
Packed inside are decades worth of recipes, by and large for pastry, that she'd torn from the pages of the Washington Post's food section. Alongside the newsprint are hand written letters from my Omi, her mother, dense with details for German classics like Stollen and Butterzeug. My grandmother signed the bottom of each international pastry missive: Mutti, which only makes sense because a family recipe is a love letter, a message of comfort and abiding affection from one generation to another that endures long after the original baker has left us.
 sweet letter from a mother to her daughter
Among the gems in my mom's collection is a business envelope re-purposed into the mother of all recipe cards. The original intent of the California based non-profit's message isn't entirely clear but the business sized envelope has my mother's name and address manually typed in the center and the pre-printed return address reads "Christian Anti-Communism Crusade." Mom presumably found the correspondence off-putting and crossed out her name and address and wrote a big fat lie, "Return to Sender Addressee moved. New address unknown."

She must have seen past her initial dismay at the letter (and apparently read it and tossed it. The thing is sadly empty of it's anti-communist contents) and filled the untarnished surface of the envelope with detailed instructions for making a Gateau St. Honoré. Like I said, incontrovertible evidence.
It's taken me years to find the courage to confront the emotional onslaught that is my mother's recipe box, every page is either laced with her hand writing or simply evidence of the great joy she found in surprising her family with gorgeous gastronomy. But now that I'm going through the brittle pages, one by one, scanning and preserving wonderful memories and buttery pronouncements of love and culinary aspiration, I am compelled to bake something from her prized collection immediately. And it appears, the recipe for the birthday cake I requested for years as a teenager, a chocolate bombe swarming with glorious cocoa and almond spirals and filled with smooth, black as ink bittersweet chocolate. It was a monumental pain in my mother's backside due to the labor intensive nature of the pastry itself and the added bad luck of Mittens the cat batting the cake off the counter on the morning of March 6th, 1986, just after mom had finally unmolded and added the finishing touches to the pastry albatross. There could be no better way to commune with Helga.
 The original recipe
In honor of my wonderful mother, Helga, I give you an adapted version of "Jimmy Schmidt's London Chop House Chocolate-Almond Cake with Mousse Filling," a cake that's insanely decadent AND gluten free!
I also ask that if you have it in your heart, contribute to my run in her honor to benefit the American Cancer Society because not a day goes by where I regret not sharing time with her in my own kitchen since she was taken by cancer.
INGREDIENTS
For the cake:
9 eggs separated, room temperature3/4 cup sugar1 tablespoon vanilla1/2 teaspoon salt1/4 teaspoon cream of tartar3/4 cup Cacao Barry Extra Brute cocoa powder14 ounces (two tubes) almond paste 1/2 cup coffee + 1/2 cup sugar, heated together until the sugar melts (the original recipe calls for Amaretto, feel free to use either)powdered sugar
For the chocolate filling:
The official description of the recipe is truly misguiding as it calls this filling "mousse" which is utter malarkey. This is ganache, pure and simple. There's not one thing about this filling that can claim relation to a mousse of any kind.
28 ounces Lindt 70% chocolate (the original recipe calls for Tobler extra bittersweet) chopped
 My Omi's favorite chocolate!
3 tablespoons unsalted butter1 quart whipping cream (unwhipped)
(This is per the original recipe but I ended up making another half batch so that the cake pan was more fully filled)
PROCEDURE
For the cake:
•Roll the almond paste between two sheets of parchment paper into a 9 x 14 inch rectangle. Set aside.

•Line a jelly roll pan/half-sheetpan with parchment and spray with non-stick spray. Preheat the oven to 350º.
•In the bowl of an electric mixer fit with the whisk attachment, beat together the egg whites, salt and cream of tartar until just foamy. Slowly add 1/2 cup of the sugar and beat on high until you achieve stiff peaks but be careful not to over whip otherwise the egg whites will become dry and clumpy and difficult to fold into the remaining ingredients.
•Transfer the egg whites to a large, clean bowl.

•Add the yolks, remaining 1/4 cup sugar and vanilla to the mixing bowl in which you beat the egg whites (you needn't clean it after whisking egg whites in it) and whisk on high until the egg yolks are pale yellow and ribbon when you lift the whisk from the batter.
 ribboning egg yolks
•Stir 1/3 of the egg whites into the yolk mixture and then gently fold in the remaining egg whites. Sift the cocoa powder over the egg mixture and fold into the batter until just combined. Spread the batter evenly on your prepared jelly roll pan with a large off-set spatula and bake for 25 minutes.
 Yummy batter.
•Place the rectangle of almond paste onto one end of the cake. Using the kitchen towel to help you, roll the cake into a jellyroll and allow to cool completely.
•Using a medium sized bowl (or as the original recipe suggests, a 10 inch springform cake pan), cut the jelly roll into 1/3" thick rounds and line your chosen receptacle by dipping one side of each slice quickly into the coffee simple syrup (or amaretto) and line the bowl or springform, starting at the middle, with the jelly roll rounds, placing them soaked side down and tightly together. Set aside.
 lining my bowl with swirly happiness...and isn't it just a lovely coincidence that they look like "g"s?
For the filling:
•The original recipe instructs you to melt the chocolate and butter over a double boiler until melted and then immediately add the cream in three additions, gently stirring until well combined and then you pour into the cake-lined bowl or pan. I prefer to place the chocolate in a large mixing bowl and then bring the butter and cream to a simmer in a large saucepan. Pour the cream/butter mixture over the chocolate and allow to sit for a few minutes undisturbed. Then stir the mixture gently until the mixture is smooth and totally combined.
•Refrigerate until set. This takes a few hours. Terribly frustrating, I know.
***NOTE*** I ended up pouring in the ganache and finding that I still had quite a bit of cake left naked along the sides. So I made another half batch of ganache to fill it up almost to the edge of the cake.
•Trim edges of the cake even with the filling. Invert the cake onto a serving platter. Use a blow dryer or heat gun to gently warm the sides of the bowl or cake pan to release the cake cleanly (but not so much that you melt the filling).
•I prefer NOT to finish the cake with anything since it's such a kaleidoscope of pastry as-is but the original recipe recommends you decoratively pipe whipped cream along the edge.

September 27, 2011
Harvest Baguette: The Epi Revisited

Just after the Autumnal Equinox, as the harvest rolls around with its gorgeous moon and lovely sweater weather, I'm compelled to break out my scissors and snip away at perfectly good baguettes waiting for their turn in the oven.
Does this culinary elective surgery provide any meaningful flavor enhancement? No. Does it elevate a standard loaf of bread to a crusty symbol of seasonal fecundity? Why yes, yes indeed it does.
You too can make your very own épi de blé, the baguette sliced to mimic a sheath of wheat in honor of the harvest. Just follow my tutorial and snip away to Autumnal happiness, sweet people!
épi
I use my standard sourdough recipe for baguettes with a minor adjustment: I use a French flour for optimal baguette gluten ratios. Leave it to King Arthur Flour to make the stuff so that we can bake the crispy, airy, chewy stuff in our very own kitchens without flying to Paris. Yes, I know that traditionally baguettes aren't made with a sourdough starter but if you had the 20 quart behemoth that was my mother sponge in your bakery, you'd think twice before making any breads without it.

Follow sourdough bread procedure but do the following hootchie koochie bread dance with your scissors to make it extra special:
First, divide the dough into three even pieces.

Second, flatten each piece to release any air bubbles.

Third, roll the dough into a tight cylinder, making sure that the seam faces down (pinch the seam to keep it tight and secure).

Forth, gently roll the dough into a long baguette, starting at the middle and working gently outwards. Place the baguette onto a cornmeal dusted sheetpan.

Fifth, holding your scissors at a 20º angle, slice into the baguette a few inches from the tail end.

Continue slicing every few inches and gently pulling each piece to the side, alternating sides between each snip.
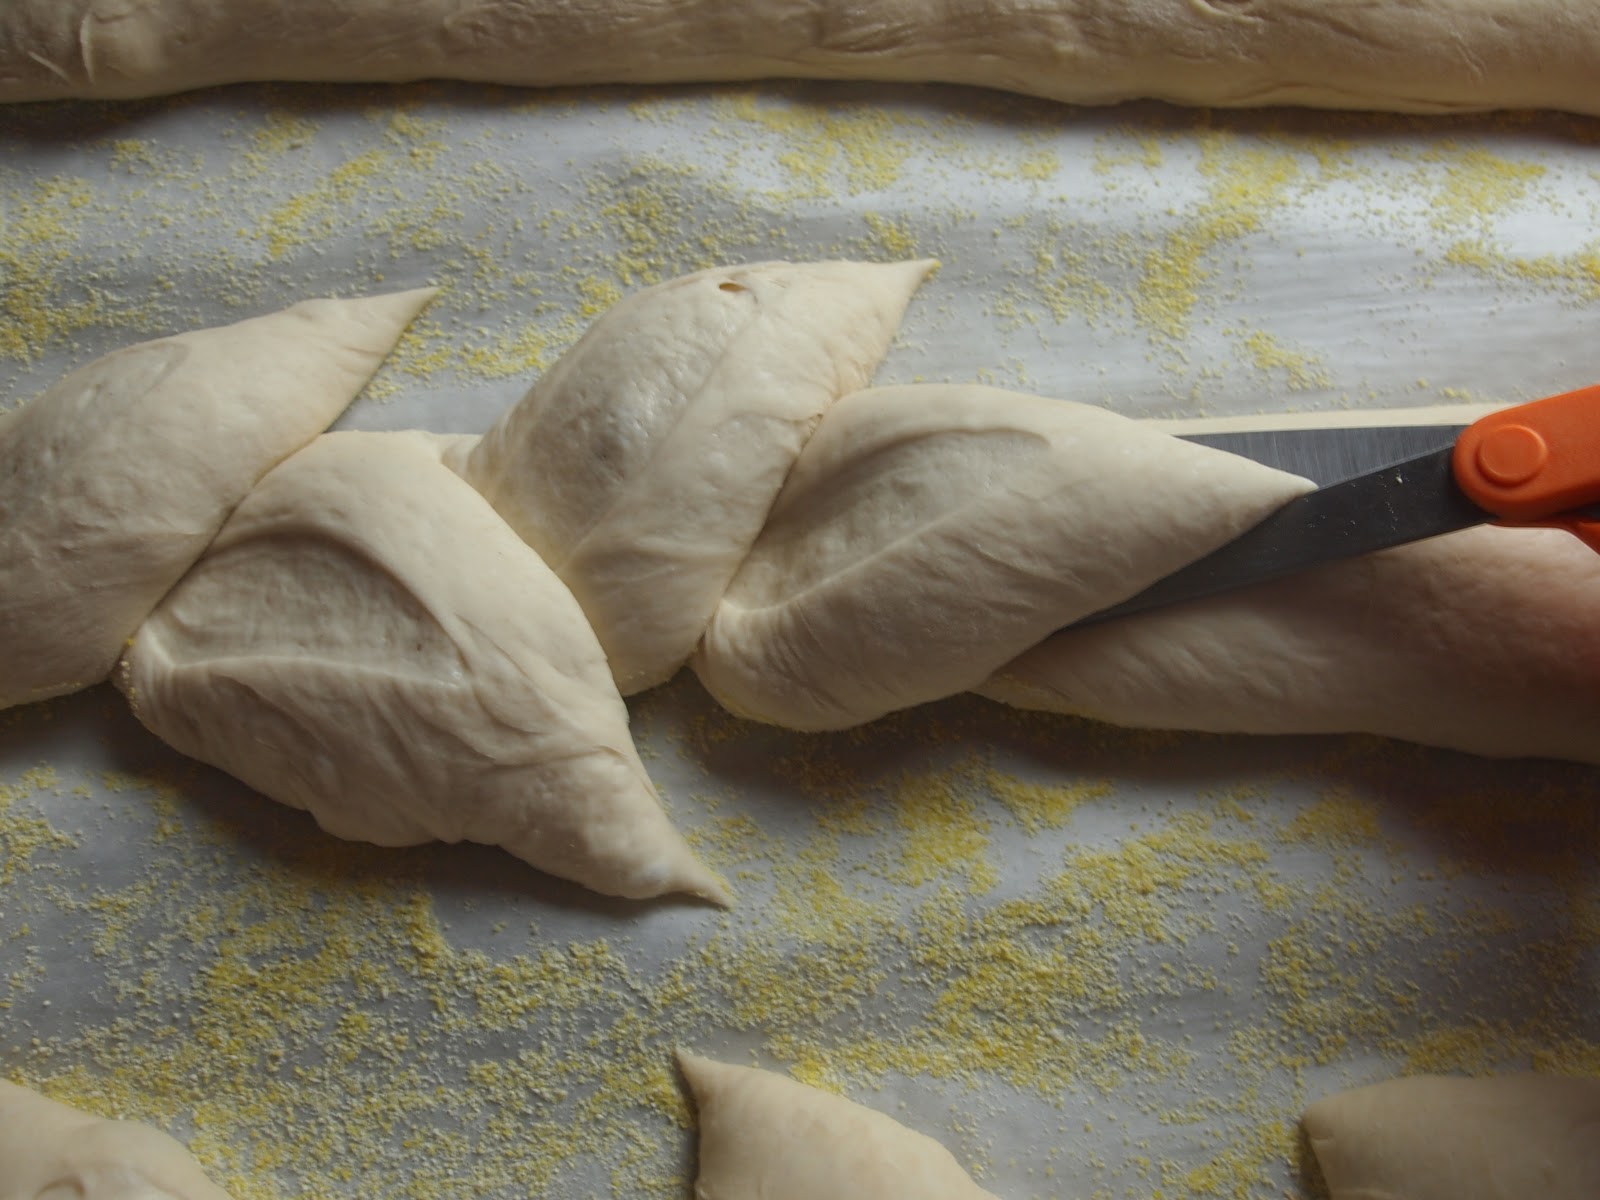

I prefer to make the cuts before the second proof, just after I've formed the loaf, as opposed to cutting the pieces just before it's ready to go into the oven but you may slice away just prior if you wish. I find that if I slice before to the bread is proofed, the final product has starker "wheat sheath" appearance but that could just be me.


Gesine Bullock-Prado's Blog

- Gesine Bullock-Prado's profile
- 69 followers
Gesine Bullock-Prado isn't a Goodreads Author
(yet),
but they
do have a blog,
so here are some recent posts imported from
their feed.


![[image error]](http://1.bp.blogspot.com/-OHChnFQUUyE/Tq8YbmVTOTI/AAAAAAAACLg/jz217Rc0EVM/s1600/PA316105.JPG)