
Gesine Bullock-Prado's Blog, page 30
December 5, 2010
Sunday Bake
 Sunday is a prep day, when I start assembling doughs and organizing a week of orders. But it's also my favorite time to savor a few hours playing with ingredients and techniques. Today I defrosted some cassis purée and dug a big bag of matcha out from the back of the pantry. I chiffoned and I buttercreamed and I assembled. Then I took out the serrated knife and dug into the layers, cutting out a bowl from the middle of the layer cake, flipping it over and then building it over again. I had meant to take pictures of the process, to give a detailed how-to for creating a checkerboard cake. However, once I shoved that knife into the middle of a perfectly good layer cake, dug out a monstrous hunk, draped a reserve layer over what was now a gaping pastry sink hole, flipped the cake over, and then replaced the hunk of cake I'd just sawed and set aside, I'd developed a serious case of baking flop sweat and was physically incapable of picking up a camera with my buttercream sodden hands and taking a picture. And if I had, you'd just be as confused as I was. Next time. I promise.


December 4, 2010
Join Me on the New Facebook Baker's Forum!

Do you have a lingering baking question? Do you particularly proud of your latest creations and want to share your triumph? Just want to talk sugar? Join me at the new forum: Bake it Like you Mean It: Closet Master Bakers Unite.

December 3, 2010
On the Third Day of Cookiemas, My True Love Gave to Me: Pistachio Hearts

Zimtsterne are de rigeur on my family's holiday cookie menu. If you're not familiar, it's a cinnamon, hazelnut (some people use almond) meringue cookie. It's chewy and lovely.
It's never been my favorite.
Since I'm a grown woman, I'm permitted to do as I please. That includes messing with time worn family recipes. And since I've been so brazen as to invent my own holiday, Cookiemas, I'm taking upon myself to start some new culinary traditions.
Let's start with pistachio hearts, shall we?
Pistachio Hearts
The hearts follow zimtsterne rules, so if you're an old hand at the nutty meringue, go forward fearlessly. Otherwise, follow directions. I've added a small amount of orange zest to give the treat a hint of holiday finesse. You can feel free to work without it.
Ingredients
2 LARGE egg whites
pinch salt
1 1/4 cups confectioners sugar
8 ounces shelled, raw and unsalted pistachios
1/4 teaspoon (large pinch) orange zest
(extra confectioners and some parchment paper for rolling)
Procedure
-In a food processor, grind together pistachios, 1/4 cup of the confectioner's and the zest until the pistachios are finely ground. Set aside.
-Combine egg whites and salt in the bowl of a VERY CLEAN and dry mixing bowl. Whisk until the egg whites become foamy. Slowly add the confectioner's sugar and beat on high until you get stiff, white peaks (this can take a few minutes).
-Set aside about 1/4 to 1/3 of the meringue mixture (just eyeball it).
-Fold the remaining meringue into the ground nut mixture until you've create a thick dough.

-Sprinkle a generous amount of confectioner's sugar on a piece of parchment. Flatten the dough on top of the parchment and sift a generous amount of confectioner's sugar on top of the dough and then top with another piece of parchment. Roll the dough to about 1/4 inch thick.
-Using a heart shaped cookie cutter (dip in confectioner's sugar or water to keep the cutter from sticking to the dough), stamp out the hearts and place on a parchment lined cookie sheet. Spread an inch or so apart. The cookies don't spread so there's not much worry.

-Using a small offset spatula, smear the tops of each heart with a light layer of the reserved meringue. Continue with the rest of the cookies.

-Bake at 300º for about 15 - 20 minutes, or until the bottoms of the cookies are a VERY light golden brown. The cookies should be light and chewy, not hard and crunchy.

December 2, 2010
On the Second Day of Cookiemas...Nutella Chevre Brownies

We're only two days in and I've already diverted from the cookie in Cookiemas. I have to consult the Good(ie) Book to make sure I've not committed some unpardonable sin with such a diversion. Oh hell, let me rot because if Nutella is a sin, I don't want to be good.
Nutella Chevre Brownies
This is a riff off of cheesecake brownies, using Vermont Butter and Cheese chevre instead of Philadelphia's. It lends a tart background that compliments the full-bore sweet of the hazenut spread. Feel free to use Philly's finest if you'd rather.
Ingredients
For the Brownies
1/2 cup flour
2 ounces dark cocoa powder (this comes out to be a little less than 1/2 cup but it's best to weigh)
1 teaspoon salt
1/2 teaspoon baking soda
6 ounces semi or bittersweet chocolate
1 stick (4 ounces) unsalted butter
3/4 cup sugar
3 eggs
For the Nutella Chevre
8 ounces chevre
2 tablespoons Nutella
1 tablespoon sugar
1 egg
pinch salt
Procedure
For the Brownies
-whisk together dry ingredients (flour, cocoa powder, salt and baking soda). Set aside.
-Melt chocolate and butter in metal bowl over simmering water until melted (or gently nuke). Set aside, keep warm.
-In a mixer, whisk eggs and sugar until just combined. Slowly add melted chocolate and butter until combined and then add flour mixture, making sure not to over mix.
For the Chevre
-in a mixer fit with the paddle attachment, mix chevre, Nutella, sugar, egg and salt until smooth.
I use heart molds (obviously) but you can use a brownie pan to bake. I fill each mold 1/2 full with brownie batter. Be forewarned, the brownie batter is quite thick. Don't be afraid to really manhandle the chevre into the brownie batter. It all comes out beautifully when baked. Swirl about 1 teaspoon of chevre into the batter (feel free to add more or less). Bake at 325º for about half hour or until a toothpick comes out with moist crumbs stuck to it but not gooey batter. If you choose to dump the lot in a brownie pan, the baking time will increase. You can also layer the brownie batter and the chevre, creating a lovely layer of tanginess.

December 1, 2010
On the First Day of Cookiemas My True Love Gave to Me: Rugelach, of course
 Don't let anyone tell you differently, it's the reason for the season. That's right, baking cookies is the heart and soul of the holidays. Let the floured hijinks of Cookiemas begin!
And as today is the first day (o.k., night) of Chanukah, the first cookie on the first day of Cookiemas shall be rugelach.
Strawberry-Pistachio Rugelach
(Makes 36)
INGREDIENTS
2 packages (1 pound) cream cheese
1 pound unsalted, room temperature butter
3/4 cup sugar
1 teaspoon salt
1 tablespoon vanilla
1 tablespoon milk
4 cups AP flour
PROCEDURE
-Cream together cream cheese, butter, sugar and salt until creamy. Add salt, vanilla and milk. Mix until incorporated.
-Slowly add all flour until just incorporated. Don't overwork the dough.
-Using your hands turn the dough out onto a floured surface and lightly knead until smooth.
-Divide the dough into three even pieces (if you're going to be exact, each round will weight 1pound 1 ounce).
-Pat each piece of dough into a circle and cover with plastic wrap. Refrigerate for an hour.
-Roll the dough on a lightly floured surface into a 12 inch circle.

-Score the dough into 12 pieces. Don't cut through just yet, you'll find that unless you have a pie marker, you won't be as good at this as you'd like. Your pieces will be uneven and you'll be able to make corrections once you start cutting.
-At this stage, you can smear a light layer of jam (I used strawberry) over the entirety of the dough before cutting. However, I like a variety of flavors. Nutella, for instance. Who doesn't want to shove Nutella into everything they can? So at this stage, I cut the little triangles like a pizza pie and divide the triangles into a jammy schmear pile and a Nutella schmear pile.

-Using a small offset spatula, gently cover each triangle with a light coating of jam (or Nutella) and sprinkle with ground nuts for added texture and flavor.
-Roll each triangle of dough, starting at the wider end, into a crescent.
-Brush the rugelach with a light coating of milk and sprinkle with sanding sugar.

-Bake at 350º for 20 minutes or until golden brown. Happy Chanukah!!!

November 30, 2010
A Sneak Preview of Sugar Baby!
 Click in the link and see a preview of Sugar Baby!
Open publication - Free publishing - More stc cooks

November 10, 2010
Holy Cream Puff, Batman! La Religieuse

I present to you the lovely Religieuse for no other reason than they are delicious, beautiful and vibrant. And writer extraordinaire, Laura Zigman, was tiring of the burnt umber so pervasive in all my baking pictures of late (it's pumpkin season, so sue me).
The French have a bevy of uses for choux: the eclair, cream puff, gougere, Paris Brest, Croquembouche, St. Honoré. Give a French baker some choux, they'll scare it up into something magnificent.
Even French nuns join in on the choux hijinks. Hence, the holy in the puff. Traditionally, the choux treat is made of one large choux puff topped by a second smaller orb. But I figured a chaste novitiate wouldn't refuse a third when offered.

La Religieuse
Choux Paste
Follow the directions in the post but instead of long eclairs, pipe a large, round dollop that's about the diameter of a tennis ball and then another that's a little smaller than half that size. Pipe the large choux puffs on a separate sheetpan from the smaller ones. Bake as directed, keeping an eye on the smaller puffs so they don't over brown. DON'T open the oven in the first 15 minutes of baking, lest those puppies fall.
THE FILLING
Raspberry Pastry Cream
Ingredients
1/2 cup heavy cream1/2 cup milk1/4 cup sugar3 egg yolkspinch salt2 1/2 tablespoons cornstarch1/8 cup raspberry purée
for lightening:
1 cup cold heavy cream, whipped to stiff peaks
Procedure
Whisk yolks, sugar, salt, cornstarch and purée in the bowl of an electric mixer until light and fluffy
Simmer cream and milk in a heavy saucepan and slowly pour the hot cream into whisking sugar/yolk mixture until well combined.
Transfer back to the saucepan and whisk over medium heat until thickened.
Place in a bowl and cover the top of the cream with plastic wrap to prevent a skin from forming. Refrigerate until completely cool.
Stir the pastry cream to loosen and gently fold in the whipped cream. Refrigerate if not using immediately. Otherwise, fill a piping bag fit with an open tipped pastry tip (large enough to allow the cream to flow easily but small enough not to create a monstrous hole in the cream puff.
THE COVER (or habit, if you will)
Pouring Fondant
1 cup sugar1/4 cup corn syrup1/4 cup water1/4 cup raspberry purée1/2 teaspoon cornstarchsquirt of lemon juice
Procedure
Stir the ingredients in a heavy saucepan over medium heat until the sugar has completely melted. Wipe down the sides of the pot with a damp pastry brush to remove any errant sugar crystals. Clip on a candy thermometer and heat to soft ball (235º F).
Immediately pour the syrup into a food processor and allow the syrup to cool, undisturbed, until the temperature has dropped to 140º F.
Process for a few minutes, until the syrup becomes opaque and a little thicker (just a few minutes).
Dip the choux puffs into the fondant and hold upside down to remove an excess. Allow the fondant to dry, at least 15 minutes before filling.
TO FILL:
Poke a small hole in the bottom of each choux puff with the pastry tip or a clean wooden dowel. Insert the pastry tip into the choux and gently squeeze pastry cream into the puff until you feel the weight increase. Don't go overboard and split the poor thing.
Fill the small and large choux puffs. Set aside and make some royal icing
TO FINISH
For the Royal Icing.
2 cups confectioners sugar
1-2 egg whites
Procedure
Place 2 cups of confectioners and 1 egg white into the bowl of an electric mixer fit with the paddle attachment. Beat until the mixture forms a paste. If the mixture is dry, add a touch more egg white. The consistency is for piping not for flooding, so it should be a thick paste that doesn't flow but should still have a nice shine.
Fill a pastry bag fit with a small open tip (#2 or #3 works well, not so small that the icing won't extrude).
Place a small dollop onto the top (very middle) of a large cream puff and place a smaller cream puff on top of the adhesive royal icing. Continue with the remaining puffs. I like to pipe fans with the royal icing and let them dry over night. I then pipe another dollop of royal icing on top of the smallest puff and stand around holding the damn thing until the fan is completely adhered. It's a pain but well worth the pastry drama.
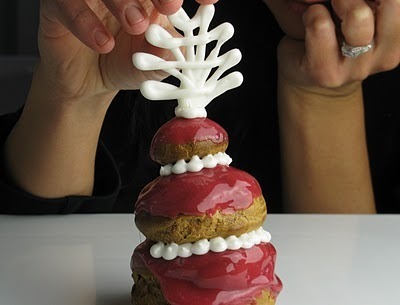 Holding a fan. Patiently.
You can pipe beading around the seams with the icing or leave them bare. Up to you entirely.

November 3, 2010
Thank you.
 Keep on keepin' on.
I wanted to write and thank everyone for your donations for my Marine Marathon run on behalf of the American Cancer Society. And your encouragement, I can say with unmitigated sincerity that had you guys not been the "rah rah squad" you've been, I might have stopped when my knee popped at mile 17 (that's what you get when you get lazy and do almost all your running on a treadmill and never on the open road. Hills and asphalt are two real-world elements you'll not encounter on a mechanized conveyor). But I kept on, if only with a slight tilt and I made sure to keep in mind that whatever momentary pain I was enduring, it was nothing compared to radiation, chemo or even the knowledge that cancer is a part of your living fiber.
I can't recommend this experience enough for bakers who really should be able to eat every damn morsel they bake with impunity but reality just doesn't see it our way. I recommend the experience even more for the pure camaraderie of the day, in a place that's the very heart of our nation and bustling with enthusiasm and support at every mile. The happy cow bells of spectators, they chimed from Arlington to the Washington Monument and back again.
Now back to baking.
 PROOF! at the finish.
October 24, 2010
Gluten Free Crepe for the Intolerant

I'm intolerant. For a woman raised for all intents and purposes as a vegan, I suffer from a cornucopia of "health food" culinary prejudices. First, of all things, I have little to no patience for the above mentioned vegans. If I fell into a worm hole and ran into my college self, I'd shove a cheeseburger in her bleating pie hole and stomp her Morrissey tape to oblivion while screaming, "Hey whiney, you wonder why you're moody and tired? Eat some !#*@(#*! protein!" The burger would be free range, organic, grass fed and kosher; my food prejudices run a perverse gamut.

Add to that, my pathological aversion to anti-gluten rhetoric when not accompanied by a valid claim to Celiacs and let's not get started on the anti-dairy faction, lactose intolerance notwithstanding.
I can't ignore that my entrenched belief system is brutally flawed, that I'm a food crank of Andy Rooney proportions. My antipathy also runs contrary to my pastry self, the girl who is forever intrigued by the chemical transformation wrought by a change up in ratio and ingredient substitution. I'm working on it, turning my bakery into a bastion of culinary tolerance and experimentation. It's a slow going therapy but I'm not displeased with some of the results. It doesn't hurt that my latest project, buck wheat crepes, are steeped in French tradition and deliciousness, so I was pretty much guaranteed a satisfying gluten-free denouement. A gluten and butter logged woman has to start somewhere.

Gluten Free/Lactose Free Buckwheat Crepes with Sautéed Maple Pears
(makes about 8 crepes)
Ingredients
3/4 cup buckwheat flour
1/4 cup garbanzo/fava flour
1 1/4 cup almond milk
3 eggs
4 tablespoons extra virgin olive oil
1 tablespoon maple sugar
1 tablespoon vanilla powder
1/2 teaspoon salt
non-stick spray for the pan
Procedure
-Blend all the ingredients in a blender or food processor. Traditionally, it's required that you refrigerate crepe batter for a few hours to hydrate the batter. Since there's no gluten present, I just ignored the usual crepe requirements and got to cooking.
-Spray a non-stick pan with non-stick spray and whirl about 1/4 cup of batter in the pan to create an even layer of crepe batter. Cook over medium heat until cooked through. You can flip the crepe to cook the top side a bit more but I like to cover the pan with a lid during cooking for supreme tenderness.
For the pears, half and core one pear and thinly slice. Sautée in 4 tablespoons of maple syrup over medium-low heat until soft. Top your buckwheat crepe with a dollop of pear and an additional drizzle of maple.

October 18, 2010
Our Journey in a Cake

 Anguillan Johnnycakes!
 Even the local kitties know what's good for breakfast
 Marcia. Chef extraordinaire!
 Welcome to the Island! Johnnycakes, salt cod, plantains and local eggs.
 The view was almost as good as the food.
We traveled far away from home. I came from New England. Ray journeyed from Santa Fe. We'd not seen each other for months and had the great fortune of staging a reunion in the most glorious of tropical locations accompanied by family and friends.
We ate and laughed and sunned.
 And then we ate some more.
And what I found, as I often do when half way around the world from home, that I can always find a culinary lodestone that can connect a glorious, tiny tropical island in the caribbean to my home in the cold, green mountains of New England.
Johnnycakes, or journey cakes, are an ancient North American staple. I like to think of them as reality's equivalent of the Ring Trilogy's Elven flatbread Lembas. It's a delicious leavened treat that travels beautifully on a long slog. It's rare to find a johnnycake on a menu these days, the rare exception is in the caribbean and New England.
local spiny lobster and crawfish!
I thank Marcia, an Anguillan chef and culinary magician, for bringing journeycakes back to my table in the north country.
 Vermont Made Johnnycakes
North Country Johnnycakes
INGREDIENTS
2 1/2 cups AP flour1/2 cup cornmeal2 tablespoons maple sugar1 teaspoon white pepper2 teaspoons sea salt2 tablespoons baking powder3 tablespoons cold butter cut into small pieces1 1/4 cups water
Extra cornmeal for forming the cakes.

PROCEDURE
In a food processor, pulse together dry ingredients until just combined.
Add cold bits of butter, pulsing until the butter is incorporated and starts to look like cornmeal.
 With the processor running, slowly add the water until the dough comes together and is uniformly processed.
The dough will be sticky, sprinkle a layer of cornmeal on a plate. Scoop cornmeal into small golfball sized blobs. Cover the blog with a small amount of cornmeal and roll into a uniform ball in your hand. Flatten the dough.

 Fry in a few inches of hot oil (325º) until the cake starts to bubble and the bottom side browns, about 2 to 3 minutes. Flip the johnnycake carefully and cook for about a minute more until brown on both sides.
 Transfer to a paper towel lined plate.
Gesine Bullock-Prado's Blog

- Gesine Bullock-Prado's profile
- 69 followers
Gesine Bullock-Prado isn't a Goodreads Author
(yet),
but they
do have a blog,
so here are some recent posts imported from
their feed.

