
Nicholas C. Zakas's Blog, page 4
March 26, 2018
Scheduling Jekyll posts with Netlify and AWS
Not too long ago I moved this site from a custom setup on Amazon Web Services (AWS) to Netlify[1]. My AWS setup was a bit cumbersome, consisting of a Jenkins machine that pulled from a private GitHub repository, built the site using Jekyll[2], and published the result to S3. The benefit of this setup over using GitHub pages was that I could schedule posts to be published later. Jenkins was run every morning and new posts were automatically published without manual intervention. (Jenkins was also triggered whenever I pushed to the GitHub repository for instant builds.)
My custom AWS setup worked well, but it cost around $14 every month and I wasn't happy about that, especially given how infrequently I've been writing new posts in the past couple of years. I decided in the short-term to just move this site to Netlify and not worry about scheduling posts because I didn't think I would be writing that much for the foreseeable future. If I ever wanted to post something, I could do so manually, and in the meantime I'd be saving $14 a month. As it turned out, scheduling posts on Netlify was a lot simpler than I thought it would be. All I needed was an AWS Lambda function and an AWS Cloudwatch event.
Note: This post assumes you already have a site setup on Netlify using a GitHub repository. While I assume the solution works the same for other source code repository types, like BitBucket, I'm not entirely sure. This post also assumes that you have an AWS account.
Configuring Jekyll
By default, Jekyll generates all blog posts in the _posts directory regardless of the publish date associated with each. That obviously doesn't work well when you want to schedule posts to be published in the future, so the first step is to configure Jekyll to ignore future posts. To do so, add this key to Jekyll's _config.yml:
future: false
Setting future to false tells Jekyll to skip any posts with a publish date in the future. You can then set the date field in the front matter of a post to a future date and know that the post will not be generated until then, like this:
---
layout: post
title: "My future post"
date: 2075-01-01 00:00:00
---
This post will be published on January 1, 2075, so it will not be built by Jekyll until that point in time. I find it easier to schedule all posts for midnight so that whenever the site gets published, so long as the date matches, the post will always be generated.
Generating a Netlify build hook
One of the things I like about Netlify is that you can trigger a new site build whenever you want, either manually or programmatically. Netlify has a useful feature called a build hook[3], which is a URL that triggers a new build. To generate a new build hook, go to the Netlify dashboard for your domain and go Site Settings and then to the Build & Deploy page. When you scroll down, you'll see a section for Build Hooks. Click "Add build hook", give your new hook a name (something like "Daily Cron Job" would be appropriate here), and choose the branch to build from.
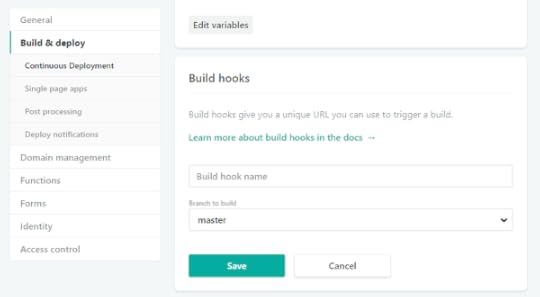
You'll be presented with a new URL that looks something like this:
https://api.netlify.com/build_hooks/{... long unique identifier}
Whenever you send a POST request to the build hook, Netlify will pull the latest files from the GitHub repository, build the site, and deploy it. This is quite useful because you don't need to worry about authenticating against the Netlify API; you can use this URL without credentials. Just make sure to keep this URL a secret. You can see the URL in your list of build hooks on the same page.
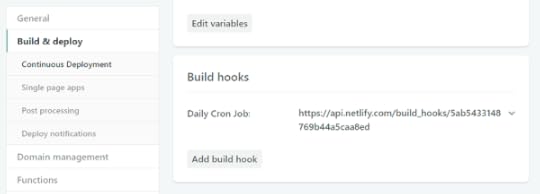
(Don't worry, the build hook URL in the screenshot has already been deleted.)
Creating the AWS Lambda function
AWS Lambda functions are standalone functions that don't require you to setup and manage a server. As such, they are especially useful when you have very simple processes to run infrequently. All you need to do is create a Lambda function that sends a POST request to the build URL.
The first step is to create a local Node.js application that will become the executable code for the Lamda function. Create a new directory (build-netlify-lambda, for example) and install the request module, which will make it easy to send an HTTP request:
$ cd build-netlify-lambda
$ npm i request
You can create a package.json file if you want, but it's not necessary.
Next, create a file called index.js inside of build-netlify-lamda and paste the following code into it:
"use strict";
const request = require("request");
exports.handler = (event, context, callback) => {
request.post(process.env.URL, callback);
};
All Lamda functions export a handler function that receives three parameters: an event object with information about the event that triggered the function call, a context object with information about the runtime environment, and a callback function to call when the function is finished. In this case, you only need the callback function. The Netlify build hook will be stored in an environment variable called URL in the Lambda function, which you access using process.env.URL. That value is passed directly to request.post() along with the callback, making this Lamda function as small as possible.
Now, you just need to zip up the entire build-netlify-lambda directory so it can be deployed to AWS Lambda:
$ zip -r build-netlify-lamda.zip index.js node_modules/
Make sure the top level of the zip file has both index.js and node_modules/. If you mistakenly zip up the entire directory so that build-netlify-lambda is at the top level, AWS will not find the executable files.
The last step is to upload this zip file to AWS. To do so, go to the AWS Console[4] and click "Create Function".
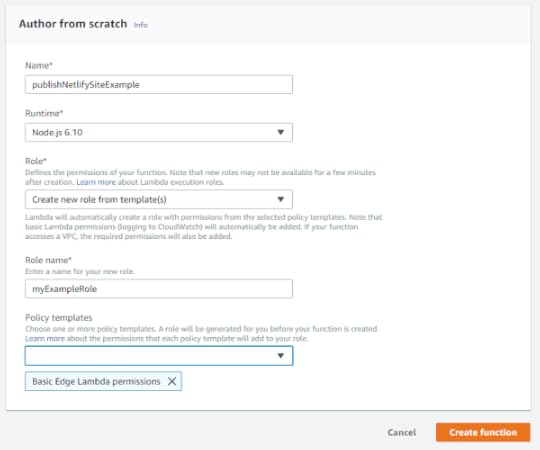
You'll be presented with a form to fill out. Enter a name for the function, such as "publishNetlifySiteExample" and select one of the Node.js options as your runtime. The last field is for the Lambda role. If you already have other roles defined, you can use one that already exists; otherwise, select "Create role from template(s)". This Lambda function doesn't need a lot of permissions, so you can just add "Basic Edge Lambda Permissions" to allow access to logs. Click "Create Function".
When the Lambda function has been created, a new screen will load. This screen is a bit difficult to parse due to the amount of information on it. If this is your first Lambda function, don't worry, you'll get used to it quickly. Scroll down to the section called "Function Code" and select "Upload a .ZIP file" from the "Code entry type" dropdown. You can then select your zip file to upload to the Lambda function.
Beneath the "Function Code" section is the "Environment Variables" section. Create a new environment variable named URL with its value set to your Netlify build hook. Once that's complete, click "Save" at the top of the screen to upload the zip file and save your environment variables.
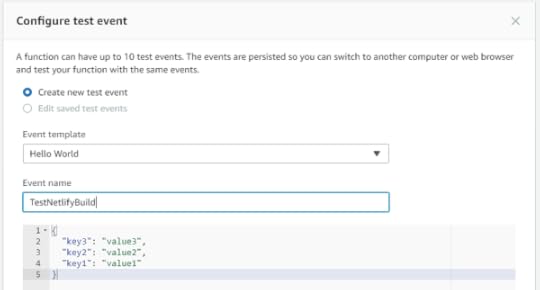
You can test the Lambda function by creating a new test event. At the top of the screen, click the "Select a Test Event Dropdown" and select "Configure Test Events".

A new dialog will open to create a test event. Since this Lambda function doesn't use any incoming data, you can keep the default settings and give the event a meaningful name like "TestNetlifyBuild". Click the "Create" button to save the test event.
In order to run the test, make sure "TestNetlifyBuild" is selected in the dropdown at the top of the screen and click the "Test" button. This will execute the function. If you look at your Netlify Deploys dashboard, you should see a new build begin.
Setting up the Cloudwatch event
At this point, the Lambda function is operational and will trigger a new Netlify deploy when executed. That's somewhat useful but isn't much more powerful than logging into the Netlify dashboard and manually triggering a build. The goal is to have Netlify build automatically on a certain schedule and Cloudwatch is the perfect solution.
Cloudwatch is a service that generates events based on any number of criteria. You can use it to monitor your services on a variety of criteria and then respond with certain actions. For the purposes of this post, Cloudwatch will be set to run periodically and then trigger the Lambda function that builds the Netlify website.
On the Cloudwatch console[5], click "Events" on the left menu and then the "Create Rule" button.
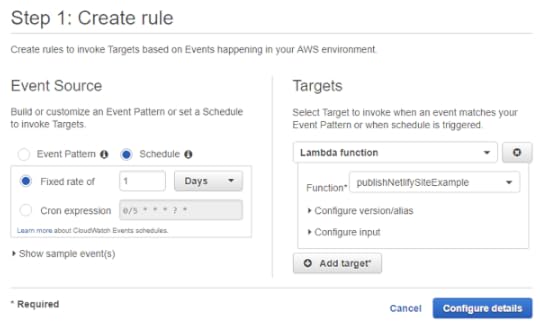
Under "Event Source" select "Schedule". You're now able to select the frequency with which you want the event to be triggered. You can select an interval of minutes, hours, or days, or you can create a custom schedule using a Cron expression. (If you want to control the exact time that an event is triggered, it's best to use a Cron expression.) Under "Targets", select "Lambda function" and your function name. There's no need to configure the version/alias or input because the Lambda function isn't using any of those. Click the "Configure Details" button. You'll be brought to a second dialog.
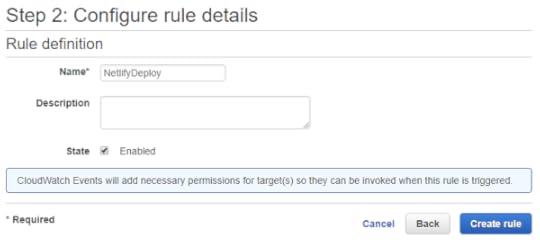
In this dialog, fill in a meaningful name for your event (and optional description) and then click "Create Rule". Rules are on by default so your new event should be triggered at the next interval. The Lambda function will then be called and regenerate the website.
Conclusion
This website has been running on the setup described in this post for over a month. In fact, this post was written ahead of time and published using my AWS Cloudwatch event and Lambda function. The functionality is the same as my previous setup with Jenkins and S3, however, this setup costs $0 compared to $14. I only run my Cloudwatch event two times a week (I'm not posting much these days) and each run of the Lambda function takes under two seconds to complete, which means I fall into the free tier and I'm not charged anything.
The Lambda free tier is one million requests and 400,000 GB-seconds per month. A GB-second is one second of execution time with 1 GB of allocated memory. The Lambda function created in this post uses the default memory allocation of 128 MB. If you figure out the match, you'll still be in the free tier even if you run your Lambda function every hour of the day each month. As the Lambda function only sends off an HTTPS request and then Netlify does the build, the real work isn't done inside of Lambda.
I've found this setup to be very simple and cost-efficient, not to mention a lot less complicated. I no longer have to log into a Jenkins server to figure out why a build of the website failed. There's just one small function to manage and all of the important information is displayed in the Netlify dashboard.
The most important thing to remember when using this setup is to set the date field of each post to some time in the future. When the Cloudwatch event triggers the Lambda function to execute, only those posts with a date in the past will be generated. You can play around with the timing of the Cloudwatch event to best suit your frequency of posts, and keep in mind that Netlify automatically builds the site whenever a change is pushed, so you still have just-in-time updates as needed.
References
Netlify (netlify.com)
Jekyll (jekyllrb.com/)
Netlify Webhooks - Incoming Hooks (netlify.com)
AWS Console - Lambda (console.aws.amazon.com)
AWS Console - Cloudwatch (console.aws.amazon.com)


February 26, 2018
The inception of ESLint
If you're like me, you probably use a lot of open source tools every day without thinking about how they got started. Few projects share the "why" of their creation: the actual problem they were trying to solve and when they first came across that problem. You can, of course, benefit from open source projects without understanding their origin story, but I always find it interesting to hear about how it all started.
I recently realized that I'd never shared the origin story of ESLint. I've shared some of the decisions I made along the way in previous posts but never the initial domino that fell and led to ESLint's creation. As you will see, ESLint wasn't created through some divine intervention or stroke of insight, but rather through a series of events that eventually built up to ESLint's creation.
The bug
I was still fairly new at Box when a teammate was working on a strange bug. A client had reported problems using the web application in Internet Explorer 7 (we were probably one of the last companies supporting IE7 at that point). A developer had apparently used the native XMLHttpRequest object in some JavaScript code instead of our in-house wrapper. This wasn't a problem for any other browser, and there wasn't a problem testing with IE7 internally. The problem occurred because the client had an internal security policy that disabled ActiveX in Internet Explorer, and since the native XMLHttpRequest object in IE7 was really just a wrapper around the ActiveX object, it was blocked as well.
The solution was easy enough, just make sure everyone knows to use the in-house Ajax wrapper instead of the native XMLHttpRequest object. But how could we enforce this? It turned out that Box had a JavaScript "linter" as part of the build system. I put the word linter in quotes because it was really just a series of regular expressions that were run against JavaScript code. For this case, my teammate added a regular expression for "XMLHttpRequest" and that was the solution. The build would break going forward if someone tried to commit a JavaScript file matching that pattern.
In my experience, using regular expressions on source code was never a good idea. I wished that there was a better way to do checks like this one during the build. I figured that someone must have already solved this problem and so I started looking for solutions.
Could it be JSHint?
The first thing I did was email the maintainer of JSHint at that time, Anton Kovalyov[1]. I had remembered reading a blog post[2] that said JSHint was planning to support plugins but couldn't find any information about that feature being implemented. From past experience contributing to JSHint and from modifying JSLint for a project at Yahoo, I knew JSHint hadn't initially been setup to support plugins, and without formal support there wouldn't be an easy way to modify JSHint to do what I wanted.
Anton informed me that the plugin proposal had stalled and didn't look like it would be implemented. I was disappointed, as this seemed like the most direct path to solving the problem. I thanked him and asked him to please not be offended if I create a linter that did what I needed. I wanted to support JSHint, but I felt like this was a problem that needed to be solved with JSHint or without it.
The inspiration
After digging around in the build system at Box, I found there was actually a PHP linter running in addition to the makeshift JavaScript linter. The PHP linter, however, was a lot more involved that the JavaScript one. Instead of using regular expressions, the PHP linter parsed the code into an abstract syntax tree (AST) and then inspected the AST for the patterns to report.
I was probably shaking my head "yes" as I read through that code. Immediately I realized that this was exactly what I needed to do for JavaScript. If only there was some way to parse JavaScript into an AST and then inspect the AST for problems.
The groundwork
With all of this floating around in my brain, I invited Ariya Hidayat[3] to give a talk at Box about whatever topic he pleased. It just so happened that he gave a talk on Esprima[4], the JavaScript parser he wrote in JavaScript. During that talk, Ariya discussed why having an AST representation of JavaScript was useful and referenced several already-existing tools built on top of Esprima. Among those tools were estraverse for traversing the AST and escope for scope analysis, both written by Yusuke Suzuki.
As Ariya continued talking and giving examples of the types of problems an AST can solve, the idea for a new tool formed in my head. It made sense to me that there should be one tool that could perform all of the evaluations Ariya mentioned. After all, they are all just using the AST for difference purposes. Why not have one AST they all can use?
The beginning
Thanks largely to the availability of Esprima, estraverse, and escope, I was able to put together the first prototype of ESLint over a couple of weekends. To me, these three utilities represented everything that I needed to create a new tool that could easily find problem patterns in JavaScript code. If I had to create those from scratch, I have no doubt that ESLint would not exist today. Building on top of those tools, I was able to iterate quickly, and eventually, the tool you know today as ESLint was born.
(I feel it's important to point out that I was not the only one looking to create an AST-based linter at the time. JSCS[5] was also under development at around the same time, and current ESLint maintainer Ilya Volodin was working on his own project before discovering ESLint. If I had not come up with something like ESLint then someone else undoubtedly would have. All of the pieces were already out there thanks to Ariya and Yusuke, someone just had to put them together in a useful way.)
References
Anton Kovalyov (antonkovalyov.com)
JSHint 3 Plans (jshint.com)
Ariya Hidayat (ariya.io)
JavaScript Code Analysis (speakerdeck.com)
JSCS (jscs.info)


October 17, 2016
The ECMAScript 2016 change you probably don't know
Compared to ECMAScript 6 (also known as ECMAScript 2015), ECMAScript 2016 was a minor update to the language specification for JavaScript. This was due to the decision that ECMAScript editions would now move to a yearly release cycle, effectively just a snapshot of all the features that were ready. As such, most resources list only two significant changes in ECMAScript 2016:
The addition of the exponentiation (**) operator
The addition of the Array.prototype.includes() method
These features had the most direct impact for JavaScript developers, however, there is one other significant change that is often forgotten. It's something I cover in my book, Understanding ECMAScript 6, however, I'm still receiving questions about it and so I'd like to dig a bit deeper.
First I'll describe the change and then I'll describe some of the rationale behind it.
The change
ECMAScript 2016 says that the "use strict" directive cannot be used in the body of a function whose parameters either have default values, use destructuring, or a rest parameter. The specification defines simple parameters as parameter lists that contain only identifiers (ECMAScript 5 only supported simple parameter lists)[1]. The change affects all function types, including function declarations and expressions, arrow functions, and concise object literal methods. Here are some examples:
// this is okay
function doSomething(a, b) {
"use strict";
// code
}
// syntax error in ECMAScript 2016
function doSomething(a, b=a) {
"use strict";
// code
}
// syntax error in ECMAScript 2016
const doSomething = function({a, b}) {
"use strict";
// code
};
// syntax error in ECMAScript 2016
const doSomething = (...a) => {
"use strict";
// code
};
const obj = {
// syntax error in ECMAScript 2016
doSomething({a, b}) {
"use strict";
// code
}
};
You can still use "use strict" globally, outside of a function, in order to have that function run in strict mode even if the function has non-simple parameters. For example:
// this is okay
"use strict";
function doSomething(a, b=a) {
// code
}
In this case, the "use strict" directive outside of the function is valid syntax. This is also not a concern if you're using ECMAScript modules, which run all code in strict mode.
Why make this change?
This change is important due to the how strict mode and non-simple parameter lists work. When strict mode was creating in ECMAScript 5, destructuring and default parameter values did not exist, so there was no problem with parsing the parameter list and then seeing a "use strict" directive. At that point, the "use strict" could not affect the outcome of parsing the parameter list, it was only used to validate parameter identifiers (disallowing duplicates and checking for forbidden identifiers like eval and arguments). With the introduction of destructuring and default parameter values in ECMAScript 6, however, this was no longer the case because the specification indicated that parameter lists should be parsed in the same mode as the function body (which means the "use strict" directive in the function body must trigger strict mode).
The first thing to realize is that strict mode requires changes to both parsing and execution[2] of JavaScript code. As a very simple example, strict mode disallows the use of the old-style octal numeric literals (such as 070). If code is parsed in strict mode, then 070 will throw a syntax error. With that in mind, what do you think the following code should do?
// syntax error in ECMAScript 2016
function doSomething(value=070) {
"use strict";
return value;
}
If you have a JavaScript parser attempting to parse this code, the parameter list is parsed before the function body. That means 070 is parsed as valid and then "use strict" is encountered in the function body, which tells the parser, "actually, you should have parsed the parameter list in strict mode." At that point, the parser would have to backtrack and re-parse the parameter list in strict mode so a syntax error is thrown for 070. That might not seem like a big deal, but what if the default parameter value is more complex?
// syntax error in ECMAScript 2016
function doSomething(value=(function() {
return doSomeCalculation() + 070;
}())) {
"use strict";
return value;
}
In this case, with a function used in a default parameter value, you have more of a problem. The number of tokens you'd have to unwind is greater and the you also have to set the function in the default value as running in strict mode. That's a lot of complexity to ensure that the default parameter value expression is parsed correctly and understood to be running in strict mode.
Destructured parameters cause similar problems because they can include default values. For example:
// syntax error in ECMAScript 2016
function doSomething({value=070}) {
"use strict";
return value;
}
Here, the destructured parameter value has a default value that is disallowed in strict mode, causing the same problems as default parameter values.
In the end, it appears TC-39 decided[3] to simply disallow function body "use strict" in situations that were not present in ECMAScript 5 in order to avoid missing edge cases. That means functions with default parameter values, destructured parameters, or rest parameters cannot have "use strict" in the function body. That includes situations where "use strict" would have no effect, such as this:
function outer() {
"use strict";
// syntax error in ECMAScript 2016
function doSomething(value=070) {
"use strict";
return value;
}
}
This example nests a function with non-simple parameters inside of another function that has "use strict". The doSomething() function is automatically in strict mode but JavaScript engines will still throw a syntax error on the "use strict" directive in doSomething()'s function body.
Workarounds
This change is unlikely to affect many developers, which is likely why you weren't aware of it. The "use strict" directive is starting to become a historical artifact of JavaScript as ECMAScript modules and classes both automatically run in strict mode without a way to opt-out, meaning that "use strict" is not needed in those situations. However, in the rare case that you need a function with non-simple parameters to run in strict mode, you can use an IIFE to create the function:
const doSomething = (function() {
"use strict";
return function(value=42) {
return value;
};
}());
In this code, a function is created inside an IIFE that is running in strict mode. This allows the returned function to run in strict mode while using a default parameter value. Because the outer scope is running in strict mode, there is no problem parsing the default parameter value correct and no need for an additional "use strict" inside the function body.
Conclusion
This small change to ECMAScript 2016, disallowing function body "use strict" for functions with non-simple parameter lists, highlights just how difficult evolving such a popular programming language can be. In this case, TC-39 decided to remove ambiguity by introducing a new syntax error that likely would have been part of ECMAScript 6 (2015) had this problem been surfaced earlier. Adding this syntax error was the most obvious path forward because it affects very little existing code (the specification change was made around the same time that JavaScript engines were implementing non-simple parameter lists) and likely wouldn't affect much future code due to ECMAScript modules and classes running in strict mode.
References
Static Semantics: IsSimpleParameterList (ecma-international.org)
It's time to start using JavaScript strict mode (nczonline.net)
The scope of "use strict" with respect to destructuring in parameter lists


April 4, 2016
ES6 module loading: More complicated than you think
One of the most long-awaited features of ECMAScript 6 is the formal definition of modules as part of the language. For years, JavaScript developers have struggled with organizing their code and needing to decide between alternate ad-hoc module formats like RequireJS, AMD, and CommonJS. Formally defining modules as part of JavaScript will eliminate a lot of heartache in the future, but right now, there is still a lot of confusion about how modules work. The confusion exists partly because, as of my writing, there are no engines that can natively load ES6 modules. In the meantime, I'm hoping this post will clarify some of the confusion.
What is a module?
To start, it's important to understand that the specification defines two different types of JavaScript programs: scripts (what we've all been using since JavaScript was created) and modules (newly defined in ES6). While scripts behave the way everyone is used to, modules behave somewhat differently. Specifically modules:
Are always in strict mode with no option to opt-out
Have a top-level scope that is not the global scope
May import bindings from other modules using import
May specify bindings that should be exported using export
These differences look subtle but in fact make modules different enough that parsing and loading needs to be done differently than with scripts.
Parsing differences
One of the most frequent questions received on ESLint related to ES6 modules is this:
Why do I need to specify that a file is a module before it's parsed? Can't you just look for import or export?
I've seen this question repeated all over the Internet as people struggle to understand why JavaScript engines and tools can't autodetect that a file represents a module rather than a script. At first glance, it seems like detecting the presence of export or import should be enough to determine that a file contains a module, but in reality, that's nowhere near enough.
Trying to guess user intent is a dangerous and imprecise game. If you guess correctly, the world applauds you whereas guessing incorrectly has the potential to cause a great deal of damage.
Parsing challenges
In order to autodetect modules in JavaScript programs, you would first have to parse the entire file. While import statements must appear at the beginning of a file, modules need not use import, and so the only positive signal that a file is a module might be the very last statement using an export. So, you cannot escape parsing the entire file in order to have a chance to determine whether or not it's a module.
However, modules are strict mode environments. Strict mode doesn't just have runtime requirements, it also defines the following as syntax errors:
The with statement
Duplicate named arguments for functions
Octal numeric literals (such as 010)
Duplicate property names (in ES5 only, ES6 eliminates this error)
Use of implements, interface, let, package, private, protected, public, static, and yield as identifiers.
All of these are not syntax errors when running in nonstrict mode. If the only signal you have is an export in the last statement of the file, then you would actually have to re-parse the entire file in strict mode to be sure to catch all of these syntax errors. The first parse would have been wasted by running nonstrict mode.
Of course, if you had to detect a module from file contents, you would be forced to always parse files as modules. Since module syntax is strict mode plus import and export, you'd need to default to that in order to allow for import and export to be used. If you were to parse in nonstrict mode, then import and export are a syntax error. You could alternately created a parsing mode that combined nonstrict mode with import and export, but that's an unnatural mode whose result couldn't be used, thus requiring a second pass once the correct mode was determined.
When is a module a module?
The edge case that many miss in the discussion is that modules are not required to use import or export at all. You can have a module that doesn't import anything and doesn't export anything. It might, for example, just modify something in the global scope. For instance, maybe you want to output a message when window.onload fires in a browser and you define a module such as:
// this is a valid module!
window.addEventListener("load", function() {
console.log("Window is loaded");
});
This module can then be loaded by another module or on its own. From looking at the source, there is no way to know that it's a module.
To sum up: while the presence of import or export might indicate a module, the lack of import or export does not clearly indicate that the file is not a module. So there is no effective way to autodetect that a file is a module during parsing.
Loading Differences
While the parsing differences are a bit subtle for modules, the loading differences are not. When a module is loaded, import statements trigger the loading of the specified files. The imported files must be completed parsed and loaded (without error) in order for module execution to begin. In order to do this as quickly as possible, loading begins as import statement are being parsed, prior to parsing the rest of the file.
Once a dependency has been loaded, there's an extra step of verifying that the imported bindings actually exist in the dependency. If you import foo from the module foo.js, the JavaScript engine needs to verify that foo is exported from foo.js before execution continues.
How loading will work
At this point, hopefully it's clear why you need to specify that a file is a module before it is parsed and loaded. In browsers, you will load modules like this:
type="module" src="http://feedproxy.google.com/~r/nczonl...
The tag is the same as always, but the type is set to "module"[1]. This signals to the browser that the file should be loaded as a module. If that foo.js then imports other dependencies, those will be loaded dynamically.
In Node.js, there is not yet a decision on how ES6 modules will be loaded. The most recent recommendation is to use a special file extension, such as .jsm, to indicate that a file is an ES6 module so that Node.js knows how to load it correctly[2].
Conclusion
The differences between scripts and modules are subtle enough that it's hard for developers to understand the restriction of declaring what a JavaScript file represents ahead of time. My hope is that this post clarifies some of the reasons why it's not possible to autodetect modules from inspecting the source code and why tools such as ESLint ask you to specify the file type before executing. There will be a point in the future where ES6 modules are the dominant JavaScript file type and script files are left only on legacy applications, and at that point, it's likely that tools will default to assuming that files are modules. In the meantime, we're going through a difficult adolescence between scripts and modules where mixing the two is going to be a bit painful.
References
The script Element (whatwg.org)
ES6 Module Detection in Node (github.com)


March 7, 2016
Mimicking npm script in Node.js
I'm a big fan of npm scripts[1] and have been using them in all of my projects instead of a standalone build system. The feature I like the most from npm scripts is the ability to run command line executables that are installed in your project's node_modules/.bin directory. That allows you to, for example, install ESLint[2] locally in your project:
$ npm i eslint --save-dev
Then create a "lint" script in your package.json file that looks like this:
{
"name": "Test Project",
"devDependencies": {
"eslint": "^1.10.3"
},
"scripts": {
"lint": "eslint ."
}
}
And after that, you can ESLint by typing:
$ npm run lint
This works because the npm script is actually running node_modules/.bin/eslint. It's a great trick, meaning you don't have to jump through any extra hoops to use these binaries in your scripts. But how does npm do it?
Modifying PATH
The answer is that npm modifies the PATH environment variable so that it affects the lookup of executables. It does this only temporarily, so the change doesn't affect your system as a whole; it is in effect only for the script. I had a need to do the same thing in a project I was working on, and so dug into how this is possible. The actual code in npm is buried pretty deep and uses the exec() asynchronous function to execute scripts. For my purposes, though, I wanted synchronous execution and I didn't need to do most of what npm was doing (since obviously npm is far more complicated than simply running scripts with a modified PATH).
The goal is to run a string on the command line as if it were running directly in the console with the exception that the PATH environment variable includes the current working directory for Node.js.
Creating a new environment
The first step is to create a clone of all environment variables. You want these so that the command will run with all the same information available on the system, and it's a good idea to keep the original process.env around just in case you need it later:
var env = Object.assign({}, process.env);
The local env is the copy you can work with and modify without fear of affecting anything else. The next step is to modify the PATH variable so that it includes the correct node_modules/.bin directory. This needs to be added to the front of PATH so the search begins there before looking elsewhere. Slightly complicating matters is that Windows uses a semicolon to separate directories in PATH while Unix uses a colon, so you need to take that into account:
var SEPARATOR = process.platform === "win32" ? ";" : ":",
env = Object.assign({}, process.env);
env.PATH = path.resolve("./node_modules/.bin") + SEPARATOR + env.PATH;
The env.PATH property is updated to place ./node_modules/.bin to the front of what it already contained (path.resolve() will resolve relative to the current working directory). Now the env object is ready for use.
Executing the script
The next step is to execute the script using the modified environment. This is done using execSync() for synchronous execution. The first argument is the command to run and the second argument is an object containing options for the execution environment. On that second argument, you need to set two properties: env, which is the environment settings, and cwd to set the current working directory (it defaults to undefined). So to run a script in the current working directory, you would do this:
var execSync = require("child_process").execSync;
var SEPARATOR = process.platform === "win32" ? ";" : ":",
env = Object.assign({}, process.env);
env.PATH = path.resolve("./node_modules/.bin") + SEPARATOR + env.PATH;
function myExecSync(cmd) {
var output = execSync(cmd, {
cwd: process.cwd(),
env: env
});
console.log(output);
}
You can then call myExecSync() and it will correctly find executables in the node_modules/.bin directory from the current working directory:
myExecSync("eslint .");
Conclusion
This little trick has come in very useful in my projects, especially when I want to write scripts that run inside of Node.js files. Given that executables are installed locally when installing packages from npm, the ability to easily run those executables is a powerful addition to your scripting capabilities. I'm using this to write longer scripts inside of JavaScript files that are triggered from npm run, and in doing so, the scripts end up looking more like Makefiles or bash scripts (and that makes me happy).
References
How npm handles the scripts field (npmjs.com)
ESLint (eslint.org)


February 8, 2016
Reflections on ESLint's success
It's hard for me to believe, but I first conceived and created ESLint[1] in June 2013 and first announced it's availability in July 2013[2]. As frequent readers might recall, the primary goal of ESLint was to create a linter with rules that could be loaded at runtime. I had seen some problems in our JavaScript at work and really wanted some automation to validate those mistakes weren't repeated.
In the two and a half years since ESLint was introduced, its popularity exploded. This past month, we surpassed 1.5 million npm downloads in 30 days, something I never thought possible back in the day when an average month of downloads was 600.
And all of this happened while I've been extremely ill with Lyme disease and barely able to leave my house for the past two years. That meant I couldn't go to conferences or meetups to speak about ESLint (the previous two years I was a conference regular). Yet somehow, ESLint gained traction and has continued to gain in popularity. I think it's a good time to look back and try to understand why.
People are writing more JavaScript
Over the past three years, we've continued to see growth in the amount of JavaScript being sent to browsers. According to HTTP Archive[3], the average page now has over 100KB more JavaScript than it had in 2013.
Another factor is the explosive popularity of Node.js. Whereas previously the amount of JavaScript written was limited to client-side usage, Node.js ensured that a whole new group of developers would be writing JavaScript. With JavaScript running in the browser and on the server, that would naturally lead to an increase in demand for JavaScript tooling. Since ESLint can be used for both browser and Node.js JavaScript, it was well-suited to address this demand.
Linting has become more popular
As the demand for JavaScript tooling increased, so too did the demand for JavaScript linting. This logically makes sense because the more JavaScript you write, the more you're going to need help keeping it functional and avoiding common mistakes. You can see this general trend by looking at the npm download numbers for JSHint, JSCS, and ESLint since mid-2013.

JSCS and ESLint were created right around the same time, so it's interesting to see the growth trajectories for each as compared to JSHint. JSHint has continued its domination of JavaScript linting popularity into the beginning of 2016. Both JSCS and ESLint continue to grow over time, as well. Perhaps the most interesting part of this data is that all three tools are continuing grow their download counts over time, implying that there are more people download linters each month than there are people switching linters.
So ESLint is really just part of a larger trend towards more JavaScript linting by the development community.
The ECMAScript 6/Babel factor
The excitement around ECMAScript 6 has been growing steadily for the past four years, so much so that it made Babel a massively successful project. The ability to start using ECMAScript 6 syntax and features without waiting for official support in browsers and Node.js meant demand for a new class of JavaScript tools. There just wasn't enough tooling for ECMAScript 6 code, and in this regard, JSHint fell pretty far behind.
ESLint, on the other hand, had a very big advantage: you could swap out the default parser for another one so long as it produced the same format as Esprima (or Espree). That meant those who wanted to use ECMAScript 6 could use the now-discontinued Facebook fork of Esprima with ES6 support immediately to get some basic linting for their code. Espree was also updated to support ES6 (mostly by pulling features from the Facebook Esprima fork). That made developers using ES6 quite happy.
Of course, Babel didn't stop at implementing ES6 features, going on to include experimental features. That meant there was demand for tools that could deal with not just the standard features, but anything that was in any stage of development for JavaScript. Here, ESLint's pluggable parser capability also made a big difference because babel-eslint[4] was created by the Babel team as a wrapper around Babel that ESLint could use.
Before long, ESLint was the recommended linter for anyone using ECMAScript 6 or Babel, and it was made possible by a decision to allow the default parser to be swapped out for a compatible one.
Today, babel-eslint is used in roughly 41% of ESLint installs (based on npm download statistics).
The React factor
It's impossible to talk about ESLint's popularity without talking about React. A key part of React is the ability to embed JSX code inside of JavaScript, and that was something no other linter was capable of doing at first. ESLint not only implemented JSX as part of the default parser, but with pluggable parsers, you could use babel-eslint or Facebook's Esprima fork to get JSX support. React users were starting to turn to ESLint because of this.
There were a lot of requests to create React-specific rules in ESLint itself, but as a policy, I never wanted library-specific rules as those would inevitably require a lot of maintenance. In December 2014, eslint-plugin-react[5] was introduced with React-specific rules and really caught on quickly with React developers.
Then, in February 2015, Dan Abramov wrote, "Lint like it's 2015"[6]. In that post, he described how well ESLint worked with React, and had high praise:
If you haven't heard of it, ESLint is the linter I always wanted JSHint to be.
Dan also walked people through setting up ESLint and how to use babel-eslint, providing some much-needed documentation for the process. It's pretty clear to see that this was a big turning point for ESLint as the monthly download count nearly doubled from 89,000 in February 2015 to 161,000 in March 2015. That really seemed to kick off a period of rapid growth for ESLint that has continued to this day.
Today, eslint-plugin-react is used in a bit more than 45% of ESLint installs (based on npm download statistics).
Extensibility was key
From the beginning, I had this idea that ESLint could be a small core utility at the center of a larger ecosystem. My goal was to make ESLint ageless by allowing enough extension points that my failure to deliver features would not stop ESLint from acquiring new capabilities. While ESLint hasn't yet met that vision completely, it is extremely flexible:
You can add new rules at runtime, allowing anyone to write their own rules. I saw this as key if I wanted to avoid spending every day with a laundry list of random rules people wanted. Now, there's nothing stopping anyone from writing an ESLint rule.
The pluggable parser means that ESLint can work with anything outputting the same format as Espree. As I've already discussed, this has been a big reason for ESLint's popularity.
Shareable configurations all people to package up their configs and share them, making it easy to have multiple projects adhere to the same configuration (eslint-config-airbnb is used in 15% of ESLint installs).
Plugins allow people to easily package and share their rules, text processors, environments, and configurations with anyone.
A rational Node.js API that made it easy to create build tool plugins (for Grunt, Gulp, and more) as well as led to the creation of no-configuration linters like Standard and XO.
I'm hoping we can add more extension points to ESLint as it continues to evolve.
Listening to the community
One of the things I tried very hard to do was really listen to the ESLint community. While I was pretty stubborn early on about my vision for ESLint, I came to realize that there is a definitely a wisdom in crowds. The more you hear the same suggestions over and over, the more likely it's a real pain point that should be addressed. I'm much better now about watching for these patterns, as the community has really come through with some great ideas that have led to ESLint's success:
The pluggable parser feature - a direct request from Facebook so they could use their own fork of Esprima with ESLint.
JSX support - early on, I was very against including JSX support by default. But the request kept coming up, so I eventually agreed. And as mentioned earlier, that has been a key part of ESLint's success.
Shareable configs - this came about due to the emergence of Standard and other wrappers around ESLint whose sole purpose was to run ESLint with a specific configuration. It seemed like the community really wanted an easy way to share configs, and so shareable configs were born.
Plugins - early on, the only way to load your own rules was from the filesystem using the --rulesdir command line option. Pretty soon, people started packaging up their rules into npm packages and publishing them. This was a bit of a painful process, and it was hard to use more than one package at a time, so we ended up adding plugins so that rules could easily be shared.
It's pretty clear that the ESLint community has some fantastic ideas for how the project should grow, and there's little doubt that ESLint's success is directly to them.
Grassroots support
Since ESLint was created, I wrote exactly two blog posts about it. The first was the intro post on my personal blog[2] and the second was a followup on Smashing Magazine[7] last September. Other than that, the extend of my marketing for ESLint was limited to mention it on Twitter and managing the ESLint Twitter account. If I had been well enough to give talks, I'm sure I could have done a better job marketing ESLint, but since I wasn't, I decided that I wouldn't even try to promote it.
I was pleasantly surprised when I started seeing other people giving talks and writing articles about ESLint. In the beginning, it was people that I didn't know and had never heard of. Articles (such as Dan's) were popping up and people were posting videos of conference and meetup talks about ESLint. The popularity grew organically as more content was posted online.
An interesting contrast is in the growth story of JSCS. Early on, JSCS got JSHint's endorsement as a companion to JSHint. JSHint had decided to remove stylistic rules altogether and JSCS serves as a replacement for those rules. As such, the JSHint team was referring people to JSCS when questions arose. Having the support of the undeniable leader in the space is huge, and for most of the early days, JSCS usage far outpaced ESLint usage. At several points during that first year, I thought that JSCS would crush ESLint and I could go back to having my nights and weekends free. But that didn't happen.
The strong grassroots support sustained ESLint and eventually helped it onto a tremendous growth spurt. Users were creating more users and more buzz, and ESLint was along for the ride.
Focusing on usefulness not competition
One of the things I'm most proud of is the story that came along with ESLint. At no point did I make any claims that ESLint was better than anything else. I never asked people to switch from JSHint or JSCS. My main message was that ESLint was better for your project is you wanted to write custom rules. That was it. To this day, the ESLint README says (in the FAQ):
I'm not trying to convince you that ESLint is better than JSHint. The only thing I know is that ESLint is better than JSHint for what I'm doing. In the off chance you're doing something similar, it might be better for you. Otherwise, keep using JSHint, I'm certainly not going to tell you to stop using it.
That's been my position, and now the position of the team, all along. I still believe JSHint is a good tool and has a lot of advantages. JSCS, as well, is a good tool that has some real benefits. Many people use a combination of JSHint and JSCS and are quite happy, and for those people, I'd encourage them to continue doing so.
The focus of ESLint is really just to be as useful as possible and let developers decide if it's right for them. All decisions are made based on how useful changes are to our community and not based on competition with other tools. There's plenty of room in the world for multiple linting tools, there doesn't have to be just one.
Patience pays off
I've mentioned before[8] that there seems to be a frantic race to create popular open source projects, with a focus on popularity over everything else. ESLint is a good example of how long it takes for a project to organically grow into a success. For the first nearly two years of its existence, ESLint downloads were a distant third behind JSHint and JSCS. It took time for both ESLint and its community to mature. The "overnight" success of ESLint didn't happen over night, it happened by continuing to improve the project based on usefulness and community feedback.
A great team
I've been truly blessed with a fantastic team of contributors to ESLint. As I've had less energy and time to work on ESLint, they have picked up a lot of the slack. The thing that amazes me constantly is that I've never met these people in real life, nor have I ever heard their voices, yet they've become a group of people I look forward to conversing with every day. Their undying passion and creativity has kept ESLint going as I've struggled with my health, and while I started ESLint alone, they are undoubtedly the reason it survived long enough to reach its current level of popularity.
A huge thanks to Ilya Volodin, Brandon Mills, Gyandeep Singh, Mathias Schreck, Jamund Ferguson, Ian VanSchooten, Toru Nagashima, Burak Yiğit Kaya, and Alberto Rodríguez for all of your hard work.
Conclusion
There are a lot of factors that have led to the success of ESLint, and by sharing them, I'm hoping to give others a roadmap for what it takes to create a successful open source project. As with most worthwhile endeavors, a bit of luck coupled with the support of others and a clear vision for what I was trying to accomplish were all key parts of this story. I'm a big believer that if you focus on creating something useful, and you're willing to put in the hard work, eventually the work will get the recognition it deserves.
ESLint is continuing to grow and change, and the team and community are growing and changing as well. I'm very excited to see where ESLint goes next.
References
ESLint (eslint.org)
Introducing ESLint (nczonline.net)
HTTP Archive Trends 2013-2016 (httparchive.org)
babel-eslint (github.com)
eslint-plugin-react (github.com)
Lint like it's 2015 (medium.com)
ESLint: The Next Generation JavaScript Linter (smashingmagazine.com)
Why I'm not using your open source project (nczonline.net)


January 25, 2016
React and the economics of dynamic web interfaces
I've been doing web development since 2000, and in that time I've seen eras marked by libraries and frameworks come and go. The Ajax era began around the same time as the jQuery era began, the Backbone era began several years later, and the React era really began about two years ago. Each of these eras brought with it a new realization about the way we can build dynamic web interfaces based on the tools available. jQuery made it clear that browser abstractions and CSS querying were important to developers, Backbone introduced the concept of client-side architecture to many, and React enables the creation of UI components instead of templates.
There are plenty of blog posts, talks, and videos touting how React works and why it's good for web development. There's been a lot of discussion around the virtual DOM, embedding HTML into JavaScript with JSX, organizing the UI into components. These are all interesting technical pieces of React, however, I don't believe the technical aspects alone account for its popularity. After researching a bit more, I realized why React is so powerful: it fundamentally changes an equation we've all been working with for years, and an idea can be much more powerful than the technology implementing it.
The economics of dynamic web interfaces
Ever since the Document Object Model (DOM) was introduced and widely adopted in web browsers, web developers have been met with the same advice: the DOM is slow. Avoid DOM updates. Repaint and reflow will get you. In short, there was a tangible cost to dynamically updating a web page, and that cost is broken down into:
Performance - making changes to the DOM is slow due to repaint and reflow
Efficiency - you can end up creating memory leaks by losing track of node references
Complexity - make sure you're detaching and reattaching event handlers in the correct spots
When you stop and look at it this way, the cost of updating the DOM is high enough that the value you get from that cost needs to be sufficiently high to justify the cost. Or, you can try to lower the cost such that the value doesn't have to be as high to justify it. So we developed a whole series of approaches to try and lower that cost:
Make only small changes. Large changes are slow, so if you can stick to small changes, it will be less slow.
For big changes, detach the DOM node from the document, make your changes, and then reattach the DOM node. This will avoid repaint and reflow.
Use event delegation to listen for events at a high level so you won't accidentally remove a node that has an important event handler.
Each of these approaches chips away at the cost of updating the DOM but doesn't do anything to fundamentally change the equation. In this world, you would never dream of issuing a command to re-render the entire page multiple times as it would undoubtedly cause a poor user experience. And that's exactly what React changes.
React changes the equation
As you're undoubtedly aware, React solves a lot of these problems. It manages your event handlers for you, ensuring they're attached and detached at the correct time and on the correct nodes; it creates and destroys DOM structures efficiently; it uses virtual DOM diffing to determine which parts of a component have changed and only updates those parts. All of these technical solutions change the old equation: DOM updates are now fast.
(Yes, there is some debate[1] as to whether React is as fast as people claim or not. That's really not important for this discussion, as it's the idea of DOM updates being fast that is important).
Changing the equation has a ripple effect through how we develop web applications. This occurred to me first when looking at React Router[2]. The basic premise of React Router is that when the URL changes, it's intercepted by the History API's[3] state mechanism, and then the entire view is re-rendered. Before React, you would never think of dynamically re-rendering an entire page at one time, it would be too slow. The complexity of ensuring that the page worked correctly was high, and while some would do it, it would undoubtedly be the source of bugs. So we'd just stick to re-rendering smaller portions of the page.
But with React, you don't think twice about re-rendering the entire page because, in all likelihood, you won't be re-rendering everything. You'll just be re-rendering the pieces that need change. The cost of each render remains relatively consistent and is based only on the parts of the page that have changed, so there's little difference between manually re-rendering just the part of the page that has changed and re-rendering the entire page. Those are effectively the same operations.
React has, ironically, allowed us to once again think about writing web applications as a series of pages rather than a monolithic blob of JavaScript code. It's no wonder that developers have become so engaged with React and React Router: it's the same mental model as traditional server-only applications. A page is rendered, some changes are requested, then a page is rendered with those changes. The only difference is that this can all happen client-side.
Conclusion
I'm still learning about React, and while the technical details are interesting, the way it has changed the dynamic web interface equation is really impressive to me. I ended up asking myself questions like, "what would you build if there was no cost to client-side rendering?" My mind took off in multiple directions at the same time and I came to realize just how game-changing React is. The most powerful thing any tool can do is fundamentally change the economics of the situation that it works in, and React has done that for client-side development.
References
React + Performance = ? (aerotwist.com)
React Router (github.com)
History API (developer.mozilla.org)


December 14, 2015
Why I'm not using your open source project
When you think of open source software, you might think of a few specific projects depending on your area of interest. If you work on web applications, the term "open source" might conjure up visions of Apache or Node.js; if you're into big data, then perhaps Hadoop comes to mind; if you care a lot about security, you might think of OpenSSL; if you're a front-end developer, then maybe jQuery and React pop into your head. In all cases, you're thinking about those projects that have succeeded and, to some degree, achieved a level of ubiquity in their respective arenas. It's with this success in mind that a lot of open source authors venture out, sharing their code with the hopes of reaching a similar level of success and ubiquity.
There's a peculiar mix of altruism and egotism that goes into releasing an open source project. On the one hand, you might be solving a problem that others are struggling with, and sharing your solution will save them a lot of time. On the other, the near-fantastic rock star status of those who have created successful open source projects (think John Resig, Ryan Dahl, and Linus Torvalds) drives people to overshare in the hopes of also achieving such status. This has resulted in a glut of open source projects being released into the wild and their creators venturing out on marketing campaigns to attract users.
You need to be aware of this trend and the reality of open source today: most open source projects are crap, and you need to be careful which ones you use.
Note: For the purposes of this post, the term "use" refers to including the project in your application.
Background
As the maintainer of a reasonably popular open source project (ESLint[1]), and an architect at Box, I make a lot of decisions around which open source projects should be used in some widely-used applications. I end up investigating some open source project roughly once a week, and most of the time, end up pretty disappointed with what I find. I want to use open source code as much as possible, but I can't do it at the expense of maintainability, security, or a whole host of other concerns. Replacing a working custom-built solution with an open source one sounds like an easy win, but in reality, could cause a lot of problems if the wrong open source project is used.
This post contains the top issues I find in open source projects that cause me to reject their usage.
Your project doesn't have a license
This might seem basic, but there are a significant number of open source projects that are published without a license. Simply saying "this is open source" doesn't make it so, nor does sharing your code publicly on GitHub or BitBucket automatically mean it can be used. Any code that doesn't explicitly have a license specified is considered "all rights reserved" by the author (this is standard copyright law in the United States[2]). That means you don't have any legal right to use, reproduce, distribute, or otherwise use the code without the consent of the author.
If the project seems promising and passes the other checks I use (see below), then I might contact the author and ask for a license to be added. I absolutely won't use a project that doesn't have its license terms explicitly defined in the source code repository, so I also will not accept just an email from the author granting me a license.
Takeaway: When you publish your project, make sure you have specified a license. Include a LICENSE file in the repository and mention the license in your README.
Your project is GPL/LGPL licensed
Many credit GPL with the rise in popularity of open source as well as the success of Linux. For those unaware, the GPL has a clause that allows anyone to use the project in its compiled form with no repercussions but if you modify the source code or include it in another project then you must open source that as well. The exact text is as follows[3]:
You must cause any work that you distribute or publish, that in whole or in part contains or is derived from the Program or any part thereof, to be licensed as a whole at no charge to all third parties under the terms of this License.
So when you license code as GPL, that license becomes viral whenever you distribute it, which means including the code in your own open source project. That is a showstopper for businesses wishing to incorporate code from these projects. (You can still safely use the code locally, such as running Linux on a server or using a build-time tool. It's just including the code in your application that can be problematic.)
The LGPL[4] slightly modifies the terms of the GPL such that you can link to the project so long as the application doesn't contain any actual code from the project itself. Here's the relevant clause:
A program that contains no derivative of any portion of the Library, but is designed to work with the Library by being compiled or linked with it, is called a "work that uses the Library". Such a work, in isolation, is not a derivative work of the Library, and therefore falls outside the scope of this License.
That means your open source project can link to a LGPL library without triggering the viral clause of the GPL, making it safe to use in business.
However, most of the code I deal with is not compiled. JavaScript, Python, PHP, CSS, etc., are a significant gray area because there is no distinction between the source code and the distributed artifact - they are one in the same. If I use a GPL or LGPL JavaScript library that is sent to the browser as part of my application, does that count as distribution? I've asked a couple of lawyers about this and the general response I've received is, "this is definitely a gray area that hasn't been decided by the courts." Perhaps someday someone will bring such a case to the courts and we can know for sure, but in the meantime, I just don't use GPL or LGPL projects.
Takeaway: If you can choose a more permissive license for your project than GPL or LGPL, please do.
You aren't maintaining the code
It seems that a lot of people see open sourcing something as the pot of gold at the end of the rainbow. They worked hard on some code and the payoff is fame and appreciation from an adoring crowd. But how many of those projects will be around in six months? A year? Is the project something you're committed to maintaining, or was it just a passing fancy? Why would I want to use that project? It was interesting to you this weekend, but if I come to rely on it, can I count on you continuing to update it?
When evaluating a project, I typically look at:
When was the last commit?
Are there responses to the most recent issues?
When was the version released?
Are pull requests being merged at all?
These all tell me how well the project is being maintained. If the most recent commit is a year ago, then I'm pretty sure no one is maintaining it. The larger the project, the more this means the project is likely abandoned. Further, it likely means the author hasn't really thought about the project in a while and might not even remember all of how it works (both bad signs). The smaller the project, the shorter the timeframe I consider (a project with one author and zero commits in three months is likely abandoned).
Similarly, the activity in issues and pull requests says a lot. Is the author engaging with people at all? Open to accepting feedback and patches? And are those turned around into new versions? If I'm going to rely on something, I need to know that either the author will fix problems or my patches will be accepted when I find problems.
Periodically I'll get people telling me that they'll maintain something if I use it. That's a nice though, but saying you'll maintain something is very different from actually doing it. I prefer to see a track record of maintenance happening regardless of my involvement.
Takeaway: If you're unsure that you want to work on this project for more than a year, think twice before encouraging people to adopt it. Don't lead them down a dead end. Build up a pattern of maintaining your code and let that speak for itself.
You don't have documentation or tests
I group documentation and tests together because they are similar: documentation describes how the end user should use the project and tests describe how the project should technically work. If a project is missing either of these or both, then I don't consider it worth my time to investigate. A lack of documentation means I need to dig through the code to figure out how to use it and a lack of tests means there's no way to tell when something breaks. Both situations are dire if you intend to rely on the functionality in a product.
Takeaway: Make sure you have documentation and tests for at least the core parts of the project.
You aren't using the project
This is an interesting occurrence in the world of open source: people who don't use the projects they create. Sometimes, this the result of an open source project that began as a weekend hobby project and the author doesn't want to leave the source code to die on their computer. Instead, they open source it with the hope of "letting it live," like releasing an animal into the wild. I frequently see people announcing such projects on their Twitter stream, proudly proclaiming that this project they spent 48 hours on is now ready for use. They themselves aren't using it in any product or in any way that could be considered "production," but they would like you to do so.
Weekend projects might be fun to play with, but relying on them for something important is placing a huge bet on an unknown quantity. I generally prefer to use projects that others are already using. The reason is simple: the more production-like places the project is used, the more someone is interested in maintaining it.
If you yourself, the author, aren't using the project in some production environment then you are essentially asking me to take a risk that you've been unwilling to take. I didn't even attempt to use ESLint at Box until it had been in existence and use on my own personal projects for eight months. Even then, I ended up spending a lot of time chasing down bugs and fixing compatibility issues. ESLint got better not just because it was open source, but because I was putting it through a lot in my day-to-day work.
Takeaway: You should always be your project's first user. Make sure you've created something that's useful for yourself first, then ask friends to try it out.
In closing
I think open source is wonderful for many reasons, but not all open source projects are created the same. "Free" isn't the same as "good," and projects that don't measure up (based on the criteria) in this article should be handled with care. As I said in the introduction, the majority of open source projects are crap, so picking out the good ones is a tough job. When you succeed, you're able to accelerate and stabilize your code base; when you fail, you can cause immeasurable harm to that same code base.
This isn't to dissuade anyone from open sourcing their work - please continue to do so. Just realize that there is a significant bar for open source projects that are reliable enough to use in a product. If you want your project to succeed, you should be aiming for that bar. If you're just sharing so your code can live on, be sure to say so in your README. There's plenty of room in the open source ecosystem for both categories of projects, we just really need people to be better about pointing out which is which.
Update(2015-Dec-15): Clarified language around GPL and LGPL license. Also added note that "use" means including in your application to further clarify the concerns.
References
ESLint (github.com)
Copyright is Automatic (nolo.com)
GPL 2.0 (opensource.org)


November 16, 2015
Hidden performance implications of Object.defineProperty()
I've recently been working on a project to port Espree[1], the parser that powers ESLint[2], to use Acorn[3]. In so doing, I ran into an interesting performance problem related Object.defineProperty(). It seems that any call to Object.defineProperty() has a nontrivial negative affect on performance in V8 (both Node.js and Chrome). An investigation led to some interesting results.
The problem
I noticed the problem the first time I ran ESLint's performance test, which showed a 500ms slowdown using the Acorn-powered Espree. Using the current version of Espree (v2.2.5), the ESLint performance test always completed in about 2500ms (you can run this yourself by cloining the ESLint repository and running npm run perf). When I switched to use Acorn-powered Espree, that time ballooned to just over 3000ms. A 500ms increase is much too large of a change and would undoubtedly affect ESLint users in a significant way, so I had to figure out what was taking so long.
The investigation
To do that, I used ESLint's profiling command (npm run profile) to run ESLint through Chrome's profiler. When I did that, something immediately jumped out at me.

As you can see, the function esprimaFinishNode() was taking up over 33% of the run time. This function augments the generated AST nodes from Acorn so that they look more like Esprima AST nodes. It took me only a minute to realize that the only out-of-place operation in that function involved Object.defineProperty().
Acorn adds nonstandard start and end properties to each AST node in order to track their position. These properties can't be removed because Acorn uses them internally to make decision about other nodes. So instead of removing them, Espree was setting them to be nonenumerable using Object.defineProperty(), like this:
Object.defineProperty(node, "start", { enumerable: false });
Object.defineProperty(node, "end", { enumerable: false });
By making these properties nonenumerable, the output of JSON serialization would match that from Esprima and anyone using for-in loop would be unaffected. Unfortunately, this was the very thing that caused the performance problem. When I commented out those two lines, the profile run looked very different:

All of a sudden, esprimaFinishNode() was no longer where the most time was spent, accounting for less than 5% (owning less than 3%). The different was the two calls to Object.defineProperty().
Digging in deeper
I really wanted to make start and end nonenumerable, so I tried several alternatives to using Object.defineProperty() in esprimaFinishNode().
The first thing I did was use Object.defineProperties() to define both properties instead of two separate calls to Object.defineProperty(). My thinking was that perhaps each call to Object.defineProperty() was incurring a performance penalty so using one function call instead of two could cut that down. This made no change at all, and so I concluded the reason for the slowdown was not the number of times Object.defineProperty() was called, but rather, the fact that it was called at all.
Remembering some of the information I read about V8 optimization[4], I thought this slowdown might be the result of the object changing shape after it was defined. Perhaps change the attributes of properties was enough to change the shape of the object in V8, and that was causing a less optimal path to be taken. I decided to this theory.
The first test was the original code, which loosely looked like this:
// Slowest: ~3000ms
var node = new Node();
Object.defineProperty(node, "start", { enumerable: false });
Object.defineProperty(node, "end", { enumerable: false });
As I mentioned before, this was about 3000ms in the ESLint performance test. The first think I tried was to move Object.defineProperty() into the Node constructor (which is used to create new AST nodes). I thought that perhaps if I could better define the shape inside the constructor, I'd avoid the late penalties of changing the shape long after its creation. So the second test looked something like this:
// A bit faster: ~2800ms
function Node() {
this.start = 0;
this.end = 0;
Object.defineProperty(node, "start", { enumerable: false });
Object.defineProperty(node, "end", { enumerable: false });
}
This did result in a performance improvement, dropping the ESLint performance test from 3000ms to around 2800ms. Still slower than the original 2500ms, but moving in the right direction.
Next, I wondered if creating the property and then making it enumerable would be slower than just using Object.defineProperty() to both create it and make it enumerable. Thus, I took another stab at it:
// Faster: ~2650ms
function Node() {
Object.defineProperties(this, {
start: { enumerable: false, value: pos, writable: true, configurable: true },
end: { enumerable: false, value: pos, writable: true, configurable: true }
});
}
This version brought the ESLint performance test down even further, to around 2650ms. The easiest way to get it back down to 2500ms? Just make the properties enumerable:
// Fastest: ~2500ms
function Node() {
this.start = 0;
this.end = 0;
}
Yes, it turns out not using Object.defineProperty() at all is still the most performant approach.
Takeaways
What was most surprising to me is that there was basically no truly efficient way to make properties nonenumerable, especially when compared against simply assigning a new property onto this directly. This investigation showed that if you must use Object.defineProperty(), it's better to do so inside of a constructor than outside. However, where performance is a consideration, it seems best to avoid using Object.defineProperty() at all.
I'm thankful that I had the ESLint performance test, which runs ESLint on a fairly large JavaScript file, to be able to narrow this issue down. I'm not sure an isolated benchmark would have revealed the extent to which this was a problem for ESLint.
References
Espree (github.com)
ESLint (github.com)
Acorn (github.com)
What's up with monomorphism?


October 19, 2015
ECMAScript 6 destructuring gotcha
With all of the new syntax in ECMAScript 6, you're bound to periodically find something that is confusing (likely as you're hunting down an error). Recently, I've seen an uptick in the reporting of a specific type of error as it relates to destructuring assignment[1] using object patterns.
Destructuring basics
Before you can understand the problem, it's helpful to look at a few examples of destructuring. Here's a simple one:
var node = {
type: "Identifier",
value: "foo"
};
var { type } = node;
console.log(type); // "Identifier"
In this example, the variable type is created and assigned to be the value of node.type using destructuring. You can also grab the value property if you want:
var node = {
type: "Identifier",
value: "foo"
};
var { type, value } = node;
console.log(type); // "Identifier"
console.log(value); // "foo"
Destructuring lets you extract specific properties from an object. On the surface, this is pretty simple and self-explanatory.
Different variable names
You can also create variables that have different names than the properties whose values they are assigned. For example:
var node = {
type: "Identifier",
value: "foo"
};
var { type: myType } = node;
console.log(myType); // "Identifier"
console.log(type); // error: type is not defined
Here, the variable created is called myType and receives the value of node.type. This syntax is a bit confusing, as it's the opposite of the name-value pair syntax of object literals. There is no variable type in this example.
Default values
Adding more complexity, you can assign a default value for any destructured property using an equals sign. This can make the destructuring looks a bit complicated, for example:
var node = {
type: "Identifier",
value: "foo"
};
var anotherNode = {};
var { type: myType = "Unknown" } = anotherNode;
console.log(myType); // "Unknown"
This example creates a local variable myType that is assigned the value of node.type is it exists. If node.type doesn't exist, then myType is assigned the value "Unknown".
Nested destructuring
You can further the complexity by nesting destructuring. That means you can retrieve values from objects inside of objects, such as:
var node = {
type: "Identifier",
value: "foo",
loc: {
start: {
line: 1,
column: 5
},
end: {
line: 1,
column: 8
}
}
};
var { loc: { start: { line }} } = node;
console.log(line); // 1
console.log(loc); // error: loc is undefined
In this example, only the local variable line is created with a value of 1. The loc and start inside of the object pattern simply serve as location information to find line.
The gotcha
Here's where things get confusing. Now that you've had this crash course in destructuring, what is the expected behavior in the following code?
var node = {
type: "Identifier",
value: "foo",
loc: {
start: {
line: 1,
column: 5
},
end: {
line: 1,
column: 8
}
}
};
var { loc: {} } = node;
console.log(loc); // ?
You may be surprised to know that console.log(loc) actually throws an error because loc is undefined. Why is that? Because the curly braces to the right of loc: indicate that loc is merely location information for what comes to the right of it. However, there is nothing to the right of it, so there are no new variables created.
This is confusing because it looks like an object literal whose loc property is assigned an empty object, but in fact, that is not the case.
It's quite possible the intent of this code is to assign an empty object when loc isn't present, and in that case, you need to use an equals sign:
var node = {
type: "Identifier",
value: "foo",
loc: {
start: {
line: 1,
column: 5
},
end: {
line: 1,
column: 8
}
}
};
var { loc = {} } = node;
console.log(loc); // [Object object]
Here, loc always ends up as an object regardless of whether node.loc exists.
Summary
Nested destructuring can be pretty confusing, especially when you mix in default values. In all cases identifier: {} in a destructured assignment is a mistake: it has zero effect. It's more likely that you meant to assign a default value to variable. ESLint just added the new-empty-pattern rule[2] to check for this problem, so I'd recommend turning that on immediately if you are using destructuring in your code.
References
Destructuring by me (leanpub.com)
Disallow empty destructuring patterns


Nicholas C. Zakas's Blog

- Nicholas C. Zakas's profile
- 106 followers

