
Vickie Howell's Blog: Vickie Howell's Website, page 30
October 31, 2018
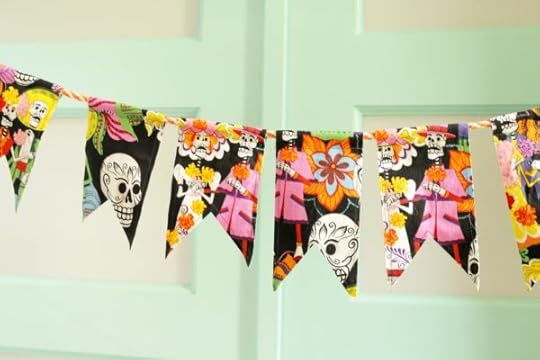
Dia De Los Muertos Fabric Garland
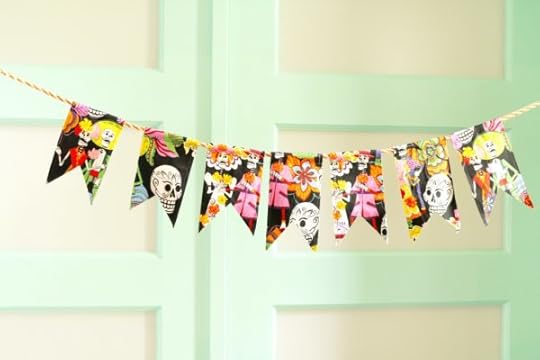
Dia De Los Muertos Fabric Garland
As the daughter of a Hispanic father who has passed away and whose birthday was on November 1st, for years I’ve been planning on creating a Dia De Los Muertos alter in his honor (as well including our other loved ones on the other side.) This year’s the year! I kicked off the plan while I already had the sewing machine out to make my daughter’s Halloween costume, by making a simple Dia De Los Muertos Fabric Garland to help decorate the scape. Bookmark this project for your own Day of the Dead alters, or use it for any holiday or celebration by simply swapping out thematic fabrics.
Sending much love to your loved ones in the great beyond!
MATERIALS
Approx 1/2 yd cotton fabric
Iron-on, fusible interfacing
Rotary cutter and self-healing mat
Straight edge or quilting ruler
Sewing machine & coordinating thread
Approx 2 yds of cotton rope, yarn, or string
Scissors
HOW-TO
Stabilize fabric: Cut fabric in half. Set one piece aside. Following the manufacturer’s instructions, iron-on fusible interfacing to the wrong side of one piece, then iron that piece to the wrong side of the other piece.
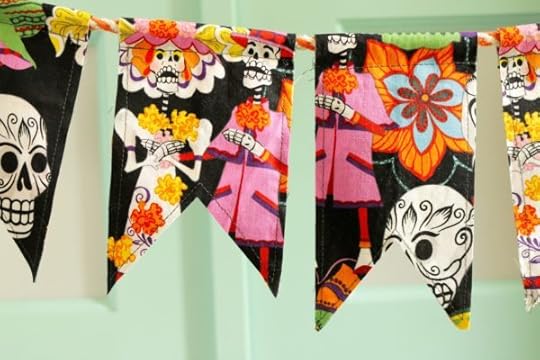
Cut out flags: Using rotary cutter and mat, cut seven, 3 1/2″ x 4″ pieces of fabric out of your now, sandwiched fabric.
Create flag points: Fold a piece in half lengthwise; beginning from unfolded corner cut the tip at an angle to the folded edge. When you unfold, you should see two points (see photo below.) Repeat process for all fabric pieces.
Sew: Fold the top edge of flag down about 1/2″/2cm from the top edge. Using 1/8″-1/4″ seam allowance, sew across to create hanging pocket, then continue topstitching around the entire flag. Repeat for all flags.
String & hang: String flags onto rope; tie loops at either end; hang and enjoy!
The post Dia De Los Muertos Fabric Garland appeared first on Vickie Howell.


October 25, 2018
Plastic Canvas Sunglass Case (a.k.a Prada in plastic?)
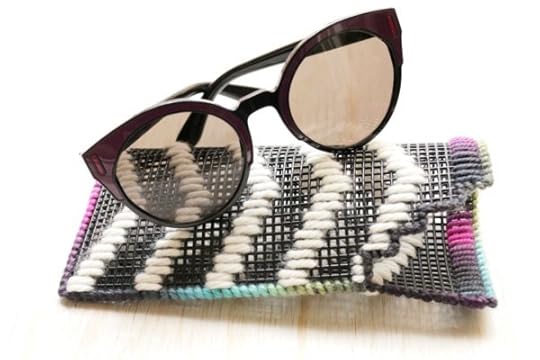
A while back my husband showed me a pair of jeans on the Barney’s New York website that, as a design detail, had white paint splattered all willy-nilly on them. They were two thousand dollars. It was at that moment that I realized that all bets were off; anything goes! Craft mediums and high fashion are at a crossroads and apparently, hitching a ride together. It’s in that spirit that I bring you today’s project post in which I put Prada in plastic canvas, and do so gleefully.
This Plastic Canvas Sunglass Case project comes to you courtesy of the folks over at SmartBuyGlasses.com who offer designer brand eyewear quickly and more affordable than most. Nab your pair, then come back to me to stitch a sleeve for your new sunnies!
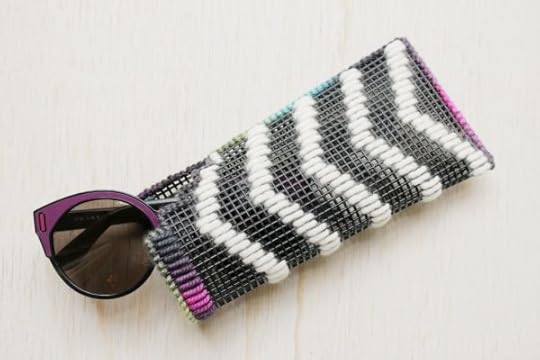
Plastic Canvas Sunglass Case
MATERIALS
1 Sheet, black plastic canvas
Scraps of chunky yarn in colors A & B (Bonus points for coordinating your palette with your specs!)
Tapestry needle
Scissors
Badass pair of Prada sunglasses from SmartBuyGlasses
HOW-TO
Cut plastic canvas so it’s 46 squares wide x 47 squares high (The numbers are only important if you’re following my exact stitch pattern. Otherwise, you do you. The piece should be around a 7″ square. Unless, of course, you’re making a sleeve for Iris Apfel’s magnificent specs in which case I highly recommend measuring first.)
OPTIONAL: Cut a little stair-step detail out of the top corner of the piece. I cut over 2-3 squares, and up 3-4 squares for each stair step. Again, add your own flair. Or borrow mine. Either is great.
Using Color A yarn and the tapestry needle, start at the bottom-left corner and make a straight stitch covering 4 squares total, vertically. Repeat once more, in the parallel squares.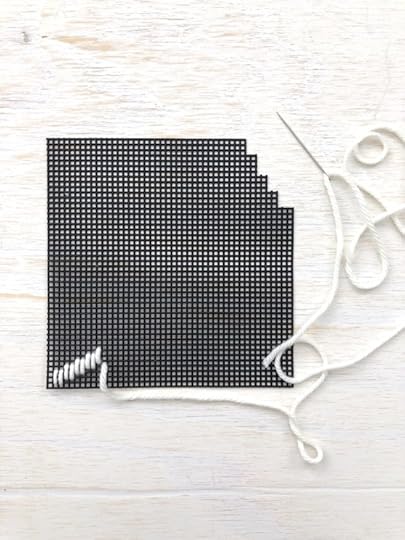
Following the photo below, continue with the straight stitch, but starting 1 stitch higher every 2 stitches until you get to the peak of the zig-zag formation, then 1 square lower (every 2 stitches) to descend.
Repeat the last step until you have 5 zig-zag stripes, or until you’re satisfied with the design.
Using Color B yarn, stitch a straight row of vertical stitches across the top of the piece.
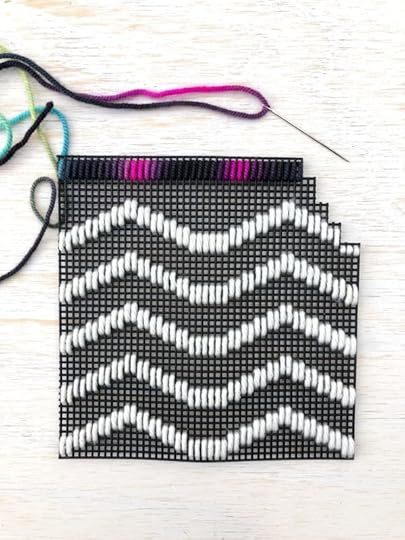
Finish by folding the piece in half and whip-stitching through both widths of plastic canvas, and around any exposed edges. Weave in ends.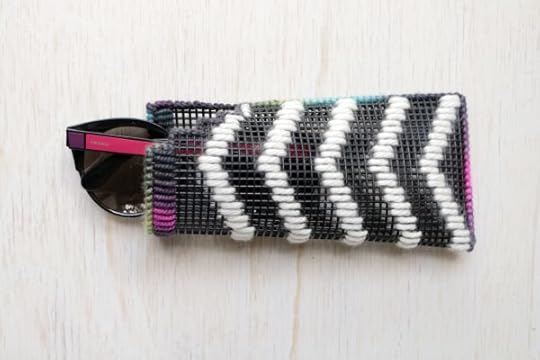
The post Plastic Canvas Sunglass Case (a.k.a Prada in plastic?) appeared first on Vickie Howell.
October 22, 2018
Crochet Rope Baskets | Crochet Pretty Organizers for Your Jewelry and More!
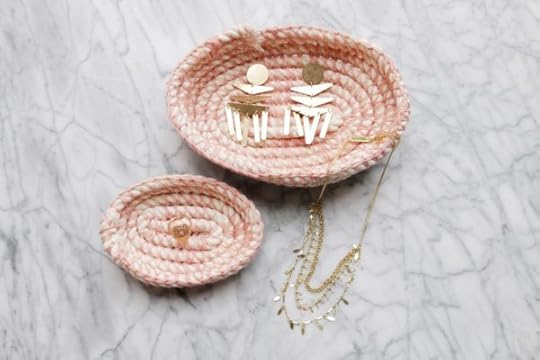
Crochet Rope Baskets
I love statement piece accessories, so when Ana Luisa Jewelry shared a few of their gorgeous, gold items: Betty Earrings, Alexa Necklace, and Janet Ring, I was thrilled to create something display them in.
These crochet rope baskets are made quickly using single crochet wrapped around plain, ol’ rope. I love the juxtaposition of the hand-dyed wool and unbleached cotton against the cool, geometric metal when used to display jewelry.
Right now you can get $15 off any Ana Luisa Jewelry by going here. Use code Vickie15 at checkout.
Then, watch the tutorial below and get started. By the time your new favorite accessories arrive, you’ll have cute containers to keep them in. Enjoy!
Crochet Rope Basket Directions
MATERIALS
Cotton rope (Approx 25 yds will make both baskets)
Small amount sock-weight (DK would work, too) yarn
US G/4mm hook (or appropriate size for yarn weight)
Sharp tapestry needle
Scissors
FINISHED MEASUREMENTS
Small 5″ x 3 1/2″ (Large 7 1/2″ x 5 1/2″)
HOW-TO
Ch 8 (18).
Base:
Round 1: Holding rope parallel to the chain, with about 1″/2.5 cm of rope standing taller than yarn chain, sc into the 2nd ch from hook AND around rope; sc around rope and in every ch to end (after a few stitches worked, snip excess rope so it’s now at the same level as crochet — see above video for reference), bend rope so that it comes back against itself (like an oval spiral), 2sc around rope and in SAME st as the last st worked (3sc total in last st); *sc around rope and into the bottom of the next st; rep from * to last st, 3 sc in last st.
Round 2: Continuing to spiral the rope, [sc around rope in next st and to one end of the piece; 3 sc in center st of one end] TWICE.
Repeat Round 2 until the basket base measures 5″(7 1/2″) long.
Body:
Next Round: Continuing to spiral the rope, sc around rope in next st and every st around (without increasing at either end.)
Repeat the last round until basket 1 (3) times more.
Secure rope end by sc into 1 row below, 3 times.
Fasten off; cut rope.
FINISHING
Weave in ends.
Use sharp tapestry needle and yarn tail to further secure rope end into place.
The post Crochet Rope Baskets | Crochet Pretty Organizers for Your Jewelry and More! appeared first on Vickie Howell.
October 15, 2018
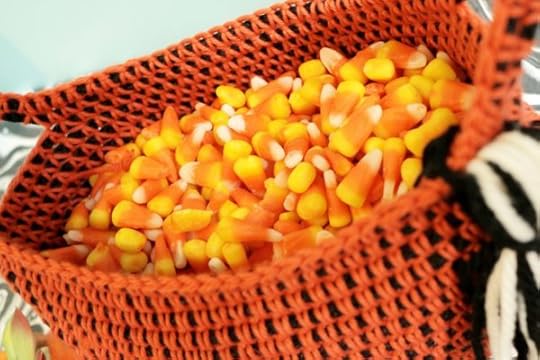
Rope and Crochet Basket | Halloween Candy Holder
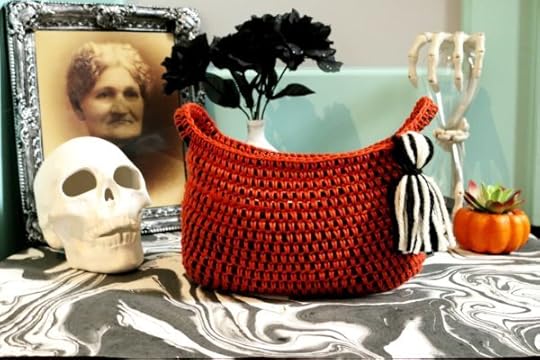
Rope and Crochet Basket | Halloween Candy Holder
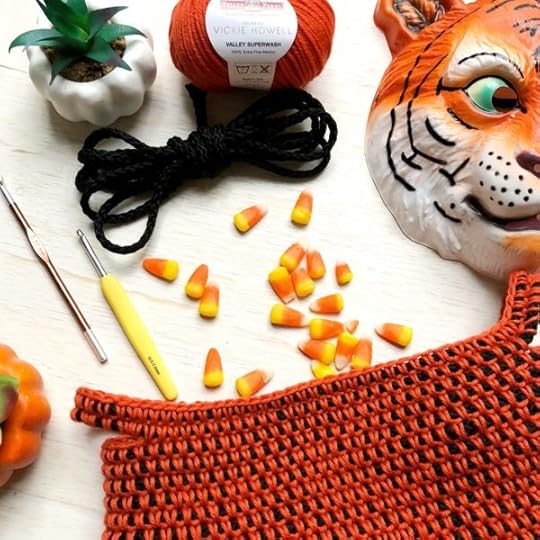
On this week’s episode of Ask Me Monday, I showed how to make a Rope and Crochet Basket that’s a perfect holder for Halloween candy. Using craft rope, worsted weight wool and a crochet hook this project works up in just a few hours.
I also, like a crazy lady, wore all of the yarn garments, because it’s actually chilly in Austin today! But I digress.
Watch the episode below, then make your own basket. Oh, and don’t forget to tag @vickiehowell with your Rope and Crochet Basket FO!
***This episode of Ask Me Monday is sponsored by Knitter’s Pride/ KnitPro***
See more KP products during “Vic’s Tips” segments of The Knit Show!
MATERIALS
Approx. 30 yds, 1/2″ Craft Cord or Rope
2 balls, Valley Yarns Valley Superwash, Colors by Vickie Howell (100% Superwash Merino; 98 yds.), in color: Siracha
Knitter’s Pride Waves or Zing! Crochet Hook
Tapestry Needle
Rope and Crochet Basket Directions
With yarn, ch 24 (or desired amount.)
Note: This project is worked in a spiral, so there aren’t traditional “Rounds.” Term is just used as reference.
Base:
Round 1: Holding craft rope parallel to the chain, with about 1″/2.5 cm of rope standing taller than yarn chain, sc into the 2nd ch from hook AND around rope; sc around rope and in every ch to end (after a few stitches worked, gently pull rope so it’s now at the same level as crochet — see above video for reference), bend rope so that it comes back against itself (like an oval spiral), 2sc around rope and in SAME st as the last st worked (3sc total in last st); *sc around rope and into the bottom of the next st; rep from * to last st, 3 sc in last st.
Round 2: Continuing to spiral the rope, [sc around rope in next st and to one end of the piece; 3 sc in center st of one end] TWICE.
Repeat Round 2 until the basket base measures 12″/30.5 cm long.
Body:
Next Round: Continuing to spiral the rope, sc around rope in next st and every st around (without increasing at either end.)
Repeat the last round until basket Body measures 4″/ 10 cm (or desired length) tall.
Handles:
Next Round: [Continuing as established until you get to 4 sts BEFORE the center of one side of the basket; WITHOUT working into basket BODY, sc around rope only for 5″/12 cm; skip 8 sts, re-attach rope by working into next st on basket Body] TWICE.
Work one last round, as established, sc around rope and in every st around.
Secure rope end by sc into 1 row below, 3 times.
Fasten off; cut rope.
FINISHING
Weave in ends.
Optional: With a sewing needle and thread, tack down rope end to secure further.

As always, you can find all episodes of this series under the Ask Me Monday playlist on the Videos section of my Facebook page. Enjoy!
The post Rope and Crochet Basket | Halloween Candy Holder appeared first on Vickie Howell.
October 12, 2018
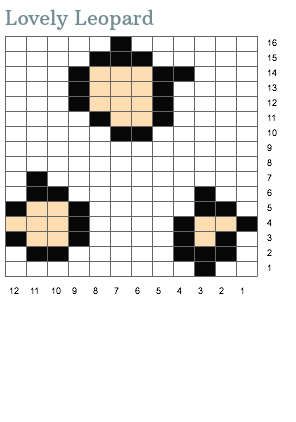
Lovely Leopard Mittens

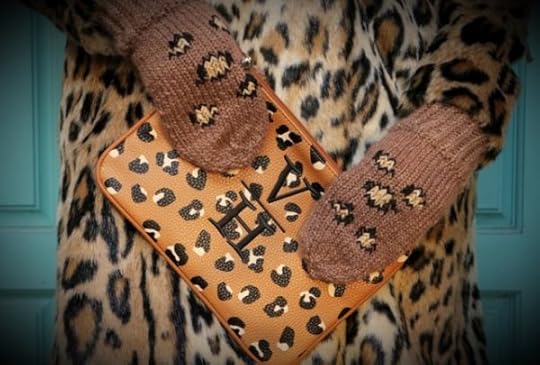
Make your own mittens, or simply embroider a store-bought pair, to match Thirty-one Gifts Fall print, Lovely Leopard. Either way, your look will be spot on!
Lovely Leopard Mittens
MATERIALS
1 Ball sport-weight yarn
Set of size U.S. 7 (4.5 mm) double-pointed needles
Tapestry needle
Stitch markers
Scrap yarn, in 2 additional colors
MEASUREMENTS
7 1/2” long / 8″ circumference
GAUGE
18 sts x 24 rows = 4”/10 cm in Stockinette Stitch
HOW TO
Right Mitten:
CO 34 sts. Divide sts evenly among needles. Join round, taking care not to twist.
CUFF:
Round 1: *K1, P1; rep from * around.
Rep Round 1 until piece measures 2” from CO edge.
BODY:
Divide sts as follows: N1: 9 sts, N2, 18 sts, N3 9 sts.
THUMB SHAPING:
Round 1: [K2, k2tog] 3 times. — 9 sts
Rounds 2 & 4: Knit.
Round 3: [K1, k2tog] 3 times. — 6 sts
Round 5: [K2tog] 3 times. –3 sts
Cut and weave yarn through remaining sts and draw closed.
Left Mitten:
Work as for Right Mitten, reversing thumb gusset as follows:
Round 5: N 1: k2, pm, k1, M1, k1, M1, pm, k to end of N 1, k sts on N 1 & 2.
FINISHING
Weave in ends.
Embroidery: Using scrap yarn, tapestry needle, and chart as a guide, duplicate leopard print motif onto mittens front.

Get Lovely Leopard Mittens Pattern PDF Here.
See Lovely Leopard print bags and scarves from Thirty-one gifts here!
The post Lovely Leopard Mittens appeared first on Vickie Howell.
October 8, 2018
Wearable Tools from Knitter’s Pride
 Wearable Tools from Knitter’s Pride
This week my daughter Clover joined me on Ask Me Monday. I shared two handy, new, wearable tools from Knitter’s Pride.
Later, we talked finger knitting for Halloween, including how to change colors for stripes and create a cozy for your kiddo’s slime jar and some spooky eyeball flowers.
Watch the episode below:
***This episode of Ask Me Monday is sponsored by Knitter’s Pride/ KnitPro***
See more KP products during “Vic’s Tips” segments of The Knit Show!
Knitter’s Pride Products Featured in this episode:
Row Counter Ring
Magnetic Knitter’s Necklace Kit
As always, you can find all episodes of this series under the Ask Me Monday playlist on the Videos section of my Facebook page. Enjoy!
The post Wearable Tools from Knitter’s Pride appeared first on Vickie Howell.
September 30, 2018
How to Knit a Blanket | Basic Blanket Recipe
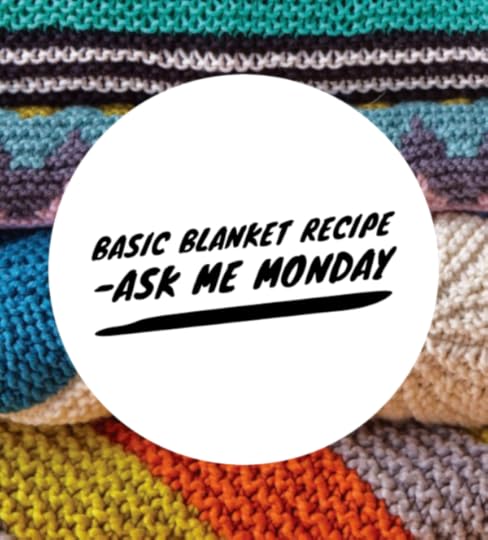
How to Knit a Blanket
In this episode of Ask Me Monday, I broke down the basics of How to Knit a Blanket. This video isn’t just for newbies, though. It’s for anyone who has wanted to tip-toe into designing but didn’t know where to start. We cover how to choose supplies, what stitch patterns work best, and how to write your own pattern. Enjoy!
***This episode of Ask Me Monday is sponsored by Knitter’s Pride/ KnitPro***
See more KP products during “Vic’s Tips” segments of The Knit Show!
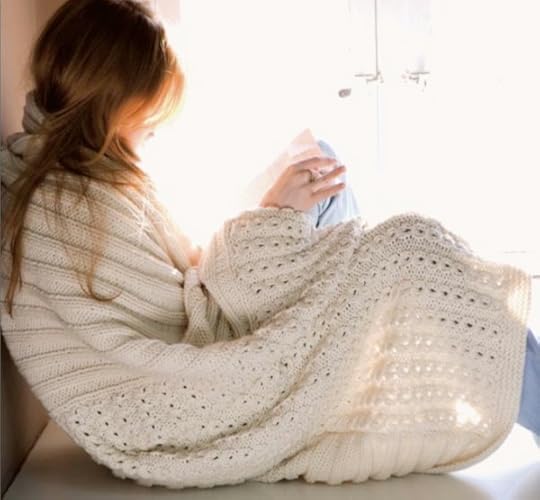
Global Warming Blanket from AwareKnits, by Vickie Howell & Adrienne Armstrong
How to Knit a Blanket: Picking Supplies
YARN:
There aren’t really any rules about what yarn you can and can’t use to knit a blanket. Any weight from sock to mega-bulky will work, depending on the desired effect. Fiber content can vary, but usually, 100% wool and blends with silk, rayon, and cotton will provide solid results. If being washable is a deal breaker than look for Super Wash fibers (which have been treated to be able to handle a reasonable amount of warm water and friction without felting) or, of course, there are always 100% acrylics which these days are often just as soft as their animal fiber counterparts and as indestructible as, well, all plastic products. The latter are also often the least expensive and are readily available at big-box retailers.
Although, washability is usually of utmost importance for baby blankets if you’re truly making an heirloom — especially one including lace — I would consider that something that special deserves an occasional handwash. In other words, if you want to knit your new niece a cashmere stroller blanket I’m all for it! Just be sure to include washing instructions when you gift it.
All in all, find a yarn that is really soft in colors you love enough to live with for the tie it’ll take to knit a blanket. Blankets are an exercise in love and patience, so set yourself up for success by treating your experience to nice yarn.
Looking for a solid, staple wool for blankets? Try Valley Yarns Superwash Worsted. If you like a mid-century palette, then try my colors within that line! 
September 28, 2018
Quick-Sew Ombre Stripe Hand Warmer
This post is sponsored by Thirty-one Gifts. Check out their Ombre Stripe Print bags here!
Ombre Stripe Hand Warmer
As colder weather soon will descend upon us we prepare for chilly mornings waiting for the school bus, crisp afternoons tailgating at a sporty-spice game, and brisk evenings by the campfire. This craft will have your hands’ back (wait, what?) for all of those activities!
Here’s a simple sewing project video I put together for my friends over at Thirty-One Gifts, and inspired by their Ombre Stripe print, for a DIY handwarmer. Make one for your entire family to keep their hands warm, and your crafty heart happy!
MATERIALS
1/4 yard each, 4 colors cotton fabric
Sewing thread & needle
Sewing machine
Cutting Supplies
Embroidery needle and floss
Scissors
Uncooked Rice

Hand Warmer How-To
STEP 1: CUT FABRIC
Cut 1 each, 1 1/2″ x 4 1/2″ strip of two colors of fabric; cut 1, 2 1/2″ x 4 1/2″ strip of third fabric for FRONT.
Cut1, 4 1/2″ square for BACK.
STEP 2: SEW & EMBROIDER
With RS facing and using 1/4″ seam allowance, sew FRONT pieces together, width-wise. Finger press seams.
Using embroidery needle & floss, chain stitch decorative lines along FRONT seams.
With RS facing, sew FRONT piece to BACK piece, leaving a 3″ opening.
STEP 3: TURN & PRESS
Snip corners; turn piece RS out.
Using an iron, press flat.
STEP 4: FILL & FINISH
Fill pouch just created with rice.
Fold-in hem of open edges; hand sew shut.

The post Quick-Sew Ombre Stripe Hand Warmer appeared first on Vickie Howell.
September 24, 2018
How to Knit Trimmings
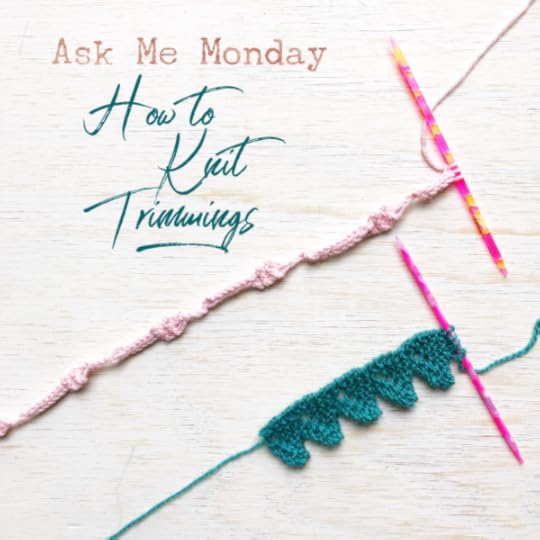
Knit Trimmings
This week’s episode of Ask Me Monday is the sister-segment to last week’s Crochet Trimmings show. In this episode, I’ll show how to make three knit trimmings: two original, and one from my book Wee Garter Stitch, all of which would make adorable gift wrappings, edgings or embellishments. Watch the video, then use the patterns below to play with creating your own knit trimmings. Oh, and don’t forget to tag @vickiehowell when with your knits!
***This episode of Ask Me Monday is sponsored by Knitter’s Pride/ KnitPro***
See more KP products during “Vic’s Tips” segments of The Knit Show!
Knitter’s Pride Product Featured in this Video:
Marblz Double-Pointed Needles Set
Marblz Double Pointed Needles (Individual)
Bobble Tape
SPECIAL STITCH
MB= Make Bobble
[Knit in the front and back of stitch] TWICE (4 stitches total), turn, knit those 4 stitches, turn, [knit 4 stitches] TWICE, turn, [knit two stitches together] TWICE, pass first decreased stitch over the second. You’ll be back to one stitch.
CO 3 sts.
Rows 1-4: Knit.
Row 5: K1, MB, k1.
Row 6: Knit.
Repeat Rows 1-6 until the piece is desired length.
BO.
Dashes & Smashes
SPECIAL STITCHES
psso = pass slipped stitch over (decrease)
CO 3 sts.
Row 1: Knit i-cord as follows: K3, slide sts to opposite end of dpn needle, bring working yarn behind stitches (it will be closest to what is now the 3rd needle on the needle) so it’s in position to knit the 3 stitches again on the next row.
Rows 2-9: Repeat Row 1.
Row 10 (WS:) Knit.
Note: This row is worked straight, not in i-cord, hence why you’re now working on the back of the fabric.)
Rows 11-14: Knit.
Row 15 (RS): Sl 1, k2tog, psso; [sl st back onto LH needle; k the stitch again] TWICE, sl st back onto LH needle. –1 st
Row 16 (RS): K in the front, back and front again of stitch. –3 sts
Repeat these 16 rows to the desired length, ending with a Row 9.

Lacey Point Trim
CO 4 sts.
Row 1 (RS): K2, yo, k2.
Row 2 and all WS rows: Knit.
Row 3: K2, yo, k3.
Row 5: K2, yo, k4.
Row 7: K2, yo, k5.
Row 9: BO 4 sts, k to end.
Row 10: Knit.
Repeat Rows 1-10, until the piece is desired length.
As always, you can find all episodes of this series under the Ask Me Monday playlist on the Videos section of my Facebook page. Enjoy!
The post How to Knit Trimmings appeared first on Vickie Howell.
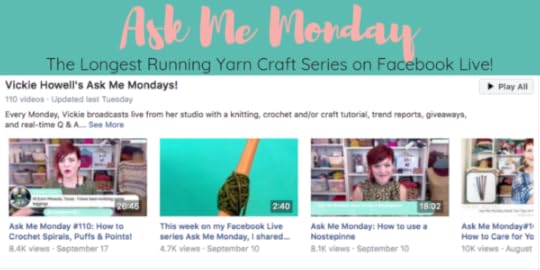
September 17, 2018
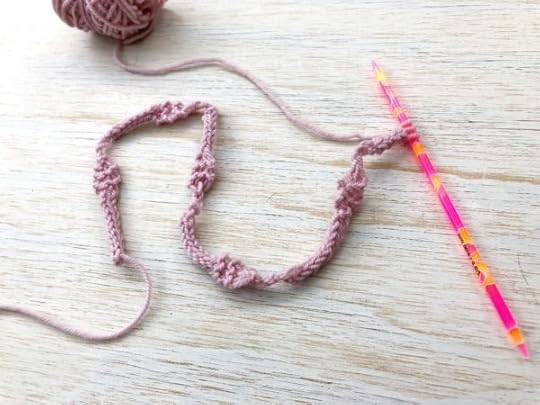
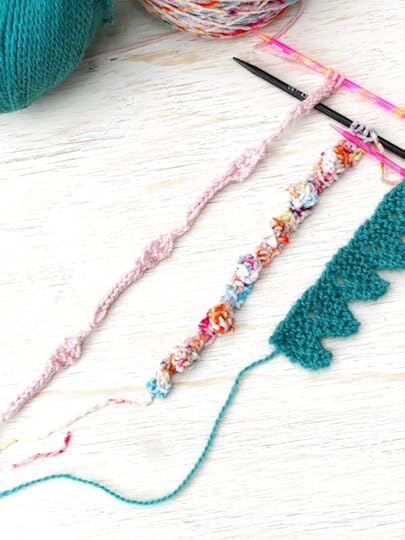
Spirals, Puffs, and Points: How to Crochet Trimmings

Spirals, Puffs, and Points
This week on Ask Me Monday, we’re playing with the sculptural aspect of crochet and learning how to stitch spirals, puffs, and points. These stitch patterns would work great on their own as ribbons and adornments, or attached to a garment as edgings. Play around and have fun!
***This episode of Ask Me Monday is sponsored by Knitter’s Pride/ KnitPro***
See more KP products during “Vic’s Tips” segments of The Knit Show!
Knitter’s Pride Product Featured in this Video:
Zing! Crochet Hooks Set
Zing! Single Crochet Hook
How to Crochet: Spirals, Puffs, and Points
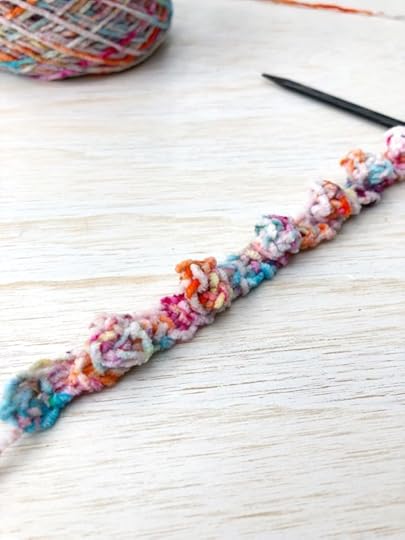
CROCHET SPIRALS (A.K.A. CURLY CUES OR COILS)
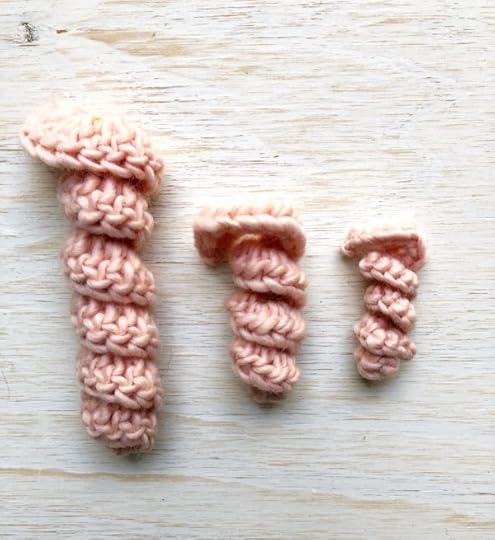
All:
Crochet a chain to desired length plus 1″-2″/2.5-5 cm more to account for shrinkage due to coiling.
Single Crochet (sc) Spiral
Row 1: Sc in 2nd ch from hook, 2 sc in same st, *3 sc in next st; rep from * to end.
Half-double Crochet (hdc) Spiral
Row 1: Hdc in 3rd ch from hook, 2 hdc in same st, *3 hdc in next st; rep from * to end.
Double Crochet (dc) Spiral
Row 1: Hdc in 4th ch from hook, 2 dc in same st, *3 dc in next st; rep from * to end.
Watch the fabric you’re creating coil while you work!
CROCHET PUFF STITCH (A.K.A. BULLION STITCH)

Row 1: Ch 2, *[yo, insert hook through 2nd ch from hook, pull loop through] FOUR times, pull through all 9 loops on hook (puff made), ch 3.
Repeat Row 1 until Puff Stitch Strand is desired length, ending with a Puff.
CROCHET POINTS (A.K.A TRIANGLES)
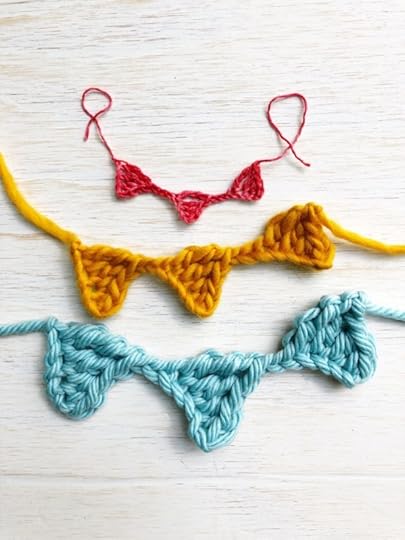
Row 1: Ch 5, sc in 2nd ch from hook, hdc in next ch, dc in next ch, tr in next ch (point made), ch 2.
Repeat Row 1 until your Point Strand is your desired length, ending with a point.
As always, you can find all episodes of this series under the Ask Me Monday playlist on the Videos section of my Facebook page. Enjoy!
The post Spirals, Puffs, and Points: How to Crochet Trimmings appeared first on Vickie Howell.


