
Vickie Howell's Blog: Vickie Howell's Website, page 28
March 15, 2019
How to Macrame Charger Cord
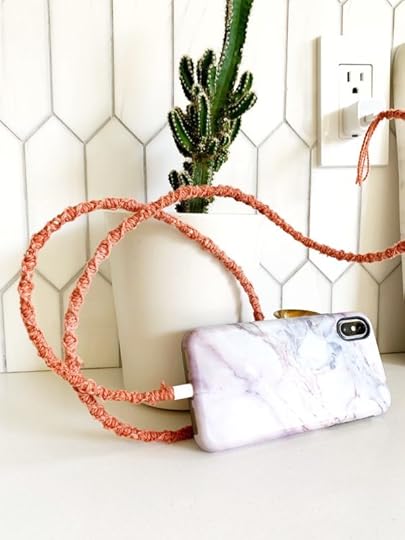
Macramé Charger Cord
Need a weekend project? How about a macramé 


February 25, 2019
Basic Top-Center-Out Shawl Recipe

Basic Top-Center-Out Shawl Recipe
This week on Ask Me Monday, I show a Basic Top-Center Out Shawl Recipe using 3, easy steps to design your own triangle shawls, shawlettes, and bandit scarves.

This episode of Ask Me Monday is sponsored by Knitter’s Pride/ KnitPro
See more KP products during “Vic’s Tips” segments of The Knit Show!
Products shown in this video tutorial: Knitter’s Pride Ginger Interchangeable Needles
Basic Top-Center-Out Shawl Recipe: Beginning Formula
The number of stitches you choose to cast on will vary based on yarn weight and your preference. Regardless, you’ll always cast on stitches for the left side, center tab (which will create a nice bit to sit at the nape of your neck, as well as a column of stitches to act as a sort of spine for your shawl.)
CO small amount (*even or odd number) of stitches for Left Side; place a stitch marker; CO an odd number (because this portion will ultimately be the tip of your triangle point) of stitches for the Center Tab; place a stitch marker; CO small amount (equal to Left Side) of stitches for the Right Side.
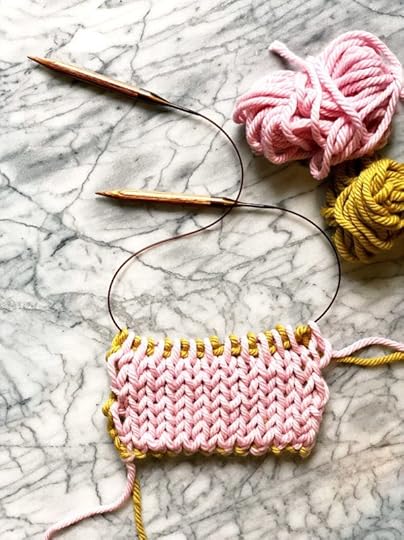
For the Love Triangle Shawlette, designed in a chunky-weight yarn and Stockinette & Garter body, the CO is 6 sts for Left Side; 3 sts for Center Tab; 6 sts for Right Side.
*NOTE: If you’re designing in a pattern stitch that requires an either even or an odd number of stitches OR multiples of a specific number, you’ll need to take that into account when determining how many stitches are cast on for the Left and Right sides respectively.

Basic Top-Center-Out Shawl Recipe: Increase Formula
For this method, you’re actually creating two triangles that then form the larger triangle-whole. To create that, you’ll need a series of FOUR increases every RS row.
Allowing for at least 1 edge stitch, increase ONE stitch (in whatever method desired) at the Left Side; increase ONE stitch before the first marker (i.e. on one side of the Center Tab);increase ONE stitch after the second stitch marker (i.e. on the opposite side of the Center Tab); increase ONE stitch (in whatever method desired) at the Right Side, before edge stitch(es). — 4 stitches increased
For the Love Triangle Shawlette, for which I chose YOs as my increases for the lacy effect, the first RS (aka increase) row looks like this:
K1, yo (
From here you just continue working your increase RS rows (in any stitch pattern you’ve chosen), then WS plain rows (without increases) until the piece is as wide as you want minus the edging and/or at the right stitch count multiples for the edging.
Basic Top-Center-Out Shawl Recipe: Edging Formula
It might seem overwhelming to calculate an edging doer the entire bottom of a shawl, but when calculating with this method, instead of working with the entire amount of stitches on your needle, you simply break the item into pieces: Left Side, Center Tab, Right side.
When considering the edging stitch pattern you choose for your piece, there’s really only one number you need to know, the amount of stitches of one of the sides minus edge stitch(es). Let’s call this number Side Body.
i.e. Left Side stitches – edge stich(es) = Side Body
Plug in the stitch pattern multiples into the Side Body amount. This same amount will apply to the opposite side.
All that’s left now are the Center Tab Stitches which will not change in stitch pattern, so you’ll continue as established, increasing on either side. The stitches created by the increases can be worked in Stockinette or Garter, and don’t need to be considered. They will create their own panels.
For the Love Triangle Shawlette, I chose an edging that required a multiple of 6 stitches + 1. The Side Body number is 43 stitches (44 – 1 edge stitch). 6 (stitches) x 7 (repeats) = 42 + 1 = 43.
You will need to add additional stitch markers for the edging to help decipher between the increase panels that will be created on both Sides and on either side of Center Tab.
For the Love Triangle Shawlette, that looks like this:

K1, yo, pm, (

Want to try knitting a top-center out project first before designing your own? Make the Love Triangle Shawlette in this month’s YarnYAY! subscription box. Yarn, stitch markers and pattern included! (Only 15 left in stock!)
Get the Love Triangle Shawlette Box!
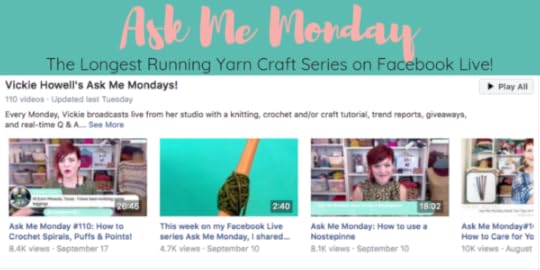
Ask Me Monday is the longest-running Facebook Live series in the needlecraft genre. It’s on hiatus until May 2019. Until then, though, you can find all past episodes of this series under the Ask Me Monday playlist on the Videos section of my Facebook page. Enjoy!
The post Basic Top-Center-Out Shawl Recipe appeared first on Vickie Howell.
February 15, 2019
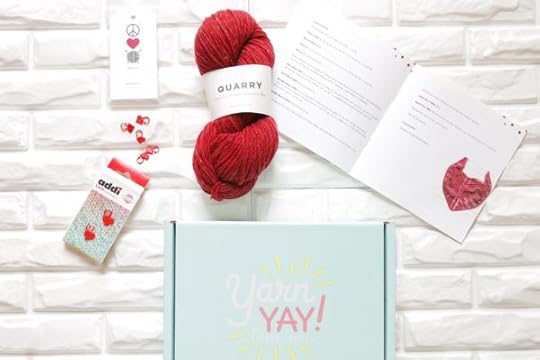
February YarnYAY! Boxes are HERE
February YarnYAY! Boxes
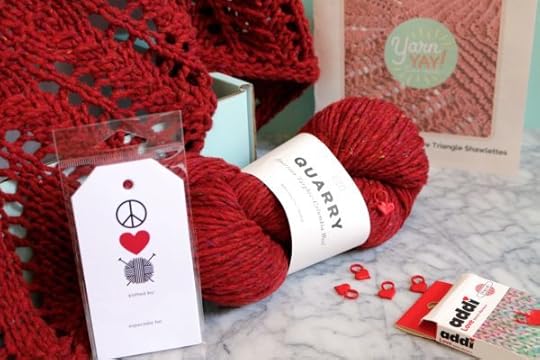
February YarnYAY! boxes are here, and all but 45 have already been spoken for. Check out what delights are featured in this month’s love-themed box, then nab yours and join us in our private Facebook group to hang out, learn, and take part in special events and exclusive giveaways!

February’s Yarn Selection
Brooklyn Tweed specializes in gorgeous designs expressed through their American-made wools. It was founded by knitwear designer and photographer Jared Flood in 2010, and is now based in Portland Oregon.
Quarry is a lofty, chunky-weight yarn that is cleverly spun in a manner that appears to be unspun. The colors are heathered but almost evoke a tweedy-look. Our selections, in honor of Valentines Day, are Garnet and Hematite.
February’s Patterns: Love Triangle Shawlettes
This month’s Love Triangle shawlettes are both great introductions to stitching triangles. The knit version is worked from the top-center out in a welt pattern, then a wide, mock cable column border.
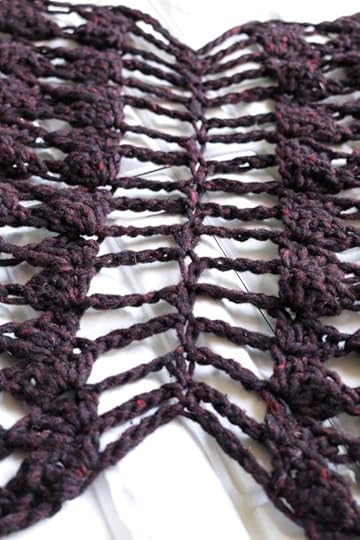
The crochet version is more abstract-looking than it’s knit sister. Its uber-open construction is worked from the bottom-up with a series of chains and DC clusters

February Notion #1 Selection
Removable stitch markers are a must-have tool for knitters and crocheters alike. The Addi heart versions will act as little reminders, that you and your hand-making are loved.
Skacel is a woman founded and run wholesale and distribution business which began when Ingrid Skacel started it more than 30 years ago. Her daughter Karin, is now at the helm.
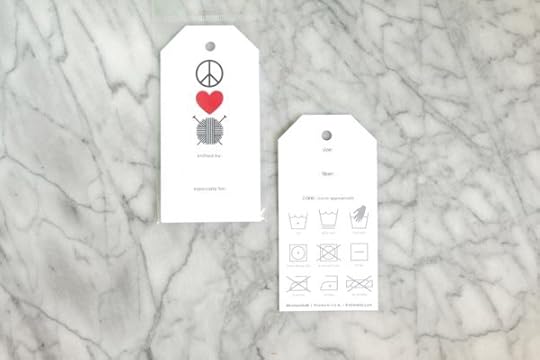
February Notion #2 Selection
Share the handmade love by adding one of these tags the next time you gift one of your knits. In addition to the usual function of a gift tag, these also act as a guide to caring for the given garment. Simply circle the appropriate symbols that correspond with the yarn you use!
Knitterella is owned by knitwear and graphic designer, Jill Zielinski.
Get Your February YarnYAY! Box
The post February YarnYAY! Boxes are HERE appeared first on Vickie Howell.
February 13, 2019
Message Heart Pillow

Message Heart Pillow
Love notes are the best use of messaging this month, well, and frankly, every month. Knit this Message Heart Pillow, then call the one you love. Happy Valentine’s Day!

This project is brought to you by Visible Mobile. For only $40 a month, get unlimited everything — including messaging of the non-knitted variety.
Message Heart Pillow: Knit It
MATERIALS
Valley Yarns Superwash Super Bulky, Colors by Vickie Howell: 2 balls (A) Pink Flamingo or Castaway Coral, and scraps (B) Aqua Oasis — or equivalent super bulky yarn
Size US 13/9 mm needles
Large-eyed tapestry needle
Stuffing or a generous amount of yarn scraps
Tip: For a smaller message heart, simply use a lighter-weight yarn and corresponding needles.
FINISHED SIZE
Approx. 8″/20 cm tall x 11″/28 cm wide
DIRECTIONS
HEART: Make 2.
With A, CO 5 sts.
Row 1: Kfb, k to last st, kfb. — 2 sts inc.
Row 2: Purl.
Rep Rows 1-2 until you have 25 sts.
Next Row (RS): Ssk, k9, BO 1, k to last 2 sts, k2tog.
Next Row: P11, leaving the rem sts on hold. Turn.
LEFT BUMP:
Row 1: Ssk, k7, k2tog.
Row 2: Purl.
Row 3: Ssk, k to last 2 sts, k2tog. — 7 sts
Row 4: Purl.
Repeat Rows 3-4, once more. — 5 sts
Next Row: Ssk, k1, k2tog. — 3 sts
Next Row (WS): Sl 1, p2tog, psso.
Cut yarn; feed through loop to fasten off.
RIGHT BUMP:
Rejoin yarn on WS.
Row 1: Purl.
Row 2 (RS): Ssk, k to last 2 sts, k2tog.
Row 3: Purl.
Rep Rows 2-3, twice more. — 5 sts
Next Row: Ssk, k1, k2tog.
Next Row: Sl, p2tog, psso.
Cut yarn; feed through loop to fasten off.
HEART SIDE
With A, CO 4 sts.
Row 1: Knit.
Row 2: Purl.
Row 3: Knit.
Row 4: Knit.
Repeat Rows 1-4 until Heart Side is long enough to wrap around the entire circumference of your Heart.
BO, leaving a long tail for seaming.
FINISHING
With B, tapestry needle and Chain Stitch (see video), embroider a message on front of one heart piece.
With long tail, tapestry needle and WS together, sew Heart Side around edge of entire circumference of one Heart piece.
With A, tapestry needle and WS together, sew second Heart to the opposite side of Heart Side, leaving an opening for stuffing.
Stuff heart with unwoven ends and stuffing or yarn scraps.
Sew opening closed; bury end.

The post Message Heart Pillow appeared first on Vickie Howell.
February 11, 2019
Warmest Knitting & Crochet Stitches for Winter

Warmest Knitting & Crochet Stitches for Winter
It’s cold out there so this week on Ask Me Monday we focus on getting you warm using the three warmest knitting and crochet stitches. In this episode, I cover Fisherman’s Rib, the crochet Thermal Stitch, and Double Knitting. Once you get the hang of these stitches, use them — along with your favorite super bulky yarn, to create scarves, cowls, and other bone-chill-busting projects.
This episode of Ask Me Monday is sponsored by Knitter’s Pride/ KnitPro
See more KP products during “Vic’s Tips” segments of The Knit Show!
Products shown in this video tutorial: Knitter’s Pride Waves, Zing!and Dreamz Crochet Hooks.

Warmest Knitting & Crochet Stitches: Swatches
MATERIALS
Yarn (I used my color collection in this line.)
Knitter’s Pride Ginger Knitting Needles in the corresponding size for yarn (I use the interchangeable set)
Abbreviations can be found here.

Warmest Knitting & Crochet Stitches: Fisherman’s Rib (knit)
Note: This stitch pattern is worked in multiples of 2 stitches.
CO 16 sts.
Row 1: Purl.
Row 2: *P1, k1 in stitch the row below; rep from * to last two, p2.
Rep Row 2 until the piece is desired length.
BO.

Warmest Knitting & Crochet Stitches: Thermal Stitch (crochet)
Note: I recommend going up a hook size or two for a less rigid fabric.
Ch 14.
Row 1: Sc in 2nd ch from hook and to end. — 13 sts
Row 2: Ch 1 (counts as sc), *insert hook in BACK loop of next st AND loop (it will look like a parallel bar) from the ch row below, sc; rep from * to end. Turn.
Row 3: Ch 1, *insert hook into back loop of next st AND the unworked loop (would’ve been the front loop) from the row below, sc; rep from * to end. Turn.
Rep Row 3 until the piece is desired length.
Fasten off.
Warmest Knitting & Crochet Stitches: Double Knitting
Note: This stitch pattern is worked in multiples of 2 stitches, with two colors (A & B) of yarn and with either a circular or dpns.
Using both colors A & B, CO 24 sts using method shown in video. You’ll have both strands hanging.
Row 1: With A, *k1, sl 1 wyif; rep from * to end.
Slide sts back to the opposite side.
Row 2: With B, *sl 1 wyib, p1; rep from * to end.
Turn.
Row 3: With A, *sl 1 wyib, p1; rep from * to end.
Slide sts back to the opposite side.
Row 4: With B, *k1, sl 1 wyif; rep from * to end.
Rep Rows 1-4 until piece is desired length.
BO.
Ask Me Monday is the longest-running Facebook Live series in the needlecraft genre. As always, you can find all episodes of this series under the Ask Me Monday playlist on the Videos section of my Facebook page. Enjoy!
The post Warmest Knitting & Crochet Stitches for Winter appeared first on Vickie Howell.
February 4, 2019
How to Crochet a Heart
![How to #crochet a #heart | Vickie Howell | Ask Me Monday| Free pattern and [VIDEO] tutorial.](https://i.gr-assets.com/images/S/compressed.photo.goodreads.com/hostedimages/1549465509i/27023821._SY540_.png)
How to Crochet a Heart
This week on Ask Me Monday I show how to crochet a heart ornament for the Galentine or Valentine in your life. Beginning with a magic circle and crocheted in just one round with a combination of chains, double crochet, and triple crochet stitches, this heart is a quick and addicting make. Finished off with a square knot macramé hanger, this project would also make a sweet keychain. I used avocado-dyed cotton for the example, but any fiber — from leather lacing to bulky wool — would work.
Sending love your way!
This episode of Ask Me Monday is sponsored by Knitter’s Pride/ KnitPro
See more KP products during “Vic’s Tips” segments of The Knit Show!
Products shown in this video tutorial: Knitter’s Pride Waves, Zing!and Dreamz Crochet Hooks.
How to Crochet a Heart Ornament

MATERIALS
Small amount of any weight yarn.
Crochet hook (size to correspond with DOUBLE STRAND of chosen yarn)
SIZE
Varies based on yarn chosen.
GAUGE
Does not matter for this project.
Abbreviations can be found here.
DIRECTIONS
Using a *DOUBLE STRAND of yarn, a 12″ tail, and the magic circle method, work the following stitches in the center circle:
Rnd 1: Ch 3, 3 tr, 3 dc, tr, 3 dc, 3 tr, ch 3; join ch with a sl st in center ring.
Fasten off, leaving an equal length tail as the beginning tail. You should have 4 strands total of tail.
FINISHING
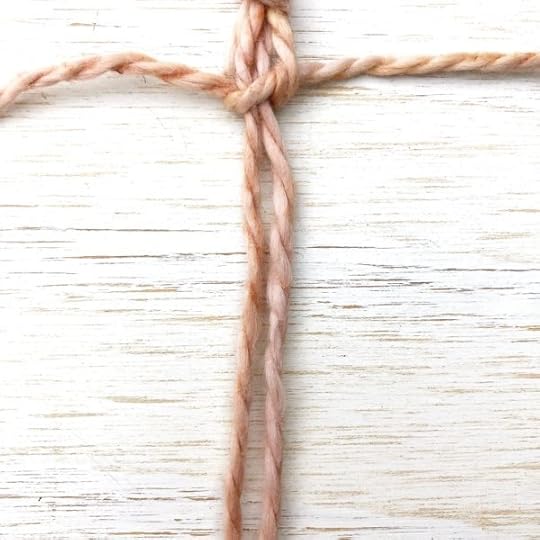
Macramé hanger (use video as a guide)
The hanger is made by creating a series of square knots as follows:
Flip the heart piece upside down so the tail strands are hanging downward.
Take the leftmost strand OVER the center two strands (It will look like the number 4) and UNDER the rightmost strand.
Take the rightmost strand UNDER the center two strands and up THROUGH the loop created by the last step.

Pull taught.
Take the rightmost strand OVER the center two strands (It will look like the number 4) and UNDER the leftmost strand.
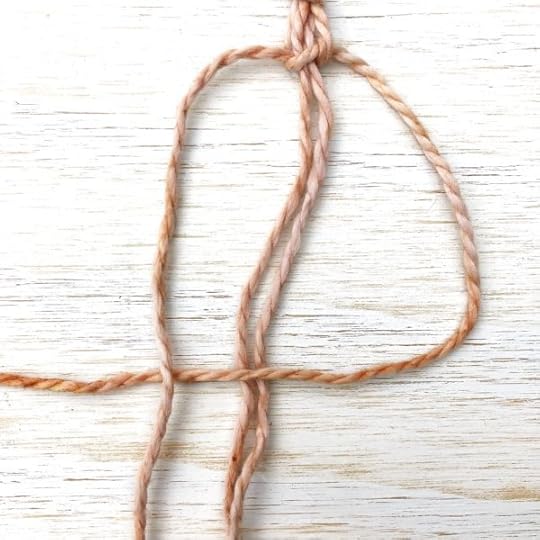
Take the leftmost strand UNDER the center two strands and up THROUGH the loop created by the last step.
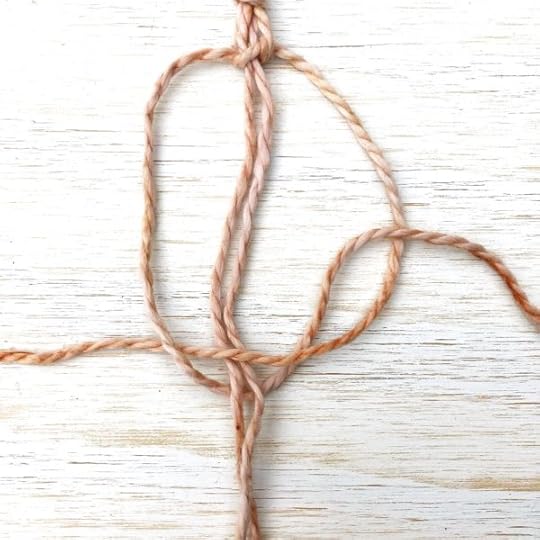
Pull taught. Square knot complete

Repeat Steps 1-6 until you have 2″/5 cm of macramé. leaving about 1″/2.5 cm of unknotted yarn, tie a plain knot to tie-off piece and create the hanging loop. Trim tails.
*Double strand necessary component for the macramé hanger. If you choose to crochet a chain hanger or other method, then a single strand of yarn will suffice.

More Valentine’s Projects
Knit Heart Plushie
Boho Wallhanging
Mooshy Gooshy Crochet Cowl
Open Crochet Heart Motif
Paper & Yarn Galentines
Love Rocks Knit Neck Garland
Ask Me Monday is the longest-running Facebook Live series in the needlecraft genre. As always, you can find all episodes of this series under the Ask Me Monday playlist on the Videos section of my Facebook page. Enjoy!
The post How to Crochet a Heart appeared first on Vickie Howell.
January 28, 2019
Scrap Bin Heart Plushie
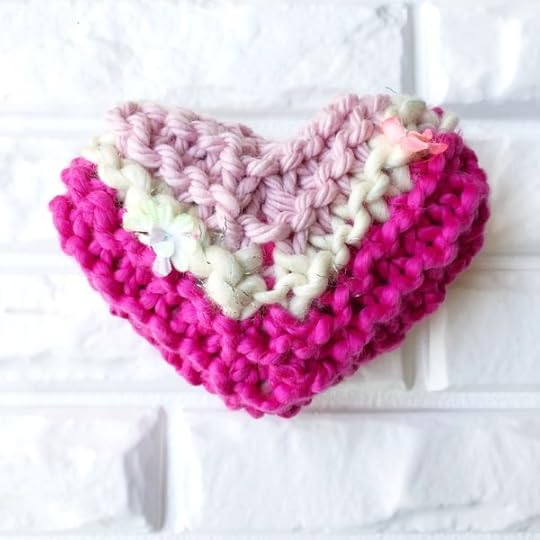
Scrap Bin Heart
This week on Ask Me Monday, I show how to knit scrap bin heart plushies using the mitered method. This cute project is a great way to use those the scraps in your stash, then share a little love this Valentine’s Day. Keep your heart as a simple plushie, use them as pin cushions, add a loop to hang it as a V-day ornament, or fill them with dried lavender and chamomile for a sweet sachet. No matter what, who wouldn’t heart getting a handmade scrap bin heart? Enjoy!
This episode of Ask Me Monday is sponsored by Knitter’s Pride/ KnitPro
See more KP products during “Vic’s Tips” segments of The Knit Show!
Scrap Bin Heart Plushie: Make it!

MATERIALS
Scraps of 3 yarns, in similar-weight, in different colors: A, B & C
(Shown: Loopy Mango Big Cotton, Knit Collage Gypsy Garden, and Valley Yarns Superwash Super Bulky)
Knitter’s Pride needles in the corresponding size to heaviest weight of yarn chosen
(Used in the video: Knit & Purr Interchangeable Set)
Stitch marker
Knitter’s Pride Wool Needles
Yarn scraps, cotton or polyfill stuffing
Optional: lighter weight yarn for seaming.
FINISHED MEASUREMENTS
Varies based on yarn.
GAUGE
Not important for this project.
ABBREVIATIONS
Go here.
DIRECTIONS (Make 2)
With A, CO 20 sts, placing marker at center point (after 10 sts.)
Row 1: With A, k to 2 sts before marker, ssk, sl m, k2tog, k to end.
Row 2: Knit.
Rows 3-4: Rep Rows 1-2
Cut A; join B.
Rows 5-6: With B, rep Rows 1-2.
Cut B; join C.
Rows 7-8: With C, Rep Rows 1-2
Row 9: Rep Row 1.
Row 10 (WS): Ssk, BO to last 2 sts (there’ll also be 1 st on your RH needle), k2tog, BO rem sts.
NOTE: If you’re working in an Aran weight or lighter, BO leaving a long tail for seaming. For heavier weight yarns, I suggest using a separate, lighter weight yarn for seaming.
FINISHING
With WS facing, place two hearts together; stuff ends so they’re sandwiched inside. Using the Wool Needle and strand of yarn, seam to pieces together while also adding more yarn scraps or stuffing as necessary.
Weave in remaining end.
More Valentine’s Projects
Boho Wallhanging
Mooshy Gooshy Crochet Cowl
Crochet Heart Motif
Paper & Yarn Galentines
Love Rocks Knit Neck Garland
Ask Me Monday is the longest-running Facebook Live series in the needlecraft genre. As always, you can find all episodes of this series under the Ask Me Monday playlist on the Videos section of my Facebook page. Enjoy!
The post Scrap Bin Heart Plushie appeared first on Vickie Howell.
January 24, 2019
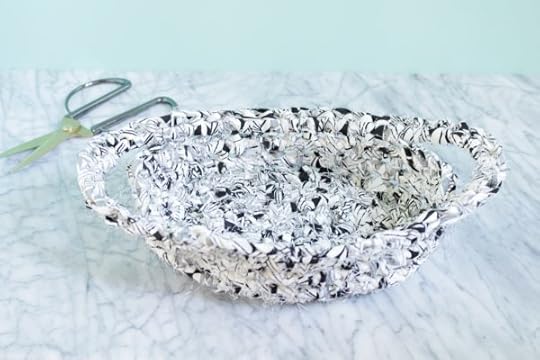
Crochet Fabric & Rope Basket
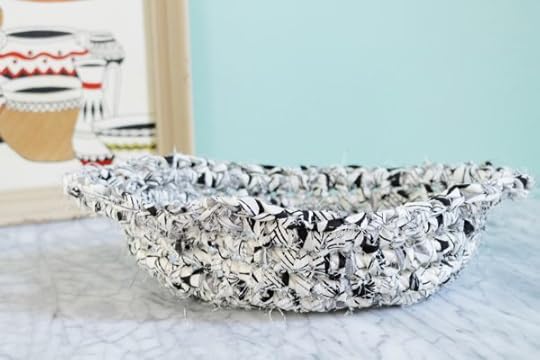
Crochet Fabric Rope Basket
MATERIALS
Fabric scrap yarn (See tutorial here)
Medium-weight rope
Size 12 mm crochet hook
Optional: Large-eyed tapestry needle, sewing needle & thread
FINISHED SIZE
Approx. 9″/23 cm wide (excl. handles) x 3″/8 cm tall
DIRECTIONS
With yarn, ch 10 (or desired amount.)
Note: This project is worked in a spiral, so there aren’t traditional “Rounds.” Term is just used as reference.
Base:
Round 1: Holding rope parallel to the chain, with about 1″/2.5 cm of rope standing taller than yarn chain, sc into the 2nd ch from hook AND around rope; sc around rope and in every ch to end (after a few stitches worked, gently pull rope so it’s now at the same level as crochet — see this video, about 7 minutes in, for reference), bend rope so that it comes back against itself (like an oval spiral), 2sc around rope and in SAME st as the last st worked (3sc total in last st); *sc around rope and into the bottom of the next st; rep from * to last st, 3 sc in last st.
Round 2: Continuing to spiral the rope, [sc around rope in next st and to one end of the piece; 3 sc in center st of one end] TWICE.
Repeat Round 2 until the basket base measures 9″/23 cm long.
Body:
Next Round: Continuing to spiral the rope, sc around rope in next st and every st around (without increasing at either end.)
Repeat the last round until basket Body measures 3″/ 8 cm (or desired length) tall.
Handles:
Next Round: [Continuing as established until you get to 3 sts BEFORE the center of one side of the basket; WITHOUT working into basket BODY, sc around rope only for 7″/18 cm; skip 6 sts, re-attach rope by working into next st on basket Body] TWICE.
Secure rope end by sc into 1 row below, 3 times.
Fasten off; cut rope.
FINISHING
Using fingers or tapestry needle, weave in ends.
Optional: With a sewing needle and thread, tack down rope end to secure further.

The post Crochet Fabric & Rope Basket appeared first on Vickie Howell.
January 17, 2019
Knitting and Crochet Abbreviations

It’s about time that I post on my site, the same knitting and crochet abbreviations list that is included in most of my books (courtesy of YarnStandards.com) Bookmark this for future reference! xx, VH
Knitting and Crochet Abbreviations
alt = alternate
approx = approximately
beg = begin/beginning
bet = between
BO = bind off
BP = back post
bpdc = back post double crochet
bpdc2tog = back post double crochet 2 together
BPdtr = back post double treble crochet
BPhdc=back post half double crochet
BPsc=back post single crochet
BPtr =back post triple crochet
byo = backward yarn over
CC = contrasting color
ch = chain
ch-sp = chain space
cont = continue
dc = double crochet
dec = decrease
dc2tog = double crochet 2 together
edc = extended double crochet
ehdc = extended half double crochet
esc =extended single crochet
etr = extended treble crochet
FL or FLO = front loop or front loop only
foll = following
FP = front post
fpdc = front post double crochet
FPhdc = front post half double crochet
FPsc = front post single crochet
FPtr = front post treble crochet
hdc = half double crochet
hdc2tog = half double crochet 2 stitches together
inc = increase
k = knit
k1B = knit stitch in row below
kfb = knit 1 into front and back of stitch
ksp = knit 1 stitch, slip this stitch from right needle to left needle, pass second stitch on left needle over first stitch and off left needle; return stitch to right needle; single right-leaning decrease
k2tog = knit 2 stitches together; single right-leaning decrease
kwise = knitwise
lp = loop
m = marker
M1 = make one stitch
M1L – make one left slanting
M1R = make one right slanting
M1p = make one purlwise
M1lp = make one left slanting, purlwise
M1lr = make one right slanting, purlwise
MC = main color
p = purl
patt = pattern
pfb = purl into front and back of stitch
pm = place marker
p2tog = purl 2 stitches together
prev = previous
psso = pass slipped stitches over
pwise = purlwise
rem = remaining
rep = repeat
rev St st = reverse stockinette stitch
RH = right hand
RS = Right Side
rnd = round
sc = single crochet
sc2tog = single crochet 2 together
sk – skip
SKP = slip 1 knitwise, knit 1, pass slip stitch over knit stitch.
SK2P = slip 1 knitwise, knit 2 together, pass slip stitch over knit 2 together
sl = slip
sl1k = slip 1 knitwise
sl1p = slip 1 purlwise
sl m = slip marker
sl st = slip stitch
sp = space
ssk = slip 2 stitches knitwise, knit these 2 stitches together through the back loops
ssp = slip 2 sts knitwise, return these 2 stitches to left needle and purl them together
through the back loops
sssk = slip 3 stitches knitwise, knit these 3 stitches together through the back loops
sssp = slip 3 sts knitwise, return these 3 stitches to left needle and purl them together
through the back loops
st(s) = stitch(es)
tbl = through back loop
tch or t-ch = turning chain
tfl = through the front loop
tog = together
tr = triple crochet
tr2tog = triple crochet 2 stitches together
WS = Wrong Side
w & t = wrap and turn
wyib = with yarn in back
wyif = with yarn in front
yb = yarn back
yf = yarn forward
yo = yarn over
U.S. to U.K. Crochet Term Conversions
single crochet (sc) = double crochet (dc)
double crochet (dc) = treble crochet (tr)
half double crochet (hdc) = half treble crochet (htr)
triple crochet (tr) = double treble (dtr)
The post Knitting and Crochet Abbreviations appeared first on Vickie Howell.
January 14, 2019
How to Make Fabric Yarn

Fabric Yarn: 3 Ways to Make it!
On this week’s installment of my Facebook Live series Ask Me Monday I showed three ways to make fabric yarn. This episode covers different types of fabrics to try, methods for cutting, techniques for joining, what tools work well to knit & crochet fabric yarn with, and what projects we might make with it. Watch, enjoy, and tag @vickiehowell with your fabric yarn adventures!
This episode of Ask Me Monday is sponsored by Knitter’s Pride/ KnitPro
See more KP products during “Vic’s Tips” segments of The Knit Show!
Made Fabric Yarn? Here are a few tools to use to make something with it!
Knitter’s Pride Ginger Needles (Sizes 13 and up), Jumbo Birch (Size 36/20mm), Waves Crochet Hooks (Sizes M/9 mm and up), Nostepinne (for winding), and Wool Needles (for weaving in ends.)
Fabric Yarn Tutorial
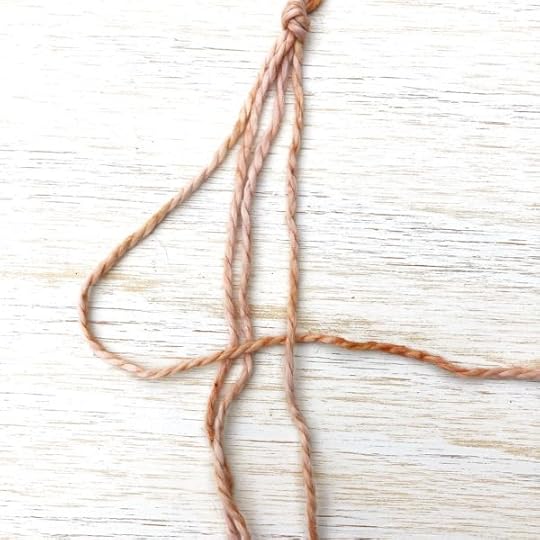
Fabric Yarn: My Favorite Way to Join Strips
Although I also showed how to knot and sew fabric strips together to make yarn, my favorite is the loop method. Here’s a recap of to do it!

Fold top of strip over about 1″/2.5 cm; cut slip (taking care to not snip all the way to the edge.) Repeat for 2nd strip.
Overlap strips, pushing the top piece through the slit of the bottom piece. Pull top piece through enough that you can see it’s slit.
Loop the long portion of the top piece around and through its own slit.
Pull to secure. Smooth with fingers.
Repeat process, adding a new “top” piece until you have desired amount of fabric yarn.
Looking for more on fabric yarn? Here are a few posts you might like!
View this post on Instagram


