
Vickie Howell's Blog: Vickie Howell's Website, page 32
July 9, 2018
How to Crochet Buttons
![How to Crochet Buttons with Vickie Howell [VIDEO and Patterns.] In this video and post, expert Vickie Howell teaches how to use yarn scraps to crochet bobble and circle buttons. #crochet #crochetpattern #learntocrochet #crochetbuttons #buttons #maker #DIYbuttons](https://i.gr-assets.com/images/S/compressed.photo.goodreads.com/hostedimages/1531216252i/25949644._SY540_.png)
On this week’s episode of Ask Me Monday, I showed a great, stash-busting project that’s also perfect for the warmer weather when you don’t want to be weight down by lots of wool. That project? Crochet buttons! Watch the video below, then nab the free patterns for both bobble and circle versions. Have fun!
***This episode of Ask Me Monday is sponsored by Knitter’s Pride/ KnitPro***
See more KP products during “Vic’s Tips” segments of The Knit Show!
How to Crochet Buttons
![How to Crochet Buttons with Vickie Howell [VIDEO and Patterns.] In this video and post, expert Vickie Howell teaches how to use yarn scraps to crochet bobble and circle buttons. #crochet #crochetpattern #learntocrochet #crochetbuttons #buttons #maker #DIYbuttons](https://i.gr-assets.com/images/S/compressed.photo.goodreads.com/hostedimages/1531216252i/25949645._SY540_.png)
Materials
Yarn scraps, in various weights and colors.
Knitter’s Pride Waves Crochet Hooks, various sizes. I used this set.
Crochet Buttons: Bobbles
Leaving a long tail for stuffing, tie a slip knot and ch 2.
Rnd 1: 6 sc in 2nd ch from hook; join rnd with a sl st in beg ch.
Rnds 2-3: Ch 1, sc in every st around. — 6 sc
Note: This technique will cause your piece to curve inward, creating a cup shape.
If you’re working with a finer weight yarn and smaller hook, you may want to repeat the last round once or twice more to create a fuller cup shape.
Fasten off, leaving a tail.
FINISHING
Stuff beginning tail into the cup to stuff.
Thread wool needle with ending tail; weave over-and-under the top edge of the piece and pull to cinch shut. Tie knot. Bobble button created!
Feed tail through Bobble and snip.
Sew onto a garment, through the knot and underside of Bobble Button.
Crochet Buttons: Circles
Rnd 1: Using Magic Circle method (see above video), ch 3 and dc 11 into center loop. Pull tail to tighten center; join rnd with a sl st in top of first dc. –12 sts
Rnd 2: Ch 1, 2 sl st in every st around; join rnd with a sl st in beg-ch. –24 sts.
Fasten off.
OPTIONAL: Consider changing colors for Rnd 2 for a variation. Add a round of Picot sts for added flair!
FINISHING
Weave in ends.
Optional: I think the button will lay better on the garment as is, but if preferred, you can choose to add a crochet chain loop to the back as well.
![How to Crochet Buttons with Vickie Howell [VIDEO and Patterns.] In this video and post, expert Vickie Howell teaches how to use yarn scraps to crochet bobble and circle buttons. #crochet #crochetpattern #learntocrochet #crochetbuttons #buttons #maker #DIYbuttons](https://i.gr-assets.com/images/S/compressed.photo.goodreads.com/hostedimages/1531216252i/25949646._SY540_.jpg)
Don’t forget to follow and tag @vickiehowell on Instagram and Facebook, with photos of your Crochet Buttons!
Tune in weekly to my Ask Me Monday series, on Facebook at 12pmCT. Watch past episodes on the playlist here.
The post How to Crochet Buttons appeared first on Vickie Howell.


July 2, 2018
Navajo Knitting Basics

Navajo Knitting: The Basics
Do you, like me, tend to shy away from large amounts of lace-weight yarns because the likelihood of knitting something on size 2 needles whilst juggling kids, career and self, doesn’t necessarily appeal to you? Do you also find yourself drooling over all of the gorgeous, hand-dyed lace yarns currently available? Or, do you just want to be able to mix and match your stash, regardless of yarn weights to make whatever you want? Well my friends, then the Navajo Knitting technique is for you and is what we focused on for this week’s episode of Ask Me Monday!
***This episode of Ask Me Monday is sponsored by Knitter’s Pride/ KnitPro***
See more KP products during “Vic’s Tips” segments of The Knit Show!
Watch and Learn the Navajo Knitting Technique
![Learn Navajo #Knitting [VIDEO] | Learn a simple way to turn light-weight yarns into bulkier versions without having to wind three separate balls, then hold the strands together! Vickie Howell shows this great, stash-busting technique.#askmemonday #tutorial #howtoknit #learntoknit #navajoknitting #yarn #bigknits #bulkyknits #lightweightknitting](https://i.gr-assets.com/images/S/compressed.photo.goodreads.com/hostedimages/1530609990i/25913207._SY540_.jpg)
Needles: Knitter’s Pride Royale Single Pointed
Once you’ve got enough yarn plied for the approximate amount of stitches you need (no worries if you’re short, though, you can always ply more), cast-on stitches. Unless otherwise specified by a pattern you’re working from , the cast-on method isn’t important.![Learn Navajo #Knitting [VIDEO] | Learn a simple way to turn light-weight yarns into bulkier versions without having to wind three separate balls, then hold the strands together! Vickie Howell shows this great, stash-busting technique.#askmemonday #tutorial #howtoknit #learntoknit #navajoknitting #yarn #bigknits #bulkyknits #lightweightknitting](https://i.gr-assets.com/images/S/compressed.photo.goodreads.com/hostedimages/1530609990i/25913208._SY540_.jpg)
Work (in whatever stitch pattern you prefer) the three plies (strands) you’ve created for each stitch as if it were 1 stitch. This triple-ply of yarn will take you from a lace-weight to a worsted; from sport-weight to a chunky; from worsted weight to a bulky, or even, from a bulky to a mega-bulky (see below!)
![Learn Navajo #Knitting [VIDEO] | Learn a simple way to turn light-weight yarns into bulkier versions without having to wind three separate balls, then hold the strands together! Vickie Howell shows this great, stash-busting technique.#askmemonday #tutorial #howtoknit #learntoknit #navajoknitting #yarn #bigknits #bulkyknits #lightweightknitting](https://i.gr-assets.com/images/S/compressed.photo.goodreads.com/hostedimages/1530609990i/25913209._SY540_.jpg)
Needles: Knitter’s Pride Jumbo Birch Needles, Size U.S. 50/25mm
Tune in weekly to my Ask Me Monday series, on Facebook at 12pmCT. Watch past episodes on the playlist here.
The post Navajo Knitting Basics appeared first on Vickie Howell.
June 25, 2018
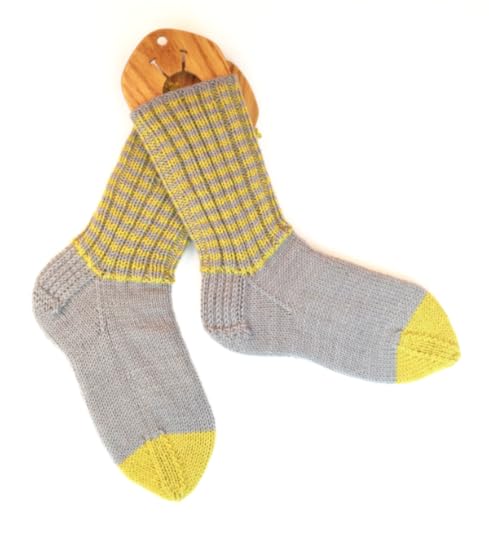
How to Crochet Socks | Basic Sock Recipe
![How to Crochet Socks | Basic Sock Recipe by Vickie Howell | Toe-up Crochet Sock [VIDEO] #crochet #howtocrochetsocks #learntocrochet #learntocrochetsocks, #crochetbabysocks #baby #yarn #tutorial #askmemonday #vickiehowell #crochettoeupsock #afterthoughtheel #crochetsockpattern](https://i.gr-assets.com/images/S/compressed.photo.goodreads.com/hostedimages/1530012553i/25859593._SY540_.png)
How to Crochet Socks
This week on Ask Me Monday was a sister-episode to Episode #100 How to Knit Socks. The latest show covered, you guessed it, How to Crochet Socks! In this video and accompanying blog post, I show how to use a basic sock recipe to crochet a sock for any sized foot. I demonstrate using the toe-up method, and with an afterthought heel. Give the show a watch, then put your hook into action by either using the recipe to create your own design or by crocheting my baby sock version. Have fun!
***This episode of Ask Me Monday is sponsored by Knitter’s Pride/ KnitPro***
See more KP products during “Vic’s Tips” segments of The Knit Show!
How to Crochet Socks: Video
How to Crochet Socks: Basic Recipe
MATERIALS
Superwash wool of any weight (For this tutorial, I’m making a baby sock, using sock-weight, superwash wool)
Knitter’s Pride Waves Crochet Hook in the corresponding size (for this tutorial, I used. a Size U.S. G/4.5 mm)
Tapestry needle
2, Removable Stitch Markers
This tutorial is written in U.S. Terms.
How to Crochet Socks: Figuring out Stitch Count
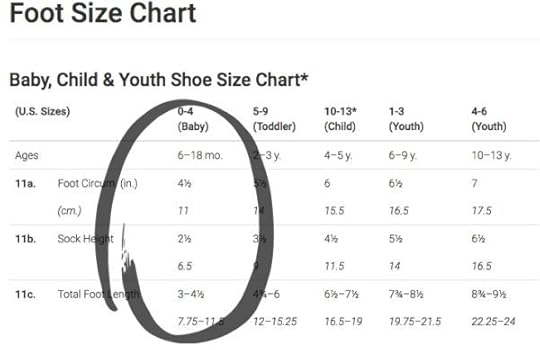
To get started, you have a couple of choices: either measure the foot circumference of the person you’re going to knit for or use the average sizing provided by Yarn Standards. I prefer the latter. You can find all size charts on their website.
Step 1: Swatch
Using your chosen yarn and corresponding hook, swatch in whatever stitch you’ll be using for the FOOT portion of the sock. Measure your stitch gauge (how many stitches per inch you achieve.) For the sample baby sock, mine is 5 sts per inch.
Looking at the chart, I want a 4 1/2″ circumference. To figure out the foot stitch count, the sts per inch is multiplied by the circumference: 5 x 4.5 = 22.5
Since we’re working with a garment that should fit snuggly, we’ll err on the side of negative ease, so round down to 22 sts. This is the amount I need to increase while working the toe (see below.)
How to Crochet Socks: Let’s get crocheting!
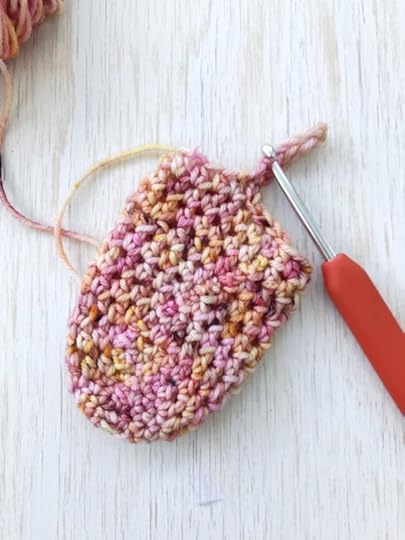
TOE:
Ch 7 (This number will work for most sizes, in most yarns. However, if you’re working on a Men’s sock in a lightweight yarn, you might want to consider adding 2-4 chains.)
Note: I recommend single crochet (sc) for toes and heels, as it’s the sturdiest, least holey stitch.
Rnd 1: Sc in 2nd ch from hook, sc 4, 2 sc in last st; flip piece over and work in the underside of chain, sc 3, 2 sc in last st; join rnd with a sl st. —12 sts
Rnd 2: Ch 1 (doesn’t count as st), 2 sc in same st as ch, sc 4, [2 sc] TWICE, 4 sc, 2 sc in last st; join rnd with a sl st. —18 sts
Rnd 3: Ch 1, 2 sc in same st, sc 6, [2 sc] TWICE, 7 sc, 2 sc in last st; join rnd with a sl st. —22 sts
![How to Crochet Socks | Basic Sock Recipe by Vickie Howell | Toe-up Crochet Sock [VIDEO] #crochet #howtocrochetsocks #learntocrochet #learntocrochetsocks, #crochetbabysocks #baby #yarn #tutorial #askmemonday #vickiehowell #crochettoeupsock #afterthoughtheel #crochetsockpattern](https://i.gr-assets.com/images/S/compressed.photo.goodreads.com/hostedimages/1530012553i/25859595._SY540_.jpg)
For the sample baby sock, you’ll stop here. For all larger sizes, you’ll continue as established, increasing 4 sts per round (two at each end of the oval, until you get to the stitch count you need for the foot (i.e. the circumference.)
TIP: If you need to end your increases with 2 sts, instead of 4 increased, the work one last round that looks like this:
Ch 1, sc X (2 stitches more than the round before), 2 sc in next st, sc to last st, 2 sc; join rnd with a sl st.
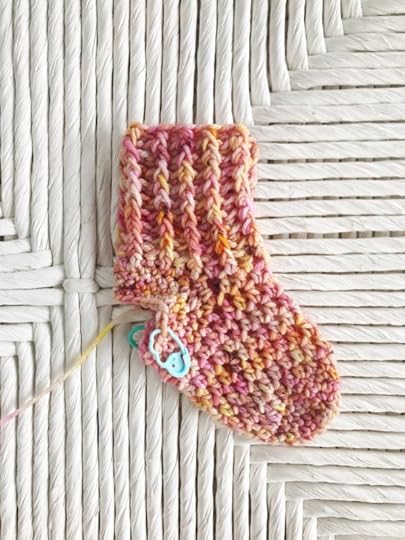
FOOT:
From here, you can change to your chosen stitch pattern. For the sample baby sock, half-double crochet (hdc) is used.
Rnd 1: Ch 2 (counts as hdc), hdc in next st and every st around; join rnd with a sl st.
Rnd 2: Ch 2, hdc in next st and every st around; join rnd with a sl st.
Repeat Rnds 1-2 until piece measures 2 1/2″/ 6.5 cm (baby sock), or length of top of foot from toe to ankle.
SET UP FOR AFTERTHOUGHT HEEL:
Note: you want the heel placement to mirror the toe, so if you’ve gotten off course at all, yo umay need to slip stitch to get you in the right position of where the instep (top of foot) is.
Next Rnd: Ch 2 (doesn’t count as hdc), hdc in next 11 sts (or half of, not including the beg ch, total stitches), ch 11 (or 2nd half of total stitches), sk 11, join rnd with a sl st. This will create a hole, which is where the heel will eventually be.
Next Rnd: Ch 2, hdc in next st and every st around; join rnd with a sl st.
TIP: If you’re making a sock for someone with a thicker ankle or calf, you can add circumference here, by simply chaining a few extra stitches!
LEG:
For this portion, you can continue with the same stitch pattern as for the FOOT, or choose something different. My favorite stitch pattern for crochet socks is a ribbing created with Front Post half-double crochet stitches (FPhdc) and Back Post half-double crochet stitches (BPhdc)
Rnd 1: Ch 2 (doesn’t count), *FPhdc, BPhdc; rep from * around; join rnd with a sl st. — 22 hdc
Repeat Rnd 1 for 2″/5cm (baby sock), or as long as you’d like your leg cuff to be.
Fasten off.
AFTERTHOUGHT HEEL
Note: I’ve found that it works best to work this portion in a spiral for a smaller sock like this one, but I’ve written the pattern in traditional rounds so it translates to all sizes. Keep in mind though, that you can always transition to spiral after rounds if your decreases start to impede on the beginning of the rnd.
Join yarn at back of leg.
Set up rnd:
Ch1, sc in every stitch around, PLUS stitches in row gap. This number will vary based on the height of stitch pattern that was used for the foot. A good rule would be to work the same amount of stitches (in each side of gap) as chains are required to create the respective foot stitch. Here’s what I mean:
sc = ch1 —> work 1 st in each gap.
hdc = ch2 —> work 2 sts in each gap.
dc = ch3 —> work 3 sts in each gap.
tr = ch 4 —> work 4 st in each gap.
For baby sock example, in which the foot was worked in hdc, the rnd would look like this:
Ch1 (doesn’t count), sc in same st and next 5 sts (aka to first gap), 2 sc in gap,place marker in that last st, sc across instep (in next 11 sts), 2 sc in gap, place marker in that last st, sc to end (last 5 sts); join rnd with a sl st.
Rnd 1: Ch1 1, sc in same st and to 1 st before marker, sc2tog (move marker to this stitch), sc to 1 sts before next marker, sc2tog (move marker to this stitch), sc to end; join rnd with a sl st.
Repeat Rnd 1 until roughly 1/3 of the sts remain, or until heel appears to be the shape you want it. Fasten off, leaving a long tail.
FINISHING
Using tail and tapestry needle, seem heel closed. Weave in ends.
![How to Crochet Socks | Basic Sock Recipe by Vickie Howell | Toe-up Crochet Sock [VIDEO] #crochet #howtocrochetsocks #learntocrochet #learntocrochetsocks, #crochetbabysocks #baby #yarn #tutorial #askmemonday #vickiehowell #crochettoeupsock #afterthoughtheel #crochetsockpattern](https://i.gr-assets.com/images/S/compressed.photo.goodreads.com/hostedimages/1530012553i/25859598._SY540_.jpg)
How to Knit Socks: More Tutorials
Prefer to learn how to knit socks? Go here!
Interested in a more intensive, step-by step tutorial? Take my Knit Maker 202: Socks Class on Creative Live!
More of a Loom Knitter? Check out my loom knit ankle tutorial here.
The post How to Crochet Socks | Basic Sock Recipe appeared first on Vickie Howell.
June 12, 2018
Gradient with a Twist Mitts Knitting Pattern

Gradient with a Twist Mitts
Did you miss out on May’s YarnYAY! box, but would love to make the Gradient with Twist mitts? I’ve got you! Now, the pattern is available on Ravelry.

Materials
1 mini hank each, The Farmer’s Daughter Fibers Juicy DK in colors: Heartbreak Hotel, Leaning Tree, and Eagle Eye
Size U.S. 6/4.5 mm double pointed needles

Skills
Knitting in-the-round using dpns
Twisted Rib Stitch
Simple Lace Pattern
Stripe colorwork
Thumb Gusset

For more information on YarnYay! by Vickie Howell click below.


The post Gradient with a Twist Mitts Knitting Pattern appeared first on Vickie Howell.
June 11, 2018
How to Knit & Crochet Wire Rings [VIDEO]
![Learn How to Knit with Wire | Learn How to Crochet with Wire | Make wire and bead rings with Vickie Howell. [VIDEO] from her Ask Me Monday series. #knitwithwire #crochetwithwire #crochetwithbeads #knitwithbeads #summerknitting #knittingjewelry #crochetjewelry](https://i.gr-assets.com/images/S/compressed.photo.goodreads.com/hostedimages/1528841967i/25738985._SY540_.jpg)
How to Knit with Wire | How to Crochet with Wire
This week on Ask Me Monday, we set yarn aside and opt for a little metal work. We focus on how to knit with wire and how to crochet with wire, then using our skills to make sweet, beaded rings that are the perfect accessory for Summer outfits. Make these rings for your friends, or set-up a ring-making station at your next ladies night or scout meeting. Hey, can you think of a better way to ring in the Summer season? You’re welcome.
***This episode of Ask Me Monday is sponsored by Knitter’s Pride/ KnitPro***
See more KP products during “Vic’s Tips” segments of The Knit Show!
![Learn How to Knit with Wire | Learn How to Crochet with Wire | Make wire and bead rings with Vickie Howell. [VIDEO] from her Ask Me Monday series. #knitwithwire #crochetwithwire #crochetwithbeads #knitwithbeads #summerknitting #knittingjewelry #crochetjewelry](https://i.gr-assets.com/images/S/compressed.photo.goodreads.com/hostedimages/1528841967i/25738986._SX540_.jpg)
Wire and Bead Rings
MATERIALS
28 Gauge Wire
Size U.S. D/3.25 mm Knitter’s Pride Waves Crochet Hook
OR
Size U.S. 1/2.25 mm Knitter’s Pride Karbonz Needles
Selection of Beads
Jewelry Cutters
![Learn How to Knit with Wire | Learn How to Crochet with Wire | Make wire and bead rings with Vickie Howell. [VIDEO] from her Ask Me Monday series. #knitwithwire #crochetwithwire #crochetwithbeads #knitwithbeads #summerknitting #knittingjewelry #crochetjewelry](https://i.gr-assets.com/images/S/compressed.photo.goodreads.com/hostedimages/1528841967i/25738987._SX540_.jpg)
How to Crochet with Wire |Ring #1
Written in U.S. terms. In the UK, please sub dc for sc.
Pre-string wire with 9 beads.
Chain (ch) 4 (for narrow version) or 6 (for wider version).
Row 1: Single crochet (sc) in 2nd ch from hook, and to end. Turn. — 3(5) sts
Row 2: Ch1, sc in next 2(4) sts. Turn.
Repeat Row 2, twice more, or until piece measures 1/4 of your finger’s circumference.
Thin Version Only:
Next Row (RS): Ch1, slide bead up and sc, sc last st. Turn.
Wide Version Only:
Next Row (RS): Ch1, sc, slide bead up and sc, sc last 2 sts. Turn.
Both Versions:
Next Row: Ch1, sc to end. Turn.
Repeat last 2 rows, twice more.
Sc every row until piece is long enough to fit your finger’s circumference.
Fasten off, leaving a tail for seaming.
Using fingers and wire tail, whip stitch ends of piece together to form ring. Weave in tail through a row or two of stitching. Use jewelry cutters to snip.
![Learn How to Knit with Wire | Make wire and bead rings with Vickie Howell. [VIDEO] from her Ask Me Monday series. #knitwithwire #knitwithbeads #summerknitting #knittingjewelry](https://i.gr-assets.com/images/S/compressed.photo.goodreads.com/hostedimages/1528841967i/25738988._SY540_.jpg)
How to Knit with Wire |Ring #2
Pre-string wire with 9 beads.
Using backward “e” wrap cast on, CO 5 sts.
Knit (k) every row for 5 rows, or until piece measures 1/4 of your finger’s circumference.
Next Row (WS): K1, [slide bead up and k stitch] three times, k1.
Next Row: Knit.
Repeat last two rows, twice more.
K every row until piece is long enough to fit your finger’s circumference.
BO, leaving a tail for seaming.
Using fingers and wire tail, whip stitch ends of piece together to form ring. Weave in tail through a row or two of stitching. Use jewelry cutters to snip.
![Learn How to Knit with Wire | Learn How to Crochet with Wire | Make wire and bead rings with Vickie Howell. [VIDEO] from her Ask Me Monday series. #knitwithwire #crochetwithwire #crochetwithbeads #knitwithbeads #summerknitting #knittingjewelry #crochetjewelry](https://i.gr-assets.com/images/S/compressed.photo.goodreads.com/hostedimages/1528841967i/25738989._SY540_.jpg)
Tune in to Facebook on Mondays for more, Ask Me Monday videos. You can watch past videos here!
The post How to Knit & Crochet Wire Rings [VIDEO] appeared first on Vickie Howell.
June 4, 2018
How to Knit Socks | Basic Sock Recipe

Women of the Comforts Committee, ca. 1910–20. LIBRARY OF CONGRESS/ LC-DIG-HEC-13931 (h/t Atlas Obscura)
How to Knit Socks
***This episode of Ask Me Monday is sponsored by Knitter’s Pride/ KnitPro***
See more KP products during “Vic’s Tips” segments of The Knit Show!
Wow, here we are less than 3 years into my Ask Me Monday, Facebook live series and have hit the 100th episode! I feel so grateful to all of you, worldwide, who share some of your time with me every week. Thank you, community!
For this episode, I decided to lean into the 100 thing — you know how I like a theme! That meant looking at where knitting was at 100 years ago. During the show we talked about the advent of circular needles, and the WWII “Knit Your Bit” campaign that had knitters making garments for soldiers, especially socks. To that end, it seemed like the perfect time to talk socks, while giving the formula to enable knitting a sock of any size and using any weight yarn.
We rounded out the episode giving away two, very generous prize packs — each value at around, you guessed it, $100 — from our friends at Knitter’s Pride/Knit Pro.
Watch. Read. Knit. Enjoy!
How to Knit Socks: Video
How to Knit Socks: Basic Recipe
MATERIALS
Superwash wool of any weight
Knitter’s Pride Marblz, Zing, or Symfonie Dreamz DPNs in the corresponding size
Tapestry needle
Step 1: ESTABLISH GAUGE
No matter what yarn you’re working with, or size sock — from baby to grown man — you’re knitting the basic model for making on is GENERALLY the same. The difference is really only in the numbers. To that end, you’ll first need to knit a swatch with chosen yarn, needles, and stitch pattern to establish stitch and row gauge. You’ll need this info for the next step.
For the purposes of this tutorial, let’s say we’re using size U.S. 6/4 mm needles and sport-weight yarn, when knit in Stockinette Stitch, gives us a gauge of 4 stitches and 6 1/2 rows per inch.
Step 2: CALCULATE CAST ON (CO) NUMBER
To get started, you have a couple of choices: either measure the foot circumference of the person you’re going to knit for or use the average sizing provided by Yarn Standards. I prefer the latter.

Since the genesis of this post was the WWII patriotic knitting for soldiers effort, let’s go with the numbers correlating to a men’s medium size sock for our pattern. To calculate a cast on number, you’ll just need to multiply the foot circumference and stitch gauge numbers. Using our results from Step 1, and the chart above that will look like this:
9 in. x 4 sts = 36
That’s it! Keeping in mind that we may need to adjust the number one way or another to accommodate a stitch pattern, we know that 36 stitches is a good amount to cast on for our socks! Bonus: If we want to work in 2×2 ribbing, we’ll need a multiple of 4. If we want to work in 1×1 ribbing, we’ll need a multiple of 2. Either way, 36 means we’re golden. High-five!
How to Knit Socks: Let’s get knitting!
Step 3: THE LEG
CO stitches to dpns (double-pointed needles). Divide evenly between needles; join, taking care not to twist.
Knit stitches in desired stitch pattern, maybe ribbed for a cuff, then stockinette for the leg, rib for the whole let, seed stitch; you do you! The length is really a preference; ankle, calf, or knee-high are all worked the same except for how long. Using the chart and our calculations, however, our numbers will look like this:
8 in (height) x 6 1/2 rows = 52
This means we’ll work 52 rounds of leg stitches in our desired stitch pattern.
Step 4: THE HEEL FLAP (Square heel method)
The heel flap is the only part of this sock that won’t be knit in-the-round. For this step, you’ll place half (the front/instep) stitches on waste yarn or spare needles, and the other half (the heel) on 1 needle. For our example, that means 18 heel stitches. I like a thick heel, so recommend knitting in the following manner, but you can technically use any stitch pattern that makes you happy.
Row 1: *Slip (Sl)1, knit (k) 1; repeat from * to end.
Row 2: Sl 1, purl (p) to end.
Repeat those two rows until your heel flap is a square. If math makes your whole hear sing, then, by all means, do the multiplication to determine exactly how many rows that will be. If not though, do what I do, which is to just fold the heel from corner to corner. Once it’s even, you’ll know you have a square and your heel is complete!
Step 5: TURNING THE HEEL
Since we’re not two-dimensional beings (no offense to Flat Stanley), we need some shaping to cup our heel. This is created with a series of simple, short rows. Here’s how:
To turn a heel, you’re going work 2/3 of the RIGHT SIDE heel stitches, decrease, and turn. Then you’ll work 1/3 of the WRONG SIDE heel flap, decrease and turn, work to gap, decrease and turn, etc. For our example using 18 heel stitches, that looks like this:
Row 1: Sl 1, k11, ssk (slip, slip, knit together through the back loop). Turn.
Row 2: Sl 1, p5, p2tog. Turn.
Row 3: Sl 1, k to 1 st before gap, ssk. Turn.
Row 4: Sl 1, p to 1 st before gap, p2tog. Turn.
Repeat Rows 3-4 until all heel stitches are worked.
Step 6: THE GUSSET
For this part of the sock, you’ll revert to working in rounds.
Rnd 1: Place half of the heel stitches on free dpn (Needle 1), with the same dpn pick up stitches evenly along the first side of heel; place instep stitches on Needle 2; use Needle 3 to pick up stitches along the second side of heel and work remaining heel stitches.
Rnd 2: Work in straight pattern stitch. (i.e. Knit all stitches, if working in Stockinette Stitch)
Rnd 3: Needle 1, work to last 3 sts, k2tog, k1; Needle 2, work straight (i.e. knit); Needle 3, k1, ssk, work to end.
Rnd 4: Work in straight pattern stitch.
Repeat Rnds 3-4 until you get back to your original, CO number of stitches. For our purposes, that would be 36 sts.
Step 7: THE FOOT
Work every round in straight pattern stitch until foot is 2 1/2″ shorter than the desired length. Using the chart above, we want our foot to be 11″, so that means we’ll work rounds until the foot measures 8 1/2″.
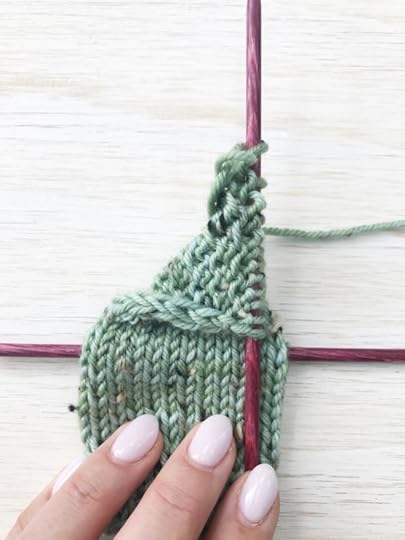
Step 8: THE TOE
Arrange stitches so 1/2 (top) are on Needle 2, and 1/4 are on Needles 1 & 3. For us that means, Needles 1 & 3 have 9 stitches each, and Needle 1 has 18. Shape as follows:
Rnd 1: Needle 1, k to last 3 sts, k2 tog, k1; Needle 2, k1, ssk, k to last 3 sts, k2tog, k1; Needle 3, k1, ssk, k to end.
Rnd 2: Knit. (I’m making the assumption here that regardless of foot stitch pattern that the stitcher will work the toe in Stockinette as is necessary for the next step to look right.)
Repeat Rnds 1-2 until about 1/3 of the stitches, rounded to an even number, remain. For us, let’s say 12 sts.
Cut yarn, leaving a long tail for grafting.
Step 9: GRAFTING TOE
We’ll seamlessly graft stitches together using Kitchener Stitch. To do so, you’ll need to divide the stitches evenly over 2 needles and hold parallel. Thread tail into tapestry needle and work as follows:
Set up:
Insert tapestry needle purlwise into the first stitch on FRONT needle. Pull tail through, but don’t let the stitch fall off.
Insert tapestry needle knitwise into the first stitch on the BACK needle. Pull tail through, but don’t let the stitch fall off.
Begin Grafting:
Insert tapestry needle knitwise into the first stitch on the FRONT needle and pull tail through, letting it fall off the knitting needle;
Insert tapestry needle purlwise into the next stitch on the FRONT needle and pull the tail through, WITHOUT letting the stitch fall off knitting needle.
Insert tapestry needle purlwise into the first stitch on the BACK needle and pull tail through, letting it fall off the knitting needle;
Insert tapestry needle knitwise into the next stitch on the FRONT needle and pull the tail through, WITHOUT letting the stitch fall off knitting needle.
Repeat those 4 steps until all stitches are grafted. Weave in ends.
Now you have it! The basic formula to make any size sock with any type of yarn. Go on now, and spread your sock-y wings! Oh, and don’t forget to tag @vickiehowell with your sock photos. Know a friend who might dig this tutorial? Share it but pinning, tweeting, or posting. Thank you!
How to Knit Socks: More Tutorials
Interested in a more intensive, step-by step tutorial? Take my Knit Maker 202: Socks Class on Creative Live!
Prefer to knit socks from the toe-up? Check out our tutorial on The Trends Episode of The Knit Show

More of a Loom Knitter? Check out my loom knit ankle tutorial here.
Math reference: SockKnitters.com
The post How to Knit Socks | Basic Sock Recipe appeared first on Vickie Howell.
May 21, 2018
How to Crochet Beaded Bracelets

How to Crochet Beaded Bracelets
In my twenties, I was really interested (amongst many metaphysical topics) in the healing properties of gemstones, and lately, as part of writing The Intention chapter of The Knit Show Book, I’ve revisited that interest. Unrelated, a couple of weeks ago, our Ask Me Monday topic covered pre-stringing beads for stitching with them. So, for this week’s show, I thought I’d combine the two focuses by sharing a crochet beaded bracelets tutorial incorporating beautiful hand-dyed tencel and natural hemp blend yarns, with several stones for energy, vision, and self-discovery. Here’s to the healing of hooking!
***This episode of Ask Me Monday is sponsored by Knitter’s Pride/ KnitPro***
See more KP products during “Vic’s Tips” segments of The Knit Show!
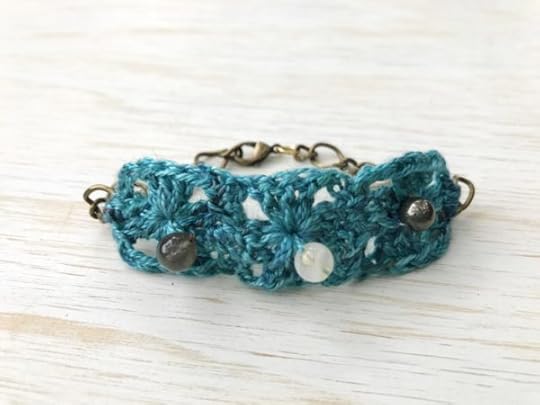
Gem Granny Crochet Beaded Bracelet
MATERIALS
Small Amount, Lace Weight Yarn (I used Trailhead Yarns Cabot Trail/100% Tencil)
Size U.S. C/2.75 mm Knitter’s Pride Waves Crochet Hook
3, Gemstone Beads (Shown in Pyrite, Citrine & Labradorite)
Embroidery Needle
Jewelry Chain & Clasp
Jewelry Pliers
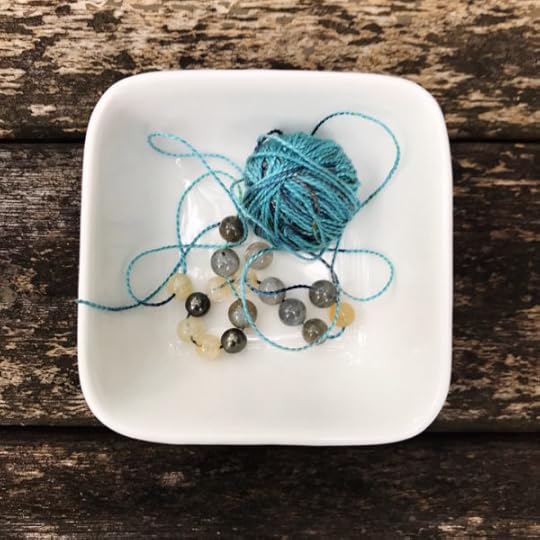
For both crochet beaded bracelets, pre-string beads onto yarn. Need a refresher? Check out this post.
DIRECTIONS
Granny Square: Make 3
With a DOUBLE STRAND (one beaded, one plain) ch 4. Sl st in 1st ch to create ring.
Rnd 1: Side bead up, ch 3, (counts as a dc here and throughout), 2 dc in ring, [ch 3, 3 dc in ring] 3 times, the last time. ch 3; join with sl sl in 3rd ch of beginning ch-3. — 4 dc clusters, 4 ch-3 spaces
Fasten off.
FINISHING
Using embroidery needle and yarn, sew granny squares together in a row.
Sew the desired length of chain, onto either side of the granny strip. Weave in ends.
Attach clasp.

Moonstone Crochet Beaded Bracelet
Small Amount, Lace Weight Yarn (I used Bare Naked Wools Hempshaugh/ Silk, Hemp, Merino)
Size U.S. C/2.75 mm Knitter’s Pride Waves Crochet Hook
12-16, Gemstone Beads (Shown Moonstone)
Embroidery Needle
Desired Jewelry Findings
Jewelry Pliers
DIRECTIONS
Ch 45 (OR work in multiples of 3 + 3 for the desired length.)
Row 1: Sc in 2nd ch from hook and to end. Turn.– 44 sts
Row 2: Ch 2, hdc in next st, *hdc (sliding bead into place), 2 hdc; rep from * to end. Turn. — 14 beads
Row 3: Ch 1, sc in every st to end.
Fasten off.
FINISHING
Weave in ends. Attach clasp.

Tune in to Facebook on Mondays for more, Ask Me Monday videos. You can watch past videos here!
The post How to Crochet Beaded Bracelets appeared first on Vickie Howell.
May 14, 2018
How to KNIT Crochet Stitches

How to KNIT Crochet Stitches
Years ago when I hosted DIY Network’s Knitty Gritty, designer Lily Chin came on as a guest to show how to knit a particular stitch to look like crochet. Since my community tends to be split amongst knitters and crocheters — both sides often wanting to create similar versions of a project in their chosen craft — I’m always mindful of ways for everyone to feel included, and this is just one way for that to be so. Unfortunately, however, I’ve searched high and low for reference (that episode was shot before the existence of blogs) of Lily’smethod, but without success. Never one to be deterred though, this morning I set off to experiment and discover what may be my own method for how to knit crochet stitches. The resulting findings are the topic of this week’s episode of Ask Me Monday (Facebook Live). Watch the video for how to work what I’m calling: knit single crochet, knit double crochet, and knit triple crochet. Once you get the gist, then grab your needles, use the instructions below and take this knitting technique out for a spin!
***This episode of Ask Me Monday is sponsored by Knitter’s Pride/ KnitPro***
See more KP products during “Vic’s Tips” segments of The Knit Show!
How to Knit Crochet Stitches Practice Info
Materials
Size U.S. 6/4 mm knitting needles (I used Knitter’s Pride Royale Single Pointed.)
Sport-weight yarn

Knit Single Crochet Stitch (ksc) Swatch
ksc = Knit (k) stitch leaving it on the left-hand (LH) needle, yarn-over (YO), knit the same stitch again, let drop off of LH needle (3 loops on RH needle), pass the first two loops over (p2so)the last.
CO 20 sts.
Row 1: Ksc in every st to end.
Repeat Row 1 until the piece is desired length.
BO.

Knit Double Crochet Stitch (kdc) Swatch
kdc = YO, k stitch, YO, p2so stitches on LH needle.
CO 20 sts.
Row 1: Kdc in every st to end.
Repeat Row 1 until the piece is desired length.
BO.
Knit Triple Crochet Stitch (ktr) Swatch
ktr = YO twice, k stitch, [YO, p2so stitches on LH needle] twice.
CO 20 sts.
Row 1: Ktr in every st to end.
Repeat Row 1 until the piece is desired length.
BO.
Tune in to Facebook on Mondays for more, Ask Me Monday videos. You can watch past videos here!
Are you a crocheter who doesn’t knit? Check out a recent episode just for you, on how to crochet open work stitches! Watch and swatch here.
The post How to KNIT Crochet Stitches appeared first on Vickie Howell.
May 7, 2018
Knitting with Beads

Knitting with Beads
This week on Ask Me Monday we’re knitting with beads!
Years ago I was invited to take part in the “Crafting from the Collection” series at the Amon Carter Museum of American Art in which I was asked to pick a few pieces from the collection as inspiration for handicrafts I would create. One of the works I chose was a painting by Wilson Alwyn Bently entitled, “Dew on Spider’s Vertical Web.” My take on the piece was a lace-weight, knit ascot with elongated stitches to mock the web and glass beads to evoke the look of dew.
With Summer coming upon us, I thought elements from this scarf seem timely, especially updated with brightly, hand-dyed yarn. Our focus is on how knitting with beads is an easy way to add interest and texture to a piece while pairing with graduated loops balances out a project to keep it airy. Tune in live on Facebook at 12pmCT (today, Monday 5/8), or watch the recorded broadcast below. Then put your beading skills to work by knitting your version of the Dewy scarf!
***This episode of Ask Me Monday is sponsored by Knitter’s Pride/ KnitPro***
See more KP products during “Vic’s Tips” segments of The Knit Show!

Tips for Knitting with Beads
Always knit beads on the wrong side of the piece.
If your sewing needle has too small of an eye to accommodate both the bead hole and the yarn size, use a piece of thread as a catalyst (see video)
If you need to add a bead on the right side of the piece and/or run out of pre-strung beads, use a tiny crochet hook to place bed directly on the stitch.

Knitting with Beads: Dewy Ascot
Materials
Approx 230 yds, laceweight yarn
Size US 6 (4.0mm) Needles — I used Knitter’s Pride Marblz
Glass Beads
Sewing thread & needle (see video)
Finished Measurements
4 1/2” (at beaded ends) x 30”
Gauge
25 sts x 24 rows= 4” (10cm) in pattern
Note: Gauge is not important for this project
Directions (Make 2)
Pre-string beads onto yarn.
CO 26 sts.
Rows 1-2: Knit.
Row 3: Knit.
Row 4 (WS): Knit (sliding 1 bead up per stitch).
Row 5: K 6, *YO, K1, YO2, K1, YO3, K1, YO2, K1, YO, K6. Repeat from * to end
Row 6: Knit all knit sts, drop all YOs.
Rows 7-8: Knit all sts.
Row 9: K1, *YO, K1, YO2, K1, YO3, K1, YO2, K1, YO, K6. Repeat to last 5 sts. YO, K1, YO2, K1, YO3, K1, YO2, K1, YO, K1.
Row 10: Repeat row 6.
Repeat Rows 3-10, 8 times more.
Repeat Rows 3-10, 4 times more, but WITHOUT using beads on Row 4.
BO.
Finishing
Use mattress stitch to attach seam two pieces together at narrow ends.
Weave in ends. Block if necessary.
Tune in to Facebook on Mondays for more, Ask Me Monday videos. You can watch past videos here!
The post Knitting with Beads appeared first on Vickie Howell.
April 30, 2018
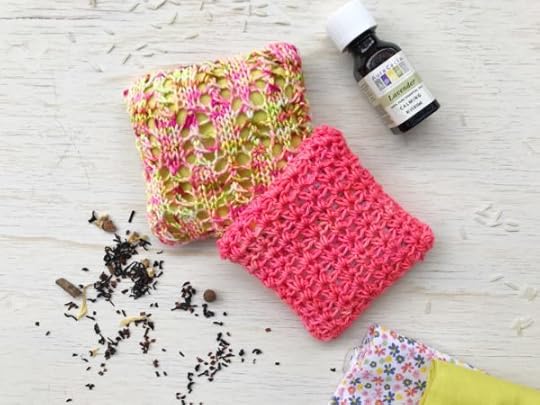
Knit and Crochet Sachets

This week on Ask Me Monday, we rounded out our month of episodes focusing on openwork with a tutorial on knitting and crocheting lacy sachets. Fill them with aromatic ingredients and place them in your lingerie drawer or yarn stash for fragrant fibers, or gift them to your mom-friends for Mother’s Day. Either way, take a moment to breathe in; stitch out. Enjoy!
Tip: Not into fragrances? Fill these instead with dried lentils or beans and use as pattern weights or bean bags!
Knit & Crochet Sachets: Watch the Rebroadcast Below
<span data-mce-type=”bookmark” style=”display: inline-block; width: 0px; overflow: hidden; line-height: 0;” class=”mce_SELRES_start”></span>
***This episode of Ask Me Monday is sponsored by Knitter’s Pride/ KnitPro***
See more KP products during “Vic’s Tips” segments of The Knit Show!

Supplies Used
US Size F/3.75mm Knitter’s Pride/KnitPro Waves Crochet Hook
Sock-weight Yarn
Tapestry Needle
US Size 4/3.5 mm Knitter’s Pride/KnitPro Zing! Knitting Needles
Fabric
Sewing Thread & Needle
Sewing Machine (optional)
Knitter’s Pride/Knit Pro Lace Blocking Mat
Knitter’s Pride/Knit Pro Knit Blockers
Rice
Essential Oils or Dried Flowers and Herbs
Knit Sachet
Front:
CO 23 sts.
Row 1: k1, yo, sl 1, k2tog, psso, yo, k3; rep from * to last 4 sts, yo, sl 1, k2tog, psso, yo, k1.
Row 2: Purl.
Rows 3-8: Repeat Rows 1-2, three times more.
Row 9: K4, *yo, sl 1, k2tog, psso, yo, k3; rep from * to last st, k1.
Row 10: Purl.
Repeat Rows 1-10, once more.
Bind off.
Back:
CO 25 sts.
Work in Stockinette Stitch until piece measures 4″/10 cm or same size as Front.
Both pieces:
Weave in ends. Block.
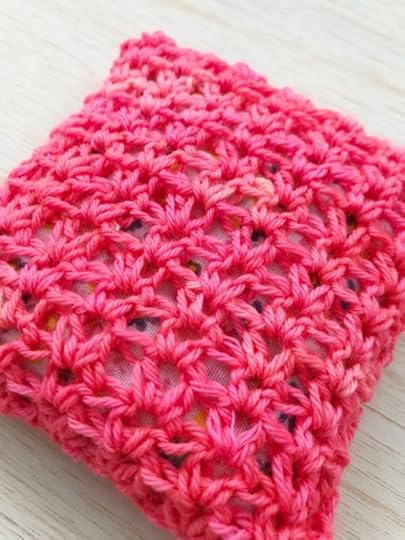
Crochet Sachet
Sachet Instructions in U.S. Terms
U.S. to U.K. Conversion
hdc = htr
Make Two:
Ch 21.
Row 1: [Hdc, ch 1, hdc] in 3rd ch from hook, sk 2, *[hdc, ch 1, hdc] in next st, sk 2; rep from * to last st, hdc. Turn.
Row 2: Ch 2, *[hdc, ch 1, hdc] in next ch-1 space, sk 2; rep from * to last st. Turn.
Repeat Row 2, twelve times more, or until the piece is square.
Fasten off.

Knit & Crochet Sachet Finishing
Sachet Filling:
Mix rice with a small amount of dried flowers/herbs or a few drops of essential oil. Set aside.
Fabric Pouch:
Cut fabric to twice the length plus 1/2″/1 cm. Fold in half with WS together; using a 1/4″ seam allowance, sew sides. Trim edges; turn RS out.
Fill the pouch with rice mixture (does not need to be very full.) Fold top edges in and hand sew closed.
Covers:
Using tapestry needle and yarn, hand sew three sides of cover Front & Back pieces together. Insert sachet pouch; sew closed.
Reference:
Lace & Eyelets, Edited by Erika Knight
Tune in to Facebook on Mondays for more, Ask Me Monday videos. You can watch past videos here!
Hey, you. Love yarn and knitting treats? Want to hang and knit with me in a more intimate, virtual setting? Subscribe to my new, knitting subscription box service, YarnYAY!
The post Knit and Crochet Sachets appeared first on Vickie Howell.


