
Emily Henderson's Blog, page 98
March 4, 2023
Hey Portland, I’m Hiring Help… And Need A Couple of Rooms For Some Fun Makeovers!

Hey all, as things ramp up again over here after a bit of a creative sabbatical. I’m excited that there are some big projects happening, but I am rather understaffed on my own project and while I’ve been doing a ton of house stuff on the weekends to try to stay on top of it all, I’m looking for a few people (as well as a couple of houses for makeovers) to help. These are all Portland-based (ideally close to SW). Here’s what I’m hoping to find:
A house manager/personal assistant. Part-time (10-15 hours on slower weeks, up to 25 on busier weeks). There is so much to do over here, a lot of it very physical that I can’t do alone or it doesn’t make sense for me to spend my time. I made a to-do list so people understand the general day-to-day expectation (and I think it fun to see other people’s todo lists): receive boxes, break down boxes, figure out how to recycle boxes, remove boxes, replant plants into large pots, cement glue large broken pot back together, plaster the pots? paint pots? power wash back deck, book painters, pick up paint, put together furniture, help me move so much furniture, hang art, book handy person, pick up groceries, put groceries away, organize prop closet, move more furniture, prep for shoots (which may include cleaning that room), sell furniture on Facebook, coordinate furniture with upholstery company, organize all props, taking out trash when full, clean up after lunches on shoot days, walk dogs if needed, help execute some more DIY ideas, run errands, return things via shipping or in-store, water plants, help manage subs, keep styled room styled nicely… the list really goes on and on. This is a position that doesn’t need a lot of fancy design skills, just great problem-solving and self-starting skills, a very positive attitude, honesty, the ability to read the room, and a lot of willingness to do anything. The hours are flexible – but mostly Monday-Thursday, during the daytime. This is $20-25 an hour and will start as an independent contractor. Obviously, anything can happen from there, but this is not a styling or design position – it’s a big ole helper that is much needed around our house as we gear up for more and more shoots (and starting to think about how to clear out and organize the other buildings on the property to get them ready for projects next year). I think this is a great job for a musician, artist, or maker looking for some consistency during the day or simply someone who likes to move their body, make some extra money, and take pride in keeping this lady’s house intact and organized during a lot of disruptive and chaotic production. Could this lead to styling help? Sure, but right now I need physical help. A video and social media creative production person 1-3 days a week, freelance – with rates TBD. Emily M. has been shooting our social and then sending it down to Mal to edit and post. Many days it works, but we all agree that for big reveals or really interesting projects (like hanging an epic gallery wall or a day of rearranging furniture in a room) having someone who is tapped into the creative here when it comes to video production (and therefore social video) would be just lovely (and far less clunky). I don’t need or want a full production crew – instead, a fun person to help direct our video content to be better, tell me what to do, and help with consistency, especially around partnership, and reveal content. Likely hourly pay or day rate, and work as an independent contractor/freelance. We’d shoot two days a week (9 am-3 pm ideally) then edit outside of that. A great handy person. This is a universal hole we are missing in the world. I’m looking for someone with experience that has their own tools to help me with all things home repair. For example, I need someone to change out our hanging porch sofa from chains to rope, hang some super heavy art, re-caulk some areas after settling, paint small dry walls areas, help my brother frame out our greenhouse, change out sink water filters, switch out sconces, hang string lights, hang a super heavy mirror, power wash all the things, etc. This would vary per week, but I’d really love someone consistent who knows the house (and depending on where we land with #1, the needs might vary as well). photo by sara ligorria-tramp | from: the feel good flash makeover reveal (a.k.a. my favorite thing i did all year)
We are also looking for a couple of homes for projects:
A no demo-reno kitchen to feature a new kitchen island. The new island doesn’t have any plumbing, gas, or electrical (but it’s a VERY pretty piece of furniture with a lot of storage). The kitchen would get a cosmetic upgrade (paint cabinets, new lighting, new tile if needed, updated appliances if needed) but no walls or plumbing moved (ideally). Great natural light is a huge plus and the ability to shoot an island from many angles (ideally not a galley kitchen). Timing is ASAP for a June shoot (so you’d get an updated kitchen in 3 months!!). You would need to contribute a construction budget, knowing that you’d get a lot of product and my services for free. We also have a budget as well – but it’s not endless. If you have this kitchen please email submissions to hello@emilyhendersondesign.com with many many many photos and the location. We will be scouting locations Monday and Tuesday (so send over the weekend – today and tomorrow – sorry for the rush!!!!) The deadline is this coming Monday 3/6!A feel-good family makeover room/s. I was watching some of our older makeover videos with our kids the other day for the first time (Sylvia’s and our first flash makeover) and y’all they are so fun and just incredibly rewarding. We decided it’s the perfect family project for the summer and the kids got SO excited to help design and do a surprise. I’m hoping to be able to do one late this summer. Ideally, you would nominate a family in Portland that could use this in their life and you’d be involved in helping and garnering help from others depending on what it requires (i.e. other family members to help paint, etc). It doesn’t need to be someone in total dire straights – just someone who is maybe in a challenging position in life and unable to do this for themselves. This would be just furniture/paint/decor (i.e. not a remodel) and likely 1-2 rooms (similar to what we’ve done before). Send through their story/photos if you can and know that we’ll take submissions for a while and likely not start until early summer, and likely execute in August (so if you don’t hear from us asap don’t be surprised).I just want to pre-thank anyone who submits! It’s going to be an exciting year. xx
Opening Image Credits: Photo by Kaitlin Green | From: A Quick Trip To Target: The Little Things That Make Me Feel Good And Pulled Together
The post Hey Portland, I’m Hiring Help… And Need A Couple of Rooms For Some Fun Makeovers! appeared first on Emily Henderson.


March 3, 2023
Jess (And Her Dad, Les) Take Paris! Get All The Vintage Recs, Design Goods, And See Her Haul

Yesterday you got Emily and Elliot and today you’re getting a big ole dose of Les and Jess (aka my dad and me). He is also known as DIY Dad for those who have been here for a while 🙂 For years my dad has talked about living in Paris (his and my late mom’s favorite city). Then finally last year he decided to go for it. He applied for his temporary visa, booked an Airbnb in Montmartre, and on January 10th, 2023 he was off. I had my worries (because I’m a perpetual worrier, especially when it comes to him) but more than anything I was wildly proud of him. Anytime I told a friend what he was doing their response would be something along the lines of, “Your dad is the coolest.” My response would always be, “he really is.” Annoyingly, he just continues to be my hero and role model:) How many of us, year after year, say that we want to do something, move somewhere, or just make a change, and here is my dad at 73 saying, “f$#! it, I’m moving to Paris.” A privilege obviously, but scary nonetheless. His girlfriend was only going to be able to stay about a month so he had almost a whole month on his own, exploring this city he had loved for years. Something that little punk from Chicago would have never dreamed of.

And because we’re best buds, I clearly wasn’t going to miss the chance to hang out with my dad in Paris…with a free place to stay, ha. FYI it was his idea first (or he at least said it out loud first)! I also don’t take for granted what a special and rare gift it is to get to have this kind of adventure with him. It’s easy to forget how fleeting life is. I kept reminding myself of that as I made him sit in cafes for longer than he wanted, strolled through streets dodging dog poop, and treasure hunting through seemingly endless flea markets and decor shops in very cold temperatures.
 can you tell he was ready to not be sitting at that cafe anymore?
Ok, enough sentimental nonsense because this is a design blog and I don’t know if you’ve heard but Paris is kinda known for its design. To say I was on an endorphin high 75% of the time would likely be an understatement.
NOTE: Remember this was my first real time in Paris (outside of a 24hr layover in 2019 where my best friend and I mostly just got day drunk on the lawn of the Eiffel Tower. 10/10 would recommend). So for those who have been there or live there, I’m sure that fact will be glaringly obvious:) NOOB ALERT.
So Many Different Kinds Of Bistro ChairsSo before we get into the vintage shopping (and what I brought back home with me!) let’s discuss how stupidly cute every. single. cafe’s. bistro. chairs. are. How are they all different? Is there a secret french bistro chair factory? Can we go?


And these were just the only ones I took awkward pictures of! I was basically a bistro chair paparazzi. I really love those light blue ones with that extra loop of rattan on the backrest.
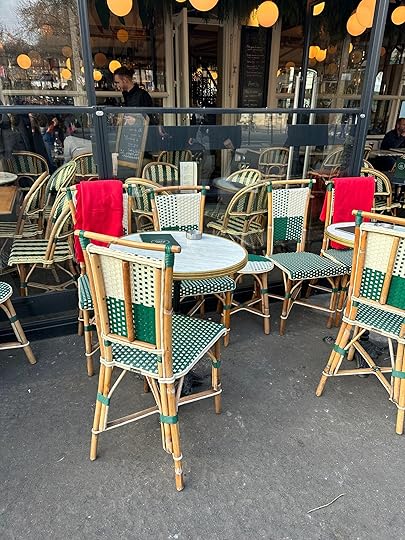


Also those green ones? Or that crazy long bench?? Or that sweet plaid??? I would like some resources, thank you.
Random Design Details


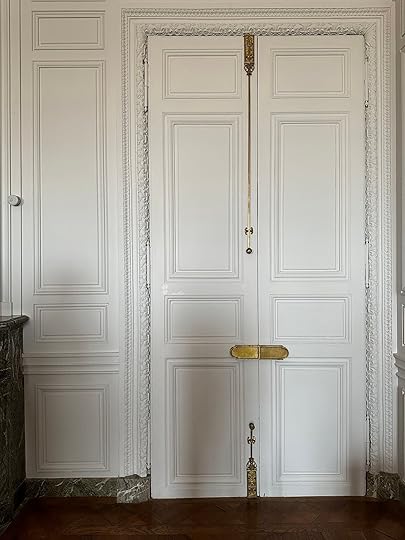
I mean it’s no surprise that the doors are beautiful with equally beautiful hardware. But look at that incredible bistro table at a random cafe. I would LOVE to have that in my kitchen. I even thought the public trash cans were pretty and thoughtfully designed. As my dad kept saying, “the French know how to do cute.”
This brings me to the shopping portion of this post.
Village Suisse
Now, I can’t remember if my dad planned to take me to Village Suisse that day or if we stumbled upon it, but regardless it was a fun place to look around. We were there on a Thursday and I’d say only 20% of the shops (little storefronts) were open. We did find out later that last week was a holiday break for schools so maybe that had something to do with it. But honestly, business hours in Paris are um, loose or uh, unpredictable so your guess is as good as mine. I’m sure the weekends are better:)

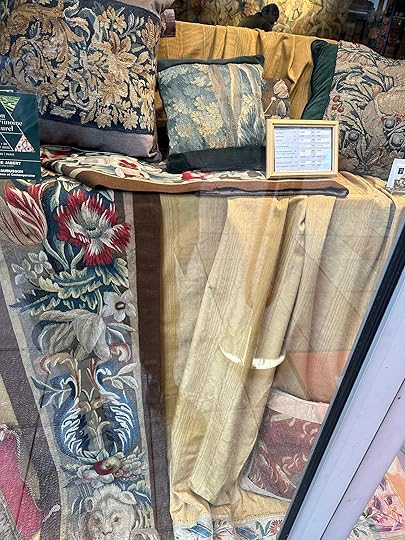
I did fall for that little green pillow but since the shop wasn’t open and it didn’t really work with my living room design, I took it as a sign to pass.


However, this vintage Murano glass striped lamp was another story. I think I said this in the post but in my office reveal, that truly stunning ceramic table lamp was only borrowed for the shoot. I was under a time crunch since it was sponsored and hadn’t found one yet. Ceramicah doesn’t normally lend out their lamps for shoots but since they knew me they were kind enough to make an exception. Also, have you seen all the awards and press they’re getting!!? I’m so happy for them and it’s so deserved!
The downside though has been trying to replace such a special lamp (since that one was too far out of my budget). It has felt near impossible. My main shopping goal of this trip was to find a vintage table lamp for my desk and this was a big contender…but it was our first day shopping and we hadn’t gone to Saint Ouen yet…


Here’s just another cute shop and a cool design moment in the village.
Versailles Details I Want To Steal

Naturally, we had to go to Versailles since it would have been my first time and my dad hadn’t been inside the palace in 25 years. I wouldn’t say February is the best time to check out the gardens but clearly, I was more interested in the interiors and getting some inspiration.
And man, do I have a newfound appreciation for parquet flooring! I think I’ve just only seen bad versions in San Francisco college apartments but these floors have made me a believer. I want them in my future home.

Also, all the decorative ceiling trim and mouldings were truly to die for (they were all over Paris but very special here, duh). I want to figure out how to add it to my bedroom ceiling. If you have any resources please let me know in the comments!


I even loved the chic simplicity of the guard rails and stair railings. Clearly, these are not original to the palace (ha) but were done in a way that they quietly add to the overall romantic aesthetic.

I had to take a picture of these awesome topiaries for Caitlin:)

This was not at Versailles but at the restaurant at the Louvre. While a bit overpriced and a total tourist trap, we really loved getting to take in the view after we were done looking at all the art. Plus we were averaging 8 miles of walking a day so a nearby place to eat and rest was extremely appreciated. Also, this was probably the nicest photo we took together on the entire trip.
Saint OuenOooooo baby, many of you told me I had to go here for vintage shopping/inspiration and you were right. This area is a design lover’s dream and is filled with the most incredible vintage. Before I left for my trip an extremely kind reader and designer who lives in Paris, Allison Crawford, messaged me on Instagram and offered to take me around. I was so grateful and PUMPED. Sadly, the one week I was there was the one week she was going to be out of town but she since she’s so sweet she sent me a list of things to see in the area. Go follow her because her account is beautiful and she is so talented!
 From Allison:
If you do everything here, expect to spend 2-3 hours browsing the flea.
If you are taking a cab, give them the address of L’Atelier 55 in St. Ouen. Put in the exact address. If you are taking the metro, take the 13 to Garibaldi and walk about 10-15 minutes to L’Atelier 55. You can also take the metro to St. Ouen via another route, however, I don’t recommend that route.
Start at L’Atelier 55 on Rue de Rosier, and peek in Maison Dumas (same owners as 55 but different vibe). For very high-end inspiration, walk across the street to Glustin. It’s inspiration gold and very expensive. Great place to look.
After hitting these shops on Rue de Rosier, go next door to Vernison to wander around for an hour or so. This is a typical flea market experience with less expensive options than other parts of the flea. Remember to negotiate.
After Vernison, go to Serpette to walk around inside. This is the best inspiration and it’s la creme de l creme of Parisian vintage and antiques. There’s everything from De Sede sofas to vintage Chanel jewelry to LV trunks. It’s my happy place!
After you walk around Serpette, go outside to Paul Bert to walk all the outdoor stalls. This will take you 30 mins to an hour.
After that, go to Mob Hotel or Paul Bart cafe for drinks and a meal if hungry.
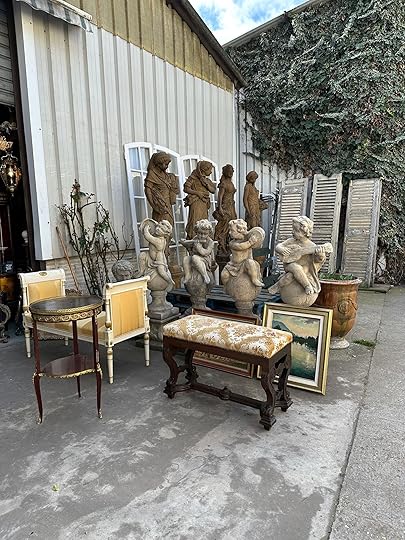
This was the first place we stopped at 80 Rue de Rosier. I can’t figure out the name and don’t want to get it wrong so that’s the address. It was more of an architectural salvage spot with INCREDIBLE pieces. I didn’t notice until about 10 mins in that photos weren’t allowed in most of the areas so this is all I got.


Look at that rattan pendant and all those stunning mirrors along the wall! I also loved that little sconce and almost asked how much that small mirror was but quickly realized I didn’t actually have a spot in my house for it. It reminded me of Em’s vintage mirror:)
Paul Bert
Paul Bert is now my happy place too and I may never be the same. It’s just stall after stall of the most beautiful things. My dad was sooooo patient with my painfully slow pace. I was just trying to take it all in!


Sorry for the terrible and not super inspiring pics. I got nervous about taking pics after that first spot and didn’t want to make anyone mad. I truly hate getting into trouble and sometimes make up rules for myself that aren’t always even real. SMH. I promise this place is actual magic. But understandably not inexpensive. I’m manifesting having at least $10k to spend next time I go so I can really indulge. How I will get that money I do not know. Miracles happen right??

I did, however, make one teeny tiny purchase and that was a studio drawing by Lebanese artist, Joseph Terdjian for 2 euros. Since I didn’t have anything but a large tote to carry it in, it got really crinkled. To ease my sadness and shame, I’m telling myself it gives it character…
The Flea Part
This was the typical feal market area Allison was talking about. Again, do not hire me as your photographer. We were pretty beat by this point in the day but it was fun to walk around for a bit. Had I had more energy I would have done some real digging.
Le BHV / Marais
Ok, so those who live in Paris might laugh at my love for this store but I don’t care. My god, I wish it existed here. It has everything. You can get there directly from the 1 or 11 metro line off of the Hôtel-de-Ville stop where you will be welcomed by a home improvement section. Please see below.

Now, it’s not that we can’t get things like this in the US, but here it’s all in one place, where you can see and touch with your own eyes and fingers!

Look at how pretty this hardware is! This isn’t a discount store by any means but the selection is so good for new goods. These photos are the absolute tip of the iceberg.

Then you go up a few floors and head to the decor section where you are greeted with all the lights you’ve drooled over on the internet but maybe haven’t seen in person, or at least not altogether in one place like this. I was very tempted by these lamps above for my desk but had my heart set on something vintage.

Even my dad was overwhelmed with design joy! JK he was ready for me to be done. Sorry, dad. I almost bought a little triangle pillow for I think 30 euros but stopped myself because I knew I was in an adrenaline overload. I kept repeating to myself, “just because you like it and it’s from Paris doesn’t mean you need it.” I actually said that to myself most everywhere we went.

Y’all this department store even had a good vintage section. DEAD.

I also considered that black and white table lamp for 320 euros but also decided it wasn’t right. Did I text Julie and Caitlin every time I saw a lamp? Basically. They helped me off the adrenaline design ledge a few times. While my dad has a great eye he’s of the “if you like, buy it” school of thought. Dad, I like EVERYTHING, I need to be extra discerning!

And here are some other photos of pretty things because this store had endless pretty things.


You wanna know what else this store had?? A gallery exhibit of incredible Ukranian artists – L’art de la resilience. Here is an article about it. I loved everything but those ceramic pieces were definitely a favorite.


If you are in Paris the exhibit is on for a couple more days! You have until March 5th.

We ended up having to go back later because a security tag was left on a shirt my dad bought and unfortunately for him, where we entered was a ferm LIVING display and I needed to check it out.

I have been a ferm LIVING fan for years (my navy velvet pouf and one of my candelabras are from them) and to get to see all of this product actually in person was awesome. I LOVED that striped chair and cabinet. Perfectly chunky:)
What I Bought
On our first trip there, I actually hadn’t bought anything up to this point (sorry this post is not in total chronological order) and I was very drawn to this brass soap dispenser. Look, I really love it but was it worth the 98 euros?? Well, I guess it doesn’t matter now. Ha. The quality is great and it is really pretty. Not a huge regret.

These candlesticks were from our trip back and as you can see they are ferm LIVING. I loved the colors and considering I own WAY TOO MANY candlestick holders and candelabras, I thought why not?! For 15 euros it was a good call since they are harder to find online.
The Flea Market We Had Been Looking For
To no one’s surprise, I wasn’t done searching for flea markets. I figured since it was Sunday there had to be a good one. So I decided to check TikTok (don’t judge me) for help and boy did it lead me to a gold mine. Now, the account I saw said to get there when it starts at 7… I say don’t get there at 7. We got there at 8ish and only some vendors were setting up. Sure you might stop a gem, but 9/ 9:30 is plenty early, at least in the winter. Maybe in the summer when it’s not freezing, vendors are willing to open up earlier. I’m sure my dad would now like credit for telling me there was “no way” a Paris flea market would start at 7. Fine dad, you were right. So to not catch frostbite, we went to a cafe nearby for a cafe au lait and a croissant for about an hour. He was such a champ because we were not properly dressed and he hung in there as I once again slowly scoured each booth. I was in heaven. I should be clear that he also loves this stuff A LOT. However, he likes to blow through and I like to carefully take in everything.
This was the address I put in my phone and it was off the 13 metro, Porte de Vanves stop: 16-18 Av. Georges Lafenestre, 75014 Paris, France.


Great sconce, even greater mirror. Sadly didn’t need either.

Two awesome lights that I passed on.

My father plotting my death but too cold to focus on any follow-through.


A mirror I WISH I could have brought back with me and two cute candlesticks. Don’t worry I didn’t buy them. I know I have enough.

Weird but awesome pendants I wanted and sconces that reminded me of Birdie’s room (that I may have accidentally texted Em about at 3 am her time. WHOOPS!)


Plates I would have bought in a second if I could have easily brought them back with me and a cabinet with cute feet.
Wanna see what I actually bought???
What I Bought
A sconce for my hallway for only 20 euros! They technically need shades so you can find me scrolling through Etsy for the foreseeable future. I did also buy the right lightbulbs that cost about another 20 euros.

I got both of these art pieces for 10 euros total. I think that black and white drawing is so pretty and while that wine bottle could easily read “bad generic art,” it’s a real painting on a sturdy board that I think will look really cute float framed in my kitchen.

Clearly, I had to come home with a design book and this square, neutral cutie caught my eye. I should have negotiated down but I paid 15 euros for it. No regrets:)


Now I’m still a little on the fence with this one and I’ll tell you why. First off, if you don’t know what it is it’s a foot warmer that I got for 20 euros (down from 30). My plan is to cut out the back and cover my nonfunctional switch and functioning thermostat with it. They are total eyesores. Functionally this is great because I can open the front when I want to use my thermostat which is not super often, and then keep it closed and pretend it’s not there when I’m not using it. I’m just not sure if the brass is right and think it might be stylistically not what I actually want. I’m not going to cut it until I’m sure and if I go a different direction my dad wants it. Win-win.


Oh, I am so excited about this little switch I got for 20 euros (down from 22:))! I have a big sconce on the main wall of my living room that you haven’t seen yet and it’s controlled by this not-as-pretty plain switch. So my dad and I are going to make a cool plate to cover the rectangle hole and then mount this switch on top of that. It’s going to look so much cooler and very special…I hope.

Here we are after braving the cold flea market, trying to feel our noses on the metro home. In total, I spent about 85 euros (plus 20 for blubs) which I’m very pleased about. What a high!
Other Lights I Looked At

Throughout the week we hit a few other lighting stores. This vintage shop, La Calinière, was cool but hard to really see what was in there because it was so packed with little to no pathways. These lights were at the front of the store which is how I got to them. The table lamp was 350 euros and I didn’t ask about the sconce because I knew I didn’t want it.


This shop, Yonoil, was in my dad’s neighborhood but we kept missing the opening hours. He was excited to show me because he and his girlfriend had bought some lights from there. Very cute but no dice for me.
So did I get a lamp for my desk??? I sure did:)
THE LAMP I BOUGHT
It’s a story as old as time. Girl sees her first vintage lamp in Paris, she’s worried she needs to look at all the other options, no other option lived up to the first one, she gets first lamp. So this gorgeous, Murano glass lamp is mine! Now it wasn’t cheap. My dad was the literal best and offered to buy it for me. It cost 650 euros. I don’t deserve him. It also was quite the scene of us packing it up because we couldn’t find a box that was a carry-on size so I needed to check it. I was worried my entire flight. But y’all it got here in one piece and I lovingly glance at it on my desk every few seconds. Caitlin wanted me to buy the lamp as soon as I sent it to her:)
Oh, and the shop owner Beatrice was so wonderful. Here is her Instagram if you are in Paris!


Then my dad actually spotted this 1930s tray as he was buying the lamp. I instantly fell in love. I paid for that though, obviously. It was 50 euros.

And finally, this was my dad’s cute apartment. Super cozy, full of vintage, and had a ton of character. Much like my father as proven below.


I didn’t read his PJ shirt till maybe our final night and burst out laughing. So while a VERY cringe shirt, the words aren’t wrong. He is in fact amazing and I don’t think I’ve fully processed what a fun and cool week we had yet. It was the best. If you ever get a chance to meet Les Bunge you are a lucky one and if you ever get the chance to go to Paris, uh, GO.
Oh, one more story that may have been the most unbelievable part of the trip! On our second or third day, we were getting off the metro to go somewhere and as we were walking down the street a gal stopped me. I thought she was trying to ask for directions which I was at first really apologetic about since I didn’t know Paris or any french for that matter. But then she asked if my name was Jess. She recognized me from Instagram and wanted to say hi. I was shocked! My dad was shocked! That has never happened to me before. Not only did a Parisian know who I was but she was also just the sweetest. So Marie (I’m sorry if I misunderstood your name!) it was an absolute pleasure meeting you and thank you for making me look cool in from of my dad:)

I hope this was a fun Friday read and that you might even be inspired to take a trip with your parent or a family member. Caitlin and Brenda are big fans too:) I know it’s not always easy to make time but life is short. Go on an adventure if you can and bonus points if it involves lots of flea markets. Au revoir, from Les and me.
Love you, mean it.
The post Jess (And Her Dad, Les) Take Paris! Get All The Vintage Recs, Design Goods, And See Her Haul appeared first on Emily Henderson.
March 2, 2023
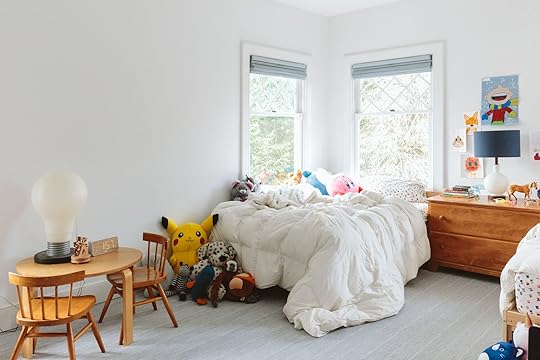
Birdie’s Room Progress – ARE YOU READY FOR THIS??

I think it’s fair to say that I’m living out a fantasy in this room, with my 7-year-old daughter (who dresses herself consistently like that). This room is not done, nor does it necessarily ‘work’ with the rest of the house but we don’t care. As a reminder, I let her take the reigns on the design (I wrote about that process here), acting as her designer and of course helping to guide her choices. She knows that this is my job and that we arn’t going to buy land-fill/garbage (like the purple LED canopy she wants). It is NOT always seamless, but I’m trying so hard to let her feel like she has control because from everything I’ve noticed, read, and personally experienced regarding parenting daughters, my trying to control her won’t be best for our relationship. She’s only 7 so I know it will get even more challenging so I’m trying to create good habits/patterns now. I will say that we don’t butt heads – I’m not saying that to brag, but just know that working together is easier for us than some of my other relationships. We are both huge enthusiasts, love color and just kinda want to go for it. We are generally on the same page which makes it easier (which I don’t think is normal and is not exactly the case with Charlie).
GO FOR IT WE DID…
Months ago I gave up on the sweet and quiet Scandinavian farmhouse bedroom that I had pinned because she was VERY MUCH against it. She wanted BRIGHT colors, and LOTS of patterns so here we are and it’s JUST SO FUN. Again, this is not a reveal, but a ‘here’s where we are today’.

The bed was from FB marketplace and she originally wanted to paint it and now she doesn’t. I kinda want to simplify the room and get a solid upholstered bed (more modern) but she loves this bed. It’s also very crickety and rickety. So this might change. The vintage dresser (also FB marketplace) was also meant to be painted a bright color but we have yet to do that and the wicker side table was thrown there for now.

Obviously, the lampshades are MY FAVORITE ($80 each at an antique mall), but I’m unsure they are working where they are currently hung. I tried hanging them in the corner together at two different heights but they are HUGE. I like the red one over the dresser, but the green one over the wicker table is obviously strange scale-wise.


We also don’t need to use both of them. One could also be over her art table, or over a reading nook. That’s all to say that this is where she wanted us to try the hanging lamps but I’m unsure if they are going to stay there.
Props to my assistant Emily for figuring out how to wire them with a chain and cord (which saved us money and time). We do still need to figure out how to add a switch, so for now they are only on when plugged in.

The rest of the room is very TBD as you can see.

She wants a drawing desk and a reading nook, but I am unsure we have room for both.
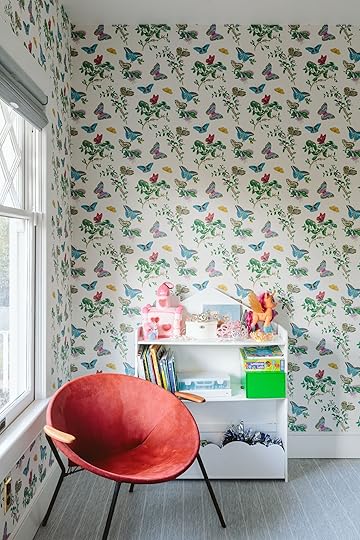
That bookshelf is very much falling apart so we’ll replace it with something that will last long term. The kids have just switched to kindles so I’m unsure how many books we’ll keep collecting, but she loves her trinkets, jewelry, gems, etc and collects a lot every time we go antiquing so I want her to have somewhere to display it all.

I considered painting all the trim and ceiling (a light lavender on the ceiling, unsure about the trim) but got the quote and it was $1700 because of all the prep so we are skipping that for now. The ceiling is much cooler than the background of the wallpaper, but it doesn’t bother me enough to do that right now so we’ll see…
But What About The Painting!!
Y’all. I got that painting at Annie’s studio (@shopwilma), by another vintage dealer, Deb Zsori (@fabiusgrange) but it’s by a Portland artist (from the ’80s). It’s incredible. the colors are so vibrant, it has so much energy and the scale is WONDERFUL (48″x48″).

I actually bought the painting for Charlie’s bedroom (I thought it would look awesome with his colorful net chair) as he loves bright primary colors. He said yes to it when I showed him a photo of it, but changed his mind once it was in his room. He said that he doesn’t like it when colors are “mixed together”, which I can appreciate. But I think it’s because it has pink in it and he’s still in an anti-pink phase. So thank goodness Birdie was so enthusiastic about it. Is it a lot going on with the wallpaper? SURE. But I think it’s also awesome.

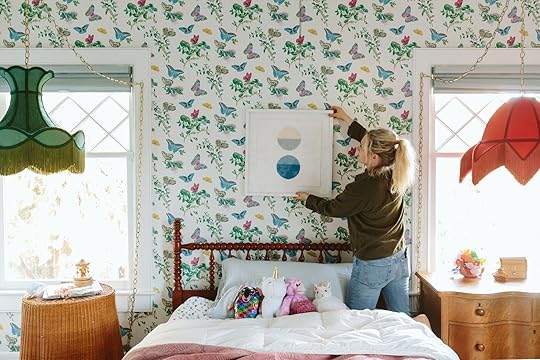
I am trying to figure out ways to calm the room down a bit. I’m going to put up a huge white corkboard (I might have to DIY It because there is a real hole in the market) and I’m considering adding white curtains just to break up the wallpaper. Stay tuned for that. Also how cute does that Jane Denton artwork look in here! That was originally in Charlie’s nursery 9 years ago, so I’m loving finding a new place for it.
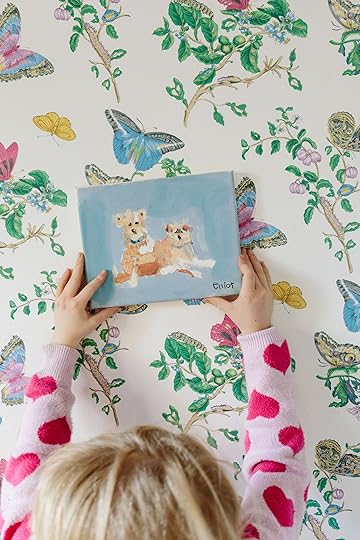

Birdie walked in as we were shooting and wanted to hang her portrait of the pups that she painted during quarantine (2 years ago). Yes. SHE PAINTED THAT, but not without a lot of guidance from Eel Costello (their quarantine teacher) who is a legit incredible artist. It really goes to show that kids can do far beyond what we typically assume. Eel had them do stained glass, threw so many pieces of pottery, mosaic art – all such advanced stuff which made them feel so empowered and confident. It was such a good lesson to us about pushing them beyond their assumed capabilities when it comes to things they love.

So that is where we are right now. We are rearranging weekly and trying out other pieces now that she is sleeping in here. But she LOVES her room and we are having so much fun doing it together.
*Photos by Kaitlin Green
The post Birdie’s Room Progress – ARE YOU READY FOR THIS?? appeared first on Emily Henderson.
March 1, 2023
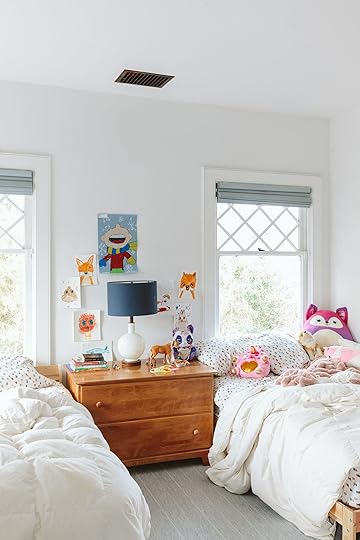
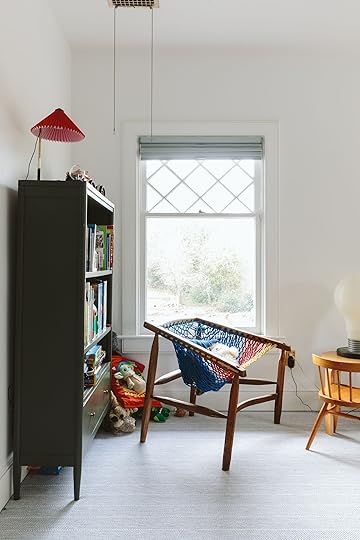
The Kids’ Shared Bedroom Update (It’s The End Of An Era…)

This post was supposed to be ‘The Kids Shared Room Update’, to show you where I’m at with designing their rooms (which was not very far). However, in order to show you Birdie’s room (which is much farther along) we brought the mattress from this room into her room so as to not shoot just a bed frame. Once the mattress was on her bed with sheets and her stuffies she was like “I really really really want to start sleeping in here, like tonight.” Charlie looked me dead in the eye and said “No. I’m not ready” which is soooo cute (he gets scared at night) but once we rearranged what is now ‘his’ room (with only one bed) he was ready to give it a go. So it’s the end of an era. I have big kids that want their own spaces and styles.

As a reminder, they’ve shared a room since Birdie was 2 and Charlie was 4 not because we didn’t have the room but because they slept better in the same room and bedtime with two toddlers in the same room was so much easier. They shared a room at the mountain house and we found that weekends, when we were there, were easier and they slept better so we stopped forcing them apart and let them share a room in LA. Then when we moved up full-time for lockdown they continued to share. We figured we’d let them tell us when they were ready (I had done some basic googling on boy/girl shared rooms and most feedback was between 8-10 the older one is typically ready for their own space and privacy).

So what it all means is that I can start figuring out this room, now Charlie’s room, and have actually made some progress now that there aren’t two beds. We tried to convince him to keep two beds for sleepovers but he was adamant that he wanted the space (and then I found the most incredible huge round chair that is big enough for sleepovers anyway).


The ages of 7 and 9 are so cute/fun because they are still obsessed with stuffies and want to cuddle their mama, but the tween-ness is happening so fast. We’ve been watching High School Musical: The Musical: The Series (which is EXCELLENT BTW) and they just really want to be teenagers. I remember that so clearly – just wanting to be a cool teenager so bad (methinks nothing has really changed).

We shot this as-is without really styling because there really wasn’t a point (I did clean up a lot of pokemon wrappers). I only JUST bought them some duvet covers that didn’t make it in time for this shoot, which brings me to a quick rant about bedding. Most kid’s duvet covers or comforters have a lot of texture and it’s my opinion that no one wants to sleep with texture. This could be because I’m sensitive to this stuff, but I think people sleep better if it’s just a soft percale and not embroidery or lace or seams everywhere (and no, not linen). Anyway, I searched all the major retailers that I loved but couldn’t find any good colors/patterns on soft percale. There were annoying colors, but no pretty percale that were in stock anyway. I ended up getting these which are super soft and have a zipper, and are affordable. I figure once I know more about their rooms I might get a color for them, but for now, they both have white duvets (not shown).
The Window Treatments

These shades (from Decorview) are excellent at function (room darkening for sure) and so easy to manually bring up and down (and down and up). The color is great. Oh, and we keep them mostly closed during the day while the kids are at school because they help so much with keeping out the cold (those windows are original and not exactly energy efficient).


They are the top-down bottom-up kind which is a lovely added function (and no ideally, a bed wouldn’t be just up against them – we always knew this was temporary). In Birdie’s room with the wallpaper, I wish we had chosen white because I think the rail at the top takes away from the diamond pattern. Unsure if I’m going to change them, but in here I’m going to make them work. They are excellent – I just wish I had done white so they receded more visually and then possibly I could add curtains.
This room was full of leftover furniture or thrift/vintage finds. I’ve had that schoolhouse lamp for 8 years now. It’s still so good. I got the large vintage lightbulb lamp on Etsy (Charlie loves funky pop art decor). The dresser is NOT staying (it’s total garbage) but I got it on FB marketplace for this exact temporary reason. I didn’t know how the room was going to be laid out or what our needs were so I didn’t want to buy something new, but we needed clothes storage badly. It has served a purpose but I’m ready to find one that is more functional (and has four knobs that stay on).

I got the second-hand IKEA table at a thrift store and really like it! The two vintage Windsor chairs are so cute, but now too small for our kids so looking for a new home.

I’ve had that bookcase for a few years – it’s from Crate and Barrel and is still available (and excellent).

The wood net chair was one of the first pieces that Charlie and I both loved and is helping to drive the style of his room. I bought it from Urbanite but I believe it was made by Purl Samoheyl (@total_nonsequitor). It’s SO FUN and rarely gets sat in, but I think will do a lot for the room.

The carpet is from Stark Carpet and I’m getting less and less nervous about it every day. I think because we are strict about no shoes in the house (you literally have to be here because of mud and the kids don’t even think about it anymore), and no food upstairs, so it’s actually been fine. Of course, the dogs are the wild cards as they come in every night for our nighttime routine and I’m always concerned about their paws, but dirt just vacuums up easily. Am I scared that they are going to pee, poop, or puke on it? Yes and no. They don’t and haven’t but they certainly could at any moment and then once they do…. That’s all to say that doing something darker would probably have been smarter/safer long term, but I think since these are on the second floor and far away from exterior entrances hopefully we are ok. And yes I MIGHT add rugs, but honestly, I really like the vibe and simplicity of the pretty wall-to-wall.
What’s In that tiny closet??
Okay. One of the only requests that the kids had was a secret door connecting their rooms. ARCIFORM put it in the plans and it was framed this way, but the sheetrockers did their job and it wasn’t exactly a priority before we moved in. But the kids, as you all know, remember EVERYTHING and asked us almost daily about it. So just recently Jamie was back working on the punch list and we asked him if he could cut it out and build the door and he did.


It’s pretty dang cute. So basically that goes to Birdie’s closet and thus into her room. It does make designing the closets more challenging (and I’m unsure how long they will even want to access each other’s room).

I have yet to paint the frame because I’m waiting to see how I design these closets now that the kids have separated.

So that is where we are at with the shared room (now Charlie’s room). I’ll show you Birdie’s very soon – we are much further along on it, although making some pivots because it’s looking QUITE ECLECTIC 🙂
Resources:
Window Treatments: Decorview
Carpet: Stark Carpet
Wall Color: Extra White by Sherwin-Williams
Door Color: Upward by Sherwin-Williams
*Photos by Kaitlin Green
The post The Kids’ Shared Bedroom Update (It’s The End Of An Era…) appeared first on Emily Henderson.
February 28, 2023
The Best Design Forward Dog Beds And Dog Crates

A few months ago my husband and I accomplished something we thought was impossible. We trained our very stubborn dog to stop sleeping on our bed. It was not without frustration and about 100 dog treats, but we’ve officially declared our efforts a success. Our 60-pound American bulldog named Gus (who thinks he is human) has accepted that his own dog bed is where he ought to sleep. Such a valiant effort would not have been possible without a durable, comfortable dog bed so we began this sleep training journey with a practical bed we knew would meet our very spoiled dog’s comfort needs. Great. Perfect. Done. But now as I stare at his quite large bed taking up a lot of precious space, I am reminded that I’d much prefer a prettier, more design-forward dog bed. Knowing how much our pets can take over our hearts AND homes, I figured I am not alone. So since I am currently in the market, I figured I’d share some of the best, most stylish dog beds available right now. Let’s get into it.
PRETTY DOG BEDS design by sarah zachary | styling by emily bowser | photos by sara ligorria-tramp | from: a historic mid-century modern home that was completely brought back to life
Around here we are big on using floor pillows as dog beds because, well, floor pillows are home decor so they are often a bit more stylish. And I’ve never met a dog who doesn’t love to snuggle up on ANYTHING remotely comfy. That said, I made it my mission to find the best, most aesthetically pleasing dog beds that are also comfortable and long last lasting (and a couple of floor pillows that I’m confident dogs would love, too).
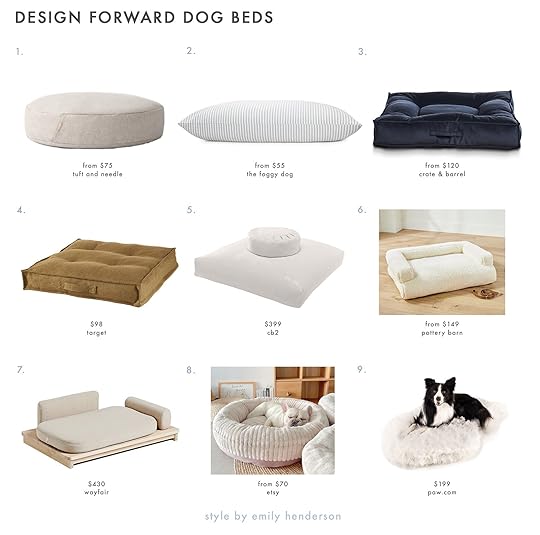
1. Essential Dog Bed: Why not give your pup the same amount of comfort you give yourself? We all know Tuft and Needle make great mattresses and now they have pretty dog beds that pets love. I love this review: After some initial reluctance to sleep on something new, our dog now spends most of her time on this bed. She loves it!
2. Upcycled Denim Stripe Dog Bed: The simple stripe design is chic yet understated. One reviewer commented: Very high-quality bed which goes perfectly with my decor and my dog absolutely loves.
3. Piazza Large Shale Tufted Dog Bed: The deep blue color is so pretty and the fabric is forgiving and easy to clean. This review sold it for me: I bought the Large Shale Tufted Bed a month ago and my dog has never been happier. He sleeps on it through the night and lounges on it throughout the day. He has very long hair that sheds often, so we love that the fabric can be easily vacuumed and/or fully removed to wash in the washing machine.
4. Square Tufted Reversible Floor Pillow: As I said above, we are always fans of swapping dog beds for floor pillows or cushions. This one comes in this mossy green, red, or dark blue and we love the tufted detail.
5. 2 Piece Sedona Pillow Set: Some superfans may remember that Emily has this floor pillow at the . It’s technically for humans but I think we dog owners know that any dog would take one look at this and think “my new bed”. Here’s what Em has to say about the comfort: Most floor pillows aren’t big enough to really lounge on and this one is HUGE with cushy down fill, and made of a really pretty grey linen. It’s so comfortable and cushy, not too firm or bouncy.
6. Sherpa Faux Fur 3-in-1 Pet Bed: This bed is INCREDIBLE. If you have trouble keeping your dog off furniture (same) then this is for you. The top cover and bolsters can be removed so you can drape it over a sofa and leave the bottom cushion on the floor. SO smart and innovative.
7. Dog Sofa: I am pretty blown away by this incredibly chic dog sofa bed design. The sleek design would go perfectly in any minimal Scandinavian home.
8. Orthopedic Calming Dog Bed: This donut shape bed offers extreme comfort and according to the seller is designed with orthopedic features to help provide support to your pet’s joints and muscles. The product photo pretty much sold it for me :).
9. Faux Fur Orthopedic Dog Bed: I have been social-media-marketed this particular dog bed for years. As far as ‘design forward’ goes, this one definitely hits the mark. It essentially looks like a sherpa rug but is actually an orthopedic bed that any pet would love. The best part? The faux sherpa cover is removable AND machine washable.
 design by lea johnson of creekwood hill | photography by sage e imagery | from: lea’s living room reveal: her pet and family-friendly open concept design agony solved
I am a recent dog crate convert. My parents inherited my brother’s dog who is crate-trained and it is such a luxury for them. My dog is about 8 years old and I WISH we had crate-trained him early on (maybe it’s not too late??). In any case, I know there are dog owners who could use some stylish crates (these things do take up a lot of precious real estate afterall) so I set out to find some of the best options available right now:

1. Abbeville Pet Crate: If you have a large dog this is a great option. It has ample room and many reviewers noted how impressed they were with the quality and durability.
2. Dog Crate End Table: This extremely well-designed dog crate has a side cabinet for added storage and the flat top allows it to act as an end table should you want that. I love the midcentury modern design and dark wood finish (but it should be noted that this comes in one size best suited for smaller dogs).
3. Corner Dog Crate Furniture: If aren’t working with a lot of space, this corner dog crate can help you save space and can act as an end table.
4. UniPaws Gray Wooden End Table Dog Crate: I love the muted gray color and modern design. Reviewers also note that it is simple to put together, great for large dogs, and very sturdy.
5. Modern Dog Crate: This one comes in various colors including black, white, clear, and pink, or you can request a custom color. I love that it has a sliding door which helps if you don’t have a lot of space.
6. Fable Crate: I love this modern crate that was designed to mimic a natural den and reduce anxiety. One reviewer commented: Obsessed with the fable crate! Worth every penny and great quality that will last a lifetime. I have a 22lbs mini labradoodle and I got the large crate size so she has some extra space which has been a great fit. The look of the crate is timeless and is a beautiful addition to any room.
 I couldn’t leave you without sharing one photo of our good boy, Gus. As you can see, he is the king of comfort.
 That is all for today and I hope this was helpful for anyone who needed it. For all you cat parents out there, you can expect a design-forward litterbox & cat accessory roundup coming to you soon. In the meantime, drop a line down below if you have any more design-forward dog beds and crates to add to the list. xx
Opener Image Credit: Design by Annie Segal and Marieke Ochtman of ASOM HOME | Styled by Velinda Hellen, Emily Bowser, and Julie Rose | Photo by Sara Ligorria-Tramp | From: Tour This Eclectic Midcentury Modern House Designed by ASOM Home + 10 Approachable Design Tricks Anyone Can Do
The post The Best Design Forward Dog Beds And Dog Crates appeared first on Emily Henderson.
February 27, 2023
Primary Closet Reveal! Our Functional and Beautiful Scandinavian Farmhouse DREAM Closet
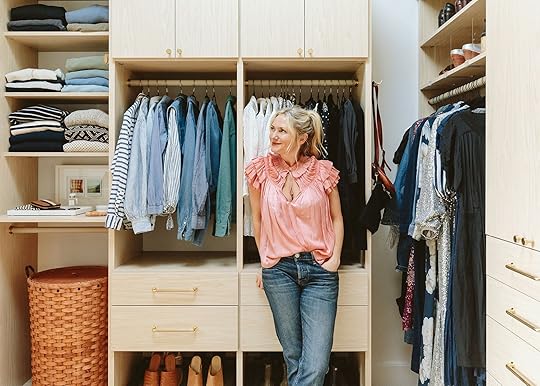
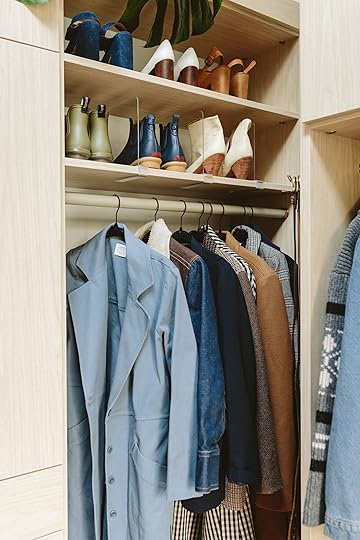
It’s closet reveal day, and I say that with equal doses of excitement and gratitude. I’m going to write this post with as much objectivity as possible, almost pretending it’s not mine because y’all this closet is incredible. Of course I was part of the design process as a client, but it’s all thanks to the California Closets team, led by pro designer Amy Bodi in Oregon (with an all-female staff, btw) who designed behind the scenes for weeks before it was installed IN ONE DAY (practically). It’s a real embarrassment of riches, and I love every single second I’m in here.
Where Are We In The House?
As you can see the closet is between our bedroom and our bathroom, with a door between the closet and our bedroom. It’s the perfect location for us as I like to bathe at times after Brian goes to bed (and then dry my dumb hair because I can’t sleep on it wet) and I often get up way before him and want to dress without waking him up. The point is – having the bath and closet together with a closable door to the bedroom has proved handy many many times.
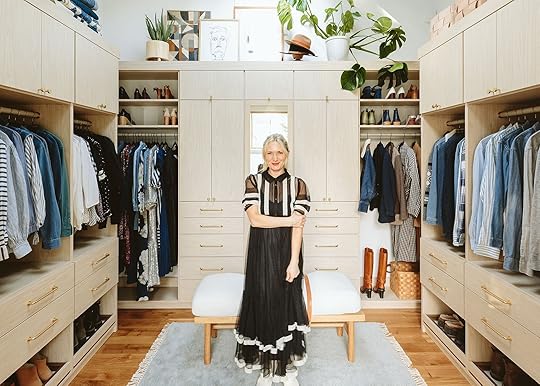
The Big Reveal!!
It’s a real dream y’all and I feel like the luckiest person on the planet that this is ours. Let’s talk about layout first because a closet is a utilitarian space and needs to function for daily needs. We designed this with California Closets (the Oregon branch) specifically for our daily clothing use which leans far more utilitarian these days. I still LOVE fun fashion and at times miss the need to try out things, but I rarely leave the house besides yoga, kids’ sports, and groceries (and LOVE it).
I’m on the left side and back, and Brian is on the right (and the drawer column along the back). Yes, I use more space because I have much more clothes. The combination of hanging rods, drawers, and shelves is PERFECT for us.
A Mix of Open And Closet Storage, Shelves, and Drawers FTW
We wanted a mix of closed storage, rods, shelves, and drawers to achieve the perfect balance of ‘easy to access’ and ‘nice to look at’ (Thank you Amy for guiding us towards more open storage :)). We fold our jeans (personal preference) so putting them on shelves behind the cabinet looked cleaner and yet easier to access than a bin within a shelf (which I like for things like spanks or swimsuits but not things you need to fold). Dresses or long coats/suits obviously get the full-length spot but anything that looks messy on a daily basis gets hidden.
Storage Symmetry = Clean Look + Easier For The Eye To Understand

As you can see we chose to be symmetrical (you don’t have to) because my eye likes when something is visually easy to understand, especially in a potentially chaotic environment. All our blouses are hung, sweaters and sweatshirts are folded on shelves, with T-shirts and workout gear in the drawers beneath the hanging rods. We also had the option of more hanging rods on the bottom but chose space for hampers instead (mine has a rod if I change my mind). I bought this tall Amish wood hamper due to its perfect size, but it’s too heavy and deep to deal with so for Brian’s side I bought the Rejuvenation rolling hamper with the canvas bag (which works better in every way honestly).
Ceramic Pot | Leather Baskets | Wood Bins
As you can imagine I edited our wardrobes a bit for this professional partnership shoot because my intent is always a mix of real + aspirational, but Brian wants me to reassure you that he’s not a psychopath based on his side of hanging clothes. He walked in after I styled out his side and I think was a bit butt hurt that I didn’t include his vintage teal and gold Rams jacket…
Drawers In A Closet Instead Of A Dresser? Yes. Contain that mess.

Here’s my pitch for prioritizing a well-appointed closet over a dresser (or two) in a bigger bedroom (I’m currently lucky enough to have both in this house). Should you have the space and are considering or currently remodeling, I’d go for a smaller bedroom with no wall for a dresser in order to get a large enough closet for drawers or a stand-alone dresser. I’m messy so this is imperative for keeping our bedroom clean so that I can sleep, but it also just means all the “clothing ingredients” are together. I have the same feelings about the kitchen/cooking areas: I’d rather have a prep pantry and a more compact kitchen than a big kitchen with a small pantry. It’s all about containing the process and therefore mess – but it’s totally a personal preference. I also just want to call out my excellent hair in that shot and how it took me almost 5 years to recover from the bleach and chop that many of you warned me not to get 🙂 I have real, thick, non-extensioned hair again!!!! (Thanks to some time and supplements).
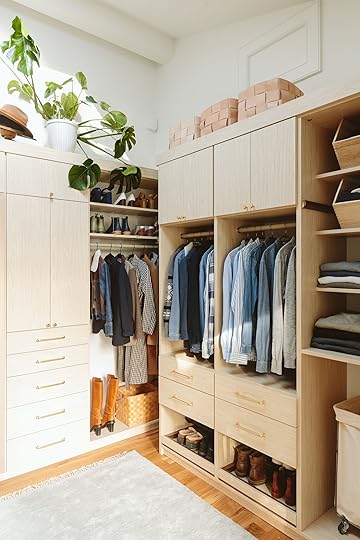
Our Finish Choice: Light Natural Wood
This cabinet front choice was harder than we thought it would be, not because we were unsure of the wood but because we were unsure of the wood tones together (including our Zena flooring). So we almost went white, but then I was reminded of Joy’s closet and just wanted the warmth of wood! Y’all I think we all need to obsess less about mixing different wood tones together. Pretty looks good with pretty, full stop (but California Closets has a LOT of options including gray tones, dark wood tones, and of course white).
The Pull Out Steaming or Prep Rod
This rod has been strangely helpful. For different fashion partnerships, I will put all the options there and steam them out, keeping them all in one location as I put together outfits. It retracts back when not in use. It’s SO nice.
The Brass Hardware
In an attempt to not busy it up too much we kept with gold on wood (low-contrast) and opted for Rejuvenation’s new Ansel pulls and knobs. California Closets lets you offer your own hardware and you can even do multiple handles or knobs, but we wanted large, easy to grab, and simple.
 Leather Rods And Brass Detailing
The details of the finishes are so good – leather rods and brass fittings. We went with the taupe leather to again, keep the contrast down and make it look more seamless and quiet.
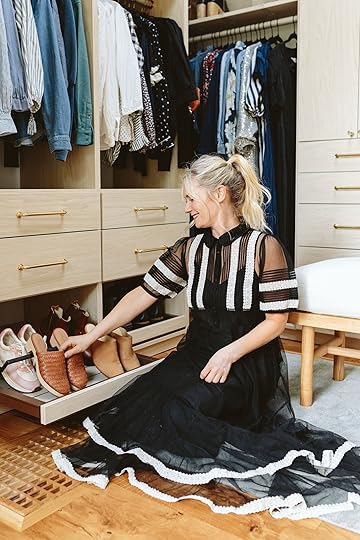
 Smart Shoe Drawers + Shoe Shelves Up Top
I was never a huge displaying-my-shoes-person before we moved back to Oregon, but now even more so. So we told Amy we wanted some easy-to-access but none that needed to feel like a shoe display or shoe showroom. These drawers pull out and can store 4-6 pairs each, and then up top, we have more shelves that fit some less worn shoes.
 The Drop Zone/Shelf

When our designer Amy suggested a drop zone shelf I didn’t predict how much I’d use it. It’s GREAT, mostly for pulling things out of my pockets before throwing clothes in the wash. Think receipts, chapstick, doggy bags, etc. Plus it’s a fun place to break up all the clothes with a sweet styling moment.
 The Jewelry Drawer
I only wear jewelry for shoots or special occasions because I end up taking them off and losing them :). This drawer is incredible and obviously allows for a place for any and all rings, bracelets, necklaces, etc.


I seriously debated how to style the top of these cabinets. Do I even put anything up there? I needed to play and experiment with what would work and make a tiny bit of sense. While Brian was out of town I went out to the prop closet and brought inside a bunch of pretty things that I thought could work – artwork that hadn’t found a place on a wall yet, stacks of vintage quilts that I love, and of course some plants. I was VERY reticent about putting plants on top because that felt like it could lean too 80s but y’all, there is a skylight RIGHT THERE. These plants might actually love it (except the faux one – can you guess which one?????). Looking at it now I LOVE how it’s styled on top and it brings me happiness every time I walk past. Yes watering the plants might be annoying at some point, but that monstera has been up there for a month (we shot this a while ago) and I’ve watered it twice with a step stool and it was only a ‘3’ on the annoying scale.

As you can see in the below photo any and all belts and bags are on hooks on the side of the cabinets. You have options to add way more (or add tie storage) but we don’t have a lot of that so we didn’t.


 The Mirror
We of course wanted a mirror in here (even though I now have a big one in our bedroom) and we love that it is super simple and opens for more shelving behind it.
The bench is a Katy Skelton original that I’ve had for almost 10 years – it works so well in here. The rug we bought from Schoolhouse. It’s a 4’x6′ and we really need a 5’x6′ or a 6’x6′ (which doesn’t exist). I would have gotten a 5’x8′ but it would look like wall-to-wall carpet plus we have a huge air return that couldn’t be covered so it needed to be 6′ wide. But if you are wondering why it’s a different orientation for different angles it’s because we cheated it for each shot.
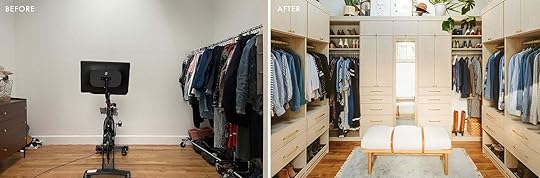
Let me be clear – a large closet like this is not essential to a life well lived, but it’s certainly a ‘good to have’ and certainly adds a lot of value to our home. I can enthusiastically state the obvious – having a well-thought-out and designed closet is pretty darn lovely. When we started designing the layout of this house 2 (3?) years ago we planned for a decent-sized primary closet. Whether I intended to or not, fashion (read: me trying on clothes) has ended up being a big revenue generator for my company so having a nice-looking closet as well as good storage (and a great steaming/prep area) became relatively important.

Should we ever decide to sell this house we knew first-hand the power of a spacious closet (or lack thereof). When we first put our LA house on the market – people loved the house, but many were turned off enough by the lack of closets. But that house was built in 1920 and lives are different now (for better or worse) so the expectation on a recently remodeled house is spacious closets. And spacious it is.


A huge thanks to California Closets for partnering with us on this closet. Amy Bodi, our designer, was so thoughtful and extremely detailed in her design. The process was incredibly seamless from start to finish. Also, I must shout out the installers who came in like ninjas and installed it all in one day (they came back the next day to add trim, etc, but it was almost fully functional after the first day). Designing and installing a closet like this is certainly a luxury and they nailed it on every single level. We are extremely impressed with the quality, the services, the function, and the style – it’s truly incredible and we feel like the luckiest people in the world. xx
Additional Resources:
Flooring: Zena Forest Products
Skylight: Velux
Wall Color: Sherwin Williams, “Extra White”
*Photos by Kaitlin Green
The post Primary Closet Reveal! Our Functional and Beautiful Scandinavian Farmhouse DREAM Closet appeared first on Emily Henderson.
February 26, 2023
The Link Up: The TV Series Emily’s Whole Family Loves, Caitlin’s Budget Date Night Idea, & A GREAT Design Shop In LA

Happy Sunday folks! We are so happy you stopped by. This week our lovely Jess has been galavanting around Paris likely wearing cute outfits and discovering awesome vintage finds. We can’t wait to hear about her trip once she returns (and you can expect a blog post about it, too :)). In the meantime, here are the links we are excited to share with you this week:
This week’s home tour takes us to San Francisco, where a striking all-black exterior contrasts the very bright and artistic interior. It is a modern “maximal minimalist” home that has us completely transfixed.
From Emily: For those of you with kids who like musicals, we just started watching High School Musical: The Musical: The Series which is a TV show set in the high school of the OG High School Musical, but 20 years later and they are re-preforming the OG musical. Listen, we didn’t love the OG High School Musical movies (besides of course our love for Zach Ephron) but this show is SO GOOD. Brian and I both LOVE IT (he even teared up during the episode where the parents tell their son that they are separating which they did so with so much thought and care). The music is awesome, the acting is so good, and the choreography is so good. The cast is refreshingly diverse and gives me hope for the future. I mean, to be fair, we are serious musical lovers over here and think that The Greatest Showman is the best family movie of the 21st century. But if you are looking for a new weeknight show to watch with your kids (over the age of 6 I think) we LOVE High School Musical: The Musical: The Series.
From Jess: I found my dream pants and I might wear them every day on my Paris trip (I’m writing this pre-trip FYI). They are SO COMFORTABLE, make me feel cool, the quality is awesome, and I can dress them up or down. Normally I don’t spend this much on pants but as soon as I put them on I knew we were meant for each other. I got a medium and at almost 5’4” I don’t need to hem them (big win:)). I can’t say enough good things about them and might even sleep in them I love them so much. 100000000/10.
From Mallory: If you’re in LA listen up: go check out Olive Ateliers if you haven’t yet!! Their whole warehouse is full of “objects with old souls” and they import awesome stuff from literally all over the world. The best part?? It’s fairly affordable (solid marble bowls for $65, vases for under $100, and awesome wood pieces and paper mache bowls for $30-45). Obviously, some of their large planters & onyx sinks can be pricier but considering that most of these pieces are shipped in from all over, I was impressed. They do “drops” every few weeks that are open to the public but during the week they’re open to the trade. Check it out & follow them on IG 
From Caitlin: Lemme tip y’all off to my favorite budget-friendly date idea: THE MONDO LLAMA CRAFT KIT. Head to Target with your love interest (or even a friend – or even yourself?), pick out a craft (or two different crafts, it’s your date!), pop on a show (something that works well in the background – I can vouch for Cheers or the Bon Appetit channel), and get to craftin’. IT’S THE BEST.
From Ryann: Once again I am looking for good books to get me back into reading. I always go in spurts where I read voraciously and then abruptly it stops which makes me feel, to be quite honest, very lazy and sad. So in an attempt to get myself reading again, I bought How High We Go In The Dark by Sequoia Nagamatsu. I’ve heard great things about it, it’s one of those novels that follows several interconnecting stories which I am a fan of, plus it’s about a prehistoric plague that decimates humanity and that’s very intriguing to me (I wonder why??). This is my first book of the year (I’ll let you know my review hopefully next week!) but I would also love some recs from you all so I can keep the reading train going instead of going on Tik Tok every second of my life 🙂
Have a lovely Sunday sweet friends, and come back tomorrow for a brand new REVEAL! xx
Opener Image Credit: Design and Photos by Rosy Alexander | From: How To Add An Addition To Your House Without It Feeling TOO New (+ A Classic Yet Trend Forward Kitchen Island Extension You Need To See)
The post The Link Up: The TV Series Emily’s Whole Family Loves, Caitlin’s Budget Date Night Idea, & A GREAT Design Shop In LA appeared first on Emily Henderson.
February 25, 2023
What You Have Bought So Far in 2023

Is it just me or is this year already flying by?? As such, when we started planning this post and realized February is nearly over, we figured we would check the data to see what ya’ll have bought so far this year. We were genuinely curious if the beginning of the year purchases would reflect any interesting buying trends. I.e. would we see a lot of organizing stuff? Cleaning supplies? General get-your-life-together accouterments? The answer lies in these here links so let’s jump right in, shall we?
10. Wood Entryway Bench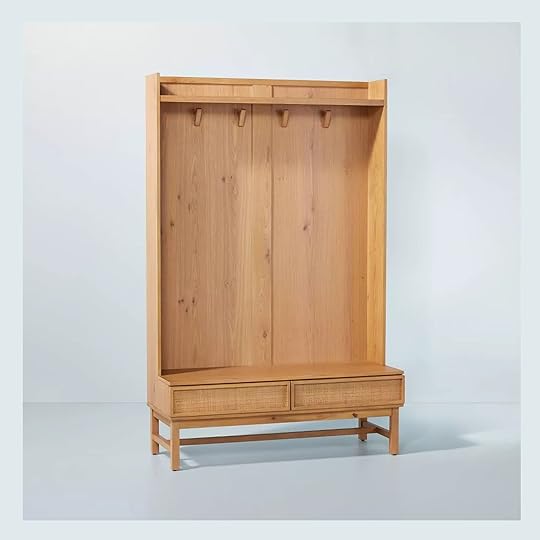
Right off the bat, the data is throwing us a surprise gem. This entryway bench is not a casual purchase but it IS a really pretty and functional piece of furniture (that’s only $399!) so I understand why it would be so popular. I love the wood finish, cane drawer detail, and the adorable peg hooks. Who among us is a proud owner of this bad boy?? Don’t be shy and sound off in the comments 🙂
9. Emily’s Glass Dinner Plates
These classic and durable dinner plates have been a favorite of Emily’s for years. Here’s what Emily loves about them: “These plates are extremely flat, lightweight, and durable which means that the kids can easily set the table, do their own dishes, and easily load them into the dishwasher. While I love handmade pottery plates, those are more like the modern-day “fine china” – great for special occasions. But for day-to-day, I will only use these”
8. Large Oval Leather Shagreen Tray
We knew this Shagreen tray would be a winner as soon as we saw it. It is so pretty and has a lovely texture (and it has a matching box if you are into that). Emily styled it in her sunroom and we love the way the muted green color interacts with the stunning blue tile flooring.
7. Ryann’s Mug
I LOVE this mug. It’s one of the few things I use every single day and at this point, it’s something I feel like I can’t live without. If you are curious, here is my original sales pitch: “If you have ever opened Tik Tok you have probably seen the now viral Stanley mugs that every Gen Z and Millenial influencer has. And these influencers deserve a proverbial raise because I found myself ready to hit purchase until I saw they are $50 and basically sold out of every color. So I gave up on the dream until I was wandering through Target and saw this. It’s a Stanley mug dupe and I am sure not as heavy duty, but it’s the same size and idea AND half the price. So I bought it and I now have to run to the bathroom every hour on the hour because of how much water I am drinking. Big fan.“
6. Emily’s Sauna Blanket
Sauna blanket for the win! I can’t say I am surprised to see this guy made it to the top 10 list once again, especially since Em wrote another honest full review after having hers for 3 years. I don’t think anyone can question why it is a top seller, but I do want to know, who got themselves one this year?? Lets us know in the comments!
5. Women’s Sherpa Anorak Jacket
Emily wore this cute (and affordable) sherpa jacket in this post and really sold it with this endorsement: “How cute is this cozy jacket? It has this brown trim detailing that mimics the look of leather, a super high collar that is oversized and very cool, and it’s just as soft on the inside as it is on the outside.“
4. Faux Leather Storage Bin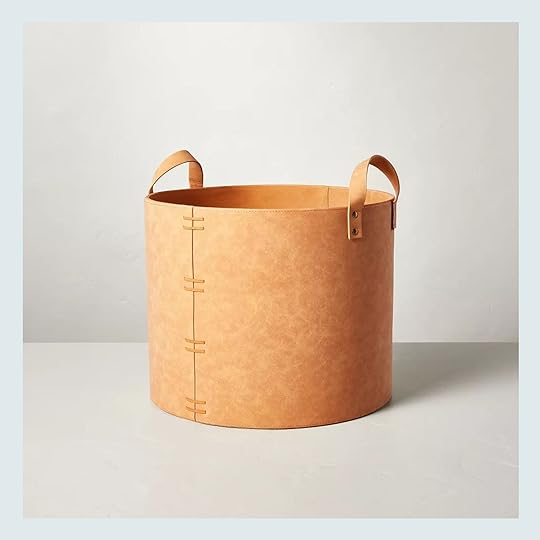
We have used these faux leather storage bins in SO MANY shoots and projects over the years. I would say this guy falls under the category of pretty org and its placement on this list is reminding me that I could use a stylish bin or two. I love the stitching detail and faux patinaed look, and this is big enough that it could store shoes or perhaps some throw blankets. Who snagged one of these this year??
3. Mallory’s Turtleneck Sweater
Mallory, the queen of finding the best sales, bought this sweater when Madewell was offering an additional 40% off sale items. What a steal! It has a perfect boxy, cropped fit and lovely detailed stitching. Who else bought this one??
2. Ryann’s Flared Leggings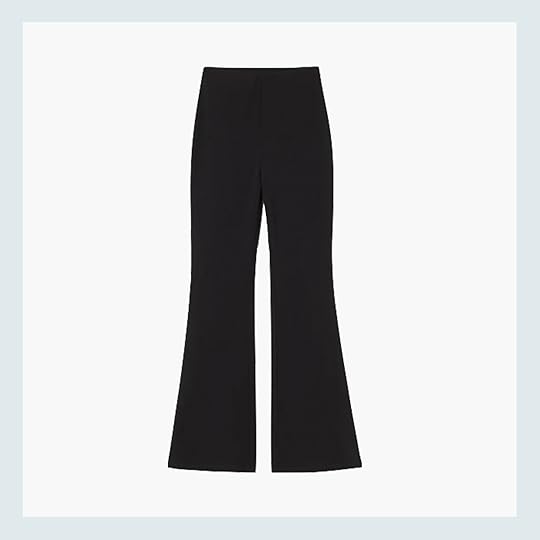
I always get compliments when I wear these pants which of course feels good 🙂 Like I said when I shared them in The Link Up, they are very flattering, COMFORTABLE, and slimming if you are into that and go with pretty much everything I own. And only $18! If you bought yourself a pair let me know down below!
1. Caitlin’s Yee Haw Needlepoint Pillows
And finally, coming in at #1 are these delightful needlepoint throw pillows. I wanna know who snagged these!! They are really cute and not surprisingly currently sold out (but don’t worry, the shop sells some others that are just as darling–like this cowboy boot one!). Here’s how Caitlin originally sold us all on them: “I’m currently obsessed with fun needlepoint pillows (anyone else?) and I just ordered a pink and orange pair that I’m so excited about!!! They’re from a small business in Texas, they shipped much quicker than anticipated, and the price is UNBEATABLE. I say this as a person who spent about $110 bucks back in 2017 on the now-famous Furbish Studio “got it all together but I forgot where I put it” needlepoint pillow – it was worth the splurge and I still love it, but dang, it feels great to find the look for about half the price:) Hoping they make it into one of my reveals this year.”
There you have it, folks. If you purchased any of these top sellers we’d love to hear about it down below! Thanks for stopping by and happy Saturday. xx
Opener Image Credit: Design by Mel Burstin | Photo by Tessa Neustadt | From: Mel’s MOTO Reveal – It’s The Breath Of Minimalist, Uncluttered Air We All Need
The post What You Have Bought So Far in 2023 appeared first on Emily Henderson.
February 24, 2023
The New Jake Arnold x Crate & Barrel Collection Is Giving Us Heart Palpitations

If you’ve made it this far you probably saw the opener photo, got butterflies, then had to click through to see more. Honestly, same. We were so excited when we heard Jake Arnold + Crate & Barrel were collaborating and now that the collection has launched, we wanted to do a deep dive into the beautiful pieces that they created together. I was actually lucky enough to see the collection yesterday in person and ya’ll, it’s even more stunning IRL. So today I am thrilled to highlight some of our favorite pieces and share why we love them so much. Enough talk, let’s let this collection speak for itself:
 Rumford Accent Chair
Those chubby chairs are the perfect balance between modern and traditional. I am a huge fan of this layout and all of the pieces in the space. Perhaps the star of the show is this guy over in the corner:

 Winslow Oak Bar Cabinet
This bar cabinet is one of my favorite pieces – dare I say – I’ve ever seen?? I love that it combines form and function seamlessly and THOSE LINES. Just, wow. So so good, Jake Arnold + team!!
Living Room
This is some serious eye candy am I right or am I right?? The curve of the chairs, the warm cognac sofa, and THAT CREDENZA. Hold up, let’s have a closer look at that…

 credenza
Just wanted to confirm that this piece it’s awesome and it sure is. How amazing is that woven texture?! And those feet?? The whole thing is *chef’s kiss*. Also, click through to see the genius cord management solution in the back. That MAKES it for me and you can tell that there’s so much thought that went behind all of these pieces to make them beautiful and also functional so they can last you a lifetime. Now a moment for some of the other awesome products featured in this room:

 floor lamp | accent chair
 mirror | sofa
Alright, let’s take this to the bedroom, shall we? Let’s start by saying that there’s nothing sexier than a statement bed and this one DELIVERS. The color is perfect, the lines are gorgeously crafted and all in all, it couldn’t be better. See for yourself:
Bedroom
Hi, can we get a closer look? Yes, yes we can:

 Caldwell Camel Bed
But here’s the real kicker: IT HAS STORAGE. Yup, you heard that right. The base of the bed pulls out which is literally a dream. Just when I thought it couldn’t get any better…I TOLD YOU THIS COLLECTION DELIVERS. Now we’ve been neglecting a seriously awesome part of the collab and I cannot continue on until we bring it up, ladies and gents, the lighting portion:
Lighting pendant
 sconce | floor lamp
 table lamp | pendant
This truly knocked my socks off. I love all of the textures and the continuity is so clear through that brass ball detail. They just really nailed it. Alright now, let’s chat a bit about decor because, between the candle holders and the textiles, we’re about to have ourselves a feast. BUCKLE UP.
Decor and Textiles
Ah, this room is styled so beautifully. Did ya notice that awesome candle holder on the coffee table?? Let me show you a more in-depth photo below because it CANNOT be missed. Here are some of our favorite decor pieces & textiles:

 euro pillow | ceramics
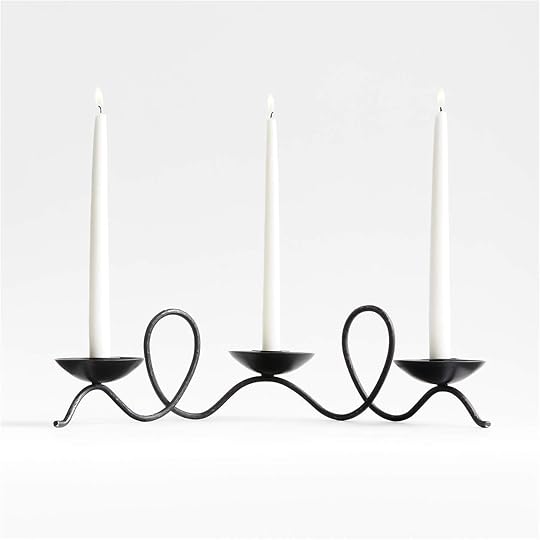
 candle holder | diamond patterned lumbar pillow
So good right?! Let’s end it off with a HUGE congrats to Jake Arnold, Crate & Barrel, and the amazing team work it takes to build something as incredible as this. Way to go everyone, it’s a MASSIVE success!! xx

If you want to check out even more of the collection, you can head here (definitely do because there are even more amazing pieces we didn’t have room for in this post, it’s worth it I swear!). Which products are your fav?? Let’s chat below! Thanks for being here. xx
**Images courtesy of Crate & Barrel
The post The New Jake Arnold x Crate & Barrel Collection Is Giving Us Heart Palpitations appeared first on Emily Henderson.
February 23, 2023
Renovation Redo: The Farmhouse Window Trim Options + Shutters Debate (With Some Photoshop Renders To Help Us Decide)

In this week’s episode of ‘fixing our remodeling regrets’, we take it to the exterior where I’m just not feeling like I should about the house (and no, it’s not just the mud). The color of the body, Pure White by Sherwin-Williams, is perfect and lovely. We then chose Online by Sherwin-Williams as the trim color because it looked really good with the Sierra Pacific Windows steel blue aluminum clad doors – similar undertones but lighter. Great. Done. The color never felt totally ‘happy’ enough for me, but it looked really good with the blue doors, copper accents, and white (in the sun), and decisions had to be made FAST. I figured the ‘Online’ trim would recede and the future shutters would be the contrast or color that I wanted. And listen this color is extra gray when it’s gray outside (which is very frequent) and far bluer when it’s sunny. We chose it when it was sunny 🙂 But that wasn’t the biggest issue.
We want shutters, and as I started researching shutters for the first time I quickly realized there is a specific formula that I prefer: white house + white trim + white window sashes + contrasting shutters/doors. Sometimes the trim/windows color is the same as the shutters (and the muntins of the window) to give it more of a monochromatic look which I thought was very cool. Around the time of shutter contemplation, a month or so ago when I was starting to break down all my reno regrets, a reader reached out (hi Misty!) and said that she was a pro photoshopping graphic designer available to be hired to help should I need it. I’m pretty sure she could sense my frustration and had been there before as a remodeler herself. I know there are a lot of good graphic designers out there, but having an invested reader helping felt like a nice alignment. So I hired her to photoshop some options so if/when we repaint we feel REALLY GOOD about it. The question wasn’t just the window trim color it was also which window should get shutters. So today through some photoshop magic, I’ll show you a bunch of options (and what we’ve narrowed it down to).
Option A: White Window Sashes + White Trim + No Shutters
Admittedly this is pretty boring without the shutters, although once landscaping grows in I think it could be really pretty and classic. What you can’t see here are the copper Rejuvenation lights and of course a lot of pink, green, and coppery-toned trees and plants that have yet to be planted. Oh and don’t get too excited – the GREEN GRASS IS PHOTOSHOPPED. I think even Misty was sick of looking at the mud so at one point she threw in the green which really did it for me (are there any glasses I can put on to help transcribe mud to grass??). Regardless, the white on white was a real hard no for Brian and I kinda agreed.

There are days when the red door on this white house is too much for me, TBH, but that’s an easy fix. I actually think that when the upstairs window treatments are open the diamond pattern of the windows really pops more when the trim is white. However I still wasn’t convinced, Brian wasn’t into it, and this time around I have to feel REALLY REALLY good about it. I love the sunroom windows without the gray trim color – which is actually how it was planned but the painters messed up and painted it, and we decided to live with it. As you can see the profile of the trim is smaller and was never intended to be painted gray.
Option B: White Window Sashes + Blue trim + No Shutters
For a brief 2 days, a shutter salesperson told us that we couldn’t do shutters on some of the windows upstairs based on the photos. So just in case, in the interim, I asked Misty to photoshop this option: blue trim, white window sashes, with no shutters. Meanwhile, I measured the top windows – specifically the two on the right and left sides of the house that seemed too close to the edges. The window sashes (without the trim) are 36″ wide, which would require the shutters to be 18″ each. We have a solid 19″ to the edges of the house so we are fine – tight but fine. I did NOT like this version without shutters. But what if we add shutters???
Option C: White Window Sashes + Blue Trim + Blue Shutters
Brian was curious about this option and felt like exploring all options was important this time around (without a painting crew waiting for my decision). So in this option, we keep the window sashes white, then paint the window trim and the shutters blue. We thought this would totally work, but this was a hard and fast no for both of us – it looks so busy!! Your eye doesn’t know what to look at – Trim! Diamond windows! Shutters! Doors! Now I want to be clear – some houses can handle a lot of busyness on the outside and I have dreams of doing a Victorian house in a billion fun colors, but that’s not the intent for this house. I have to admit that I would not have known how much I didn’t like this until it was photoshopped. It sounded like a good idea (and I think we even tried it in the chief architect renderings once and liked it). But no, it’s too busy.
Option D: Blue Sashes + Blue Trim + Blue Shutters
When I first saw this monochromatic look I was like ‘OOOOHHHHH’, but I think for the wrong reasons. I thought it looked cool and a new take on the farmhouse exterior style. Brian and my brother Ken were both hard no’s thinking it was too trendy and didn’t want that for our house. I wasn’t going to fight for it, but I was surprised at how much I liked it. I actually thought that maybe it could be two different dark colors so not quite as monochromatic. I think I am just responding to feeling like a basic middle-aged lady with a big fancy house and wanting it to feel younger and cooler (!!), which is obviously pathetic and dumb to write, but I know I’m not alone in feeling like my house doesn’t really look like ‘me’ 🙂 So I asked Misty to do a few different views of the house to really make sure this wasn’t the direction we should go:

Pretty darn intense. But what if the red door was changed? There is still something that I liked about it, but I think it’s just that it’s strangely graphic, easy for your eye to ‘get’, and it has style to it. This brought up the dark house debate: whether or not dark houses will be dated in 20 years, but ultimately we decided that in the right setting it is soooo appropriate and classic, but no, a house like this with a wrap-around porch is probably meant to be more classic. Or maybe without the shutters it would look better. I also want to be clear that painting the actual sashes of the windows (the grid with the diamond) is more challenging so having them white is FAR easier and less expensive.
Option D + A Porch Shutter
In this one, you can see Misty added shutters on the bottom window (which I really liked as a feature). Here are a few more angles in this monochromatic look so you have all the information:

This is the kitchen patio side, which I think looks cool, actually, but that could be because there is no landscaping yet so the blue and white really pop (right now because of the lack of trees/bushes growing in every angle of the house looks so unfinished).

This side of the house is the most problematic (and publicly seen) for me and always has been. Here’s why: you can see all the mechanical aspects (heat pump, electrical panels, generator – all will be covered eventually but very exposed now) and this side also highlights a lot of window awkwardness (mixing old + new with the older windows oddly placed). BTW the odd placement doesn’t bother ME, but people sure love to call it out. I actually find it super charming that they aren’t perfectly aligned but boy are people on social media upset :).
Option E: Blue Sashes + Blue Trim + No Shutters
Misty also sent through this option without shutters, which is also fun to see and perhaps better. It’s still not what we decided on but I wanted to show you because it’s just so illuminating to see all the variations.

It’s definitely less intense and busy than the monochromatic + shutters look. Are you still following? This is getting complicated. OH, and we have a big cherry tree coming from the front porch area which I’m very excited about (and the grass and bushes are photoshopped – they aren’t in yet).
Option F: White Sashes + White Trim + Blue Shutters

OK NOW HERE WE GO. When Brian and I both saw this we were like ‘ooh, pretty!’. It feels super classic and still fresh. Is it young and cool? Nah, not really, but it’s timeless and appropriate and with styling, furniture, and landscaping I think it will still look fresh. After seeing this, I wanted to take a more pulled-back photo for Misty to see the mudroom/bedroom and potentially put shutters there.
Option G: White Sashes + White Trim + Blue Shutters On Both Floors

That looks SO PRETTY to us. I almost want to add more shutters on the windows flanking the big scenic doors but those would definitely hit the exterior sconces. It feels fresh and bright, pulled together, and hopefully not regrettable. Ok, let’s say that the white + blue shutters combination was our winner, does it work on all sides of the house?
Option G: Other angles Of The House + Shutter Debate
The kitchen side of the house allows for shutters on top, but not in the kitchen windows. You might think that it looks a little plain, but what you don’t know is that we are adding two large potted trees on the patio, a big striped umbrella, string lights, trees and bushes along the side of the house, etc. It’s going to be styled out a lot so the white-on-white window situation will just be a nice background.
But what about the shutters on the second floor? This is HARD. I think they are cute, but are they dinky? The one on the far left is a bedroom window and the rest of them will have shutters, but you won’t see them at the same time. The other two are pretty small – both bathroom windows. We could save money and not do any of these, but will this side look unfinished?
Option G: East Side/Problematic Angle
Look how happy our problematic side looks now! I like the shutters on the bottom left large window by the brick patio and the ones on the second floor. But then the ones on the first floor without shutters look unfinished and yet shutters don’t really work on them (especially that big one on the bottom left – the other three could maybe handle them). So I reached out to Misty again and asked for these options:
Only put shutters on top of larger “bedroom” windows (this is the more traditional way to do it – just bedrooms).Put shutters on top of larger windows + smaller upstairs windows (except that tiny one), but none on the bottom. Shutter all windows possible.We don’t have to make this call today, but very soon. I’m hoping that any and all experienced shutter people will help weigh in. I’m a shutter newbie and they aren’t cheap so I don’t want to put some up that we eventually take down. Before we go let’s look at the front Porch entrance:
Option G: Front Porch/Entrance Without Shutter
It looks good but could be better…
Option G: Front Porch/Entrance With Shutter
Now that looks like a nice happy lady. I love the shutters on the window on the front porch. The red + blue + white is feeling really strong, so rethinking the red door but definitely going to wait a bit.
What’s up next? So we feel pretty darn confident that we want to paint the gray window trim the same white as the body of the house (Pure White by Sherwin-Williams). We are good there. But what I still feel needs a solid rethinking is what exact shade of blue (or green? pink? blush? black?) the shutters should be. Misty (our graphic designer) did them this round to match the doors as I asked. But I’m hoping to do my favorite thing and really EXHAUST ALL OPTIONS (something I didn’t do actually during this process the first time around). I think I under-thought it (I was also feeling overwhelmed/alone and depressed, so not in my best design self). Now that I feel excited again (!!) I think my old instincts will kick in and it will turn out GREAT.
Let me know in the comments what colors you want to see as the shutters (knowing that the blue aluminum-clad doors can’t change, but the red door can). I want to try Dutch Tile Blue which feels happier and a powder blue. I also want to see what a rosey-toned door would look like (blush and blue forever, no?) But what else??
The post Renovation Redo: The Farmhouse Window Trim Options + Shutters Debate (With Some Photoshop Renders To Help Us Decide) appeared first on Emily Henderson.
Emily Henderson's Blog

- Emily Henderson's profile
- 10 followers

