
Emily Henderson's Blog, page 99
February 23, 2023
Renovation Regrets: The Farmhouse Window Trim Options + Shutters Debate (With Some Photoshop Renders To Help Us Decide)

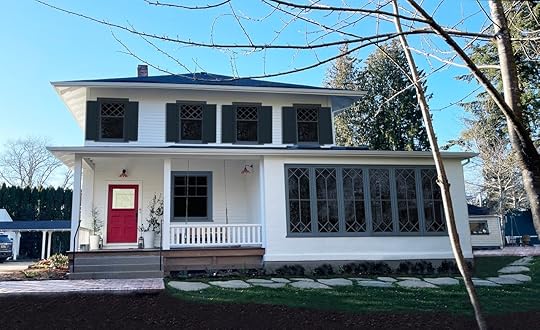
In this week’s episode of ‘fixing our remodeling regrets’, we take it to the exterior where I’m just not feeling like I should about the house (and no, it’s not just the mud). The color of the body, Pure White by Sherwin-Williams, is perfect and lovely. We then chose Online by Sherwin-Williams as the trim color because it looked really good with the Sierra Pacific Windows steel blue aluminum clad doors – similar undertones but lighter. Great. Done. The color never felt totally ‘happy’ enough for me, but it looked really good with the blue doors, copper accents, and white (in the sun), and decisions had to be made FAST. I figured the ‘Online’ trim would recede and the future shutters would be the contrast or color that I wanted. And listen this color is extra gray when it’s gray outside (which is very frequent) and far bluer when it’s sunny. We chose it when it was sunny 🙂 But that wasn’t the biggest issue.
We want shutters, and as I started researching shutters for the first time I quickly realized there is a specific formula that I prefer: white house + white trim + white window sashes + contrasting shutters/doors. Sometimes the trim/windows color is the same as the shutters (and the muntins of the window) to give it more of a monochromatic look which I thought was very cool. Around the time of shutter contemplation, a month or so ago when I was starting to break down all my reno regrets, a reader reached out (hi Misty!) and said that she was a pro photoshopping graphic designer available to be hired to help should I need it. I’m pretty sure she could sense my frustration and had been there before as a remodeler herself. I know there are a lot of good graphic designers out there, but having an invested reader helping felt like a nice alignment. So I hired her to photoshop some options so if/when we repaint we feel REALLY GOOD about it. The question wasn’t just the window trim color it was also which window should get shutters. So today through some photoshop magic, I’ll show you a bunch of options (and what we’ve narrowed it down to).
Option A: White Window Sashes + White Trim + No Shutters
Admittedly this is pretty boring without the shutters, although once landscaping grows in I think it could be really pretty and classic. What you can’t see here are the copper Rejuvenation lights and of course a lot of pink, green, and coppery-toned trees and plants that have yet to be planted. Oh and don’t get too excited – the GREEN GRASS IS PHOTOSHOPPED. I think even Misty was sick of looking at the mud so at one point she threw in the green which really did it for me (are there any glasses I can put on to help transcribe mud to grass??). Regardless, the white on white was a real hard no for Brian and I kinda agreed.

There are days when the red door on this white house is too much for me, TBH, but that’s an easy fix. I actually think that when the upstairs window treatments are open the diamond pattern of the windows really pops more when the trim is white. However I still wasn’t convinced, Brian wasn’t into it, and this time around I have to feel REALLY REALLY good about it. I love the sunroom windows without the gray trim color – which is actually how it was planned but the painters messed up and painted it, and we decided to live with it. As you can see the profile of the trim is smaller and was never intended to be painted gray.
Option B: White Window Sashes + Blue trim + No Shutters
For a brief 2 days, a shutter salesperson told us that we couldn’t do shutters on some of the windows upstairs based on the photos. So just in case, in the interim, I asked Misty to photoshop this option: blue trim, white window sashes, with no shutters. Meanwhile, I measured the top windows – specifically the two on the right and left sides of the house that seemed too close to the edges. The window sashes (without the trim) are 36″ wide, which would require the shutters to be 18″ each. We have a solid 19″ to the edges of the house so we are fine – tight but fine. I did NOT like this version without shutters. But what if we add shutters???
Option C: White Window Sashes + Blue Trim + Blue Shutters
Brian was curious about this option and felt like exploring all options was important this time around (without a painting crew waiting for my decision). So in this option, we keep the window sashes white, then paint the window trim and the shutters blue. We thought this would totally work, but this was a hard and fast no for both of us – it looks so busy!! Your eye doesn’t know what to look at – Trim! Diamond windows! Shutters! Doors! Now I want to be clear – some houses can handle a lot of busyness on the outside and I have dreams of doing a Victorian house in a billion fun colors, but that’s not the intent for this house. I have to admit that I would not have known how much I didn’t like this until it was photoshopped. It sounded like a good idea (and I think we even tried it in the chief architect renderings once and liked it). But no, it’s too busy.
Option D: Blue Sashes + Blue Trim + Blue Shutters
When I first saw this monochromatic look I was like ‘OOOOHHHHH’, but I think for the wrong reasons. I thought it looked cool and a new take on the farmhouse exterior style. Brian and my brother Ken were both hard no’s thinking it was too trendy and didn’t want that for our house. I wasn’t going to fight for it, but I was surprised at how much I liked it. I actually thought that maybe it could be two different dark colors so not quite as monochromatic. I think I am just responding to feeling like a basic middle-aged lady with a big fancy house and wanting it to feel younger and cooler (!!), which is obviously pathetic and dumb to write, but I know I’m not alone in feeling like my house doesn’t really look like ‘me’ 🙂 So I asked Misty to do a few different views of the house to really make sure this wasn’t the direction we should go:
Pretty darn intense. But what if the red door was changed? There is still something that I liked about it, but I think it’s just that it’s strangely graphic, easy for your eye to ‘get’, and it has style to it. This brought up the dark house debate: whether or not dark houses will be dated in 20 years, but ultimately we decided that in the right setting it is soooo appropriate and classic, but no, a house like this with a wrap-around porch is probably meant to be more classic. Or maybe without the shutters it would look better. I also want to be clear that painting the actual sashes of the windows (the grid with the diamond) is more challenging so having them white is FAR easier and less expensive.
Option D + A Porch Shutter
In this one, you can see Misty added shutters on the bottom window (which I really liked as a feature). Here are a few more angles in this monochromatic look so you have all the information:

This is the kitchen patio side, which I think looks cool, actually, but that could be because there is no landscaping yet so the blue and white really pop (right now because of the lack of trees/bushes growing in every angle of the house looks so unfinished).

This side of the house is the most problematic (and publicly seen) for me and always has been. Here’s why: you can see all the mechanical aspects (heat pump, electrical panels, generator – all will be covered eventually but very exposed now) and this side also highlights a lot of window awkwardness (mixing old + new with the older windows oddly placed). BTW the odd placement doesn’t bother ME, but people sure love to call it out. I actually find it super charming that they aren’t perfectly aligned but boy are people on social media upset :).
Option E: Blue Sashes + Blue Trim + No Shutters
Misty also sent through this option without shutters, which is also fun to see and perhaps better. It’s still not what we decided on but I wanted to show you because it’s just so illuminating to see all the variations.

It’s definitely less intense and busy than the monochromatic + shutters look. Are you still following? This is getting complicated. OH, and we have a big cherry tree coming from the front porch area which I’m very excited about (and the grass and bushes are photoshopped – they aren’t in yet).
Option F: White Sashes + White Trim + Blue Shutters

OK NOW HERE WE GO. When Brian and I both saw this we were like ‘ooh, pretty!’. It feels super classic and still fresh. Is it young and cool? Nah, not really, but it’s timeless and appropriate and with styling, furniture, and landscaping I think it will still look fresh. After seeing this, I wanted to take a more pulled-back photo for Misty to see the mudroom/bedroom and potentially put shutters there.
Option G: White Sashes + White Trim + Blue Shutters On Both Floors

That looks SO PRETTY to us. I almost want to add more shutters on the windows flanking the big scenic doors but those would definitely hit the exterior sconces. It feels fresh and bright, pulled together, and hopefully not regrettable. Ok, let’s say that the white + blue shutters combination was our winner, does it work on all sides of the house?
Option G: Other angles Of The House + Shutter Debate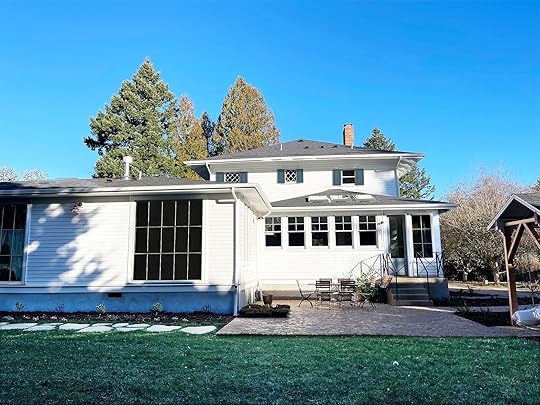
The kitchen side of the house allows for shutters on top, but not in the kitchen windows. You might think that it looks a little plain, but what you don’t know is that we are adding two large potted trees on the patio, a big striped umbrella, string lights, trees and bushes along the side of the house, etc. It’s going to be styled out a lot so the white-on-white window situation will just be a nice background.
But what about the shutters on the second floor? This is HARD. I think they are cute, but are they dinky? The one on the far left is a bedroom window and the rest of them will have shutters, but you won’t see them at the same time. The other two are pretty small – both bathroom windows. We could save money and not do any of these, but will this side look unfinished?
Option G: East Side/Problematic Angle
Look how happy our problematic side looks now! I like the shutters on the bottom left large window by the brick patio and the ones on the second floor. But then the ones on the first floor without shutters look unfinished and yet shutters don’t really work on them (especially that big one on the bottom left – the other three could maybe handle them). So I reached out to Misty again and asked for these options:
Only put shutters on top of larger “bedroom” windows (this is the more traditional way to do it – just bedrooms).Put shutters on top of larger windows + smaller upstairs windows (except that tiny one), but none on the bottom. Shutter all windows possible.We don’t have to make this call today, but very soon. I’m hoping that any and all experienced shutter people will help weigh in. I’m a shutter newbie and they aren’t cheap so I don’t want to put some up that we eventually take down. Before we go let’s look at the front Porch entrance:
Option G: Front Porch/Entrance Without Shutter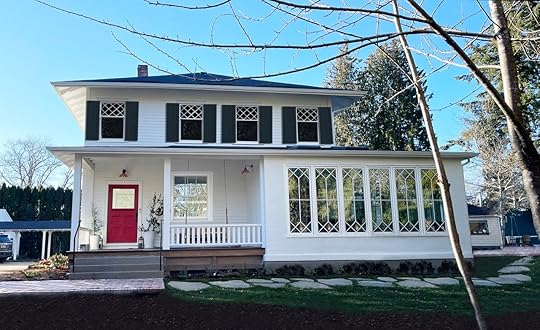
It looks good but could be better…
Option G: Front Porch/Entrance With Shutter
Now that looks like a nice happy lady. I love the shutters on the window on the front porch. The red + blue + white is feeling really strong, so rethinking the red door but definitely going to wait a bit.
What’s up next? So we feel pretty darn confident that we want to paint the gray window trim the same white as the body of the house (Pure White by Sherwin-Williams). We are good there. But what I still feel needs a solid rethinking is what exact shade of blue (or green? pink? blush? black?) the shutters should be. Misty (our graphic designer) did them this round to match the doors as I asked. But I’m hoping to do my favorite thing and really EXHAUST ALL OPTIONS (something I didn’t do actually during this process the first time around). I think I under-thought it (I was also feeling overwhelmed/alone and depressed, so not in my best design self). Now that I feel excited again (!!) I think my old instincts will kick in and it will turn out GREAT.
Let me know in the comments what colors you want to see as the shutters (knowing that the blue aluminum-clad doors can’t change, but the red door can). I want to try Dutch Tile Blue which feels happier and a powder blue. I also want to see what a rosey-toned door would look like (blush and blue forever, no?) But what else??
The post Renovation Regrets: The Farmhouse Window Trim Options + Shutters Debate (With Some Photoshop Renders To Help Us Decide) appeared first on Emily Henderson.


February 22, 2023
How Well Do IKEA Kitchen Cabinets Actually Hold Up? A Very Honest Review 4 Years Later

Hello! Amanda Holstein here with an update on how my IKEA Kitchen Cabinets have been holding up since my last post in 2020. To remind you, I’m an interior designer based in Mill Valley, California, and five years ago my husband and I began renovating our first home together. With a tight budget and the expectation of living there for 5-7 years, we chose to save on cabinetry by going with IKEA. Though the process was a bit of a headache, we were generally happy with the results and how our kitchen looked & functioned in the end.
It’s been 5 years since our renovation, including a global pandemic, so we’ve definitely put our kitchen to use with so much time spent at home. Here’s what we’ve experienced:
The Good News Nobody can tell they are from IKEA
Our friends, family, and guests have always commented on how nice our kitchen looks and are surprised when I tell them our cabinets are from IKEA. To a more discerning eye, like a designer or contractor, you can tell the materials are more cheaply made since the doors feel much lighter than real wood. But generally, I’d say they blend in nicely and our kitchen looks elevated.
We love our layout
The way we laid out our cabinetry, using IKEA’s 3D Kitchen Planner, has proven to be super functional for the way we live our daily life. We love our pantry and trash-pull out, and I wouldn’t change or rearrange anything. So those 3 hours (and 3 hot dogs) at IKEA deciding on every little detail paid off.
They’ve been easy to cleanOne thing I wasn’t anticipating is how easy the doors have been to clean. They have a really smooth finish that wipes clean with minimal effort.
The Bad News
 Some doors & drawers have become misaligned
Many of the doors have slightly shifted out of alignment and feel flimsy. Our trash pull-out, for example, gets a lot of use and feels a bit unstable. You can easily shake it from side to side. In the above photo, you can see our upper cabinets are clearly out of alignment as well.
There is some chipping paint

Because some doors have come a bit loose/misaligned, they are rubbing against each other, causing the paint to peel in certain areas.
They probably can’t withstand kidsI don’t think they are durable enough for regular use with kids. I can’t imagine the drawers being strong enough to hold the weight of a toddler pulling down on them or the doors making it very long with teenagers slamming them.
Their customer service is very difficultUnfortunately, dealing with IKEA’s customer service is a huge pain. If a piece breaks or is missing, I wouldn’t waste your time trying to replace it. We experienced so many issues that we ended up giving up, so one of our drawers is missing a side.
So, are they worth the savings?
For us, yes, they were worth the savings. Choosing IKEA cabinetry saved us a ton of money and we definitely don’t regret that (our cabinetry and appliance total came to about $6,500). Because we had a tight budget to renovate our entire 1800 sq foot house, I’d say saving on lower quality cabinets was worth it in our case as it allowed us to spread our budget over more square footage. We aren’t expecting them to last forever and we don’t have kids adding to their wear & tear, so they still look pretty good and function as we need them to.
My Final Recommendation

If you’re planning to use them for 1-5 years, with no kids, and you’re doing a cheap flip or temporary renovation on a super tight budget, then yes they’re worth it. However, with a few more renovations under my belt, I’m now more likely to recommend something like Granite Expo which is slightly more expensive, and much better quality than IKEA, but nowhere near as expensive as custom cabinets. This kitchen cost $6500 in cabinetry and I would guess it would only be two thousand or so more from Granite Expo.
Just for fun, here is a before and after so you can see how the kitchen looked before the renovation:

Thanks for going on this IKEA Kitchen Cabinet journey with me! If you have any other questions or want to get in touch with me, you can find me at www.amandaholstein.com or on Instagram @amanda_holstein.
*Design and photos by Amanda Holstein
The post How Well Do IKEA Kitchen Cabinets Actually Hold Up? A Very Honest Review 4 Years Later appeared first on Emily Henderson.
February 21, 2023
We Are Putting In A Pool At The Farm!! All The Details Of Our “Soake” Pool And Why It’s The Best Fit

As I’ve alluded to on social media we are putting in a “pool,” but it’s not what you think (it’s better). When we first closed on the farm, the innocent fantasies for the property began. With almost 3 acres we technically have the land for a big old pool. But living in the PNW it doesn’t make as much sense to spend that kind of money or space to stare at a pool cover 8 months of the year. At the same time, thanks to climate change, the summers are now crazy hot, and while there are rivers and public pools, the heat last summer reignited the pool question with the same “it just doesn’t make sense for us” conclusion. I even explored a bio-dynamic swimming pond for months, to just realize that the liability of an open body of water scared me too much and the likelihood that it would look “natural” was low. Besides, do you really want to swim in a pond that cleaned itself with its own plants? So we almost gave up on the idea of a swimmable body of water when I was Facebook marketed by something called a Soake pool. I immediately clicked, landed on their site, and screamed to Brian that I’ve indeed found our “pool” that checks our boxes and makes so much more YEAR-ROUND sense for our PNW farm.
What is a Soake Pool?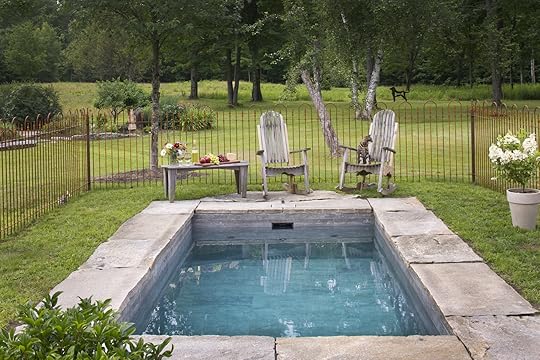 photo courtesy of soake pools
 Here’s how I describe it to friends: It’s a pool the size of a living room rug (7×13) that can be a hot tub in the winter, and a cool pool in the summer. A year-round win/win that adds to your life without using as much real estate or spending as much money as a typical pool. It may not be perfect for everyone, but it was exactly what we wanted and needed.
 photo courtesy of soake pools The Pros of a Soake Pool – My Pitch To Brian:
1. It’s year-round enjoyment regardless of outside temperature – pure genius. As I said, it can be a hot tub in the winter (or a cold plunge should you turn it off and let the outside temp cool it) and a normal heated or cool pool in the summer. We don’t live in CA anymore, so it was hard for us to justify the expense and the maintenance when we’d use it so much less. This year-round enjoyment really made the difference to us.
2. It’s made on the East Coast out of high-quality beautiful materials – think pretty tile and concrete, not a fiberglass shell. It’s delivered to you ready to install, thus eliminating the need for a pool contractor (it’s not a total plug-and-play, it’s still a construction project but no, you don’t need to hire a pool contractor which can save you a lot of time and money).
3. It’s a much smaller lead time for a pool (2-3 months) versus getting on a waitlist and then having six to eight months of construction.
4. When not in use, the smaller footprint means that you aren’t staring at a huge pool cover or dealing with as much maintenance. Up here a house with a huge pool is almost a deterrent for a lot of people (it was for us and my brother’s family) because they can be just so huge, expensive, and used so infrequently. Yes, this property could handle the size, but we simply didn’t feel like it was how we wanted to use our outdoor space (I mean, we still have to get these alpacas in here).
5. Because of the size and less construction needed it obviously can cost less than a pool. To be clear, these are not “cheap” as they are very high quality, but depending on how you design it and what your needs are to hook it up, it can be way less of an investment than a pool.
 photo courtesy of soake pools & murphy foto imagery
Obviously, that depends on your lifestyle and preferences. It’s our opinion (and hope) that this is perfect for our needs because while our kids love swimming and jumping/diving (and will continue to do so in rivers and public pools) they mostly gravitate towards the shallow area where they can float, stand, sit, splash, hang out, and cool off. We are huge homebodies and designed this house and land to not really need to leave and instead to entertain friends, families, and neighbors. We picture kids coming over after camps all summer, warming up playing basketball/pickleball, and cooling off in the pool when it’s 95 degrees until 8 pm (it gets strangely hotter here throughout the day). It’s a great way to be able to chill and hang out in your backyard in a body of water on super hot days, but no it’s not going to be where they learn how to dive. We won’t be having pool parties, we’ll be having backyard hang sessions by the sports court where people can cool off by a pool when they get hot.
How Does A Soake Pool Work? Is it Easy To Install? photo courtesy of soake pools & jon caron art
It definitely can be. Similar to a hot tub, you need to have the equipment hooked up to electricity and either gas or propane to heat it. It’s more involved than a hot tub that sits on the earth – you will have to trench for those mechanical lines, make sure you have enough on your electrical panel and gas meter to accommodate it, etc. You’ll need to dig a huge hole for it to be craned in and backfilled properly. The Soake team has helped hundreds of families ensure they are all good to go and they are there to help streamline the process. Of course, I relied on our local expert landscape construction team, Northwest Native Landscapes who acted as our GC on this one (which is atypical for him and we are SO grateful). Thank you, Dan’l! The point is – it is a construction project and shouldn’t be ordered like a rug, but it’s typically far more manageable than a pool.
You might have seen on stories that we ran into problems because our driveway and turn radius was so narrow that our crane company couldn’t bring in a larger crane. They brought a smaller crane in hopes of bringing the pool closer to the hole via a flatbed truck. But the mud and rain had different plans for us that day and the flatbed truck got stuck. Our team troubleshoot and did an incredible job of making it happen the next day and it wasn’t a huge deal. But with all heavy machinery + rain + mud + a hill can get trucks stuck so consider your topography if you are doing it in the rainy season or if your location is hard to access. Typically they can crane over a house just like a hot tub and drop it into the hole in your backyard without much disruption. It’s incredible.
How Much Do Soake Pools Cost? photo courtesy of soake pools & alden landscape design
Like all semi-custom things in life, it ranges from a smaller model with simple materials and a manual cover to a larger version with more high-end materials and electric covers. There is a lot to factor in and like any construction project, there could be some costs specific to your project. For our Soake Pool, we worked out a mutually beneficial partnership and we are obviously very grateful to be in this position, full stop. There is the cost of the pool itself and then the labor around it. To install it we had to put in a lot of gravel up the mud hill to get the truck carrying the pool (which included a lot of labor to spread out and compact the gravel and now to remove it). We also had to replace and upgrade our gas line and meter (we didn’t need to when we renovated because we have almost zero natural gas usage here), so that was an additional few thousand dollars. You will need a contractor or installer to dig the hole and put it all together. The product itself (fully tiled pool, including all equipment needed to run the pool) ranges from $31k-$45k depending on the cover and features chosen. That won’t include the excavation, trenching, hardscape, electrical, plumbing, or delivery. Like everything in our homes, it’s very specific to your project. It can be simple or add up so it’s good to know going into it so you can ensure it’s the right decision for your family. The final cost really depends on how far away your pool equipment is from the electrical or gas source (trenching is usually cost per linear foot) or how you want to finish the hardscape surrounding it (readymade cement tiles are a lot cheaper than flagstone, for instance). Like most things in life, the more you do yourself the less you spend on hiring out. It’s the old “time versus money” conundrum. If I could go back in time I would have rushed the installation for October, before months of rain made it harder to maneuver in the mud, which would have saved us some money.”
Are These Becoming More Of A Thing? photo courtesy of soake pools & jon caron art
Yes. Soake has been around for almost 10 years and their business has exploded with happy customers that wanted exactly what we do. I know firsthand that if you live in SoCal or Arizona that a traditional pool can get a lot of use, but in so many other areas what you really want is just to float around and cool off in the hot months. It simply makes so much sense and therefore is indeed a growing trend. The size also cuts down on maintenance and electricity costs and since you can use it in the winter as a hot tub most users keep it open year-round, eliminating the need to shut it down and winterize
Is It Chlorine Or Salt Water?It’s a salt water pool. It’s smooth and luxurious and clean.
So Where Is Our Soake Pool Going And What Is It Going To Look Like?
See it up there as that tiny little blue square!!! We are treating our Soake Pool almost like a large water feature or a fountain, then designing the spaces around it. Since our property is more of a farm vibe (yes with a pickleball court, I know) we don’t want it to be front and center or to be too obvious and turn it into what could look more like an estate. It is not THE feature of our property, it’s more of a secret surprise in its own little courtyard surrounded by a split rail fence, and lots of potted plants and greenery. The greenhouse/shed that we are designing is more of a feature behind it. So from the sunroom, where I’m writing right now, you really won’t see it – you’ll see the split rail fence and the greenhouse, which is our intent.
The View From The Back Porch
This is the view from our back porch that Cali from Studio Campo (our landscape designer) drew up. The landscaping is actually still up in the air (just as far as how many plants are over there, etc) but we wanted to get a sense of what it could look like. This drawing gives us SO MUCH HOPE.
 how it looks in early february
 This is how it looks now:) Right now we have the area around it designed with rectangular flagstone as the hardscape then the greenhouse and veggie garden area will be pea gravel, but that part is up in the air.

Our plan is to finish the hardscape around the pool and then reassess everything. Ideally, we’d live with it for a summer before making more permanent decisions but at the same time, we can’t deal with another winter of mud out here. I’m thinking we want to widen the stone path from the greenhouse area to the pool area to make it feel more open and connected (and add locking gates that aren’t on the plan). So this could all get tweaked and changed over time as well. What can’t move is the sports court and the pool and we know pretty closely where the greenhouse is going to land, but everything else is up in the air.
 What Does The Inside Of The Pool Look Like?
Ours is still wrapped so I can’t show you but will as soon as we take it off. It’s so lovely and looks very high-end – like a custom site-specific pool.

The interior area is 7×13 (the exterior is larger) with a 55″ – 57″ water depth (just shy of 5′). We designed ours with a bench and two stairs – so people can easily perch and get in and out. Our kids can’t touch the bottom but they can easily bounce off of it and swim so easily to the side. I chose a darker tile that basically just recedes, but all your options are here.
Is There A Pool Cover? Does It Lock?
Yes. As someone who has unmatched anxiety around kids + bodies of water, I feel really darn comfortable with this pool in my backyard (I recognize there are safe large pool covers these days, too but between the size/height of this and how easy and safe it is to open and close I have zero anxiety). There are different options for pool covers – both manual and automatic. We chose the powered safety cover, which locks (they all do). It is more expensive, but we are hoping the ease is worth it. As far as pool gate requirements – check your local code, but in many areas, it’s not required. We will have them, though because I’m a big fan of safety and low-maintenance parenting.
Can A Soake Pool Be Above Ground Or Flush With The Earth? photo courtesy of soake pools & murphy foto imagery
Both. And I really like the look of both, too! We chose to have it be flush just so it has less presence (and it saves on hardscape) but I love the idea of the partial above-ground option that acts more like a hot tub and of course provides seating even if you aren’t in the pool.
 photo courtesy of soake pools & jon caron artphoto courtesy of soake pools & murphy foto imagery
This one (above) is our inspiration – we love how it integrates nicely with a more rustic design and greenery.
The Soake Pool Is In!! Now What?
The mechanicals are all trenched and the electrical and gas are going in this week and next. Then they can backfill the pool (put gravel all the way around it), install the pool cover, hook up all the goods, and then hardscape. We are all learning the process as we go (and Soake customer service has been super informative with a lot of calls and follow-ups). We are probably still a couple of months out from using it (or needing to), but we hope by late spring we’ll have sod, and hardscape and can start building out the greenhouse and finish planting.


Y’all, I can’t wait for this to be transformed. I know that the landscaping won’t be grown in for a while (read: years) but the mud will be reduced greatly in the next six months.
I didn’t want to leave you with visions of mud – instead one more picture of a Soake pool in the prettiest farm setting.
 photo courtesy of soake pools & taylor ahearn
We feel extremely lucky to do this and bring you along in the process. I felt like this was a really great product to share with my audience because I figured I wasn’t alone in wanting a hot day body of water option, but not wanting a full pool. Soake will be in the comments answering questions should you think that a Soake pool is right for your family. I’ll also be continuing to document the process here and of course, give a full review (similar to the induction range post) after the first year.
Thanks, Soake Pools for partnering on this project – now let’s hope the sun lets the spring greenery explode so I can show it sooner rather than later 🙂
*Photos of Me and the Farmhouse by Kaitlin Green
The post We Are Putting In A Pool At The Farm!! All The Details Of Our “Soake” Pool And Why It’s The Best Fit appeared first on Emily Henderson.
February 20, 2023
The Best EHD-Approved Presidents’ Day Sales

Happy Presidents’ Day, sweet pals! Spoiler alert: the sales this year are AWESOME. I normally have pretty great impulse spending control – it’s a skill you have to develop when your job involves this much internet shopping, I think – but even I fell prey to some deeply-discounted pieces at H&M Home, Urban, and Anthropologie. (We’re talking HUGE savings here – like, over 80% off after all the discounts were applied in cart!). If you’re in the market for something in particular, today will be a GREAT shopping day for you. (And if you’re not in the market for something particular…proceed with caution, okay?). In alphabetical order, I hereby present the best President’s Day sales of 2023…
 photo by kaitlin green | from: a first round farmhouse reveal – readying our guest bedroom for family to visitAbercrombie & Fitch
Deal: 20% off 3+ items, 15% off 2 items.
Our Picks: Reformation Dress Dupe | The Internet’s Favorite Wide-Leg Pants | Curve Love Jean Collection
Deal: Up to 60% off select items, plus an extra 20% off with code GET20.
Our Picks: Orlando’s LA Bungalow Sofa | Woven Leather Bench | Geometric and Textural Neutral Rug
Deal: 20% off in-stock items with code REFRESHEMILY.
Our Picks: Cozy Harlequin Jute Rug | Quiet Handwoven Herringbone Rug | Luxe Pebbled Wool Rug
Deal: Up to 30% off select in-stock furniture, decor, and more.
Our Picks: An EHD-Favorite Storage Cabinet | Capri Blue Candles | Sweet Grecian Bust Planter
Deal: 15% off site-wide; 20% off orders over $2,999; 25% off orders over $3,999; 30% off orders over $5,499.
Our Picks: A Comfortable, Beautiful Sleeper Sectional | MCM-Inspired Console Shelving | Classic Upholstered Bed
Deal: 25% off site-wide with code TREATYOURSELF.
Our Picks: The Ready-Made Gallery Walls (Of Course!)
Deal: Up to 30% off select furniture, decor, and lighting.
Our Picks: Fresh and Modern Sofa | Statement Oak Sideboard | The Coziest Sheepskin Pillows
Note: Click right here for an extra $50 off an order of $200 or more. Plus, drop a comment in this post for your chance to win a $2,000 gift card!
Deal: Up to 45% off select bathroom, kitchen, lighting, and more.
Our Picks: Em’s Panel-Ready Dishwasher | The Top Nugget Ice Maker | A 48″ Free-Standing Vanity (+ Hardware and Marble Top!) for $1,000
Deal: Up to 30% off best-selling furniture and decor, plus up to 60% off new markdowns.
Our Picks: Simple, Graphic Entryway Cabinet | Half-Price Wicker Chaise | Courant Wireless Charging Tray ($70 Off!)
Deal: 20% off top-selling furniture, plus up to 60% off clearance.
Our Picks: Burl Bar Cabinet | Leanne Ford Cane Settee ($800 Off!) | Organic Modern Taper Candle Holders
Deal: Up to 60% off select items.
Our Picks: Merino Turtleneck Sweater | Comfy and Functional Jumpsuit | High-Rise, On-Trend Jeans (70% Off!)
Deal: 20% off site-wide, including fashion and home.
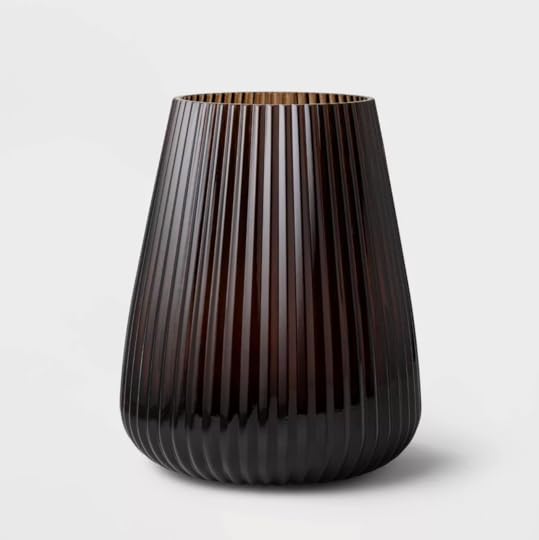
Our Picks: Julie’s Famous Ceramic Vase | Wiggly Pink Glass Candlestick Holder | Rattan Storage Box
Deal: 20% off site-wide with code PRESIDENT20.
Our Picks: Mal’s Cane Sideboard | Simple, Durable, Easy-to-Style Coffee Table | Lawson-Fenning Sofa Dupe
Deal: 40% off site-wide, plus an extra 60% off sale styles with code WEEKEND.
Our Picks: Ruched V-Neck One-Piece Swimsuit | Timeless Straight Chino Pants | Cheery, Bright Striped Button Up
Deal: 25% off site-wide with code EXECUTIVE.
Our Picks: Any of the Vice Canisters | Pencil Reed Table Lamp | Wicker Giraffe Wall Art
Deal: 20% off site-wide.
Our Picks: Em’s Go-To Coffee Table | Sarah Sherman Samuel Irregular Checkered Rug | Ginny’s New Modern Traditional Dresser
Deal: Extra 20% off sale with code YESPLEASE.
Our Picks: Extra-Long Plaid Shacket | EHD’s Favorite Cotton Bandanas | Lug-Sole Chelsea Boots
Deal: 15% off with code PRES2023.
Our Picks: Jess’ Outdoor Sofa | Teak Outdoor Dining Set | Recycled Flatweave Outdoor Rug
Deal: Up to 50% off fashion, kids, home, and beauty.
Our Picks: Our 2022 Best-Selling Sneakers | My Favorite Mascara 🙂 | Iconic Ray Ban Aviators
Deal: Up to 50% off bedding, furniture, decor, and more.
Our Picks: Chunky Throw Blanket | Iron Sleigh Bed | Concrete Fluted Planters
 photo by kaitlin green | from: the farmhouse kitchen reveal and all my thoughts and feelings about itRejuvenation
Deal: Up to 60% off lighting, hardware, furniture, and more.
Our Picks: The Cabinet Hardware We Can’t Stop Using | Conical Drum Pendant | Sara’s Kitchen Rail System
Note: You can win a $2,500 Rejuvenation gift card AND a free consultation with Em by dropping your email right over here!
Deal: 15% off site-wide with code PRES2023.
Our Picks: Jonathan Adler Collection | Iris Apfel Collection | Nina Takesh Collection
Deal: Up to 70% off, plus $50 off orders over $250 with code SAVE50.
Our Picks: Lauren Liess Collection | Great Basic Jute Rug | Soft, Textured, Braided Wool Rug
Deal: Up to 50% off select beauty.
Our Picks: A Dreamy Retinol Serum | Ultra-Effective Moisturizing Face Cream | EHD-Tested (And Loved!) Lash-Enhancing Serum
Deal: Up to 30% off all outdoor items.
Our Picks: Outdoor Hanging Chair ($300 Off!) | The Sweetest Striped Umbrella | A Double Chaise That’s Perfect For Cuddling
Deal: Up to 30% off furniture and decor, 20% off jeans, up to $100 off Apple products, and more.
Our Picks: Studio McGee Safari-Style Armchair | Em’s Ticking Stripe Bench/Ottoman | Airpod Pros
Deal: 25% off furniture, fire pits, doormats, and fireside accessories.
Our Picks: Angled Obelisk Chiminea | Weathering Steel Outdoor Fireplace | Low-Profile Square Fire Pit
Deal: Up to $625 off mattresses, plus up to 30% off bedding, furniture, and more.
Our Picks: My New Mattress (10/10!!!) | Body/Lumbar Pillow | A Chic, Comfortable Dog Bed
Deal: An extra 40% off sale home, fashion, and more.
Our Picks: Neutral Cane Bed Frame (Nearly $1,000 Off!) | The Lamp I Bought While Writing This Post ($29.99, down from $90!) | Cone-Shaped Candle
Deal: Up to 70% off furniture, appliances, fixtures, decor, and more.
Our Picks: 6-Person Outdoor Dining Set (56% off!) | Spindle-Back Entry Bench | Serena & Lily Riviera-Style Stools
Deal: Up to 50% off furniture, bedding, decor and more.
Our Picks: Elevated, Textured Media Console | Half-Priced Faux Fiddle Leaf Fig | Bowser’s Metal Nightstands
We’re out of office today, but we’ll see you back here tomorrow for a VERY exciting farm update from Emily. It’s going to make a splash, if you catch my drift…so float on back here on Tuesday, okay? SEA YA LATER! xx
Opening Image Credits: Design and Styled by Emily Bowser | Photo by Sara Ligorria-Tramp | From: Emily Bowser’s Back Unit Yard REVEAL, 2022 Musings, New Year Resolutions, And Other Meanderings…
The post The Best EHD-Approved Presidents’ Day Sales appeared first on Emily Henderson.
February 19, 2023
The Link Up: The Giveaway Em Can’t Wait To Tell You About, Caitlin’s Affordable Curtains She LOVES, And Ryann’s Next Drugstore Skincare Find

Happy Sunday everyone! Not a ton to report this week on the EHD front aside from the fact that exciting things are continuing to happen in our homes design-wise so we promise we will have A LOT for you soon:) So to get your mind off waiting, here are this week’s links…
This week’s house tour features an INCREDIBLE Adam Pouge curtain that we can’t stop thinking about.


 photos by kaitlin green | farmhouse reveals left to right: kitchen, pantry, mudroom
From Emily: We typically don’t do a ton of giveaways because when we do we want to make sure it’s GOOD. And folks, this is a good one from one of my favorite brands, Rejuvenation. As you may know, Before we started the demo, I reached out to see if they would partner with me on all the fixtures, hardware, and plumbing for the farmhouse. It was a dream collaboration and I was beyond excited and grateful that they said YES! I’ve truly used their products for years and years because the quality and style are always amazing. So, when they wanted to do a giveaway with my readers it was an easy yes because here is what you get if you win:
1. FREE 30-minute consultation with me (but honestly they are fun and it will be longer:))
2. $2,500 Rejuvenation gift card
Designing alone is hard so let’s chat about your current or next project and then go spend your $2,500 on some beautiful Rejuvenation product. To enter just submit your email here. Good luck and can’t wait to chat with the winner:)
From Caitlin: OMG. GUYS. After a lot of trial and error, I have found THE BEST cheap curtains. They are all around $40 per panel (I KNOW!), they have a really pretty woven linen texture, they feel AWESOME to the touch, they’re weighted at the bottom, and they look WAY more expensive than they are. I got the Tuscany Green color which is a REALLY pretty deep olive (I spent a long time debating between the Khaki Green and the Tuscany; highly recommend the latter!). I hung mine with curtain rings, but they’re also constructed with rod pockets and back tabs so you can pick the look that you prefer. I bought them in the 96″ length and had them hemmed to look more custom, (which I could finally afford to do because I only spent $160 bucks on a whole room’s worth of curtains!!!). I’m so jazzed about them that I turned in this link TWO WEEKS EARLY. It’s usually impossible to find things that are fast, cheap, and good and this one is somehow the trifecta! Emphatically recommend for any renters in more temporary situations or anyone else without $$$ to drop on custom curtains. These ROCK. Ahh!!!
From Ryann: Like I said last week, I am trying a bunch of drugstore skincare because I am tired of overspending on products that are just “ok”. I am happy to report I have another winner to recommend and this one is only $8. This micellar water is the best makeup remover I have ever tried. It’s lightweight, gentle on the skin, and doesn’t dry out your skin either. It even removes my waterproof eyeliner with little effort. I 100% will be buying it again!
From Jess: As you read this I will be one day out from my trip to Paris. EEEE!!!!!!! But if there’s one thing about me it’s that I don’t understand the concept of charging my phone. It’s annoying to everyone, me included. So I decided it was time to get a proper external charge with the power cord incorporated (that’s the important part). This is the one I got. I’ve been using it already and so far it’s great. Don’t be the person with the dead phone, ok?
From Mallory: I got new party pants and I have to tell you about them!!! I went to Nordstrom and snagged the deal of the century on these fun satin trousers – originally $365 but now on sale for $146!! They’re probably the nicest pants I’ve ever owned in my life and they crushed on my valentines date. You’ll see me wearing these often. I got a size 4 and I love how they fit (they’re slightly loose in the waist but I think in a good way where they sit not super high-waisted but perfectly in the middle, I could tailor them but I don’t think I’m going to because they’re SO comfy). My favorite thing in the world is wearing pants that feel like pajamas but look fancy and this checks that box with a big fat red marker. Highly recommend snagging them before they sell out!! 🙂
Thanks for stopping by and hope y’all have a wonderful rest of your day. xx
Opening Image Credits: Design by Christie Veres | Photo by Keyanna Bowen | From: Suprise Home Tour! See How This Designer Transformed A Nursery, Kid’s Room, & Home Office In Her 1809 Historic Home
The post The Link Up: The Giveaway Em Can’t Wait To Tell You About, Caitlin’s Affordable Curtains She LOVES, And Ryann’s Next Drugstore Skincare Find appeared first on Emily Henderson.
February 18, 2023
New/Old Trend Alert: Ballet Flats Are Back And Bigger Than Ever (+ 5 Ways To Style Them)
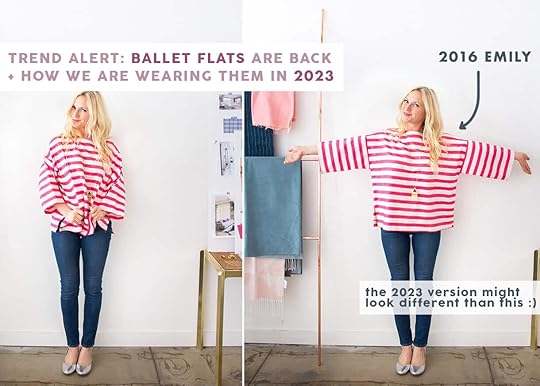
In high school, you could not convince me that my Urban Outfitters ballet flats were not the coolest shoes. I would wear them every day and quite literally wore them into the ground. I think they had zero soles by the time I was done with them. That was over 10 years ago, so I can’t say I am surprised that this shoe silhouette is returning to taunt us millennials and gen Xers. Almost everything in fashion eventually makes its way back (except really low-rise jeans–PLEASE don’t bring those back!) and this year no one can deny that the ballet flat is having a resurgence. To be honest, I am not complaining. I love an easy-to-slip-on shoe, and there is something inherently youthful about ballet flats that I find endearing. Maybe the youthfulness stems from the fact that they offer zero support so you’d have to be young and reckless to wear them for an extended period of time. In any case, I think the ballet flat is going to be HUGE this spring/summer so I decided to do some digging around to see how they might be styled in 2023:


 left: image source | middle: image source | right: image source
 The first look on the left consists of baggy straight-leg jeans, a white T-shirt, simple black ballet flats, and a trench coat to top it off. I love the relaxed vibe and can see myself wearing this to run errands, walk my dog, or even WFH.
Next up, the middle outfit is a bit more involved but would undoubtedly grant you the title of ‘Coolest In The Office’. The simple trousers and button-up are instantly elevated by the socks and ballet flat combo. And yes, in 2023 we are apparently pairing ankle socks with ballet flats and I am not complaining, but I can only assume that to make this work you would have to size up (flats famously need to be pretty snug so they don’t slip off).
Let’s move on to look #3. The ultra-feminine silk midi skirt paired with neutral ballet flats gives an off-duty ballerina vibe that’s both sophisticated and laid back. I am a big fan of how easy it would be to throw together this outfit. All you would need is a midi skirt, a long sleeve sweater or cardigan, and a pair of ballet flats. Bonus points for the sunglasses. It’s simple yet very pulled together and elegant.

 left: image source | right: image source
 I love an unfussy outfit and this maxi dress look meets that criterion. This is what I’d call “Gen Z meets Coastal Grandmother“. I love the double stripes in different colors and the silver flats give an added flair that’s cool and unexpected. Last but not least, I had to include another sock and ballet flat combo because it’s too good and very 2023. I really like the short skirt paired with scrunched-up socks and matching pink flats. This look is Sporty-meets-Baby-Spice and I am here for it.
If you are into this new/old trend, here are some picks we really love:

1. Anya Scrunchie Ballet Flats | 2. Leather Ballet Flat | 3. Alohas Sway Flats | 4. Zoe Ballet Flats | 5. Arissa Metallic Leather Flat | 6. The Italian Leather Day Glove | 7. ALOHAS Sway Ballet Flat | 8. Paola Ballet Flat | 9. Aurora Flats | 10. Ballet Flats | 11. Bow Leather Ballerina | 12. Corinna Ballet Flats
So, what say you? Will ballet flats be in your wardrobe rotation this year or are you opting out of this one? Sound off in the comments and have a lovely Saturday. xx
The post New/Old Trend Alert: Ballet Flats Are Back And Bigger Than Ever (+ 5 Ways To Style Them) appeared first on Emily Henderson.
February 17, 2023
The Top 8 Design News Stories You Should Know About (Get Excited)

It’s time for my new favorite series – Design News. Why is it my favorite? What’s not to love about sharing the exciting things happening in the design world? I love seeing new collaborations, new ideas, new beautiful books, etc. All these things feed my love for this beautiful industry (I mean it’s literally beautiful). So without further ado let’s talk about the first collaboration with a beloved EHD brand…
Lulu And Georgia’s Hadiya Williams Collection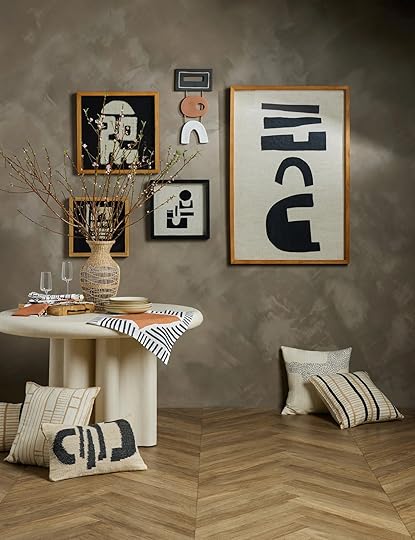
Lulu and Georgia have been simply killing it with their designer/artist collaborations! Last month Ginny’s and now this stunning collection with Hadiya Williams. According to Lulu and Georgia’s site, Hadiya “uses clay and other natural materials to tell visual stories inspired by the culture of the African diaspora,” and as you can see it’s incredibly beautiful. The wall art, in particular, is pulling at my heartstrings.


Winnow Wall Hanging | Apus Textile Wall Art | Course Silk Pillow
See what I mean about this wall art?!
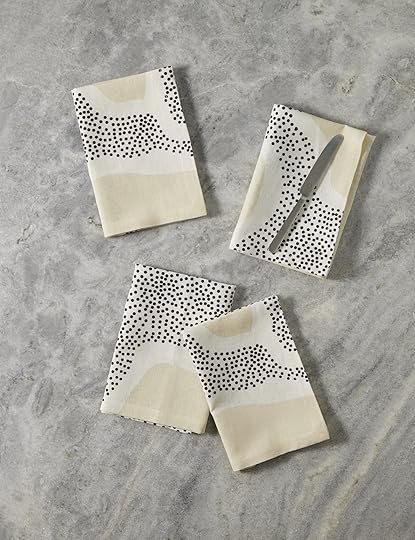


Course Linen Napkins (set of 4) | Chassis Wall Hanging | Channel Silk Pillo
All of her pieces feel so alive and would add so much wonderful texture to any room they are put in. Lulu and Georgia know how to choose their collaborators:)
Target’s Celebrate Black History Month


‘Limitless’ Neon Light Box | Glazed Ceramic Planter | Medium Basket
I love this year’s Black History Month collabs with Target. I focused on the home decor but their fashion is also incredible! But since we are about decor, I saw that black planter in person and it’s awesome. If I didn’t already own more planters and vases than I know what to do with, I would have grabbed it immediately. It’s big too! And that neon light for a kid’s room is so cool and fun.


25pc Incense with Ceramic Holder | ‘Lift Every Voice’ Printed Pennant | Large Ribbed Sculptural Glass Vase
Then that incense holder is so chic and you can’t go wrong with a Rayo & Honey pennant🙂
Nate Home by Nate Berkus x mDESIGN

He’s baaack. Well, Nate Berkus thankfully never went anywhere but most of his recent collaborations have been in collab with his equally as talented husband, Jeremiah Brent. I love all of their lines but also love when they do their own things too. It’s cool to see the little differences and each of their own styles. So for this line, Nate created a bed and bath collection that is all him – timeless (leaning traditional), elegant, neutral (of course:)), and western European inspired. Take a look:


Ribbed Matelasse Duvet Cover Set | Velvet Pillow Bolster | Geometric Cotton Jacquard 4-Piece Bath Towel Set
See what I mean? It’s nothing over the top but also they just look really beautiful.

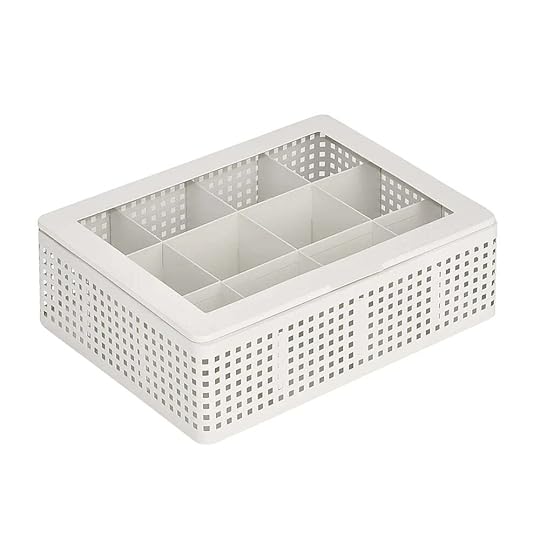

Block Print Percale Sheet Set | 12-Section Perforated Metal Tea Bag Organizer | Painted Stripe Cotton Quilt Set
Each piece could also easily work with a ton of different styles giving you a ton of versatility! Also, I really love that stripe quilt set.
Spero by LF
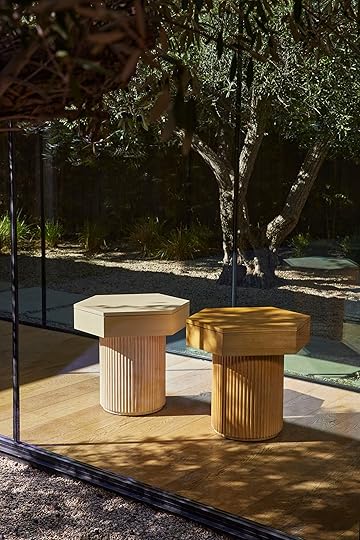
Ooooo baby you know I was excited about this one. Lawson-Fenning can do no wrong in my book. With Spero, they really leaned into fluting but in an elevated, super simple way (like everything they do:)). They say that this collection was inspired by ’60s – ’70s Scandinavian design and is meant to “evoke a sense of comfort and delight”. Well, I am definitely delighted.


Pier Nightstand | Frieze Credenza 4 Door | Span Coffee Oval Table
I do have to say though that the coffee table is my favorite piece. I’m a sucker for a circle cut out what can I say!
Colin King Studio for Troy Lighting

We all have big design crushes on Mr. Colin King so when I saw that we now can buy lighting he created I was SO excited to see what he came up with. I can say that I would happily have any of these lights in my apartment.


The curve in that floor lamp!? I wish I needed one. So simple, cool, and yet playful.


I also adore that fabric pendant. I love the brass accents that make it feel a little more luxe than your average pendant in this style.
Rebel Walls’ Vintage Brocade Collection

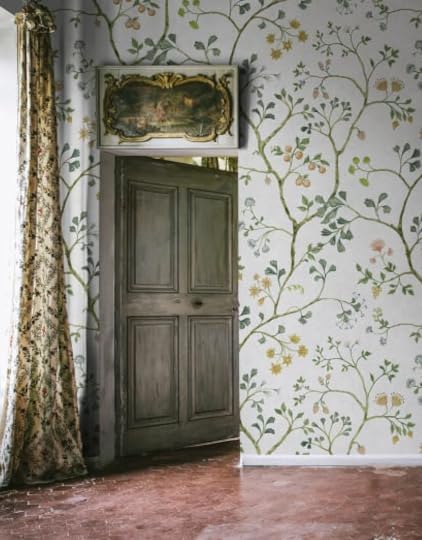
Emily has used Rebel Walls wallpaper many times, but my first time was when I designed my friend and neighbor’s bedroom. All I can say is wow and that the quality is SO GOOD. Even the wallpaper installer (who has been doing this for 20+ years) says that their wallpaper is great to work with. So if you see this very moody and romantic collection and are considering using one of them, GO FOR IT. It’s going to be beautiful:)


Fairy Tale Castle – Gold | Vintage Flora – Ebony | Song Tree – Pearl
I really love that fairy tale one!
Shoppe by Amber Interiors’ 2023 Spring Collection

It’s impossible not to love an Amber Interiors collection and this one is no different. But this is for her Shoppe instead of a collaboration with another brand which I love too. The prices are not cheap but man are they beautiful and high quality.


Alfie Bed | Summer Storm | Lewis Armchair
I can’t decide if I love the bed or the chair more. And look at the way that piece of art expresses light. It’s stunning!


Column Taper Candlestick S/2 | Bell Chaise | Ovie Picture Light
Oh, how I love a chunky moody candlestick next to a perfect gray-blue chaise sporting what almost looks like matching patches, all the while under the prettiest bronze picture light:)
Dabito’s Old Brand New: Colorful Homes for Maximal Living
And finally, we have a design book by the one and only Dabito. If you love color and great, beautiful design then you are going to need to pre-order his book, Old Brand New for an August release. I’m sure Emily and he go way back but it was the team’s first time meeting him and I think we held in our fangirling pretty well.
See anything you like? Any other news stories you want to share in the comments? Let’s celebrate design!
Love you, mean it.
Opening Image Credit: via Lulu and Georgia
The post The Top 8 Design News Stories You Should Know About (Get Excited) appeared first on Emily Henderson.
February 16, 2023
From Hungary To East LA: Caitlin’s “Weird” Vintage Finds That Were Almost All Under $100 Each

Hello world! It feels like a good day for a little old-fashioned blogging – a few minutes of show-and-tell, if you will. Today, we’re headed around the world – briefly, at least – and checking out some of my recent vintage finds, collected from a tiny shop in Hungary to a best-keep secret vintage warehouse in East LA (with a few spots in between). It’s the nitty-gritty details, too: what I bought, what I skipped, what caught my eye, and what I wish I’d brought home – and how much I paid (spoiler: only one thing was over $100, but it was worth it). Was any of it worth it? Is my taste too weird for the internet? You be the judge. Let’s kick it off with two of my personal favorite recent scores…
A Few Pieces From Europe

But first, quick context: over the holidays, my mom and I went on a little European trip. I didn’t have a ton of room in my suitcase for souvenirs (amateur!!! What was I thinking?), but I did have enough space to bring these two pieces home! I grabbed the 1800s pear-shaped storage box at an antique shop in Budapest – I fell in love with the warm wood, thoughtful craftsmanship, and still-functioning lock and key – for about $100. The antique botanical print on the right was purchased from an old bookshop in Passau, Germany for around $20. (The original was painted in 1776 and it’s supposed to be a sea lion, in case the wild expression also threw you for a loop.) I’m so excited to get this absolute freak in a frame, though – he’s going to hang out in my kitchen, jubilantly cheering for me as I make noodles day in and day out.
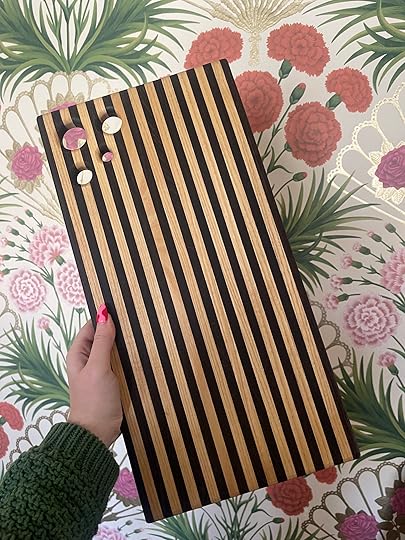
We saw a ton of beautiful cutting boards at the Christmas Markets all over Germany, Austria, and Slovakia, but I was really taken by this one in Budapest – I loved how clean and graphic it was. I do remember it being a little out of my price range (I think around $80?), and I was SO STOKED when I got to open this on Christmas morning. Brenda had noticed my ogling and bought this while I was looking at some art. She’s the best 🙂
The Long Beach Flea

Annnnnd we’re back to America. This one is a classic flea market story: I spotted these Homecrest chairs when I walked in around 5 AM (does the darkness give it away?), asked for the price ($150 for 4 chairs!), and made it halfway down the aisle before turning around and racing back to Venmo the seller (@twosunbears – he does a ton of stuff in SoCal and has the best inventory!). I know they’re technically for the patio, but I plan to use them in the dining room – I love how the shape echoes the fans in my wallpaper. I’m getting some sweet little piped cushions made for the seats and I can’t wait to get them finished!


I was obsessed with this giant egg and wanted to grab it for above my stove, but balked at the price ($300!!!). The pet portrait also tugged at my heartstrings – very EHD of me – but I left it behind because the framing felt a little too ornate for the current vibe of my house.


AHH. How cool is this? I paid $50 for it, negotiated down from $80 – it felt a little high at the time (seeing as I am no Beth Harmon, in case you couldn’t tell), but I love it so much that I think it’s a fair price now. The inlay wood? The hidden chess pieces? It’s decor that’s functional (if I ever have someone to play chess with, at least) and I LOVE IT.


The bookshelf on the left sold SO quickly – I didn’t have space for it, but I loved those wrought iron balls up top. It made it feel a little extra regal and special, don’t you think? I’m also so taken by this type of mirror – the shape, the finish, the patina! – but this one was a little beyond my repair skill level (and I also don’t really have wall space for more mirrors, which is kind of insane).

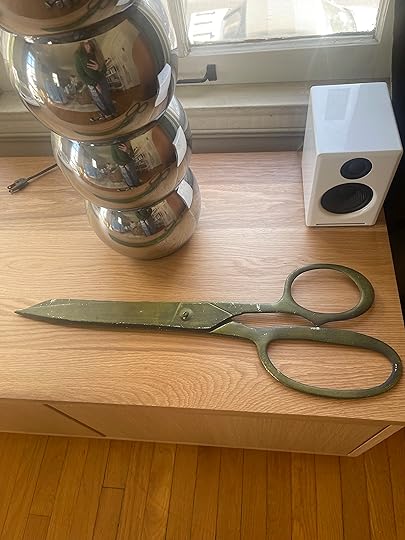
Of course, I bought the old, giant, ceremonial ribbon-cutting scissors. OF COURSE, I DID. (But for $20, how could I not?) I don’t think they’ll live on top of my record credenza forever, but I do enjoy seeing them there right now 🙂 They could be fun on a gallery wall or hung against the back of a bookshelf. (My bet is that this will be the most polarizing purchase.)


Alright, hear me out: I’m starting to get VERY into embroidered and needlepoint pillows (I think a trend may be brewing here, too). I didn’t take any of these home with me, but I’m kind of regretting not nabbing the bright florals on the left or the sweet fish on the right.

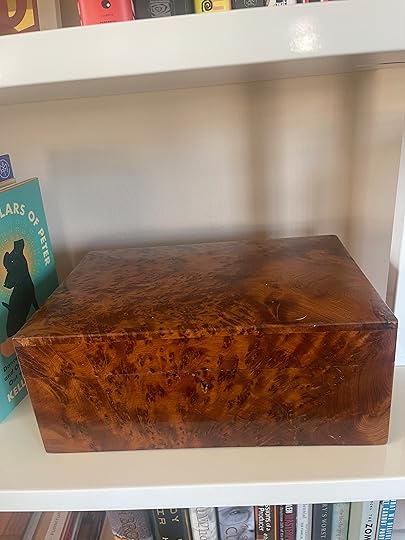
Another “saw it, couldn’t stop thinking about it, had to return and nab it” situation. This burl jewelry box is HUGE, beautifully crafted, and in awesome shape. Originally the seller held firm at $80, but came down to $60 after he saw me pacing outside his booth. (Life lesson: neuroticism pays off sometimes?) This one still feels like an absolute steal to me – the newer version I’d been eyeing is less than half the size and more than twice the price. Let’s head on to…
The Rose Bowl

I’m not interested in hiking or camping, but I will HAPPILY schlep in the hot Rose Bowl parking lot for miles while hauling a whole brunch of stuff. I loved this campaign lingerie dresser, but the price was a little steep at $275. It’s technically totally fair – maybe even a deal!! – but these occasionally pop up on Marketplace for ~$40, and I wasn’t willing to splurge here. I was also super inspired by the matte black globe on the right – it’s so bold and graphic and interesting!!! – and it got me noodling on ways to repurpose some of the decor I’m no longer excited about.


I WAS very excited about this verdigris candleholders, though. I don’t think they’re actually copper or bronze (the finish feels more “painted” than “patinated”), but they felt like a fitting bridge between my previous postmodern-leaning style preferences and my current pre-1980s tastes. The best of both worlds, you know? They were $40, which felt like a pretty fair price.


OH MY GOSH. How could I not buy a little brass monkey? He’s looking at himself in the mirror, guys!!! I’ve never whipped out $5 faster in my life, I swear. And I’m such a sucker for these wicker suitcases and picnic baskets – I see them all the time on Marketplace for $10-20, but the prices are usually SUPER jacked up at flea markets (like, $60!). I lucked out here, though – the seller was super reasonable ($20) and he decided to cut me a 50% off deal in the hopes of making his first sale of the day. He made a sale, and I spent $10 AND got to ring a little bell he had set up. 10/10 experience.


SO PRETTY. I wish I had infinite rooms to decorate in my apartment (and infinite money to decorate with, I guess – that seems necessary, too). Look at the detail on the legs on that table on the left! Look at that rich pink rug on the right! GAH. I hope both of these things found great homes. That brings us to our next stop…
Urban Americana

If you’re not familiar, is an awesome vintage/antique mall (with an incredibly well-maintained IG presence, for the record) just south of LA. There are tons of booths and the curation here is TOP NOTCH – it’s all great stuff, selected by folks with really impressive design chops. Case in point: man, that antique dresser on the left really makes my heart skip a beat! I’m on the hunt for a second-bedroom dresser and this one was a great size, but it felt a little too country/sweet for the space in question. (Side discussion: dark woods are totally coming back, right? Let’s confer in the comments.) On the literal opposite end of the design spectrum, I LOVED these faux fur ottomans. So weird, so unpractical, so fun. I’m honestly still thinking about them. (Should I scoop? Is that insane?)

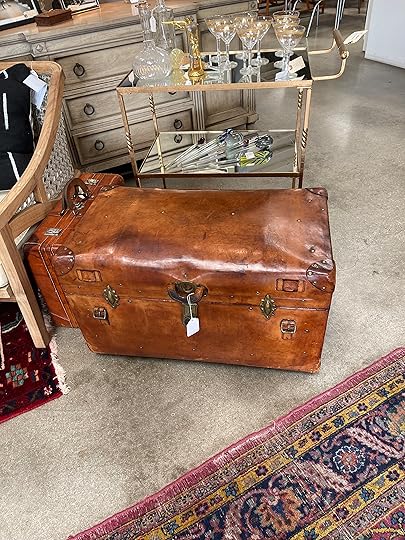
I was looking for a not-ugly trunk to store my little green machine and miscellaneous vacuum attachments. Both of these were SO COOL – I’d never seen anything like the one on the left, and the patina on the right was so pretty! – but both felt a little too precious or serious for my home. (I did eventually find a trunk – read on!!!)

I came home with this 1987 Haldon Group tortoiseshell ice bucket. It was $30 – about half of what it’d go for on eBay or Etsy – but I really liked the hexagon shape, lacquered finish, and space for a tassel. (I’m planning to replace this one with a tassel that’s a little more substantial.)
Vintage Junktion

OH MY GOSH. GUYS. If you live in the LA area and you have not been to Vintage Junktion, STOP WHAT YOU’RE DOING AND REARRANGE YOUR SCHEDULE. (You’re going to have to because it’s only open from 11-3 on Wednesday and the weekend.) It’s 50,000 square feet of vintage and antiques, spread across two separate buildings – one for furniture, decor, and smalls (this building feels kind of like a giant office) and one for overflow furniture, building materials, and ephemera (this one feels like a warehouse). It’s PACKED and incredibly inspiring – how beautiful are the copper pieces on the left? Wouldn’t the mini-trophies be so sweet on a bookshelf?! – and I literally CANNOT wait to go back.
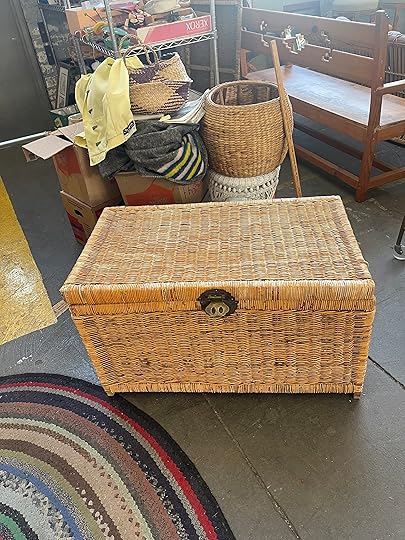

I found this Chinoiserie wicker trunk in the warehouse portion, snapped this photo, and headed to the cash register in the primary building to ask for its price. I’ve seen these listed between $20 – $200 and was hoping that this would fall on the lower end of the spectrum. The good news: it was on the lower end – $60! – and I brought it home. The bad news: the scale was a little larger than I’d imagined, so I think this will be headed to Marketplace VERY soon. That’s what I love about vintage – it didn’t work for me, but I feel great about recouping my costs here!!

I just wanted to show you a peek of part of this warehouse – it’s gorgeous. This is my kind of place 🙂 (Upon second viewing, I now realize that what I consider “gorgeous” – natural light, high ceilings, original wood, patinated furniture, well-loved building supplies – may also look like “a bunch of junk in an old building.” I stand by my initial assessment. I love it in here.) This concludes our tour of Vintage Junktion, and brings us to…
2 Marketplace Scores

Can you tell I love campaign furniture and wicker? Is that coming off? (I hope so.) I didn’t know where the Thomasville Huntley dresser would go when I bought it – at first, I thought maybe the dining room or the bedroom – but it’s landed in the living room and it’s actually the PERFECT storage piece for that space. It’s a great mix of shelving and drawers and it stores everything from board games and printer paper to old photographs and extra computer chargers. This wasn’t cheap – $400 after delivery, which I needed because it’s pretty massive and dense – but I have no doubts that I’ll be able to sell it for that price when the time comes.
And the tiny wicker dresser on the right was a $40 score for this tiny, previously unused corner of my hallway. It now stashes all my accessories – sunglasses, headbands, bobby pins, scrunchies, enamel pins, scarves, rings, etc. – and getting all of those things out of my closets/dressers/bathroom drawers and into one easily-accessible place has been pretty transformative, space-wise. HIGHLY RECOMMEND an accessory dresser. Huge fan.
This concludes my recent scores – WHAT SAY YOU? I’m ready to chat about all things brown wood, vintage pricing, and whether or not anyone else out there has a similar love of ceremonial scissors and brass monkeys. Let’s gab? xx
The post From Hungary To East LA: Caitlin’s “Weird” Vintage Finds That Were Almost All Under $100 Each appeared first on Emily Henderson.
February 15, 2023
How To Order A Rolling Library Ladder + The Price, Lead Time, And The Different Style/Finish Options

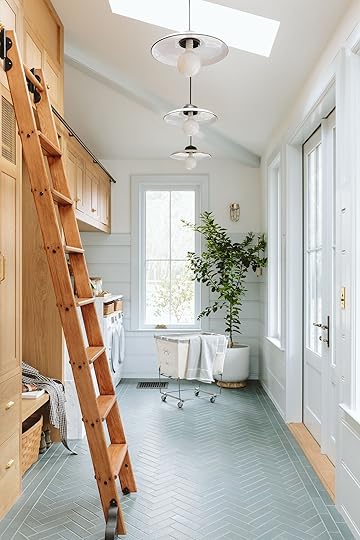
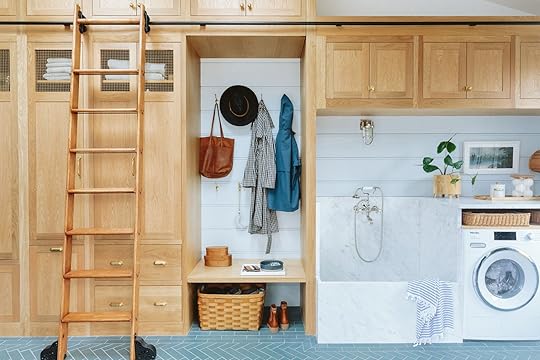
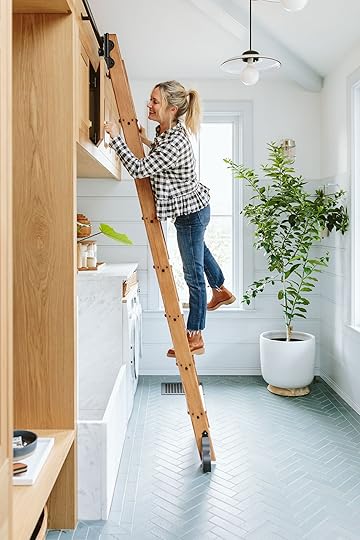
I think it’s fair to say that we all love the idea of a rolling ladder – the romance of it is seared into our brains from fantasy libraries of yore, a la Belle in Beauty and the Beast. I too was awaiting my big rolling ladder moment and figured that the mudroom was the perfect stage for its big debut. But not having ever done one before I didn’t know how to execute it and surely felt intimidated. They all look vintage but are they really? Is it one of those luxury things that is like $12k? Are they custom-made? Do you have to be a designer to do one? (no, no, can be, no). So today I’ll walk you through our rolling ladder “journey,” as led by ARCIFORM as they have lots of rolling ladder experience. I’m not saying it’s the only way to do them or the only source to get them from (totally not gifted or sponsored) but I was surprised at how not a big deal it was.
How Do You Order A Rolling Ladder?
I don’t have a bunch of options for you, just the one that we ordered. Most of the ladder is standardized – the distance between rungs, the overall width, etc. The most specific piece of information you need to provide, that only you know, is the exact height of the rolling rod/rack pole thing that it slides on and the length of that rod. It’s pure geometry. With this information, they will ensure that the height of the ladder itself is the right angle (not a right angle) to climb up as well as the correct angle when it’s not in use (it retracts much straighter – keep reading). Jamie (our lead ARCIFORM project manager) ensured that we were ordering the right rod height and length because I don’t do measurements accurately.
As you can see there are wheels on the bottom that go right to left, and hardware on top that you install on the rod that rolls left to right (and is very safe as it is secured on top and bottom).


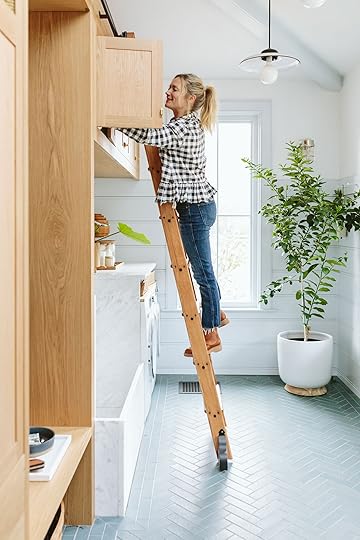
To save space, avoid tripping, and be less of a kid-temptation, the hardware allows it to easily go more vertical and hug the cabinetry. It’s extremely easy to do this and this is how it is most of the time.
 What Are The Design Options For Wood, Metal Finish, And Style?
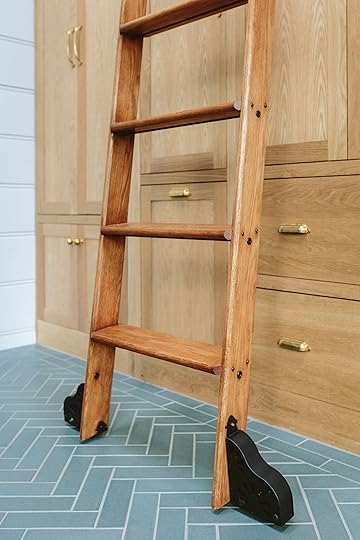
We bought ours from Custom Hardware Services LLC, and you can click here straight into what we bought here: rolling ladders. The metal finish options are below.

We chose black because we had black in our lighting and the Oil Rubbed Bronze looked, well, brown.

We also chose the more old-fashioned brake wheel although I’m unsure how it brakes. But since it’s recommended it felt like the right thing to do.
For wood options, you have cherry, hickory, red oak, and maple. We chose unfinished red oak and it came in a very light color wood (think blonde).
There are more custom options on their site (like adding handrails), I’m really only guiding you through what we did.
If you want to know our exact order (besides the height which is totally up to you) here you go:
“Rolling ladder, Black, Brake wheel, Standard roller, Normal red oak ladder, 20” wide, Unfinished, Straight rails, Normal mount, Regular stop kit, Horizontal brackets, No accessories”
When it came in it was too light for us (to us it looked cheaper and more IKEA-like) and we wanted it slightly darker than the cabinets. Jamie put a clear coat on it and it brought out the grain more, but still too light.
So we ask ARCIFORM to send out their lead painter who is the same guy that matched the wood of our incredible top of the island. He’s been custom-staining anything for years and years and doesn’t just choose one. He’s a real mixologist.
He sampled a few and based on his suggestions (and our opinion) we went with the red mahogany which admittedly I was like, “huh” but he was absolutely right (and he says it’s the stain he uses when he wants something to age well and look older faster). It pulled the tone from the darker tones of the Unique Kitchen And Baths white oak Cabinets and said it will age very nicely.
 How Much Did It Cost? And How Long Did It Take?
The ladder and rod system was $1800, with the shipping an additional $200. It comes flat-packed so that doesn’t include the install. It took a day to assemble the ladder and hang the system by someone experienced (shout out to Jamie and Taylor), plus more time for staining. The lead time was around 6 weeks (might have taken longer but it felt around that long). To me both of those things – price and lead time, were reasonable. Could you make this for less? Probably, but not me:)

We love this ladder and of course, want it in all the rooms (Closet? Should we create a library in the family room?) For those of you wondering if it’s dangerous for the kids my response is “eh…not really”. Like most things, when it got installed they were a bit enthusiastic and reckless, but we hammered out some rules quickly and they lost interest. Turns out they don’t really want access to the backup pillowcases as much as they thought they did 🙂
Mudroom Resources:
Cabinetry: Unique Kitchen and Baths
Wall Paint Color
: Extra White by Sherwin-Williams
Paneling and Trim Paint Color: Dew Drop by Sherwin-Williams
Floor Tile: Pratt + Larson
Tile Installer: Level Plane
Dog W
ashing Stone
: Bedrosians Tile & Stone
Appliances: Build with Ferguson
Skylights: Velux
Stone Fabrication
: Alpha StoneWorks
Hardware: Rejuvenation
Light Fixtures: Rejuvenation
Rolling Ladder: Custom Hardware Services LLC
*Design by Emily Henderson and ARCIFORM
*Photos by Kaitlin Green
The post How To Order A Rolling Library Ladder + The Price, Lead Time, And The Different Style/Finish Options appeared first on Emily Henderson.
February 14, 2023
A Roundup Of Our Favorite Article Pieces And A Chance To Win a $2,000 Gift Card (+ A Sneak Peek At The New Mountain House Living Room Sofa)

There are certain brands that I/my team go back to again and again and Article is one of those brands. I’ve been a longtime fan and have used their pieces in many a makeover. Their furniture and decor are well-designed, and beautiful, and their delivery and installation services are truly unmatched. We love working with them and have tried out so many of their pieces so we can confidently attest to their style, quality, and longevity. Today, in honor of Article’s Presidents’ Day Sale (happening right now!), we have a $2,000 Article gift card to give away to one lucky reader. All you have to do is check out their site and leave a comment here with the piece that you’d love to bring home. To help aid in your search, we’ve rounded up the best deals along with a few inspirational shots of our tried-and-true favorites. But before we get into that, I wanted to show you the sectional we grabbed for the mountain house. When I needed a really comfortable yet sturdy, beautiful sofa that could hold up with renters AND our extended stays with lots of guests, I turned to Article…
My New Sectional
Last summer, my sofa frustration was at an all-time high as our awesome vintage sectional fell apart anytime anyone sat on it. Literally sitting on it was a problem. My friend, Annie, so bluntly put it – “You hate this sofa, get a new one.” Yes, it was almost 3 years of tolerating the vintage sectional. I knew that I needed A. Extreme comfort – this is a vacation house for Pete’s sake. B. It needed to be family/kid/pet-friendly (i.e. dark and hard to destroy), and C. Not have a crazy long lead time or be super expensive. Even though we weren’t living at the mountain house full time we were renting it out and the guests were also complaining about how annoying our vintage sectional was. So I ordered this sectional from Article (it’s a new sofa for them), it came within 2 weeks, and after the wonderful white glove installers put it together and left I was overwhelmed with a sense of relief and joy. It is SO COMFORTABLE, with a wide whale corduroy that is so soft – and has the perfect mountain house family-friendly vibe.
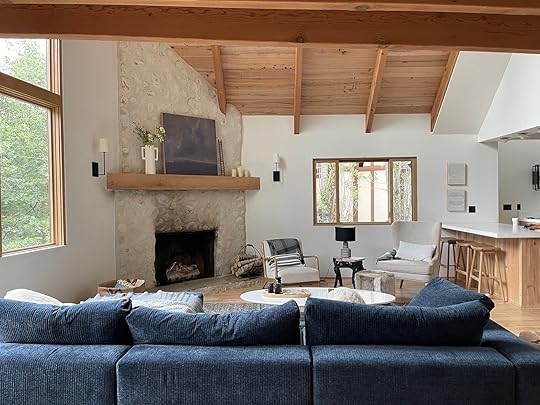
Over Christmas, I would come down every morning early, throw myself on the sofa with my coffee and kindle, and say to myself about how it literally couldn’t be more comfortable and perfect for our needs there. I recently convinced my friend Kaitlin to get the green version even saying, “As your friend, I want you to have this level of comfort in your family room.” I don’t know what magic foam or filling they have in their cushions but I swear it’s the perfect level of comfort and give. Some sofas are too tightly filled so even though the cushions are high-end/quality it almost propels you off the sofa. And then other types of filling don’t have enough structure so they look like garbage after a few months of use. It’s this high quality + perfect amount of give that makes it so comfortable and long-lasting. I should know, I’ve had their other sectional, the Burrard, for almost 9 years now and it’s still so comfortable and yet structured! I hate showing you iPhone shots, but we are going to shoot this summer.
If you’re the lucky winner of this $2,000 gift card, I can’t recommend this sectional enough. But if you want to stretch those winnings a little further, we’ve rounded up the creme de la creme of their Presidents Day Sale offerings (happening now until 2/20). These items will deliver on comfort, style, and quality over and over, for years and years.
Sofas
 left: photo by tessa neustadt, from: how we styled our living room to sell | right: photo by sara ligorria-tramp, from: quick changes I made to my la living room
This was the debut of the Burrard sectional in our Glendale house before it sold. It really was perfect. We then used it for our living room in the LA house, and I’ve moved it up to Portland, where it lives in our living room right now. Sure, the chaise isn’t going to work where it is and it’s the wrong orientation for this room, but it’s just so comfortable that it’s hard to buck up and buy or invest in a new statement sofa. I’m going to miss how comfortable it is!

 left: photo by sara ligorria-tramp, from: how to make your smallest room the coziest room in your house | right: photo by sara ligorria-tramp, from: ryann’s living and dining room moto reveal
Like I said before, we’ve used Article sofas in many a makeover including Sara’s TV room and Ryann’s living room. Sara has the Sven Sofa in their velvet Pacific Blue color and loves how it completes the monochrome look she was going for plus it is super comfortable. Ryann chose their Texada Sofa because she wanted a statement sofa that had an interesting shape but would still blend with many styles. She loves this sofa and how stylish and comfortable it is (and it’s pet friendly!).
If you are looking for a new sofa these are some new styles we love that are also a part of their Presidents Day sale:

1. Abisko Sofa | 2. Timber Sectional | 3. Lappi Sofa | 4. Klara Sofa | 5. Abisko Sectional | 6. Nordby Sofa Bed
Chairs
 left: photo by sara ligorria-tramp, from: the ultimate family-friendly media room | right: photo by sara ligorria-tramp
 A good accent chair can provide additional seating but also add more style and intrigue to a room. This armchair that we used in a couple of makeovers and LOVED is sadly no longer available but speaks to how Article knows how to construct a comfortable and stylish accent chair like no other. Anytime I use their chairs, I am always thrilled with their quality. Here are some new accent chair picks that are currently on sale:

1. Netro Lounge Chair | 2. Abisko Lounge Chair | 3. Chantel Chair | 4. Oscuro Chair | 5. Angle Lounge Chair | 6. Meklen Lounge Chair
Benches & Ottomans
 left: photo by sara ligorria-tramp, from: a cozy yet sophisticated bedroom makeover | right: photo by sara ligorria-tramp, from: my friend’s kid and pet friendly living room
 If you’re looking for an end-of-bed bench or an ottoman, you can’t go wrong here. In Suzanne’s bedroom makeover, we choose their Level Bench to add a sleek, modern flair. I love the U-shaped leg design on the backside and it has just the right amount of tufting. And longtime readers might remember this makeover where we paired this beautiful caramel ottoman with a blue/gray sectional. I wanted to ensure that the sofa had a warmer-toned best friend that was also pet and kid-friendly and this was the perfect fit. I still love the subtle tufting and stitching that swoops down the sides.
Lucky for us, Article has a ton of cool new styles of ottomans/benches on sale:

1. Cossa Ottoman | 2. Virk Bench | 3. Hira Pouf | 4. Oda Bench | 5. Bamba Pouf | 6. Abisko Ottoman
Casegoods
 left: photo by sara ligorria-tramp, from: quick changes I made to my la living room | right: photo by sara ligorria-tramp, from: ryann’s living and dining room moto reveal
Article of course makes extremely quality casegoods that provide style and storage. I had the Seno Sideboard in my LA living room since day one and loved it so much. It’s a solid Midcentury Modern piece with a lovely finish and wood grain and oh so timeless. Ryann used the Seno Media Console for her TV stand and it ended up being the perfect low-standing piece to complete her living room. It has storage on both sides and a little open shelf in the middle, and similar to my sideboard, the color and finish look very high-end/expensive.
 photo by sara ligorria-tramp | from: my best friend‘s 1970s basement gets a makeover
In Robyn’s basement makeover, we went with the black Oscuro Cabinet with brushed brass details. It complements the awesome wood paneling without being too loud and we love the fluted glass doors.
No matter your style, there’s a casegood for you that will look great in your home. Here are some new styles on sale:

1. Merto Cabinet | 2. Nera Cabinet | 3. V Bar Sideboard | 4. Floru Sideboard | 5. Vireo Dresser | 6. Seno Media Unit
Tables
 left: photo by sara ligorria-tramp, from: arlyn’s moody dining room reveal | right: photo by sara ligorria-tramp, from: jess’ communal patio reveal
Article has incredible indoor and outdoor tables that we’ve tried and tested for you. To balance the dark, moody walls in her rental dining room, Arlyn used one of Article’s solid oak tables (similar) which has a light, warm wood finish and matched it with oak and leather dining chairs. She loves how the light tone pops against the dark walls and how sturdy it is. On the left, we have Jess’ communal patio where she opted for this round rattan outdoor table that can easily seat six people. It’s somehow both extremely special and unique while also being neutral and so versatile. Arlyn’s table is no longer available but here are some awesome picks (including side tables) that are:
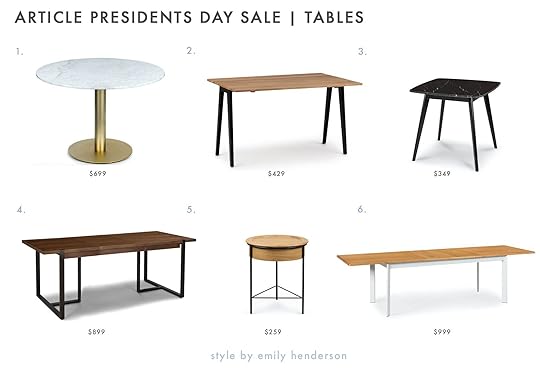
1. Erno Round Dining Table | 2. Alna Dining Table | 3. Vena Café Table | 4. Oscuro Dining Table | 5. Crena Side Table | 6. Grale Dining Table
Lighting + Decor
 left: photo by tessa neustadt, from: elliot’s nursery reveal | right: photo by sara ligorria-tramp, from: sara’s living and dining room reveal
We talk about Article’s furniture a lot but they also have amazing lighting and decor selections. Their sheepskin throw is great to layer over area rugs for a layered, cozy look. I have used it countless times. They also carry awesome lighting like this floor lamp that Sara used in her living room. It’s perfectly modern and sculptural and it adds movement and height.
If you want to browse more decor and lighting, here are some of our favorites:
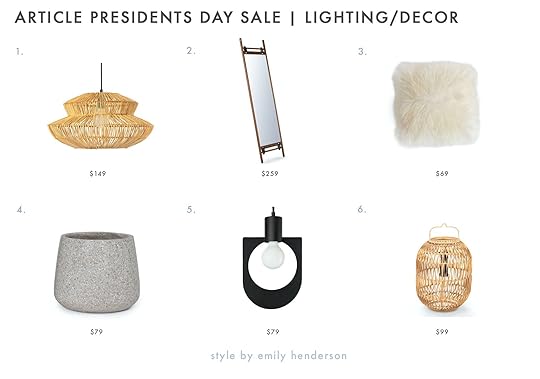
1. Suru Small Pendant Lamp | 2. Beau Floor Mirror | 3. Lanna Pillow | 4. Tuva Small Planter | 5. Wyndrow Pendant | 6. Bori Lantern
Again, we are truly fans of Article and their timeless, quality pieces and we feel very lucky to partner with them. In addition to the $2,000 giveaway (enter by commenting below what Article piece you’d love to take home – open to U.S. and Canada residents), Article kindly offered to make sure all our readers get a little extra value out of the sale. Click here to get $50 off a purchase of $200 or more (valid until March 31, 2023). Discount will apply automatically at checkout.
Opener Image Credit: Photo by Sara Ligorria-Tramp | From: Quick Changes I Made To My LA Living Room
The post A Roundup Of Our Favorite Article Pieces And A Chance To Win a $2,000 Gift Card (+ A Sneak Peek At The New Mountain House Living Room Sofa) appeared first on Emily Henderson.
Emily Henderson's Blog

- Emily Henderson's profile
- 10 followers

