
Emily Henderson's Blog, page 73
October 26, 2023
The Sofa Style Trend We’re Seeing Everywhere (& Are SO Pumped About) + Shopping Options!

It’s hard not to start a post here with something like “Hey EHD world, it’s Arlyn and I’m back with another post on XXXX.” Is everyone okay if I just launch into a thing? Yes? Good, because you know when you learn, say, a new word, and then soon after, you see and hear it everywhere and you wonder if you were blind to it all along or if everyone also just learned that new word, too? This happens to me a lot, and a decade or so ago, I did a lengthy internet search on this marvel.
It’s called the Baader-Meinhof phenomenon, or if German isn’t your thing, you can also refer to it as frequency illusion. So yes, it actually has a name! I could write a whole post on it (I actually did a really long time ago on another site!) but basically, it’s a cognitive bias that affects how we think and process information, making that thing we learn feel more common than it actually is.
Except this time, I think I’m onto something. Not just because of my own Baader-Meinhof moment, but because I like to believe I have a knack for these things. (Don’t worry, I’m getting to the sofa trend part of this post, just go on this journey with me, please).
Back in my days as a magazine editor, I went to a lot of trade shows where hundreds of home brands would exhibit their newest products. When you walk 20,000 steps from booth to booth to booth, you learn to quickly pick up on things, particularly trends. The publication I worked for covered uber-luxury design, and if you know anything about trends, you know they start at the tippy-tippy top. I got very good at calling a thing years in advance to hitting the mainstream market. All that to say, I’ve spotted a new “it” piece and I’m fairly obsessed with it.

While working on a shopping piece for another website recently, I popped into a custom-sofa boutique in Beverly Hills called The Joneses. (If you’re local and on the search for a sofa, GO THERE. It’s amazing.) I walked all the displays and kept coming back to the Beanbag sofa above. Something about the soft curves that meet in a peek in the arms was magnetic to me. I even went so far as to request a quote from the wonderful salesperson for this in a gorgeous mustard velvet but scaled down to better suit my living room (for the record, I’m not looking for a new sofa but I couldn’t help myself).
Then…I started seeing more and more of those arms everywhere I looked. In design publications like Domino, on my favorite designer’s Instagram feeds, in the catalog of great furniture stores. “I think I’m seeing a new trend emerge,” I said one day to Jess in passing, who encouraged me to write about it here.
The only problem was, I didn’t know what this was called. I started my Google search with “beanbag style sofa” and got some interesting hits but no exact dice. It wasn’t until I reached out to the incomparable Reath Design for more information on a photo I had saved of a living room with a rust velvet-colored sofa that I learned what this is: the Marenco Sofa by Arflex.

Designed by Mario Marenco in 1970, this sofa style is on par(ish) with the other ’70s sofa design that became WILDLY popular in the last few years: the Camaleonda Sofa by Mario Bellini re-released by B&B Italia. You couldn’t open Instagram without this pebble-like piece being front and center. It was endlessly knocked off by more affordable retailers. You could even get a pretty badly made version for about $800 on Amazon. That’s when you know you’ve reached peak furniture trend.

What I find most interesting about the Marenco line is the feeling that these big, tufted cushions are just floating. The cushions *are* the frame of the sofa, which makes it playful but also inviting. And while it’s a pretty unique silhouette, it’s still simple and sleek. I’ve seen similar styles but a bit toned down at other e-comm sites lately, and in any iteration, I’m smitten with it.
Let’s take a look at a few photos of the real deal in some different colors and fabrics:
 image courtesy arflex
 image courtesy arflex
 image courtesy arflex
All of these photos are just catalog shots from the brand that makes the sofa, so they’re a little bit lifeless, yes. But here’s the photo I referenced earlier by Reath Design, in a real (albeit very grande) home:
 design by reath design | photo by laure joliet
It’s the kind of piece that fits into a more traditional aesthetic like the room above (I think because it’s a vintage design rather than a new one) but it also modernizes whatever classic or even basic pieces surround it. And all the curves and fabric creases really accentuate the fabric choice, particularly in velvet.
If the Marenco sofa isn’t your speed (yet!), you might like this modified version in a room by Abbie Naber of A Naber Design. (I believe this is the Jones sofa from Maiden Home, which I linked below in the product round-up, too). It’s more in line with the framing of an approachable mainstream sofa design with the added touch of that interesting arm and upholstered base.
 design by abbie naber/a naber design | styling by a naber design/california casa/en shell space | photo by charlotte lea photography
Also from Maiden Home is this less bulbous but equally striking design, their Bond Settee. What I’ve noticed is a lot of brands have taken the hallmarks of the Marenco (like that arm style) and mixed them into something a bit more straightforward. So while the *exact* design isn’t being replicated everywhere (again…yet!), there are whispers of it everywhere.
 courtesy maiden home
Whether I’m right or wrong about this Marenco-style sofa trend, I do know one thing for certain: it’s a fabulously interesting furniture design that I’m going to keep my eye on for whenever the time comes that I’m ready for a new sectional.
And before we go, I pulled together nine options in a range of prices that give me the vibes I’m most drawn to of the original sofa.

1. The Jones Modular | 2. Copious Performance Velvet Sofa Cognac | 3. The Bond Settee | 4. Double Seat Sofa – Orange | 5. Marenco-Style Three Seater Sofa | 6. Cambria Green Velvet Sofa 96″ | 7. Clyde Modular Sofa | 8. Studio Sofa | 9. Jolt Ltalian Home Row Leather Sofa
I’d love to hear what you think here. Love it? Hate it? Undecided? If you’re anything like me, it might take a minute to warm up to the idea but just wait…like me and mushrooms, you may find yourself craving it soon enough.
Your friend in design (and sofas and funghi), Arlyn
Opening Image Credits: Design by Abbie Naber/A Naber Design / Style by A Naber Design/California Casa/En Shell Space | Photo by Charlotte Lea Photography
The post The Sofa Style Trend We’re Seeing Everywhere (& Are SO Pumped About) + Shopping Options! appeared first on Emily Henderson.


October 25, 2023
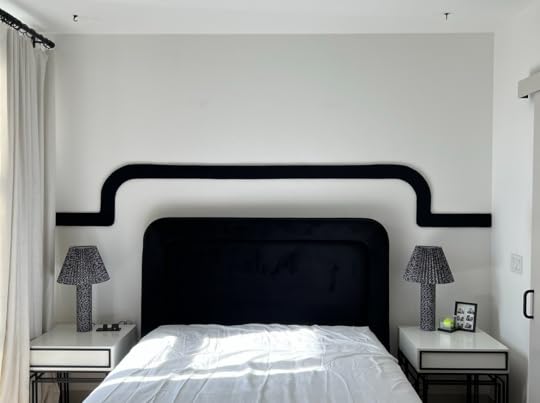
Mal’s Renter-Friendly DIY Headboard Wall Completely Transformed Her 500 Square Foot Studio Apartment

Hello, Its me, Mal (EHD social media manager) and welcome back to my 500 sqft studio apartment. AND I’M HAPPY TO REPORT IT’S FINALLY FINISHED! I’ll be walking you through two of the fun DIYs I did for this space first, and then come back next week for the full reveal!! EEK! First, we’re starting with the bed wall that I’ve been in a boxing match with for years now. I was Rocky and this blank wall was Apollo Creed. But we went the distance babyyy and I think in this case I came out on top. Seriously though, I spent so much time scratching my head wondering how I could transform this back wall into something more interesting than the standard landlord white box special. After much trial and error, I finally figured out how to bring my vision to life!! So today I’m going to break down exactly how I did it in case you want to try this out at home, too, or if you don’t wanna try it out but you’re curious about the struggle that was this wall, let me entertain you 🙂
THE BEFORE


When I said this was a boring wall I meant it…and this is pretty much the main wall of the apartment (the other side of this room is the other main section which is where the second DIY that I’ll be showing you is) so design-wise, I knew this was the place to make a statement.
The InspirationThis apartment is small and laid out pretty similarly to a hotel room, so when I was looking for inspiration the first place I went was cool hotels. I’m very much obsessed with Palm Springs vibes and style, so I popped into the Sands Hotel and Spa which was designed by Martyn Lawrence Bullard, and had lunch at the Pink Cabana during a weekend trip there. In case you haven’t been and have no clue what I’m talking about, let me show you some mediocre photos I took while visiting:
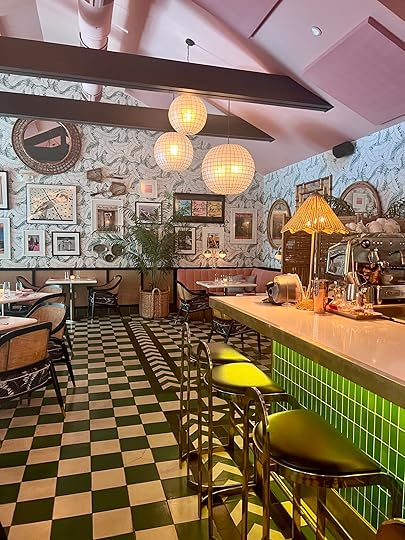

It’s SO fun right?? I was immediately blown away by the design (again shoutout to Martyn Lawrence Bullard!!) and knew I wanted to incorporate a touch of this fun, resort-y feeling in my space. So far, I haven’t been much of a “super bright colors in the main living space” kind of person (but this could also be because I live in 500 sqft), so I wanted to take pops of this but make it more restrained to be more livable in such a small space. Then when I saw this awesome custom headboard, I knew I could combine the two and create something really special.
The OptionsSo I started drafting up some options and you guys helped me decide on the direction (thank you!!). Here are some of the options we ran through:

A lot of you guys were split on which ones you liked, but there was a pretty solid pack that came together for option 6, and while it was easily the hardest version to complete, I agreed that it looked best (especially once the pendant lights came in!!) So now let’s chat about how to actually construct this baddie.
How To Create This Headboard Wall DIYOkay, so now you wanna know how I did it, huh? Let me break down exactly how to do it (with some key learnings) so you don’t have to figure this out on your own (trust me, you don’t want to).
Items NeededSo here are the items you need. I used cardboard from boxes that I had and taped them together, but if you wanted to purchase cardboard I’ve got it linked for ya too! Also please note the amount for each item might change based on the size of your wall, but I’ll list how much I used for each item for my 10 ft wide x 8 ft tall wall:
Wallpaper: 3 rollsCane: 1 roll (could only purchase 40-inch wide cane in 50ft lengths lol) I ended up using about 20 ft and I have a TON left over which I’m planning to use for future projects (more on why this happened later) Black velvet fabric: 5 yards White painter’s tape: 3-5 rolls Double-sided tape: 5 rolls or more (I also just found this double-sided tape and wish I had used this instead…seems easier to apply!) 4 Art hooks Nails Batting: 5 yards Command strips Staple gun with lots of staples Scissors Hot glue gun and lots of hot glue Screwdriver Wood strips (long pieces that will be cut down –– I bought these in person at Home Depot! Get the thinnest ones you can find)4″ Wide x10′ Long 1/4″ Thick neoprene: 2 rolls1/4″ Thick X 12″ Wide X 54″ Long neoprene: 2 pieces Measuring tape Exacto knife Box saw Wallpaper scraperAlso in terms of timing, this project should take about 3 or 4 days in total (one or two days for the trim, one day for the cane, and another day for the wallpaper). There was a lot of trial and error.
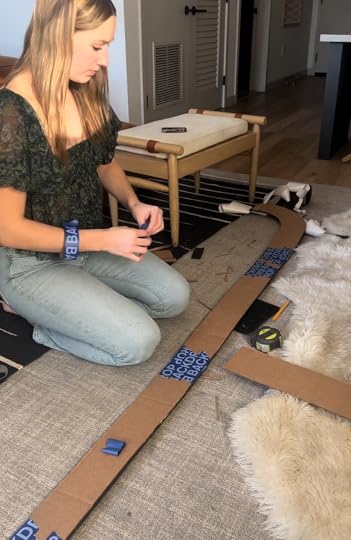
Step One: Trace, Tape, And Cut Out The Cardboard ShapeSo the first thing I did was hoard some cardboard boxes so I could create the shape for the black trim. Then I took a solid square of the cardboard and I traced the corner curve of my headboard so the trim would mimic the shape. I marked some points 4 inches below the curved line I traced and then traced another curve below it. Next, I cut this curve out and traced the exact shape onto another piece of cardboard then cut that one out. Boom. Now you have your curves! Next, I cut out a straight, long, piece of cardboard that was 4 inches wide and made it a little longer than the length of my headboard. I taped it together to the edges of my cardboard corners and used some command strips to put it onto the wall and see if the sizing looked right. Once I nailed down the top sizing, I cut out two more pieces to attach the bottom of the curves to the wall. I decided to give these a little curved moment too to make it feel really seamless and flowy. You’ll notice that a few photos down.


 Step Two: Add Sticky Neoprene To One Side Of The Cardboard Trim To Secure It Together
 Once I had taped the cardboard together I wanted something to make it feel more secure and a little more plush –– so I found this sticky neoprene foam on Amazon and I knew it was just the right thing!! I got the 4″ width so I wouldn’t need to cut it again (plus this would help the lines be a bit straighter because ya know…human error :))


Once the neoprene was up I used command strips and painter’s tape to put it onto the wall to make sure the shape looked right. Here’s what it looked like with just the neoprene up, before it was wrapped in fabric. The black helps you really understand where you’re at so you can adjust the shape if needed.

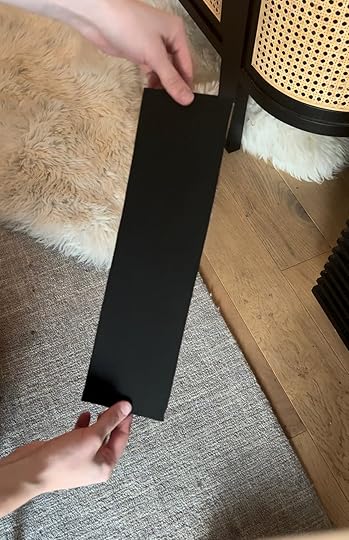
And then here’s what the finished result looked like before it was wrapped in fabric:
I ended up rounding the edges a bit on the bottom corners which I think gave it a better flow! This was the point where I ended day one (it was a doozy). If you wanna continue on and pull this out in one day YOU GO, GIRL. Please enjoy my grime-y outfit change…
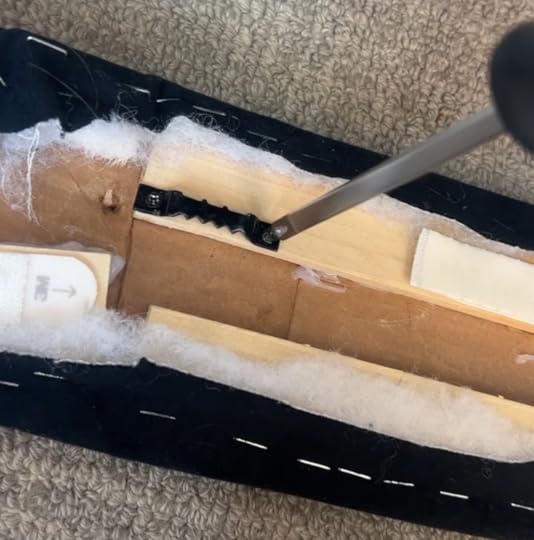
Step Three: Hot Glue Wood Planks On The BackOnce I was happy with the shape, I needed something to really make the trim solid and to have something to staple the fabric to. So I had these poplar planks lying around and decided it would be the perfect thing. I ended up using about 10 long pieces (some of which I cut down with a box saw) and I hot glued a strip to the top and a strip to the bottom of the back of the trim. When it came to the curved corners, I cut down the wood pieces and glued them down to follow the curve (it’s not going to be perfect and that’s okay –– it’s really just to hold it all together).

 Step Four: Staple Batting To The Wood Planks
Once the wood planks were locked in and the glue was dried, it was time to break out the staple gun and END THIS. If you’re attempting this DIY, this is the point where you’re gonna need a killer playlist and a little treat to keep going, but don’t worry there’s a light at the end of the tunnel, I PROMISE. At this point, I just laid out the batting and cut it to match the shape of the trim, then I pulled it tight and used a staple gun to wrap the trim. When it gets to the corners it’s all about going slowly and pulling really tight so it doesn’t crease. Check in on the other side frequently to ensure there aren’t any wrinkles!


This is an up-close shot of the corner (which is definitely the hardest part FYI). Take it slow so you can ensure there aren’t any wonky wrinkles happening in the front! Also, make sure to cut the batting so there’s still some of the wood exposed for the hooks coming in a second…
 Step Five: Staple Velvet Fabric
Next up, I laid out my velvet fabric, cut it to match the shape (but make sure there’s lots of overage) and then I stapled it to the wood planks as well. Again, pulling tight each time you staple!! TAKE IT SLOW EVEN THOUGH YOU WILL BE QUESTIONING LIFE AT THIS POINT.

 Step Six: Screw In Art Hooks And Add Command Strips
Next up was figuring out a way to hang this bad boy. I tried just using command strips to make this ultra-renter friendly, but then I decided I really don’t want a chance of this falling on my head in the night, so I opted for four art hooks (which I stole from a picture frame I had) and I screwed it into the wood.
 Step Seven: Cut Cane To Size & Tape It Up With White Painter’s Tape
Now time for the cane!!! Finding a huge piece of cane was a real piece of work. At first, I used two 24″ wide pieces and it looked so janky. I then went on a WILD GOOSE CHASE to find a 40″ wide piece of cane (which is truly the widest they go). I had to go straight to the source and found an awesome manufacturer called Yeeya Home. They were so incredible to work with and the quality was far more premium than the shitty 24″ wide cane I had originally purchased on Amazon. They also sent samples of a bunch of different options –– I went for a radio weave and am absolutely obsessed with how it turned out!! Note: because I had to do a custom order I could only purchase a 50ft roll of cane which I thought was a ton (and it is) but I ended up using half of it and the other half I’ll save for my next project! It’s also nice to have some piece of mind in case something goes wrong and you cut it too short or something on accident. Here’s what it looked like installing the cane:


Now, you could lay it flat for a day or two if you have the space for it…I don’t so it was a little tough trying to lay it flush against the wall. I pushed the bed as close to the wall as possible which really helped to keep it in place, then I used white painter’s tape behind it to keep some of the other parts down and it worked pretty well. Note that I had to add in two smaller pieces of cane behind my nightstand because it didn’t go all the way to the floor, so for those pieces I used some small nails to keep them flush with each other. I also have an outlet down there so I cut the cane around it 🙂
Step Eight: Nail In Black Trim To WallNow it’s time to put that pretty trim (that I worked so hard to pull off) onto this wall. I used some command strips to make sure the placement was right and then nailed in four nails (two on the ends and two on the curved corners) and secured it in place.


Here’s what it looked like once it was up!!
 Step Nine: Install Wallpaper
Now if you’re attempting this project, you could stop here OR you could keep going like I did and add a wallpaper. I fell in love with this wallpaper from Pottery Barn because it reminded me of the pink cabana in Palm Springs but the only problem was that it wasn’t peel-and-stick. So when I came across this article by Studio DIY a lightbulb went off and I added my dream wallpaper to cart!!! The gist is you put painter’s tape in a grid and then put double-sided tape over the painter’s tape so it becomes removable. I’d recommend grabbing a wallpaper smoother downer (yes, that’s the technical term) or a credit card to smooth it down as you go. Also, a huge lesson I learned was to A. use white painter’s tape if your wallpaper is thin or has a white background and B. line the painter’s tape grid up with the edges of the wallpaper so it looks more seamless and the edges won’t flip up. Then I just used the wallpaper smoother thing and an exacto knife to trim the edges and it worked wonders!! Lastly, I know painter’s tape isn’t technically supposed to be on a wall for long periods of time so we’ll see how removable this actually is when I move out (I’ll keep you posted), but it looks too good to not try 🙂

 Step Ten: Revel In The Hard Work You Just Accomplished!
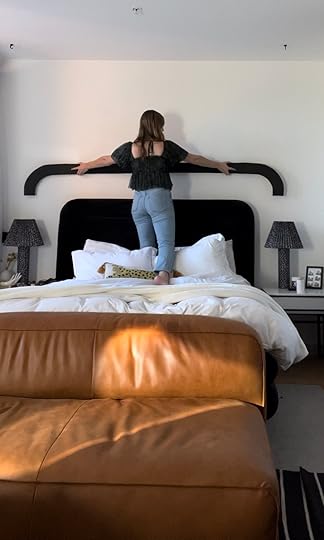
And just like that!!!! It took DAYS, WEEKS, MONTHS of trial and error but the finished result is so worth it!! This boring white box apartment isn’t so boring anymore!! Have a look!!!!!
 photo by veronica crawford
I’ll be revealing the full space on Monday but I have one more DIY to share with you before then so stay tuned!!! More to come! Drop your comments/questions/concerns below and I’ll see ya down below or follow me on Instagram and TikTok! Thank you all for reading! xx
Opening Image Credit: Photo by Veronica Crawford
The post Mal’s Renter-Friendly DIY Headboard Wall Completely Transformed Her 500 Square Foot Studio Apartment appeared first on Emily Henderson.
This Renter-Friendly Headboard Wall Completely Transformed This 500 Square Foot Studio Apartment
Hello and welcome back to my 500 sqft studio apartment!! AND I’M HAPPY TO REPORT IT’S FINALLY FINISHED! I’ll be walking you through two of the fun DIYs I did for this space first, and then come back next week for the full reveal!! EEK! First, we’re starting with the bed wall that I’ve been in a boxing match with for years now. I was Rocky and this blank wall was Apollo Creed. But we went the distance babyyy and I think in this case I came out on top. Seriously though, I spent so much time scratching my head wondering how I could transform this back wall into something more interesting than the standard landlord white box special. After much trial and error, I finally figured out how to bring my vision to life!! So today I’m going to break down exactly how I did it in case you want to try this out at home, too, or if you don’t wanna try it out but you’re curious about the struggle that was this wall, let me entertain you 🙂
THE BEFOREWhen I said this was a boring wall I meant it…and this is pretty much the main wall of the apartment (the other side of this room is the other main section which is where the second DIY that I’ll be showing you is) so design-wise, I knew this was the place to make a statement.
The InspirationThis apartment is small and laid out pretty similarly to a hotel room, so when I was looking for inspiration the first place I went was cool hotels. I’m very much obsessed with Palm Springs vibes and style, so I popped into the Sands Hotel and Spa which was designed by Martyn Lawrence Bullard, and had lunch at the Pink Cabana during a weekend trip there. In case you haven’t been and have no clue what I’m talking about, let me show you some mediocre photos I took while visiting:
It’s SO fun right?? I was immediately blown away by the design (again shoutout to Martyn Lawrence Bullard!!) and knew I wanted to incorporate a touch of this fun, resort-y feeling in my space. So far, I haven’t been much of a “super bright colors in the main living space” kind of person (but this could also be because I live in 500 sqft), so I wanted to take pops of this but make it more restrained to be more livable in such a small space. Then when I saw this awesome custom headboard, I knew I could combine the two and create something really special.
The OptionsSo I started drafting up some options and you guys helped me decide on the direction (thank you!!). Here are some of the options we ran through:
A lot of you guys were split on which ones you liked, but there was a pretty solid pack that came together for option 6, and while it was easily the hardest version to complete, I agreed that it looked best (especially once the pendant lights came in!!) So now let’s chat about how to actually construct this baddie.
How To Create This Headboard Wall DIYOkay, so now you wanna know how I did it, huh? Let me break down exactly how to do it (with some key learnings) so you don’t have to figure this out on your own (trust me, you don’t want to).
Items NeededSo here are the items you need. I used cardboard from boxes that I had and taped them together, but if you wanted to purchase cardboard I’ve got it linked for ya too! Also please note the amount for each item might change based on the size of your wall, but I’ll list how much I used for each item for my 10 ft wide x 8 ft tall wall:
Wallpaper: 3 rollsCane: 1 roll (could only purchase 40-inch wide cane in 50ft lengths lol) I ended up using about 20 ft and I have a TON left over which I’m planning to use for future projects (more on why this happened later) Black velvet fabric: 5 yards White painter’s tape: 3-5 rolls Double-sided tape: 5 rolls or more (I also just found this double-sided tape and wish I had used this instead…seems easier to apply!) 4 Art hooks Nails Batting: 5 yards Command strips Staple gun with lots of staples Scissors Hot glue gun and lots of hot glue Screwdriver Wood strips (long pieces that will be cut down –– I bought these in person at Home Depot! Get the thinnest ones you can find)4″ Wide x10′ Long 1/4″ Thick neoprene: 2 rolls1/4″ Thick X 12″ Wide X 54″ Long neoprene: 2 pieces Measuring tape Exacto knife Box saw Wallpaper scraperAlso in terms of timing, this project should take about 3 or 4 days in total (one or two days for the trim, one day for the cane, and another day for the wallpaper). There was a lot of trial and error.
Step One: Trace, Tape, And Cut Out The Cardboard ShapeSo the first thing I did was hoard some cardboard boxes so I could create the shape for the black trim. Then I took a solid square of the cardboard and I traced the corner curve of my headboard so the trim would mimic the shape. I marked some points 4 inches below the curved line I traced and then traced another curve below it. Next, I cut this curve out and traced the exact shape onto another piece of cardboard then cut that one out. Boom. Now you have your curves! Next, I cut out a straight, long, piece of cardboard that was 4 inches wide and made it a little longer than the length of my headboard. I taped it together to the edges of my cardboard corners and used some command strips to put it onto the wall and see if the sizing looked right. Once I nailed down the top sizing, I cut out two more pieces to attach the bottom of the curves to the wall. I decided to give these a little curved moment too to make it feel really seamless and flowy. You’ll notice that a few photos down.
Step Two: Add Sticky Neoprene To One Side Of The Cardboard Trim To Secure It Together Once I had taped the cardboard together I wanted something to make it feel more secure and a little more plush –– so I found this sticky neoprene foam on Amazon and I knew it was just the right thing!! I got the 4″ width so I wouldn’t need to cut it again (plus this would help the lines be a bit straighter because ya know…human error :))
Once the neoprene was up I used command strips and painter’s tape to put it onto the wall to make sure the shape looked right. Here’s what it looked like with just the neoprene up, before it was wrapped in fabric. The black helps you really understand where you’re at so you can adjust the shape if needed.
And then here’s what the finished result looked like before it was wrapped in fabric:
I ended up rounding the edges a bit on the bottom corners which I think gave it a better flow! This was the point where I ended day one (it was a doozy). If you wanna continue on and pull this out in one day YOU GO, GIRL. Please enjoy my grime-y outfit change…
Step Three: Hot Glue Wood Planks On The BackOnce I was happy with the shape, I needed something to really make the trim solid and to have something to staple the fabric to. So I had these poplar planks lying around and decided it would be the perfect thing. I ended up using about 10 long pieces (some of which I cut down with a box saw) and I hot glued a strip to the top and a strip to the bottom of the back of the trim. When it came to the curved corners, I cut down the wood pieces and glued them down to follow the curve (it’s not going to be perfect and that’s okay –– it’s really just to hold it all together).
Step Four: Staple Batting To The Wood PlanksOnce the wood planks were locked in and the glue was dried, it was time to break out the staple gun and END THIS. If you’re attempting this DIY, this is the point where you’re gonna need a killer playlist and a little treat to keep going, but don’t worry there’s a light at the end of the tunnel, I PROMISE. At this point, I just laid out the batting and cut it to match the shape of the trim, then I pulled it tight and used a staple gun to wrap the trim. When it gets to the corners it’s all about going slowly and pulling really tight so it doesn’t crease. Check in on the other side frequently to ensure there aren’t any wrinkles!
This is an up-close shot of the corner (which is definitely the hardest part FYI). Take it slow so you can ensure there aren’t any wonky wrinkles happening in the front! Also, make sure to cut the batting so there’s still some of the wood exposed for the hooks coming in a second…
Step Five: Staple Velvet FabricNext up, I laid out my velvet fabric, cut it to match the shape (but make sure there’s lots of overage) and then I stapled it to the wood planks as well. Again, pulling tight each time you staple!! TAKE IT SLOW EVEN THOUGH YOU WILL BE QUESTIONING LIFE AT THIS POINT.
Step Six: Screw In Art Hooks And Add Command StripsNext up was figuring out a way to hang this bad boy. I tried just using command strips to make this ultra-renter friendly, but then I decided I really don’t want a chance of this falling on my head in the night, so I opted for four art hooks (which I stole from a picture frame I had) and I screwed it into the wood.
Step Seven: Cut Cane To Size & Tape It Up With White Painter’s TapeNow time for the cane!!! Finding a huge piece of cane was a real piece of work. At first, I used two 24″ wide pieces and it looked so janky. I then went on a WILD GOOSE CHASE to find a 40″ wide piece of cane (which is truly the widest they go). I had to go straight to the source and found an awesome manufacturer called Yeeya Home. They were so incredible to work with and the quality was far more premium than the shitty 24″ wide cane I had originally purchased on Amazon. They also sent samples of a bunch of different options –– I went for a radio weave and am absolutely obsessed with how it turned out!! Note: because I had to do a custom order I could only purchase a 50ft roll of cane which I thought was a ton (and it is) but I ended up using half of it and the other half I’ll save for my next project! It’s also nice to have some piece of mind in case something goes wrong and you cut it too short or something on accident. Here’s what it looked like installing the cane:
Now, you could lay it flat for a day or two if you have the space for it…I don’t so it was a little tough trying to lay it flush against the wall. I pushed the bed as close to the wall as possible which really helped to keep it in place, then I used white painter’s tape behind it to keep some of the other parts down and it worked pretty well. Note that I had to add in two smaller pieces of cane behind my nightstand because it didn’t go all the way to the floor, so for those pieces I used some small nails to keep them flush with each other. I also have an outlet down there so I cut the cane around it 🙂
Step Eight: Nail In Black Trim To WallNow it’s time to put that pretty trim (that I worked so hard to pull off) onto this wall. I used some command strips to make sure the placement was right and then nailed in four nails (two on the ends and two on the curved corners) and secured it in place.
Here’s what it looked like once it was up!!
Step Nine: Install WallpaperNow if you’re attempting this project, you could stop here OR you could keep going like I did and add a wallpaper. I fell in love with this wallpaper from Pottery Barn because it reminded me of the pink cabana in Palm Springs but the only problem was that it wasn’t peel-and-stick. So when I came across this article by Studio DIY a lightbulb went off and I added my dream wallpaper to cart!!! The gist is you put painter’s tape in a grid and then put double-sided tape over the painter’s tape so it becomes removable. I’d recommend grabbing a wallpaper smoother downer (yes, that’s the technical term) or a credit card to smooth it down as you go. Also, a huge lesson I learned was to A. use white painter’s tape if your wallpaper is thin or has a white background and B. line the painter’s tape grid up with the edges of the wallpaper so it looks more seamless and the edges won’t flip up. Then I just used the wallpaper smoother thing and an exacto knife to trim the edges and it worked wonders!! Lastly, I know painter’s tape isn’t technically supposed to be on a wall for long periods of time so we’ll see how removable this actually is when I move out (I’ll keep you posted), but it looks too good to not try 🙂
Step Ten: Revel In The Hard Work You Just Accomplished!And just like that!!!! It took DAYS, WEEKS, MONTHS of trial and error but the finished result is so worth it!! This boring white box apartment isn’t so boring anymore!! Have a look!!!!!
photo by veronica crawfordI’ll be revealing the full space on Monday but I have one more DIY to share with you before then so stay tuned!!! More to come! Drop your comments/questions/concerns below and I’ll see ya down below or follow me on Instagram and TikTok! Thank you all for reading! xx
Opening Image Credit: Photo by Veronica Crawford
The post This Renter-Friendly Headboard Wall Completely Transformed This 500 Square Foot Studio Apartment appeared first on Emily Henderson.
October 24, 2023
Shopping For Dining Chairs…Consider A Curved-Back Option (Wisdom From A Pro Stylist)

Shopping for dining chairs isn’t easy! There are SO many options where even the “most affordable” ones still add up to A LOT of money because you at least need four for most dining tables. But Emily discovered one easy way to narrow your search…The curved-back chair. There’s honestly no downside. They feel great to sit on, you can comfortably converse with the person next to you, AND they look great. Why do they look great, do you ask? Well, if you know us, you know we love to mix and match shapes (ie. you don’t want all squares or all curves in one space). What a curved-back chair does, especially for a rectangular table, is nicely contrast that shape. Your guests will ask you if you hired a designer! Isn’t that what we all really want?? But the truth is you are just smart and learned all this good design advice for free, here:) It’s all about visual interest baby (and comfort)!


Ceremonie Green Mohair Dining Chair
This green mohair dining chair from Crate & Barrel was an INSTANT love match for Emily and her sunroom. It’s also what really made her “team curved-back” dining chair after getting some real use out of them.
 design by emily henderson and arciform | photo by kaitlin green | from: my favorite spot in the farmhouse: our sunroom reveal!
Sure, they are clearly beautiful, but more than that, they are so comfortable to sit in. And I can attest to that! I usually sit in that middle one on the right (my unofficial farmhouse sunroom work chair). So while this table is a pill shape and isn’t technically a rectangle, there are SO many other straight, graphic lines in this room. These chairs really soften the overall look. Then when you want to chat with the person next to you, that little curve gives you a really comfortable armrest. 10/10!
So in hopes of helping you find a functional AND beautiful dining chair. Here are our favorites online right now:
Sienna Boucle Dining Armchair
Let’s start out real strong with what looks (and is rated high) to be a beautiful and comfortable dining chair! The color is gorgeous and also comes in three other more neutral options. At $399 it’s not cheap (few good dining chairs are) but it is a stunner and a bestseller so that is saying something, right?! Also, it could easily be a great accent chair:)
Malin Whitewash Ash Wood Dining Chair
A modern take on the classic wishbone that I truly love. The light ash wood is so pretty with that natural flecked wool-blend fabric (which also looks very forgiving with spills). The curved back may not be upholstered but I’ve sat in wishbone chairs because and love how they feel. Originally, this chair was $349 but Crate & Barrel is having a Dining Room Event (aka a good sale) so right now this puppy is $279 each. Oh, and it’s made from sustainable wood!
Dame Dining Chair
Back to upholstered backs! If you know me you know I love this one. The scale of the tubular back is slim and chic but still looks substantial enough to be comfortable for maximum eating and conversation time around the dining table! While this cutie is $648 each, it’s a very special and unique chair. If you go to the product page and see it in people’s homes you’ll see what I mean.
Inesse Boucle Dining Chair
Modern and moody! This is the same fabric in a different color as the first one but this one is clearly more sleek and minimal. I also think the style and color are wildly versatile and can work with a ton of different home styles. This cutie comes in at $379 with a 4.6-star rating!
Mathilde Leather Dining Chair
What a vintage Shaker-inspired stunner. But I also feel like the design very much took cues from the Scandinavian vintage dining chairs we saw Em considering for the farmhouse. Honestly, it makes total sense since the style/vibe of Emily’s house is Scandinavian Farmhouse:) It’s also a beautiful dining chair that looks comfortable and is easy to clean up with that leather seat.
Carlyle Dining Chair
More leather and more modern shapes! This pricey ($995) but beautiful chair would elevate anyone’s home. It’s current yet timeless at the same time. I just think it’s the coolest.
Orion Luxe Dining Chair
I found an affordable AND colorful option at $100 a pop! Target came through with a simple, luxe, and fun dining chair. A gently curved back with a gentler piece tag. It also comes in cream and green however those colors seem to be sold out online but you can check back for them.
Lennox Karissa Dining Chair
Man, I love this one too! Very similar to Emily’s chairs but the wooden, darker, warmer version. Look at that joinery detail that says “modern” instead of “only farmhouse”. The seat also comes in a cream but I feel like this color is a bit more forgiving. Both are beautiful though. Love the options!
Solid Real Wood Leather Cushion Elbow Dining Chair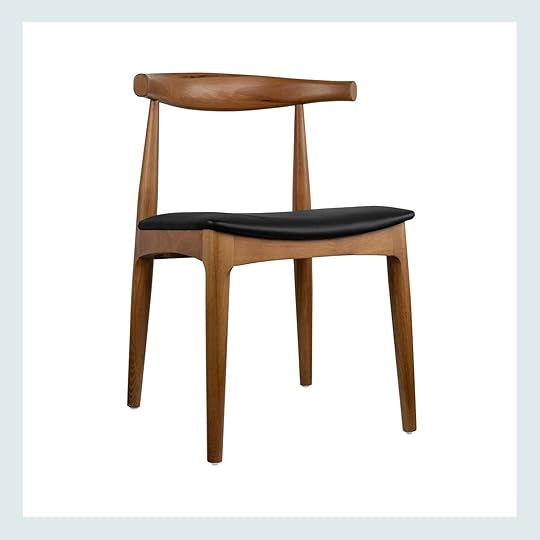
Another vintage-inspired piece that is made from real wood and is still only $269 (I know that is still a lot but it’s a great price for a piece like this). It also comes in a few different colors if you love the shape but want another tone.
Rimrow Dining Chair
I clearly needed to add in some other materials so rattan it is! This chair truly looks like it’s giving you a hug and how the seat is shaped also looks really comfortable. It comes in this natural color, black as well as white, and is $520 each. It would add not only that beautiful contrasting shape but also help you mix in another texture into your home!
Valissa Armchair
For this one, it’s a little less rattan and a little more cushion which is nice for you and your guests. It’s neutral but still interesting and again looks really comfortable chair! The price tag of $600 isn’t nothing but if you have the budget and want a beautiful chair, this could be it.
Lana Curved Back Dining Chair
Another far more affordable option at $130! No assembly is required and this sleek but rounded design is perfect for almost every home. It also comes in a light wood:)
Raleigh Dining Arm Chair
Yikes, I also love this one. You can lean back with extra cushion and comfort, the frame wood is kiln-dried which they say makes it sturdier, and it’s gorgeous. Not the cheapest but not the most expensive at $449.
Reid Wood Upholstered Dining Chair (Set of 2)
How good is that wood detail under the arms? It’s super simple but a nice touch. This one also comes in a handful of other colors and for two chairs it costs $750.
Frederique Cerused Natural Oak Wood Upholstered Dining Side Chair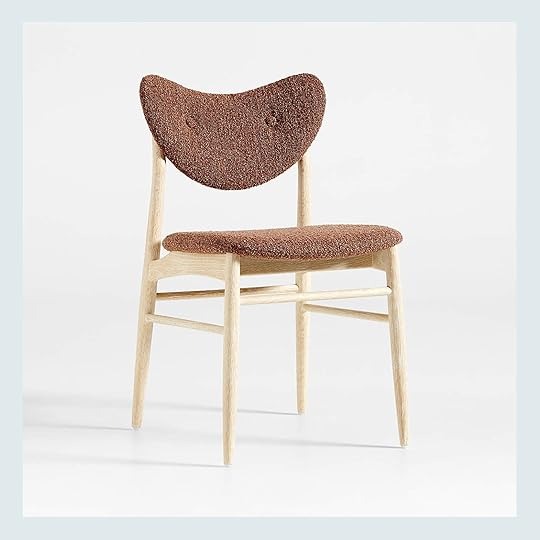
This one might be cheating because calling this a curved-back dining chair is a stretch but look how COOL it is. The shape of the back is too good and that dark mauve color is just to die for. This chair comes in at $349.
That’s it for curved back chairs! More than anything I hope this helps you think about mixing shapes and profiles when designing a room. This is a great start if you are in the market.
Love you, mean it.
Opening Image Credits: Design by Emily Henderson and ARCIFORM | Photo by Kaitlin Green | From: My Favorite Spot In The Farmhouse: Our Sunroom Reveal!
The post Shopping For Dining Chairs…Consider A Curved-Back Option (Wisdom From A Pro Stylist) appeared first on Emily Henderson.
October 23, 2023
**Introducing** Our Farmhouse Primary Bathroom Reveal (FINALLY)
We both have probably lost track of how many posts have been published around here leading up to this very moment where I FINALLY get to show you our primary bathroom. But hey, why else do you follow a design blog then to read about all the countless steps it takes to go from empty shell to finished showstopper?
This post is a dedication to this space I love so much. I love to look at it, I love to use it and I feel grateful for it every day. It’s airy and Scandinavian-inspired, with some traditional elements sprinkled throughout, all combined to create a visually calm and pretty bathroom that checks all our boxes (and more).

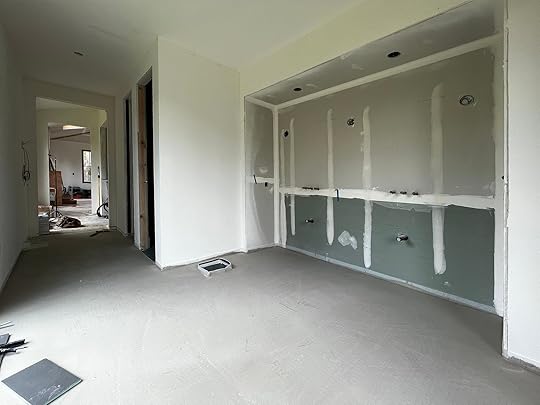
To be honest, the layout of this room is hard to shoot (bathrooms are always smaller and difficult to work around, plus the hallway leading into it presents even more challenges for a camera). If you look at the layout (above and below), it can help you imagine the whole thing. It’s far easier to wrap your head around in the full Webisode video (watch that HERE). I’m also including a cut-down version below. Just wait for the ad to play!

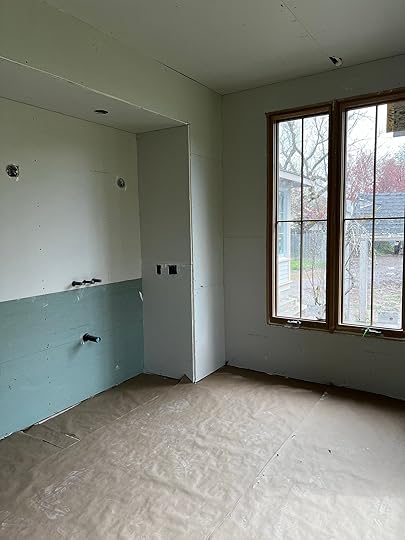
Basically, there are three separate spaces to this room: the toilet room (WC), the shower room and the vanity/tub area. Below, you’ll see construction shots we took early on with a wide-angle lens, looking far bigger than it is, but showing where everything might land.


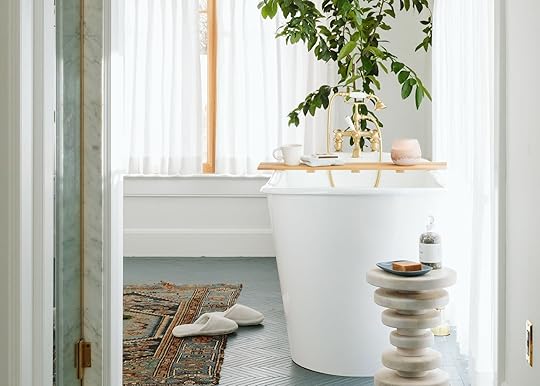
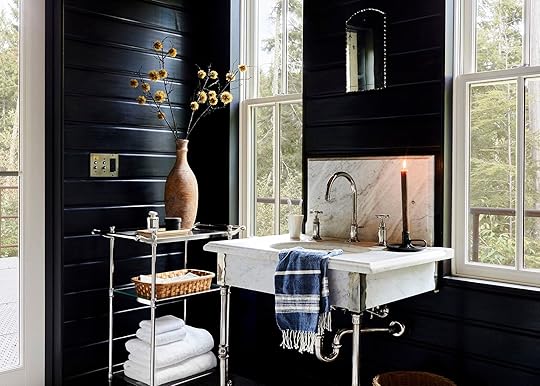
Tile | Tub | Tub Caddy | Mug (similar) | Candle | Tub Faucet (similar) | Windows | Curtains | Wall Color | Marble Side Table | Rug (vintage)
From the bedroom and closet, you walk in and see the pretty tub in front of the huge window on the prettiest blue tile of the whole house. If you are just landing here, check out the post about deciding on the grout shade (it was a real thing) but it’s so beautifully executed and the color gives me life.


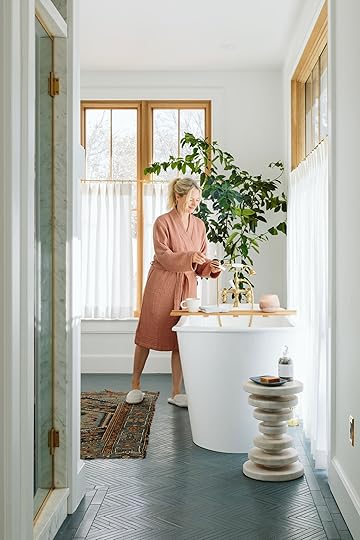
Shower Door (local and custom) | Robe | Slippers
The light reflecting off the floor tile has such movement and texture. As you can see above, the WC is the first doorway (with a pocket door) and next is the shower room (the glass door that I’m opening).
The Shower “Room”
Tile | Stone | Shower Set | Shower Head | Drain (no longer available) | Marble Tray (similar)
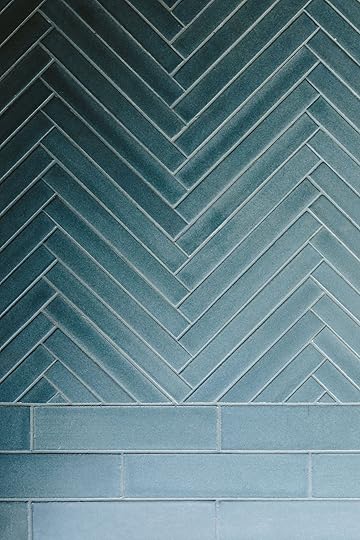
The shower room is the same blue Pratt & Larsen tile as the floor except I went with a brick pattern in subway shape. Instead of a monochrome grout, I opted for a lighter color in here. Except for the brass of the shower plumbing and stone top, it’s blue from floor to ceiling (in true EHD fashion). I LOVE it being a dark, intimate shower versus a big glass room. That’s a great look for the right house, just not for this one. As you might know, tile installers prefer smaller-scale tiles on the floor so they can more easily slope them down to the drain so we took the same color again but in a penny-sized hex mosaic.

It’s such a pretty color and a cozy space. The plumbing pops off against it so well and the round shapes of the faucets and handles are a nice juxtaposition to the linear brick tile. We had the glass door custom-made (by a normal company, nothing fancy) and they added that brass strip around the edging and the little knob which gives a vintage feel.

 The Water Closet
Sconce | Art (vintage) | Toilet | Toliet Lever | Wooden Tray (similar) | Toliet Paper Holder | Switchplate Cover | Basket (similar)
In the world’s most obvious sentence, this is our toilet room. Yes, it’s pretty basic and private thanks to the pocket door I mentioned earlier. The toilet is such a pretty shape (you know, for a toilet) and the sconce adds softer light at night so no one is blinded with a midnight run to the loo. Look, I do still think about wallpapering this room but honestly, it’s hard to budget for it when it doesn’t need it. Would it be more fun? Sure! But until I find the right paper, we are pretty happy with it as-is.

Flushmount | Wall Art | Moon Ceramic | Sconce
Some of the details ARCIFORM created here that I love are harder to read in the photos, like the beautiful brass floor grate. Also, put in a peg rail along a piece of trim for our towels which is subtle utilitarian but also a moment for the organic look of a towel hung just so. If you want to join the whole ‘towel bar versus hook/peg’ debate we wrote a whole post about it HERE. Essentially, for more humid weather (Portland) you have to spread out the towel more (on two pegs), but we still much prefer the look over a bar (because bars are always messy unless perfectly folded).

Stool (vintage) | Pink Towel | White Waffle Hand Towel | Teal Blue Waffle Towel | Blue Mug
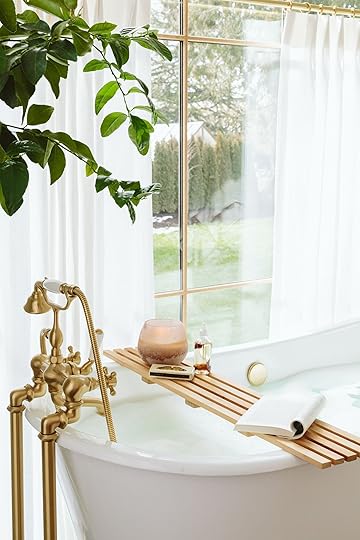
Oh boy, do I LOVE those cafe curtains with that sweet little pinch pleat. We worked with Decorview (yet, again, because we love them); they brought samples and helped us choose size/fabric and, of course, did the full install.

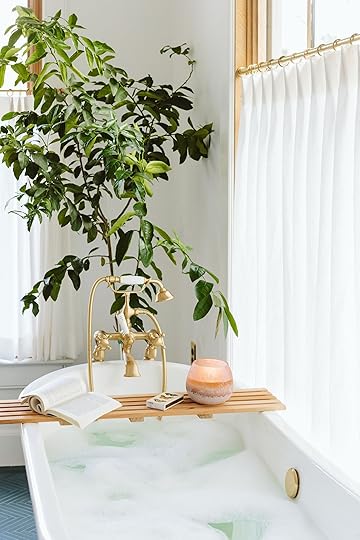
I love that I can lay in the bath and still see the sky and trees but with full privacy. It also splits in the middle so when I know that no one is over, I’m able to open them and look directly out the window, as well. It’s very, very dreamy.
As you can see here, the bath is in front of the window but what you can’t tell is that it’s not EXACTLY centered and you can’t tell AT ALL. Phew. The whole wall feels balanced by the stool and the plant. Also, I want to give an official endorsement for this tub from Rejuvenation. It’s on the narrower side which I knew because I saw it before we ordered it. But I actually love that it’s not really wide because sometimes you feel like you are swimming in the tub and it takes forever to fill up. This size/scale is tighter for two people (but very doable…wink wink).

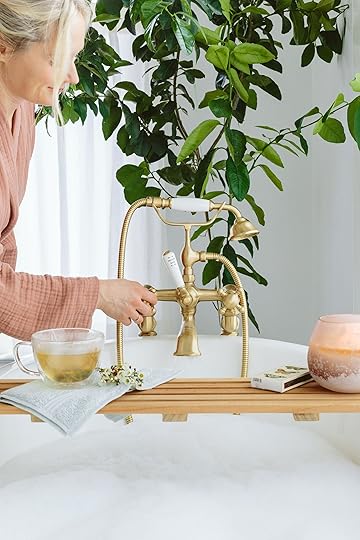
Tub Faucet (similar)
We went with this more old-world faucet from Rejuvenation with a hand shower and tub filler, which we love.
The teak bath tray is also from Rejuvenation and that’s my favorite smelling (and super long-lasting) tub candle from Target.


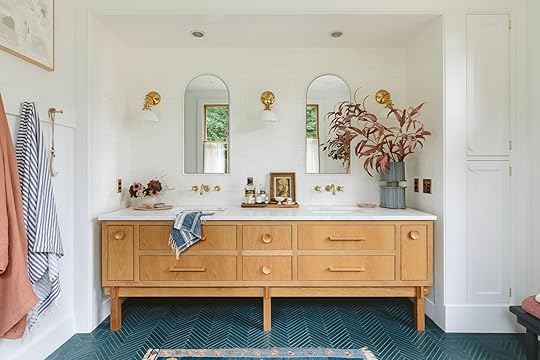
Vanity (custom by Unique Kitchens and Bath and base by Nate Dinihian) | Medicine Cabinets (custom) | Wall Tile | Vanity Stone | Sconce | Faucets | Switchplates
Let’s stop for a second and take this in. I love this vanity so much. It gives us plenty of storage in addition to the medicine cabinets and the cupboards to the right, and I’m crushing hard on the tile extending underneath it. It’s a good look, right? (Right…there’s no other response here I’ll accept.)

Another fun fact about the knobs…I thought I was ordering much smaller knobs but since I didn’t really measure the two inches noted in the description (it always sounds smaller to me) these came in and we actually love how playful they are. Happy accidents sometimes make for the best design “choices.”
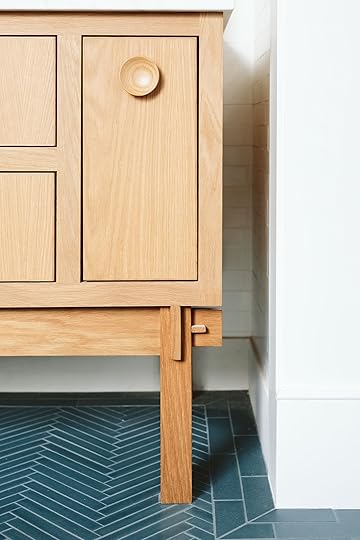

We designed that leg joinery with local maker Nate Dinihinian and love how it turned out so much. Unique Kitchens & Baths did such a great job with the cabinetry and drawers, too.
If you are trying to squint to see the tilework, you aren’t alone. In person, it’s this really pretty reflective wall of tile, but again, the running theme here is how hard everything is to capture on camera! Quiet beauty doesn’t come across on screen.
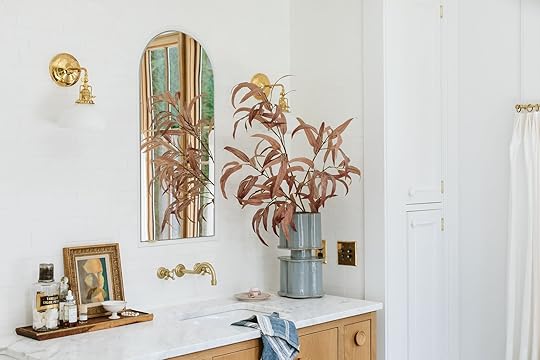
That vase is a new acquisition from an artist I’ve been a fan of forever, BZippy. We bought it from local gallery/shop Spartan Shop.


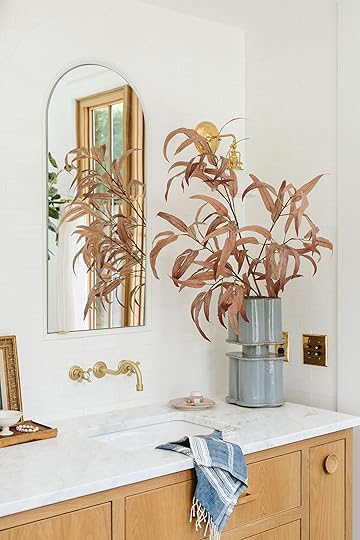
Here, you can see the tile a bit better. It’s all handmade and has a shaky, imperfect feel. Obviously, it’s meant to just go fade away visually and I love that it feels so clean and fresh and not busy. I find that while I love other spaces on the internet that are fun and lively, I don’t love that for me every day. Does that mean I won’t wallpaper the bathroom at some point? Nope. I do have some fantasies of doing that, for sure.


That medicine cabinet is one of my favorite elements in the house (read the whole post about how ARCIFORM custom-made it here).

All the lighting and plumbing are by Rejuvenation and they feel so perfect in the space. You might notice that the finishes don’t match (unlacquered brass for the lights, aged brass for the faucets) which I was worried would bother me until the sconces age and get more patina, but it doesn’t bother me at all.


That’s a wrap on this for a while. MAYBE I’ll wallpaper at some point, but for now, it’s such a lovely and easy bathroom to be in and makes me so happy every day (and night, your girl loves a bath). The tile, the vanity, the tub and the plumbing—it’s just so airy and bright yet grounded. Thanks to ARCIFORM for the excellent execution, per usual. And all the resources are below!
Bathroom Resources:
Tile: Pratt + Larson
Tile Installer: Level Plane
Countertops: Bedrosians Tile & Stone
Stone Fabrication: Alpha StoneWorks
Custom Vanity: Unique Kitchens and Baths and Dinihanian Design Build
Wall Paint Color: Extra White by Sherwin-Williams
Plumbing: Rejuvenation
Tub: Rejuvenation
Toilet: Kohler
Light Fixtures: Rejuvenation
Windows: Sierra Pacific Windows
Window Treatments: Decorview
*Design by Emily Henderson and ARCIFORM
**Photos by Kaitlin Green
The post **Introducing** Our Farmhouse Primary Bathroom Reveal (FINALLY) appeared first on Emily Henderson.
October 22, 2023
The Link Up: The Romance Novel Em Got Brian Into, A Magical NO SCRUB Vase Cleaner, And The Affordable Healthy Recipe We Love
Hope everyone is having as good of a week as they can. While no one is feeling good right now we hope to bring you a little joy as you read this. On Monday, Emily is revealing her primary bath:) If you missed the recap or the medicine cabinet journey go catch up on those before tomorrow. She is really proud of it (even the “hiccups”) and we hope you love it too. Since Monday is reveal day, you know that means…we have another great and in-depth YouTube video for you! So before all of the links, here’s a little preview of the primary bath video (just wait for the short ad to play:))
And if you’re ready to watch the whole thing, tap right here to enjoy:

Em’s Primary Bath Full Video Reveal
This week’s house tour is actually a hotel. But not just any hotel! This Parisian hotel was designed by EHD favorite, Beata Heuman. Hôtel de la Boétie is her first hotel and if the photos are any indication it’s perfect. Colorful, whimsical, and chic just like all of her projects. Go check it out here!
Our friends at Pact have extended their EHD-exclusive sale through the end of the month! Right now, you can take 20% off your entire order (that’s the best deal currently available!) with code EHDFALL. For some cute outfit inspo, be sure to check out Em’s fall basic recommendations or our favorite pull-on-and-go pieces that’ll make you feel pulled together, even when you’re just running errands. (PS. Did we mention that they’re affordable, sustainable, and women-owned?)
From Emily: I just finished a page-turning weekend read that, yes, is in the romance genre but it’s more about relationships. It’s called The Roughest Draft (Kindle + Local) and it’s written by a husband and wife author team that usually does YA, but this is their first foray into more of the adult genre. You definitely get a sense that they bring a lot of their own relationship into the story which makes it very compelling and hard to put down. Brian’s even gonna give it a go because he heard about it–that’s how non-romance novel-y it is.
From Caitlin: OH MY GOSH. Why did it take me so long to learn about Bottle Bright tablets?! Y’ALL HAVE BEEN HOLDING OUT ON ME!!! Here’s the deal: I love having fresh flowers around the house, but some of my vases are REALLY difficult to clean and they’ve been looking a little worse for the wear. (The ones with narrow neck openings? The super long and tall ones? HOPELESS.) Enter: these freakin’ miracle tablets! Over the weekend, I filled up two of my glass vases with warm water, dropped a tablet in each, left them in the sink overnight, poured them out the next morning, and…MAGIC. All the gunk that had been impossible to reach and that had been clouding up the glass was just TOTALLY GONE. I didn’t even have to do anything!!! No scrubbing, no swishing, no monitoring – I just dropped in a tablet and my vase was clean. These were originally formulated for water bottles (and I will absolutely be using them for that task, too) but OMG I CANNOT BELIEVE HOW WELL THEY WORKED. (Actually, I can – the reviews are filled with people who have freshened up ancient coffee tumblers, teapots, and more.) Anyway, if you want clean vessels but do not want to spend time scrubbing anything, these are AWESOME. (PS. If you also like buying vintage cache pots or barware or planters or anything that can hold liquid, these make fast work of cleaning up that gunk, too!)
From Mallory: I was marketed for this dress and they got me good. How cute would it be with some chunky gold earrings and tall black boots??? I’m in my Sandro-style-but-not-Sandro-prices era and this dress totally fits the bill 🙂
Also from Mallory: I wish I had a baby child at Christmas time just so I could dress them in this.

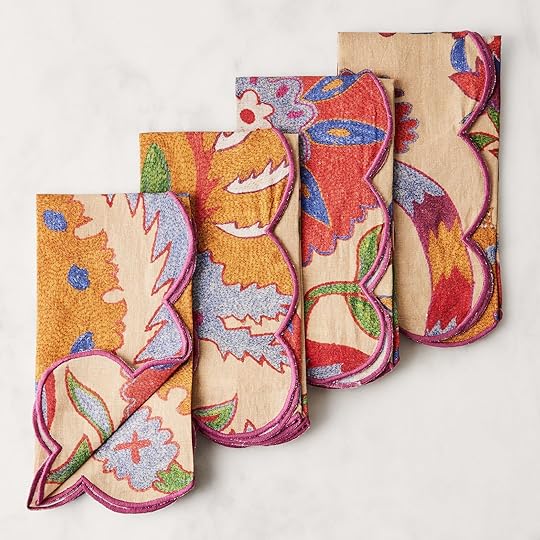

Chambray Lattice Baule Decorative Pillow | Bright Botanical Suzani Napkins | Recycled-Glass Tumblers
A BEAUTIFUL collaboration just launched between St. Frank and Food52! It’s full of color and pattern and is mostly things for your table…but of course, there are some pillows too:)
From Gretchen: Winter is coming and I need a new coat! I had a long puffer coat I once loved from Uniqlo (basically this one), that sadly bit the dust. I wore it camping once and a rogue ember burned a hole in the arm–thankfully I caught it before it burned one in mine! It also wasn’t waterproof, which is a mega bummer here in Oregon, like in a really dumb way. Finding my perfect coat means: it’s matte black with minimal to no flashy branding, Michelin Man puffy, sits at or well below my knees but doesn’t graze the floor, has a good hood with no fur, is under $200 (we’ll see) and, most importantly, is waterproof or water repellent. Does anyone out there know of a coat like this?? That you swear by? I’m starting my search back where I left off, at Uniqlo, with this coat. It says it’s waterproof and I like the overall look and price, but I’m still searching. Of course, I LOVE this Lululemon coat but it’s roughly double my budget, so I’d really need to love it, love it to justify the buy. I also found this great option from Quince. I haven’t bought from here before so it makes me a bit nervous, but it may be worth a try? For now, I’m back to the drawing board but would love to hear if anyone out there can recommend something better!
From Arlyn: Man do I love a designer collab. I mean…who doesn’t, right? While I’m not sure entirely when, I know my EHD pals shared the original release of Arvin Olano’s line for RugsUSA (it’s so good, it’s worth mentioning again). His fall collection just launched this past Thursday and ugh…I want everything. I’m in the beginning phases of finding some new rugs for my dining room/living room and many of these are high on the list.
Also from Arlyn: I’m always looking for meal inspiration that’s satisfying, affordable, healthy, and everyone at my table will eat. I recently found and tried this recipe for whipped tahini tofu with a bean and tomato medley and OMG I enjoyed eating it so much. The next time I make it, I’ll likely add some more acid via white balsamic vinegar and let the beans and tomatoes marinate a bit more but I couldn’t wait to eat the leftovers the next day.
From Jess: TikTok may have got me again. Look at this car phone holder that goes into your cupholder! I might have been living under a rock because until this week I hadn’t seen one like this! This is IDEAL since the vent holders tend to not be strong enough for the bigger phones or don’t always work with bulkier cases. You can also place your phone vertically or horizontally AND still be able to use your cup holder for you know, a cup. The reviews are great so I am adding to cart!
Thank you for reading, go watch that YouTube video :), and see y’all tomorrow. xx
Opening Image Credits: Design by Anne De Wolf of ARCIFORM and Versatile Wood Products | Styled by Emily Henderson and Emily Bowser | Photo by Sara Ligorria-Tramp | From: This Might Be The Perfect Rustic Bathroom – With An Easy Design Tip To Ensure It Feels Cozy
The post The Link Up: The Romance Novel Em Got Brian Into, A Magical NO SCRUB Vase Cleaner, And The Affordable Healthy Recipe We Love appeared first on Emily Henderson.
October 21, 2023
A Fall Color Trend (Brown) I’m Embracing Hard Right Now

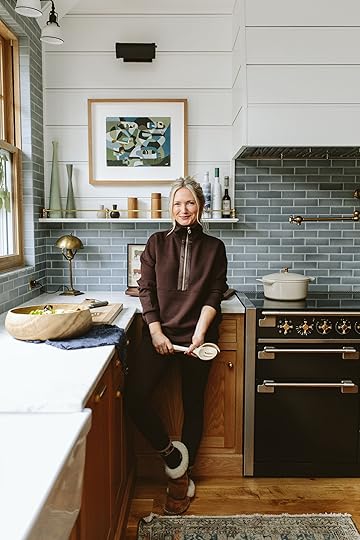
Oh, she’s performing her “I’m so cozy” look for you… We all saw it coming. It was on the runways four years ago but it took me a while to integrate this “OH SO VERY ’90S” color into my personal wardrobe in a way that felt “me”. Sure, I’ve always worn camel, caramel, brown leather, etc, but today in 2023, is the year where apparently I’m really into brown. So I snuggled up and posed around the house in some new things that I LOVE.
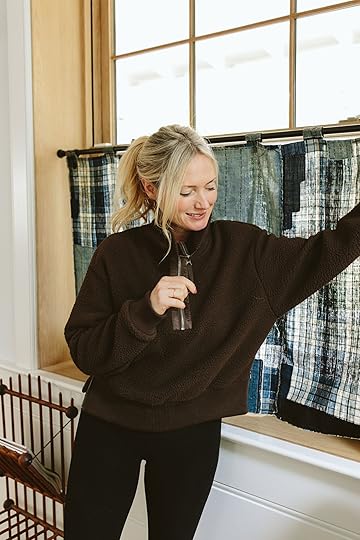

That quarter-zip fleece is a really good color and cut. Not all browns are created equal and I think a lot of it has to do with the texture of the fabric within the brown family. This is nubby and cozy and has side zippers as well as the front satin-y detail. Also, the leggings are my hands down favorite for both workouts and around the house (I wear a medium and they are even very comfy for the bloated days of the month – they don’t cut in at all and have a really wide and soft waistband). These will forever be on my “favorites” list.

Cardigan (similar) | Button-Up Shirt | Pull-On Barrel Jeans | Kitten-Heel Boots | Fanny Bag
I recently bought this striped button-up which I’ve worn a lot because it’s so good to layer under thicker sweaters. Many poplin or cotton shirts can be too stiff to layer under anything that is fitted (they bunch in the armpits and wrists), but this one is satin-y (polyester probably) and is super thin so it layers and drapes really easily. I’ve had that cardigan for years but those are my new barrel pants that I love (and they are thick and good for fall).


The whole barrel pant + kitten heel is pretty darn good if you ask me.

Half-Zip Pullover Sweater | Jeans
This cardigan MIGHT be more burnt orange than brown, but I’m still including it. It is a bit long (and I have a short torso) so I give it a little tuck. Good front pockets and Iquarter zip.


And yes, you are getting more and more peeks into our bedroom which we are finally shooting next week (we’ve been waiting on a partnership and then I added more window treatments and am moving the lamps around). Stay tuned…

Cape | Beanie | Cable-Knit V-Neck Crop Sweater | Over-The-Knee Boots
UGH. This cape is ridiculously good. It’s gingham wool, totally timeless, and extremely high quality. It’s a lot of fabric so for me, I’d wear it more with heels than sneakers, but I might make up a work lunch or trip to NYC with someone just to wear it.


It’s splurgy but I feel like it’s one of those pieces that will be in FOREVER. It makes such a statement in a really classic way. The details are so good. And those are my favorite over-the-knee boots (they come in blue suede which I secretly wish I had bought instead, but the brown suede is probably more classic). And this new chunkie beanie that I proceeded to lose out of my pocket on a pitch-black nighttime walk with the pups (I’ve already repurchased because the chunkiness is so good).
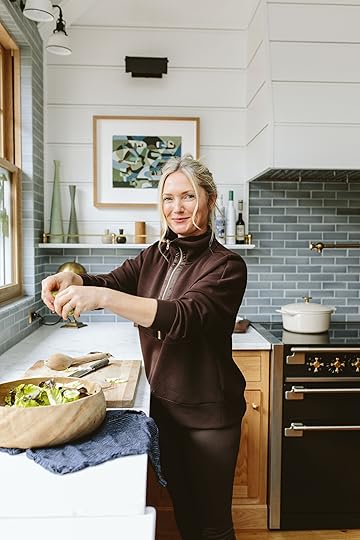
Half-Zip Puller | High-Rise Leggings | Socks | Slippers
I had a social partnership with Varley so I got to try on a bunch of their pieces (they were new to me) and I LOVED THEM. They are a more high-end Madewell meets Vuori – luxe basics in extremely soft fabrics. I’ve worn this brown zippie and coffee-colored leggings many times since I got them. Again, the legging fabric is just SUPER SOFT (rivaling the before-mentioned Vuori butter pants I love).

My only note to give to the Varley team is less light neutral colors for the leggings – I hate looking naked on the bottom half nor will I buy light-colored leggings (probably because the pigs would ruin the calves immediately). But this chocolate brown is such a pretty color.

Hat (similar) | Belt Bag (similar) | Striped Shirt (similar) | Blazer | Jeans | Boots (similar)
Not my best post (or maybe best outfit) but I bought this jacket as part of this western suit that I was hoping to wear on a big shoot. The pants didn’t fit well on me, and If I’m being honest I thought that the jacket was overpriced, but I keep wearing it because the cut, style, and thickness are good for fall (it’s boxy enough in the armpits to layer over well).


Those wide legs from Mother have such good structure and I just read an article about how red is going to be all over our bodies next year (I’m ALL FOR THAT). It’s an old Wyeth hat that I’m just wearing again (My hope is that we are in a new hat era).

Beanie | Sweater | Jeans (unavailable) | Boots (similar)
This is the sweater that kicked it all off, actually – a nice color-blocked cropped and cozy guy. Same chunky beanie that I love (and have lost).


Skinny jeans I’ve had forever (they are SO GOOD and so stretchy, from Parker if you can track them down) and Equestrian boots from J. Crew three years ago, but these are similar.

Puffer Coat | Beanie | Boots (similar) | Jumpsuit
Part of my Varley partnership was also this chocolate brown slightly metallic puffer. I mean, for a puffer it is SO GOOD and feels incredibly lightweight and so soft.


I’m wearing a small here, but I ended up returning for an XS (Varley runs a little big, FYI) so in that brand I wear medium in tights (because I always like them not crazy tight) and then XS small in tops and coats (but in the brown zippy above I wore a small). Why is sizing so confusing these days online??
As you can see the alpacas and piggies are complementing my fall color palette – Bert might need a bang cut. Anyway, if you love wearing denim and blue as much as I do, this might be your call to incorporate a complementary fall color (brown) into the wardrobe. I’m finding it so easy to wear and it’s making me pretty darn happy.
*Photos by Kaitlin Green
The post A Fall Color Trend (Brown) I’m Embracing Hard Right Now appeared first on Emily Henderson.
October 20, 2023
How We Designed And Built Our Arched Medicine Cabinets (And Where To Buy Them Now)

I had a simple request that turned out to be NOT so simple and it warrants a huge post (with a big twist at the end). I wanted a medicine cabinet in our bathroom, BADLY, but I also wanted an arched mirror with pretty tile on top. I have never had a medicine cabinet and yet I’m very messy AND I also hate clutter – I’m a real peach!!! A few years ago I wrote one of our most highly trafficked posts ever – why designers hate medicine cabinets, so this might seem odd to want one so bad. But it’s not that we don’t like the function of a medicine cabinet, we just like beautiful mirror details more. I wanted an arched mirror and that did not exist on the market then. ARCIFORM said they could figure it out. They are real pros at doing custom details so we approved the concept and we’d figure out the execution later. GREAT.
Here was our plan…

We would each have one over our sinks, but it wasn’t my job to really figure out how to make that happen (hello, Jamie). I think the whole thing would have been easy if we were just doing drywall or normal tile, but you see, we ALSO wanted this radiant tile work at the top of the arch – so that it went from a horizontal running bond (stagger) tile on the back wall then following the shape of the curve on the arch. Seemed easy to me!

You get the idea, but we’d made it more complicated with the tile going vertical on the top of the arch. Sure, we’d have to figure out how the tile dies into the cabinet (finished edge? bull nose? wood trim?) and then the carpenter and tile installers would have to work closely together to make sure that it actually worked, but again – it’s not my job (and I don’t say that in a snarky way, I just simply have zero experience or ability to give any guidance or input on it so I put it out of my head). It wasn’t that it wasn’t my responsibility, it was that it would be irresponsible for me to shove my nose into the process.
The Size Of The Arched Mirror…

First, we had to figure out the size of the mirror. Anne had drawn it in at 14″ wide and it looked fine in the renderings at first. Then when we were in the space 14″ wide felt VERY narrow – and not just for storage, but also for seeing yourself. The case for the smaller mirror was that it was a more vintage look and the skinny proportions were unexpected and cool. I definitely could see that case. But the cons for the skinny mirror were my fear of not being able to see enough when I was doing my hair.
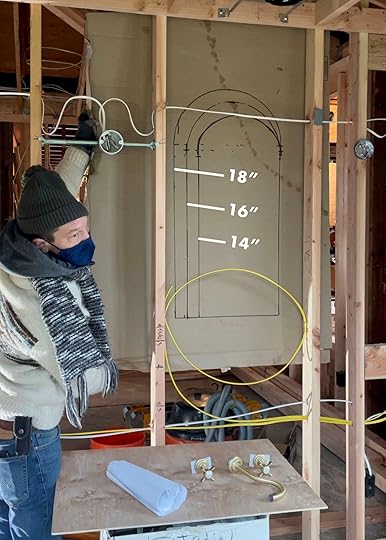
So we took a piece of cardboard and drew out three sizes – 14″, 16″, and 18″. ARCIFORM (Adam, Jamie, and Anne) unanimously thought that 18″ would be way too wide. But Brian and I felt very sure that 14″ was too narrow, so we settled on 16″ wide.
Wait, What About the Medicine Cabinet Behind The Mirror?It’s SUCH a long story but here goes. About a year into the renovation, where money was seemingly blowing out a firehose and we couldn’t find the nozzle to turn it off (because of our choices, of course, and the sheer scope of work), we had a walkthrough with our team and the medicine cabinet situation hadn’t been figured out yet (because it wasn’t a priority timing wise yet). In this meeting, Adam and Jamie told us that troubleshooting the building of it would take a lot of time and since we were paying hourly we all guessed it would be about $3k in their time/labor (not including materials). Brian and I looked at each other and immediately nixed them. We’d either get rectangular readymade cabinets and soldier stack the vertical tile on top (left to right vertical), OR we’d buy arched mirrors with no medicine cabinet. But we would not spend $3k on two arched custom medicine cabinets. Fine. Were my dreams killed a bit? Sure, but I also have a decent perspective and knew it wasn’t anything to cry over.
Then months later I might have been grieving the death of our medicine cabinet design with Anne, and she said “Surely we could figure out how to do it for less”. We came up with the idea to buy a readymade rectangular 14″ medicine cabinet, then take off the mirror front, install it, and retrofit our custom arched mirror on top that we had cut from a glass shop.

But Jamie (expert carpenter) and Adam (project manager/general contractor) both said that while this MIGHT work it was actually much harder to retrofit something than to make it custom. I think the biggest issue for them is needing a trimmed-out frame around the mirror and we had some hinging issues, and if that had to be customized anyway. I showed them all the DIY versions I saw out there (vintage mirrors on hinges in front of recessed shelves) and I don’t remember why these wouldn’t work for us, but I trusted them as they explained that they wouldn’t.
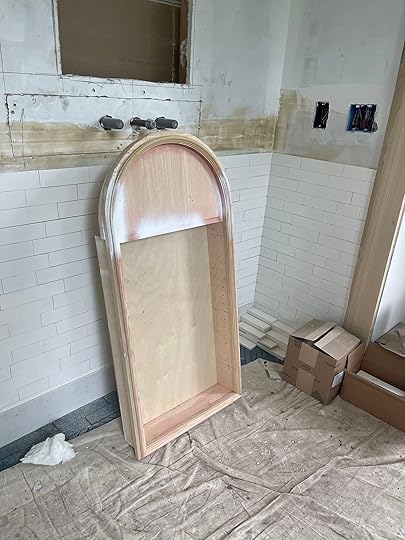
All I know is that Jamie and Adam pulled it off. I came back to the house the next week and saw the beautifully made arched shelf you see here with the hope that this meant I was getting my arched medicine cabinet. Were they charging me? Of course. Do I know how much it ended up being? NOPE! All I know is that I got my arched medicine cabinet and I LOVE IT SO MUCH.
Troubleshooting The Arched Tile Detail

Our tile installer (shout out to Eric and Jeremy of Level Plane) mocked up the arch with leftover brick tile from the shower. They figured there were two different ways to do it – alternate rectangles with extreme triangles OR cut the brick tile to be narrow on one end and form an arch with the narrow ends. I appreciated the mockup of course and it was a swift decision – option B.

The detail in it was so pretty. Subtle for sure but I think that’s mostly from my decision-making (a darker grout would have made it more noticeable. I thought about doing it but I was nervous about the vertical grout lines being too close and more noticeable from the random tile on the back wall so I just called it and moved on.

So thanks to the ARCIFORM team (Jamie!) we got our custom arched medicine cabinets with the prettiest tile detail on top (thanks to Stephyn and Anne for troubleshooting that with us). Of course, you might want to see how it turned out…
Our Arched Medicine Cabinet
Y’all. They are PERFECT. Jamie executed them so well and they look amazing inside and out.


Inside he installed three shelves and then painted out the top wood white just to disappear. As you can see he glued the mirror to a piece of painted plywood so it would be substantial and then used heavy-duty hinges. Then he installed these little brass finger pulls on the bottom (he had to slightly carve out on the bottom of the mirror to fit the pull).
I am so happy with them and while I’m sure it ended up costing a lot in their expert time, it is over now and I’m really really really glad we have them. They house a lot of the stuff that I use every morning and night and would otherwise be on the counter.
Of course, about six months ago I started seeing readymade arched medicine cabinets on the market and laughed OUT LOUD. These larger companies are just getting faster at solving our design meets function problems and so here are a few that I think are awesome (and had they existed 18 months ago we would have definitely opted for them).

Arched Metal Framed Medicine Cabinet


Edge Brass Arch Medicine Cabinet
I also found some on Amazon. I think a roundup would be super helpful. I think pill-shaped is also cool. Can’t wait to show you everything on Monday! xx
*Pretty Photos by Kaitlin Green
The post How We Designed And Built Our Arched Medicine Cabinets (And Where To Buy Them Now) appeared first on Emily Henderson.
October 19, 2023
Primary Bath Recap + A Layout Hiccup I Haven’t Shared Yet That Totally Freaked Me Out


Our beloved bathroom has been “done” for a good while and yet besides a few sneak peeks, I haven’t done a real show and tell. Why? Well, the huge windows (prior to window treatments) really highlighted the construction outside so we had to hold the photo/video until that was done…and then I reshot it because I didn’t like how I styled it. Also, I had to troubleshoot a more permanent change that I wanted to make (that I didn’t). But she is done, shot, and in the can. So over the next few days, we’ll recap where we are, where we came from, and get into some of the juicy details that I haven’t shared yet.

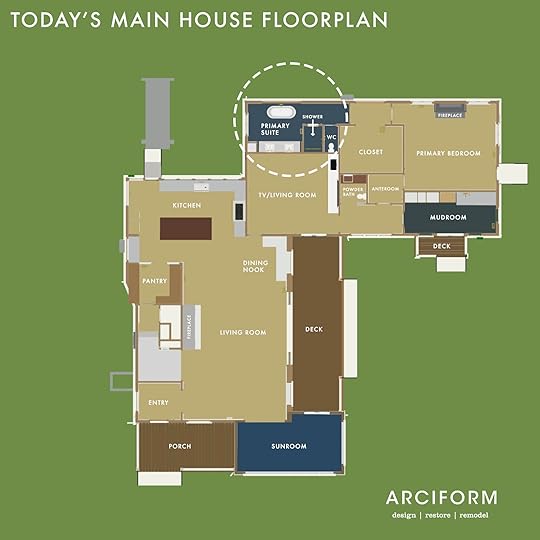
As a reminder, the floorplan on the left is how the house was arranged when we bought it and the one on the right is our current layout. So as you can see we kept it near the plumbing over in that corner, but completely reconfigured it all. It’s in the corner, on the first floor. If you are wondering why we didn’t flop the mudroom and the primary bath I have wondered that a million times. But now that we have these pigs and alpacas and the plunge pool, the mudroom is much closer to all of those dirty/wet things so PHEW.

As a reminder, we believe that the ’60s addition (the rectangle off of the main house) was then turned into some sort of adult foster care meeting center in the ’70s or ’80s. None of the finishes were in good enough shape to salvage.
Hiccup #1:
One of my favorite sayings in renovation is “Everything is a THING”. Meaning that every time you change one thing it has a domino effect. Very few changes don’t require you to think about other things. So as you can see in the above layout, we have the tub in front of a huge window, opposite the vanity. Great. But what you don’t know is that for a while we had a cabinet/bench under the east window with more storage. But as we got the cabinetry quote back and needed to cut the budget, we decided to skip it. No problem. But we didn’t catch that the room would be off balance.

Then after the whole space was framed out and we walked through we realized that the clearance between the shower corner and the tub itself was pretty narrow. Was it doable? Sure, but it was just so odd how tight it was there, but then have so much space on the other side. So we had three options:
Make the shower room less deep (which would make the toilet room also less deep) giving some of that space to the hallway. Our shower is definitely a good size, but not huge. Like, my brother already thinks it’s too small for him (it’s not, but I get it – it feels tight to him). For the record, I love the size of it – fits two people should that be your thing, but warms up easily whereas huge showers can take a while to warm up and can feel really exposing. It feels nice and intimate but no I didn’t want to go smaller. Move that HUGE window to the left (the tub would follow suit and remain centered). This was actually a doable option framing-wise but would require our engineer to re-submit plans to ensure that the sheer wall (the corner support) could still be solid enough. It’s a whole formula – you need enough corner support depending on how tall your ceiling is, how big your windows are, how big the house itself is, etc. Re-framing the window was a 2-day thing (and a couple of thousand dollars to be sure), but going through the engineering and permitting process again was a big “hell no” for us. Move the tub to the left, therefore having it not be centered in front of the window. NOT IDEAL, but since they hadn’t finished the rough plumbing nor tile floor it was definitely an option. Leave the clearance as-is (24″) and put something (like a piece of furniture) on the other side of the tub under the window to make the extra space there feel more intentional.We ended up doing #3 – off-centering the tub in front of the window by cheating it back towards the other window. The rest of the options weren’t acceptable.

My hope was that once the floor tub faucet was in you wouldn’t notice the lack of symmetry anyway. We actually decided to move the floor faucet from directly behind the tub (centered on the tub and in front of the window) to the left of it. We, of course. thought about putting it to the right but that felt weird to walk into plumbing from the hallway. Now, if this window and tub moment was viewed straight on you would ABSOLUTELY notice how off-center it was, but since you never view it straight on (unless you are sitting on the vanity) my hope was that your eye wouldn’t clock it.
That’s all to say that while this is a nuanced and VERY specific situation, for those of you who have felt you were in an impossible “no perfect solution” scenario, you aren’t alone and this happens frequently in a renovation. There is no room for inflexibility and perfectionism in this process – you make the best choice and hope you don’t notice it later.
Now On To The Tile…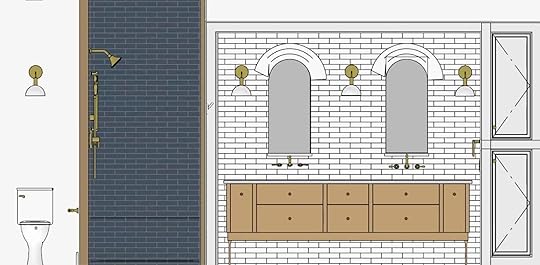
As you know I’ve got a real “formula” for many a room in my life – blue, white, wood, brass, and a LOT of natural light. Obviously, this isn’t strict, but for this room, I wanted airy simplicity. So for the tile, I wanted a field of blue on the floor and white on the walls. Sounds boring (and definitely on the simpler side) but now that I’ve been using and loving this bathroom for over a year I LOVE IT.

We worked with Pratt + Larson (a Portland tile company that can customize ANY tile color, shape, and has a million finishes). I wanted the floor to have visual movement and texture but not a busy pattern. So we chose these 1×6″ pencil tiles and installed them in a herringbone pattern with a brick-shaped running bond border.

We went with a blue grout that almost matched the tile but there are times (mostly when we are shooting the bathroom) that I wish I had done more of a contrast so you got more of a sense of the herringbone. But when the sunlight hits it, it’s SO PRETTY. It just doesn’t read that well on camera (which is a hilarious career problem).


The shower is the same colored tile, but in a 2×6 brick instead on the walls (and ceiling!!), mixed with a smaller scale hex on the floor. Fun fact – the walls and floor are the same “color” but because they are different shapes and therefore different dye lots, they are SLIGHTLY different (you can see the floor is a lot greener). This does NOT bother me at all and I didn’t notice it until my brother asked about it. Just a good reminder that dye lots are a real thing, especially in more handmade tile brands, which is why you always order at least 20% overage (and never throw away your extra) because the chance of it being the exact same again is not guaranteed.
A Second Hiccup…The Wall Tile
For the wall tile, I had this fantasy/idea of doing different-sized brick tiles (2×4, 2×6, 2×8) and creating a “random” pattern. The idea would be that your eye didn’t really figure it out until it did and it looked like a secret unexpected choice, but not a visible high risk. Great. We laid out the “pattern” so that the vertical grout lines wouldn’t be too close to each other and had it repeat every four rows. The above photo was taken when we were OOT so I didn’t catch that the vertical lines in SOME of the rows in fact were VERY close to each other (def not what I was going for). By the time I saw it the whole thing was installed and so my options were to rip it out or be ok with it. I chose the latter knowing that it was likely the fault of the concept and not the installers. Maybe the math didn’t line up? Or did LOL. I figured that since the grout was going to be white (and a very minimal grout line anyway) you wouldn’t notice. I think where they started it (on the side) affected the pattern and ultimately it lined up more than I had intended at certain points. The reveal is on Monday so you can see what you think of it.
The Vanity…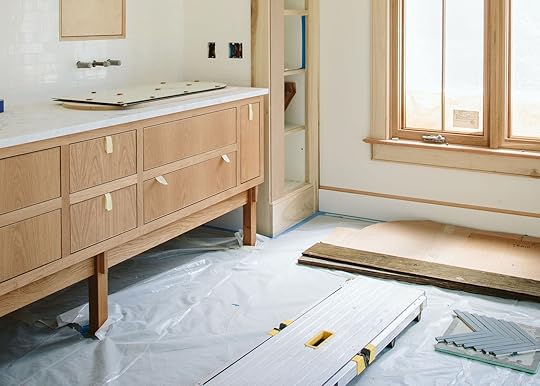
We customized the drawer part of the vanity with Unique Kitchens and Baths (I wrote about it here) and then had the base made by a local maker, Nate Dinihanian. I wanted this fun joinery! In retrospect, I think that UKB could have done it but I think we needed to get the cabinet order in asap as to not hold up the kitchen/mudroom so we decided to design the base later with a local maker.
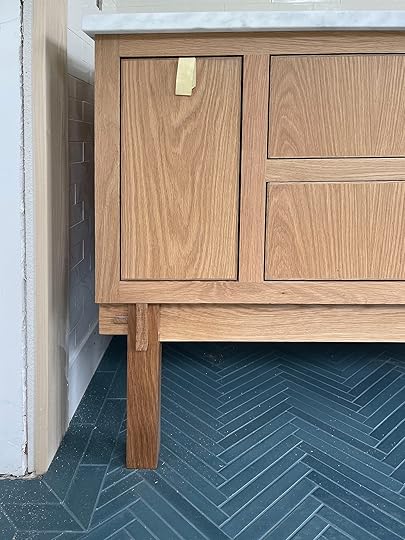

I truly could NOT be happier with how it turned out (and look at that gorgeous grouted tile above – SO BEAUTIFUL).
Of course, almost three years ago, we chose all the plumbing and lighting fixtures (all Rejuvenation) which I wrote about here. In case you missed it here’s the mood board so you can see where we are headed.


 not where the tub faucet ended up:)
I have to tell you about our medicine cabinets next (it’s a real thing) and then come back Monday to see how it all turned out. 🙂
*Pretty Photos by Kaitlin Green
The post Primary Bath Recap + A Layout Hiccup I Haven’t Shared Yet That Totally Freaked Me Out appeared first on Emily Henderson.
October 18, 2023
This Might Be The Perfect Rustic Bathroom – With An Easy Design Tip To Ensure It Feels Cozy

Welcome to the final and equally magical space in Anne and Richard’s Washington Coast home. If you missed the other three posts we covered the open-concept kitchen, dining and living room, the main suite, and lastly the lofted bunk rooms. It’s impossible to pick a favorite space so I will just say that this bathroom is also SO SPECIAL. Even just looking at the cropped photo above you get the design wind knocked out of you a bit. If a bathroom can be romantic this one might be the most.

The power of this copper tub is out of this world! It was purchased from Signature Hardware but this exact one is no longer in stock. It’s grand yet rustic and elegant yet simple. I didn’t know how much I’d love a copper tub but there’s some true love stuff happening over here. I also really appreciate that it isn’t hammered which isn’t always my personal favorite copper finish. This baby is smooth!
What I really love that Anne so perfectly does is nail the rustic elegant style in a really authentic way. It’s not showy or faux because each piece is thoughtfully found or built and is most likely vintage. Do you also see that door?? That is how to do rustic right. But as she said in the main suite post, her husband Richard is more traditional and you can see that incorporated in these beautiful floor tiles and plumbing fixtures.
One question I did have for Anne was, “Why did you decide to use a skinny piece of marble for the wall faucet instead of going the length of the tub?” She said, “It felt less ‘fancy’. I hope that makes sense. That was really the only reason. It is the same reason for the simple scones and the tiny mirror.”
That makes total sense to me. Scaling back on size for higher-end materials gives them an inherent sweetness rather than a bold luxury vibe. This is a hot tip for anyone designing a bathroom that wants a similar aesthetic!
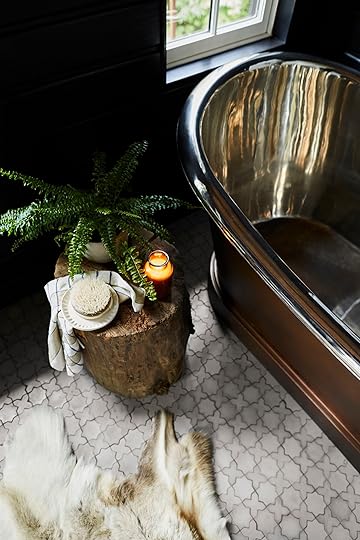
I mean just LOOK AT THE INSIDE OF THAT TUB. Then add in a beautiful tree stump and you have the dream elegant, romantic, rustic bathroom:)

Emily had mentioned that Anne had her copper plumbing exposed in the ceiling so naturally I had to ask her why and this was her response: “This was due to the way the second floor is framed. There was no room to hide the plumbing. I embraced that fact and really like the bit of copper showing.”
I also really like that little bit! It ties in with the tub and just looks cool. Oh, and now you can see what she meant when she chose a small mirror and sconce so the room felt less “fancy”. 🙂
In case you were wondering about the black paint on the paneling, it’s also milk paint! Anne said they weren’t sure if it would hold up in a bathroom, so they had a coat of wax added.

If you are also drooling over that PERFECT vintage vanity (do you see the corners and the claw feet?!) so am I! Anne told me that it’s an antique piece she stumbled across in the vintage section at Rejuvenation. They did have to reduce the size of the backsplash a little bit to fit between the windows, but otherwise, it was great. What a total design dream!
Now, if you are a privacy curtain person, don’t worry because they have a very cute solution that we don’t see in these photos. Anne said, “For privacy, we hang antique table runners from tiny hooks in the windows. Super cute. Since we are mostly alone out here, I did not want permanent drapes.” That makes sense to me. Why block the view if you don’t have to?? 🙂
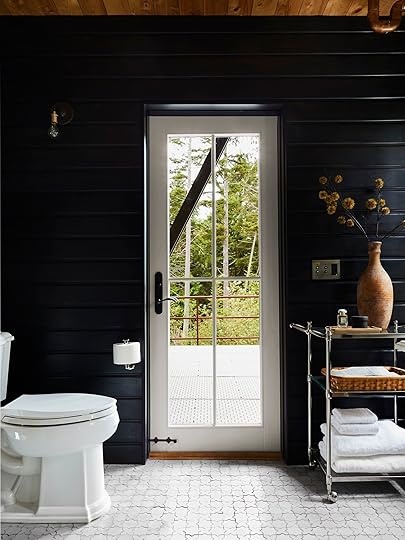
The final feature of this bathroom is that it connects to an outdoor shower. Yep, the perfect vacation home. But this was also a thoughtful decision for their friends. “This allows our friends who like to camp to use the bathroom without having to come into the house. It is also the shortest distance from the sauna.” (Quick! Notice that the wood of the door’s threshold matches the ceiling wood!)
It turns out that when an interior architect designs a house from the ground up, she thinks of everything:) Hope you enjoyed this house tour and we can’t thank Anne and Richard for sharing it with all of us.
Love you, mean it.
*Design by Anne De Wolf of ARCIFORM and Versatile Wood Products
**Chief Lumberjack: Richard De Wolf of ARCIFORM and Versatile Wood Products
***Styled by Emily Henderson (me!) and Emily Bowser
****Photos by Sara Ligorria-Tramp
The post This Might Be The Perfect Rustic Bathroom – With An Easy Design Tip To Ensure It Feels Cozy appeared first on Emily Henderson.
Emily Henderson's Blog

- Emily Henderson's profile
- 10 followers

