
Emily Henderson's Blog, page 219
April 25, 2020
Beauty Advice From My Friend That Tries And Tests Everything So We Don’t Have To
 photo by sara ligorria-tramp | from: portland reveal: how the bathroom I was most nervous about turned out to be my favorite
We all wish we had this friend – the one that has tried every single beauty product. I’ve only met Whitney once, but my friend Suzanne has talked about her for years, mostly saying, “Whitney says we should be using _______” or “Whitney found this new product that is way cheaper and better for your _______”. I would ask Suzanne to ask Whitney questions for me all the time (until I got her number and cut out the middle man) not because she is a dermatologist or a makeup artist but because she literally TRIES EVERY NEW PRODUCT. She’s my trusted beauty expert hobbyist who now runs an instagram called, The List (follow her!), who has sacrificed her own money in the name of beauty research, regardless of price. And when you are around her you believe every word, her opinion is so strong. She is SO adamant, that you find yourself buying the item mid-conversation. I’m running out of all my beauty supplies as a lot of us are, so before I buy what I always buy, I found myself wanting to ask this friend who I barely know what I should be using because I trust her and right now I don’t want to waste any money nor do any returns. So I figured we could all use a bit of Whitney in our life. Take it away…
Whitney here, and I’ll start by saying I am not an expert. Just a product obsessed beauty lover. I am continuously testing, updating, and replacing the products in my line-up. Through all my trials and errors I’ve found some solid products that I know I can always rely on, as well as a few tips and tricks that will help them work and look better.
FIRST UP, SKINCARE . . . .
Let’s start with skin care first, because healthy skin is the first step to a better overall makeup application. I have a pale complexion and sensitive skin that can lean on the oily, break-out prone side if I am not properly taking care of it.
When trying a new skin care product there can be a purge phase where you might break out and there can also be an irritation phase, especially when initially introducing acids or retinoids/retinol. It is normal for some products to make things worse before they get better. This doesn’t necessarily mean you should give up on it. Try lessening the frequency of the product while continuing a consistent routine to build up a tolerance.
My nighttime cleansing routine is the most impactful routine I do for my skin. It’s a simple three-step process, that involves breaking down and removing make-up followed by a two-step cleanse. I find that washing my face at night is super important, as it gives my skin a break from pollution, dirt, and makeup.
STEP ONE – REMOVE YOUR MAKEUP

Product of Choice: Avocado Oil & Living Libations Organic Hemp Face Cloths ($8+)
Organic avocado oil is my go-to makeup remover. It’s nourishing to the skin and super effective at removing stubborn foundation and eye makeup. I rub a little less than a quarter-sized amount into my palm and massage into my face (including, carefully, my eye area). Then I use a warm, damp face cloth to wipe the oil and makeup away. These organic hemp face cloths are thick, fleece-like, and glide over even the most sensitive skin.
STEP TWO – OIL CLEANSE

Product of Choice: Living Libations Best Skin Ever Seabuckthorn Oil Cleanser ($17+)
This is a thoughtfully crafted oil cleanser that will rebalance and reset your skin. This is also an effective makeup up remover but a somewhat pricier product. If you have the budget you could absolutely use this to remove your makeup with a double oil cleanse and forgo the avocado oil altogether but I prefer to make this product last longer. I use the same face cloth method to remove my oil cleanser as I do to remove my avocado oil. Make sure to use a fresh side of your face cloth with each oil removal.
STEP THREE – GEL CLEANSER

Product Of Choice: Reflekt 1 – Daily Exfoliating Face Wash ($18+)
I usually feel traditional cleansers dry me out and cause skin imbalance, but this has done the complete opposite. It is moisturizing and exfoliating while protecting the balance and pH of my skin. Because this cleanser has (biodegradable) exfoliation beads, you are in control of how intense the exfoliation will be. The less water you use the more intense the exfoliation will be. I tend to start on the drier side and once I’ve achieved the exfoliation I am looking for I then add more water to my fingers and it turns into a more traditional cleanser feel.
HOT TIP: Remember to rinse your skin thoroughly. I literally put my head under the faucet and let the water run over both sides of my face. The ring around their face of leftover cleanser that gets “wiped away” with a towel will get you into some clogged pore trouble!
And the most important (daytime) step:

Product Of Choice: Supergoop Mattescreen Sunscreen SPF 40 ($38)
SPF is an absolute must, even if I am having a no-makeup day at home. I will still apply SPF because the UV rays are coming through the windows even when you are inside. If you use peels/acids or retinoids/retinols your skin is now more vulnerable to sun damage/aging. Once you start regularly using these types of treatments for anti-aging you could be doing more harm than good if you are not religiously using SPF. For example, I always tell my friends who want to start a retinoid/retinol that if you are not committed to protecting your skin with SPF then I would not start it at all.
I love this particular sunscreen because it is a duel product for me. I use it as my makeup primer to blur my pores and as my daily protection from the sun. I think it is also amazing on its own because it gives you a subtle blurring and evening of skin tone when you want protection for a natural no-makeup day.
NOW FOR THE FUN PART, MAKEUP . . .
I have two big notes I want to start with before we dive into the makeup products I put on my own face almost every day. First, if you’re using sponges or brushes you’ve had for a long time, consider replacing them. Even if you clean them regularly. It can be hard to prioritize your tools, but dirty or worn tools can cloud your judgment as to whether you like a product or not. If your tools are not performing to the best of their ability then it will result in less than stellar makeup application.
Secondly, test new makeup products on their own to see how they perform before you use them in conjunction with your other products. For example, if you are trying a new foundation try it without primer to see its true nature first! Ok, let’s dive into some products . . . .
CHEEKS

Powder Product of Choice: Hourglass Cosmetics Veil Translucent Setting Powder ($46)
Setting powder for me is something I use strategically and in places that accumulate oil and unwanted shine. Be intentional in your placement. I do not put powder all over my face. I focus on my t-zone and under my eyes to ensure my concealer is set properly. This powder melts into the skin flawlessly and doesn’t have talc in the ingredients.
HOT TIP: When applying powder I want you to gently press it into the skin as opposed to brushing it all over. When you press your powder into the skin it will give you better coverage as well as minimize the disruption to your foundation/concealer. I like to press my powder in with the Morphe M536 brush, or I use my sponge for even more coverage.
Powder Blush of Choice: Milani Baked Blush in Luminoso or Dolce Pink ($8)
It’s a drugstore product, but when it’s good, it’s good!
Cream Blush of Choice: Stila Convertible Color Cream Blush in Petunia ($25)
If you prefer a cream blush, this is my go-to.
LIPS

Lip Pencils of Choice: NYX Suede Matte Lip Liner in Sandstrom ($4) & KKW Beauty Lip Liner in Nude ($12)
I love a nude lip. With that said, nude is relative to skin tone and I am on the paler side – be cautious when buying my version of nudes because it could wash you out the deeper your skin tone is. I gravitate to brown lip liners/contour colors and a soft matte pinks for my lipstick.
Lipsticks of Choice: Pat McGrath Matte Trance Lipstick in Peep Show ($38) & Kjear Weis Lipstick in Honor ($56).
These are my favorite lipsticks to pair with the above lipliners. I use all of these interchangeably, combine them, and switch them around.
Lip Gloss of Choice: NYX Butter Gloss in Fortune Cookie ($5)
If you’re into a glossy lip, I love to top any of the above combinations with a swipe of this.
HOT TIP: Combining a contour shade lip liner with a nude lipstick will give your lips the illusion of being larger.
EYES

I am a complicated mascara person. I prefer one mascara for my top lashes and one for my bottom lashes. This has been the case for years and years. I want my top lashes to be a bit fluffier and I want my bottom lashes to have a more twiggy feel. (editors note: I, Emily, can’t stop laughing every time I read this – the level of obsession, detail, and enthusiasm is amazing and I get it – we all have our things – Whitney, please continue).
Right now my daily top lash mascara is the Sumptuous Extreme Lash Multiplying Volume Mascara by Estee Lauder ($28). This mascara has a large bristle wand and a formula that gives your lashes volume, length, and thickness. The formula has a blend of three high volume fibers that are combined with a conditioning vitamin complex base that creates a lash extension look. This is a wetter formula and when you combine that with a big brush it can be a bit messy if you are not careful, so make sure to take your time applying so you don’t have a messy application. This mascara is buildable, does not flake, and gives me the dramatic lash that I love!
My favorite bottom lash mascara is Loreal Telescopic Mascara ($11) (the gold tube version is my favorite). This mascara provides length, drama, and it separates lashes really well! I am a multi-coat mascara applier – you can go as natural or as dramatic as you like! The brush is on the thinner side with what I am assuming are short silicone bristles. There is one downside to this mascara – over time it can be hard to get the wand back in the tube because there is some flexibility where the wand and brush meet. This is usually my signal to buy a new one – for me it’s worth it but I know that might be frustrating for some.
To be honest, most of the brow pencils and powders I have used over the years are all very similar to each other. The only brow “product” that has truly stood out to me is Soap Brows – this is more for hold/thickening than for filling in – you will still need an additional product to do that step ). Soap Brows used to be my go-to daily brow but it is a more complicated process that I now reserve for a more glam special occasion brow look when I’m going for a bigger bushier brow.
I feel confident in Anastasia Beverly Hills Brow Wiz Pencil ($23) and their Brow Powder Duo ($23). They perform well consistently and are not over the top expensive.
I think a great inexpensive dupe for Anastasia Beverly Hills Brow wiz pencil is the NYX Micro Brow Pencil ($10).
APPLICATION TOOLS

Real Techniques and Morphe brushes are my two go-to brands for brushes. They are both inexpensive and deliver amazing application! I also love the Real Techniques sponge. It’s made well and performs as well as the more expensive version. I believe makeup tools should be replaced far more often than they typically are and these price points allow you to do that more easily without sacrificing quality.
HOT TIP: Clean your brushes with two parts mild soap (I use Seventh Generation dish soap) and one olive oil. Whisk the soap and oil together and it will emulsify. The olive oil will break down your makeup like an oil cleanser would, while conditioning the bristles. The soap will help you thoroughly wash away any residue. Dampen your brush with warm water and then lightly dip it into the solution and work it in with your fingers, or makeup brush cleaning pad if you have one. Depending on the condition of your brushes you might have to repeat this process. Make sure to run your brushes under warm water until the water runs clear. You want to give your brushes a good shake and dry them laying flat on your counter, using a clean towel. I generally leave the bristles hanging off the counter to ensure water does not accumulate during the drying process. You never want to dry your brushes upright because the water will run down the bristle to the base of the bristles and accumulate causing damage and possibly mold.
OUR FINAL BURNING QUESTIONS:
1. Do you use any toners or serums in your skincare routine? if so what are they?
The nightly toner I use is iS Clinical Active Serum ($138). This is a very expensive toner and for many people, it may seem really out of touch and crazy to spend that much on a very small dropper bottle that is $138 which I get. But sadly there is not a hack for this little gem.
I am prone to breakouts and this serum has helped keep my skin in check and has evened out my skin tone. It has a water-like consistency and I use more drops in the palm of my hand than they have recommended and gently press it all over my face. This is a toner that I am desperately trying to avoid any waste so I skip the gauze step entirely. I tried to drop it directly on my face for an even more efficient application but it absorbs too quickly in my opinion for it to have a thorough application. You will feel an immediate tingly sensation – I look forward to this nightly. This toner has never irritated my skin but I do feel like it is a product that needs to be eased into.
Biossance Squaline + Tea Tree balancing oil ($49) is an oil I keep in the rotation that I will apply day or night depending on my need for it. This is a clean beauty product that is EWG certified. This oil has never clogged my pores, feels hydrating, and lightweight. I think oils can have a tendency to sit on top of the skin without ever absorbing fully and I really like that this one seems to penetrate easily. I use this when I feel like I have a break out coming for its antibacterial properties that help to keep acne from thriving.
2. Do you have a go-to foundation that has SPF?
Foundation is such a complex situation. I started writing it in my initial email to you guys and then it was like – this option for this skin type and categorized by coverage – it kind of got out of control – so I deleted it all.
I do think if you are specifically looking for a foundation that has SPF – It Cosmetics cc+ cream ($39) is an awesome option. It is a lightweight feeling foundation that provides medium to full buildable coverage. It comes in three different versions depending on what kind of look you are trying to achieve. Original, oil-free matte, and illumination (my personal favorite). I apply this foundation with my Real Techniques Sponge. Start with one pump and build your way up if needed. The better primed your skin is the further a pump of foundation will go and the more natural-looking it will be. If you are overly dry it will absorb quickly and you will need more product and it can end up looking cakey. Skin prep is key!
When applying foundation, I like to focus on the center of my face/cheek area to begin with because that is where I need the most coverage and then I work outward towards my hairline using less and less product. I try to use the residual foundation left on my sponge in the places that I do not need as much coverage. If you have a blemish try to spot conceal with the foundation instead of adding more product all over. This will help you achieve the coverage you need and have a more natural finish.
3. Do you use any products that make your skin look especially glowy?
I think the more hydrated the skin is prior to foundation application the more naturally glowy your makeup will be. If I want a more matte finish I will use my moisturizer sparingly before my foundation application. If I want a dewier finish I will prep with a little heavier handed moisturizer application. Do use caution when applying more moisturizer before makeup application as it can affect the longevity of your foundation and create unwanted movement. There is a sweet spot you will have to find for your moisturizer ratio and foundation ratio so it will not completely break down throughout the day when you want to go more glowy. This is very individual to your complexion and will take some trial and error.
Emily here. HUGE thank you to Whitney for giving us tons of great advice and product recommendations. A few of us already bought the Supergoop Sunscreen and Ryann bought the Reflekt Exfoliating Face Wash and LOVES it. If you want more beauty advice and product recommendations be sure to follow Whitney on Instagram 


April 24, 2020
Our Favorite Games To Play Right Now (With or Without Kids)
 photo by sara ligorria-tramp | from: mountain house reveal: our light-filled neutral & textural living room
While up here at the mountain house, we mostly play hide and go seek, DIY easy Pictionary with words they can read and easily draw (surely they could play Pictionary Junior??) and we puzzle. But I realized I need help in the board game category for sure. HELP. Are there any new board games to play with little kids?? And are there any fun games for two grownups, sans kids? Brian and I have never been the type to play games just the two of us, but maybe if someone said “Emily and Brian you’d love this game and it kills hours of time” I’d try it…
So I asked my team: What games are adults playing these days?? And in general, what are people playing while stuck at home? This line of questioning quickly became a blog post idea so here we are. These are all the fun games EHD (and the Hendersons) have been into as of late:
Kid-Friendly (6 and under)
From me: I thought that we had reached “board game age” at 4 and 6 – and in a way we have if we are on teams, but I need more help because what we have is getting real old. So far our kids are super into (and thus we’ve exhausted) the following: Uno, Guess Who, Trouble, Sorry. We’ve tried monopoly and they like it but they end up fighting over money and real estate and basically the richest person wins and guys, we are hipster liberals and it’s too painful to listen to. I don’t want to be conservative about messaging, but, well, we are. Then we tried “Life” for nostalgia’s sake a few times and it’s equally weird and dated.
The only game that we’ve tried that is new-ish is Chickapiglet (and for older kids, Chickapig). It’s a memory board game and has animals and POOP and it’s pretty fun. And guess who helped invent int? DAVE EFFING MATTHEWS, yes the singer/songwriter
For the Whole Family
 photo by sara ligorria-tramp | from: mountain house reveal: how we designed our super kid-friendly family room
From Julie: Exploding Kittens – I was very skeptical of this game when my niece and nephew first coerced me to play and wasn’t a fan of the title either. But there is a reason why over 9 million copies have sold, it’s so fun! Kinda like UNO with the addition of magical enchiladas. Intrigued?
From Ryann: Cattan – I am thrilled I am the first to recommend this because it’s the first board game that I’ve played in like 10 years, and it would feel pretty silly to recommend Monopoly after all these years. This is coming from someone who is NOT a board game fan so hopefully, you’ll heed my words. This game is a blast. It’s best played with 4 people but I think 3 is okay too and it is about building a civilization but the best part is the strategy of it all. Oh, and the board game itself is different every time you put it together, so each time you play it’s like a different game.
From Mallory: Spyfall – This is the ultimate game to play with the whole family and the best part is that all you need is an iPhone. Literally just go to this link, start a new game and it will assign you character. Everyone except for one person knows their “role” and the “location” except for one person who is the spy. The whole point of the game is to guess who the spy is before the spy guesses the location. The catch? You have to talk to each other and ask them questions (and the way we play it, we all act out our action or role while we’re talking). It’s hours of endless entertainment. 10/10 recommend.
From Julie: Sequence – My family has been playing this game since I was a freshman in high school and now my 8-year-old nephew is learning to play. It’s all about strategy and the best part is that it’s great for a large group of 12 to play but just as fun one-on-one. My sister and I used to play for hours on end but that’s probably more due to the fact that we are very competitive with one another.
Games for Two
From Ryann: Qwixx – Despite the fact that my boyfriend and I are horrible at math, we seem to love games that have to do with numbers? Maybe it’s the only way we are equally matched since we are equally bad at counting. That said, this game is addicting and SO fun. It involves a bit of strategy which I like, but it’s easy to get the hang of quickly. You can probably play with kids, too!
From Sara: 7 Wonders Duel – Mac and I love playing board games, but most of the games we had you needed 3 or more players. So I started hunting down the best two-player board games out there and Duel (not to be confused with 7 Wonders, the board game) was the highest reviewed game. It’s a game of strategy and luck that doesn’t get old, because the strategy you decide to take depends on the cards dealt. We also have the Pantheon expansion set.
From Sara: Patchwork – This is another two-player game, but much simpler than Duel. If you like puzzles or Tetris, this is the game for you. You move around a board collecting pieces to piece together a “quilt.” It’s easy to understand, moves fast, and is a light enjoyable game.
From Sara: Ticket To Ride – This is a cult classic, and can be played by 2-5 players. This game is all about strategy and secrecy as you race to build connecting railways. It’s one of my favorite games to play with just Mac or with a larger group. There are several different versions of this game, but North America is our favorite.
From Mallory: Battleship – This is a CLASSIC. I forgot how good it was until we played it the other day. Play on a team or one-on-one, it’s a real gem!
From Mallory: Connect 4 – This is another classic, and it’s way more fun than you’ll remember. And how about yet ANOTHER classic?? Mario Kart and Super Smash Bros. IF YOU HAVE A NINTENDO WII THESE GAMES ARE SO FUN AND WILL NOT DISAPPOINT. The best Mario kart courses are coconut mall and rainbow road.
Advanced Strategy Games
From Sara: Whitehall – If you’re a Sherlock Holmes fan, or love a collaborative game, this is a great detective game. As police officers, you’re attempting to catch the infamous Jack The Ripper as he makes his way across London. While one player does play the role of Jack, there isn’t any need to lie in this game, which I appreciate. Games that rely on me on having to perform stress me out. This can be played by 2-4 players, and make sure you’re playing with someone who likes critical thinking and deduction.
From Mallory: Pandemic – Here’s a new one. Months ago, my friend Riley brought this over to my house and it’s all too fitting. It’s a little terrifying because it might hit slightly close to home, but because it’s so real it feels really good when you win! Also, I used to play the app version of this game all the time — Plague inc, so if you have ever played that, you’ll like this.
From Sara: Arkham Horror – If you like highly involved, long-form games, as well as sci-fi and mystery this should be at the top of your list. It’s constantly evolving, with several expansions, but also several different ways to play the original set. Mac and I play this A LOT. We make an evening of it, set mood music, and play for 2-3 hours. It’s complicated at first, but don’t let that deter you from giving it a try. The base game is for two players only, but you can add players with some of the expansion packs. This game can also be played solo!
From Julie: Magic: The Gathering – Never in a thousand years would I think I’d be this invested in a game. About a month ago my boyfriend started to teach me how to play Magic: The Gathering, a game he has been playing since the second grade….not intimidating at all (sarcasm). It was very confusing at first but once I got the hang of it I was hooked and now we will play for hours most nights, plus it is fun to beat him. 
Need Decor But Don’t Know Where to Shop?? – Here is Our Complete EHD Online Resource Shopping List
 photo by sara ligorria-tramp | from: a quick update: the changes i’ve made to my la living room
Happy Friday, everyone! (I like keeping normal weekly traditions despite things being anything but normal). So yes, it’s Friday and we have a pretty big post for you today. We get asked all the time (and the requests have not slowed down, despite this new normal) what our go-to, favorite online shops are. And we get it. The world is filled with endless options which at times is great but more so, completely overwhelming. So we finally put together The EHD online resource guide so that if and when you are looking to buy something for your home, you can come here and feel confident about your purchases.
We have everything from big box stores to little online-only shops so that no matter what, you can find what you need. So before we get into this epic juicy list, we want to say to please only shop for what you need to make your home better for you. Every purchase, delivery, and potential return is risking someone being negatively affected by this virus. We’re in this together and are also doing everything we can to shop smarter.
Ok, with that in mind let’s give some much-deserved love to our favorite hardworking retailers, categorized by types of home good. We laid it out so if you are looking for say, lighting, you can scroll down and they are all there in one area. Easy peasy, right.? So because of that, there are some repeats of vendors. Just know that most of these retailers have more than just one kind of good so please explore.
Hot Tip
If you aren't in need of anything right now, bookmark this post so you have easy access when you do:).
So without further ado, let’s get into it…
FURNITURE (and More)
 photo by sara ligorria-tramp | from: portland project: the living room reveal
I personally find furniture to be the most intimidating purchase (as do most people). It’s usually big, expensive, and not the easiest to return. But with our tried and true recommendations, you can rest a little easier. In alphabetical order, here we go…
OUR PICKS:
Amsterdam ModernAnthropologieAllModernArticleApt2BBig Daddy’s AntiquesBurke DecorCB2ChairishCisco HomeClad HomeCrate & BarrelDesign Within ReachEclectic GoodsEtsyFerm LivingFinnish Design ShopGarde ShopHD ButtercupHedgeHouseHorneIKEAIndustry WestInterior DefineJayson HomeJonathan AdlerKaty SkeltonLawson-FenningLulu & GeorgiaMcGee & CoNickey KehoeOne Kings LaneOverstock.comPottery BarnRejuvenationRoom & BoardSchoolhouse ElectricSerena & LilyShoppe by Amber InteriorsSixpennyTargetThe CitizenryThos. MoserTRNK NYCUrban OutfittersWayfairWertz BrothersWest ElmWorld Market
 photo by sara ligorria-tramp | from: mountain house reveal: our soft yet secretly sultry downstairs guest bed + bath
If you need some extra furniture help and tips check out these posts:
The Living Room Rules You Should Know | Bedroom Design Rules | Dining Room Rules | DESIGN MISTAKE: Too Much Furniture In One Room (With Real Life Agonies) | Rules For Picking a Coffee Table | Budget Power Couples: Beds And Nightstands For Every Style (All Under $600) | No, Your Nightstands Don’t Have to Match (& Here’s How to Do It Like a Designer) | Accent Chairs Under $800 (Organized By How You Actually Use Them) | These Unique Beds & Headboards Will Make You Want to Rethink Your Bedroom Style | The Coffee & Accent Tables That Will Save Your (Boring) Living Room + 6 Tips To Ensure Success | Stop Boring Sofa Syndrome: 62 Non-Basic Picks to Wake Up Your Living Room | How to Mix and Match Dining Chairs Like a Boss (+ 28 Pairs We Love) | Power Couples: 22 Dresser & Nightstand Combos + A Few Rules | Dining Table Combos + What Shape Works Best For Your Space
Lighting
 photo by sara ligorria-tramp | from: arlyn’s moody dining room reveal is all about the insane power of paint
I have recently discovered that I am a lamp collector (read: hoarder). It’s truly insane since I have less than 400 square feet of home and ONE outlet in my living room. BUT good/pretty lighting is so important to a space and can be super affordable, and is an easy way to add personality. I am going to leave you until the next section because I simply can’t look at these vendors without buying a lamp I definitely don’t need…or do I? No, no I don’t. Have fun!
OUR PICKS:
Allied MakerAnthropologieApparatus StudioBrendan RavenhillCB2Cedar and MossChairishCirca LightingCrate & BarrelDelightfullEtsyGantriGarde ShopHAYHorneHumanHomeJones Country RoadKaty SkeltonLamps.comLamps PlusLawson-FenningLulu & GeorgiaOne Forty ThreePark Studio LARejuvenationRoom & BoardSchoolhouse ElectricSerena & LilyShades of LightStarlight LightingTargetTriple SevenThe Urban Electric Co.Urban OutfittersWayfairWest ElmWorkstead
 photo by sara ligorria-tramp | from: all the what’s, why’s & how much’s of the portland kitchen (+ big reveal)
Need more lighting help? Some solid tips and tricks? Here you are:
Where to Buy Affordable Lighting Online: 18 of Our Go-To Resources | My Favorite 37 Online Lighting Resources | Power Couples: Floor & Table Lamp Combos That Work | A Roundup of Affordable Pendants Under $100 | 19 Lighting Combos + The Rules of Lighting | The Surprising Value of Colored, Textured or Patterned Lampshades
RUGS
 photo by tessa neustadt | from: our master bedroom – finally
We get asked about rug size a ton. It’s another one of those intimidating purchases because it can set the tone for the whole room. Well, now we bestow the confidence of 1000 interior designers with these here shops. Just make sure to measure your space and check out the blog posts below for our rules before you hit purchase:)
OUR PICKS:
Annie SelkeAnthropologieArmadillo RugsBen Soleimani Blue Parakeet RugsEsmaili RugsEtsyGarde ShopJohn DerianJonathan AdlerLulu & GeorgiaLoloiNordic KnotsRejuvenationRoom & BoardRuggable Rugs DirectRugs USATargetThe CitizenryThe Rug CompanySerena & LilyWest Elm
 photo by sara ligorria-tramp | from: sara’s living room & dining room reveal
Buying a rug is hard. These posts will make it easier:
Design Mistake #2: The ‘Too Small Rug’ | Our Ultimate Vintage Rug Resource Guide | How To Choose The Right Rug Size For Your Living Room – 5 Formulas Guaranteed to Work | 60 Affordable Area Rugs Roundup + How To Find The Right Rug For Your Room
WINDOW TREATMENTS
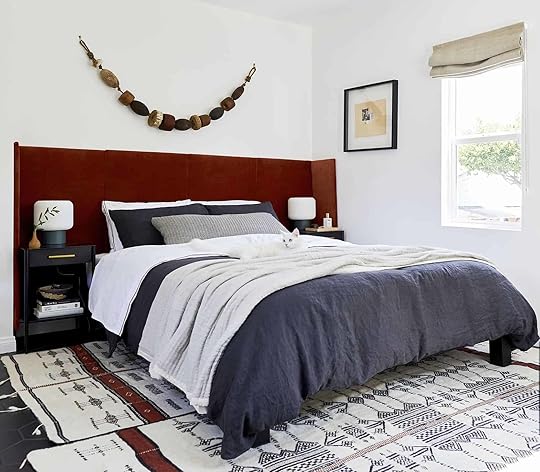 photo by sara ligorria-tramp | from: moto reveal: emily bowser’s bedroom “after” is unrecognizable from the “before”
I am never not surprised by the transformation a room goes through after simply putting up some curtains (or shades). I promise you don’t even need to be really expensive one (heck, mine are IKEA and I love them). The instant coziness that comes with a window treatment is well worth the money spent (big or small).
OUR PICKS:
AnthropologieBarn & WillowDecorviewEtsyEverhemH&MIKEATargetTonic LivingWayfairWest Elm
 photo by tessa neustadt | from: staging my dream parisian hotel suite with sothebys
Don’t underestimate the power a window treatment. Here’s how to to do them right:
Hanging Curtains All Wrong | Wake Up When You Want: Super Affordable Blackout Shades and Curtains | Ready-made Roman, Woven and Roller Shade Roundup | How To Dress Awkward Windows + Where To Shop For Readymade Options | Design Myth Busters: The “Real Cost” of Custom Drapery | Power Couples: How to Expertly Pair Curtains & Rugs
BED LINENS/PILLOWS
 photo by sara ligorria-tramp | from: reveal: how we brightened up a room (and some deserving lives) with velux skylights
Cozy (and pretty) bedding is high up on all of our decor lists right now. The world is stressful enough, so why not make your bed the oasis that you want/probably need. We are big big fans of these companies, so if you are looking either for a refresh or overall, you are covered (pun intended). Here is Emily’s all-time favorite.
OUR PICKS:
AnthropologieBrooklinenCB2CultiverGarde ShopH&MIn BedJohn DerianMinna GoodsParachutePom Pom at HomeRebecca AtwoodTargetTonic LivingTuft & NeedleZara Home
 photo by tessa neustadt | from: brady’s bedroom makeover with parachute
Fewer things make us happier than a pretty and cozy bed. These posts will help you make that your reality:
The Right Way To Make Your Bed – Our 5 Best Formulas | 14 Rules for How We Style the Perfect Bedroom (+ 3 New Reveals) | 18 Neutral (and Textured) Pillow Combos + 5 Rules for Guaranteed Combo-ing Success | Our Extra Long Lumbar Pillow Roundup | My Favorite “Household Basics” (Including The Bed Pillow I Travel With Because I Love It That Much) | How to Mix Decorative Pillows
TABLETOP
 photo by tessa neustadt | from: griffith park formal dining room reveal
Do you need new plates, new napkins or even just a pretty little salt and pepper shaker? Then this is your section. Gathering together has never been more appreciated so if you need some pieces to make your table just the way you want, look no further.
OUR PICKS:
AnthropologieArtillerietCB2EtsyFerm LivingFood52Garde ShopHawkins New YorkH&MHeath CeramicsJohn DerianLost & FoundMinna GoodsNickey KehoeSheldon CeramicsTargetThe White CompanyZara Home
 photo by sara ligorria-tramp | from: velinda’s tiny kitchen makeover takeover
Setting the table should be easy, here’s how:
How to Style Your Dining Table for Everyday Living | How To Style Open Shelving | Setting the Table with Parachute’s New Table Linens | Upgraded Utilitarian: Really Beautiful Everyday Things for Your Kitchen | 10 Dinnerware Combos For Every Style | 12 Barware Combos for Every Style
WALL ART
 photo by sara ligorria-tramp | from: reveal: a budget and rental-friendly living and dining room (with 80% thrifted finds)
I think this is my third time saying that something is an “intimidating purchase”. And while art isn’t always a large purchase, we want it more than almost any other decor piece to say something about us, right? So ya, intimidating! It’s a little peek into your real personality. Well, these awesome vendors are not only super talented but there is something here for every style and budget. Basically don’t be scared because this is a no-fail list.
OUR PICKS:
AnthropologieArt.comArtfully WallsChairishCindy Hsu ZellEtsyKaite Gong DesignJane DentonJuniper Print ShopMaryAnn PulsMintedMcGee & Co.MQuanSaatchi ArtSerena & LilySociety6Tappan CollectiveTargetThe Poster ClubUrban OutfittersUprise Art
 photo by tessa neustadt | from: our modern english tudor living room
The hardest thing to do is buy and decide how to hang art. These will make those decisions easier:
How to Hang Art Correctly | Best Online Art Resources | Affordable Large Scale Art & How To Get It In Your Home | Top 5 Most Affordable Online Art Resources | Design Mistakes: Generic Art | The 7 Things You Need to Know Before You Try to Hang That Gallery Wall | Is This The New Gallery Wall (AKA Gallery Wall 2.0)? | Think Outside the Frame: Wall Hangings Are the Cure for Your Boring Walls | 15 Ideas for Hanging Art We Got From You Guys
Frames
Art doesn’t always need frames but most do. Here are our favorite vendors…
Artifact UprisingCB2FramebridgeFrame It EasyIKEATargetUrban Outfitters
Misc. Decor
 photo by sara ligorria-tramp | from: makeover takeover: jess’ long awaited (small space) living room reveal
If you can’t tell from the photo above I LOVE decorative objects (it’s my living room). I like to think of them as little gems around my home that make it theoretically sparkle. Plus they are texture, depth, and some weirdness which never hurts a room design. Sure these objects can seem pointless since that don’t technically have a “function”. But not a day goes by that they don’t make me happy. I’d say that’s functional enough. If you are looking for a little quirk to add to your space check out these shops…
OUR PICKS:
AnthropologieBen MedanskyEtsyFerm LivingGarde ShopH&MJohn DerianLawson-FenningLost & FoundMoebeNickey KehoeTargetVirginia SinZara Home
 photo by sara ligorria-tramp | from: in defense of the comfy sectional—a friend’s almost-finished family room
Bringing personality through small objects is our bread and butter. Here are some posts to maximize your little treasures:
4 Ways to Style That Credenza For “Real Life” + Shop Our Favorite Credenzas | 8 Easy Ways To Style Your Nightstand Like a Dang Pro | Tray Combos for Every Room | Styling With Too Many Small Objects
WALLPAPER
 photo by tessa neustadt | from: elliot’s nursery reveal
Before I worked at Emily Henderson, I was entranced by her rooms with wallpaper. They were an explosion of joy and yet totally cohesive and not overpowering. That’s the beauty of wallpaper. It’s high risk but high reward and if you are thinking about it, DO IT and send me pics. Also, these are our favorite place to start:
OUR PICKS:
AnthropologieBien FiatChasing PaperEtsyFarrow & BallHygge & WestKelly WearstlerJuju PapersLulu & GeorgiaMintedRebel WallsRebecca AtwoodSandberg WallpaperSerena & LilySchumacherTargetTempaperUrban OutfittersWalnut Wallpaper
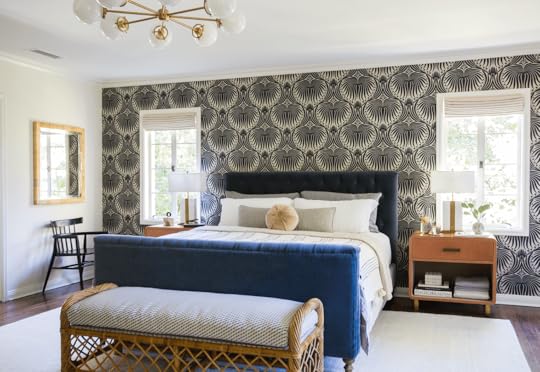 photo by tessa neustadt | from: the griffith park master bedroom reveal
We love wallpaper. How could we not!? Here are some more resources:
The Most Comprehensive Wallpaper Resource Roundup (Probably Ever) | How Splurge-Worthy Wallpaper or Tile Can Make a Room | My 63 Favorite Temporary Wallpaper Patterns | A Home Office Makeover With Threshold Removable Wallpaper by Target
Ok, that is actually it. Well, for now at least. We will continue to add more vendors as we discover them or even some that we missed. So like I said, bookmark for future decor needs and hope you found this super helpful.
Question. Would you want a more reno based resource list? Like faucets, appliances, windows, flooring, doors, etc? We know that renovating isn’t an option really at the moment but if this is something you want, then we want to give it to you. Let us know in the comments and if you have any favorite retailers.
Love you, mean it.
Opening Photo Credit: Photo by Sara Ligorria-Tramp | From: A Quick Update: The Changes I’ve Made to My LA Living Room
The post Need Decor But Don’t Know Where to Shop?? – Here is Our Complete EHD Online Resource Shopping List appeared first on Emily Henderson.
April 23, 2020
How To Style Out Your Outdoor Space So You’ll Actually Use It (No Matter How Big Or Small It Is)


There’s no doubt about it, this spring and summer are going to be a little different. But listen, mother earth is calling (we hear you now!) and now that the weather all over the country is starting to tip into sunny and warm, maybe getting outside will help us all shift our perspectives a bit. Even if that just means hanging out in our yards more than ever before. The outdoor living room is about the get its moment.
Here’s the deal, we shot this whole beautiful Target patio story months ago at Velinda’s. We loved how all the spaces turned out and were super excited to share it with all of you, but up until last week we were thinking we’d have to skip sharing this story completely. It’s really hard to write about anything during a situation like this and we’ve really shifted our content because of it. But as we were all looking at our own outdoor spaces to spruce up while inside (I’ve never finished the outside up here at the mountain house), we realized that we are sitting on this really pretty story, full of tips and ideas for those of you who do need help with styling your outdoor spaces. Those outdoor rooms still deserve some love, and in fact we might all be getting more time in them than usual this spring. So if you are looking to spend more time outside and want some ideas – we got you.
MAKE THE MOST OF A SMALL OUTDOOR SPACE

Let’s start small – not everyone has a full yard. Even if all you’ve got is a small patio, you can still brighten up your space and turn it into a miniature oasis.
KEEP YOUR COLOR PALETTE NEUTRAL WITH ONE GOOD POP OF COLOR


I love color, but it can overwhelm a small space easily (go for it if you want, by the way). So here’s what we did: We styled it with neutrals, like natural tones from wicker, white textiles, and simple black and white patterns (for a little graphic interest). But then brought in one good color pop with this striped pouf. The pouf is definitely loud in both color and pattern, but the fact that it’s the only loud piece in this vignette let it stand out, rather than get lost in a sea of eye numbing color.
CHOOSE ACCENT PIECES THAT ARE MULTIFUNCTIONAL


Small spaces mean less furniture, so you’ll want to make sure that the few pieces you do pick are going to pull double duty whenever they can. I absolutely love a simple, but timeless stump side table. Not only can it easily transition into so many different styles, but it can also serve as a quick stool whenever needed (so can the pouf!).
MAKE IT COZY

Blankets and pillows will make any night out in your small space cozy. But if you can safely have one, a chiminea is going to be the ultimate cozy addition to your space (like this modern one I love). Let’s call it the space saving cousin of the fire pit – it’s vertical, slim, but still brings that warmth you want on a chilly spring night.

1. Outdoor Pouf | 2. Decorative Marble Tray | 3. Iron Planter With Brass Stand | 4. Cateye Metal Sunglasses | 5. Outdoor Tasseled Throw Pillow | 6. Llama Planter | 7. Faux Wood Accent Table | 8. Globe String Lights | 9. Mulberry Chat Set | 10. Outdoor Metal Chimnea | 11. Small Metal Outdoor Lantern | 12. Lumbar Duo Stripe Outdoor Pillow | 13. Goldpan Tuft Printed Pillow | 14. 16-oz. Glass Cup | 15. Glass Stackable Short Tumbler | 16. Hexagon Stoneware Planter | 17. Women’s Kerrigan Slide
CREATE AN OUTDOOR LIVING ROOM

We were all pretty obsessed with this room when we styled it, tbh. It’s happy and bright and extremely cozy – which is exactly what I’m personally wanting right now. So for those of you with more space, hopefully this gives you some “outdoor living room” inspiration. Also known as “the perfect place to drink a Thursday evening margarita while the sun sets because I made it through another day and really, that’s enough to celebrate.” At least that’s what we’re calling it.
CREATE “WALLS” TO MAKE A COZY “ROOM” OUTSIDE

You don’t NEED four walls to make a space feel like a “room.” This rule gets even more lax when you’re in the great outdoors (your backyard). All you really want to do is make a space feel a little more enclosed and intimate. We accomplished that by bringing in that patio umbrella with the sweet tassel fringe as our “ceiling,” a bunch of potted plants and lanterns around the perimeter as our “walls,” and laying down that big area rug to ground us and be our “floor.”
We also strung up those awesome outdoor lights, which look cute during the day, and help the area transition into a warm glowing space at night.
MIX & MATCH YOUR SEATING

Just like in a living room, you want to have a mix of different seating options. Both to give yourself options (in case you’re feeling lounge-y one day, but want a chair with a back for reading the next), and to add visual variety. For this space, we brought in a few different options.
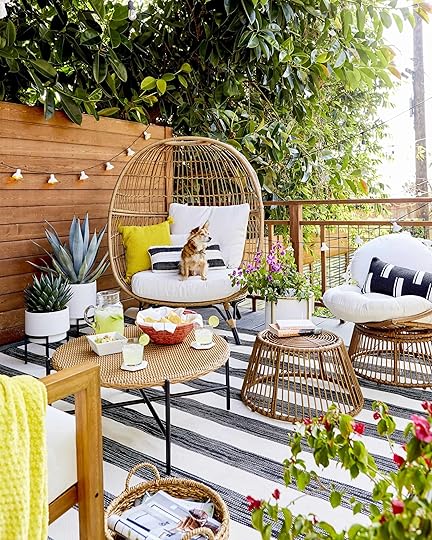
First, we brought in a larger piece to help anchor the space (and is big enough to accommodate some snuggling). Then added a simple loveseat that is super easy to mix with other pieces. It’s especially easy to combine with more sculptural pieces since the arms are so simple and square. Lastly is our low lounging chair and foot rest/side table combo. This is where you’re gonna wanna be for a weekend book reading marathon (or 1 minute of “counting” during hide and seek with your kids, during which you actually try and take a 1-minute power nap).


One last note – we kept all our seating options feeling cohesive by making sure all the cushions were the same color, even though they all varied largely in style.
NEUTRAL FOUNDATION – THEN GO BOLD WITH PRINTS AND COLORS

Because this is a bigger space, it can handle some color and pattern. We brought in a huge pinch of personality with that striped outdoor rug (I love that it’s this woven faded black, not a stark black and white), and happy pops of color with bright yellow textiles (rare for me and I LOVE IT). Small unexpected details, like the little hits of brass on the inside of the string lights and the tassels on the umbrella, make this space feel ultra inviting. Trust us, we tested it out by drinking that whole pitcher of margaritas in the space at the end of the shoot. It was awesome.
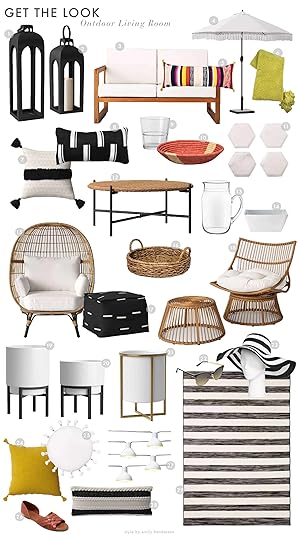
1. Large Metal Outdoor Lantern | 2. Small Metal Outdoor Lantern | 3. Kaufmann Wood Patio Loveseat | 4. Fringed Patio Umbrella | 5. Oversized Lumbar With Tassels | 6. Yellow Chenille Throw Blanket | 7. Outdoor Tasseled Throw | 8. Lumbar Duo Stripe Outdoor Pillow | 9. Glass Stackable Short Tumbler | 10. Hand Women Raffia Bowl | 11. Marble Hexagon Coasters | 12. Wexler Patio Table | 13. Libbey Glass Pitcher | 14. Porcelain Square Rim Bowl | 15. Southport Patio Egg Chair | 16. Woven Serving Tray | 17. Oversize Stripe Outdoor Pouf |18. Papasan Chair & Ottoman Set |19. Large Ceramic Planter With Stand | 20. Small Ceramic Planter With Stand | 21. Iron Planter With Brass Stand | 22. Cateye Sunglasses | 23. Women’s Floppy Hat | 24. Woven Tasseled Outdoor Throw Pillow | 25. Oversized Hand Woven Pillow | 26. Women’s Vail Woven Slide Sandals | 27. Hooded Outdoor String Lights | 28. Stripe Outdoor Lumbar | 29. Outdoor Rug
TAKE YOUR MEALS OUTSIDE

Outdoor dining is my favorite part of warmer weather. I don’t know why, but eating al fresco makes every meal taste way better and our table gets hours and hours of use each day.
OPT FOR SEATING WITH BACKS AND SEAT CUSHIONS


Comfort, guys. A bench looks cool, but chairs with actual backs and cushions give you hours of comfort. If you truly want to use and enjoy your space (and almost treat a dining table like a living room) opt for comfort – especially these days.
START WITH A COLOR PALETTE – AND PEPPER IT THROUGHOUT THE SPACE


This is the other option for a bigger space. While we went bold with the color and pattern in the “outdoor living room,” for our “outdoor dining room” we went quieter, picking a pink theme and sprinkling it around the table in varying tones and shades. The embroidered throw we used as a table linen is the centerpiece, but we brought in other pink pops through pillows, pillow tassels, and flowers.

We also brought in a few pops of red, the darkest form of pink, to shake up the space without moving out of our color palette. Always feel free to dress according to the color palette of your space. You know, just in case a photographer happens to be hiding on the upper-level patio and decides to start shooting candid photos of you styling a pillow.
MAKE SURE YOU GET THE RIGHT SIZE RUG

We’ve waxed poetically about choosing the right rug size forever, and an outdoor space is no different. You want to make sure the rug you pick is big enough to ground the space and allow for the table and chairs to sit comfortably on the majority of the rug. If it’s too small it will catch on the feet every time you try to move the chairs in and out. A good general rug is to keep the 2 feet wider and longer than the dining table.
We went with this gray, textured rug, which is neutral and doesn’t draw attention away from the table, but still gives us a sense of space. Otherwise our table and chairs would have just felt like they were floating on all that terracotta tile.

1. Oversized Lumbar Pillow With Poms | 2. Landscape Lumbar Throw Pillow | 3. Chunky Knit Throw Blanket | 4. Tasseled Lumbar Pillow | 5. Stagger Stripe Pillow | 6. Hearth & Hand Throw Blanket | 7. Stoneware Salad Plate | 8. Libbey Glass Pitcher | 9. 16-oz Glass Cup | 10. Glass Stackable Short Tumbler | 11. Multi-Tassel Outdoor Throw | 12. Stripe Napkin Set | 13. Citronella Tea Lights | 14. Recycled Tapered Planter | 15. Wheat Straw Boater Hat | 16. Acacia Serving Tray | 17. Porcelain Ramekin | 18. Ceramic Tea Light Lantern | 19. Metal Perforated Outdoor Lantern | 20. DuraSeason Seat Cushion | 21. Mid-Century Patio Stack Chair | 22. Diamond Global Coast Outdoor Rug | 23. Small Ceramic Planter With Stand | 24. Large Ceramic Planter With Stand
THE SINGLE SEAT
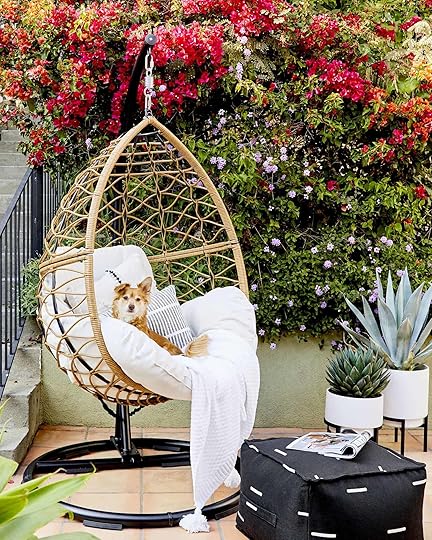
Maybe all you’ve got room for is one chair, and a foot rest. Really, that’s all you need. If all you can fit on your small corner of outdoor space is a chair and footrest (like that cute ottoman), then you’re all set for a spring outside.

1. Hanging Egg Chair | 2. Gray Lumbar Pillow | 3. Woven Throw Pillow | 4. Large Ceramic Planter With Stand | 5. Small Ceramic Planter With Stand | 6. Oversize Stripe Outdoor Pouf | 7. White Chenille Throw
There you go. We hope that if you have an outdoor space (big or small) you have more time to enjoy them this spring and summer. So how about it, are any of your spending more time in your outdoor spaces? Any outdoor improvement projects in the works? Let us know in the comments. xx
The post How To Style Out Your Outdoor Space So You’ll Actually Use It (No Matter How Big Or Small It Is) appeared first on Emily Henderson.
April 22, 2020
How To Make Any Piece Of Furniture Instantly Cooler


We’re about to drop one of our favorite furniture secrets. It’s so simple, yet so effective. Any guesses as to what it could be from that slightly vague, but also totally obvious opener image? DON’T SAY IT OUT LOUD. First, let’s do a little light imagination exercise to get you in the right headspace . . . .
Imagine for a moment that you’re at a flea market, walking up and down rows of vintage pieces. The smell of aged wood and ancient rugs hangs heavy in the air like a comforting perfume. There’s a lot to sift through, but you know that your hard work will pay off if you just keep your eyes open. And then you see it, a little vintage side table covered by old books and hidden behind a stack of old frames. Easily overlooked by someone else, but not by you. YOU have “the eye” and you see it for what it could be. The shape is unique, the size is perfect, and the brass hardware is everything you’ve ever dreamed of. The only thing holding you back is the dull gray, chipping paint. But then you remember the words you read in this post . . . .
Should we have Emily write and record little stories like this for bedtime listening? “Imagine you’re in a cozy vintage shop, the rain softly falling outside . . . ” I’m already imagining sweeter, better-styled dreams. ANYWAYS, stay with me (focus on your focus, Sara). So you’ve got your little vintage table, perfect in every way except for the color or tone. Painting is the obvious choice here, duh. I WON’T INSULT YOUR INTELLIGENCE.
But let me ask you a question. What color do you paint your piece? Ah, now we get to the heart of this post. Because the one, sure-fire way to give any piece of furniture an upgrade is to paint it a DEEP, DARK, MOODY color. Yes, that’s right – paint that piece of furniture DARK.
WHY IT WORKS
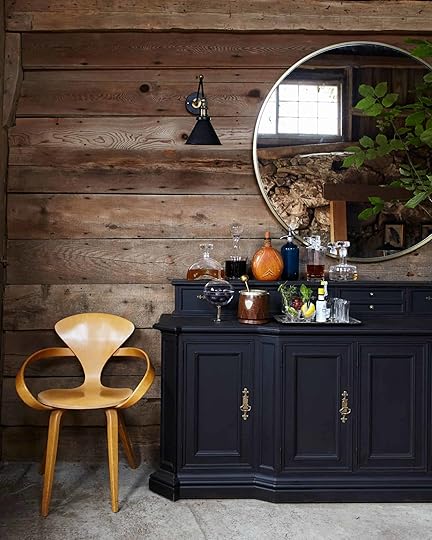
 photo by geneieve garruppo | from: a 120 year old barn| photo by tessa neustadt | from: em’s dream parisian hotel suite
There’s nothing wrong with painting a piece a light color, but in general light furniture pieces either tend to feel very minimal or have a sense of “youth” to them. There’s also a chance that your piece could end up looking a bit “shabby chic,” especially if you’re painting an already vintage piece. And let me tell you, a light paint is NOT a forgiving medium. It’s like highlighter for chips or dents.
Dark paint, on the other hand, can add a sense of sophistication, which can lean modern or antique. And dark paint is very forgiving. If your painting skills aren’t quite up to snuff, a dark paint is going to hide any mistakes more readily – including imperfections in the piece that may not be considered “vintage charm.”
FIRST, DETERMINE IF YOU REALLY SHOULD PAINT
Now before you start eyeing that little credenza you got from your grandma’s house a few years ago, determine if your piece really needs to be painted. There’s nothing more tragic than seeing a beautiful piece unnecessarily painted. If your piece is already a beautiful natural wood, or just needs a sand and stain to get there, really do some soul searching to decide if a painted piece is going to be able to compete with the seemingly ageless beauty of an all-wood piece. Wood is timeless, people.
But if the original wood of the piece is really not to your liking, OR the piece was already painted and you’re ready to give it a new life then keep heading down this path with me. For example, Em bought this vintage dresser a few years ago for her entryway.


There was nothing wrong with the wood, but Em wasn’t in love with it. The shape, however, was awesome and unique, so she thought a good coat of paint would take it to the next level. Originally she wanted to go for more of a monochromatic look in her entry and painted it a light blue-ish gray (Pike’s Peak Gray, to be exact). But the piece ended up feeling lost against the light wall. So instead, we visualized it in a few different, darker, colors (it was a whole debate, and if you’re interested you can read about it here):

In the end, Em ended up going with Newbury Port for the piece, and it felt so much better. The darker color just makes the piece feel a little more weighted, anchoring it in that space, rather than having it feel like it was floating against the wall.
 from: how we shoot, edit, and hang family photos
THINK ABOUT WHERE YOUR PIECE IS GOING TO LIVE
Sometimes you have a gut instinct about a piece before you even know where it’s going to live, and that’s ok. I am you people, and I’m often handing my cash to a flea market vendor before either Mac or my brain can ask me “wait, what do we need a vintage milking stool for?” But if you’re shopping for a specific area of your home then you’ll want to keep in mind the color of the wall behind the piece and the other colors in the room.
 photo by tessa neustadt | from: emily’s english tudor living room
Em had this rad demilune painted a dark navy blue (I believe it’s Hague Blue), and it pops off the light-colored wall in such a beautiful way. Em also had a lot of other blue elements sprinkled throughout the room that the demilune picked up once it was painted. All together they created this beautiful color harmony in the space. That’s not to say that you can’t put a dark piece of furniture against a dark wall like Em did below (by putting that dark bar cabinet against a dark wood wall).
 photo by geneieve garruppo | from: a 120 year old barn makeover
Not gonna lie, that piece gives me SHIVERS. The hardware, the lines, the STATELINESS, be still my heart. But just know that a dark piece against a light wall is going to draw more attention and may add a graphic element, while putting a dark piece in a dark room is likely going to give the space an overall moody feel (which I love, and is actually what I did in my own TV room).
WHAT OTHER ELEMENTS DOES THE PIECE ALREADY HAVE?
 photo by tessa neustadt | from: emily’s master bedroom
Before you pick a color, think about the other elements the piece already has. Does it have hardware? Brass, silver, black, or gold? Is it upholstered? Does it have a mirror element, and if so is it a new mirror or a vintage mirror with a tint to it? All of these things are elements you should take into consideration when choosing your dark paint color. Even though it may be harder to tell with dark colors, they’ll still lean warmer or cooler and have discernible undertones. For example: If I was painting a piece dark green, and it had silver hardware, I might choose a dark green that is on the cooler/blue side rather than something more yellow so it vibes better with the cooler silver tones of the hardware.
A FEW TIPS ON PAINTING VINTAGE PIECES
Alright, so you’ve got your piece, your paint, and your afternoon free. UGH, WHY CAN’T YOU JUST PAINT ALREADY?! Because preparation is key to a smooth and successful paint job. BORING, I know. But crucial. Ok, here’s the bad news – you’re going to need to sand your piece. Whether it’s raw or already painted, you’re going to want to create a smooth, even surface that your new coat of paint can stick to. I spent about two hours sanding that little table below before I painted it. Oh, and use a tack cloth to wipe down your piece after sanding to make sure there’s no sanding grit left! My dad introduced me to tack cloths during our reno and I can never go back to life without them.


Next, make sure you choose a paint finish that will be conducive to its use. I went with a semi-gloss finish (in Caviar) for this little table because I knew it was going to endure a lot of traffic, and a semi-gloss surface is much easier to clean than something matte. Also, I liked the stately, sea captain’s office vibe it gave the table.
 design by velinda hellen & sara ligorria-tramp | from: 6 easy hacks from sara’s house
On the other hand, Em tends to prefer matte paint for a more modern finish to her pieces. Like with her dresser below (painted Caldwell Green).
 photo by tessa neustadt | from: emily’s master bedroom
Lastly, use a combination of super fine rollers and brushes to get your perfect finish. The brush is perfect for getting inside all the little nooks and crannies of a piece, while a super fine roller is going to help you cover those larger, flat areas much faster without visible brush strokes.
A FEW OF OUR FAVORITE DARK COLORS
 design by julie rose | from: julie’s bedroom makeover
Now that you’re ready to go full Picasso on a piece (like Julie did with her bed frame above with Limousine Leather), I’ll leave you with one last thing – 6 of our favorite dark, moody colors to upgrade your furniture with. These are the colors we’ve used ourselves, and that we still can’t get enough of.

1. Hague Blue by Farrow & Ball | 2. Caviar by Sherwin Williams | 3. Limousine Leather by Behr | 4. Rookwood Shutter Green by Sherwin Williams | 5. Newbury Port by Portola Paints | 6. satin Black by Behr
Alright folks, the shows over. SO, I’m curious. What are your thoughts on painting pieces, and have you ever taken a little paint trip to the dark side? Let me know in the comments.

The post How To Make Any Piece Of Furniture Instantly Cooler appeared first on Emily Henderson.
My (Beginner) Plan To Grow A Backyard Garden – With Key Tips From Some Experts: “Climate Victory Gardens” Are Here

In celebration of Earth Day I’m going back to my survivalist roots (bringing the bad puns with me) and revealing to you my patio and backyard plan to install a “Victory Garden” so us Hendersons can attempt to grow and eat our own food (AND SO CAN YOU). It’s been in the works for a while, and today seemed appropriate to talk about it, and give homage to the one thing that connects us all (that’s you, mother earth). “Victory Gardens” were this genius idea the government had during WW1 and WW2 to encourage people to grow their own backyard and community gardens. And it worked. At one point it yielded almost 40% of America’s fruits and vegetables. It was a decades-long campaign because transporting fruits and veggies became difficult with fewer workers, rationing healthy food was important and they felt that it was good for morale – both within the community as something they did together, and just as a positive and productive thing to do physically to support yourself while your country was in crisis. Ring a bell?
What this video for a little sneak peek at our plan…
Well, I set out to do this before I realized there was a movement happening, this time for a different battle – climate change. Deeming the new name, Climate Victory Gardens, and I’m so glad I’m not alone. If you are like me, you are probably thinking you need a huge yard or like 4 raised beds to have a proper vegetable garden, but by the end of this post, you’ll realize that you can even do it on a tiny patio or balcony.
 image source
But why NOW? You see the big Q has stopped all the hustle, noise and busyness and it has become clear what is essential in every single way. We are forced to look at every purchase and decide if we want it bad enough to either risk doing it ourselves or pay to have someone else make that sacrifice. So think hard about it, guys.
We are lucky enough to be up in the mountains, and truly have little to complain about in the scheme of things. But getting good produce is hard up here and yet I’ve never wanted to be healthier or to cook more. (There are two grocery stores, but we avoid going and can order pantry supplies online so I realized that its just dairy, produce and meat that we need).
Organic and local produce isn’t just our hipster LA preference, it’s supporting the principals that go along with them and that is generally lacking up here. Buying produce grown and shipped from other continents, imported 35,000 miles away, food that we could literally grow in our own backyard seems like a fictional story and not one that I want to hear or tell. According to our global food system contributes up to 29% of greenhouse gas emissions. It doesn’t have to be like this. So, Mother Earth, I’m listening harder to the message you’ve been trying to send, I have the time and due to our current world standstill, I finally have the real motivation (and I know I’m not alone) to reduce my impact by growing my own vegetable garden (amongst other things – lots of permanent positive changes are happening over here).


This isn’t my first attempt at being a “farmer”. I put in a raised bed in our LA backyard last year to make some soup veggies (shown above), but I planted what I wanted to eat not thinking about the season, sun, location, water, climate or what would thrive. It would be like Brian buying a professional-grade sewing machine, then being shocked when he sat down to make his own tuxedo, he failed. Ultimately I lacked the time to tend for it, the know-how, any experience, but mostly the real motivation. I could get delicious organic local veggies at the farmers market every Sunday so that convenience kept me from having the need.
Convenience is the killer of innovation, and it’s going to be different this time. Brian and I were both nervous that I was getting too ambitious, and was going to invest even more time and money to again pull up 4 small carrots after 6 weeks and feel dumb. No more waste. I will be this smarter. And by “be smarter” I mean that I reached out to two experts for help – a local company called Farmscape, and a great garden supply resource, Gardeners.com and with their help came up with a doable plan that might actually yield an edible harvest.
 image source
Sadly, that’s not mine, it’s a garden that Farmscape put in a residential backyard in LA. Their motto is, “Quit landscaping and Start Farmscaping”, and that’s exactly what they do. They turn your property into a source of food for you, in an attractive way. There are over 40 million acres of lawn in this country – why not use some of it to feed ourselves? But they know that it requires a lot of experience, know-how, labor, etc. so for LA and SF they will do it all for you. I think it’s a genius shift from landscape design – for those that don’t have the time, but have the resources and budget to hire this out – and yes, they even maintain it weekly. I think it’s INCREDIBLY smart to think about your backyard more in terms of producing edibles, rather than just landscaping aesthetically. FYI they do corporate spaces, restaurant farms, and rooftops too. This isn’t sponsored in any way, I just think it’s an inspiring way to think about your backyard, and love that they are providing that service.
They agreed to help consult over the phone (thank you!) for this post. I sent then our address and they helped me come up with the plan for my specific climate, sun/shade location and what I really want to grow (more on that later). While they normally build everything custom, they highly recommended Gardeners.com as a resource for products – I called Gardeners.com and they helped walk me through specific products (many listed below). So here is the rough plan (but I’d love to know your thoughts).
Our Backyard

The backyard is wide and shallow and covered in bark, which we don’t love. We are still figuring out what we want to do, and figured we’d landscape this summer was which is why I called Farmscape in the first place – WHAT DO WE DO HERE – but ultimately they convinced me to hold off on setting up rows of raised planter boxes because I need to better track the sun/shade when the trees have leaves (they are still bare). Instead, they suggested starting where we do know we have sun – on the patio. What I love about this is the flexibility is that it feels really approachable, without a huge investment. So how do you have a patio garden???
RAILING OR BALCONY PLANTERS

I didn’t know that this was a thing. Sure I knew about window boxes, but I guess I just thought they were for flowers, not vegetables – besides these are different. As you can see right outside our backdoor (with the kitchen nearby) there is the deck railing that gets a decent amount of sun during the summer not to mention the deck above (but far away from the kitchen). Now the BBQ is not 100% set there as we do want to do some sort of built-in for it (she looks sad right now). But the plan is to put 2-3 railing boxes over there – they just sit right on top, no fancy install – near the bbq and have them be easy to access from the kitchen and move if we reconfigure. There are a lot of options out there, but for ours, I want them to be black (or could be eco-stained black) to disappear and blend in with the black railing.

1.Veradek Brooklyn Rectangular Window Box Wall | 2. Mission-Style Over-the-Rail Planter | 3. Bonfield Self-Watering Thermosplastic Rail Planter
Mobile Carts

Near the windows, we could put two carts with lettuce greens or herbs. They suggested keeping these near the kitchen for easy access. I love the wood cart because it can be moved if the sun is too extreme during certain parts of the summer, and the fact that it is waist-high makes it really easy to tend to (and some of these aren’t mobile, but I’m leaning towards either #1 in black or #5) :

1.Eco-Stain Rolling Cedar Patio Garden | 2. Nest Raised Bed Planter | 3. Vintage Bathtub with Stand | 4. Kronos Low Planter| 5. VegTrug Poppy Go 2-Tier Planter | 6. Timothy Vegetable Garden
Patio Pots

I’m not sure why this didn’t occur to me before. POTS! Of course! Farmscape and Gardeners.com both just said to make them deep enough for plants and they need to have drainage (most pots do, obviously). The drawn pots above are too small (but I didn’t have the heart to ask Sara to redo the graphics) because they need to be big and deep to really yield and have it be worth it (or so Farmscape told me). I’m thinking a cluster or two around each of the posts, one tall (for tomatoes in a cage) and one lower and wider. I’m going to really try to keep myself to just a few large ones to keep it still modern and minimal up here.

1.VegTrug Barrel Planter | 2. VegTrug Tapered Square Planter| 3. Seminyak Taupe Planter | 4. Grooved Bowl Planters | 5. Madison Planters | 6. Studio Planter
RAISED BEDS

After I spoke to Farmscape I realized that we do indeed have an unused area of the yard that does get 6 hours of full sun in the summer (or so I remember). So I still may go for a small bed, but we aren’t going to build it from scratch this time.

1.Miracle-Gro Unfinished/Natural Cedar Raised Garden Bed| 2. Self Watering Raised Bed | 3. Rech Dual Purpose Cedar Planter Box Set
I love the look of all of these, but ultimately because of our extreme gopher issue, I’m going with the self-watering raised bed and it comes in gray (or I might stain black). Once filled with soil and plants it won’t exactly be movable, but I like the idea that if next year we do landscape (or Farmscape) we can empty to relocate it or add to it – maybe even add a greenhouse for my seedlings:) Plus it allows for some growth underneath, is super ergonomic, and it’s such a pretty look.
One of the things that came up on both interviews is that gardening is extremely nuanced and essentially without knowing exactly my climate, soil, native plants and pests it’s really hard to say “put wild strawberries on the third pot from the left next to Thai basil”. But they did give me a ton of good initial advice and resources for the next step – choosing the seeds, seedlings and figuring out what will thrive where. My neighbor who has a thriving garden agreed, that it’s really about experience and trying/failing, that one year you might get a huge yield of tomatoes and the next 4 you won’t (even if you do the exact same thing). So it sounds like it’s a lot of trial and error.
So a few questions for you:
1. Do you want me to continue the series on how this goes with what I’m specifically planting and where it’s going to go? I suppose I’ll know the answer by looking at the traffic of this post, but I know this is kinda out of our wheelhouse, which I think is exactly why it’s going to be fun to document and watch.
2. I started doing a ton of research (and interviewed both sources) for apartment gardens, hydroponic gardens, vertical gardens and gardens for small balconies. Let me know in the comments if this there is an appetite (HAHAHA) for this. I’m obviously SUPER into it, but want to make sure I’m not alone here
April 21, 2020
Ginny Macdonald (The Original EHD Alum) Has Just Launched Her First Furniture Line and It’s Everything We Want

I’m not sure how much you know about Ginny and me but here’s how it went down. Ginny applied to be an intern 8 years ago, right when I was starting (and over my head). I looked at her resume and portfolio during the interview at like “woah, she has more experience than I do” albeit in restaurant and hospitality design. I loved her despite being intimidated and knew that I needed her. She came with so many skills that I didn’t know really existed in the design world since my background was in styling. She had such a great and different eye than I did and saved so many projects. It was definitely a ying-yang thing – I learned to be more intentional and conceptual from her and I think she’d say that she learned to be riskier and looser (especially in residential) from me. Oh and we had so much fun together, became great friends and had many late nights. She worked for me through the birth of both kids, not to mention like 12 major design projects. When it was time for her to go out on her own, 5 years later, I was so happy for her as taking that step can be terrifying and still couldn’t be happier for her success.
 design by ginny macdonald | photo by zeke ruelas | from: ginny’s living room reveal
I met up with her at a party recently (for Bobby Berk’s new line with Brady – an OG reunion!) and she told me about her upcoming furniture line with Lulu and Georgia and I remember saying (or thinking), “I’m sure it’s going to be great, but it must be hard to make a collection stand out right now, how do you even go about doing it?” Having no lines of anything myself (more on that later) I’m extremely intimidated by the prospect. So when I saw the lookbook in my email I was like “GINNY MACDONALD, YOU DID IT”. I LOVED IT and immediately wanted a few pieces for the projects we were working on. It’s so warm and modern, but feels extremely easy to use and be confident that it will be timeless. There are subtle lines and details that make it feel special and modern. We already wanted this bed for a bedroom makeover we are doing so stay tuned for when we can fully design and shoot again:)
Now I will pass it over to Ginny who let us get some “straight from the designer” answers to all of our burning questions…
Was designing your own line something you always knew you wanted to do?
We often design custom pieces for clients, as it’s a way to have fun and gives us more flexibility with colours, fabrics, sizes, and styles. We’ve been doing this for a while now and I’ve always thought about offering it on my website. The infrastructure you need to have in place and the time it takes is a lot, especially for a small business, so that has been something that’s held me back from pushing it forward. It’s essentially a full-time job. Being able to collaborate with the incredible team at Lulu and Georgia seemed like an opportunity not to pass up.
If you’ve been with us for a minute you might remember the swivel chairs from this master bedroom reveal that Ginny and Mel designed together:)


How did this collaboration with Lulu & Georgia come about? Was this something you pitched or an idea they came to you with?
I’d always wanted to do a furniture collection and it’s been something that I’d been considering for some time, but this came to fruition in a really organic way. I’d been working with Sara, the founder of Lulu and Georgia on her new Spanish-style home in LA, and throughout the design process, we knew we wanted to create some custom pieces. We designed two sofas and the bed for her master, and once they were installed, we knew we wanted to make this into something bigger, so the collaboration started from there.

How did you even go about starting? Was it materials, shapes, color palette?
Since the collection began with Sara Sugarman’s house, we started with the Belmont and Hollingworth sofas, which were designed specifically for her living room. They both float in the middle of the room, so I wanted to make sure there was some interesting detailing that can be seen from every angle. However, we didn’t want to go too ornate or fussy with the design, so we kept things on the simpler side, which I personally like, especially when it comes to the collection as I didn’t want the styles to sway in any particular direction. Since we have a lot of colour choices I wanted to give people options and for them to be used in every style of house. For example, I could see the Hollingworth sofa in Goldenrod velvet being used in a Mid-Century style house, but then it could also work in the Jade velvet in a craftsman style. I wanted people to have fun with the pieces and colours.
We are currently dreamy up even more future projects with these pieces.

We love that your line is a total expression of you, both expressing your English roots and your California life. Was that always the direction you planned to go in?
As with most of my designs, I’d say they’re a reflection of my UK upbringing and my life in California. My style isn’t the typical clean, white California coastal look, as I like colour too much. That’s why I really pushed to add some colour tones that you’d find in grand, English houses. My old rental house in London had each room painted in a different bold colour. The hallway was a rich welcoming green, the living room was a deep red, and the kitchen was a dark blue. It sounds like it would be too hectic, but it actually worked and I really wanted the colour palette to be an expression of that.
It basically looks like the ideal color palette and shapes for our new favorite style, EGG (Eccentric English Grandma) but the coolest and most chic version:)

Tell us how you start a line. Do you start with finishing one piece and then that informs the rest? Or do you just throw a bunch of ideas at the wall and design a bunch of pieces at a time?
In this case, it was a bit of a mix. With the first two sofas, they had to feel cohesive and work together, but once we had those designed it was easy enough to break them up into their own family, i.e. the sectional and side chair. We did add some pieces that I’d previously designed for clients, like the Ambleside Bed and the Grasmere Bench, but we developed those into their own family. I particularly love how the Ambleside bench and ottoman came together. Since I like to mix styles in my designs, I wanted the same for the collection and for people to be able to combine more than one piece in the same environment. That way it doesn’t feel like their room looks like something pulled from a catalogue, yet they have the ease of shopping from the same place. Same with the colours; not all of them can be combined, but I can see a lot of options working together in a cohesive way.
The signature Ginny look. Collected, clean, rich, unexpected and yet totally cohesive.


How long did it take from start to the first sample and what was the feeling like?
It was about 6 months for the first round, which was just the master bed and two sofas. The whole collection took just over a year. It isn’t normally that long with custom pieces for clients, but in this case there’s a lot more to consider from the Lulu and Georgia side. It was a very exhilarating experience seeing the pieces for the first time, and what was important to me is that they were made in LA. Touring the workshop and meeting everyone who works there was just as exciting as seeing the end results. I love the process part, as it makes you appreciate the hard work that goes into making each piece.


Now with hindsight probably being 20/20, did you learn anything unexpected about yourself or as a designer through this new process? Obviously it was exciting, but I can only imagine also pretty stressful...Especially right now with the timing of the launch.
The process has been fairly seamless, but at times it was definitely stressful. There’s a lot at stake and what the consumers don’t see is how much time and effort goes into creating something like this. And I’m really only a small portion of the process. It’s the amazing team behind Lulu and Georgia and the workshop that really made this happen. Obviously, more than anything, I want people to love what we have created and as a designer we are our own worst critic. Putting yourself out in the world these days is something you need a thick skin for.
When the pandemic hit, we were shooting the collection at a beautiful location in Los Feliz, and the following week we were set to shoot one of the pieces in my house. Between the two shoots, LA went into lockdown, so we never got the chance to do the second shoot. We also had a big launch party planned, which we had to cancel. In the grand scheme of things that didn’t really matter, and the launch was still being scheduled for April. I think the toughest part (and probably the largest learning curve) is that you cannot control everything. I’d be lying if I said I’d not toyed with the idea of asking them to postpone until fall (when hopefully things will have calmed down), but that wasn’t my call to make. My worry was that the last thing people want to see is someone shouting from the rooftops about a furniture launch when the world is really hurting right now. I just didn’t want to come across as being insensitive. I always try to find a silver lining in things and while it does feel strange to be launching at such an uncertain time, I really hope that people find some inspiration or joy from what we have created.

I’m proud of what we have achieved, and it would be wrong of me not to honor all the hard work everyone has put into this collection. From the buyers, to the social team, the stylist, the photographer, the people who have spent the last month developing the copy, the photo and video edits, the website uploads and probably a million other things I don’t even know about. While we can only do a virtual celebration at this time, I’ll be taking the champagne to the Lulu and Georgia office when we’re allowed to celebrate in person again!
Emily again! If any of you are in the market for some beautifully made furniture (in LA) then please take a peek at Ginny truly stunning collection…

1. Belmont Velvet Sofa |2. Lockwood Velvet Bed | 3. Coniston Linen Sleeper Sofa | 4. Hollingworth Linen Sectional Sofa | 5. Ambleside Velvet Bench | 6. Belmont Velvet Chair | 7. Belmont Velvet Sectional Sofa | 8. Rivington Velvet Sofa | 9. Ambleside Linen Bed | 10. Grasmere Velvet Bench | 11. Hollingworth Velvet Sofa | 12. Ambleside Velvet Ottoman

Thank you, Ginny, for this little chat and again CONGRATULATIONS! We will all be cheers-ing you with hopefully too much champagne. But wait is “too much champagne” a thing?? Also for those of you who know, love and miss Ginny, don’t worry because she just might be gracing our site with some other words of wisdom very soon. xx
The post Ginny Macdonald (The Original EHD Alum) Has Just Launched Her First Furniture Line and It’s Everything We Want appeared first on Emily Henderson.
The 13 Renter-Friendly Hacks We Swear By (and Have Done Ourselves)
 photo by tessa neustadt | from: brady’s living room refresh
I can think of about 10 pros that come with renting and all of them have to do with not being responsible for home maintenance. As a “temporary” lodger, it is technically not my fault when the garbage disposal breaks or windows start leaking when it rains. When that happens, I call up Mr. Landlord and say “We’ve got a problem that’s really your problem so please come fix it”. This lack of responsibility is one big reason why I’ve been a renter for 7 years now and will be for the foreseeable future. And yet, there can be no pros without a few cons. My apartment is temporary no matter how long I plan to stay, so I can’t go around breaking down walls or ripping up the tile in the bathroom. And even if I could, my bank account would suffer, and I’d be a dummy for spending so much time and money on something that is not mine. Herein lies the plight of us renters. We deserve a home we love but at what cost? What’s worth it to upgrade and what are we doomed to live with?
Over the years EHD has done the work in figuring out just that. These are tried and true hacks that are mostly low cost, low maintenance but always guaranteed to make you and your rental happier together. Grab your hard hats and let’s get started with the lowest lift…
Replace That Old (or Boring) Hardware
 photo by sara ligorria-tramp | from: sara’s living room & dining room reveal
This is the most low-lift yet impactful hack out there and happens to be a classic EHD design move. We encourage replacing doorknobs, cabinet pulls, towel racks, dresser knobs, switch plates, you name it. It can be very affordable and the best way to change up the style on a piece of furniture or in a room. All you need is a screwdriver and the hardware of your choice and you’re in business. Look at you go! Recently, Sara did this (above) with her Ikea entry cabinet and it upgraded a plain piece of furniture to have a modern Scandinavian feel.
If you are in the market here are some ones we love:

1. Brass Hexagon Knobs | 2. Patton Cabinet Knob | 3. Leather Drawer Handles | 4. Gwyneth Handle | 5. Brushed Brass Cabinet Handles | 6. Villa Towel Hook
Painting (We Promise It’s Worth It)
 photo by sara ligorria-tramp | from: arlyn’s moody dining room reveal
There is a reason we talk extensively about paint colors around here. Being trapped within walls that are not your ideal color is depressing. Luckily, this is a pretty easy fix and hiring help is not necessary. You will likely need permission from your landlord to do this (or, some of us rebels maintain the philosophy that it is easier to ask for forgiveness than permission). As long as you paint it back to the same color before you move out, you should be in the clear. I mean look at the transformation Arlyn’s dining room made with a coat of paint (WHAT?!)
P.S. A bunch of paint companies are delivering paint cans right to your door. Head to this post to see which ones are our favorites.
Install Temporary Wallpaper For A Hit Of Personality
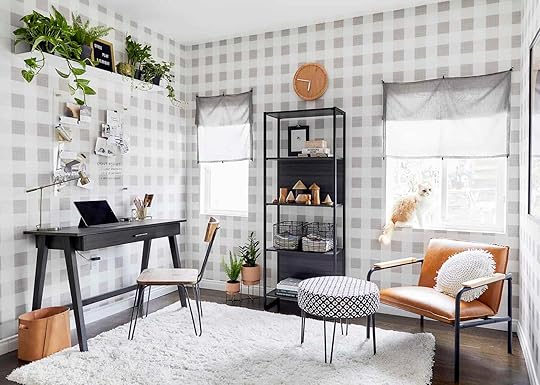 photo by sara ligorria-tramp | from: a home office makeover with threshold removable wallpaper
Removable wallpaper is alive and well, my friends, and good thing because it can add so much charm and intrigue to your rental. We love adding temporary wallpaper and murals in nooks or small spaces because it can make the space pop. Also, it can create the perception of different “zones” even in the smallest spaces if you don’t cover every wall.
 photo by: sara ligorria-tramp | from: a romantic glam bedroom reveal
 We aren’t going to lie, wallpaper can be labor-intensive, but nowadays there are some great options out there that are easy to install and remove. Here are some of our favorites:

1. Vintage Blue Bird and Leaves Wallpaper | 2. Buffalo Plaid Peel & Stick Wallpaper | 3. Orange Crush Wallpaper | 4. Garden Mural | 5. Lollipop Floral Peel & Stick Wallpaper | 6. Green House Print Wallpaper
Or Make your own wallpaper using pages from a vintage book
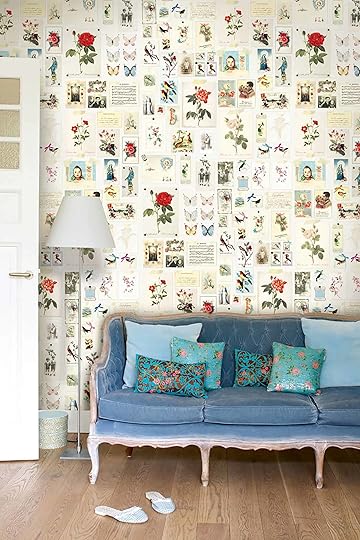 image source
This reminds me of my childhood bedroom except my makeshift wallpaper strategy was cutting out pictures from fashion magazines and pasting them all over my walls. I am thrilled to discover that there is an adult version of this. I can imagine recreating this look with vintage botanical guides, drawing books, magazines, or postcards. The best part is you can simply use double-sided tape or even putty to avoid doing harm to the walls.
Install Window Treatments That You Love
 photo: by sara ligorria-tramp |from: julie’s huge (and diy packed) bedroom upgrade
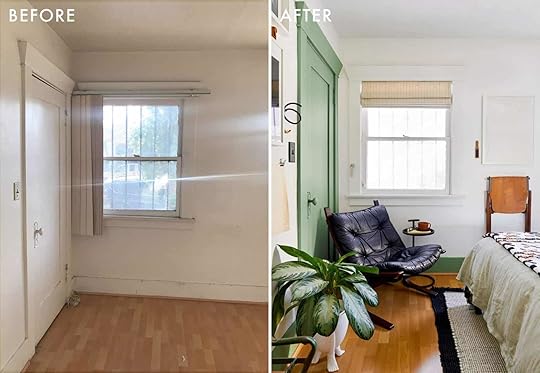
Window treatments don’t feel necessary (especially if you have blinds that came with the space). But we PROMISE that installing curtains or roman shades like Julie did will make your house feel like a home. It feels like a magical transformation. Now, most of the time it’s very doable to find affordable options but sometimes you might need to go custom (weird windows), but if you can swing it will make all the difference. And if knowing how to hang them is holding you back, we’ve got you.
O and if privacy/sleep is REALLY important to you, then we really recommend blackout shades.
Replace Those Ugly Light Fixtures To Light You Up
 photo by sara ligorria-tramp | from: reveal: arlyn’s bright & happy rental living room makeover
 photo by tessa neustadt | from: house tour: mel’s new place makes us want to declutter immediately
This is a more advanced move and we advise acquiring the help of an electrician unless you are confident in your wiring abilities. But do not skip this step if you can help it because it’s so impactful. I mean talk about a custom looking home. Do yourself a favor and replace that chandelier from 1985 that you can’t stand to look at. It’s worth the labor and you can always bring your light fixtures with you when you move (just make sure to save the original one to reinstall).
Hot Tip
If you have an exposed hanging cord, wrap it in twine or some patterned fabric.
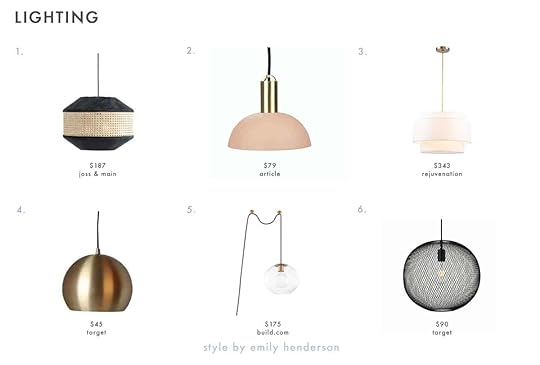
1. Saucedo 1 – Light Single Geometric Pendant | 2. Tangent Pendant | 3. Tiered Drum Pendant| 4. Modern Globe Pendant Ceiling Light Brass | 5. Elegant Lighting LD2251 Keller Single Light 15″ Wide Pendant
Ugly Floors? Install Peel & Stick Vinyl Tile
 photo by tessa neustadt | from: brady’s kitchen reveal
Remember Brady’s insanely affordable vinyl floor hack?? It cost under $50. No, I am not kidding. And guys, this kitchen is so good looking you’ll be shocked that it is a rental and you’ll be even more shocked by the before pictures ( I mean, right?!). The best part is if you follow his steps you don’t have to touch the original tile at all. It basically entails measuring the space and putting down tile “stickers”. Here are some more of our favorites:

1. Vinyl Floor Tile Sticker | 2. Nexus Self Adhesive | 3. Carrara Hexagon Peel and Stick Tile | 4. Self-Adhesive Decorative and Removable Vinyl Tile | 5. Simple Elegance Losas Mosaic Vinyl Tile | 6. White, Grey, Slate Stellar Tile
Replace Outdated, Grimey Faucets
 photo by zeke ruelas | from: brady gives a refresh to his vintage bathroom
This step might seem intimidating but thanks to Youtube there are thousands of videos that can walk you through it, step by step. And the labor is worth it. I personally love a matte black or brass faucet and the difference they make in an otherwise run-down bathroom or kitchen.
You can also go the route that Brady did and overhaul the whole sink, toilet, and mirror with your landlord’s permission. But unless you plan to spend years in your rental (which Brady has), it’s not the most financially sound option.

1. Single Hole Bathroom Faucet | 2. Dia Widespread Lavatory Faucet, Brushed Bronze | 3. Kohler Tempered 1.2 GPM Widespread Bathroom Faucet | 4. Kohler Purist Widespread Bathroom Faucet | 5. Yaquina Cross Handle Faucet | 6. Avanity Positano 1.2 GPM Widespread Bathroom Faucet
Replace Toilet Seat Cover (Easy, Peasy)
We love any easy bathroom hack because rental bathrooms don’t get enough love and respect. If your bathroom is your least favorite place to visit, you probably are not giving it the attention that it deserves (she says to herself…). Replacing the toilet seat is so simple to do (plus was an EHD 2020 bathroom trend prediction) and the act itself will feel like a small step towards more self-care. Oh, and while we’re on the subject of self-care, you can get real fancy and install a bidet, too. Both Jess and Bowser love theirs. There are some great, affordable options out there that some of us have and love love love.
Install A Pretty Countertop Cover
 photo by: sara ligorria-tramp | from: jess’ moto: you have to see how she hacked her rental kitchen with diys
Who could forget Jess’ DIY countertop cover?? She used alder plywood and employed the help of her very handy dad to create this stunning and chic cover (inspired by Sarah Lonsdale) and it immediately modernized the space. Though she had some assistance, it’s a pretty straightforward process and if you are curious, be sure to head to her kitchen reveal for all the deets. In fact, head there no matter what because the whole kitchen is SO good and full of tons of other renter-friendly hacks.

Remove Cabinet Doors To Create Instant Open Shelving
Jess’ rental kitchen happened to come without closed cabinet storage up top, but seeing this photo reminded us that this can easily be done in any kitchen. Removing cabinet doors can open up your space and give you an opportunity to display all your favorite kitchenware (and could be a unique place to sneak in some art).
Hot Tip
Lorem ipsum dolor sit amet, consectetur adipiscing elit. Cras sodales arcu ac massa accumsan euismod. Nullam accumsan tellus vel ipsum pharetra posuere. Nulla tincidunt augue est, ut dignissim ipsum malesuada sed. Nam venenatis efficitur tincidunt. Sed at aliquet enim. Phasellus eleifend felis quis mi aliquet, at sodales ante fermentum. Nunc pulvinar, elit nec mattis tristique, arcu felis pretium dui, sed pharetra eros velit at nulla. Nunc ornare gravida sem et gravida. Mauris eget consectetur dui. Interdum et malesuada fames ac ante ipsum primis in faucibus. Donec ullamcorper mauris justo, nec auctor enim tincidunt non. Nullam sit amet felis placerat, auctor ante sit amet, pellentesque turpis.
Install A Temporary Backsplash
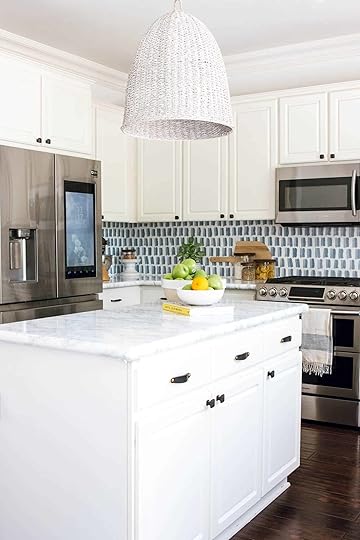 design by anita yokota
Backsplashes are sadly overlooked in rentals. We generally don’t replace kitchen backsplash tile because of the time, energy, and money that it requires. That’s a job for homeowners, we say! But, this is not to suggest that you are destined to be stuck with ugly backsplash tile or no backsplash at all. Tile is not the only option for backsplashes. Take it from Anita Yokota (who you might remember from this #ShowEmYourDIY post) who installed Rebecca Atwood wallpaper to make her backsplash pop. (Also, take a closer look at the countertop…it’s contact paper! Another countertop that is super affordable (like $40 affordable))
We also love this scalloped backsplash by Matilda Goad (which you may remember from yesterday’s post). She tested it out with carboard and when she felt satisfied with the look she turned to a local stonemason and had them cut out the shape in a granite slab that matched the countertop. This might be advanced for a rental, but in hopes that one of you might be able to come up with something just as intriguing I had to share.
Can’t Make Any Holes In Your Walls?Try these…
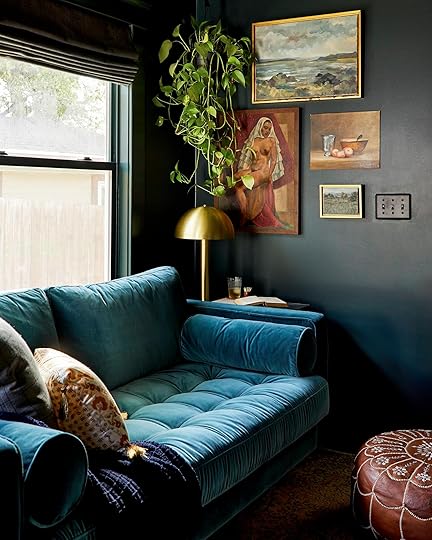 photo by sara ligorria-tramp | from: sara’s tv room reveal
 Drilling 50 different holes into your wall to create the perfect gallery wall is not advised, but we certainly understand that it happens. Like I said before, sometimes it’s easier to ask for forgiveness than ask for permission. But might I suggest an alternative: Take notes from Sara’s TV room and even opt to hang art unframed as one way to avoid the drill (hint: she used putty). It’ll save you money and the time replastering holes when your lease is up and happens to look really cool. Win win, my friends. But whether you want to use a frame or not, here are our favorite damage free, no hole making, picture hanging tools:
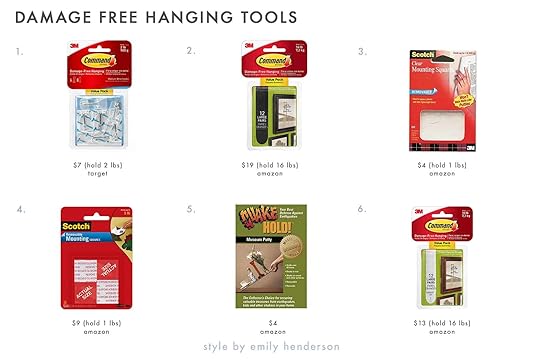
1. Command Medium-Sized Wire Toggle Hooks | 2. Large Black Command Picture Hanging Strips | 3. Mounting Squares | 4. Scotch Mounting | 5. Quakehold! | 6. Large White Command Picture Hanging Strips
Alright, that is all I have for now. I hope if you are in a rental (or even not) that you feel that making your home feel more like yours is very possible. And if you are very DIY minded, have you done any of these hacks in your own rental? Are there any other rental-friendly tricks that we missed?? Tell me everything.
Opener Image Credit: Photo by: Tessa Neustadt | from: Brady’s living room refresh
The post The 13 Renter-Friendly Hacks We Swear By (and Have Done Ourselves) appeared first on Emily Henderson.
April 20, 2020
The “Decorative” Trend I’m Leaning Into And How I’m Going To Bring It The Kid’s Room – BRING ON THE CRAZY
 design by lindsey lane design
I love it when you see something traditional – anything – in a new light and are able to find more love for it and then shove it into your home (even if it already looks like you are crazy). That’s how I am with “The Scallop”. I should have seen it coming what with our current obsession with circles and arches because scientifically the scallop is just a half circle and a low arch. But it wasn’t until I saw it in these inspiration photos that I realized the ways I could bring it into my home, in a modern yet totally EEG (Eccentric English Granny) way. But first – some convincing in case you haven’t seen it around as much as we have.
 design by beata heuman interiors | photo by simon brown photography
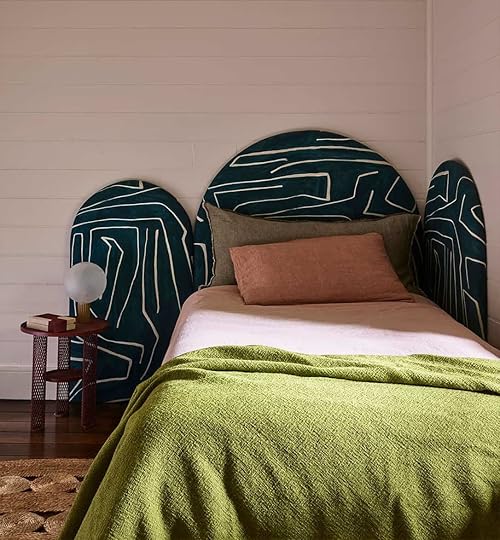 design by arent & pyke | photo by anson smart
 design by nickey kehoe & doug levine| photo by amy neunsinger
It seems like this trend came first in the headboard (we have a purple scallop bed that we just built for a client that we haven’t shown you actually) but I love it on the bottom of that chaise above. It’s not like the scallop is new, it’s just that we are seeing it so much more or maybe my eyeballs are just more drawn to it.
 design by beata heuman interiors | photo by simon brown photography
 design by harriet anstruther | photo by miguel flores-vianna
Then I started finding myself wanting it in bed skirts, blankets, pillows – WHAT? Decorative bed skirts? What in the actual heck is happening to me??
 design by matilda goad
But obviously I knew I wasn’t alone when I saw it on this backsplash. OH the scallop, the half-circle pattern is happening and we love it.
My Vintage Chaise?
design by nickey kehoe & doug levine| photo by amy neunsingerSo how am I going to bring it into my life? Well, I had some fast and totally unthought through ideas. First my chaise lounge (below, not above). It’s highly inspired by the photo above by one of my favorite design firms, Nickey Kehoe. I love it so much I had to show you twice:)
 photo by sara ligorria-tramp | from: a refresh around the house with parachute
 You see my chaise, above, needs to be reupholstered and re-built because it is ripped and the innards are coming out. It’s 100 years old, she is FRONCH, and has such a pretty shape. So I found the most amazing fabric from House of Hackney to reupholster it in – after searching forever for modern English florals I went straight to the source. It’s a dark floral with all the colors of the room so it “matches”.


I used my patented “throw it on a random chair” method to ensure that I really wanted it in that corner. And I do. Currently, the chaise has fringe, and the plan was to find fringe the same color as the background of the floral fabric, but I, A. Haven’t found it yet and B. Fell in love with the idea of the scallop. I’m just not totally convinced that it will work as well with the shape of my chaise.
 photo via lawson-fenning
Currently, my sofa (above) by Lawson Fenning is being made and recovered in a powder blue Crypton velvet, and now I’m like, should I put scallops on the bottom of that instead? Would it look great with the arms or just too much and I should just calm down? I think it would take it into “silly” territory which is a mistake because it took me 41 years to pull the trigger on that sofa. We are even customizing the depth and arm height to ensure it’s as comfortable as we need, so perhaps risking my dream sofa by adding unnecessary scallop trim on the bottom would be the most try-hard mistake I’ve made yet. GREAT let’s DO IT. jk.
Here’s the next place I am thinking of “scalloping”…
The Kid’s Shared Room

 design by bre bertolini
 Here’s a better idea. I’m just loving this sweet detail that Bre Bertolini did, so I’m definitely leaning towards doing this in the kid’s room. After that controversial update post last week (GUYS I’M NOT DONE WITH THE ROOM YET) I need to either lean in or pull back.
 design by emma på långagärdet
So I decided to do both – I’m going to both lean in AND pull it back. How is that even possible you weirdo?! Remember my house is my own laboratory where I get to take risks and fail and you guys get to watch the whole thing and laugh or cheer me on. So what does that even mean?
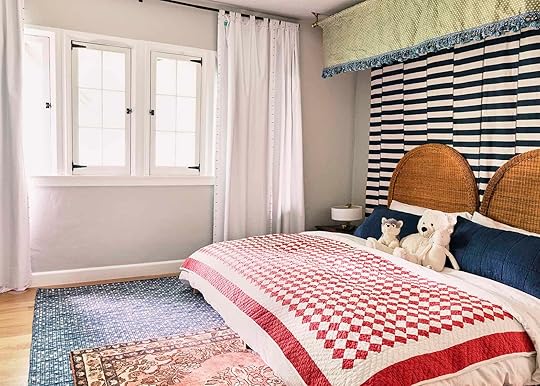
I’m going first try to reduce the red (take away red rug, quilt, and mirror), but make it more playful in the reduced color palette of mostly blues and greens. PLEASE REMEMBER THE CURTAINS ARE TURNING INTO WOVEN SHADES and the light fixture is changing – amongst other things. The canopy is a lot, I know, so I think that I can choose “crazy” or “colorful” but maybe combined is the problem. Or maybe I’m just reacting to some of your very visceral reactions (guys, no offense taken EVER, well not ever but not about design stuff).
That’s the latest decision (less color, more crazy) but like I said, I haven’t even seen it in person and I don’t know when I’m going to live there again full-time or be able to do it. So these are all just me fantasizing from afar. But meanwhile, imagine a scallop in there.
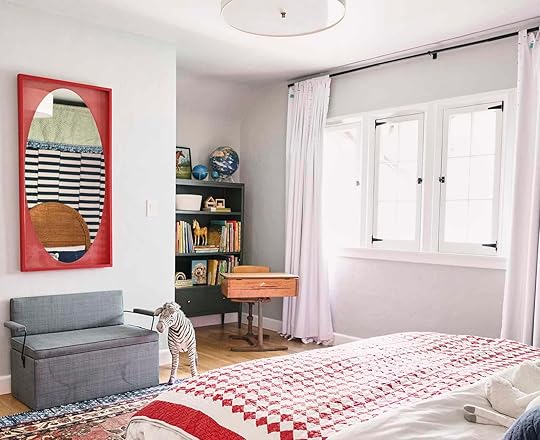
So if no red (boo) then I need to decide if I should do the scallop paint treatment in a light, medium or dark blue? Or green – except the bookshelf in the corner is green, but maybe that’s ok? Or a pretty pink and have it be blue, green and pink? And then do I paint white above the scallop or leave the gray because I LITERALLY JUST PAINTED IT 2 MONTHS AGO?
left: design by emma på långagärdet | right: design by bre bertolini Last questions – left or right. The left has different shaped scallops (looking a bit more like bubbles or the ocean) and more of a hand painterly look (and more playful?). But the right is obviously so sweet and cute too and might compete less with the broken stripes. So many decisions that likely warrant a full photoshopped post showing you all the options so we can all make this decision as a nation, together/apart. We need to have some fun things to debate while in the big Q. So if you have more suggestions let me know and we’ll add it to the list for Julie to photoshop because I literally have no actual computer design skills.
April 19, 2020
How Hard Is Baking Your Own Bread Really? (And The 7 Recipes I’ve Tried)

I won’t lie – during those first few days, when everyone was buying up all the toilet paper, I was concerned about our chain of supply and demand. But now that things have mellowed a certain amount (at least I’ve seen toilet paper on the shelves again), items are staying on shelves longer*, and our local grocery stores have been implementing shopping limitations that reduce overbuying. But what I still have in AMPLE supply is time. So I decided, that even though I could now go out and buy a loaf of bread, why not try my hand at learning how to bake it myself? Everyone on Instagram is doing it, so how hard could it be?
*As a quick aside, I know flour and yeast have been in exceedingly high demand recently and may be tough to get. I still haven’t been able to find yeast in stores. I’ve got three tips: First, my brother’s friend manages a pizzeria, and they buy yeast in BULK for their dough. That’s where I bought a few teaspoons of yeast for a couple of dollars. It might be especially precious to them right now, but they might also be willing to sell you a small amount if you ask extremely nicely. Just an idea! But don’t worry if you can’t get any, there are ways to make bread without yeast (like soda bread, levain breads, and flatbreads). Secondly, bleached, all-purpose flour is definitely the most popular and I’ve seen those wiped out in stores. But there were still bags of whole wheat on the shelves in the store near me. Whole wheat just happens to be great for bread. If you’ve never tried baking with it, maybe now is the time. Finally, you could try ordering from a smaller flour mill directly. This one still seems to have flour in stock!
I’ll start by saying that I’m an avid cook and hobbyist baker. I can usually end up with something edible, and for the most part, I’m pretty happy with what I get. BUT BREAD IS DIFFERENT. I’ve tried bread a few times over my life and never had stellar results. What is it about the illusive bread process? There are just so many variables and different steps where the process could go amiss. The yeast, the water temperature, the temperature of your kitchen the first rise, the second rise, over proofing, under proofing, the list goes on!
Over the last few weeks though, I’ve been trying my hand at several different bread type recipes. We’ve been eating some sort of bread with almost every meal, and I’m probably 90% dough at this point. With some bread, I experienced great success, and the entire loaves were eaten in one day. With others, not so much . . .

JAMIE OLIVER’S SODA BREAD
Let’s start with what was hands down the easiest bread to make. This recipe can literally be measured out with a washed out vegetable can (15 oz), requires no yeast, and overall is pretty foolproof. Instead of using yeast as the leavening agent, this bread relies on baking soda, which does give it a particular flavor. It’s sharper, or even a little bit metallic. But it’s a delicious loaf, and we ate it with a big pot of beef stew. If your bread making experience is zero this is a good place to start. You can follow along step by step with his video here.


JAME OLIVER’S SANDWICH BREAD
I had so much success with his first bread recipe that I decided to give his sandwich bread a go next. This recipe required yeast and rising time, but again he has a super easy to follow video which makes it seem easy and manageable. Everything looked great each step of the way, but when it came time to actually cut into the loaves they turned out a bit dense and stodgy.
I have two guesses as to what happened – First I added too much flour during the kneading process, making the dough too heavy and not allowing bubbles to form in the dough. Or that I kneaded too hard during my second second knead when I was shaping the dough, which squished too much of the gas out of my dough. The flavor was nice though!


SATURDAY WHITE BREAD FROM FLOUR WATER SALT YEAST
I decided to take it from 0 to 100 real fast when I saw that the Kindle edition of Flour Water Salt Yeast was on sale on Amazon for $5. This is an ultra-focused bread baking book, and I’ve decided it’s my bread bible. From it, I’ve learned how to incorporate dough ingredients, about the importance of temperature, and all different sorts of important bread-making techniques.

I started with the very first recipe in the book, Saturday White Bread, which is a make-in-one-day bread. Because this bread is made in one day it does use instant dry active yeast. But it still takes about 7 hours from start to finish. There’s the first mix, then there’s a rest, then the full incorporation, then a rest, then a fold, then the first fermentation, then a second fold, then the bulk fermentation, then the divide and shape, then the final proof, and finally the bake. I had to literally write out a schedule to make sure I was keeping track of time. But again, since I’m working from home, I’m actually able to take a 5-minute break to go fold some bread dough.

The book was like a comforting friend, answering all my questions and showing my image by image how to do certain steps. It feels like a lot of reading, but it’s all very interesting, and I learned SO MUCH. And of course, the results were 1000x what I had achieved with my previous bread recipes, and the whole thing was gone within ONE DAY.
FLOUR WATER SALT YEAST PIZZA DOUGH
I set aside a bit of the dough from the Saturday White Bread to make pizza with (a recommendation from the book). It made a delicious, flavorful, and flaky pizza crust that I have zero complaints about. You can also make focaccia with leftover dough! There are recipes for both in the book.

FLOUR WATER SALT YEAST LEVAIN STARTER
The biggest trend on Instagram right now is everyone making their own starters and turning it into levain breads (i.e. sourdough). If you don’t have yeast, but have flour, water, and patience, then this is an option for you. It’s a long process, over several days (I’ll be able to finally finish mine TODAY!), but I’ve enjoyed the journey. It’s just very interesting to learn about the process and make something completely from scratch.
By the way, the most internet-famous recipe is this New York Times one, but you have to have a subscription to access it. But this looks like a pretty good recipe from Food52. Plus starters can be used for more than just bread. I personally want to use some to make these sourdough chocolate chip cookies.

SMITTEN KITCHEN OAT & WHEAT SANDWICH BREAD
Following my mild failure with Jamie’s sandwich bread recipe (and after we turned those loaves into croutons for soups and salads), but also following my success with the Saturday White Bread, I decided to try a sandwich recipe from one of my favorite food bloggers, Smitten Kitchen. I’ve always loved her tone and found her recipes easy to follow (it also helps that she provides plenty of process photos so I know how things should look along the way).

I still didn’t get perfect results. Either my kneading really needs some help or I didn’t let these rise enough. But I did have better results. I kind of see each loaf of bread as a science experiment, and sometimes you just have to try again.

This is my most recent baking adventure, and one that I have to admit I’m more familiar with. Back in college, I went on somewhat of a Challah baking bender. For some reason, Challah has just always worked for me. I prefer my challah on the softer, sweeter side. And this recipe did not disappoint.


The braiding of the loaf is the hardest bit with this bread, but she has a great gif at the beginning of her post which makes it so easy to follow along. And you’ll end up with some seriously impressive loaves. This is so good sliced with butter and jam, or turned into french toast, or used in a savory sandwich. I just eat by the chunks though.

So there are all the things I’ve baked since we’ve been hanging out at home. Since it’s just Mac and I in the house (plus our two cats), baking has really given me a lot of joy. Not to mention it’s added some good structure to my day. What’s my next project? Kindred’s Milk Bread, a cult icon in the bread world.
Lastly, if you’re gonna do some baking, you’re gonna need some tools. Over the year’s I’ve collected a good amount of baking tool essentials which I use weekly, but even I’ve added to my collection in the past weeks. Luckily, most of these tools are so basic that they already exist in some form in most kitchens, so don’t worry too much if you don’t have one! Bread making can still be achieved.

1. Electric Scale – When it comes to cooking, guesstimating is totally fine. Baking, on the other hand, is a more exact science, and getting the correct proportions of ingredients is essential. That’s why most baking recipes will be given in weight (120 grams of flour) rather than volume (1 cup of flour). I bought this little scale 4 years ago, and I use it several times a week.
2. Bench Scraper – This is a handy tool for dividing dough and scraping it off counters. A sharp knife will also work for dividing dough, but I use my scraper for a lot of other things (like frosting cakes).
3. Good Set Of Bowls – These work as mixing bowl, dry ingredient/wet ingredient bowls, proving baskets, you know name it. It’s especially important to have one good, big bowl for mixing your dough in, and letting it rise.
4. 6 Quart Tub – If you’re going to making your own starter then you’re going to want one of these to house it.
5. Banneton Proofing Basket – This isn’t an essential, any bowl with a linen napkin will do for letting your dough prove. But this is the bowl that’s going to give you the pretty circular pattern you see in fancier loaves.
6. Airtight Food Storage Container – These are what I use to store my flours, salt, and sugars. They’re amazing, keep everything fresh and dry, and make it very easy to access and asses when I’m running low.
7. Bread Knife – If you’re gonna be baking bread, you’re gonna wanna a GOOD bread knife. We upgraded last week and it’s made a world of difference. Honestly. Our old bread knife was a hand down from my great grandmother, and while it’s sentimental, the cutting power was causing more crushing and mashing of bread than it was cutting. This knife helps our bread keep its shape and texture when we slice it.
8. Flour Sack Cloths – You’ll need these for covering bowls during dough rises, and for lining bowls during dough proving. They’re the simple, basic workhorses of your baking ensemble.
9. Dutch Oven – Besides a basic loaf tin or cookie tray, this is what I’ve been using to bake my rustic round loaves in, and what most recipes call for. I’ve been using my friends 7.25 qt Dutch oven, because I don’t have one of my own, but I’m thinking it’s time to treat myself. If you’re looking for a budget version try this one. I have do have a 5 qt. Dutch oven and it’s worked fine. I just have to make smaller loaves.
10. Flour Water Salt Yeast – I owe this book so much . . . .
11. Proofing Bags – These are perfect for making sure your dough stays nice and warm and humid while proofing. And unlike saran wrap, these are reusable!
12. Bread Lame – If you want to get artistic with your bread scoring, then you’ll want to use a real razor.
Happy Baking!
The post How Hard Is Baking Your Own Bread Really? (And The 7 Recipes I’ve Tried) appeared first on Emily Henderson.
Emily Henderson's Blog

- Emily Henderson's profile
- 10 followers

