
Emily Henderson's Blog, page 217
May 10, 2020
The Link Up: The $10 Toy Emily’s Kids Played With For Hours, Jess’ Favorite Moisturizer & A Stew Recipe That Went Viral
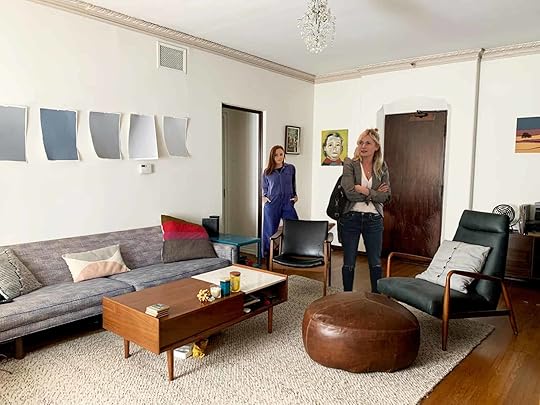
 design by three birds renovations | via coco kelley
Happy, happy Mother’s Day to all the mothers and caregivers out there. We hope you are able to celebrate (or not celebrate) in whatever way makes you the happiest. It’s your day! Now, here’s what the EHD team has been loving this week:
Today’s home tour is everything we want a Sunday to feel like. Happy, cozy, soft, and a solid dose of light pink. The entire house is a calm breath of fresh Australian air so be prepared to feel very good once your eyes get a load of this home by the very talented ladies of Three Birds Renovations.
ALSO, the wonderful, talented Sarah Sherman Samuels revealed her home’s second kitchen and the island is truly a work of art. GO NOW.
From Emily: “I finally found an over the sink dish drying rack that stores easily and is visually appealing. GOODBYE GROSS TOWELS.”
Also From Emily: “My kids got these as a gift in the mail from a former babysitter and they played with them for like FOUR HOURS.”
From Sara: “I swear I’m never buying store made tortillas again (a lofty statement). While homemaking them takes a decent amount more prep time than just pulling some straight out of a bag, the softness, flavor, and feeling of accomplishment is bar none. The hardest part about these is trying to roll them out into circles – which I failed out, but they still worked even in their blob-esque organic shapes. This recipe calls for bacon fat, but I didn’t have any on hand so I subbed the 2 tablespoons of bacon fat for 2 tablespoons of butter (ghee or vegetable oil would work as well).”
From Julie: “Even before working from home, I had been getting a serious pain in my neck/shoulder area. This was probably partially due to sitting at a desk for most of the day, not working out, being a prone-left-side-sleeper and constantly moving heavy objects for work (aka sofas). Last January, I finally booked myself a 90 min massage which is a rarity for me but after not being able to fully move my neck for about a week straight I thought it might be time to let a professional at it. And OH BOY she did! Let’s just say it wasn’t the most relaxing massage I’ve ever had in my life but it helped so much and above all, I learned the root of the problem. She told me that my muscles and tendons in that area were starting to move down and forward because of the aforementioned issues above. Like the true procrastinator I am, I didn’t really do anything different the following months until all of this went down and we were suddenly working from home for the foreseeable future. My workspace setup isn’t ideal and definitely wasn’t helping my pain issues. So I finally caved and started to look for a heating pad for my neck but it had to be electric since I don’t own a microwave. Then I came across this one from Sunbeam. And it’s AMAZING! It truly helps relive that intense pain I was feeling throughout the day and unlike those ones you heat up in the microwave I don’t have to keep getting up to reheat it only to leave it in the microwave a little too long and inevitably burn the sh*t outta my neck. It comes with 4 different heat settings and a magnet in the front that keeps it from falling off my shoulders and the cord is super long so I am actually able to move around a lot with it on. There is also a little bit of weight that makes me more aware of my posture so I am sitting up straighter throughout the day. Also, it looks like some futuristic battle armor so you know that’s cool too…right?”
From Ryann: “I am trying to drink more water but I unfortunately love sparkling water with the passion of a thousand suns. Since I am now at home 99.9% of the time, I decided it now makes sense to purchase a soda stream, so I can make delicious sparkling water drinks at home. Now I have it and it’s been great, but I am looking for some interesting drink recipes. As of now, I just squeeze some lemon in there and call it a day but I want to experiment. Any ideas??”
From Jess: “I just finished the moisturizer I was using and am now finally getting this one from my favorite skincare line, Tatcha. I have talked about them before (because I LOVE them) but I got a sample of this moisturizer over Christmas and knew it was my next try. I have pretty dry skin and this one really made me feel so hydrated and glowy. Plus according to its description, it’s supposed to tackle literally all of my face concerns: dryness, dullness and uneven texture, and loss of firmness and elasticity. It’s not cheap but I am really focused on getting my skin and routine SET. I require something personally positive to come out of this time at home so anti-aging it is.”
From Mallory: “Have you ever heard of #thestew?? If you haven’t, watch this ASAP. NYT cooking’s Alison Roman is my favorite person and I don’t even know her. Like if I was into polygamy, this girl would be the dream sister wife 100%. I think I linked her cauliflower pasta recipe on here once, but I can’t believe I haven’t discussed #thestew yet…who even am I? The other day I showed my boyfriend (aka personal chef…yes I am very lucky) #thestew recipe so he could make it for us. I was inspired by EHD alumn, Arlyn Hernandez (of course), who made it a mere 3 days before and gave me all the tips. 1. DO NOT SKIP OUT ON THE YOGURT AT THE END and 2. ADD SOME LIME IT DOES WONDERS! We made this even when it was 90+ degrees outside and we didn’t care…that’s how good it is. Trust me, you won’t be disappointed. After all, it went viral for a reason :)”
Exciting news! Emily’s Weekend Check-In is finally here. What’s that you might ask? Basically, the Saturday “blog recap newsletter” got a BIG makeover. Now, this newsletter is from Emily herself, which will include a quick “hi” and a “how I’m doing update” along with our usual (but now complete since before it didn’t account for our content nearly doubling) weekend “Here’s What Happened On The Blog This Week.” It is kind of like the “letter from the editor” section you see in magazines. Here’s a snippet from last week to give you an idea:
“We are very, very, very lucky that being a digital company means that our “doors” can stay open, articles can still be read, and we can still connect with our community. Of course there have been some shifts in the business what with this “exciting” (terrifying) new economy. In full transparency, ads are worth far less right now and partnerships are shaky. But we feel genuinely so grateful that as a team we can continue doing what we love to do, remotely, and that we have this incredible community (you) that comes to read our articles every day. It’s really forced us to be more creative and innovative, and while the world is in this very uncertain era, the home continues to be more and more important. You may have noticed that we’ve shifted our content, and now we’re realizing it was a shift that needed to happen anyways. We’ve gotten back to more personal, solution based posts about design/style and the response has been really enthusiastic. It feels more real and grounded and even I’m connecting to it more.”
If you are interested in hearing more from Emily herself, sign up for the newsletter here.
That’s all we have for now, and as always we hope you have a lovely Sunday and a great Mother’s Day. x
Opener Image Credit: Design by Three Birds Renovations | via Coco Kelley
The post The Link Up: The $10 Toy Emily’s Kids Played With For Hours, Jess’ Favorite Moisturizer & A Stew Recipe That Went Viral appeared first on Emily Henderson.


May 9, 2020
We Tackled Our Non-Functional Garage and These Are Our Ideas To Maximize It

Hi guys, Brian here. I’m writing this post because we found out yesterday that Emily is allergic to pollen. Like, suuuuper allergic. Like, looking at her you’d think she’d watched “The Notebook” and the opening sequence from “Up” back to back. Her poor little lash-less eyes are so red and watery that she can barely see. Also she’s been so congested at night that she can’t sleep. So last night she took something to knock herself out, and she’s still out as I write this, which is 7:39 am on Friday. That’s crazy for Emily, she’s usually up at 5:30 writing posts for the blog. So now I’m up early writing for the blog. I’ll keep you posted on when she wakes up… Hopefully, she goes for a while, she needs it.
Let’s start with a video so you can get the full scale and get Emily right before the pollen fully attacked (just wait for the ad to play).
OK. I’m back. The garage. This has a special significance for me because there’s something innate in men to have a squared away garage. I think it’s because the garage is the one room in the house (or out of the house I guess) where function matters more than form. It’s kind of the only place where I can win some design battles. In a garage, you’re not trying to figure out which pouf would offset the muted tones of a chaise lounge, you’re trying to figure out how many rakes can we fit on that wall. And that’s my kind of design.
The problem is, I’m lacking motivation to do things right now, which I think is a symptom of the whole quarantine thing. After home-schooling the kids in the morning, I find myself acting like an old British man, mumbling incoherently and stumbling around the house in a daze until cocktail hour.
But Emily, pre-allergies, is ever-motivated and kept threatened to do the garage herself until I acquiesced. So off to the garage we went!
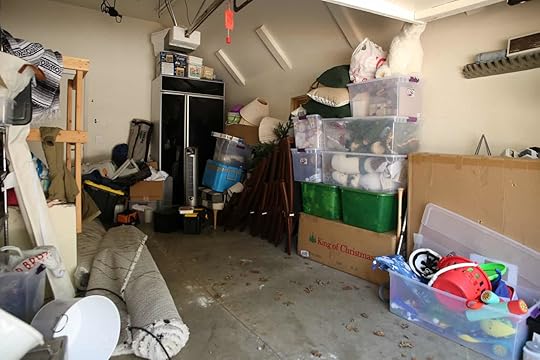
Our garage here at the is pretty small and has not been organized in about a year. Plus it was the storage site for the reader event we threw and photoshoots we did last year, so there’s a lot that needs to be sorted and donated or driven back to LA.
Here’s Emily showing off the space before her face got attacked by pollen.

As you can see, we never spent a lot of time thinking about the organization of this space. Emily and I are both kind of “I’ll just put this here and deal with it later” people, which isn’t a good combination when it comes to garages. We’ve got a shelving unit up, but it’s not being used very well. And we’ve got lots of random stuff near the shelves, but we just didn’t make it to the final step of putting them on the shelves, which is hilarious. Plus we have a bunch of stuff we need to find new homes for (not in our home) like the rugs, and some chairs, and some lampshades. We have a LOT of random lampshades. Anyone else have that problem?

BTW, it’s 8:01 am, and still no Emily. It’s getting to that point where I might go check to see if she’s still breathing.
So after Emily got the old British drunk to focus on the garage, we figured out some specific things that we needed: storage for our tools and yard stuff, space for our bikes, an area that we can rotate for seasonal things like beach stuff in summer and sled stuff in winter, a redesign of the shelving, and of course space enough to park my 6 seat “Ferrari” golf cart, which I will still defend as one of the best craigslist finds any human has ever made.

I mean the best, right?? Ok moving along…

It should be noted that there originally wasn’t access to the garage from inside the house so we put in that little stairway (it has to be that big for code, but we could certainly reduce its footprint). We love the access and we use it all the time but it does mean that we will never be able to put an actual car in here. But honestly, it’s so small that we don’t know if we would have been able to fit our big cars anyway. So yes, we need to be able to put the Ferrari in there, but that’s about it.
Here are more pics of the whole original mess:

We have a lot of Christmas stuff in those bins, which takes up a lot of space. We need to find a new spot for it though because it’s silly that something we only use for two months is dictating so much space for the whole year.

First Round of Organization
After everything was removed and cleaned it was much easier to see what might be possible in there. We gave some stuff to some neighbors up here, we drove some stuff back to LA, we relocated some stuff, and we learned that we had a lot of broken things that had to go in the trash.
Emily just came out of the bedroom, it’s 8:11 am. I don’t think she’s slept in that late since college. She says she’s feeling better today.
So here are some decisions we still need to make:

We need shelving, but could certainly make it nicer than that. And while we love that staircase do we want to make it nicer than that? Paint the janky railing? Like I said, we could have made it just three steps down without the railing but not legally, so we put in this big guy. We aren’t terribly motivated to demo it out and likely will just work with it for now.

The big black fridge came out of the kitchen during the remodel, and we were using it for secondary food storage, until someone accidentally unplugged it before we left for a few months. When we came back and made the mistake of cracking the door open, we were slapped with the most gag-inducing putrid smell and discovered a moldy sludge that had covered all the surfaces. We closed it back up and there it sits like the arc of the covenant, waiting to melt someone else’s face off. We tried disinfecting it, but it may be a lost cause. We need to make a call on this one. Like how much do we REALLY need a garage fridge??

Emily doesn’t think we need a garage fridge, because apparently she’s ok with pulling out 12 pounds of food to access the thing she wants in the back of our kitchen fridge. She says we’re doing fine without it now, but I’m less optimistic. Maybe things will change in a bit, but right now we are doing huge grocery shops to lessen the frequency of shopping, which means that every time we open the fridge it’s like that cliché scene in every comedy movie where the guy opens the closet full of stuff and everything falls on top of him, capped by a late bowling ball to the head. That’s our fridge, but it’s a jar of bread and butter pickles that rolls out last.
I also think a garage fridge is a perfect pace for beverages, which take up a bunch of room. And our kids aren’t old enough yet to try to steal adult beverages out of the garage fridge, so we’re good right? I mean, once they turn 13, I’ll put a lock on it, like my friend Alan’s dad should have. But for now, we’re good. What do you guys think? Fridge or no fridge?

I got a big-brimmed hat at the hardware store and I’m now super into yard work. I bagged 17 contractor bags of oak leaves last week and still have more to do, so I obviously need some space for my tools.
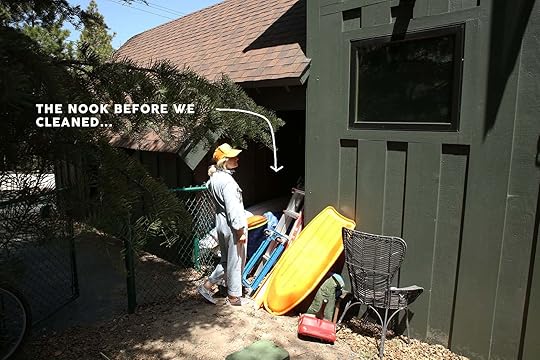
We have this little nook that is a covered space for storage if need be (and another entrance into the garage), we may put the bikes in here if we can figure out how to get them in there and still have space to get into the garage from the side yard. It took hours for us to clean and it wasn’t pretty. It was full of so much extra tile, leaves, random paint cans, our friend’s kayaks we just inherited, and empty gross Pepsi bottles left over from the construction crew (from two years ago). We feel very accomplished that it looks like this now:

We actually found some unused space up in the attic that we stuffed all the Christmas and winter stuff in, which was super helpful. The attic entrance is across from the kids’ play area, and the other storage space we have is behind a hidden door that goes to the guts of the house.
What’s Now?
We still have to figure out things like the shelving and the fridge. We also are going to find a way to hang the bikes because they take up an abnormal amount of space. Also, the ceilings are nice and high, so we’re trying to figure out if there’s a way to hang some stuff up there for storage.
The Solutions
We need some tool storage but I don’t know if we really need anything fancy. It seems like at least considering something like this (below) would be nice and may make me feel more manly. Like whenever I have to replace a battery in a kid’s toy I can make a big deal out of folding out my workbench and feel like a handy guy.
 image source
I’m also worried that I would leave all my tools on the table instead of hanging them up in their right place. I think I may need a big box to throw them in. I know, I’m lazy, but it’s folly to think that I’m going to change.
This person’s garage is dreamy.
 design and photo by simply organized
I feel like this is good inspo for storage. The only problem for us is that the space between the wall and that big staircase is pretty narrow so I don’t think we could hang bikes and pull the golf cart in…. a sentence I never imagined that I would ever write. Sorry, I know these are all champagne “problems” but hey, we’re writing what we’re actually going through up here.
But I really like how there’s two rows of storage happening, the shelf for bins and underneath for hanging things that get used often. These are some good broom and rake storage options that could work:

1. LETMY Broom Holder Wall Mounted | 2. Corner Double Tool Rack | 3. Koova Wall Mount Garden and Garage Tool Organizer | 4. Deluxe Tool Tower | 5. Goowin Broom Holder | 6. Stalwart Rolling Garden
We thought about getting a small outdoor shed to house things like rakes and such, but I think it makes more sense to keep everything contained to the garage. Plus it’s been impossible to find a shed that has gotten Emily’s approval.
 image source
We got into mountain biking up here, and Charlie is finally up and running on a peddle bike, so we definitely will be using them a lot. Right now, I think mine is laying in a pile of leaves on one side of the house while Emily’s and Charlie’s are sprawled out around a tree on the other side. That can’t keep happening, our neighbors must think that we’ve been raptured mid-bike-ride. So we will try one of these. Have you guys used any that you recommend?

1. TORACK Bike Rack Garage | 2. 6-Bike Storage Rack 2.0 | 3. Elfa Utility Vertical Bike Hook | 4. Copenhagen Wall Mount Bike Rack | 5. Delta Cycle Leonardo Da Vinci Single Bike Storage| 6. Bike Wall Mount
And while we’ve found a way to clear out most of our bins, I’m sure we’ll accumulate more, so we’ll need a good vertical storage system. I’d love to say I could build one, but I’d also love to say that I can do a standing jump over a car or that I can run faster than a gazelle. I’m just not that handy y’all.
 design and photo by simply organized | design and photo by modern builds
Here are some solutions we are considering…

1. Platinum Elfa Utility Basement Storage | 2. Bror | 3. Matias the Heavy Duty Storage System Ceiling Mounted Rack | 4. Shelf Steel Freestanding Storage Cabinet | 5. Chrome-Finished Tower Shelving | 6. LEXIMOUNTS WR24B Storage Rack
Lord knows we go through a lot of storage here in Emily Hendersonland, and we’ve used lots of types of bins. Here are my tips – they can’t be hard plastic because they break, they have to have a good seal, preferably not the clip handle because those break, they should have good grips for when you move them a hundred times, and they should be stackable.

1. Tough Storage Bin | 2. Brute Tote Storage Container | 3. Heavy Duty 54 Gal. Storage Bin
So that’s where we are with the garage so far. We’ve got a long way to go, but it’s looking much better in there, plus we’ve kept it pretty clean since the organizing day. We’ll see how long that lasts. But at least for now, the garage is no longer a place to just dump stuff and go, it’s clean and organized and we can see the potential. Or at least I can see the potential, Emily may not be able to see much until spring is over. Stupid pollen.
The post We Tackled Our Non-Functional Garage and These Are Our Ideas To Maximize It appeared first on Emily Henderson.
May 8, 2020
Our List Of REALLY Good, Binge-able TV Shows You Might Have Missed Or Forgotten About
 photo by sara ligporria-tramp | from: emily bowser’s “refreshed for function” small living room makeover
It’s no secret that I prefer TV over films, but it’s only because I like to get VERY invested in the characters. Some might say obsessed. You see, I can go full “Nurse Betty” about TV shows. If you don’t know that reference, it’s a movie about a woman who was obsessed with a soap opera, fell down hit her head and when she woke up she thought it was real – that the characters were her actual friends and the hospital was an actual place (she left her life to move to LA to find the hospital, get back to her friends and her lover, etc). That’s how I am. I don’t just watch shows, I go deep and practically lose myself. And that’s how it should be. But not every show wins my obsessive affection. I need the following words/descriptors in order to surrender my time (they don’t have to be ALL of these, but certainly need to be some). Ahem: Teen, drama, coming of age, thriller, romance, epic, love, mystery – with the ONLY exception being family drama (but only some – I’m talking to you Parenthood, This is Us and Brothers and Sisters). Sure, I loved 30 Rock but can you watch 16 episodes in a row and then have dreams that you work at Rockefeller Center? Not me. So here are my all-time bingeable, addictive, can’t stop thinking about TV shows I’ve ever watched and loved (along with the rest of the EHD teams recommendations, just in case you aren’t as crazy as I am about the teen/love genre).
Teen Romance/ Coming of Age
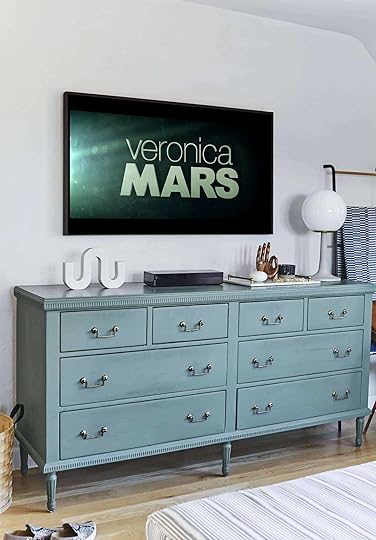 photo by veronica crawford | from: our bed room update (also how i feel about have a tv in the bedroom)
From Emily: Veronica Mars – I avoided this for the first few years because, as Brian so aptly put it, “why would I watch a show about a detective teenager in the OC?” But stop avoiding it, you will be so grateful to me. Enough friends told me to watch it so we caved, and then Brian and I found ourselves watching 16 episodes in a row (season 2). Here’s what you need to know: It’s set in the aughts in the OC, with the “haves” versus the “have nots” (I will always love this dichotomy), it has probably the best father/daughter relationship on television ever, with weekly crimes to solve but more importantly an overall extremely compelling mystery that is GRIPPING. Super talented acting, hilarious writing, and don’t worry – there is love, folks. There is love. It’s also very fun to know that Kristen and Ryan Hansen are still practically best friends even though they hate each other in the series. I loved it so much that I gave far too much money to get the movie made, getting a minor producer credit.
From Emily: Vampire Diaries, Riverdale, Gossip Girl, Roswell – If you like teenage thrillers as much as I do these are all addictive, fun, and hard to stop watching.
From Sara: Skins – If you’re a fan of Riverdale or Gossip Girl (like Emily and I are), but you haven’t ever watched SKINS, then buckle up. This show is so nostalgic to me that the opening song can bring a tear to my eye. It’s filled with extremely extra drama, a good dash of comedy, copious amounts of teens almost kissing (and actually kissing), and witty dialogue. The first two seasons feel a little dated at this point, and they definitely have some moments we’d consider “tone deaf” to our modern sensibilities, but for the most part the characters at their core still feel totally relatable to my teen self. Plus you’ll get to see some current favorite celebrities in their early days (Nicholas Holt, Dev Patel, and Kaya Scodelario, along with two GOT staples, Joe Dempsie and Hannah Murray #Cassie4Ever). But seasons 3 & 4 are my personal favorites. By the way, this isn’t a PG show (we’re talking drinking, sex, copious drug use, violence, topics of ED, rape, teen pregnancy, etc.), but it’s one for the books, AND ALL 7 SEASONS ARE ON NETFLIX. Make sure you’re watching the original British show, not the American remake.
From Julie: Degrassi: The Next Generation – It’s the Canadian teen equivalent TV show of Parenthood where they address literally ever issue that could happen to someone between the ages of 12 to 21. Super relatable and highly addictive. And if you were a tween/teenager in the early 2000s like I was then you’re probably also well aware of the fact that Jimmy Brooks is now DRAKE.
From Ryann: Dawson’s Creek – It’s possible everyone and their mother has seen this already and I was just super late to the game when I binged it last year. But if you haven’t watched it and you love teen/coming of age story with (PG) romance, you’re going to devour it. You also will probably love rewatching if it’s been 20 years since you first saw Katie Holmes and James Van Der Beek fall in love.
From Emily: Felicity – Oh if I could go back and watch it for the first time. What a gift you can give yourself if you haven’t seen it. Here’s what you need to know: Coming of age, romance, a love triangle, and New York pre-2001, with J.J. Abrams as the producer. If you missed my favorite show the first time around, the good news is that it doesn’t date. A good friend of mine (38 years old) FINALLY listened to me and started it this year, then couldn’t stop, making all her plans around watching 3-4 episodes a night. A direct quote from her: “I think no matter what happens in my life now there is a Felicity episode that can comfort me.” It’s incredibly relatable and so well written and acted.
Comedies
 photo by sara ligorria-tramp | from: how to design the ultimate family-friendly media room + wet bar
From Caitlin: Dave – This is my new favorite show AND it just aired it’s season finale so you have A WHOLE TEN EPISODES TO WATCH, you guys!!! That’s the perfect amount – it’s binge-able in like 4.5 hours, which is scientifically the perfect amount of binge-watching time (according to me, because you can finish a show AND still get some stuff done afterward). ANYWAY, it’s based on the life of real-life rapper Lil Dicky (aka Dave) and it was SO MUCH better than I anticipated. It’s SO earnest, way more so than you’d expect from a guy who’s made a living rapping about his junk, which he does address in the show. And it is so well-cast with characters who will remind you of regular people in your life. Like, I can’t find enough ways to stress how genuine and sweet this show is. I really, really love it. (Also, my first job out in LA was in a recording studio, and this gets it SO RIGHT.)
From Ryann: Veep – Julia Louis-Dreyfus is a national treasure and her performance in Veep is incredible. I don’t think I have ever laughed harder from a show. It’s also SO smart and well written.
From Ryann: Crashing – Fans of Flea Bag and queen Phoebe Waller-Bridge, this is for you. PWB actually created and wrote this series so it has that same dry, raunchy British humor that Flea Bag does and it’s hilarious. I think I got through the whole series in a day and was so sad to discover it only ran for one season. But don’t let that discourage you! It’s worth the binge.
From Sara: Psych – If you loved Scrubs, or are a fan of Brooklyn Nine-Nine then give Psych a try. This is a classic buddy cop/bromance comedy, with the twist being one of buddies isn’t actually a cop at all. He’s just a highly perceptive dude who’s trained himself to put together clues like a puzzle (or a detective??) all under the guise of being a psychic. And while he may be wildly perceptive, he’s not the easiest pill to swallow. HILARITY ENSUES. This is just a really fun, feel-good show.
From Jess: Weeds – Talk about a show that takes A LOT of twists and turns. I mean what else does a mother/widow do when her husband suddenly dies… sell weed of course. It’s funny, sexy, touching with a ton of action. Also, it was created by the same women as Orange is the New Black so you know it’s good. I also never held my iced coffee the same way after watching this show…
From Jess: Sisters – I stumbled upon this little one season Australian show on Netflix and I was immediately taken in. The main character Julia, has just lost her Nobel prize-winning father who unbeknownst to anyone was secretly/illegally using his own sperm in a ton of his In Vitro patients. So after years of thinking she was an only child, she actually isn’t and may have to share her father’s fortune. It’s sweet, funny, sad and at moments enjoyably cringe-y.
From Julie: Grace & Frankie – Lily Tomlin (Frankie) & Jane Fonda (Grace) are friendship goals (are we still saying this?) starting off as rivals the two commiserate together in a beach house after some shocking news. Six seasons later Jess and I are still so excited to binge-watch it all in one night!
Dramas
 photo by veronica crawford | from: velinda renovated & furnished her “fixer upper” for under $55k…here’s how
From Emily: Parenthood – If you like This is Us, then you’ll love Parenthood even more. This show made me rethink keeping our family small, because everyone wants to be a Braverman. I don’t think I would have watched this seemingly commercial network family drama if a million people had not told me to. So I started it and the first episode I was sucked in, cried, and the marathon began. It’s the most incredible ensemble cast, with every situation in life being played out in such relatable ways.
From Sara: Unreal – If you love The Bachelor this show is for you. If you HATE The Bachelor (or just can’t take a single episode seriously, like me), this show is for you. So really, this show is for everyone. It’s a fictional drama based on the production side of a “Bachelor” type show, and it’s RIVETING. It’s got just as much drama and high flying emotions as any episode of The Bachelor that I’ve seen, but with strong female leads and a great script.
From Caitlin: Manifest – I’m not actually 100% sure who the target demo is for this show, but I’m pretty sure I’m not it. I love it anyway. Manifest is about the passengers of Flight 828, who get on a turbulent flight, land, and learn that 5 years have passed and that all of their family and friends have basically moved on without them. The premise is very cool, some of the storylines get a little bizarre, and a few of the graphics are kind of funny in that they really take you out of the show (like, really, you’re sailing on an ancient boat in a storm now?) — but those are all things that I really enjoy. It’s escapist, easy to get into, and pretty family-friendly. RECOMMEND.
From Ryann: The Sopranos – This show is amazing. It’s suspenseful and addicting and if you’ve been putting off watching, nows the time to change that. It’s not just an Italian mob show. There is so much social commentary going on about masculinity, mental illness, family, identity and it has surprisingly aged well considering when it was created and the plotline. It’s also so well-acted and written. Oh, it’s also a great show to watch if you are quarantining with your husband or boyfriend and you’ve run out of things you both want to watch.
From Sara: The Newsroom – For fans of sharp wit, fast-flying dialogue, and politics (think Succession or House of Cards), give The Newsroom a try. It’s Andy Sorkin, so this show moves FAST. But the characters are compelling, the topics feel relevant, and the acting is really top-notch. I was hooked after the first 15 minutes.
From Jess: The Get Down – One of my absolute favorites. It’s a two-season series (the first season is better IMHO) that is set in the late 1970s in New York. It was the demise of Disco, the rise of Hip hop and not the New York we know today (duh). I love that while most of the characters are fictional, there are a lot of characters that actually existed during that time so it feels historical in that way. But ultimately it’s full of beautiful love stories. The end first episode still makes cry, like hold your heart and remember your first true love cry.
From Sara: Nashville – This one clings right to my Grey’s Anatomy loving heart (and yes, I’m still up to date on Grey’s). I’m a little biased, because I really enjoy country music, but this show really sucked me in. I didn’t get into it until right before the final season was released, and I feel in love hard and fast. And this show has something just really soulful and heartfelt with the added music element.
From Mallory: Madmen – This is all I’m watching right now. For some reason, it took being locked in a house for 2 months for me to get into this show, but holy hell am I in. The 1960s world is SO fun to watch, the story is steamy and compelling, and WHY IS EVERYONE SO INSANELY ATTRACTIVE. I’m weak. Watch it if you haven’t yet.
Dramadies
 photo by tessa neustadt | from: house tour: mel’s new place makes us want to declutter immediately
 From Julie: Sex Education – This British show is not your average teen drama, it’s a refreshing real take on sex and the insecurities that surround the subject. The main character, Otis, who is the least experienced in this department finds himself offering advice to his peers solely based on the knowledge he has acquired from his sex therapist mother. The show plays upon the growing trend of being set in an unknown decade making it relatable for a wide age group and a tad nostalgic.
From Julie: Misfits – This show is definitely a bit on the cheesy side but the first 3 seasons had me hooked. As I am not usually one for stories about superheroes my skepticism was high. But I will always give it a few episodes when it comes to British TV like I have in the past with Skins and the IT Crowd.
From Jess: Ally McBeal – This show was above my age group when it was on TV but after years of hearing references and not knowing what that dancing baby was about, I decided to end my curiosity and just watch. It was weird but I was IMMEDIATELY hooked and binged it hard.
From Sara: Queer As Folk (the American version) – This show has one of my all time favorite romances ever, and for me, it just doesn’t get better than Brian Kinney. He will forever be the king of lust worthy bad boys. I would binge this in college on DVDs rented from the school library. It paired endearing characters, with witty humor, hard hitting important topics, and lots of sex. It definitely has it’s dated moments (like a white character dressed as a Geisha complete with a wildly offensive accent), but it also has a lot of merits. And again, a romance thru line that still makes my heart JUMP. And while I’m here, even though it doesn’t fit the bill of the post since it’s current, I’ll throw a recommendation out for everyone to watch POSE.
From Jess: Lovesick – I don’t know why more of my friends didn’t see this?! It’s a classic “will they or won’t they” and SO endearing. Plus it’s a British dramedy, so the humor is dry and wonderful.
From Jess: She’s Gotta Have It – Ok so I still haven’t seen the original movie but I LOVED the series so much (sadly only two seasons). I’m sure I don’t need to tell the plotline to most of you, but Nola Darling (the main character) is on an unapologetic mission to be true to herself and her art while bouncing between three VERY different men. It deals with love, art, friendly, race, and so many other social issues. You need to watch this show to get the Puerto Rico episode. It’s complete magic.
From Jess: Drop Dead Diva – This show is REAL corny but also really endearing and SO addicting. I mean who doesn’t love a body switch, romance-filled, law dramedy?? Give it a chance and you will be hooked.
Period Pieces
From Emily: The Tudors – This might deserve a rewatch. It’s dramatic and sexy and transports you instantly.
From Emily: – Remember when the entire world watched an extremely slow show about a buttoned-up British family? We were obsessed with it and while it is slow, its really beautiful if you have the patience together into it. If not now, when?
From Emily: Outlander – Well I think you all know how I feel about this one – once I started I bingeing this hard it became a bit of an obsession – like speaking in a Scottish accent, wearing ren-faire inspired clothing. Perfectly normal life changes due to a 17th-century epic romance sci-fi show. By watching this you are totally transported into the Scottish highlands, with time travel, love, romance, wars, betrayal, and likely the most attractive human being on the planet, aside from Brian, obviously. While Brian didn’t watch it, he sure did LOVE that I watched it if you know what I mean. Fine, it’s basically love porn, ok?
From Sara: The Borgias – I love, love, LOVE a period piece. Downton Abbey, The Tudors, Outlander – these are my JAM. The Borgias is one you might have missed. Set in Rome, it’s just three seasons of beautiful people doing very naughty things. The costumes are drop dead gorgeous, and the sets are *chefs kiss*. I will say that there is one major plot twist that is, uh . . . less than ideal. But both actors are wildly hot and have SIZZLING chemistry, so it’s confusing. . . Anyways, it’s totally bingeable (and there was a finale screenplay released after the end of the 3rd season to help wrap things up for the fans).
From Sara: Wow, honestly this is my favorite category so I’m just gonna throw a BUNCH out there for you all, because this would turn into it’s own post if I had to write about each one: Vikings, The Last Kingdom, The Spanish Princess, Poldark, War & Peace, Taboo, Black Sails . . .
Thrillers
From Emily: You, Bloodline, and The Affair – Three gripping thrillers that you will get extremely addicted to. They all have well-done production, acting, and writing along the way. Bloodline became an obsession for me, it’s set in Florida, and is about a dysfunctional family (with lots of money) with a super compelling mystery and incredible acting/writing. Also, Outer Banks just came out and I binged it in ONE DAY – it’s what would happen if Bloodline and Veronica Mars had a baby.
From Emily: Lost – I was so disturbed to know that half our team hadn’t seen this – LUCKY YOU, likely because they were in high school when it came out. If you like plane crash thrillers, set on a beautiful deserted island, with beautiful people falling in love and lots of sweaty body parts, betrayal, action and so much mystery and drama – how can you not love this show? It really was the perfect blockbuster TV show and if you missed it the first time around consider yourself lucky.
From Sara: I second Lost. Listen, this a classic for a reason, and if you’ve never watched it now is the perfect time to binge it. And you will want to BINGE. This show has it all – hot people, serious mystery, good laughs, high key drama. The last two seasons get a little woo woo, and the ending was a little “lost” on me. But the first three seasons are AMAZING. Julie thirds the Lost recommendation and she’s watched 3 full times.
From Mallory: Here’s another vote for You. This is the kind of show that you watch and then can’t stop watching, and then you finally accept the fact that sleeping was for the pre-You, you. Both seasons 1 and 2 are incredibly bingeable and will lead a desire – nay – LIFE-DEPENDING NEED to know what happens next. Guys, I haven’t loved a show like this since I watched Gossip Girl for the first time, so if that doesn’t give you a clue to what kind of show this is, let me break it down further. It’s basically is Gossip Girl but instead of Penn Badgely playing Dan Humphrey, Penn Badgely plays creepy Dan Humphrey. I don’t know what else I can say because I don’t want to give it all away, but just do yourself a favor, watch this show.
From Julie: Killing Eve – I am a huge fan of Sandra Oh (Grey’s Anatomy) so I was thrilled to hear she was the lead when Velinda recommended this show to me two years ago. It’s the classic good guy tracking down the villain but the leads are all women. Get ready for a lot of smart witty humor and some equally terrifying shocking scenes. (Ryann seconds this).
From Julie: Dexter – Dexter is the serial killer that everyone loves and no one suspects since he works as a blood splatter analyst (fitting) for the Miami-Metro PD. Each season’s storyline centralizes around a different theme which grows darker by the season. But do yourself a favor and skip season 8, trust me you’re not missing out on anything. This show was my stepping stone into watching thriller tv shows like The Sinner & Criminal Minds – which if you haven’t seen this but love a CSI type show then WATCH IT.
Alright, that’s all from us. Now we want to hear about your favorite shows that didn’t get the hype they deserve. Meet us in the comments and let’s chat. xx
Opener Image Credit: Photo by Sara Ligporria-Tramp | From: Emily Bowser’s “Refreshed For Function” Small Living Room Makeover
The post Our List Of REALLY Good, Binge-able TV Shows You Might Have Missed Or Forgotten About appeared first on Emily Henderson.
May 7, 2020
Kid Playhouse Roundup: For Every Type of House, For Every Budget

A couple of Saturdays ago was one of my favorite days in awhile. My dad and I picked up a playhouse kit that my friends (who live up north too) had bought for their 2-year old. Sadly, it had been sitting in its box, untouched for weeks. Apparently having two kids (the other under a year) in diapers is pretty time consuming:) Anyway, we HAPPILY took on the project. I mean what a win-win. We get a project to pass an afternoon and my friends get what will hopefully be hours of endless entertainment for their sweet but nonstop toddler. I also want to mention that we felt like actual Santa Claus. The pure joy on Otto’s face was soul-filling, to say the least. Then hearing him ask what his mama wanted him to cook from the little window made my ovaries hurt. Her answer was a burrito (duh) a pure example of why we have been friends for 17 years.
Side note: We all kept a VERY safe distance and were wearing masks. I can’t wait for the day I can scoop that little pumpkin up.
This whole little adventure got me thinking. The weather is getting nice (or is already HOT in places like LA) and maybe other parents are thinking about finally ordering a playhouse. Likely most parents are at the “whatever will keep them occupied that isn’t just the TV” stage of this quarantine (my friends were). So I decided to round up three different types of playhouses: wood, cardboard, and fabric. This way whether you have a backyard or live in an apartment, there is “a house” for every type of home and budget (I’m serious there is a very cute $18 tent down below).
But before we move on to the houses please enjoy little Otto’s sweet face and his cute playhouse! My dad and I didn’t install the roof because since it was just the two of us carrying it (again for safety), we didn’t want it to be too heavy. To cover that fact, my dad said that my friends should have do something (typical Les Bunge). So the roof was expertly installed by Otto’s dad as shown in the picture on the right:)

WOODEN PLAYHOUSES
 photo by tessa neustadt | via lonny
Let’s start with classic wood playhouses. What’s great about a wood playhouse is the obvious fact that they are likely going to last you much longer (which usually comes with a higher price tag). They also require more labor to put together (unless you choose something like #3 or #7). But it’s pretty undeniable how cute these are and so much room to personalize with paint!

1. Outdoor Farmhouse Style Playhouse | 2. Modern Outdoor Playhouse | 3. Castle Playhouse | 4. Meadow Lane Market Playhouse | 5. Scenic Heights Cedar Playhouse | 6. Hillcrest Wooden Outdoor Playhouse | 7. Castle Rock | 8. Evermeadow House Playhouse | 9. Brown Aspen Playhouse
CARDBOARD PLAYHOUSES
 from: 50+ nearly free ideas for how to entertain your kids (& get you through summer)—updated
I know that buying a cardboard playhouse may seem crazy when you can build one yourself (please see the Henderson’s masterpiece above). But if you don’t have the boxes or you are just wanting something a little more special looking, then have a look at the ones below. #1 blew my socks off when I saw it and #2 is actually a bunch of building blocks so your kids can create all different kinds of structures. Pretty darn cool.

1. Cardboard Magic Castle | 2. Mega Building Blocks | 3. Rocket Playhouse | 4. Cardboard Space Shuttle | 5. Cardboard Playhouse Pirate Ship | 6. Cardboard Playhouse
FABRIC PLAY TENTS
 photo by tessa neustadt | from: little girl’s playful bedroom reveal
Fabric play tents are great if you don’t have an outdoor space, are on more of a budget, or just simply prefer the ease of a tent (no tools required doesn’t sound bad). Just giving your kids a new little place to play and use their imagination is such a gift (especially when they are this cute). First off I can’t handle how funny #4 is. I mean it’s actually a “Palm Springs” house. Clearly reserved for the most design-forward of children. But I really love the classic feel of #1 and the utter sweetness of #2.

1. CIRKUSTÄLT | 2. Play Tent Play House | 3. Indoor Outdoor Fort | 4. Palm Springs Playhouse | 5. Small Colorful Flags Play Tent | 6. Circular Kids Pop-Up Play Tent | 7. Tower Tent | 8. Tent with Beetle Embroidery | 9. Fire Station Playhouse
I hope that if you were thinking of getting a playhouse for your little one that this helped. And I know we shouldn’t be selfish and make it about us (and not the kids) but guys feeling like Santa Claus truly rocked. Happy Thursday:)
Love you, mean it.
Opening Photo Credit: Photo by Sara Ligorria-Tramp | From: Building Our Backyard Castle with Wood Naturally + Fort Roundup
The post Kid Playhouse Roundup: For Every Type of House, For Every Budget appeared first on Emily Henderson.
Virtually Designing A Friend’s DARK Living Room (From My Living Room). Help Us Choose A Paint Color!!!

Well, we are moving forward on some smaller design projects, without stepping inside the room. It would be like writing a book on a typewriter with invisible ink – doable (?), but certainly not our usual process and that makes us feel unsafe and unsure, but maybe in a good way? Today we are showing you an update of a project we introduced briefly earlier this year, and we have a very important paint color decision to make in order to keep this moving forward – because while we can’t shop, they can paint.
You see, there is a dark accent wall that is bumming us all out, making the space feel smaller and becoming this daunting force in the room screaming for attention in a bad way. It’s going to be a BEAST to paint over, so we are partnering with KILZ® on this project because we need a seriously good primer and they are the best in the business – it’s what all our painting contractors use and recommended to us. Plus, now that they have paint colors to choose from as well, it’s a one-stop paint solution. So without actually being in the room, seeing how it feels or how it looks in the morning versus the night we are all going to choose this color TODAY.
Here’s how this project went down – Corbett is one of my best friends (see her house ) and her brother Chandler just moved into a new apartment that was dripping with charm, but needed some help in the decor department. She has GREAT taste, as you can see from her house, so she was going to be the lead designer on this (to save on our design time) and we were going to do it together for him as a fun project, with his input of course. We had dreams of thrifting trips to Palm Springs and so many Rose Bowl Flea market hauls, that who knows, might still be in our future. But meanwhile, we are moving forward and you are invited to come with us.

He lives in a historical building on Wilshire – that is the courtyard you walk through to get to the lobby. It’s SO AWESOME.
When we first saw his apartment, he had JUST moved in. Corbett had just held a garage sale so he had sold most of his furniture that he didn’t like, thus the stuff on the floor and the lack of furniture. OF course, if he knew it would be months before he got a sofa he might have waited, but without a time machine we can’t really go back and fix it.

It is a great space with some obvious, solvable, challenges. The biggest is the lack of natural light. His window faces the courtyard so it doesn’t get a ton of light, and painting just ONE wall such a dark color hasn’t helped. Plus he wants some privacy from his neighbors so we can’t leave the window naked. He needs window treatments which frankly is a bummer because that window is gorgeous, but I get it – he would feel very exposed.

Besides needing a sofa, there is also a challenge of laying out the room because it is a pass-through space (but not too long and narrow, thank goodness) and there is a lack of storage. But the biggest culprit is that dark accent wall, which we’re planning to cover up with KILZ® Primer and paint.
Months ago Corbett pulled together a mood board for it, which we loved, based on this inspiration.
 image source
It was ’70s brutalist, with some mid-century mixed in and lots of contemporary or more post-modern pieces. We are in need of some color I realize, but we still want to keep it moody.

We all met up and landed on the below mood board, but it wasn’t finalized – just a bit closer to where we were headed. We knew that we wanted a lot of thrifted vintage so it’s hard to create a mood board not knowing what we will score.

But then Chandler let us in on a secret – he doesn’t really like the ’70s, hates brutalist and in fact leans far more ’60s. And the ’80s/ postmodern trend that we loved was definitely not his jam. When probed, what he wanted it to look like this room from Mad Men.
 design by | photo by eric laignel | via interior design
So Julie took that inspiration and brought it more into 2020 with the following inspiration. We get you Chan, you want cleaner lines and more of a mid-century feeling, but we think that can be done while mixing in some contemporary pieces.
 image source 1 | 2 | 3
There are ways to bring in the mid-century vibe without going full “set,” mostly by using cleaner lines and less round and bulbous shapes (he really didn’t like them).

A few weeks before the shutdown, Julie and I were thrifting in Pasadena and I found this sofa for $200. TWO HUNDRED. As an unfortunate sofa hoarder (WHY OF ALL THE THINGS TO HOARD?) I HAD to get it, but so would you – $200 for this mid-century gem with original upholstery in decent shape? I didn’t have any place to store it and while I wasn’t convinced it was right for Chandler (this was before we knew he wanted more mid-century) we figured we’d at least store it in his living room and he could sit on it while we continued to design. Then, since we were renting a UHaul anyway, I said: “hey swing by my storage unit and lets at least get you some other pieces that MIGHT work.” This is an unusual part of the process as most people don’t have an inventory to temporarily pull from. But since he’s a friend it felt like a good way to get him some pieces to sit on as well as get a better sense of what really works in the space and what he likes. So a lot of the pieces you’ll recognize and they may or may NOT stay as we haven’t seen them in the space.
Julie gave him some direction of where to put the pieces that we were loaning/giving him.
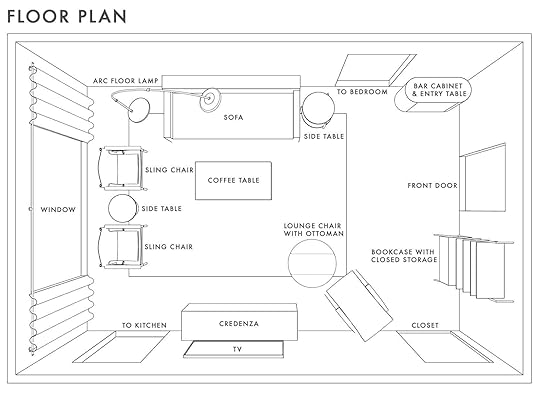
Now there are a few different ways you can layout this room, but this feels the most natural to us and him and like I said, it might not be this exact furniture but we like the two chairs across a chair and ottoman, allowing a pass-through space.


Having these simple SketchUps by Julie certainly helped him arrange them and gave us all a better idea of what would work.

Of course, I’m dying to go in and move them around (and remove at least one black leather/wood chair – THERE ARE A LOT!), but until it’s safe to, we can’t go over there. Now normally we would wait to paint until at least some of the major furniture decisions, but Chandler has offered to paint while staying at home and it would be a huge check off the box. So we chose some neutrals that he (and we) were most attracted to – here goes.
 more details here
Julie ordered samples and painted them all on large pieces of paper and then dropped them off outside his apartment building and texted him to come grab them – like a paper drug dealer.

We instructed him to put them on both the accent wall and the opposite wall and take SO MANY PICTURES.

Like I said, this is not our usual process and it’s EXTREMELY hard to make this decision not being in the room and not knowing what really is working design-wise with the furniture.
So right now our thoughts are this:
Going light will keep it feeling bigger or at least as big as it can be, but without very much natural light bouncing around, will it just feel boring and dead? Going dark could make it feel moody, but it’s a pretty big room to go dark in, with a large white ceiling (that we’d love to not paint as it’s a rental and it’s just so time-consuming and laborious to paint such a big ceiling). With only one window to break up the space it could just be a big dark box (which I suppose is why the last renter painted just that one accent wall).It’s a little on the safe side mostly because all the “leftover furniture” is black and wood. It’s making me realize we need some color, some art, and VINTAGE. I’d love to try to mix in more mustards like in Corbett’s mood board above. While I love that sofa, I want more contrast with the wall color and yet we don’t want the room to be a bold color (nor white). But we are in a “make it work” phase of life so I also would love to try to just make it work. I’d love to consider doing something with the paint to break up the walls, or painting the trim a contrast. It’s honestly so hard to be creative without being in the space but it’s a good challenge.As far as decor goes we are going to follow our rules of how to make a dark room feel brighter – mirrors, more contrast, things to draw your eye around, plants, adding architectural elements that pop and art that brings in pattern, color and interest. This room needs LIFE. (See this post where we break down how to do this). While I love the article chair (no longer available)/ottoman and the leather sling chairs I bought at the flea market – I’d love one or more of those to be different – and I’m leaning more towards nixing the sling chairs in hopes of finding some that are upholstered (in a mustard velvet?) or in a pattern. In the above mood boards, I like the darker colors the most, but I do fear that they’ll be really dark so we could do a lighter tone with darker curtains. The rug we want to use is from the mountain house living room (it was getting way too much traffic in there so we switched it for something darker). We are actually dropping it off this week to see if it works in there, instead of sourcing another rug (his current one is too small). It’s a good opportunity for a pattern, but since we have this rug I’d love to try to make it work on a budget.
Right now if we keep the vintage sofa I’m leaning towards doing the darker “Porpoise” with a patterned curtain (am I suggesting a statement curtain? Are we back to that?) to help draw your eye in and give some interest while they are closed. We could even sew a bunch of flags together or do a textile art for curtains since it doesn’t need to be blackout or anything, more just so people can’t see in. BUT I could easily be convinced to do “Silverado” which would make it feel bigger, but wouldn’t be as dramatic. Then we could add drama and moodiness through the textiles, art, and accessories. Or, here are all the paint colors available if you want to suggest a totally different direction.
I mean guys, I can’t tell you enough how much I wish we could get our bodies into this space. I want it so bad that I had Julie photoshop us in and looking very serious about the design of this room.
So since you have seen the space as much as we have at this point (clearly) – what say you????
The post Virtually Designing A Friend’s DARK Living Room (From My Living Room). Help Us Choose A Paint Color!!! appeared first on Emily Henderson.
Virtual Design: Helping A Friend’s Dark Living Room (From My Living Room). We Want Your Opinion On The Paint Color!!!
Well, we are moving forward on some smaller design projects, without stepping inside the room. It would be like writing a book on a typewriter with invisible ink – doable (?), but certainly not our usual process and that makes us feel unsafe and unsure, but maybe in a good way? Today we are showing you an update of a project we introduced briefly earlier this year, and we have a very important paint color decision to make in order to keep this moving forward – because while we can’t shop, they can paint.
You see, there is a dark accent wall that is bumming us all out, making the space feel smaller and becoming this daunting force in the room screaming for attention in a bad way. It’s going to be a BEAST to paint over, so we are partnering with KILZ® on this project because we need a seriously good primer and they are the best in the business – it’s what all our painting contractors use and recommended to us. Plus, now that they have paint colors to choose from as well, it’s a one-stop paint solution. So without actually being in the room, seeing how it feels or how it looks in the morning versus the night we are all going to choose this color TODAY.
Here’s how this project went down – Corbett is one of my best friends (see her house ) and her brother Chandler just moved into a new apartment that was dripping with charm, but needed some help in the decor department. She has GREAT taste, as you can see from her house, so she was going to be the lead designer on this (to save on our design time) and we were going to do it together for him as a fun project, with his input of course. We had dreams of thrifting trips to Palm Springs and so many Rose Bowl Flea market hauls, that who knows, might still be in our future. But meanwhile, we are moving forward and you are invited to come with us.
He lives in a historical building on Wilshire – that is the courtyard you walk through to get to the lobby. It’s SO AWESOME.
When we first saw his apartment, he had JUST moved in. Corbett had just held a garage sale so he had sold most of his furniture that he didn’t like, thus the stuff on the floor and the lack of furniture. OF course, if he knew it would be months before he got a sofa he might have waited, but without a time machine we can’t really go back and fix it.
It is a great space with some obvious, solvable, challenges. The biggest is the lack of natural light. His window faces the courtyard so it doesn’t get a ton of light, and painting just ONE wall such a dark color hasn’t helped. Plus he wants some privacy from his neighbors so we can’t leave the window naked. He needs window treatments which frankly is a bummer because that window is gorgeous, but I get it – he would feel very exposed.
Besides needing a sofa, there is also a challenge of laying out the room because it is a pass-through space (but not too long and narrow, thank goodness) and there is a lack of storage. But the biggest culprit is that dark accent wall, which we’re planning to cover up with KILZ® Primer and paint.
Months ago Corbett pulled together a mood board for it, which we loved, based on this inspiration.
image sourceIt was ’70s brutalist, with some mid-century mixed in and lots of contemporary or more post-modern pieces. We are in need of some color I realize, but we still want to keep it moody.
We all met up and landed on the below mood board, but it wasn’t finalized – just a bit closer to where we were headed. We knew that we wanted a lot of thrifted vintage so it’s hard to create a mood board not knowing what we will score.
But then Chandler let us in on a secret – he doesn’t really like the ’70s, hates brutalist and in fact leans far more ’60s. And the ’80s/ postmodern trend that we loved was definitely not his jam. When probed, what he wanted it to look like this room from Mad Men.
design by | photo by eric laignel | via interior designSo Julie took that inspiration and brought it more into 2020 with the following inspiration. We get you Chan, you want cleaner lines and more of a mid-century feeling, but we think that can be done while mixing in some contemporary pieces.
There are ways to bring in the mid-century vibe without going full “set,” mostly by using cleaner lines and less round and bulbous shapes (he really didn’t like them).
A few weeks before the shutdown, Julie and I were thrifting in Pasadena and I found this sofa for $200. TWO HUNDRED. As an unfortunate sofa hoarder (WHY OF ALL THE THINGS TO HOARD?) I HAD to get it, but so would you – $200 for this mid-century gem with original upholstery in decent shape? I didn’t have any place to store it and while I wasn’t convinced it was right for Chandler (this was before we knew he wanted more mid-century) we figured we’d at least store it in his living room and he could sit on it while we continued to design. Then, since we were renting a UHaul anyway, I said: “hey swing by my storage unit and lets at least get you some other pieces that MIGHT work.” This is an unusual part of the process as most people don’t have an inventory to temporarily pull from. But since he’s a friend it felt like a good way to get him some pieces to sit on as well as get a better sense of what really works in the space and what he likes. So a lot of the pieces you’ll recognize and they may or may NOT stay as we haven’t seen them in the space.
Julie gave him some direction of where to put the pieces that we were loaning/giving him.
Now there are a few different ways you can layout this room, but this feels the most natural to us and him and like I said, it might not be this exact furniture but we like the two chairs across a chair and ottoman, allowing a pass-through space.
Having these simple SketchUps by Julie certainly helped him arrange them and gave us all a better idea of what would work.
Of course, I’m dying to go in and move them around (and remove at least one black leather/wood chair – THERE ARE A LOT!), but until it’s safe to, we can’t go over there. Now normally we would wait to paint until at least some of the major furniture decisions, but Chandler has offered to paint while staying at home and it would be a huge check off the box. So we chose some neutrals that he (and we) were most attracted to – here goes.
more details hereJulie ordered samples and painted them all on large pieces of paper and then dropped them off outside his apartment building and texted him to come grab them – like a paper drug dealer.
We instructed him to put them on both the accent wall and the opposite wall and take SO MANY PICTURES.
Like I said, this is not our usual process and it’s EXTREMELY hard to make this decision not being in the room and not knowing what really is working design-wise with the furniture.
So right now our thoughts are this:
Going light will keep it feeling bigger or at least as big as it can be, but without very much natural light bouncing around, will it just feel boring and dead? Going dark could make it feel moody, but it’s a pretty big room to go dark in, with a large white ceiling (that we’d love to not paint as it’s a rental and it’s just so time-consuming and laborious to paint such a big ceiling). With only one window to break up the space it could just be a big dark box (which I suppose is why the last renter painted just that one accent wall).It’s a little on the safe side mostly because all the “leftover furniture” is black and wood. It’s making me realize we need some color, some art, and VINTAGE. I’d love to try to mix in more mustards like in Corbett’s mood board above. While I love that sofa, I want more contrast with the wall color and yet we don’t want the room to be a bold color (nor white). But we are in a “make it work” phase of life so I also would love to try to just make it work. I’d love to consider doing something with the paint to break up the walls, or painting the trim a contrast. It’s honestly so hard to be creative without being in the space but it’s a good challenge.As far as decor goes we are going to follow our rules of how to make a dark room feel brighter – mirrors, more contrast, things to draw your eye around, plants, adding architectural elements that pop and art that brings in pattern, color and interest. This room needs LIFE. (See this post where we break down how to do this). While I love the article chair (no longer available)/ottoman and the leather sling chairs I bought at the flea market – I’d love one or more of those to be different – and I’m leaning more towards nixing the sling chairs in hopes of finding some that are upholstered (in a mustard velvet?) or in a pattern. In the above mood boards, I like the darker colors the most, but I do fear that they’ll be really dark so we could do a lighter tone with darker curtains. The rug we want to use is from the mountain house living room (it was getting way too much traffic in there so we switched it for something darker). We are actually dropping it off this week to see if it works in there, instead of sourcing another rug (his current one is too small). It’s a good opportunity for a pattern, but since we have this rug I’d love to try to make it work on a budget.
Right now if we keep the vintage sofa I’m leaning towards doing the darker “Porpoise” with a patterned curtain (am I suggesting a statement curtain? Are we back to that?) to help draw your eye in and give some interest while they are closed. We could even sew a bunch of flags together or do a textile art for curtains since it doesn’t need to be blackout or anything, more just so people can’t see in. BUT I could easily be convinced to do “Silverado” which would make it feel bigger, but wouldn’t be as dramatic. Then we could add drama and moodiness through the textiles, art, and accessories. Or, here are all the paint colors available if you want to suggest a totally different direction.
I mean guys, I can’t tell you enough how much I wish we could get our bodies into this space. I want it so bad that I had Julie photoshop us in and looking very serious about the design of this room.
So since you have seen the space as much as we have at this point (clearly) – what say you????
The post Virtual Design: Helping A Friend’s Dark Living Room (From My Living Room). We Want Your Opinion On The Paint Color!!! appeared first on Emily Henderson.
May 6, 2020
You Ask, I Answer: Design Lightning Round Questions and Answers From You Guys

We get a ton of questions on social media either in comments or through my DM and while we try to answer them in real time, it is hard to keep up so we thought we’d try a post where I do a quick lightening round to answer the latest questions. Keep them coming (this is fun!).
How do you know when to stop looking? Do you keep going until you find the perfect piece, or do you justify some “meh” feelings? Do you put off a project until you can find the right fit?
Never stop looking 
Starter Tool Kit Guide: The Basic Tools You Should Have in Your Home (Plus Our Go-To Power Tools)
 photo by sara ligorria-tramp | from: moto reveal: emily bowser’s bedroom “after” is unrecognizable from the “before”
Lately at EHD, we’ve been brainstorming a lot of beginner guides and formulas, and since I am in the midst of designing my apartment, I’ve found myself contemplating things like tools. Riveting, I know. But when you have things like painting, installing window treatments, and hanging art on the brain these things come up. So, I wanted to know what tools do I really need in my toolbox? And what tools should I invest in that will ultimately make my life easier in the long run? These are the important questions the current state of the world has me pondering. Hey, it had to happen sometime.
EHD is no stranger to a DIY project, but most of us don’t have expert knowledge or passionate feelings about the best tools out there (though I know Julie who has done many DIYs knows way more than me). So instead of wasting time researching and reading online reviews from strangers, I turned to an actual tool expert. My dad. He is a retired fireman and now a licensed general contractor and literally uses tools every single day. Even on the weekends you can find him in the backyard casually building a corn hole set or replastering something. If it’s a day that ends in Y, he is working with tools.
My dad has about one thousand tools in his garage, most of which the average person would never need. As I was interviewing him, I began picking up random tools and asking, “What about this? Do I need this??”. Most of the time, the answer was absolutely not. There are definitely more tools in the world that someone like me would even know what to do with, so we kept it simple. The following are the tools that are essential for the common homeowner, renter or even beginner DIYer. This is your Starter Tool Kit Guide. It’s “Tools For Dummies” (don’t worry – I am the dummy, not you). Let’s get started.
Manual Tools
If your main use for tools is light home maintenance, hanging art and shelves, and other low lift and rental friendly projects these are your basic tool needs:

1. Hammer | 2. Screwdriver Hand Tool Set | 3. Kobalt Screwdriver | 4. Set of Nails | 5. Screw Kit | 6. Adjustable Wrench | 7. Magnetic Stud Finder | 8. 48-in I-beam Level | 9. 9 in. Torpedo Level | 10. Tape Measure | 11. Utility Knife
Hammer: Hammers are still relevant in 2020. I know this for sure because I asked my dad if you still need a hammer if you have a power drill and he was shocked (and perhaps offended) why I would ask such a question. Apparently, hammers are and forever will be a tool kit staple. Noted!
Screwdriver Set: Screws come in all shapes and sizes so a single screwdriver won’t work for every project. Something like #2 is great because it comes with different sized Phillips and flathead screwdrivers and a slim case that would be easy to store. #3 is also very cool because the different size Phillips heads are stored in the base of the screwdriver so you won’t ever lose them, and all you have to do is pop on the correct size head onto the handle. My dad has this and was very thrilled to show me its capabilities. It’s a really good option if you don’t have a lot of storage space as it could easily fit into a drawer.
Nail & Screw Set: You never want to run out of nails or screws in the middle of a project. I am always so relieved knowing I have way more nails and screws than I could ever find a use for. It just puts me at ease.
Adjustable Wrench: Again, if you don’t have a lot of storage for tools, an adjustable wrench like this one is a good place to start and it saves on space.
Stud finder: In the midst of interviewing my dad, I overheard my mom in the background, “Who couldn’t use a STUD finder am I right??”. Okay mom, calm down. But bad pun aside, she’s actually right! If you plan on drilling into your walls whatsoever you gotta know where those studs are.
I learned from my dad that usually, studs are about 16 inches apart. There won’t always be a stud where you need it, so you can hang very light things using a drywall screw. Or, if you need to hang something heavier, you can use a screw anchor that will provide more stability.
Here are instructions straight from Mr. Miller himself:
Using your drill and a drill bit, make a hole that is slightly smaller than the size of the anchor. Put the anchor in the hole and hammer it in until the anchor is flush (inline) with the wall. Then proceed to screw the proper sized screw into the anchor. Sorry for the number of times I just had to write “screw”.
Level: I am definitely guilty of just “eyeing it” and thinking something is “good enough”. But there’s really no need for that. For small projects, this level has great reviews and has a magnetic edge for hands-free work, and this is good for leveling cabinets or larger objects and even has measurements printed on the side.
Tape Measure: Having a good tape measure is peak adulthood. I use mine constantly and it’s one of those things every home needs. I advise investing in a couple because when measuring out furniture it can be nice to use two at a time. I also misplace mine a lot, so an extra set never hurts:). This tape measure has tons of great reviews and is your classic, straightforward tape measure that will get the job done. But if you want something a little fancy, this tape measure has the fractions printed on it. No need to use your brain again!
Utility Knife: I never realized how much a knife comes in handy until I bought one for my boyfriend for Christmas one year. Now that I know he has one on him, I regularly find myself needing to use it. It’s just nice to NOT use kitchen knives for home improvement because that’s gross.
All in One Kits: Of course, a lot of these starter tools can be found in tool kits which can save you the hassle of having to “build” your own tool set up. My boyfriend and I have this one that has come in handy countless times, but this and this are great options as well.
Power Tools
According to my dad (and dad’s everywhere), everyone should have a cordless hand drill in their tool kit. That’s tools 101. Some people can probably stop there and take it slow with other power tools. Myself included. I have zero use for a power saw and don’t see that changing anytime soon. But I know a lot of you are wanting to dabble in building and are DIYers so you’ll need more toys than me.

1. Cordless 1/2 in. Drill/Driver Kit | 2. Black Oxide Drill and Drive Kit | 3. Worm Drive Circular Saw | 4. Hole Dozer General Purpose Bi-Metal Hole Saw Set
Cordless Hand Drill: Both mine and Jess’ dad recommend this drill. That’s 2 out of 2 dad’s! We like those odds.
My dad has been using this Ryobi drill for over 10 years. He also used this one for over 10 years and then gave it to me when I moved into my first apartment and it’s still kicking. You can splurge on a Dewalt, but the cheaper options like Ryobi and Black and Decker are super reliable in his experience.
Circular Saw: If you cut a lot of lumber a good option is worm drive power saw like this one. It is easier to handle than your typical circular saw and a very good investment if you think you would get a lot of use out of it. Just make sure you have the proper experience with saws and use protective goggles. But if you are wanting something a little cheaper this guy is a good one too.
Hole Saw Kits: Hole saw kits are always good to have for home projects. You’d be surprised how often you use them. Just check to make sure you buy ones that are compatible with your drill bit.
Painting Tools
Painting a room is no one’s favorite task (why is it the most exhausting thing ever??) but it’s something we all have to do once in our lives. It also happens to be the easiest renter hack we can think of so we’re all big fans of painting around here. If you have a paint project coming up here’s what you’ll need:

1. 5 Gallon Bucket | 2. 5 gal. Steel Paint Can Grid | 3. 12 in. 5-Wire Professional Frame | 4. Shed Resistant White Woven Paint Roller Cover | 5. Easy Reach 5 ft. Adjustable Extension Pole | 6. DryDex 32-oz White Spackling | 7. 3 in. Bent Extendable Scraper | 8. Frog Tape
5 Gallon Bucket: My dad prefers using a bucket for paint jobs because it can hold more paint but you can also use a tray like this if you are painting a smaller space.
Bucket Grid: If you do use a bucket, you’ll need a grid to roll the paint off so it doesn’t drip all over and cause streaks.
Roller Frame: A handheld roller frame is good for touching up or painting a small space like a closet, and you can buy an extended handle for painting an entire room.
Rollers Covers: My dad always keeps a back of extra rollers around just in case a paint job comes up (aka just in case my mom decides a room should be painted from white to a “subtle off white”).
Spackling: If you are repainting you might have holes from previous hangings in the wall, so you’ll need some spackling to cover those right up. Just apply a little on a scraper tool and blend it into the wall.
Frog Tape: You’ll need painters tape to avoid getting paint on moulding or doors. Frog tape has good reviews, but we usually use Scotch painters tape.
Storage Options
Are your shopping carts filling up with tools??? I thought so. Now that you are envisioning DIYs and home improvements, you might be in the market for tool storage. I get it. Here are some great options for big and small spaces:

1. Deep Tool Chest Mobile Workbench in Gloss Black with Hardwood Top | 2. 3-Drawer Small Metal Portable Tool Box | 3. Leather Crafts Beech Tools Holder | 4. White Elfa Utility Board Starter Kit | 5. Canvas Tool Roll With Zipper Pouch | 6. Emily Henderson.
May 5, 2020
How To Add The Right Amount of Color For Every Room in Your House (Plus a Killer House Tour)

Colorful home design can be very polarizing (especially bright color). You have those who want ALL the color and those who are wary of even dipping their toe in the color pond. But we think there’s a place in the middle so that everyone can be happy (especially those who live in the same home). Enter the very talented interior designer, Sarah Zachary. When she took on this beautiful family home, she actually wasn’t the first to tackle its design. Nope, after working with a previous interior designer who went fairly glam, the family decided that they wanted to bring in a more earthy feel (while still keeping it happy and colorful). So Sarah went to work, and I got to ask her about the project and get all of her color tips.
Was color something that your client wanted or did you talk them into it?
I definitely did not have to talk my client into color, especially in the her daughters’ rooms. She has a soft spot for neon pink and butterflies and wanted the kids’ spaces to be as fun and whimsical as possible. I actually took over the job from a previous designer and worked to dial back the color and pattern in some of the rooms.
I think Sarah nailed it. Both girls’ rooms, as you are about to see, are colorful and whimsical but not so overwhelming that you feel like you don’t know where to look. Balance is always the goal. It’s so important to have “moments” where your eyes can rest.


Wallpaper | Flushmount | Bookcase | Crib | Designed and custom made by Sarah Zachary | Mobile | Chair
For instance in the nursery, the wallpaper is super bold but all of the furniture, window treatments, and rug are all very neutral with almost no pattern. Sarah chose very specifically where she put her bright pops of color which makes the room feel super balanced.

Wallpaper | Flushmount | Blanket | Crib | Mobile | Designed and custom made by Sarah Zachary
What was the reason you wallpapered all four walls in the nursery and not in the other child’s bedroom? Did it have to do with scale and do you have a rule of thumb for that? Basically when to accent and when to go all the way : )
We fell in love with the Christopher Farr wallpaper we selected for the nursery so the client and I were happy to see it cover every surface in that space. I personally prefer to have wallpaper on all the walls as opposed to an accent wall. It just feels more complete. I usually only do an accent wall if 1.) the wallpaper is crazy expensive but we love it anyway, 2.) the wallpaper is a mural rather than a pattern, or 3. the pattern is super busy and will overwhelm a space.
I agree and also am in love with that wallpaper. The mix of boho and modern glam makes this room feel textured, and lux (but still fun and a perfect for a little munchkin).


Wallpaper | Bookcase | Oprah Winfrey Children’s Book | DIY Letter Lightbox | Eyelash Basket | Dresser (no longer available) | Table Lamp | Shelf Brackets | Changing Baskets | Pouf Designed and custom made by Sarah Zachary, Fabric by Pierre Frey
I saw in a different project of yours (coming soon to a blog near you) that you’re not afraid to wallpaper a ceiling. Do you have a rule of thumb on when to go for a wallpaper ceiling or when to keep it bare?
This particular moment was actually a choice made by the client! She loves a space with warmth and a vintage/cottage feel and I think the wallpaper on the ceiling creates that. If a pattern is subtle and small enough to not be overwhelming in the space, and you’re able to keep the furniture and finishes of the room more minimal, then wallpapering the ceiling as well as the wall can work. Doing that in this nursery would likely have overwhelmed the space.
We agree that delicate pattern work best if you want to cover all five walls. And if you are wanting to tackle your ceiling, this post has a ton of inspiration. Also, here is the list of our favorite online wallpaper resources if you are needing some sourcing guidance.
Now, are you ready for another SUPER cute kids room??
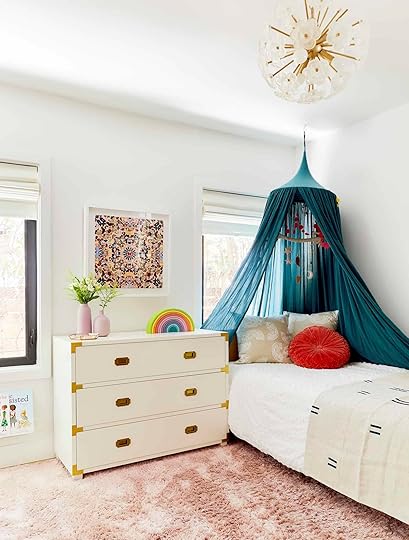
Glass Tray | Dresser | Artwork | Canopy | Bed | Squiggles Pillow | Round Pillow | Wooden Rainbow
What are your tips for going bold with color and wallpaper?
If you are choosing a bold wallpaper or color you have to consider balance. We chose some very graphic and colorful wallpapers in this house and balanced them out with minimalist designs, natural woods, and clean white accents. Before I met the client, the older daughter’s room already had the wallpaper on one wall and the rest of the walls were painted turquoise. They also had blue striped curtains. There was a lot happening in there so we kept the wallpaper (on one wall, as an accent because the pattern worked well as mural), painted the other walls white, and left only the white roman shades. That way the wallpaper could really be appreciated on its own. This opened the door for a colorful canopy and some fun art.
Such a good move. Having too many big moments will make everything a small moment.

Wallpaper | Lamp | Bookshelf | Ceramic Eye | Kacey Musgraves Vinyl Record |Pink Globe | Gold Dog Ballon Bookend
So now we need to know your shopping secrets. Where do you like to source your wallpaper from?
I love Walnut Wallpaper and usually order from them exclusively. They have everything that designers source at the PDC as well as really unique and artisanal wallpaper brands. They are also super helpful in finding that very specific pattern you are hunting for.


Dresser | Artwork | Canopy | Bed | Squiggles Pillow | Round Pillow | Wooden Rainbow
Do you have any advice for people who are nervous about a bold wallpaper?
I say start your bold wallpaper journey in a small and low stakes space like a bathroom or laundry room. This way you can dip your toes into something bold. If you still love the look after a while, upgrade to a larger room and remember to balance out the furnishings with neutral or natural colors.
Here is a post that Emily wrote about the true benefits of taking the plunge (if you are ready).
Ok, so it makes sense that colorful wallpaper works in a little kid’s room but here’s how Sarah brought some bright colors into the more “adult” part of the house.

Cabinet | Art | Table Lamp | Planter
Was wallpaper ever an idea for any of the common areas?
We considered doing wallpaper in the entry initially but decided to keep the neutral palette. Toys, shoes, and strollers live in the entry so we wanted to keep the space as uncluttered and clean as possible. Wallpaper would have just added to the hustle and bustle of the entry.
As Sarah implied, wallpaper and color can overwhelm a busy area. So keep in mind how your space is going to be used before putting up really bold and busy wallpaper.

Sofa | Coffee Table | Floor Lamp | Art | Rug | Pillows | Sheepskin | Ottoman | Ceramic Vases
What was the color conversation for the common areas? Since they are a family with two little kids, was the color brought in to bring in some sophisticated youthfulness (ha, that sounds like an oxymoron), or did the parents also want some bright colors – use very intentionally?
When I started on the project, a lot of the choices from the last designer were very glam. We wanted to create a more earthy and eclectic feel, while still being clean and modern. Since the living room/dining room already had the green banquette, I presented a very neutral palette that we could build off of. My client’s background is in art, so I knew that was where the color would come in as well as with pillows and accessories.
The big takeaway here is that even dabbling in some color can have a massive impact on a space. I love that, while I’m a sucker for a neutral, earthy room, bringing in that colorful art makes it feel really unique and personal. I think even the most neutral loving among us can agree, no?


Sofa | Coffee Table | Art | Rug | Pillows | Sheepskin | Ottoman | Ceramic Vases | Chairs | Mirror

Custom Bench | Pillows | Custom Dining Table by Sarah Zachary | Dining Chair | Vase | Art | Chandelier (similar) | Bookshelves
Before we get into that truly beautiful dining area, a super easy but cool way to add color into your home is books. It’s so simple but I think can be an afterthought in the design process. So if you want to look super smart and colorful, just make sure some of your books have colorful spines.
Also, side note for those of you wanting to know how to style a bookshelf when you have A LOT of books, this room is a great example. From the looks of it, the bottom two rows are filled up, then moving up they staggered the other “full shelves.” Then for the other sections, Sarah played with different and simple configurations of books, objects and picture frames but kept it simple. Also, note that the top row is lightly styled (mainly with art) to make the ceiling feel visually light and taller.
Ok back to the interview . . . .

Custom Bench | Pillows | Custom Dining Table by Sarah Zachary | Dining Chair | Vase | Art | Chandelier (similar)
The dining bench is almost too beautiful! I am assuming it was custom? Also, I know that green is simply just a beautiful color to use, but how did you all decide on it for the bench?
The bench was custom and was actually inherited from the first designer. We worked everything in this space around the green banquette. When I first started the project there was a huge replica Saarinen Tulip Table that was too big and too cold for the space. We wanted the room to have more warmth, so I designed a custom walnut table that my dad built for my clients. Now the clients have a handmade heirloom as opposed to a replica.
Oh, I love the story behind the table! And I agree that for warmth and texture a dark wood table was the way to go. It feels approachable but sophisticated. Then to add in some color and playfulness Sarah added some pillows and those happy, bright pieces of art by one of our Sara’s favorite artists, Anna Ullman.
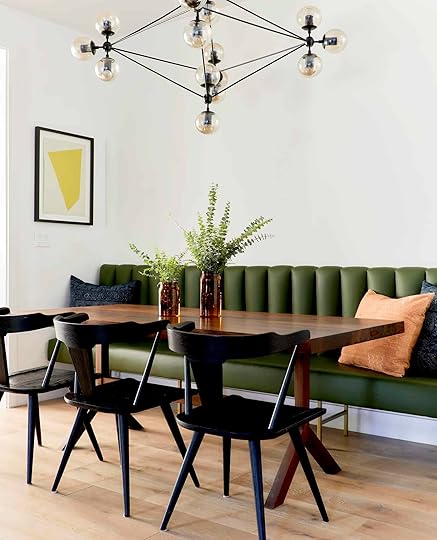
Custom Bench | Pillows | Custom Dining Table by Sarah Zachary | Dining Chair | Vase | Art | Chandelier (similar)
There you have it. A stunning home with the perfect amount of color to add some joy, but not take over. Thank you to Sarah for answering my questions and letting us share your beautiful work on the blog.
So, if you are classically a neutral lover, are you tempted to bring some color into your home? Or if you love color what was your favorite part of this home? Let’s talk about it!
Love you, mean it.
Credits: Design by Sarah Zachary, Photos by Sara Ligorria-Tramp
The post How To Add The Right Amount of Color For Every Room in Your House (Plus a Killer House Tour) appeared first on Emily Henderson.
May 4, 2020
What Living Alone, Not Hugging Anyone for 53 Days and A LOT of Self Reflection Looks Like
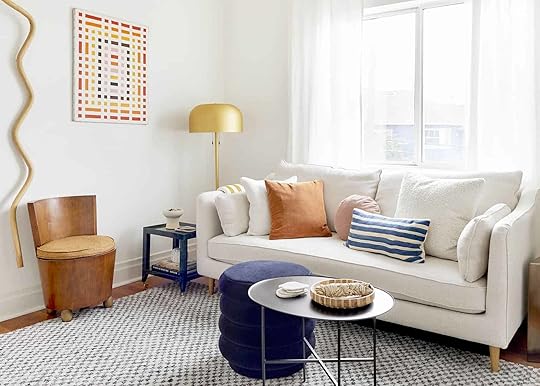
I have talked about my childhood dreams of living alone before on this blog. It has been a thing for as long as I can remember. It wasn’t because I hated my parents or my upbringing, quite the opposite actually. I think it was because I would prove I was capable, smart and was worthy of true respect (which for some annoying reason does not automatically come once your new house keys are placed into your adult hands). Again my parents loved and respected me but I clearly have some self-confidence issues to work through.
So in all of my years of fantasizing, you know what wasn’t a part of my magical “Kate Hudson in How To Lose a Guy In 10 Days Fantasy”?? A global pandemic quarantine. Short-sighted of me? I guess so. But a global pandemic came nonetheless and I was all of a sudden faced with the reality that I was alone and pretty in shock. Of course, my endless gratitude for video chats with friends and family was noted daily in my head but now I was being put to the task of inevitable self-evaluation. I also felt a little extra isolated due to the fact that while two of my close friends were in the same “alone” situation, most everyone else I knew wasn’t. I’m 32, so most of the people in my life in my age group are either in a pretty serious relationship, married with kids, or living with roommates (the ones with roommates are living in expensive cities like New York so roommates are basically required if you are single). However, one wonderful EHDer was also going through this in the same way I was (alone) and that beauty was Caitlin.
Normally living alone is almost always wonderful. We are HUGE fans. But then shelter in place was ordered and naturally, that perspective shifted a bit.
Please know that I know this weird time has likely made everyone look at what the eff they are doing with their lives. Or what they have become. Or how they deal with things, whether that’s by yourself in a small studio or with a big family in a big house. But Emily and the rest of the team were understandably curious what our experience has been like so that’s why we are here, to get maybe too honest about the lies we didn’t know we were telling ourselves (mainly me), what we have generally learned (or haven’t) and what is even relevant due to the fact that THIS TIME ISN’T NORMAL LIFE. Please join us because my god could we use the company.
I’ll start.

I am not a stranger to being by myself. Within a two year period, starting about 5 years ago, I had moved to three different cities and while I had some friends within driving distance I spent a lot of time by myself. So I wasn’t worried that I was going to go into a deep depression for a lack of face to face interaction. Don’t get me wrong, quality time is my #1 love language so spending time with friends is truly one of my most valued things in the world. But I am real good at following the rules and knowing this wasn’t going to be “forever” I felt pretty ok.
The moment I started to spin out was when I realized I had zero supplies. I am telling you aside from (thankfully) having a safe place to stay and luckily getting my hair done the day before the world freaked out (ha!), maybe no one was less prepared to shelter in place than me. Then I had a realization…
I’m not a minimalist but instead a privileged 32-year old that can get mostly whatever she needs with a click of a button.
This realization hit me like a ton of bricks when in the initial frenzy of the quarantine I quickly realized that I was anything but equipped to staying inside for an undetermined amount of time. No food, little toilet paper, no crafts, and one readable book. This felt like a glass shattering moment. Here I was walking around, silently congratulating myself with this idea that I didn’t require tons of things to feel happy and that I wasn’t going to end up like my hoarding grandmother. I thought it was learned from my “life experience” since I had moved a handful of times (including internationally) which made my ability to carry a heavy loot nearly impossible. So anything that wasn’t precious to me, went. But guess who was my secret beautiful storage unit…the consumer marketplace. I didn’t need to hold onto things that didn’t “spark joy” because I could easily find something else that would. After talking over this idea with Caitlin she sent me this tweet that perfectly summed up this idea:
“Minimalism only works when capitalism/consumerism is in full swing. I miss that bag of fabric that would have made AMAZING masks.” – Anna Bulbrook
Now I am not saying that I am about to become a packrat (visually clutter makes me noticeable nuts) but I am absolutely going to take a much closer look at my need to constantly get rid of things “I don’t currently need.” I will no longer pat myself on the back for ultimately falling for a false sense of security that our system has led us to trust. How’s that for week one of being alone? Let’s keep going.
My affinity for comedy is deeper than just wanting to be in a good mood.
I am aware that I tend to stay away from deeply sad, heavy entertainment (not always, but most of the time). Not to pull the “dead mom card” but I think it definitely started when she was sick which is now 11 years ago. I don’t think of myself as someone who “can’t handle” sad movies, books, tv shows but when I’m recommended “a great movie” but I know it’s heartbreaking, I decide to protect my usually tender heart and turn on something lighter. I don’t avoid sad feelings, but when I am 100% in charge of my activities (which is a lot when you live alone) I take them in the smallest of doses, like a song or a short article. I don’t think I am a HSP which was a new thing I learned about last year, but I am truly coming to terms that there is likely a deep vat of sadness in me that I am not all that willing to tap into on the regular, afraid it might take me off course of my celebrated glass half full optimism. I promise I’m not boiling water, ready to explode the top off of the pot but I do think that I am avoiding (you’ll see it’s a BAD pattern) dealing with the darkness. And don’t get me wrong I love darkness and emotional depth. I think it’s a beautiful part of life which makes me even more irritated that I am clearly ignoring my own.
I’m avoidant, not busy.
This was THE thing I was going to really work on this year in my personal life. Despite my complete and utter exhaustion with my inability to deal with “hard things” head-on when I am the one not 100% in the right or that my opinion might hurt someone I love, I haven’t been able to stop. But guess what is a grrrreat excuse to putting those hard things off…life. However “life” or what used it to be, is no longer an excuse (it never was) or an obstacle. Now I get to sit in my self-built misery, paralyzed to move with LITERALLY zero excuses. I don’t even have a cute animal to blame it on. Nope, it’s just me.
Ok sure, we are in an unprecedented situation for our time and if there’s ever a time to give yourself a break, it’s now. But this is not new so what am I going to do? I honestly don’t know. I will say I’m working on it, and I really hope I do. If I find a magical hack or likely a good therapist, I’ll let you know.
Now for my last but definitely not the final lesson of this quarantine. Will they ever stop?
I didn’t fully appreciate my life.
Gross. But in a selfish confidence of good karmic rewards, I have realized a secret part of me felt that the gifts, moments, friends I had were earned which subsequently meant I was taking them for granted. Sure, I work hard to show the people I love that I love them but in no way am I automatically allotted reciprocation for good deeds. Again my privilege was glaringly apparent and if I take one thing from all of this mess is that I am owed nothing and I will do my best to appreciate every bit of life and the people in it.
Caitlin, you’re up.

HELLO, PALS. Every day, I sign in and I read your comments — the ones about your kids making a mess, about your partner helping you tackle a project (or not), about rearranging your living room with your roommates, about what to watch when you’re quarantined with your parents or in-laws — and I, an adult person who has officially been totally alone for 53 days, feel like I MISSED THE FREAKIN’ BOAT.
Y’all, it’s like NOAH’S ARK out there. (Yes, I did attend a private Catholic school, and yes, this is about as much as I remember from theology class…sorry, mom.) ANYWAY — everyone has coupled up (or…throupled up? Quadupled up? — you get it, PEOPLE ARE TOGETHER) and I’m on my raft for one. It’s my own 2020 take on Rose at the end of Titantic — there’s no room for Jack Dawson in this little 1 bedroom apartment.
Most days, quarantining solo is pretty normal. I bet we’ve done a bunch of the same things — I’ve cut my own bangs. I’ve abandoned a craft project. I’ve texted an ex. I’ve texted the guy dated right before this — the one who never actually became a real ex — a whole lot. I’ve googled “is this COVID or allergies???” too many times. I’ve binged all of Tiger King. (I have not made banana bread or a sourdough starter, which is impressive. Also, can you believe that Tiger King came out AT THE END OF MARCH? In the same month that all of the Democratic primary contenders dropped out? It feels like it has been years.)
But here are the big differences: I had my last hug on March 9, which makes me really sad, and being alone for this long is starting to amplify some of my worst qualities.
On Losing Contact
Honestly, this just sucks, and it makes me sad to write about. Today marks 8 weeks since I even grazed another person. Touch is so polarizing now: on one end of the spectrum is me, rewatching a boomerang of me hugging a friend and thinking about how I am going to glom onto the first person I see once it’s safe; on the other end of the spectrum is a friend of mine with a four kids under 7, hoping for ONE MOMENT without a child attached to their person. There’s no winning here for anyone — I think that universally, we’re all either alone or a little overstimulated. At least we’re all uncomfortable, though, which I guess helps?
On Amplifying My Bad Qualities
This is kinda the big one for me, so let’s start with an anecdote: almost EVERY DAY, I make a box of macaroni and cheese. Instead of plating it (already a stretch, seeing as my only plates are Tupperware, because my design paralysis also extends to both table and flatware), I grab a trivet and eat it straight out of the pot at my desk in heaping spoonfuls. It honestly feels kind of primal and I think I may be scratching some itch in the weird hunter-gatherer part of my brain. I almost always finish the whole thing in under 6 minutes.
And guys, there are so many Instagram stories and posts telling me that this kind of behavior is okay. They say things like “surviving is more important than thriving” and “so much love to everyone who’s trying” and “self care is doing whatever you need to get through this”….but I don’t think anyone was referring to completely devolving into a Neanderthal-like version of themselves. I am legitimately just leaning into being gross for grossness’ sake.
Because I mean, I’m fine. I’m so lucky to be employed in a job I love (or employed in any job, period), in an apartment that makes me happy, with friends who care about me enough to check-in constantly. There’s no universe where I can say, “oh, I’m avoiding showering because it’s self-care.” I’m avoiding showering because I’m kind of lazy and I’m just capitalizing on my lack of social interaction for as long as I can. I always thought that with enough free time, I’d finally try and learn how to cook. Now, with LITERALLY all of the free time in the world, I am just too lazy to try. (My love affair with boxed mac and cheese continues.)
But it’s not just food, or bathing, or the general other horrifying habits I’ve developed — I’m starting to get EXTRA avoidant, with is kind of the opposite of what you’d expect. Outside of our daily EHD video meetings, I’ve refused (or slept through, oops) every Zoom or Houseparty invitation I’ve gotten since March 22nd. THAT’S TWO DAYS AFTER THE TIGER KING PREMIERE, you guys. FOREVER AGO. I’ve always been a little bit of a ghost-er (read: I am an enormous ghost — I have 1,820 unread text messages), but quarantine is just amplifying it.
I’m alone, so you’d think I should want to talk to people — but I just don’t. There’s nothing I can talk about. Here are my personal major life updates over the past 2 months: I’ve spent 7 straight days watching a bruise on my leg go from dark purple to yellow. I’ve updated a notebook detailing new growth on my Pothos plants every day. It hit 91 degrees in my apartment. I’m thinking about buying a comforter that Emily recommended. I got a sunburn while sitting on my balcony. I start checking our EHD analytics at 5 AM because I have nothing else to do. I’m buying some jasmine because y’all recommended it to me. THAT’S IT.
Does anyone actually want to talk about these things? Even typing them was boring. (Are you still reading? Please don’t leave, I’ll try to be more interesting!!!) Everything I do feels more like a tweet — one and done — and less like something worthy of actual conversation, so I’m just avoiding chatting. (To that point, my Twitter has never been more active. I’m filled with hot takes like “every member of Joy Division looks like they could have been a math teacher,” or “how could Zooey Deschanel be attracted to both Ben Gibbard AND a Property Brother?”)
But for the Most Part, It’s Okay
There are so many things that I really do miss. I miss distracting my coworkers with constant side conversations. I miss my daily lunchtime tacos and the weird friendships I’d forged with all the employees at our local taco stand. I miss doing the thing where you make intense eye contact with a person after someone else in the room says something weird. None of these are easily replicated or replaced when you’re living solo, and it stinks. It also stinks that my skin has never been clearer and THERE’S NOBODY HERE TO SEE IT. (And you just KNOW that as soon as this is lifted, I’m going to break out. THAT IS THE WAY OF THE UNIVERSE.)
But for real — the idea of having to do this with another person seems terrifying to me. I don’t know how you all are doing this. I’m sure it’s my only child syndrome talking, but I can’t imagine two months in the same space as another person with no breaks. I need my alone time, and while this may be a little too much alone time (like, guys, last night I cried because I was moved by this Twitter thread about a girl writing letters with USPS employees), I’m just embracing it for now. ANYWAY, I’M FINE, HOW ARE YOU DOING? I want to chat in the comments.
Ok, Jess again. Lastly, when this post was originally scheduled and mostly written when I was home alone for the long haul. But after 5 weeks and 2 days had passed and my dad asked me if I wanted to stay with him for a bit. After a lot of thought, dreams of some outdoor space/great cooking and a negative COVID test result (my dad, while a total badass, is 70, asthmatic and there was no chance I would not know to the absolute best of my ability that I was safe to be around him) I drove up North with zero bathroom breaks. A personal victory. Then with 37 days of not so much as a handshake, I hugged my dad and cried. The truly biggest lesson from all this is that all we have is each other and I know I am not alone in that. That lesson is evident regardless of your living situation.
Also, Caitlin get ready for the HUG OF YOUR LIFE when I see your super clear face
I think we are due for a little quarantine check-in as Caitlin just said. How are you doing? Better? Worse? The same? Have you had any good or bad epiphanies? We are here for you. xx
Love you, mean it.
Opening Photo Credit: Photo by Sara Ligorria-Tramo | From: Makeover Takeover: Jess’ Long Awaited (Small Space) Living Room Reveal
The post What Living Alone, Not Hugging Anyone for 53 Days and A LOT of Self Reflection Looks Like appeared first on Emily Henderson.
Emily Henderson's Blog

- Emily Henderson's profile
- 10 followers

