
Emily Henderson's Blog, page 213
May 26, 2020
Sara’s Kitchen “Update” Spirals Into A full Renovation (Plus – Help Her Choose A Design Plan)
 photo via deVOL
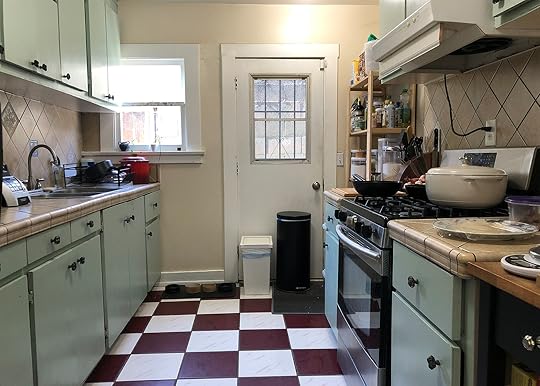
Recently, I decided that I was going to put all my #shelterinplace energy into one room – my kitchen. I spend most of my free time in there these days after all. And last week I shared my initial plan for a $3k budget, kitchen UPDATE. Last week feels so long ago. Almost as if it was a different lifetime. A different life. Remember in that last post when I said I pull triggers fast and impulsively? Well, I’ve really done it now. Let me fill you in on what’s transpired since that last post went live.
 the current situation . . .
 So many of you commented with some amazing suggestions – “Rip out all the top cabinets and just do open shelving!”. Love it. “Why not invest in new lower cabinets at least?” Why indeed! And then a few of you shared your own “update” stories. Most of them went something like, “we did a kitchen update so we could enjoy our kitchen until we could afford a full renovation . . . that was 25 years ago.” I can see how that could easily happen – you put a little effort into the kitchen, and it becomes functional. Suddenly everything else becomes more of a priority than fully renovating a room that is already good enough.
Finally, while talking through plans with my dad, we realized that it would be easier to take care of a few things now – like moving electrical, getting rid of the back door and centering the window, and picking permanent flooring (to save money we’re going to install some of the leftover pre-finished hardwood that’s been sitting out in the garage, which we used throughout the rest of the house). Which kind of made us wonder if it was just worth it to do . . . everything. The first part of our renovation took almost a year and half because my dad was going back and forth between here and NY, where he works. But right now, he’s kind of stuck here. So it makes sense to take advantage of that uninterrupted time. Plus, he’s really, REALLY excited for something to do. Like me, my dad is a bit of a workaholic. Must be genetic.
So, WE’RE BITING THE BULLET AND FULLY RENOVATING THE WHOLE KITCHEN. Now I know that there’s going to be a lot of you out there that will be bummed with the change of plan, and trust me, I was really excited to take on a simpler “update” project and document it. But I also really want to take advantage of the fact that my dad is here and happy to help us. And it makes more sense to hustle and get it all done. It’s a really small kitchen, and he thinks it will only be a 5 week project. Don’t worry though, it’ll still be a DIY project. And this time I don’t have a full-time designer taking care of all the hard stuff for me (I will forever be grateful to Velinda for designing our living room and dining room. She also happened to do her own amazing little budget kitchen reno, and built a super cute mini kitchen in her basement). Folks, I’m about to learn how to install my very own sink.
We’re also going to try and keep the budget down where we can as well. Besides using leftover flooring to save money, we’re going to go with Ikea cabinets (but hopefully get Semihandmade cabinet fronts to elevate the look), I already bought our sink on Craigslist for half of what it would have cost new, and doing most, if not all of the labor ourselves will certainly keep the cost down. But I also want to keep in mind that this is the only kitchen renovation this house is going to get.
In preparation, I spent most of this long weekend binge-watching the most recent season of Riverdale (a show so extra that you can’t NOT watch it), pinning design ideas, bugging Julie to help me with a cabinet layout plan, and putting together different kitchen design options. So now that I’m on a tight schedule to design my dream, forever, permanent kitchen – WHAT DOES IT LOOK LIKE? Let’s get into the options . . .
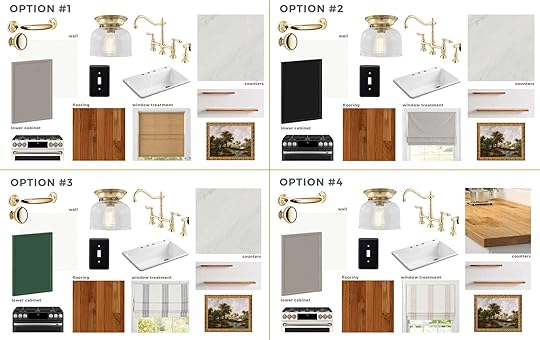
OPTION #1

 photo via oakstone homes | photo via the identité collective
Part of me wants to go in a light, neutral direction. With a gray or oatmeal lower cabinets, and light uppers. There’s something very traditional, elegant, and timeless about this direction to me. And I’m really considering splurging on stone countertops. It’s still nice and smooth for rolling out doughs, but won’t compete with the warmth of the wood on the floors. Plus, stone will keep butter very chill for biscuit and pie dough making (yes, this is a serious consideration for me when designing my kitchen).

Which leads me to Option #1 – Taupe/gray lower cabinets, white upper cabinets and walls, light colored appliances, stone counter, and a warm organic window treatment. I love how light and traditional this design feels. It makes me think of lazy Sunday mornings baking bread and drinking tea. My biggest concern with this option? Mac won’t like the light lower cabinets.
OPTION #2

 photo by tessa nuestadt | design by amber interiors | photo via farrow & Ball
Next up we have the idea of going for dark, dramatic lower cabinets in BLACK. I have a feeling this is going to be Mac’s favorite option. There is something really elevated about the look. It’s cozy, while still feeling high end. And dark lowers might be a tad easier to keep clean in a kitchen, right? My concern with this option is that it’s going to be a lot of DARK in the house. The TV room is dark, the kitchen would be dark, and I have design ideas for the front bathroom that are dark. I don’t want the house to feel too heavy.

So here we have design Option #2 – dramatic black lower cabinets, dark appliances, and a gray and white striped window shade. This design makes me think of hosting Saturday night dinner parties, and mixing up cocktails for our guests in this kitchen.
OPTION #3

 photo by lauren miller | design by ashley montgomery | photo via kelsey leigh design co.
Moving right along. There’s a part of me that’s still really interested in bringing in a color to the kitchen – namely green, which is the overall theme for the whole house. Green in a kitchen feels very English countryside, and I think the green still plays really beautifully with brass accents and a marble counter.

Here we have Option #3 – Green cabinets, dark appliances, and a more traditional blue striped window shade. The green is very saturated, but that’s the only option that Semihandmade has in a green tone. Truth be told I don’t mind it – I love how rich it is. Plus this kitchen (below) from deVOL makes me really want a GREEN kitchen.
 photo via deVOL
Semihandmade do make customizable doors that come unfinished so you can lacquer them yourself whatever color you’d like, but I don’t have too much faith in my dad and I being able to give the cabinets professional-quality lacquering. And I want our cabinets to be well done, so they last. My concern with this design is that the green will be too saturated, and will feel like too much color next to our TV room.
OPTION #4

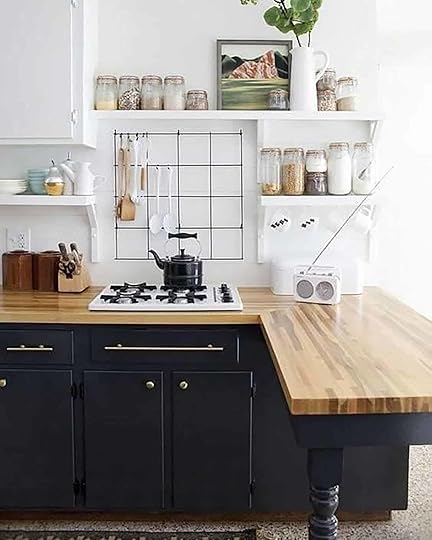 photo via jenna sue design | photo via a beautiful mess
Stone counters aren’t going to come cheap. There’s a big part of me that wants to go for them anyways. You know, splurge on one aspect of the kitchen that will make a big impact. Plus I spend a LOT of time in the kitchen, so I might as well make it the room of my dreams. But there’s another part of me that knows how much more affordable wood counters would be, and they would still look beautiful.

So for my final option, I’ve thrown in wood counters instead of stone, and nice neutral window shade to bounce the warmth around. This could work with dark or light lower cabinets, but for the sake of a design board I’ve popped in a lighter option. But maybe I go part stone, part wood? Best of both worlds?
Now the question is which is my favorite. The truth is I’m really torn. PLUS, it’s not just my kitchen. Mac needs to sign off on the design plan, too (as soon as I get him to sign off on a full kitchen renovation, which I’ve already decided we’re doing, but he may or may not know is happening yet).
But I’m also desperate for the opinion of my fellow EHD team and YOU. This is the first time anyone is seeing my design boards, and I’m waiting with bated breath for advice. What direction do you think we should go in? Because there’s nothing like peer pressure to help you make a permanent decision about your home 


May 24, 2020
Active & Modest Swimsuits That Make Me Feel Good (Plus, My Thoughts On The “Bikini Industrial Complex”) Plus Plus Some Updated Favorites


While life has changed (as have my hair, lashes and tan from this time last year). But a lot of us have some plans of enoyging some kind of body of water and/or sunbathing soon. I found myself shopping for swimsuits and found out I wasn’t alone (my team and friends were also on the hunt). So I thought we’d update this swimsuit post – about modest but still cute suits to wear around friends/family/kids (you can wear whatever you want obviously, I just don’t like to chase/rescue kids in a string bikini). There are some new ones I’m eyeing and some from last year that Im still LOVING. From last year…
While on vacation up at the , we were at the lake all the time so wearing swimsuits was pretty much an everyday occurrence. The thing was, I had all these cute suits (all one-pieces—nothing super revealing) but I wasn’t feeling very confident or comfortable playing and being active with my kids. I felt like I was constantly adjusting up and down and felt a bit too exposed. I felt I needed to be more “modest” as a mom being around friends, in-laws, and kids, but was also struggling with wanting to feel stylish and cute. Typical…
When I started this post, my idea was to find modest but not too “mom-ish” swimsuits that I felt very comfortable in and review them for all of you. But little did I know, this post would become more about a larger culprit, the bikini industrial complex, than about finding the right suit.
So, at first I went on a MISSION to find the suits I actually wanted to wear, and I’m so happy to say I found some that I feel comfortable in while also still feeling young and stylish. Of course, what makes me feel comfortable and stylish could be wildly different from what makes you feel that way, but here are the suit details I’ve found that are working for me:
I like heavy lining. I look for suits that are either double-lined or ribbed so they are thicker, which not only helps the suit itself stay put better, but also keeps more goods in and hides some bumps. High necks, scoop necks, and square necks tend to have the best support for my chest. In my real life, I avoid high necks because I think they do make my boobs look even bigger. I thought I needed low necks in a suit as well, but after trying a bunch I can say a high neck is great and still looks cute. I prefer to skip the underwire for either just really tight suits or soft cups. Again, I thought that I needed underwire to support the ladies but I found that most of the time with underwire, I’m actually overflowing which is just uncomfortable, not to mention it looks like I don’t know how to dress myself properly. Until they make underwire suits with cups for all frames and sizes, they just don’t and won’t work for me.
In the end, I tried about a million suits to find exactly what I was looking for. The ones you are about to see are ones I will likely be wearing all summer, and feel very good in. I know we have had swimsuit posts before, but this time I wanted to actually show you (yes, on my body), despite the very real anxiety I am having thinking about my body in a swimsuit being displayed on the internet—keep reading to the end for my concluding thoughts on that. Here goes nothing:

The All Buttoned Up Cover-Up, $75: Not a swimsuit, but I love this cover-up so I wanted to share. It’s light and easy to throw on, and looks really cute on top of a red one piece.

1. Heidi Klein Zip Detail One Piece, $295: Okay, you are going to see a few red swimsuits in this roundup, but this one is my favorite. I love the ribbed texture, the soft cups give the right amount of support, and the gold zipper detail adds a fashionable element so it doesn’t come across completely sporty.

2. The Current, $95: All my boxes are checked with this one. It is thick, lined, has a square neck, a cute cutout in the back, plus GREAT support. The site says to size up if you are a bra size D or larger, but my normal size was fine for me and I didn’t feel like I was spilling out of it. Side note: myself and my staff love love love Summersalt and as we were preparing this post, everyone was ogling over everything on their site. They just have really cute swimsuits that are super flattering and have lots of fun colors. I would definitely go check them out if you haven’t already.

3. Underwire Swim Dress Set, $175: This suit is pretty, and I always wanted to try this shape swimsuit on me (because who doesn’t love a good twirl moment), but ultimately I didn’t fall in love with it. I can say however that it is high quality so for those that like this style, I think it’s a great option. Although, the underwire isn’t nearly as supportive as it could be.

4. Beach Break Paddlesuit, $128: Wetsuit definitely comes to mind with this one, but in a cool way. It is VERY comfortable and obviously less revealing with the high neck and cap sleeves, but the red color and the mesh detail actually make it feel stylish and flattering. Even Brian said “that’s a cool suit,” which is saying something.

5. Zuma One Piece (similar), $120: Even though there isn’t built-in bra support in this one, the fit is tight enough that you feel supported. It is great for paddleboarding and kayaking because of how much coverage it gives in the front and back (it’s almost a wetsuit), but the scoop neck and color block, it feels stylish.

6. Sofia Flutter Sleeve One Piece, $250: My team loves this one and I really like it, too (hello, ruffle sleeves!). The only problem is that I feel it does not have enough support for me. There are no soft cups or bra support and it isn’t as tight fitting as the others so I feel it wouldn’t keep everything up top in place, but it is SO CUTE. The woven ribbon detail is really special.

7. By The Bay Skimpy One Piece, $128: Again, the cap sleeve and high neck create a sort of wetsuit/lifeguard vibe, but this one has a really cute hole cut out in the back that I love. The bright red adds a bay watch sexiness element, without being too loud about it. The bottom is a bit cheekier than the others but I still feel comfortable in it.

8. The Mesh Diver, $95: This one feels sporty but not too “swim team.” It is also by Summersalt so it is high quality and thick lined, and has soft cups so it is supportive. I like the racerback and mesh detail that adds a stylish element.

9. Kiki One Piece, $135: I love the scoop neck and T-shirt style swimsuits that are very in right now. They are so flattering and look cute worn with cut-off distressed shorts. The only issue I have with this suit is I wish it came in more fun colors and I also really would love if the pocket details weren’t just details and actually functioning pockets.

10. Doss Demi Underwire One Piece Swimsuit, $240: Brian really likes this one and I do too, but the underwire pushes up the ladies in a way that could cause a slip at any moment, plus the little cut-out, though cute, does make me feel too exposed. I don’t feel completely comfortable in it because it doesn’t fit perfectly up top, but I do like the overall shape and the floral pattern.

11. Lipsi One Piece, $228: Here is another underwire one piece, but this one still doesn’t work cup-size for me and is kinda uncomfortable. So many of the others really are more flattering.
A few new ones:
Vitamin K came out with my favorite black suit but in blue and pink YAY! And the Heidi Klein piece that I love in red, now comes in blue and white stripe (it’s VERY expensive but it’s the one I always wear because it’s supportive, flattering (it’s thick) stays put, fun (brass zipper) and I like a racerback.
So, there you have it. These are the swimsuits I will be considering keeping, but as promised, I wanted to share my thoughts and process about this post. When I first decided to do this, I had tried on a bunch of suits in my room by myself in front of my mirror and felt good in them. I told my team, “sure I’ll shoot them on my body, no problem.” Then the day of the shoot I was on my period, felt bloated, and as I looked at the photos on the camera screen I said “nope. Not going to do this.” All I saw were the fat pockets in my armpits and the slight bulge outside my thighs (things that I’m sure only I notice). But then I asked myself why? WHY would I be ashamed. I’m healthy and strong, and those are the words we use in our house to teach our children to use (we NEVER use “skinny” or “perfect”). But I fell victim to the visual story/lie that I have been told my entire life: that of Photoshop and retouching and perfect lighting. I don’t really have any shame or embarrassment in any other aspect of my life, so why would I let the least interesting part of me, my looks and physicality, dictate how I feel about myself in photos and, more importantly, shift this story??
It seems no matter what size you are (be that “too skinny” or “not skinny enough”), no one is safe from the unrealistic, unattainable standards we see perpetuated in advertising and fashion every single day. Don’t get me wrong, the industry has come a very long way, and it is refreshing to see the shifts towards REAL body positivity and inclusivity, but we have a long way to go. I muse with my friends all the time that hopefully someday there won’t be a “modeling” industry. It seems so dinosaur and archaic that we allow one version of the female body show us how we should all look. It is so dated and last century. High fashion can do what they want, but it seems to me that designing clothes for just one small one size seems SO cheap and easy. I wish brands would do the harder job of dressing bodies in all shapes and sizes, celebrating healthiness, and caring about happiness.
I joked with our photographer, Veronica, “have you ever shot for Sports Illustrated, because get your olive oil brush ready.” I’ll be honest trying on 10 swimsuits was embarrassing to shoot and even more-so to “OK” the photos that I liked.
Hilariously as I’ve been writing this post and reflecting (per usual) I see the irony that someone who is a size 4-6, has both hair and lash extensions, and a spray tan isn’t exactly the beacon of “realness”. We all struggle with our own vanity issues and frankly its hard to to de-learn years of mass-media (which, no surprise, is often driven by men) telling us we have “too many” curves or “not enough.” So, hopefully, posting un-retouched photos of myself online is step one in the right direction. That’s not to say that I think doing things that make YOU feel good about yourself are wrong (like putting on make-up or getting a spray tan). But we should be aware of why we’re doing those things, and making sure we’re doing them because WE like the way they make us feel and look, not because we’re trying to live up to some pretty unrealistic body standards.
Fun fact: all companies have “fit models” which means models that are in every size they offer their clothes in (which frankly is often embarrassingly non-inclusive) to ensure that indeed those sizes will fit. They have size 8, 10, 12 (and often more) fit models AND YET MANY STILL ONLY SHOOT SIZE 2. It’s the easiest solution EVER to simply shoot their clothing in every size. I realize this will cost more resources, but scale it down, don’t bother with photoshopping or retouching. Just shoot like we did in one hour with a cannon. It’s not that hard to be real. It’s actually pretty easy.
Now looking at this post in its final form, it shouldn’t have been that hard, and I shouldn’t have been that hard on myself. When I’m being healthy I feel good and feel that I look good. I’m not embarrassed. I understand I’m considered small, so if I’m “small” and I feel this aggressively self-critical then how the heck does the industry make other people feel?
I can’t wait until the status quo catches up with this generation that has so much body pride, that promotes body positivity and knows that the picture of one size that every woman should aspire to will be absolute thing of the past. Feeling healthy is what should we should all strive for. To be pressured to look and feel happy while comparing yourself to the ubiquity of perfection is absolutely demoralizing. I believe we can change that. I want to start by buying from companies that don’t photograph one size. If I see a company hiring real women of all shapes, colors, sizes, and ages to model their clothes and suits (which more and more are doing) I want to buy their product. I’m done with the bikini industrial model. Hopefully, you are, too.
***Photography by Veronica Crawford
**The “Bikini Industrial Complex” was coined by Emily Nagoski + Amelia Nagoski. I’ve only listened to a podcast about it, but I hear the ted talk is GREAT.
The post Active & Modest Swimsuits That Make Me Feel Good (Plus, My Thoughts On The “Bikini Industrial Complex”) Plus Plus Some Updated Favorites appeared first on Emily Henderson.
The Link Up: The Self Tanner That Replaced Emily’s Spray Tan, 3 Dresses Under $35, & The BEST Gardening Tool

 design by katie monkhouse interiors | photo by margaret austin
Happy Memorial Day Weekend folks. Hopefully today you are able to celebrate (or not celebrate) in whatever way feels right to you and keeps everyone protected. And if you are interested in some great sales, we rounded up all our favorite one’s happening right now. Okay now here is what EHD has been loving this week:
If you want to see a beautiful house then check out this one designed by Katie Monkhouse Interiors. It’s both earthy and modern and while we think the bedroom above is our favorite room, the study is also a stunner.
From Emily: “I had to quit my love affair with my local spray tan machine 2 months ago, which was painful, but have finally started lathering up with this at-home backup. You HAVE to buy the mitt, but once you apply evenly and often I/you can get that golden natural look that frankly I had no idea how much I was missing. Starting last week I applied twice a week and while the vanity shame was high, I felt better. happier. strangely even healthier.”
Also from Emily: Like the former Pacific Northwest Family we liken ourselves to be, Brian bought the kids their first official hiking shoes, and let’s just say it’s all they want to do now.
If you haven’t heard, some very exciting design blog news happened this past week with two of our favorites. Apartment 34 is BACK! After a brief hiatus this year, Erin is back blogging and with a beautiful new site to celebrate. And speaking of a site redesigns, Sarah Sherman Samuel also debuted her newly designed site. We are very familiar with how much work goes into a redesign (it’s no joke). So we wanted to give a big congrats and that we can’t wait to fully dig in.
From Sara: I FINALLY got myself a set of good baking sheets. I’d been using a cheap small set for the last three years, and I can’t believe the difference these new ones make. No warping, even baking, nice and big, and two for only $20. I honestly don’t know why it took me so long to make this jump. And now all my silicon liners and pre-cut parchment sheets (SO much better than a roll) fit like a charm. O and coincidentally Jess also bought these and loves them just as much. We are at the point where we don’t even need to speak to purchase the same items.
From Mallory: I’m desperate for a summer dress that I can wear at home during the work day or on the weekends. I found this dress for $28 (it’s 50% off) and she might be the one… but I’m trying to do ALL my research, so I’m debating if I should get this one instead (it’s $27). Which one should I get? Also as a bonus, I found this cute and casual little black dress with buttons for $11 (78% off) while doing said “summer dress research” that I’ll also probably get because it’s such a good deal.
This home tour is so dreamy that you’ll wish there were more photos to stare at. If you love a Victorian meets eclectic modern style, you will be obsessed just like the rest of us.
From Ryann: Remember when I said in this post that I was praying that these jeans would go on sale?? Well I have since decided to access the smart part of my brain to see if I could find a similar pair on my favorite luxury consignment retailer, The Real Real. Turns out this was a very smart decision because I found these Moussy jeans for half the price. These aren’t the exact ones I want but I have faith that they will show up on this site one day and I will be thanking myself for buying second hand instead of splurging.
From Jess: My father has basically become a professional gardener now. At least four times a week we eat something from his vegetable garden and his flowers are frequently displayed on the dinner table. When I was thinking of a link this week he said, “Jess, this is the best gardening tool ever. When I tell you it’s good, it’s really f*$&ing good. Can’t you tell from my yard?” He rarely gives out that kind of adoration for things so I knew I had to tell you all about it. So, if you are a gardener, an aspiring gardener, or have a relative (cough father’s day will be here in a minute) this is THE TOOL you or they need. Plus it’s only $36 and is likely on sale this weekend:)
From Julie: If you are in need of a dose of nature like I am then check out this video, “This is not a beautiful hiking video”. It’s all about a personal journey of hiking The Pacific Crest Trail and it was posted in 2017 about one week before I attempted thru-hiking the trail myself. It’s beautifully shot, truly inspiring (makes me cry every time I watch it) plus it’s over 9 minutes of pure nature.
Also if you are wondering about what Memorial Day sales we think are this year’s best then head to our big ole post about it
The Link Up: The Self Tanner That Replaced Emily’s Spray Tan, 3 Dresses Under $35, & A Peaceful Nature Video
design by katie monkhouse interiors | photo by margaret austinHappy Memorial Day Weekend folks. Hopefully today you are able to celebrate (or not celebrate) in whatever way feels right to you and keeps everyone protected. And if you are interested in some great sales, we rounded up all our favorite one’s happening right now. Okay now here is what EHD has been loving this week:
If you want to see a beautiful house then check out this one designed by Katie Monkhouse Interiors. It’s both earthy and modern and while we think the bedroom above is our favorite room, the study is also a stunner.
From Emily: “I had to quit my love affair with my local spray tan machine 2 months ago, which was painful, but have finally started lathering up with this at-home backup. You HAVE to buy the mitt, but once you apply evenly and often I/you can get that golden natural look that frankly I had no idea how much I was missing. Starting last week I applied twice a week and while the vanity shame was high, I felt better. happier. strangely even healthier.”
Also from Emily: Like the former Pacific Northwest Family we liken ourselves to be, Brian bought the kids their first official hiking shoes, and let’s just say it’s all they want to do now.
If you haven’t heard, some very exciting design blog news happened this past week with two of our favorites. Apartment 34 is BACK! After a brief hiatus this year, Erin is back blogging and with a beautiful new site to celebrate. And speaking of a site redesigns, Sarah Sherman Samuel also debuted her newly designed site. We are very familiar with how much work goes into a redesign (it’s no joke). So we wanted to give a big congrats and that we can’t wait to fully dig in.
From Sara: I FINALLY got myself a set of good baking sheets. I’d been using a cheap small set for the last three years, and I can’t believe the difference these new ones make. No warping, even baking, nice and big, and two for only $20. I honestly don’t know why it took me so long to make this jump. And now all my silicon liners and pre-cut parchment sheets (SO much better than a roll) fit like a charm. O and coincidentally Jess also bought these and loves them just as much. We are at the point where we don’t even need to speak to purchase the same items.
From Mallory: I’m desperate for a summer dress that I can wear at home during the work day or on the weekends. I found this dress for $28 (it’s 50% off) and she might be the one… but I’m trying to do ALL my research, so I’m debating if I should get this one instead (it’s $27). Which one should I get? Also as a bonus, I found this cute and casual little black dress with buttons for $11 (78% off) while doing said “summer dress research” that I’ll also probably get because it’s such a good deal.
This home tour is so dreamy that you’ll wish there were more photos to stare at. If you love a Victorian meets eclectic modern style, you will be obsessed just like the rest of us.
From Ryann: Remember when I said in this post that I was praying that these jeans would go on sale?? Well I have since decided to access the smart part of my brain to see if I could find a similar pair on my favorite luxury consignment retailer, The Real Real. Turns out this was a very smart decision because I found these Moussy jeans for half the price. These aren’t the exact ones I want but I have faith that they will show up on this site one day and I will be thanking myself for buying second hand instead of splurging.
From Jess: My father has basically become a professional gardener now. At least four times a week we eat something from his vegetable garden and his flowers are frequently displayed on the dinner table. When I was thinking of a link this week he said, “Jess, this is the best gardening tool ever. When I tell you it’s good, it’s really f*$&ing good. Can’t you tell from my yard?” He rarely gives out that kind of adoration for things so I knew I had to tell you all about it. So, if you are a gardener, an aspiring gardener, or have a relative (cough father’s day will be here in a minute) this is THE TOOL you or they need. Plus it’s only $36 and is likely on sale this weekend:)
From Julie: If you are in need of a dose of nature like I am then check out this video, “This is not a beautiful hiking video”. It’s all about a personal journey of hiking The Pacific Crest Trail and it was posted in 2017 about one week before I attempted thru-hiking the trail myself. It’s beautifully shot, truly inspiring (makes me cry every time I watch it) plus it’s over 9 minutes of pure nature.
Also if you are wondering about what Memorial Day sales we think are this year’s best then head to our big ole post about it
May 23, 2020
Our Biggest Memorial Day Sale Post Ever (And All Of Them Are GOOD)

HI, FOLKS. Welcome to our biggest sale roundup post of 2020. Let’s get one thing straight — it’s a weird time to be shopping, but we wanted to bring you the list of the best, most relevant sales just in case you’re in the market for something special. If you’re trying to update your WFH situation, buy some new sweats, or make your home a little happier, this is the weekend where you’re going to get the best deals of the summer.
We have furniture. We have appliances. We have indoor stuff. We have outdoor stuff (including a solution for all you “I can’t have upholstered furniture outside” naysayers — I found a brand for you, but you’ll have to scroll down for the details). We have fashion. We have beauty. I also turned on infinite scroll on our “All Posts” page so you can catch up on all the stuff we’ve rounded up lately without having to click “see more” a million times. ANYWAY, THERE’S SOMETHING FOR YOU ON THIS LIST, WHAT ARE YOU WAITING FOR?
The rules are simple: all the vendor names are clickable; I included sale details for each; be sure to check the coupon code because sometimes our EHD-exclusive code is better than what’s being offered on-site (!!!); I linked up a few items that are certifiable good deals; and when available, I linked to posts where you can see pieces in action. Everything I picked is reasonable and timely. (So think more planters, affordable furniture swaps and loose clothing instead of splurges and ballgowns. I can read a room!)
PS. If you’re a small business owner and running a promotion this weekend, please drop it in the comments! We’d love to support you. OK FOR REAL NOW, SALE TIME.
HOME & DECOR
This is all the stuff you put inside the place you live.
Annie Selke
Dates: Through Tuesday, 5/26
Deal: 20% off in-stock products
Code: MEMORIAL2020
Our Picks: This insanely plush rug and this hand-knotted option
See it in action: in the Mountain House loft and downstairs guest bedroom
AllModern
Dates: Through Tuesday, 5/26 (ends at 9 AM EST)
Deal: Take an extra 15% off sale items
Code: LETSGO
Our Picks: This ceramic planter (there’s a good selection – worth a look!), this simple mid-century-inspired end table, this very fun settee (if someone buys this, please send me a photo), and this organic/minimalist coffee table
Apt2B
Dates: Through Tuesday, 5/26
Deal: 15% off storewide, 20% off orders over $1,999, 25% off orders over $2,999, 30% off orders over $3,999. Free delivery on every order.
Our Picks: This English roll-arm sofa (particularly in sky), this glam sectional in velvet (under $2,000 AND comfortable, folks!), and this queen-sized sleeper sofa that doesn’t actually look like a sleeper sofa
Article
Dates: Through Monday, 5/25
Deal: Up to 25% off over 200 items
Our Picks: The sectional Emily owns and loves and this sofa that’s a little bit 2020 and a little bit classic
See it in action: GOSH, we use a lot of Article! Mainly because we truly love them. There are a lot of posts to pick from. But here’s one with that sectional, and here’s what it looks like in a different room.
Artifact Uprising
Dates: Through Tuesday, 5/26
Deal: 10% off site-wide
Code: LONGWEEKEND
Our Picks: These photo books are seriously the best on the market.
Barnaby Lane
Dates: Through Tuesday, 5/26
Deal: 20% off site-wide
Code: SALETIME
Our Picks: This leather sling chair in blush has literally given me an arrhythmia
Bed, Bath & Beyond
Dates: Through Monday, 5/25
Deal: Up to 40% off furniture, kitchen, decor, and outdoor
Our Picks: If you have kids, this life-size unicorn sprinkler. If you don’t have kids, also the life-size unicorn sprinkler. KIDDING – this cordless Dyson (that multiple EHDers have and LOVE)is a must-have for pet owners and this air fryer is under 50 bucks
 photo by veronica crawford | from: our bedroom update (also how I feel about having a tv in the bedroom)
Brooklinen
Dates: Through Wednesday, 5/27
Deal: 15% off with free US shipping
Code: WKND15
Our Picks: The lightweight down alternative comforter and this sheet set, especially in the grid pattern. Also, I just actually bought the weighted comforter (like, full price, with my regular money) and it’s worth it!
See it in action: in this bed styling post, and then you can read Emily’s testimonial about how much she actually loves that comforter
CB2
Dates: Through Monday, 5/25
Deal: Up to 40% off outdoor sale, up to 55% off clearance, free delivery for orders over $1,000
Our Picks: This outdoor modular sectional and this outdoor chair with a super special shape
See it in action: okay, it’s technically a roundup, but take a peek at our posts on the best outdoor furniture and best outdoor decor and accessories. SO MUCH of our pre-vetted CB2 product is linked up in there and it’s all on sale!!!
Clad Home
Dates: Through Monday, 5/25
Deal: 20% off all art, accessories, and floor model sofas
Our Picks: This original line drawing, this single-cushion curved sofa, and this best-selling sofa
See it in action: in Sara’s living room and in this heartwarming home makeover reveal
Crate & Barrel
Dates: Through Thursday, 5/28
Deal: Up to 40% off outdoor furniture, up to 30% off pillows and throws, up to 50% off summer decor
Our Picks: I have been watching these sphere planters forever and this is the best deal I’ve seen!!! Also, the Sunbrella outdoor pillows come in a ton of colors
The Container Store
Dates: Through 5/25
Deal: Up to 30% off closet essentials, up to 20% off garage organization, up to 25% off kitchen organization
Our Picks: These drawer dividers (so small, so life-changing) or these linen drawer organizers
See it in action: again, two roundup posts, but check out Ryann’s organized closet plan and then our all-time favorite not-ugly storage and organization options for more EHD-approved picks
Design Within Reach
Dates: Through Tuesday, 6/9
Deal: Up to 40% off on select outdoor products, lighting, and accessories, plus free shipping
Our Picks: These Dusen Dusen beach towels (or backyard towels, because it’s 2020 and you deserve to make the most of your at-home lounging), this globe lamp, and this classic bullet planter
Eclectic Goods
Dates: Through Tuesday, 6/9
Deal: 15% site-wide
Code: SUNSHINE
Our Picks: This stunning rattan chair (guys it SWIVELS) and this truly beautiful cabinet (complete with a drawer) are almost too beautiful!
Hay
Dates: Through Tuesday, 6/9
Deal: 15% off select outdoor furniture and accessories
Our Picks: My friend has a whole Palissade outdoor collection and folks, it’s awesome — I can vouch for everything. My favorite is this bench, but I also love this cone side table. Plus, the most BEAUTIFUL watering can I’ve ever seen
Home Depot
Dates: Through Wednesday, 6/3
Deal: Up to 40% off appliances
Our Picks: This refrigerator with a bottom freezer and this insanely highly-rated dishwasher with a minimalist pocket handle
Industry West
Dates: Through Monday, 5/25
Deal: 20% site-wide plus free shipping
Code: MEMORIAL20
Our Picks: Industry West is our favorite source for bar stools, counter stools and dining chairs. I cannot physically just pick a few and I refuse the premise of this section
See it in action: in the Atlanta project, in the Mountain House dining room, AND in the Mountain House kitchen
 photo by sara ligorria-tramp | from: jess’ small space makeover takeover
Interior Define
Dates: Through Tuesday, 5/26
Deal: 15% off site-wide
Our Picks: The Caitlin sofa (because we’ve used it, not because I’m self-centered, though that may be up for debate) and the Maxwell sectional
See it in action: in Jess’ studio apartment and in Arlyn’s living room reveal
Jayson Home
Dates: Through Monday, 5/25
Deal: Free shipping on all furniture
Our Picks: This Italian-inspired lounge chair, this organic and geometric end table, and this neutral terrazzo end table (the whole vintage section is also ::chef’s kiss::)
See it in action: in this dining room reveal from Em’s old house and in the OG reveal of Em’s tudor-inspired living room
Lulu and Georgia
Dates: Through Tuesday, 5/26
Deal: 15% off orders over $500, 20% off orders over $1,000, and 25% off orders over $1,500
Code: MDW15, MDW20, and MDW25 respectively
Our Picks: Em’s favorite coffee table (3 years in a row!), the whole Ginny Macdonald collection, and our go-to rug
See it in action: GUYS THEY’RE IN NEARLY EVERY POST, I DON’T KNOW WHICH ONES TO FEATURE. But here’s Em’s coffee table in the wild and here’s a peek at our very own EHD alum, Ginny, and all the pieces she designed!
McGee & Co.
Dates: Through Monday, 5/25
Deal: 20% off site-wide
Code: TISTHESEASUN
Our Picks: This blanket or towel ladder and these charcuterie knives (if you’re gonna eat cheese in the middle of the night, you may as well make it a little nice for yourself)
Outer
Dates: Through Sunday, 5/31
Deal: $250 off a sofa
Code: EMILY250 (an EHD exclusive!)
Our Picks: I’ve been sitting and reading all of your “I can’t have cushions outside, they get gross” comments and I HEAR YOU, and I wanted to help, so I went out and found this sofa with a built in-cover (so it always stays clean and dry – AND it’s ACTUALLY CUTE, too), and then I got you the best discount they can offer. Do you like it???
Overstock
Dates: Through Monday, 5/25
Deal: Up to 70% off select items plus free shipping
Our Picks: The cutest (and also fanciest?) scalloped umbrella I’ve ever seen, this sconce that reminds me of Emily’s living room, and this clean and modern curtain rod (a super fast way to change the look of your room!)
Parachute
Dates: Through Monday, 5/25
Deal: 20% off site-wide
Our Picks: The bath sheet (way better than a towel!) and this tub mat
Pom Pom at Home
Dates: Through Sunday, 5/31
Deal: 20% off site-wide plus free shipping for orders over $49
Code: HAPPYHOME20
Our Picks: Emily has this lumbar pillow and loves it, and this textured blanket is beautiful
Pottery Barn
Dates: Through Monday, 5/25
Deal: 10% off orders over $100, 15% off orders over $250, 20% off orders over $500, and 25% off orders over $1,500
Code: SAVEMORE
Our Picks: There’s obviously something for everyone here, but the best deal is definitely on the blackout curtains – grab these before your home heats up this summer
 photo by sara ligorria-tramp | from: all the what’s, why’s, and how much’s of the portland kitchen
Rejuvenation
Dates: Through Monday, 5/25
Deal: 25% off all lighting, 20% off everything else, additional 20-25% clearance, plus free shipping
Code: FREESHIP
Our Picks: These articulating sconces, this ceiling fan, and this pendant lamp which would look awesome paired up in a kitchen
See it in action: You see that picture right there? If you hit CMD+F and then search for ‘Rejuvenation,’ you’ll be able to tell that WOW, WE USE THEM A LOT. Most recently, though, I have been swooning over this mirror in Julie’s room
Rugs USA
Dates: Through Monday, 5/25
Deal: Up to 70% off in-house rugs
Our Picks: A jute rug that’s perfect for layering (if you’ve been putting this off, today’s the day!), a neutral rug with a little bit of texture, and a neutral rug with a little bit of pattern
Saatchi Art
Dates: Through Monday, 5/25
Deal: 15% off all originals, 20% off originals over $3,000
Code: SUMMERSALE15 and SUMMERSALE20, respsectively
Our Picks: I know better than to try and recommend one of a kind art, but here’s the page for your browsing enjoyment
See it in action: in Brady’s first living room reveal and Jess’ studio apartment
Schoolhouse
Dates: Through Monday, 5/25
Deal: 20% off select items
Our Picks: This brass and black chandelier, perfect for bringing some balance when your furniture is a little off-centered, and this classic print
See it in action: in Arlyn’s dining room and in Charlie’s first big-kid bedroom
Serena & Lily
Dates: Through Tuesday, 5/26
Deal: 20% off site-wide
Code: ATHOME (an EHD exclusive!)
Our Picks: This woven console (and its nightstand counterpart) and this arched wicker bed
See it in action: in our Apartment Therapy Small/Cool design and in this Brighten Up room makeover
Sixpenny
Dates: Through Friday, 5/29
Deal: 20% off orders over $1,000
Code: GRATEFUL20
Our Picks: The Neva is the be-all and end-all of comfortable seating. Get it as a chair, sofa, or sectional – we love ALL the versions
See it in action: in this family room we styled, in Brady’s refreshed living room, and after you’ve looked at those, read our testimonial here
St. Frank
Dates: Through Sunday, 5/31
Deal: 20% off core collection plus free shipping for orders over $100, sale section up to 65% off
Code: STAYINGIN
Our Picks: This linen lumbar pillow and this text-embroidered throw blanket from Peru (if anyone wants to buy me this, I wouldn’t be mad, just saying)
Sur La Table
Dates: Through Monday, 5/25
Deal: Up to 55% off summer cooking essentials, up to 40% off outdoor dining, up to 50% off select knives
Code: None
Our Picks: I have no idea how to cook, so I asked Sara what’s actually a good deal here and she recommended this knife, this Staub cast iron cocotte (50% off!), this knife for bread, and this very cute $9 pitcher
 photo by sara ligorria-tramp | from: how target’s fall threshold collection nails the “updated classic” trend
Target
Dates: Through Monday, 5/25
Deal: Up to 25% off select home items, an extra 15% off select furniture items, 50% off select bedding, 50% off beach towels
Code: HOME
Our Picks: This chiminea, this oversized lumbar, and this round outdoor pillow with tassels
See it in action: in this post about maximizing your outdoor space and this one about embracing outdoor pastels
Terrain
Dates: Through Monday, 5/25
Deal: 25% off select planters, outdoor furniture, and outdoor decor
Code: SUMMERISHERE
Our Picks: Just chimineas, seriously, they’re all good
Tuft & Needle
Dates: Through Sunday, 5/31
Deal: Up to 30% off site-wide
Our Picks: We’re split evenly between The Mint and The Hybrid
See it in action: in Bowser’s bedroom reveal and in Julie’s room. THIS IS THE ONLY MATTRESS BRAND WE REALLY RECOMMEND. Seriously.
Wayfair
Dates: Through Monday, 5/25
Deal: Up to 70% off, 40% off Samsung appliances
Our Picks: Guys, 40% off appliances with free shipping, installation, and haul away is NO JOKE. This is an insane deal on a washer and dryer for under $1,500 but the whole page is worth a look. And while everyone is buying for their outdoor setup, there are GREAT deals on home office essentials (especially helpful if you’re now WFH permanently!)
West Elm
Dates: Through Monday, 5/25
Deal: 10% off orders over $100, 15% off orders over $250, 20% off orders over $500, 25% off orders over $1500, plus free shipping on orders over $79
Code: SAVEMORE
Our Picks: These very cute planters with a fun pedestal base, these tall planters which are perfect for making your patio feel more like a “room,” and this coffee table with storage
Williams Sonoma
Dates: Through Monday, 5/25
Deal: 20% off Williams Sonoma collection, tabletop, backyard cooking & dining essentials, plus up to 65% off select items
Our Picks: Again, our own chef Sara recommends this wok set (it’s under $30 for a bunch of stuff, so I may also grab this), the non-stick mesh grill bags, and this cherry pitter
World Market
Dates: Through Monday, 7/27 (not a typo!)
Deal: Up to 40% off site-wide
Our Picks: This brass-inlay media cabinet and this bath mat that looks WAY more expensive than it is (actually, the whole bath section is VERY strong. Worth a look!)
FASHION & BEAUTY
This is all the stuff you put outside the place where you live. (Bet you weren’t expecting to have an existential crisis in a sale roundup post, WERE YOU?)
 photo by veronica crawford | from: my favorite affordable spring dresses (all with pockets)
& Other Stories
Dates: Through Monday, 5/25
Deal: Up to 50% off spring/summer styles
Our Picks: This lightweight linen wrap dress, this midi dress with voluminous sleeves, and these high-waisted culottes (we like the print, but the solid colors are also great)
Alo Yoga
Dates: Through Monday, 5/25
Deal: Up to 50% off new sale items
Our Picks: These moto-inspired leggings (I own these and bought my 61-year-old mom a pair, and now we both wear them and match, also SORRY for publishing your age on the internet, mom), these high-waisted leggings with mesh cutouts, and these leggings with an awesome front
Anthropologie
Dates: Through Monday, 5/25
Deal: 25% off all clothing, shoes, and accessories, plus an extra 50% off sale items. Free shipping on orders over $50
Our Picks: I wrote on Thursday that I could buy out Anthro and I wasn’t joking. It’s impossible to narrow down, so here’s the sale page
ASOS
Dates: Through Monday, 5/25
Deal: Up to 50% off select items
Code: None
Our Picks: This swimsuit which looks perfect for backyard lounging, these $13 paper-bag shorts, and this super swingy leopard-print dress
COS
Dates: Through Monday, 5/25
Deal: 25% off orders over $200
Our Picks: This voluminous maxi skirt (are you already sensing a theme here? We’re SUPER into lightweight coverage this summer), this cotton jumpsuit, and this cotton/linen A-line dress in a REALLY pretty blue
Express
Dates: Through Monday, 5/25
Deal: 40-50% off site-wide
Our Picks: SO MANY SHORTS HERE, Y’ALL. We’re partial to these high-waisted lace ones with some breathing room around the legs, these high-waisted mom shorts with a pastel cabana stripe, and these high-waisted shorts with a flirty ruffle (another theme is emerging: high-waists!!)
Farm Rio
Dates: Through Monday, 5/25
Deal: 15% off plus free shipping
Code: SPRING15
Our Picks: If you’re only seeing people once a week (like me!!!), you should make it count with something like this tropical jumpsuit (so you can be an anthropomorphic version of Blanche’s room in Golden Girls), this 3/4 sleeve banana-print dress, or this statement maxi (“Who is this GLAMAZON in the grocery store?” – everybody, after they see you in the grocery store)
 photo by veronica crawford | from: this one pair of shorts worked on all of our bodies (+ all the other options we reviewed & loved)
Free People
Dates: Through Monday, 5/25
Deal: Select sandals for $50
Our Picks: These olive slip-ons are the best option, but only for those with narrow feet!!!
Hautelook
Dates: Through Monday, 5/25
Deal: Up to 65% off select items
Our Picks: These Steve Madden sandals that are $37 and basically go with everything, these leopard print d’Orsays, and surprisingly, this 3′ tall 3 pot planter (I know we’re in the fashion and beauty section, we didn’t expect to find planters here either)
Lululemon
Dates: Through Monday, 5/25
Deal: Up to 50% off We Made Too Much section
Our Picks: This yellow rain jacket, especially if your kid is SUPER into Paddington Bear and you want to look like Paddington Bear, these cropped pants (for regular life, not exercise), or this long-sleeve shirt with a cool hem
Mango
Dates: Through Monday, 5/25
Deal: 30% off site-wide
Our Picks: This ruffled maxi dress, these timeless straight linen pants (with an elastic waist!), this short dress with long sleeves
Nike
Dates: Through Monday, 5/25
Deal: Up to 40% off select items
Our Picks: Em has these in a different color variant and loves them, and we love these printed running shorts that look like a vacation AND the solid, classic option
Nisolo
Dates: Through Monday, 5/25
Deal: Take an extra 20% off sale items
Code: MDWEHD (an EHD exclusive through 5/25) / JUSTFORNOW will get you 15% off sale through 5/31
Our Picks: WE LOVE NISOLO. I own these and will vouch for them til the end of time, and we all (seriously) own this d’Orsay
See them in action: in this post and in this one too (yes, this is the only fashion brand that gets a “see them in action” section, because that’s how serious we are)
 from: night to day lounge wear – our new wfh uniforms
Nordstrom
Dates: Through Monday, 5/25
Deal: Up to 60% off select items
Our Picks: The off-the-shoulder one piece swimsuit, these $47 star-embroidered white sneakers, and this lightweight rain jacket (because DANG, rainy season is looking wild this year, right?)
Parker Clay
Dates: Through Monday, 5/25
Deal: 20% off select items
Code: HERECOMESTHESUN
Our Picks: These are lifetime bag purchases, so we recommend this backpack or this belt bag (yes, that is the 2020 way to say “fanny pack,” but we wear this like a tight-fitting cross-body)
Sephora
Dates: Through Monday, 5/25
Deal: Up to 50% off select beauty
Our Picks: This Fenty lip gloss sampler (each has the perfect amount and the containers can fit in your purse or bra!), this curling wand with changeable barrels, or this neutral eyeshadow palette with a 5-star average rating
Splendid
Dates: Though Monday, 5/25
Deal: 40% off site-wide
Code: THISISBIG
Our Picks: If you’re leaning full into the “I’m working from home forever and investing in the appropriate wardrobe,” every basic on this page cannot be beat (I’ve been wearing a shirt from Splendid for 5 years with no fading or complaints – they’re worth it)
Ulta
Dates: Through Monday, 5/25
Deal: Up to 50% off select hair essentials
Our Picks: The special items change every day (and as someone who’s preparing these sales, I gotta say that I don’t care for that) but you can see today’s offers here
Urban Outfitters
Dates: Through Monday, 5/25
Deal: Extra 30% off sale styles site-wide through Sunday, then 50% off select items on Monday
Our Picks: These mustard pull-on shorts (yup, there’s not a lot of buttons or zippers in our future), this printed robe/cover up, and this wide-leg jumpsuit that truly can only be described as “daytime pajamas”
Verishop
Dates: Through Monday, 5/25
Deal: Up to 70% off markdowns
Our Picks: Everything on this site has 2 free day shipping (even now) so this is hard to narrow down, but we love this babydoll dress for WFH days, this scoop-neck top (I recently wore something like this on one of our team Zooms and everyone cheered for me), and these pants which are wearable versions of our favorite Brooklinen sheets
Zappos
Dates: Through Monday, 5/25
Deal: Up to 50% off select styles
Our Picks: It’s family time – we love these $54 Nike sneakers (in men’s sizes, so just subtract 1.5 from your women’s size – I’m a 9.5 and take an 8 in these!) these sneakers for your little kid (SO CUTE, as a childless lady I had no idea about “little kid sizes!), and these Adidas slides (you truly already know what’s linked here, I guarantee it)
OH BOY, WE DID IT. WE MADE IT. If you’re a small business owner running a promotion this weekend or if you have any sales to recommend that we missed, please drop them below. I’ll be here and updating this post all weekend! HAVE A GREAT WEEKEND, see y’all in the comments
Let’s Talk Garbage Storage Sheds With Brian (Because What’s More Rock n’ Roll Than That?)
Alright cool kids, welcome back another meeting of the “Adults Who Aren’t Really Adults” Club. Glad you could make it, and thanks for not telling any real adults, like the lame ones. I want to keep this super exclusive for those of us who go against the grain. Before we start, let’s all say the club motto: “I am still young. I am still cool. I’m not turning into my parents.”
Ok, does anyone have anything they want to share this week? Katy, do you have any updates on that nose piercing you got last week for your 41st B-Day? No? Ok, well I’ve got something, I’ll go.
So last Saturday I was listening to some super young and hip music, like stuff that’s a little “underground”. I think her name was Lizz-y? Lizz-er? Lizz-something. Whatever her name was, you could tell that the song was super cool because she said the b-word in it. Anyway, I was listening to her as I was putting some SPF 50 on my tattoos (mineral-based, obviously). I was wearing my vintage band tee-shirt, (not a button-up!) because I still rock! and my arms were exposed and I didn’t want any of the three tattoos that I got in the last year to fade. I was headed outside to play basketball with my kids, because I’m still active enough to get a little too serious about playing sports with my kids.
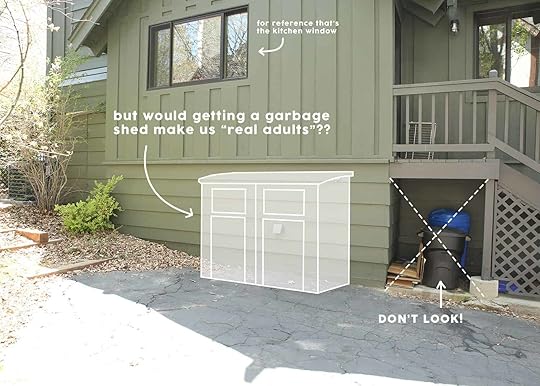
I turned my hat backwards, of course, because the brim gets in the way of my sick jump-shot, which I had to show Charlie like twenty times before it was his turn to try a shot. And after my sixth brick bounced over to the side of the house, I saw that our collection of garbage cans were a mess. They were scattered all around, with some random trash strewn around them – the result of nighttime critters getting into the scraps of our organic Mac and cheese night.
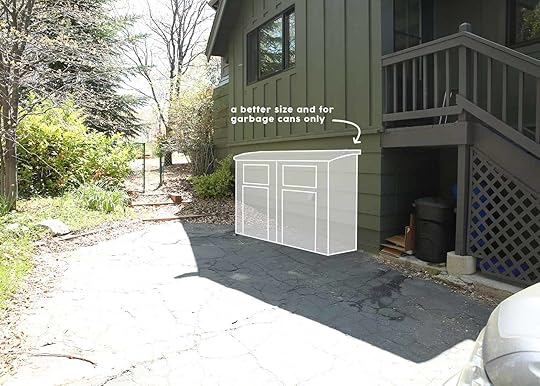
My eyes followed the mess to our backyard, (don’t worry I was wearing wayfarers but you know, prescriptions) where I saw all of our kids’ yard toys scattered around. That’s when I had the most “fire” idea. It’s time for us to get some… wait for it… sheds!

WOAH! WHAT?! I know what you’re thinking, that shopping for sheds is a pedestrian task that comes with cliche adulthood and homeownership. But don’t buy into that establishment thinking – shopping for sheds is super punk rock. It’s not lame or boring at all! Here’s the rundown.
We needed a place to store both our garbage cans and our outdoor stuff, and it had to be black or at least dark grey to match our exterior color scheme, and our rock ’n roll spirit! But mostly the color scheme. At first, I thought about getting a huge shed that was big enough to store everything in one place like this big storage beast.
But after we cleaned out and organized the garage, in our super non-basic Saturday afternoon punk rock way, we figured out that we can store all of our outdoor tools in the garage. Plus we think it would look nicer to have a few small things around than a big ole’ honking shed that takes up a bunch of space. Are you floored yet? Well there’s more!
Also because it snows and rains up here at the mountain house (nothing screams reckless youth more than a mountain house btw) we needed something that was weatherproof and sturdy. So I whipped out my laptop, closed some edgy tabs like Disney+ and ABC Mouse, and started a badass google search – black outdoor storage. It was like I was twenty again! The excitement! The edge-of-your-seat suspense!
Here’s what came up:
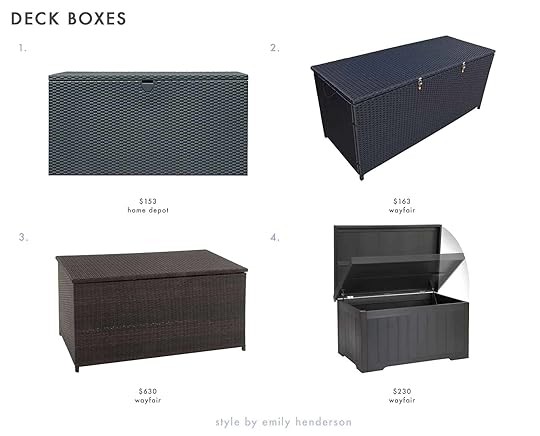
1. Steel Spacemaker Deck Box | 2. Wicker Deck Box | 3. Estep Resin Deck Box | 4. 70 Gallon Resin Deck Box
Talk about rock and roll. I think we’re leaning towards this trunk one for the outside toys since it looks like wicker but is really a resin that can withstand the weather.
It was a little harder to find something to store the garbage cans in… is a sentence that you only write if you live on the edge. There were some black ones we found online but I like to check the reviews before buying, and man oh man were the reviews bad. Checking the reviews of garbage can storage sheds is basically the new skydiving. It’s like the X-Games – not for the faint of heart. Buckle up if you go down that rabbit hole because your eyes will see some crazy stuff like, “You need an engineering degree to put this together!” or, “This thing sucks!”. Woah! These guys are ruthless.
I literally couldn’t find a single black garbage can shed that didn’t appear to fall apart after a month. The best I could find was this medium-sized one. It has a black top and dark grey body, which would disappear enough. It also gets good reviews and seems easy to put together.
I know what you’re probably thinking – “Brian, why don’t you buck the patriarchy and just build your own shed?” Well I might. I HATE the patriarchy! Emily found some pretty edgy examples of wood sheds that are DIY, which look much nicer than the pre-fab ones. The problem is, as super manly as I am, I’m not the greatest carpenter, so building a shed from scratch seems kinda daunting. I may end up trying my hand at it, or we may hire a handyman to build one for us. We’re still deciding. It’s crazy over here, guys.
Here’s that inspo Emily found:
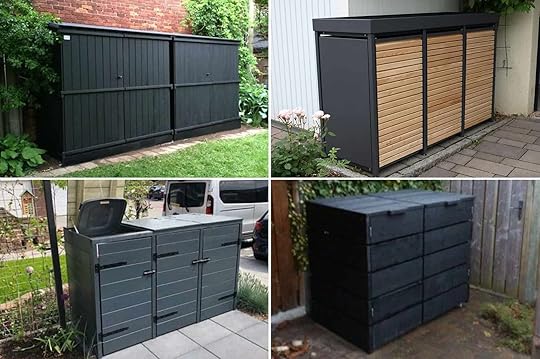 clockwise from top left: image source | image source | image source | image source
So what do you guys think? Do you have any good ideas? Woah! That’s a lot of hands in the air! This is almost as provocative as our debate about using knee-pads while gardening! And that debate almost tore this club apart. I know it’s hard because this is such a “fire” topic, But let’s try not to yell so much this time, ok? So, please leave your comments down below and I’ll make sure to read them all. And remember, don’t let anyone tell you that home improvement is lame, or that shopping for household items is boring, I mean, I’m sweating from the adrenaline this conversation has cooked up! Now go out there and rebel against adulthood! Let’s finish with our closing statement:
“I’m cool, I’m young, and I’m relevant. And I’m definitely not, I repeat NOT turning into my parents.
Keep on rocking. I’ll see you at the next meeting of the “Adults Who Aren’t Really Adults, Because We know Who Lizz-er Is” Club.
The post Let’s Talk Garbage Storage Sheds With Brian (Because What’s More Rock n’ Roll Than That?) appeared first on Emily Henderson.
Let’s Talk Garage Storage Sheds With Brian (Because What’s More Rock n’ Roll Than That?)
Alright cool kids, welcome back another meeting of the “Adults Who Aren’t Really Adults” Club. Glad you could make it, and thanks for not telling any real adults, like the lame ones. I want to keep this super exclusive for those of us who go against the grain. Before we start, let’s all say the club motto: “I am still young. I am still cool. I’m not turning into my parents.”
Ok, does anyone have anything they want to share this week? Katy, do you have any updates on that nose piercing you got last week for your 41st B-Day? No? Ok, well I’ve got something, I’ll go.
So last Saturday I was listening to some super young and hip music, like stuff that’s a little “underground”. I think her name was Lizz-y? Lizz-er? Lizz-something. Whatever her name was, you could tell that the song was super cool because she said the b-word in it. Anyway, I was listening to her as I was putting some SPF 50 on my tattoos (mineral-based, obviously). I was wearing my vintage band tee-shirt, (not a button-up!) because I still rock! and my arms were exposed and I didn’t want any of the three tattoos that I got in the last year to fade. I was headed outside to play basketball with my kids, because I’m still active enough to get a little too serious about playing sports with my kids.
I turned my hat backwards, of course, because the brim gets in the way of my sick jump-shot, which I had to show Charlie like twenty times before it was his turn to try a shot. And after my sixth brick bounced over to the side of the house, I saw that our collection of garbage cans were a mess. They were scattered all around, with some random trash strewn around them – the result of nighttime critters getting into the scraps of our organic Mac and cheese night.
My eyes followed the mess to our backyard, (don’t worry I was wearing wayfarers but you know, prescriptions) where I saw all of our kids’ yard toys scattered around. That’s when I had the most “fire” idea. It’s time for us to get some… wait for it… sheds!
WOAH! WHAT?! I know what you’re thinking, that shopping for sheds is a pedestrian task that comes with cliche adulthood and homeownership. But don’t buy into that establishment thinking – shopping for sheds is super punk rock. It’s not lame or boring at all! Here’s the rundown.
We needed a place to store both our garbage cans and our outdoor stuff, and it had to be black or at least dark grey to match our exterior color scheme, and our rock ’n roll spirit! But mostly the color scheme. At first, I thought about getting a huge shed that was big enough to store everything in one place like this big storage beast.
But after we cleaned out and organized the garage, in our super non-basic Saturday afternoon punk rock way, we figured out that we can store all of our outdoor tools in the garage. Plus we think it would look nicer to have a few small things around than a big ole’ honking shed that takes up a bunch of space. Are you floored yet? Well there’s more!
Also because it snows and rains up here at the mountain house (nothing screams reckless youth more than a mountain house btw) we needed something that was weatherproof and sturdy. So I whipped out my laptop, closed some edgy tabs like Disney+ and ABC Mouse, and started a badass google search – black outdoor storage. It was like I was twenty again! The excitement! The edge-of-your-seat suspense!
Here’s what came up:
1. Steel Spacemaker Deck Box | 2. Wicker Deck Box | 3. Estep Resin Deck Box | 4. 70 Gallon Resin Deck Box
Talk about rock and roll. I think we’re leaning towards this trunk one for the outside toys since it looks like wicker but is really a resin that can withstand the weather.
It was a little harder to find something to store the garbage cans in… is a sentence that you only write if you live on the edge. There were some black ones we found online but I like to check the reviews before buying, and man oh man were the reviews bad. Checking the reviews of garbage can storage sheds is basically the new skydiving. It’s like the X-Games – not for the faint of heart. Buckle up if you go down that rabbit hole because your eyes will see some crazy stuff like, “You need an engineering degree to put this together!” or, “This thing sucks!”. Woah! These guys are ruthless.
I literally couldn’t find a single black garbage can shed that didn’t appear to fall apart after a month. The best I could find was this medium-sized one. It has a black top and dark grey body, which would disappear enough. It also gets good reviews and seems easy to put together.
I know what you’re probably thinking – “Brian, why don’t you buck the patriarchy and just build your own shed?” Well I might. I HATE the patriarchy! Emily found some pretty edgy examples of wood sheds that are DIY, which look much nicer than the pre-fab ones. The problem is, as super manly as I am, I’m not the greatest carpenter, so building a shed from scratch seems kinda daunting. I may end up trying my hand at it, or we may hire a handyman to build one for us. We’re still deciding. It’s crazy over here, guys.
Here’s that inspo Emily found:
clockwise from top left: image source | image source | image source | image sourceSo what do you guys think? Do you have any good ideas? Woah! That’s a lot of hands in the air! This is almost as provocative as our debate about using knee-pads while gardening! And that debate almost tore this club apart. I know it’s hard because this is such a “fire” topic, But let’s try not to yell so much this time, ok? So, please leave your comments down below and I’ll make sure to read them all. And remember, don’t let anyone tell you that home improvement is lame, or that shopping for household items is boring, I mean, I’m sweating from the adrenaline this conversation has cooked up! Now go out there and rebel against adulthood! Let’s finish with our closing statement:
“I’m cool, I’m young, and I’m relevant. And I’m definitely not, I repeat NOT turning into my parents.
Keep on rocking. I’ll see you at the next meeting of the “Adults Who Aren’t Really Adults, Because We know Who Lizz-er Is” Club.
The post Let’s Talk Garage Storage Sheds With Brian (Because What’s More Rock n’ Roll Than That?) appeared first on Emily Henderson.
May 22, 2020
Easy Ways You Can Feel A Litte More “Dressed Up” For Your Zoom Meetings and Well…Life


Recently I’ve transitioned into a new stage of quarantine where I want to look cute/a bit more put together for Zoom meetings and maybe even squeeze into jeans just to create some semblance of normalcy. I think it is the same reason why I dress up to go to the grocery store or put on makeup when I am having an off day. Everything just feels foggy and uncertain right now, so I am desperately holding on to the little things that can lift my mood in even the smallest way. Is anyone else feeling like this?
I know that so many people are dealing with issues far more significant than what to wear for Zoom meetings to feel cute, so if reading this is making you cringe, I get it. It is not everyone’s top priority but if you are like me and have been searching for ways to feel a little more normal I hope this post can help.
So, after lots of discussion on our Zoom meeting here are some ideas for feeling more put together on work or school zoom calls, if you are interested. If not, feel free to skip this post and come back tomorrow or perhaps peruse our projects or shop page.
A $3,000 Kitchen Makeover Challenge

These days I’m spending a lot of time in my kitchen. My old, disgusting, literally falling apart kitchen. It wasn’t in great shape when we moved in, and I had to admit that we haven’t really helped the situation over the last year (by ripping out random cabinets, cutting the power on one side of the kitchen, and closing up the entrance to the kitchen from the master bedroom, but never plastering and painting the wall).
When we first bought the house I had naive dreams of renovating the kitchen right after finishing round one of renovations (which I thought would only take two months). Well, here we are more than a year in, and we still don’t have a master bathroom or closet system, let alone a renovated kitchen.
 please note that the house had TWO fridges when we toured it…
But recently we featured a home tour where the owners really focused on “making it work.” They didn’t renovate their home, opting to just updated it using paint, wallpaper, and a lot of hard work. I was IMPRESSED and decided that if they could implement that concept on their entire house, I could implement it in my kitchen.
Needless to say, I think my kitchen will need a little more than paint and elbow grease. But there certainly have to be budget ways I can update my kitchen to make it an enjoyable space to spend time in while we save up money – and emotional energy – to tackle a full-on kitchen renovation in 2-20 years.
THE BUDGET

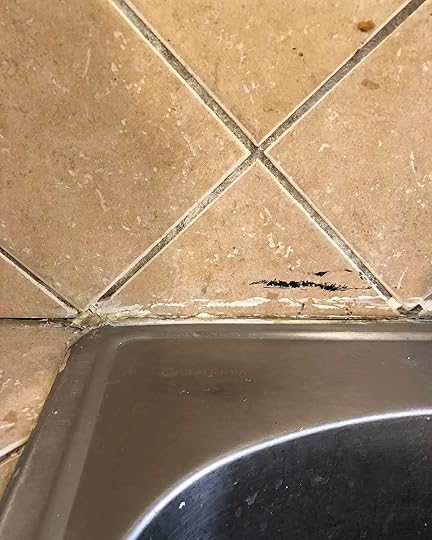
First, I need to decide what “breaking the bank” meant to me (and Mac). My kitchen really needs some TLC to even be sanitary – The grout in the counters is falling apart making it a hotbed for stuck food and bacteria, and there are more than a few holes in the walls that need to be properly sealed in order to keep “things” out. So, I’m not just focusing on aesthetics. I need to tackle functionality as well.
After doing some soul searching and research, I’ve decided that for this kitchen update I’m setting a budget of $3000 for myself.
Sure, $3k doesn’t sound as budget as, say, $300. But versus a full-on renovation, $3k is budget. A full gut and renovation of a kitchen can easily cost upwards of $20k (That was Velinda’s Kitchen Budget and she DIY’d almost all of it). So I feel like $3k is a tight enough budget that it will force me to get creative, while also allowing me to make big enough changes to actually improve not only the appearance of the kitchen, but the functionality. But how am I going to stay within that $3k budget (give or take)?
Keep the cabinets I already have – I can not summon the emotional energy or budget to figure out a complete cabinet plan right now. It sounds like an impossible puzzle and even using only pre-made Ikea cabinets, the cost is just a little out of reach.No new appliances – The ones we have (that came with the house!) work fine for now. When we get new cabinets maybe we’ll be able to think about adding a dishwasher or getting a pretty fridge or stove.DIY – No hiring out for this project, it all needs my dad and I can do together. And yes, the free labor will definitely bring down the cost.Using Leftover Material – I’ll get to this later . . . .
THE PLAN
If you know me, then you know I’m impulsive, pull triggers quickly, and change my mind equally as fast. It’s like design whiplash, and Mac should honestly be canonized for putting up with me. One day last week I impulsively texted my dad (who, along with my brother, did most of the renovation work on the rest of our house – neither of them are contractors by the way, both just handy and adept at figuring things out) all my big ideas for this kitchen “update” in one mega long text, to which he simply responded, “I’ll come over tomorrow and we’ll talk.”
The next day he showed up with a tape measure, three deli sandwiches, and more optimism than I’m used to from him. I think he’s excited to have a project to work on. And over one lunch break we brainstormed and came up with a solid plan of attack (and have been texting back and forth non-stop about it ever since).
THE FLOORS


I do not like the tile on the floor of the kitchen. But if you like it, you’re not alone! Both Jess, Julie, and Mac’s mom really like the flooring. It’s not bad tile, it’s just not my style. So I’ve got three options when it comes to flooring:
Design around the existing flooring – This would be the most difficult, but most interesting road to go down.Rip out the existing tile and put down new tile – This sounds like the most expensive option because it would involve purchasing tile.Rip out the existing tile and use extra leftover hardwood flooring – I really overbought on the hardwood almost a year ago and still have a hefty amount just chilling in the garage.
Well, I don’t think it’s hard for everyone to guess which option I’m going with. BUT IT’S THE HARDWOOD ONE. We’re going down this route for two reasons – 1.) It will cost us lots of time and labor BUT zero extra monies – I’ve already spent the money and at this point I can’t return the extra flooring (but it would have cost me about $400, which would still keep me in budget), and 2.) I think I could be really happy with hardwood floors in the kitchen permanently, so laying the majority of it now means this is huge step we’re removing from the full kitchen renovation down the road.
THE COUNTERS

The next big hurdle was deciding what to do with the counters. Not only is the tile ooogly, but the grout is disintegrating and disgusting. So, something needs to change. I came up with two ideas:
Repair the grout and epoxy paint the tile – I’ve watched a ton of videos of this being done and it looks successful.Rip out the tile counters and replace with readymade wood counters, and epoxy paint the backsplash.
Both of these options sound somewhat labor-intensive and time-consuming, but we’re leaning towards the wood counter/painted backsplash option. Again, this is a project I would need my dad’s help with, but I think it’s going to be a more functional and aesthetically pleasing outcome.
 anyone else have 4 appliances they use daily on their counter?
My dad actually built custom wood counters for my parent’s kitchen, and Jess installed a DIY wood counter in her apartment kitchen. But I found these really nice looking, pre-made butcher block counters that my dad thinks will work nicely. Dad approved!
I am REALLY excited to have all wood counters, guys. I do a lot of bread baking, noodle making, and veggie chopping, so these counters will be a very welcome addition to the kitchen.
THE CABINETS


Finally a project I can conquer on my own! The plan for the cabinets is simple – deep clean, sand, repaint, and replace hardware. My dad even came up with the plan of beveling the edges to give them a fresher look. The only question is WHAT COLOR PAINT? Do I go light? Do I got dark? Do I go dark on the bottom, light on the top and the walls? I am in true agony over this decision.
ALL THE OTHER DETAILS
There are several other changes that we’ll be making as well:
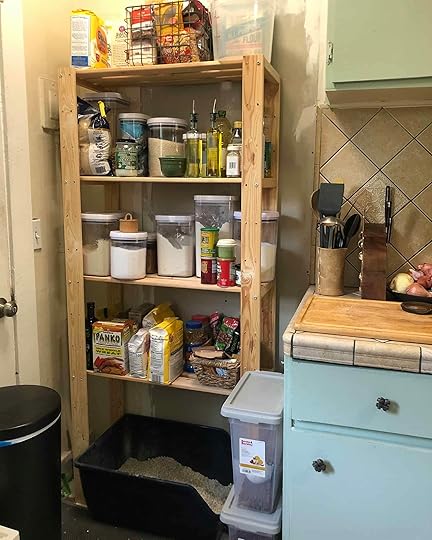

The biggest one is removing the door from the back wall, refurbishing the window (which is original to the house), and centering the window to the room. This won’t cost us much (just some plaster and dry wall), but will take our time and labor.Swap out the overhead light fixtures, light switches, and electrical plates – Easy and affordable.Add a proper standing pantry to replace the Ikea wood shelves – I’ve already found the perfect piece.Install floating shelves on some empty walls space – I’d love having somewhere to put a few of my most used cooking books.Get a new sink (and install a garbage disposal!) – I actually already found a gently used version of this cast iron sink on Craigslist that I’m so excited to install.Find a permanent home for the cat’s litter box that isn’t right underneath the kitchen pantry.
“So if you’re doing all of this, what would a full kitchen renovation down the road constitute?,” a few of you may be asking. Well, all new cabinets for a start. In my dreams I’m able to design the custom cabinet layout of my dreams with a broom closet, all sorts of organizing solutions, and built-in pantry. I’d love to possibly move the sink to the back wall, under a window. And reconfigure a lot of the electrical. I’m sure the layout of the kitchen could be improved. And I’d like new appliances (an oven with a proofing drawer please). And a pretty tile backsplash! ANYWAYS, there are many, many things I’d like to do in a full on renovation. But this will certainly get us going, and help us down the road! Getting the window centered and the majority of the hard wood flooring laid now will be huge.
That’s the plan! I’m really excited to get moving on this, and I think my dad is too. So what is this all going to look like? Stay tuned next week, because I’ve put together way too many design mood boards and I’m ready for your input. Until then, who else is getting themselves into what they thought was going to be a small “quarantine” project that’s already started snowballing out of control?
The post A $3,000 Kitchen Makeover Challenge appeared first on Emily Henderson.
May 21, 2020
The 3 Things In Our Carts That We Really Hope Go On Sale This Weekend

Everyone has their weird secret hobby. Building enormous online shopping carts is mine.
Take a walk? Go outside? Call a friend? Do some dishes? PASS. Why would I do something productive when I could use that same time to look at every single page on the Anthropologie website and add every single thing I’d ever want to my cart just so I can think wow, if I ever won the lottery, I could probably spend about $30,000 here! (I bet that no one actually needs a checkout page to tell them they could drop that much at Anthro, but there is something fun about seeing just how much money you’d need to buy ALL THE THINGS.)
Folks, I have carts like this on hundreds of websites. The amount of imaginary money I have tied up in these aspirational checkout pages could single-handedly stimulate the entire US economy while raising the GDP. It’s so much stuff, you guys.
With all this said, Memorial Day sales are IMPORTANT to me. Sure, you can get some good deals (and please come back this Saturday, because I’m working on a round up of the best sales along with some EHD exclusive coupon codes!), but I’m mainly excited because I CAN WATCH MY CART PRICES CHANGE. And by a lot! Like, thousands of dollars (that I don’t even have to begin with, but who cares)! IT IS THRILLING. I swear I wasn’t this much of a loser before quarantine, but this is really all I have to look forward to now. I’m not joking about not having any other hobbies. Please indulge me.
ANYWAY — because I’m very nosy in addition to being a big ol’ loser (a winning combination!), I asked the rest of Team EHD what they’re currently hoarding in their online shopping carts. And because they are good and kind people, they each told me about 3 things in the lifestyle category they hope will go on sale this weekend. And because they have good taste and I also wanted all the things, I thought hey, if I turn this into a blog post, maybe some of the readers will respond and chat with me about online shopping, which sounds like a step up from what I’m currently doing.
So without further ado, I present to you all the things we’re hoping to purchase this weekend on sale. PLEASE let me know about the things that you want to buy, too — I think we are best friends at this point and I truly want to hear about what you’re hoping to grab soon. LET’S GO!
Apparel

From Sara: All I’m wearing right now are summer dresses. They make me feel a little more put together than leggings and a t-shirt, but are still so roomy that they’re extremely comfortable. So I’m desperately hoping that this dress, this dress, and this dress will all go on sale.
From Julie: One thing I can say for certain is that I will never outgrow a piece of clothing that looks like you tried but still feels like pajamas on your body. I’ve been eyeing these three jumpsuits from Free People so here is hoping at least one of them goes on sale sometime soon. This one looks so cozy and that burnt orange color is what I want to incorporate into a room one day. This one is like the more refined friend of the first and I’m not mad about it. This last one is very much more my style and has a vintage feel with the mixed stripes but it would definitely be an investment for me.
From Ryann: It has been really warming up in LA recently (praise be) and since beaches are closed, I have resorted to tanning in my backyard and spraying myself with a hose. It is pretty bleak, so I’ve been searching for a new bathing suit to make this activity a little less depressing. I really love this one piece bathing suit and desperately want it to be mine.
From Mallory: If I had an unlimited clothing budget, I’d strictly shop at Reformation. I don’t know what it is about the clothes and brand that I just identify with so much. It’s that store for me where I look at their stuff and want every single thing in my closet. I would LOVE a top that has a cute little neckline like this so I could wear it every single day during summer. IMAGINE the feeling of wearing this top to a picnic or this dress. I’d die of cute-clothes-ness.
From Julie: It’s about that time of the year for me to swap out my leggings for shorts when doing my daily “run” aka run for about 5 minutes and walk for 15 around the neighborhood. The goal is for me to eventually run a half marathon (whenever those are a thing again) and so I am ready to get some real running shorts that don’t ride up after the first .25 mile. Everyone that I know who is an avid runner swears by these Strider Running Shorts by Patagonia. I’m finally ready to give them and running a real try.
From Ryann: I am always in pursuit of the perfect pair of jeans so naturally whenever a national sale holiday comes around my brain automatically goes on a jean hunt. I have never spent more than $120 on jeans, but maybe that is why I have never felt completely satisfied? Maybe I need to splurge to find my one true love? I know that Emily is a really big fan of this brand, so when I was google searching “best jeans” and these popped up, I started to get all warm and fuzzy inside. They are out of my budget but if they go on sale…should I go for it? (please say yes).
From Jess: My Girlfriend Collective leggings are my favorite leggings in the world. They are so soft AND are flattering, holding in my bits well. Lately, I have been wanting a new pair but buying another pair of leggings at full price seems silly right now. Regardless I REALLY hope that these midnight blue leggings go on sale (I also love the agave color) because I want them in my life and they are a great alternative to my go-to black ones.
From Caitlin: When I actually hit the jackpot, Farm Rio will be my first stop. Y’all do not even WANT to know how much stuff is in my cart on this site — I spend an inordinate amount of time praying for HUGE sale here. While I don’t think their Memorial Day discounts are going to bring them into my price range (oof, maybe someday?), I am keeping a really close eye on these printed pants. I’m SUPER into lightweight summer pants this year for some reason (maybe because I feel like no germs can get through them? I know that’s wrong, but like, I truly think that’s what’s going on in my brain) and these feel like they’d make getting dressed a GOSH DARN DREAM. (Honorable mention goes to this adorable summer dress. FARM RIO PLEASE DO A PARTNERSHIP WITH EHD. My email is caitlin@emilyhendersondesign.com. This is not a joke.)
Beauty

Pore Treatment | Tan Drops | CC Cream
From Emily: I got a sample of this in a swag bag from the Goop conference and every time I put it on my face I GLOW and people say ‘wow your skin looks great.’ I have dry skin and I need a lot of daily hydration but I hate thick creams (I like things to get deep, fast). Warning: I put it on my hair once and because my hair is blonde and curly (therefore so porous) it made it feel disgusting and greasy, so even though it says ‘face, hair and body’ be careful of the hair part. Anyway, I’m almost out of this and very excited to re-up.
From Sara: I got a sample of this from a friend, and I’m slightly obsessed. It’s a thick, slightly pearlescent oil serum that makes my face look very fresh and dewy. Basically it does exactly what it says it will. I was mixing a little drop into my Supergoop CC cream (the only makeup I wear these days – love it so much I’ve replaced my IT Cosmetics CC cream with it), to thin it out a bit and give it an extra boost of moisture, and it’s a dream team for my face. Truly hoping it goes on sale, but I’m about to buy a full-size bottle in two days when I’m out of my sample regardless.
From Jess: I mentioned a few weeks ago in this Link Up that I was starting a retinol serum and I have to tell you that I love it so much. The one I am using is Shani Darden’s Texture Reform which is apparently great for people with sensitive skin which I definitely have (and is vegan, cruelty-free, and comes in recyclable packaging). So far there has been zero “downtime,” it smells great and I love the way my skin is responding. BUT that is not what I hope goes on sale (well I do for you, but I just bought it). Nope, I hope that Tan Lux’s THE FACE Illuminating Self-Tan Drops do because now that I am using retinol I have to be even more diligent about protecting my face in the sun. I know that I will be “happy when I’m older” that I saved my skin but the idea not have a tan on my face makes maybe ever again me embarrassingly sad. It’s so vain but it’s just the truth. But I think there’s hope since these drops are highly rated and you can just mix them in with your moisturizer or serum. It sounds so easy. Can I have the best of both worlds??? I really really hope so… but at a lower sale price, of course.
From Sara: It would be a true DREAM if this perfume went on sale, because it’s my absolute favorite summer scent and I’m almost out. Whenever I want to test a new perfume, I buy the travel roller ball size first, and even if I love a scent, if I don’t use the travel size then I know I’m not wearing it often enough to invest in the full size (no matter how pretty the bottle). This scent just smells like warm summer evenings when the sun takes forever to go down, an extra glass of rose, and laying in hammock with your friends listening to the live jazz music from the bar down the street. Yea, it’s THAT good.
From Julie: As of late, my skin has been acting up more than usual. I’m not sure if it’s the lack of sunshine and fresh air or that my diet has shifted but I’ve developed these really small and plentiful pimples on my forehead that just won’t seem to go away. Good Times. I really want to try this pore treatment because not only are there over 1,650 5-star reviews for it on Sephora, I also know that Emily has mentioned it a handful of times before for the skin magic that it performs. I can just never bring my frugal self to hit add to cart for its high price point (even though I know it would probably do the trick). So here’s to hoping I can finally find a deal!
From Jess: I have been eyeing this perfume brand since I started at EHD. Sara and Brady introduced me to the high-end world of perfumery and Le Labo specifically. While I love the scent of a beautiful perfume, Light Blue by Dolce & Gabana (the scent of the 2006) has been as pricey and luxurious as I have gone:) Since then I have been basically running around naked, no perfumes at all. But GUYS, Santal 33 and Bergamote 22 are what I want heaven to smell like. Last year I found out you can buy samples for $6 which I gleefully took part in but I think I need this smell in my life right now, full-time. I need that daily pick me up desperately. A reminder of simpler times if you will. So I am crossing my fingers and toes that they go on sale so I can justify spending the (slightly less) insane amount of money on just one of them. I think I will start with Santal??
Accessories

From Emily: I’m placing far too much value and attention on this headband and while it is expensive (it’s leather and one of my favorite designers), hopefully a sale will help me justify the price.
From Ryann: I have never had a solid jewelry collection and I’d really like that to change. I like simple, dainty gold jewelry so this bracelet seems like the perfect fit. My birthday is coming up next month so I am thinking this would be a great early birthday present from me to me
Emily Henderson's Blog

- Emily Henderson's profile
- 10 followers

