
Emily Henderson's Blog, page 163
July 16, 2021
Just A Couple Of EHD Gals Back At The Rose Bowl (A Real Flea Market Diary With Some Very Helpful Tips)
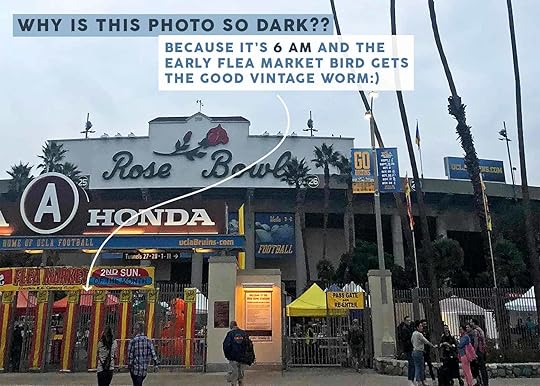
It’s time for some good old-fashioned blogging, folks! Jess and I went to our first flea market in over a year on Sunday and I’m still riding the dopamine high. We were about 10 steps into the Rose Bowl before I was like, “Hey, can I turn this into a blog post?” and HERE WE ARE – I want to show you our hits, misses, and maybe even sprinkle some pro tips in there in case you’re a little rusty at in-person negotiation (I was).
The day was an absolute WINNER for me (less so for Jess, who shall hereby be known as “the girl with expensive taste” – everything she asked about had a huge price tag!) so let’s get to cooking, yeah? I’m going to start out with some quick refreshers on what to wear to the flea market, what to bring, etc. but if you’re a total pro, please just jump down so you can see what caught our eye! LET’S GO 

 this was taken at the cinnabon truck when we were deeply dehydratedWhat to Wear
Ah, yes, my most frequently asked question. The Rose Bowl is WILD because there’s a huge fashion area and it’s very easy to differentiate the folks who are there for clothing (they’re clean, fully styled, and they all look ready for a Sartorialist street style photoshoot) and the folks there for furniture and home goods (comfort is king). Here’s my go-to dressing checklist…
A Baseball Hat: The sun WILL be in your eyes. Always. I don’t care what time you go. (PS. If you’re like “hey, hats don’t look good on me” – first of all, you’re wrong and being too critical because I’m sure you look amazing, but second of all, try a middle part *just* when you’re wearing hats. Total game changer.) A Windbreaker or Button Up with Multiple Pockets: If it doesn’t have 2 outside and 2 inside pockets, I don’t want it. I stash different monetary amounts in each pocket (e.g. $20 in one, $200 in another, $60 in a third, $40 in the fourth) so I don’t look like an asshole when I’m bartering. Do not end up being the person who negotiates for a lower price before whipping out a huge wad of cash!!! Plus, layers are important because they’re like, warm and lightweight and stuff…but mainly, the money thing. A Top You Don’t Mind Getting Dirty: OH MY, I WISH I HAD A PIC OF JESS AND I – we were DISGUSTING after hauling 4 rusty chairs back to her car at the end of the day. White tops are great because they keep you cool but MY GOSH AT WHAT COST??? Leggings or Shorts: I mean, this is just my preference, but I’m way more comfortable walking around, bending down, and hauling things around when I’m appropriately dressed (because let’s be clear: this IS a workout). I also swear by Thigh Rescue when I’m wearing shorts (we walked ~8 miles over the day and it kept me SO COMFY).Actual Sneakers: We’re talking athletic sneakers, guys. Jess wore more traditional ~stylish~ tennis shoes (you know, the super flat and cute kind) and halfway through our first hauling trip to the car, she was like “ahhh, my dogs are BARKING.” That’s a direct quote and we had to do THREE MORE TRIPS back and forth, in and out of the flea, to get everything loaded up. Treat yourself to feet that don’t ache by the end of the day! photo by alanna hale | via real simpleWhat to Bring
 I mean, like, OTHER than cash (and the exact change for your entry ticket).
A Tote or Ikea Bag: I know that most women have a supernatural ability to carry a million things in their hands, but don’t do that to yourself. Bring something to put your spoils in. A Cart: I am wildly loyal to this one from Food52 (it does triple duty as my laundry bag/grocery cart/recycling can and the special wheels mean I can bring it up the stairs easily!) but most folks just go with wire-framed ones that you can grab for $20-$40, like this. Wagons are also a good call if you’re getting bigger pieces.Measuring Tape: You know, to measure. Jess loves this one because the fractions are printed on it!!Water: You’re gonna need it.(Optional) A Dolly: If your car has room to store a dolly, BRING IT. Vendors will often let you borrow their carts (shoutout to Cynthia from Old Green Garage for letting me use hers to get my purchase back to Jess’ car!) but it’s nice to just have one in your car.(Optional) A Generous Friend With a Big Car: I won the lotto on this one Jess’ car had room for everything we bought AND she drove me back to Koreatown after the flea in Pasadena…even though she LIVES IN PASADENA. Can you even believe?!?!  photo by tessa neustadt | from: how to haggle (or not) at the flea market like emily hendersonWhen to Get There
FREAKING EARLY. Anyone who arrives to a flea market at like, 9 or 10 AM deserves to win a medal cause y’all are WILD. I normally go at doors (~5-6 AM), while vendors are still driving in and unpacking because I’m an indoor cat who cannot be outside in the heat for extended periods of time. It’s nice to feel like you’re done for the day and that you’ve seen everything before the masses show up and before the blacktop turns you into a melted pile of goo (I’m usually done by 9/9:30).
Folks tell you to get that the best deals are at the end of the day, but TBH standing in a hot parking lot at 4 PM sounds like my nightmare so I can neither confirm nor deny this. Chime in if you’re an EOD loyalist!!!
 photo by tessa neustadt | from: we rounded up all the most “worth it” flea markets by region (i.e. something for everyone)Three Final TipsDo at least two full passes and change the direction you’re walking on each pass. I like to do a quick run at the beginning to grab any “can’t live without” pieces (WAIT TIL YOU SEE WHAT WE SCORED!) and then when I get to the other end of the flea, I walk back through and do a closer inspection. Oftentimes folks will have art or decor leaning against a side of a car or hidden behind a table, so making sure that you walk through each aisle from both directions will ensure that you’re seeing EVERYTHING. If anyone says that a piece is “25” or “45” or “65” bucks, you can almost always just grab it for 20/30/40. I usually just say “I only have 20/40/60, is that okay?” and it’s never failed me. QUICK PRO TIPS, GUYS. If you’re going with a friend, make your brunch plan ahead of time. The last thing you wanna do is try to find somewhere to eat when you both have heat exhaustion and can’t even think of what you’re hungry for. Take it from experience What We Saw
 Without further ado…LET’S GET TO THE GOOD STUFF.


We both fell in love with those special plywood chairs. I sat in one and was pleasantly surprised by how comfortable it was…and then I learned that the pair was $1900 bucks and I was OUTTA THERE.
Next up: THE SCORE OF THE DAY. Jess spotted these saddle leather and iron chairs really early in our trek (for those familiar with the Rose Bowl, we started closest to the road and made our way to the stadium; these chairs were in section V) and we both started hyperventilating as they’re the perfect fit for both of our homes. Rog, the vendor at V05 (she is the best AND she’s there every month, go visit in August!!) quoted us $350 for all four and WE BOUGHT THEM SO FAST – Jess took two and I took two. They’re are in the style of Ilana Goor and if you’d like to match us, this similar vintage set is $880 for two (all-in, we paid $175/each). WHAT A DEAL, RIGHT? (PS. Wildly, this is the SECOND TIME THIS MONTH that we have split a set of 4 chairs. Who needs a friendship bracelet when you can have friendship furniture?)
And lastly, I’m just so partial to iron campaign-style furniture. We saw a few of these chairs scattered around and I always think they’re so beautiful.


These brass giraffes were a steal (usually they’re on Chairish for $3-5k, these were $400 for the small and $600 for the large) but alas, I could not justify spending $600 on a brass giraffe. C’EST LA VIE.
But these mirrors – I did end up bringing these home. I loved the scale (they’re huge – another pic at the end of the post), the mixed materials, and the horses. Originally I was like “oh, yeah, I’ll see if they’re available when I come back” but once Cynthia, the vendor in N09 (just dropping all my favorite spots here, NBD) was like “you can just venmo me,” I was sold. They make me SO HAPPY and I can’t wait to get them shot in my MOTO (Makeover Takeover)!


This turtle lamp was the first thing I saw – his expression was so sweet and the wicker lampshade is awesome. It was $25 bucks and I said that I’d consider it…and then it was still there on my second trip around, so I grabbed him for $20. He’s very cute
I loved the twisted base of this vintage lamp in the middle – the construction was STUNNING. I’m trying not to get too ~grandmillennial~ in my home so it was a pass, but BOY, it was pretty.
And then we saw not one but TWO popsicle lamps! I took pics of them for Em, since she’s the proud owner of a popsicle lamp of her own. These have such a cool texture and I’d love to see one bringing some soul to a super-modern space.


I’ve been on the hunt for some vintage wall-mounted candleholders (or sconces that I can turn IN to candle holders) and these were so beautiful. I forget how much they were – maybe $40? – and now I kind of regret not bringing them home.
Also loved the shape and color of this vessel. Classic EHD, right? It would work in so many styling scenarios.


This is when I kind of started going off the grandmillenial rails (again, an aesthetic I’m trying to nod towards, vs. an aesthetic that I’m trying to cover my whole home in) and I had to reign myself back in. I’ll always be a sucker, though, for a crystal vessel/dish/bowl/plate – I still have some from my grandma and they’re my favorite.
I also loved the construction of this little container (it was beautiful in person!!!) and it was on a table filled with similarly gorgeous objects, so I’m hoping they’ll be back next month.
And I *WISH* I had a space for this tiny malachite ball lamp. She was SHORT and the proportions were so sweet – if I was a stylist and had infinite hoarding space, this 100% would have come home with me for future bookshelf-decorating purposes.


How cool were these candelabras? Such fun construction, right? The lamp was so playful, too – it kind of reminded me of the Pixar lamp I love when pieces have some humor and personality and this one DEFINITELY did. Again, another piece I wish I could have hoarded if given infinite resources.


Jess was eyeing this black table for her balcony MOTO (we’re both still trucking ahead, although at this point, it seems that neither of us will win the race by 7/20, ha) and the price was so good – about $30 – but she decided against it because we thought the scrollwork may clash with the chairs she’s planning to use out there.
And this little table was SO GOOD – I wish you could see more detail on the top, because the veining on the stone (or resin maybe?) was really, really, beautiful. It was such a nice mix of high-end materials and a sweet, modern shape. Jess was noodling on it but ultimately decided to skip because she “didn’t have a place for it yet” and “wasn’t sure where it would go” TBH I think we should all bully her for leaving such a cute piece behind.
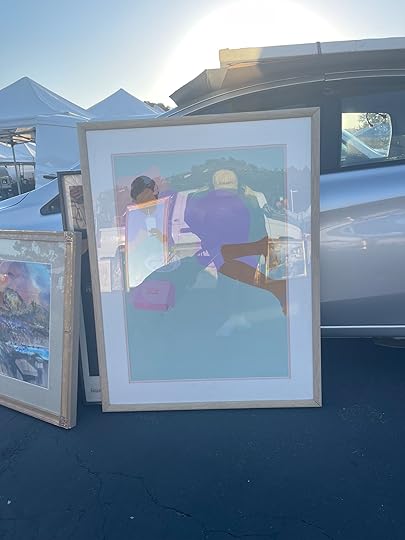
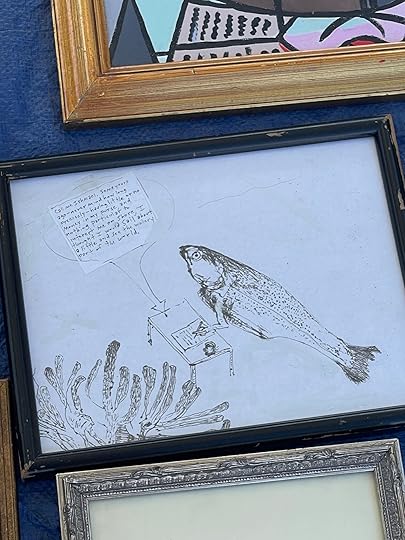
These were the two art pieces that stuck out to me – a huge print featuring a reclining women (DM me for photography inquiries, I know that I’m a professional) and this truly WEIRD illustration of a fish writing Moby Dick. At the time I was like “LOL that’s so weird” and now I’m SO SAD I DIDN’T BUY IT. Have thought about it every day since Sunday. Let this be a lesson to buy things that literally spark joy even if they’re a little (or a lot) out there.


Jess’ art taste was a little more refined. We both fell in love with the piece on the left, but the price tag was a little high (I think it was $350). The colors were so lovely and the design was so great, though. I’m blanking on the dealer’s name/spot (he’s in the same place every month and I’ve purchased work from him before) but his curation is SO GREAT. Will update y’all next time Jess inquired about that light switch art, too, but ended up deciding against it because it was also $350. The lines were awesome and the framing was in great condition, but it just wasn’t meant to be on this trip. Maybe next time?
I had THE BEST DAY, guys. You can see how big those mirrors are in the back – they’re almost 3′ wide by 4′ high – and I also have my two chairs from Jess and I’s split and the turtle lamp from earlier!
My other finds: this AWESOME $20 lampshade – I actually grabbed it while the vendor was still unloading (the perks of being early!) and it technically had a lamp-mate, but they were more than happy to separate them for me. I also grabbed this $40 brass bin (down from $50!) which I’m currently using to corral my mail recycling at the front door, but I could see it working high-end garbage can, shoe bin, etc. I really, really love it. And last but not least: those weird little stone eggs with stands! I spotted the blue one from like 100 feet away – truly, it was like a bird of prey honing in on a meal – and then ended up falling in love with its mate, the brown one with the gorgeous base. All I know is that they’re from Germany and they’re making my bookshelf SO PRETTY now


Onwards to Jess’ purchases, yeah? First off – I may or may not have coerced her to buy this vintage OG bullet planter. The fiberglass has seen better days but the lines are SO GREAT – especially with Jess’ style – and it was about 1/10th the price it should have been, so it was an awesome score at only $26. The painting was an early find, too, and the composition/texture/framing/color/EVERYTHING is so, so, so great. Jess is such a master of mixing vintage pieces like this alongside work with super modern, graphic lines and I can’t wait to see where this ends up!

After our first trip back to the car to drop off our early spoils (and to pull down the seats so we could load in the mirrors and chairs), we re-entered the flea and walked STRAIGHT into these – they’re super oversized wall-mounted hooks and they’re GREAT. They were on the ground and I didn’t even see them, but Jess spotted them right away. And, I mean, y’all have seen her last place – could there have been a more perfect find? They were affordable at $30 for the pair and the possibilities are endless – gonna be SO GREAT once they’re up on a wall.

Last but not least, this was my absolute favorite purchase of the weekend (and I think it may end up being yours, too). Jess spotted this and was like “what is this” and I said “candleholder” because I saw the hole in the middle, but then the vendor was like “hey give me $20 and you can have the candle holder AND a set of candles.” Jess ended up heading through his set-up and back to his van (truly, fleas are the only place where I’m like “YES GIRL, go crawl around in a stranger’s vehicle!”) and she emerged with THESE TINY CANDLES. Have you ever seen anything like this?! I haven’t. Like, WHAT A FREAKING SCORE. Let this be a lesson to really peek at the smalls (because I’m tellin ya, you KNOW this would have sold for WAY MORE had it been styled like this).
To close it out with some bonus friend content: after the flea, Jess and I drove to brunch at Millie’s in Pasadena where we consumed SO MUCH water/juice/coffee/iced tea/diet coke (yes, ALL of those) before we headed back to her place so I could help bring her chairs up. I ended up doing my back stretches and laying on her floor for a while (because #friendship) and then Jess got back in her car, left her house, drove me back to MY house, and helped me carry all those things upstairs. Before I worked here, I remember reading the blog and being like “there’s no way all these people can be coworkers and still be this close” but ALAS, IT’S TRUE. Can’t believe I have a job where I (a.) landed a really great friend and (b.) am now allowed to write 12 double-spaced pages about my trip to the flea market. Feeling lucky to be able to go outside, lucky for work, lucky for pals, and lucky that you’re here, too HAPPY FRIDAY, FRIENDS.
The post Just A Couple Of EHD Gals Back At The Rose Bowl (A Real Flea Market Diary With Some Very Helpful Tips) appeared first on Emily Henderson.


July 15, 2021
How To Make “A Cook’s” Kitchen – It’s Not Just About The Appliances

From Em: Today we have a kitchen reveal of a friend, collaborator and fellow blogger, Barrett Prendergast. We were hanging out a couple of years ago chatting about how we could collaborate on her kitchen and while I had NOTHING to do with the design of this (she did it all and did an awesome job) I agreed to produce/publish the reveal when it was all done – win/win. So a couple of weeks ago Bowser and Sara went over and shot Barrett’s awesome kitchen (you must read until the end and see the befores) that works wildly better for her and her soon-to-be three sons + husband. More on her below. Follow her and hot tip – she also runs Valleybrink Road where we buy our gift boxes throughout the year for friends/family/clients – they are wonderful.
Hi everyone. Barrett Prendergast here. I’m the founder of gifting company Valleybrink Road and lifestyle blog Barrett and The Boys. I’m so excited to be sharing the story of our kitchen renovation with you! To be honest, my husband and business partner, André Vippolis, managed the entire project, dealing with all of the nitty-gritty details, and is still recovering from the stress of it all. It was a WILD ride, and we learned SOOO much. Before we jump into all the design details and obstacles we encountered as construction newbies, let me give a little background.
André and I bought a small Spanish bungalow in an area of Los Angeles called Atwater Village ten years ago. Initially built in the 1920s, the house was a flip. It had been tastefully redone with a combination of Ikea and Home Depot products and finishes. After losing out on so many places and looking for what seemed like forever, we were so grateful to get a home with great bones. We fell in love with the breezy feel and open kitchen vibe. The kitchen was simple, with white cabinetry, a farmhouse sink, grey countertops, and an island in the center. The kitchen had some strange design choices, including a desk nook and a stackable washer/dryer smack in the middle of one of the walls. Still, there was tons of potential for a future redux.

Over the years of living in and using the space, we started to dream of all the things we would change. Wouldn’t it be amazing if we had an actual range with a vent? Can you imagine what we could do with six burners and a large oven? For two people obsessed with food, cooking, and entertaining, the kitchen’s 24″ cooktop was a challenge. You could never cook two things at a time, as the burners were so close together and the pots didn’t fit side by side or diagonally. We were also desperate for more storage. And, as we had one child and then another, it started becoming harder and harder to find a place to store anything. We thought, wouldn’t it be nice to trim down the poorly designed island so we could have more flow and movement while cooking and hosting. And on and on.
So, a year ago, we decided to finally take the plunge and create the kitchen of our cooking dreams. But on a budget. Our goal was a bright, spacious, functional cook’s kitchen that was kid-friendly and great for entertaining. The most important things to us were:
1) High-quality appliances
2) Increased storage and a large pantry
3) An island where our kids and friends could gather comfortably as well as be utilized for prepping and cooking.
4) A home espresso machine setup
5) Increase the natural light in the space
6) A big sink and quality faucets
We had a relatively clear vision of what we wanted the space to look like (constantly pinning away). To save money, we had an architect’s assistant prepare drawings for us based on our mood board and the goals mentioned above. We were also able to partner with many incredible brands that helped bring the kitchen to life on a budget. And, while it took much longer than expected, we made it through and are in love with our new kitchen! Here’s how it all came together.


Sconce | Tea Kettle | Blue Dipped Ceramic Bowl (similar) | Vinegar Dispenser (similar)
Appliances: As we mentioned above, we had been dreaming of having appliances that were more conducive to cooking. We decided to go with Thermador as their appliances are solid performers with a good reputation among cooks. They have a great ultra-low simmer feature and the ability to have more burners with high BTUs on their ranges. The design of their Pro Harmony line is clean and modern without looking too high-tech. We were also able to get a free dishwasher and rangehood with the promotion they had running at the time we made our range and refrigerator purchase.

Refrigerator | Wood Veneers | Custom Cabinets


Appliance Pulls (in satin brass) | Cabinet Pulls ( in stain brass)
Storage: With our goal of increased storage in mind, we decided to dedicate one entire wall in the kitchen to the pantry, fridge, and extra shelving for cookware, ceramics, dinnerware, serving pieces, etc. Initially, our laundry was along this wall in the kitchen, along with a random desk area we never used, leaving very little room for the pantry or any other storage. We decided to do floor-to-ceiling cabinetry and a built-in fridge to get the most storage and shelf space while keeping as much as possible put away and out of sight. We opted for custom cabinetry from AT Designs and chose GL Veneer’s Premium Rift Cut White Oak veneers for all the cabinetry and Emtek hardware for all the finishes. The neutral tones of the veneer bring a lot of soft warmth into the space. By having cabinetry that goes floor to ceiling, we were able to triple the amount of storage we originally had in the room. Rather than having cooking appliances on the countertops, like our Kitchen Aid Mixer or Vitamix, we can now store these items out of sight and bring them out as needed.

Flooring | Stools | Ceramic Pitcher | Footed Bowl (similar)
Space: Cooking, especially when you get in the flow, is almost like a beautiful dance. You might be sauteing something, then spin around to grab more ingredients before making your way back to the stove to finish it all off. When space is tight, it’s more difficult to find that cooking flow. After years of cooking in our kitchen, we knew we needed more space to move around while still maintaining the island. Removing it would have significantly reduced how much usable countertop space we had to utilize. Also, the island is where everyone gathers. Our kids and friends always love to spend time in the kitchen with us when cooking, so we wanted to create a comfortable place for them to sit and connect with us. We chose Article Esse Stools in White Oak with a leather seat for the island seating. They are comfortable and fresh-looking, while the oak color and leather complement the kitchen’s tones nicely.


With cooking and prep at the top of mind when designing the kitchen, we wanted to make sure we had enough usable counter space and that the material would be durable. We opted for Caesarstone countertops in London Grey. We chose this for its balance of performance, price, and quality. It’s less prone to staining and easier to clean and maintain than more porous natural stone such as marble. The London grey color has cool tones that compliment the warmer tones of the GL White Oak Veneers and the FireClay Tiles in Milky Way we used for the backsplash and shelf wall. We loved the contrast between the subtle texture of the handmade tiles and the smooth quality of the countertops. We also brought in the most beautiful indoor plants from Folia Collective as an added touch on the floating shelves, and by having them line the top shelf, our countertops and island still have a lot of usable space.

Espresso Machine | Espresso Grinder
Home Espresso Machine Setup: Two small children mean hectic mornings, and often for us, not great sleep. We need our coffee! We’d always been in the habit of getting a cappuccino outside the house after a morning Americano from our trusty Bialetti. We decided it would be great to learn to make our coffee drinks and have them whenever we wanted. So, we knew that our new kitchen would have an espresso machine setup plumbed in when we remodeled. This way, we would never have to fill and clean a tank multiple times per week. We partnered with Pasquini Coffee Co. to make our coffee dreams come true. They set us up with a beautiful Bezzera Duo De machine and a Mazzer Mini Electronic A grinder. We had the machine panels custom powder coated white and selected the grinder in white as well.

Skylight | Ceiling Flushmounts | Plants
Light and Lighting: Adequate natural light is so crucial to both of us when we are cooking. We also wanted the space to feel calm and inviting. The kitchen ceiling was always high and on a slant but had faux-wood beams across it. So, we ripped out the beams and decided to add a solar-powered skylight from Velux right above the island. It brings beautiful natural light into the kitchen throughout the day, along with touches of blue skies. It also opens, which helps with air circulation if it gets hot or a little smokey when cooking.
As for lighting, initially, we were thinking of adding pendant lights above the island but then decided to keep the space open and airy, adding two additional surface mount lights around the skylight instead. We chose Cedar and Moss Swift surface lights for the ceiling and RBW Dimple Flush Mounts as sconces on each side of the archway for accent. We added LED strip lighting under all of the lower floating shelves, which has turned out to be a beneficial detail when cooking at night. Also, switching out the dark engineered flooring in our entire house for a lighter engineered wood floor from National Hardwood, #304, made all the difference in how bright and light everything now feels.

Sink | Faucet | Beverage Faucet | Kitchen Towel (similar) | Glass Canisters | Pot Brush (similar) | Dinner Plates | Salad Plates | Cereal Bowls |
Sink and Faucet: The combination of being parents and foodies causes us to spend a great deal of time at our kitchen sink. With this in mind, we knew we wanted something larger than our original sink and more durable. We decided to go with Kohlers’ Strive stainless steel sink. For the faucet, we chose their Crue Kitchen Faucet in brushed brass so that it would complement the Emtek brass pulls throughout the kitchen. Having a larger sink has been a gamechanger for cooking and cleanup.

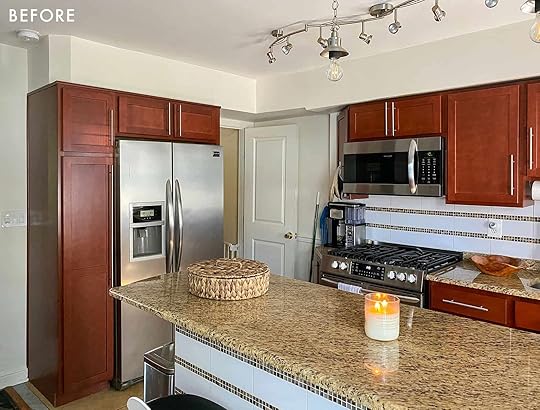
Here are the before and afters:


And, that’s about it! Thank you for letting us share our little kitchen journey with you and hopefully it inspires you to design some of your kitchens with cooking and entertaining at top of mind!
*Design by Barrett Prendergast
**Styled by Emily Bowser
***Photos by Sara Ligorria-Tramp
The post How To Make “A Cook’s” Kitchen – It’s Not Just About The Appliances appeared first on Emily Henderson.
July 14, 2021
Is Cord Swagging Back?? And Are They Part Of The Sculpture (+ It Can Actually Be A Really Affordable Trend)

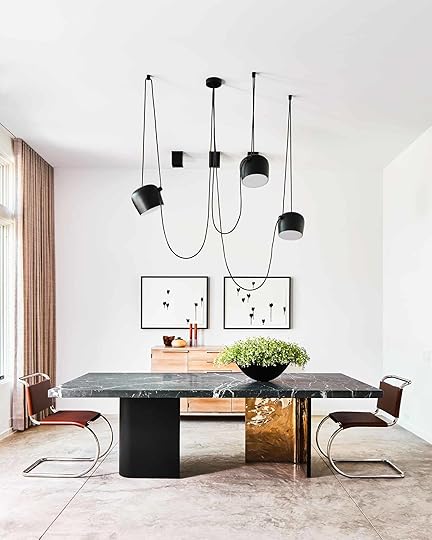
The majority of the time I’m scrolling through Instagram, I’m both inspired and simultaneously kinda bummed. I know that’s likely the most common feeling on that particular app. There are just so many cool new things happening design-wise that are simply so beyond 99% of people’s reach financially. I don’t want to dismiss the artistry/time it takes to not only make the designs and products happen but also the experience/schooling it takes to know how to create them. But last week, Emily was mentioning how cord swagging (with pendants and chandeliers) felt like it was back and how actually awesome it is visually. Now depending on the price of your fixture, nearly anyone who wants to swing in on this swag trend can! HECK YES!
But why is it cool, Em and Jess?? Well my friend, it effortlessly creates a lighting sculpture which automatically gives your eye something to stare at as well as takes up a large amount of visual space (and potentially physical space too). Aka it looks very cool with the right amount of swag and cord material. The material part is important too. Not to mention, if you have a junction box in an annoying place that doesn’t properly center over say…anything, this is the perfect solution. So to recap, it can be affordable AND might solve a design agony. Is it all of our birthdays??
 styled by bek burrows | architecture by blackman creative | photo by adam gibson | via the design files
Aside from the breathtaking views of nature, this vintage pendant was expertly swagged over to the left to be what looks like a perfect reading light for the bench while also lighting up the whole room. It also helps to visually balance the room so that there’s enough “weight” in front of the white windows and your eye doesn’t focus solely on the darker, natural french door on the right.
Hot TipConsider the height/length of your swag if it's a directional light fixture. The lower you go will affect how much the fixture will light up your whole space. But going low looks super cool if you only need to light a small area.
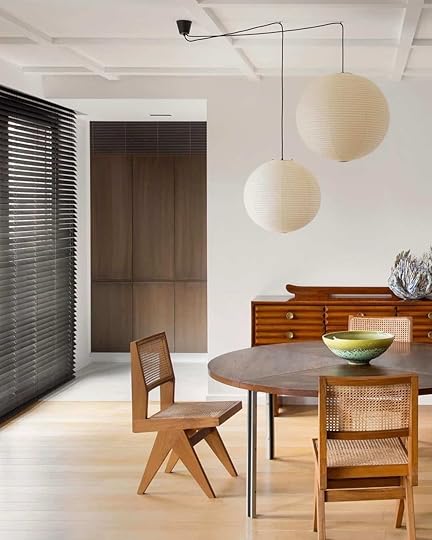
 design by felipe hess | photo by filippo bamberghi | via trendland
This is a perfect example of creating a simple sculptural moment and playing with a low height. Plus notice how the curve of the swag contrasts all of the straight lines in the space (well, except for that incredible wine storage moment). I’m not a huge MCM (mid-century modern) gal but this space is really speaking to my heart. Also, is that a drawing of a flower on that cement post?? Stop. I get it, you’re perfect.
 design and photo by rachael jackson
Then here we have the colorful, DIY joy of Rachael Jackson’s ORC reveal. See how she wrapped her probably undesirable-looking cords in a rainbow pattern due to her beams likely making it very hard to conceal them in the first place? It’s playful, draws your eye up, and really gives a sculptural, artistic feel.

 design by amanda gunawan | photo by justin chung | via dwell
Now while this can be super affordable, like everything else in this world, there are ways to dive in and spend all of your money too. I’m unfortunately a pro at finding these ways first. Never have I seen an expensive, full/overpriced item I didn’t immediately gravitate towards. But enough about me and more about these BIG TIME cord swagging fixtures.
If you look at Amanda Gunawan‘s beautiful neutral, minimalist home, it would be totally pretty with a simple single pendant. BUT instead, she chose to install that insanely cool multi-pendant fixture with extra-long swagged cords to create a real piece of art. It gives the space so much more movement and accentuates how high the ceilings are! Very cool and noooo jealously here…
 design by chad dorsey design | styled by jenny o’connor | photo by stephen karlisch | via vogue living
Here’s the same fixture but in black and with fewer lights (three vs five). Sure this room could use some more dining chairs for everyday use but there is no need for any more decor. That light is graphic, bold, and is nearly impossible to look away from! I also love how the cords are asymmetrical so it doesn’t look uniform and keeps those eyeballs moving.
 design by bos studio | sara mathers | photo by helen cathcart | via
 This is a maximalist dream and my oh my is it a beaut. A canopy look is VERY cool, and if you are technically inclined you could DIY or take it to a lighting shop and have them turn your individual lights into a single, large pendant.

 design by courtney bishop design | photo by katie charlotte
Both of these Apparatus fixtures are sculptural pieces of art but what makes them work so well together is that one is thicker with less arms and the other (with the swagging cords) is visually lighter with more “arms”. So remember to mix up “the weights” when mixing ceiling lights.
 design by workstead
Another way to bring in “the swag” without the cords coming out of the ceiling is to have it come out of the fixture itself like this one! That way you still get the sculpture look but with it being a little less intense:)
 design by courtney bishop design | photo by katie charlotte
But what if you want to up drama and happy to have a beam or horizontal pole hanging from the ceiling?? Baby, you can just wrap that puppy up! I love how Courtney Bishop wrapped these macrame corded pendants around that pole. Sure this is in a restaurant but think how pretty something like that would look in our outdoor dining area?? Actually, my dad and his girlfriend did something like this with pendants like this one and it looks really great.
 design by cynthia zamaria | photo by robin stubbert
Of course, it can look awesome inside too:) It really adds just a ton of texture to a space, right??
Side note. I want to talk about cord material. You really want to stick with fibers or a very simple but pretty rubber one. Chains can be cool buuuut are tricky and can easily look not great. Places like World Market with this one and this one, Etsy with this shop or this shop are great options. But don’t forget to check out your local lighting shop. Back when I live in New York, I went to this lights and parts shop and had them make a lantern pendant I had bought into a working light fixture for like $40 (back in 2013 FYI)! They had a ton of material options and it really turned out special.
 design by stef claes | photo by eric petschek
Now let’s go back to the inspo, and see the power of a simple double pendant light. I love how Stef Claes took this extremely classic Noguchi pendant but doubled it up (in different sizes) and decided to swag it over the dining table. Not sure if placing the junction box to the side of the table was intentional but regardless it makes it so much more interesting than if it were simply right above. It’s something you might want to think about if you are renovating and want to do things a little outside of the box.
 design by flack studio | styling by joseph gardner | photo by anson smart | via architectural digest
This room is perfection to me and those lights are a big reason why. Not only are they just freaking cool but they are different shapes, hung at different heights, and with that simple cord swag, lightly fills in the upper ceiling space so it doesn’t feel too empty and forgotten about.
Hot TipGot really high ceilings? Consider adding some length to your cord so it can swag a bit. That way you have a simple but impactful piece of art above you. Two birds, one stone.

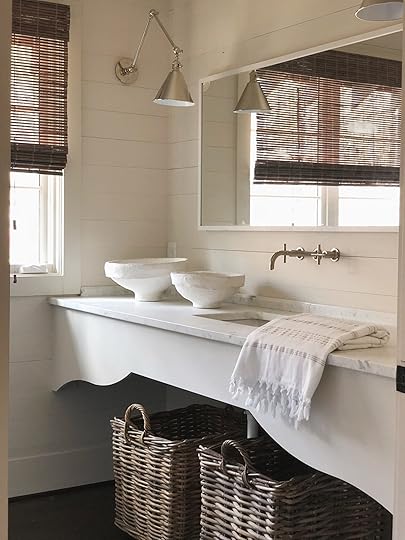
 left: design by jeppe utzon, photo by mads mogensen, via elle decoration uk | right: design by studio simple, photo by verne photography, via elle decoration uk
Lastly, you might have a wall junction box that you could take advantage of for your ceiling purposes. Sure it might have been meant for a sconce, but it can be a really cool way to have a slightly unexpected cord swag that you can then take up to the ceiling like in the photos above.
I’m actually thinking of doing this in my very dark and uninteresting hallway. It has a sconce but it’s practically butting up to a doorframe. Very weird. So my thought now, after Em brought up this idea/trend, is to put the “ceiling plate” on the wall and then have lots of cord length to have a cool pendant sculpture on the ceiling. It will not only brighten it up with multiply lights but it will look so much more interesting. I’m pretty excited about it:)
Hopefully, you might be too and are a little inspired to put some swag in your home:) But what are your thoughts? Do you agree that a cord can add a sculpture element to a room? Do you like it?? Let’s chat.
Love you, mean it.
Opening Image Credits: Design by Reath Design | Architecture by Bestor Architecture | Photo by Laure Joliet
The post Is Cord Swagging Back?? And Are They Part Of The Sculpture (+ It Can Actually Be A Really Affordable Trend) appeared first on Emily Henderson.
July 13, 2021
Powder Bathrooms (For The Farm) I Won’t Copy But Seriously Want To Copy…

If all the rooms in a house are meant to feel like a “family”, the powder room is the crazy cousin, the one that spikes the crystal light during the family reunion. You can take risks in here, and go a bit wild because they are temporary spaces, used for just one (or two – :)) singular purpose. It’s usually on the first floor, often without a window, and it’s the bathroom that guests will likely use. And since it’s not where you regularly bathe, shower, or get ready you can forego storage needs or other practicalities that you have to consider in other rooms. Also with less water splashing around, it means less need to use a waterproof material so you can lean into wood on walls floors, backsplash, or even vanity top. Less ‘functional needs’ means more fun.
So today I’m showing you all the powder rooms I’m HEAVILY inspired by, and pointing out the ideas that I kinda want to copy (and obviously do the EH shaker/victorian PNW farmhouse version of it). I still don’t know the adjectives I want to lean into. Here we could echo some of the themes in the sunroom which are more “Victorian” and “whimsical”, or we could keep it “utilitarian” and “rustic”. We could panel the walls and do a custom penny mosaic tile floor, OR we could go balls to the wall and tile it all in a pattern. I am still exploring all the things and just waiting to find the right special salvaged sink, and then if we don’t find one we’ll lean in a different direction. Unlike most other spaces I feel more freedom in here because I know I can take a big risk, a bold move because it’s used pretty infrequently (aka, I won’t get sick of it). I guess I want it to “appropriately unexpected”.
Inspiration design by beata heuman | photo by simon brown | via you magazine
That first one, by Beata Heuman is JUST INSANE. The “under the stair” architecture was ingeniously embraced, the off-center sink gives room to play on the other side (and you can do a super small sink in a powder room or WC), and I love how the pleated skirt doesn’t go to the floor. SEXY MOVE, LADY. It looks like there is a low window here, at shin level, the sconces might be headbangers but I kinda don’t care, and that pink paint color is incredible. I will not copy this bathroom, but I want to.
 design by beata heuman | photo by simon brown
This next is also from Beata… obviously. The marble backsplash, taking it up and creating such a pretty sculptural shape at the top ABOVE the shelf is excellent. I’m also loving decorative brackets these days, and again with the skirt.
 design by patrick williams | photo by michael sinclair | via house and garden
Now this one is just about finding that perfect vintage sink and hoping that you can find faucets or taps that work with it. So sweet.
 design lauren caisley interiors | photo by sarah griggs
 When I saw this bathroom above I said “yes, this”. How they played with the wood paneling and trim is inspiring and just a simple super utilitarian sink mounted off-center on the wall. Of course, I think it helps to have a window (and we don’t have one) but it’s made me hunt for a sink like that, to place it off-center and play with the paneling.
 via home stories
Or could I go away from being “utilitarian” and lean into some romance and whimsy. The single sconce is awesome but the carved marble sink steals the show. I’ve been looking online all over the country to find a special “sink” to help the direction of the room but nothing yet.
 design by yvonne mcfadden | photo by jeff herr | via atlanta magazine
I’m not typically a vessel sink lady mostly because you lose some space and feels like you can never clean the base of it, but this one is special and would be worth it. I LOVE that thick slab of marble, the exposed screws on the wood base (keeping it still feeling casual), and that gorgeous rounded dark wood backsplash. INSPIRED.
 design by elizabeth metcalfe | via house and garden
Ok, generally this one is a bit fussy/antique-y for me BUT it did remind me how much I love a patterned tile. I found deadstock tile from France online that I’m eyeing and might pull the trigger because even if we get it and it’s not right, I feel confident we could use it in one of the other buildings or another project.
 photo by marina denisova | courtesy of cotswold farm hideaway | via remdolista
If I DID do a patterned tile on the wall, I love the idea of taking it up to be the backsplash and then stopping it.
 design by brooke and steve giannetti | via giannetti home
This is a shot I’ve pinned a thousand times for this house so I must love it. I think it’s about that table, in the most beautiful non-replicable Swedish worn blue. I would likely do an undermount sink with a sweet little lip and maybe a plaid or floral skirt to take a little bit of the Rachel Ashwell out of it (nothing wrong with it, but it’s a bit shabby chic for me and I would rather lean into a weird pattern). Also, that wall mount sink on plaster walls is so pretty. I do wonder how plaster walls look in a windowless room – like do they create enough movement without natural light to create that feeling? Unsure. Either way, without that vintage table I’ve got nothing – so to execute this look I need to go on the hunt.
 design by meredith sherrill
Now this is just pretty, simple, doable and you could get creative with the color, the wood, the paneling, and the stone. I love the architectural sconce coming into the vanity from the sides. Maybe a vintage mirror with wavy glass that you can’t even see yourself in and then add a skirt (obviously).
 design by studio tack | via remodelista
I ALSO love this bathroom from the Anvil Hotel in Oregon. It has more hipster “dude” vibes, but that dark navy vanity disappears into the beadboard in a really chic way, then the heavy blocked chair rail trim is a cool way to transition the colors. I think I can say for sure that this bathroom won’t be white or gray, but not sure I would go this dark. It’s also a VERY small beadboard that I love, rather than the traditional scale.
 design by studio alexandra | photo by lucy halfhead
Lastly, this round chubby little lady makes me smile!!! Maybe there is a version of this that goes wall to wall instead of what seems to be a 1/2 circle and gets much thinner on the sides. I have been collecting vintage plaids for years and dream of quilting them together a la Adam Pogue’s work (yeah, right) which would be the more EH homespun version of the victorian skirted sink. Also, fun fact, which you might know, but the reason tables and sinks were skirted in the Victorian era was because it was inappropriate to look at the legs – the level of prudeness is beyond Bridgerton levels and it makes me smile just to think how far it affected art and design.
Opener Image Credit: Design by Beata Heuman | Photo by Simon Brown
The post Powder Bathrooms (For The Farm) I Won’t Copy But Seriously Want To Copy… appeared first on Emily Henderson.
Powder Bathrooms (For The Farm) I Won’t Copy But I, Like, Seriously Want To Copy…
If all the rooms in a house are meant to feel like a “family” the powder room is the crazy cousin, the one that spikes the crystal light during the family reunion. You can take risks in here, and go a bit wild because they are temporary spaces, used for just one (or two – :)) singular purpose. It’s usually on the first floor, often without a window and the bathroom that guests will likely use. And since it’s not where you regularly bathe, shower, or get ready you can forego storage needs or other practicalities that you have to consider in other rooms. And with less water splashing means less need to use a waterproof material so you can lean into wood on walls floors, backsplash, or even vanity top. Less functional needs means more fun.
So today I’m showing you all the powder rooms I’m HEAVILY inspired by, and pointing out the ideas that I kinda want to copy (and obviously do the EH shaker/victorian PNW farmhouse version of it). I still don’t know the adjectives I want to lean into. Here we could echo some of the themes in the sunroom which are more “Victorian” and “whimsical”, or we could keep it “utilitarian” and “rustic”. We could panel the walls and do a custom penny mosaic tile floor, OR we could go balls to the wall and tile it all in a pattern. I am still exploring all the things and just waiting to find the right special salvaged sink, and then if we don’t we’ll lean in a different direction. Unlike most other spaces I feel more freedom in here because I know that I won’t be in the space often enough to get sick of it if I take a big risk with a bold move. I guess I want it to appropriately unexpected.
Inspirationdesign by beata heuman | photo by simon brown | via you magazineThat first one, by Beata Heuman is JUST INSANE. The “under the stair” architecture was ingeniously embraced, the off-center sink gives room to play on the other side (and you can do a super small sink in a powder room or WC), and I love how the pleated skirt doesn’t go to the floor. SEXY MOVE, LADY. It looks like there is a low window here, at shin level, the sconces might be headbangers but I kinda don’t care, and that pink paint color is incredible. I will not copy this bathroom, but I want to.
design by beata heuman | photo by simon brownThis next is also from Beata… obviously. The marble backsplash taking it up and creating such a pretty sculptural shape at the top ABOVE the shelf is excellent. I’m also loving decorative brackets these days, and again with the skirt.
design by patrick williams | photo by michael sinclair | via house and gardenNow this one is just about finding that perfect vintage sink and hoping that you can find faucets or taps that work with it. So sweet.
design lauren caisley interiors | photo by sarah griggs When I saw this bathroom above I said “yes, this”. How they played with the wood paneling and trim is inspiring and just a simple super utilitarian sink mounted off-center on the wall. Of course, I think it helps to have a window (and we don’t have one) but it’s made me hunt for a sink like that, to place it off-center and play with the paneling.
via home storiesOr could I go away from being “utilitarian” and lean into some romance and whimsy. The single sconce is awesome but the carved marble sink steals the show. I’ve been looking online all over the country to find a special “sink” to help the direction of the room but nothing yet.
design by yvonne mcfadden | photo by jeff herr | via atlanta magazineI’m not typically a vessel sink lady mostly because you lose some space and feels like you can never clean the base of it, but this one is special and would be worth it. I LOVE that thick slab of marble, the exposed screws on the wood base (keeping it still feeling casual), and that gorgeous rounded dark wood backsplash. INSPIRED.
design by elizabeth metcalfe | via house and gardenOk, generally this one is a bit fussy/antique-y for me BUT it did remind me how much I love a patterned tile. I found deadstock tile from France online that I’m eyeing and might pull the trigger because even if we get it and it’s not right, I feel confident we could use it in one of the other buildings or another project.
photo by marina denisova | courtesy of cotswold farm hideaway | via remdolistaIf I DID do a patterned tile on the wall, I love the idea of taking it up to be the backsplash and then stopping it.
design by brooke and steve giannetti | via giannetti homeThis is a shot I’ve pinned a thousand times for this house so I must love it. I think it’s about that table, in the most beautiful non-replicable Swedish worn blue. I would likely do an undermount sink with a sweet little lip and maybe a plaid or floral skirt to take a little bit of the Rachel Ashwell out of it (nothing wrong with it, but it’s a bit shabby chic for me and I would rather lean into a weird pattern). Also, that wall mount sink on plaster walls is so pretty. I do wonder how plaster walls look in a windowless room – like do they create enough movement without natural light to create that feeling? Unsure. Either way, without that vintage table I’ve got nothing – so to execute this look I need to go on the hunt.
design by meredith sherrillNow this is just pretty, simple, doable and you could get creative with the color, the wood, the paneling, and the stone. I love the architectural sconce coming into the vanity from the sides. Maybe a vintage mirror with wavy glass that you can’t even see yourself in and then add a skirt (obviously).
design by studio tack | via remodelistaI ALSO love this bathroom from the Anvil Hotel in Oregon. It has more hipster “dude” vibes, but that dark navy vanity disappears into the beadboard in a really chic way, then the heavy blocked chair rail trim is a cool way to transition the colors. I think I can say for sure that this bathroom won’t be white or gray, but not sure I would go this dark. It’s also a VERY small beadboard that I love, rather than the traditional scale.
design by studio alexandra | photo by lucy halfheadLastly, this round chubby little lady makes me smile!!! Maybe there is a version of this that goes wall to wall instead of what seems to be a 1/2 circle and gets much thinner on the sides. I have been collecting vintage plaids for years and dream of quilting them together a la Adam Pogue’s work (yeah, right) which would be the more EH homespun version of the victorian skirted sink. Also, fun fact, which you might know, but the reason tables and sinks were skirted in the Victorian era was because it was inappropriate to look at the legs – the level of prudeness is beyond Bridgerton levels and it makes me smile just to think how far it affected art and design.
Opener Image Credit: Design by Beata Heuman | Photo by Simon Brown
The post Powder Bathrooms (For The Farm) I Won’t Copy But I, Like, Seriously Want To Copy… appeared first on Emily Henderson.
July 12, 2021
Rashida’s Totally Transformed Kitchen Reveal (That Includes One Of Our Favorite “New Classic” Kitchen Trends)

Today’s kitchen reveal marks some pivotal firsts for me… My first time making a reveal on the EHD blog, my first time designing a kitchen and seeing it from concept to real life, my first time ordering windows and doors, my first time managing such a large project… and my first time feeling like a true designer! Most of my portfolio consists of room makeovers/refreshes. But now I have a renovation under my belt and have learned so much about the dos and don’ts. For starters, it’s July. This project started back in late January, with an anticipation that the reveal would have been in April. Boy was I wrong! But nonetheless, after you’ve seen the reveal photos, I think we can all agree that it was worth the extra few months to get it just right! And I could not have done this without the help of my husband (who I nagged with my bajillion questions), and my amazing brand partners.

Cabinet Fronts | Cabinet Color | Vase (similar)
Let’s take a trip back in time to our old Tuscan-like kitchen. The cherry cabinets, the red grout, the old granite countertops from the early 2000s, and the busy backsplash all had to go. The only thing I loved about our old kitchen was the layout, our range, and the good condition of our cabinet boxes… everything else changed!

One of my first design decisions was narrowing down the cabinet color. Do I want off-white, creamy white, mushroom white, peachy white, or grayish warmish white (yes a color like that exists)? Initially, I wanted to do a two-tone kitchen, leaving some cabinets in wood and painting the others. But that idea quickly disappeared, when I realized how a two-tone kitchen in such a small space would disrupt my eye too many times, so I decided to go with Benjamin Moore’s “Creamy White” for all of the cabinets. It’s that perfect cream color that’s not too peachy.
 my final moodboard
After addressing the cabinet color, I had a huge epiphany… I need to update my cabinet doors to a more modern classic style and go from partial overlay to full overlay doors. I can’t lie, that thought freaked me out, because it was yet another decision to be made, and a decision I knew very little about! However the decision to change the doors mattered a great deal to the overall look of the kitchen, so the hours of research began. I came across a company called “Nieu Cabinet Doors” (I think the name is quite genius). They specialize in making custom cabinet doors for any cabinet box. I fell in love with their door style called Super Shaker. It’s a modern shaker door with classic beveled seams that fit perfectly into my modern classic design style. Check out my blog tutorial here, on how to paint cabinets. However, you can order them to arrive painted already. To add some jewelry to the cabinet doors, we went with unlacquered brass knobs and pulls from Rejuvenation.

Countertops | Refrigerator | Hood | Knobs | Pulls
I already knew that I wanted quartz countertops with a fair amount of natural-looking veining. Caesarstone has so many quartz options to choose from and I went with the color “Statuario Maximus”. It’s the perfect amount of white in the space to balance out the warmth in the cabinet color, along with the perfect amount of veining to not compete with other finishes. With just one slab, my fabricator was able to cut out all of the counter surfaces and add a waterfall edge. I’m so glad I decided to do a waterfall edge at the last minute. It was an extra $700 well spent.


Another major change that’s not too noticeable, but has a high impact on the air quality of our home, was swapping out the over-the-range microwave for a range hood that vents outside. We have a gas stove and a range hood helps reduce the amount of toxins in the air from cooking with a gas range. Aside from the health benefits, range hoods just look more sleek. So, you’re probably wondering, where’s the microwave? It’s in the peninsula. I scoured the internet to find the smallest built-in microwave, and I got lucky on Home Depot’s site, along with finding a reasonably priced Bosch refrigerator on there as well. My dreams of having a freezer drawer came true!
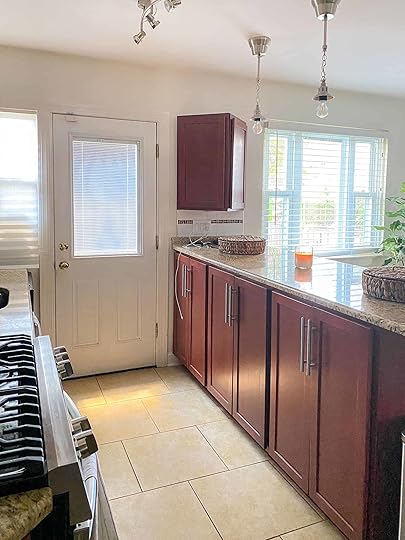

You all know how much I hated our old kitchen floors. It was a tacky yellowish stone with red grout to match the cherry cabinets (I’m still trying to figure out who is the responsible party for such an offense??).


The first store I stepped into for this kitchen renovation was The Tile Shop. My eyes fell in love with the 12 x 24 inch Aqua Nero Matte Porcelain Tile. The natural black stone, with the white and reddish-brown veining really redefined and elevated the feel of the kitchen. I decided to take it up a notch by laying the tile in a herringbone pattern versus a standard stagger pattern. As complicated as it was (I’m pretty sure my contractor had lots of colorful words for me in his head), I’m so happy we did. It brings a subtle interest to the flooring and again elevates the atmosphere of the kitchen. We topped off the tiled floor with a beautiful wool runner from Lulu & Georgia because they literally have some of the most stunning rugs I’ve seen!

Now there was A LOT of pushback about dark tile floors LOL. Some of you guys said DON’T DO IT! But, I’ve lived with my black tile floors for a few months now, and I have absolutely no regrets. The veining and the matte finish reduces the appearance of dust. I thought that I would be constantly cleaning the floors, but surprisingly I’m not.
There was a particular comment from my previous blog post that asked if we were changing the flooring in the dining room because there was a weird strip of tile under the peninsula. Honestly, it was something I didn’t think about, but I never liked the diagonal wood floors anyway, so we did end up changing that flooring. Great suggestion! Since we have 2 dogs, I didn’t want to go back to wood. I needed something waterproof and scratchproof but still looked like wood. Que in Luxury Vinyl Plank flooring from Flooret! My husband and I ended up installing them ourselves, which was quite easy. I mean… just look at the difference! And the beautiful cognac velvet bar stools from Industry West complement the flooring so well. They were meant for each other.

Initially, I was going to only tile the backsplash and the back end of the peninsula. But something about it didn’t feel right to me, so I decided to carry the backsplash tile into the neighboring wall, and cover it from floor to ceiling instead. And it was one of the best decisions. Tiling a full wall is definitely an emerging trend that I think will be around for a while. It makes a statement in a non-traditional way that simply pleases the eye. And yes that’s vintage artwork suspended from the ceiling. I bought the hanging kit from Amazon. Very very easy to install. To finish off the tile area we upgraded our outlets and switches to black outlets from Leviton for a pop of visual drama. It’s a small detail that’s often forgotten, and I love that it comes with USB ports for charging our phones and other devices in a more minimal-looking way.

Let’s talk about mixed metals briefly. Our faucet is polished nickel from Elkay. I thought I wanted unlacquered brass, but then I realized that I wanted a break from all the warmth, so I opted for this classic faucet that’s really functional with a pull-down and spray feature. Because I went with a different finish, the warmth frames out the faucet, and allows it to have its own moment. The moral of the story is, don’t be afraid to mix metals. The faucet was paired with a deep rectangular crosstown sink also from Elkay. Quick question for you guys: Do you prefer a single sink or a double sink?

Faucet | Sink | Soap Dispensers | Pot Brush | Napkin
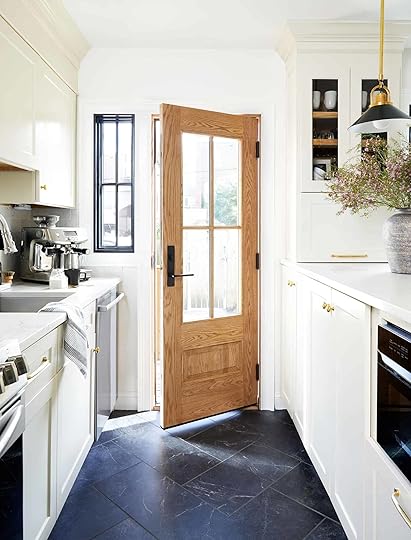
Another major change in the space is the oak door and black windows from Andersen Windows & Doors. Our previous door allowed some light in, but I wanted even more light to enter the space so we opted for Andersen’s Straight Line 181 door with custom grilles. As for the windows we went with the A series casement windows, black inside and black outside, which give a really modern, custom look. I can’t quite bring words to the feeling of opening my windows in the morning to let in the fresh air. Casement windows are just so charming to me. It’s like living in a fairy tale for just a moment.

Can we just take a moment and appreciate all the details in the pendant lighting from Hudson Valley? The aged brass and the black shades were the perfect amount of contrast that the kitchen needed. It perfectly ties in with the floor. And the rounded shades break up the angular shapes seen throughout the kitchen.


One of my favorite functions of the kitchen is the appliance garage Jasen (my husband) and I installed. It involved some math LOL, but we figured it out because one thing that I really wanted for the kitchen was a KitchenAid and we needed a place to house it. You might as well add that in as a line item on your budget. What is a kitchen without a KitchenAid?? When I saw this metallic finish in Williams Sonoma, I just had to have it along with a Breville for my latte’s in the morning (slight coffee snob here). Any other coffee snobs out there??

Since transferring all of our spices, cookware, storage containers, etc. back into the kitchen after many months of living out of boxes, I wanted to make sure that the insides of the cabinets were transformed as well. So we added some awesome pull-out drawer systems from The Container Store. The pull-outs just make navigating the kitchen that much easier, and organization just makes me happy!

If you’re anything like me, you’re the kind of person who may pin inspiration photos for hours, days, weeks, years without moving an inch to execute (ugh!). Well, don’t beat yourself up too much. The reality is, renovations are scary sometimes. Take your time with it, map out everything you desire for your space, do it alongside a friend like I did with my girl Albie (who by the way will be revealing her kitchen soon!)… then, begin to execute! It will be sooo worth it. Home design is a form of self-care in my opinion. There’s nothing like coming home to a space that’s beautifully designed and works for your lifestyle. To get more behind the scenes and in-depth details about the kitchen reno, follow me on Instagram @rashida.banks and as always feel free to leave me a comment/question below!
*Design by Rashida Banks
**Photos by Keyanna Bowen
The post Rashida’s Totally Transformed Kitchen Reveal (That Includes One Of Our Favorite “New Classic” Kitchen Trends) appeared first on Emily Henderson.
July 11, 2021
The Link Up: Ryann’s $30 Jewelry Cleaning Machine, Caitlin’s Go-To Wallpaper Source And The Lamp We Fantasize About Buying
Hello and welcome back to The Link Up –– Episode: 7/11/21. Now, you probably already know this, but it’s a national holiday here in America… it’s free Slurpee day at 7Eleven. If you’re waiting in a long line in the hot sun to go get one, good for you and if you’re not, that’s definitely gooder for you (yes we know gooder is not a word, we’re just joshing you). Alright enough with the jokes and Slurpee talk, let’s dig right into The Link Up.
If you watched the Goop Lab on Netflix and like colorful homes, you’re gonna love this week’s home tour. Welcome to the totally charming & bold brownstone of Goop senior beauty editor, Megan O’Neill. Both Megan and her husband LOVE color (y’all their kitchen cabinets are magenta and incredible), so they made super intentional choices to have their home be a full representation of who they are. This home is totally eye candy, full of color, vintage, pattern, so go check it out!
From Emily: I’m 70% sure I’ve talked about the show “Making It” around here, but basically my entire family is OBSESSED. It’s such an inspiring competition to watch, everyone is so talented and not to mention they are all SO NICE to each other (which is always refreshing in a competition show). Also, I recently found out one of our readers, Becca is on the show and she has this really cool creative/interior design studio you guys should check out. Their website is very very fun.
From Ryann: My best friend recently surprised me by getting me this ultrasonic jewelry cleaner for my engagement ring and all I can say is it is slightly obnoxious how much my ring sparkles now. I hate when soap or lotion gets stuck to my ring and makes the diamond look cloudy and this gets all of that gunk off so easily. I use it for my other, cheap jewelry and it works wonders. I think this would be a great wedding or engagement gift if you are looking for one!
From Emily (Bowser): Waaaaaay back at the beginning of the pandemic, I worked quite a bit on our backyard and got four of these amazing Tamarak Chairs from CleverMade. I liked the idea of them because they are very handsome, comfortable and best of all, easy to move around and store. They proved to be the best during the pandemic where the only hope for human connection was having people over to your backyard and sitting as far apart as humanly possible. I could throw up a cute set up in the middle of our grass while Andrew and I could be (yards away) on our patio. I wouldn’t want to keep them full time in the middle of my grass because I wouldn’t want my irrigation to ruin them, but they are so easy to fold up and put away when not in use. I hate that outdoor furniture (if comfortable) is usually hard to protect, gets gross with weather and exposure, and becomes landfill material in a few seasons. I can tell after over a year, we will have the Tamarak chairs for years to come. They are sold out often and I noticed they got more in stock this week so get them while they last!
From Albie: Not a product but I have been obsessing over this site ever since moving into our home, but especially now. With outdoor living on my mind, I have been wanting to learn more about gardening to make sure I can maintain or be yard & garden. Even though there’s tons of resources out there on gardening, very few spoke to me. I love that she’s a woman of color & she shares relatable information. The day she decides to write a book, I’ll def be her first sale!
From Jess: I might have purchased this outdoor (but could totally be indoor) coffee table for a secret project:) The best part is it’s still $100 off. I would go now if your outdoor space needs a really pretty coffee table:)
From Caitlin: Guys, my (inside) MOTOs are cooking with gas after two straight years of debilitating design paralysis!! I just officially ordered some dining room wallpaper that I’ve been lusting after for six straight months – because you know, had to make sure that it was the one – and I just wanna share my excitement with somebody! I recently discovered Wallpaper Direct and have been blown away by their selection (tons of Morris and Sandberg for fans of classics; tons of new brands for those who are looking for something updated!). O and the pricing is unbeatable (the rolls of the wallpaper I got, in particular, are usually like $180/per on other sites, but they average out to about ~$100/per here). I bought 70+ samples before officially pulling the trigger on this one and the shipping time for those was super quick, too. BIG FAN, highly recommend for all wallpaper needs (or for just fun Sunday browsing :))!!
Also From Caitlin: Must-follow IG account: Balto Baggins. He’s a 4-year-old black lab who lives in Norway and spends his days chasing balls, playing in forests, wagging his big otter tail, doing lots of tippy-taps, and swimming in the most idyllic spots I’ve ever seen. They post every day and it’s truly a digital resting point for me – watching their clips takes my stress level down several notches. Plus, all my childhood dogs were black labs, so I’ll always have a soft spot for a big, happy, cuddly pup
From Mallory: This coffee table and this accent table are both VERY good for how affordable they are. If I had somewhere to put them they would most certainly be mine…
Also from Mallory: If I had $1,000 to spend on a lamp, I would without a doubt spend it on this one.
Thanks for tuning in! Now go enjoy your Slurpees
Opening Image Credit: Design by Studio Nato | Photo by Annie Schlechter | Styling by Benjamin Reynaert | Home of Megan O’Neill | via Domino
The post The Link Up: Ryann’s $30 Jewelry Cleaning Machine, Caitlin’s Go-To Wallpaper Source And The Lamp We Fantasize About Buying appeared first on Emily Henderson.
July 10, 2021
The Design Risk-Takers I Deep Dive Into When I’m Looking For Inspiration And New Ideas
I follow a billion designers and love so many things about so many of them. Some create spaces that I want to live in (practical and beautiful but more quiet), and some create spaces I want to stay for the weekend and stare at every detail. Today I’m sharing the latter, the “thumbstoppers”, that are inspiring the design of the farmhouse – HARD. I’m often full of reverence for how these designers are able to still do something so fresh, in the traditional home space. Now often these spaces just aren’t practical for a young family or maybe my brain can’t handle the amount of color, pattern to live in on an everyday basis. Or maybe we’d never be able to afford one thing in the room anyway BUT they are design greats that I’m getting so inspired by and studying hard for this shaker meets victorian farmhouse. Let’s give some respect and break down why they are so genius…. here we go.
Studio Shamshiri design by studio shamshiri | photo by stephen kent johnson | via architectural digest
I wouldn’t typically put this team of geniuses in the “traditional” style camp – in fact, they are hard to pinpoint because every project is so different and unexpected and they nail them all (thus the severe respect and admiration). This California Chalet stopped me because there is a lot to take in and dissect. This isn’t the vibe we are going for, but again so many little nuggets of inspiration that can be gleaned.
Things to notice:
1. The cabinet detail on the fronts by the sink echo’d on the wood shelves. SO GOOD
2. Tiny little semi-flushmount light fixtures.
3. The triangle piece brace holding up the island. I would have overthought that and they just did the simple version that works.
4. The wood paneling, obviously.
5. How they incorporated the likely load-bearing post at the right of the range that made the design of it off-center. Hello, quirk. Nice to meet you.
 design by studio shamshiri | photo by stephen kent johnson | via architectural digest
Their work is always so cozy and feels rich yet casual. I feel they believe in comfort as much as I do and boy can they execute it in a non-generic way. Of course, every piece of furniture in here is tens of thousands of dollars, but I’m still so inspired by it all.
What to notice:
1. Is the paneling not lined up? I can’t tell if it’s perspective or not on that back wall. Also is that the hidden TV?
2. A totally unexpected (if not super impractical) light that reminds you that yes, we are in a cabin, but I went to Italy and found this light and I don’t give a shit if it’s supposed to be in a cabin.
3. Tiny red sconce shades – it’s like a little wink that says, “Hey girl, hey. We were little proper sconces a la the live-action beauty and the beast but sold at the french market and now living here, brightening up this epic space with our tiny light”.
 design by studio shamshiri | photo by stephen kent johnson | via architectural digest
When I first saw this shot in a magazine I was like what. how. why??
1. That color combo is SICK. This is actually more inspiration for the barn or carriage house where we want to take more design risks (of course I can in our home, but I know myself and what kind of spaces we like to be in a lot, and it’s fresh but not busy).
2. That curtain – such a sweet little detail on the window and dutch door. It takes balls to be so delicate. Feel free to put that on my gravestone.
Again all of their projects are so different – head over and check them out here.
Jessica Helgerson design by jessica helgerson design | photo by aaron leitz | via remodelista
We shot one of Jessica’s projects for Styled – I believe an old firehouse turned residence and it was just incredible. Being in that space first hand I was like “oh this is what brave interior designers do”. When I saw this NW Johnson home it blew my mind and I pin it over and over.
Here’s what I love:
1. That custom-painted tile mosaic tile is unbelievable (on the fridge, too. shut up).
2. The wood countertops make me wonder why I’ve been stressing over stone forever (and yes I know that wood has to be treated nicely and isn’t as seemingly low maintenance, but you know what – ME. SAME.)
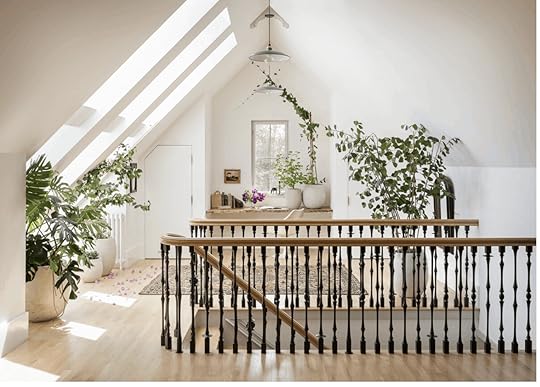 design by jessica helgerson design | photo by aaron leitz
3. The most epic “traditional” banister I’ve ever seen. See how the balusters are sculpted differently and yet in a pattern? And they go straight into the floor, not on a plate, with that gorgeous ergonomic wood on top.
4. And yes to those skylights making that space just sing.
 design by jessica helgerson design | photo by aaron leitz | via remodelista
This picture gave me so much inspiration for the farm as the windows are similar. While I don’t know if we have a place for such an epic sectional I think we can say collectively that no one in the world would not want to sit/nap here. It’s unequivocally desirable.
 design by jessica helgerson design | photo by aaron leitz | via architectural digest
Jessica (and her team) designed this wonder of an island to explore life as we know it and remind us it can be better. Also, that cord sculpture with the pendants is epic.
See more of her work here, including a new family shelter solution-building that took my breath away.
Beata Heuman design by beata heuman | photo by simon brown | via the nord room
If you haven’t heard of Beata yet you’ve seen her work. Oh, the reverence I have for her irreverent designs. You can stare at her work for a long time while trying to understand how and why it’s so great. It’s definitely more color and pattern than I can live with on a daily basis, but oh would I pay real dough to stay in one of her houses to be able to experience her work in person.
 design by beata heuman | photo by simon brown | via vogue
I’m not saying she invented the scallop, but she sure is responsible for bringing that detail to life in so many amazing pieces. How genius is that radiator cover? Insane. Looking at it unlocked some ideas for our cabinetry and our custom dining bench.
 design by beata heuman
Is it true that the inside of the cabinetry on the far left is painted red? And note the flanking drawers next to the range – curving back and making it look so cool. I also love how they jumped down to a lower cabinet I’m assuming to keep the windows where they were – but it’s a nice quirky detail. She has her first book out now that I can’t believe I haven’t ordered but must NOW.
 design by beata heuman | photo by simon brown | via the nord room
I mean. That window. Those sconces. And that incredible toilet with red brackets (look up). She’s blowing up right now just as she should be.
She more of her truly incredibly inspiring work here.
WORKSTEAD design by workstead | photo by matthew williams
I was able to stay in a Workstead hotel in Hudson valley a few years ago and it was inspiring. They certainly have some restraint, and yet every detail is magnificently executed. They do a ton of custom furniture/lighting and woodworking and employ a lot of vintage.
 design by workstead | photo by matthew williams | via architechural digest
 design by workstead | photo by matthew williams
Gah. Have you ever seen such a beautiful knob? The simplicity of that woodwork will never date, and the quality is insane.
 design by workstead | photo by matthew williams | via architechural digest
The balance of lines and curves. THAT WALL MURAL. The built-in storage (closed, semi closed, and open). It’s all incredible.
 design by workstead
You absolutely should go check out the rest of their work (and their stunning lighting) here.
Commune Design design by commune design | photo by stephen kent johnson
I’ve been a massive fan of Commune forever. But I pretty much freaked out when I saw this project. The wrap-around peg rail with hanging lantern. The off-center stone fireplace. The plaid sofa.
 design by commune design | photo by stephen kent johnson
I’ve been pitching a plaid sofa to Brian for years but have never done one or even seen the right one done (plaid fabric is hard to find without it going super ’80s) until this one. But it’s also more of a daybed.
Look how they used (and likely redid) the knob and tube electrical with the lighting. We have this in our victorian (I think it works, but no bulbs) and are going to keep it. You can see it in the background with the outlet. And the woodwork is just so stunning.
 design by commune design | photo by stephen kent johnson
This kitchen is breathtaking. The joinery on the drawer, the quilted skirt, the paneling. I have no idea how well that wood holds up in a working kitchen but it’s just stunning.
 design by commune design | photo by stephen kent johnson
I have such dreams of a floral sofa in this house, but if you google “floral sofa” you’ll be horrified. I’m not saying it’s this one, but it shows you how well it can be done. The right risks equal a great reward.
Check out the rest of their work here.
Heidi Caillier design by heidi caillier design | photo by haris kenjar photography
Massive fan of Heidi who really specializes in the eclectic, unexpected twist on warm traditional spaces (although she can do anything). I poured over that cabin she did up there. Notice the copper hinges on the shelving, the plaid chairs – SEE??? BRIAN HENDERSON IT CAN BE DONE. So warm and cozy yet unexpected.
 design by heidi caillier design
She’s clearly not down with the project yet, but I wanted to show you because between the tile wall and the scallop backsplash it’s going to be incredible.
 design by heidi caillier design | photo by haris kenjar photography
This won’t be the last time you see this bathroom on this blog, because I think it’s just so well executed and simple, but with a lot of impact and special details.
 design by heidi caillier design | photo by haris kenjar photography
When I saw that sectional I gasped. It’s SO RIGHT. Notice how it matches the lampshade.
 design by heidi caillier design | photo by haris kenjar photography
A slightly rounded-edge vanity shouldn’t blow your mind and yet it does. I know that the tiny drawer at the top isn’t functional and yet Heidi put it in anyway. One of my best friend’s sisters just hired Heidi for her house in Seattle and I can’t WAIT to see how it turns out. Go follow her on Instagram NOW.
Leanne Ford design by leanne ford | photo by erin kelly
My friend Leanne cares not about rules. She used coffee to stain her walls in her kitchen intentionally. I love following her work and while I tend towards more practical designs, I’m incredibly inspired by what she does. I’m not sure if that brick fireplace was original or if she installed it, but it’s beautiful, warm, simple, and classic. Not sure if you can put a gas insert in that arch, but I want to badly.
 design by leanne ford | photo by reid rolls
Girlfriend doesn’t care if the sink takes up all the chopping space, if she finds an old awesome farm sink and will use it. I love it so much.
 design by leanne ford | photo by reid rolls
She’s also excellent at embracing “awkward” spaces and making them architecturally more interesting. Please notice that the trough sink on the right has a floor mount faucet. So good.
Head here to see more!
Reath Design design by reath design | architecture by bestor architecture | photo by laure joliet
Reath Design is another excellent follow for those wanting to watch some rule-breaking. Above we have one asymmetrically placed sconce on the left, a wood vanity and backsplash (again I’d love to know how to make this hold up with water!), and a pill-shaped mirror that looks “melted”.
 design by reath design | architecture by bestor architecture | photo by laure joliet
I’ve been hoarding vintage quilts for a while with dreams of upholstering at least a bench in them (and how appropriate it would be for a farmhouse). So well done in a modern space as they did above.
See more of their awesome work here.
It’s hard to be a risk-taker in any creative field but especially in interior design because so much is so permanent and needs to be so hyper-functional for living (as opposed to say graphic design or art). So when interior designers do it, and it is so fresh and yet classic, I can’t help but bow down. Who else am I missing? (obviously love Amber Lewis and Joanna Gaines :))
Any follows that really get your creative juices flowing when you are needing some inspo?? xx
Opening Image Credits: Design by Studio Shamshiri | Photo by Stephen Kent Johnson | via Architectural Digest
The post The Design Risk-Takers I Deep Dive Into When I’m Looking For Inspiration And New Ideas appeared first on Emily Henderson.
July 9, 2021
How To Build An Outdoor Kitchen: The 3 Essentials The EHD Team All Agreed On + Bonus Items If You Want To Up Your Outdoor Cooking Game

Picture this: it’s a hot summer Saturday and you’ve worked up an appetite from spending the early afternoon lounging at the beach, reading your favorite book. “What should we do for dinner?” little Johnny asks. All of a sudden it comes to you: burger night. You get home and start cranking up the tunes, turn on the grill, and pop some rosé. You’re surrounded by close friends, family, and music. Your floor is grass, the ceiling is the 7 pm summer sun. The sweet smell of smoking corn is radiating in the air. And all this was made possible by your outdoor kitchen. Now if there’s one thing the pandemic taught me –– it’s how to have a good time in your own backyard and this, for me, is the best way to enjoy doing the otherwise mundane task of cooking dinner.
In our team zoom call last week, Emily and I had a debate on what is actually needed in an outdoor kitchen. I love those “non-essential” cooking gadgets (when they actually work well) to shake up the dinner-making process, so I was trying to convince everyone of the really cool, best ones that can give you and your family endless amounts of fun. Emily on the other hand thinks these gadgets can be a lil’ unnecessary and never get used as much as you think they will (like she talked about in this post). So she would rather have a simple outdoor kitchen without fancy built-in pizza ovens or Brazilian charcoal grills (we’ll get to that later). Now she’s not TOTALLY wrong, but I think all of these gadgets and gizmos can be VERY fun and can get used a lot depending on the person. We both agreed however that if you’re going to build an outdoor kitchen, there really are only 3 really essential items you need and then everything else is just a bonus. So we’re gonna break it down into the basics and then I’m gonna send you down a list of weirdly fun doodads that I’ve used/want to use that you could totally try out this summer (and the summer after that and the summer after that, you get the picture).
 photo left: image source | photo right: design by burdge architects, photo by tessa neustadt, home of helene henderson of malibu farm1. The Grill
I mean DUH. I know it’s self-explanatory so please don’t click away yet bc we’re about to get to the fun stuff. But for the people in the back, if you don’t have a grill, definitely start here. I’m linking some well-reviewed gas, charcoal, and electric grills below and I’d love to hear which you guys love and use in the comments too. Also note, grills and really any gas stoves, in general, aren’t the best for the earth (and according to this article, propane grills are slightly better for the earth than charcoal grills, and then electric grills are probably the best planet-saving option). We feel like there is a total hole in the market for awesome, better-for-the-earth options since the electric grills aren’t reviewed as well in terms of actual cooking experience… if you know any other grills that are more sustainable or if you have any more insight on this please let us know in the comments — it’s a very important topic and we want everyone to shop smarter and more sustainably. Okay now onto some of the best-reviewed grills:

1. 3-Burner Propane Gas Grill in Black with Built-In Thermometer and Side Burner | 2. 4 Burner Propane Gas Grill | 3. HERO Portable Charcoal Grill System | 4. 18″ Portable Electric Grill | 5. Precision Charcoal Grill | 6. Charcoal Grill | 7. Large Charcoal Kamado Grill and Smoker | 8. Everdure CUBE Portable Charcoal Grill | 9. George Foreman Indoor/Outdoor Electric Grill | 10. 4-Burner Propane Gas Grill in Stainless Steel with Side Burner | 11. Mon Oncle BBQ V2 | 12. Weber ® Slate Blue Performer Deluxe Charcoal Grill
Apparently, according to Chris Loves Julia’s IG stories, everyone is head over heels for this Weber grill linked above as #1 (the reviews are basically that it lasts A LONG TIME which is also important when shopping sustainably). Also, I just got Instagram marketed for these new grills (#5) which are apparently supposed to be “grills that are designed beautifully” (and boy they are pretty). Lastly, my boyfriend LOVES to cook at the beach/lake so I got him this HERO portable grill (#3) as a gift and we’re very excited to try it out this summer.
 image source2. The Surface/Prep Area
You’re gonna need to put your corn on the cob and burger patties SOMEWHERE…why not make it fashion?? Here are some awesome prep counter/storage cabinets that you can add to your kitchen (for minimal to no renovation costs!!!) including this one that Emily just got from Pottery Barn for the mountain house that they’re planning to use for both a cooking surface and then also toy/outdoor activity storage underneath. She also wanted me to inform you guys that they had to get metal because wood ––or really any other material–– don’t do great out there because the seasons can be so extreme. So if you live in a climate with real seasons (unlike LA), definitely consider that before you buy. Alright, onto the options:

1. Kitchen Sink & bbq | 2. Sherly Counter Height Trestle Dining Table | 3. Indio Metal Kitchen Double Cabinet | 4. Black Stainless Steel Grill Island | 5. Portside Outdoor Kitchen Collection | 6. Kitchen Island Shelf Unit | 7. Big Green Egg Cart | 8. 5-Piece Modular Outdoor Kitchen Cabinet |9. 8 Foot Table for Large Green Egg | 10. Outdoor Kitchen Series 3-Piece Modular Kitchen | 11. Everdure by Heston Blumenthal Mobile Prep Kitchen | 12. Portside Bar Island
So #3 is the one that Emily just got for the mountain house which is AWESOME. Also a huge fan of #11, which is a genius designed if you look at the video on amazon…there’s a hole cut out so you can slide your trash straight into the trash once you’re done chopping. Also for a more affordable option, this ikea one is a steal for $129!!
3. The Mini FridgeOkay before I start, this is only REALLY needed if your outdoor kitchen is really far away from your normal indoor kitchen. If you are, then a fridge outside is a GAME CHANGER. You can store all the meats and veggies and whatnots you’re gonna cook right under your cookin’ station along with some ice cold beers, La Croix (or Spindrift…we have a debate about which one is better going around EHD currently), or just cool refreshing water. I’ve personally never had an outdoor fridge by my BBQ, which also works out okay, but would it be better if there was a fridge?? Absolutely. Also, note that the fridges below are not all weatherproof, but you could certainly build them into a cabinet or just have them under a covered pergola or something if that’s your thing.

1. Freestanding Mini Fridge Freezer Compartment | 2. Galanz Retro 3.1 cu ft True Freezer Dual-Door Refrigerator | 3. Built-in Indoor/Outdoor Undercounter Double Drawer Refrigerator | 4. Frigidaire 4.5 cu ft Single-Door Refrigerator | 5. Outdoor 19 in. 2.1 cu. ft. Commercial Refrigerator in Black | 6. Kenmore 4.4-Cu. Ft. Retro 1-Door Compact Refrigerator
So like I said, some of these are probably better if they’re under a covered patio or at least in a fridge cabinet especially the awesome retro ones…(#2 and #6). Otherwise, the really expensive (#3) one on the top right says it’s indoor/outdoor which is awesome, but if you’re looking for a more affordable option, this target one is also great!
A Heated Debate On The Outdoor SinkA real internal debate has sparked at EHD and we need to share it with you. I personally think it would be AWESOME to have a sink in your outdoor kitchen for washing your hands in between seasoning meat and whatnot. However, Emily thinks it’s the least essential thing to have in an outdoor bbq area (and they’re not planning to put one outside at the farmhouse). Her argument is that it basically just becomes a dumping ground for dirty glasses and dishes that all eventually end up getting moved into the kitchen to go into the dishwasher. I totally get this point, and from a guest’s perspective, I also get why they would put their dirty drink glass there, but as the chef, I’d love to have a place to rinse flour off my hands when making pizza or whatnot. So what do you guys think?? Are you on team outdoor sink or team no outdoor sink?? AKA WHO DO YOU LIKE MORE… ME OR EMILY? Wait don’t answer that. Just comment your opinions below, please.

 photo left: design by lahaus, photo by jody d’arcy | photo right: image sourceThe Bonus Fun Stuff
NOW TO THE FUN STUFF I’VE BEEN WAITING TO TELL YOU ABOUT. I love the idea of having a giant outdoor kitchen with all these fun things. Some of them are decently affordable (and portable) and others are like full-on custom built-in situations that cost thousands of dollars that are definitely less attainable… but are fun to dream about. Let’s begin.
 via lulu and georgiaThe Smoker
Let’s start off with the big one that everyone loves to talk about. THE SMOKER. Anyone else watch The American BBQ Showdown on Netflix?? They use a smoker for pretty much every single round in this competition and it’s no surprise why. If you’re a bbq kind of chef, the smoker is the greatest tool you can have. It’s a low and slow process (like seriously you can cook stuff for like 24 hours) which is perfect for making ultra-tender brisket, ribs, and whatnots. We want one SO BAD.

I linked this awesome Traeger pellet smoker because it’s SUPER affordable at only $117. The dream smoker though would definitely be the pro wifi Traeger because you can check the internal temperature of your meat straight from your phone (which is awesome when you’re smoking it for hours and hours and hours). I was once at a family party where they were smoking a brisket that took 18 hours (or longer) to cook and I got swept up into a 3-hour conversation about different smokers, how to use them and what they do. Traeger is probably the most famous smoker brand (at least according to every country song ever) and apparently, the tale goes that an employee from Traeger was fed up once the company got HUGE and thought their quality of product started to decline, so he started Pit Boss which is another awesome smoker brand that you should check out if you’re in the market. But honestly, I’ve heard great things about both brands so you can’t go wrong. Also, Carmeon did an awesome brand partnership with Traeger in this post, which honestly made me want one even more:

 via carmeon hamiltonThe Pizza Oven
Have ya heard about the portable pizza oven phenomenon that’s going around right now??? It’s all thanks to Ooni, which are seriously great, small pizza ovens that have both wood-pellet ovens and gas-powered ovens. They range in size but can be as small as 12″ and 23 lb (that’s the one we have) which makes it perfect for those who don’t have space or funds for a built-in pizza oven since it can be stored away nicely when you’re not using it. I bought one for my boyfriend for Christmas last year –– it took 3 months to ship because they’re that in demand… and let me say we’re not disappointed. Our first pizzas weren’t perfect, but once you get past the learning curve these are a lot of fun for summer.
If you want a built-in pizza oven but are not down to pay the cost, you can also build your own from this cool kit on Etsy! Would be so fun & you could paint the brick if you wanted to just saying…
The Evo Grill
Sam the Cooking Guy is a legend over at my house and if you watch any of his videos, you’ll see he cooks on an Evo grill, which is basically a hibachi grill but more circular and just looks so cool. For sure this is a splurge, but it’s super awesome because you can use it like a stove and put a pot or pan on it OR you could literally grill stuff up directly on it. We’ve been wanting one for so long and I can’t even tell you how many giveaway competitions we’ve unfortunately lost. One day…
The Kegerator
Bruh (the bruh seems like a fitting way to start this paragraph in particular), having a keg at your house is like the ultimate party trick. Of course, if you don’t want to install one, you can totally get what I have which is a small device that turns any can or bottle on draft in seconds (it’s pretty cool too and it can be battery operated or plugged in which is cool). Also, shoutout to this thing which I think is also a keg and definitely gets the award for being the prettiest of the bunch.
The Brazilian Outdoor Grill
Sam the Cooking Guy also has a custom version of this and I just think they are SO COOL. It’s a charcoal grill where you can raise and lower your food depending on where you want it to sit on the flame below. This is another splurge and a lot of people do custom builds into their outdoor kitchens like these from Etsy, so if you’re looking for something interesting and fun, try these out:)
 design by nathan turner | photography by victoria pearson | via house beautiful
That’s all for this post!! Thanks for reading and have a wonderful weekend, everyone xx.
Opening Image Credits: Design by Velinda Hellen Design | From: How Does E-Design Even Work?? Velinda Shows Off Three Client Reveals She Never Saw In-Person
The post How To Build An Outdoor Kitchen: The 3 Essentials The EHD Team All Agreed On + Bonus Items If You Want To Up Your Outdoor Cooking Game appeared first on Emily Henderson.
July 8, 2021
A House Hunt For The “Worst Home” On The Best Block – Ajai Takes Us On A Wild Journey
It’s been almost a year since we sold our first home, and I can’t believe we are back on the hunt for another. Yes, you read that right, we are a couple of crazies looking for a home during a time where homes all over the U.S. are being sold for more than 30 percent of what they would have been sold for a year ago. I’m here to tell you it’s a seller’s market indeed, and when you see some of the homes we’ve been looking at buying and the prices they’re going for, you’ll absolutely be gasping for air (I’m still trying to catch my breath throughout this process).
I should start by reminding you all that we live in California, and are looking for homes in Los Angeles county (to be closer to all of our family members). With a 7-month-old, it gets a little tough driving back and forth to grandma and grandpa’s from Orange County. We are literally turning away free babysitting because we don’t want to deal with the commute to drop off our little guy. Nonetheless, the price to live in Los Angeles was nuts to begin with, now throw in the fact that banks are offering extremely low interest rates, making demand well over supply, driving up the cost of each home, and creating a seller’s market. Thus, you’ve got the perfect recipe for beyond-expensive real estate. With all of this in mind, my husband and I thought it would be best to do what we did the first time we purchased a home – look for the worst house on the best block and work on making it our dream home. We decided on a $625k budget for a fixer, and then told our realtor to “find us the worst homes Los Angeles has to offer,” and boy did he follow through with our request…
THE HOUSE WITH THE TREE-FILLED VIEW
 front door view outside | front door view inside
The first place we visited was a 1,047 sq ft two-bed one-bath house up in the Pasadena hills, located right next to the Rose Bowl. I was so excited when our realtor sent over the images for this one. It looked like something right out of a fairytale, tucked away behind flowers, foliage, and trees. The sellers were listing it for $624,000 – this was a good sign! I could hardly wait to get up there to see the house. I immediately called my dad (he does contracting work) and my mom (she is good for getting good energy and vibes from a space) to come along and view it.
 kitchen
 first bedroom | second bedroom
When we arrived, I got out, strapped Jack (our 7-month old) into his carrier, and wore him as we all made our way up the driveway. We spotted the realtor at the front door and he waved for us to come inside. I was the first one to make my way into the house, only to be met with a really bad smell, and the following words from the realtor “So, the owner died right over there in the house.” I looked at my mom, and she reached for Jack and said “we’ll wait in the car, Jack and I don’t want to stay to find out how he passed away.” I gave Jack to my mom and decided to look around.
 but look at this backyard!
 living room | bathroom
Every time I convinced myself we could make this home work, I ran into something that suggested otherwise. We discovered severe termite damage inside and outside of the house. There were foundational problems, like the floor being unlevel, there wasn’t much room for any additions, and the ceiling was caving in and extremely low. Let’s be honest, this would be a complete gut job, but there was still a voice in my head telling me, “it’s such a steal though, and this view is to die for”… My thoughts were quickly interrupted when the realtor chimed in to say “so, the sellers want cash for the home”. It was all starting to make sense to me now – a fixer in the Pasadena hills for $624,000 – I knew it was too good to be true. The decision had been made for us, we certainly do not have $624,000 laying around to purchase this home. Fast Forward to today – this home was sold well over the asking price, a $957,000 cash offer to be exact. On to the next fixer, or so to speak…
THE START FROM SCRATCH
With the cost of homes so high in California, my husband and I have been considering other ways to obtain our next home other than purchasing an already existing structure. The idea of purchasing a lot, and building our home from scratch has always been fascinating to me. Another reason why I’ve always considered a lot of land, was for the ability to build a home with the materials, layout, and location already in cohesion.
 jack was clearly not sold on the idea
We found a 5,891 sq ft lot in the Hollywood Hills area, being sold for $99,000. This one seemed promising, and we were thrilled about the location. We arrived at the lot via a dirt path. At about a third of the way up the dirt path, we had to access the land by foot. As the realtor, my husband, baby, and myself (me wearing our little one again) walked up the path we were already dreaming/planning of what we could do with the space. Once we arrived, we could see a huge eucalyptus plant, what appeared to be remnants of some large cement casing, and wildlife in every direction. As field mice scattered from bush to bush, hawks roamed above, and droppings from something bigger lay on the dirt path (maybe some coyotes), it reminded me of the critters from our last home, and that I should keep in mind what sorts of animals and reptiles we’d encounter on a regular basis while living in these hills. Our realtor told us we’d definitely have to be on the lookout for coyotes and snakes (this was the last thing I needed to hear – the snake-mating that took place in our last backyard was enough to send us packing). Other things we’d learned that would come with purchasing this lot were: the cost of surveyors, the threat of a fire in the hills, and coordinating an easement with the city.

To determine if the lot of land was suitable for a house, we’d have to pay anywhere between $3,000 – $5,000 (in California) for a surveyor to come out and run a report. That said, we weren’t willing to lose $3,000 – $5,000 if the results of the survey came back unfavorably, and this is something we’d want to know before purchasing the land. Building a house on this land also comes with the reality that one day there could be a fire that destroys it and all of our surroundings. California is constantly going through droughts, which leaves our terrain in constant dry and fire-prone condition (we literally have a fire season here). As appealing as living in the Hollywood Hills is, the idea of having to build a home, have it burn down, and have to start from scratch seems scary and heart-breaking. Last but not least, we’d have to coordinate with the city to get an easement (road) built to access our home. To be honest, I could barely get the city to return my phone call to confirm the street of the lot’s location. In a nutshell, we talked ourselves out of the lot.
THE HOUSE WITH THE FLORAL CURTAINS
We found a 2 bed, 2 bath 909 sq ft fixer in Long Beach going for $545,000. This home showed real promise, and our realtor said the sellers were willing to negotiate on the price. Everything was on the up and up, and then we pulled up to the home… When we first arrived, I noticed stray dogs running free, and furniture in the street, this was not our dream area. All that said, the real treat for me was waiting on the inside of the home.
 kitchen sink view
 kitchen floor view
 living room
 kitchen nook | laundry room
 When we walked in we were confronted with an odd smell, like mildew and burnt hair (it was by far the smelliest house we’d been in) and a home that I’m sure had seen better days. After viewing a few rooms, I discovered where that odor was coming from – the basement. Apparently, the previous residents were hoarding all kinds of stuff in the basement, so much so, we couldn’t get two feet beyond the door. The garage was also filled beyond entry. The realtor advised that we not lift the door… because everything would come spilling out. All of this and the owner was only willing to come down $15,000, so this house was a “no.” Nonetheless, I was never able to see my child living in this home and very quickly was able to make the determination that this one wasn’t for us. We ended the first week of our house hunt with this house, we felt a bit defeated and needed to recharge our batteries before the next batch of options.
 our little house hunting family
My husband and I are looking for a 1,200 sq ft home in a good school district and neighborhood. I believe our wants are reasonable. We understand that the closer we are to certain hotspots, the more expensive a home will be. When we left California a little over three years ago, houses in the same previous neighborhoods were going for $400 – $700k (we’re talking homes considered turn-key). Now, $400,000 will get you a tent on the beach (the closest to coastal living I’ll be getting if we purchase something this year). We’ll continue the search for our next home, but if anyone knows of any fixers in a nice SoCal neighborhood, please share. Also, I’m curious to know what it’s like buying homes in other states right now, and if anyone has any crazy house hunting stories.
The post A House Hunt For The “Worst Home” On The Best Block – Ajai Takes Us On A Wild Journey appeared first on Emily Henderson.
Emily Henderson's Blog

- Emily Henderson's profile
- 10 followers

