
Emily Henderson's Blog, page 153
October 11, 2021
Happy Indigenous Peoples’ Day + 27 Beautiful Native Owned Shops For Art, Decor, Fashion, & Beauty

Last year, to recognize Indigenous Peoples’ Day, we scoured the internet to find and share Native owned brands in art, home decor, fashion, beauty, and more. Since then, more brands have immersed and come to our attention, so we’ve updated this post to reflect even more artists and makers that we’ve come to love. We hope you will follow their work, support by buying, or use your own time to research and educate yourself on the rich and unique Indigenous histories that shape our country.
Happy Monday everyone. We hope you had a lovely, relaxing weekend and if you are enjoying another rejuvenating day off today, we are so happy you took the time to stop by. Today, EHD is OOO and recognizing this holiday celebrating Indigenous People in our country and all over the world.
When Indigenous Peoples’ Day started to become established in the U.S. it was a long overdue act of recognition to the native people who have been historically and unjustly disenfranchised in this country. It seems such a feeble act to simply acknowledge this day but since we are a design blog, we wanted to bring attention to the native-owned shops and artists that may not be on your radar yet– especially since Native American culture has so much influence on interior design. That said, I am thrilled to introduce you all to some incredible Native artists, makers, and brands that you can shop, support, and follow right now.
Art & Photography: Itsooaakii | Aly Mcknight | Tyana ArvisoSheridan MacKnight
Sheridan MacKnight is an artist of Hunkpapa Lakota, White Earth Chippewa and Scottish descent. She paints as well as makes jewelry that honors her roots and powerful Indigenous identity. From the artist: “My work honors my Native American roots, and to the strong and spiritual devotions of my people. I am Lakota from the Hunkpapa clan and Chippewa from the White Earth Band. My images reflect the heart and emotion of my relations, be it historically or in the present time in the narration of the composition.”
Follow on Instagram: @sheridoll
Our Picks: “Roaring ’20’s” Print | “Sisters” Drum
Aly McknightAly Mcknight’s body of work consists of watercolor prints and mixed media that celebrates her heritage and life as an Indigenous woman and mother. From the artist: “My artwork and creative endeavors are dedicated to Indigenous representation and youth and womxn empowerment.” I absolutely love her modern take on native culture and how she reflects the female spirit.
Follow on Instagram: @alymcknight
Our picks: AIN’T MY FIRST POWWOW Print | MOTHER EARTH Print
ItsooaakiiEvelyn Mikayla Martin’s (itsooaakii) body of work “primarily consists of self portraits (acrylic on canvas) working to hold space for herself & all of her intersecting identities, along with BIPOC womxn whose identities & lived experiences mirror her own.” Her work is bold and extremely empowering (I especially love this one and need it for my bedroom).
Follow on Instagram: @itsooaakii
Our picks: “Show Up For Yourself” Print | “Call Yourself” Print
Thundervoice EagleLehi ThunderVoice Eagle is an artist of Navajo/Totonoc descent. He was raised part-time in the Arizona wilderness, living off the land and part-time in the city and as such his work is about “Reclaiming, reharmonizing, and renewing a way of life in an authentic way.”
Follow on Instagram: @thundervoice_eagle
Our picks: Kiss From Above | Buffalo Tree Rings
HOME DECOR: Indian Pueblo Store | Indigo Arrows | eighth generation Bettys Baskets Shop
 Betty’s baskets shop is where you NEED to go for just about the dang cutest handwoven baskets you’ll ever see. Owner and Native artist, Betty Derke, is a member of the Chippewa tribe from the White Earth Indian Reservation in Minnesota. From the artist: “Weaving became a way to not only connect with my heritage, but to answer a calling I have had since childhood. I could close my eyes and imagine a circle of women working closely together. Most of the time I’ve felt that Sprit was doing the designing as my hands sculpted, so to speak. It has been a very spiritual experience for me. My baskets are functional as well as ornamental; as my grandson used to say, “Gramma, you could put your treasures in there!” SO. CUTE.
Our Picks: Sand Dune Coil Basket | New Mexico Coil Basket
Indian Pueblo StoreThe Indian Pueblo Store was founded in 1976 to gather and showcase work from Pueblo and Southwestern Native artists. They work with internationally renowned Native American artists as well as emerging talents from the Southwest, and sell everything from rings, to rugs, to Pendleton blankets.
Follow on Instagram: @indianpueblostore
Our picks: Traditional Micaceous Bowl by Clarence Cruz | Pendleton Chief Joseph Adult Robe Blanket
Heart BerryHeart Berry Owner, Sarah Agaton Howes is an Anishinaabe-Ojibwe Artist from Fond du Lac Reservation in Northern Minnesota. She says that Heart Berry “began in the kitchen on the Rez. What began as a custom beadwork and regalia business “House of Howes”, grew from a one woman squad in 2007 to our current team.” They collaborate with other Native artists and are now committed to teaching and building a community of makers.
Follow on Instagram: @heartberry.co
Our Picks: Woodlands Floral Throw Blanket | Birch Mug
 Heart Berry | Northwest Native Expressions | Indigo ArrowsNorthwest Native Expressions
Northwest Native Expressions is a Native art gallery (located in Sequim, WA) featuring Native American artists from around Washington State. They sell baskets, books, clothing, textiles, jewelry, and more.
Our picks: Dream Catcher | Ecuadane ~ Antisana Earth Blanket
Made By NativosMade by Nativos makes hammocks, blankets, bags that are meant to encapsulate centuries of ancient native traditions. The shop was created by owner Laura Bustamante to support and preserve Ancient Native traditions, as part of humanity’s cultural heritage.
Our picks: Dark Blue Double Hammock | Alpaca Blanket Reymi Wine Genuine Handmade Queen blanket
Indigo ArrowsIndigo Arrows sells pillows, linens, and textiles with patterns that are inspired by historical native pottery. From the owner: “For thousands of years, Indigenous peoples in Manitoba, including my Anishinaabe ancestors, created beautiful patterns to adorn their pottery collections and host of bone tools. Most of the surviving pieces are held by museums now, but I think the world needs more than exhibition- we need these patterns in our homes provoking thought; we need them bridging gaps; and, we need them inspiring our loved ones. The Indigo Arrows line picks up where my ancestors left off.”
Follow on Instagram: @indigo_arrows
Our picks: Bezhig 20×20 Pillow | Bezhig Long Lumbar Pillow
Eighth GenerationEighth Generation is a Seattle-based art and lifestyle brand owned by the Snoqualmie Tribe. Founded in 2008 by artist, activist, and educator, Louie Gong (Nooksack), it is a marketplace where you can find 100% Native designed and made products from wool blankets, to art and home goods.
Follow on Instagram: @eighth_generation
Our Picks: The Get Down Mini Framed Print | First Light Baby Blanket | Stronger Together Mug
Fashion & Jewelry: She Native | B.Yellowtail | Shiyoo DesignsB.Yellowtail
 B.Yellowtail is founded on the notion that clothing can be a vehicle for storytelling through wearable art. Founder Bethany Yellowtail, originally from the Crow (Apsaalooke) & Northern Cheyenne (Tsetsehestahese & So’taeo’o) Nations in southeastern Montana, is fueled by her social justice vision for her community which is fused with her work and artistic vision. “In a world where indigenous images are often stolen and misappropriated, Bethany serves as an unapologetic arbiter of authenticity; a genuine voice who seeks to empower her people through design and representation.”
Follow on Instagram: @byellowtail
Our picks: VOTING IS SACRED T-shirt | Protect Her – Women’s Organic Cotton Tee
The NVTSThe NVTS was started by “two Native American guys trying to fill a hole in the market that is missing the voice of the people.” Their mission is to inspire the youth to embrace culture and history and they did so by creating this native-owned clothing company. Now, their team is comprised of natives from several different tribes and they specialize in making modern clothing with native prints that hold a deeper meaning.
Follow on Instagram: @nvtsclothing
Our picks: Heather Gold Tee | Powwow Highway Tee
She NativeSheNative’s mission is to instill inner strength and unwavering confidence in all women, inspired by teachings that come from Indigenous Nationhood, stemming from the idea that Nationhood means knowing who you are and where you come from. As an Indigenous woman, founder Devon Fiddler has overcome discrimination and feelings of self-doubt and has created an uplifting fashion and lifestyle brand that celebrates her heritage and encourages resilience in all women.
Follow on Instagram: @shenativegoods
Our picks: Resilient Ladies Bamboo Sweatpants | Cropped Crewneck Fleece
4KinshipSay hello to your new favorite sustainable clothing brand that sells colorful and exciting vintage and up cycled clothing made in small batches. It is a Diné (Navajo) owned and the collections are heavily inspired by Southwest terrain.
Follow On Instagram: @4Kinship
Our Picks: Vintage 40s Brocade Jacket | Upcycled Vintage 60s Danish Civilforsvaret Military Jacket
Kuychi CauldronMaria Cauldron is an indigenous Peruvian American who makes and sells naturally dyed clothing, handmade cermaics, and what is perhaps most impressive, creates plant extractions to make pure pigments from plants which she then makes into plant based inks and paints. SO cool, right?
Follow On Instagram: @mariacauldron
Our Picks: Kuchinilla Puka Ink | How You Made Mama A Magical Mystical Miracle Book
 She And Turquoise | Ginew | B.Yellowtail Ginew
Ginew (Gih-noo) is the only Native American-owned denim line in the world. It is based out of Portland, Oregon, and founded by husband-and-wife duo Erik Brodt and Amanda Bruegl who live and create their brand by the motto “Minobimaadiziiwin” – “Yohahi-yo sathahita?n” which, simply put, means “Live Well”. Their clothing is androgynous in style, extremely versatile, very COOL, and designed to last.
Follow on Instagram: @ginew_usa
Our picks: Strawberry Down Vest | West Fork Red Jean
She And TurquoiseShondina Lee, founder of She and Turquoise, is a creative director, photographer, fashion influencer, and jewelry maker. She launched She and Turquoise to sell her earrings that are both classically fashionable and uniquely inspired by her Indigenous heritage.
Follow on Instagram: @shondinalee
Our picks: Naja Necklace | Big Pendant Necklaces
 Kristen Dorsey Designs | She Native | Shiyoo DesignsNative Clay Co
Sa-ha-na Jackson originally started Native Clay Co. as a fun new hobby but quickly transformed into an avenue for self-discovery. Her earrings are handmade on the rez and her designs are created to honor her people and history.
Follow on Instagram: @nativeclayco
Our picks: Feminine in Terracotta and Turquoise Long | Beaute in Olive
Beyond Buckskin BoutiqueBeyond Buckskin launched in 2009 by Jessica R. Metcalfe (Turtle Mountain Chippewa). What began as a blog showcasing native artists and makers, expanded to an online boutique where you can shop over 40 native owned and designed brands and unique artisans.
Follow on Instagram: @beyondbuckskin
Our Picks: Turquoise Boulder Earrings | Radiant Feathers Choker
Kristen Dorsey DesignsKristen Dorsey, a citizen of the Chickasaw Nation, makes her jewelry under the foundation that “Jewelry captures our cultural identity and our spirituality.” Her designs are elegant and uniquely inspired by her life experiences and heritage.
Follow on Instagram: @kristendorseydesigns
Our picks: Heart of the Shield Studs in Sterling Silver | Four Direction Loksi Earrings in Sterling Silver
Shiyoo DesignsFounder Jeri Yazzie is an Indigenous artisan that makes jewelry that feels chic, happy, and authentic. Her creations are all handmade and are made with a whimsical and carefree style in mind.
Follow on Instagram: @shiyoodesigns
Our picks: Vintage Coin Earrings | Abalone Shell Earrings
Authentic Native MadeIs there anything cuter than baby mocassins?? My guess is no. The founder of Authentic Native Made is a member of the Sault Ste. Marie band of Chippewa Indians, in northern Michigan and a self-taught artist. Her shop features her handmade baby mocassins and infant shoes in a variety of styles and colors. If you have any baby showers coming up, say hello to the perfect gift!
Follow on Instagram: @sharolynmaleport
Our picks: Native American Beaded Infant Moccasins | Fringe baby Mocassins
Ataumbi MetalsArtist and jeweler, Keri Ataumbi, makes unique jewelry rooted in “a conceptual narrative exploration as its core.” She uses traditional Kiowa imagery and materials in a contemporary form, making her work a celebration of her heritage and wearable art.
Follow on Instagram: @ataumbimetals
Our Picks: Rainbow Cuff | Silver Hoops
Beauty: Cheekbone Beauty | Sister Sky | Mother Earth EssentialsCheekbone Beauty
Cheekbone Beauty is an Indigenous-owned and founded, digitally-native, Canadian cosmetics company established in 2016. It began because founder Jennifer Harper wanted to create a beauty brand that the Indigenous youth could see themselves in after being separated from her Indigenous roots for most of her childhood and adult life. Cheekbone beauty is also cruelty -free and just this year they launched a less-waste line of lipsticks called SUSTAIN, and they have zero-waste goals for 2023.
Follow on Instagram: @cheekbonebeauty
Our picks: Face Palette | Fire & Autumn Lip Set
Mother Earth EssentialsMother Earth Essentials is a Canadian based Indigenous brand that creates luxurious bath & beauty products from natural ingredients and traditional recipes. The founder, Carrie Armstrong, comes from a long line of Cree Medicine women and is passionate about sharing her culture through the brand’s beauty essentials.
Follow on Instagram: @motherearthessentials
Our picks: Sweetgrass Hand & Body Lotion | Sweetgrass Aromatherapy Mist
Sister SkySister Sky is a natural beauty brand that was started by two sisters inspired by their Native American grandmothers who harvested a variety of plants like sweet grass, cedar and sage to make teas, ointments and creams.
Follow on Instagram: @sistersky__
Our picks: Kevin’s Care Body Lotion | Sweetgrass Body Care Gift Set
Additional Learning Resources:
This article has great information on how to support Indigenous organizers fighting Covid-19 in Native American Communities.
Matika Wilbur (a visual storyteller from the Swinomish and Tulalip peoples of coastal Washington) discusses her personal journey to finding her way back to her culture and Representation vs. Power with Grace Bonney in this video.
Matika also has a wonderful podcast with Adrienne Keene called All My Relations, where they talk about the issues Native American people are facing in today’s world.
If you haven’t heard of James Jones (@notoriouscree), he’s an Indigenous influencer who celebrates his culture through dance and funny/powerful videos. I promise you will be blown away and learn. He is really huge on TikTok but you can also find him on Instagram.
Alright, that is all we have for you for today. Please share any additional shops, artists, or resources in the comments. Have a great Monday and week sweet friends. xx
The post Happy Indigenous Peoples’ Day + 27 Beautiful Native Owned Shops For Art, Decor, Fashion, & Beauty appeared first on Emily Henderson.


October 10, 2021
The Link Up: Mallory’s $30 Structured Sweater, Caitlin’s All-Time Favorite Chelsea Boot (+ A Heads Up That Holiday Shopping Might Not Be So Easy This Year…)

Willkommen, bienvenue, welcome! It’s that time of the month again –– sorry I mean time of the week –– where we pull together some fun and cool links of products, places, things that are present in our lives right now  Once again, we’ve some very fun links for you all this week, so instead of dilly-dallying, let’s just get right to it:
This week’s home tour is the home of none other than Kirsten Dunst. Dunst befriended interior designer Jane Hallworth at an early age, so when it came time to design her Hollywood Hills lakehouse, she knew just the person to help her pull it together. The home is charming, moody, and full of character and life. Plus their use of moody, beautiful tones throughout the space is absolutely remarkable. Check this one out, guys.
From Emily: My friend, Kate Arends from Wit and Delight just revealed her kitchen and it’s very fun. She takes a lot of design risks which is what I love about her..for example, she painted her kitchen cabinets PURPLE. Just click the link & check it out if you haven’t seen it yet
From Jess: Historically I’m not a foundation gal. I’ve used this powder one and have liked it but never stuck with it for the every day (not that I feel the need to wear makeup every day but I don’t hate a little bit of coverage:)) Then from a sample I got from Sephora, I tried a MAGICAL product from Kosas called Tinted Face Oil Comfy Skin Tint. Look, I know tinted face oils aren’t new but I’m usually late to the skincare makeup party. This thing gives me my ideal amount of coverage (light to medium because I like to still see some of my normal skin), a slight glow, and makes me look healthy and moisturized. And since it’s an oil, it actually IS moisturizing. 20/10!
From Albie: If you’ve been following along with my IG stories for the past couple of weeks, then you know I have been on a planner’ing kick. I’ve always loved planning because it’s just another form of organizing — aka my love language — but it wasn’t until last year that I found planner system I could actually stick to. I have a whole post on what my planner system is and how I use it, but at the center of it all are my Happy Planners. Because Happy Planners are disc-bound, I’ve been able to create & customize planners that I can actually stick with, not just collect & hoard because they’re pretty. I have one main “catchall” for personal & professional, and one mini planner for our home. After a year of basically winging it, I am excited to get back into a rhythm where things make sense by creating systems that can support my unpredictable (sometimes) manic life.
From Mallory: I’m so excited about this new sweater I got (because it’s officially below 75 degrees here in LA so it’s fall y’all!) I’m very into ruffley, architectural, kind of structured sweaters and this one caught my eye. Plus for $30 I could not pass it up when I was at Target…run don’t walk if you’re in need of a good new sweater.
Also from Mallory: I can’t tell you the last thing I bought from at Banana Republic, but I got an ad recently and it really made me want this dress (I love the yellow so much, but also the purple?? Oh or classic black and white I’m not sure) – it’s all about THOSE SLEEVES. It’s in my cart but now I just need something to wear it to
From Caitlin: This week it was finally cold enough (read: “night time and below 90 degrees”) to break out my all-time favorite classic black Chelsea boots and I had forgot how much I loved them!!! I bought these in 2019 and they still look new, which is saying a lot because I’ve worn these bad boys INTO THE GROUND – we’re talking traipsing through snow, salt, and at least 6 different airports in 2 different countries. I really love the spot they hit on my ankle (sometimes boots just make me feel kinda stumpy, you know?) and they’re incredibly comfortable AND ethically made AND sustainable…so basically like, the jackpot of heeled ankle boots. There are also like a billion (or 130+) people singing their 5-star praises in the reviews, so it’s not just me! They’re a little pricey at $230 but absolutely worth the investment – can’t wait to wear them for years to come
Also From Caitlin: Just a PSA from someone behind the scenes – holiday shopping this year is going to be a doozy. Between the new USPS slowdown, supply chain problems with literally all your favorite retailers, and anticipated 20% price increases (!!!)…we’re in for a rough one. I know we’re a while out but if you wanna watch your wallet, it may be worth making your list now! On the bright side – never been a better time to shop vintage or local (If anyone needs a present for me, I’m currently falling prey to a crippling obsession with vintage swan-shaped planters. So niche, so affordable, so fun!!!)
From Ryann: My latest trip to Target was a huge success (not always the case when you are a notorious impulse buyer like me) so I just would love to share everything I purchased in one trip that I actually LOVE and won’t be returning. I went looking for a black throw pillow and found this which has a really lovely texture. I also was looking for some decor and saw this basket bag and thought it would be really cute styled with wild branches (spoiler alert: it is). I bought this large basket for all my throw blankets and it’s just a solid basket with a great shape. And finally, I meandered to the clothing section and LUCKILY saw these flare jeans that I’ve been eyeing ever since the Nili x Lotan collab dropped. They had my size so I tried them on and folks, these are very cool. I really love how different they are and they look really good with heeled cowboy boots just FYI.
Well, that’s a wrap on this week’s link up. Stay tuned for next week and until then, well, we’ll see you for some more exciting design content!
Opening Image Credits: Design by Jane Hallworth | Photo by Laure Joliet | Styling by Colin King | via Architectural Digest
The post The Link Up: Mallory’s $30 Structured Sweater, Caitlin’s All-Time Favorite Chelsea Boot (+ A Heads Up That Holiday Shopping Might Not Be So Easy This Year…) appeared first on Emily Henderson.
October 9, 2021
How I’m Styling Some Comfortable Fall Basics/Classics To Look Fresh In 2021 – My Current Fall Uniform

I’m a lover of all seasons (like all styles) but fall fashion is by FAR my favorite and I know I’m not alone. One of the reasons is that fall ‘style’ doesn’t really change too much – it’s always cozy layers and denim, mostly basics that can just be styled or supplemented to look cool. Or so I’ve tried. So I shopped my closet (and added a few things) to pull together what feels like a pretty comfortable and yet not totally boring fall capsule collection. We are talking chore coats, cardigans, denim on denim, hits of stripes, and leather. Also, I’m definitely leaning into some grandpa and commercial fisherman vibes here and I’m pretty darn into it.
The Portland Grandpa

Hat | Sweater | Button Up | Vintage Jeans | Bag | Boots (similar)
I think Mal might have laughed out loud when I sent her this one, because yes it’s very Portland. Here we have a vintage cardigan and hat that I got at an antique Mall (wassup Stars in Sellwood). It’s an EXCELLENT cut, but if you are in the market, Alex Mill also has a bunch that are awesome. The denim shirt is Target (Universal Thread) and the cut/drape is really good – I feel like I’ve worn it a ton the last two years. I like it buttoned all the way to the top with the sleeve poking out under the cardigan (it’s thin and drape-y so it’s especially easy to layer under). The Levis are vintage and even a big baggy (I did it!!!!) that I rolled them up which I haven’t done before. I think one of my favorite things is the purse strap from Madewell that really added something special. The boots were from my boot roundup a couple years ago and they tuck in really nicely into the pants which is crucial, but here are some that are similar.

1. Plaid Bucket Hat | 2. Felt Bucket Hat | 3. Bucket Hat | 4. Bucket Hat | 5. Plaid Print Wool Blend Bucket Hat | 6. Corduroy Bucket Hat
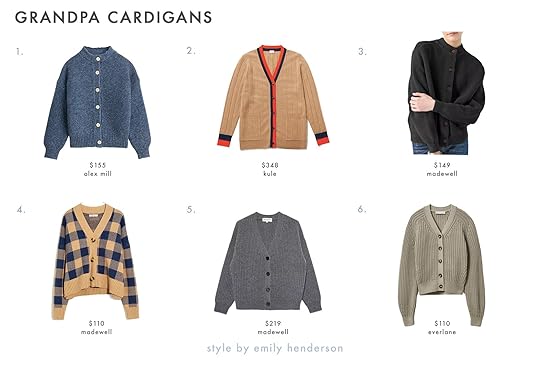
1. Nico Chunky Cardigan in Upcycled Yarn | 2. The Sinclair | 3. Kailyn Cardigan Sweater | 4. Bayberry Cardigan Sweater in Buffalo Check | 5. Cassa Cardigan | 6. The Texture Cotton Cardigan

1. The Snapshot Leather Crossbody Bag | 2. Dome Crossbody Bag | 3. The Knotted Crossbody Bag | 4. The Sydney Zip-Top Crossbody Bag in Colorblock | 5. The Transport Saddlebag | 6. Naha Black Phone Mini Crossbody Bag
Head to my jeans review post for my current-ish picks:)
The Sloppy Hipster

Beanie | Shirt | Sweats | Jacket | Boots
Now Brian thought this look was funny, but I’m into it. That rugby shirt is a new addition and I LOVE it but was having problems styling it. I think it’s definitely a dress it down sort of situation so once I paired it with my sweats I liked it so much more. Then shoved said sweats into the boots and I was VERY into it, but I literally have no idea what is in fashion right now (and don’t like a lot of it) so this might be dumb. The oversized beanie is AWESOME, from Urban and the sherpa Levi’s Jacket I’ve had forever (and is a classic fall staple). And listen if you aren’t into “dressing up sweats” I get that, but I am and I really like them in these boots.

1. Knit Cuffed Beanie | 2. UO Short Roll Knit Beanie | 3. Re)sourced Cotton Cuffed Beanie | 4. Four-Stitch Shaker Beanie. | 5. Cuffed Beanie | 6. (Re)sourced Cotton Cuffed Beanie
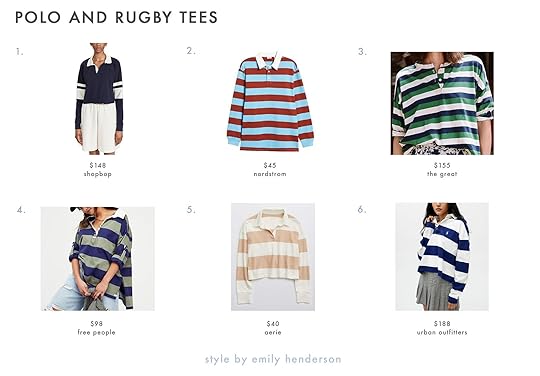
1. Tiger French Terry Rugby Shirt | 2. Rudie Oversize Rugby Stripe Shirt | 3. The Shrunken Henley | 4. Peyton Rugby Tee | 5. Aerie Long Sleeve Cropped Polo T-Shirt | 6. Polo Ralph Lauren Varsity Stripe Rugby Top

1. MWL Breeze Skinny Joggers | 2. Live In Pocket Joggers | 3. French Terry Lounge Cargo Jogger Pants | 4. On The Road Pants | 5. MWL Superbrushed Easygoing Sweatpants: Striped Trim Edition | 6. Perfectly Cozy Lounge Jogger Pants
The Denim On Denim And “Just Add Stripe”
Beanie | Stripe Shirt | Jacket | Jeans | Boots
This one is a bit more basic – denim chore coat over skinny denim (both Madewell) with the same boots. The shirt has a really cute mustard collar which shakes it up and again I like the sleeve popping out under the coat. What you can’t see well is the classic navy bandana which I think was necessary to break up the same/same ness.

1. Chore Jacket | 2. Relaxed Patch Pocket Corduroy Jacket | 3. Denim Oversized Chore Coat | 4. Military Shirt Jacket | 5. Utility Denim Jacket | 6. Shirt Jacket

1. The Turtleneck | 2. The Modern Breton Tee | 3. Whisper Cotton Turtleneck in Herrick Stripe | 4. Striped Long Sleeve French T-Shirt | 5. Whisper Cotton Rib-Crewneck Long-Sleeve Tee in Mulford Stripe | 6. Modern Stripe Crewneck T-Shirt

1. Oversized Bandana | 2. Lotus Paisley Print Bandana | 3. Organic Cotton Print Bandana | 4. Cotton Bandana in Gingham | 5. Bandana Set | 6. 2-Pack Triangle Bandanas

1. Sharnell II Waterproof Knee High Boot | 2. Sadie knee-high boots in leather | 3. Phrancie Boot | 4. Melissa Button Inside Zip Leather Boot | 5. The Winslow Knee-High Boot with Extended Calf | 6. Melissa Harness Pull On Tall
The “Sun Just Came Out But It’s Still Muddy” Look

Sweatshirt | Shirt | Shorts | Boots | Socks
Welcome to the pullover I’ve worn 3-4 times a week (seasonally) since last fall. The Great just launched a couple new colors, which I don’t love as much as this one but the cut is my favorite. I put it over a striped mock turtleneck (Madewell) and added some striped socks (Urban) with my new duck boots (that I’ve since fallen in LOVE with from L.L. Bean). Obviously, I wore one of my million Levi shorts which never go out of style (ish).

1. Oversized Quarter-Zip Pullover | 2. French Terry Quarter-Zip Lounge Sweatshirt | 3. Soft Fleece Half-Zip Sweatshirt | 4. Camile Pullover | 5. MWL Airyterry Half-Zip Tunic Sweatshirt | 6. Quarter Zip Sweatshirt
Head to our shorts review post for the team’s favorites!
The “Are We Doing A Turtleneck Under A Sweatshirt?” Look

Turtleneck | Sweatshirt | Jeans | Shoes
I’m not a HUGE fitted turtleneck person because of my larger lovely ladies, but this one is boxier, with a dropped sleeve and a stiffer open neck. I LOVE IT (from Kule). I put it under my other zippy that I’ve been wearing a ton of (Alex Mill). I think the stripe is too much with my Vans, but I liked the flared jeans so I wanted to tuck the sweatshirt into that.
The “Neutral But Not Boring” Look

Beanie | T Shirt | Jacket (similar) | Jeans | Boots
Just when I thought that my favorite jeans (going on four years) were out of style (from Moussy) I rolled them up and boom, we are back. I LOVE the cut/drape of that t-shirt in boxy thin fabric. It has a wide neck and slouches just perfectly (Sundry is made in LA, too). I added some thick mens socks from Target, my Dr. Martens (that I obviously call Doctor Martens), with my classic bandana, beanie (Urban), and sherpa jacket (old but here is a similar).

1. Backcountry Sherpa Trucker Jacket | 2. (Re)sourced Sherpa Zip Jacket | 3. Sherpa Work Jacket | 4. Cropped Sherpa Utility Jacket | 5. Sherpa Liner Jacket | 6. Sherpa Bomber Jacket
The Sweatshirt “Onesie and Donesie”

Sweatshirt Jumper | Hat (similar) | Bag | Shoes
You bet I’ve been wearing the hell out of this. My stupid camera is blocking the zipper collar which is the same as my sweatshirt above, but it’s SO GOOD. It’s a heavy material so it drapes (doesn’t cling) and yet the cuffs are strong so it stays up styled like this. I’ve worn it with Vans, my Doc Martens and new Bog rain boots and it always looks cool. It has a drawstring that adds some shape, too. It’s a 10 out of 10, y’all.

1. Comfy Knit Jumpsuit | 2. Finn Jumpsuit | 3. Butter Wrap Jumpsuit | 4. MWL Breeze Drawstring Jumpsuit | 5. Lindsay Sweater Jumpsuit | 6. x goop Windbreaker Performance Jumpsuit
The Commercial Fisherman Cozy Vibe

Beanie | Shirt | Jacket | Sweats | Socks | Boots
Yep. I’m leaning into this in every way. The jacket (Madewell, from last year) is longer than I usually like to wear, but I like it here. I layered it over my old denim thin shirt (from The Great, similar here) and then with some sweats. I think the stripe on the socks with the duck boots are my favorite part, but those sweats fall down too fast, so next time I’d get a stronger bottom cuff to assure that my socks can be seen by all.

1. The Oversized Trucker Jean Jacket in Hunton Wash | 2. Denim Oversized Chore Coat in Laurelton Wash | 3. Denim Jacket | 4. Ex Boyfriend Trucker Jacket | 5. Denim Trucker Jacket | 6. Shacket Trucker Jacket

1. Denim Button-Up Shirt in Bluffton Wash | 2. Chambray Button-Up Workshirt | 3. Denim Big Shirt | 4. Relaxed Boyfriend Western Shirt | 5. Slim-fit chambray shirt | 6. Urban Renewal Vintage Oversized Chambray Button-Down Shirt
For some great duck boots and other waterproof shoes, I talked about my current favorites here.
The Chore Coat + Stripe combo

Chore Jacket | Jeans | Beanie | Boots (similar)| Bag
This chore coat is excellent – stiff cut (which is what you want), but soft and easy to layer. I have a couple vintage versions of these which I love but they are wider (likely because they were mens) and this is just a very slimming cut (if you are into that). Again over the same Target shirt, vintage Levi’s rolled up and old boots that tuck. But of course, I wanted a bit of a pattern so I added that beanie (Urban) and crossbody bag (similar).
The “If I Were To Wear Heels Again” Look

Turtleneck | Jacket (similar) | Jeans | Heels (similar)
I haven’t dabbled too much back into heels, but these (from & Other Stories three years ago) are still pretty darn comfortable because they are platforms. So I put them under my flares (Paige denim, last year) with the same Kule turtleneck, and my favorite tweed jacket (going on 6 years – WOAH). I feel like I could and will wear this to non-shopping meetings this fall to show that I can indeed look/feel pulled together but still casual.

1. Austina Coat | 2. Longline Plaid Blazer | 3. Scott Coat | 4. Women’s Plaid Coat | 5. Brushed Plaid Coat | 6. Plaid Double Breasted Overcoat
Ok, that’s it! What is everyone else wearing these days? Happy fall y’all
The post How I’m Styling Some Comfortable Fall Basics/Classics To Look Fresh In 2021 – My Current Fall Uniform appeared first on Emily Henderson.
October 8, 2021
The 4 Budget (HIGH IMPACT) Halloween Decorations I’ve Used For The Past 4 Years (+ 6 Extra I Love)

As a Mom, I know what parents are doing this weekend…decorating for Halloween. My kids (due to years of living with their holiday-obsessed mother) were BEGGING for us to decorate a couple of weeks ago. I happily agreed. But we are in a rental so I didn’t want to go buy a bunch of new decorations. Instead, I hit the Henderson Halloween Box, supplemented with a couple of new additions and BOOM – super affordable, very high impact decorations, that took almost no time (or stress) to put up. So I decided to update this post that we did a couple of years ago, add more photos for proof that I’m being honest, and show you the very much not professional photos of our Portland rental decorations.
Despite maybe looking like I have it all together, I have two small kids so I’m a *snow* show, even in the fall. So today, I’m talking quick, easy, affordable Halloween decor that is low-maintenance and not too visually chaotic because, frankly, that’s all I can handle. I veer more ‘Martha Stewart’ than a ‘Nightmare on Elm Street’ so I’m more ‘spooky’, than ‘scary’ and definitely ‘spiders’, not ‘psychos’. So these are my quick and easy tips that can help you make your house feel like Halloween without spending too much time or money or putting your children into therapy.
Black Candles with Black Candlesticks
Rocket science, I know. But this is one of the easiest things we did to up the spook factor. It’s beautiful, editorial, and VERY budget-friendly. We got these tapers at a local shop for about a dollar each and I already had these awesome new matte black Target Threshold candlestick holders (similar). With this look, more is more. Few people functionally need four candles on one cabinet but having that many gives it the spooky haunted mansion vibe I wanted. If you don’t want to buy new candlesticks, you could also easily head to the thrift store and buy some and spray paint them all black and throw some candles in it. With this idea, you will also want to vary the heights of the candlestick holders for visual interest. It will make the look more collected and put together.
Spooky Fabric (My #1!)
I didn’t come up with the name, but I am into the look. We decided to mix up the type of gauze on the living room furniture and went for this “spooky fabric.” It’s super affordable (like $10) and comes in a few different colors from Target. The fabric looks somewhat like fishnet so to make it look extra “spooky” we played with it by pulling sections apart. It gave us that perfect old-timey, haunted house look. And because the kids love the plastic spiders and bugs, we added in a few of them to the set up to look like they were crawling all over the cabinet. It’s one of those accents that is “creepy, not freaky,” which is exactly our kind of Halloween decor over at the Hendersons.
More Examples Over The Years photo by sara ligorria-tramp | from: my spooky (and super simple) kid-approved halloween decor
 photo by sara ligorria-tramp | from: how we decorate for halloween
 photographer shall not be named | from: our portland rentalBat Decals
Another awesome and kid-friendly decor idea that we all loved are these bat decals. I can’t take credit for them as Martha (Stewart) used them a few years back. But their impact and affordability are too good not to mention. They are also SO inexpensive but have big visual impact. When you are laying them out, you really can do whatever you want but we found it best to start with the largest ones every few feet and then add in the smaller ones around them. This helps with making sure you are spacing them out in a balanced way that adds depth and perspective. The ones that we used come with an adhesive already on them but that adhesive did leave a little residue on the wall, so if we were to do it again, we would recommend using a more wall-friendly tape. We had our bats just hang out in this little vignette but you could use them on your front door, on the ceiling or it could be fun to put them near a window so that it looks like they are all flying in from outside.
White And/Or Black Spiderwebs (#2)
I somehow missed the memo on black spider webbing. I used white previously, and as we were coming up with the ideas for this post, Brady recommended the black as it would pop off of the walls, lampshades and art, so we gave it a try. Yes, it isn’t as realistic as the white webbing but we love the way that it contrasts with everything. If you have mainly light colors in your home, USE THIS. It adds the perfect amount of spooky drama and is so easy and affordable.
More Examples Over The Years photo by sara ligorria-tramp | from: how we decorate for halloween
 Black Painted Branches
Ready for some more rocket science? Take something, paint it black and instantly it is spooky. These painted branches make the room look so editorial (which I love) and spooky (which Brian and the kids love). The day before the shoot, we (and by we I mean Brady and our styling assistant, Emily Bowser) collected some fallen branches from a local park and spray painted them with matte black spray paint. NO TREES WERE HARMED IN THE MAKING OF THIS SHOOT. I think most, if not all of you all know how I feel about trees and especially the horror of cutting them. But if your trees are in need of a trim, then you could always repurpose them and take off the remaining leaves to get this look. Our branches were about 3 to 4 feet each but with the use of black zip ties, were able to secure the branches together and also make them taller and more spread out. To cover the zip ties and add more drama (duh), we wrapped the branches with white spider webs. Here, the white makes sense since we wanted the color to contrast the black branches. Then to top it off, we wired some crows onto the branches. Spooky branches always need spooky crows.

Black Zip Ties | White Spider Webs
More Examples Over The Years photo by sara ligorria-tramp | from: my spooky (and super simple) kid-approved halloween decorBlack Crows
Speaking of crows, I love to use A LOT of them. The kids think they are great and they feel a little more “sophisticated” Halloween which is great for me…the adult. I get them in different sizes and positions so they look varied throughout the house and more realistic. To add them to the branches (or anything really), we used floral wire and wrapped it around the crow’s legs and branches. They stay completely secure and look awesome.
 More Examples Over The Years
 photos by sara ligorria-tramp | from: my spooky (and super simple) kid-approved halloween decor
As the bats wave goodbye let’s dive into some of the super fun younger kid decor we cooked up last year.
 Googly Eyes
It’s definitely nice to up the spooky side and make the space feel a little more editorial, but I did love the googly eyes on the portraits from last year. It was fast, fun and affordable. If the eyes you buy come with adhesive, I would first check to see how sticky it is to avoid any art damage. Washi tape is a great and safe adhesive alternative.

 Overscale Spider Webs And Spiders (#3 Maybe My Favorite)
Last-minute decorating is something I am VERY familiar with. So when I go into power decorating mode, I try and think of what will have the biggest impact for the least amount of time, effort, and of course, money. This large-scale spiderweb from Target checked off all of those boxes last year and it’s under $10. WHAT? Don’t worry, it’s available this year, too. It looked awesome and the kids loved it. I think putting a large-scale web over a window is ideal because of the light that comes through and you can see it from the outside. That’s a win-win in my book. We used one in the living room as well as one in the dining room.
 More Examples Over The Years
 photo by sara ligorria-tramp | from: my spooky (and super simple) kid-approved halloween decor
Oversized Spider Web | Oversized Spider

 photos by sara ligorria-tramp | right from: how we decorate for Halloween | left from: my spooky (and super simple) kid-approved halloween decor
 again, the photographer shall not be named | from: our portland rentalNeutral Pumpkins (#4!)
Don’t get me wrong, orange pumpkins are great. But I’m more of a fan of white and black pumpkins. These ones I’ve had for years because they are awesome, totally classic and are prelight which gives you that gold/orange glow (see I’m not totally anti orange:))
More Examples Over The Years photo by sara ligorria-tramp | from: my spooky (and super simple) kid-approved halloween decor
 better, but still, no photo credits needed | from: our portland rentalNeutralize Books
One FREE Halloween decor trick we’ve done was flip around our books to neutralize the color palette. Not only does it automatically give an old-timey look to the space, but you can easily accent with monochromatic decor without creating too much visual chaos. Black and white pumpkins (and crows, of course) are still festive without feeling too Halloween Central. Plus, I’m not huge on orange. The one downside, of course, is that you can’t show off how smart you are to your friends with all the fancy book titles you have on your shelf (but just give it a few weeks, and flip them right back around).
 Gauze Fabric on Furniture
I know I talked earlier about much I love the “Spooky Fabric” from Target (we actually used it for last year’s table runner in the dining room) but a classic gauze is just as great. It feels super haunted mansion-y and is easy to just drape and be done with it. No crafting skills required. Again, it’s high-impact decor with a very little amount of time, effort, and money needed.


To finish us off, I felt the need to reiterate my support for black crows basically being the perfect Halloween accent decor piece. You saw how great they were on the black branches from this year but below are a couple more examples of where you could style your feathered friends. I used to be the lady that collected vintage bird ladders, now I am the lady that collects black crows. Go figure.

The dining room table and a top/inside cabinets are great places for crows to perch. This isn’t a setup that you would have on your dining table all season long. But it is something that is so easy that could be done last minute for a party this weekend. This gauze table runner we made with Spooky Fabric for our dining table last year instantly feels cooler and spookier with a crow or two on it.

And you know, through a crow on top of a lamp or liquor cabinet here and there. It says “Hey, it’s Halloween and I’m incredibly stylish.” Am I getting my “just put a crow on it”point across?

Well, that’s it folks. All quick and easy Halloween decorating ideas that are very budget and kiddo-friendly. The holidays are full of plenty of stresses so let’s not have decorating your home be one of them. Now we can focus on the important part of Halloween…dressing up our kids in adorable costumes and eating candy. Let us know in the comments if you have done any of these or if you have any more great ideas. Happy Happy Halloween from the Hendos.
***Photography by Sara Ligorria-Tramp for EHD
The post The 4 Budget (HIGH IMPACT) Halloween Decorations I’ve Used For The Past 4 Years (+ 6 Extra I Love) appeared first on Emily Henderson.
What You Bought Last Month: September Edition


Haaaaaappppppppy Friday everyone!! Friends and family, we’re excited to inform you that it’s almost the weekend (wahoo!) but before we get ahead of ourselves, we’re gonna backtrack for just one moment and chat about the 10 hottest and most popular items on this blog last month. We love looking at data and reporting back to you on what you guys ACTUALLY purchased and loved from our site, because it’s good to know what people like & we just think it’s fun. So, here we go folks.
10. Mal’s Target Dress
This dress was an unexpected hit. I saw it when I was walking through Target and almost bought it, then wrote about it in the link up, then plot twist: I went back and bought it because so many of you did. It’s SO CUTE (I got the black and white color but the brown is also great for fall, plus the smock part on the top makes it very flattering but still comfortable and I’m already planning to wear it on thanksgiving (and for $30 why not??) I’m glad you guys really liked this one

Ryann hits us hard with an amazing Etsy shop once again!! This girl is like the queen of finding amazing small businesses on Etsy for pretty much any of your needs, and if you’re currently in need of a cute vintage frame, this shop has got you COVERED.
8. Jess’s Match Sticks
Who knew everyone needed match sticks so badly?? You guys bought over 200 matchboxes, and if you assume there’s about 30 matches per box that’s like 6,000 matches hahaha. Way to go, Jess and we hope you guys are all enjoying those stylish little matches (perfect to pair with #6 on this list, bet you can’t guess what that’s gonna be…).
7. Mal’s Madewell Sweatshirt
Oh my favorite sweatshirt!! And it’s on sale now! I wear this sweatshirt almost everyday (kinda gross but if you have it, you get it). It’s the perfect shade of green and the perfect amount of crop, plus it’s like a comfy kind of towel-ish material so it’s perfect for wearing with athleisure. I love to wear it to the gym and I always start my workout by wearing it (because it’s a lil cold) and then by the time you’re warm and sweaty it’s ready to come off (and no fuzz gets on you because it’s kind of towel-y). It’s so great and I love it, I wear it with these shorts all the time (which are half off right now, guys).
6. Jess’s Favorite Candle
Ha I told you #8 would relate to #6 (and I’m sure no one’s surprised at what it is) but congrats Jess on linking such a loveable and delicious candle!! Perfect for fall if you’re in the market.
5. Mal’s Bubble Candle
Another candle!! Yay! I linked this candle because well, first off, I bought it and love it. Second, because it’s the perfect gift for cool aunts to give to their nieces (which seemed to be a need based on the comments from this post). And it’s really affordable (at $15) so it’s truly a great gift for a gen-zer
4. Em’s Jockey Underwear
Haha not surprised to see the iconic, wildly stretchy jockey underwear we all tried out in this post (along with 2 of her other favorite products).
This underwear really is soft (I didn’t love it because of the seams but I’m heavily in the minority about this so here’s what Emily had to say about it if you missed it):
“I DESPISE a bad pair of underwear – one that cuts in, feels super uncomfortable, and frankly makes me feel bad and sad with the line it creates. So when I found this pair (totally randomly) I want to never go back. I get so bummed when I can’t find one pair and will often hand wash one rather than wearing a backup. Where do I start – this fabric is stretchy enough so they stay in place, but they do NOT cut in – like even if I’m bloated or gain some fun “summer/beer” lbs, they are still so comfortable (it’s nice to not feel shamed by your panties). There isn’t a “band” or seam at the top or bottom in which to cut in. They are SO THIN and soft, but so far (after 5 months) are still in great shape and have held their shape. I can NOT feel they are there, at all – both the thong and the normal underwear. They don’t ride up, they stay put, and they are so soft that I’d even say they make me feel sexy – despite being so simple.”
Honestly it’s worth giving it a shot because they’re only $3.99 right now (originally $11.50!!)
3. Kodiak Cakes
We all cannot stop laughing about the fact that a cup of pancakes made this list. It’s a first for sure but it was rightfully deserved – moms LOVE these for a quick and easy (and not horrible for you) breakfast. Em said 2 of her mom friends separately told her how great they were, then she let Birdie and Charlie try them and they love them which has made “those” mornings before school very easy.
2. Mal’s Fall Dress
Guys my dress!! This dress is so cute and I love a J-crew moment for the entire holiday season (you might remember the plaid J-crew dress I linked last year that was my ‘Thanksgiving dress’) I’m not sure why I’m so into the idea of a Thanksgiving dress, but there are now 2 that made this list, so you guys must be too. This one is super great!
1. Em’s Utility Jacket
Ding ding ding, we have a winner! Emily needed some new jackets to get into the PNW lifestyle, so she purchased a few utility jackets and linked some other fun ones over in this post if you missed it. This one was in the roundup, but it truly caught our eye almost immediately. Even Em mentioned that she considered getting it
So those are the top 10 for September! Hopefully you enjoyed seeing what was bought last month, we know we do. Let’s chat in the comments & be sure to have a great weekend. xx
Opening Image Credit: Photography by Sara Ligorria-Tramp for EHD | Design and Styling assistance by Emily Bowser and Julie Rose | From “A Budget and Rental-Friendly Living Room With 80% Thrifted Finds“
The post What You Bought Last Month: September Edition appeared first on Emily Henderson.
October 7, 2021
In Search Of The Best Rugs For Kids And Pets That Are Still Actually Cozy – And The 4 Rugs We Keep Coming Back To (Guess What They Have In Common???)

I’m still furnishing the rental to be cozy and inviting but TRYING to buy for the farm at the same time – nothing temporary unless we need it here to live but won’t need it there (like bar stools). So I’ve been on the hunt for what I feel like we all want in a rug: comfortable and cozy, durable and long-lasting, sustainable, forgiving (or should I say “FURgiving” to mud/dirt/hair and wear and tear), and obviously kid-friendly. We are low-maintenance people, folks. While we have started taking our shoes off inside (Oregon, duh) I still don’t want to have to worry.
If you’ve ever shopped for area rugs you know that this comfortable + durable + affordable + stylish combo is extremely hard to find, if not impossible. PLUS I want to buy responsibly so I’m vintage hunting FIRST. And when you add in “vintage” it makes my universal mom quest for a rug that can withstand legos and puke even harder. So today I’m going to walk you through all the types of rugs I’ve debated and ranked the categories from MY experience.
 photo by tessa neustadt | from: experimenting in my living room: trying to find “the” rug
Before I get too far into this – truly the durability of the rug depends on its materials and craftsmanship – a hand-dyed and woven rug from Turkey will likely be superior to one that is mass manufactured in a factory. And frankly, the price will give you a good indication of its quality (for new rugs at least). And when it comes to sustainability – well, the category of rug doesn’t have anything to do with its sustainability – it’s who, how, from what, and where that it’s made. All rugs can be made of all materials. Generally woven cotton won’t last as long, a wool blend will last the longest, stay far away from viscose and silk – so pretty, but even water will stain it.
The High Pile Shag photo by tessa neustadt | from: our master bedroom – finally
 left: photo by sara ligorria-tramp, from: our calm scandinavian master bedroom | right: photo by tessa neustadt, from: our master bedroom reveal
Now I’ve used this rug above more than 3 times because it’s like walking on a cloud. But this was before dogs and honestly, I can’t imagine a fluffy white rug working in Oregon (plus it’s no longer available – we kept the one at the mountain house + sold the one in LA to the new owners). But let’s break it down ANYWAY: Coziness – 10, FURgiving/Kid-friendly – 6, durability for high traffic – 4. If you want a big fluffy rug like this you are basically getting another piece of furniture – it can be the most fought-over spot in the room. I LOVE these in bedrooms or TV rooms, and wish I could have them in every room but A. They do not pass the “tiny lego/barf and crumb test”, and B. The yarn CAN get packed down and show “the path” if it’s in a walkway or high traffic zone. I’ve had some that didn’t, but most of my “long-haired” rugs got matted where it got the most foot traffic. It’s actually fine if it’s all over (and can be revived with a steam clean), but a bummer when you can see the path.
 charlie and his still best friend sabine at 1 1/2 | photo by kelsey tucker | from: a modern glam nursery makeover
Good news – due to the shadows amongst the high pile it can actually hide dirt/stains way longer than I would have thought especially if it’s evenly distributed wear and tear. In fact, it hides even better than a short low-cut pile rug where it might be more obvious to have a “spill”. The one above is from my friend’s house and she bought it for $8k 10 years ago and it still looks EXCELLENT. The shag rugs I’ve bought have been cheaper (still around $1k – $3K) and they showed more wear and tear faster – more matting at the foot of the bed or side where it got far more foot traffic. We recently rotated the one at the mountain house bedroom and it looks great now, but just know that some super high piles like this can get matted with consistent foot traffic.
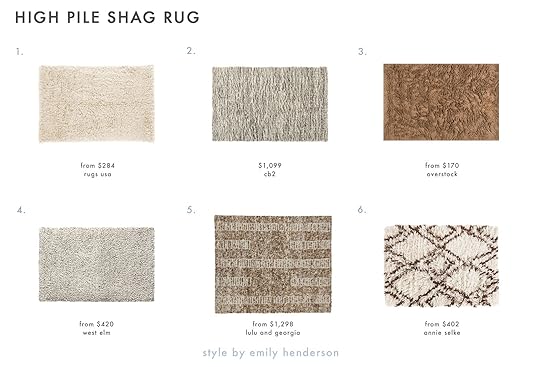
1. Natural Greek Flokati Area Rug | 2. Auckland Natural Wool Shag Rug | 3. nuLOOM Hand-woven Flokati Wool Shag Area Rug | 4. Bello Rug | 5. Tegan Moroccan Shag Rug | 6. Moroccan Diamond Brown Indoor Outdoor Rug
The Flatweave (Kilim Or Durrie) photo by sara ligorria-tramp | from: 14 rules for how we style the perfect bedroom (+ 3 new reveals)
 photo by david tsay | from: styled: secrets for arranging rooms, from tabletops to bookshelves
Coziness – 4, Pet/Kidfriendly – 7 to 8 (depends on the colorway), Durability – 9. On their own flatweaves aren’t terribly cozy as they are woven horizontal versus the yarn pulling up and fluffing out. However, with my memory foam hack (my favorite rug pad) they can be super cushion-y with 1/4 inch of memory foam for you to sit on. While originally not Brian’s favorite, once the pad is added it’s an absolute game-changer. So I’m still open to these knowing that the carpet pad absolutely makes a difference. New ones are easy to find, vintage or antique are all over the internet but if you are picky about size and color (me! me!) then it can be a challenge. But they hide a lot and don’t have a lot of fur in which to fish your dogs puke out of.
 photo by laure joliet | from: a kid-friendly, baby proof yet stylish living room, ohjoy 2.0.
I used one 12 years ago for Joy’s living room and I just texted her to see what her review was for two kids and two cats (in their main family room) and she said that with spills and cat puke she would just use a steam cleaner and it came out (which would be way harder with a shag rug).
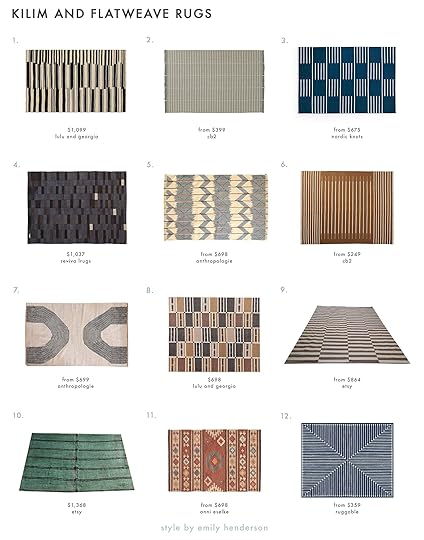
1. Lemieux Et Cie | 2. Reed Grey White Stripe Rug | 3. Classic | 4. Gunnjona | 5. Lemieux et Cie Flatwoven Manette Rug | 6. Copper With White Stripe Rug | 7. Lemieux et Cie Handwoven Tukar Rug | 8. Anni Rug | 9. Brown And Cream Striped Rug | 10. Vintage Turkish Hemp Rug | 11. Canyon Kilim Woven Rug | 12. Jonathan Adler Inkdrop Lapis Blue Rug
The Traditional Persian Style Rug photo by tessa neustadt | from: our modern english tudor living room
Coziness – 7, Pet/Kid-friendly – 10, Durability – 10. Hands down the most durable of them all. This is a huge category and could be its own post as it spans many styles, continents, and centuries. It’s art on the floor and when right can absolutely MAKE your room. I have found that Persian rugs hide almost everything and obviously the darker and busier they are the better. I use them for entry rugs since there is SO much outside shoe traffic.
I even have one in my kitchen that I’m sure is disgusting but it still looks GREAT. My only issue with these is that I’m so picky with color/pattern and it’s extremely hard to find allover color ones in blues/greens or pinks which is what I want. I don’t love a strong dark border. It’s like they can either be too busy/loud for me or they can be a wee bit too “modern farmhouse” predictable. All I want in the world is a 9×12 version of my entry rug below, which is proving to be IMPOSSIBLE to find – I’ve been trying FOR YEARS.
 photo by sara ligorria-tramp | from: styling to sell – the final entry reveal (that’s real estate agent approved)
I once found one that I wanted from Mansour Modern and when I called to “request price” it was $150,000 – yes, the cost of a home. They are both everywhere and nowhere and I recently scoured our post about “where to find antique and vintage rugs online” if you are interested. Ultimately I’ve found the best ones randomly, like underneath a bunch of stuff at a booth in an antique mall and totally filthy – but actually affordable.
I once bought an overdyed vintage Persian rug from Rejuvenation’s vintage site (below) and it was also super kid-friendly (we ended using it in the basement). Here’s what many dealers are doing now – they take 1980s bright Persian rugs that aren’t as popular (and might be cheaper) and they shave them down to look “worn” and then desaturate the color or dye them a new color. Like so:
 photo by sara ligorria-tramp | from: our guest room/office basement suite reveal
I’m neither fully into this or fully opposed to it – totally depends on the rug pattern, etc and I did really like mine above. And listen, I do appreciate that it’s getting a new life, while still being really durable and easy to hide stains.

1. 8’3 x 11′ Antique Persian Tabriz Rug | 2. Aschraf | 3. Idalina | 4. Antique Persian Hamedan Rug | 5. Aleah Rug | 6. 8’2 x 11’9 Antique Persian Mahal Rug
The Berber/Moroccan (Contemporary And Vintage) design by brady tolbert for ehd | photo by tessa neustadt | from: brady’s living room refresh with the citizenry
Moroccan rugs (new or vintage) tend to be not as high pile as the shag, but still with ample plushness. Cozy level – 9.5, Kid/Pet-friendly – 8 (depends on color-way) and durability – 8 to 10 (depending on color-way). I LOVE a Moroccan rug, both in style and coziness. They can be simple and neutral or wild and colorful. So even if your style isn’t bohemian (are we still saying that?) there is a Moroccan rug for you. It’s more the technique, the durability, the wool pile that they all have in common (and per usual, the ones actually made in Morocco are the best quality).

1. Boundaries | 2. Speck Black Hand-Knotted Wool Rug | 3. 022 | 4. Checkered Beni Ourain Rug | 5. Balance | 6. Jutland Geo Moroccan Hand-Tufted Shag Area Rug | 7. 026 | 8. Contemporary Moroccan Rug | 9. Soukie Modern Vintage Moroccan Mercer Rug | 10. Soukie Modern Vintage Moroccan Willa Rug | 11. Reda Vintage Moroccan Rug | 12. Eliko Rugs Vintage Moroccan 57931 Rug
The Hide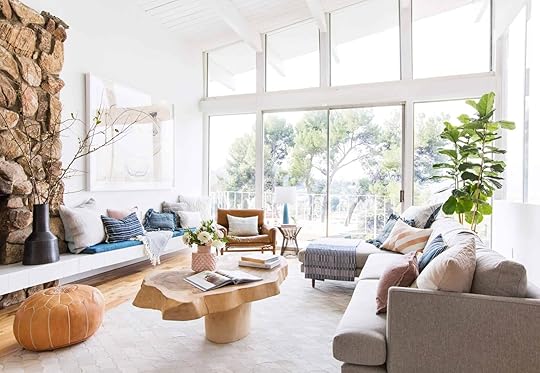 photo by tessa neustadt | from: how to add style to a neutral living room
Coziness level – 2, Pet/Kid-friendly – 10, Durability – 10. While I do question the sourcing these days (this is an animal), I will say that when we had this rug it was ALMOST indestructible (also no longer available). Wine, Coffee, Ketchup – all would EASILY wipe off. I would still buy a vintage hide rug if I saw one at the antique mall or flea market (great under a pedestal dining table), but I don’t feel so good about buying new unless I knew for sure how it was being sourced. This one would get some “bald patches” in VERY high traffic over the 5 years we had it. Ultimately if you want a SOLID white rug in your living room and you have kids and pets, this is a good option (and I’m excited about exploring the vegan options).
1. Handmade Studio Leather Dorotheia Modern Leather Rug | 2. Cowhide Rug | 3. Real Cowhide Rug Salt&Pepper Tricolor | 4. Tetra Pieced Hide Rug | 5. Ivory Printed Faux Cowhide Area Rug | 6. Scallop Black Hide Rug
The Sisal Or Natural Fiber photo by tessa neustadt | from: mel’s living room reveal
 photo by laure joliet | from: a kid-friendly, baby proof yet stylish living room, ohjoy 2.0.
There are two types of people in the world – those that like the feeling of sisal underfoot and those who very much DO NOT. I’m fine with it in certain areas, but I think no one would say these are “cozy” and as you can imagine Brian is very “ANTI-SISAL”). Sisals/Jutes, etc have a time and place for sure – I’ve often layered them under vintage rugs that are on the slightly “too small” side (see above). But only some are pet-friendly (cats can scratch, dogs puke gets stuck inside). I sound like I’m not a fan, but I am – they are classic, affordable, and totally unoffensive. But no, not cozy and just generally hard to get excited about. (If you know of a really durable or comfortable sisal in the comments please let us know – it’s not like I’ve tried every single one and below are some options to look at).

1. Luru Woven Jute Rug | 2. Jasper Jute Rug | 3. Jute Wave | 4. Redick Handmade Tufted Jute/Sisal Beige Area Rug | 5. Riverton Striped Jute/Wool Area Rug | 6. Cassia Woven Jute Rug | 7. Georgia Ombre Black Jute Rug | 8. Reseda Hand Woven Striped Jute Cotton Area Rug | 9. Bryn Jute Rug
The Cut Pile Rug photo by sara ligorria-tramp | from: from: a quick update: the changes i’ve made to my la living room
Coziness – 8-9, Kid/Pet-friendly – 7, durability – 10 if high quality. A “cut pile” is where it’s looped and then cut, so it’s shorter than a shag, but longer than like a flatwoven. I would definitely use the word “plush”. Generally, I’ve found them to be really, really great – when made well. The one I have above (which I have now in our rental living room) is SO COMFORTABLE but we bought it before we had dogs and the mud/dirt is more of a problem than I had hoped. I even got that eco stain repellant applied to it for like $300 when I bought it which I felt did very little. All in all though, the dirt is coming out just fine (the pee is another story).

1. Baxter Indigo Wool Rug | 2. Keen Handknotted Viscose Silver Rug | 3. Kelly Rug | 4. Agra | 5. Taylor Hand Tufted Wool Rug | 6. Parker Neutral Wool Rug
Here’s The Deal photo by sara ligorria-tramp | from: reveal: our boy/girl, 2-twin bed shared kids room
Blue Rug (unavailable)
I mean the long and short of it is the more variation in color the easier it is to hide, full stop. It’s not necessarily about being “dark” because we had a dark blue rug once and it collected and showed our kids and pups blonde hair (and dust) really easily. It’s when the yarns of the rug vary, not being totally solid – that is what is the most forgiving.
So what will we decide? I honestly think that it will be a mix, totally depending on the functional needs of the room the color palette, who will be using it, and honestly just what I find out vintage shopping.
So far I’ve pulled the trigger on two vintage Moroccan rugs on Etsy – these two:

They were both super affordable – 8×10, one $450, and one $600. Right now we need rugs in most rooms so while I’m unsure where they are going here or at the farm, I like them and could throw them many places.
I will also keep shopping for the right Persian rug – likely vintage for now. Lastly, I keep coming back to all the new rugs that I’ve owned and loved for years that seriously check all the boxes – cozy, soft, with enough variety in colors to mask dirt/stains and be kid and dog friendly.

 left: photo by sara ligorria-tramp, from: how i transformed an awkward space into my dream work loft | right: design by lea johnson, photo by sage e imagery, from: lea’s living room reveal
 photo by sara ligorria-tramp | from: the living room reveal
 photos by sara ligorria-tramp | left: our soft yet secretly sultry downstairs guest bed + bath | from: target’s new see it in your space feature
 photo by sara ligorria-tramp | from: one of emily’s best friends gets the cozy yet sophisticated bedroom makeover she really deserves
 photo by sara ligorria-tramp | from: reveal: how we brightened up a room (and some deserving lives) with velux skylights
 photo by sara ligorria-tramp | from: emily bowser’s “refreshed for function” small living room makeover
Rug (unavailable)
Opening Image Credits: Photo by Sara Ligorria-Tramp | From: See How EHD Brings Fall Into Our Homes (And Yes, There Are *Chic* Pumpkins Involved … Target Does It Again)
The post In Search Of The Best Rugs For Kids And Pets That Are Still Actually Cozy – And The 4 Rugs We Keep Coming Back To (Guess What They Have In Common???) appeared first on Emily Henderson.
October 6, 2021
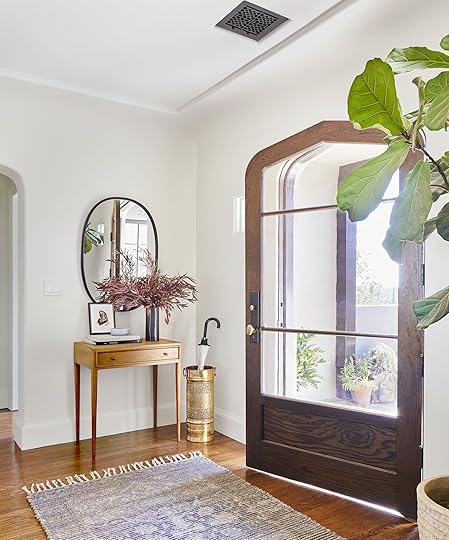
The Anatomy Of An Entryway: 5 Foolproof Formulas AND Our Favorite Shoppable Picks

Sometimes a post really hits. And while we are ALWAYS pumped, we aren’t always sure what the exact magic sauce was (especially if it was a little unexpected aka not the mountain house kitchen). One of these was Emily’s entryway reveal. We looked at all of the data to come to the conclusion that maybe people are just really into their entryways. Which I actually get. A pretty entryway is psychologically important. Why? Well if it’s a mess when you leave then you are already bummed/stressed about seeing it when you get back. And when the first area you see when you get home is not the way you want it to look, it really can drag down your mood. Honestly, the world is in too much chaos to not have our homes bring us as much peace as possible, right? So while the boxes I need to put in the recycling dumpster and the large blanket I need to return to my dad are mocking me daily, when it’s clean, I LOVE walking into my home, seeing my entry and feeling a sense of calm (or as calm as 2021 will allow).
I want that for everyone. So I did the necessary EHD research, realized we have 5 favorite entryway formulas that we repeat ALL THE TIME, and then put together arguably too many shoppable options (I really couldn’t stop myself). So, no matter the size entry you have, you can come home, rip off that mask, take a deep breath, and feel peace because your entry is on point. No more clutter body.
But before we get into the formulas this is what we think every entry needs:
Function (because form is great until you have nowhere to throw your third pair of shoes that you can’t be bothered to take allll the way to your room)Mixed materials (for texture and visual interest)Varied levels (also for visual interest)Formula #1: Bench + Basket + Wall Feature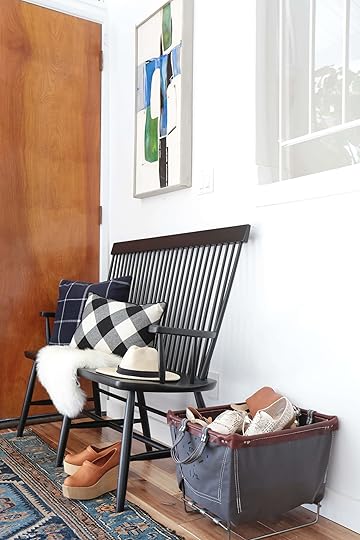
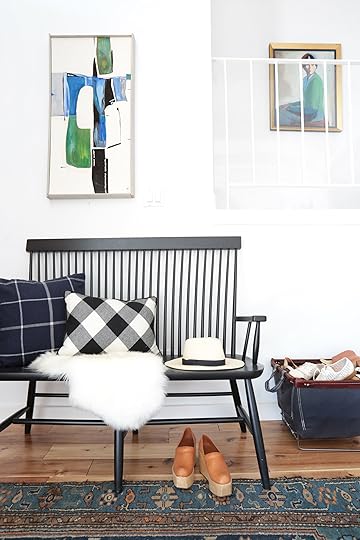 photo by tessa neustadt | from: the 10 easy things in your space you could update this weekend
This one is one of the simplest because it only requires three elements and nothing electrical. However, it’s SO functional. I am a huge kick-your-shoes-off-the-moment you-get-home kina gal so having a shoe bin is imperative for me to have an “organized” entry. Emily is also very team shoe bin as shown above.
But first, let’s talk benches. The bench is your main piece and sets the tone for the rest of your house. So choosing the right bench will not only give you a great place to sit but also an awesome opportunity to show off your style (bonus points for cute pillows). These are some of our favorites:

1. Pax Black Natural Bench | 2. Bodhi King Bench, Bronze | 3. Woven Rope Indoor Bench | 4. Wood and Leather Bench | 5. Baro Wood Entryway Storage Bench | 6. Walking Bench | 7. Shaker Dining Bench | 8. Georg Bench | 9. Skye Upholstered Bench | 10. Amicable Split 60″ Bench | 11. Verken Mid Century Modern Settee Bench | 12. küdd:krig HOME Capsule Bench
#1 and #9 are awesome because their upholstered tops really make a bold and colorful statement. #5 is pretty great because it’s a bench and bin all in one so it’s perfect for smaller entries or simply for extra storage. But #4, #6, #10 and #12 take what could be a simple wooden bench and really make them into something SO special.

 photos by sara ligorria-tramp | left from: how to bring “winter” in with target | right from: jess’ living room reveal
Large baskets are SUCH a good long term purchase. They can be used for a near limitless amount of things… heck, even as a pretty planter cover. I would just make sure for your entry, make note of the number of shoes that normally collect by your door and then adjust your basket size needs accordingly.
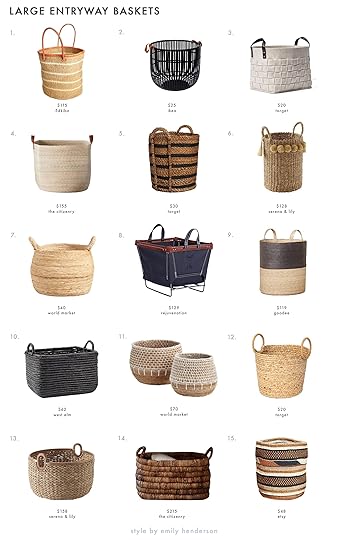
1. Garissa Basket | 2. HURRING | 3. Woven Felt Rectangular Basket with Faux Leather Handles| 4. Mercado Storage Basket | 5. Tall Striped Basket | 6. Big Sur Basket | 7. Large Banana Delilah Tote Basket | 8. Steele Canvas 1-1/2 Bushel Basket | 9. Tambo Basket | 10. Woven Seagrass Basket | 11. Natural Banana Leaf Harper Basket with White Macrame| 12. Small Basket with Round Handles | 13. Seagrass Basket | 14. Merapi Storage Basket | 15. TAMADUNI
I LOVE #1, #4, #14, and #15 so much. But for those who want something neutral with a lot of texture, #11 with the macrame detail is the way to go. However, #8 is the EHD classic and has multiple versions and colors (there’s even an option with wheels).
Hot TipMake sure your basket is a different height than the overall height of your bench... but keeping it shorter than the seat of the bench is our rec.
Formula #2: Entry Cabinet + Mirror + Sconce + Tall Vase photo by sara ligorria-tramp | from: styling to sell – the final entry reveal (that’s real estate agent approved)
Next up, we have a formula with a bit more drama (and more closed storage). While a single basket is enough entry storage for some of us, if you have the space and want to up the storage, consider an entry cabinet. Sure you can’t sit on it. BUT it’s the ultimate catchall.
These are some great options…

1. Quinn Lacquer Entry Cabinet | 2. Miller 43.5″ Wide Buffet Table | 3. Matte Black Standard Rectangle Composite Console Table with Cabinet | 4. Gabi Rattan Entryway Cabinet | 5. Perch Marble Entry Cabinet | 6. Libby Small Cabinet | 7. HEMNES | 8. Live Edge Wood And Gold Metal Sloan Sideboard | 9. OSCURO | 10. Coles | 11. Industrial Storage Dresser | 12. Lap Credenza
You first want to think about your needs. Are you a drawer person where #7 and #11 would be your go-to? Or would a cabinet with doors and bins inside be a better fit like, well the rest of these? I personally LOVE #3, #5, #9, and #12. Can you tell I have a hard time choosing my favorite of anything?
 photos by sara ligorria-tramp | left from: bower’s living room reveal | right from: how we staged a house (to sell) with soul
1. Inman Venetian Accent Mirror | 2. Brinley Mirror | 3. Corin Rattan Round Wall Mirror | 4. Hub Oval Mirror | 5. Round Decorative Wall Mirror | 6. Woven Mirror Artwork | 7. Beveled Hub Wall Mirror | 8. Hutcheson Arch Mirror | 9. Perch Round Mirror With Shelf | 10. Wall Mirror | 11. MERON | 12. Acacia Wood Mirror | 13. Hub Modern and Contemporary Accent Mirror | 14. Victor Leather Mirror | 15. Rattan Arched Wall Mirror
Mirrors and entryways are THE power couple. Art is wonderful and I will never vote against a beautiful piece of art. BUT a mirror is not only functional, so you don’t miss the fact that maybe you forgot to brush your hair as you hurry out the door, it also will reflect more light around your space. Also, you can easily “go big” without it looking overwhelming. For something classic and affordable, #5 is great. You may recognize #6 from this makeover we love:) I also have a real soft spot for #2 and #10.
 design and photo by malcolm simmons
1. Berkshire Single Sconce with Linen Shades | 2. Wood and Concrete Hayes Wall Sconce | 3. Double Cone Brass Bowtie Wall | 4. Wall Sconce With Neutral Beige Rattan Shades, Black Metal Finish | 5. Arney Sconce | 6. Leggero Champagne Pole Wall Sconce | 7. Claremont Milk Glass Cylinder Sconce | 8. Arc Mid-Century Sconce | 9. Nodes Large Angled Sconce | 10. Novogratz Addison Single Light 15″ Tall Wall Sconce | 11. Arney Articulating Sconce | 12. Alabax Small Sconce | 13. Whare Sconce in Various Colors | 14. Black Vanity Light | 15. Matte Black Plug-In or Hardwire Wall Sconce
Now the sconces are probably my favorite part of this formula because I really love cool lighting. I mean look at Malcolm’s entry above! Those sconces are incredible. They are also nice for mood lighting at night when you only want some lights on (HOT TIP: install a dimmer if you can). But as for the roundup, I also love #2, #5, and #11 for something modern and #1, #10, and #12 for a more traditional look.
I didn’t include a tall vases roundup in this formula but I do later so get excited:)
Formula #3: Entry Cabinet + Table Lamp + Wall Art + Short Vase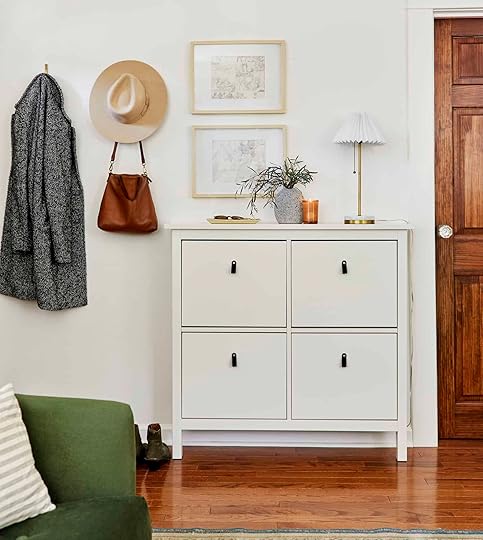 photo by sara ligorria-tramp | from: sara’s living and dining room reveal
With this formula, it’s basically the little sibling to #2 but equally as great. You still have your wonderful cabinet but instead of a sconce you have a lovely table lamp (which personally is actually my favorite type of light) and instead of a tall dramatic vase you have a smaller more delicate one. Also, while a mirror is a solid go-to for an entry, you can’t forget about the power of art. You can choose something large, a few small pieces, or even a small gallery wall. No rules. That’s it so let’s shop!

1. Ivory Reactive Glaze Pedestal Vase | 2. Round Earthenware Vase Gray | 3. Celia White Vase | 4. Large Stone Vase | 5. Sandy Mole Ceramic Table Vase | 6. Hand Turned Wood Bud Vase | 7. Rustic Brown Vase | 8. Little Gem Bud Vase | 9. Ceramic Vase | 10. Wide Mouth Glass Vase | 11. ORIGAMI | 12. Full Moon Clay Vase by Leanne Ford
Vases (especially the shorter ones) are such a fun way to bring in personality to a design. #2, #5, and #7 are quietly bold which I love. Then #3 and #11‘s verticle ribbing is a fun but elegant accent.
 photo by david tsay | from: my best friend’s los feliz home
1. Dublin 26.5″ Standard Table Lamp | 2. White Abstract Ceramic Lyra Table Lamp Base | 3. Downbridge Table Lamp | 4. Bond Lamp | 5. Valencia LED Task Lamp | 6. Rustic Terracotta Table Lamp Base | 7. Modern Wood Column Table Lamp | 8. Linus Table Lamp Antique Black | 9. Lighting 30-inch Giselle Adjustable Black/ Gold Task Table Lamp | 10. Graduate Lamp | 11. Remi Blue Linen Table Lamp | 12. Rigdon USB Table Lamp
Hello, lover (in Carrie Bradshaw’s sultry voice)! #1 looks like it would give the most beautiful glow in the evening and for such a unique lamp, that price is not bad. #4 is one of Emily’s all-time favorites because well that blue lampshade is basically iconic at this point. BUT #12 will give off a beautiful light but will also charge your phone which seems GENIUS since you can charge your phone and easily grab it on your way out.
Formula #4: Tulip Table + Tall Vase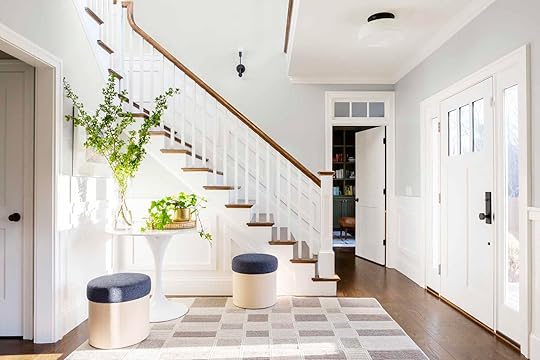 photo by christopher dibble | from: 12 tips to make a spec home, special…with max humphrey
This one is the most straight forward but does require you have a decent-sized entryway (and likely a mudroom to store your shoes). However, in this photo, those stools might act as storage. VERY smart and sneaky, Max
Why we love this look is because of how simple yet stunning it is. The beautiful shape of the table plus the tall vase with even taller greenery is graphic but feel. Basically, it’s a slam dunk. Side note: You can also add a tray or bowl if you want a little something extra:)
Ok, let’s talk tulips…

1. Capsule Dining Table | 2. DOCKSTA | 3. Marble Top Leilani Tulip Dining Table | 4. 24″ Round Pedestal Dining Table, Blackened Oak Wood Top | 5. Artificial Marble Veneer Top with Strong Tulip Style Metal Pedestal Base | 6. 36″ Somerset Wood Top Round Dining Table | 7. Clay Dining Table | 8. Small Eero Saarinen for Knoll Tulip Side Table | 9. Grove Marble Round Bistro Table | 10. White Marble Round Bistro Table | 11. Odyssey Brass Wood Table | 12. Oak Torsion Dining Table
I don’t know about you but I can’t HANDLE how beautiful #1 is. That wood accent makes my heart skip a beat every time I look at it. 10/10. I also think that #5, #10, and #11 are fun and slightly unexpected versions. However, a classic is a classic for a reason so #2 and #6 will always be a great buy.
 photo by sara ligorria-tramp | from: portland project: the entry & staircase reveal
See I told you the vases were coming up:)

1. Terra Cotta Vase | 2. Dual Vase | 3. Large White Textured Ecomix Vase | 4. TIDVATTEN | 5. Afloral Tall Watertight Terracotta Vase | 6. Ruff White Vase | 7. SIN Cenote Vase | 8. Brass Hurricane Vase | 9. Tall Amber Vase
I think about buying #2 about once a week but sadly just don’t have the right spot for her. BUT if you do, then you 10000000% should. Now for something more neutral #6 and #7 are quiet but special.
Formula #5: Console Table + Short Vase + Chair + Table Lamp + Wall Art photo by david tsay | from: styled: secrets for arranging rooms, from tabletops to bookshelves
We made it! This last one has a little bit of everything. It has a place to sit, a catchall table, a light source, and of course some accessories. Now I didn’t add a basket into this formula but you absolutely could.
Ok, let’s jump right in…

1. Warwick Narrow Console Table | 2. 2 Tone Grey and White Marble Console | 3. Niche Burl Wood Console Table | 4. Profile Console | 5. Live Edge Wood Sansur Console Table | 6. Parsons Table | 7. Bixby Console | 8. Waterfall Edge Two Tier Console Table in Burl Wood | 9. Lau Console Table | 10. Streamline Console | 11. Woodson Console Table | 12. Swish Console Desk
We love console tables because they are visually a bit lighter and tend to be more physically slender which is great for an entryway the needs that (and a lot do). If you don’t need drawers or are into maybe some smaller shelf baskets then #1, #4, #8, and #11 are awesome options. But if you want something with that “extra something” then #3 and #7 (it’s wrapped in fabric!) then I would suggest those.
 photo by sara ligorria-tramp | from: the no-reno house that looks Completely renovated
1. Taylorsville Spindle Accent Chair | 2. Kaishi Black Chair | 3. Aesop Armchair | 4. Cleo Chair | 5. Sunnyvale Woven Accent Chair | 6. Morpho Swivel Velvet Arm Chair | 7. Ingrid Dining Chair | 8. Nadia White Cane Chair | 9. Charcoal Gray And Ivory Dash Print Noemi Tub Chair
Accent chairs have SUCH a special place in my heart and it kills me that I hardly have space for the very small one in my living room. SO if you have an entryway that can handle an accent chair DO IT! Just make sure to consider the scale of your console table and your chair so that one doesn’t overpower the other.
Now let’s get specific. As soon as I saw #3 I immediately sent it to Julie and simply blurted out, “LOOK!!!!!” I mean, it’s juuuust so good. So that chair aside #6, and #4, #2, and #7 are great modern picks. BUT if you want a little extra cushion and boldness then #9 is the way to go.
We are at the end! I hope that this was really helpful and makes you feel like designing an entryway is now a breeze. Now I know I didn’t get heavily into accessorizing but remember less is more. Maybe a small framed pic and a tray added are all you need atop your cabinet (in addition to your cute vase)! Don’t overthink it. Also, these formulas are guidelines. If you want to add a shoe bin next to your console, do it. If you want to add a sconce over your bench, I think that could look great! It’s up to you.
And to make life a little clearer and pinnable here is a graphic I made. Enjoy!

Love you, mean it.
Opening Image Credit: Photo by Tessa Neustadt | From: How We Styled Our Living Room To Sell
The post The Anatomy Of An Entryway: 5 Foolproof Formulas AND Our Favorite Shoppable Picks appeared first on Emily Henderson.
The Only Outdoor Halloween Entertaining Idea Post You May Ever Need: Emily “BOOswer” Does It Again

Hi everyone! It’s been a minute. How are we all doing? I know. It’s been a year(s). Good news, I’m here for some uplifting creepy-crawly Halloween content made 100% because I thought it would be fun and EHD was up for it.
Backstory: My husband’s favorite store is Halloween Town in Burbank that is open all year long. He wears gross t-shirts with monsters and murderous characters DAILY. He has a podcast called The Untold Hour and has over a million followers on TikTok as a Satanist character, Onyx the Fortuitous. I KNOW, IT’S A LOT.
Let us never forget…

I mean, I lived with this and it still leaves me speechless.
Do you have Google remind you of photos taken “a year ago today” with a musical slideshow of about 20 pictures that all more or less look like this?

Couple of questions one could ask here: Why are these on my phone? (“you have a better camera”) Where was I when this was happening? (“sleeping” – uh. what.) “Who is this masked person?” Actually, WHO IS THIS MASKED PERSON INSIDE OF MY LIVING ROOM DURING A PANDEMIC…WHILE I WAS SLEEPING?? A question I’ll have to ask later. You get the point though – we have different…interests? My husband literally owns a TV/VCR (Gen Z – google it) and has horror movies on loop 24/7 in his garage and I consider ET too scary. Let’s just say our algorithms couldn’t be less the same.
HOWEVER. One thing we can agree on is we like the cozy nature of the festive season, which Halloween really kicks off. We’re both from Maryland and miss the weather changing in September so I try extra extra hard to make our home feel like fall and cozy (even though it was 92 degrees outside today – AGH). For the loving sake of my husband, I’ve embraced Halloween, in a cozy (and a teeeeny bit creepy) way the past few years without breaking the bank, here’s how I’ve done it:
I Use What I HaveThese Jungalow for Opalhouse plates are the singular thing that made me decide to shoot a last-minute Halloween party in my backyard. They are NOT Halloween plates but when I saw them next to a display of Target’s Halloween product I could not unsee the possibilities. I threw them all in my basket and 10 minutes later Marco Polo’d Caitlin from the parking lot and was like, “remember how I said I absolutely don’t have time to pull together a Halloween shoot? Yeah, never mind. LOOK HOW CUTE THESE PLATES WOULD BE ON A HALLOWEEN TABLESCAPE” – I had to see it through.

Ok, I understand that’s not exactly “using what I have” although, I now DO own these plates and it is using something that could be used any other time of the year.
Side note: this is generally how I start on any project, there’s a smaller idea or product that I then build off of, who else works this way? I like to have that *spark*. These plates were my spark – thank you Justina Blakeney and team – and from that spark, we ended up here:


I love it. Sara came over and shot everything in a couple of hours as the sun was setting. It was true speed styling, and she was able to capture a real creepy, moody vibe.

Cat Plates | Candlestick Holders | Table Runner | Cloth Napkins
This year it was new for me to bring in more color. I usually stick to mostly black and white because we only live in 860 square feet and that keeps the space a bit calmer with all the extra stuff. However, when I brought the party outside (a much safer situation in these times anyway), I really wanted to make it pop more with orange. Besides, these ADORABLE app plates from Target convinced me a rusty orange was perfect.


Going back to using things you own (or I guess things you could buy and use again and again), let’s take a look at where we landed for the tablescape and talk about how little of it is actually specifically Halloween. The dinner and salad plates from Jungalow’s line, with their spiky edges, look a little sinister (like a chainsaw edge possibly?) here, but in every other photo where I’ve seen them styled out, they are cute and flirty. The candlestick holders are a staple and VERY helpful with their wax catcher because drippy candles add to the ambiance (and to the amount of wax that you will inevitably ingest because those are EXTRA long candles and by the end of the night half of it is in your wine). I broke out my black cutting boards to use for the savory and sweet boards. Both the circular and rectangular ones are still available. The black vase is an oldie from H&M Home, but I also own this one from CB2 which honestly is a great vase and would have worked as well. The runner is actually 2 stacked for length as you can easily see because, as I mentioned, we were speed styling/shooting. I think it could be used for most of the year but easily through fall. I considered using these glasses before Sara said she would bring her vintage amber wine glasses over. The cloth napkins are Hearth & Hand and could be used any time of the year and obviously, so could the flatware.

Woven Chargers | Chairs | Wave Concrete Table
We *may* have had a smoke machine for this shoot and it was SO FUN. Because we had very limited time, Andrew got to man the smoke machine and honestly, I don’t know if he’s ever taken a job more seriously. The “seat pads” are actually woven chargers that I’ve put on some old outdoor stools/side tables (similar) I’ve owned for years. I have these amazing Blu Dot chairs (on sale now!) on the other side of the table but I was still waiting on the rest to show up (lead times! Amiright??)

The table is the Wave Concrete Table by TOV it’s about 400 lbs (not exaggerating), it’s one of the only pieces of furniture I’ve bought for the patio (which is why this isn’t a reveal and we are not showing the whole space). The tile I used for the patio is from a San Diego-based company called Tierra Y Fuego and it’s the Circle and Cross Tierra High Fired Floor Tile. I very much paid for all this, which is why I haven’t finished my space! Won’t stop me from enjoying what I have though At the moment, there’s just some potted plants on the other side of the patio. The lanterns are vintage Target and I honestly love them so much but they are not made anymore. This is what I will say about lanterns though: unless for weather reasons it makes more sense for you, I love that these don’t have glass. They are so much easier to just spray off with the hose and about once a year I give them a coat of black spray paint and they are good as new. You could totally do that with lanterns that have glass, but I find it is a lot more annoying. I think these lanterns from Pottery Barn are what I would buy if I couldn’t have these.

Bar Cart | Drink Dispenser | Vase | Large Bowl | Cloth | Spooky Fabric
Moving over to the bar cart area, let’s first address the most important thing, PUCK WEARING BAT WINGS. Ok, back to business, I like for guests to be able to help themselves as much as possible when having a get-together because I’m usually too busy with prepping food. This bar cart is Project 62, it is made for outside but could be used inside – it’s that chic. I’ve used it here as a serve-your-own drink station with a “Perfect Pear Punch” in a drink dispenser I’ve owned and loved for years (they sell dispensers and stands that all work together!). In this context, the large bowl, that is holding cold beverages, looks like a cauldron. Both the bowl and dispenser are from Crate & Barrel. I piled up all the throw blankets I have in the color palette for guests to grab if they get chilly – fire pits are not a thing right now (or maybe ever again?) in LA. The Jungalow vase also takes on a bit of a Beetlejuice vibe in this space, but again, seeing it styled for Target, you would never think of it as a Halloween-specific vase. The vase also has a really nice size opening for arranging flowers, I didn’t have to use any floral tape or any fancy florist trick for this arrangement.
Side note: it has a very pretty pitcher counterpart that didn’t end up having a spot in this shoot but I did use it to style my extra flowers (beware: unedited iPhone pic below)

If I had a much larger table (or any surface really) I would have used this extra-large pitcher.
I Buy (And Keep!) A Few Versatile Halloween-Specific Decor ItemsI keep 1 big bin in my garage for Halloween decor and space is PRECIOUS in my garage my friends, so I try to make it count.

The jumbo “creepy cloth” was used under the runner like a tablecloth, with the smaller white “spooky fabric” draped over the bar. Creepy cloth and spooky fabric are my favorite Halloween staples. FYI creepy cloth is thinner, with smaller holes and spooky fabric is thicker with larger holes. I have a lot of them in both black and off-white. You can throw them on a table, over your window treatments, draped on a chair, etc etc. They are easy to style, big impact even though they are very compact to keep and very reusable (throw them in a gentle wash and hang dry).

I know you are going to want a link for the bowl with claw hands. I think I bought it 3 years ago from Michaels and the bowl it came with broke and that’s just a random white bowl I had that fit. I found this one that is similar for you all.

Fake Spider Web | Felt Spiders | Skeleton Hand | Serving Dish
My glorious hedge was made even more glorious with a 10-foot fake spider web – didn’t know that was possible did you? (if you’re new to me – I’m obsessed with the hedge that I planted with my OWN TWO HANDS in 2018 that are now 12 feet tall and showing us all what it is to THRIVE IN AN ACTUAL DESERT). I’ve reused the same spider webs for years, but they’ve always been inside. I’m curious if I will be able to use this again with it being in an actual tree, my guess is it will be gross so maybe I would say that was not the best decision, but maybe it can be reused outside at least a couple of times? I’ll report back.

Speaking of easy-to-store decor, these hanging felt spiders are new to me this year. They are a pretty large scale, so the impact is high, and very lightweight so hanging them from fishing line is an easy thing to do to creep up the space. Before anyone asks, was it risky hanging them directly next to burning candles? YES. Yes it was, but I risk my life and home for all of you. Luckily it was not a very breezy evening, but if it had been I would have also connected them to fishing line going to the table, possibly weighted with a nut or something small to keep them from blowing into the candles. Could be cute hanging on the inside of your windows with fishing line and a small command hook, or you could easily connect them to the fake spider web. Here, mine are attached to the bistro lights directly above. I didn’t use any outside, but a similar product is decorative (well obviously not real!) bats that are cheap, can be used over and over, and take up practically no space in storage. Mentioning them because I’m sad I didn’t add them to my flower arrangement on the table like Royale did for her Halloween tablescape.

My light up pumpkins are from a few years ago, but Target still has similar ones, this smaller one and this larger one (only found in some stores).
HOT TIP: I noticed they have a lot of orange light-up pumpkins this year, if they only have ones in stock that are orange (or another color you don’t want), you can spray paint them. The larger one pictured here was actually black to begin with, I sprayed it white myself because they were out of white a few years ago. I just taped the eye holes from the inside so the paint wouldn’t go inside and taped over the stem. Easy peasy.
The skeleton hand and the spider serving dish are weirdly so versatile in how you can style them. It’s a weird sentence but it IS true. Place the hand on a pile of books on a shelf or up the creep factor on your charcuterie board. Use the spider dish for Halloween candies (or pistachios, pictured here), or put it on your coffee table to hold your matches and collection of pretty rocks you found on a hike (specific and personal obviously).

I really wanted these snake napkin rings from CB2, but remember, I decided to shoot this like 3 days before, so there was no time for shipping. I found these skeleton hand napkin rings instead from Amazon and they do the job, I’ll totally use them for years to come. Also new to my collection this year, ALL the Target Halloween app plates. I bought one of each style (only $4!)
I brought in metallics with the flatware and the owl figurine. The skull glams up the space while tying in the yellows in the flower arrangement and the translucent nature of the amber glasses.


The bat glasses are a new addition to my Halloween collection. They are not as easy (fragile) or space-efficient to pack up each year but the classy simplicity of them got me. Same for the simple tray they are on from Target (sad it’s not better pictured – speed styling). The skull drink stirrers are vintage Target but look how cute these ghost ones are on Etsy.

I spray painted the hanging skeleton from Target black so it would pop off my white house and used a couple of command strips to bend his arm. He folds down very flat and fits perfectly on top of everything in my Halloween bin but still manages to make a big statement. The branch situation over my window is Crate & Barrel from a couple of years ago but you can get the same effect from spray painting sticks in your backyard – like the branches I found in my local park and spray painted a few years ago for this post
 photo by sara ligorria-tramp | from: 10 super easy + affordable halloween decor ideas
Fake crows – I have owned them for years, attach them to every surface in my house and it never stops being funny watching my cats try to figure out how to get them.
Movie Night!Having movie nights outside is something we started during the pandemic as a safer way to get together with our friends. We set up chairs in clusters, some would relax on the ground with blankets and pillows. We own 4 CleverMade Tamarack Chairs which are great because they are comfortable and fold up to be stored easily.

Rust Stripe Pillow | Maze Pattern Pillow | Boucle Pillow | Oversized Neutral Pillow (similar) | Rust Blanket (similar) | Lounge Pillow | Tamarack Chairs
Our tiny yard is on a slight incline which is actually very nice for snuggling up with your cats on a bunch of blankets and pillows. I’ve found that the ground can get damp as the evening progresses though, and for that reason I like to have a large (mine is 9×12) canvas dropcloth to help reduce the moisture. It also helps keep the blankets/pillows/cushions I put on top from getting overly dirty, which is good because I like to use indoor pillows/cushions/blankets so everything feels a lot more cozy. I used blankets (similar) and thick vintage fabric I’ve gotten from flea markets. Daffy is loving the new addition of Jungalow’s lounge pillow and floor cushions. Luckily the other pillows from my home already fit the vibe.


Lights | Portable LED Light | Bistro Lights
The ghost lights! I’ve had these for years. I think I put some in Emily’s yard back when I was an assistant and bought them the next day because I thought they were so cute. I also love our portable LED light, it can change colors and comes with a remote. Our bistro lights are tried and true, we have had them up (properly with wire and everything) since 2018.

Because some of you will be interested in the ins and outs of outdoor projection, here’s that info for you: We spent a little more on our projector in order to have better quality. As you can see here, all of the lights are on and you can still see the screen clearly. We have the Miroir M220 HD Pro LED and it’s $100 less than we bought it. There’s an HDMI port on the back and we usually end up just attaching our Fire TV Stick and playing movies from there. I’m not a projector connoisseur or anything, just letting you know my experience. The projector can sit on a small table, my husband attaches it to a tripod (it has a hole at the bottom for that purpose). We got a simple projector screen and stand off Amazon, which breaks down easily into a small duffle bag. I do recommend having sandbags or something (we use large stones from our garden) to hold the stand down though, it’s a little top heavy. Andrew would like to point out that we have not perfected the sound situation yet. The projector has speakers that aren’t great, so we attach some pretty basic laptop speakers that are completely fine but my husband said he would still not recommend so, there you have it.

Basket Tray | Black Circular Tray | Spider Bowl | Skeleton Jenga
Let’s Talk About Food!
I can’t believe I’m actually allowing this photo to be shown because obviously it’s missing drinks on the coasters (similar) but I guess this is the only pic we got of the sweet board?? I would yell at Sara but she’s currently honeymoon-ing (RUDE). ANYWAY, I digress, I made a sweet board with some themed cookies from Target (because who has time to make and ice their own cookies while also setting all this up?). The board was simple and straightforward because I always forget being a food stylist, prop stylist, and florist are three separate jobs for a reason. My house was an EXPLOSION of all three of those things by the end of the night. I kept meaning to take a pic of how insane it was so I could be like, “Hey! Not everything is pretty all the time!” but I literally kept forgetting to because I didn’t sit down for 16 hours. Take my word for it, everything is harder than it looks and behind every styled photo is a very messy room.
My advice: make it a room with a door so you can shut it when the guests come over. Also: put anyone you can grab in charge of something you don’t need to do. Case in point: I made my husband make the rounded “ghost” baggies of popcorn while we were shooting the other side of the space.

Oh the plans I had for this savory board! You know, I would not recommend looking at @ainttooproudtomeg’s instagram feed after looking at this because you will find me less impressive than you already do. However, I would recommend looking to get your own inspiration – or what I like to call it – “what can I do that’s shown here in, oh, 15 seconds?” I cut brie to look like a coffin and tried – unsuccessfully – to write RIP on it. Ha! Wiped it off and turned it over to hide the attempt. I stabbed my goat cheese and used jelly to look like blood. And my final creepy endeavor was to make “eyeballs” out of some peppers, mozzarella, sliced olives, and capers. You know what? Anyone who is actually hosting, I’m here to say, it’s ok to be mediocre. Also, ghost veggie chips and caramelized onion jam fixes a lot, it’s all your guests will talk about anyway.
OK, y’all. I think that’s it! Let’s talk in the comments. Here’s to me becoming independently wealthy so I can fully reveal the front and back yard to you all soon! Xo
*Designed and Styled by Emily Bowser
**Photos by Sara Ligorria-Tramp
***Cat Models: Daffy and Puck Bowser
The post The Only Outdoor Halloween Entertaining Idea Post You May Ever Need: Emily “BOOswer” Does It Again appeared first on Emily Henderson.
The Only Outdoor Halloween Entertaining Idea Post You May Ever Need: Emily “BOOswer” Did It Again
Hi everyone! It’s been a minute. How are we all doing? I know. It’s been a year(s). Good news, I’m here for some uplifting creepy-crawly Halloween content made 100% because I thought it would be fun and EHD was up for it.
Backstory: My husband’s favorite store is Halloween Town in Burbank that is open all year long. He wears gross t-shirts with monsters and murderous characters DAILY. He has a podcast called The Untold Hour and has over a million followers on TikTok as a Satanist character, Onyx the Fortuitous. I KNOW, IT’S A LOT.
Let us never forget…
I mean, I lived with this and it still leaves me speechless.
Do you have Google remind you of photos taken “a year ago today” with a musical slideshow of about 20 pictures that all more or less look like this?
Couple of questions one could ask here: Why are these on my phone? (“you have a better camera”) Where was I when this was happening? (“sleeping” – uh. what.) “Who is this masked person?” Actually, WHO IS THIS MASKED PERSON INSIDE OF MY LIVING ROOM DURING A PANDEMIC…WHILE I WAS SLEEPING?? A question I’ll have to ask later. You get the point though – we have different…interests? My husband literally owns a TV/VCR (Gen Z – google it) and has horror movies on loop 24/7 in his garage and I consider ET too scary. Let’s just say our algorithms couldn’t be less the same.
HOWEVER. One thing we can agree on is we like the cozy nature of the festive season, which Halloween really kicks off. We’re both from Maryland and miss the weather changing in September so I try extra extra hard to make our home feel like fall and cozy (even though it was 92 degrees outside today – AGH). For the loving sake of my husband, I’ve embraced Halloween, in a cozy (and a teeeeny bit creepy) way the past few years without breaking the bank, here’s how I’ve done it:
I Use What I HaveThese Jungalow for Opalhouse plates are the singular thing that made me decide to shoot a last-minute Halloween party in my backyard. They are NOT Halloween plates but when I saw them next to a display of Target’s Halloween product I could not unsee the possibilities. I threw them all in my basket and 10 minutes later Marco Polo’d Caitlin from the parking lot and was like, “remember how I said I absolutely don’t have time to pull together a Halloween shoot? Yeah, never mind. LOOK HOW CUTE THESE PLATES WOULD BE ON A HALLOWEEN TABLESCAPE” – I had to see it through.
Ok, I understand that’s not exactly “using what I have” although, I now DO own these plates and it is using something that could be used any other time of the year.
Side note: this is generally how I start on any project, there’s a smaller idea or product that I then build off of, who else works this way? I like to have that *spark*. These plates were my spark – thank you Justina Blakeney and team – and from that spark, we ended up here:
I love it. Sara came over and shot everything in a couple of hours as the sun was setting. It was true speed styling, and she was able to capture a real creepy, moody vibe.
Cat Plates | Candlestick Holders | Table Runner | Cloth Napkins
This year it was new for me to bring in more color. I usually stick to mostly black and white because we only live in 860 square feet and that keeps the space a bit calmer with all the extra stuff. However, when I brought the party outside (a much safer situation in these times anyway), I really wanted to make it pop more with orange. Besides, these ADORABLE app plates from Target convinced me a rusty orange was perfect.
Going back to using things you own (or I guess things you could buy and use again and again), let’s take a look at where we landed for the tablescape and talk about how little of it is actually specifically Halloween. The dinner and salad plates from Jungalow’s line, with their spiky edges, look a little sinister (like a chainsaw edge possibly?) here, but in every other photo where I’ve seen them styled out, they are cute and flirty. The candlestick holders are a staple and VERY helpful with their wax catcher because drippy candles add to the ambiance (and to the amount of wax that you will inevitably ingest because those are EXTRA long candles and by the end of the night half of it is in your wine). I broke out my black cutting boards to use for the savory and sweet boards. Both the circular and rectangular ones are still available. The black vase is an oldie from H&M Home, but I also own this one from CB2 which honestly is a great vase and would have worked as well. The runner is actually 2 stacked for length as you can easily see because, as I mentioned, we were speed styling/shooting. I think it could be used for most of the year but easily through fall. I considered using these glasses before Sara said she would bring her vintage amber wine glasses over. The cloth napkins are Hearth & Hand and could be used any time of the year and obviously, so could the flatware.
Woven Chargers | Chairs | Wave Concrete Table
We *may* have had a smoke machine for this shoot and it was SO FUN. Because we had very limited time, Andrew got to man the smoke machine and honestly, I don’t know if he’s ever taken a job more seriously. The “seat pads” are actually woven chargers that I’ve put on some old outdoor stools/side tables (similar) I’ve owned for years. I have these amazing Blu Dot chairs (on sale now!) on the other side of the table but I was still waiting on the rest to show up (lead times! Amiright??)
The table is the Wave Concrete Table by TOV it’s about 400 lbs (not exaggerating), it’s one of the only pieces of furniture I’ve bought for the patio (which is why this isn’t a reveal and we are not showing the whole space). The tile I used for the patio is from a San Diego-based company called Tierra Y Fuego and it’s the Circle and Cross Tierra High Fired Floor Tile. I very much paid for all this, which is why I haven’t finished my space! Won’t stop me from enjoying what I have though At the moment, there’s just some potted plants on the other side of the patio. The lanterns are vintage Target and I honestly love them so much but they are not made anymore. This is what I will say about lanterns though: unless for weather reasons it makes more sense for you, I love that these don’t have glass. They are so much easier to just spray off with the hose and about once a year I give them a coat of black spray paint and they are good as new. You could totally do that with lanterns that have glass, but I find it is a lot more annoying. I think these lanterns from Pottery Barn are what I would buy if I couldn’t have these.
Bar Cart | Drink Dispenser | Vase | Large Bowl | Cloth | Spooky Fabric
Moving over to the bar cart area, let’s first address the most important thing, PUCK WEARING BAT WINGS. Ok, back to business, I like for guests to be able to help themselves as much as possible when having a get-together because I’m usually too busy with prepping food. This bar cart is Project 62, it is made for outside but could be used inside – it’s that chic. I’ve used it here as a serve-your-own drink station with a “Perfect Pear Punch” in a drink dispenser I’ve owned and loved for years (they sell dispensers and stands that all work together!). In this context, the large bowl, that is holding cold beverages, looks like a cauldron. Both the bowl and dispenser are from Crate & Barrel. I piled up all the throw blankets I have in the color palette for guests to grab if they get chilly – fire pits are not a thing right now (or maybe ever again?) in LA. The Jungalow vase also takes on a bit of a Beetlejuice vibe in this space, but again, seeing it styled for Target, you would never think of it as a Halloween-specific vase. The vase also has a really nice size opening for arranging flowers, I didn’t have to use any floral tape or any fancy florist trick for this arrangement.
Side note: it has a very pretty pitcher counterpart that didn’t end up having a spot in this shoot but I did use it to style my extra flowers (beware: unedited iPhone pic below)
If I had a much larger table (or any surface really) I would have used this extra-large pitcher.
I Buy (And Keep!) A Few Versatile Halloween-Specific Decor ItemsI keep 1 big bin in my garage for Halloween decor and space is PRECIOUS in my garage my friends, so I try to make it count.
The jumbo “creepy cloth” was used under the runner like a tablecloth, with the smaller white “spooky fabric” draped over the bar. Creepy cloth and spooky fabric are my favorite Halloween staples. FYI creepy cloth is thinner, with smaller holes and spooky fabric is thicker with larger holes. I have a lot of them in both black and off-white. You can throw them on a table, over your window treatments, draped on a chair, etc etc. They are easy to style, big impact even though they are very compact to keep and very reusable (throw them in a gentle wash and hang dry).
I know you are going to want a link for the bowl with claw hands. I think I bought it 3 years ago from Michaels and the bowl it came with broke and that’s just a random white bowl I had that fit. I found this one that is similar for you all.
Fake Spider Web | Felt Spiders | Skeleton Hand | Serving Dish
My glorious hedge was made even more glorious with a 10-foot fake spider web – didn’t know that was possible did you? (if you’re new to me – I’m obsessed with the hedge that I planted with my OWN TWO HANDS in 2018 that are now 12 feet tall and showing us all what it is to THRIVE IN AN ACTUAL DESERT). I’ve reused the same spider webs for years, but they’ve always been inside. I’m curious if I will be able to use this again with it being in an actual tree, my guess is it will be gross so maybe I would say that was not the best decision, but maybe it can be reused outside at least a couple of times? I’ll report back.
Speaking of easy-to-store decor, these hanging felt spiders are new to me this year. They are a pretty large scale, so the impact is high, and very lightweight so hanging them from fishing line is an easy thing to do to creep up the space. Before anyone asks, was it risky hanging them directly next to burning candles? YES. Yes it was, but I risk my life and home for all of you. Luckily it was not a very breezy evening, but if it had been I would have also connected them to fishing line going to the table, possibly weighted with a nut or something small to keep them from blowing into the candles. Could be cute hanging on the inside of your windows with fishing line and a small command hook, or you could easily connect them to the fake spider web. Here, mine are attached to the bistro lights directly above. I didn’t use any outside, but a similar product is decorative (well obviously not real!) bats that are cheap, can be used over and over, and take up practically no space in storage. Mentioning them because I’m sad I didn’t add them to my flower arrangement on the table like Royale did for her Halloween tablescape.
My light up pumpkins are from a few years ago, but Target still has similar ones, this smaller one and this larger one (only found in some stores).
HOT TIP: I noticed they have a lot of orange light-up pumpkins this year, if they only have ones in stock that are orange (or another color you don’t want), you can spray paint them. The larger one pictured here was actually black to begin with, I sprayed it white myself because they were out of white a few years ago. I just taped the eye holes from the inside so the paint wouldn’t go inside and taped over the stem. Easy peasy.
The skeleton hand and the spider serving dish are weirdly so versatile in how you can style them. It’s a weird sentence but it IS true. Place the hand on a pile of books on a shelf or up the creep factor on your charcuterie board. Use the spider dish for Halloween candies (or pistachios, pictured here), or put it on your coffee table to hold your matches and collection of pretty rocks you found on a hike (specific and personal obviously).
I really wanted these snake napkin rings from CB2, but remember, I decided to shoot this like 3 days before, so there was no time for shipping. I found these skeleton hand napkin rings instead from Amazon and they do the job, I’ll totally use them for years to come. Also new to my collection this year, ALL the Target Halloween app plates. I bought one of each style (only $4!)
I brought in metallics with the flatware and the owl figurine. The skull glams up the space while tying in the yellows in the flower arrangement and the translucent nature of the amber glasses.
The bat glasses are a new addition to my Halloween collection. They are not as easy (fragile) or space-efficient to pack up each year but the classy simplicity of them got me. Same for the simple tray they are on from Target (sad it’s not better pictured – speed styling). The skull drink stirrers are vintage Target but look how cute these ghost ones are on Etsy.
I spray painted the hanging skeleton from Target black so it would pop off my white house and used a couple of command strips to bend his arm. He folds down very flat and fits perfectly on top of everything in my Halloween bin but still manages to make a big statement. The branch situation over my window is Crate & Barrel from a couple of years ago but you can get the same effect from spray painting sticks in your backyard – like the branches I found in my local park and spray painted a few years ago for this post
photo by sara ligorria-tramp | from: 10 super easy + affordable halloween decor ideasFake crows – I have owned them for years, attach them to every surface in my house and it never stops being funny watching my cats try to figure out how to get them.
Movie Night!Having movie nights outside is something we started during the pandemic as a safer way to get together with our friends. We set up chairs in clusters, some would relax on the ground with blankets and pillows. We own 4 CleverMade Tamarack Chairs which are great because they are comfortable and fold up to be stored easily.
Rust Stripe Pillow | Maze Pattern Pillow | Boucle Pillow | Oversized Neutral Pillow (similar) | Rust Blanket (similar) | Lounge Pillow | Tamarack Chairs
Our tiny yard is on a slight incline which is actually very nice for snuggling up with your cats on a bunch of blankets and pillows. I’ve found that the ground can get damp as the evening progresses though, and for that reason I like to have a large (mine is 9×12) canvas dropcloth to help reduce the moisture. It also helps keep the blankets/pillows/cushions I put on top from getting overly dirty, which is good because I like to use indoor pillows/cushions/blankets so everything feels a lot more cozy. I used blankets (similar) and thick vintage fabric I’ve gotten from flea markets. Daffy is loving the new addition of Jungalow’s lounge pillow and floor cushions. Luckily the other pillows from my home already fit the vibe.
Lights | Portable LED Light | Bistro Lights
The ghost lights! I’ve had these for years. I think I put some in Emily’s yard back when I was an assistant and bought them the next day because I thought they were so cute. I also love our portable LED light, it can change colors and comes with a remote. Our bistro lights are tried and true, we have had them up (properly with wire and everything) since 2018.
Because some of you will be interested in the ins and outs of outdoor projection, here’s that info for you: We spent a little more on our projector in order to have better quality. As you can see here, all of the lights are on and you can still see the screen clearly. We have the Miroir M220 HD Pro LED and it’s $100 less than we bought it. There’s an HDMI port on the back and we usually end up just attaching our Fire TV Stick and playing movies from there. I’m not a projector connoisseur or anything, just letting you know my experience. The projector can sit on a small table, my husband attaches it to a tripod (it has a hole at the bottom for that purpose). We got a simple projector screen and stand off Amazon, which breaks down easily into a small duffle bag. I do recommend having sandbags or something (we use large stones from our garden) to hold the stand down though, it’s a little top heavy. Andrew would like to point out that we have not perfected the sound situation yet. The projector has speakers that aren’t great, so we attach some pretty basic laptop speakers that are completely fine but my husband said he would still not recommend so, there you have it.
Basket Tray | Black Circular Tray | Spider Bowl | Skeleton Jenga
Let’s Talk About Food!I can’t believe I’m actually allowing this photo to be shown because obviously it’s missing drinks on the coasters (similar) but I guess this is the only pic we got of the sweet board?? I would yell at Sara but she’s currently honeymoon-ing (RUDE). ANYWAY, I digress, I made a sweet board with some themed cookies from Target (because who has time to make and ice their own cookies while also setting all this up?). The board was simple and straightforward because I always forget being a food stylist, prop stylist, and florist are three separate jobs for a reason. My house was an EXPLOSION of all three of those things by the end of the night. I kept meaning to take a pic of how insane it was so I could be like, “Hey! Not everything is pretty all the time!” but I literally kept forgetting to because I didn’t sit down for 16 hours. Take my word for it, everything is harder than it looks and behind every styled photo is a very messy room.
My advice: make it a room with a door so you can shut it when the guests come over. Also: put anyone you can grab in charge of something you don’t need to do. Case in point: I made my husband make the rounded “ghost” baggies of popcorn while we were shooting the other side of the space.
Oh the plans I had for this savory board! You know, I would not recommend looking at @ainttooproudtomeg’s instagram feed after looking at this because you will find me less impressive than you already do. However, I would recommend looking to get your own inspiration – or what I like to call it – “what can I do that’s shown here in, oh, 15 seconds?” I cut brie to look like a coffin and tried – unsuccessfully – to write RIP on it. Ha! Wiped it off and turned it over to hide the attempt. I stabbed my goat cheese and used jelly to look like blood. And my final creepy endeavor was to make “eyeballs” out of some peppers, mozzarella, sliced olives, and capers. You know what? Anyone who is actually hosting, I’m here to say, it’s ok to be mediocre. Also, ghost veggie chips and caramelized onion jam fixes a lot, it’s all your guests will talk about anyway.
OK, y’all. I think that’s it! Let’s talk in the comments. Here’s to me becoming independently wealthy so I can fully reveal the front and back yard to you all soon! Xo
*Designed and Styled by Emily Bowser
**Photos by Sara Ligorria-Tramp
***Cat Models: Daffy and Puck Bowser
The post The Only Outdoor Halloween Entertaining Idea Post You May Ever Need: Emily “BOOswer” Did It Again appeared first on Emily Henderson.
October 5, 2021
What To Put On Your Kitchen Counter?? (Try These 8 Easy Styling Hacks)
It’s kinda wild how even the simple design questions don’t always come easy to us (*cough* me). I remember when I was styling my kitchen counter for my MOTO a few years ago, my first go was NOT a go. Too cluttered and not balanced. Then I took the blog, did a bit of studying (had Sara make some adjustments while she was shooting), and voila, I had a styled kitchen counter I loved.
As I said, that was a few years ago so I kinda forget about all that until Emily suggested we do a post that really broke down this potentially agonizing question… What do you put on your kitchen counter?? I immediately remembered my own experience and said “HECK YES! I think the readers will really find this super helpful because it was the post I needed three years ago.” So let’s get fricken into it:)
Herbs/A Plant design by cassandra lavalle | photo by ellie lillstrom | from: cassandra lavalle’s basement kitchen reveal
There is nothing like the smell of fresh herbs and/or the look of freshly cut flowers in a kitchen. I personally feel like I’m living in the beautiful countryside…preferably in Spain. But seriously they bring nature, color, texture, and quite literally “life” into your kitchen. The best part is that there is a plant for every person and size of kitchen. Let me demonstrate…

 photos by sara ligorria-tramp | left: design by velinda hellen design, styled by emily bowser, from: velinda’s first freelance client reveal: molding the ‘builder-grade budget’ + where they saved & splurged | right: design by sara ligorria-tramp, styled by emily bowser, from: sara’s kitchen – an updated sneak peek
On the left, we have Velinda’s first freelance client project. Emily Bowser chose an awesome medium-sized plant (fern?). It’s happy, brings in a lovely softness that contrasts all the right angles around it:) Then on the right is Sara’s alllllmost finished smaller-sized galley kitchen. Bowser placed a wonderful little flower sprig in a bud vase. See? You don’t always have to go big or “care heavy” (she says as she looks at her sad, wilted basil plant).
 design by elspeth benoit and arterberry cooke | staging by a 1000 x better | photo by alex zarour of virtually here studios | from: a master class in using color in your home without it feeling like a colorful home (it’s not the decor)
But also we do love some plant drama when it calls for it like in this kitchen staged by A 1000 X Better. If you have the space (or just like a greenery moment) then get a vase and fill ‘er up!
Open Cookbook
 left: photo by sara ligorria-tramp, from: mountain house kitchen reveal | right: photo by tessa neustadt, from: our modern english country kitchen
As someone who dreams of loving/wanting to cook, I really love the idea of at least looking like I do. An open cookbook really does that:) But if you DO authentically love to cook, then a cookbook stand (like this one, this one, or this one) is also super practical. No need to mess your pretty book up with your food-covered fingers. Plus it helps to create levels with your other counter items.
HOT TIP: Put your cookbook and stand in a corner because it helps to fill that awkward space. Or you can put it in front of an outlet that you don’t like the look of.
 photo by sara ligorria-tramp | from: portland kitchen reveal
But if you have no desire to have a cookbook stand on your counter then simply leave it open to your favorite recipe! This is a fun stylist trick. It looks kinda chic and effortless. Add an organically draped tea towel for bonus points!
Cutting Board
 photos by sara ligorria-tramp | left: design by sarah zachary, styling by emily bowser, from: afraid of designing a boring home?? this designer will steer you clear by showing you her tricks | right: design by jess bunge, from: jess’ kitchen reveal
I love pretty cutting boards. I’m serious. I LOVE THEM. So much so that when Sara came over to shoot my old kitchen I had FOUR stacked against each other in different orientations. I was very proud of myself. When she took two of them away it felt like she was ripping my heart out of my chest. But after I saw the photos, she was obviously right. My tiny kitchen looked too cluttered with that many boards.
So my first tip is to take it easy with the number of boards. If you have a large kitchen three is likely plenty. And if you have a smaller guy, like one was, then two is good… I promise.
HOT TIP: Just as we say with pillow mixing, you want to vary the sizes, tones, colors, shapes, and if applicable, patterns and patina of your boards.
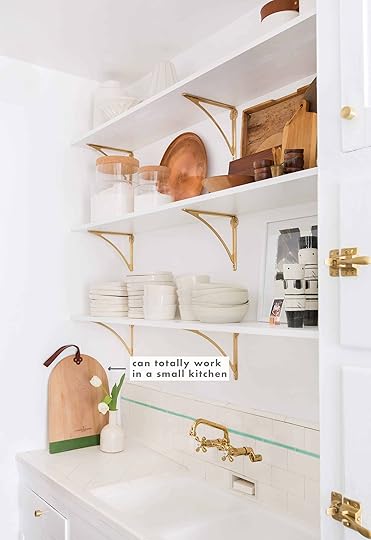
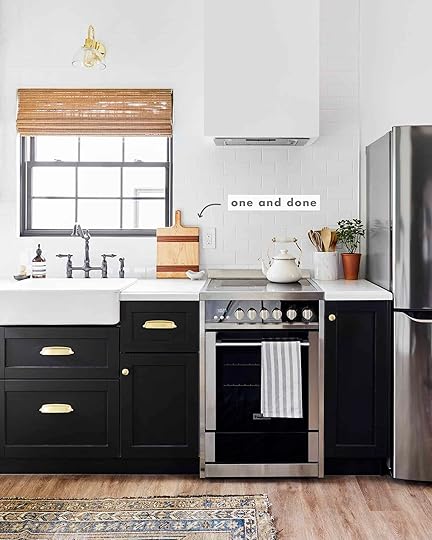 left: design by brady tolbert, photo by tessa neustadt, from: brady’s kitchen reveal | right: design by shaun crha, photo by sara ligorria-tramp, from: how this designer built a beautiful modern traditional guest home for his dad to age in place
But also there’s no shame in the one cutting board game! Especially when counter space is limited like in Brady and Shaun’s kitchens. The trick is to make sure there is something a little special about them. That could be a color, pattern, shape, or really cool handle like with this awesome one.
A Fruit Bowl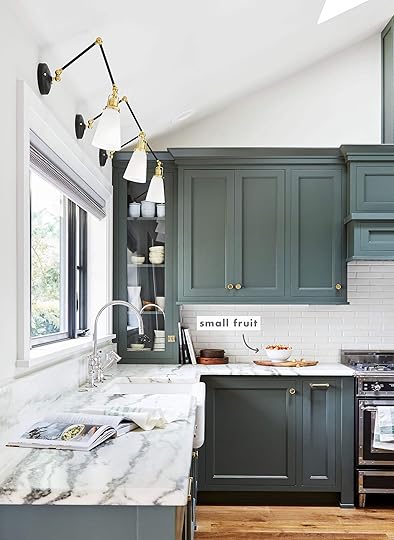
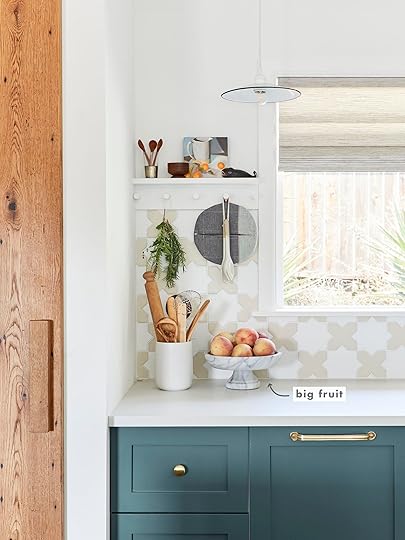 photos by sara ligorria-tramp | left: from: portland kitchen reveal | right: design by velinda hellen design, styled by emily bowser, from: velinda’s first freelance client reveal: molding the ‘builder-grade budget’ + where they saved & splurged
 Now an open cookbook may make you look chic, but nothing says, “I have my life together” more than a bowl of fresh fruit. I want to emphasize “fresh” because my bowl is on top of my fridge, just slightly out of my line of vision and there have been more times than I care to admit that I have been unpleasantly greeted by a not-so-fresh fruit. But enough about me and more about you putting a bowl of dealer’s choice fruit on your counter.
Both Emilys, (Henderson and Bowser) seem to be fans of the single fruit, fruit bowl. It looks clean and adds a simple pop of color. The second thing you want to consider is the type of bowl. You can grab a cute little guy from your cupboard, get a little fancy with a beautiful footed bowl like this one, or…
 design by ginny macdonald for ehd | photo by zeke ruelas | from: modern deco kitchen reveal
go REAL crazy and use a platter. Heck, if you are already breaking “the bowl rule” (not a real rule) mix those fruits like Ginny did in the modern deco kitchen we all love so much!
HOT TIP: If you want to have a mix of fruit varieties consider choosing ones in the same color palette like Ginny did with those oranges, reds, and dark plum colors. It just looks more cohesive. But that is only for looks. By all means, buy the fruits you and your family like to eat first and foremost:)
Art
 left: design by allison pierce, styling by velinda hellen & erik staalberg, photo by sara ligorria-tramp, from: an $8k budget kitchen makeover with a lot of vintage charm | right: design by rashida banks, photo by keyanna bowen, from: rashida’s kitchen reveal
Art is THE EASIEST way to personalize your kitchen counter. You may also be surprised that you have some options when it comes to displaying them.
In Allison Pierce’s kitchen, she has her small little pieces of art hung on her tiled backsplash. It’s unexpected and SO cute. Now I know they aren’t technically touching the counter but it still gives the illusion AND frees up some valuable counter space for ya know… cooking.
On the right, Rashida chose to lean a framed vintage piece of art and it’s perfect. For her kitchen specifically, the gold frame and warm-toned still life painting really warmed up the overall look of the kitchen. 10/10 and so easy to replicate.
 photo by tessa neustadt | from: our modern english country kitchen
But of course, a frame isn’t necessary as proven by Emily Henderson herself. I really like how soft it looks. But regardless, the most important part is that you love your art and that if you don’t want it to get wet then keep it away from the sink.
HOT TIP: Flea markets and Etsy have a ton of affordable art like this! You just gotta dig a little.
Cute Decanters/Canisters
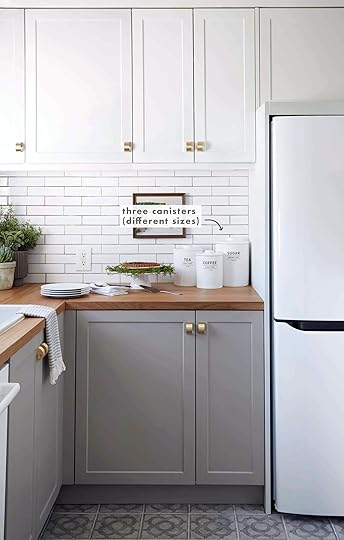 left: design by velinda hellen design, photo by sara ligorria-tramp, from: velinda’s tiny kitchen makeover | right: photo by zeke ruelas, design by orlando soria, from: orlando’s kitchen reveal
Don’t sleep on decanting some of your dry goods. It’s such an easy way to bring a little style to your countertop and alleviate some space in your cabinets. We are always a fan of the “rule of three” and varying the sizes like Orlando did on the left. But if you need to save on counter space like Velinda did, then two totally works too.
Also, note that these canisters are solid/not clear. It’s honestly a preference. If you are someone that mostly wants the “cute look” and doesn’t care a whole lot about the functionality then definitely go for ones like those. These ones are SO great in person if you need a shopping rec. But if you want to physically see your dry goods then keep reading.
 design by barrett prendergast | styled by emily bowser | photo by sara ligorria-tramp | from: how to make “a cook’s” kitchen
The added benefit of seeing your food is that it adds a ton of visual texture and you’ll know when you need to stock up before you’re out! You can have one filled with rice, one with a cool-looking pasta, one with a seed, the possibilities are truly endless.
An easy way to make your canister look a little more modern/uniform is to have them be the same height like Bowser did for Barrett’s kitchen above. But unless you have a very long counter I wouldn’t do more than three at the same size. But also it could be great. You can be the one to decide since it’s your kitchen:)
Salt & Pepper Shakers/Grinders
 left: design by barrett prendergast, styled by emily bowser, photo by sara ligorria-tramp, from: how to make “a cook’s” kitchen | left: photo by sara ligorria-tramp | from: portland kitchen reveal
By total accident, I have started to collect salt and pepper shakers. Two were gifts, one set I scored from Emily’s prop garage grab, and the last set I just bought last month. I couldn’t help it! They were mini, gold, ceramic, and only $5. They were practically paying ME at that point.
And while salt and pepper shakers are great, salt and pepper mills or grinders are where it’s really at for counter styling (more height). I think all of us have drooled over the insanely cool mills that have graced the EHD kitchen countertops. They are another super-easy way to make a kitchen counter look elevated by doing very little. Here are three I love: this set, this set, and this set.
HOT TIP: To keep things interesting style-wise, you can choose a salt and pepper grinder set in a slightly contrasting style to your kitchen. So if you have a traditional kitchen style, try a more modern mill and vice versa.
 photo by sara ligorria-tramp | from: mountain house kitchen reveal
But if you are more of a salt pinch bowl or salt cave person, then one pepper grinder is great! It’s more about introducing cool shapes that are functional.
A Tray (Duh)
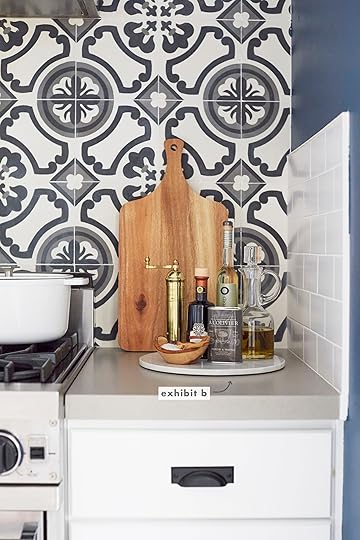 photos by zeke ruelas, designs by ginny macdonald for ehd | left: from: modern deco kitchen reveal | right: from: traditional eclectic kitchen: the big reveal
Trays are the most useful piece of decor in almost any room. Why would the kitchen be any different? Well, it isn’t. A tray helps to create a zone or a “house” if you will and makes a group of things look less “all over the place.” Take these trays above. They just make those cooking supplies look more put together and stylish. Plus they add another material bringing color contrast, warmth, and another great material.
HOT TIP(S): Decant some or all of your oils too! Then put them in special containers to add more fun shapes and less busy labels. I own this one and love it.
 design by velinda hellen design | photo by sara ligorria-tramp | from: velinda’s tiny kitchen makeover
 And if you think you are limited to one tray, think again! If you want to have two, like Velinda did, then go for it. Just make sure the tray aren’t too matchy-matchy.
That’s it. Pretty easy lesson plan, right? How many of these have you already done (or haven’t)?? Any tips you think aren’t to be missed? Drop your thoughts in the comments.
Love you, mean it.
Opening Image Credits: Restored and Designed by Jamie Haller and Craig Ekedahl | Styled by A 1000 X Better | Photo by Lauren Moore | From: How To Do “Craftsman” Right – The 7 Key Elements That Make This Vintage Style Work
The post What To Put On Your Kitchen Counter?? (Try These 8 Easy Styling Hacks) appeared first on Emily Henderson.
Emily Henderson's Blog

- Emily Henderson's profile
- 10 followers

