
Emily Henderson's Blog, page 152
October 20, 2021
The 7 Beautiful, Versatile, And Practical Bar Tools You’ll Use All Holiday Season/Forever

In a past life, I worked (and all too frequently drank) at some pretty incredible cocktail bars in New York. And I’m sure for anyone that has ever worked in the hospitality industry, it comes to no one’s surprise that I have also dated a couple of bartenders who may or may not have also worked at these cocktail bars. So while I was never behind the bar, I learned A LOT about how to make cocktails and what you actually need in terms of tools from these very talented pros. What can I say? I’m a gal who appreciates a good cocktail shake;)
There are so many fun gadgets and tools if you love to nerd out on cocktails. BUT if you just want to have the essentials that will simply make your life and your cocktails better then this post is for you baby.
Let’s start at the beginning…
1. ShakerA good quality shaker is important. Also not adding any carbonation until after you shake is also important. Explosions are bad and are only made worse by poorly made shakers. All the bars I worked and drank at used metal tins. Below are a couple because if I didn’t add at least one option I might have my bar card permanently revoked. So if you want to try the real deal go for it! But when you are first starting use both hands. The one-handed, two-tin shake can be a little disastrous at first. However, there is nothing wrong with the lidded shaker for your home bar! They are super pretty and might be easier to handle:)

1. Dial-A-Drink Cocktail Shaker | 2. Large Weighted Shaking Tin + Small Weighted Shaking Tin | 3. S’well Teakwood Cocktail Shaker Set | 4. Williams Sonoma Mixology Shaking Tin | 5. Elevated Craft Hybrid Cocktail Shaker | 6. Fenton Graphite Cocktail Shaker
 photo by david tsay | from: styled: secrets for arranging rooms, from tabletops to bookshelves2. Mixing Glass
Ok, not all drinks need or should be made in a shaker. A stirred cocktail (especially for the colder months) is so good. This means you need a good mixing glass. My ex always made sure he had one and also loved how they looked (both in style and in practice). It’s impossible to not look cool stirring a cocktail (with a barspoon) in a pretty mixing glass. May I suggest a twist on a classic Manhattan? Instead of bourbon, use a nice dark rum (think Ron Zacapa or El Dorado). I have never been a big rum drinker but after one of my friends make me this drink I was in love and will order it when it’s chilly out. It will also impress your friends.
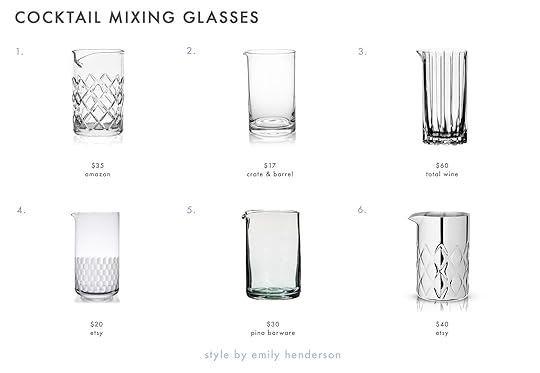
1. Yarai Mixing Glass | 2. Cocktail Mixing Glass | 3. Riedel DSG Mixing Glass | 4. Cocktail Mixing Glass | 5. Handblown Recycled Cocktail Mixing Glass | 6. Double-Walled Mixing Glass
3. BarspoonIf you ever plan on making a stirred drink you are going to be SO MUCH happier in your drink-making if you have a barspoon. They make stirring way easier and you look waaaay cooler using it. So if you don’t already have one, get one. I promise it’s about the function. The looking cool is a bonus (and not a terrible one).

1. Bulu Pineapple Barspoon | 2. Gold Bar Spoon With Muddler | 3. Extendable Magic Cocktail Bar Spoon | 4. Italy Flat Cocktail Mixing Spoon | 5. Trident Bar Spoon with Full Twisted Stem Handle Cocktail Spoon | 6. Teardrop Barspoon
 photo by sara ligorria-tramp | from: 4 ways to style that credenza For “real life” + shop our favorite credenzas4. Jigger
I’m 100% guilty of “eyeballing” my pours. And while that’s fine, your drinks are simply going to be better and more consistent when you measure. I don’t think any of us want to see our guests visibly wince when they take a sip of your too heavy “free pour” cocktail. Be a pro and make your drinks taste good… get a jigger.

1. Leopold Jigger | 2. Walnut Cocktail Jigger | 3. Fenton Graphite Jigger | 4. Vintage-Inspired Copper Jigger | 5. Graham Metal Jigger | 6. Angled Jigger
5. MuddlerI know a muddler may not seem like an essential but I promise you’ll be so relieved when you all of a sudden realize you need one and you’ve got it. Mudding isn’t just for mojitos, people. Sugar, herbs, anything else that isn’t liquid or a garnish will need a little muddling.

1. Walnut Cocktail Muddler | 2. Williams Sonoma Signature Muddler | 3. Hand-Turned Walnut Muddler | 4. Crafthouse by Fortessa Wood Muddler | 5. Easton Stainless Steel Muddler | 6. American Heirloom Pitcher Muddler
 photo by zeke ruelas | from: brady’s living room reveal6. Strainer
Unless you are making a muddled drink where you want allll of the ingredients from your shaker in your cocktail glass, you should be using a strainer. Even if you are making a stirred drink like a martini, you should use a strainer because who wants old ice in their nice new drink…no one. I honestly don’t think I’ve ever seen a cocktail made in a fancy bar where a strainer wasn’t used on a drink. The mesh ones are great if you really want to make sure not a simple sliver of anything to get into your perfectly crafted drink.

1. Crafthouse by Fortessa Hawthorne Strainer | 2. Cocktail Strainer | 3. 4-Prong Hawthorne Strainer | 4. Strainer, 3-Inch | 5. Graham Hammered Metal Springed Strainer | 6. Williams Sonoma Mixology Hawthorne Strainer
7. Wine Key/Bottle OpenerIt’s just a general life essential and we all need one. I actually suggest you go check now. Just because you think you do doesn’t mean you actually do. I am speaking from personal experience here. I truly thought I had three…I was wrong. I had none.
O and I feel VERY STRONGLY about a double lever wine key. Unless you are super into an electronic wine bottle opener (that’s a whole other world), don’t bother with any other kind. A double level is the best and makes getting the cork out so much easier. And I’m sure it’s clear by this roundup, I also dislike the winged openers. Too much work and awkwardness in my opinion. The pros are all about the double lever. But if you just want a simple bottle opener, then all the bartenders I’ve worked with use a flat opener like #1 (theirs were sadly never rose gold but yours can be:)

1. Heavy Duty Stainless Steel Flat Bottle Opener | 2. Double Lever Corkscrew | 3. Waiter’s Black Corkscrew | 4. Le Creuset Waiters Corkscrew Wine Opener | 5. Sommelier Waiter’s Corkscrew | 6. Gold Plated Corkscrew
Glad I could finally whip out my old knowledge and hopefully get y’all making some delicious drinks with more ease. If you are looking for more bar content you bet we’ve got it! Here is a great bar cart styling post and here is a great beginner cocktail-making guide post.
Love you, mean it.
Opening Image Credits: Photo by Tessa Neustadt | From: Griffith Park Sunroom Reveal
The post The 7 Beautiful, Versatile, And Practical Bar Tools You’ll Use All Holiday Season/Forever appeared first on Emily Henderson.


The New/Old Risky Tile Trend I’m Exploring For The Farm – Flower “Statement” Tiles, Murals, And Contemporary Delft Tile

When I’m advising others on their renovations I will always say to stay safer with the permanent finishes, take your big risks with art/accessories, lighting and textiles… Paint, wallpaper even, but NOT things like flooring, tile, moldings, windows – the things that are so expensive to change. And yet I know from experience that if you take no risks you can find yourself living in a really expensive boring house in the name of being ‘timeless and classic’. So I got to thinking about a statement tile…
The Statement Tile InspirationYou’ve probably seen this STUNNING kitchen by Jessica Helgerson, here in Portland. The backsplash is a handpainted tile mural, giving homage to the PNW and it’s pretty much unbeatable (I believe one of her team members painted it).
 design by jessica helgerson design | photo by aaron leitz | via remodelista
While there are no guarantees, I’ll go on record saying that this is statement wall is actually timeless simply because it’s so well executed, appropriate, full of so much creativity, high quality, and extremely unique. It’s like how beautiful art doesn’t date – knockoffs do, cheaper copies do, but an original masterpiece is always ‘in’. A beautiful mural appropriately executed is always beautiful. Have I thought about buying a time machine, ordering myself back a few years, wearing a mask, buying the farm (before the massive real estate jump), and asking her team to do their first tile mural wall for me? Yes. But sadly this has been done by her and nothing close to it will suffice (nor would I want to).
 design by jessica helgerson design | photo by aaron leitz | via remodelista
So I’m left with my own ‘creativity’ to figure out my own quiet statement tile wall. One that is appropriate for a farm, feels like ‘me’ (happy, with a bit of whimsy and a nod to vintage), and one that I won’t regret. I like sweet, humble, and not too flashy, but if everything feels that way is it going to look boring? I just want something extra, something to make this kitchen or mudroom feel 100% like ours. And it’s safe to say that I love flowers and trees (the real deal as well as motifs) more than anything. But flower tiles? How do you do that???
 design by plain english | via architectural digest
 left: photo by owen gale, via house and garden | right: design by tyler wells of bbdw, via town and country
 via bddw
 photo via marazzi tile
And then Jess slacked me a link to this tile and I freaked OUT. It’s handpainted, leaves and flowers, but in a modern fresh way.
I would honestly have pulled the trigger immediately. I don’t need to customize a tile if something better exists. Maybe there isn’t a hole in the market and I don’t need to fill it (which frankly would reduce a lot of work).
 photo via marazzi tile
So sweet. Hand-painted and that BLUE! Sadly Brian didn’t have the same reaction to the tile – he thought it felt random and trying a bit too hard. And you know that’s my trigger, so I moved on. But the idea of a floral statement tile stayed in my head.
 tile by lisa hardy and edit58 | via remodelista
This one also has this hand painterly feel and obviously would work in a Shaker-inspired farmhouse.
 tile by lisa hardy and edit58 | via remodelista
I also love how the tile itself is so organic and handmade. But Brian still wasn’t sold and life is just more fun when we agree (and I want him to love the house as much as I do, so if he’s not as into something I keep moving). Honestly, it didn’t feel exactly right either…
Classic Delft TileAs I’ve written about before I really love Delft Tile – Intricately handpainted tile from Northern Europe, often with little scenes on them. They feel like tile that tells a story which makes you dive in visually and emotionally. While you can find some antique remnants online they usually don’t preserve too easily or if they do it’s like 10 tiles which doesn’t really do much for me. They are so expensive that people usually only install them as a border or just behind the range, for instance. And I don’t think I feel very great about an ‘accent’ tile if mixed with other tiles. I don’t think it helps that there was a big resurgence in the 80s and 90s and many a french country kitchen had knock-off Delft tiles that existed in the suburbs (nothing wrong with that, but it feels neither old world or fresh to me).
 design by emma grant | via financial times
I love this accent wall, but I don’t think it’s right for this project – it feels like it belongs in a European space that is more classic, less ‘Shaker/Victorian Oregon Farmhouse’.
 design by beata heuman | photo by paul massey | via house & garden
Same with this one by Beata Heuman. What a lovely way to bring in Delft in a small way that leans the room more classic and old-world immediately. Again, the more I think about it the more I’m just unsure about this in our home, at least as we’ve designed it thus far (and there is no going back on a lot of what we’ve chosen).
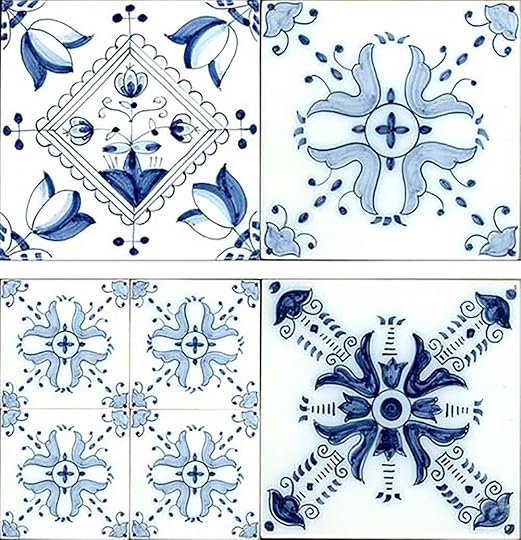
Then I realized maybe it’s not that I love Delft tile for this house, per say, it’s that I love handpainted floral anything. So I found two companies that paint new Delft tile (in the traditional ways) and fell in LOVE.
New HandPainted Floral Tile photo via dutch tile
I found these, (above) from Dutch Tile (out of Connecticut, but in the traditional Amsterdam style) and I fell in LOVE. The detailing, the vintage botanical vibe (I love and collect hand-drawn botanicals so much), all the shading. It’s a classic, old-world method of painting tiles that is hard to copy, even though the knockoffs have made many of us hesitant to use these at all.
 photo via dutch tile
These get more decorative with the patterns in the corners – SO CUTE and yes they do make my heart SING. Definitely less ‘Shaker’ which is typically less ornamental. But maybe for the mudroom or the WC this could be a way to bring in my love for all things floral. But if I wanted to pair it back a bit…
 via dutch tile
All the shades of blue! Maybe that’s a way to keep it a bit more pulled back and therefore ‘modern’, against our mostly wood-toned cabinets in either room we are considering these for. They are just so detailed and happy and that color of blue is amazing. You can either mix them or just get the same tile and apply over and over and over.
 via
via Now, are more traditional tile Delft patterns, but you don’t have to mix them. I could just do one of them and repeat them. I think this could be awesome for just a small backsplash behind a wall hung sink – just like an 18″ square so it’s not overwhelming and feels special.
But also if you like cats…
 via dutch tile
How cute is that? We are less into felines on our tiles, but guys the farm versions of these with cows, chickens, pigs were SO CUTE.
Then I found another maker in Europe that makes new versions, Douglas Watson Studio and was blown away by their work. Take a peek…
 photo via douglas watson studio
 photo via douglas watson studio
 photo via douglas watson studio
SO GOOD. And I showed Brian these and he said, ‘yah, I love those’. So turns out (not shocking) he’s far more into the classic antique feel than anything that feels new or “reinvented” which I suppose I knew.
 photo via douglas watson studio
I love even mixing in the insects and butterflies and the more and more I fantasize I can see it all in the mudroom as if feels like an indoor/outdoor extension where I’ll be potting plants, cutting flowers, and washing dogs and is all windows that opens up to the backyard.
 photo via douglas watson studio
So what do you think? My next steps are to get samples and touch/feel in person. We’ve chosen almost all the tile for the rest of the house (handmade in Portland via Pratt + Larson) so I’m hoping that waiting on a couple of places won’t hold up the whole project. I just feel like I’d be amiss to not include these SOMEWHERE since they make me (and Birdie and Brian so happy). Charlie liked the bugs  The only other thing I’m still exploring is finding a local artist and creating our own, but there are a billion risks in that which make me nervous, especially since Brian wasn’t as excited about the more fresh versions of the handpainted tile. Again, if it’s not right it can look very very wrong so I’m leaning towards one of these two new studios painting in the classic way. Stay tuned, y’all…
Opening Image Credits: British Standard by Plain English | via Financial Times
The post The New/Old Risky Tile Trend I’m Exploring For The Farm – Flower “Statement” Tiles, Murals, And Contemporary Delft Tile appeared first on Emily Henderson.
October 19, 2021
Dining Room Design Agony: How Lea Plans To Design Her Walk Through Dining Room To Feel Cohesive

Hiya! It’s been a while since I’ve been on here and the truth is, I’ve been enjoying some much-needed downtime and since there’s all of these project and product delays well…it seemed like a good time. Earlier this year, I revealed my living room that Em and I worked on–sort of. I mean it’s a third of the way there – it is an open concept after all!
The holidays are approaching and in the Midwest, that means it’s time to hunker down and get ready for the long and cold winter. To me, it made sense to finally tackle the dining room – the two-thirds of the open concept part. Holidays usually mean more gatherings indoors with family and friends and a slower living lifestyle where my own family sits down and shares more meals together – even if they are delivery or take-out. Side note: Since the pandemic last year I have really enjoyed NOT cooking! Ok, I digress.
Anyway, since the living room got a glow up, the dining room was looking a little lackluster and not as functional and flowy (yes, that’s my professional term) so it was time.
To start, measuring the space I had to work with made the most sense.

Our dining room is tricky because it’s a walk-through to both the living room and kitchen. I’m sure like many open-concept homes this is the challenge many of us face. With my floorplan, I wanted to try to maximize the space but also really complement the living room that Em and I worked so hard on.
Here’s a look back at the living room to reference for how I want to bring some of ‘this’ into the dining room:
 design by lea Johnson | photo by sage e imagery | from: lea’s living room reveal
 Sofa | Rug | Coffee Table | Drink Table (similar) | Curtains (custom) | Table Lamp | Swing Arm Lamp (similar)
What I love most here is the coziness of the warm wood tones.
 design by lea Johnson | photo by sage e imagery | from: lea’s living room reveal
 Table Lamp | Sideboard | Arm Chair | Throw Blanket
To start, I looked through my Pins and this one became the sole inspiration for my dining room.
 design by amber interiors | photo by tessa neustadt
It’s by none other than Amber Interiors. While this looks nothing like my floor plan nor living room, what it did do is give me the cozy vibes I was looking for. It looks comfortable and enjoyable to sit in and collected over time. I was really into the color pallet as well, very earthy. I’m a Virgo and I think that explains a lot, especially my love for earthy hues.

 left: image source | right: image source
 This is another Pin that completely inspired me, even though it’s food. When thinking of cozy and home, doesn’t food always come to mind? Ok, maybe I was hungry that day of Pinning but it’s the rustic and earthy colors that spoke to me.
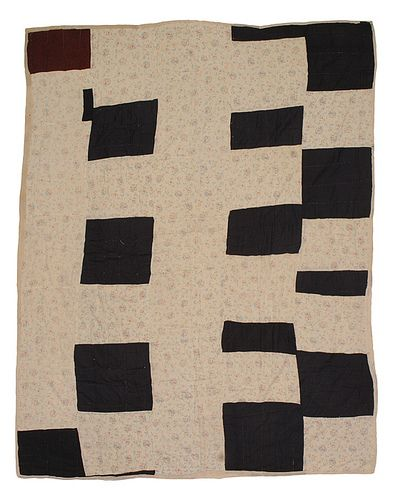
I was recently out in California a couple of weeks ago and one of my most favorite things to do is thrift. I found a beautiful vintage textile out there (I wish I had snagged more of them) but it was completely also inspired by this image I found.
Again, nothing says cozy more than like a cozy blanket or an heirloom quilt am I right? Even in the dining room. For me, it’s about layering and surrounding ourselves with pieces we love and found together.
 design by jake arnold | photo by michael clifford photography
This image and design by Jake Arnold also really spoke to me, this one was all about aesthetics. The whole space just feels good, right? Pass me that burrata salad, please. Light some candles and play a record and it’s a whole mood.
Pictured below is my dining room as it currently sits.
 design by lea Johnson | photo by sage e imagery
Chandelier | Dining Chairs | Bench | Sheepskin | Bookcases (3 shown) | Dining Table Pear Basket
*since writing this, I sold that corner hutch and removed the bookshelves.
 design by lea Johnson |photo by sage e imagery
Yes, I’ll admit, it’s not bad. Like the previous version of my living room, there are many parts of it that I like. But as a whole, when I stand back, I just don’t LOVE it like I should. Or like I want to. And now with the living room finally in a place that we all do LOVE, I really want it to flow into the dining room. I want that cozy, cohesiveness that Em often talks about. Even in the dining room. I mean…who says dining rooms can’t be cozy? And shouldn’t they? It’s a place in our homes where meals are shared with family and friends, where tough conversations are had and celebrations take place. A place for morning coffee and reading the paper, at times – a classroom or an office even, and a place of gathering and sharing gratitude.
Ok, so I suppose you’re asking yourselves, so how is it that I plan to tie the two spaces together in a cohesive way that doesn’t look like I matched tone for tone from the living room to the dining room??
Here’s a little mood board to show what I am envisioning:
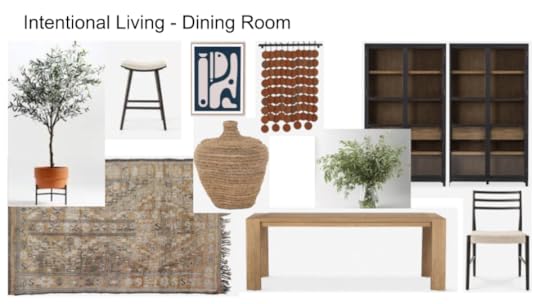
It is not an exact list that I would shop from but I love working from a mood board because this helps me visualize the tones and colors and how they will look together instead of seeing them individually.
I would say after looking at this mood board things have changed (A LOT).
Here’s a peek – excuse the crappy iPhone pic:

How does this tie in from the living room? TBH if I look at this board, it doesn’t do much tying…(insert nervous lunatic laugh). But what I will say (while keeping this a semi-surprise) is that I love how black instantly grounds a space. With all of our walls and ceilings and trim in white (Snowbound by Sherwin-Williams), it feels good to see statement pieces like these two cabinets cozy up this side of the room.
Also, I’m a big believer in wood tones not needing to match but they do need to at least complement one another and since we have warm wood tones in the living room and the floors, I felt the wood tone inside this cabinet gave another variation without matching tone for tone. I like how the black framed art, wood sculpture on the wall, and black leather on the chair play nicely with the black wood on the cabinet while on opposite walls of the room. Balance.
 design by lea Johnson | photo by sage e imagery | from: lea’s living room reveal
 Speaking of art – additionally, the wall in the living room here visually holds weight so to complement this, the cabinets on the adjacent wall in the dining room do the same. Same but different. The goal is to keep colors in the same tones or family to help keep both spaces feeling connected but not identical.
You already know I sold the corner cabinet in the dining room so what else will change? Well…I’m debating putting a rug down in the dining room and I have this super amazing antique rug that would look gorgeous but sigh…cats. So, it will probably remain in storage as I’m typing this out. I may leave the floor bare – like it currently sits (it sure makes it easier to clean).
But with fall and winter in the Midwest it always feels good to have something cozy underfoot.
Stay tuned…
We currently go back and forth on the dining table too. I had recently sold my table in the basement that I use for work and now I need one again (sometimes I move too fast) so our current dining table may be relocated down there. If you’ve forgotten what that space looks like you can check it out in this reveal post. I love this dining table but I’m ready for something warmer. Something cozier. For now, we’ll table the table. Ha! Cheesy, I know, I couldn’t help myself.
While I begin to work on this space of ours and as we move into the cooler months, I’ll be keeping this post tethered to me so as not to distract myself from wandering off into something completely different. Who else can relate? With product delays and timelines pushed, I am leaning more and more into slow living. Who’s with me?
Lea
Opening Photo Credits: Design by Lea Johnson of Creekwoodhill | Photo by Sage E Imagery
The post Dining Room Design Agony: How Lea Plans To Design Her Walk Through Dining Room To Feel Cohesive appeared first on Emily Henderson.
October 18, 2021
The 3 Best Ways To SAVE $$$ On Your Kitchen Reno (+ Our EHD Alumns’ First Reveal As a New Boutique Team)

Hi EHD Friends! I’m back… strike that, we’re back (The EHD-Alum Team: Julie, Grace, and I in cohorts with Emily Bowser & Sara T) with a new, budget-conscious reveal… our very first project together as a new team so, pop the champagne!! (And send us some).
After stepping boldly into freelance (as only the naive do) in January 2020 (let’s all laugh-cry at the timing of that), I took on this project alone. In the (forced) isolation of my home office and the multiple nights that were sleepless as I juggled the load/every ⅛” detail of that design solo, I found myself craving the collaboration that was abundant on the EHD team-of-friends (It’s not just an act. We can’t seem to quit each other).
Then came a plot twist. Emily Henderson decided to move to Portland, meaning she no longer needed her dream-worthy Los Angeles-based design team. Dibs-dibs-dibs, mine-mine, stand-back, don’t-touch, I called it – No Take Backs!
And that’s how the new Velinda Hellen Design team (and E-Design team!) was formed.
Bringing more reason to celebrate, the absolute loveliest couple; Jeff (a composer) and Claire (Book Editor – LACMA) came to us for some creative solutions. In tow was their one-year-old. We couldn’t get the rights to her name/likeness as she’s a pretty big deal, so we’ll just call her ‘Trap Baby’ because she tricked even this ‘probably-no-kids-for-me’ design team into doubting their life decisions. But let’s not digress into future plans to steal a baby, the long and short of it; we couldn’t have asked for better clients for this first team collaboration!
Settling into their new role as homeowners, our artist clients needed help lifting their bungalow’s kitchen from a non-functional abyss that was, well, this….

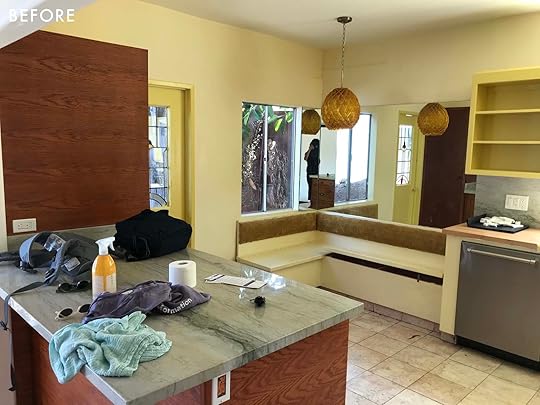
Considering budget and, therefore, keeping the existing footprint for appliances and plumbing, we maximized functionality, space, and character through a simple design facelift. The goal was to create a kitchen that was warm, inviting, and undeniably ‘cool’… one that was true to the artists (and baby artist) that live here. Because this wasn’t quite doing it for them:

This was a bit more ‘them’:

Jeff, Claire, and Trap Baby wanted a user-friendly, easy to clean space that had scandi-minimal, mid-century, and coastal casual influences…. “Modern meets vintage”. Keen on cooking, they wanted space to store the many ‘unsightlies’ a cook uses but also hoped to display their collection of cookbooks. A coffee/beverage station was of key importance in this design too. In fact, it was through Jeff that I learned there’s a whole coffee scene for in-home coffee connoisseurs. I was personally converted from a Keurig-user to a fully-formed barista. But more on that later.

Considering our clients’ needs and attraction to ‘high-concept’ mid-century and a willingness to go bold, but a desire not to abandon simplicity, we got to brainstorming. The concept that evolved included blending clean woods, whites, and pops of color, revitalizing existing pieces, pulling in warmth, and a bit of ‘pizzazz’ through brass finishes. The concepts looked something like this:

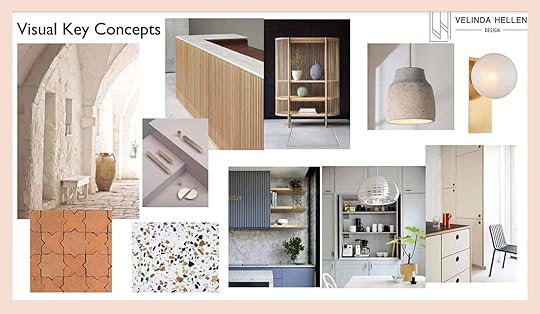 Rendered Design Concept:
But the actual details and execution of the design broke down something like this:
MAXIMIZING THE BUDGETKeeping What Worked (Or Worked Well Enough):
This was the biggest dollar-saving factor as it lobbed off labor expense (the biggest fee of this and many renos). Since the placement/functionality of the sink, range, fridge, and pantry/island worked, we left that alone. In fact, we left the major appliances, though we replaced the sink and faucet, sourcing all of our plumbing fixtures through Build Ferguson. It’s probably not a giant secret, but if you’re budget conscious and can avoid moving plumbing and gas lines, DO IT!

We also left the existing flooring throughout the house. And it’s parquet! Now, less-fearless clients would have probably replaced those for a ‘light-to-medium-tone’ hardwood. But because we knew the parquet could actually shine within the design update and because we wanted to save our client thousands and thousands of dollars, we all easily agreed the floors would stay! And now we all love them.
Mixing High & Low Materials:A not-so-secret skill our team has not-so-secretly inherited from EHD is pulling in both ‘save’ and ‘splurge’ materials. A couple ‘saves’ on this project include the cabinet hardware (which we either didn’t need at all thanks to Reform’s cabinet face design (or we found the hardware on Etsy), the backsplash tile, a Wayfair find, was porcelain and sheeted vs handmade and harder-to-install. This meant saving a lot on install and cutting costs!
 Embracing ‘Elevated’ IKEA
 If we’re gonna talk about saving on materials, we’ve gotta talk IKEA ‘hacks’. Instead of going with custom, the outdated/not-ideally functioning kitchen cabinets were replaced with IKEA, but the door & drawer faces were a bit more sublime. Reform offered faces for IKEA that were not only reasonably priced, but had a style that actually completed the vintage-inspired look (and cut down the need/expense for hardware thanks to integration and push-to-open features!). We were obsessed with how the flat panels of their Basis design were anything but boring due to wood detailing and two-tone pulls. The linoleum vibes (and color options) were perfect for this design. The colors we selected were Pistachio for the base and white for the upper cabinets. Reform established the look of this kitchen… hiding the budget boxes below beautifully.
MAXIMIZING THE FUNCTIONALITYStorage!: Open & ClosedLayers of closed storage extending to the ceiling maximized the vertical space of this small-ish kitchen and allowed for more-limited, open storage below. All of these boxes were IKEA/Reform except for the open cookbook shelving, which we had our carpenter custom make from Reform paneling to match the rest.
 Zones!: Beverage Stations (Prep, Cook, Clean Zones)
 Especially in a small space, you gotta ‘zone out’ a design by purpose. It may seem obvious, but thinking through (and maybe even circling out the areas on a floor plan drawing) what you intend to do within each stretch of space is vital for determining what types of drawers, doors, and cabinets you need.

The ‘cook, clean, and prep’ zones were pretty established already given we kept the range, sink, fridge, and peninsula placement. The zone we were able to focus on, then, was the beverage zone! The Whirlpool wine cooler and Whole Latte Love’s coffee solutions were the all-star players in these particular ‘in-zones’. This wine fridge holds a TON and the wood feature was an accidental (er… I mean… design-team-genius) detail that worked perfectly in the space.
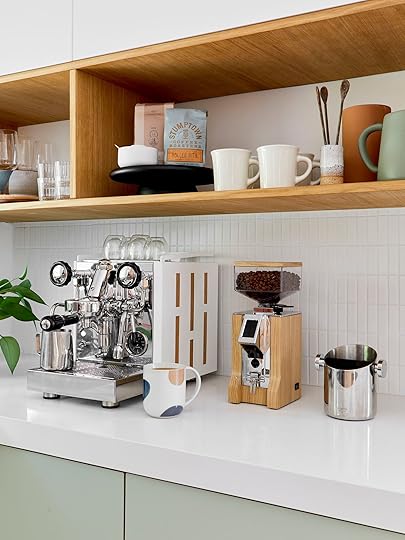
Espresso Machine | Coffee Grinder
The wood detailing of the Pathfinder Heat Exchanger Espresso Machine was anything but accidental. How do you convert a Keurig-using designer into an avid barista? Let them CUSTOM DESIGN A COFFEE MAKER! This espresso machine shatters the average ‘stainless box look’ by letting you pick from a variety of shell and insert material design options and the grinder is by far the sexiest I’ve seen out there (and I’ve searched)! Jeff already loved this machine for all the ‘coffee-expert’ reasons, something about being quiet and then doing-something-something for yummy-something. I loved this machine… because it’s SO PRETTY! I got one.
Lighting & Layout Tweaks:
One detail that made the original design all-the-more… ummm Exceptional?… Was having only one light in the entire room! And a horribly-placed one at that. Since the dark space was also small, the ‘eat-in’ feature made no sense. So, we re-did the lighting plan, pulled in more natural light by swapping for a full-lite door and made minimal adjustments to the existing layout to ‘kill’ the banquette in order to maximize storage and worktop space. Speaking of worktops, the countertops used are super user-friendly and easy to clean. They’re engineered quartz in Pure White from Caesarstone, which has become a VHD go-to!


Kohler Plumbing Fixtures via Build Ferguson

Glass Cruet | Copenhagen Salt & Pepper Mills
MAXIMIZING THE CHARACTERInspired by ‘coastal meets mid-century-clean’ vibes, texture through material (terrazzo and tambour) and a bold ‘pistachio’ cabinet color elevated even the subtler design changes. Our personal favorite elements:
 Terrazzo Floor Tiles:
 Both classic and on-trend, the terrazzo floors were the star of the space. We were SO thrilled our clients wanted to do something special as we had been stalking Concrete Collaborative on Instagram for months! They offer both poured and tile terrazzo and aggregates can be custom selected for their poured options (the tile we used: Venice (Alabaster MCC Medium Colorful). Love, love this look. Love the clean-ability and the forgiving nature these tile provide (dirt, dust and other imperfections are less obvious against texture). Love the limited grout lines of the large-scale tile option. Overall, just love!
Wooden Texture:Some of this came by luck (the original flooring) and some came through sourcing. The half-round/dowel look is simple ‘cladding’ (covering a surface). We used a sheeted ‘tambour’ to achieve this look. Our wood species: Alder!

Flush Mount Lights | Drawer Pulls
 Color:
Keeping the small space ‘light’ by staying mostly white, wood, and clean/organic on the top half of the room, we anchored the space color pops subtly inspired by the 60s. The pistachio dominates delightfully, but the specks of pinks and yellows in the terrazzo complements (and sets the tone for the living spaces we’re designing for them next!).
 Styling:
 We cheated… and more than once!
The design would be flat without the details, but because we’re still designing their dining room, we ‘pretended’ it was ready by borrowing the dining room setup from a previous design. You sleuths may have already recognized Sara Tramp’s amazing vintage pieces from this project. The gorgeous leather stools in the room are Esse from Article and that amazing portrait is Ethan Caflisch / Tappan Collective.

Art by Ethan Caflisch via Tappan Collective
Cheating again, our clients had excellent taste and pieces to display. And then the ultimate cheat, bringing in Bowser who brought us alllll the beautiful stuff! Design is in the details so finishing a space with a final round of styling shouldn’t be overlooked!
Being a reunited team with stellar, creative clients may be a dream, but I’d be amiss not to share a couple hard-earned lessons/insights as a new design firm. 1. Covid is NO joke. Don’t expect to plan construction based on estimated delivery dates. Those seem to come with a bit of a *wink* these days. 2. Finding the right contractors, even as a design team, takes time. I talked to several designers about this and we weren’t so lucky on this project (despite beautiful results)… but that’d be a whole separate post.
But let’s focus on what reeeeaaalllly worked (and worked their bums off)… this NEW TEAM! I’m so grateful for Grace De Asis (the brain behind so many of these ideas), Julie Rose (the lead throughout this project), Marlene (our newest designer who just FITS), Sara Tramp, and Emily Bowser (who made these photos pretty) and our two stellar freelancers: Brittany and Trina.
Quick note: our lil’ team works all over the world! We offer E-Design and Virtual Consultations, so please reach out… wherever you are!

We’re all grateful for Jeff, Claire, and Trap Baby who are now stuck hosting dinners for us forever… don’t tell them, we’re breaking in the idea gently. And we’re thrilled because we NOW have a stellar contractor aboard for future projects… Dibs-dibs-dibs, mine-mine, stand-back, don’t-touch, I called it – No Take Backs!
THE END!! Roll Credits:
*Photos by Sara Ligorria-Tramp
**Design by Velinda Hellen Design
***Lead Designers: Grace De Asis & Julie Rose
****Styled by Emily Edith Bowser
The post The 3 Best Ways To SAVE $$$ On Your Kitchen Reno (+ Our EHD Alumns’ First Reveal As a New Boutique Team) appeared first on Emily Henderson.
October 17, 2021
The Link Up: Em’s Tall Boot Dupe (That’s Affordable), Jess’ HIGHLY Reviewed Nail Care Hack, And An Umbrella That Is Too Cute To Miss
Happy Sunday! It’s been a pretty nice week with 3 reveals (this one, this one, and this one) and a fun visit from Em. The gang was back together and it was glorious. We hope you all also had some nice moments this week that will only be made better by these nice links:)
In honor of Caitlin’s birthday week and her love of maximalism (and this designer who just happens to also be a Caitlin) check out this wildly cool nursery tour by Caitlin Murray of Black Lacquer Design. It’s happy, modern but incredibly whimsical. Oh, and the one and only Sara Ligorria-Tramp shot it!
From Emily: A lot of you responded to my Mille boots because yes they are very good — but while shopping for a Target shoot I found some dupes that are surprisingly excellent and comfortable because they have a memory foam sole. So comfort is a definite check. Is anyone interested in a fall boot post?
From Ryann: I spend an unholy amount of time browsing Etsy, usually looking for new vintage shops where I can find weird one-of-a-kind pieces that will bring personality into my home. But at times, searching for decor on Etsy is tough because there is SO much to sift through, and if you don’t have a specific search term for what you are looking for you can spend hours looking through hundreds of pages. That is why I always refer back to this post, which has all of our favorite Etsy shops in one place! It’s a great resource if you don’t know exactly what you are looking for and just want to browse curated vintage finds from all over the world. I’d also add this shop to the list, which has a ton of eclectic pieces from kitchenware to furniture and lighting.
From Caitlin: PSA that Lulu & Georiga’s anniversary sale ends on 10/19! You can grab 25% off sitewide (as the person who makes all your holiday sale roundup posts year-round, I’m confirming that this is a SLAMMING deal) with code CELEBRATE. Some EHD tried-and-true favorites: Emily’s go-to coffee table, a dreamy demilune side table (the semi-glass smoked top makes it a DREAM for avoiding fingerprints), this hearty statement tray, and this absolute stunner bed by the supremely talented EHD alum, Ginny. We also LOVE this rug from the new Nina Freudenberger collaboration – eyeing it for a few projects we have in the works! BIG SAVINGS, GUYS.
Also From Caitlin: My all-time favorite white popover top (business casual approved for those of ya who are back in office!) is somehow only $14.99 at Madewell right now!!! You may have seen me in it on the blog before – it’s a go to whenever we contribute to fashion posts because it’s just so easy to slide on – and I love it, especially on those days where I need to look put together but I want to feel super comfortable. It looks great french-tucked and it’s a dream to layer under other sweaters or coats, especially at this time of year. I don’t know why it’s so cheap right now (if they’re discontinuing the style, I WILL WEEP) but boy, what a total steal!!!
From Mallory: In need of a good new book? I’m halfway through Greenlight by Matthew McConaughey and I LOVE IT SO FAR. His perspective on life is so fun and refreshing. If you want to cuddle up with a good book by the fire in the near future, I highly recommend.
Also from Mallory: In need of a good, affordable “layering” kind of denim jacket?? I found this bad boy at Target for $30 and have worn it almost every day since I got it. It’s certainly more of the “oversized” fit which is fun because you can comfortably wear a sweater over it and I know it’s going to last a super long time in my closet because these never really go out of style (my last denim jacket was $15 and I’ve had it since freshman year of HIGH SCHOOL and I still wear it – no joke).
From Jess: I found the most perfect faux plant (for $15!!) that works for all seasons! It’s this one and when I saw it I knew it had to come home with me. These are impossible to kill, right??
Also From Jess: For my birthday, I finally dove into the world of Gel X. This is my first time getting any sort of “fake nails” despite my desperate plea to my mother in middle school because “ALL the girls had them.” Honestly though, it was for the best (okay mom, you were right!) and for the health of my nails. Now Gel X is suppooooosed to be better for your nails than acrylics but I want to stay on top of it if I’m going to continue (and honestly I LOVE them so this is likely). The other week I was listening to a Forever 35 podcast mini-episode and Kate (one of the hosts who says she has weak nails) was recommend Hard As Hoof nail cream by a listener that SWORE by it. And with a 4.5 star rating from 45,596 reviewers (WHAT?!) I think it’s the move. So once I get this first set off, I’m going to take maybe a week off, hoof it up then Gel X it u again. I’ll let you know how it goes!
From Albie: In case you didn’t know, I live in the Pacific Northwest, and while I do think the stereotypes of how often it rains here are slightly exaggerated (I’m from NYC) it does rain often, especially in the fall. With the mini in school now, I thought it high time she get her own umbrella. I used to always want my own clear bubble umbrella way back when, but I never got one. Something about them was always just so attractive to me + living in NYC, a wide canopy umbrella was a pain in the butt to navigate on the crowded sidewalks, and a bubble umbrella just seemed like it could be a way better option. All these years later, I decided may mini’s first umbrella would be — you guessed it — a clear bubble umbrella… except hers has rainbow polka dots on it because why not. It’s the perfect size for her, so she’s not struggling to hold on to it & keep it steady like she would with even the smallest adult-sized umbrella; and she feels super grown up with it while I get the satisfaction of knowing it’s keeping herd dry. Who knows… I may just finally get one of my own (in the adult size of course) because the quality is pretty impressive.
Ok that’s it! See you tomorrow for another very exciting EHD reunion;)
Opening Image Credits: Design by Black Lacquer Design | Photo by Sara Ligorria-Tramp | via Domino
The post The Link Up: Em’s Tall Boot Dupe (That’s Affordable), Jess’ HIGHLY Reviewed Nail Care Hack, And An Umbrella That Is Too Cute To Miss appeared first on Emily Henderson.
October 16, 2021
My Latest Haul – Because Thrifting Is Therapy (Right?)

If I were to get all existential on you I’d say that I’ve re-found my original “Why??” – at an antique mall in Sellwood called “Stars”, inside a primitive wicker-basket backpack. It didn’t even have a top on it – you strap it to your back and feel the handmade structure, the random obsoleteness on your ribs as you try to convince yourself that you need this mode of transport for $65, for that charcuterie picnic you’ve been fantasizing about for years. It’s not an easy decision and you leave wishing you had got it. Thus is the thrill of the hunt that I’ve pursued for 35 years now and what drove me to become a stylist. Only the market is different from when I started – it’s better curated, with professional pickers and dealers doing a pretty darn great job of sorting through the literal garbage to bring us all the good stuff. And while I’m adjusting OK back to city life, thrifting has been my therapy when I’m feeling overwhelmed, which is far more frequent than I’d like. Maybe it’s an addiction to the serotonin burst I get from the thrill of the thrifting kill, or maybe it’s feeling at home with a hobby, a smell, a repetitive action I’ve had since I was a wee bairn (I’m also back into comfort-watching Outlander and reading Scottish romance novels when I feel untethered, so there’s that). But I’m being super super choosy – focusing on what is a steal or something we really need. Here’s what I’ve scored so far.
TINY LITTLE WINDSOR CHAIRS FOR MY LIKELY GROWING CHILDREN
In the name of trying to entertain our kids through “the long dark” (aka winter in PNW) we bought our lego-loving kids this table to help spruce up their basement playroom. But I needed chairs and I wanted to find something farm-appropriate and not too expensive because they are growing too fast. So I was pretty darn psyched when I found these two kid Windsor chairs for $15 each in Aurora. Now, as soon as I get a free 45 minutes I’m going to strip them to a nicer more raw oak finish. But for $30 total they are solid and great.
A FANCY PLANTSTAND TO PROVE TO MYSELF I’VE STILL GOT IT
This perplexed my best friend who had flown up for the weekend to cheer me up/keep me company when Brian was OOT. I wouldn’t say it’s “simple and special”. No. It’s full-on special and specialer. Here’s how I plan on styling it in our more minimal shaker farmhouse – in a corner, by a window, and with either with an epic weird plant on top OR a sculpture of some sort (something post-modern, not too traditional to create that weird tension). She’ll be on her own, letting her hand-carved lines shine. This lady was not cheap – I think $140, but my brain told my tummy to tell my hands to pick it up and put it on the counter and pay for it. My body parts are a real team like that.
THE LIDDED BOX FROM MY CHILDHOOD TREE OR SO I’LL TELL MYSELF
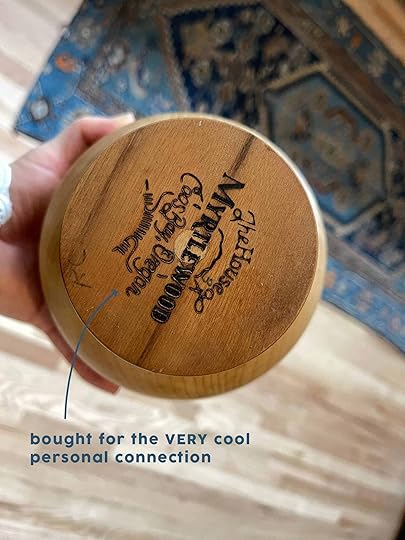
I grew up on Myrtlewood Lane in Coos Bay Oregon and even BEFORE I saw the markings on the bottom I was super drawn to this footed, round, and lidded box (check, check, check). So When I flipped it over and saw that it was from Myrtlewood, Oregon and from Coos Bay my heart leapt a little bit with nostalgia. Now to find the Myrtlewood clock that we had growing up (from the ’70s) that of course now I would LOVE (let me know if you have one and my body parts will pay you properly).
THE ACTUALLY “GOOD HEIGHT” STANDING LAMP
I find that many standing lamps are too tall for lower sofas (which are more common these days). Very often when you sit next to a standing lamp you are staring right into the bulb (and you know how I feel about BAD lighting killing vibe and mood) and it’s a bummer. So this height is basically the height of a good table lamp on a side table (hello, hole in the market). Sure I still need a side table (a cute cocktail table will do) but I love the architectural shape/style and simplicity. I’m open to new shades, for sure – either something pleated and weirder or something more angular and a solid color. Dunno. Maybe I’ll draw Brian’s family Scottish crest on it. Only time or a really good psychic can know where I’m headed here.
THE PINE ARMOIRE TO SAVE MY SANITY AND SHOES
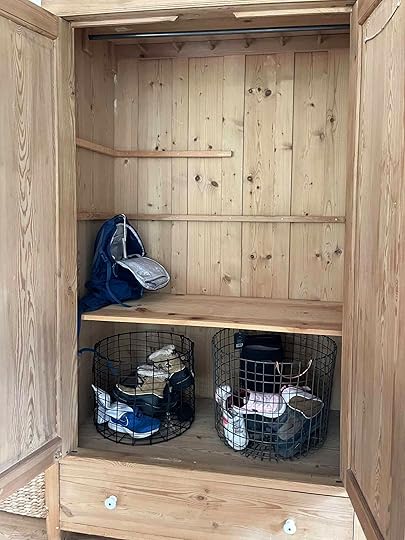
Our shoe and coat situation was DESPERATE. And it wasn’t about hoarding. I needed 2-3 coats a day based on temperature and activity (working out, walking dogs, a meeting) and 2-3 shoes a day (running in rain, Uggs inside, vans for the grocery store, rain boots). Without a mudroom and a proper drop zone, I was going NUTS. So I found this at Urbanite via Wilma and pulled the trigger fast. I knew that it would work here and while I was unsure if we needed it at the farm, at least if we do it will stylistically work and if we don’t need it then I didn’t buy new (but I’m sure it will work somewhere). Now cleats and shinguards have a place in the drawer and coats and baskets of shoes inside. The problem isn’t solved because turns out you still have to “hang things up” and “put things away” but I’m way happier doing that daily than the visual chaos that we had before.
MY NEW COMFORT BLANKY “JANET THE LEATHER STICK GIRAFFE”
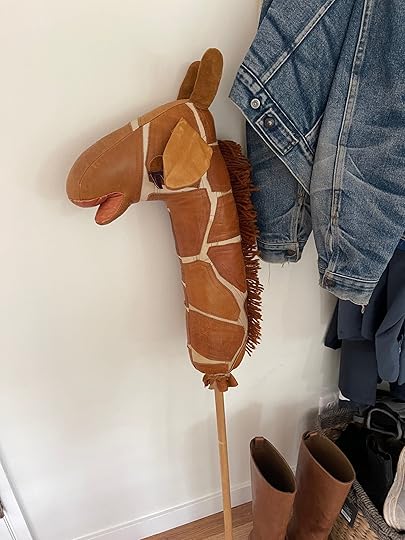
I had this huge “leather stick giraffe” ‘box’ that has been left unchecked for decades until last week. She was in the back of an antique booth, smothered in quilts, her face/lips forced into an eternal kiss with a stack of paint by numbers. I was drawn to her for her caramel leather tones, the hand stitching, the utter whimsy of her existence made me smile HARD. Not to mention how good she is going to look in one of my kid’s rooms – something they’ll likely not appreciate visually as much as I do, but I’ll force it just as much. Curious if there is a kid version of cat-nip – a liquid or powder you can pour over something to ensure they play with it. Pause while I contact my agent to ensure a spot on Shark Tank because once again I have a trillion-dollar idea.
While I miss the Rose Bowl (deeply) I’ve only just begun vintage shopping in Portland and it’s just so gooooooood. On days when I miss living in the mountains, thrifting has become my therapy (along with cardio) and it’s something I couldn’t do there so it helps me reframe why I’m here.
The post My Latest Haul – Because Thrifting Is Therapy (Right?) appeared first on Emily Henderson.
October 15, 2021
Another Feel Good Flash Makeover Has Wrapped – Here’s How Lowe Transformed This Empty 2 Bedroom Apartment Into A Cozy, Kid-Friendly Oasis

Hey friends! Lowe here — again! And this time, I’m popping in to say we’ve wrapped up Jem’s Feel Good Flash Makeover *cue the celebratory bells!*.
In case you weren’t here when we first started, I’m a lover of all things decor (the weird decor, the cute decor, and the cheap decor, too). And I got the amazing opportunity to share a bit of that love with a sweet family of three that was transitioning out of homelessness. Thanks to the collab between two women-led teams I’ve admired for ages (Pen + Napkin and Emily Henderson Design), I met Jem* and her two young sons. They secured an apartment after going through a time living in their car and then a shelter and temporary housing. But when they first moved in, they didn’t have much. There were no tables, no chairs, no mattresses, and certainly nothing to make things feel cozy.
Pen + Napkin’s mission is to turn empty houses into homes for families like Jem’s, though. So that means we HAD to make things cozy. In my original moodboards for the apartment, I layered in things like art, throw pillows, rugs, and more to get that warm look. I wanted to add color and vibrancy while ensuring each piece was kid-friendly and fun. For the living room, I focused on making the space feel open and inviting with a great spot for family dinners and games. For Mom’s room, we wanted to really hone in on the relaxation factor with calming colors and a few luxe touches. And finally, for the boys’ domain, making things feel styled but not too precious was a top priority. I wanted everything from the feature wall to the bedding to be poppy and bright. Plus, the two little ones love all things related to planes, cars, and trucks. So we needed some of that, too.
The Original Moodboards


And after sharing those plans and moodboards with you all, words of encouragement (and the most generous donations) came pouring in. I was floored to read everyone’s kind messages and suggestions. Even those who weren’t able to contribute financially shared about Jem’s story as well as Pen + Napkin’s mission (which by the way, the folks at P+N regularly do home makeovers for families transitioning out of homelessness so if you’re able, please consider donating whenever you can ^_^).
In the end, we didn’t quite reach our $3K fundraising goal, but we got so so close and SO many lovely people purchased items from our decor registries. (I’m still trying to figure out who donated what so I can say thank you personally, but I’m not savvy at all when it comes to figuring out things like that. Also maybe the names are private?).
It was amazing to watch items get crossed off of the list, from things like the canopy bed we got for Jem to the impossibly cute green bedding we found for the boys to the sweet toys we used to fill in a DIY bookshelf.
Let me tell you, though, I’ve never furnished any space in such a short time period using pieces mostly sourced from online. So I was not prepared at all to receive so many packages in the weeks leading up to the apartment install. Actually, thinking about all the boxes that I had to go through, store, and eventually, transport to Jem’s still gives me just a little bit of anxiety. But of course, that’s a great problem to have!

Rug | Sofa | Ottoman | Side Table
As for the actual installation, we did a lot of pivoting from the initial plans. But that’s something I was completely prepared for. I’ve learned that even when you have an unlimited budget, sometimes the item you have your heart set on is out of stock; sometimes things break. Overall, decorating can just be unpredictable. But usually, I find that having a bit of flexibility can create an even better, finished room.
In this case, for example, we weren’t able to get the navy blue sectional that I had my eye on. It just wasn’t available when P+N founder Catie took me to the magical world that is the Poly & Bark outlet store. But instead, we ended up finding the most gorgeous warm brown, chestnutty leather couch and ottoman that will likely last for years and years to come because the quality is just that good. I also had plans to get a small circular table for Jem and her little ones but we found one that was much more substantial also thanks to Poly & Bark. No matter how rough playtime, study time, or dinner time gets, that mid-century modern beauty will not be moving (I know because I accidentally tripped over it, and the table didn’t budge).

Chair | TV Stand | Dining Chairs | Table
Another pivot was changing up the art. I had plans to do fun mini gallery walls in each room, but as I’m sure everyone knows, art ain’t cheap to put it plainly. So to make sure the walls still had some pizazz, I dug into the hoards of decor that I’ve been keeping for just such an occasion. Simple nature prints helped the living and dining space feel cohesive. A few wall hangings added some geometric intrigue to the faux entry situation. And for the boys’ room, we let the wall decals be the main focal point behind mattresses that were generously donated by Tuft & Needle. If we’d had more time I would’ve LOVED to do some art DIYs to finish off each space but alas.

Circle Serve Board | Stoneware Canister | Soap Dispenser | Wooden Cookbook Holder | Basket
One thing I realized during this process is it truly was a flash makeover. I think I’ve always taken for granted how much time you need to turn a blank canvas into a home. In my own apartment and in the projects I’ve done, I’ve always been lucky enough to work at my own pace. Deadlines were few and far between, and I could do everything mostly by myself because there’s never been a time crunch. That was 100% (not even an inch) the case this time. Not only were we all trying to furnish Jem’s home as quickly as possible because we didn’t want them living without for any longer than they had to, but we also only had TWO days to get everything built, hung, cleaned, and mounted. I was optimistic (foolishly optimistic, some might even say unrealistic) about finishing up until the very last moments. But we seriously ran out of time, and that felt pretty disappointing. If I could change anything about this process, it would be that.

Bed Frame | Airplane Wall Decals | Sheets | Quilt | Pillow Sham | Shelves

Tent | Flag Garland | Rug
However, there was also no way in heck that I would’ve been able to install everything myself. Assists came from everywhere.
My boyfriend loaded up his van multiple times to cram in copious amounts of furniture, rugs, and more. Then he made the drive from my apartment all the way to Jem’s and didn’t complain once, not even when his contact literally fell out on the freeway.
Emily’s team (hi Ryann, Jess, and Mallory!!) came out on both install days to build beds, style kitchens, and just lend their expert design eyes whenever it was needed. Jess even made a last-minute trip to Target and completely saved the day with the cutest decor finds that brought in some much-needed spice and transformed every single room.

Bed Frame | Rug | Mirror | Accent Table | Dresser

Pen + Napkin powerhouse Synthia — who is somehow managing design school, work, and interiors — literally was a Godsend throughout it all. She came to IKEA with me, and we shopped until the store kicked us out/closed. And then on install day, Synthia kept everyone in good spirits and singlehandedly built Jem’s IKEA dresser. And dressers are verifiably the hardest thing you can build from IKEA (lol maybe not verifiably but I said what I said).
All in all, this was the biggest team effort project I think I’ve done. It was certainly the most meaningful. Jem welcomed me into her house, she told me her story, and she trusted me to transform her space. It’s a major thing to be responsible for something so precious. I remember on the first day of the install, Jem handed me the keys, and she only had the one set. So it truly felt like she was entrusting me with something major. The pressure was there, and it felt like a lot of pressure if I’m being honest. But it also felt soo special to have her trust.


Shower Curtain | Faux Plant | Metal Bath Wastebasket | Yellow Towel | White Towel | Tray | Bathmat

Hand Towel | Wood Bathroom Tumbler | Soap Dispenser
It was special to have everyone’s trust actually. And I cannot thank Catie and Emily enough for giving me the chance to be part of this makeover. I can’t wait to see what the next designer comes up with!
Now the best part – the before and afters!


*Design and Photos by Lowe Saddler of Hot Sunday Home
The post Another Feel Good Flash Makeover Has Wrapped – Here’s How Lowe Transformed This Empty 2 Bedroom Apartment Into A Cozy, Kid-Friendly Oasis appeared first on Emily Henderson.
October 14, 2021
Caitlin’s Long, Dark Hallway Makeover (And The Perfect Paint Color That Worked With All 3 Of Her Bold Wallpapers)
OH HEY. Fancy seeing you back here for the second time today! As promised, I’m coming in hot with your little afternoon amuse-bouche. It’s a good one, too, with lots of intrigue. Like, sure, there’s a reveal, but I’m also going to tell you the story of how I kind of, sort of stole a partnership from Emily. Sometimes, the heart wants what it wants…and this time, the heart wanted to do a dramatic weekend makeover with its new all-time favorite not-neutral, but also somehow kind of neutral paint color. (If you’ve spent any time on ~home decor IG~ over the past few days, you may have seen it…we’re talking Sherwin-Williams 2022 Color of the Year, guys!!!) It’s a neutral for maximalists, if you will. HANDS OFF, BOSS. I’m taking over this one!! Let’s get into how we got here so we can get to the ‘after’ photos, yeah?

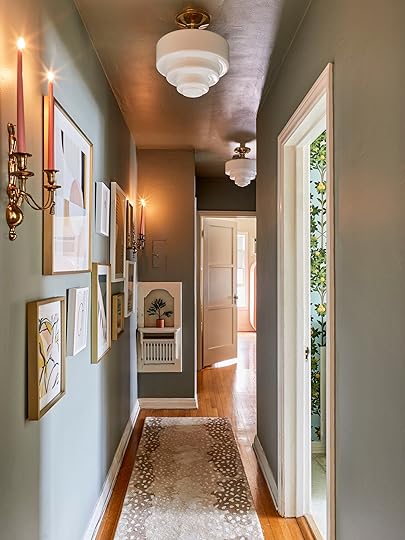
 this is the “dining room and kitchen stretch”
First thing’s first: Welcome to more of my house! This hallway is 17′ long, narrow, and VERY dark. It’s also Tetris-piece shaped (the “Cleveland Z,” to be specific – it zig-zags in the middle), because OF COURSE it has to be a little weird. Who wants a plain, simple, boring hallway (like the “Hero” Tetris piece, if you’re interested in googling 80s video game etymology later) when you can have something that’s kind of confusing and disorienting and difficult for inebriated guests to navigate? It’s also an interior hall that faces east, which means that the light in here is questionable at best.
BUUUUT, it’s also kind of nice, once you get used to it. 4 main rooms are located off this hall – the dining room, kitchen, bathroom, and my bedroom – plus there’s a huge built-in linen closet next to the bathroom along with a bonus private entrance that’s right next to my bedroom. It does feel like it’s been pre-zoned – there’s a natural space for an entryway, a dedicated bathroom section, and a nice standard long stretch that’s begging for some art.

 and here we have the “mini bath hallway” and the “other spot where shoes pile up”
And while I lived with this space for two years without complaint – it’s for walking! It works! It’s fine! – it became design priority #1 after I wallpapered 3 of the adjacent rooms. Life lesson learned about maximalism: if you’re going to go big, you have to go big EVERYWHERE. My wallpapered rooms were so bold and vibrant and this hallway, in comparison, looked SO sad and dingy and unfinished. I know it’s just a thoroughfare, but I wanted my hallway to have its own little design moment so that it felt like it belonged in the same home, you know? I set off on a quest to find the perfect paint color and I had three main criteria:
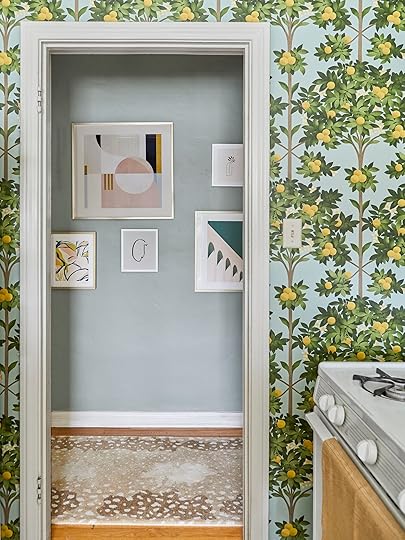
It had to be dark. It’s hard to believe (potentially impossible), but the hallway was originally a warm white. A WARM WHITE, GUYS. Going brighter in here wasn’t going to help, so I knew I wanted to embrace the cave-like feel with some dark paint.But it couldn’t be stark. All that said, I’m not allowed to touch anything painted with semi-gloss in the apartment (for lead reasons, I think), so I needed a dark color that wouldn’t look absolutely bonkers next to the white trim and built-in features. I wasn’t looking to put a black hole in the middle of my house – I needed something that wouldn’t be too distracting or imposing. It had to work with all three wallpapers. This one was the biggest doozy of all. I know that some folks are “whole home” decorators – you know, like, kind of thoughtful in how one room flows into the next – but I, tragically, am not one of those people. I was leaning towards a green – to tie in the kitchen and dining room wallpapers – and was dreading the color-picking process until the universe basically stepped in and was like, “HERE YA GO, GIRL.”

Bust Wallpaper | Kitchen Wallpaper | Dining Wallpaper
Here’s what went down: I was picking up a TON of potential samples from my local Sherwin-Williams when their team shot me an email that they’d included a sample of Evergreen Fog SW 6244, the 2022 Color of the Year, with my order. (You know you’re in DEEP when you can start naming the color codes.) ANYWAY – we had been offered the opportunity to partner with Sherwin-Williams on some Pinterest exclusive content (if you’re not following us over there, what are you waiting for?!) around the Color of the Year Launch and I was technically supposed to pass the paint on to Emily – you know, in case she could work it into one of her upcoming projects – but instead, I fell in love.
I brought it home, made a little (ok, enormous) sample swatch, and taped it on every surface in the hallway. I then sent a pleading email to Sherwin-Williams. I KNOW I’M NOT EMILY BUT PLEASE, LET ME SHOOT EVERGREEN FOG IN MY HOUSE, I begged. It’s such a great, creamy, rich color – not too green, not too gray, not too bright or too dark. It was the goldilocks of paint. Evergreen Fog doesn’t overpower and it doesn’t compete – it just goes. It feels like a fit. In a true testament to Sherwin-Williams’ vision, they read my pitch (which was basically “this is the only paint color that works here, please help” – a consummate professional, I am), saw my before shots and were like, “yeah, okay, have at it,” which I’ll always be grateful for. Bonus life lesson: shoot your shot! Sometimes it works out! (And let me know if you see any of the sponsored content on Pinterest throughout the month, will you?!)

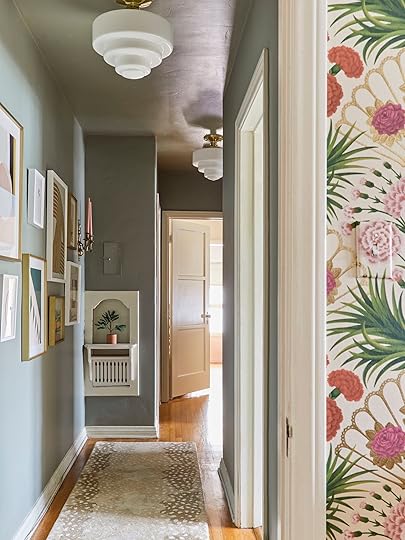
OKAY. You sat through a lot of intellectualizing about what I wanted so this is obviously where we have to start: THE RESULTS, BABY. Three VERY different rooms, all connected by my new favorite not-technically-neutral but also kind of neutral paint. I don’t want to pat myself on the back too much – you know, seeing as I uh, didn’t actually source this color – but I’m so excited about this space, guys. There’s enough delineation and difference to be like, “hey, the hallway is its own moment, let’s enjoy it,” without being like “AH, why is there a big, distracting black hole in the middle of this apartment?” It’s dark without screaming for attention but still saturated enough to feel happy, if that makes sense. LET’S DEEP DIVE A LITTLE, YEAH?
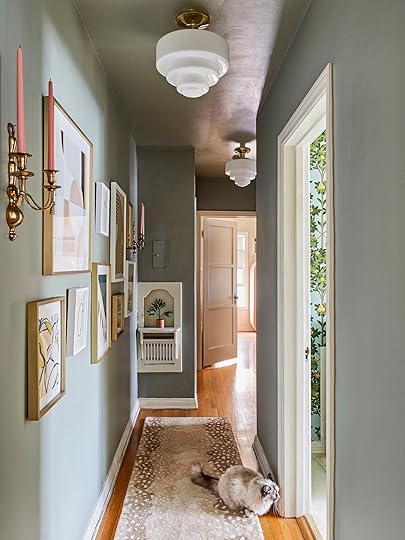
I ended up hitting the whole hallway – ceiling and all! – with two coats of Evergreen Fog in a Satin finish. (If these walls weren’t fairly textured plaster and if I was better at paying attention to detail, I could have done it in one – the paint coverage is great, but my rolling abilities are a 6/10.) The previous paint had been flat and it had done a very impressive job of sucking up EVERY DROP OF LIGHT in the entire hall, so I wanted a finish that’d do a better job of bouncing light around. You can actually see it on the ceiling – despite being a darker paint color, it’s actually carrying the light WAY farther down the hall. (Scroll up and check if you don’t believe me!) IT’S WILD.
To that end, I’m firmly a member of team #PAINTYOURCEILING. These are standard and only 8′ high, but they looked about a foot taller after being painted because everything sort of blended together – it’s way harder to tell where the walls end and the ceiling begins, which I love. If you have a dark room and you’re noodling on color options, let this be a sign to go deep and rich with your paint – embrace the space you have instead of fighting it. (And maybe consider going with a Satin finish instead of a Flat paint, while you’re at it :))

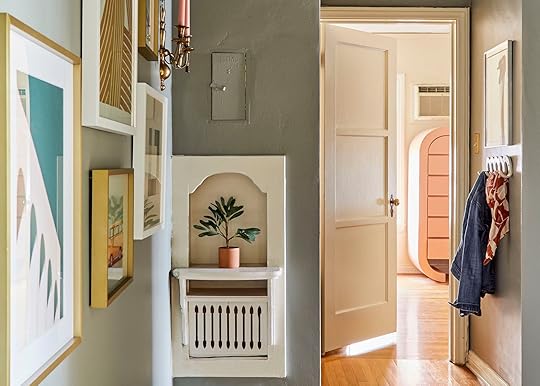
But now, let me tell you about this gallery wall. LET ME TELL YOU. I texted the team at Minted (415-993-WALL) and they designed this wall for me based on photos of my space and a few suggestions from me…but this isn’t some influencer exclusive special. THEY DO THIS FOR EVERYONE. FOR FREE! Can you believe????
Basically, you’ll answer some style/inspiration questions via text (my texts: “I want to do a gallery wall here but don’t have enough art and don’t know how to pull things together that’ll work in the space. Help!!!”) and a Minted Stylist sends back recommendations. Once you give feedback, they’ll send you an actual rendering of your art selections on the ACTUAL PHOTO OF YOUR ROOM. All of my photos were at an angle because of like, hallway geometry, so my Stylists (Melanie and Stacy, thank you!) ended up making me a custom head-on render.

Gallery Wall Left to Right: Sandstone Dunes 1 by Liz Taylor | Malena by Alex Roda | Tangerine by Emily Kariniemi | Roller Skates by Cristiane | you are seen by Alicia Schultz | Face Study I By Chelsea Petaja | Arches by Alaric Yanos | Falconer by Andrew McClintock | Squares by Alisa Galitsyna
They handled all the nitty-gritty stuff – you know, the size, the frame color, the matte, the float, the signature – AND they laid it out so install is a breeze. Added bonus: Minted places all the art you’ve agreed on straight into your cart so checkout is SO fast and easy (no accidental “oops, I ordered this without a mat!” or “woops, this frame should have been brass and I grabbed white!”). It was the first time I’ve hung a gallery wall without tears, which is really saying something. I did my best to follow their layout and although it’s a liiiiiitle more spread out than Minted had planned, it was a one-and-done hanging job. That’s right – no need to double to triple nail holes in the wall trying to get things just so.
These were my first-ever Minted pieces and while I love the aesthetics, I was super impressed by the packaging, too. Each piece comes with some info about the artist which I loved – my stylists helped pull pieces that were almost exclusively by incredible women, and it was so cool to learn about each of them. (Highly recommend checking out more of each artist’s work above – it’s fun to browse, I promise.) ALSO. In a past life, I helped design boxes for a monthly subscription service (don’t ask) so I know firsthand that box design for fragile objects is NO JOKE, and they knocked it outta the park. Minted, please extend my congratulations to the box designer because I can tell they put a lot of care and effort into the presentation. A million THANK YOUS to the whole team for helping my gallery wall dreams come true from start to finish. I hope they can help you, too.

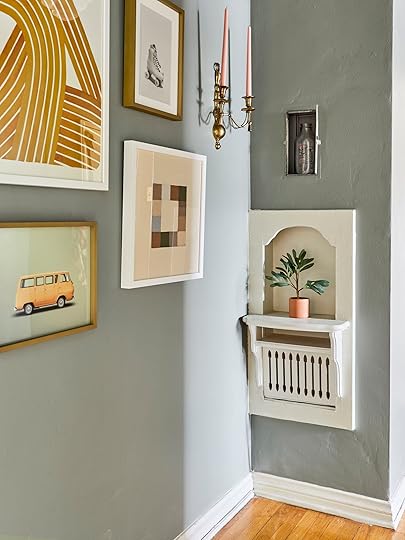
That art feels like such a breath of fresh air, right? I’m especially partial to the roller skate piece on the top right – that was a special request from me that the Minted team facilitated. I love this part of my hall, though. You see that little hole in the wall? It’s a vintage steel milk receptacle. There are a ton of options inside – whipping cream, milk, butter, cottage cheese, buttermilk, eggs, etc. – alongside a variety of measurements that range from “nothing” to “2 lbs.” Basically, you’d make your order using this door and then the milkman would drop it off in this insulated area the next day. HOW FREAKING COOL IS THAT?
And then OF COURSE we have to talk about the phone nook – it’s an LA classic. I grabbed this faux plant from the dollar spot at Target two weeks ago (it was $3 and it looked so sweet, I had to!!!) and it’s the perfect fit for this little nook. After a lot of trial and error (error, mainly), I’ve learned that real plants don’t do super well in this space, so I’ll settle for this little guy for now. The rest of the surface is left clean because it’s usually a drop zone for keys or mail or scissors or really any sort of random ephemera that I need to remind myself to bring somewhere else in the apartment. #reality

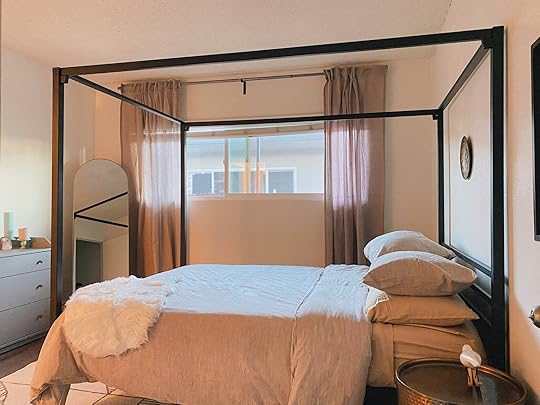
I also wanted to take a second to talk about these UNREAL semi-flush mounts from Rejuvenation. I took a little bit of a gamble on these – by every standard I’ve read, they were technically too big for the space – but I pulled the trigger anyway and I’m SO GLAD. I customized the Eastmoreland Fitter 6″ Semi Flush Fixture in Lacquered Polished Brass with a 14″ Opal Deco Stepped Shade and MAN, DO I LOVE IT.
They’re big without being too visually heavy – remember, this is a 36″ wide hallway with 8′ ceilings – and I’m a sucker for the Old Hollywood shape. They’re only an inch or two higher than the door frames and I just love how they fill out that space. The shades give off such a warm glow at night, too – cannot recommend them enough. I can’t believe I tolerated the boob lights for SO LONG, GUYS. What a freakin’ improvement. I linked my custom configuration above (in case you wanna be matching!) but you can also make your own right here. (PS. I hired a pro to swap out all the fixtures because the wiring is old and I didn’t want to electrocute myself. If you’re in LA, I swear by 5 Star Electric. They’re neat and timely and talented and their prices are BANANAS fair – just bookmark if you’re ever in need! #notsponsored, just a fan.)

Welcome to my little mini-entryway – she’s small but mighty! That’s my bedroom to the front and my private door/stairs to the left. I don’t use this exit/entrance a ton right now (it heads straight to my garage area, and I haven’t been driving that much…buying a new car today, though!!!) but it’s stocked with the basics: some fun, affordable hooks from Urban Outfitters and a vintage mirror I bought at the Rose Bowl a few years back.
Let me tell you – I stalked this mirror. It was $40, I only had $30 on my person, and the seller was SO firm on the price that I ended up trekking to the ATM and paying a bogus fee just to withdraw 10 extra bucks to buy it. It’s silly and weird and fun and every day I walk past it, I’m thankful for 2019 Caitlin’s heat-induced-determination. I also swapped out both light switch plates in the hall for these $13 unlacquered brass ones I grabbed on a whim at Home Depot – they’re really heavy and beautiful and surprisingly great quality for the price.

This may be my favorite shot of all because you can see the texture on my walls (UGH, I just love plaster) but more importantly, I’M SO EXCITED TO SHOW YOU THIS NEEDLEPOINT. I grabbed it from one of my favorite Etsy shops, Object Vintage Goods, and it felt like the finishing touch on the hallway in that it’s signed and dated from 1936 (!!!), it has some fun personality, a little bit of wisdom, and it ties in all the colors that I’m obsessed with. It just feels like one of those slam dunk internet finds, you know? (Also bookmark Sep’s shop, because the curation is so good. I’m just lettin’ you in on all my favorite vintage resources today!!!)
Speaking of Etsy – I knew I wanted an Antelope runner and was SO JAZZED when I discovered ArtcoreOnline’s shop. I paid about $150 for this runner – over 25% cheaper than a comparable one I’d been eyeing – and Artcore’s customer service was INCREDIBLE and so communicative. I know there are a lot of “new rug” vendors on Etsy and it can get kind of tricky figuring out who’s legit, but this place is an absolute dream to purchase from. 10000/10, would buy again.

And man, you thought we’d show you all these photos with candle sconces and NOT give you a little treat with both of them lit up? Full disclosure: this isn’t the norm and DON’T TRY THIS AT HOME, but I had to share these shots for two reasons: first, because I love how you can see the light bouncing off the walls (Satin paint wins again!). And second, GOSH, I love these vintage sconces. I grabbed both from Dude and Edith which is, you guessed it, another one of my favorite Etsy shops. (They’re the kind of Etsy shop who emails you after your order to be like, “hey, I found a more affordable shipping option,” which is ABSOLUTELY the kind of shop worth supporting. They don’t even know I’m writing this!!!) ANYWAY – the sconces. I fell for the scale, shape, and tassels, and stayed for the solid brass. I’m a vintage lover at heart (you know, in case you missed it when I said it 80 times earlier) so having these next to my new, more modern Minted pieces brings a lot of joy.

And here’s me: unintentionally dressed in what could be mistaken as my first holy communion look, standing in my old-and-improved hallway while staring into an empty mug. I DON’T EVEN DRINK COFFEE, GUYS. Who do I think I am??? (I don’t know, either.)


I just wanted to take a second to thank Sherwin-Williams for letting me shoot some Color of the Year content in my own home – I love Evergreen Fog and I’m so lucky and thankful that y’all trusted me and worked with me on this project. (Keep an eye out on our Pinterest, too – there’s some more of this hall rolling out there throughout the month!) Thanks to Minted for stepping in when I was lost in an art rut – try texting them, it’ll blow your mind – and thanks to Rejuvenation for making my deco-shade and tall-ceiling dreams come true. (I’m pretty tall at 5’8″ but these ceilings look huge, RIGHT?!) But most importantly, thanks to YOU. I know I’m a little wordy – blame it on a year and a half alone in my house – but chatting with y’all is truly the best part of my day. It’s fun to talk about design!! I really like you guys!!!
But ENOUGH ABOUT ME. I’m ready for your thoughts. Hit me with your best ones – I’m 30 now, so I can take it. See ya down there, yeah? xx
*Design by Caitlin Higgins
**Styled by Emily Bowser
***Photos by Sara Ligorria-Tramp
The post Caitlin’s Long, Dark Hallway Makeover (And The Perfect Paint Color That Worked With All 3 Of Her Bold Wallpapers) appeared first on Emily Henderson.
Caitlin’s First MOTO Reveal – A Vintage Bathroom Gets A Modern Update

FASTEN YOUR SEATBELTS. Today’s reveal has everything you’ve ever dreamed of: creamed corn-colored tile! A 4’ tall leather giraffe! A runner I bought for $40 after drinking too many glasses of wine! An emphatic defense of medicine cabinets! That’s right, pals – after spending 2 years spouting off about all things design on the blog, I figured it was about time to put my money where my mouth is. Welcome to my weird, vintage-heavy, silly, happy home. We’re starting off with my bathroom, but come back this afternoon for a little amuse-bouche. That’s right, friends: IT’S A DOUBLE REVEAL DAY, starting with this fine little space right here.
Here’s the thing: sharing your home on the internet is kind of intimidating – especially when your tastes are as, uh, loud as mine – but today is my 30th birthday, and I am filled with the kind of self-confidence and acceptance that only comes with age…so COME ON IN, BABY. The water’s fine. I’m glad you’re here, even if it’s just for a quick visit. I’ve made a lot of changes since we last saw each other. Let’s take a quick walk down memory lane so we can get this show on the road, yeah?

 before
The background: I live in a 1930s deco apartment in Koreatown, Los Angeles. Pros: Reasonable rent, 1100 square feet, a private garage, timeless architecture, walkable neighborhood. Cons: THIS BUTTER AND SALMON TILE. Look, I’m all for a vintage bathroom, but NOT ONCE has anyone been like, “wow, I hope that one day I, too, will rent a cooked-spaghetti-noodle and melon-colored bathroom where ghastly footprints of tenants of yore have worn themselves into the floor in front of the toilet.” NEVER HAPPENED. Not even one time.
So look, she’s 90 years old, and she kiiiiiinda looks it. My landlord also decided to throw 4 different unchangeable paint colors into the mix right before I moved in, because Caitlin NEEDED A DESIGN CHALLENGE. That’s right – we’re looking at warm white walls, a cream vanity, cool white trim, and a greige door. Finding something – a paint, a wallpaper, anything – that worked with the tile wasn’t enough…of course we had to add some permanent paint in the mix. Got it.

 before
But other than the less-than-ideal paint and tile situation, the bones of this bathroom are kind of dreamy – there’s a vanity with tons of storage and counter space, a separate tub and shower, and a pretty lovely layout. The room is about 9′ long by 8′ wide at its largest point and it’s very private. It didn’t need a ton – just a new light fixture, some cabinet knobs, updated linens…and something to, you know, balance out the whole bottom half of the room. Easy peasy, right?
YUP. Easy peasy. (I know. I was expecting it to be more painful, too.) Sometimes things just click and fall into place, and this was one of those times. I don’t know how or when I stumbled upon this wallpaper by the folks at Work & Sea, but THAT WAS IT. I was sold before I even got the sample – this was the only wallpaper I considered. Like, beyond doing the impossible (complementing the world’s strangest bathroom color palette), I was also just so taken by its illustration and quality – it just felt like a natural fit for the space. Plus, I love the modern take on a classic motif. It makes me smile every. single. day. and I’m just so ridiculously thankful that Work & Sea helped me set the tone to bring this space to life (and they’re nice, to boot!!!).

 before and progress
So this is where we last checked in. I shared this lone BTS shot late last month when I broke down how much I spent on wallpaper installation (to sum it up: a lot). I hired the professional ~wallpaper installer to the stars~, Mark, to sand, prime, prep, and hang everything in here and I swear, he was worth EVERY. FREAKIN. PENNY. Since then, I’ve just been putting the finishing touches on this bad larry…which brings us to today. It’s time to let you into my actual house, where I actually live. Are you ready? (Am I???) Let’s ease in with a similar angle, shall we?
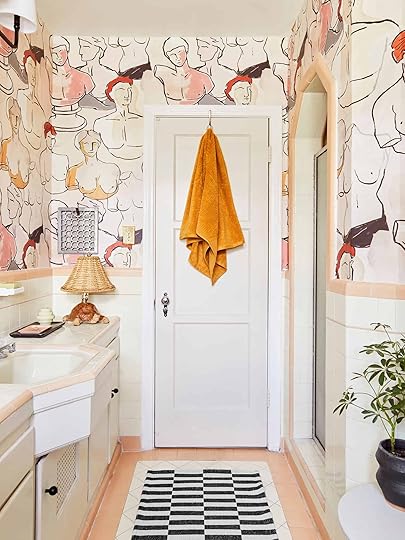
WELL. Here she is, in all her finally finished glory. Lemme start this off with a fun confession – you see that runner? It was purchased on a whim after Rugs.com emailed me a coupon. (Don’t send me discounts once I’ve opened up my $11 Sauv Blanc from Walgreens because I WILL be placing orders.) I had originally planned to return it, but Bowser convinced me to try it out in here and I’m so glad she did. There’s a lot going on up top, so it’s nice to have something really graphic balancing the whole space, you know? It’s also long enough to cover up 90 years of tile damage and thin enough to work with my door frame. WIN/WIN. And let me sing the praises of those Threshold towels real quick, because they’re incredible and SO soft. 2 for $10, too! I grabbed a set in black and a set in mustard and I’m really impressed with both so far.

Two more simple but impactful changes: the light fixture and the cabinet knobs. I had originally planned to go brass for both, but I changed my mind after the wallpaper was installed. I grabbed the 1″ cabinet knobs from Build.com for about $50 – I really love their modern shape and the way that they ground the vanity a little bit more than their silver predecessors. The light fixture was an absolute score from Walmart, believe it or not. There’s a very high chance that it’s available via ANY lighting retailer of your choice for $190 (just google “Capital Lighting 3 arm bathroom sconce,”) but I was able to grab it on sale for just over $100 bucks with free shipping. It’s simple and clean and traditional and it looks more luxe than its tiny price tag, which is a win in my book.

Black Tray | Peach Tray | Geometric Candle (similar)
Before we get any further, YES, that geometric wall thing is my heating grate. I open that bad boy up in the winter time and it gets SO TOASTY in here! It’s kind of fun to look at, too. You’ve also seen that lamp on the blog before – I grabbed it on a Rose Bowl flea market trip earlier this year with Jess. It’s actually my preferred nighttime light source because it’s so warm and soft and moody and cozy. Doing my skincare routine in here every night is a blast, guys. (And yes, my medicine cabinet is fully utilized – we’ll get there.)
That black marble tray was an Emily hand-me-down when she moved up to Oregon, and it’s also still available via CB2! It’s really weighty and I’m pleasantly surprised by the $35 price tag because it’s one of those pieces that feels like it should be way more expensive. We layered this tiny peach Los Angeles-themed tray on top – you know, in case you forgot where you were – and it’s perfect for storing jewelry or hair clips. Bowser also brought that INSANE geometric candle – it’s so good, right? If you’re in the market for something similar, Forma Studios makes some super cool modern alternatives.

Two more of my favorite things to talk about!! First up, that toothbrush cup. It’s a Sara Tramp original (not to brag, no big deal) that she made me for Christmas a year or two ago. It may not be her favorite piece (judging by her reaction when I was like “YOU MADE THIS!!!” and she was like, “ugh”), but I love it very much. It’s fun to use things made by your friends. For what it’s worth, though, I keep my actual magenta plastic toothbrush in my medicine cabinet and my face-washing tools in the drawer you see on your lower right. It’s nice to pretend I’m the type of person with beautiful wooden toothbrushes and face brushes, but uh, that’s not my reality. (Maybe one day, but not today.)
Next up – I’m in love with that art by Elissa Barber in the back. You can only see one in the reflection right now, but I have two pieces hung like a diptych. Erik actually sourced her work for the book and it’s so cool and minimal and fresh – both of the pieces hung here are single-line drawings of faces and they feel so special and weird (in the good way, always) with this wallpaper as their backdrop.

I thiiiink this is tied for my favorite shot of the bunch. Scout Design Studio, my favorite small business for all things home, introduced a line of sculptures earlier this summer and I would be lying if I said that I did not SPRINT to my laptop to purchase this zig-zag bust of Hermes. It wasn’t cheap then and I think the price has gone up a bit since, but I know I’ll love it forever. (Do not click on that website if you don’t have 30 minutes to browse. Their furniture is too good. Their decor is too good. The art is too good. I don’t know anyone over there, but I want to be friends because they all seem to have TIP. TOP. TASTE.)
I’ll also always be a sucker for a preserved boxwood topiary. I grabbed this one from Ballard Designs and it’s a real plant that they soak in something or spray with something (you know, they do some sort of science to it) and then it should last for about three years as long as I take care of it. Boxwoods are really traditional and classic but they’re also pretty graphic and playful, so I think they’re a great way to bring some life and greenery to a space. That candle was an Urban Outfitters find and it is VERY beautiful, but it also smells like an elementary school cafeteria on French Toast Stick day. Would not recommend for scent, but would recommend for styling. (Alternate option: stick your own tassel on a glass jar and call it a day.)
Last but not least – that art on the wall was my Christmas gift from Emily in 2019. Getting a piece of MaryAnn Puls work is an EHD rite of passage – you’ve seen one of her pieces in almost every team MOTO reveal we’ve ever shown on the blog – and I’m glad to be able to share mine today. I love it very, very much. (PS. the bud vase is Hearth & Hand, but it’s no longer sold online.)
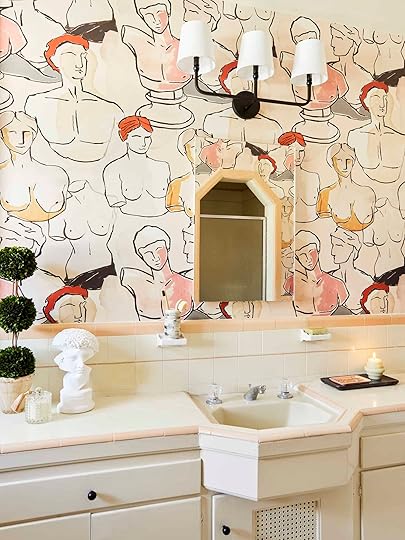
The moment you’ve all been waiting for: AN ARGUMENT IN DEFENSE OF MEDICINE CABINETS. In my original design plan, I wanted to remove the front of my medicine cabinet in favor of installing a bigger, more abstract-shaped mirror. Now, as I look back, all I gotta say is WHY WOULD I WANT THAT? You know what’s in this magnificent storage space? SO much skincare. And my toothbrush. And toothbrushes WITH toothbrush holders for guests. And anti-seasickness wristbands. And sunscreen. And hairspray and self-tanner and multiple kinds of lotion. And guys, it’s all RIGHT IN FRONT OF ME. There’s no bending or digging or aimlessly searching – I know where everything important is, because it is smack dab in front of my face. The aesthetics of this medicine cabinet never really bothered me, but the frameless front fully disappears into the wallpaper now. ONE MILLION STARS FOR MEDICINE CABINETS. They are the functional heroes of bathrooms nationwide and I’m tired of the slander.
One more note: aren’t vintage bathrooms the best? I have a whole new appreciation for the way this sink echoes this shower shape now that I’m not, you know, glaring at my yukon gold tile and quietly cursing the painter who slapped the beige sampler palette on every other surface in here before I moved in.

OH BOY. We’re halfway around the room so just as you’re settling in – like “oh, I get this, I think,” – here’s a very disorienting vintage giraffe statue to throw you off your rhythm. (“Now he’s off his rhythm” – John Mulaney, and also me, right now, in this moment.) First up, though – I eschewed a window treatment in here in favor of hanging a mirror. I originally started balancing this mirror in my window frame because the light was better for makeup application (eastern facing, so gets kind of shadowy in here as the day goes on) until then one day I was like, “screw it, this is my window treatment now.” I live on the second floor, the bottom pane of glass is treated with privacy film, and at this point, I just think it looks cool. It’s fun and functional hanging it was way less than an actual window treatment (the mirror is old from Target, the chain was like $2) so we’re rolling with it. Also, peek that little egg in the bottom right of the windowsill – that was another flea market find from my trip with Jess.
Now, I KNOW. We’ll get to the giraffe. But I also just wanted to hype up this West Elm end table, which was a birthday gift from my mom last year (thanks, Brenda!!!). It’s the perfect height for tub laptop-watching and it’s held up great to a year of heat & humidity in this bathroom, so it gets full passing marks from me. The putty color also coincidentally works super well with the door – they’re a shockingly close color match – which is an unintended bonus that I’m still very happy about.

Art | Frames | Bath Giraffe (vintage)
There’s that second piece of Elissa Barber art I mentioned earlier – isn’t it cool? I wasn’t sure if I could get these framed in time so I grabbed two $30 Target frames on a whim and I’ve been kind of blown away by the quality. I wanted to highlight Elissa’s art with a crisp, white mat so it’d stand out against the wallpaper and I’m really happy with how it turned out. It may be too many faces for some, but it’s just right for me!! (Bonus fun fact: I wear slippers 24/7 but those do not belong to me, because apparently, my slippers are “too thick” and “too worn” and “flat in weird places” with “paint all over them.” Or, you know, something like that. So basically, thank you to Bowser for lending her beautiful, luxe, not ugly slippers for the day. My clunky L.L. Bean slippies and I can acknowledge that these do, in fact, look much better in the shots. You’re right, as always.)
And now, the saga of BATH GIRAFFE. Basically, I fell in love with an 8′ tall giraffe statue on Facebook Marketplace (as one does). I’ve long had a thing for vintage leather animals – in 2013, I was moving into my first unfurnished LA apartment and spent all of my money (wasn’t much, TBH) on this instead of, like, actual furniture – so falling in love with impractical things is super in character for me. Tragically, I came to terms with the fact that the 8′ tall giraffe would not fit in a home with extraordinarily average ceilings so I let it go, but MAN, I WAS BUMMED…until a smaller, super affordable version popped up a few days later. I presented it to the EHD team and I mean, COME ON, we all know what happened next…

SO HERE BATH GIRAFFE IS, making his EHD debut. I know it’s kind of weird (read: very weird) to put a statue in your bathroom but it just FELT like he belonged in here, you know? I had the space and visually, he just sort of slid right into place. This is the blog post, boss. This is how and where I have styled it. I hope you approve!!
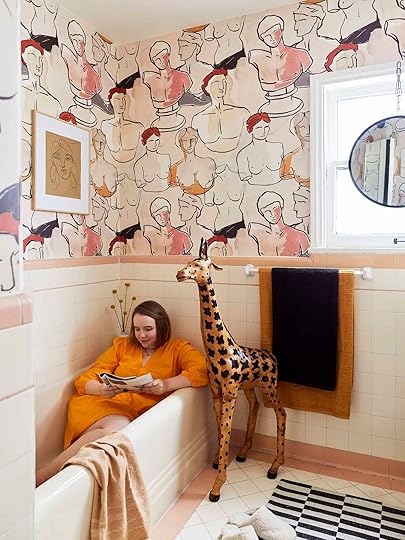
SEE? We’re really happy together, my Bath Giraffe and I. Here I am, a totally grown and seemingly normal person, reading Dwell out loud to the 4′ tall leather giraffe that I bought from a stranger in a Carl’s Jr. parking lot. I know that it’s silly to have this in here, but it’s also VERY FUN. And honestly…there are worse sights to see when you’re dragging yourself outta bed in the morning. Like, why NOT put something ridiculous in your bathroom so you can start every day thinking that you’re hilarious? The whole room is a little surreal, so I might as well lean into it.
Maybe one day Bath Giraffe will find a new home, but for now, I’m happy to relax beside him once or twice a week. I was also recently informed that the 8′ giraffe I missed out on has been paired with a similar 4′ bath giraffe dupe and that the set are now being sold for eight. thousand. dollars. here in LA so uh, I think I’m kinda on to something here. Like, who needs bitcoin or GME when I can invest in whimsical animals? (PS. I’m still laughing that this is a picture I took ON THE CLOCK. At my job!!!! This was me working!!! I know it’s been over 2 years at EHD, but I still gotta pinch myself once in a while – can’t believe I’m allowed to have this much fun at work, you know?)

SIGH. Somehow, that brings us to the end of our morning tour. I know this space isn’t traditionally super EHD (nary a blue in sight!!) and it may be one of the uh, louder bathrooms we’ve ever run on the blog, but being in here makes me really happy. When I get ready in this space every morning, I feel like I’m headed to a party and even the simple things, like brushing my teeth by the light of the turtle lamp at night, feel extra special. GEEZ. Even I’m making myself cringe with how sentimental I’m getting, SORRY. It’s just fun when your house feels like an actual reflection of you, you know??
With all that said, please come back and spend some more time with me this afternoon. We’ll be exiting right through that door and peeking around some corners. I’d love to have you (if only so you can judge my photos and be like “this girl who’s lecturing me about the rules of window treatments doesn’t even have curtains in her own house?! WHAT A DOOF!”). But before you go, let’s peek at the before and afters…


In the meantime I’ll be here, navel-gazing privately (no more sap from me today, you’re welcome) while staring at the walls that I somehow love more every. dang. day. I’m so excited to have finally dropped the curtain a little bit, so now I’m left with one final question: ANYONE WANNA VISIT? I’m great with a curling wand and I have a stockpile of face masks that are ready to go. Let’s make some plans. We can include Bath Giraffe, if you want. See ya this afternoon for round two. xx
*Design by Caitlin Higgins
**Styled by Emily Bowser
***Photos by Sara Ligorria-Tramp
The post Caitlin’s First MOTO Reveal – A Vintage Bathroom Gets A Modern Update appeared first on Emily Henderson.
October 13, 2021
The Surprising Piece Of Furniture Gen Z Wants… Turns Out We Do Too
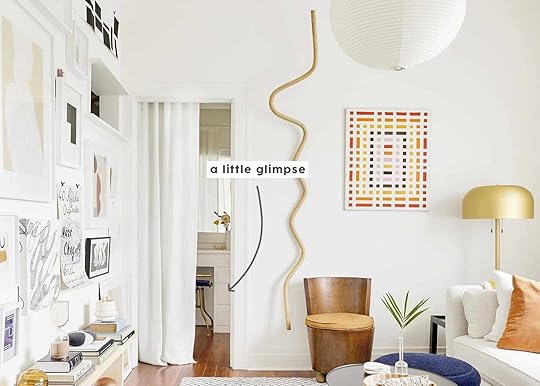
The first time I ever had a vanity in my room was my first apartment in college. Luck was on my side because I drew the big straw (literally) and got to pick the biggest room with a BUILT-IN vanity. I tried to find a picture of it but I wasn’t as good at taking photos (or backing up my computer) back in 2007. Actually, I’m still bad at backing up my laptop… Anyway, the feeling of adult womanhood washed over me like a delicate spritz of an expensive perfume the moment it was officially mine. I pictured how elegant and grown I would feel sitting on a vintage stool in front of my vanity mirror while probably wearing something like a long silk robe. Can you tell I was a theatre major with this scene I created??? Not sure if it was the movies, the musicals, or the older women in my life that created this huge imprint but regardless of the influence, it was real and I am still under it. However, I’m not alone… Gen Z wants in too.
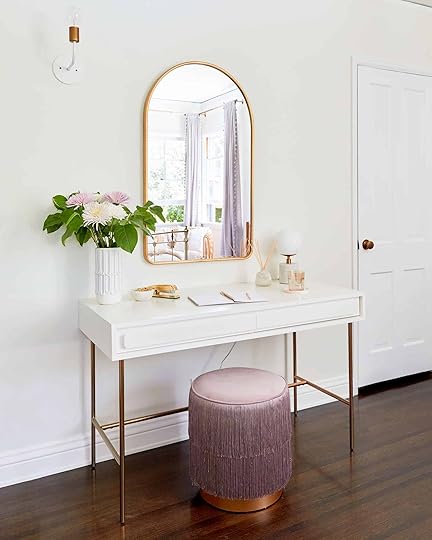 design by julie rose for ehd | photo by sara ligorria-tramp | from: a refresh of our favorite “child client’s” – bedroom 8 years later
When Julie refreshed 17-year-old Grace’s bedroom (above), one of Grace’s main requests was that there was a vanity. Since Julie likes to make her clients happy she did her one better by making it a vanity/desk since ya know, dumb homework. Then as I was pursuing the internet this past week, I noticed that Urban Outfitters was STOCKED with tons of vanity options. My conclusion, given these two strong pieces of intel, Gen Z wants in on vanities. Like me, as a 19-year-old yearning to be grown, they are likely feeling the same. But instead of its primary purpose to be a place to become “perfect” looking (ie giving Marvelous Mrs. Maisel vibes), now it’s more about self-care. This is the way it should be, right?
If you were anything like us gals at EHD, you went kinda deep into the skincare life during quarantine. Actually, creating a solid routine was one of my proudest achievements since washing my face daily was only a 50/50 probability pre-covid. Look, some of us are late bloomers. But I seriously fell in love with the gentle, slow care I did for my face. And it’s something I don’t want to lose just because life is getting busy again and I have a tendency to put myself last. I really think sitting down (after you wash your face) is crucial for ease, enjoyment, and ultimately, consistency… at least for me (a certified sitting lover).
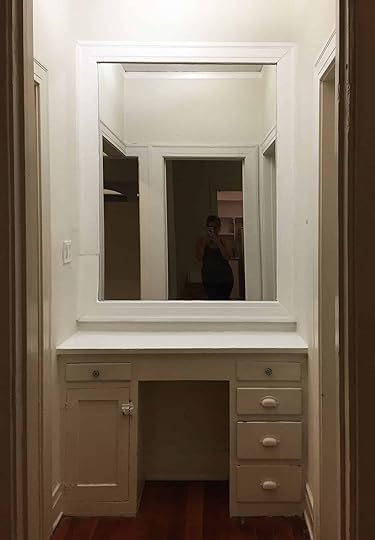
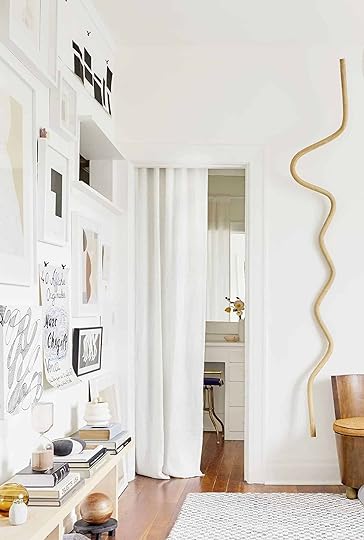 right photo: design by jess bunge (me!) | photo by sara ligorria-tramp | from: makeover takeover: jess’ long awaited (small space) living room reveal
You may remember seeing that I had a built-in vanity in my last apartment. It was a HUGE perk and is probably what made me say “I’ll take it!” three minutes are stepping inside. I thought, “FINALLY, after 10 years sans vanity, I’m back baby!” Well, that was until I moved. There are about 1000 things I love about my new apartment but having a built-in vanity isn’t one of them. And obviously, that’s totally ok… we’ll it’s mainly ok since I can probably fit a free-standing one in my bathroom. Let me show you…
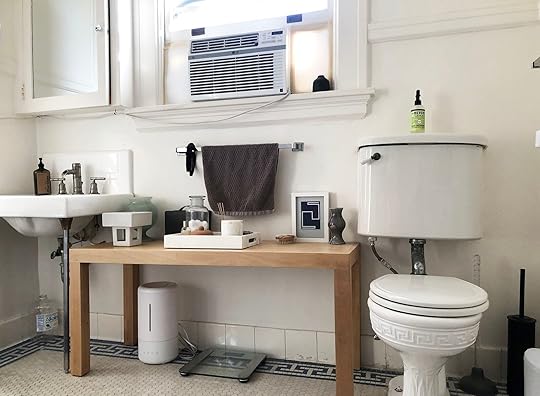
This is the current state of my bathroom. It’s ummm, fine for now. Actually, that’s Emily’s “paint can riser” desk from waaaay back in April of 2020. If you don’t know what I’m talking about go here for a good laugh. Anyway, I was going to use it for a potential sponsored thing that ended up shifting its focus but I still had the table and Em didn’t want it back. Since I had a lack of sink counter space for when I wanted to do my skincare routine or put on makeup, I thought I’d see if it fit between my sink and toilet. As you can see it did. While definitely not the right scale, it’s been SO nice to have to set things on. But boy do I want a vanity where I can sit down. I promise I stand and walk too!

I honestly wasn’t even looking for one yet but then I came across this AWESOME vintage set for under $400! It’s in northern California but my dad lives up there:) I quickly started to craft my “Hey dad, best guy in the world. Could you maybe, possibly pick up this vanity set for me???” Luckily for him, size-wise it wasn’t going to work given that the mirror would’ve covered the air conditioner vent. It’s the only ac unit in the whole apartment. I actually need it. So despite the heartbreak, I got the urge to see what’s on the market in case something jumped out at me and/or in case any of you could use a self-care vanity of your own. Here’s what I found…
 design by studio shamshiri | photo by stephen kent johnson
Let’s start with a good ole wooden vanity. Wood will always bring in texture and warmth to a space. And especially in a bathroom filled with tile that could be really nice, right? But also remember vanities can absolutely go in bedrooms if your bathroom doesn’t have “vanity square footage”.
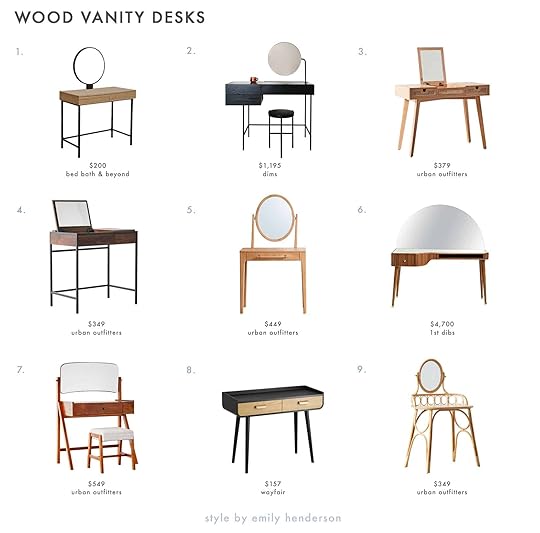
1. Wood and Metal Vanity | 2. Composed Vanity II by Ladies & Gentlemen Studio | 3. Marte Vanity | 4. William Vanity | 5. Linnea Vanity | 6. 21st Century American Walnut Veneer Vanity Desk with Mirror | 7. Loren Vanity Set | 8. Mcmaster Solid Wood Desk | 9. Caroline Rattan Vanity
If me loving #1 isn’t enough to convince it’s great, it’s also one of Jeremiah Brent’s picks of the Studio 3B collection. Juuuust saying. Now if you have a bigger budget #2 is well, perfect (?). I love how simple yet interesting and functional but beautiful it is. It also comes in a natural wood so you have options. Oof, I wish it could work for me. But truly I really like all of these…which is why I picked them:)
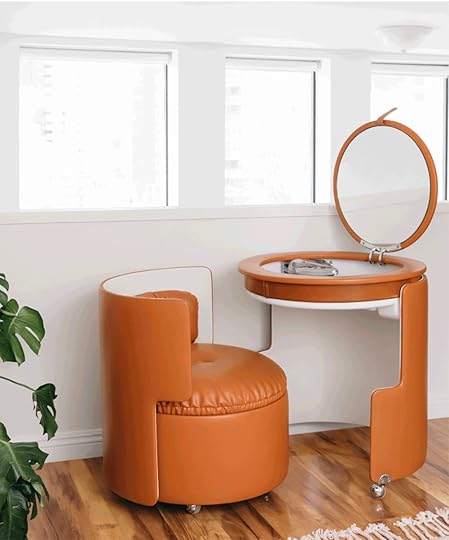 design by alyssa coscarelli | styled by elaina sullivan | photo by sharon radisch | via domino
If you really want to go modern to either contrast your bathroom’s (or bedroom’s) style or keep the modern look going strong then here are some great options.

1. Chloé Vanity Desk Design By Emmanuel Gallina | 2. Blaire Classic Vanity Desk Set | 3. Grubbs Vanity with Mirror | 4. Williams Bedroom Vanity with Mirror | 5. Wall Mounted Heavy Duty Folding Dressing Table | 6. Mid-Century Vanity Desk Set | 7. Sonnet Storage Vanity Desk | 8. Mangino Vanity Set with Stool and Mirror | 9. Charlette Vanity
Of course #1 (the most expensive) is really speaking to me but for under $300, I love number #9. But if storage is what you need (and after “the great skincare product testing of 2020” a lot of us do) #5, #6, and #7 look like they can hold a lot.
 design by harding & read | styled by michelle kelly | photo by seth carnill | via remodelista
But it’s always a good (and sustainable) idea to check out if there are any vintage options that might be perfect. Plus these vanities have seen a lot and deserve a second life to be there for a new generation of people wanting to take a little extra time for themselves…while sitting.

1. Antique Art Deco Veneered Vanity With Mirror | 2. Vintage Woman’s Vanity with Mirrored Panels | 3. Mid Century Vanity by Meredew Furniture Teak | 4. Midcentury Modern Birch Wood Veneer on Black Legs Vintage Dressing Table | 5. Danish Teak Vanity Desk | 6. Danish Art Deco Vanity Desk with Tri-Folding Mirror | 7. Vanity Desk Dressing Table | 8. Mid-Century Scandinavian Teak Vanity | 9. Mid Century Modern Danish Teak Vanity Table
I’m personally most drawn to #2 and #9 but I feel like #1 has Caitlin’s name written alllll over it. You’ll get what I mean if you read this post. But honestly, check out your local thrift and consignment shops. I always see vanities so you might just find your perfect match.
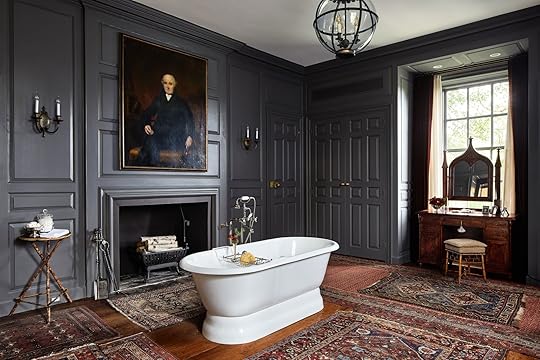 design by lea berman | photo by stacy zarin goldberg | via architectural digest
Not all of us can have a vanity. If only. Space can be a real jerk in this department. All you want to do is sit down and put on your eye cream like the luxurious person you are! But if you grab a tabletop mirror, any table or desk can become a temporary vanity.
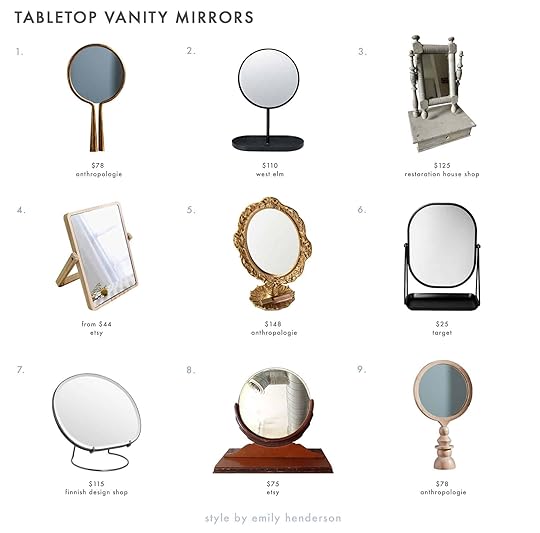
1. Tabletop Vanity Mirror | 2. Modo Vanity Mirror | 3. Antique Shaving Stand | 4. Wooden Swivel Mirror | 5. Coraline Vanity Mirror | 6. Metal Vanity Flip Mirror with Tray Black | 7. Pond Table Mirror | 8. Vintage Mirror | 9. Harper Tabletop Vanity Mirror
Is it any surprise that I LOVE #1?? It’s so good. Please, someone, buy it and tell me how good it is in person. Modern elegance. But on the other hand, I am totally charmed by #3. What a cutie. But #2, #5, and #6 are great since they have little trays things like jewelry.
So what do y’all think? Do you have similar feelings toward having a vanity table? Do you have one and love it? Are you not down and prefer to stand up while doing all your routines? If you are a parent to a Gen Zer, do they have or want one? Fun Fact: Emily is planning to get one for her closet in the farmhouse. I can’t wait to see what she chooses!
Love you, mean it.
Opening Image Credits: Design by Jess Bunge (me!) | Photo by Sara Ligorria-Tramp | From: Makeover Takeover: Jess’ Long Awaited (Small Space) Living Room Reveal
The post The Surprising Piece Of Furniture Gen Z Wants… Turns Out We Do Too appeared first on Emily Henderson.
Emily Henderson's Blog

- Emily Henderson's profile
- 10 followers

