
Inu Etc's Blog, page 9
August 15, 2024
How to Get Your WordPress eCommerce Store to Compliance with GDPR Cookies?
The GDPR was, in a way, an eye-opener for privacy laws across the world. Although the GDPR is specific to Europe, it acted as a benchmark that various countries followed up by framing similar privacy laws.
Under the General Data Protection Regulation, businesses are required to obtain explicit user consent for the collection of personal data through website cookies, tracking scripts, contact forms, sign-up forms, and other means. The GDPR has also made provisions that give users the right to easily withdraw consent.
Of these, cookies can be one such big culprit in violating GDPR compliance since they collect a good deal of information from the website visitors without their knowledge and consent, thus encroaching on the right of privacy.
So, if you are stuck, wondering how to make sure that your use of cookies complies with GDPR, we are here for the rescue. We’ll show you how to ensure that your use of cookies complies with GDPR for your WordPress eCommerce site in this article.
Now, without wasting any time, let us get into the details.
How Do Cookies Risk Your GDPR Compliance?The website cookies might risk your GDPR compliance in many ways.
Lack of Transparency: Cookies collect information from your website visitors in the background. As per GDPR, businesses should inform users about data collection, what data is collected, why it’s collected, how long it’s going to be stored, etc.Lack of Consent: Cookies work in the background and never ask for consent to collect data from users. That is clearly against the GDPR guidelines.Third-party ad and tracking scripts: Most websites use cookies and other tracking scripts to make it possible for a user’s browsing behavior to be tracked across the internet. This information is then sold to interested advertisers, who display retargeting ads on different websites. These third parties will also have to comply with the GDPR, and the website will have to ensure that their usage of third-party cookies does not break the privacy rights of users.Extended retention periods: Cookies should not be retained longer than necessary. According to the GDPR, personal data — including that collected through cookies — is supposed to be kept only for as long as it was collected.Inadequate Cookie Banners: Just putting up a cookie banner in front of the visitors does not make you cookie compliant with GDPR. It should meet certain criteria as mandated by GDPR. Moreover, dark patterns such as hiding the reject button or tricking the visitor to give his/her consent go against GDPR.
 Also Read:
11 “Must Have” Free WordPress Plugins Every Blog Needs
Also Read:
11 “Must Have” Free WordPress Plugins Every Blog Needs
A cookie consent banner will assist you in seeking prior consent from your website visitors to load cookies on browsers. The cookie banners include both the ‘accept’ and ‘reject’ buttons, which permit users to choose their consent over different classes of cookies and scripts.
Now, let us see what requirements are there for a cookie consent banner to be considered as GDPR-compliant.
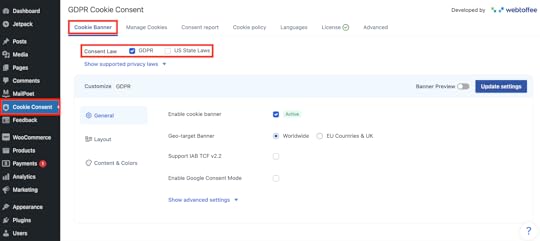
Requirements for a GDPR-Compliant Cookie BannerOpt-in consent: You will have to put a system for opt-in consent in place under the GDPR. This means that, essentially, all third-party cookies that exist on your website must be blocked unless users opt for it.Notice of use of cookies: Very clearly, the cookie banner shall give the entire information regarding the type of cookies used, why they are used, and how long they will be retained on your website.Automatic Translation: Allow content in the cookie banner to be automatically translated according to a user’s preferred language. Categorization: Organize cookies based on their purpose. Granular Control: Allow users to accept consent to cookies at a granular level based on the categories to which they belong.Accept/Reject Buttons: Place buttons inside cookie banners that represent their acceptance and rejection.Revisit consent: Users can be given a widget with which they can configure their consent settings on the website and withdraw or change previous consent. Links to policy pages: Links to the privacy policy and the cookie policy have to be given in the cookie banner. Mobile responsive: The cookie banner should be mobile responsive and user-friendly.Consent log report: Users’ consent has to be recorded for proof of consent.Now, let us see how to create a GDPR-compliant cookie banner on your WordPress eCommerce website.
How to Create a GDPR Cookie Banner in WordPress?To create a cookie banner, we will use the GDPR Cookie consent plugin by WebToffee. This WordPress cookie plugin is a Google-approved CMP that aids one in managing cookie compliance on websites.
The plugin will automatically turn off all third-party cookies until the user has given his consent. Different accept and reject buttons, granular consent options, cookie banner messages, etc. are also added according to the GDPR requirement.
Now, to display a GDPR cookie banner in WordPress, follow these steps below:
Step 1: Install and Activate WebToffee GDPR Cookie PluginWebToffee’s GDPR Cookie plugin is a premium plugin that requires you to purchase a license to use it. After purchasing the plugin, you can download the plugin file from the My Account page.
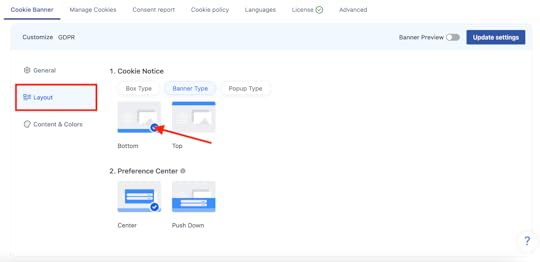
After downloading the plugin file, go to your WordPress dashboard and click on Plugins > Add New Plugin.Install the plugin with the option of uploading, after which you will upload the respective plugin file and click on the Install Now button.After this, activate the plugin.Step 2: Install a GDPR Cookie Banner


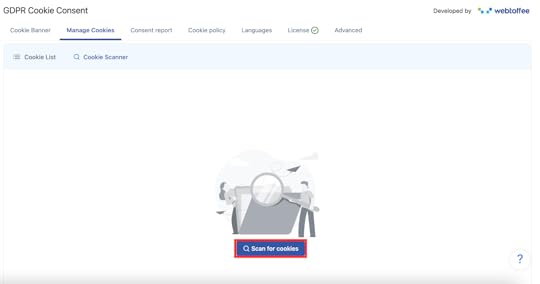
This will initiate the process of scanning for cookies. After the plugin scans your website completely, it will display all the cookies present on it according to their categories, and all the third-party cookies are disabled unless the user has consented.
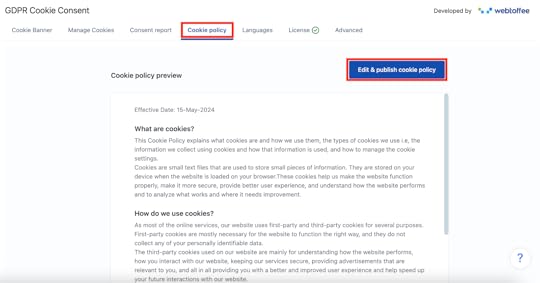
Step 6: Create a Cookies PolicyGo to the tab that says Cookie Policy and click the Edit & publish cookie policy button.
[image error]
Click Publish if you have already made the changes.
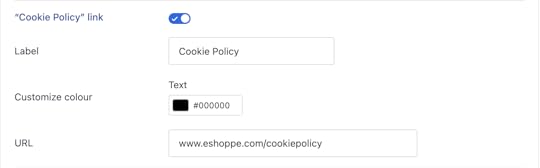
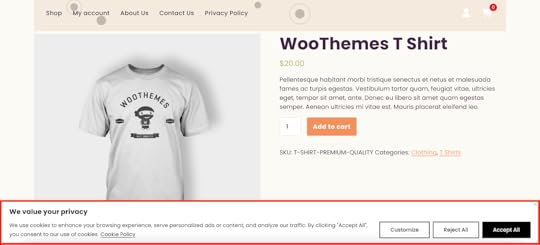
Here is a preview of the cookie banner on a WordPress eCommerce website.
Conclusion – How to Get Your WordPress eCommerce Store to Compliance with GDPR Cookies?GDPR Compliance involves constant efforts to maintain your data collection in accordance with the guidelines. Hopefully, this article has helped you with ways to ensure GDPR compliance for cookies on your WordPress eCommerce website. I would also recommend reading our article: “How to Make Sure Your Google Analytics Complies with CCPA.”
Thanks for reading this article. 
If you loved what you read, would you be able to buy me a cup of coffee? It’s okay if you can’t right now.
If you have any questions or if you wanna work with me, feel free to contact me. I’m always available to help young hustlers like you @InuEtc on Instagram.
Keep hustling!
The post How to Get Your WordPress eCommerce Store to Compliance with GDPR Cookies? appeared first on Inuidea.com by Inu Etc.


August 12, 2024
I Started a New Website and Got AdSense Approval Within 2 Months
I started a new website called Wavegen Media on May 21, 2024, and within 2 months and 10 days, I got AdSense approval.
When I launched Wavegen Media, I applied from my old AdSense account and within 20 days of starting Wavegen Media, I got AdSense approval.
However, I thought it would be better to apply from a separate AdSense account rather than using my old one, where I already have Inuidea.com and some other websites AdSense approved, as it would be easier to transfer ownership in the future if I want to sell Wavegen Media.
After I sold Zillion Media, I had to help the buyer get new AdSense approval, and it turned out to be quite difficult because there were a lot of changes made on the website content, but after waiting for a couple of months, I was able to get new AdSense approval for Zillion Media as well.
The experience of selling Zillion Media taught me that if I sold an AdSense account with the website, it’s easier, it simplifies transferring ownership, I don’t have to re-apply for AdSense, I only have to transfer the Google account and the website.
That’s why I made a new Google account for Wavegen Media, and I applied for a new AdSense account last month, and I got approved on July 31, 2024.
Now, I can do a lot of experiments with Wavegen Media, and my old AdSense account for inuidea.com will remain safe.
After getting AdSense approval for Inuidea.com with just 7 blog posts, Zillion Media within a month (though the second attempt took longer, it was a valuable learning experience), and Wavegen Media with only 14 articles, along with my success with my other websites and helping hundreds of others achieve the same,
I’ve realized that,
Getting AdSense approval is not a big deal for me if I design the website, manage the content, and follow the step-by-step guidelines I created for AdSense approval.
Here are some of the most important things to keep in mind when creating a website for AdSense approval.
Design a professional-looking blog. I usually buy a premium theme from Themeforest , and sometimes I use Elementor and Astra Theme to design a premium looking website. A user-friendly website, with a clear navigation menu and an attractive design, is extremely important, both for AdSense approval and visitors’ experience with your website.Treat your website like a real business. Create a professional logo and brand assets, and set up social media accounts on Pinterest, Facebook, Instagram, Twitter, and LinkedIn—these are essential. Make sure your website looks professional and authentic. If you need a logo and brand assets designer who can manage all these things, you can hire me.Publish original SEO content. Don’t fill your blog with plagiarized articles. Write some unique, valuable, engaging, and high-quality content for your targeted audience. Create the necessary pages. There are some pages which your blog must have before you apply for Google AdSense. Such as the about page, privacy policy page, and contact page.Keep creating original content. If you want to learn how to write blog posts that generate traffic and sales for your business, then you need to read this article. — How To Write a Blog Post that Generates Traffic and Sales.Read this article for more information about getting AdSense approval for new blogs. — How to Get Google AdSense Approval Fast With a New Blog.
You can also hire me to create your website and manage it for a month or more to get it ready for AdSense approval.
Thanks for reading this article.
If you loved what you read, would you be able to buy me a cup of coffee? It’s okay if you can’t right now.
If you have any questions or if you wanna work with me, feel free to contact me. I’m always available to help young hustlers like you @InuEtc on Instagram.
Keep hustling!
The post I Started a New Website and Got AdSense Approval Within 2 Months appeared first on Inuidea.com by Inu Etc.
August 9, 2024
How to Get Google AdSense Approval Fast With a New Blog (2024)
As a beginner blogger, If you want to convert your blog into a money making blog, then Google AdSense is the #1 ad network you can use to monetize your blog.
Every new blogger wants to monetize their blogs with AdSense, and many of them fail because of the strict Google AdSense policies.
The good news is,
If you follow some basic rules and maintain your blog like a real business from the starting of your blog, you’ll definitely get Google AdSense approval with your new blog.
In this post, I’m going to show you some Google AdSense approval tricks and the 7 essential things you must do before applying for Google AdSense.
Let’s dive right in!
How Much Traffic is Required for AdSense Approval?Related Post: The Ultimate Guide on How to Start a Money Making Blog
There is no actual traffic minimum to apply to AdSense. The number of visitors is not a factor of Google AdSense approval. Like other ad networks, they don’t have minimum traffic thresholds you need to meet.
Even though Google says, the number of traffic isn’t a Google AdSense approval factor, according to my personal experiment, I think traffic matters.
After all, if you don’t have a decent amount of traffic, you’re not going to make much money from your blog.
So, if you’re a beginner blogger, I suggest you use Pinterest to get targeted traffic to your blog and work on SEO to get free organic traffic from Google.
Things You Must Do Before Applying for Google AdSense1. Write High-Quality ContentDon’t fill your blog with plagiarized articles. Write some unique, valuable, engaging, and high-quality content for your targeted audience.
Write in-depth and well-optimized blog posts with above 500–600 words.
Also, AdSense will not approve your application if you write AdSense prohibited content.
So, make sure your blog has some high-quality content before you apply for Google AdSense.
2. Make Your Blog Posts SEO FriendlyYou should optimize your high-quality blog content with the Meta title and description tag.
Google AdSense may use its crawler bots to check your complete site because it’s not possible for the AdSense team to visit and review hundreds of websites that have applied for AdSense approval.
If you are using WordPress, install the free Yoast SEO plugin to optimize your blog content for search engines easily.
These simple tactics can help you rank higher on Google too.
3. Write Sufficient Blog PostsI got Google AdSense approval for Inuidea.com with only seven high quality and in-depth blog posts.
So the number doesn’t matter; what matters is the quality of the content.
But try to write up to 15 blog posts before you apply for Google AdSense and make sure your blog has sufficient content on every single web page.
4. Create Must-Have PagesThere are some pages which your blog must have before you apply for Google AdSense.
Such as about page, privacy policy page, and contact page.
A privacy policy is required by law if you collect personal information from users, and it’s necessary if you are going to use Google AdSense ads on your blog.
If you have a business similar to my business, just copy and modify my privacy policy page according to your needs. You can copy and use someone else’s privacy policy, and it doesn’t hurt your blog SEO health or reputation.
After all, there are millions of privacy policy pages and they are almost the same.
5. Make Sure You’re 18Related post: How Much Does It Cost to Start a Money Making Blog (The Cheapest Way)
AdSense Terms and Conditions clearly notify that they only accept applications from applicants who are over 18.
If you’re under 18, you can ask your parents or guardian and sign up for AdSense using their information.
This post contains affiliate links. I may receive a commission for purchases made through these links. This commission comes at no extra cost to you. Also, I don’t recommend anything that I don’t believe in.
6. Ensure You Don’t Use Copyrighted ImagesAdSense doesn’t approve blogs if they noticed copyrighted contents.
Maybe you’re using copyrighted images without taking permission from the owner. Keep in mind that it’s illegal and harmful to your business.
So, make sure you’re using images by taking permissions, or you’re using copyright free images on your blog.
7. Design a User-Friendly and Professional-Looking BlogYou should design a user-friendly site with a clear navigation menu to help your visitors find important pages.
Also, make sure your blog is professionally designed and responsive to improve user experience.
If you have no idea about building a website, I can help you build a professional website for your online business. Know More

If you’re using WordPress, you can easily design a professional-looking blog using a WordPress theme.
For Inuidea, I’m using Avada, an easy to customize WordPress theme available on Envato Market.
8. Create Brand Assets, and Set Up Social Media Accounts.Related Post: 7 Best WordPress Themes for Blogs
Treat your website like a real business. Create a professional logo and brand assets, and set up social media accounts on Pinterest, Facebook, Instagram, Twitter, and LinkedIn—these are essential. Make sure your website looks like an authentic brand.
Applying for Google AdSenseIf you need a logo and brand assets designer who can manage all these things, you can hire me.
After maintaining a blog by following all the tips mentioned above, you can apply for Google AdSense and quickly get AdSense approval for your new blog.
To apply for AdSense, go to the sign-up page for Google AdSense and apply by entering your website details, contact information, etc.
When applying for Google AdSense, keep in mind that you are using your real name, an actual address, and a correct payee name.
Google AdSense Approval ProcessRead more: 11 “Must Have” Free WordPress Plugins Every Blog Needs.
Once you have signed up for Google AdSense, you need to add AdSense codes to your blog. You can also install ‘Site Kit by Google‘, a WordPress plugin to set up AdSense on your blog.
Ads will show as blank until the final approval process doesn’t finish. It may take up to 1 or 2 weeks for the final review and approval.
After the final AdSense approval, you will get a confirmation email saying that ‘The site “yoursitename.com” is now ready to show AdSense ads.’
Yes, now you can add more ads to your site. Within a few hours, you’ll begin to see relevant ads and can start earning money from your AdSense approved blog or website.
Once your earnings reach $10, AdSense will mail you an address verification PIN to the address. Login to your AdSense account and enter the PIN.
Congratulations,
You have completed all the steps of the Google AdSense approval process. Once your earnings reach $100, Google will send you or wire transfer your earnings to your bank account.
Google AdSense Alternatives
Get Google Adsense Approval Fast With a New BlogWant me to review your site for AdSense Approval?
Learn more or contact me.
Looking for a Google AdSense alternative?
Try PropellerAds or Media.net. They are reputable, they also have a large number of advertisers, and their payouts are good too.
Google AdSense is easy to set up, but the amount of money you can earn from AdSense is limited. So, directly selling banner ad space can be more profitable.
It takes more work to manage directly selling ads than Google AdSense. You’ll have to negotiate the pricing, come up with an agreement, and take care of invoicing.
However, using a WordPress ad management plugin such as Ad Inserter can make the process easier.
I recommend you use AdSanity, it allows you to manage Google AdSense as well as your own banner ads.
You can also try affiliate marketing, sponsorship, and more to monetize your blog.
Now It’s Your Turn.Read more: 9 Proven Ways to Monetize Your Blog – Make Money Blogging
Hey hustlers,
I really hope you enjoyed this Google AdSense approval guide.
If you follow all the above-mentioned tips, Google AdSense approval tricks, and apply for AdSense, I’m pretty sure that Google will approve your AdSense account.
Do you have any questions regarding Google AdSense approval?
Let me know in the comment section below.
If you enjoyed reading this article, don’t forget to share it with your friends and fellow bloggers.
How to Get #GoogleAdsense Approval Fast With a New Blog. #Blogging #BloggingTips
Share on X
If you loved what you read, would you be able to buy me a cup of coffee? It’s okay if you can’t right now.
If you have any questions or if you wanna work with me in any way, feel free to contact me. I’m always available to help you.
Keep hustling!
AdSense CalculatorEnter “Click-Through Rate (CTR) in %,” “Cost Per Click” and “Ad Impressions” below and click “Calculate Earning”.
AdSense Calculator
body
#adsense-calculator-form {
font-family: 'Poppins', sans-serif;
margin: 0;
padding: 0;
background-color: #fff;
}
#adsense-calculator-form form {
background-color: #fff;
border-radius: 10px;
box-shadow: 0 0 10px rgba(0,0,0,0.2);
margin: 20px auto;
max-width: 500px;
padding: 20px;
}
#adsense-calculator-form label {
display: block;
margin-bottom: 10px;
color: #d8334a;
font-weight: bold;
}
#adsense-calculator-form input[type=text] {
border: 1px solid #ccc;
border-radius: 3px;
padding: 10px;
width: 100%;
margin-bottom: 15px;
}
#adsense-calculator-form input[type=button] {
background-color: #d8334a;
border: none;
border-radius: 3px;
color: #fff;
cursor: pointer;
margin-top: 10px;
padding: 10px;
width: 100%;
}
#adsense-calculator-form input[type=button]:hover {
background-color: #c72e3a;
}
#adsense-calculator-form input[type=text][readonly] {
background-color: #f2f2f2;
border: none;
font-weight: bold;
padding: 10px;
width: 100%;
color: #d8334a;
margin-bottom: 15px;
}
#adsense-calculator-form .btn-spacing {
margin-bottom: 15px;
}
CTR (in percentage):
Cost Per Click (in USD):
Ad Impressions:
Estimated Earnings:
function calculate() {
// Get input values
var ctr = document.getElementById("ctr").value;
var cpc = document.getElementById("cpc").value;
var impressions = document.getElementById("impressions").value;
// Calculate earnings
var clicks = impressions * (ctr / 100);
var earnings = clicks * cpc;
// Display earnings
document.getElementById("earnings").value = "$"
earnings.toFixed(2).replace(/\d(?=(\d{3}) \.)/g, '$&,');
}
If you need help estimating monthly revenue from Google Adsense ads, you can use this simple Adsense Calculator.
The post How to Get Google AdSense Approval Fast With a New Blog (2024) appeared first on Inuidea.com by Inu Etc.
August 6, 2024
17 Most in Demand Fiverr Jobs for Students in 2024
Are you looking for the most in-demand Fiverr jobs for students?
Well, you just landed on the right blog post.
Fiverr is one of the leading freelancing platforms on the internet. It has been of great help to freelancers who enjoy the comfort of working from home.
While most of the workers on the platform are professionals and stay-at-home mothers, there has been a growth in student freelancers on the platform.
The unprecedented growth of student users has been backed by the growing demand for unique skills often found in students at this creative stage.
Once you visit Fiverr’s home page, you can become a freelancer by opting to “Become a seller”.
At the moment, there are over 25 freelancing opportunities for students.
In the articles, we will look at the 17 most in-demand Fiverr jobs for students in 2024.
17 Most in Demand Fiverr Jobs for StudentsThe most in-demand Fiverr jobs are:
1. Social Media Marketing and AdvertisingThis is the best freelancing job for most students. The prevalent use of social media allows them to gain valuable experience and audience engagement.
Once you visit the site, you can easily locate other freelancers on the job. Looking at the platform, you can also determine the amount of money to charge for your services.
Keep in mind that you have to offer something unique so that you can stand out from the other social media market managers on Fiverr.
You can easily set up your services for a full-time gig or a short-time gig. Most social media marketing freelancers charge a fee starting at $25 to as much as $300 per gig.
The pricing largely depends on your experience and the number of social media followers.
2. CodingThis is a very good option for computer science students. There are a lot of options for students who would like to join this line of work.
For those who would like to get in on this opportunity, there are a lot of online resources and tools that can help you learn computer science.
In just under three months, you are equipped with the skills to take on coding jobs. The category is broad and includes systems designing, app development, systems analysis, and systems audits among others. Since there are many different gigs with different requirements, you have to check out the platform to determine the price you would charge for your services.
After doing some research, you can set a price for your services and start making extra income on the side. You can make as much as $1,000 from a single client.

With the emergence of new businesses, several people need logos made for their businesses. This is a great opportunity for students who love and practice art.
The biggest requirement is having a laptop and art software. Most designers use Canva since it is readily accessible off the internet. For you to get good at this gig, you have to ensure that you are giving the client exactly what they need.
This opportunity can make you upwards of $1,300 if you are well placed. For starters, you can charge each client $20 for every job they give to you.
At the moment, there is an opportunity to get into AI logo design. Here, you are only allowed to use AI for the designs.
4. Digital MarketingDigital marketing refers to the use of the Internet to promote products and services. It includes the use of websites, social media, and other digital channels.
It can be split into two sections; Marketing strategy and social media marketing. We have explored social media marketing and advertising.
The other side of digital marketing is making marketing strategies. Here, we have various gigs that include management and design of product material.
Since it can be learned within a short period, students are usually preferred for the job. For full plans, you can charge as low as $40. If you choose to make it a full-time gig, you can charge as much as $3,000 per gig.
5. Proofreading and editingThis gig is under the writing and translation category. Depending on your capabilities, this is probably the easiest gig on the platform.
It requires you to go through documents such as novels, research papers, study books, articles, and other related documents to correct any mistakes.
It can be challenging when the documents to be edited are too technical. However, you can navigate this obstacle by choosing the technical articles based on the course you are taking.
For example, it is easier for a medical student to edit medical writings. Editing comes in when you are asked by the client to make any corrections where necessary to make the document readable. The difference in requirements per gig makes the pricing alternate between $20 and $500 per gig.
6. Virtual Assistants
Virtual assistants provide professional administrative and technical help to clients remotely. Due to the nature of their work, you just need to get a quiet place with a good internet connection plus a computer.
For most of these gigs, you shall work as a secretary for someone else which means your main roles are organizing the calendars, preparing documents, and maintaining basic accounts.
These gigs are preferred by students since you work for a few hours a week while making extra cash on the side. You can charge $10 per hour per gig.
7. Designing book coversThere are a lot of writers releasing fiction, nonfiction, and educational books all the time. For students who are active in the art field, you can grab hold of this opportunity.
You are required to have design software and an imaginative mind. Going through the book might give you an idea of what the book cover should represent.
Of course, you can just wait for the writer to describe what they would like as a cover. Nevertheless, you can charge upwards of $20.
8. Website and App TestingThis refers to testing the compatibility and use of a web application. This gig requires you to run these applications in different testing conditions.
Developers create the apps and write the code necessary for them to start working. However, in uncontrolled environments, the apps and websites often stop working as they have not been tested enough.
To combat failures, they test the applications using a controlled group of testers in a process called website and app testing.
You need a simple checklist usually provided by the developers and check to see how the application performs on all parameters. This gig is currently priced at $10 but can reach $100.
9. Article and Blog PlotsUnder the writing and translation category lies this gem. Article writing is a general term for creating written content to post on websites.
The articles can vary based on the topics to be researched and compiled. The market for article writers is always big.
Every single website needs a writer to help research and provide the best content for the readers. This is something that can be done by most students.
At times, the articles require expertise and give bias to specific fields. For less specialized posts, you can receive at least $15 for a 500-word article.
For specialized articles, you can earn as much as $500 per article. The specialized articles are in the fields of technology and other sciences.
10. Photo EditingLife is often lived out in real-time and remembered in memories. These moments are captured in photos. There is an ever-growing need to capture the best picture.
More often than not, these pictures require the professional touch of a photo editor to bring them out in the best possible way.
Even with the emergence of AI, clients prefer photo editing done by Photoshop. You can always make use of the Wi-Fi at school to learn how to use the software and eventually start editing photos for clients on Fiverr.
You can start charging your clients $10. As you improve your skills, you can keep raising the figure.

After developing and launching a website, more time is invested into designing the website. Web designing is a tedious process that involves beautifying the interface of the website so that it can attract and keep more users.
When designing the website, it is also important to add display features that make the website easy to use and interactive.
This requires a little bit of training in the art of web design so that you can provide the best services to your clients.
This option works best for those with an artistic side as it requires adequate time to deliver what is expected of clients.
Several hosting services give you the option to design your website using plugins.
Just like other gigs, the pay largely depends on the type of work you have at hand. Simple gigs can go for as low as $10 rising to as high as $200.
12. TranscriptionIf you have no idea about building a website, I can help you build a professional website for your online business. Know More
Transcription involves listening to audio and video files so you can produce a written file. This means that you are provided with playable media and tasked with listening to everything within the audio before you type it out as a document.
This is a fairly technical gig and often requires you to have passed a transcription test so you can start working.
For this gig, you need to have a good computer, good headphones, good language skills (the job can be in any language), and a good internet connection.
With this equipment, you are in a position to transcribe all types of audio quality. You can opt to create captions for video files or fully transcribe audio files.
Either way, you are in a position to earn around $5 per hour per file. When talking about these jobs, ensure that you get clients that have good audio quality.
Otherwise, it may prove to be a challenge for you to get any work done.
13. Financial ConsultingThis is a very good gig for finance students. Financial consulting involves accounting, bookkeeping, and tax consulting.
For the students who want to become practitioners, this is a good place to make use of your knowledge.
Depending on the country, you have to understand the federal tax code so that you can readily advise all your clients on the best possible course of action.
On the other hand, you can provide the less technical service of bookkeeping or accounting. Usually, these are small-time gigs that require less time with limited technicalities.
You need to select a gig depending on your capabilities as a person. Depending on the service you choose to offer, you can earn $10 per gig and upwards of $200 per gig.
It is more profitable to focus on tax consulting but easier to focus on bookkeeping and accounting.
14. Research & SummariesEducation involves a lot of research. For most students, this is child’s play. This freelancing gig requires you to be attentive to detail.
You are often engaged by clients that have specific requirements for the work at hand. When it comes to summaries, you are given a document which often comes in a long report, book, researched material, and products reports.
When given this material, you are required to go through it and come up with a summary. This gig works best for students in their fields of specialization.
For example, law research is best done by a law student. You can easily find work based on the field of study.
Based on the kind of work you have to do, you can charge as high as $300 per research paper.
15. Product DescriptionsProduct descriptions are a way of describing and explaining the benefits of a product. They are usually made for ecommerce stores.
In some cases, you are asked to come up with a proper description of the product in a unique way. The description can be as long as a paragraph or enough to fit in a sentence.
On Fiverr, there are a lot of ways to sound unique. You can choose to specialize in anything ranging from real estate to services.
The product descriptions vary according to the type of product you choose to specialize in. Before you decide on the price of your service, you have to see how much other service providers charge.
16. Infographic DesignInfographics are referred to as a visual representation of information or data. They are usually used for presentations and creating educational material.
Creating infographics helps online teachers to create engaging content for kids that makes learning easier. You might also be contacted to prepare a presentation for a conference.
Usually, the client will provide you with the necessary material to prepare the presentation. At times, you might be required to include additional material for the client per their request.
You can charge clients depending on your experience. Other freelancers start at $5 and go as high as $200.
17. TranslationTranslation involves changing the language of a file from one to another. It can be a document, application, agreement, book, etc.
It is very common to find students who are proficient in two languages. Usually, it is Spanish, Portuguese, Danish, Belgian, Arabic, Indian, and many others.
At times, there are scenarios where the author or a creator releases something in one language yet it could cater to people who are not proficient in their language of choice.
This is where translators come in. As a student, you can easily find translation gigs. You just have to find clients and let your brain do the work.
In some scenarios, you can be employed to create content for other audiences. The gig can earn you as much as $150 depending on the difficulty.
Final Thoughts – 17 Most in Demand Fiverr Jobs for Students in 2024Looking through this list, you are bound to find something that can make you money while still in school.
However, you should also check out the Fiverr homepage to see what else is on offer. To get the best out of these gigs, ensure that you do adequate research on pricing, put in the necessary time to improve your skills, and ensure that you have set up a proper account with the Fiverr platform.
This is a guest post written by Awuah Gideon. If you want to submit guest posts to Inuidea, check out the guest post guidelines for Inuidea.com
The post 17 Most in Demand Fiverr Jobs for Students in 2024 appeared first on Inuidea.com.
August 2, 2024
9 Best Blogs for Aspiring Entrepreneurs to Learn from in 2024
Today I’m going to show you the 9 best blogs for aspiring entrepreneurs from where you can learn the latest business strategies, and some essential skills.
If you want to build a successful online business or if you want to start your own entrepreneurial journey, you have to learn some skills and new business strategies.
The best part is,
Now you can learn entrepreneurship, online business, marketing, and other required entrepreneurial skills for free by reading some awesome blogs available on the internet.
Also, these 9 entrepreneur blogs will help you stay updated with the latest industry news, startup stories, and business strategies.
Let’s dive right in.

Yeah, you’re reading Inuidea!
Inuidea is a blog dedicated to young hustlers like you who want to start an online business to make money online.
Inu Etc started Inuidea in 2019 to help young aspiring entrepreneurs and young hustlers build their own online business.
Although Inuidea is a new blog, Inu Etc helps thousands of young hustlers from all over the world through Inuidea.
Also, he personally helps and guides many aspiring entrepreneurs and young hustlers through Instagram DMs, emails and even on phone calls too.
If you want to learn more about entrepreneurship, online business, blogging, and marketing, explore Inuidea, ask Inu Etc and start hustling!
Read more: How to Find Your Passion and Pursue a Career You Love
We all love GaryVee, he is a great hustler icon and a great mentor to all aspiring entrepreneurs.
He is a Belarusian American entrepreneur, investor, public speaker, New York Times bestselling author, and internet personality.
His own personal blog is a treasure trove of valuable blog posts, motivational videos, podcasts, digital marketing tips, valuable advice on business and entrepreneurship.
Gary Vaynerchuk’s entrepreneur blog is my favorite and one of the best blogs for aspiring entrepreneurs.
He always provides every bit of his knowledge of entrepreneurial success and shares his thoughtful advice on whatever he has learned throughout his inspirational journey to get success.
If you want to learn more about entrepreneurship, I recommend you listen to his podcast – ‘The GaryVee Audio Experience’.
Also, read two of his books ‘Crushing It!‘ and ‘Crush It!‘. These are my favorite entrepreneurship and business books and must-read books for every aspiring entrepreneur.
This post contains affiliate links (I don’t recommend anything that I don’t believe in), meaning at no extra cost to you, I might receive a small commission for purchases made through these links.
Read more: 31+ Proven Online Business Ideas – Money Making Ideas That Work in 2024

If we talk about the best digital marketer entrepreneur in the world, then it can’t happen if Neil Patel’s name doesn’t come. He is a great inspirational entrepreneur for every aspiring entrepreneur like you and me.
Born in London, UK, Neil Patel is a 31-year-old entrepreneur. He is the co-founder of Crazy Egg, Hello Bar, and Ubersuggest. He also shares valuable digital marketing strategies, business strategies, and entrepreneurship advice on his blog.
I have learned absolutely genuine elements of entrepreneurship by following Neil Patel and his advice on the field of entrepreneurship.
He is like a gem mentor to me and would be yours if you would like to learn about entrepreneurship, online business, digital marketing, and blogging.
If you are an aspiring entrepreneur then I would like to recommend you read his blog, listen to his podcast, watch his videos and get entrepreneurial advice, business tips, and digital marketing strategies.
I’m pretty sure that Neil Patel’s resources will help you learn more about entrepreneurship, online business, digital marketing, and blogging.

My friend Inu Etc says:
“Pat Flynn’s blog ‘Smart Passive Income‘ was one of the first blogs that genuinely helped me learn a lot about entrepreneurship, online business, passive income streams, and blogging.
Pat Flynn shares proven passive income ideas, practical and actionable online business tips that will help you make your online journey easier.
He is one of my early remote mentors whom I follow from the bottom of my heart. I follow all his tips and strategies because I know they’re absolutely genuine. I suggest you check out his blog and learn as much as you can about entrepreneurship and passive income streams.”
Pat Flynn is regularly praised for his authentic leadership style and business principles. Forbes recently named him one of the ten most transparent leaders in the online business world.
His blog is full of trusted learning and development resources for online entrepreneurs.
If you are an aspiring entrepreneur then I would like to recommend you read his blog to learn more genuine passive income streams, entrepreneurial aspects, business strategies, and digital marketing strategies.
Also, listen to his podcast and watch his YouTube videos to get more knowledge about entrepreneurship and the new-age online business opportunities.
Related post: 17 Genuine Ways to Make Passive Income While You Sleep
If you want to learn about SEO, content marketing, entrepreneurship, digital marketing, copywriting and online business then believe me this blog will help you a lot.
If you are a blogger and want higher rankings on Google to get more organic traffic, then Backlinko is the best blog you can trust blindly.
“Even though Backlinko has lots of articles on SEO, still I love Backlinko for its articles on copywriting. And I think copywriting is one of the most essential skills you will need if you want to start your online entrepreneurship journey in 2024.” – Inu Etc
The founder of Backlinko, Brian Dean has a YouTube channel which is a great place to learn SEO and content marketing and the latest digital marketing strategies.
I have learned a lot by reading Brian Dean’s blogging tips and actionable copywriting strategies. These actionable tips help me a lot with writing this blog post and many more I have written before.
So, if you’re an aspiring entrepreneur, I highly recommend you visit the Backlinko blog and read all the masterpiece posts written by Brian Dean.
YourStory.com is India’s largest media-tech company for startups, entrepreneurs, investors, innovators, and change-makers.
Shradha Sharma is the founder, CEO and chief editor of YourStory. It’s a storytelling platform for entrepreneurs, innovators, and change-makers.
Since 2008, YourStory has published over 20,000 stories of entrepreneurs and features many innovative startup stories of Indian entrepreneurs.
If you want to stay updated with startup stories, modern business ideas, the latest business, and entrepreneurship news, founder interviews, start reading YourStory right now.

“Copyblogger is the bible of content marketing.” – VentureBeat
If you want to sell a product or if you want to be a successful entrepreneur, copywriting and content marketing can help you succeed. So I think copywriting and content marketing are the most essential skills, you need to build a successful career in the entrepreneurial field.
Brain Clark started Copyblogger in January 2006, Now Copyblogger is one of the best copywriting blogs available on the internet.
Content marketing is the backbone of getting your company noticed, attracting the target audience and turning them into loyal customers and clients.
Copyblogger founder Brian Clark has been building businesses with copywriting and content marketing since 1998, Seven years later, Brian Clerk decided to share what he knew with the world. And yeah, his blog is full of practical guides about copywriting and content marketing.
So, if you want to learn more about copywriting and content marketing, I suggest you start reading Copyblogger and learn copywriting and content marketing using the best free resources available on the internet.
Read more: 7 Best Blogs to Learn SEO, Marketing and Copywriting

Entrepreneur is an American magazine and website that carries news stories about entrepreneurship, small business, online business, startup, and business.
First published in 1977, it’s one of the oldest business and entrepreneurship magazines in the world.
World’s leading entrepreneurs, including Gary Vaynerchuk, Seth Godin, Neil Patel, and business columnists share business strategies, startup news, success stories and entrepreneurship tips in Entrepreneur magazine.
If you want to learn more about entrepreneurship and if you want to stay updated with the latest business news, start reading Entrepreneur magazine’s blog right now.
Quick Sprout was originally started in early 2008 by Neil Patel, the world’s leading digital marketer.
Over the years, Neil Patel built Quick Sprout into one of the top sites for digital marketing, blogging, and entrepreneurship. Quick Sprout helps you grow your traffic, business, and digital marketing career.
Now Quick Sprout is managed by Corry Cummings and Lars Lofgren.
Quick Sprout is the one-stop solution to learn almost everything about digital marketing, blogging, SEO, online business and entrepreneurship.
Final Thoughts: 9 Best Blogs for Aspiring Entrepreneurs to Learn from in 2024Yeah, these are my favorite entrepreneur blogs for aspiring entrepreneurs.
Gary Vaynerchuk’s blog, Neil Patel’s blog, Quick Sprout, and Smart Passive Income are great free resources to learn entrepreneurship.
Backlinko and Copyblogger can help you improve your content marketing and copywriting skills.
Entrepreneur magazine’s blog and YourStory blog can help you stay updated with the latest industry news and startup stories.
And finally, the Inuidea blog can guide you on your entrepreneurial journey. Inu Etc is always happy and available to help young hustlers and aspiring entrepreneurs like you.
Now It’s Your Turn
You’ve read about the 9 best blogs for aspiring entrepreneurs to learn from in 2024.
Now I would like to hear from you:
So, what’s your favorite entrepreneur blog from this list?
Let me know in the comment section below right now.
Also share this post with your friends, aspiring entrepreneurs, and young hustlers who are looking for some blogs to learn entrepreneurship and also want to stay updated with the latest business strategies, startup stories, and entrepreneurship news.
9 Best Blogs for Aspiring #Entrepreneurs to Learn from in 2024
Share on X
If you have any questions, feel free to contact us. We are always available to help young hustlers like you.
Life is a journey!
Keep hustling!
The post 9 Best Blogs for Aspiring Entrepreneurs to Learn from in 2024 appeared first on Inuidea.com by Inu Etc.
July 20, 2024
13 Ways of Link Building for Startups in 2024
Where your business ranks determine the amount of traffic your startup gets. A process like ‘link building’ helps businesses to rank highly in search results. This increases website traffic. It allows other niche websites to link to your site and improve brand visibility.
Ranking in the first pages of search results is important for customer engagement. Statistics show that 75% of online users do not look beyond the first page of Google search results.
That is why you need to focus on link-building strategies. These strategies will help you get high-quality backlinks. The quality of links you get helps you rank higher. Here are ten link building strategies for startups.
Importance of Quality BacklinksBacklinks can signal Google that you provide valuable content in a particular niche. This is unique content that other websites find useful. Search engines rank websites with backlinks well in SERPs, but not all backlinks are good.
Bad backlinks can come from sites that are not trusted or from black hat methods of link building. That is why the Penguin algorithm was launched to stop such bad linking practices.
Focus your backlink building on finding quality links. This will improve your website ranking while adding value to your audience. Here is how you can identify quality links.
Page AuthorityWhen an authoritative page links to your business website, it passes the authority to you. An authoritative web page is a source of useful information. It provides reliable content users can trust. Look for links from high-authority web pages. Avoid web pages with lesser authority. Gaining links from such authoritative blog posts allows Google to rank your business.
Site AuthorityQuality links come from authoritative sites. When a website with an authoritative domain links to your startup, it makes a bigger impact. Getting links from such authoritative sites might not be easy.
Google recognizes links with site authority on your website. This makes your business rank higher in search results.
Site RelevanceQuality links come from sites that are relevant to your website’s niche. This means the theme of your website and the site that is linking to you should be closely related.
Such links are likely to be topically similar and benefit the audience. Site relevance is important because Google uses it to understand your business. This includes understanding your niche, services, and products.
Add relevant links to content. This helps to prevent black hat methods of link building. Google requires that such links appear naturally in your content. It should also add value to readers who visit the site. The following are strategies of link building.
White Hat StrategyBuilding backlinks using the white hat method adds value to users. It enhances their experience.
This strategy is an SEO practice that links a webpage to other relevant content on the internet. It helps provide users with quality content while organically improving the webpage ranking.
1. Guest Blogging MethodGuest blogging is one of the well-known ways of building backlinks. It involves offering valuable and unique content. For example, you can write case studies to a different audience in the same niche.
For example, writing blog posts for a high authority domain like NY Times is more impactful. After writing you link back to your website.
Providing useful insights to audiences makes you a thought leader in your industry. It increases your chances of getting more visitors to your site.
When writing, use strategies that will improve the Google ranking of your startup. Link doctor strategies drive business results through organic link building. The quality links improve lead generation, business ranking, and help generate high revenue.
Such ethical white hat strategies produce exceptional business results. The results emphasize quality over quantity.
2. Broken Backlinks MethodReaching out to websites and reporting broken links is an effective link-building strategy. This method involves finding websites in your niche and checking their resource page.
If the link to the resource page is broken, you can contact the owner, tell them the exact situation, and offer to help. Provide value to the site owner in a helpful and friendly manner. You can offer your guest post as a resource instead of linking to a broken page.
The help you offer is an alternative to the broken links, which include your website’s link.
3. Infographics Link Building Method

Infographics are easy-to-understand content that people share widely. Such content leads to more backlinks to your website.
Create an infographic with an interesting story. Using the right methods will increase engagement and backlinks. For example, you can start by finding trending topics. You can also collect data before creating an infographic.
Write a story about your infographic. Make sure your content is unique and interesting. It should capture your audience’s attention.
4. Brand MentionsA business can mention your business without linking to your products or services. This is an opportunity to reach out and ask them to link to your startup.
Look for sites that mention your brand positively to their audience. Their audiences are potential customers in your niche.
These customers can quickly click and buy from your business. This is because they trust the site that mentioned your products. Brand mentions create brand awareness that leads to high sales and revenue.
Follow up any content that mentions your services, slogan, or products. Requests them to link to you.
5. Share Content on Social Platforms

Engage your audience where they hang out. Actively post your content on social media. Share your new posts, updates, or images on different platforms.
This will boost your engagement and extend your brand reach. The links you share will direct visitors to your website. It will also increase your business visibility.
6. Build Backlinks from Projects You SponsorMany nonprofit organizations, conferences, or webinars may champion a particular cause. You may want to support this cause. You can also get a backlink to your website when you support a cause you believe in.
Supporting such events means your logo and link will be displayed at the event. It will also be put on the organization’s website. People who visit these websites can click the links and access your business.
This helps create brand awareness. You also get an authoritative backlink that improves your search engine ranking.
7. Interview an InfluencerShare the accomplishments of an influencer or an expert with a large following. This can happen in a podcast interview.
Look for influencers in your niche who have accomplished something extraordinary. This will motivate your audience. Featuring influencers can inspire them to share your content. They can also share your links with their huge following.
8. Expert Roundup Link Building MethodBuilding useful connections with complementary companies and experts can help you get backlinks. These connections can take part in roundups. This is where you ask questions and allow industry leaders to share their opinion on the topic.
Many people will want to click and listen to expert advice. This leads to more content shares and high traffic to your website.
These industry leaders will most likely share your link with many followers. Some of these backlinks come from major websites that boost your page authority.
9. Research Using Link-Building ToolsReach out to websites for backlink opportunities. Link-building tools like Semrush, Ahref, or Buzzstream can help you find contact information. Connect with prospects using this information.
Such tools provide the information you need to send personalized emails to prospects. This increases your chances of getting good results from your email campaign.
You can also follow up and track backlinks using these tools. This involves monitoring backlinks to ensure they do not disappear. If a link is not working, you can quickly contact the website owner to restore it.
10. Online Directories Link BuildingAdding your startup to directories like Yelp, Bing, or Google Places can increase users. This is a way to achieve link building. Online users trust these directories and use them for searching particular business information.
Listing your startup on directories helps customers find important information about companies. These are companies they are interested in. Listing your business also means you are likely to get high-quality traffic on your site. This can convert to buying customers.
Add your business to directories that match your niche. This will help boost your local SEO and increase your search result ranking.
Grey Hat StrategyGrey hat is a combination of white and black hat methods of link building. It involves combining accepted link-building strategies and banned strategies. The aim is to improve web page ranking.
For example, someone writes content about social sites. They pay for them to link to a website and improve ranking. Google does not allow such methods of link building. This is because they do not focus on providing high-value content to users. A common example of gray hat strategy include:
11. Posting Blog CommentsHelpful comments on a blog post in your niche can help you connect with an online community. It can also help you build backlinks. Such backlinks generate traffic to your website, which is good for business.
Make sure your comment adds value to the reader and contributes to the topic of discussion. Posting nonsense and irrelevant comments can be considered spamming and bad for SEO. Google flags such comments and marks them as spam.
Black Hat StrategyBlack hat is a link-building strategy that does not add value to the content users. The main purpose of this method is to improve website ranking. Such practices violate the terms that search engines set for SEO.
12. Content With Unrelated LinksA website with many links unrelated to the page’s content uses a black hat to get backlinks. Google penalizes such activities because they do not serve the end-user.
13. Link FarmLink farms are websites that do not have any content. Instead, they feature many unrelated links to other sites. They do not provide organic links or add value to online users. There is no long-term value for link farms and when Google discovers link farms they are punished.
Key TakeawayBonus: Check out this article to learn the best and easiest ways to get high-quality backlinks for free from top media outlets worldwide. – I Have Over 7 Million Views On My Photos – The Easiest Ways I Get High-Quality Do-Follow Backlinks For Free
Link building is one of the best ways to improve traffic and ranking in search engines. Startups benefit when website traffic increases, leading to business growth.
Developing an effective strategy gives you the best results. This helps in reaching your desired goal. These results come from high-quality links. You need to consider the page authority, site authority, and relevance of a site to rank highly. It requires upfront effort to build quality backlinks, but it pays well in the long term.
Now it’s your turn!You’ve read about 13 ways of link building for startups.
Now I’d like to hear from you:
Do you have any other new ideas for link building?
Let me know in the comment section below right now.
Also, share this post with your friends, marketers, and bloggers who wants to build links for their startups.
If you have any questions, feel free to contact me. I’m always available to help you.
Keep hustling.
If you wanna submit a sponsored post, sponsored paragraphs, or collaborate with me in any other way, contact me.
The post 13 Ways of Link Building for Startups in 2024 appeared first on Inuidea.com by Inu Etc.
I Co-Founded a Travel Company - Travelestify.com: Your Gateway to the Hidden Gems of Northeast India
I always wanted to start a travel company. I launched ‘Travel With Inu Etc’ in January 2024, just to travel with people who wanted to travel with me.
However, I soon realized that I couldn’t build a successful travel company on my own.
After several days of discussion with my co-founder, Sany, we purchased the domain name Travelestify.com from Hostinger.com on June 2, 2024.
I then started working on developing and designing the website. After a week of hard work, the website was ready for launch.
In July, we started running Instagram ads, and on July 15th, we sent our first group to Dzukou Valley.
I managed the group remotely via phone calls, while our local guide and team member, Zhopovito Thao, managed the group on-site in Dzukou Valley.
The clients were happy with their experience. Zhopovito went above and beyond by giving them an extra tour of Zakhama village, which was not included in our itinerary.
Typically, our trips are 2 nights and 3 days, but we customized a package for this group.
They wanted an additional night to rest and to explore Kohima city, so we created a 3-night, 4-day package for them.
Here are their reviews about their travel experience with Travelestify:
“The whole journey was amazing. Every moment was memorable. There was a lot of excitement in me while trekking and all of it was really good. Thanks for giving me this amazing experience of Dzukou Valley.” — Angav G Chakravartty
“Thank you for your hospitality… It was an amazing experience with you guys.
Best of luck for your future endeavors and trips… looking forward to be your client once again :)” — Amaan Ikbal
We started Travelestify.com to help people explore Northeast India, with our main focus currently on the Dzukou Valley trek.
Two unique features in the valleys of Nagaland are perhaps found nowhere else in India or even the world. One is the ‘waves’ of small green hills covered entirely with short bamboo trees.
From a distance, Dzukou Valley looks like a child has painted the hills green.
The other is the Dzukou Lily.
The valley is famous for its wide range of flowers in every season, but the most famous one is the “Dzukou Lily” (Lilium chitrangadae), named after the mother of its discoverer, Hijam Bikramjit, a researcher from the Life Sciences Department at Manipur University, in the summer of 1991.

The valley’s blooming season is from April to September, with the first two weeks of July often being the peak. The monsoons bring the lilies along with other flowers like Aconitum, Euphorbia, and Rhododendrons, transforming the valley into a floral paradise.
Ready for Your Adventure?Get in touch with Travelestify.com to begin your unforgettable journey to the enchanting Dzukou Valley.
Explore the unique flora and natural beauty that make this destination truly unique.
Book your adventure today and experience the wonders of Northeast India with Travelestify.com.

Thanks for reading this article.
If you loved what you read, would you be able to buy me a cup of coffee? It’s okay if you can’t right now.
If you have any questions or if you wanna work with me, feel free to contact me. I’m always available to help young hustlers like you @InuEtc on Instagram.
Keep hustling!
Keep traveling.
The post I Co-Founded a Travel Company - Travelestify.com: Your Gateway to the Hidden Gems of Northeast India appeared first on Inuidea.com.
July 15, 2024
5 Genius Hacks To Boost Instagram Reach And Gain More Followers
As reels become one of the most effective ways to increase reach and interaction on Instagram, it is crucial to figure out how to use this feature, and of course, getting familiar with the instagram reel posting time is also a must for anyone who wants to improve their online presence.
It is unearthing the need for quality and effectiveness that is as much about timing and engaging the audience as it is about the content.
But let me reveal 5 practical tips that will level up your Instagram game and catapult you to the new, excellent level of having more followers and a more significant impact on social media.
From setting up profiles to make the right first impression, finding the best time to post Instagram reels for engagement, and improving the quality of your content that will be enforced on your Instagram reels, we will explain the mammoth ways of using Instagram reels efficiently.
Further, I will reveal how reacting to your audience, partnering with influencers, and using Instagram Stories & Highlights collectively can create a powerful strategy to extend your reach to Instagram.
Profile Picture And Bio
The first thing people notice about your profile is the photo; thus, it should be easily identifiable and related to your industry, business, or group; it should be a clear, high-quality photo that remains clear even when cut to a circle.
It also contains a section allowing the brand to introduce characters up to 150 characters extended on Instagram through the bio section.
Here, you need to introduce yourself and describe your business in words that allow the readers to immediately grasp the nature of the product or service and use slight branding elements.
It is recommended to add the keys relevant to the field of your business, and optionally, there should be the possibility of driving out the unique point of your sale.
Use Keywords And HashtagsMake sure you add relevant keywords in your bio to describe the contents of your profile and make it easier for the search engines to pick out your profile. For example, if your niche is design, the terms design, remodel, or construction can also be helpful.
Moreover, make use of the new feature, which enables hashtags used in the bio section and profile tags to be clickable links that would improve the SEO of the Instagram profile and provide an easy way for users to navigate to related content or profiles.
Add A Call-To-ActionA well-written CCA in your bio is a statement that encourages one to take a particular course of action, like visiting your Website or following your Account.
Be as specific with phrases such as ‘subscribe to our newsletter’ or ‘Join us to stay informed.’ Add the URL of other social media platforms where you are active and update it to lead to more promotions/events, making it easy to transfer traffic from Instagram to other social platforms.
Hack 2: Create High-Quality ContentTo truly stand out on Instagram, you must focus on three critical aspects: the primary focus of all aspects of the ambiance, the coherent and non-conflicting theme and style of the images, high-quality photos, and well-designed text captions for the presented shots.
Consistent Theme And StyleComing up with a theme helps you establish a brand image and ensures that your Instagram page looks uniform. It does not matter if one chooses bright red blazers or lol poppy; the key is to choose one color and then stick to it, either the brighter shades or the softer pastel shades.
Everyday topics such as ‘Fashion Friday’ or dialogical topics like posting about sustainability also help build a unified identity in content.
High-Resolution PhotosThe main thing to focus on is how well you took and captured the photos. For posts in the grid, always use high-quality images at a staggering of at least 1080px by 1080px to avoid pixelation.
For image quality, it is advisable to stick to professional applications such as Adobe Lightroom or colorful applications like Snapseed on your mobile devices for consistency throughout one’s feed.
So remember that the overall aesthetics of your Instagram feed play a massive role in getting more attention from viewers and increasing the number of followers.
Engaging CaptionsCaptions play a significant role in reaching people. They should be more than an addition; they are a chance to speak to the audience and share your opinion to spark interest in your post.
Make sure you have distinct calls to action. Avoid using emojis too often if they don’t suit your brand image, and ensure your captions match the pictures.
Brands: Including detailed captions alongside the photos can help tell your story or share information about current promotions, which can increase user engagement and drive traffic to other channels.
By developing the senses through these elements, you can post quality content that captures the attention of potential viewers and garner’s engagement, making your page popular and those who run it to attract more followers on Instagram.
Hack 3: Use Instagram Stories And HighlightsFeature Key StoriesUse Instagram Stories to present content relevant to the present moment. I must admit that such posts would also capture the audience’s attention due to the brand personality displayed there.
Overall, it has been found that tough-proving content related to the target group’s interest, like backstage content or a cover shared by one of the fans, can boost interaction and lead to a better connection with the fans.
Highlight Different Content TypesWe should follow a pattern on Instagram when posting different items to make it manageable for followers to move from one piece of content to another.
Whether this is product demos, training videos, special events, etc., creating sub-groups of such videos as the Highlights can increase engagement and make the profile more convenient to use.
Use Stories To Drive EngagementInstagram Stories are perfect for increasing engagement through polls, questions, or interactive stickers.
Encourage discussion: Likewise, you can get your followers to choose in a poll or answer questions, which will not only encourage participation but also offer you insights into what your followers want.
Make it a habit to post stories frequently to keep the content new and relevant to the followers so that your brand’s position stays fresh in their minds.
Hack 4: Engage With Your AudienceRespond To Comments And DMsIt is essential to interface with your audience as this is how you would be building more and improving your Instagram audience. It is essential to always reply to comments and replies directly to your page’s messages.
You can use software like DelightChat to handle the incoming and outgoing messages within DMs properly and respond within an integrated centralized platform akin to the Instagram web application.
This builds time efficiency and guarantees that the users do not receive any response, whether it is a funny emoji reply or a profound customer support request.
Host Contests And GiveawaysYou are increasing your friends and followers’ enthusiasm and engagement with your brand by holding Instagram contests and giveaways. These events could generate interest, where people could learn more about your brand and follow you. Ensure you make your contest eye-catching so that the people attracted are those in your target market.
Another essential aspect to consider when conducting an online contest is the proper posting of the contest using tools such as Hootsuite to post the contest and monitor and organize the interaction related to the contest. By consistently gain recognition from Reels likes among the new followers is a unique way to extend your reach On Instagram.
Use Polls And QuestionsUse those features available in Instagram stories, such as polls and questionnaires, to engage your viewers. This ensures that your content is enjoyable for the reader and gives you essential information on the subject.
It is best to plan these during the hours across the day or week that the target audience is most active. Always ensure that The more the audience will interact with your posts the better your impression statistics on the site will be.
Hack 5: Collaborate With InfluencersStart by selecting a suitable influencer to build strong relationships with. Target those who share an interest in your brand, have a loyal following and are in your niche. Instagram has its own analytics, Instagram Insights, as well as third-party analytics, which, if used, could give statistics on the engagement rate and authenticity of the followers.
Co-branding is another significant option for increasing brand awareness. Think of ideas such as word-of-mouth endorsements, wherein the influencers integrate your products into their themes or campaigns. This makes the advertisement more authentic and supports the campaign’s desired effect to a greater extent by leveraging the influencer’s scope.
Considering its importance, using influencer takeovers is beneficial in enhancing your brand’s visibility. In an influence takeover, an influencer posts directly on your brand’s Account, thus introducing their followers to your brand. This way, you reach out to more new people, and seeing the content from others’ angles enhances the interaction and the number of followers.
Please ensure the influencer’s messages also enshrine your brand, as you look forward to working with them to get the right message across.
Final Thoughts: Genius Hacks To Boost Instagram Reach And Gain More FollowersCredibly, in this walkthrough of Instagram growth techniques, various strategies found in the process include profile setup, content creation and production, influencer interaction, and partnership.
It is crucial for both the established and prospective members to understand these strategies to execute the role effectively in the ever-evolving landscape of Instagram and reap the benefits of the opportunity to acquire a more significant following base.
Here, explaining what is essential for Instagram reels, identifying the most suitable time to post material, and encouraging interactions all define a more robust social media platform.
The conclusions derived from this case depict strategic positioning and implementation as critical success factors in social media marketing. That said, students and practitioners trying to put these hacks into practice should ponder the given hacks and their potential impact on DM and PB.
In doing so, we maintain the critical ability of adaptation, ongoing evaluation, and understanding of strategies and tactics with the continually changing environment we are addressing and the inherent nature of social media.
It will provide a framework for increasing the presence and interaction of your Instagram account and become a source of ideas and encouragement for further exploration of the social media world.
This is a guest post written by Jency Margaret.
Jency Margaret is an experienced social media marketer and writer who works at Boostiglikes.com. She enjoys creating content for social media blogs and has the ability to provide interesting content for a range of networks and platforms.
If you want to submit guest posts to Inuidea, check out the guest post guidelines for Inuidea.com.
If you have any questions or if you wanna work with me, feel free to contact me. I’m always available to help young hustlers like you!
The post 5 Genius Hacks To Boost Instagram Reach And Gain More Followers appeared first on Inuidea.com.
July 2, 2024
5 Digital Nomads Reveal Their Secrets on How to Become a Digital Nomad in 2024
Want to become a digital nomad in 2024?
Want to travel the world while working full-time remotely?
Whether you are an aspiring digital nomad looking for actionable tips or a new digital nomad seeking more ideas to grow, this roundup post is for you!
I asked some experienced digital nomads the following question:
If you have tips or practical advice on how to become a digital nomad, start a successful travel blog, get a remote job, or anything similar, I’d love to hear from you and publish your thoughts in my blog post.
As a beginner traveler new to the digital nomad world, learning the best practices can be overwhelming.
The tips listed below reflect the hard work and experience of various successful digital nomads and online entrepreneurs. I’m confident their advice will help you grow as a digital nomad.
Let’s dive right in.

There are a lot of different ways to become a digital nomad. You can start your own business offering digital skills as a freelancer; you can get hired as an employee with a fully remote company; you can become a successful content creator. Throughout my nearly 5 years as a digital nomad, I’ve done it all. Some things I’ve enjoyed, some I couldn’t wait to move on from.
If you’re dreaming of the digital nomad lifestyle, the biggest decision you’ll need to make is how to fund your lifestyle. The beauty of being a digital nomad is certainly the freedom it brings with it, so you’ll need a way to make an income from wherever in the world you want to hop to.
Each of the main income revenues outlined above comes with a web of specifics but you’ll want to start from the general and work your way to the nitty-gritty.
Here are some pros and cons you’ll want to keep in mind when making your decision:
1. As a freelancer:Pros: You get you to set your own schedule and work only in what you enjoy and have experience with. You’ll have the most freedom as a freelancer since you won’t have a boss telling you when you need to work and from where.Cons: You’ll have to find your own clients, so will constantly need to be in sales mode. If you don’t do the work, you won’t get paid, so it really relies on you having the motivation to get things done even when there’s a beautiful beach right outside your door.2. As an employee:Pros: You’ll earn a stable paycheck, so you can easily choose places that you know you can afford. You know your responsibilities on a day-to-day basis and don’t have to worry about the admin side of the business.Cons: You’ll be stuck with their schedule. It can be tough to navigate time zones if you require any “face-to-face” online meetings throughout your day. You’ll need to prove to your boss that you can be self-sufficient and work from anywhere.3. As a content creator:Pros: You get to be creative and utilize the platform you enjoy the most. This could be social media, a travel blog, or a mixture of the two. Just like as a freelancer, you’re your own boss, but in this job your main objective is to share about your travels.Cons: It can be time-consuming and a long journey to monetize this. It’s certainly possible but know that it will take a lot of “free” work until you start to make significant money as a content creator.Once you’ve chosen which of these 3 paths you most prefer, put your head down and focus on how you’ll achieve it. The moment your online income starts to roll in, it’s time to buy that plane/train/bus ticket and hit the road as a digital nomad!
Kat Smith
Founder of A Way Abroad

One of the most important steps to becoming a digital nomad is setting realistic expectations.
Without realistic expectations, you won’t last long.
To set realistic expectations, first determine what your work needs and goals are. This is different for everyone, depending on the type of digital nomad jobs you have.
Are you working as a full-time employee for a remote company? Don’t expect to be at the beach every day with your friends.
Wanna spend every day at the beach with your friends? Don’t expect to work full-time or be as productive as you would be at home.
In fact, unless you’re staying in one spot for several months at a time, you should never expect to be as productive as you would be at home.
Hopping from place to place is awesome, and it’s totally doable for short stints. But know that the more you move, the more you have to plan. Move too fast for too long and the logistics involved will start to feel like a second job.
That’s why many digital nomads burn out.
You can avoid this by shifting your mindset. It’s natural to feel FOMO, and we all have the urge to see as much as possible. But as a digital nomad, it’s not necessary.
You’re not on a two-week vacation anymore. It’s perfectly fine to “miss” some of the highlights that all the other short-term travelers are raving about. Because unlike those short-term travelers, you can return to a country as many times as you want.
If it’s helpful, don’t think of it as traveling in different countries as a digital nomad. You’re now living in different countries.
There’s no rush.
And the sooner you let that sink in, the more you’ll enjoy being a digital nomad.
Mitch Glass
Website: https://www.projectuntethered.com

One of the most impactful things that you do to help yourself become a digital nomad is to learn how to budget. If you don’t have control over your spending, stress and anxiety about finances will constantly infringe on your travel experiences.
Budgeting can feel like a dirty word, but start this week with a cash grocery budget. Decide on how much money you’re willing to spend on groceries per week, and take out that much cash.
Use a week-by-week budget instead of a monthly budget because it’s easier to succeed and if you do slip up, failure doesn’t last longer than a few days before your budget resets.
Also make it a habit to routinely look at your bank account and see how much money is coming and going. This will help you develop a positive relationship with your finances, and be proactive rather than reactive.
Budgeting is often only associated with saving money, but it gives you a sense of control that’s invaluable.
When you’re a digital nomad without a home base, having a sense of control over your money (one of the most important aspects of your life) will improve your travel experience radically.
Written by Kayla Ihrig
Author of How To Be A Digital Nomad

One of the frequently overlooked elements of travel as a digital nomad is pacing. Many travelers feel that to really be nomadic, they need to move as fast as possible and see as much as possible.
But this can often lead to burnout and fatigue, where you don’t really enjoy the moment you’re living in because you’re constantly planning the next part.
One of the best ways to combat this can be by embracing slow travel.
Slow travel can involve spending more time in one place and really getting to know the area before moving on. This gives you more time to discover hidden gems and immerse yourself in local culture.
It can also give you more time to explore the activities that you personally find most interesting, whether it’s hiking up a volcano or spotting wild sloths.
Having days off travel can also be a great way to recharge or to get remote work completed before moving on.
Lingering in one place longer is also a great way to make connections through networking with like-minded travelers in the local community.
By establishing a base more frequently, you can also be sure of a consistent Wi-Fi connection, which can ease work anxiety and make it easier to meet deadlines.
Slow travel can also be a great way to stretch your budget for longer. By booking the accommodation longer-term, you can often secure favorable renting rates.
And by choosing accommodation with cooking facilities, nomads can save so much money on food by grocery shopping and batch cooking.
These tips can all help a digital nomad to regain a feeling of control in their life and achieve a better work-life balance while on the road.
Lucy and Dan
Website: https://www.thoroughlytravel.com

The first step to becoming a digital nomad is letting go of clutter.
Getting a remote job and learning how to make money online is pretty easy in the modern world. So, while this is most definitely an important step, it is easier than you would imagine.
The biggest roadblock for many digital nomads is making their lifestyle “nomad-friendly”.
As a digital nomad, you’ll need to be able to fit all of your essential possessions in just one or two pieces of luggage. This likely means selling your Xbox, throwing out the boxes of random stuff under your bed, and essentially storing or getting rid of 90% of the things you own.
This is a pretty major transition. It can be pretty difficult for new nomads to cut down their wardrobe to a travel-friendly collection, and deciphering which of your possessions are necessary and which aren’t is a major challenge.
It took me a few tries to become truly minimalist. I made a list of everything I owned and decided what I would actually use in the next 2 years, and what would just become annoying clutter, weighing me down as I traveled the world.
Beyond physical possessions, you also must make your financial life more “digital nomad-friendly”.
Most digital nomads don’t start making a consistent full-time income right away, so it is important to make sure you are in control of your finances. This involves ending all your useless monthly subscriptions.
End that gym membership you no longer use, sell your car, and rid yourself of any financial burdens that will make your nomad journey more difficult. The trick isn’t to make more money, but instead to be fully in control of your money so that you can do what you want with each dollar.
Lev Baker
Website: https://thenomadalmanac.com
Thanks for reading this article.
If you loved what you read, would you be able to buy me a cup of coffee? It’s okay if you can’t right now.
If you have any questions, let me know in the comment section below right now. If you wanna work with me, feel free to contact me. I’m always available to help young hustlers like you @InuEtc on Instagram.
If you want to share your thoughts and get featured in this blog post, please contact me and share your thoughts. If you email me, keep the subject line “Digital Nomad Roundup.” You can also DM me your thoughts on Instagram @InuEtc.
The post 5 Digital Nomads Reveal Their Secrets on How to Become a Digital Nomad in 2024 appeared first on Inuidea.com.
June 16, 2024
From Hitchhiking Bliss to a Survival Night in Dzukou Valley: Lost in the Wild and Lessons Learned
From the best hitchhiking experience in Northeast India to a thrilling Dzukou Valley trek where we found ourselves lost in the wild, discover the valuable lessons we learned and the mistakes we made.
9 June — Hitchhiking — Guwahati to DimapurAbeer and I were at a mosque at night in Guwahati, Assam, and in the morning, we decided to hitchhike to Dimapur, Nagaland.
We took multiple cars and one e-rickshaw. All the people were so welcoming and kind, but the e-rickshaw driver deserves a special mention.
He saw our lift card and stopped, telling us he was going to Khanapara, Guwahati. We hopped on, and as we talked, he was so happy. After reaching Khanapara, he gave us money to reach our next destination.
I told him repeatedly that we didn’t need the money, but he insisted, saying it would make things easier for us. His kindness made me emotional. He wasn’t wealthy, but he had the richest heart.
Then, we got a ride from some college students in a car, followed by a car ride to Dimapur with two guys from Karnataka.
At the end of the day, we decided to stay at the Gurudwara in Dimapur. The room was great, with electricity, three beds, a fan, and washroom facilities.
We had our dinner (langar) at 8:30 PM. There was daal, chawal, roti, and lassi. I don’t drink lassi, so I only had roti, sabji, and daal chawal. It was great and tasty.

We had our breakfast around 10 AM and did some seva (service) in the langar, moving utensils from one floor to another.
We left the Gurudwara and informed them that we might visit again after our Dzukou Valley trek.
Then, we went to the police station to get our Inner Line Permit (ILP).
They told us to visit the DC office, but an officer informed us that we couldn’t get the ILP that day or the next as everyone was busy with the election.
We had applied for the ILP two days ago, but it was still showing as “under process.”
We visited a computer shop to see if they could help arrange ILPs for us. The lady called someone but said it wasn’t possible.
However, she assured us we could travel and that nothing would happen if we explained our situation.
We then started hitchhiking to Kohima.
After waiting for a long time, an auto driver gave us a lift, followed by another auto.
Finally, we got a truck ride to Lalmati. It was my first time hitchhiking on a truck, and I enjoyed the stunning view of the hills while relaxing in the cool breeze. The driver was from Assam and he was a great guy.
From Lalmati, two guys from Dimapur gave us a lift in their car to Kohima. We decided to stay the night at Kohima Mosque.
While hitchhiking, we both received notifications that our ILPs were approved, we paid the required fee (Rupees 100 for me and Rupees 50 for Abeer) and received our ILPs online.
11 June — Hitchhiking — Kohima to ZakhamaAfter waiting for a long time in Kohima, we got a lift to Zakhama village from Savi Uncle, who works as a guide in Dzukou Valley.

We reached Zakhama and began trekking around 12 PM. After trekking for about six hours, we almost reached the peak but lost our route.
We screamed for help and got some responses, but no one came.
We decided to return to the mid-rest house, but it was already dark.
We pitched our tent in the middle of the jungle, on the edge of a cliff. It wasn’t safe, but we had no energy left. We had no food, no water, and no other options.
We were just hoping for rain to get some water.
We placed two pots outside the tent for rainwater and hoped for the best.
With no network, we couldn’t call for help. It was the worst trekking experience to date.
I just hoped to wake up healthy the next morning and considered stopping the journey and returning home.

I couldn’t sleep at night.
In the morning, we tried to find a route but failed.
We had no energy, food, or water.
After realizing we couldn’t find a route, we tried contacting local guides from a place where there was little network availability, but no one was awake.
We called Dawn Homestay for a local guide. The owner was responsive and tried her best, but everyone was asleep.
We also called Savi Uncle, who also tried to help.
We then called all our friends and family. They provided us with numbers and contacted the police.
Finally, we connected with a rescue team who told us to stay at the location. They promised to arrive within an hour or two.
Here’s the update I posted on my Instagram story:
“We’re in the middle of the jungle without water and food since 3 PM yesterday.
We started the Dzukou Valley trek from a new route without a guide, which was our first mistake. Our second mistake was not carrying enough water and food.
We’ve contacted a rescue team, and they should arrive within two hours. Let’s hope for the best.
We’re waiting in the middle of the jungle with limited network availability. We can’t move because we don’t know the route, we have no energy, and we might lose energy and network connection if we try to move.
We’re just waiting for the local guide.
Thanks for all the support.
Thanks a lot @baldeepdhurkot @andrenoarii @thisissanidol, Dawn Homestay, Savi Uncle, and all my friends and well-wishers.
See you soon
Finally, three local guides came, gave us food and water, carried our rucksacks, and dropped us at Dawn Homestay, Zakhama.

We made many mistakes:
We started the trek late.We carried heavy rucksacks.We went on the trek without a guide.We didn’t carry enough water.We learned many lessons.
We’ll never trek without a guide again, start trekking in the morning, pack our backpacks light, and always carry enough water and dry fruits.
We realized the importance of water. Spending 18 hours without water was incredibly difficult. We survived by eating sugar, dry Electral powder, and three palm fruits.
Thanks for reading this article.
If you loved what you read, would you be able to buy me a cup of coffee? It’s okay if you can’t right now.
If you have any questions or if you wanna work with me, feel free to contact me. I’m always available to help young hustlers like you @InuEtc on Instagram.
Keep hustling!
Keep traveling.
The post From Hitchhiking Bliss to a Survival Night in Dzukou Valley: Lost in the Wild and Lessons Learned appeared first on Inuidea.com.


