
Melissa Coleman's Blog, page 8
October 31, 2019
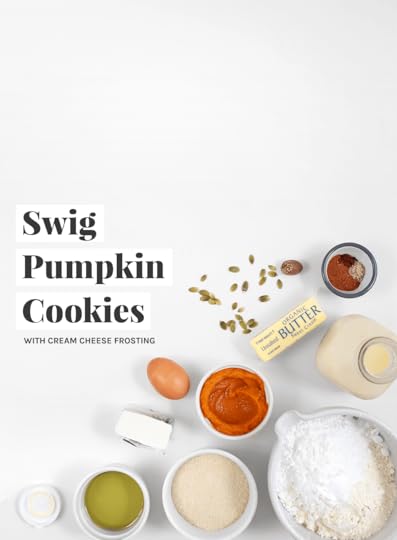
Swig Pumpkin Cookies
How realistic are your expectations of yourself? Hmmm. Do you over plan and underdeliver? Uh-huh. Are you met with the feeling of failure when you don’t live up to your expectations? Uh-huh, yes. How many hours are allotted in your day to complete these expected tasks? Hmmm. Do your expectations exceed or fit within that given timeframe? Ugh, you got me there.
These Swig Pumpkin Cookies were on my list to-make last year. You know, October 2018. Here we are on the last day of October 2019, after a whole lotta cookie testing, and the cookie in my head finally slid out of the oven and onto the blog. Just in time. Expectation barely met after completely underdelivering last year. Hmmmph.
Last year, when I chose to continue blogging, I had to majorly readjust expectations of myself. I was always overpromising, to myself and others, and underdelivering, meeting failure around every corner. Now, these were tiny, not life-altering failures, but they felt huge at the time, especially after a pile-up.
Here’s what happened. Somewhere along the way, I took my blinders off, pulled my head up, and saw that my peers were moving at a pace much faster than me. So I started sprinting, in my green pointy-toed flats. Hey, wait for me. And I got tired really fast.
My book club reads two books, probably more, to my barely one. My friends develop four times as many recipes as I do in a year. Other friends decorate a whole house in a year, which took me five. Kev sleeps an average of 1.5 hours less than me a day. That’s over 10 hours a week. The tick and the tock of my clock is slow. And I’m slowly, in true fashion, learning this about myself, coming to terms with it, and adjusting my expectations to meet this reality. Because that failure I thought I was meeting, it was just disguised as an unrealistic, poor expectation.
These Swig Pumpkin Cookies are anything but. You can go ahead and set your expectations high here.
So what does Swig even mean? It’s a soda shop in Utah that makes the most delicious sugar cookies with frosting, unlike any sugar cookie to ever hit your mouth. You can see my version here, which led to this chocolate version. Last year, after eating the limited-time-only pumpkin cookies from D’Amico, a cafe in Minneapolis, I thought, “I’ll turn this into a Swig-style cookie,” which yields a dry dough, producing a large disk of a crispy-on-the-top, cracks-around-the-edges, and soft-in-the-middle kind of cookie. Turns out, the addition of pumpkin puree to the dough really changes the DNA of the cookie, taking it in to the slightly, oh so slightly, cakey category. I guess you could say Swig and D’Amico had a baby and it tastes like this. Amazing.
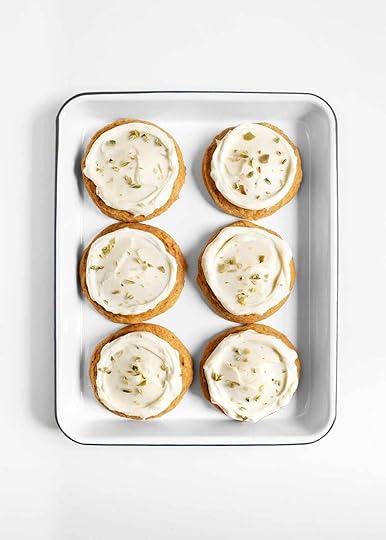
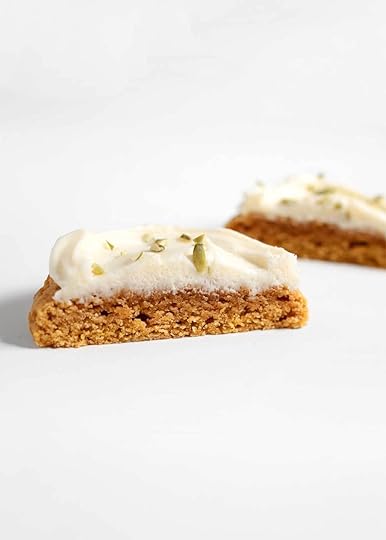
Laden with cinnamon, spice, and everything nice, these lightly sweetened cookies get scooped onto the cookie sheet, then lightly pressed into a thick disk, before getting a generous sprinkle of sugar, which helps the cookie to crispen on top while protecting its soft center just beneath the surface.
They come out of the oven beautifully round and full. You could eat them like this, though they are on the under sweetened side, a hallmark trait of a Swig cookie.
But a swoop of cream cheese frosting, left to set overnight, softening the cookie further, takes this pumpkin spiced cookie to the perfect balance of sweet and spicy, but not overly so. For natural sprinkles, just add roughly chopped pepita seeds. As you sink your teeth into this melt-in-your-mouth Swig Pumpkin Cookie, adjust your expectations to make time for the good stuff. Because it’s true what they say, good things take time. And I need lots of it.
.tasty-recipes-image {
float: right; }
.tasty-recipes-yield-scale {
border: 1px solid #979599;
border-radius: 2px;
color: #979599;
margin-left: 3px;
padding: 0 4px;
font-size: 0.7rem; }
.tasty-recipes-scale-container {
float: right;
padding: 0 0 1rem; }
.tasty-recipes-scale-container .tasty-recipes-scale-label {
text-transform: uppercase;
font-size: 0.6rem;
color: #979599; }
.tasty-recipes-scale-container button {
background: transparent;
border: 1px solid #979599;
border-radius: 2px;
color: #979599;
margin-left: 5px;
padding: 2px 4px; }
.tasty-recipes-scale-container button.tasty-recipes-scale-button-active {
color: #353547;
border-color: #353547; }
.tasty-recipes-scale-container button:focus {
outline: none; }
.tasty-recipes-print-button {
background-color: #666677;
display: inline-block;
padding-left: 1em;
padding-right: 1em;
padding-top: 0.5em;
padding-bottom: 0.5em;
text-decoration: none; }
a.tasty-recipes-print-button {
color: #fff; }
a.tasty-recipes-print-button:hover {
color: #fff; }
.tasty-recipes-equipment {
display: -webkit-box;
display: flex;
flex-wrap: wrap;
-webkit-box-pack: space-evenly;
justify-content: space-evenly; }
.tasty-recipes-equipment > h3 {
-webkit-box-flex: 0;
flex: 0 0 100%; }
.tasty-recipes-equipment .tasty-link-card {
-webkit-box-flex: 0;
flex: 0 0 50%;
padding: 1.5rem 1rem;
text-align: center; }
@media screen and (min-width: 500px) {
.tasty-recipes-equipment .tasty-link-card {
-webkit-box-flex: 0;
flex: 0 0 33%; } }
.tasty-recipes-equipment .tasty-link-card p {
font-weight: bold;
font-size: 1em;
margin-bottom: 0; }
.tasty-recipes-equipment .tasty-link-card p a {
color: initial; }
.tasty-recipes-equipment .tasty-link-card span {
font-size: 0.9em; }
.tasty-recipes-rating.tasty-recipes-clip-10 {
-webkit-clip-path: polygon(0 0, 10% 0%, 10% 100%, 0% 100%);
clip-path: polygon(0 0, 10% 0%, 10% 100%, 0% 100%); }
.tasty-recipes-rating.tasty-recipes-clip-20 {
-webkit-clip-path: polygon(0 0, 20% 0%, 20% 100%, 0% 100%);
clip-path: polygon(0 0, 20% 0%, 20% 100%, 0% 100%); }
.tasty-recipes-rating.tasty-recipes-clip-30 {
-webkit-clip-path: polygon(0 0, 30% 0%, 30% 100%, 0% 100%);
clip-path: polygon(0 0, 30% 0%, 30% 100%, 0% 100%); }
.tasty-recipes-rating.tasty-recipes-clip-40 {
-webkit-clip-path: polygon(0 0, 40% 0%, 40% 100%, 0% 100%);
clip-path: polygon(0 0, 40% 0%, 40% 100%, 0% 100%); }
.tasty-recipes-rating.tasty-recipes-clip-50 {
-webkit-clip-path: polygon(0 0, 50% 0%, 50% 100%, 0% 100%);
clip-path: polygon(0 0, 50% 0%, 50% 100%, 0% 100%); }
.tasty-recipes-rating.tasty-recipes-clip-60 {
-webkit-clip-path: polygon(0 0, 60% 0%, 60% 100%, 0% 100%);
clip-path: polygon(0 0, 60% 0%, 60% 100%, 0% 100%); }
.tasty-recipes-rating.tasty-recipes-clip-70 {
-webkit-clip-path: polygon(0 0, 70% 0%, 70% 100%, 0% 100%);
clip-path: polygon(0 0, 70% 0%, 70% 100%, 0% 100%); }
.tasty-recipes-rating.tasty-recipes-clip-80 {
-webkit-clip-path: polygon(0 0, 80% 0%, 80% 100%, 0% 100%);
clip-path: polygon(0 0, 80% 0%, 80% 100%, 0% 100%); }
.tasty-recipes-rating.tasty-recipes-clip-90 {
-webkit-clip-path: polygon(0 0, 90% 0%, 90% 100%, 0% 100%);
clip-path: polygon(0 0, 90% 0%, 90% 100%, 0% 100%); }
.tasty-recipes-nutrition ul {
list-style-type: none;
margin: 0;
padding: 0; }
.tasty-recipes-nutrition ul:after {
display: block;
content: ' ';
clear: both; }
.tasty-recipes-nutrition li {
float: left;
margin-right: 1em; }
.tasty-recipes-plug {
text-align: center;
margin-bottom: 1em;
display: -webkit-box;
display: flex;
-webkit-box-align: center;
align-items: center;
-webkit-box-pack: center;
justify-content: center; }
.tasty-recipes-plug a {
text-decoration: none;
box-shadow: none; }
.tasty-recipes-plug a img {
width: 150px;
height: auto;
margin: 5px 0 0 8px;
display: inline-block; }
@media print {
.tasty-recipes-no-print,
.tasty-recipes-no-print * {
display: none !important; } }
.tasty-recipes {
border: 5px solid #666677;
margin-top: 6em;
margin-bottom: 4em;
}
.tasty-recipes.tasty-recipes-has-plug {
margin-bottom: 1em;
}
.tasty-recipes-plug {
margin-bottom: 4em;
}
.tasty-recipes-print-button {
display: none;
}
.tasty-recipes-image-shim {
height: 69.5px;
clear: both;
}
.tasty-recipes-entry-header {
background-color: #666677;
color: #fff;
text-align: center;
padding-top: 35px;
padding-bottom: 1.5em;
padding-left: 2.5em;
padding-right: 2.5em;
}
.tasty-recipes-entry-header.tasty-recipes-has-image {
padding-top: 0px;
}
.tasty-recipes-entry-header .tasty-recipes-image {
float: none;
text-align: center;
transform: translateY(-115px);
margin-bottom: 1em; /* Decide if we need this */
}
.tasty-recipes-entry-header .tasty-recipes-image img {
-webkit-border-radius: 50%;
-moz-border-radius: 50%;
border-radius: 50%;
border: 5px solid #666677;
height: 150px;
width: 150px;
display: inline-block;
}
.tasty-recipes-entry-header h2 {
font-size: 2em;
font-weight: 400;
text-transform: lowercase;
margin-bottom: 0;
text-align: center;
color: #fff;
margin-top: 0;
padding-top: 0;
padding-bottom: 0;
}
.tasty-recipes-has-image .tasty-recipes-entry-header h2 {
margin-top: -115px;
}
.tasty-recipes-entry-header hr {
border: 1px solid #b7bbc6;
background-color: #b7bbc6;
margin-bottom: 1em;
margin-top: 1em;
}
.tasty-recipes-entry-header div.tasty-recipes-rating {
text-decoration: none;
border: none;
}
.tasty-recipes-entry-header .tasty-recipes-rating:hover {
text-decoration: none;
}
.tasty-recipes-entry-header div.tasty-recipes-rating {
font-size: 1.375em;
display: block;
}
.tasty-recipes-entry-header .tasty-recipes-rating p {
margin-bottom: 0;
}
.tasty-recipes-entry-header span.tasty-recipes-rating {
margin-left: 0.25em;
margin-right: 0.25em;
color: #fff;
}
.tasty-recipes-entry-header .rating-label {
font-style: italic;
color: #b7bbc6;
font-size: 0.6875em;
display: block;
}
.tasty-recipes-entry-header .tasty-recipes-details {
margin-top: 1em;
}
.tasty-recipes-entry-header .tasty-recipes-details ul {
list-style-type: none;
margin: 0;
}
.tasty-recipes-entry-header .tasty-recipes-details ul li {
display: inline-block;
margin-left: 0.5em;
margin-right: 0.5em;
font-size: 1em;
line-height: 2.5em;
color: #fff;
}
@media only screen and (max-width: 520px) {
.tasty-recipes-entry-header .tasty-recipes-details .detail-icon {
height: 0.8em;
margin-top: 0.4em;
}
.tasty-recipes-entry-header .tasty-recipes-details ul li {
font-size: 0.875em;
line-height: 1.75em;
}
}
@media only screen and (min-width: 520px) {
.tasty-recipes-entry-header .tasty-recipes-details .detail-icon {
height: 1em;
margin-top: 0.6em;
}
.tasty-recipes-entry-header .tasty-recipes-details ul li {
font-size: 1em;
line-height: 2.5em;
}
}
.tasty-recipes-entry-header .tasty-recipes-details .tasty-recipes-label {
font-style: italic;
color: #b7bbc6;
margin-right: 0.125em;
}
.tasty-recipes-entry-header .tasty-recipes-details .detail-icon {
vertical-align: top;
margin-right: 0.2em;
display: inline-block;
fill: #ffffff;
}
.tasty-recipes-entry-header .tasty-recipes-details .author a {
color: inherit;
text-decoration: underline;
}
.tasty-recipes-entry-content {
padding-top: 1.25em;
}
.tasty-recipes-entry-content .tasty-recipes-buttons {
margin-bottom: 1.25em;
margin-left: 1.25em;
margin-right: 1.25em;
}
.tasty-recipes-entry-content .tasty-recipes-buttons:after {
content: ' ';
display: block;
clear: both;
}
.tasty-recipes-entry-content .tasty-recipes-button-wrap {
width: 50%;
display: inline-block;
float: left;
box-sizing: border-box;
}
.tasty-recipes-entry-content .tasty-recipes-buttons a {
text-transform: uppercase;
text-align: center;
display: block;
color: #fff;
background-color: #666677;
font-size: 1em;
line-height: 1.375em;
padding-top: 1em;
padding-bottom: 1em;
font-weight: bold;
margin-top: 0;
border: none;
border-radius: 0;
text-decoration: none;
}
.tasty-recipes-entry-content a img {
box-shadow: none;
-webkit-box-shadow: none;
}
.tasty-recipes-entry-content .tasty-recipes-buttons a:hover {
background-color: #979599;
text-decoration: none;
}
.tasty-recipes-entry-content .tasty-recipes-buttons img {
vertical-align: top;
}
.tasty-recipes-entry-content .tasty-recipes-buttons img.svg-print,
.tasty-recipes-entry-content .tasty-recipes-buttons img.svg-pinterest {
height: 1.25em;
margin-right: 0.375em;
margin-bottom: 0;
background: none;
display: inline-block;
}
@media only screen and (min-width: 520px) {
.tasty-recipes-entry-content .tasty-recipes-button-wrap:first-child {
padding-right: 0.625em;
}
.tasty-recipes-entry-content .tasty-recipes-button-wrap:last-child {
padding-left: 0.625em;
}
}
@media only screen and (max-width: 520px) {
.tasty-recipes-entry-content .tasty-recipes-button-wrap {
width: 100%;
}
.tasty-recipes-entry-content .tasty-recipes-button-wrap:nth-child(2) {
padding-top: 1em;
}
}
.tasty-recipes-entry-content h3 {
text-transform: uppercase;
font-size: 0.75em;
color: #979599;
margin-bottom: 1.5em;
}
.tasty-recipes-entry-content h4 {
font-size: 1em;
padding-top: 0;
margin-bottom: 1.5em;
margin-top: 1.5em;
}
.tasty-recipes-entry-content hr {
background-color: #eae9eb;
border: 1px solid #eae9eb;
margin-top: 1em;
margin-bottom: 1em;
}
.tasty-recipes-entry-content .tasty-recipes-description,
.tasty-recipes-entry-content .tasty-recipes-ingredients,
.tasty-recipes-entry-content .tasty-recipes-instructions,
.tasty-recipes-entry-content .tasty-recipes-keywords {
padding-left: 1.25em;
padding-right: 1.25em;
}
.tasty-recipes-entry-content .tasty-recipes-description p {
margin-bottom: 1em;
}
.tasty-recipes-entry-content .tasty-recipes-ingredients h3 {
clear: none;
}
.tasty-recipes-entry-content .tasty-recipes-ingredients ul,
.tasty-recipes-entry-content .tasty-recipes-instructions ul {
list-style-type: none;
margin-left: 0;
margin-bottom: 1.5em;
padding: 0;
}
.tasty-recipes-entry-content .tasty-recipes-ingredients ul li,
.tasty-recipes-entry-content .tasty-recipes-instructions ul li {
margin-bottom: 0.625em;
list-style-type: none;
position: relative;
margin-left: 2.5em;
line-height: 1.46;
}
.tasty-recipes-entry-content .tasty-recipes-ingredients ul li:before,
.tasty-recipes-entry-content .tasty-recipes-instructions ul li:before {
background-color: #666677;
-webkit-border-radius: 50%;
-moz-border-radius: 50%;
border-radius: 50%;
height: 0.5em;
width: 0.5em;
display: block;
content: ' ';
left: -1.25em;
top: 0.375em;
position: absolute;
}
.tasty-recipes-entry-content .tasty-recipes-ingredients ol,
.tasty-recipes-entry-content .tasty-recipes-instructions ol {
counter-reset: li;
margin-left: 0;
padding: 0;
}
.tasty-recipes-entry-content .tasty-recipes-ingredients ol > li,
.tasty-recipes-entry-content .tasty-recipes-instructions ol > li {
list-style-type: none;
position: relative;
margin-bottom: 1em;
margin-left: 2.5em;
line-height: 1.46;
}
.tasty-recipes-entry-content .tasty-recipes-ingredients ol > li:before,
.tasty-recipes-entry-content .tasty-recipes-instructions ol > li:before {
content: counter(li);
counter-increment: li;
position: absolute;
background-color: #666677;
-webkit-border-radius: 50%;
-moz-border-radius: 50%;
border-radius: 50%;
height: 1.45em;
width: 1.45em;
color: #fff;
left: -1.25em;
transform: translateX(-50%);
line-height: 1.5em;
font-size: 0.6875em;
text-align: center;
top: 0.1875em;
}
.tasty-recipes-entry-content .tasty-recipes-ingredients li li,
.tasty-recipes-entry-content .tasty-recipes-instructions li li {
margin-top: 0.625em;
}
.tasty-recipes-entry-content .tasty-recipes-ingredients li ul,
.tasty-recipes-entry-content .tasty-recipes-ingredients li ol,
.tasty-recipes-entry-content .tasty-recipes-instructions li ul,
.tasty-recipes-entry-content .tasty-recipes-instructions li ol {
margin-bottom: 0;
}
@media only screen and (max-width: 520px) {
.tasty-recipes-entry-content .tasty-recipes-ingredients ol,
.tasty-recipes-entry-content .tasty-recipes-instructions ol {
margin-left: 0;
}
}
.tasty-recipes-entry-content .tasty-recipes-equipment {
padding-left: 1.25em;
padding-right: 1.25em;
}
.tasty-recipes-entry-content .tasty-recipe-video-embed ~ .tasty-recipes-equipment {
padding-top: 1em;
}
.tasty-recipes-entry-content .tasty-recipes-notes {
padding: 1.25em;
background-color: #edf0f2;
}
.tasty-recipes-entry-content .tasty-recipes-notes ol {
counter-reset: li;
margin-left: 0;
padding: 0;
}
.tasty-recipes-entry-content .tasty-recipes-notes ul {
margin-left: 0;
padding: 0;
}
.tasty-recipes-entry-content .tasty-recipes-notes p,
.tasty-recipes-entry-content .tasty-recipes-notes ul li,
.tasty-recipes-entry-content .tasty-recipes-notes ol li {
background-color: #fff;
padding-left: 1.5625em;
padding-right: 1.5625em;
padding-top: 1.25em;
padding-bottom: 1.25em;
position: relative;
-webkit-clip-path: polygon(20px 0, 100% 0, 100% 100%, 0 100%, 0 20px);
clip-path: polygon(20px 0, 100% 0, 100% 100%, 0 100%, 0 20px);
margin-bottom: 1.5em;
}
@media only screen and (min-width: 520px) {
.tasty-recipes-entry-content .tasty-recipes-notes p,
.tasty-recipes-entry-content .tasty-recipes-notes ul li,
.tasty-recipes-entry-content .tasty-recipes-notes ol li {
padding-left: 2.5em;
}
.tasty-recipes-entry-content .tasty-recipes-notes p:before,
.tasty-recipes-entry-content .tasty-recipes-notes ul li:before {
content: 'i';
display: block;
background-color: #666677;
-webkit-border-radius: 50%;
-moz-border-radius: 50%;
border-radius: 50%;
height: 1.3em;
width: 1.3em;
font-size: 0.75em;
line-height: 1.3em;
text-align: center;
color: #fff;
position: absolute;
left: 1.167em;
top: 1.9em;
}
.tasty-recipes-entry-content .tasty-recipes-notes ol > li:before {
content: counter(li);
counter-increment: li;
position: absolute;
background-color: #666677;
-webkit-border-radius: 50%;
-moz-border-radius: 50%;
border-radius: 50%;
height: 1.45em;
width: 1.45em;
color: #fff;
left: 2em;
transform: translateX(-50%);
line-height: 1.5em;
font-size: 0.6875em;
text-align: center;
top: 2em;
}
}
.tasty-recipes-entry-content .tasty-recipes-notes p:last-child {
margin-bottom: 0;
}
.tasty-recipes-entry-content .tasty-recipes-other-details {
background-color: #edf0f2;
padding: 0 1.25em 1.25em;
}
.tasty-recipes-entry-content .tasty-recipes-other-details ul {
color: #666677;
display: flex;
flex-wrap: wrap;
font-size: 0.85rem;
justify-content: center;
list-style: none;
margin-bottom: 0;
}
.tasty-recipes-entry-content .tasty-recipes-other-details ul li {
margin: 0 0.5rem;
list-style: none;
}
.tasty-recipes-entry-content
.tasty-recipes-other-details
ul
li
.tasty-recipes-label {
font-style: italic;
}
.tasty-recipes-entry-content .tasty-recipes-other-details .detail-icon {
fill: #666677;
vertical-align: top;
margin-right: 0.2em;
display: inline-block;
}
@media only screen and (max-width: 520px) {
.tasty-recipes-entry-content .tasty-recipes-other-details .detail-icon {
height: 0.8em;
margin-top: 0.4em;
}
.tasty-recipes-entry-content .tasty-recipes-other-details ul li {
font-size: 0.875em;
line-height: 1.75em;
}
}
@media only screen and (min-width: 520px) {
.tasty-recipes-entry-content .tasty-recipes-other-details .detail-icon {
height: 1em;
margin-top: 0.6em;
}
.tasty-recipes-entry-content .tasty-recipes-other-details ul li {
font-size: 1em;
line-height: 2.5em;
}
}
.tasty-recipes-entry-content .tasty-recipes-keywords {
background-color: #edf0f2;
padding-bottom: 1em;
padding-top: 1em;
}
.tasty-recipes-entry-content .tasty-recipes-keywords p {
font-size: 0.7em;
font-style: italic;
color: #979599;
margin-bottom: 0;
}
.tasty-recipes-entry-content .tasty-recipes-keywords p span {
font-weight: bold;
}
.tasty-recipes-nutrifox {
text-align: center;
margin: 0;
}
.nutrifox-label {
background-color: #edf0f2;
}
.tasty-recipes-nutrifox iframe {
width: 100%;
display: block;
margin: 0;
}
.tasty-recipes-entry-content .tasty-recipes-nutrition {
padding: 1.25em;
color: #666677;
}
.tasty-recipes-nutrition .tasty-recipes-label {
font-style: italic;
color: #b7bbc6;
margin-right: 0.125em;
font-weight: 400;
}
.tasty-recipes-nutrition ul {
text-align: center;
}
.tasty-recipes-nutrition li {
float: none;
display: inline-block;
line-height: 2em;
}
.tasty-recipes-entry-footer {
background-color: #666677;
padding-top: 1.5625em;
padding-bottom: 1.25em;
padding-left: 2.5em;
padding-right: 2.5em;
text-align: center;
}
.tasty-recipes-entry-footer .tasty-recipes-footer-content {
display: inline-block;
}
.tasty-recipes-entry-footer img {
width: 65px;
}
.tasty-recipes-entry-footer h3 {
color: #b7bbc6;
font-size: 1.25em;
line-height: 2.25em;
margin-top: 0.5em;
margin-bottom: 0.125em;
padding: 0;
line-height: 1em;
}
.tasty-recipes-entry-footer p {
margin-bottom: 0;
color: #fff;
font-size: 0.75em;
}
.tasty-recipes-entry-footer p a {
color: #fff;
text-decoration: underline;
box-shadow: none;
border-bottom: none;
}
.tasty-recipes-entry-footer:after {
content: ' ';
display: block;
clear: both;
}
@media only screen and (max-width: 520px) {
.tasty-recipes-entry-footer h3 {
margin-top: 0.5em;
margin-bottom: 0.5em;
}
.tasty-recipes-entry-footer {
text-align: center;
}
}
@media only screen and (min-width: 520px) {
.tasty-recipes-entry-footer img {
float: left;
}
.tasty-recipes-entry-footer h3,
.tasty-recipes-entry-footer p {
margin-left: 90px;
clear: none;
text-align: left;
}
}
/* Print view styles */
.tasty-recipes-print-view {
font-size: 11px;
background-color: #fff;
}
.tasty-recipes-print-view .tasty-recipes-print-button {
display: inline-block;
}
.tasty-recipes-print {
padding: 0;
font-size: 11px;
}
.tasty-recipes-print-view .tasty-recipes {
margin-top: 1em;
}
.tasty-recipes-print .tasty-recipes-entry-header {
background-color: inherit;
color: inherit;
padding-bottom: 0;
padding-left: 1em;
padding-right: 1em;
padding-top: 1em;
}
.tasty-recipes-print .tasty-recipes-entry-header .tasty-recipes-image {
float: right;
transform: none;
}
.tasty-recipes-print.tasty-recipes-has-image .tasty-recipes-entry-header h2 {
margin-top: 0;
}
.tasty-recipes-print .tasty-recipes-entry-header h2 {
color: inherit;
margin-bottom: 0.5em;
}
.tasty-recipes-print .tasty-recipes-entry-header hr {
display: none;
}
.tasty-recipes-print .tasty-recipes-entry-header span.tasty-recipes-rating {
color: #000;
}
.tasty-recipes-print .tasty-recipes-entry-header .tasty-recipes-details ul {
padding: 0;
clear: none;
}
.tasty-recipes-print .tasty-recipes-entry-header .tasty-recipes-details ul li {
line-height: 1.5em;
color: #000;
}
.tasty-recipes-print
.tasty-recipes-entry-header
.tasty-recipes-details
.detail-icon {
display: none;
}
.tasty-recipes-print .tasty-recipes-entry-content img {
max-width: 50%;
height: auto;
}
.tasty-recipes-print
.tasty-recipes-entry-content
.tasty-recipes-ingredients
ul
li,
.tasty-recipes-print
.tasty-recipes-entry-content
.tasty-recipes-ingredients
ol
li {
margin-bottom: 0.25em;
line-height: 1.1;
}
.tasty-recipes-print
.tasty-recipes-entry-content
.tasty-recipes-instructions
ul
li,
.tasty-recipes-print
.tasty-recipes-entry-content
.tasty-recipes-instructions
ol
li {
margin-bottom: 0.5em;
line-height: 1.1;
}
.tasty-recipes-print
.tasty-recipes-entry-content
.tasty-recipes-ingredients
ul
li:before,
.tasty-recipes-print
.tasty-recipes-entry-content
.tasty-recipes-instructions
ul
li:before {
top: 0.3em;
}
.tasty-recipes-print
.tasty-recipes-entry-content
.tasty-recipes-ingredients
ol
li:before,
.tasty-recipes-print
.tasty-recipes-entry-content
.tasty-recipes-instructions
ol
li:before {
top: 0;
}
.tasty-recipes-print .tasty-recipes-entry-content .tasty-recipes-notes p,
.tasty-recipes-print .tasty-recipes-entry-content .tasty-recipes-notes ul li,
.tasty-recipes-print .tasty-recipes-entry-content .tasty-recipes-notes ol li {
padding-top: 0;
padding-bottom: 0;
background-color: #edf0f2;
clip-path: none;
}
.tasty-recipes-print .tasty-recipes-entry-content .tasty-recipes-notes p:before,
.tasty-recipes-print
.tasty-recipes-entry-content
.tasty-recipes-notes
ul
li:before {
top: 0;
clip-path: none;
margin-bottom: 0.5em;
}
@media print {
.tasty-recipes-print .tasty-recipes-entry-footer img {
display: none;
}
}
.tasty-recipes-print .tasty-recipes-source-link {
text-align: center;
}

Swig Pumpkin Cookies
 Prep Time: 25 min Cook Time: 11 min Total Time: 36 minutes
  Yield: 14 cookies
  Print Recipe
  Pin Recipe
Description
Slightly cakey, exceptionally delicious Swig Pumpkin Cookies laden with cinnamon, spice, and everything nice, including a swoop of cream cheese frosting. These are best made a day in advance for all the flavors to soften, absorb, and meld into each other.
Ingredients
Pumpkin Cookie
Wet
6 tbsp. unsalted butter, room temperature
3/4 c. pure cane sugar, plus more for sprinkling
1/2 c. pumpkin puree*
1/4 c. neutral oil (like grapeseed)
1 large egg
Dry
2 1/2 c. all purpose unbleached flour
1/2 c. powdered sugar
1 scant tbsp. ground cinnamon
1/2 tsp. ground nutmeg
1/2 tsp. ground ginger
1/2 tsp. kosher salt
1/4 tsp. baking soda
1/4 tsp. cream of tartar
1/4 tsp. ground cloves
Cream Cheese Frosting
Frosting
3 tbsp. unsalted butter, room temperature
3 oz. cream cheese, room temperature
1 3/4 c. powdered sugar
1 1/2 tsp. heavy cream
splash of pure vanilla extract
pinch of kosher salt
Sprinkles
2 tbsp. raw pepita seeds
Instructions
Make the cookies. Preheat oven to 350°F. Line baking sheets with parchment paper or Silpat. Set aside.
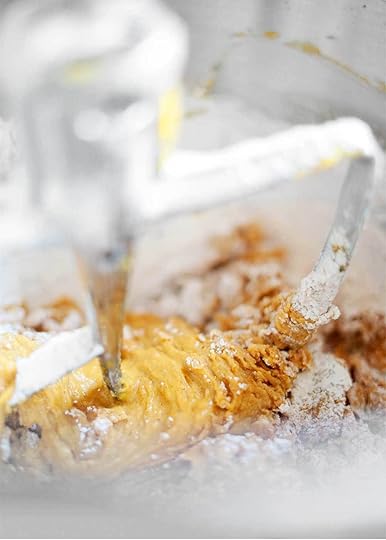
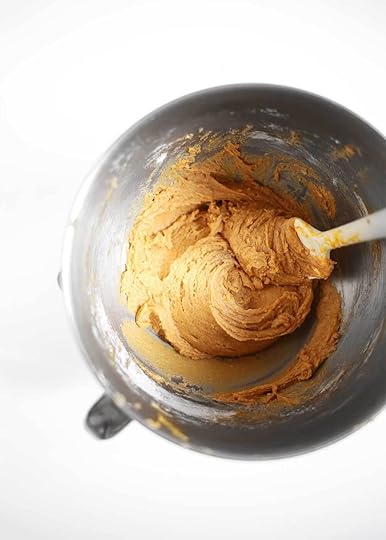
Begin mixing the wet ingredients. In a stand mixer fitted with the paddle attachment, cream the butter and sugar over medium speed until evenly combined and the mixture begins pulling away from the sides of the bowl, about 4 minutes.
Meanwhile, whisk together all the dry ingredients in a large mixing bowl until evenly combined. Set aside.
To the wet mixture, add in the pumpkin and mix again on medium to combine. The mixture will look seperated. Scrape down sides and add in the oil, mixing until smooth and emulsified over medium speed. Add in the egg and mix until combined.
With the mixer on low speed add in the flour in 3 or so increments, mixing until nearly combined but not completely. We don’t want to overmix this dough and create a tough cookie. Finish mixing the dough by hand, folding with a spatula until just combined.
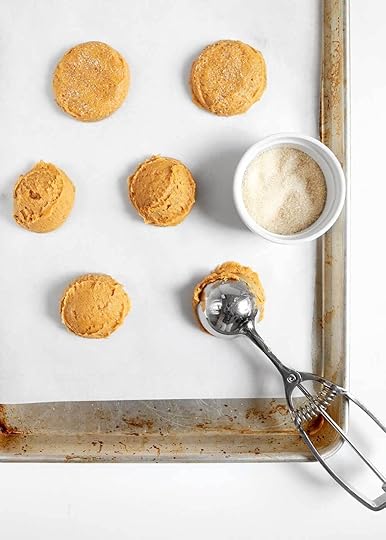
Using a 2oz. spring release scoop (4 tablespoons), scoop 7 cookies evenly spaced on a baking sheet at a time. Sprinkle each with a little sugar and gently press the dough into a thick disk, about 2 1/2″ in diameter, patting in the imperfections. This will keep the dough from sticking to your fingers. Repeat on all cookies then give them another sprinkle before heading into the oven.
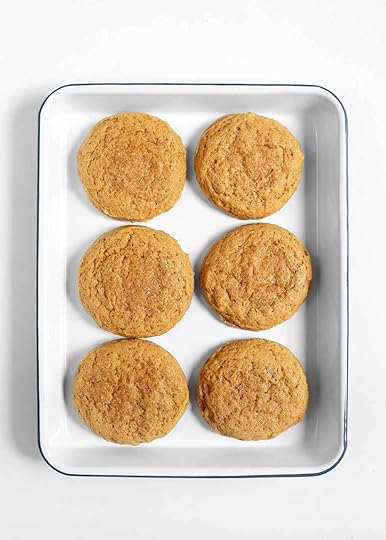
Bake for 11-12 minutes, watching carefully. The cookies are ready when puffed and slightly soft to the touch, neither gooey or hard. Allow to cool on the baking sheet for 4 minutes before removing to a cooling rack. Cool completely before frosting.
Make the frosting. In a large mixing bowl with a handheld mixer (or a stand mixer with the whisk attachment), cream together the butter and cream cheese until evenly combined. Add in the remaining frosting ingredients, and mix over medium-low speed at first to give the crumbly mixture time to come together. Then mix on medium-high until fluffy and pale. To make a thicker frosting, add more powdered sugar. For a thinner frosting, add more heavy cream.
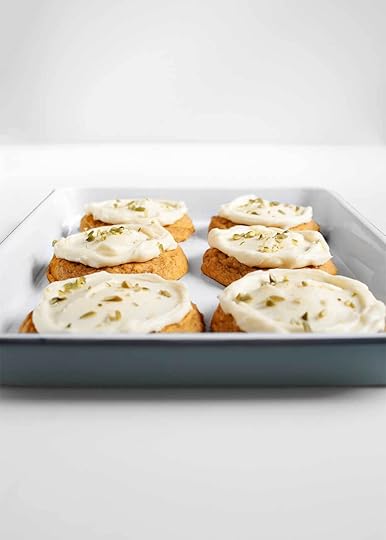
Apply the frosting to the cookies with an offset spatula or butter knife, adding a scoop to the middle of each cookie, about 1 1/2 tablespoons. Gently press the frosting out to the edge, leaving enough finger space to hold the cookie. To create the swoop, bring your spatula in to create a crust on your frosting, angling the spatula slightly down and pull in a circular motion, pulling up at the end of the swoop.
Roughly chop the pepita seeds and use as sprinkles. Cookies are best served the next day. Store in a single layer, covered but not airtight, making sure nothing is touching the frosting. Eat within 4 days of making.
Notes
*Use high quality canned pumpkin puree or make your own. I like to steam mine.

Did you make this recipe?
Tag @thefauxmartha on Instagram and hashtag it #thefauxmartha
Recipe Card powered by [image error]
The post Swig Pumpkin Cookies appeared first on The Faux Martha.


October 22, 2019
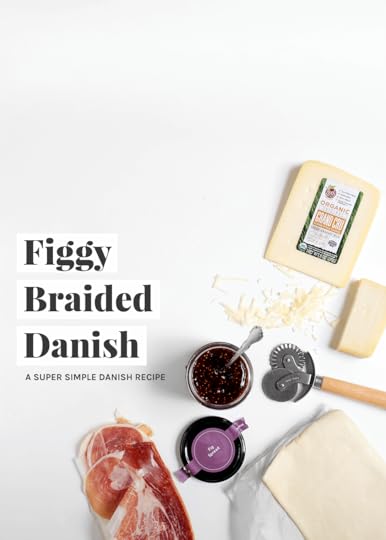
A Figgy Braided Danish and a Cheese Tour

Last month, between the pile-up of summer and the beginning of fall, between the first day of kindergarten and Hallie’s 6th birthday, between getting her first pet, Pearla the hamster, and losing her top tooth, I flew to Madison, WI for a cheese tour with Roth Cheese.

This post was created in an ongoing partnership with Roth Cheese, makers of handcrafted alpine-style cheeses made in Wisconsin, next door to us in Minnesota.
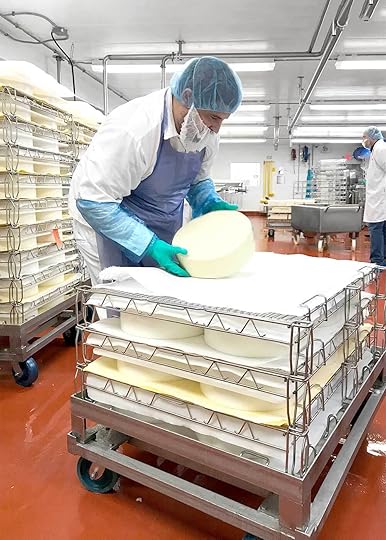
We bumped down a bumpy road from Madison to the Roth Cheese Creamery where cheese wheels are still flipped by hand and made from a recipe of only a couple of ingredients. A creamery where cheesemongers craft new varieties while preserving the classics. A creamery where flavor is added the good old fashioned way, by way of a little to a lot of time depending on the variety.

We bumped a little further down the road to a local dairy farm, where the cows moo and the milk is sourced within a 60-mile radius of the creamery, always fresh, always rBST-free. Can you spot Sarah Copeland?

While at the creamery, we learned how cheese is made, and how to cut it too. A wheel, that is. And how to store it, which I’ll share more about next month. And that most aged cheese is naturally lactose-free. I had no idea. (The longer a cheese is aged, the more lactose is broken down by the bacteria inside the cheese, in other words, the lactose in milk is converted into lactic acid during aging.) We learned about the most delicious figgy breakfast bread, homemade by the Roth Cheese team, by way of breakfast. With a little of their Grand Cru tucked inside the folds of the bread, it almost tasted like a danish.
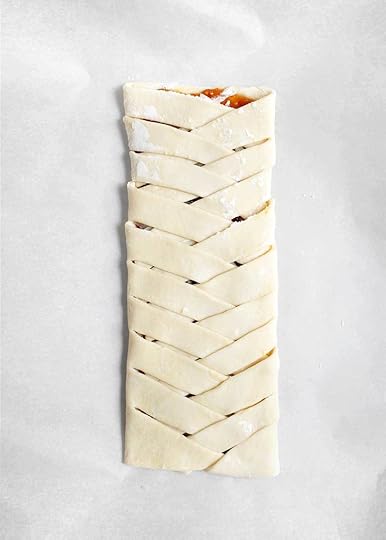
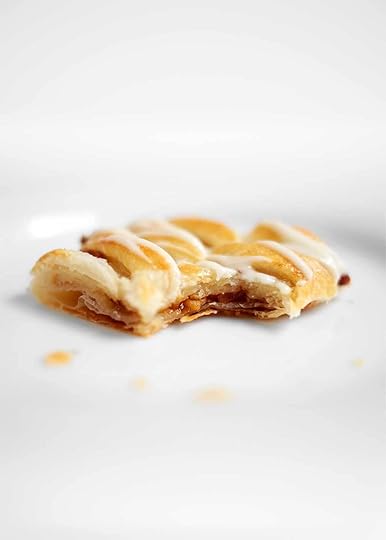
To commemorate the trip and give you a little taste of it, too, I made my own version of a Figgy Braided Danish. It’s super simple, compared to a traditional danish, made with only 4 ingredients: puff pastry, fig jam, Organic Grand Cru, plus an egg wash. The creamy drizzle is completely optional and so is the prosciutto, unless you’re a Monte Cristo lover like Kev. Don’t be scared off by the braid. It’s actually a simple yet foolproof way to fold a danish, keep the filling tucked inside without burning, and maintain the desired shape throughout the bake time. I speak from trying every danish fold in the book. Who knew braiding would end up being the simplest method?
.tasty-recipes-image {
float: right; }
.tasty-recipes-yield-scale {
border: 1px solid #979599;
border-radius: 2px;
color: #979599;
margin-left: 3px;
padding: 0 4px;
font-size: 0.7rem; }
.tasty-recipes-scale-container {
float: right;
padding: 0 0 1rem; }
.tasty-recipes-scale-container .tasty-recipes-scale-label {
text-transform: uppercase;
font-size: 0.6rem;
color: #979599; }
.tasty-recipes-scale-container button {
background: transparent;
border: 1px solid #979599;
border-radius: 2px;
color: #979599;
margin-left: 5px;
padding: 2px 4px; }
.tasty-recipes-scale-container button.tasty-recipes-scale-button-active {
color: #353547;
border-color: #353547; }
.tasty-recipes-scale-container button:focus {
outline: none; }
.tasty-recipes-print-button {
background-color: #666677;
display: inline-block;
padding-left: 1em;
padding-right: 1em;
padding-top: 0.5em;
padding-bottom: 0.5em;
text-decoration: none; }
a.tasty-recipes-print-button {
color: #fff; }
a.tasty-recipes-print-button:hover {
color: #fff; }
.tasty-recipes-equipment {
display: -webkit-box;
display: flex;
flex-wrap: wrap;
-webkit-box-pack: space-evenly;
justify-content: space-evenly; }
.tasty-recipes-equipment > h3 {
-webkit-box-flex: 0;
flex: 0 0 100%; }
.tasty-recipes-equipment .tasty-link-card {
-webkit-box-flex: 0;
flex: 0 0 50%;
padding: 1.5rem 1rem;
text-align: center; }
@media screen and (min-width: 500px) {
.tasty-recipes-equipment .tasty-link-card {
-webkit-box-flex: 0;
flex: 0 0 33%; } }
.tasty-recipes-equipment .tasty-link-card p {
font-weight: bold;
font-size: 1em;
margin-bottom: 0; }
.tasty-recipes-equipment .tasty-link-card p a {
color: initial; }
.tasty-recipes-equipment .tasty-link-card span {
font-size: 0.9em; }
.tasty-recipes-rating.tasty-recipes-clip-10 {
-webkit-clip-path: polygon(0 0, 10% 0%, 10% 100%, 0% 100%);
clip-path: polygon(0 0, 10% 0%, 10% 100%, 0% 100%); }
.tasty-recipes-rating.tasty-recipes-clip-20 {
-webkit-clip-path: polygon(0 0, 20% 0%, 20% 100%, 0% 100%);
clip-path: polygon(0 0, 20% 0%, 20% 100%, 0% 100%); }
.tasty-recipes-rating.tasty-recipes-clip-30 {
-webkit-clip-path: polygon(0 0, 30% 0%, 30% 100%, 0% 100%);
clip-path: polygon(0 0, 30% 0%, 30% 100%, 0% 100%); }
.tasty-recipes-rating.tasty-recipes-clip-40 {
-webkit-clip-path: polygon(0 0, 40% 0%, 40% 100%, 0% 100%);
clip-path: polygon(0 0, 40% 0%, 40% 100%, 0% 100%); }
.tasty-recipes-rating.tasty-recipes-clip-50 {
-webkit-clip-path: polygon(0 0, 50% 0%, 50% 100%, 0% 100%);
clip-path: polygon(0 0, 50% 0%, 50% 100%, 0% 100%); }
.tasty-recipes-rating.tasty-recipes-clip-60 {
-webkit-clip-path: polygon(0 0, 60% 0%, 60% 100%, 0% 100%);
clip-path: polygon(0 0, 60% 0%, 60% 100%, 0% 100%); }
.tasty-recipes-rating.tasty-recipes-clip-70 {
-webkit-clip-path: polygon(0 0, 70% 0%, 70% 100%, 0% 100%);
clip-path: polygon(0 0, 70% 0%, 70% 100%, 0% 100%); }
.tasty-recipes-rating.tasty-recipes-clip-80 {
-webkit-clip-path: polygon(0 0, 80% 0%, 80% 100%, 0% 100%);
clip-path: polygon(0 0, 80% 0%, 80% 100%, 0% 100%); }
.tasty-recipes-rating.tasty-recipes-clip-90 {
-webkit-clip-path: polygon(0 0, 90% 0%, 90% 100%, 0% 100%);
clip-path: polygon(0 0, 90% 0%, 90% 100%, 0% 100%); }
.tasty-recipes-nutrition ul {
list-style-type: none;
margin: 0;
padding: 0; }
.tasty-recipes-nutrition ul:after {
display: block;
content: ' ';
clear: both; }
.tasty-recipes-nutrition li {
float: left;
margin-right: 1em; }
.tasty-recipes-plug {
text-align: center;
margin-bottom: 1em;
display: -webkit-box;
display: flex;
-webkit-box-align: center;
align-items: center;
-webkit-box-pack: center;
justify-content: center; }
.tasty-recipes-plug a {
text-decoration: none;
box-shadow: none; }
.tasty-recipes-plug a img {
width: 150px;
height: auto;
margin: 5px 0 0 8px;
display: inline-block; }
@media print {
.tasty-recipes-no-print,
.tasty-recipes-no-print * {
display: none !important; } }
.tasty-recipes {
border: 5px solid #666677;
margin-top: 6em;
margin-bottom: 4em;
}
.tasty-recipes.tasty-recipes-has-plug {
margin-bottom: 1em;
}
.tasty-recipes-plug {
margin-bottom: 4em;
}
.tasty-recipes-print-button {
display: none;
}
.tasty-recipes-image-shim {
height: 69.5px;
clear: both;
}
.tasty-recipes-entry-header {
background-color: #666677;
color: #fff;
text-align: center;
padding-top: 35px;
padding-bottom: 1.5em;
padding-left: 2.5em;
padding-right: 2.5em;
}
.tasty-recipes-entry-header.tasty-recipes-has-image {
padding-top: 0px;
}
.tasty-recipes-entry-header .tasty-recipes-image {
float: none;
text-align: center;
transform: translateY(-115px);
margin-bottom: 1em; /* Decide if we need this */
}
.tasty-recipes-entry-header .tasty-recipes-image img {
-webkit-border-radius: 50%;
-moz-border-radius: 50%;
border-radius: 50%;
border: 5px solid #666677;
height: 150px;
width: 150px;
display: inline-block;
}
.tasty-recipes-entry-header h2 {
font-size: 2em;
font-weight: 400;
text-transform: lowercase;
margin-bottom: 0;
text-align: center;
color: #fff;
margin-top: 0;
padding-top: 0;
padding-bottom: 0;
}
.tasty-recipes-has-image .tasty-recipes-entry-header h2 {
margin-top: -115px;
}
.tasty-recipes-entry-header hr {
border: 1px solid #b7bbc6;
background-color: #b7bbc6;
margin-bottom: 1em;
margin-top: 1em;
}
.tasty-recipes-entry-header div.tasty-recipes-rating {
text-decoration: none;
border: none;
}
.tasty-recipes-entry-header .tasty-recipes-rating:hover {
text-decoration: none;
}
.tasty-recipes-entry-header div.tasty-recipes-rating {
font-size: 1.375em;
display: block;
}
.tasty-recipes-entry-header .tasty-recipes-rating p {
margin-bottom: 0;
}
.tasty-recipes-entry-header span.tasty-recipes-rating {
margin-left: 0.25em;
margin-right: 0.25em;
color: #fff;
}
.tasty-recipes-entry-header .rating-label {
font-style: italic;
color: #b7bbc6;
font-size: 0.6875em;
display: block;
}
.tasty-recipes-entry-header .tasty-recipes-details {
margin-top: 1em;
}
.tasty-recipes-entry-header .tasty-recipes-details ul {
list-style-type: none;
margin: 0;
}
.tasty-recipes-entry-header .tasty-recipes-details ul li {
display: inline-block;
margin-left: 0.5em;
margin-right: 0.5em;
font-size: 1em;
line-height: 2.5em;
color: #fff;
}
@media only screen and (max-width: 520px) {
.tasty-recipes-entry-header .tasty-recipes-details .detail-icon {
height: 0.8em;
margin-top: 0.4em;
}
.tasty-recipes-entry-header .tasty-recipes-details ul li {
font-size: 0.875em;
line-height: 1.75em;
}
}
@media only screen and (min-width: 520px) {
.tasty-recipes-entry-header .tasty-recipes-details .detail-icon {
height: 1em;
margin-top: 0.6em;
}
.tasty-recipes-entry-header .tasty-recipes-details ul li {
font-size: 1em;
line-height: 2.5em;
}
}
.tasty-recipes-entry-header .tasty-recipes-details .tasty-recipes-label {
font-style: italic;
color: #b7bbc6;
margin-right: 0.125em;
}
.tasty-recipes-entry-header .tasty-recipes-details .detail-icon {
vertical-align: top;
margin-right: 0.2em;
display: inline-block;
fill: #ffffff;
}
.tasty-recipes-entry-header .tasty-recipes-details .author a {
color: inherit;
text-decoration: underline;
}
.tasty-recipes-entry-content {
padding-top: 1.25em;
}
.tasty-recipes-entry-content .tasty-recipes-buttons {
margin-bottom: 1.25em;
margin-left: 1.25em;
margin-right: 1.25em;
}
.tasty-recipes-entry-content .tasty-recipes-buttons:after {
content: ' ';
display: block;
clear: both;
}
.tasty-recipes-entry-content .tasty-recipes-button-wrap {
width: 50%;
display: inline-block;
float: left;
box-sizing: border-box;
}
.tasty-recipes-entry-content .tasty-recipes-buttons a {
text-transform: uppercase;
text-align: center;
display: block;
color: #fff;
background-color: #666677;
font-size: 1em;
line-height: 1.375em;
padding-top: 1em;
padding-bottom: 1em;
font-weight: bold;
margin-top: 0;
border: none;
border-radius: 0;
text-decoration: none;
}
.tasty-recipes-entry-content a img {
box-shadow: none;
-webkit-box-shadow: none;
}
.tasty-recipes-entry-content .tasty-recipes-buttons a:hover {
background-color: #979599;
text-decoration: none;
}
.tasty-recipes-entry-content .tasty-recipes-buttons img {
vertical-align: top;
}
.tasty-recipes-entry-content .tasty-recipes-buttons img.svg-print,
.tasty-recipes-entry-content .tasty-recipes-buttons img.svg-pinterest {
height: 1.25em;
margin-right: 0.375em;
margin-bottom: 0;
background: none;
display: inline-block;
}
@media only screen and (min-width: 520px) {
.tasty-recipes-entry-content .tasty-recipes-button-wrap:first-child {
padding-right: 0.625em;
}
.tasty-recipes-entry-content .tasty-recipes-button-wrap:last-child {
padding-left: 0.625em;
}
}
@media only screen and (max-width: 520px) {
.tasty-recipes-entry-content .tasty-recipes-button-wrap {
width: 100%;
}
.tasty-recipes-entry-content .tasty-recipes-button-wrap:nth-child(2) {
padding-top: 1em;
}
}
.tasty-recipes-entry-content h3 {
text-transform: uppercase;
font-size: 0.75em;
color: #979599;
margin-bottom: 1.5em;
}
.tasty-recipes-entry-content h4 {
font-size: 1em;
padding-top: 0;
margin-bottom: 1.5em;
margin-top: 1.5em;
}
.tasty-recipes-entry-content hr {
background-color: #eae9eb;
border: 1px solid #eae9eb;
margin-top: 1em;
margin-bottom: 1em;
}
.tasty-recipes-entry-content .tasty-recipes-description,
.tasty-recipes-entry-content .tasty-recipes-ingredients,
.tasty-recipes-entry-content .tasty-recipes-instructions,
.tasty-recipes-entry-content .tasty-recipes-keywords {
padding-left: 1.25em;
padding-right: 1.25em;
}
.tasty-recipes-entry-content .tasty-recipes-description p {
margin-bottom: 1em;
}
.tasty-recipes-entry-content .tasty-recipes-ingredients h3 {
clear: none;
}
.tasty-recipes-entry-content .tasty-recipes-ingredients ul,
.tasty-recipes-entry-content .tasty-recipes-instructions ul {
list-style-type: none;
margin-left: 0;
margin-bottom: 1.5em;
padding: 0;
}
.tasty-recipes-entry-content .tasty-recipes-ingredients ul li,
.tasty-recipes-entry-content .tasty-recipes-instructions ul li {
margin-bottom: 0.625em;
list-style-type: none;
position: relative;
margin-left: 2.5em;
line-height: 1.46;
}
.tasty-recipes-entry-content .tasty-recipes-ingredients ul li:before,
.tasty-recipes-entry-content .tasty-recipes-instructions ul li:before {
background-color: #666677;
-webkit-border-radius: 50%;
-moz-border-radius: 50%;
border-radius: 50%;
height: 0.5em;
width: 0.5em;
display: block;
content: ' ';
left: -1.25em;
top: 0.375em;
position: absolute;
}
.tasty-recipes-entry-content .tasty-recipes-ingredients ol,
.tasty-recipes-entry-content .tasty-recipes-instructions ol {
counter-reset: li;
margin-left: 0;
padding: 0;
}
.tasty-recipes-entry-content .tasty-recipes-ingredients ol > li,
.tasty-recipes-entry-content .tasty-recipes-instructions ol > li {
list-style-type: none;
position: relative;
margin-bottom: 1em;
margin-left: 2.5em;
line-height: 1.46;
}
.tasty-recipes-entry-content .tasty-recipes-ingredients ol > li:before,
.tasty-recipes-entry-content .tasty-recipes-instructions ol > li:before {
content: counter(li);
counter-increment: li;
position: absolute;
background-color: #666677;
-webkit-border-radius: 50%;
-moz-border-radius: 50%;
border-radius: 50%;
height: 1.45em;
width: 1.45em;
color: #fff;
left: -1.25em;
transform: translateX(-50%);
line-height: 1.5em;
font-size: 0.6875em;
text-align: center;
top: 0.1875em;
}
.tasty-recipes-entry-content .tasty-recipes-ingredients li li,
.tasty-recipes-entry-content .tasty-recipes-instructions li li {
margin-top: 0.625em;
}
.tasty-recipes-entry-content .tasty-recipes-ingredients li ul,
.tasty-recipes-entry-content .tasty-recipes-ingredients li ol,
.tasty-recipes-entry-content .tasty-recipes-instructions li ul,
.tasty-recipes-entry-content .tasty-recipes-instructions li ol {
margin-bottom: 0;
}
@media only screen and (max-width: 520px) {
.tasty-recipes-entry-content .tasty-recipes-ingredients ol,
.tasty-recipes-entry-content .tasty-recipes-instructions ol {
margin-left: 0;
}
}
.tasty-recipes-entry-content .tasty-recipes-equipment {
padding-left: 1.25em;
padding-right: 1.25em;
}
.tasty-recipes-entry-content .tasty-recipe-video-embed ~ .tasty-recipes-equipment {
padding-top: 1em;
}
.tasty-recipes-entry-content .tasty-recipes-notes {
padding: 1.25em;
background-color: #edf0f2;
}
.tasty-recipes-entry-content .tasty-recipes-notes ol {
counter-reset: li;
margin-left: 0;
padding: 0;
}
.tasty-recipes-entry-content .tasty-recipes-notes ul {
margin-left: 0;
padding: 0;
}
.tasty-recipes-entry-content .tasty-recipes-notes p,
.tasty-recipes-entry-content .tasty-recipes-notes ul li,
.tasty-recipes-entry-content .tasty-recipes-notes ol li {
background-color: #fff;
padding-left: 1.5625em;
padding-right: 1.5625em;
padding-top: 1.25em;
padding-bottom: 1.25em;
position: relative;
-webkit-clip-path: polygon(20px 0, 100% 0, 100% 100%, 0 100%, 0 20px);
clip-path: polygon(20px 0, 100% 0, 100% 100%, 0 100%, 0 20px);
margin-bottom: 1.5em;
}
@media only screen and (min-width: 520px) {
.tasty-recipes-entry-content .tasty-recipes-notes p,
.tasty-recipes-entry-content .tasty-recipes-notes ul li,
.tasty-recipes-entry-content .tasty-recipes-notes ol li {
padding-left: 2.5em;
}
.tasty-recipes-entry-content .tasty-recipes-notes p:before,
.tasty-recipes-entry-content .tasty-recipes-notes ul li:before {
content: 'i';
display: block;
background-color: #666677;
-webkit-border-radius: 50%;
-moz-border-radius: 50%;
border-radius: 50%;
height: 1.3em;
width: 1.3em;
font-size: 0.75em;
line-height: 1.3em;
text-align: center;
color: #fff;
position: absolute;
left: 1.167em;
top: 1.9em;
}
.tasty-recipes-entry-content .tasty-recipes-notes ol > li:before {
content: counter(li);
counter-increment: li;
position: absolute;
background-color: #666677;
-webkit-border-radius: 50%;
-moz-border-radius: 50%;
border-radius: 50%;
height: 1.45em;
width: 1.45em;
color: #fff;
left: 2em;
transform: translateX(-50%);
line-height: 1.5em;
font-size: 0.6875em;
text-align: center;
top: 2em;
}
}
.tasty-recipes-entry-content .tasty-recipes-notes p:last-child {
margin-bottom: 0;
}
.tasty-recipes-entry-content .tasty-recipes-other-details {
background-color: #edf0f2;
padding: 0 1.25em 1.25em;
}
.tasty-recipes-entry-content .tasty-recipes-other-details ul {
color: #666677;
display: flex;
flex-wrap: wrap;
font-size: 0.85rem;
justify-content: center;
list-style: none;
margin-bottom: 0;
}
.tasty-recipes-entry-content .tasty-recipes-other-details ul li {
margin: 0 0.5rem;
list-style: none;
}
.tasty-recipes-entry-content
.tasty-recipes-other-details
ul
li
.tasty-recipes-label {
font-style: italic;
}
.tasty-recipes-entry-content .tasty-recipes-other-details .detail-icon {
fill: #666677;
vertical-align: top;
margin-right: 0.2em;
display: inline-block;
}
@media only screen and (max-width: 520px) {
.tasty-recipes-entry-content .tasty-recipes-other-details .detail-icon {
height: 0.8em;
margin-top: 0.4em;
}
.tasty-recipes-entry-content .tasty-recipes-other-details ul li {
font-size: 0.875em;
line-height: 1.75em;
}
}
@media only screen and (min-width: 520px) {
.tasty-recipes-entry-content .tasty-recipes-other-details .detail-icon {
height: 1em;
margin-top: 0.6em;
}
.tasty-recipes-entry-content .tasty-recipes-other-details ul li {
font-size: 1em;
line-height: 2.5em;
}
}
.tasty-recipes-entry-content .tasty-recipes-keywords {
background-color: #edf0f2;
padding-bottom: 1em;
padding-top: 1em;
}
.tasty-recipes-entry-content .tasty-recipes-keywords p {
font-size: 0.7em;
font-style: italic;
color: #979599;
margin-bottom: 0;
}
.tasty-recipes-entry-content .tasty-recipes-keywords p span {
font-weight: bold;
}
.tasty-recipes-nutrifox {
text-align: center;
margin: 0;
}
.nutrifox-label {
background-color: #edf0f2;
}
.tasty-recipes-nutrifox iframe {
width: 100%;
display: block;
margin: 0;
}
.tasty-recipes-entry-content .tasty-recipes-nutrition {
padding: 1.25em;
color: #666677;
}
.tasty-recipes-nutrition .tasty-recipes-label {
font-style: italic;
color: #b7bbc6;
margin-right: 0.125em;
font-weight: 400;
}
.tasty-recipes-nutrition ul {
text-align: center;
}
.tasty-recipes-nutrition li {
float: none;
display: inline-block;
line-height: 2em;
}
.tasty-recipes-entry-footer {
background-color: #666677;
padding-top: 1.5625em;
padding-bottom: 1.25em;
padding-left: 2.5em;
padding-right: 2.5em;
text-align: center;
}
.tasty-recipes-entry-footer .tasty-recipes-footer-content {
display: inline-block;
}
.tasty-recipes-entry-footer img {
width: 65px;
}
.tasty-recipes-entry-footer h3 {
color: #b7bbc6;
font-size: 1.25em;
line-height: 2.25em;
margin-top: 0.5em;
margin-bottom: 0.125em;
padding: 0;
line-height: 1em;
}
.tasty-recipes-entry-footer p {
margin-bottom: 0;
color: #fff;
font-size: 0.75em;
}
.tasty-recipes-entry-footer p a {
color: #fff;
text-decoration: underline;
box-shadow: none;
border-bottom: none;
}
.tasty-recipes-entry-footer:after {
content: ' ';
display: block;
clear: both;
}
@media only screen and (max-width: 520px) {
.tasty-recipes-entry-footer h3 {
margin-top: 0.5em;
margin-bottom: 0.5em;
}
.tasty-recipes-entry-footer {
text-align: center;
}
}
@media only screen and (min-width: 520px) {
.tasty-recipes-entry-footer img {
float: left;
}
.tasty-recipes-entry-footer h3,
.tasty-recipes-entry-footer p {
margin-left: 90px;
clear: none;
text-align: left;
}
}
/* Print view styles */
.tasty-recipes-print-view {
font-size: 11px;
background-color: #fff;
}
.tasty-recipes-print-view .tasty-recipes-print-button {
display: inline-block;
}
.tasty-recipes-print {
padding: 0;
font-size: 11px;
}
.tasty-recipes-print-view .tasty-recipes {
margin-top: 1em;
}
.tasty-recipes-print .tasty-recipes-entry-header {
background-color: inherit;
color: inherit;
padding-bottom: 0;
padding-left: 1em;
padding-right: 1em;
padding-top: 1em;
}
.tasty-recipes-print .tasty-recipes-entry-header .tasty-recipes-image {
float: right;
transform: none;
}
.tasty-recipes-print.tasty-recipes-has-image .tasty-recipes-entry-header h2 {
margin-top: 0;
}
.tasty-recipes-print .tasty-recipes-entry-header h2 {
color: inherit;
margin-bottom: 0.5em;
}
.tasty-recipes-print .tasty-recipes-entry-header hr {
display: none;
}
.tasty-recipes-print .tasty-recipes-entry-header span.tasty-recipes-rating {
color: #000;
}
.tasty-recipes-print .tasty-recipes-entry-header .tasty-recipes-details ul {
padding: 0;
clear: none;
}
.tasty-recipes-print .tasty-recipes-entry-header .tasty-recipes-details ul li {
line-height: 1.5em;
color: #000;
}
.tasty-recipes-print
.tasty-recipes-entry-header
.tasty-recipes-details
.detail-icon {
display: none;
}
.tasty-recipes-print .tasty-recipes-entry-content img {
max-width: 50%;
height: auto;
}
.tasty-recipes-print
.tasty-recipes-entry-content
.tasty-recipes-ingredients
ul
li,
.tasty-recipes-print
.tasty-recipes-entry-content
.tasty-recipes-ingredients
ol
li {
margin-bottom: 0.25em;
line-height: 1.1;
}
.tasty-recipes-print
.tasty-recipes-entry-content
.tasty-recipes-instructions
ul
li,
.tasty-recipes-print
.tasty-recipes-entry-content
.tasty-recipes-instructions
ol
li {
margin-bottom: 0.5em;
line-height: 1.1;
}
.tasty-recipes-print
.tasty-recipes-entry-content
.tasty-recipes-ingredients
ul
li:before,
.tasty-recipes-print
.tasty-recipes-entry-content
.tasty-recipes-instructions
ul
li:before {
top: 0.3em;
}
.tasty-recipes-print
.tasty-recipes-entry-content
.tasty-recipes-ingredients
ol
li:before,
.tasty-recipes-print
.tasty-recipes-entry-content
.tasty-recipes-instructions
ol
li:before {
top: 0;
}
.tasty-recipes-print .tasty-recipes-entry-content .tasty-recipes-notes p,
.tasty-recipes-print .tasty-recipes-entry-content .tasty-recipes-notes ul li,
.tasty-recipes-print .tasty-recipes-entry-content .tasty-recipes-notes ol li {
padding-top: 0;
padding-bottom: 0;
background-color: #edf0f2;
clip-path: none;
}
.tasty-recipes-print .tasty-recipes-entry-content .tasty-recipes-notes p:before,
.tasty-recipes-print
.tasty-recipes-entry-content
.tasty-recipes-notes
ul
li:before {
top: 0;
clip-path: none;
margin-bottom: 0.5em;
}
@media print {
.tasty-recipes-print .tasty-recipes-entry-footer img {
display: none;
}
}
.tasty-recipes-print .tasty-recipes-source-link {
text-align: center;
}

Figgy Braided Danish
Prep Time: 15 min. Cook Time: 17 min. Total Time: 32 minutes Yield: 4 braids, 12 servings Print Recipe Pin RecipeDescription
The base of this simple danish comes together in under 4 ingredients. Serve at breakfast, as an afternoon snack, or an after-dinner treat. The creamy, nutty Roth Organic Grand Cru stands in as the cream cheese, which is traditionally used in a cheese danish.
Ingredients
Braid
1 (14 oz.) sheet of puff pastry, thawed, plus flour for rolling
1/2 c. fig jam
1/2 c. grated Roth Organic Grand Cru
2–3 slices of prosciutto (optional)
Egg Wash
1 large egg
2 tsp. water
Glaze (Optional)
1/2 c. powdered sugar
1 1/2-3 tsp. whole milk
Instructions
Divide the refrigerator-thawed puff pastry sheet into 4 sheets. Refrigerate remaining sheets to keep chilled or if freezing for later use, wrap in parchment paper and cover airtight. Preheat oven to 375°F and line a baking sheet with parchment paper. Set aside.
On a well-floured surface, roll out the sheet into an 8.5” x 7.5” rectangle and about 1/16” thick using a rolling pin. If any sticking occurs, sprinkle with additional flour. Using a knife or pastry wheel, make about 10 cuts on both sides angled down, leaving a 3” wide space for spreading the filling. The top cut will create a removable triangle to be discarded or used as a decoration.
Spread a thin, even layer of the fig jam, or another jam of choice, down the middle, about 2 tablespoons per braid. Sprinkle lightly with the cheese, about 2 packed tablespoons per braid. Add a couple of torn strips of prosciutto, if desired. With a little water in a nearby bowl or ramekin, fold over one stip first. Dab the end of the strip with water to act as glue. Then fold over the top strip from the opposite side. Again, dab the end of the strip with water. Fold over again, repeating and alternating sides. The final triangle strip can be braided and folded underneath to help keep the filling tucked inside, using a dab of water to help glue it underneath. Using a pastry bench or spatula, carefully transfer the braid to the prepared baking sheet. If making additional braids, place in the fridge to chill before baking while assembling the others.
Meanwhile, whisk together the egg wash ingredients until evenly combined. Using a pastry brush or something similar, lightly and evenly brush the braid with the egg wash. Bake for 17-20 minutes or until golden and puffed. Serve warm or cooled. If serving cooled, make the optional glaze by whisking the powdered sugar and milk together until smooth. For a thicker glaze, whisk in more powdered sugar. For a thinner glaze, whisk in a little extra milk until smooth. Drizzle back and forth over braid. Allow glaze to harden before serving. Danishes can be made a day in advance and stored uncovered or lightly covered, but not airtight. Each braid yields about 3 servings.
Notes
This recipe can easily be halved or doubled or singled. Use it as a guide. The basic recipe goes like this. Roll out puff pastry into a rectangle that’s closer to a square, about 1/16″ thick. Make slits for braids on the longest side of the rectangle. The slits and the filling area are almost equally divided into thirds, with the filling area slightly wider than the slits. Add a thin layer of jam, then a thin layer of cheese. Braid and bake.
Roth cheeses can be found in your grocer’s deli case and online via Instacart and Amazon Fresh. To find Roth Grand Cru near you, head this way for the store locator. Note: Organic Grand Cru is only available in some markets, however, the regular varieties are more readily available.
Did you make this recipe?
Tag @thefauxmartha on Instagram and hashtag it #thefauxmartha
Recipe Card powered by [image error]
The post A Figgy Braided Danish and a Cheese Tour appeared first on The Faux Martha.
October 17, 2019
This is Us

Kev always says this to me. “What is now, will not always be, Mel.” “But Kev, I’m serious,” I say, “I’m never moving from this house.” I hate it when he says it. It’s like he knows me better than I know myself, like he sees something I can’t see yet. It’s like he’s trying the shake the unsteady ground I built for myself with a pile of permanent claims that might not be so permanent. The longer I’ve lived with Kev, the more space I’ve given myself to be unsure about it, sometimes, about it all.
The hard part about being unsure, especially about things people are generally very sure of, is that look of brokenness after disclosing. I felt it at church when my finger poked a hole through something and the hole was too big to ignore. I felt it a long time ago from a best friend when I was thinking about casting my vote in the other box. And since becoming a mother, I’ve felt it every time someone asked when, if, we’d be adding on to our family. “I don’t know. I’m not sure.” She must be broken. I saw it in their eyes and felt it, too. Maybe I was broken, but I couldn’t be certain.
Whenever I approach a new recipe, I ask why. Why, why, why? Why do we need to soak the beans? Why do we need to reduce the sauce? And I begin replacing the whys with the what-ifs. What if we start cooking the beans right away? What if we skip creaming the butter? What if, what if, what if? It’s the process of reconstruction. And the only way to reconstruct is to deconstruct first. And that’s what I did with my belief system and our family system, too.
I won’t go into detail about my belief system. It’s too personal for the internet. And I’m also absolutely terrified to tell you about our family system because it’s too personal for the internet. But with a little nudge from Kev, I’m doing it. Because there’s good news at the end. Though, I don’t want the good news to cloud the process that came before it. I am certain of this—reconstruction after the mess of deconstruction is a beautiful thing. It’s a story I’m proud to tell, especially after living through a storm of shame, as a new parent unsure of whether we’d have more kids.
Becoming a parent was the absolute hardest recipe I ever chose to tackle. Parts of our experience were really hard because of who I was. Parts of our experience were really hard because of who Hal was. And other parts of our experience were really hard because of who Kev was. Kev and I, we’d never parented together before becoming parents. There was no practice run for this tiny, precious human we were holding in our arms, each holding her differently, each trying to get it right. We approached so many things so differently, all out of the same place of deep love. And sometimes different can feel wrong. It definitely can create conflict.
When I started to add up all the hard parts, I almost broke. Well, maybe I did. Like the MCL in my knee that tore so many times, it lost its elasticity, its ability to self heal, ultimately needing surgery for repair, I wondered if I’d need surgery, too. Would I ever be the same again? Would my stretched out rubber band get its elasticity back? (I’m not referencing my waistline here, though that change was hard to watch, too.) Would I ever be enough for her, for him, for myself, much less another human being? Would it take a deep scar and lots of healing to repair me? Yes. To all of it.
By telling you how hard it all was, you might wonder if it was good. Oh yes, of course it was. It is. Isn’t life always both/and? It’s both euphoric and tragic all at the same time, on the same line of music, within the same capsule of a day. The good parts, those are the really easy parts to talk about. No one looks at you with broken eyes when you play those melodic notes. The hard parts, the sharp notes, well, they’re harder to hear. So we build a pile of nevers and always and black and white permanent claims to make our shaky ground feel more secure. It feels good to feel secure.
Mine started to feel so good, I didn’t want to rock the boat. As the years went on, our every day’s slowly got better. Why would I willingly hike down the road that almost broke us again? So we didn’t. What if we kept it just the three of us? So we did. We didn’t completely count out adding on to our family, but I was incredibly uncertain for a lot of years. Kev always left the answer to the question of more up to me.
I am grateful for the years (years!) of space he gave me to be unsure, to be unsure about it all (and a tiny handful of close friends, too). What a gift. I am grateful for the years to reconstruct by way of deconstruction, by way of a big ole mess. I can’t help the flood of tears and the wave of gratitude I feel as I write this. Earlier this year, 6 years after becoming a first-time parent, I decided I was ready to try again, much later than most, despite all the hard parts. If it worked, what a gift that would be. If not, I was grateful for everything we had, for all three of us. I surprised Kev with a funny little homemade card to let him know I’d made up my mind. I’ll keep that moment just to the two of us.
Maybe the swell of my stomach gave it all away. It worked. We are having another little girl early April! A friend who knew this story said, “Wow, you changed your mind.” I did, or maybe I made up my mind. I’m finding a lot of comfort in what Kev says—what is now, will not always be. There’s always space to change your mind or make up your mind, even if it takes years.
Despite a whole lot of uncertainties, I’m certain that I’m not who I was before becoming a parent. And I’ll probably be different after becoming a parent to another human. I’m certain that I’m more resilient than I thought I was, especially standing next to someone who is even more resilient than me, Kev. (We have this print hanging in our room as a reminder of the last 6 years and a good posture to keep moving forward.) I’m certain that Hallie is going to be an amazing big sister. I’m certain that it will be hard and good all at the same time. And I’m certain that I wouldn’t trade all the hard parts for the easier parts. We’re built out of that rubble, and that’s a beautiful thing. Now to turn The Fauxtel into a cozy little sleeping room where baby girl will inevitably fight sleep (if she’s anything like her big sister). I’m excited to get to know her and get to know us all over again.
I don’t really know how to wrap this all up, so I’ll borrow the title of our favorite show. This is us (for now).
The post This is Us appeared first on The Faux Martha.
October 10, 2019
StonyFIELDS in Minneapolis

He puts his roots down in the dirt and calls it home, starting out short and nubby and ending up long and curvy, nutrient-rich and sweet. She scoops out hunks of the dirt, handfuls of sand, and calls it fun, with fingernails and fingertips as confirmation. She makes park pies from carefully picked weeds, fallen leaves, a sprinkle of grass, and a handful of dirt, stirred together with a short stick. The dirt for the long skinny carrot, well, I’d like that dirt to be organic, I decided after having Hal. The dirt and the fields and the parks Hal plays in, well, I never really thought about it until last summer while visiting Stonyfield, makers of our favorite plain whole milk yogurt. You can read more about that trip here, the trip that convinced me to cancel our synthetic fertilizer for our small patch of grass.

I’m excited to partner with the yogurt we’ve been stocking our fridge with since Hal was born, Stonyfield, on their StonyFIELDS initiative that has made its way to Minneapolis parks. As always, all opinions are my own.
A month or two after that trip, Stonyfield launched the StonyFIELDS initiative, a mission to convert all parks to organic across the US, which has just made its way to Minneapolis, where we play. It’s a huge, ambitious mission. You know that point in your young adult life where people start telling you your ideas are so ambitious they’re childish? Your dreams get a little quieter and a little quieter. Gary, the co-founder of Stonyfield, who is well past his young adult years, is very good at plugging out those calloused voices, making big things, things he believes in, happen. Like making a really good organic yogurt years before organic was mainstream; like helping farmers convert their conventional, underpaid dairy farms to profitable organic farms because it was better for the farm and the earth; like taking organic practices that make for healthier dirt and cows to our parks, where our kids play. What Gary and the rest of the folks at Stonyfield Organic understand, that I’m only just beginning to understand, is that organic is an ecosystem that doesn’t end with a really good vat of yogurt or a long, skinny carrot.

What is an organic park?
It’s a park free of synthetic fertilizers, instead using organic, natural fertilizers, like compost. (Watch this video for a great explanation.) Organic fertilizers deliver nutrients to both the plant (the grass in this case) and the soil. Synthetic fertilizers are known for delivering nutrients to the plant while stripping away the naturally occurring nutrients in the soil. An organic park is also free of synthetic pesticides, used to kill weeds, insects, and other unwanted pests and fungi. Good right? Well, for a second. Pesticides don’t stop with the bad pests, impacting other things, like our declining bee population. Glyphosate, a common ingredient in synthetic pesticides, may also be carcinogenic and is banned in some countries, like France. It’s shown to cause issues including Parkinson’s, Non-Hodgkin’s Lymphoma, and thyroid and endocrine disruption. It’s also more harmful to tiny people, children whose systems are not yet fully developed.

In partnership with Stonyfield on the StonyFIELDS initiative, the city of Minneapolis is continuing its movement towards creating organic parks, a mission they’ve been on for the last 5 years, with the help of Beyond Pesticides, Osborne Organics, and Bee Safe Minneapolis. A year ago, the Minneapolis Park Board voted unanimously to ban glyphosate from all parks! They also approved a trial run to use goats (goats!) to naturally target certain invasive species within a couple areas of the park system. How cool is that?
What can you do?
I left the trip with Stonyfield last year feeling empowered to do something and overwhelmed with where to start. (Thankfully I didn’t leave feeling shamed. I’m not sure anything productive would have come from that.) Like any huge project, breaking it down into tiny tangible pieces tends to make it more doable. Here are a couple of ideas that I found helpful in tackling the idea of an organic yard:
Take a long exhale out. It’s a lot of information.
Do some of your own research. Start by looking into Glyphosate. Glypho, what?! Make this information your own.
Remind yourself that change is always uncomfortable, especially when you’re learning a new way of doing something that will inevitably produce different results.
Try pausing your synthetic fertilizer for a season and opting for organic fertilizer or compost.
Try handpicking your weeds, or let them be.
Try letting your grass grow a little taller, around the 3-inch height, where it’s able to achieve maximum health—absorbing sunlight, making its own food, and establishing a deep root system, which also helps to combat weeds.
Check out this no mow, weed resistant, drought-tolerant grass we put in our backyard.
Apply to have your city join the StonyFIELDS mission.
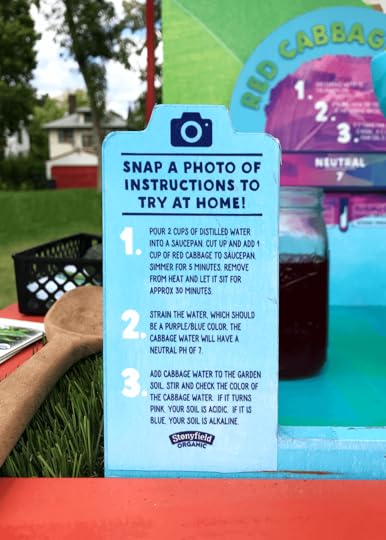
Understand the acidity of your soil so you can properly treat it. Try the at-home cabbage method (see above) or send off a soil sample to a nearby university. If you’re local, use the University of Minnesota. Note: some plants like acidic soil and some do not. Pine trees, for example, are very acidic, so plant acidic-soil-loving plants nearby.
If this initiative becomes your initiative, remember how overwhelming this information was at first, especially when you think about your neighbor who loves to spray.
Do you have more ideas? I’d love to hear them.
The post StonyFIELDS in Minneapolis appeared first on The Faux Martha.
October 8, 2019
Fall Fireplace Bats

The last couple of years, we’ve gotten by with pumpkins for fall decorations and an annual leaf wreath, too. At the age of six, with ideas growing as tall as her height, Hal wanted to take our decorations closer to spooktacular. Her word, not mine. “Spooky like bats, Mom.” Thank goodness the bats are out on Instagram. I knew just what to do— make fall fireplace bats.

So, on a rainy fall Saturday, preceded by a week of rainy days, we made bats out of what we had, from construction paper in the craft cabinet. I made templates from a couple of tries and the thick backing of the construction paper pad. When you’re six and your mom draws bats with lots of curves, it takes all afternoon to cut. So we cut and we cut and we folded and we rejigged the layout and curled the wings back and called it a day. A very fun day that totally took our house to spooktacular level. Her words, not mine.
How to Make Fall Fireplace Bats
A couple people asked for the bat template, so I made one for you and included simple steps for getting these bats on your wall. If you want to skip the activity of it all, you can buy these paper bats instead.
Step 1
Download the Halloween Bat template and either print on thick paper or regular weight paper. If printing on regular weight paper, cut out the bats and trace them onto thick paper to create a sturdy template. Cut the templates out.

Step 2
Using a pencil, trace the bats on black construction paper. Lightweight construction paper is fine here. Keep an overhead light on to help make the pencil visible on the black paper for cutting.
Step 3
Slowly cut out the bats. Make an afternoon of it. I love the variation of bat-cutting from Hallie, though it did take some encouragement as hers looked different from mine. Encourage the variety if crafting with tiny humans. Speaking of variety, a great arrangement comes from a variety of sizes. Use all 4 sizes and feel free to cut outside or inside the lines to create more size variations.

Step 4
Flip the bat pencil side down so you’re seeing the side without any leftover trace lines. Gently fold each wing over the body to create a slight bend in the paper. Then, hold the body down with one hand while curling the wing with your thumb underneath the wing and your pointer finger on top, curling in a curved motion, like the sun on the horizon. I prefer my bats to have a lightly pronounced wing bend and curve, so I’m gentle here.
Step 5
Roll a tiny piece of wall-safe tape, and tape it to the back of the body (pencil side). Place on the wall. Arrange and rearrange, making sure to keep things organic and not so perfect. For your overall shape, try starting small and ending larger, like the shape of a tornado. Use smaller bats down low and larger up high, adding in a variety of sizes all the way through.
To clean up after Halloween, remove the tape and discard in the trash. Recycle the bats. How’s that for a zero storage, low waste, lotsa fun, spooktacular decoration?
PS—If you have pumpkins outside standing in as decoration, be sure to try this trick (see fall bucket list) to keep the squirrels away.
The post Fall Fireplace Bats appeared first on The Faux Martha.
September 30, 2019
Make Ahead Banana Coco Carrot Muffins
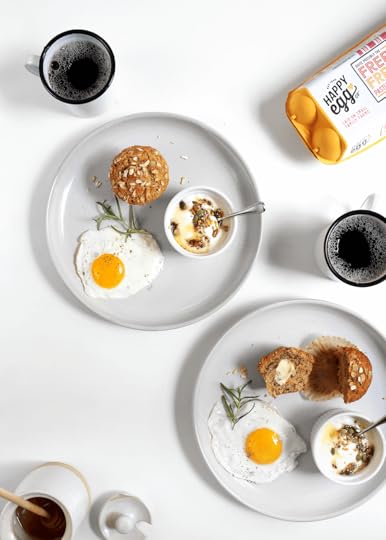
I got the dreaded letter in the mail but deferred for 6 months because Hal was in preschool. And, like clockwork, as promised, the dreaded parcel came again, 6 months later. Jury duty. Duty. My duty, despite needing to be available to get Hal on the bus in the morning and off in the afternoon. Despite being self-employed with previously scheduled deadlines. Despite, despite, despite. So, I made muffins outta jury duty—wholesome make ahead banana coco carrot muffins made entirely from pantry staples, including Happy Egg Organic Free-Range Eggs to stock the freezer for breakfast this week. Because jury duty starts today.

This recipe was created in partnership with Happy Egg Organic Free Range Eggs
for better breakfast month. Happy Eggs are the Free-est of the Free Range(), with their rich, bright yellow-orange yolks to show for it. Their hens roam free on over eight-acres of pastures, which is ten times the space of standard free-range farms.
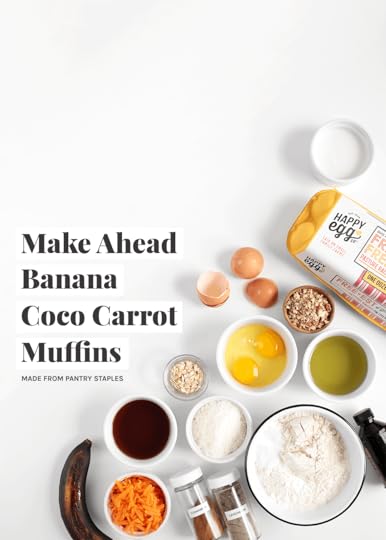
We’re a muffins-on-the-weekend type of family. The kind you eat warm, straight out of the muffin tin on a lazy Saturday morning. But in the face of jury duty and work and school, we needed a hearty, wholesome make-ahead muffin. The kind of muffin you pull out of the freezer to thaw on the counter while the coffee drips and the showers run. The kind of muffin that’s full of all the good stuff—protein, whole grains, fruits and vegetables, and just enough sweetness. The kind of muffin that will keep you full and energized until lunch, when served alongside a creamy, rich Happy Egg or two.
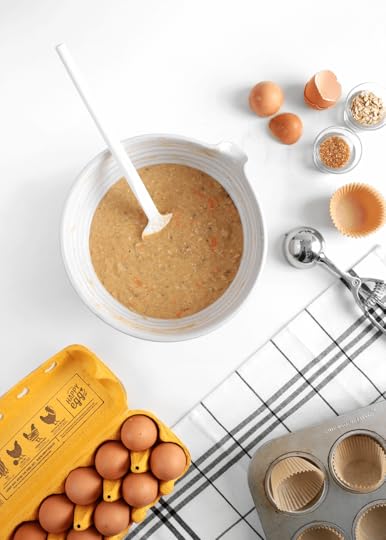
So that’s the kind of muffin I made, starting from my trusty base recipe, swapping this for that and that for this. A lot of tests later, my freezer is studded with muffins for the morning. Here’s to handling whatever lands in your mailbox, your inbox, or your messages this week by way of Make Ahead Banana Coco Carrot Muffins.
These muffins are made extra happy with Happy Egg Organic Free-Range Eggs laid by hens living in 8 acres of hormone, pesticide, and antibiotic-free pasture. Farmers market quality eggs I can find at my local grocery store, yes please. These USDA Certified Organic eggs are now available at Walmart in Minneapolis. Check their store finder to find them where ever you are.
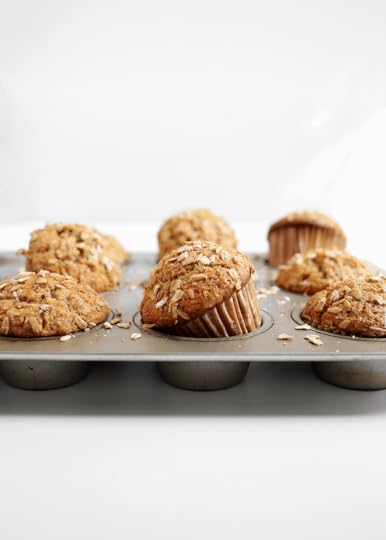
Composition of the Make Ahead Banana Coco Carrot Muffin
Pantry Staples: Every ingredient in this recipe is a pantry staple, something we always keep around either in the pantry or the fridge, so it can easily be made at the drop of a hat or a jury duty. If your banana isn’t ripe right now, see recipe notes for a quick solution.
Protein: Gimme a P for Protein. I wanted to add extra protein in this recipe for long-winded energy in the morning, while Hal’s at school, while I’m sitting in a juror box. The spelt flour has a slightly higher protein content compared to wheat, so I tucked a 1/2 cup in this recipe, while adding pecans, and two high-quality Happy Eggs.
Whole Grains: I like to use a 2:1 ratio of unbleached all-purpose flour to a whole grain flour. It holds the muffin together while allowing for a dense nutty flour, like wheat flour, spelt flour, buckwheat, etc. You can get playful here using this ratio. See recipe notes. I also topped the muffin generously with oats, skipping a sweet crumble.
Fruits and Vegetables: You know you’re a mom when you start adding vegetables to your pastries. Though, the addition of carrots is nothing new to the baking world. Hello, carrot cake. So shred away. And add a spotty banana too.
Sweetness: I’m looking for just-sweet-enough in the morning. Anything too sweet before noon doesn’t settle well in my body. I opted for maple syrup and an extra ripe banana to carry the sweetness in this muffin. While the carrots and coconut also add some natural sweetness, the addition of the salt and spices really help to enhance the sweetness without needing to add more. The sprinkle of turbinado on top helps too. A little crunchy sweetness on every bite.
Fats: For a moist muffin, especially when using whole grains, you want to add fat; you need to add fat. The coconut milk and oil do their job in this recipe, though these fats are flexible to substitutions. See notes for variations.
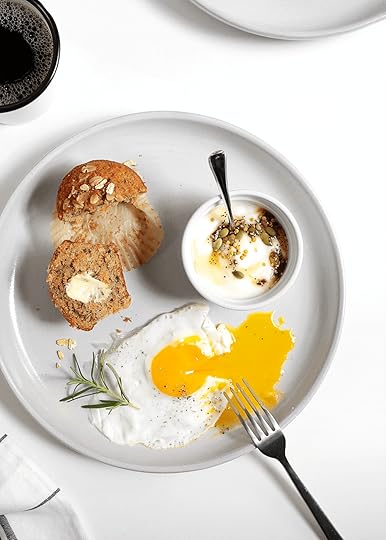
.tasty-recipes-image {
float: right; }
.tasty-recipes-yield-scale {
border: 1px solid #979599;
border-radius: 2px;
color: #979599;
margin-left: 3px;
padding: 0 4px;
font-size: 0.7rem; }
.tasty-recipes-scale-container {
float: right;
padding: 0 0 1rem; }
.tasty-recipes-scale-container .tasty-recipes-scale-label {
text-transform: uppercase;
font-size: 0.6rem;
color: #979599; }
.tasty-recipes-scale-container button {
background: transparent;
border: 1px solid #979599;
border-radius: 2px;
color: #979599;
margin-left: 5px;
padding: 2px 4px; }
.tasty-recipes-scale-container button.tasty-recipes-scale-button-active {
color: #353547;
border-color: #353547; }
.tasty-recipes-scale-container button:focus {
outline: none; }
.tasty-recipes-print-button {
background-color: #666677;
display: inline-block;
padding-left: 1em;
padding-right: 1em;
padding-top: 0.5em;
padding-bottom: 0.5em;
text-decoration: none; }
a.tasty-recipes-print-button {
color: #fff; }
a.tasty-recipes-print-button:hover {
color: #fff; }
.tasty-recipes-equipment {
display: flex;
flex-wrap: wrap;
justify-content: space-evenly; }
.tasty-recipes-equipment > h3 {
flex: 0 0 100%; }
.tasty-recipes-equipment .tasty-link-card {
flex: 0 0 50%;
padding: 1.5rem 1rem;
text-align: center; }
@media screen and (min-width: 500px) {
.tasty-recipes-equipment .tasty-link-card {
flex: 0 0 33%; } }
.tasty-recipes-equipment .tasty-link-card p {
font-weight: bold;
font-size: 1em;
margin-bottom: 0; }
.tasty-recipes-equipment .tasty-link-card p a {
color: initial; }
.tasty-recipes-equipment .tasty-link-card span {
font-size: 0.9em; }
.tasty-recipes-rating.tasty-recipes-clip-10 {
-webkit-clip-path: polygon(0 0, 10% 0%, 10% 100%, 0% 100%);
clip-path: polygon(0 0, 10% 0%, 10% 100%, 0% 100%); }
.tasty-recipes-rating.tasty-recipes-clip-20 {
-webkit-clip-path: polygon(0 0, 20% 0%, 20% 100%, 0% 100%);
clip-path: polygon(0 0, 20% 0%, 20% 100%, 0% 100%); }
.tasty-recipes-rating.tasty-recipes-clip-30 {
-webkit-clip-path: polygon(0 0, 30% 0%, 30% 100%, 0% 100%);
clip-path: polygon(0 0, 30% 0%, 30% 100%, 0% 100%); }
.tasty-recipes-rating.tasty-recipes-clip-40 {
-webkit-clip-path: polygon(0 0, 40% 0%, 40% 100%, 0% 100%);
clip-path: polygon(0 0, 40% 0%, 40% 100%, 0% 100%); }
.tasty-recipes-rating.tasty-recipes-clip-50 {
-webkit-clip-path: polygon(0 0, 50% 0%, 50% 100%, 0% 100%);
clip-path: polygon(0 0, 50% 0%, 50% 100%, 0% 100%); }
.tasty-recipes-rating.tasty-recipes-clip-60 {
-webkit-clip-path: polygon(0 0, 60% 0%, 60% 100%, 0% 100%);
clip-path: polygon(0 0, 60% 0%, 60% 100%, 0% 100%); }
.tasty-recipes-rating.tasty-recipes-clip-70 {
-webkit-clip-path: polygon(0 0, 70% 0%, 70% 100%, 0% 100%);
clip-path: polygon(0 0, 70% 0%, 70% 100%, 0% 100%); }
.tasty-recipes-rating.tasty-recipes-clip-80 {
-webkit-clip-path: polygon(0 0, 80% 0%, 80% 100%, 0% 100%);
clip-path: polygon(0 0, 80% 0%, 80% 100%, 0% 100%); }
.tasty-recipes-rating.tasty-recipes-clip-90 {
-webkit-clip-path: polygon(0 0, 90% 0%, 90% 100%, 0% 100%);
clip-path: polygon(0 0, 90% 0%, 90% 100%, 0% 100%); }
.tasty-recipes-nutrition ul {
list-style-type: none;
margin: 0;
padding: 0; }
.tasty-recipes-nutrition ul:after {
display: block;
content: ' ';
clear: both; }
.tasty-recipes-nutrition li {
float: left;
margin-right: 1em; }
.tasty-recipes-plug {
text-align: center;
margin-bottom: 1em;
display: flex;
align-items: center;
justify-content: center; }
.tasty-recipes-plug a {
text-decoration: none;
box-shadow: none; }
.tasty-recipes-plug a img {
width: 150px;
height: auto;
margin: 5px 0 0 8px;
display: inline-block; }
@media print {
.tasty-recipes-no-print,
.tasty-recipes-no-print * {
display: none !important; } }
.tasty-recipes {
border: 5px solid #666677;
margin-top: 6em;
margin-bottom: 4em;
}
.tasty-recipes.tasty-recipes-has-plug {
margin-bottom: 1em;
}
.tasty-recipes-plug {
margin-bottom: 4em;
}
.tasty-recipes-print-button {
display: none;
}
.tasty-recipes-image-shim {
height: 69.5px;
clear: both;
}
.tasty-recipes-entry-header {
background-color: #666677;
color: #fff;
text-align: center;
padding-top: 35px;
padding-bottom: 1.5em;
padding-left: 2.5em;
padding-right: 2.5em;
}
.tasty-recipes-entry-header.tasty-recipes-has-image {
padding-top: 0px;
}
.tasty-recipes-entry-header .tasty-recipes-image {
float: none;
text-align: center;
transform: translateY(-115px);
margin-bottom: 1em; /* Decide if we need this */
}
.tasty-recipes-entry-header .tasty-recipes-image img {
-webkit-border-radius: 50%;
-moz-border-radius: 50%;
border-radius: 50%;
border: 5px solid #666677;
height: 150px;
width: 150px;
display: inline-block;
}
.tasty-recipes-entry-header h2 {
font-size: 2em;
font-weight: 400;
text-transform: lowercase;
margin-bottom: 0;
text-align: center;
color: #fff;
margin-top: 0;
padding-top: 0;
padding-bottom: 0;
}
.tasty-recipes-has-image .tasty-recipes-entry-header h2 {
margin-top: -115px;
}
.tasty-recipes-entry-header hr {
border: 1px solid #b7bbc6;
background-color: #b7bbc6;
margin-bottom: 1em;
margin-top: 1em;
}
.tasty-recipes-entry-header div.tasty-recipes-rating {
text-decoration: none;
border: none;
}
.tasty-recipes-entry-header .tasty-recipes-rating:hover {
text-decoration: none;
}
.tasty-recipes-entry-header div.tasty-recipes-rating {
font-size: 1.375em;
display: block;
}
.tasty-recipes-entry-header .tasty-recipes-rating p {
margin-bottom: 0;
}
.tasty-recipes-entry-header span.tasty-recipes-rating {
margin-left: 0.25em;
margin-right: 0.25em;
color: #fff;
}
.tasty-recipes-entry-header .rating-label {
font-style: italic;
color: #b7bbc6;
font-size: 0.6875em;
display: block;
}
.tasty-recipes-entry-header .tasty-recipes-details {
margin-top: 1em;
}
.tasty-recipes-entry-header .tasty-recipes-details ul {
list-style-type: none;
margin: 0;
}
.tasty-recipes-entry-header .tasty-recipes-details ul li {
display: inline-block;
margin-left: 0.5em;
margin-right: 0.5em;
font-size: 1em;
line-height: 2.5em;
color: #fff;
}
@media only screen and (max-width: 520px) {
.tasty-recipes-entry-header .tasty-recipes-details .detail-icon {
height: 0.8em;
margin-top: 0.4em;
}
.tasty-recipes-entry-header .tasty-recipes-details ul li {
font-size: 0.875em;
line-height: 1.75em;
}
}
@media only screen and (min-width: 520px) {
.tasty-recipes-entry-header .tasty-recipes-details .detail-icon {
height: 1em;
margin-top: 0.6em;
}
.tasty-recipes-entry-header .tasty-recipes-details ul li {
font-size: 1em;
line-height: 2.5em;
}
}
.tasty-recipes-entry-header .tasty-recipes-details .tasty-recipes-label {
font-style: italic;
color: #b7bbc6;
margin-right: 0.125em;
}
.tasty-recipes-entry-header .tasty-recipes-details .detail-icon {
vertical-align: top;
margin-right: 0.2em;
display: inline-block;
fill: #ffffff;
}
.tasty-recipes-entry-header .tasty-recipes-details .author a {
color: inherit;
text-decoration: underline;
}
.tasty-recipes-entry-content {
padding-top: 1.25em;
}
.tasty-recipes-entry-content .tasty-recipes-buttons {
margin-bottom: 1.25em;
margin-left: 1.25em;
margin-right: 1.25em;
}
.tasty-recipes-entry-content .tasty-recipes-buttons:after {
content: ' ';
display: block;
clear: both;
}
.tasty-recipes-entry-content .tasty-recipes-button-wrap {
width: 50%;
display: inline-block;
float: left;
box-sizing: border-box;
}
.tasty-recipes-entry-content .tasty-recipes-buttons a {
text-transform: uppercase;
text-align: center;
display: block;
color: #fff;
background-color: #666677;
font-size: 1em;
line-height: 1.375em;
padding-top: 1em;
padding-bottom: 1em;
font-weight: bold;
margin-top: 0;
border: none;
border-radius: 0;
text-decoration: none;
}
.tasty-recipes-entry-content a img {
box-shadow: none;
-webkit-box-shadow: none;
}
.tasty-recipes-entry-content .tasty-recipes-buttons a:hover {
background-color: #979599;
text-decoration: none;
}
.tasty-recipes-entry-content .tasty-recipes-buttons img {
vertical-align: top;
}
.tasty-recipes-entry-content .tasty-recipes-buttons img.svg-print,
.tasty-recipes-entry-content .tasty-recipes-buttons img.svg-pinterest {
height: 1.25em;
margin-right: 0.375em;
margin-bottom: 0;
background: none;
display: inline-block;
}
@media only screen and (min-width: 520px) {
.tasty-recipes-entry-content .tasty-recipes-button-wrap:first-child {
padding-right: 0.625em;
}
.tasty-recipes-entry-content .tasty-recipes-button-wrap:last-child {
padding-left: 0.625em;
}
}
@media only screen and (max-width: 520px) {
.tasty-recipes-entry-content .tasty-recipes-button-wrap {
width: 100%;
}
.tasty-recipes-entry-content .tasty-recipes-button-wrap:nth-child(2) {
padding-top: 1em;
}
}
.tasty-recipes-entry-content h3 {
text-transform: uppercase;
font-size: 0.75em;
color: #979599;
margin-bottom: 1.5em;
}
.tasty-recipes-entry-content h4 {
font-size: 1em;
padding-top: 0;
margin-bottom: 1.5em;
margin-top: 1.5em;
}
.tasty-recipes-entry-content hr {
background-color: #eae9eb;
border: 1px solid #eae9eb;
margin-top: 1em;
margin-bottom: 1em;
}
.tasty-recipes-entry-content .tasty-recipes-description,
.tasty-recipes-entry-content .tasty-recipes-ingredients,
.tasty-recipes-entry-content .tasty-recipes-instructions,
.tasty-recipes-entry-content .tasty-recipes-keywords {
padding-left: 1.25em;
padding-right: 1.25em;
}
.tasty-recipes-entry-content .tasty-recipes-description p {
margin-bottom: 1em;
}
.tasty-recipes-entry-content .tasty-recipes-ingredients h3 {
clear: none;
}
.tasty-recipes-entry-content .tasty-recipes-ingredients ul,
.tasty-recipes-entry-content .tasty-recipes-instructions ul {
list-style-type: none;
margin-left: 0;
margin-bottom: 1.5em;
padding: 0;
}
.tasty-recipes-entry-content .tasty-recipes-ingredients ul li,
.tasty-recipes-entry-content .tasty-recipes-instructions ul li {
margin-bottom: 0.625em;
list-style-type: none;
position: relative;
margin-left: 2.5em;
line-height: 1.46;
}
.tasty-recipes-entry-content .tasty-recipes-ingredients ul li:before,
.tasty-recipes-entry-content .tasty-recipes-instructions ul li:before {
background-color: #666677;
-webkit-border-radius: 50%;
-moz-border-radius: 50%;
border-radius: 50%;
height: 0.5em;
width: 0.5em;
display: block;
content: ' ';
left: -1.25em;
top: 0.375em;
position: absolute;
}
.tasty-recipes-entry-content .tasty-recipes-ingredients ol,
.tasty-recipes-entry-content .tasty-recipes-instructions ol {
counter-reset: li;
margin-left: 0;
padding: 0;
}
.tasty-recipes-entry-content .tasty-recipes-ingredients ol li,
.tasty-recipes-entry-content .tasty-recipes-instructions ol li {
list-style-type: none;
position: relative;
margin-bottom: 1em;
margin-left: 2.5em;
line-height: 1.46;
}
.tasty-recipes-entry-content .tasty-recipes-ingredients ol li:before,
.tasty-recipes-entry-content .tasty-recipes-instructions ol li:before {
content: counter(li);
counter-increment: li;
position: absolute;
background-color: #666677;
-webkit-border-radius: 50%;
-moz-border-radius: 50%;
border-radius: 50%;
height: 1.45em;
width: 1.45em;
color: #fff;
left: -1.25em;
transform: translateX(-50%);
line-height: 1.5em;
font-size: 0.6875em;
text-align: center;
top: 0.1875em;
}
@media only screen and (max-width: 520px) {
.tasty-recipes-entry-content .tasty-recipes-ingredients ol,
.tasty-recipes-entry-content .tasty-recipes-instructions ol {
margin-left: 0;
}
}
.tasty-recipes-entry-content .tasty-recipes-equipment {
padding-left: 1.25em;
padding-right: 1.25em;
}
.tasty-recipes-entry-content .tasty-recipe-video-embed ~ .tasty-recipes-equipment {
padding-top: 1em;
}
.tasty-recipes-entry-content .tasty-recipes-notes {
padding: 1.25em;
background-color: #edf0f2;
}
.tasty-recipes-entry-content .tasty-recipes-notes ol {
counter-reset: li;
margin-left: 0;
padding: 0;
}
.tasty-recipes-entry-content .tasty-recipes-notes ul {
margin-left: 0;
padding: 0;
}
.tasty-recipes-entry-content .tasty-recipes-notes p,
.tasty-recipes-entry-content .tasty-recipes-notes ul li,
.tasty-recipes-entry-content .tasty-recipes-notes ol li {
background-color: #fff;
padding-left: 1.5625em;
padding-right: 1.5625em;
padding-top: 1.25em;
padding-bottom: 1.25em;
position: relative;
-webkit-clip-path: polygon(20px 0, 100% 0, 100% 100%, 0 100%, 0 20px);
clip-path: polygon(20px 0, 100% 0, 100% 100%, 0 100%, 0 20px);
margin-bottom: 1.5em;
}
@media only screen and (min-width: 520px) {
.tasty-recipes-entry-content .tasty-recipes-notes p,
.tasty-recipes-entry-content .tasty-recipes-notes ul li,
.tasty-recipes-entry-content .tasty-recipes-notes ol li {
padding-left: 2.5em;
}
.tasty-recipes-entry-content .tasty-recipes-notes p:before,
.tasty-recipes-entry-content .tasty-recipes-notes ul li:before {
content: 'i';
display: block;
background-color: #666677;
-webkit-border-radius: 50%;
-moz-border-radius: 50%;
border-radius: 50%;
height: 1.3em;
width: 1.3em;
font-size: 0.75em;
line-height: 1.3em;
text-align: center;
color: #fff;
position: absolute;
left: 1.167em;
top: 1.9em;
}
.tasty-recipes-entry-content .tasty-recipes-notes ol li:before {
content: counter(li);
counter-increment: li;
position: absolute;
background-color: #666677;
-webkit-border-radius: 50%;
-moz-border-radius: 50%;
border-radius: 50%;
height: 1.45em;
width: 1.45em;
color: #fff;
left: 2em;
transform: translateX(-50%);
line-height: 1.5em;
font-size: 0.6875em;
text-align: center;
top: 2em;
}
}
.tasty-recipes-entry-content .tasty-recipes-notes p:last-child {
margin-bottom: 0;
}
.tasty-recipes-entry-content .tasty-recipes-other-details {
background-color: #edf0f2;
padding: 0 1.25em 1.25em;
}
.tasty-recipes-entry-content .tasty-recipes-other-details ul {
color: #666677;
display: flex;
flex-wrap: wrap;
font-size: 0.85rem;
justify-content: center;
list-style: none;
margin-bottom: 0;
}
.tasty-recipes-entry-content .tasty-recipes-other-details ul li {
margin: 0 0.5rem;
list-style: none;
}
.tasty-recipes-entry-content
.tasty-recipes-other-details
ul
li
.tasty-recipes-label {
font-style: italic;
}
.tasty-recipes-entry-content .tasty-recipes-other-details .detail-icon {
fill: #666677;
vertical-align: top;
margin-right: 0.2em;
display: inline-block;
}
@media only screen and (max-width: 520px) {
.tasty-recipes-entry-content .tasty-recipes-other-details .detail-icon {
height: 0.8em;
margin-top: 0.4em;
}
.tasty-recipes-entry-content .tasty-recipes-other-details ul li {
font-size: 0.875em;
line-height: 1.75em;
}
}
@media only screen and (min-width: 520px) {
.tasty-recipes-entry-content .tasty-recipes-other-details .detail-icon {
height: 1em;
margin-top: 0.6em;
}
.tasty-recipes-entry-content .tasty-recipes-other-details ul li {
font-size: 1em;
line-height: 2.5em;
}
}
.tasty-recipes-entry-content .tasty-recipes-keywords {
background-color: #edf0f2;
padding-bottom: 1em;
padding-top: 1em;
}
.tasty-recipes-entry-content .tasty-recipes-keywords p {
font-size: 0.7em;
font-style: italic;
color: #979599;
margin-bottom: 0;
}
.tasty-recipes-entry-content .tasty-recipes-keywords p span {
font-weight: bold;
}
.tasty-recipes-nutrifox {
text-align: center;
margin: 0;
}
.nutrifox-label {
background-color: #edf0f2;
}
.tasty-recipes-nutrifox iframe {
width: 100%;
display: block;
margin: 0;
}
.tasty-recipes-entry-content .tasty-recipes-nutrition {
padding: 1.25em;
color: #666677;
}
.tasty-recipes-nutrition .tasty-recipes-label {
font-style: italic;
color: #b7bbc6;
margin-right: 0.125em;
font-weight: 400;
}
.tasty-recipes-nutrition ul {
text-align: center;
}
.tasty-recipes-nutrition li {
float: none;
display: inline-block;
line-height: 2em;
}
.tasty-recipes-entry-footer {
background-color: #666677;
padding-top: 1.5625em;
padding-bottom: 1.25em;
padding-left: 2.5em;
padding-right: 2.5em;
text-align: center;
}
.tasty-recipes-entry-footer .tasty-recipes-footer-content {
display: inline-block;
}
.tasty-recipes-entry-footer img {
width: 65px;
}
.tasty-recipes-entry-footer h3 {
color: #b7bbc6;
font-size: 1.25em;
line-height: 2.25em;
margin-top: 0.5em;
margin-bottom: 0.125em;
padding: 0;
line-height: 1em;
}
.tasty-recipes-entry-footer p {
margin-bottom: 0;
color: #fff;
font-size: 0.75em;
}
.tasty-recipes-entry-footer p a {
color: #fff;
text-decoration: underline;
box-shadow: none;
border-bottom: none;
}
.tasty-recipes-entry-footer:after {
content: ' ';
display: block;
clear: both;
}
@media only screen and (max-width: 520px) {
.tasty-recipes-entry-footer h3 {
margin-top: 0.5em;
margin-bottom: 0.5em;
}
.tasty-recipes-entry-footer {
text-align: center;
}
}
@media only screen and (min-width: 520px) {
.tasty-recipes-entry-footer img {
float: left;
}
.tasty-recipes-entry-footer h3,
.tasty-recipes-entry-footer p {
margin-left: 90px;
clear: none;
text-align: left;
}
}
/* Print view styles */
.tasty-recipes-print-view {
font-size: 11px;
background-color: #fff;
}
.tasty-recipes-print-view .tasty-recipes-print-button {
display: inline-block;
}
.tasty-recipes-print {
padding: 0;
font-size: 11px;
}
.tasty-recipes-print-view .tasty-recipes {
margin-top: 1em;
}
.tasty-recipes-print .tasty-recipes-entry-header {
background-color: inherit;
color: inherit;
padding-bottom: 0;
padding-left: 1em;
padding-right: 1em;
padding-top: 1em;
}
.tasty-recipes-print .tasty-recipes-entry-header .tasty-recipes-image {
float: right;
transform: none;
}
.tasty-recipes-print.tasty-recipes-has-image .tasty-recipes-entry-header h2 {
margin-top: 0;
}
.tasty-recipes-print .tasty-recipes-entry-header h2 {
color: inherit;
margin-bottom: 0.5em;
}
.tasty-recipes-print .tasty-recipes-entry-header hr {
display: none;
}
.tasty-recipes-print .tasty-recipes-entry-header span.tasty-recipes-rating {
color: #000;
}
.tasty-recipes-print .tasty-recipes-entry-header .tasty-recipes-details ul {
padding: 0;
clear: none;
}
.tasty-recipes-print .tasty-recipes-entry-header .tasty-recipes-details ul li {
line-height: 1.5em;
color: #000;
}
.tasty-recipes-print
.tasty-recipes-entry-header
.tasty-recipes-details
.detail-icon {
display: none;
}
.tasty-recipes-print .tasty-recipes-entry-content img {
max-width: 50%;
height: auto;
}
.tasty-recipes-print
.tasty-recipes-entry-content
.tasty-recipes-ingredients
ul
li,
.tasty-recipes-print
.tasty-recipes-entry-content
.tasty-recipes-ingredients
ol
li {
margin-bottom: 0.25em;
line-height: 1.1;
}
.tasty-recipes-print
.tasty-recipes-entry-content
.tasty-recipes-instructions
ul
li,
.tasty-recipes-print
.tasty-recipes-entry-content
.tasty-recipes-instructions
ol
li {
margin-bottom: 0.5em;
line-height: 1.1;
}
.tasty-recipes-print
.tasty-recipes-entry-content
.tasty-recipes-ingredients
ul
li:before,
.tasty-recipes-print
.tasty-recipes-entry-content
.tasty-recipes-instructions
ul
li:before {
top: 0.3em;
}
.tasty-recipes-print
.tasty-recipes-entry-content
.tasty-recipes-ingredients
ol
li:before,
.tasty-recipes-print
.tasty-recipes-entry-content
.tasty-recipes-instructions
ol
li:before {
top: 0;
}
.tasty-recipes-print .tasty-recipes-entry-content .tasty-recipes-notes p,
.tasty-recipes-print .tasty-recipes-entry-content .tasty-recipes-notes ul li,
.tasty-recipes-print .tasty-recipes-entry-content .tasty-recipes-notes ol li {
padding-top: 0;
padding-bottom: 0;
background-color: #edf0f2;
clip-path: none;
}
.tasty-recipes-print .tasty-recipes-entry-content .tasty-recipes-notes p:before,
.tasty-recipes-print
.tasty-recipes-entry-content
.tasty-recipes-notes
ul
li:before {
top: 0;
clip-path: none;
margin-bottom: 0.5em;
}
@media print {
.tasty-recipes-print .tasty-recipes-entry-footer img {
display: none;
}
}
.tasty-recipes-print .tasty-recipes-source-link {
text-align: center;
}
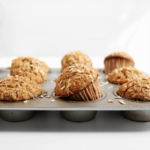
Make Ahead Banana Coco Carrot Muffins
Prep Time: 15 min. Cook Time: 16 min. Total Time: 31 minutes Yield: 10 muffins Print Recipe Pin RecipeDescription
A hearty, nutty, make ahead, banana, coconut, carrot muffin made exclusively from pantry staples. To make substitutions in this recipe, follow the asterisks and notes at the bottom of the recipe. Note: this muffin is best made in advance. Straight out of the oven, the flavor is flat, the texture is dry, and the molecules are crazy. After an overnight rest, the flavor is rich, the texture is moist, and the molecules are very well rested.
Ingredients
Dry
1 c. unbleached all-purpose flour
1/2 c. spelt flour*
1/2 c. unsweetened shredded coconut
1/4 c. chopped pecans
1 1/2 tsp. aluminum-free baking powder
3/4 tsp. cinnamon
1/2 tsp. kosher salt
1/4 tsp. baking soda
1/4 tsp. cardamom
Wet
1 ripe banana*
1/2 c. grated carrots
1/2 c. neutral tasting oil, like grapeseed oil*
scant 1/2 c. maple syrup*
1/3 c. full fat coconut milk (from a can)
2 large Happy Egg Organic Free-Range Eggs
1 tsp. pure vanilla extract
Topping
1/4 c. (or so) oats
2 tbsp. turbinado
Instructions
Preheat the oven to 400°F and line a muffin tin with 10 liners. Set aside. Note: these muffins are best made a day in advance. See headnotes.
Prep the dry ingredients. In a large bowl, whisk together all the dry ingredients. Set aside. Note: always whisk together your dry ingredients before wet so that you don’t have to wash your whisk halfway through.
Prep the wet ingredients. In a large bowl, mash the banana with the back of a fork until no chunks remain. Add in all the remaining wet ingredients, and whisk together until evenly combined. Note: grate the carrots using your cheese grater. This is my favorite deconstructed grater.
Pour the wet ingredients into the dry ingredients and fold together with a spatula until just barely combined. Over stirring will create a tough, dense muffin. Using a spring release scoop, evenly distribute the batter into the prepared muffin tin. Batter should reach the top of each liner. Lightly sprinkle the tops with turbinado and generously sprinkle with oats.
Bake for 16-18 minutes or until the tops spring back at the touch of a finger tip. Remove from oven and allow to cool for about 5 minutes before setting a rack to cool completely. Store in an airtight container for up to 4 days at room temperature or in the freezer for a month.
Notes
*This recipe can be flexible within reason, as long as the ratios are consistent and the fat content swaps are similar. For the spelt flour: try wheat pastry flour or buckwheat flour. For the oil, try melted and cooled butter or coconut oil. For an underripe banana, roast on a baking sheet while the oven preheats until the skin turns black. This will deepen the flavors and caramelize the sugars. For the coconut milk, try whole milk. For the maple syrup, you can get away with 1/3 cup when using a very ripe banana, though my family preferred it best at 1/2 cup.
For my favorite fried egg technique, check out my book The Minimalist Kitchen. For the seedy honey and yogurt recipe, check out this post.
Did you make this recipe?
Tag @thefauxmartha on Instagram and hashtag it #thefauxmartha
Recipe Card powered by [image error]
The post Make Ahead Banana Coco Carrot Muffins appeared first on The Faux Martha.
September 24, 2019
After: Tara’s Pantry Makeover
Ahh, it’s reveal day for Tara’s Pantry Makeover. I wish I could have captured the excitement in the air and the long exhale out we felt during this process. But maybe you can feel it by looking through the pictures? Pantry Peace. You can see everything at once, retrieve something easily, and put it back without having to dig or think. We’ve handled Tara’s pantry, so she has the bandwidth to handle the bigger, more uncontrollable parts of life. It’s one of the best gifts you can give yourself, in my opinion. And all the people said amen. Amen. To Tara, thank you for having me in your home and being willing to share it here.

This post was created in partnership with OXO in celebration of their updated POP Container line, a line I’ve been using in my pantry for years to keep the pantry peace. I’m so excited to partner with them to pass the peace onto Tara’s Pantry.
Before we dive too deep, let’s take a quick walk down memory lane with a before of Tara’s Pantry. Like so many pantries, it was overcrowded and hard to quickly find what you’re looking for. Items were getting lost and buried and going stale way too fast. Their pantry wasn’t working for them, mostly against them, adding unwanted frustration to their day.

Last week, we walked through Steps 1-6 in paring down Tara’s pantry. Head this way to read about it. Today, we’re wrapping up the process with Steps 7-10.
Step 7: Order the Pantry Supplies
After deciding what items Tara wanted to stock permanently in her pantry and where, I pared the items to the best container to match both the pantry shelf height and the ingredient amount. I’ve used the OXO POP Containers in my pantry for years, so I’ve become an expert about what item fits best in which container. If you’re new to this system, you might find this to be the hardest part. To see everything we ordered for Tara’s Pantry, as well as all of the container sizes, download this list. OXO also has a great sizing resource post here. And, just in case you need a little extra guidance, I’ve created a little visual guide below so you can see which containers share the same height.
We also used these long clear bins perfect for deep shelves and corralling multiples, like snack bars. And this series of white bins that coordinate well with the POP Containers and come in a variety of sizes to store the overflow items.
By the way, OXO just launched their updated POP Container line. It carries the same footprint as their previous line, so your old containers fit with your new ones, with a couple new sizes as well. The new lids are more sleek in design but have the same thick seal for freshness. They also created a line of accessories that slide or clip into the underside of the POP container, like brown sugar savers, scoops, measuring scoops, and sifters. So smart.
Step 8: Paring Down
There’s no one right way to pare down. You can read my gentle approach here, an approach that works well for my personality and for the pantry. Do what works best for you. Due to time constraints, we had to makeover Tara’s pantry in a matter of hours. Hours! Thankfully, we had an organizational plan in place (see here) with containers washed and at the ready, knowing what we were putting in each one. We pulled it off in 3 hours with 3 people. It was one part gentle, another part ruthless, plus a sliver of magic.
First, we started by removing everything from her pantry, placing it on her dining room table. A blank slate. Next, we placed the OXO POP Containers on the counter with the item that belonged inside the container. Then, we transferred the contents to the containers, using a wipeable China Marker to label when necessary. This is one area I wanted Tara to be able to customize with her own labels or handwriting once I moved out. I love these 1/4″ vinyl black letters or these new labels from OXO.
Step 9: Putting it Back Together Again
As Chief Pantry Peacemaker, a title I just gave myself, I executed the organizational plan, placing the containers on the shelves, making live edits as needed. The shelves looked as good as they function. With the containers in place, we moved on to the overflow areas, adding things like the extra cracker boxes and applesauce, etc, to a large bin down low and up high, to the hard to reach shelves that don’t need to be accessed on the everyday. We added the cans of beans, the jars of tomato sauce, and boxes of mac and cheese to the Lazy Suzan in the corner cabinet, stacking 1-item deep, like a grocery store.
This got Tara’s pantry to a really good place. However, there were things left on the dining room table she had to handle. Some things were an automatic giveaway or throw-away (expired). But there were other things she realized she wanted to keep. So, she made a list of additional containers to buy. The good news—we created plenty of space in her pantry to store a couple extra items as needed. I, too, recommend doing this process in layers. Your pantry is like an onion. Once you peel back the top layer, you can see the layer underneath. It’s to be expected. To the remaining leftovers on the table, I recommend trying the 3-month rule. You can read more about it here.
Step 10: Edit
On my way out the door, lingering, as usual, I reminded Tara to edit her pantry. Notice the new problem areas that pop up, and create solutions around them. If something isn’t working, it can most likely be solved with a simple solution. It’s really hard, no, impossible, to get everything right all at once—in the pantry and in everyday life. Let it be.
OXO Pop Container Giveaway
Thanks for tuning into Tara’s Pantry Makeover. OXO is also giving away a makeover to you! One lucky winner will receive a 20-Piece POP Set and all 8 of the new accessories! To enter, sign up below to receive the OXO newsletter.
#mc_embed_signup{background:#fff; clear:left; font:14px Helvetica,Arial,sans-serif; }
/* Add your own Mailchimp form style overrides in your site stylesheet or in this style block.
We recommend moving this block and the preceding CSS link to the HEAD of your HTML file. */
Email Address
OFFICIAL RULES: Sweepstakes valid from 9am CST on September 24, 2019 to 9am CST on October 1, 2019. Must be a resident of the United States to enter. Void where prohibited. By entering this giveaway, you are opting in to receive email marketing communications from OXO. View their Privacy Policy.
The post After: Tara’s Pantry Makeover appeared first on The Faux Martha.
September 20, 2019
Before: Tara’s Pantry Makeover

There’s nothing quite as intimate as opening your pantry doors to a group of strangers on the internet. When I first shared the before of mine a couple of years ago, I would have preferred to open my underwear drawer instead. Today, another brave soul is opening wide her pantry doors to the internet. I’d like to introduce you to Tara and her pantry. It’s a very familiar pantry to me, a whole lot like the one I grew up with and the one I created as an adult. Most of us think the pantry is a problem exclusive to our home. Well, maybe we shouldn’t think too highly of ourselves; it’s a pretty universal problem. Pantry items look great on the shelf at the grocery store and not so great at home. It’s to be expected. It’s also to be expected that the little cardboard flap on the top of the box won’t keep your items as fresh as promised after opening. So we say, “Why bother?” This is a mindset that carries over to the pantry. It’s a beast too crazy to control. Or maybe it’s not?
Tara was incredibly kind to let me and The Minimalist Kitchen Course into her pantry for a good old fashioned makeover. As someone hesitant towards change, I’m always a little nervous to be directly involved in this process in someone else’s kitchen. It’s an intimate space. Tara not only embraced the change with a big smile, she helped a friend makeover their pantry, too. She’s a believer. I took Tara through The Minimalist Kitchen Course, a course I designed to create a pared-down, user-friendly kitchen custom to your kitchen, not necessarily my kitchen. You can take this free, 4-part course here. Here’s how we did it.
Step 1: Define the Objective
Tara’s objective was to end up with a pared-down pantry where everything could easily be found and seen. She also wanted to cut down on buying duplicates and waste from pantry items going stale. Both Tara and her husband work, so they needed the pantry to work efficiently for them, something they’ve successfully integrated into other parts of their home. They also have two children in middle school who love to bake. Tara wanted to make sure the pantry was conducive to her kids as well, giving them the ability to make their own lunches, grab their own snacks after school, and easily access the baking items (and put them back too).
Step 2: Take a Space Assessment
Good news. Tara has plenty of great pantry storage, and it’s mostly confined to one area, so she’s not hopping all around her kitchen to gather ingredients before cooking. They also have a Lazy Susan corner cabinet across the kitchen next to the stove used to store pantry items. When starting on her pantry makeover, we didn’t have to add any additional storage. If you find yourself needing more pantry storage, check out this post on how to add more without a remodel.
Step 3: Identify Problem Areas
Crackers and chips going stale too fast.
Things get lost on the deep shelves.
Baking items hard to access in the Lazy Susan.
Hard to find things.
Buying duplicates at the store.
Having too much of one thing and not enough of another.
The special occasion pantry items were creeping into the everyday.
Step 4: Take Inventory
Tara took inventory of her kitchen using this worksheet. This allowed her to decide which items she wanted to stock permanently in her pantry, thus giving them a permanent home. It also allowed her to see the things she no longer wanted to keep. We then were able to create an informed initial order for the New OXO Pop Containers we’d be using to makeover the pantry.
While it may feel too confining to permanently stock certain pantry staples in your kitchen, you’re probably already doing it. That’s just what Tara confirmed. They were always buying the same type of crackers, cereals, flours, etc. To all of those things, we wanted to give them a permanent home to increase visibility, preserve freshness, decrease decision making at the store, and tidy up.
Step 5: Take Note of Recipes and Hobbies
I’m a huge advocate of preserving your personality and tastes (and your family’s too) in the pantry. There is no one size fits all solution for every pantry. I had Tara make notes of the recipes they most often make, the ones that dress their dinner table on a weekly basis. We needed to make sure to preserve the ingredients needed to make those recipes and look for overlap in ingredients. If a lot your everyday recipes call for rice, let’s say, then stock enough rice for a couple of weeks to accommodate those recipes.
As for hobbies, Tara’s daughters love to bake. And they have a lot of baking ingredients. Our goal wasn’t to get rid of the robust baking supplies. Instead, we needed to save enough space for the baking items on a shelf the girls could easily access, not the lazy suzan that they found hard to access. My favorite saying is from Leonard Koren. He says this, “Pare down to the essence but don’t remove the poetry.” In Tara’s home, the poetry looks like a plethora of sprinkles, chocolate chips, and cocoa powder. Let it be.
Step 6: Create a Rough Organizational Plan
The organizational plan isn’t in the course, nor is it necessary, but you may find it extremely helpful. A common question I got during the course—how do you organize your shelves? This may be incredibly intuitive for some and rocket science for others. I like to think of pantry organization in these general categories:
Breakfast Grains
Dinner Grains
Baking
To-Go Snacks
Chips and Crackers
Nuts and Dried Fruit
Canned Goods
Nut Butters
Overflow
Note: overflow is for back-up supplies. I like to keep extras of things we go through quickly so that I’m not constantly at the grocery store. With that said, I suggest designating space, either high up or down low, for the overflow. Using this method, we want to give everything a home. If it doesn’t have a home, it will quickly make one in the common spaces, and usually, it will make a mess.
Make your list exclusive to your pantry, using my list as a guide. Thinking about pantry ingredients in these categories helps not only to group similar items within the pantry, but also helps to give you answers about where to put what.
For example, Tara has one deep shelf. Deep shelves are known for being troublemakers. Things get lost way in the back. So, we honored the nature of the deep shelf by planning to add deep bins to store on-the-go snacks and lunch items. She also has a tall square shelf with a door on it, probably once used to store produce. The height makes it the perfect spot to store tall containers of breakfast cereal. We also knew we needed to save a shelf for middle schoolers to be able to reach the baking items. Already, we’ve begun to organize the pantry given the natural parameters of the pantry and the parameters of the people using it. Now that we have an informed start, it’s not so hard to fill in the rest. With that said, prioritize the necessary first and then fill in the rest. And if it helps to sketch it out first, do it.
Stay tuned next week to see how we pared down Tara’s Kitchen and put it all back together again. It’s so happy!
The post Before: Tara’s Pantry Makeover appeared first on The Faux Martha.
September 12, 2019
How to Add a Pantry to Your Kitchen
We’re back to the rhythm of the school year, a rhythm I’ve come to crave. We really let things go this summer—from cleaning to meal planning to using a calendar. I’m itchy to get things back into normal working order, mostly so life works. Maybe you’re rowing down the same stream? If so, it may be a good time to take a look at the pantry, whether you need a little tidying up or some major help. My mantra: Handle the things within your control so you have the bandwidth for the rest. Let’s handle the pantry. Over the next two weeks, I’m focusing specfically on the pantry, answering some great common questions that came out of The Minimalist Kitchen Course earlier this year. First up (today)—how to add a pantry to your kitchen without a remodel. Next—how to make an organizational plan for your pantry, working with a real-life pantry. Finally—a real-life pantry makeover and reveal.
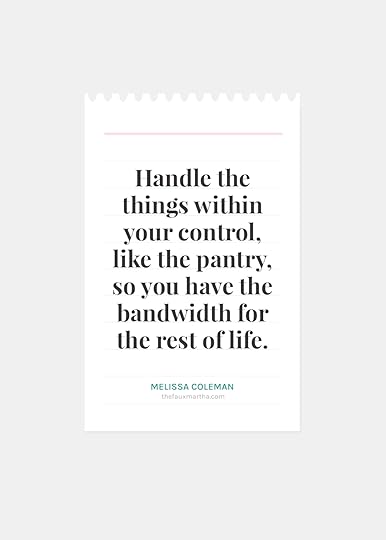
This isn’t new news. Many kitchens have the problem of not enough storage space or insufficient storage, meaning you have cabinets but they aren’t conducive for storing pantry items. You can read more here about auditing the space in your kitchen to make an accurate assessment. Let’s say you come to the realization that you don’t have enough storage space, especially pantry storage, nor do you have the budget to do a kitchen remodel. Take heart. Here are a couple ideas for adding a pantry to your kitchen or another nearby space without breaking the bank. These ideas are fit for both renters and owners.
Add IKEA Cabinets
Maybe you have an empty wall nearby the kitchen with just space enough for a 15-inch deep cabinet, which in the world of cabinets and furniture is about as shallow of a depth as you can get. That’s plenty of space to squeeze in IKEA upper cabinets or IKEA high cabinets and create a pantry. With this route, you have the option to permanently affix the cabinets to your space or not, which is a great solution if you’re renting or transient.

I love what Brittany Makes did with an empty wall. Let there be a pantry, she said. And there was. She used the high cabinets from IKEA, adding new cabinet fronts and pulls to customize the system. It’s beautiful, functional, and doable. You can read more about it on her blog.
Look at all that extra storage space she created!
You may remember, we did something similar with two IKEA upper cabinets, creating a faux buffet. In an effort to save money and complete this project without hiring out, we skipped drilling them into the wall or together. Essentially, they are freestanding upper cabinets that could be moved or added onto (most likely) should we ever decide to. Flexibility and functionality at its finest. You can read more about this solution here.
Or maybe you live in an open concept home with plenty of floor space and not enough kitchen storage. Consider erecting a half-wall or full-wall pantry, like we did. Though our pantry was custom-built and dreamt up by Mike, you could recreate this system by bolting several IKEA High Cabinets together and to the floor, then installing some sort of backing, from a flat panel to shiplap. (Ok, if you’re not all that handy, maybe you should hire out the finishing touches on this idea.) Ours sits between the dining room and kitchen, breaking up the two spaces without closing them off.
Add a Piece of Reclaimed Furniture
Is it possible to add form, function, and character to your space all at the same time? I think so, with a reclaimed piece of furniture turned pantry. Think old hutches from a vintage shop or salvage yard. Place against a wall or use as a divider between rooms if the back is attractive.
Cathy from The Grit and Polish is in the middle of installing a similar beautifully reclaimed hutch to their farmhouse kitchen. It adds instant character while also functioning as a pantry. I’m in love.
View this post on Instagram
A post shared by Odette Williams (@odettewilliams) on Aug 3, 2019 at 6:22am PDT
I also love this beauty Odette added to her previous kitchen in NYC. It adds so much richness to a clean, minimal space. With that said, don’t be afraid to mix and match styles by adding something old and something new.
Convert a Closet
In almost every apartment we lived in, the laundry room was adjacent to the tiny kitchen. I always took over part of that space to create a pantry. Typically, it lacked any shelving but had just enough space to add some. I don’t have any pictures, and even if I did, they weren’t all that inspiring to look at, which is good to keep in mind. Everything doesn’t have to be beautiful, but functional, yes, please. Adding an inexpensive shelf to a closet is a great way to go. You can always close the door.
Or, maybe you want to make that space special. If so, here are a couple of inspiration drawings I did for my friend Amanda, who also had a laundry room off of her kitchen in her previous condo. The idea was to add high cabinets from IKEA to create a much-needed pantry while also hiding the laundry machine from plain sight. On the back wall of that room, they had a table that wasn’t offering much by way of storage. I recommended trading the table for IKEA lower cabinets.
Moral of the how to add a pantry to your kitchen story, there’s almost always a solution to this very common problem so that it’s no longer a problem. I hope these ideas help. See you Thursday to walk through a real-life pantry we’re making over, tackling the question of how to intuitively categorize your shelves.
The post How to Add a Pantry to Your Kitchen appeared first on The Faux Martha.
September 5, 2019
Intimacy and The Internet
Emotions are high this morning, making it a good day to write about intimacy and the internet, a conversation I keep coming back to, a conversation I’d love for you to inject your thoughts into. It’s the first day of kindergarten for Hal. This morning was piled high with anxiety, hers and mine for her, with comforting southern buttermilk biscuits, with a clump of toilet paper in the toilet from a single 5-year-old sneeze, with dishes leftover from last night’s boxed mac and cheese (or mackin’ as she calls it) and caesar salad, the back-to-school dinner she requested, with lots of sweet smiles, too. I have the quintessential first-day-of-school pictures on my phone, plus a quick video we took before hopping in the car. And I find myself asking a question that’s become so familiar over the past 2 years, what do I share on the internet? Do I share our most intimate moments, like the one above? When I choose to share them, do they lose their intimacy? I’m 100% certain they do, and entirely unsure at the same time.
When I use the word “intimate” I’m not talking about our master bedroom. I’m talking about the sacred moments at the dinner table, the family vacation, the birthday parties, and the everyday ordinary moments. The iPhone camera has found a home in these moments, and the internet has created an easy space to share them—to our closest friends and a world of strangers. When the internet was small, 10 years ago, I questioned none of it. Post, publish, share. I was liberal about it. Now that the internet, or at least my slice of it, feels a little bigger, I have sharing paralysis. What do I share on the internet? And when do I sacrifice intimacy?
Every situation comes with benefits and losses. Call them pros and cons if you want. They exist together, side-by-side. You can’t measure the weight of the benefits without subtracting the weight of the loss to determine the cost. I’m having a whole lot of trouble calculating that number for myself in regards to this conversation, deciding if it’s a net positive or a net loss or maybe somewhere in the middle.
There’s something good about sharing and consuming real-life content, even from a stranger. That’s why I follow blogs and then started one. The personal, intimate stuff is good stuff. There’s value in hearing another mother struggle like you; value in watching someone turn an idea into a reality; value in hearing Nora and Linsday grieve out loud; value in being confronted with something your immediate world can’t give you; value in finding a recipe that makes dinnertime more doable and a grass that doesn’t need mowing.
There’s a point, though, when I begin to question it all. I think it’s at the point of oversharing, both as a creator and a consumer. It’s the point when I begin to think about the iPhone and the person holding it. Are they present to what’s right in front of them? Am I present to what’s right in front of me if I’m so engaged with their online life? Why are they sharing so much of their intimate life? Do their kids and partner hate having a camera in the middle of every moment as much as mine do?
As a creator and sharer of personal life, these are all questions I started asking myself two years ago, probably around the same time Instagram Stories became a thing. My answer lately has been to pull back, to preserve the private moments, to keep some things to myself, or at a minimum, to figure this question out. It’s humorous though. In that place of holding back, I’m toeing the line of creating an over-curated blog and feed, which has its own set of losses.
Ping. Pong. This conversation is complex and complicated, full of benefits and losses, all at the same time. Maybe I’m overthinking it all. Probably. Certainly. But I want to be certain I can afford the cost of intimacy and sharing life on the internet. I’d love to hear your thoughts. Imagine we are at a coffee shop, and I just unloaded all of this on you. What would you share back? What’s your experience as a creator? As a consumer of content? Where do you draw your lines and create your boundaries? How have they changed over the years? What works for you? What doesn’t? As you read the comments of others, please handle them with the same respect you would with a friend over coffee, thinking out loud. The internet is big, but maybe it’s intimate, too.
The post Intimacy and The Internet appeared first on The Faux Martha.
Melissa Coleman's Blog

- Melissa Coleman's profile
- 4 followers

