Brian Meert's Blog, page 69
June 18, 2020
How to Turn Off Political Ads on Facebook

JUN. 18, 2020
 Austin Distel / Unsplash
 For many, politics on Facebook is not a welcome sight. Those who want to keep their news feeds politics-free can finally rejoice. The social media company is currently rolling out a feature that allows US users to turn off political ads, which they will no longer see on their feeds.
The change came after Facebook received feedback from users who wanted to see fewer political content on the social media site. With the new feature, all political ads will be turned off, including ads with the “paid for by” disclaimer.
Although currently rolling out to US users for the weeks to come, the social media company plans to expand the rollout to other countries.
To turn off political ads directly from an ad you find on News Feed, follow these steps:
Step 1: Click “Confirmed Organization.”
Step 2: Click “See fewer ads about this topic.”
Step 3: Click “See fewer ads about this topic” again.
To turn off political ads from Settings, follow these steps:
Step 1: Go to Settings.
Step 2: Scroll down to “Ad Preferences.”
Step 3: Click “Ad Topics.”
Step 4: Click “Social Issues, Elections, or Politics.”
Step 5: Click “See fewer ads about this topic.”
Here is a video tutorial courtesy of Facebook:
Because the feature is still rolling out, some users will already have access while others will not.
What Else Is New with Facebook?
Shareable “Paid for by” Tags
In an effort to improve transparency, Facebook is also updating the “Paid for by” tags. Moving forward, when users share an ad with a political disclaimer, the tag will remain intact. Previously, disclaimer tags disappeared after sharing, creating confusion as to whether the post was an ad or an organic post.
New Ad Library Features
Facebook is also making updates to the Ad Library. Now, users can track the ad spend of US House and Senate races. Previously, users could only find the ad spend for presidential races. The updated Ad Library also contains a custom tracker that compares the ad spend of advertisers running political or issues ads.
Voting Information Center
Facebook is rolling out the Voting Information Center, which contains resources about voting. According to Facebook’s announcement, the new feature aims to “register 4 million voters and help them get to the poles so they can hold our leaders accountable.” In 2016 and 2018, Facebook helped 2 million users register to vote.
 Photo courtesy of Facebook
In the Voting Information Center, users can find resources on registering to vote and requesting an absentee or mail-in ballot, as well as alerts from officials.
New Collections Test
Facebook is currently testing a feature that allows users to more broadly share Collections, organized folders containing posts bookmarked on the platform.
 Photo courtesy of Tech Crunch
With the new test, users can choose to share Collections with the public, friends, or contributors. Users can also choose to make Collections private. Previously, users could only share Collections by manually selecting people from their friends list.
By Anne Felicitas
The post How to Turn Off Political Ads on Facebook appeared first on AdvertiseMint.


June 16, 2020
Creating an Effective PPC Landing Page: 10 Best Practices

JUN. 16, 2020

Le Buzz / Unsplash
Paid traffic rarely gets the credit it deserves.
In most cases, marketers applaud search engine optimization as the strategy that drives sustainable business growth. What’s unsaid is that SEO takes time to yield results. It can take up to a year for you to rank for keywords that matter.
But paid traffic delivers instant results and gives you full control of where you want to take the traffic. Most important, paid traffic converts at a significantly higher rate than organic traffic — 64.6% of people click on a Google adwhen they want to buy an item. However, to get such superb results, your ad and landing page must work together perfectly.
In this guide, I’ll walk you through the essentials of high-converting PPC landing pages that boost your return on ad spend (ROAS). The best part? There’ll be plenty of examples along the way, so you see the real-life application of the concepts.
Let’s first cover the fundamentals.
PPC Landing Pages Commonly Asked Questions
What Is PPC?
PPC means pay-per-click, an online marketing strategy where advertisers only pay a fee when a user clicks on their ad.
What Is a PPC Landing Page?
A pay-per-click landing page is a standalone web page designed to convert traffic from a paid traffic source, such as a Google ad or a Facebook ad. It’s a special page where people who clicked your paid ad land, ready for the next step in the buyer journey.
What’s the Purpose of Having a Special Landing Page for a PPC Ad?
The sole purpose of a PPC landing page is to get the visitor to take a specific predetermined step, such as buying a product, taking up a free-trial offer, or downloading a free report.
How to Create a PPC Landing Page: 10 Proven Optimization Tips
So then, how do you optimize your landing pages for maximum conversions? Here are some proven tips to help you get started.
Tip 1: Take Traffic to the Right Place
People who click on an ad are serious about solving a specific problem. They want help here and now. The traffic is hot, and the shoppers are ready to take the next step. Taking such traffic to your home page is a massive mistake because it’s a busy page. Visitors have many options there. They can visit your blog, click on your social profiles, or read customer testimonials. The homepage distracts visitors from taking a specific action connected to the ad they followed.
That’s a waste.
Instead, send paid traffic to a focused, dedicated landing page. This increases the chances of getting conversions because the page is distraction-free. See the difference in design between the homepage and the landing page from this revealing visual from Kissmetrics.

Source: SlideShare
The home page has 57 CTAs that lead to distinct places. With only a single CTA, the landing page is more focused. Either the reader clicks on it or leaves. As a result, more people will convert.
Tip 2: Follow the Rule of One
Your ad addresses a specific problem, right? So it must lead to a specific landing page with a specific goal. The more aligned your ad is to your landing page, the higher the chances of converting the traffic.
Have total focus — follow the rule of one religiously: One ad. One landing page. One goal. One offer. This means you must create multiple pages for multiple offers. You will see an uptick in conversions because you are not splitting your focus. Visitors will click on your offers since you address one problem at a time instead of overwhelming them with many solutions.
For instance, Airbnb has a laser-focused landing page.

Source: HubSpot
From the headline to the body, from the body to the CTA, from the CTA to the average earnings underneath, everything is about one thing — hosting.
This makes it super easy for readers to understand and take up the offer.
Tip 3: Keep the Ad “Scent”
It’s crucial for people who click on your ad to know they are in the right place as soon as they land on your landing page. If visitors sense a hint of incongruity between the ad and landing page, they’ll bounce off on arrival.
Give visitors a consistent experience. Your page has to “smell” like the page they came from — your traffic source, the ad. Here’s how you can achieve that:
Include the same keyword you used in your ad on your headline.Use a similar language to your ad’s language.Maintain the same page design and imagery.Stick to the same color scheme and font throughout.Let your offer answer the problem your ad promised to solve.
An excellent example of this tactic in action is Tidio, a Livechat Software brand. A quick search for “best chatbot software” shows this ad on the top of SERPs.

Click on the ad, and you’ll see this landing page.

Notice how it uses the exact keyword “best chatbot platforms” on both the ad and landing page headlines? This ensures a smooth landing for visitors. Users continue to read on with confidence because they know they are in the right place.
Tip 4: Lead with a Strong Headline
The first thing visitors see when they arrive on your page is the headline. It must convince them to stay on the page, otherwise they’ll leave immediately. Here’s how:
State the biggest and juiciest benefit of your offer.Let your headline scratch the itch introduced by your ad.Tie your headline’s phrasing to your ad’s headline copy.Support your headline with a powerful subheadline.Reveal your product’s unique selling proposition.
Keep your headline short, only ten words. Its purpose is not to say everything but to entice visitors to stay on the page and read the next sentence.
Look at Get Response’s post-click landing page.

The simple headline “email marketing” isn’t earth-shattering, huh? Until you return to the original search query “email marketing.”

It’s all about ad scent:
Search query “email marketing”Ad headline “Email Marketing by Get Response”Landing page headline “Email Marketing”
Now, it doesn’t look so bad. It’s a genius stroke. The headline “email marketing” introduces the offer, and the subheadline “get more opens, clicks, and sales” completes it by adding further details.
Tip 5: Include a Top-Notch Hero Image
Besides your headline, your hero image is another element that grabs visitors’ immediate attention. By hero I don’t mean Spider Man or Superman. A hero image is the first or main graphic you see on top of a web page. Because it occupies prime space on the page, it plays a crucial role in drawing visitors to your copy. It can either help visitors better understand your offer or hinder them.
As a general rule, stay away from stock images. People have seen them everywhere and don’t recognize them anymore. Use custom images instead.
Here are hero images that work:
Show your product or offer front and center.Depict people using your product.Fit the context of the ad and the offer.Closely match your ad images.
Mattress brand Casper picked the perfect hero image:

Source: Instapage
The post-click landing page shows a couple sleeping peacefully in bed. Showing the product in use appeals more to readers than just a bare mattress would have. And the child running towards the bed completes the picture of one big happy family with the bed taking center stage.
When you are not sure which image to use, try images of people. They tend to convert better.
Tip 6: Use Benefit-Driven, Reader-Friendly Body Copy
Once you’ve hooked visitors with a brilliant headline and hypnotic image, your next goal is to keep them glued to the page. Convince them to keep reading by piling on the benefits of your offer in the body copy. People are selfish. Tell them what’s in it for them. Then they’ll stick around.
How will they profit from your offer? Is your product faster, safer, richer? Whatever the benefits, include them in your body copy. Here’s how to format your copy for easy reading:
Use brief sentences and paragraphs.Include one benefit per bullet point.Use lots of white space, so your copy isn’t crowded.
Survey Anyplace, a software-for-surveys brand, is an outstanding example. The bullets are brief yet benefit-laden. Plus, they’re nicely spaced out.

Brevity is your friend. Don’t belabor your points. People are impatient these days.
Tip 7: Include Trust-Building Signals
Social proof is a critical part of the conversion equation.
People do what they see other people do. That’s why up to 97% of consumers look at reviews before they buy a product. Show visitors you are the real deal so they take up your offer. Instill confidence in your offer. Prove your authority. There are several ways to do that:
Include testimonials from satisfied clients or influencers in your niche.Ass spectacular reviews of your product or service.Flaunt the big-name clients you have served.Show glowing mentions of your company in respected publications.Display awards and certifications you’ve earned from renowned institutions.Leverage the power of numbers if you have sizable customers.
Online course platform Thinkific used the power of numbers intelligently on its post-click landing page for the keyword “launch an online course.”

Who wouldn’t want to join more than 36,000 fellow course creators who reach 10 million students collectively? Such whopping numbers prove beyond a doubt that the platform is a trusted service provider.
Tip 8: Optimize Form Fields
Everything on your page drives people towards your lead capture form. That’s where you catch the lead. How do you get the most from your form? To begin with, put your form above the fold so visitors don’t have to scroll to see it. According to a recent Nielsen Norman Group study, while people now scroll down a page more than they used to, their attention nosedives below the fold.

Your best chance of getting a conversion is above the fold while their focus is fresh. As for the ideal number of form fields, experiment. Unbounce carried out a study on the relationship between the number of form fields and conversion rates. See the results below.

Source: Unbounce
More fields equals more friction.
Usually, the fewer the fields, the higher the conversions, but lead quality becomes poor. This is understandable because filing a short form is easier than completing a longer one. The more fields, the lower the conversions, since it requires more effort. However, the quality of the leads improves. It’s a tradeoff between lead quantity and lead quality.
Also, the weight of your offer determines the number of fields. Surely, you wouldn’t make people fill in a 12-field form just to get a free report, would you? Only an email address can do. But if you own a B2B brand selling a pricey product, you’d want more details, such as job title, phone number, location, and number of employees.
However, things don’t always pan out that way. Sometimes longer forms convert better than shorter ones. If you are using a long form
Draw users with a valuable offer: If people deem your offer valuable, they won’t mind completing a lengthy form. Make it a multi-step process: Multi-step forms are less scary and allow you to increase the number of fields without spoiling the user experience.Pre-populate some fields: By prefilling some fields, you save users time and the hassle of typing.Input field size: Don’t make your input fields too long. They intimidate users. Match their length to the expected length of the answers.
Not only must you put your form above the fold, position it so it stands out from the rest of the page elements. Also, don’t forget to include a privacy policy statement. It helps allay people’s fears of parting with their info.
Tip 9: Captivating Call to Actions (CTAs)
You’ve done well if your visitor is still with you. You are on the home stretch of the conversion race. The finish line is in sight. After your visitor fills out the form, all that’s left is for her to click your CTA. There are three sides to a convincing CTA.
Clear: Be simple. Cryptic copy confuses readers.
Specific: Tell readers exactly what you want them to do or get.Action-oriented: A call to action must do just that, drive action through verbs. Verbs are energetic and forceful. Work them into your CTA.
Leading messaging platform Intercom is an exceptional example.

Because the brand knows it’s dealing with a high-purchase intent keyword “customer support tool,” it doesn’t waste time. It uses a straightforward call to action “get started,” since visitors already know what they want.
Tip 10: Test. Test. Test.
A landing page isn’t a do-once, set-and-forget page. For the best results, you must keep fine-tuning it. But you don’t use gut feeling to perfect your landing page. The secret? A/B testing.
An A/B or split test simply means comparing two unique versions of a web page to determine which one performs best. Test every element of your page, one at a time:
Headline.Hero image.Benefits.CTA.
Add the winning version to the page and move on to the next element. Rinse and repeat until you find the perfect mix that generates the most conversions. For higher conversions on your PPC landing pages, always test and tweak.
PPC Landing Pages: The Gateway to More Leads and Customers
In summary, use these tips to build winning PPC landing pages. With focus, a bit of patience, and a steely desire to improve through constant testing, you can succeed. You will see more sign-ups, leads, and customers.
Go rock your first or next PPC landing page!
By Qhubekani Nyathi, certified SEO copywriter
The post Creating an Effective PPC Landing Page: 10 Best Practices appeared first on AdvertiseMint.
June 15, 2020
How to Embed TikTok, Instagram, Twitter, and More Posts into WordPress

JUN. 15, 2020

ThisisEngineering RAEng / Unsplash
When writing an article, you sometimes may want to reference a specific social media post to bolster your point. Embedding has made this process easier, improving not only the appearance and credibility of your article but also the readers’ experience. Here’s how to embed posts from today’s most popular social media platforms.
How to Embed TikTok Videos into WordPress
You don’t need a TikTok account to find the videos you want to embed. In fact, you can simply scroll through videos on the Trending and Discover feeds. You cannot, however, use the search feature to look for specific content without logging in.
Step 1: Go to TikTok.com and click “Watch now” from the upper-right corner of your screen.

Step 2: Click on the video you want to embed then click the embed icon.

Step 3: Click “Copy code.”

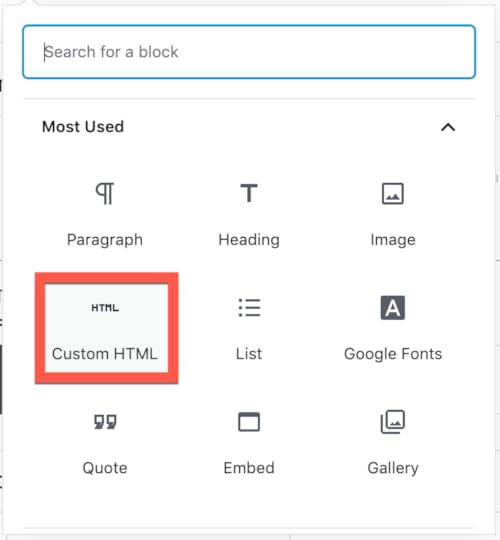
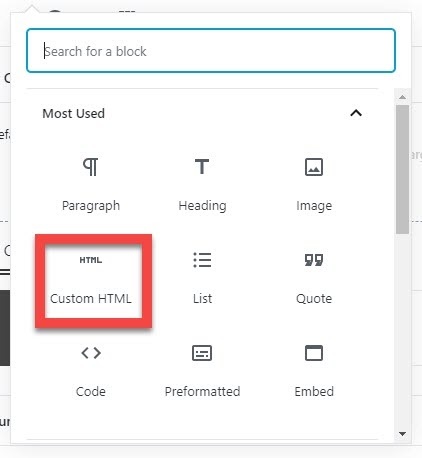
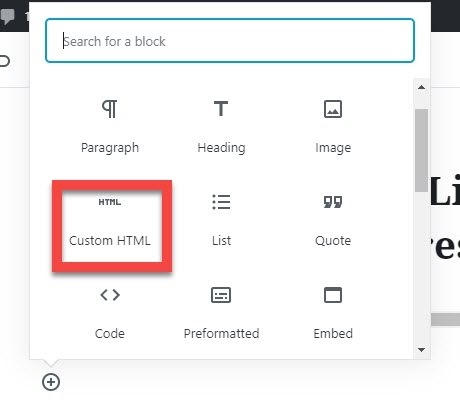
Step 4: Go to WordPress and open a new post. Click the plus icon to add a new block.

Step 5: Click “Custom HTML.”
Step 6: Paste your embed code then click “Preview.”

This is what it looks like when you preview it as a published blog.

How to Embed Instagram Posts into WordPress
Step 1: Go to Instagram.com, find the post you want to embed, then click the three-dotted icon from the upper right.

Step 2: Click “Embed.”

Step 3: Click “Copy Embed Code.”
You also have the option to include the post’s caption. If you would rather leave that out, click the blue box to disable.

Step 4: Go to WordPress, open a new post, and click the plus icon to add a new block.

Step 5: Click “Custom HTML.”

Step 6: Paste code then click “Preview.”

Step 7: You’re Done.
This is what the embedded link looks like once the post has been published.

How to Embed Facebook Posts into WordPress
Step 1: Go to Facebook.com and find the post you want to embed. Click the three-dotted icon from the right corner of the post.

Step 2: Click “See more options” then click “Embed.”

Step 3: Highlight the code then copy.

Step 4: Open a new post on WordPress then click the plus button to add a new block.

Step 5: Click “Custom HTML.”

Step 6: Pase code then hit “Preview.”

Step 7: You’re done.

How to Embed Twitter Posts into WordPress
Step 1: Go to Twitter.com, find the post you want to embed, then click the upside-down triangle from the upper-right corner of the post.

Step 2: Click “Embed Tweet.”

Step 3: Click “Copy Code.”

Step 4: Open a new post on WordPress and click the plus button to add a new block.

Step 5: Click “Custom HTML.”

Step 6: Paste code then click “Preview.”

Step 7: You’re done.

How to Embed Pinterest Posts into WordPress
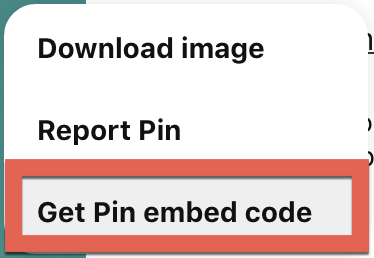
Step 1: Go to Pinterest.com, find the post you want to embed, then click the three-dotted icon from the left.

Step 2: Click “Get Pin embed code.”
Step 3: Choose the size you want, highlight the code, then copy.

Step 4: Open a new post in WordPress and click the plus button to add a new block.

Step 5: Click “Custom HTML.”

Step 6: Paste code then click “Preview.”

Step 7: You’re done.

How to Embed a YouTube Video into WordPress
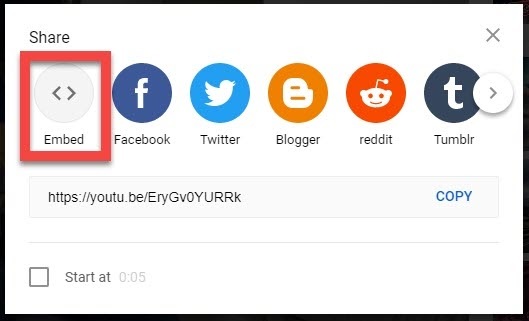
Step 1: Go to YouTube.com, click the video you want to embed, then click the “share” button on the bottom right of the video.

Step 2: Click “Embed.”
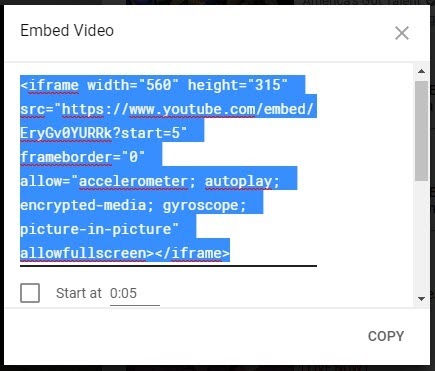
Step 3: Click the code then click “copy.”
You have the option to choose when your video plays. To enable, click the box next to “Start at” then type the specific moment in the video (whether at 5, 10, or 15 seconds) when you want it to automatically play.
Step 4: Open a new post on WordPress, then click the plus button to add a new block.

Step 5: Click “Custom HTML.”
Step 6: Paste code then click “Preview.”

Step 7: You’re done.

How to Embed Reddit Posts into WordPress
Step 1: Go to Reddit.com and find the post you want to embed. Copy the post URL.

Step 2: Open a new post in WordPress and click the plus button to add a new block.

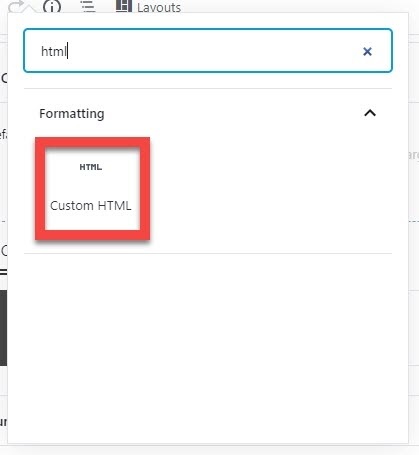
Step 3: Click “Custom HTML.”
Step 4: Paste URL then click “Preview.”

Step 5: You’re done.

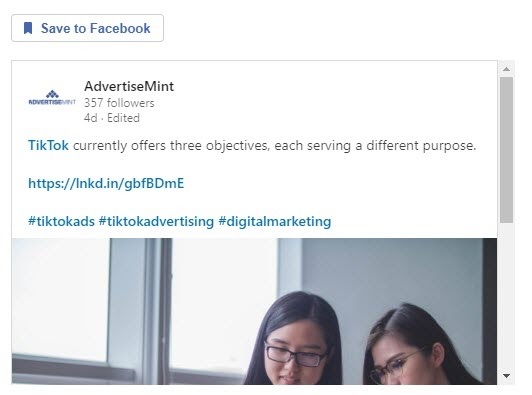
How to Embed a LinkedIn Post into WordPress
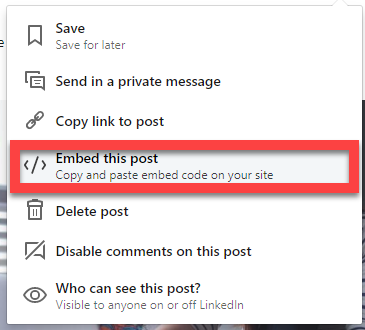
Step 1: Go to LinkedIn.com, find the post you want to embed, and click the three-dotted icon from the upper-right corner of the post.

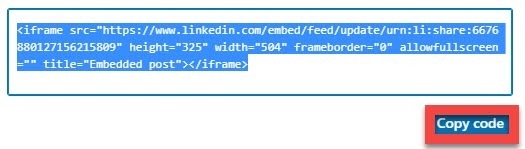
Step 2: Click “Embed this post.”
Step 3: Click “Copy code.”
Step 4: Open a new post on WordPress, click the plus icon to add a new block, then click “Custom HTML.”
Step 5: You’re Done.
By Anne Felicitas
The post How to Embed TikTok, Instagram, Twitter, and More Posts into WordPress appeared first on AdvertiseMint.
June 12, 2020
How to Go Live on TikTok

JUN. 12, 2020
 Eliott Reyna / Unsplash
So you’re addicted to TikTok. Welcome to the club. With its endless stream of entertainment and the chance to show your talents to followers, the social media app can be a delightful way to kill an hour or two of your time.
As if the app can’t get any more entertaining, you discover that — yes — much like its competitors, TikTok also offers a live feature, in which you can broadcast a live video to your audience. How do you do that? Well, it’s simple.
How to Start a Live Video on TikTok
This is already obvious, but to create a live video, you must first download the app. Available to both Android and Apple devices, you can get TikTok from the Apple Store or the Play Store. You must be at least 13 years old to create an account.
According to TikTok’s Terms of Use:
The Platform is only for people 13 years old and over. By using the Platform, you confirm that you are over the relevant age specified above. If we learn that someone under the relevant age specified above is using the Platform, we will terminate that user’s account.”
Step 1: Go to your For You page.
Once downloaded, open the app. Doing so will take you to your For You page, which contains a curated train of videos the algorithm believes to be relevant to you.
Step 2: Click the plus button.
On the bottom of the app, you will see a plus button. Click it.

Step 1: Swipe left at the bottom until you find “LIVE.”
Click the “LIVE” button to broadcast your video.

Who Can Go Live on TikTok?
Is your “live” button missing? Unfortunately, not everyone has access to this feature. To broadcast a live video on TikTok, you must have more than 1,000 followers, according to Seventeen. Additionally, you must be at least 16, even though the minimum age requirement to create an account is 13.
The Benefits of Broadcasting a Live Video
Of course, there are benefits to broadcasting a live video, in case you needed some convincing.
You Can Interact with Followers
Growing your account requires interacting with followers. Use this time to really get to know them. You can, for example, ask what kind of content they would like to see next. You can also answer any questions they have for you. This will help your followers get to know you better.
You Can Earn Money
Going live on TikTok allows you to receive gifts from fans, which you can cash in. This is one of the ways to make money on TikTok. Here is a breakdown of the gifts you can receive:
Panda: 5 coinsItalian Hand: 5 coinsLove Bang: 25 coinsSun Cream: 50 coinsRainbow Puke: 100 coinsConcert: 500 coinsI’m Very Rich: 1,000 coinsDrama Queen: 5,000 coins
The gifts you receive can be converted into diamonds, which you can convert to coins. Diamonds are worth 50 percent the value of coins: one-hundred coins equal 50 diamonds; 50 coins equal 25 diamonds. Each diamond is worth 5 cents.
You Can Increase Your Reach
When you go live on TikTok, your followers will receive a notification. This feature is unique to live videos — your regular posts won’t get the same special treatment. Going live increases your reach.
You Can Stay on for Longer than 20 Seconds
TikTok videos can only last as long as 20 seconds. This rule doesn’t apply to live videos. Use this time to deliver your message and connect with your audience. Maybe even shoot a video that would otherwise be too long to post on the platform.
By Anne Felicitas
The post How to Go Live on TikTok appeared first on AdvertiseMint.
June 11, 2020
What Are TikTok’s Advertising Objectives?

JUN. 11, 2020

Mimi Thian / Unsplash
TikTik isn’t only a video hub on which gen Zs (and a new wave of millennials) create and share dance videos. It’s also an advertising platform, on which big brands such as Universal and Guess find their target audience.
Like all the other social media platforms, TikTok has its own Ads Manager type of website, where advertisers can create and run TikTok ads. There, you can choose your budget, upload your creatives, and select an advertising objective.
TikTok currently offers three objectives, each serving a different purpose.
Conversions
The conversions objective drives desired actions on your website, whether that’s to fill out a form, sign up for a newsletter, or purchase your products. To use this objective, you need a website link (where you want users to be redirected) and a working TikTok pixel.
With this objective, you can choose to target a Custom Audience, a group that has previously taken an action on your business; for example, people who added items to their carts before abandoning.
Traffic
The traffic objective drives people to a destination, whether that’s to your website, online form, or app install page. Traffic and conversions may sound similar, but they have completely different goals. Conversions aim to achieve as many specific actions on your website, such as a purchase, whereas traffic aims to only bring as many people as possible to your chosen destination.
Currently, you can only drive users to two destinations using the traffic objective: your website or your app. Like the conversions objective, you can also target a Custom Audience; for example, people who visited your destination in the past.
App Installs
TikTok’s app installs objective drives users to install your app. Once clicked, the ad will redirect TikTokers to the landing page to download. You can only use this objective if you added your app to Event Manager, one of the pages within TikTok’s advertising dashboards. There, you will find all of your apps and website pixels. You can access Event Manager by clicking “Library” then “Events.”

Unfortunately, you need a third-party tracking service to track app installs. TikTok specifically asks that you use one of its tracking partners, such as Appsflyer, Adbrix, or Branch.
How to Choose the Right Objectives
It’s important to choose the right objectives to get the results you want. Before creating an ad, think about what you want your target audience to do after seeing your ad. If you want your target audience to read your latest blog post, then the traffic objective is your best option. If you want users to buy your product, then the conversions objective is the ideal choice. If you choose the wrong objective, you will end up paying for results you didn’t want.
Where to Find TikTok’s Advertising Objectives
You can find TikTok’s advertising objectives in the ad-creation process of its self-serve ad platform. To find it, follow these steps.
Step 1: Log in to your TikTok ad account then click “Campaign.”
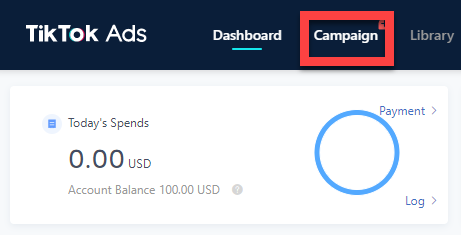
Step 2: Click “Create” under “Campaign.”
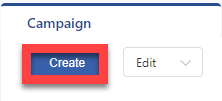
Step 3: Choose your budget and scroll to “Advertising Objective.”
The list of TikTok’s objectives appears in the Campaign level.

By Anne Felicitas
The post What Are TikTok’s Advertising Objectives? appeared first on AdvertiseMint.
June 10, 2020
Why Social Selling Is an Important Business Strategy

JUN. 10, 2020

Priscilla Du Preez / Unsplash
In the past, when people wanted to know more about a product or service, they asked family and friends for suggestions. They would even visit or call several businesses to talk to representatives.
Today, much of customers’ pre-purchase activities are happening online. People post on social media to ask their connections for recommendations or to reach out to a company’s team. Some people, for example, use Facebook’s Recommendations feature to receive suggestions from friends.

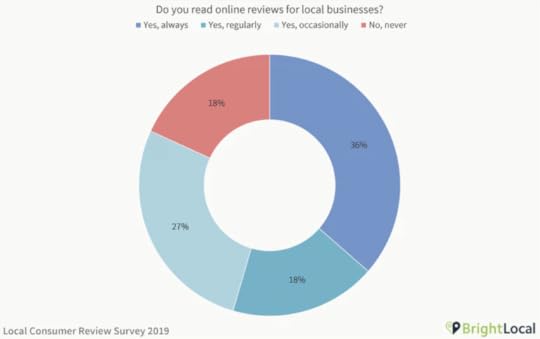
They check out reviews and ratings, too. In Bright Local’s 2019 survey, 82 percent of respondents said they read the online reviews of local businesses. Among them, 97 percent also read companies’ responses to reviews.
Social Media: An Essential Sales Tool
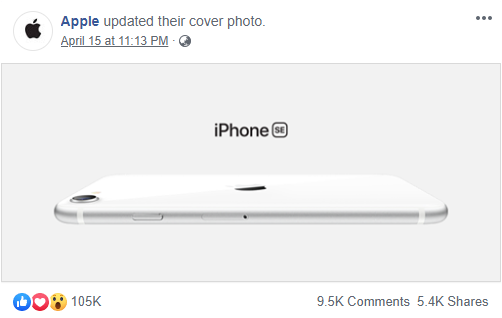
Social media functions and features — ratings, reviews, shares, tags, hashtags, and comments — are helping customers find service providers, evaluate products, and stay updated on their favorite brands. Apple, for example, used its Facebook page cover to promote its latest product.
Businesses with an active social media presence are able to generate more leads and sell to customers in multiple platforms. Moreover, reviews and ratings are supplying the social proof they need to build trust and improve their customer pipeline.
What Is Social Selling?
Social selling is the process of leveraging social media to find, understand, and establish trust with your ideal customers so you can hit your business goals. The power of social selling lies in its being “social,” which indicates a pleasant exchange, not a one-sided form of communication. Businesses that spam their followers and potential leads or marketers who are only focused on making a sale are bound to turn off prospects.
Many businesses are already engaging in some level of social selling. If you have a Facebook page, LinkedIn profile, or accounts on Twitter, Pinterest, or Instagram, then you have begun establishing a social media presence.
Why Social Selling Is a Must-Have for Your Business
You may have some reservations about social media’s potential impact on your company’s marketing and sales performance. Here are six key reasons why you should incorporate social selling into your strategy.
Your Customers and Prospects Are Engaging in Social Buying
When customers need a solution, they usually don’t approach a salesperson at once. They do their own research instead, browsing the internet for answers and gathering input from their network.
Aside from your website, potential customers also check your social media accounts. They use reviews and posts to assess your company’s reliability or expertise. A strong social media presence is especially helpful for new or small businesses that are still growing their reputation and reach.
Keep in mind that social media platforms are search engines, too. If you’re using another company’s SEO services, be sure to discuss how you can maximize social media to improve your SEO.
Social Selling Gives Your Sales Team an Edge over the Competition
More than 70 percent of sales professionals are already using Facebook, Twitter, LinkedIn, and other social selling tools. Training your sales team to maximize social media gives them a competitive edge over your competitors. It keeps them updated on technologies and strategies for getting more qualified leads, engaging with prospects, and closing more deals.
Social Selling Can Boost Your Sales Team’s Results
In an internal study, LinkedIn found that sales representatives with a high social selling index have 45 percent more sales opportunities. Fifty-one percent are more likely to reach their quota, and 78 percent outsell those who are not utilizing social media.
You Can Get More Leads in Less Time
Social selling tools make it easier for sales teams to find and target people who fit your company’s buyer personas. In a 2016 CSO Insights study, 39 percent of respondents said that social selling tools decreased their contact research time. A third (33 percent) said it increased their leads and improved lead conversion rates by 24 percent.
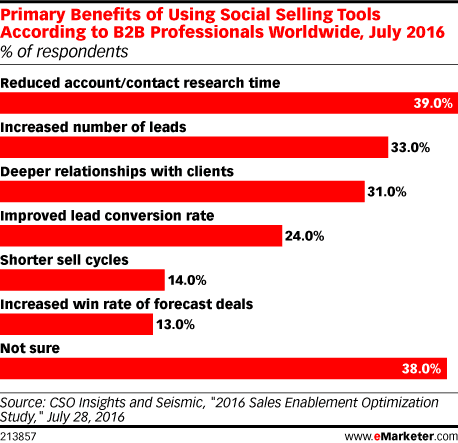
With even more people engaging with social media these days, those numbers would have only gone up.
You Can Build an Online Reputation
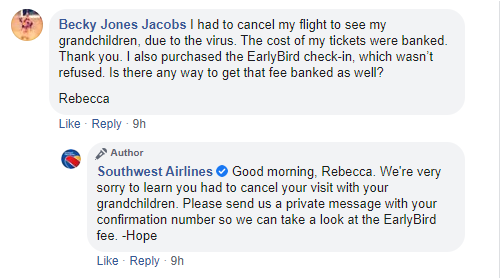
Social media allows your satisfied customers to leave reviews and ratings. These positive feedback can help convince prospects that your company is trustworthy. Additionally, social media allows your team to quickly address questions about your product or respond to complaints before they can hurt your reputation. Southwest Airlines, for example, uses its Facebook page to respond to customers’ problems in the comments section.
You Can Get Higher Sales Revenue
Social selling can increase your profit in several ways. Positive reviews and high customer ratings can help you attract more buyers. In addition, posting promotions on your social media pages, sharing links to your products or online stores, and running well-targeted ads enable you to put your offers in front of more prospects.
At the same time, nurturing your relationship with your leads and customers builds trust. Consumer trust can improve conversion rates and brand loyalty. It may even earn your sales team several referrals or introductions to mutual connections.
How to Include Social Selling in Your Marketing Strategy
Because social selling requires an investment of time, money, and human resources, you want to make sure you’re doing it right so you can hit your business goals and recover your investment. Here’s how to include social selling into your marketing strategy.
Set Goals and Measure Your ROI
Link your social selling goals to your company’s business objectives. Identify how you can maximize social selling to reach or even surpass these objectives. Aside from direct sales, brainstorm ways to use social media to educate your prospects, demonstrate your knowledge in your field, and provide more value.
When measuring your ROI, go beyond social media’s contribution to your profit. Include indicators like having more followers or subscribers, increased engagements, or higher gated content downloads.
Create a Social Selling Strategy
Limiting your posts to promotional content about your products will not help you develop a stronger relationship with your leads. Your prospects need to know how your company can help solve their problems or improve their lives. Start by trying to know more about your ideal clients: their pain points, interests, aspirations, and behavior. Practice social listening and list down their issues, suggestions, and struggles.
Next, improve your social media profiles so prospects can easily find you online. Include links to your website or other social media pages, so customers can follow you on their preferred platforms. Put yourself in your leads’ shoes and ask yourself what other information they may want to see on your page. Make it easy for them to find useful tips or links to your FAQ page, as well as your product pricing, order form, or a link to your online store.
Aside from organically growing your social media accounts, you can boost your following and reach by running paid ads. With social media’s targeting options, you can have the ad shown to people in a specific age group, income, location, occupation, interest, and other criteria.
Top 5 Social Selling Strategies
Now that you know the basics, follow the five tips below to level up your social selling skills.
Practice Social Listening
This is how HubSpot defines social listening:
The monitoring of your brand’s social media channels for any customer feedback and direct mentions of your brand or discussions regarding specific keywords, topics, competitors, or industries, followed by an analysis to gain insights and act on those opportunities.”
During your research, find out what your customers are saying about your company. When they leave positive reviews, thank them. If they report issues, apologize and use this as an opportunity to turn an unsatisfied customer into a happy customer. For example, if they are disappointed with the product’s quality, guide them through the return or refund process.
Be sure to monitor queries, too. Find out what questions your prospective customers are asking about your products, competitors, or industry.
Always Provide Value
Social media platforms give your business plenty of opportunities to provide value. For instance, your sales team can jump in conversations to offer actionable insights or personalized solutions. Take Louis Vuitton, for example, whose team uses Twitter as a customer service platform.

You can also publish a helpful blog, infographic, or video that addresses your customers’ pain points. Be sure to use relevant hashtags in your posts to make it easier for your target audience to find your message.
By consistently providing value, your business will eventually be recognized as reliable. Your target audience will follow you and may even start leaving questions on your page, giving you a chance to educate them or overcome their reservations about buying from you.
Share Success Stories
Aside from providing valuable information, you can strengthen trust by sharing your customers’ success stories on social media. Add credibility by including more details about the customer, such as his or her image, full name, position, and company. You can either share an excerpt from the customer’s story or publish it as part of an interview or case study.
Aside from sharing how your customers succeeded with your company’s help, mention some strategies or best practices that your prospects can also replicate. This way, you don’t just talk about a current customer’s wins. You’re also showing your future customers how they can enjoy the same success.
Establish Yourself as an Expert or a Trustworthy Brand
Build credibility using both your expertise and your customers’ reviews. Aside from publishing relevant content on your website, create articles on LinkedIn or write a guest post on leading blogs in your industry, sharing the link on social media. Red Stag Fulfillment, for example, promoted its employee’s guest post on its social media account.
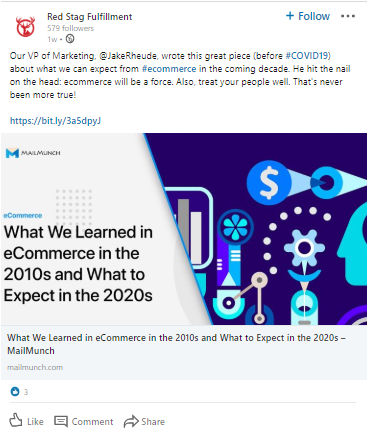
Maximize social platforms’ features to provide social proof. Encourage customers to leave a review on your Facebook page or a recommendation on your LinkedIn profile.
Nurture Your Target Clients
Understand that your prospects may not be ready to buy from you just yet. Keep providing helpful information on social media. Use social tools like LinkedIn Sales Navigator, Twitter lists, and Hootsuite’s social listening feature to monitor discussions and organize your lead-nurturing efforts.
Continue to engage by liking posts, participating in relevant discussions, and crafting insightful content. Encourage people to leave a question or comment on your posts and respond to them. Show them that you’re not just on the platform to sell, but you genuinely want to help. SEO Reseller, for example, provides webinars to customers, helping them reach their revenue goals.

Final Words
Social selling goes beyond creating social media accounts and promoting your business. It’s about building relationships with your current and future customers. And as with any relationship, you must listen, respond, participate in conversations, and provide value.
Done right, social selling benefits both your customers and your brand. Your clients get to have a positive experience with your company, and your business enjoys higher revenues and continues to attract new and repeat customers.
By Vincent Sevilla
The post Why Social Selling Is an Important Business Strategy appeared first on AdvertiseMint.
June 9, 2020
How to Enable Dark Mode on Facebook, Instagram, Twitter and More

JUN. 9, 2020

Daniel Korpai / Unsplash
There’s nothing more annoying than being blinded by an app’s bright, piercing display when opened in the dark of night. How can you stop this assault on your eyes once and for all?
Thank goodness for dark mode, which allows you to change your apps’ theme from light to dark, protecting your sensitive eyes from irritation. Dark mode is currently available on Facebook, Instagram, Twitter, and Messenger. Here’s how you turn them on.
How to Turn On Dark Mode on Facebook
Although dark mode is not yet available on the Facebook app, it’s currently an option for users with the redesigned version of Facebook desktop. Still a beta test, the new Facebook is not yet available to everyone — so don’t despair if you don’t have it right now.
For those who do have the new Facebook, follow this step.
Step 1: Click the upside-down triangle from the upper-right corner of your screen then click “Dark Mode.”
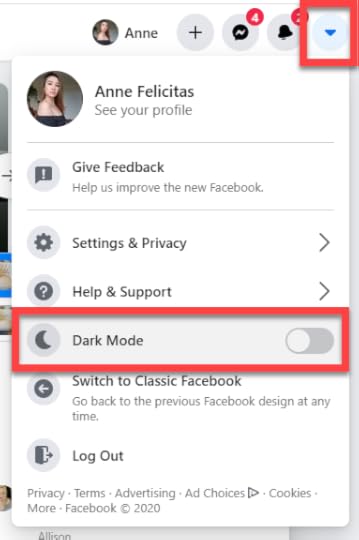
Easy, no? Also, a tip: If you have the redesigned Facebook, and you would much rather have your old Facebook back, you can switch between new and old by clicking the same aforementioned upside-down triangle then clicking “Switch to Classic Facebook.”
How to Turn On Dark Mode on Instagram
Although not yet a feature on Instagram, you can force dark mode on the app by changing your phone’s display settings. This tutorial is for Android devices (Samsung Galaxy S8, specifically).
Step 1: Go to your settings and click “Display.”
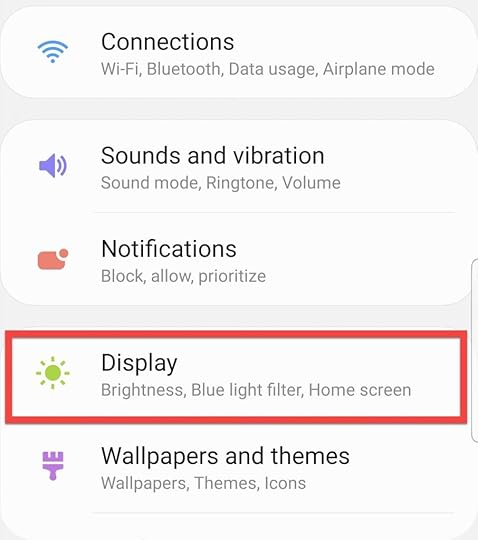
Step 2: Click “Night Mode.”

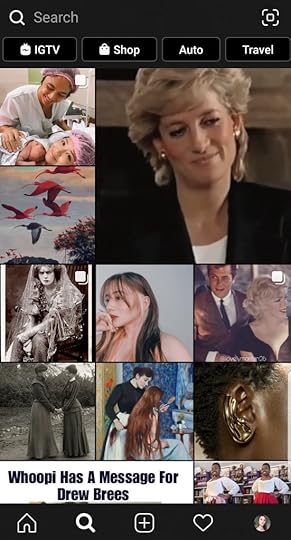
Not only does your phone switch to night mode but also your Instagram app. Behold:
How to Turn On Dark Mode on Twitter
Twitter has had a dark mode long before Facebook and Instagram. Follow these steps to turn it on using your mobile phone.
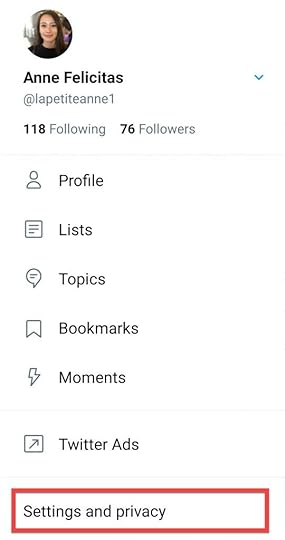
Step 1: Click your Twitter profile picture.

Step 2: Click “Settings and privacy.”
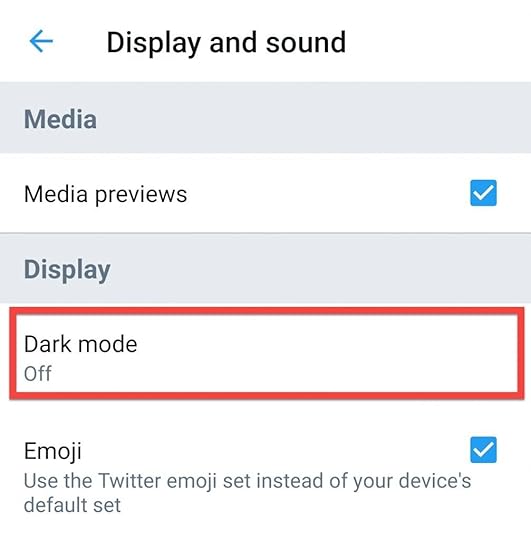
Step 3: Under “General,” click “Display and sound.”

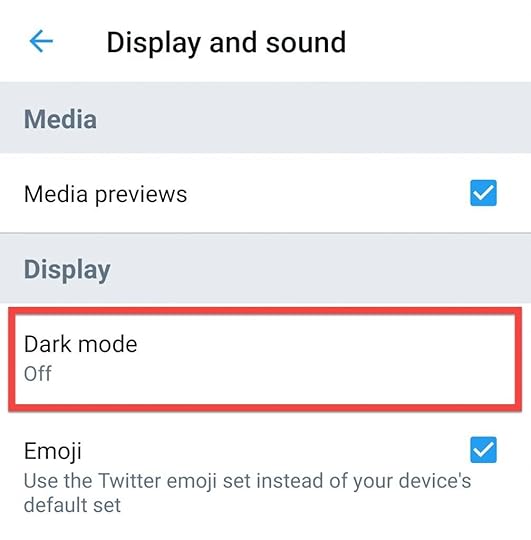
Step 4: Under “Display,” click “Dark Mode.”
Step 5: Set your preference.

Twitter has more sophisticated options than Facebook and Instagram. You can choose from the following:
On: Instantly turn on dark mode. It will remain enabled until you turn it off. Automatic at sunset: Dark mode will turn on at sunset and turn off during the day. Dim: When dark mode is enabled, your display will have a dark gray theme. Lights Out: When dark mode is enabled, your display will have a black theme.
How to Turn On Dark Mode on Messenger
Enabling dark mode on Messenger is easy. Follow these steps.
Step 1: Click your Messenger profile picture.

Step 2: Click “Dark Mode.”
Et voilà!
How to Turn On Dark Mode on WhatsApp
Dark mode is also available on the Facebook-owned messaging platform, WhatsApp.
Step 1: From your profile, click the three-dotted icon from the upper-right corner of your screen.
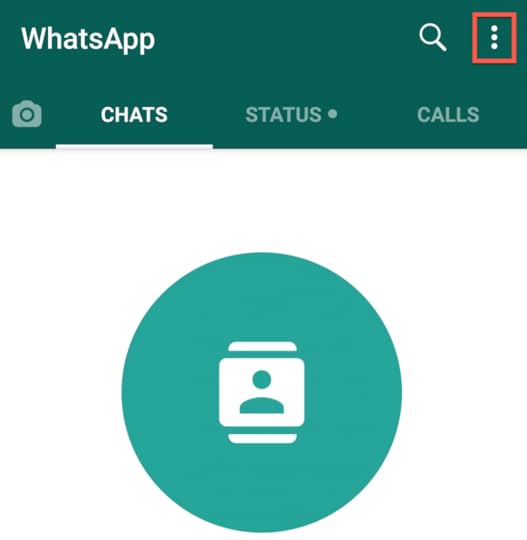
Step 2: Click “Settings.”

Step 3: Click “Chats”
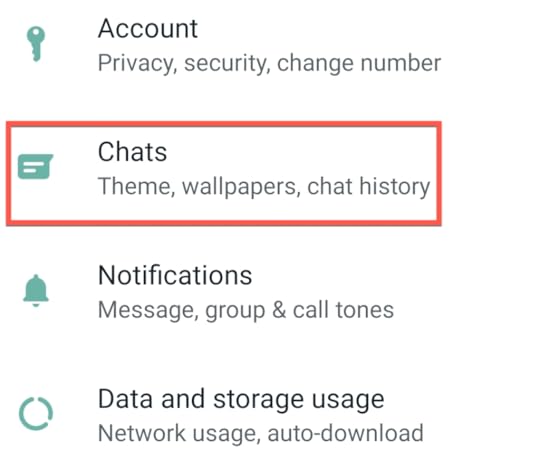
Step 4: Click “Theme”
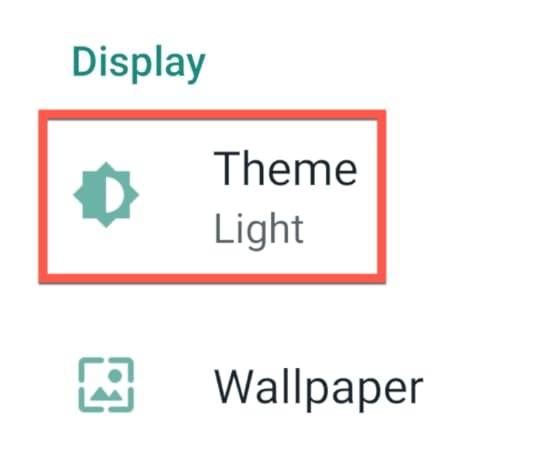
Step 5: Click “Dark.”

How to Turn On Dark Mode on YouTube
Of course, you can’t forget about YouTube.
Step 1: From YouTube’s home page, click your account icon.
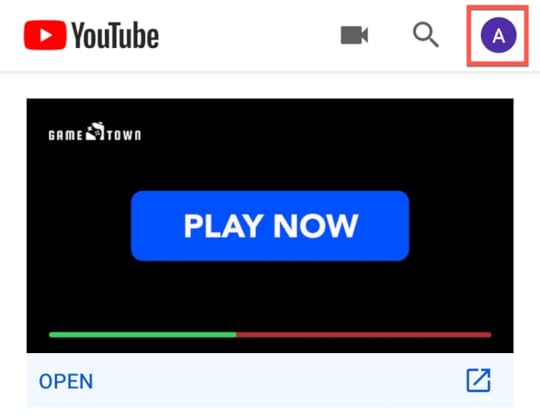
Step 2: Click “Settings.”

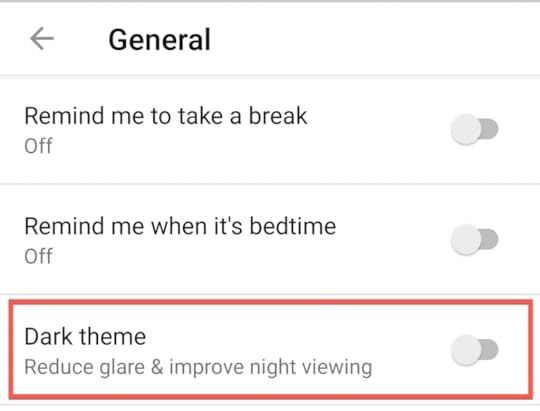
Step 3: Click “General.”

Step 4: Click “Dark Theme.”
For far too long our eyes have burned from our apps’ searing displays. White is the preferred theme for a clean look, but it sure doesn’t do our optic nerves any favors when we’re opening our apps late at night.
By Anne Felicitas
The post How to Enable Dark Mode on Facebook, Instagram, Twitter and More appeared first on AdvertiseMint.
How to Enable Dark Mode on Facebook, Instagram, Twitter, and Messenger
JUN. 9, 2020
Daniel Korpai / Unsplash
There’s nothing more annoying than being blinded by an app’s bright, piercing display when opened in the dark of night. How can you stop this assault on your eyes once and for all?
Thank goodness for dark mode, which allows you to change your apps’ theme from light to dark, protecting your sensitive eyes from irritation. Dark mode is currently available on Facebook, Instagram, Twitter, and Messenger. Here’s how you turn them on.
How to Turn On Dark Mode on Facebook
Although dark mode is not yet available on the Facebook app, it’s currently an option for users with the redesigned version of Facebook desktop. Still a beta test, the new Facebook is not yet available to everyone — so don’t despair if you don’t have it right now.
For those who do have the new Facebook, follow this step.
Step 1: Click the upside-down triangle from the upper-right corner of your screen then click “Dark Mode.”
Easy, no? Also, a tip: If you have the redesigned Facebook, and you would much rather have your old Facebook back, you can switch between new and old by clicking the same aforementioned upside-down triangle then clicking “Switch to Classic Facebook.”
How to Turn On Dark Mode on Instagram
Although not yet a feature on Instagram, you can force dark mode on the app by changing your phone’s display settings. This tutorial is for Android devices (Samsung Galaxy S8, specifically).
Step 1: Go to your settings and click “Display.”
Step 2: Click “Night Mode.”
Not only does your phone switch to night mode but also your Instagram app. Behold:
How to Turn On Dark Mode on Twitter
Twitter has had a dark mode long before Facebook and Instagram. Follow these steps to turn it on using your mobile phone.
Step 1: Click your Twitter profile picture.
Step 2: Click “Settings and privacy.”
Step 3: Under “General,” click “Display and sound.”
Step 4: Under “Display,” click “Dark Mode.”
Step 5: Set your preference.
Twitter has more sophisticated options than Facebook and Instagram. You can choose from the following:
On: Instantly turn on dark mode. It will remain enabled until you turn it off. Automatic at sunset: Dark mode will turn on at sunset and turn off during the day. Dim: When dark mode is enabled, your display will have a dark gray theme. Lights Out: When dark mode is enabled, your display will have a black theme.
How to Turn On Dark Mode on Messenger
Enabling dark mode on Messenger is easy. Follow these steps.
Step 1: Click your Messenger profile picture.
Step 2: Click “Dark Mode.”
Et voilà!
For far too long our eyes have burned from our apps’ searing displays. White is the preferred theme for a clean look, but it sure doesn’t do our optic nerves any favors when we’re opening our apps late at night.
By Anne Felicitas
The post How to Enable Dark Mode on Facebook, Instagram, Twitter, and Messenger appeared first on AdvertiseMint.
June 8, 2020
How to Set Up Facebook Pay on Facebook and Messenger

JUN. 8, 2020

Anastasiia Ostapovych / Unsplash
Facebook Pay is a feature that allows you to make purchases from the social media company’s family of apps without being redirected to a different landing page. You can, for example, send payments to your Messenger contacts. You can also purchase digital gift cards from businesses’ pages. When you make transactions using Facebook Pay, you will not incur any processing fees.
This feature is currently rolling out to Facebook and Messenger users in the U.S. and internationally in the future. The social media company also plans to roll this out to WhatsApp and Instagram.
Transactions via Facebook Pay are secure and protected. It has the following:
An anti-fraud feature that monitors suspicious activityData encryption that protects your payment informationBiometrics and pin options for added security
How to Set Up Facebook Pay on Facebook
Step 1: Click the three-lined icon from the upper-right corner of the screen.

Step 2: Click “Settings & Privacy” then “Settings.”

Step 3: Under your account settings, click “Facebook Pay.”

Step 4: Click “Add Credit or Debit Card” or “Add PayPal.”

Provide your account information then save. Your transaction history, including payments made via Messenger, appears underneath your payment method.
How to Set Up Facebook Pay on Messenger
Step 1: Click your profile picture on Messenger.

Step 2: Scroll down to “Facebook Pay.”

Step 3: Click “Add new debit card or PayPal” then enter payment information.

You can find your Payment history under your payment information. Using Facebook Pay on Messenger, you can send money to contacts or request payments. All transactions occur within the Messenger conversation between you and the recipient. All payments are automatically deducted or added to your account.
By Anne Felicitas
The post How to Set Up Facebook Pay on Facebook and Messenger appeared first on AdvertiseMint.
June 5, 2020
AdvertiseMint Stands Against Racism

JUN. 5, 2020

One of our core company principles is to help businesses grow. After the murder of George Floyd at the hands of a white police officer, it is time for us to continue growing by standing with our fellow Americans to help, support, educate, and create a world that is safe for everyone.
We stand against racism. We stand for inclusion. We stand to treat all individuals equally. We stand with Black families, communities, and team members.
You are seen. You are heard. You are loved. We support you and stand by your side.
We encourage everyone to help create a world free of racism.
Brian Meert, CEO of AdvertiseMint
Join Us in Taking Action Today
Donate to a bail fund.Support local Black-owned businesses. Donate, sign petitions, or contact local governments.Help expand voting access to Black communities.Learn how to support the movement if you can’t join the protest. Support the NAACP. Donate to the National Police Accountability Project.Learn to be anti racist by reading these books.Learn to be an ally to the Black community. Learn about the repercussions of slavery.Fund therapy sessions for Black women and girls.
The post AdvertiseMint Stands Against Racism appeared first on AdvertiseMint.